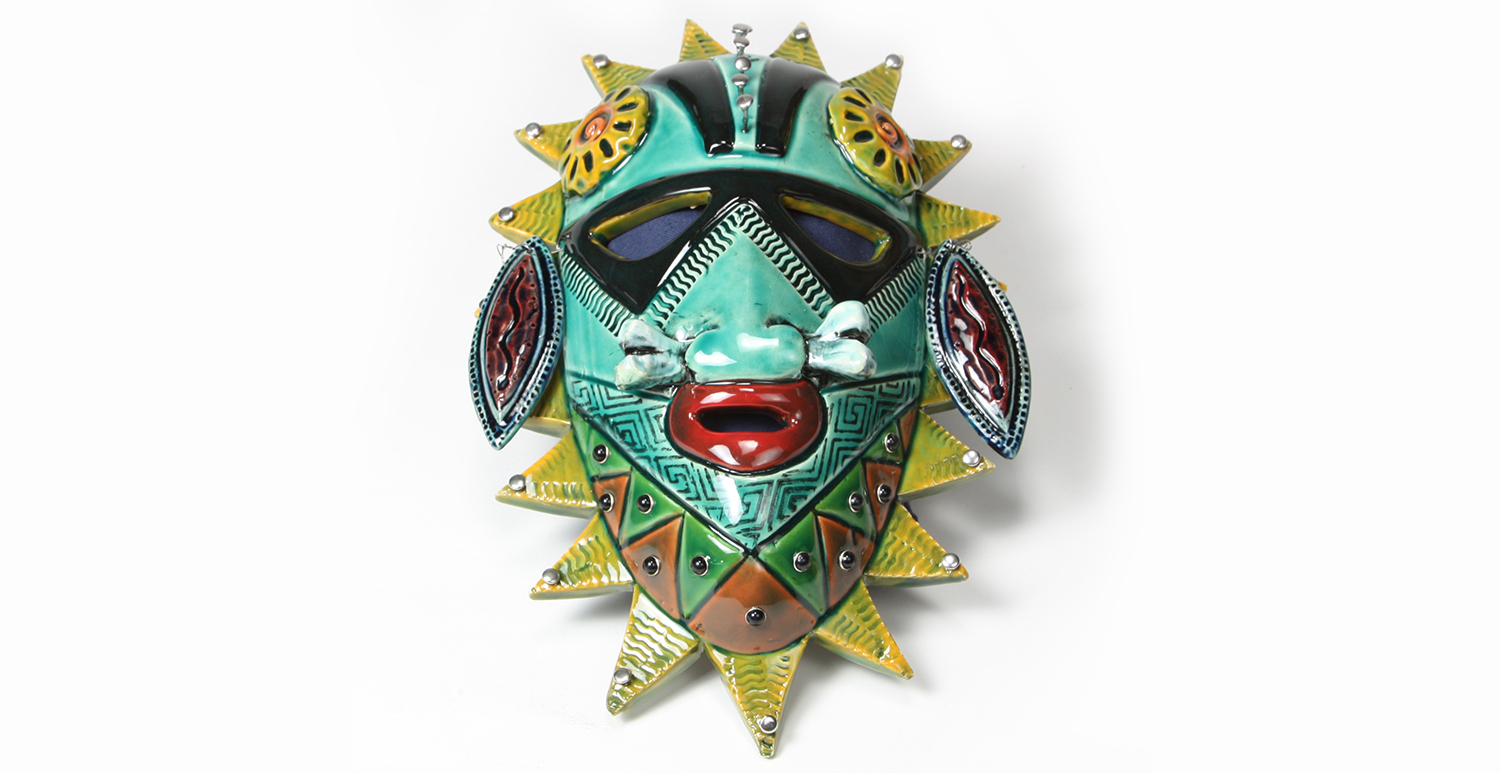
Instructions
Handbuilding:
- With a rolling pin on canvas, roll out a piece of moist clay ¼” thick between wooden slats.
- Smooth out the grain from the canvas with a straight edge.
- Lay the smooth side of the clay over the CD911 African Mask (Oval) slump mold clay should extend to the edges of the mold. Use a sandbag to hump the clay into the form of the mold.
- Take a damp sponge to further the slumping process to make sure the clay fills all the detail of the mold. Trim around the outside edge of the mold shape with a knife or fettling tool.
- Let the clay sit in the mold for 20 min. (approx). Release the clay from around the edges of the trimming. Place a board over the mold, flip the mold over and it should release easily, if it does not, wait longer.
- Once the mask is out of the mold, pencil in triangles on the flange surrounding the mask, when you are satisfied with the design, cut out using the X-ACTO knife.
- Cut out the eyes and the mouth. Drill small holes in the triangles below the chin (for later decoration with studs). Drill small holes to fit a wire for earrings.
- Open the nose on the sides, make bones to fit into the nose opening. If desired, cut small pieces of high fire wire, poke the pieces in a row in the middle of the forehead, for decoration.
- Use Xiem tool ARD02 to roll design in a zigzag under the eyes, and on the triangles around the mask.
- Press clay into the shield from CD1260 Masks & Shield African Theme Sprig Mold, trim the excess from around the shape. Make a ball of clay, stick it to the back of the shield to release it from the mold. Put a small hole at the top, for a wire. Press the sun shape from the press to CD1072 into a thin piece of clay, cut around it, score the section on the forehead, add water to the score, place on the sun shape.
- Clean edges of the mask with a damp sponge, let dry.
- Fire to cone 04.
Glazing:
- Brush slightly thinned SC-15 Tuxedo over the mask, wipe off excess with a damp sponge to antique.
- Using sponge-on-a-stick, pounce SC-15 Tuxedo onto the ST-124 Maze Stamp. Press stamp to the triangle shape under the mouth. Remove stamp marks from other areas with a sponge.
- Using CB-106 #6 Script Liner, brush 2-3 coats of SC-97 Cant-elope to the triangles around the face, inside edge of the eyes, and rays of the sun; coloring the center with SC-75 Orange-A-Peel.
- Using CB-106 #6 Script Liner, brush the mouth with 2-3 coats of SC-74 Hot Tamale. Brush the triangles at the chin with 2-3 coats of SC-26 Green Thumb and SC-75 Orange-A-Peel.
- Using CB-106 #6 Script Liner, brush 2 coats to the bones with SC-16 Cotton Tail. Brush the triangles at the eyes and bands on the forehead with 2 coats of SC-15 Tuxedo.
- Antique the shield earrings with SC-15 Tuxedo. Brush 2 coats of Hot Tamale in the center section. Let dry completely.
- Using CB-604 #4 Soft Fan, brush the entire mask with 3 coats of EL-136 Lapis Lagoon. After each coat, brush water over the Stroke and Coat colors to remove some of the Lapis Lagoon.
- Fire to cone 06.
- Use epoxy to glue on the various studs. Wire the earrings to the hole at the eyes.
Supplies
Form
- 5 lbs of low-fire clay body (Cone 06/05)
- CD911 African Mask (Oval)
- CD1260 Masks & Shield African Theme Sprig Mold
- CD1072 Spiral Press Tools
Colors
- EL-136 Lapis Lagoon
- SC-15 Tuxedo
- SC-16 Cotton Tail
- SC-26 Green Thumb
- SC-74 Hot Tamale
- SC-75 Orange-A-Peel
- SC-97 Cant-elope
Design Tools
- Sponge-on-a-stick
- ARD02 Xiem Roller Tool
- BT-910 Synthetic Sponge
- CB-106 #6 Script Liner
- CB-604 #4 Soft Fan
- ST-124 Maze Stamp
Additional Materials
- 1/4″ studs by Sew-ology
- X-ACTO or fettling knife
- Sandbag
- High fire wire
- Rolling pin
- 1/4″ wood slats
- Canvas
Top