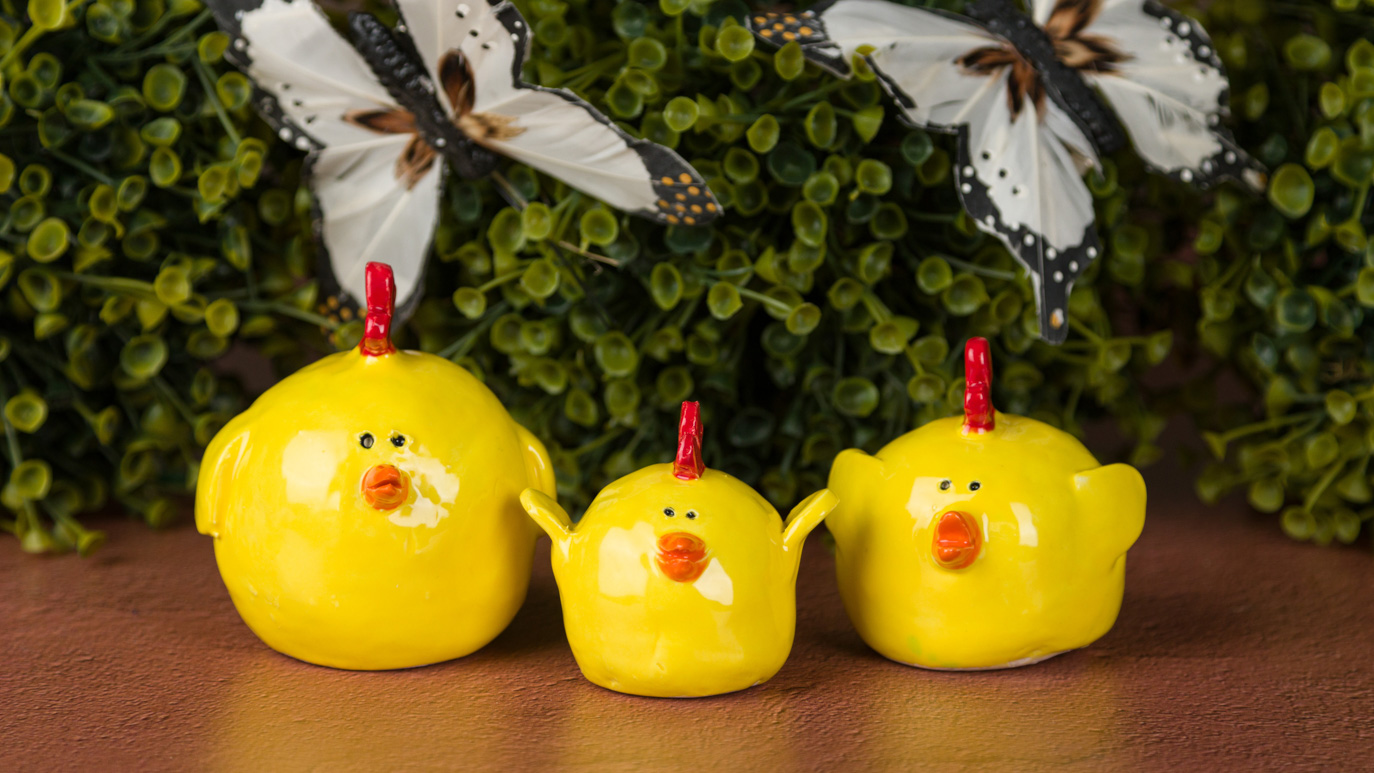
Build and Glaze
- Place around 1 TBS of clay into a small bowl or cup. Add around 1 TBS of water and let it sit. Mash up the clay to make slip. You might need to add more water or clay to make it the right consistency. It should have a similar consistency to gravy.
- Cut off 3 pieces of clay: 1 large, 1 medium and 1 small. They should correspond to the size ball you would like for your chicks. Take each piece of clay and roll it into a ball. Then take each ball and firmly hit it against the table to make the bottom flat.
- Cut off another piece of clay and roll it out with a rolling pin until it is around 1/8” thick. Use the pencil to draw the combs and wings you would like for your chicks (1 comb & 2 wings for each). Cut them out with the X-ACTO knife.
- Take the needle tool and score the bottom edge of the combs, as well as the tops of the chicks, where the combs will be located. Add slip to each scored surface. Press the combs onto the tops. Take a small amount of clay and roll it into the smallest coil that you can. Place the coil around the base of each comb and spread it into the joint using the wood modeling tool.
- Take the 2 wings and score the backs, as well as the sides of the chicks, where the wings will be located. Add slip to each scored surface. Press the wings onto the chicks. Take a small amount of clay and roll it into the smallest coil that you can. Place the coil around the wing joints. Use the wood modeling tool to smooth it out. You can position the wings however you would like.
- Take a small amount of clay and roll it into a small coil, around ¼” diameter. Take the X-ACTO knife and cut off 3 pieces that will become the beaks. After you cut off each beak, roll one end to make a pointed tip. Use the X-ACTO knife to score the flat end. Then score the face, where the beak will be located. Add slip to each scored surface. Press the beaks on the faces. Take a small amount of clay and roll it into the smallest coil that you can. Place the coil around the base of the beak and spread it into the joint using the wood modeling tool. Take the X-ACTO knife and cut down the center of the beak.
- Take the needle tool and make 2 dots above each beak for the eyes.
- Place small pieces of damp paper towel over the combs, beaks and wings. This will prevent them from drying faster than the bodies and breaking off.
- Once the chicks are firm enough to handle, take the loop tool and hollow out the inside of each chick.
- Allow chicks to dry.
- Using the Script Liner with SC-6 Sunkissed, apply 2 coats to the body of each chick (do not glaze the bottom). Allow glaze to dry between coats.
- Using the Script Liner with SC-74 Hot Tamale, apply 2 coats to the combs of each chick. Allow glaze to dry between coats.
- Using the Script Liner with SC-75 Orange-A-Peel, apply 2 coats to the beaks of each chick. Allow glaze to dry between coats.
- Using the Detail Liner with SC-15 Tuxedo, make a dot in each eye.
- Fire to cone 04.
Variations/Adaptations/Tips&Tricks
After step 10, bisque fire to cone 04 and then glaze and fire to cone 6