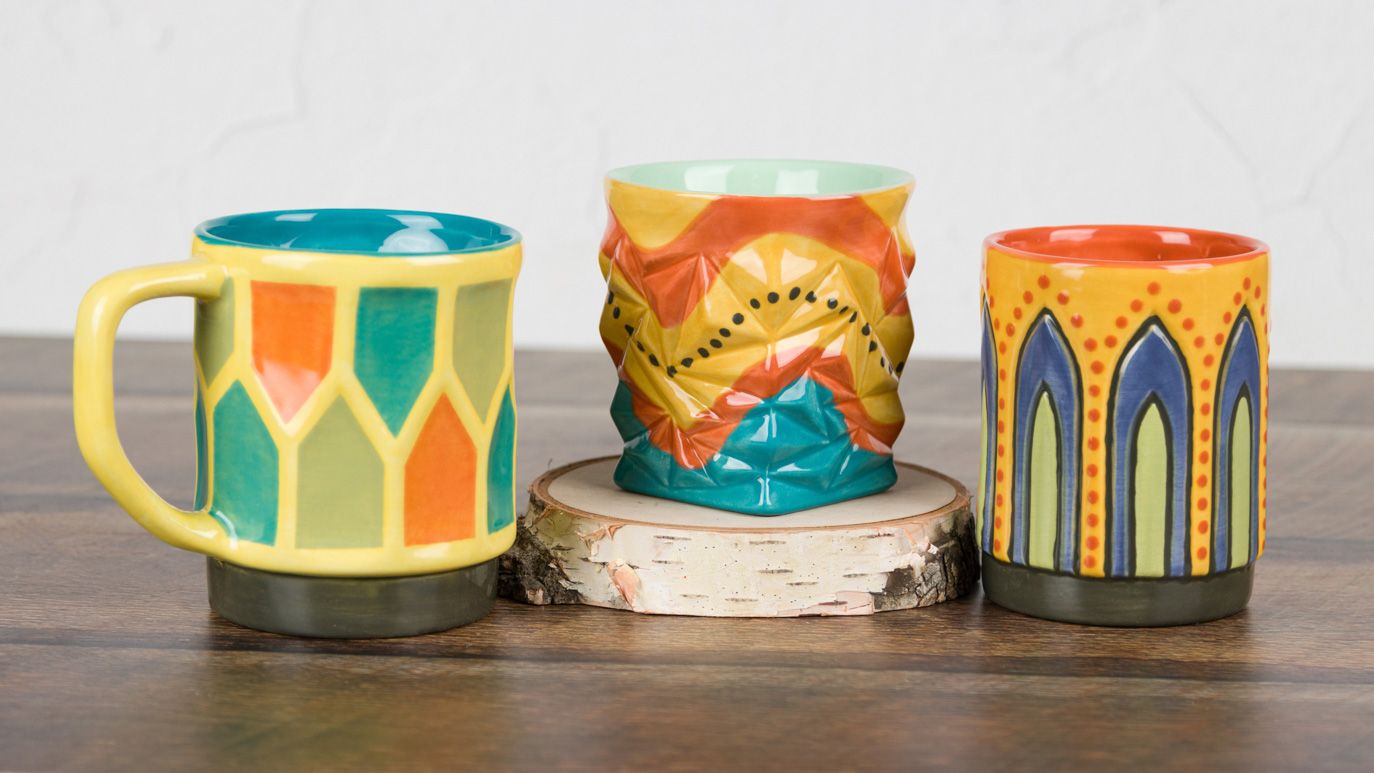
Retro Mug and Tumblers

Designer: Elizabeth Carey

Share

Instructions

Faceted Tumbler:

  1. Begin with properly fired cone 04 bisque. Moisten a sponge and wipe bisque to remove any dust.
  2. Use the pencil to draw 4 wavy lines going around the tumbler. This will create 5 different sections. The directions will refer to each section as 1st, 2nd, 3rd, 4th, and 5th going from top to bottom.
  3. Using the Script Liner with SC-28 Blue Isle, apply 2 coats to the 5th section and bottom of the tumbler. Allow glaze to dry between coats.
  4. Using the Script Liner with SC-80 Basketball, apply 2 coats to the 2nd and 4th sections. Allow glaze to dry between coats.
  5. Using the Script Liner with SC-51 Poo Bear, apply 2 coats to the 1st and 3rd sections. Allow glaze to dry between coats.
  6. Squeeze out around 1 TSP of SC-99 Charming onto the palette. Take the back of the brush handle and dip it into the glaze. Press in the middle of the 3rd section, going around the tumble. Repeat until you have a line of dots going around the tumbler.
  7. Using the Soft Fan with SC-96 Aqu-ward, apply 2 coats to the inside of the tumbler.
  8. Dip into NT-CLR Clear One Dipping Glaze.
  9. Stilt and fire to cone 06.

Arched Tumbler:

  1. Begin with properly fired cone 04 bisque. Moisten a sponge and wipe bisque to remove any dust.
  2. Using the Script Liner with SC-51 Poo Bear, apply 2 coats to the outside of the mug, around the arches. Allow glaze to dry between coats.
  3. Using the Script Liner with SC-58 501 Blues, apply 2 coats to the outer arches. Allow glaze to dry between coats.
  4. Using the Script Liner with SC-79 It’s Sage, apply 2 coats to the inner arches. Allow glaze to dry between coats.
  5. Using the Soft Fan with SC-99 Charming, apply 2 coats to the bottom lip and bottom of the tumbler. Allow glaze to dry between coats.
  6. Using the Detail Liner with SC-99 Charming, make a line going around each arch. Use the groove as a guide.
  7. Squeeze out around 1 TSP of SC-80 Basketball onto the palette. Take the back of the brush handle and dip it into the glaze. Press in a line going around the arches. Repeat until you have a line of dots going around the arches.
  8. Using the Soft Fan with SC-80 Basketball, apply 2 coats to the inside of the tumbler. Allow glaze to dry between coats.
  9. Dip into NT-CLR Clear One Dipping glaze.
  10. Stilt and fire to cone 06.

Retro Mug:

  1. Begin with properly fired cone 04 bisque. Moisten a sponge and wipe bisque to remove any dust.
  2. Using the Soft Fan with SC-42 Butter Me Up, apply 2 coats to the outside of the mug (not foot or bottom). Allow glaze to dry between coats.
  3. After glaze from Step #2 is bone dry, use MC-001 6mm Low Tack Masking Tape to tape around the borders of the “scooped” sections of the mug.
  4. Using the Script Liner with SC-28 Blue Isle, SC-50 Orange Ya Happy and SC-79 It’s Sage, apply 2 coats to each “scoop” going around the mug. Allow glaze to dry between coats. Remove tape before glaze is bone dry.
  5. Using the Soft Fan with SC-99 Charming, apply 2 coats to the foot and bottom of the mug. Allow glaze to dry between coats.
  6. Using the Soft Fan with SC-28 Blue Isle, apply 2 coats to the inside of the mug. Allow glaze to dry between coats.
  7. Dip into NT-CLR Clear One Dipping
  8. Stilt and fire to cone 06.

Supplies

Form

  • MB-1575 Faceted Tumbler
  • MB-1576 Arched Tumbler
  • MB-1580 Retro Mug

Colors

Faceted Tumbler:

  • SC-28 Blue Isle
  • SC-51 Poo Bear
  • SC-80 Basketball
  • SC-96 Aqu-ward
  • SC-99 Charming
  • NT-CLR Clear One Dipping

Arched Tumbler:

  • SC-51 Poo Bear
  • SC-58 501 Blues
  • SC-79 It’s Sage
  • SC-80 Basketball
  • SC-99 Charming
  • NT-CLR Clear One Dipping

Retro Mug:

  • SC-28 Blue Isle
  • SC-42 Butter Me Up
  • SC-50 Orange Ya Happy
  • SC-79 It’s Sage
  • SC-99 Charming
  • NT-CLR Clear One Dipping

Decorating Accessories

  • MC-001 6mm Low Tack Masking Tape
  • RB-144 #4 Soft Fan
  • RB-106 #6 Script Liner
  • RB-110 10/0 Detail Liner

Miscellaneous Accessories

  • Sponge
  • Water
  • Pattern
  • Pencil
  • Tissue paper
  • Permanent marker
  • Scissors
Top