Santa and Reindeer App Plates

Designer: Elizabeth Carey

Share

Instructions

Reindeer Plate

  1. Begin with properly fired cone 04 bisque. Moisten a sponge and wipe bisque to remove any dust.
  2. Take the pattern and cut around “Carrots for the Reindeer” to get rid of the excess paper. Place the pattern on the far-right side of the plate. Slide AC-230 Clay Carbon Paper under the pattern. Trace with a pencil.
  3. On the DSS-0162 Holiday Icons screen, locate the reindeer. Cut it out with excess screen around the edges. Color over the shiny side of the screen with the dry erase marker. Wipe off with a piece of paper towel. You should be able to see the reindeer.
  4. Pour around 2 TBS of NT-BR Clear One Brushing onto the palette. Add a few drops of food coloring. Add a pinch of AC-310 Silkscreen Medium. Mix with a palette knife until it becomes the consistency of peanut butter. You may need to add more silkscreen medium or glaze.
  5. Place the reindeer screen on the bottom-left section of the plate. While holding the screen firmly in place, take a small amount of premixed silkscreen medium, and gently rub in circles starting in the center and working outward. Remove the screen, rinse, and dry it.
  6. Using the Script Liner with SC-25 Crackerjack Brown, SC-46 Rawhide, and SC-48 Camel Back, apply 2 coats of glaze to the corresponding screened area. Allow glaze to dry between coats.
  7. Squeeze around 2 TBS of SC-15 onto the palette. Add a pinch of AC-310 Silkscreen Medium. Mix with a palette knife until it becomes the consistency of peanut butter. You may need to add more silkscreen medium or glaze.
  8. Repeat step #5. Make sure to line up the screen. You will be rescreening the same image in black.
  9. Cut the carrot out from the pattern. Take it and place it along the lip of the plate. Trace around the pattern with a pencil. Repeat until you have a border of carrots going around the plate.
  10. Using the Script Liner with SC-23 Jack O’Lantern, apply 2 coats to each carrot. Allow glaze to dry between coats.
  11. Using the Script Liner with SC-27 Sour Apple, apply 2 coats to carrot tops. Allow glaze to dry between coats.
  12. Using the Detail Liner with SC-15 Tuxedo, outline the carrots and the lettering.
  13. Using the Soft Fan with SC-73 Candy Apple Red, apply 2 coats to the back and rim of the plate. Allow glaze to dry between coats.
  14. Using the Soft Fan with SG-704 Peppermint, apply 2 coats to the front of the plate and 1 coat to the back. Allow glaze to dry between coats.
  15. Fire to cone 06.

Santa Plate

  1. Begin with properly fired cone 04 bisque. Moisten a sponge and wipe bisque to remove any dust.
  2. Take the pattern and cut around “Cookies for Santa” to get rid of the excess paper. Place the pattern on the far-left side of the plate. Slide AC-230 Clay Carbon Paper under the pattern. Trace with a pencil.
  3. On the DSS-0162 Holiday Icons screen, locate the Santa. Cut him out with excess screen around the edges. Color over the shiny side of the screen with the dry erase marker. Wipe off with a piece of paper towel. You should be able to see the Santa.
  4. Pour around 2 TBS of NT-BR Clear One Brushing onto the palette. Add a few drops of food coloring. Add a pinch of AC-310 Silkscreen Medium. Mix with a palette knife until it becomes the consistency of peanut butter. You may need to add more silkscreen medium or glaze.
  5. Place the Santa screen on the bottom-right section of the plate. While holding the screen firmly in place, take a small amount of premixed silkscreen medium, and gently rub in circles starting in the center and working outward. Remove the screen, rinse, and dry it.
  6. Using the Script Liner with SC-6 Sunkissed, SC-27 Sour Apple, SC-46 Rawhide, and SC-73 Candy Apple Red, apply 2 coats of glaze to the corresponding screened area. Allow glaze to dry between coats.
  7. Squeeze around 2 TBS of SC-15 onto the palette. Add a pinch of AC-310 Silkscreen Medium. Mix with a palette knife until it becomes the consistency of peanut butter. You may need to add more silkscreen medium or glaze.
  8. Repeat step #5. Make sure to line up the screen. You will be rescreening the same image in black.
  9. Cut the tree out from the pattern. Take it and place it along the lip of the plate. Trace around the pattern with a pencil. Repeat until you have a border of trees going around the plate.
  10. Using the Script Liner with SC-46 Rawhide, apply 2 coats to each tree. Allow glaze to dry between coats.
  11. Using the Script Liner with SC-26 Green Thumb, apply 2 coats to the inner triangle on each tree. Allow glaze to dry between coats.
  12. Using the Script Liner with SC-25 Crackerjack Brown, apply 2 coats to the inner square on each tree trunk. Allow glaze to dry between coats.
  13. Using the Detail Liner with SC-15 Tuxedo, outline the trees and the lettering.
  14. Using the Soft Fan with SC-73 Candy Apple Red, apply 2 coats to the back and rim of the plate. Allow glaze to dry between coats.
  15. Using the Soft Fan with SG-704 Peppermint, apply 2 coats to the front of the plate and 1 coat to the back. Allow glaze to dry between coats.
  16. Fire to cone 06.

Supplies

Form

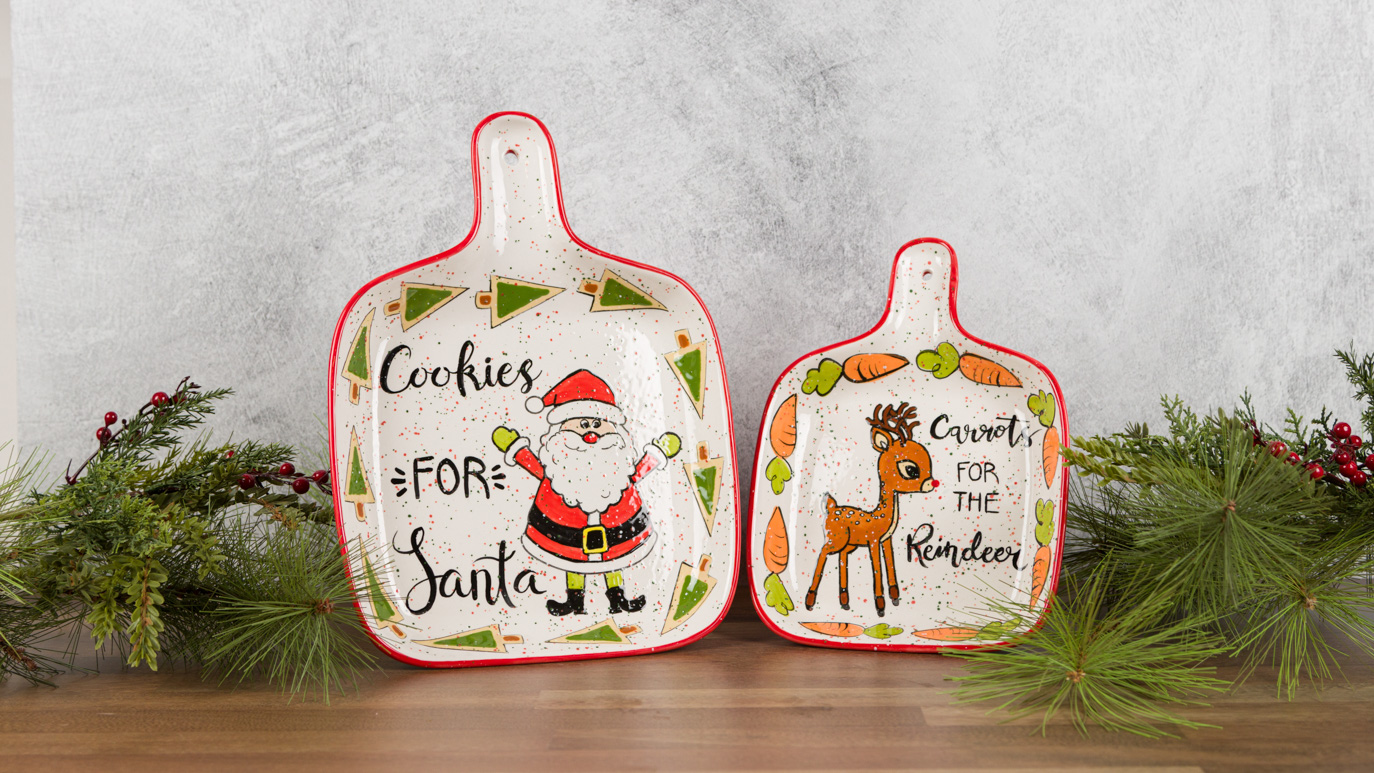
  • MB-1586 Small App Plate
  • MB-1587 Large App Plate

Colors

  • Santa Plate
    • SC-6 Sunkissed
    • SC-15 Tuxedo
    • SC-25 Crackerjack Brown
    • SC-27 Sour Apple
    • SC-26 Green Thumb
    • SC-46 Rawhide
    • SC-73 Candy Apple Red
    • SG-704 Peppermint
    • NT-BR Clear One Brushing
  • Reindeer Plate
    • SC-15 Tuxedo
    • SC-23 Jack O’Lantern
    • SC-25 Crackerjack Brown
    • SC-27 Sour Apple
    • SC-46 Rawhide
    • SC-48 Camel Back
    • SC-73 Candy Apple Red
    • SG-704 Peppermint
    • NT-BR Clear One Brushing

Decorating Accessories

  • AC-230 Clay Carbon Paper
  • AC-310 Silkscreen Medium
  • DSS-0162 Holiday Icons
  • RB-144 #4 Soft Fan
  • RB-106 #6 Script Liner
  • RB-110 10/0 Detail Liner

Miscellaneous Accessories

  • Sponge
  • Water
  • Palette
  • Palette Knife
  • Scissors
  • Dry Erase Marker
  • Paper Towels
  • Pattern
  • Pencil
  • Food Coloring (blue or green)
Top