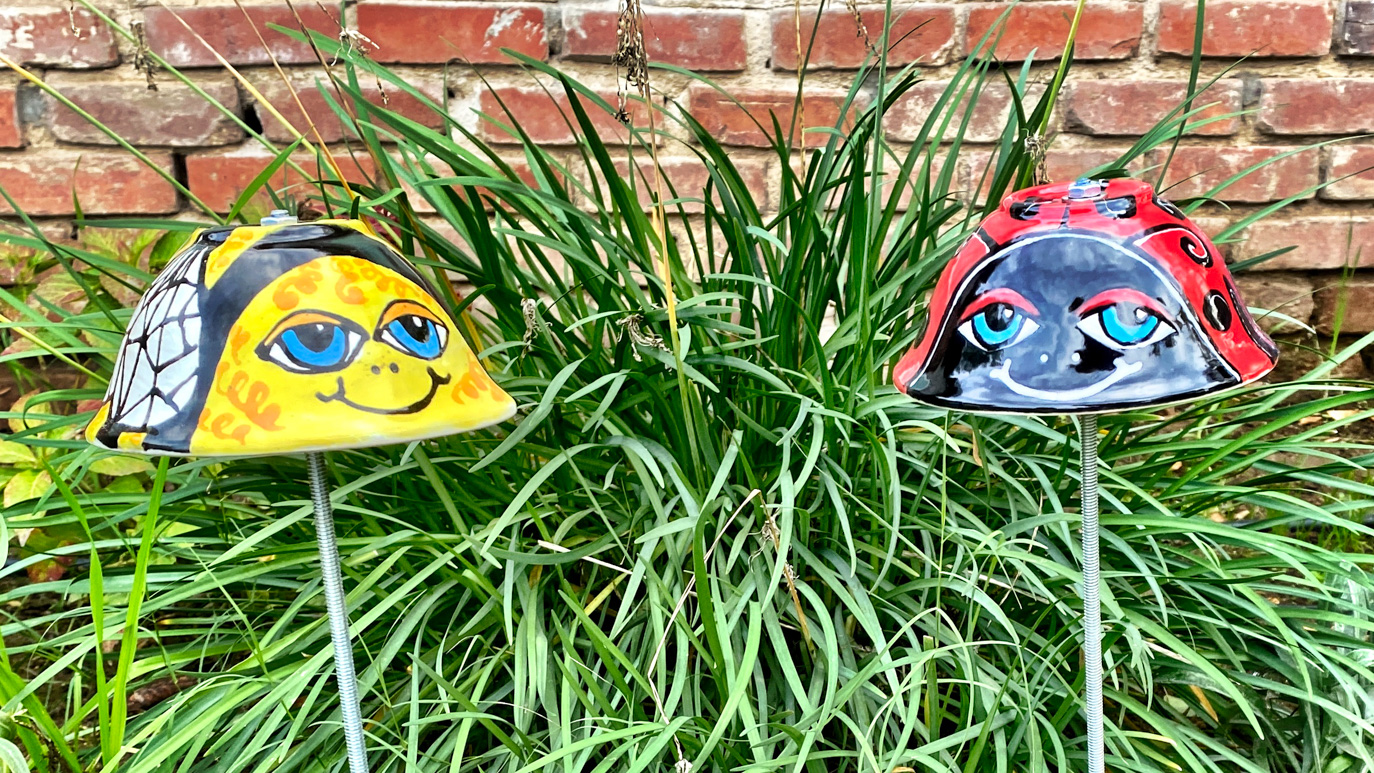
Stoneware Bee and Lady Bug

Designer: Laura Fraedrich

Share

Instructions

  1. Begin with properly fired shelf cone 04 bisque. Moisten a clean sponge and wipe bisque to remove any dust.
  2. If desired, drill a hole with the carbide bit through the center of the bottom of the bowl.

Bee Instructions:

  1. Using the CB-604 Soft Fan Brush, apply 2 coats of SW-501 White Gloss to the outside of the bowl. Make sure you don’t get any glaze on the rim. Let dry completely.
  2. Using the pencil and AC-230 Clay Carbon Paper, trace the pattern onto the upside down bowl. You will have to adjust the pattern as you go along so that it is laying flat on the section you are working on. Use a pencil to extend the lines down for the stripes.
  3. Using the CB-106 Script Liner, apply 2 coats of SW-502 Yellow Gloss to the face of the bee and every other stripe, leaving the eyes and wings white. Use the photo as a guide.
  4. Using the CB-106 Script Liner, apply 2 coats of SW-508 Black Gloss to the rest of the stripes.
  5. Fill the AC-219 Designer Bottle with Writer tip with SW-508 Black Gloss. Use it to outline the facial features and the lines on the wings.
  6. Fill the AC-219 Designer Bottle with Writer tip with SC-97 Cant-Elope. Use it to draw squiggles onto the yellow sections of the bee and on his eyelids.
  7. Use the SB-110 Mini Liner to apply 2 coats of SW-506 Bright Blue Gloss to the eyes.
  8. Use a damp sponge to remove any glaze that got onto the rim.
  9. Fire the bowl upside down. Do not stilt or hang over the edge of the kiln shelf.
  10. Fire to cone 5/6.
  11. Insert the threaded rod into the drilled hole and secure with the nuts and the washers to make a garden stake. You may have to use the drill to make the hole a little bigger if it shrank during firing.

Ladybug Instructions:

  1. Using the pencil and AC-230 Clay Carbon Paper, trace the pattern onto the upside down bowl. You will have to adjust the pattern as you go along so that it is laying flat on the section you are working on. Trace the legs on both sides of the bowl.
  2. Using the CB-604 Soft Fan Brush, apply 3 coats of SW-504 Red Gloss to the body of the ladybug, leaving the face, back side triangle and feet unglazed. Use the photo as a guide.
  3. Using the CB-106 Script Liner, apply 3 coats of SW-508 Black Gloss to the face, the feet, and the back side triangle. Don’t glaze the eyes.
  4. Using the CB-106 Script Liner, apply 2 coats of SW-501 White Gloss to the eyes. Let dry completely.
  5. Fill the AC-219 Designer Bottle with Writer tip with SW-508 Black Gloss. Use it to outline the eyes, the line down the back, and his antennae. Also use it to make polka dots on the back.
  6. Fill the AC-219 Designer Bottle with Writer tip with SW-501 White Gloss. Use it to add highlights to the face, feet and dots. Draw in the smile and the nose.
  7. Use the SB-110 Mini Liner to apply 2 coats of SW-506 Bright Blue Gloss to the eyes.
  8. Use the SB-110 Mini Liner to apply 2 coats of SW-504 Red Gloss to the eyelids.
  9. Use a damp sponge to remove any glaze that got onto the rim.
  10. Fire the bowl upside down. Do not stilt or hang over the edge of the kiln shelf.
  11. Fire to cone 5/6.
  12. Insert the threaded rod into the drilled hole and secure with the nuts and the washers to make a garden stake. You may have to use the drill to make the hole a little bigger if it shrank during firing.

Supplies

Form

  • SB-111 Dessert Bowl

Colors

  • Ladybug:
    • SW-501 White Gloss
    • SW-504 Red Gloss
    • SW-508 Black Gloss
    • SW-506 Bright Blue Gloss
  • Bee:
    • SW-501 White Gloss
    • SW-502 Yellow Gloss
    • SW-508 Black Gloss
    • SW-506 Bright Blue Gloss
    • SC-97 Cant-Elope

Decorating Accessories

  • CB-604 #4 Soft Fan Brush
  • CB-106 Script Liner
  • SB-110 Mini Liner
  • AC-230 Clay Carbon Paper
  • AC-219 Designer Bottle with Writer Tip

Miscellaneous Accessories

  • Synthetic Sponge
  • Pencil
  • Water
  • Pattern
  • Drill with 5/8″ Carbide Drill Bit (optional)
  • ¼” Threaded metal rod (optional)
  • 2 nuts and 2 washers that fit the threaded rod (optional)
Top