Build:
- Roll out a small slab that is about ¼ inch thick.
- Cut a round base out from the slab by tracing a circular item of the desired size.
- Begin building coil pot by rolling out coils from pieces of clay.
- Attach around the rim of the base using a slip & scoring technique.
- Once coils are attached, smooth over texture with your finger to straighten the connection and create a smooth surface.
- Continue to build up vase, curving slightly outward or inward to achieve desired shape.
-
Once vase is built, smooth out outer texture by using a serrated rib on the outside of the pot and then going over it with a smooth metal rib to re-distribute the clay into a smooth surface finish.
-
Allow pot to dry slowly, once fully dry bisque fire to Cone 04.
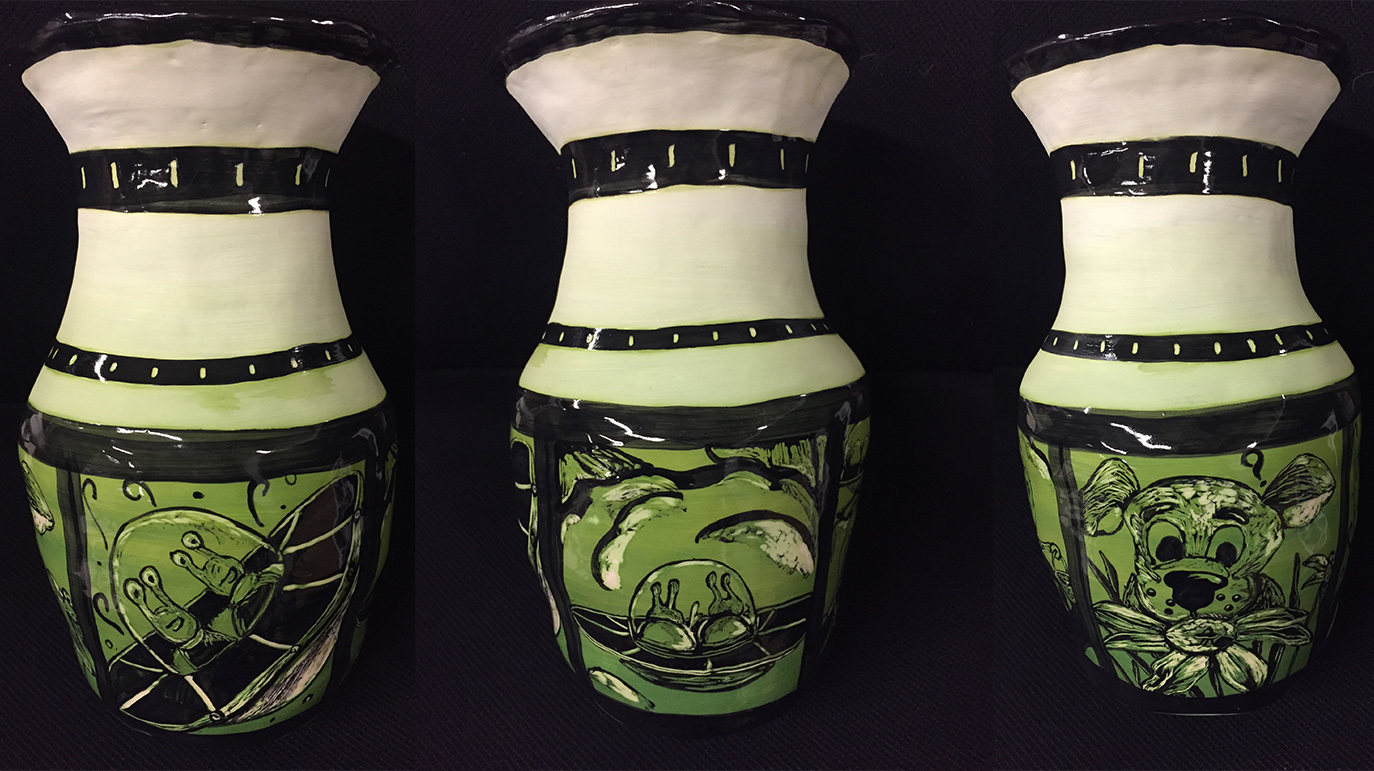
Planning Your Comic Strip:
- While waiting for vase to be bisque fired take the time to plan out your comic strip by considering the following:
- What story would I like to tell on my vase?
- How can I depict this story with only imagery and symbols (no text)?
- Who are my characters?
- How many panels will I need to tell my story? (recommended 3 or 4)
- Make a sketch of your comic strip to base your final draft off of.
Comic Design:
- Once vase is out of the bisque kiln, use a string to measure around the section of the vase the comic strip will go. Cut out pieces of paper of equal sizes to represent your comic strip panels.
- Draw out your final draft comic strip onto these panels.
- Trace panels onto tissue paper, indicating size of each panel by tracing full shape.
- Put materials aside to be used in decoration.
- Wipe bisque with a damp sponge to remove any dust.
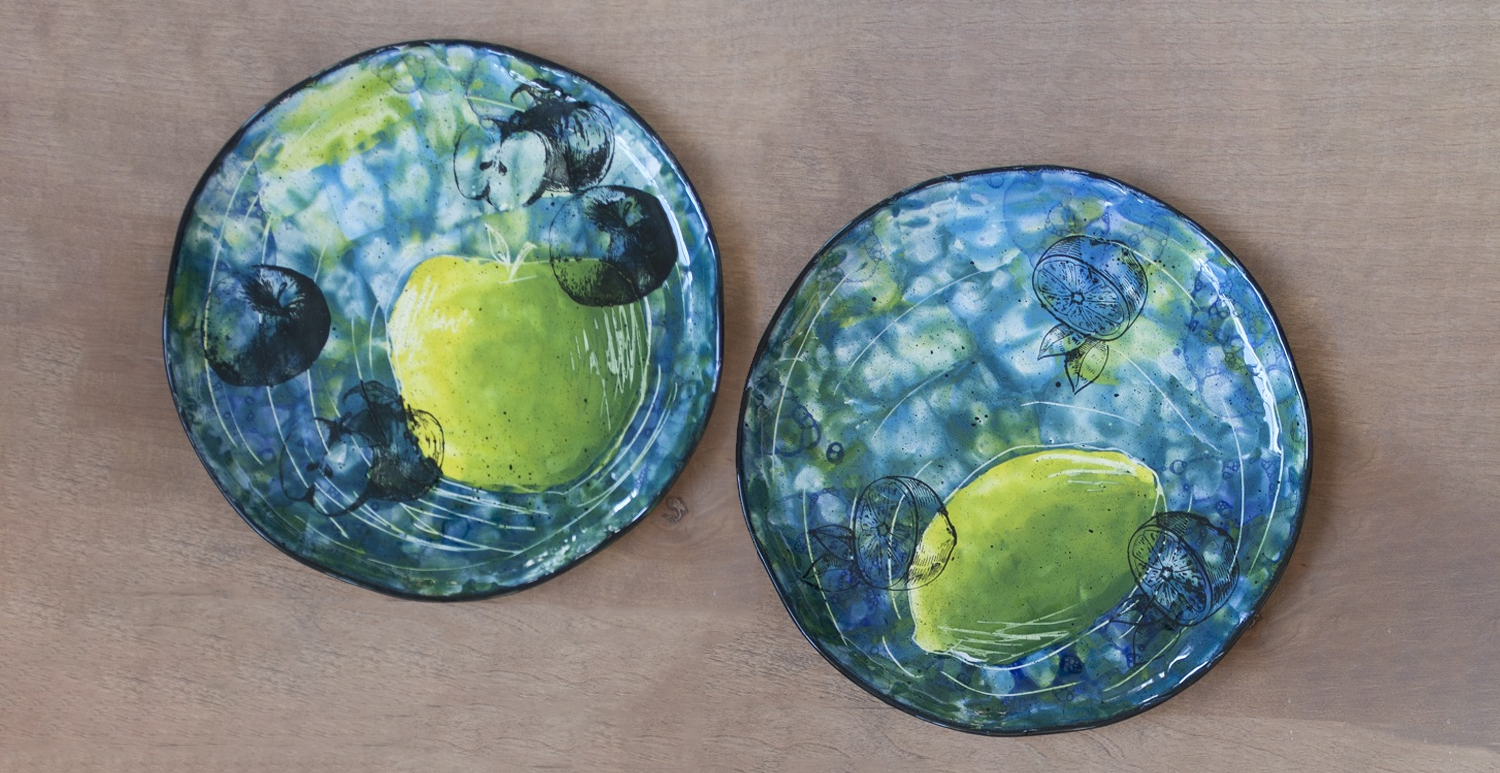
- Using a soft fan brush, apply 3 coats of Apple Green (UG-68) to your vase, allowing underglaze to dry in between coats.
- Coat inside of vase with brush if you can reach inside. If you cannot reach inside- thin underglaze to a heavy cream consistency with a little bit of water and pour into the vase, shake around and pour out.
- Start by applying a thin coat of Leaf Green (the darkest green) to the bottom 1/3 to 1/2 of the vase.
- Apply a thin coat of Apple Green (the lightest green) to the top 1/3 to . of your vase.
- Apply a thin coat of Spring Green (the medium green) in the middle of the two other greens.
- While underglaze is wet, work quickly switching between color applying thin layers of glaze to blend. Allow underglaze to dry overnight.
- Allow Apple Green to dry overnight.
- Apply color bland over base coat using soft bristled brush(s) and UG-68 Apple Green, UG-22 Spring Green, UG-21 Leaf Green.
- It is the easiest to apply a color blend if you have a brush for each color- if you do not have enough brushes- clean your brush off well when alternating.
Sgraffito:
- Using masking tape, lightly tape panels in place on vase lining up the tops of the panels.
- Holding tissue paper in place, trace drawn lines with magic marker to transfer image to pot.
- Once all lines have been traced, remove tissue paper from pot revealing comic panels.
- Using a small brush first, establish the borders of each frame- edges may need to be altered slightly to accommodate the gradual angle of the vase.
- With various sizes of soft bristled detail brushes, apply Jet Black (UG-50) to one section of your design at a time.
- Give the underglaze a moment to set (count to 5) and then while the black is still wet, go in with your sgraffito tool to create the lines in your drawing.
- If you pull away too much you can re-apply the black.
- Be sure to clean off the end of your tool while using it so that you create clean sgraffito marks.
- Continue using this wet sgraffito technique to realize the designs in each of your comic panels.
- (Optional) to create a decorative boarder using this same technique surrounding the comic panels or at the top or bottom of your vase.
- Allow underglaze to dry fully overnight.
- If no clear glaze is desired- fire vase to cone 06 for a full matte finish.
Clear Glaze
- For a gloss finish, add 2 coats of S2101 Crystal Clear Brushing to your pot using a soft bristled brush.
- Thin the Crystal Clear Brushing glaze with a little bit of water to a heavy cream constancy and pour glaze into inside of your pot.
- Swirl around and dump extra out- coating the whole inside.
- Allow glaze to dry fully.
- If you have glazed the bottom of your vase be sure to use stilts when firing to Cone 06.