Elements Chickens

Designer: Elizabeth Carey

Share

Instructions

Rudy Rooster

  1. Begin with properly fired cone 04 bisque. Moisten a sponge and wipe bisque to remove any dust.
  2. Use the pencil to draw a jagged line going around the base of the neck. This will separate the top and bottom colors on the rooster.
  3. Using the Soft Fan with EL-130 Sea Green, apply 3 coats to the bottom half of the rooster. Make random, irregular strokes around the neckline, so that there won’t be a distinct border between the top and bottom.
  4. Using the Soft Fan with EL-101 Oyster Shell, apply 3 coats to the top half of the rooster. Overlap the glaze on the bottom half by around 1 inch. Make random, irregular strokes around the neckline, so that there won’t be a distinct border between the top and bottom.
  5. Use an X-ACTO knife or damp sponge to remove any glaze from the eyes, beak, waddles and comb.
  6. Using the Script Liner with SC-16 Cotton Tail, apply 3 coats to the eyes. Allow glaze to dry between coats.
  7. Using the Script Liner with EL-143 Cactus Flower, apply 3 coats to the beak. Allow glaze to dry between coats.
  8. Using the Script Line with EL-127 Rose Granite, apply 3 coats to the comb and waddles. Allow glaze to dry between coats.
  9. Use the pencil to draw pupils in the eyes. Using the Script Liner with SC-15 Tuxedo, apply 2 coats to the pupils. Allow glaze to dry between coats. Use the Detail Liner with SC-16 Cotton Tail to apply a dot to each pupil.
  10. Cut out 4 small square of cardboard. Around 1.5” on each side. You will be using the side with only straight lines (not the corrugated side).
  11. Pour out around 1 TBS of EL-101 Oyster Shell, EL-130 Sea Green, PC-601 Clear Cascades, and PC-602 White Cascades onto the palette.
  12. Take your piece of cardboard and dip one of the edges with straight lines into PC-602 White Cascades. Stamp around the neck of the rooster, where the 2 glazes overlap. Continue dipping and stamping until you go completely around the neck.
  13. Repeat Step #12 with EL-130 Sea Green. Make sure to stamp over some of the glaze from Step #12. Use a different piece of cardboard.
  14. Repeat Step #12 with EL-101 Oyster Shell. Make sure to stamp over some of the glaze from Step #12 and Step #13. Use a different piece of cardboard.
  15. Repeat Step #12 with PC-601 Clear Cascades. Make sure to stamp over some of the glaze from Step #12, #13, and #14. Use a different piece of cardboard.
  16. Stilt and fire to cone 06.

Holly Hen

  1. Begin with properly fired cone 04 bisque. Moisten a sponge and wipe bisque to remove any dust.
  2. Use the pencil to draw a jagged line going around the base of the neck. This will separate the top and bottom colors on the hen.
  3. Using the Soft Fan with EL-118 Blue Grotto, apply 3 coats to the bottom half of the hen. Make random, irregular strokes around the neckline, so that there won’t be a distinct border between the top and bottom.
  4. Using the Soft Fan with EL-101 Oyster Shell, apply 3 coats to the top half of the hen. Overlap the glaze on the bottom half by around 1 inch. Make random, irregular strokes around the neckline, so that there won’t be a distinct border between the top and bottom.
  5. Use an X-ACTO knife or damp sponge to remove any glaze from the eyes, beak, waddles and comb.
  6. Using the Script Liner with SC-16 Cotton Tail, apply 3 coats to the eyes. Allow glaze to dry between coats.
  7. Using the Script Liner with EL-143 Cactus Flower, apply 3 coats to the beak. Allow glaze to dry between coats.
  8. Using the Script Liner with EL-127 Rose Granite, apply 3 coats to the comb and waddles. Allow glaze to dry between coats.
  9. Use the pencil to dry pupils in the eyes. Using the Script Lien with SC-15 Tuxedo, apply 2 coats to the pupils. Allow glaze to dry between coats. Use the Detail Liner with SC-16 Cotton Tail to apply a dot to each pupil.
  10. Cut out 4 small square of cardboard. Around 1.5” on each side. You will be using the side with only straight lines (not the corrugated side).
  11. Pour out around 1 TBS of EL-101 Oyster Shell, EL-118 Blue Grotto, PC-601 Clear Cascades, and PC-602 White Cascades onto the palette.
  12. Take your piece of cardboard and dip one of the edges with straight lines into PC-602 White Cascades. Stamp around the neck of the hen, where the 2 glazes overlap. Continue dipping and stamping until you go completely around the neck.
  13. Repeat Step #12 with EL-118 Blue Grotto. Make sure to stamp over some of the glaze from Step #12. Use a different piece of cardboard.
  14. Repeat Step #12 with EL-101 Oyster Shell. Make sure to stamp over some of the glaze from Step #12 and Step #13. Use a different piece of cardboard.
  15. Repeat Step #12 with PC-601 Clear Cascades. Make sure to stamp over some of the glaze from Step #12, #13, and #14. Use a different piece of cardboard.
  16. Stilt and fire to cone 06.

Supplies

Form

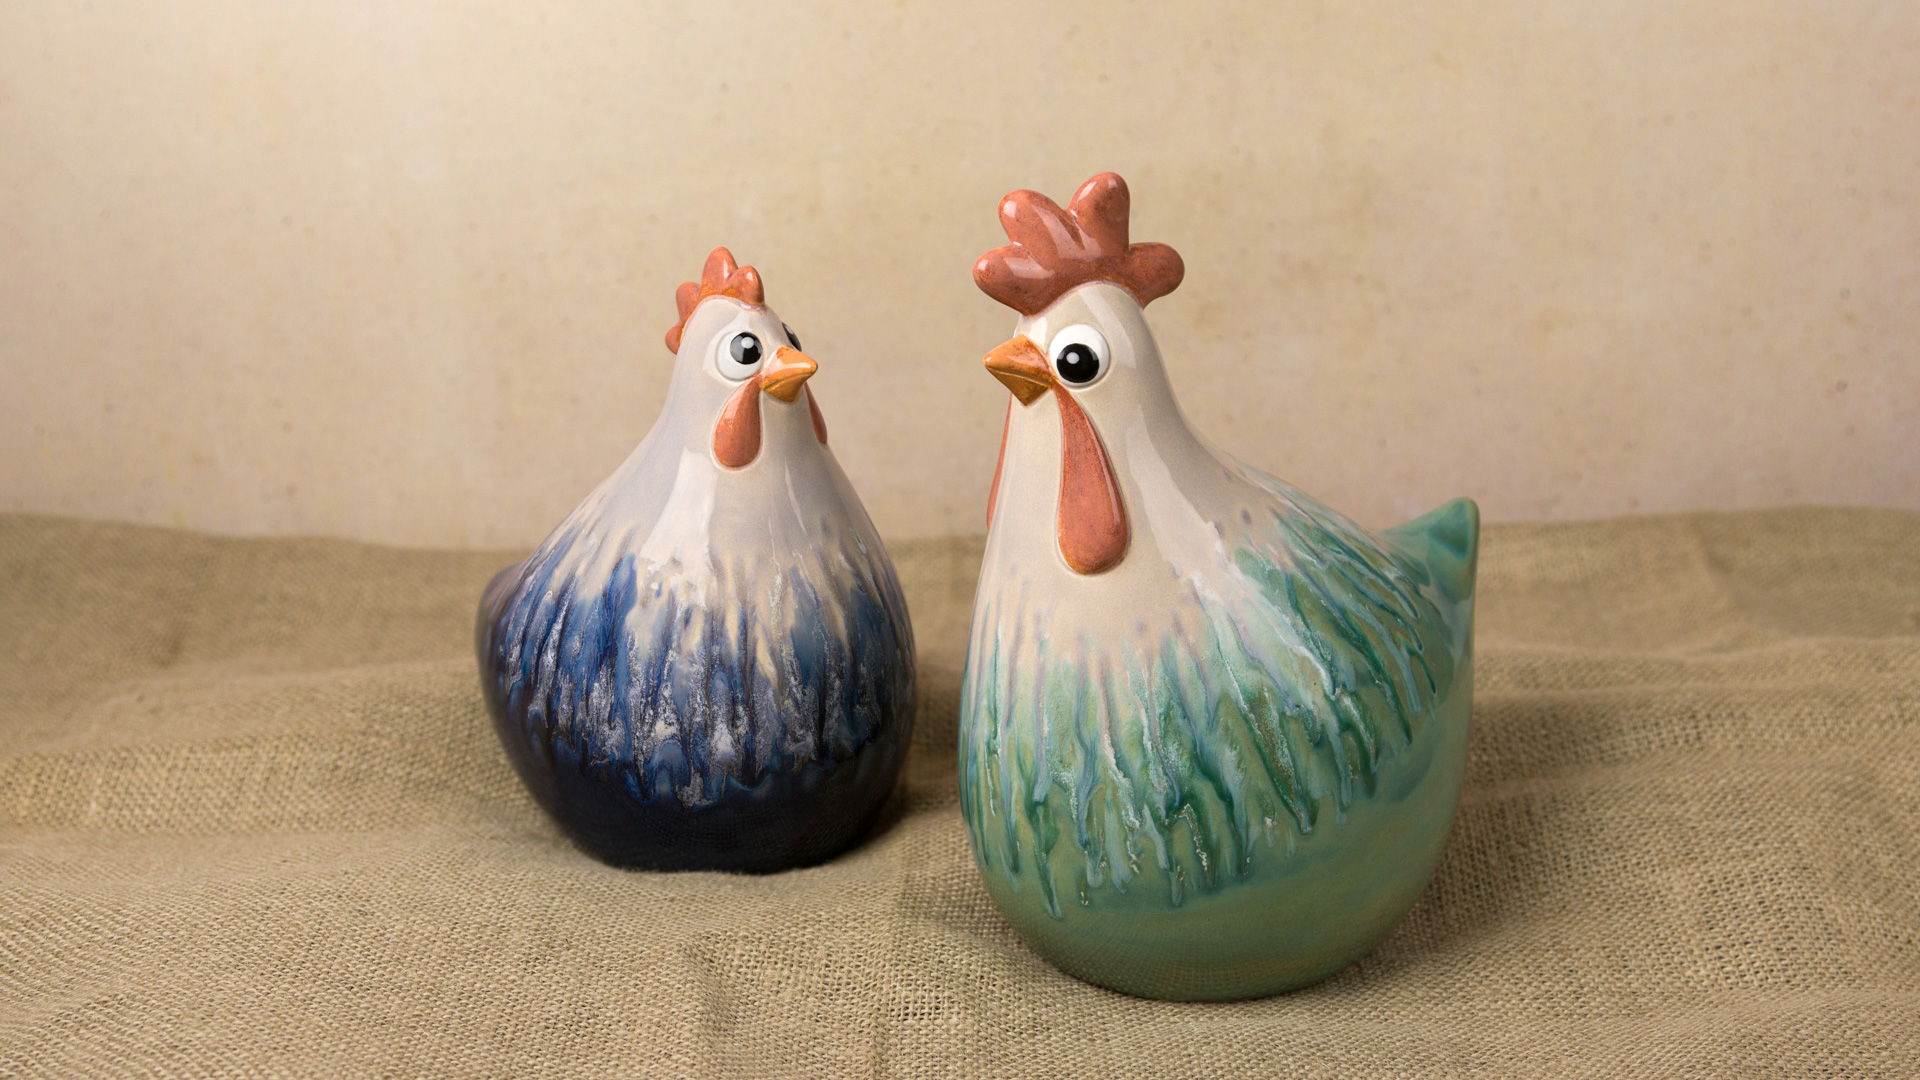
  • MB-1596 Rudy Rooster
  • MB-1597 Holly Hen

Colors

  • EL-101 Oyster Shell
  • EL-118 Blue Grotto
  • EL-127 Rose Granite
  • EL-130 Sea Green
  • EL-143 Cactus Flower
  • PC-601 Clear Cascades
  • PC-602 White Cascades
  • SC-15 Tuxedo
  • SC-16 Cotton Tail

Decorating Accessories

  • RB-144 #4 Soft Fan
  • RB-106 #6 Script Liner
  • RB-110 10/0 Detail Liner

Miscellaneous Accessories

  • Sponge
  • Water
  • Pencil
  • Cardboard
  • Scissors
  • X-ACTO knife
  • Palette
Top