Building
Cut out shapes from pattern and trace onto cardboard or cardstock to use as stencils for cutting clay
If creating your own shapes, use cardboard or cardstock and masking tape to build your prototype by cutting a verity of shapes and building with them to create your own vase
Roll out a slab that is about 1/8 inch thick and compress with a rib
Using a fettling knife, trace and cut out shapes
If using pattern cut out a of shape A, 4 of shape B and 1 of Shape C
Smooth out cut edged with a damp sponge
When ready to build, start at the base layer. Cut a beveled edge on the long sides of each of the 4 shapes in the bottom rom (shape B)
To create a beveled edge, bring your clay slab to the end of the table and use the table to hold your fettling knife or bevel cutter sturdy at a 45-degree angle to cut. You can also use a bevel cutter
Attach the beveled angles together by slipping and scoring
Roll a thin coil to attach inside each corner as extra support at the seam
Cut beveled edges onto the 3 longer sides of the next layer of shapes (Shape A) leaving the shortest end unbeveled
Slip and score beveled edges together
Attach rim by wrapping Shape C around the top of the vase creating a small cylinder
Smoosh ends together and smooth out seam
Slip and score points of contact to attach to the top
Smoosh together and smooth out seam on inside and outside. Option to alter the shape of the rim to angle in or out
To create bottom, place vase onto of an unused slab and cut piece to fit
Slip and score edges together and smooth extra clay over the seam
With a damp sponge clean up surfaces
Create texture by gently pushing the eraser side of a pencil into the clay to make the large marks and the tip of the pencil to make the small marks
Smooth out any unwanted marks with sponge
Allow vase to dry slowly, draped with plastic
When dried completely bisque fire to Cone 04
Glazing
Create a thinned mix of Fern (EL-150) by mixing 2-parts glaze and 1-part water into a separate container to create a mixture that is the consistency of heavy cream.
Pour mixture into vase and turn to coat inside. Place your hand over the opening to keep glaze from spilling out while coating
When you feel that you have fully coated the inside pour extra glaze back into your mixing container. This can be saved to use for pouring insides of other projects by covering with an airtight lid
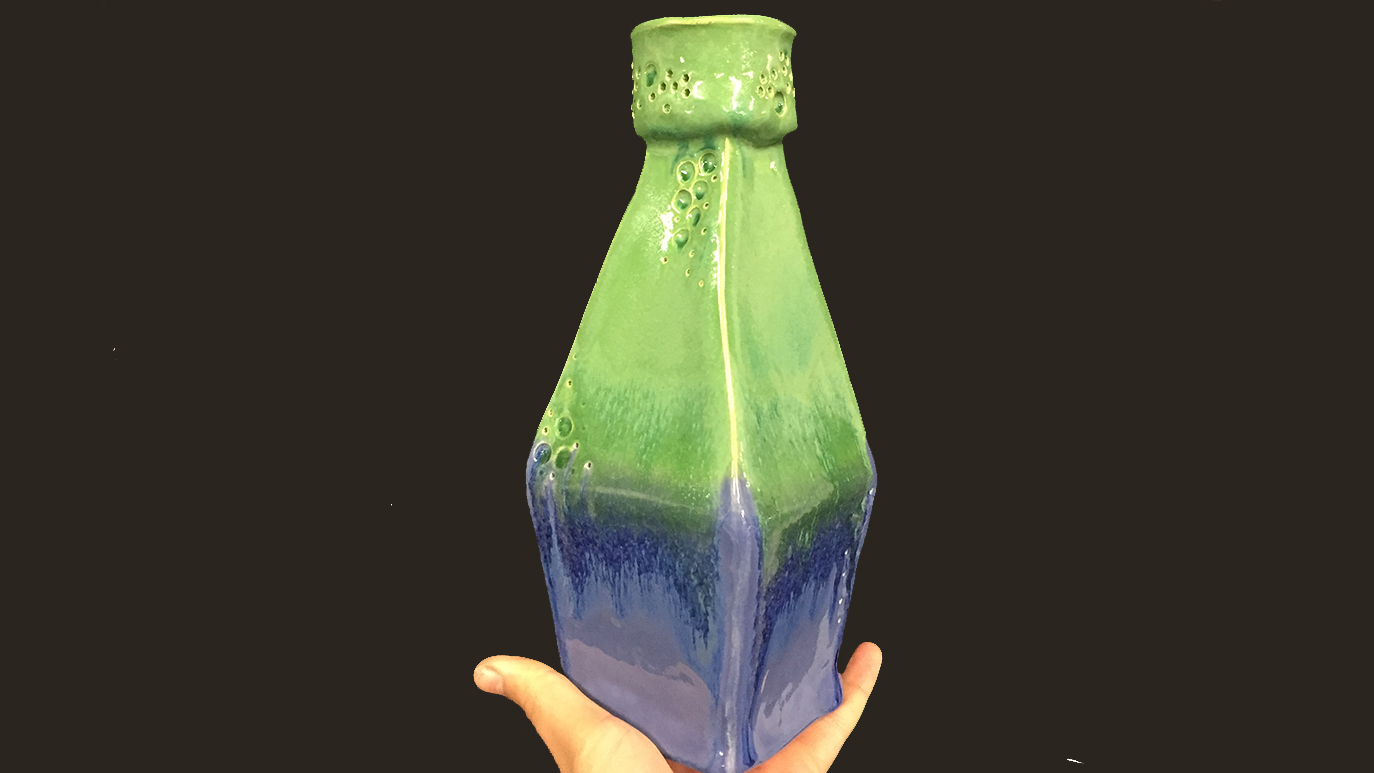
Establish your half way mark by drawing a line around the outside of your vase where the two glazes will meet
With a soft fan brush apply 3 coats of Fern (EL-150) to the top half of the vase, stopping at the center line
Allow each coat to dry before applying the next
With a soft fan brush apply 3 coats of Deep Water (EL-151) to the bottom half of the vase, from the center line down
Allow each coat to dry before applying the next
When dry, apply one coat of Clear Cascade (PC-601) stating one-inch above the midline and extending about ½ -inch down from the centerline with a soft fan brush. Let dry
Apply a second coat to the top 2/3 of where the Clear Cascade was applied. Allow to dry completely
Fire to Cone 06
Form
Colors
EL-150 Fern (Discontinued)
EL-151 Deep Water (Discontinued)
PC-601 Clear Cascade
Miscellaneous Accessories
Paper
Pencil
Masking tape
Cardboard or cardstock
Scissors
Fettling knife
Needle tool
Rib
Sponge
Water
Rolling pin or slab roller
Brushes for glazing
Pattern
Bevel Cutter (Optional)