Frightened Ghost and Carved Pumpkin Plate

Designer: David Hoff

Share

Instructions

  1. Check the bisque ware over for any blemishes and remove by lightly sanding with fine sandpaper.
  2. Center the provided pattern with pencil and the Clay Carbon trace the design onto the ware.
  3. Damp sponge ware to remove any dust and to condition the piece for decorating. The damp sponging will not harm the traced design.
  4. Place the Stroke ‘n Coat as needed on the palette and condition with a few drops of water if product is extremely thick.
  5. Place Java Bean, Cracker Jack and Down to Earth on palette. These should be thinned to a milk like consistency. Add water and mix with Palette Knife. (Note: Brown tones have a tendency to be thicker in the jar than other Stroke ‘n Coat colors.
  6. Using a water dampened #8 Pointed Round fully loaded with thinned Cracker Jack and heavily tip in the thinned Java Bean. Working horizontally, with the point of the brush directed upward to the horizon line begin the streak in the foreground. Hold the brush almost on the flat work back and forth several times to achieve complete streaked coverage to the ground. Water can be used to soften the color. Reload often and make sure the application of color remains straight across the bottom section of the plate. Allow to set.
  7. With water dampened #8 Pointed Round pick up Down to Earth on its tip and blend on the palette. Again, with the point of the Round directed upward to the horizon add soft shading, along the horizon line under the pumpkin and leaves. Also, streak in some shading here and there to the foreground.
    1. Note Steps 6 and 7 may need to be repeated a second time if application appear extremely thin.
  8. Place Sour Apple, Toad-ily Green, Irish Luck, Sunkissed and Cant-elope. These colors will be used on the leaves.
    1. Block in the leaves with a smooth coat of Sour Apple, using #6 Pointed Round.
    2. Reload with Sour Apple and side load Toad-ily Green, with the Toad-ily to the left side of each leaf apply color from the base to tip working the loaded brush across the leaf.
    3. Side load the #6 Pointed Round with Sunkissed and float color down the right side of the leaf.
    4. Side load the #6 Pointed Round with Cant-elope and float in color over the Sunkissed.
    5. Allow to dry.
    6. Corner load #8 Flat Shader with Irish Luck and float in shading to the leaves, under pumpkin, down the left side of each leaf and the center of the leaf. Be sure to use Shader on the flat.
    7. Detailing will be done later.
  9. Complete the Ghost as follows:
    1. Fully load #6 Pointed Round with Cotton Tail and block in one coat to entire Ghost
    2. Reload the Round with the Cotton Tail and side load with Silver Lining. Keeping the Silver Lining to the outside edge of Ghost apply a second coat. The Silver Lining will create a shadow around the entire Ghost.
    3. Paint in the mouth with a coat of Silver Lining.
    4. Paint in the eyes with Sour Apple.
    5. Detailing will be done later.
  10.  To the palette add Jack o’ Lantern, Orange Ya Happy, and more Cant-elope.
  11. Complete the Pumpkin as follows working one segment at a time. For best result work for the outer segments inward. Do not cover the cut-out design of the face while painting in the segments.
    1. Block in segment with Cant-elope using the #4 or #6 Pointed Round. One smooth coat is sufficient.
    2. Reload the Round with Cant-elope and side load with both Jack O’ Lantern and Orange Ya Happy. Blend the colors together on palette. With the darker shades direct to the inner edge of each segment apply a second coat. Be sure to app pressure to the brush thus softening the bending of the darker colors.
    3. Repeat the process for all segment except for the middle piece.
    4. When the color has set side load the Round with Orange Ya Happy and float another coat along the darker edge of the painted segments.
    5. The middle segment should be kept lighter in tone, therefore apply two coats of Cant-elope to the remaining segment
    6. With #0 Detail block in two coats of Sunkissed to the small cuts to the mouth and the eyes.
    7. Fill in the eyes and mouth with two to three coats of Tuxedo using the #4 Pointed Round. The pumpkin will be detailed later.
  12. The stem is completed in two segments. To the lower segment apply two coats of Java Bean, with #4 Pointed Round. When dry shade the upper edge, down one side of the stem and from the bottom of stem upward with Down to Earth. Follow the contour of the stem.
  13. The upper segment is block in with two coats of Java Bean and the upper edge is shaded with Down to Earth.
  14. Detail the stem with thinned Down to Earth and Tuxedo using 10/0 Liner
  15. Place Orkid, Grapel, Blue Yonder and Blue Dawn thin the colors to a wash consistency. These colors will be used for the soft “water-color” background. To the right of the pumpkin more of the purple tones were used and to the left more of the blue tone. The color merge and overlap each other at the top of the plate. Use the # 8 Pointed Round that is fully load with water and then tip with a color. The brush is used on the flat.
    1. Start with Grapel and work color away from the ground, leaves and ghost. Swish and swirl the color in place and try to stay off the of the previously applied color. Reload as needed.
    2. As the color is pulled out about an 1½“ away from the design pick up the lighter Orkid color and bring color out to the edge of plate. Apply color over the unpainted spider web.
    3. To the left side of the Pumpkin use the Blue Yonder and Blue Dawn. The Blue Yonder is used closest to the leaves, ground and Pumpkin pulled out in the same manner as the purple tones.
    4. Proceed to pick up the Blue Dawn and swish and swirl the color to the outer edge of the plate.
    5. As the two colors meet work one over the other blending the two colors together.
  16. With #4 Pointed Round and #10/0 Mini Liner pull is the tree to the left of the design using all three of the Browns (Cracker Jack, Java Bean and Down to Earth. Work from the base of tree upward. Try to create a bark like finish with coloration.
  17. Thin down the Tuxedo to a milk like consistent and with the #10/0 Mini Liner pull in the spider web. By moving slowly one coat should be enough for good coverage, however if color appears light carefully apply a second coat.
  18. The thinned Tuxedo should be used to:
    1. Detail the Ghost adding an outline, outlining the eyes, painting the pupils and accent the mouth
    2. Accent outline the stem with fine lines.
    3. Accent the tree with fine Lines
  19. With the #0 Detail add tiny leaves to the tree using Sour Apple tip with Toad-ily Green. Additional leaves are added with Sunkissed and tipped with Jack 0’ Lantern. These leaves are small and should be randomly applied with tiny pressure strokes.
  20. With thinned Irish Luck and #10/0 Liner
    1. Outline and detail the leaves around the pumpkin
    2. Pull in the scroll like tendrils,
    3. Pull in the tuffs of grass as shown on pattern working from the group upward.
  21. With thinned Down to Earth with broken line outline the segments of the pumpkins. Add a few detail lines here and there on the Pumpkin. Sign your name as well.Also accent the ground with a few fine lines. All using the #10/0 Liner.
  22. Place the plate on a turntable and center.
  23. Thin the Tuxedo slightly and dampen the 1” Foam Brush. Fully load one side of the foam brush and proceed to band the rim of the plate. Two to three passes may be needed.
  24. Allow to dry 24-hours.
  25. With slightly thinned Crystal Clear Brushing apply two coat over the entire plate. Allowing some drying time between coats.
  26. Stilt ware and fire to shelf cone 06.
  27. Remove stilt marks with Dremel Tool or Stilt Stone.

Supplies

Form

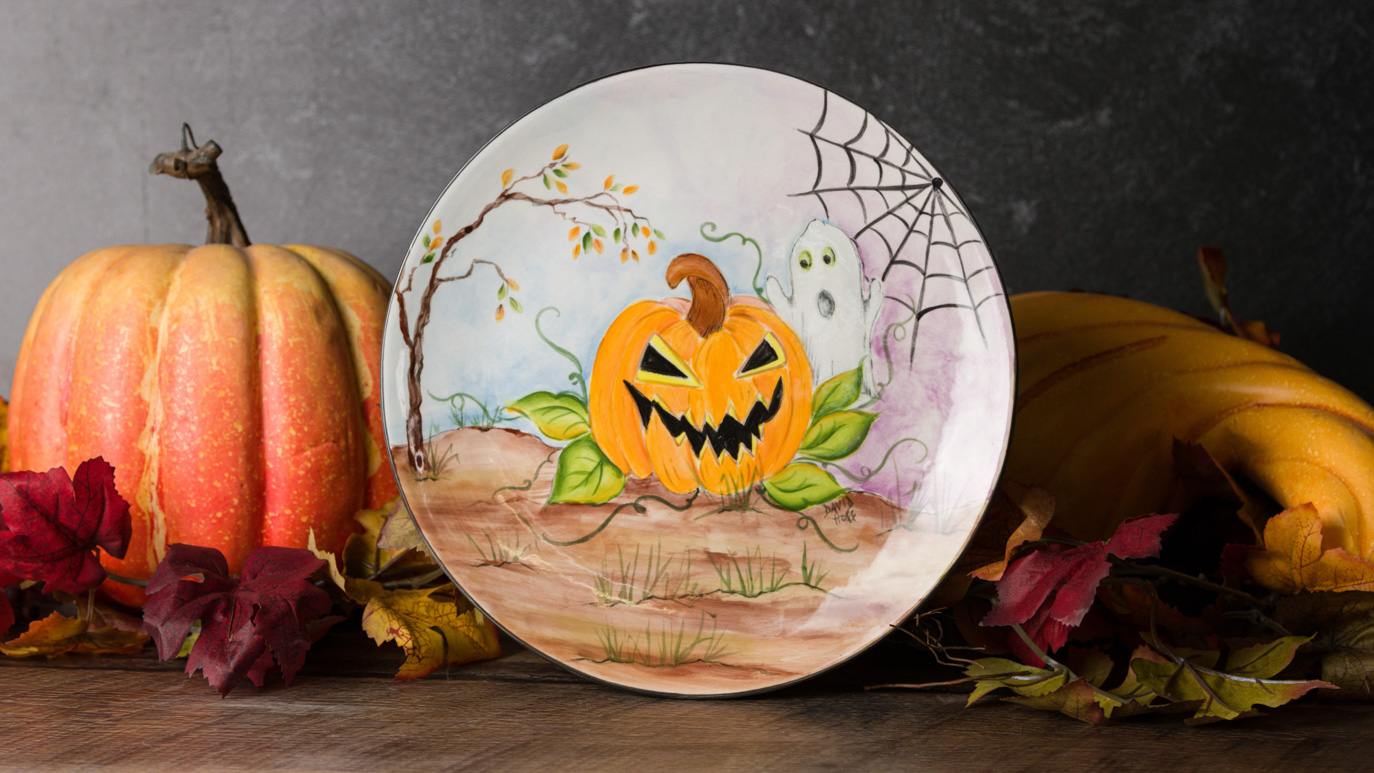
  • MB-102 Coupe Dinner Plate

Colors

  • SC-6 Sunkissed
  • SC-11 Blue Yonder
  • SC-13 Grapel
  • SC-14 Java Bean
  • SC-15 Tuxedo
  • SC-16 Cotton Tail
  • SC-23 Jack O’ Lantern
  • SC-25 Cracker Jack
  • SC-27 Sour Apple
  • SC-30 Blue Dawn
  • SC-34 Down to Earth
  • SC-36 Irish Luck
  • SC-50 Orange Ya Happy
  • SC-52 Toad-ily Green
  • SC-60 Silver Lining
  • SC-85 Orkid
  • SC-97 Cant-elope
  • S-2101 Crystal Clear Brushing

Decorating Accessories

  • CB 110 Mini Liner
  • CB 200 #0 Detail
  • CB 308 #8 Flat Shader
  • CB 404 #4 Pointed Round
  • CB 406 #6 Pointed Round
  • CB 408 #8 Pointed Round
  • CB 618 #8 Soft Fan
  • AC-320 Clay Carbon Transfer Paper

Miscellaneous Accessories

  • Sponge
  • Water
  • Pattern
  • 3 oz-paper cup
  • Palette Knife
  • Fine Sandpaper
  • Glaze tile for palette
  • Paper Towel
  • Pen/Pencil
  • Turntable (optional)
Top