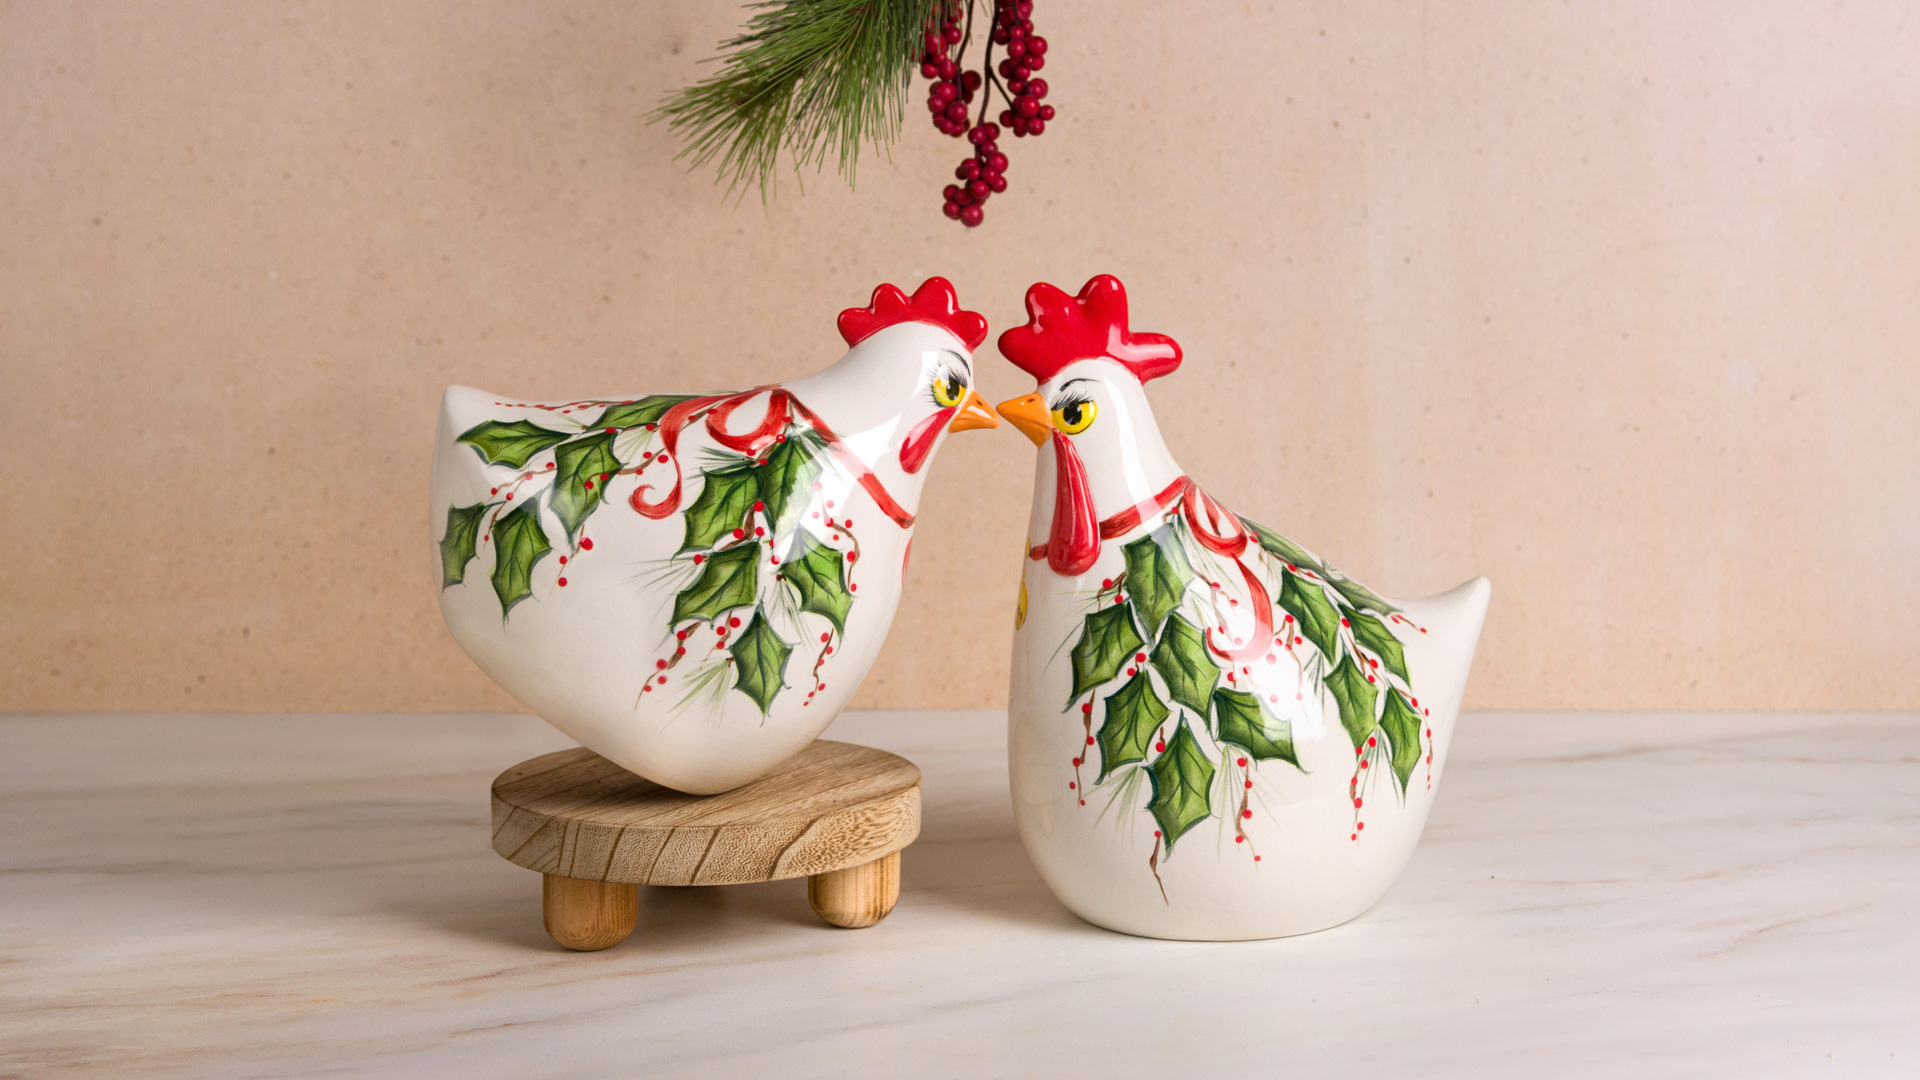
Holiday Ready Rudy and Holly

Designer: David Hoff

Share

Instructions

  1. Check the two pieces over for blemishes and if any are present lightly sand with 100-grit sand paper.
  2. Review the pattern and trim to make tracing easier on the rounded surface of the chickens.
  3. Using provided patterns, Clay Carbon and Red Pen, trace the designs onto both sides of each chicken. If using the tissue paper method of tracing the design onto the ware: trace the design onto the tissue paper with a standard pencil. Proceed to align the traced pattern on the ware and slowly retrace with the Ultra-Fine Sharpie Marker. The marker will bleed through the tissue paper thus leaving the design.
  4. Damp sponge ware to remove any fired dust and to condition the piece for decorating.
  5. The Bows and Ribbons are completed as follows, using the #6 Script Liner and #10/Detail Liner with the following colors: Coral Red, Passion Red and Cobalt Jet Black. As needed place the colors on the page protector palette and if extremely thick, thin with water. Use the shaded pattern as a guide for deepening of the color.
    1. Each section of the ribbon and the bow are pulled in with the #6 Script Liner that has been loaded with Coral Red and tipped with Passion Red. Start at the narrowest point of the ribbon or bow section. Start the stroke by tipping and slowly pressing the Liner against the ware to broaden the stroke and slowly lift off. The coloration should be darker at the beginning of the stroke and then lighten slightly as the stroke is completed.
    2. Reload the #6 Script Liner in the same manner and starting at the opposite narrow end of the previous applied color, repeat the motion. Thus, creating a ribbon/bow with the deeper shade at the narrow beginnings and endings of the segment.
    3. Complete each segment of the ribbon in the same manner using the shaded pattern as a guide where to deepen the ribbon and bow.
    4. To enhance the shading of the color, using the #10/0 Detail Liner, feather in more of the Passion Red.
    5. To further enhance the shading on the ribbon add a drop or two of Cobalt Jet Black to the Passion Red and with the #10/0 Detail Liner add a few more shading lines and accent outline both the ribbon and bow.
    6. Be sure to paint in the ribbon around the necks of both chickens and stop at the bell or heart.
  6. Holly leaves are completed using Irish Green, Leaf Green, Ivy Green and Royal Blue Green and the #10 or #8 Flat Shader as follows:
    1. Smoothly block in holly leaves with one coat of Irish Green. Fully load the Shader of choice and apply color following the leaves’ contour. (Brush stroke will be visible).
    2. Lightly sketch in the middle vein line with a pencil.
    3. Reload the Shader with Irish Green, side load with Leaf Green and corner load the same side of Shader with Ivy Green. Blend on palette. Using soft C like strokes, apply color to the leaves with the darker shade to the outer edge of the leaf. Reload as needed. For best results add this color to the left side of each leaf first. Remember the lightest shade (Irish Green) is to the middle of the leaf.
    4. When the left side of all the leaves are shaded. Reload the brush in the same manner and apply shading colors to the right side of the leaves with the darker tones to the outer edge of each leaf. Again, the Irish Green will be in the middle of the Holly Leaf.
    5. Thin the Royal Blue Green slightly. Dampen the Shader with water and pat off excess water. Precede to corner load the left corner of the Shader and blend on clean area of palette. Float the Royal Blue Green down the left side of all the leaves. Also, float color down the penciled in center vein. Remember to use the shader on the flat.
    6. Fully load #10/0 Detail Liner with the thinned Royal Blue Green and outline the holly, add a center vein and pull-out side veins.
  7. Thin French Brown slightly and fully load #10/0 Detail Liner. Barely touching the ware with the liner’s tip, twist and pull the branches in throughout the design. Remember to lift up on the Liner as the branch ends, thus creating a fine tip at the ending.
  8. Using the #10 Detail Liner fully loaded with all four shades of the green, pull in wisps of pine needles throughout the design.
  9. To complete the eyes, using Liner of choice:
    1. Horizontally sketch in an upper lid line with a pencil. This line cuts the eye opening in half.
    2. To the lower half of the eye, apply two coats of Yellow Orange, using the #6 Round. The upper half of the eye opening does not have color.
    3. Shade the upper half of the Yellow Orange with a float of Poppy Orange. While doing this, apply two coats of the Poppy Orange to both beaks.
    4. Add a Cobalt Jet Black round pupil to the eye.
    5. Finish off the eye with a lower and upper lid line, fine eye lashes, eyebrows and nostril marks on the beaks, all in the Cobalt Jet Black.
    6. Add a White highlight to the eyes.
  10. Rudy Rooster’s bell and clasp are blocked in with two coats of Yellow Orange. When dry, float in Poppy Orange around the outer edge of the bell and clasp with Poppy Orange. The French Brown is used to outline the bell and clasp, add the tinny tie string and paint in the opening to the bottom of the bell.
  11. Holly Hen’s heart is painted in with three coats of Flame Red. The clasp is completed the same as Rudy Rooster’s clasp. French Brown is used to outline the heart, tie string and clasp.
  12. To the combs and waddles to both birds, apply three coats of the Flame Red.
  13. Sign the piece with E-Z Stroke color of choice.
  14. The berry like dots, are added last with the handle of a brush using Flame Red. Dots should always be completed last to prevent smearing.
  15. Fire the ware to shelf cone 04.
  16. Damp sponge the ware to remove any fired dust and to condition the piece for glazing.
  17. Pour enough Crystal-Clear Brushing into a paper cup, apply three coats of glaze to both birds using the soft fan. Allow drying between coats.
  18. Before firing, pieces should dry 24-hours for best results.
  19. Stilt Rudy and Holly and fire to shelf cone 06.
  20. Remove stilt marks with Dremel Tool or Stilt Stone.

Supplies

Form

  • MB-1596 Rudy Rooster
  • MB-1597 Holly Hen

Colors

  • UG-207 Flame Red
  • EZ003 Irish Green
  • EZ010 French Brown
  • EZ012 Cobalt Jet Black
  • EZ013 White
  • EZ024 Royal Blue Green
  • EZ026 Yellow Orange
  • EZ028 Leaf Green
  • EZ033 Ivy Green
  • EZ057 Coral Red
  • EZ058 Poppy Orange
  • EZ075 Passion Red
  • S-2101 Crystal Cleat Brushing

Decorating Accessories

  • CB-406 #6 Pointed Round or CB-408 #8 Pointed Round
  • CB-308 #8 Flat Shader
  • CB-310 #10 Flat Shader
  • CB-106 # 6 Script Liner
  • RB-110 #10/0 Detail Liner
  • RB-140 Soft Fan

Miscellaneous Accessories

  • Sponge
  • Water Bowl
  • 3 oz Plastic or Paper Cup (1)
  • 100-grit sandpaper
  • Clay Carbon
  • Heavy Duty Plastic Page
  • Paper Towels
  • Red Pencil
  • Scissors
  • Standard Pencil
  • If using Tissue Paper Method to transfer the design
    • Ultra Fine Sharpie Marker
    • Inexpensive Tissue Paper
  • Palette Knife
  • Pattern
Top