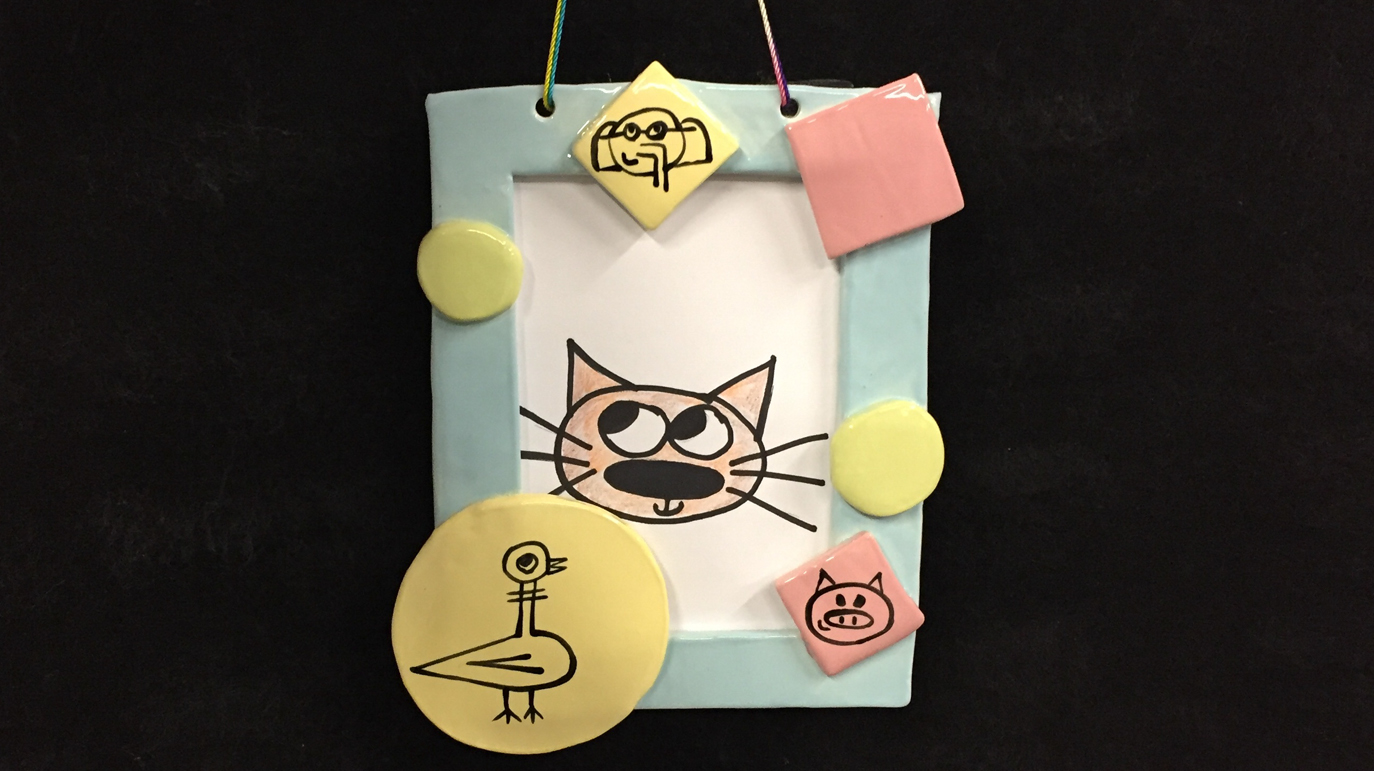
Mo Willems Inspired Frame
Designer: Kaitlyn Miller
Instructions
Build:
- Roll out a slab that is about 1/8” thick
- Compress slab with rib on both sides
- Cut out frame shape (ours is a rectangle) be sure that the frame is at least 2” thick
- Smooth down cut edges with sponge or fingers
- Cut out various geometric shapes to attach to frame
- Attach shapes to frame face buy slipping and scoring pieces together
- Smooth out edges
- Make two holes to hang string from at the top of the frame at least 3” apart by pushing a straw though the clay
- Cover with plastic and let piece dry slowly to prevent warping
- Once fully dry bisque fire to Cone 04
Glaze:
- Wipe bisque with a damp sponge to remove dust
- Use a soft fan brush to apply 2 coats of My Blue Heaven (SC-45) to the base frame being sure that coats are fully dry in between
- Apply 2 coats of color to each shape alternating between the remaining colors Pink-A-Boo (SC-1), Yella Bout It (SC-55), and Honeydew List (SC-93)
- Allow glaze to dry
- Select your favorite doodles from lunch doodles with Mo to transfer to your frame
- Trace doodles using tissue paper and pencil
- Cut out traced doodles and place them in desired spots on frame
- Transfer image by tracing over pencil lines with magic maker allowing marker to bleed though and leave image on glazed surface
- With a detail liner brush, apply Tuxedo (SC-15) to your doodles
- Allow to dry completely
- Fire piece to Cone 06
Assemble:
- Hang using your favorite string, string though holes
- Tape your favorite Mo doodle in your frame
- Hang and enjoy
Supplies
Form
Colors
- SC-1 Pink-A-Boo
- SC-5 Tuxedo
- SC-45 My Blue Heaven
- SC-55 Yella Bout It
- SC-93 Honeydew List
Decorating Accessories
- Slab Roller or Rolling Pin
- Rib
- Fettling Knife
- Shape stencils (or objects to trace)
- Sponge
- Water
- Brushes for glazing
- Tissue paper
- Pencil
- Magic marker
Top