- Check the bisque ware over for any blemishes and remove by lightly sanding with fine sandpaper.
- Damp sponge ware to remove any dust and to condition the piece for decorating.
- Into a paper cup place Tuscan Turquoise, using the entire 2 oz bottle.
- Also into the paper cup add approximating ½ ounce of Matte Transparent. Mix thoroughly with palette knife.
- Pour the mix on to the palette.
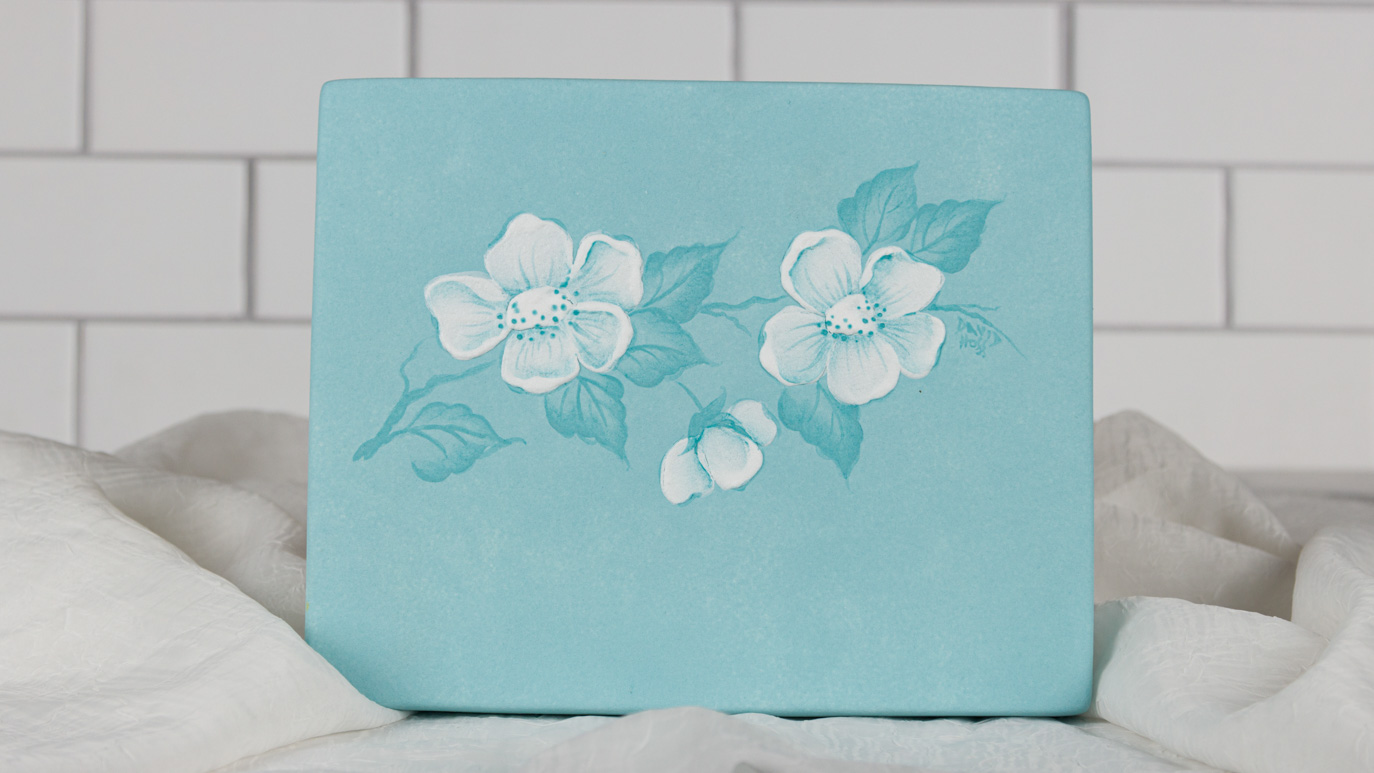
- Pick up the mixed Tuscan Turquoise on to the sponge and proceed to pounce sponge the three solid textured coats over the canvas ware, including the side and small rim on the back of canvas. Allow each coat some drying time. When finished set piece aside to thoroughly dry.
- Using the Clay Carbon, provided pattern and pencil/pen carefully trace the design onto the ware. Try not to score the ware while tracing. Note: the Clay Carbon will not work if the ware is damp from the color application.
- Place Snowfall onto the palette and condition with palette knife. Do not thin the color, work the palette knife through the Specialty Glaze, thus making the painting easier to brush with.
- Fully load the #6 Pointed Round with the conditioned Snowfall. Begin to apply two heavy coats of the Snowfall to the flower petals. As the color is applied create raised area here and there along the outer edges of the petals. Try to achieve some dimension to each of the petals.
- The center of the two flowers should be filled with a generous build up of Snowfall which should appear more raised than the actual applied petals.
- Allow the Snowfall some drying time.
- Place Marine Blue on the palette and thin slightly with a few drops of water. Mix with palette knife. Consistency should be of light cream.
- Dampen the #8 Flat Shader with water. Remove excess water onto a paper towel. Proceed to corner load the Shader with the slightly thinned Marine Blue.
- The leaves are floated in with color using the corner loaded #8 Flat Shader, keeping the color to the outer edges of each leaf. For best results work from base of the to the tip, use the shader on the not just the corner loaded edge. Reload as needed. If leaves are completed correctly the center of each leaf will be free of the Marine Blue.
- Fully load the 10/0 Mini Liner with Marine Blue and outline the leaves with a smooth outline, add a center and side veins to each leaf and finally pull in a gnarled looking branch and twig attached. One coat should be sufficient
- Corner loading the Shader with Marine Blue float in shading to the petals were the applied center overlap the petals. Complete the shading one petal at a time.
- Float in shading to the petals along the inner edge of the raised edge. Also shade the petals where an overlapping petal would create a shadow on its neighboring petals. Be sure to keep the shading soft and blended in appearance. Again reload as needed.
- With #6 Pointed Round loaded with Marine Blue press, pull and lift three small pressure strokes to the base of the bud to form a calyx.
- To opened flowers (not the bud) pull in five to seven fine vein lines from the center outward on to each petal. These lines should be of varying lengths. Complete these lines with the #10/0 Mini Liner.
- Add tinny Marine Blue dots to the center of the fully opened flowers, using the tip #10/0 Mini Liner.
- Sign the piece.
- Since Matte Transparent Clear has been added to the Fundamentals proceed to stilt the piece and fire to shelf cone 04 or 06.
Special note: If this piece were to be glaze with either a matte or gloss glaze the intensity of the Marine Blue will be diminished due to the fact there is only a thin application of color. By adding the Matte Transparent to the original base coat help intensifies the over all look of the non-glazed Fundamentals.