Begin with properly fired shelf cone 04 bisque. Moisten a clean sponge and wipe bisque to remove any dust.
With the RB144 Soft fan glaze 3 coats of UG220 Sage onto the legs, belly, head, and inside of the turtle box.
Avoid glazing the bottom of the feet.
Apply the same glaze to bottom half of the shell and the inside, apply 3 coats. Avoid Glazing the inside rim.
Apply 2 coats of SW120 Northern Woods onto the top of the turtle shell. Apply with a RB106 Script Liner.
Apply 2 coats of SW253 Green Opal onto the top of the turtle Shell. Apply with a RB106 Script Liner.
Apply 2 coats of SW408 White Flux in a hexagon pattern on top of the shell. Add small dots to fill in the gapes between the hexagons. Apply with a RB106 Script Liner.
Apply one coat of UG068 Apple Green using a Dotting Gyre around the bottom of the shell and for the eyes.
Fire to cone 6.
Turtle 2 – Leaf Green:
Begin with properly fired shelf cone 04 bisque. Moisten a clean sponge and wipe bisque to remove any dust.
With the RB144 Soft fan glaze 3 coats of UG021 Leaf Green onto the legs, belly, head, and inside of the turtle box.
Avoid glazing the bottom of the feet.
Apply the same glaze to bottom half of the shell and the inside, apply 3 coats. Avoid Glazing the inside rim.
Apply 2 coats of SW128 Cordovan onto the top of the turtle shell. Apply with a RB106 Script Liner.
Apply 2 coats of SW108 Green Tea onto the top of the turtle Shell. Apply with a RB106 Script Liner.
Apply 2 coats of SW408 White Flux in a hexagon pattern on top of the shell. Add small dots to fill in the gaps between the hexagons. Apply with a RB106 Script Liner.
Apply one coat of UG232 Olive using a Dotting Gyre around the bottom of the shell and for the eyes.
Fire to cone 6.
Turtle 3 – True Teal:
Begin with properly fired shelf cone 04 bisque. Moisten a clean sponge and wipe bisque to remove any dust.
With the RB144 Soft fan glaze 3 coats of UG091 True Teal onto the legs, belly, head, and inside of the turtle box.
Avoid glazing the bottom of the feet.
Apply the same glaze to bottom half of the shell and the inside, apply 3 coats. Avoid Glazing the inside rim.
Apply 2 coats of SW112 Triger’s Eye onto the top of the turtle shell. Apply with a RB106 Script Liner.
Apply 2 coats of SW101 Stone Demin onto the top of the turtle Shell. Apply with a RB106 Script Liner.
Apply 2 coats of SW408 White Flux in a hexagon pattern on top of the shell. Add small dots to fill in the gaps between the hexagons. Apply with a RB106 Script Liner.
Apply one coat of UG019 Electra Blue using a Dotting Gyre around the bottom of the shell and for the eyes.
Begin by wiping down the bisque with a damp sponge to remove any dirt/dust.
Fill 6 AC220 Detail bottles with the Elements glazes listed.
Prepare the prism technique by squirting out a line of each color from the detail bottle, side by side and touching, on the pallet in this order: EL127 Rose Granite, EL128 Wheat, EL166 Foliage green, EL153 Caribbean Blue, EL118 Blue Grotto, EL149 Lavender Flower
Using the soft fan brush, start from the bottom of the rainbow glaze pallet and pat the glaze into the brush bristles.
Apply the glaze mixture randomly and thickly in different directions across the face of the bisque piece, ensuring no bare bisque is showing.
Apply two coats of EL149 Lavender Flower to the inside of the vase.
Begin by wiping down the bisque with a damp sponge to remove any dirt/dust.
Fill 6 AC220 Detail bottles with the stoneware gloss glazes listed.
Prepare the prism technique by squirting out a line of each color from the detail bottle, side by side and touching, on the pallet in this order: SW512 Coral Gloss, SW502 Yellow Gloss, SW515 Aqua Gloss, SW506 Bright Blue Gloss, SW505 Purple Gloss, SW511 Pink Gloss
Using the soft fan brush, start from the bottom of the rainbow glaze pallet and pat the glaze into the brush bristles.
Apply the glaze mixture randomly in different directions across the face of the bisque piece.
Apply three coats of SW140 Black Matte to the inside of the vase.
Begin by wiping down the bisque with a damp sponge to remove any dirt/dust.
Fill 6 AC220 Detail bottles with the stoneware gloss glazes listed.
Prepare the prism technique by squirting out a line of each color from the detail bottle, side by side and touching, on the pallet in this order: SW512 Coral Gloss, SW502 Yellow Gloss, SW515 Aqua Gloss, SW506 Bright Blue Gloss, SW505 Purple Gloss, SW511 Pink Gloss.
Using the soft fan brush, start from the bottom of the rainbow glaze pallet and pat the glaze into the brush bristles.
Apply the glaze mixture randomly in different directions across the face of the bisque piece.
Once the piece is covered, go back over the first layer of rainbows with a second layer of rainbows, doing your best to go in different directions from the first layer.
Apply three coats of SW140 Black Matte to the inside of the spoon rest.
Begin by wiping down the bisque with a damp sponge to remove any dirt/dust.
Fill 6 AC220 Detail bottles with the stoneware gloss glazes listed.
Prepare the prism technique by squirting out a line of each color from the detail bottle, side by side and touching, on the pallet in this order: SW512 Coral Gloss, SW502 Yellow Gloss, SW515 Aqua Gloss, SW506 Bright Blue Gloss, SW505 Purple Gloss, SW511 Pink Gloss
Using the soft fan brush, start from the bottom of the rainbow glaze pallet and pat the glaze into the brush bristles.
Apply the glaze mixture randomly in different directions across the face of the bisque piece.
Once the piece is covered, go back over the first layer of rainbows with a second layer of rainbows, doing your best to go in different directions from the first layer.
Apply three coats of SW140 Black Matte to the inside of the stein.
Begin by wiping down the bisque with a damp sponge to remove any dirt/dust.
Mix two ounces of SC015 Tuxedo with a heavy pinch of AC310 Silkscreen Medium using a pallet knife and set aside to let thicken up.
Prepare the prism technique by squirting out a line of each color directly from the bottle, side by side and touching, on the pallet in this order: SC050 Orange Ya Happy, SC024 Dandelion, SC096 Aqu-ward, SC028 Blue Isle, SC103 Lavendear, SC070 Pink-A-Dot
Using the soft fan brush, start from the bottom of the rainbow glaze pallet and pat the glaze into the brush bristles.
Apply the glaze mixture randomly in different directions across the face of the bisque piece.
Once the piece is covered, go back over the first layer of rainbows with a second layer of rainbows, doing your best to go in different directions from the first layer.
Note: If possible, allow this base layer to dry overnight or for a couple of hours before applying the silkscreen steps for the best silkscreen application.
Apply three coats of SC015 Tuxedo to the inside of the tea bag container.
Using your finger, apply the silkscreen medium and SC015 Tuxedo mixture from step 2 to the Art Deco silkscreen with light pressure in a circular motion on the pre-glazed sides of the container. Remove the screen immediately each time.
Begin by wiping down the bisque with a damp sponge to remove any dirt/dust.
Fill 6 AC220 Detail bottles with the Stoneware glazes listed.
Prepare the prism technique by squirting out a line of each color from the detail bottle, side by side and touching, on the pallet in this order: SW119 Cinnabar, SW168 Coral Sands, SW169 Frosted Lemon, SW253 Green Opal, SW224 Tropical Teal, SW165 Lavender Mist
Using the soft fan brush, start from the bottom of the rainbow glaze pallet and pat the glaze into the brush bristles.
Apply the glaze mixture randomly in different directions across the face of the bisque piece, ensuring no bare bisque is showing.
Repeat step 5 two times, doing your best to overlap the glazes in the exact same direction.
Apply three coats of SW224 Tropical Teal to the inside of the vase.
Begin by wiping down the bisque with a damp sponge to remove any dirt/dust.
Mix two ounces of SC015 Tuxedo with a heavy pinch of AC310 Silkscreen Medium using a pallet knife and set aside to let thicken up.
Prepare the prism technique by squirting out a line of each color directly from the bottle, side by side and touching, on the pallet in this order: SC0088 TuTuTango, SC024 Dandelion, SC105 Tic-Tac-Turquoise, SC011 Blue Yonder, SC072 Grape Jelly, SC001 Pink-a-Boo.
Using the soft fan brush, start from the bottom of the rainbow glaze pallet and pat the glaze into the brush bristles.
Apply the glaze mixture randomly in different directions across the outside and bottom of all three mugs.
Once each mug is covered, go back over the first layer of rainbows with a second layer of rainbows, doing your best to go in different directions from the first layer.
Note: If possible, allow this base layer to dry overnight or for a couple of hours before applying the silkscreen steps for the best silkscreen application.
Apply three coats of SC015 Tuxedo to the inside and handles of the mugs.
Using your finger, apply the silkscreen medium and SC015 Tuxedo mixture from step 2 to the paisley silkscreens with light pressure in a circular motion on the pre-glazed sides of the container. Remove the screen immediately each time. The smallest mug gets the smallest paisleys, the medium mug gets the medium size paisleys, the large mug gets the large and medium size paisleys.
Outline the paisleys with two coats of a thick line of SC016 Coton Tail.
Mix a 3:1 mixture of SC016:SC015 to create a grey tone. Using the detail brush, create a grey shadow under each of the paisleys to create a 3D effect.
Using the detail brush and SC016 Cotton Tail, create small starbursts and dots around the paisleys to mimic shine.
Begin with properly fired shelf cone 04 bisque. Moisten a clean sponge and wipe bisque to remove any dust.
Apply 3 coats of FN009 Black to the back of the plate then apply 2 coats to the top of the plate. Apply with a CB618 Fan Brush.
Apply 2 coats of EL132 Rust Red to the top of the plate. Apply with a CB618 Fan Brush.
With a round sponge on a stick apply 2 coats of dots of PC602 White Cascade, make sure the dots are close together. Where there is blank space between the dots apply 1 coats of smaller dots with a CB106 Script Liner.
Begin by wiping down the bisque with a damp sponge to remove any dirt/dust.
Prepare the prism technique by squirting out a line of each color directly from the bottle, side by side and touching, on the pallet in this order: SC088 TuTuTango, SC024 Dandelion, SC105 Tic Tac Turquoise, SC011 Blue Yonder, SC072 Grape Jelly, SC001 Pink-a-boo.
Using the soft fan brush, start from the bottom of the rainbow glaze pallet and pat the glaze into the brush bristles.
Apply the glaze mixture randomly in different directions across the outside and bottom of the mug.
Once the mug is covered, go back over the first layer of rainbows with a second layer of rainbows, doing your best to go in different directions from the first layer.
Apply three coats of SC015 Tuxedo to the inside and handle of the mug.
Begin with properly fired shelf cone 04 bisque. Moisten a clean sponge and wipe bisque to remove any dust.
Apply 3 coats of FN009 Black to the back of the plate then apply 2 coats to the top of the plate. Apply with a CB618 Fan Brush.
Apply 2 coats of EL117 Waterfall to the top of the plate. Apply with a CB618 Fan Brush.
With a round sponge on a stick apply 2 coats of dots of PC602 White Cascade, make sure the dots are close together. Where there is blank space between the dots apply 1 coats of smaller dots with a CB106 Script Liner.
Dilute each E-Z Stroke colors two parts water with one part color in small cups.
Use the script liner to dab the diluted color on the sides of the vase. You want the colors to flow and drip. Continue to add drips as you work up the side of the shape. You want them to overlap.
One dry, apply thin lines of White Designer Liner around the drips. They don’t need to be exact where colors have flowed together or mixed. Always try to hold the bottle at an angle (rather than straight up and down) and try to pull the bottle toward yourself, rather than pushing away. Scraping the tip of Designer Liner in the color below can plug the tip.
Apply three coats of Sapphire Blue to the top area of the vase and interior. You can dilute the Sapphire Blue one part water to one part color to roll on the inside and dump out excess color.
Fire to cone 6.
Optional: Apply clear glaze to the E-Z Stroke area if you want it to be glossy.
Begin by wiping down the bisque with a damp sponge to remove any dirt/dust.
Mix one ounce of SC076 Cara-Bein Blue with a pinch of AC310 Silkscreen Medium using a pallet knife and set aside to let thicken up.
Using your finger, apply the silkscreen medium and SC076 Cara-bean Blue mixture from step 2 to the Paisley silkscreen with light pressure in a circular motion on the center of the bisque pitcher. Remove the screen immediately.
Apply three coats of SC076 Cara-bein Blue to the base of the pitcher under the edge of the silkscreen and an inch and a half above the silkscreen.
Apply three coats of SP289 Speckled Cutie Pie Coral above the band of blue until you reach the first ridge on the lip of the pitcher.
Apply three coats od SP2105 Speckled Tic-Tac-Turquoise to the lip of the pitcher, and inside.
Once the Silkscreen has dried, Use the detail liner brush to fill in one thick layer or SC105 Tic-tac-Turquoise and SP289 Speckled Cutie Pie Coral to the silkscreen design like a coloring book.
Apply one coat of NTBR Clear One Brushing Glaze to the Center of the pitcher where the silkscreen is applied to cover any thin areas and areas of plain bisque.
Allow to dry, stilt, and fire to cone 06.
For a video walkthrough of how to use Jessica Putnam-Phillips Silkscreens click below:
In this Art Spark, students carve nesting tunnels into a solid-ish clay block to create a sculptural garden pod that provides habitat for solitary bees and beneficial insects. The finished pieces have usable nesting holes (keep the insides unglazed) and colorful, textured decorations on the outside.
Great For
STEAM connections (art + environmental science)
Outdoor garden sculpture and functional ceramics.
Spring ceramic projects and art camps
Simple Directions
Form a solid block (grapefruit size) shape into an organic form (log, stone, mound)
Carve nesting holes with dowels/pencils; do not go through the back, tilt holes up 5-10* and keep the interior of the holes smooth as not to damage the fragile wings of the insects.
Smooth tunnel interiors; add textures, leaves, or a small overhang roof.
Begin with a properly fired cone 06-04 bisque vessel.
Using a RB144 #4 Soft Fan, apply 2 coats of SC33 Fruit of the Vine or SC27 Sour Apple to the entire piece, avoiding the bottom.
Apply 2 coat of either SW226 Pink Pearl or SW227 Tidal Wave to the exterior of the mug, below the lip line. On the second coat leave about ½-1” of space near the bottom to avoid run-off.
Clean the bottom of the piece with a damp sponge.
Place directly on the kiln shelf and fire to cone 6.
Using a RB144 #4 Soft Fan, apply 2 coats of UG51 China White evenly to the outside of the vessel. Since the piece it leather hard, you will need to wait additional time in between coat for them to fully dry (so you can touch it without creating blemishes).
Once the underglaze is dry, apply 1 coat of AC302 Wax Resist. This will help preserve the clean white surface as you are carving through into the brown clay.
Using a pencil or marker, lightly compose your design on the piece.
Using your favorite carving tool, outline the entire design. Once outlined, carve out the background of the design by removing one stroke at a time. These ones are vertical but feel free try out different patterns. You can create some interesting dimension by hatching at different angles or by creating movement in the background.
Allow the piece to dry. Once it is bone dry, clean up any extra blemishes or boogers that remain throughout your carving pattern. Doing this too early can smudge your edges and design.
Bisque fire your piece to cone 06-04.
Using an CB624 #4 Glaze Fan, apply 2 coats of SW225 Lily Pad to the entire piece. Use the stiffness of this brush to pull the glaze out of the texture. You do not want it to be applied too thick or to pool or it can distort the carved design. Apply a third coat to the inside of the vase.
Clean the bottom of the piece with a damn sponge.
Place directly on the kiln shelf and fire to cone 6.
Begin with a leather hard vessel made with a white stoneware clay – samples used Laguna B-mix.
Using an RB144 #4 Soft Fan, apply 2 coats of SW229 Mood Ring to the outside of the piece; leave ¼-1/2” below the lip unglazed as this glaze is not recommended for dinnerware. This area will be covered with the combo glaze, that is dinnerware safe, after the bisque firing.
Use a Xiem Mini Ribbon Sculpting Tool to carve a design into the piece. I like to keep one hand on the inside to provide support and to ensure I do not carve through the wall.
Once the carving is complete, allow the vessel to finish drying.
Bisque fire to cone 06-04.
Using an RB144 #4 Soft Fan, apply 2 coats of SW128 Cordovan to the entire piece (avoiding the bottom). Add a third coat to the interior, lip, and handle.
Clean the bottom of the piece with a damp sponge.
Place directly on the kiln shelf and fire to cone 6.
Begin with a properly fired cone 06-04 bisque vessel.
Apply AC302 Wax resist to the bottom.
Using a CB106 #6 Script Liner, apply 2 coats of SW167 Sand and Sea to the handle.
Once the glaze is completely dry, use dipping tongs to dip the entire piece with SD165 Lavender Mist. Depending on your glaze consistency, dip the exterior a second time.
Clean the bottom of the piece with a damn sponge.
Place directly on the kiln shelf and fire to cone 6.
Additional Adaptations & Tips
This project can be completed using SW165 Lavender Mist where it is brushed on, but the outcome will be different. In my personal practice, I have found that SD165-169 tend to only create this kind of visual texture when they are applied as dipping glazes on this particular clay body. When they are applied as brushing glazes, they tend to be more opaque and less speckled. This is not a speckled clay body, this effect is a reaction between the clay and glaze. You can observe how the opacity builds on the handles of these pieces where the brushing SW167 is applied.
As for the consistency of the dipping glaze, I have my glazed mixed to be used with layering and combinations. I honestly do not measure my glaze density, but I would guess it is usually hovering around 1.36-1.40. This works for me with my clay in my personal practice, but keep in mind a different consistency may work for you and that is totally okay. We are just looking for a full application here whether that be with different density measurements or different number of dips.
Form
Thrown and Sculpted Vessel – KY Mudworks Brown Bear
Begin with a leather hard vessel made with a white stoneware clay – samples used Laguna B-mix.
Using an RB144 #4 Soft Fan, apply 3 even coats of SW230 Pink Speck or SW232 Baby Blue Speck to the outside of the vessel. Allow extra time for coats to dry since the glaze is being applied to a moist surface.
Apply 1 coat of AC302 Wax resist over the glaze.
Use a Xiem Mini Ribbon Sculpting Tool to carve a design into the piece. The depth and structure of the design should be reflective of the vessel. I like to keep one hand on the inside to provide support and to ensure I do not carve through the wall.
Once the carving is complete, allow the vessel to finish drying.
Using a CB106 #6 Script Liner fill the carved design with the corresponding Stroke and Coat color. Two loaded coats should be plenty.
Use a damp sponge to clean any Stroke and Coat off the waxed area.
Bisque fire to cone 06-04.
Using an RB144 #4 Soft Fan and a CB106#6 Script Liner, Apply 2 saturated coats of the corresponding Stroke and Coat color to the inside and the handle of the piece.
Place directly on the kiln shelf and fire to cone 6.
Begin with a properly fired cone 06-04 bisque vessel.
Using a RB144 #4 Soft Fan, apply 2 coats of SW165 Lavender Mist to the entire vessel (not the bottom or handle). Apply a third coat to the interior.
Apply 2 coats of SW228 Beetle Wing to the exterior of the piece, since this glaze is not recommended for surfaces that directly come into contact with food (Not Dinnerware Safe) be sure begin the combination at least an inch below the rim. This combination can create a lot of movement and we want the outcome to create a gradient, so you will want to apply one coat to the bottom section and then the second coat across the middle of that section. This will leave space for the combination to move down and allow the Lavender Mist gradually fade into the full combination.
Clean the bottom of the piece with a damp sponge.
Place directly on the kiln shelf and fire to cone 6.
Using a RB144 #4 Soft Fan, apply 2 coats of UG229 Aquamarine to the belly of the vessel.
Allow the piece to dry completely.
Bisque fire your piece to cone 06-04.
Using an RB144 #4 Soft Fan, apply 3 coats of flux to the top section of the vessel.
Once dry, apply 3 coats of SW165 Lavender Mist on top of that.
Using an RB144 #4 Soft Fan CAREFULLY apply SW444 Pink Bead to the piece. The application thickness can vary depending on the performance of the glaze as it dries.
Try to move the piece into the kiln before it has entirely dried, as Beads can be very fragile as they start to dry and separate.
Place directly on the kiln shelf and fire to cone 6.
Form
Thrown Vessel – KY Mudworks Brown Bear
Colors
UG229 Aquamarine
SW165 Lavender Mist
SW401 Light Flux
SW444 Pink Bead
Decorating Accessories
RB144 #4 Soft Fan Brush
Miscellaneous Accessories
Sponge
Mid-Range|Clay
407|401
58782
Curvy Speckled Brown Wheel Thrown Vase with Red Melt Gloop
Directions (Please remember to write clear and concise directions, include item numbers and names)
Begin with properly fired shelf cone 04 bisque. Moisten a clean sponge and wipe bisque to remove any dust.
Using a CB604 #4 Soft Fan, apply 2 coats of EL135 Rare Earth to the stem and 3 coats to the underside of the mushroom top.Allow to dry!
Stir and shake the CG1013 Papaya glaze.Place some of the glaze on a paper plate or palette.
Using a CB604 #4 Soft Fan, apply 2 coats of CG1013 Papaya top of the mushroom. Allow to dry!
Pour some PC602 White Cascade and PC601 Clear Cascade onto a paper plate or glazed tile (palette).
Using a Plastic Pot Scrubber, dab some of the PC602 Whit Cascade to the top of the mushroom and to about 1 ½ inches from the bottom of the stem.Repeat using the PC601 Clear Cascade. Do not cover the areas completely, allow the bas glaze to show through.Allow to dry!
Stir and shake the S2708 Oriental Carmel and the S2709 Cappuccino Mint glaze.Place some of the S2708 Oriental Carmel glaze on a paper plate or palette.
Using a CB604 #4 Soft Fan, apply 2 coats of S2708 Oriental Carmel to the mushroom top.Allow to dry between each coat!
Stir and shake the S2709 Cappuccino Mint glaze.Place some of the S2709 Cappuccino Mint glaze on a paper plate or palette.
Using a CB604 #4 Soft Fan, apply 2 coats of S2709 Cappuccino Mint to the mushroom stem.Allow to dry between each coat!
Stilt and fire to shelf cone 06.
Additional Adaptations & Tips if needed.
Make sure to shake all products to mix well.
Pottery Cascades™ are moving, flowing glazes, commonly used under or over other glazes to create reactions and movement.
PC601 Clear Cascade will have more movement than PC602 White Cascade.
The Cascades can be applied over, under or in between glazes such as Elements, Jungle Gems, Foundations and Stroke & Coats.
The heavier application of the Cascades the more movement it will have.
Cascades can also be used in glaze combinations such as the plop technique.
Begin with properly fired shelf cone 04 bisque. Moisten a clean sponge and wipe bisque to remove any dust.
Using a CB604 #4 Soft Fan, apply 3 coats of UG032 Cocoa to the plain area of the stem.Allow to dry!
Using a CB604 #4 Soft Fan, apply 2 coats of FN009 Black to the top of the Skirt of the mushroom stem and to the mushroom top inside and out. Allow to dry!
Using a CB604 #4 Soft Fan, apply 2 coats of PC602 White Cascade to the Skirt of the mushroom Stem. Then apply 2 coats of EL118 Blue Grotto.Allow to dry between coats!
Using a pencil, divide the mushroom top into sections with 4 rows for the 1 1/4” Sponge on Stick and 2 rows for the 3/4’” Sponge on the stick.
Pour some PC602 White Cascade onto a paper plate or glazed tile (palette).
Using the 1 ¾” Sponge on a Stick, apply dots, 2 coats of PC602 White Cascade to the top of the mushroom bottom 4 rows with ½” dots in between the previous dots. Then using the ¾” Sponge on the Stick, apply 2 rows above the previous rows. Add a dot on the very top with the 1 ¾” Sponge on a Stick.Allow to dry between coats!
Using a CB604 #4 Soft Fan, apply 2 coats of EL118 Blue Grotto to the mushroom top.Allow to dry!
Stilt and fire to shelf cone 06.
Additional Adaptations & Tips if needed.
Make sure to shake all products to mix well.
Pottery Cascades™ are moving, flowing glazes, commonly used under or over other glazes to create reactions and movement.
PC601 Clear Cascade will have more movement than PC602 White Cascade.
The Cascades can be applied over, under or in between glazes such as Elements, Jungle Gems, Foundations and Stroke & Coats.
The heavier application of the Cascades the more movement it will have.
Cascades can also be used in glaze combinations such as the plop technique.
Begin with properly fired shelf cone 04 bisque. Moisten a clean sponge and wipe bisque to remove any dust.
Using an AB 708 ¾ Flat Shader, basecoat the top of the mushroom on both sides with OS480 Garnet Red. Allow to dry!
Using a DB803 #8 Round Dry Brush, starting on the top side of the mushroom, drybrush both sides of the mushroom with OS568 Fire Thorn, then OS483 Real Red, then OS449 Bright Red.
Not cleaning the brush, continue drybrushing, moving down about a third of the way working from the red into the orange color start with OS439 Hot Orange then OS484 Permission then OS438 Orange Peel.Remember to also do the underside working from the cast hole toward the outer edge.
Now starting the final third of the mushroom, drybrush with OS588 Golden Ocher, then OS436 Gold, then OS435 Dark, then OS435 Dark Yellow.
Using an AB709 3/8 Angular Shader, shade the deep crevices of the large segments of the mushroom with OS480 Garnet Red.Allow to dry!
Using an AB 708 ¾ Flat Shader, basecoat the mushroom stem with OS467 Light Brown.
Using a DB805 #3 Fan, streak the following colors on the mushroom stem to your liking starting with OS599 Medium Taupe, then OS471 Medium Brown, then with OS472 Walnut.Allow to dry!
Using an AB 708 ¾ Flat Shader, apply 2 light coats of AS954 Matte Sealer.Allow to dry between each coat!
Using an AB706 #2 Filbert, apply dots on the top of the mushroom with AS964 No Fire Snow.
Begin with properly fired shelf cone 04 bisque. Moisten a clean sponge and wipe bisque to remove any dust.
Dilute about a quarter size amount of the Stroke & Coat® colors in separate small cups with two parts water to one part color.
Dab the diluted colors randomly over one half of the vase doing a small area at a time, and wet into wet. You want the colors to bleed into one another, so don’t do blotches of one color in select areas over the entire surface, because the color will dry before you add the two additional colors. You don’t need to wash the brush between colors.
Pick the vase up and allow the colors to move. For additional movement, gently mist the wet colors with water using a mister bottle. Be careful not to add too much water that you completely wash out the color.
Add additional dabs of diluted Stroke & Coat® in some areas to get more intense color.
On the bottom half of the vase, apply three coats of non-diluted Stroke & Coat® color of your choice with a Fan Brush. Stroke & Coat® becomes more opaque with each additional coat and will block out any drips of color on that area.
While the coats of Stroke & Coat® dry, apply optional lines of White Designer Liner following the outlines of color blotches.
When all the colors are dry, apply two coats of clear glaze over the entire tile.
Wipe a damp sponge on the surface to remove any dust.
Use a dampened fan brush to pick up Bright Yellow and apply to the bottom half of the tile. White it is still wet or damp, use the same brush (without washing) loading with Fire Engine Red and starting at the top of the tile, apply working down into the Bright Yellow. Work the brush to blend the Bright Yellow into the Fire Engine Red to create a blend and remove any defined line where the colors meet. Dampen the brush to help with blending if needed. Notice how these colors blend to create a shade of orange where the colors overlap.
If you want some depth and sparkle in your sky, use the sea sponge to dab some Clear One Brushing over the tile. You only want small areas with the clear glaze. This will leave darker, shiny spots. Do not cover the tile solid with clear.
Transfer the pattern to the tile. You can also freehand your own design.
Determine what colors you want on your cactus. Use the Snow Gems as they are designed, or you can tint them with Fundamentals Underglaze colors. Mix small amounts on the tile. Only a few drops of Fundamentals® are needed to tint. Remember, the base of Snow Gems is white, so it will always lighten the color you add to tint.
Apply two to three coats of Snow Gems in the colors of your choice to the cactus designs. Allow to dry.
Use any of the Fundamentals® Underglazes to outline and shade the cactus. Notice how Fundamentals® colors can be used right on top of Snow Gems with no fear of movement. Use the Leaf Green and detail liner brush to add come blades of grass coming up from the bottom.
Begin with properly fired shelf cone 04 bisque. Moisten a clean sponge and wipe bisque to remove any dust.
Using a CB404 #4 Pointed Round, apply 3 coats of SC005 Tiger Tail to the body of the cow. Allow to dry!
Using a CB404 #4 Pointed Round and a CB202 #2 Detail Liner, apply 3 coats of SC051 Poo Bear to the hair on the head, around the neck and the tip of the tail. Allow to dry!
Using a CB404 #4 Pointed Round, apply 3 coats of SC054 Vanilla Dip to the horns and the muzzle, then 3 coats of SC002 Melon-choly to the front of the nose. Allow to dry!
Using a CB404 #4 Pointed Round and a CB202 #2 Detail Liner, apply 3 coats of SC048 Camel Back to the inside of the ears, the feet and inside the nostrils. Allow to dry!
Using a CB202 #2 Detail liner, apply 2 coats of SC016 Cotton Tail to the eye area. Allow to dry!
Using a CB110 #10/0 Liner outline and detail the eyes with SC015 Tuxedo. Allow to dry!
Begin with properly fired shelf cone 04 bisque. Moisten a clean sponge and wipe bisque to remove any dust.
Using a CB404 #4 Pointed Round, apply 3 coats of SC001 Pink-A-Boo to the main part of the body of the Axolotl except the belly and the center part of the tail. Allow to dry!
Using a CB404 #4 Pointed Round and a CB202 #2 Detail Liner, apply 3 coats of SC100 Makin’ Me Blush to the belly. Allow to dry!
Using a CB404 #4 Pointed Round and a CB202 #2 Detail Liner, apply 3 coats of SC017 Cheeky Pinky to the sides of the tail, the spikes on the head, the inside of the mouth and to the inside of the feet and nostrils. Allow to dry!
Using a CB202 #2 Detail liner, apply 2 coats of SC016 Cotton Tail to the eye area. Allow to dry!
Using a CB110 #10/0 Liner outline and detail the eyes with SC015 Tuxedo. Allow to dry!
Begin with properly fired shelf cone 04 bisque. Moisten a clean sponge and wipe bisque to remove any dust.
Draw a rectangle starting from the top then to the middle of the tile, add a frame around the rectangle to make it look more like a window.
Apply 3 coats UG051 China White in the middle of your rectangle. Apply with a CB308 Flat Shader.
Add a pinch of AC310 Silkscreen Medium to EL143 Cactus Flower, mix with a palette knife until the mixer is as smooth as peanut butter.
Cut around the image the cat and place it smooth side down over the UG051 China White.
Using your finger apply the silkscreen mixer over the image of the cat, then remove the silkscreen.
Apply 1 coat of EL127 Rose Granite onto the cat’s nose and one coat of EL153 Caribbean Blue to the cat’s eyes. Apply with an AB701 Detailed Brush.
Apply 3 coats of EL135 Rare Earth to the frame around the window. Apply with a CB308
Draw jagged edges around the window then apply 3 coats of EL144 Dark Amethyst. Apply with an AB701 Detailed Brush.
On the edges of the window seal draw two simple flowerpots with long vines. Apply 3 coats of EL153 Caribbean Blue to the flowerpots and then apply 3 coats of EL131 Turtle Shell to the vines. Apply with an AB701 Detailed Brush.
Behind the cat apply 3 cats of EL153 Caribbean Blue to make it look like the cat is sitting on a pillow. Apply with an AB701 Detailed Brush.
With your finger apply EL144 Dark Amethyst randomly in the background, then over top apply 2 coats S2101 to only the background and where you randomly apply the EL144 Dark Amethyst. Apply with a RB106 Script Liner. The S2101 will change the color and make it appear lighter.
Begin with properly fired shelf cone 04 bisque. Moisten a clean sponge and wipe bisque to remove any dust.
Apply 3 coats of SC079 Sage Green to the back of the plate and the rim on the front. Apply with a RB144 Soft Fan.
Apply 3 coats of SC086 Old Lace to the middle of the plate. Apply with a RB144 Soft Fan.
Add a pinch of AC310 Medium Silkscreen to SC079 Sage Green.
Mix both together with a pallet knife until the texture is smooth like peanut butter.
Cut around your silkscreen image of the custom design; leave extra space around the image.
Place the custom design smooth side down in the middle of the plate over the SC086 Old Lace. It helps to tape the side down to prevent the silkscreen from moving.
With your finger rub the AC310 Medium silkscreen and SC079 Sage Green mixture over the custom image. Make sure there are no lumps and it is completely smooth.
Remove the silkscreen.
Apply stripes round the rim of the plate using SP286 Speckled Old Lace. Apply 3 coats using an AB701 Detail Brush.
Begin with properly fired shelf cone 04 bisque. Moisten a clean sponge and wipe bisque to remove any dust.
Pour SG101 Rapid Roll White into the vase, roll the glaze about and dump out the extra glaze.
Mix together a ratio of 50/50 water and SC045 My blue Heaven.
Apply 2 coats of splotches all over the vase with a CB106 Script Liner.
Repeat step 3 with SC068 Old Lace.
Once dry use your pencil to draw a big wave in the middle of the vase, then draw blossom flower all over the side and back of the vase.
Outline all the flowers, the wave, and the rim around the middle circle with one coat of FD258 Pure White.
Fill in the top of the wave by applying 2 coats of CG788 Dutch Enamelware, then apply 3 coats of SC031 The Blues to the bottom of the wave. Apply with an AB701 Detail Brush.
Mix together a ratio of 50/50 water and SC041 Brown Cow.
Apply 1-2 coats of splotches around the middle ring with a CB106 Script Liner.
On both sides of the middle ring apply 2 coats of CG795 Yadro Print. Apply with an AB701 Detail Brush.
Fill in all the flowers by apply 2 coats CG1014 Pink Plum with an AB701 Detail Brush.
Begin with properly fired shelf cone 04 bisque. Moisten a clean sponge and wipe bisque to remove any dust.
With a RB144 #4 Soft Fan Brush apply two coats of UG050 Jet Black Underglaze to the entire outside of your vase and on the interior top section of the curvy vase.
With a RB144 #4 Soft Fan Brush apply two coats of SP286 Speckled Cutie Pie Coral to the middle and bottom sections of your vase.
With a RB144 #4 Soft Fan Brush, apply two coats of SW226 Pink Pearl to the outside top and middle section, as well as the interior top section of your vase.
Kindness leaves a mark. In this Art Spark, students create small ceramic tokens using the sole of their own shoe as texture, turning something that carries them through the world into a symbol of where they’ve been, who they are, and how they show up for others. Each token becomes a wish meant to be traded, gifted, or left behind for someone else to find.
These aren’t just clay tokens; they’re tiny reminders that kindness travels.
Great For
Ceramics classrooms exploring identity, empathy, or community
School, camps & workshops focused on mindfulness and personal meaning
End-of-term projects that balance reflection with play
Quick, soulful projects for all skill levels
Clay Technique
Slab rolling & cut-out forms
Texture pressing (shoe soles, found objects)
Adding or pressing words or symbols after texturing
Optional: attach a magnet or add a hole for hanging or wearing
Simple Directions
Roll a slab of clay to about ¼” thickness.
Press the sole of your shoe firmly into the clay to create texture (sandwich clay in plastic wrap before adding pressure).
Cut out small token shapes (circles, hearts, tags, footprints, stones) from the most interesting part of the shoe impression.
Option to add a word, phrase, or symbol that represents kindness, care, or encouragement.
Smooth edges and poke a hole if the token will be worn, tied, or hung.
Opportunity to glaze leather hard clay, just one fire! (avoid glazing the back of the token if you follow this step to allow for outgassing)
Mayco Glaze Suggestions
Several Glaze lines represented. Foundations Sheer and Elements glazes work great to enhance the textures
Foundations Sheer – Soft, sheer color highlight texture from shoe soles
Elements – Inspired by aspects of nature, when applied to detail pieces, the two-tone float color will appear in the crevices.
Stroke & Coat – Bright pops of color for symbols, borders, or uplifting words
Designer Liner – Ideal for lettering
Why? These glazes work beautifully on textured surfaces and small forms, allowing the sole impressions to remain visible while the message stays strong.
Variations & Extensions
Walk a Mile Tokens: Students reflect on someone else’s experience and create a token inspired by empathy.
Kindness Trail: Leave tokens along a walking path or school route with permission.
Sole Stories: Write a short reflection on where your shoes have taken you, and where your kindness might go next.
Community Trade: Invite other schools’ art classes to exchange tokens with your students.
What happens when two faces become one? In this Art Spark, students create a simple ceramic mask by mashing up two ideas, two animals, two emotions, or a human and an animal. The result is a playful mask that explores identity, contrast, and imagination without overthinking it.
Think: half fierce / half friendly, half real / half mythical, half you / half creature.
Each mask should clearly show two ideas combined into one face. Encourage bold differences rather than subtle changes using different shapes, expressions, or textures. Masks may be wall-hung, displayed on shelves, or worn briefly for photos (after firing).
Great For
Ceramics classrooms exploring identity or symbolism
Art camps and workshops
Intro to mask-making, slab construction, and drape molding
Projects that encourage creativity without complex building
Clay Technique
Slab construction
Press or Drape molding over a simple form (foam head, bowl, or hand-built hump)
Additive details (eyes, brows, noses)
Carving simple lines and texture
Simple Directions
Roll a slab to about ¼” thickness.
Drape the slab over a simple form to create a shallow mask shape.
Divide the mask visually in half (top/bottom or left/right or diagonal).
Design each side as a different face (animal/animal, human/animal, emotion/emotion).
Add basic features using small coils or slabs, keep it simple.
Cut eye holes and smooth edges.
Bisque fire
Glaze
Glaze fire
Mayco Glaze Suggestions
Stroke & Coat – Bold, saturated colors that clearly separate the two sides
Foundations – Smooth base colors for clean facial areas
Designer Liner – Perfect for outlining eyes, mouths, and details
Jungle Gems Crystal Glazes- Fun for animals or anywhere that magic sparkle is needed
Why? These glazes allow strong color contrast so each “side” of the mash-up gets the attention it deserves.
Begin with properly fired shelf cone 04 bisque. Moisten a clean sponge and wipe bisque to remove any dust.
Using a CB604 #4 Soft Fan, apply 2 coats of PC601 Clear Cascade to the inside of the rice bowl. Allow to dry!
Start by filling the AC220 Tip and Bottle with PC602 White Cascade. Cut a small amount of the tip for the glaze to come out. Do not cut a lot of the tip off. This will cause to much glaze to come out of the tip.
Create a free hand w pattern around the top of the bowl with the PC602 White Cascade in step #2 then add a second row of w’s below the first row going in between the first row then place a straight line about 1 inch down from the second row. Allow to dry! Apply a second coat. NOTE: You can create the w’s by using a quarter a 25-cent coin to trace around with a pencil creating the w’s.
Place some SC040 Blue Berry Hill and some SC105 Tic Tac Turquoise on a paper plate (palette).
Using the ½” Sponge on a Stick, apply 2 coats of SC040 Blueberry Hill in the opening of the top row of w’s.
Using the ½” Sponge on a Stick, apply 2 coats of SC105 Tic Tac Turquoise in the opening of the second row of w’s. Allow to dry!
Using a #4 Soft Fan Brush, apply 2 coats of EL129 Slate to the top side of the bowl over everything that has been applied. Allow to dry!
Using a CB604 #4 Soft Fan, apply 1 coat of PC601 Clear Cascade to the inside of the bowl over everything. Allow to dry!
Using a CB604 #4 Soft Fan, apply 3 coats of FN009 Black to the back of the bowl. Allow to dry!
Begin with properly fired shelf cone 04 bisque. Moisten a clean sponge and wipe bisque to remove any dust.
Using a CB604 #4 Soft Fan brush, apply 3 coats of UG067 Ivory to the top of the SB105 Rimmed Dinner Plate – Stoneware.Allow to dry!
Using a CB604 #4 Soft Fan, apply 3 coats of SW501 White Gloss to the top of the SB104 Rimmed Salad Plate – Stoneware.Allow to dry!
With a pencil and AC230 Clay Carbon Paper, trace the pattern on both pieces.
Place some EZ055 Brick on a glazed tile.If needed, mix well with a palette knife.
Using a CB406 #6 Pointed Round brush, load the brush with the EZ055 Brick and apply to the flower and the leaves by doing a pressure stroke.On the flower, start from the bottom edge of the petal and pull the brush around the petal ending on the bottom of the other side.On the leaves, start the stroke from the bottom of the leaf by pressing, pulling, and lifting to a point.
Place some of the EZ010 French Brown on the glazed tile.
Using a CB110 10/0 Liner brush, outline, and detail all the leaves and flower petals with EZ010 French Brown.Add the center of the leaves using the CB202 #2 Detail Liner brush.Allow to dry!
Using a CB604 #4 Soft Fan brush, apply 3 coats of SW513 Brown Gloss to the back of each plate.Allow to dry!
Using a CB106 #6 Script Liner brush, apply 3 coats to the rim on the top of each plate.Allow to dry!
Using a CB604 #4 Soft Fan brush, apply 2 coats of SW004 Zinc Free Clear glaze to the top of the SB105 Rimmed Dinner Plate – Stoneware. Not on the rim of the plate.Allow to dry!
There is no further glazing on the SB104 Rimmed Salad Plate – Stoneware.
Make sure that the foot of each plate has been cleaned with a damp sponge to remove any glaze on the foot.
Place the plates on a clean kiln washed shelf in the kiln, making sure that they do not hang over the edge of the kin shelf to prevent warping.
Fire to shelf cone 5/6.
Additional Adaptations & Tips if needed.
Make sure to shake all products to mix well.
EZ Strokes are pure pigment compared to Fundamentals underglaze, which is more like colored slip.
It is best to place EZ strokes on a glazed tile for a palette to do brush work.
EZ Strokes can be used for more than brush work.They can be used to color low fired slip or mid-range slips.Also, can be used to color clear glaze to create a sheer type glaze.
EZ Strokes can be fired from cone 06 – 6 and some with good results to cone 10.
EZ Strokes are intermixable to create other colors.
EZ Strokes can be used on greenware, bisque, over an underglaze and even over a glazed that has not been fired.
Begin with properly fired shelf cone 04 bisque. Moisten a clean sponge and wipe bisque to remove any dust.
Using a CB604 #4 Soft Fan, apply 1 coat of SC026 Green Thumb to the toad, excluding the eyes. Allow to dry!
With a damp sponge, wipe back the SC026 Green Thumb, leaving it in the deep crevices.Allow to dry!Make sure to remove any color from the eyes.
Using a CB604 #4 Soft Fan, apply 1 coat of SC027 Sour Apple to the toad, excluding the chest and eyes.
Place some SC027 Sour Apple and SC052 Toad-ily Green on a palette.Mix the colors together.
Using a CB604 #4 Soft Fan, apply 1 coat of of the mix to the body of the toad, excluding the chest and the eyes.
Using a CB106 #6 Script liner, apply 1 coat of SC027 Sour Apple to the lip area.
Using a CB604 #4 Soft Fan, apply 2-3 coats of SP286 Speckled Old Lace to the chest area of the toad.
With a Damp sponge, sponge the body of the toad with SC105 Tic-Tac Turquoise.When sponging on the color, do not apply it solid. Allow some of the other colors exposed.Do not sponge the color on the face, lips, chest, or feet.
Using a CB604 #4 Soft Fan, apply 2 coats of SP289 Speckled Cutie Pie Coral to the feet. Allow to dry!
Using a CB106 #6 Script Liner, apply 2 coats of SP289 Speckled Cutie Pie Coral to the spots on the toad.
Using a CB106 #6 Script Liner, apply 2 coats of SC052 Toad-ily Green to the toenails.
Using a CB106 #6 Script Liner, apply 2 coats of SC042 Butter Me Up to the eye area.Allow to dry!
Using a AB709 3/8 Angular Shader, shade the corners of the eyes with SC075 Orange-A-Peel.Allow to dry!
Shade the iris of the eyes with SC041 Brown Cow. Allow to dry!
Using a CB202 #2 Detail Liner, apply 2 coats of SC015 Tuxedo to the pupil of the eyes.Using a CB110 #10/0 Liner, outline the eyes with SC015 Tuxedo.Add a highlight with SC016 Cotton Tail.Allow to dry!
Using a CB604 #4 Soft Fan, apply 1 coat of NTBR Clear One to the toad.Allow to dry!
Stilt and fire to shelf cone 06.
Additional tips:
Stroke & Coats can be mixed to create other colors.
The amount of coats applied will determine the depth of the colors..
The Speckled Stroke & Coats base color match the regular Stroke & Coats.The last two numbers of the Speckled Stroke & Coats match the regular Stroke & Coats eg.SP215 Speckled Tuxedo matches SC015 Tuxedo.
Stroke & Coats can be used as an antique by applying 1 coat of the color then wiping back with a damp sponge, then you can apply other colors over that.
Begin with properly fired shelf cone 04 bisque. Moisten a clean sponge and wipe bisque to remove any dust.
Using a CB604 #4 Soft Fan, apply 4 coats of FN301 Marshmallow White to the inside and the outside of the Butter Dish Top. Allow to dry!
Using a CB604 #4 Soft Fan, apply 3 coats of SC031 The Blues to the Butter Dish Tray. Allow to dry!
Using a CB604 #4 Soft Fan, apply 1 coat of NTBR Clear One Brushing glaze to the Butterdish Tray
Using a Pencil and AC230 Clay Carbon Paper, trace the pattern to the top of the Butter Dish Top. Make sure to center the pattern.
Using a CB202 #2 Detail Liner, apply 3 -4 coats of SC031 The Blues to the pattern BUTTER. Allow to dry.
Place some SC099 Charming onto a paper plate. Sprinkel a small amount of AC310 Silkscreen Medium on top of the SC099 Charming and mix with a palette knife blending the color to the consistency of peanut butter or toothpaste.
Cut out your choice of flower design of your choice leaving a boarder around the flower. The sunflower / daisy was used for this piece.
Center the silkscreen in the middle of the Butter Dish Top. Using your finer tip, pick up some of the SC099 Charming mix. Starting in the center of the screen, rub the color over the screen working your way the edge of the flower and leaves. Clean the silkscreen with water and allow to dry!
Place some of the following colors onto to paper plate: SC014 Java Bean, SCo26 Green Thumb, SC027 Sour Apple, SC042 Butter Me Up, SC048 Camel Back and SC097 Cant-elope.
Using a CB106 #6 Script Liner, apply 2 coats of each color to the area as follows: flower petals – SC042 Butter Me Up, flower center – SC048 Camel Back then dab some SC014 Java Bean
around the outer edge of the center, upper part of leaves – SC027 Sour Apple; lower part of the leaves and the stems – SC026 Green Thumb.
Repeat step number 7 if your color has dried up.
Reposition the flower silkscreen over the colored flower making sure to line it up.
Using your finer tip, pick up some of the SC099 Charming mix. Starting in the center of the screen, rub the color over the screen working your way the edge of the flower and leaves. Remove the screen. Clean the silkscreen with water and allow to dry!
Repeat on the other side of the Butterdish Top. Allow to dry!
Stilt and fire to shelf cone 06/05.
Additional Adaptations & Tips if needed.
Make sure that you mix the AC310 Silkscreen Medium with the product of choice well.
A Palette Knife works best to mix the Silkscreen Medium and the color together.
Do not add any water to the color mix. If the color mix is too thin, add a small amount of more medium or if to think add some more color product.
Make sure to clean the screen after use. You do not want the color mix to dry in the screen.
The easiest way to clean the screen is to place it into a container of water that is larger than the screen. You do not want to jam the screen into a container that is too small, it adds a lot of wrinkles to the screen.
Begin with properly fired shelf cone 04 bisque. Moisten a clean sponge and wipe bisque to remove any dust.
Center the mushroom top on the banding wheel.
Place some of the following colors on a plate: OS469 Light Turquoise; OS452 Purple; OS564 Pansy.
Using a AB710 ¾ Flat Shader, starting at the top of the mushroom cap, apply OS469 Light Turquoise, coming down about 1/3rd of the way while spinning the banding wheel. Next apply OS452 Purple about 2/3rds of the way down. Finally apply OS564 Pansy to the final third of the way down towards the bottom of the mushroom. Allow to dry!
Using a AB710 ¾ Flat Shader, apply OS484 Persimmon to the underside of the mushroom cap. Allow to dry!
Using a DB803 #8 Round, drybrush the underside of the mushroom cap with OS438 Orange Peel. Highlight with OS435 Dark Yellow.
Place the mushroom stem on the banding wheel.
Using a AB710 ¾ Flat Shader, apply OS596 Medium Portrait to the center section of the mushroom stem. Ap ply OS471 Medium Brown to the top and bottom of the stem blending into the OS596 Medium Portrait. Allow to dry!
Cut out both large Butterfly Silkscreens.
On a paper plate, place a small puddle of OS474 Gray. To this add a few pinches of AC310 Silkscreen Medium and mix well with a Palette Kinfe to the consistency of Peanut Butter or Toothpaste. Push the mix in a puddle.
Next, holding one of the butterfly screens centering it on the top of the mushroom cap. Using the Gray mix, screen the butterfly. Repeat on the opposite side of the cap.
Next using the other butterfly, center between the other butterfly and screen this butterfly and then repeat on the opposite side. Place the screens immediately in water after you have used the screen to prevent the color to dry in the screen.
Using a AB705 #5 Round apply OS435 Dark Yellow to the yellow butterflies. Allow to dry!
Using a AB709 3/8 Angular Shader, shade the yellow butterflies with OS438 Orange Peel.
Using a AB705 #5 Round apply OS457 Medium Blue to the blue butterflies. Allow to dry!
Using a AB709 3/8 Angular Shader, shade the blue butterflies with OS459 Bright Blue. Allow to dry!
On a paper plate. mix some OS476 Black with some AC310 Silkscreen Medium and mix well with a Palette Kinfe to the consistency of Peanut Butter or Toothpaste. Push the mix in a puddle.
Align one of the butterfly screens back over the area that was screened, hold in place and screen the OS476 Black mix starting from the center out. You may have to clean the screen between applications. Allow the screen to dry between cleanings.
Repeat for the other butterfly screen. Place the screens immediately in water after you have used the screen to prevent the color to dry in the screen and clean.
Using the end of a brush handle add dots of OS431 White on the ends of the yellow butterfly wings.
Put some AS964 No Fire Snow into a small cup, add some OS487 Olive Moss, then add a few drops of OS471 Medium brown to make a Green Brown moss color.
Using a DB804 #3 Flat, stipple the Green Brown mix to the tip of the Mushroom cap and around the bottom of the stem to simulate moss growing.
Streak some OS 487 Olive Moss in between the moss mix to simulate dome grass growing.
Using the end of a brush handle, add dot cluster of OS435 Dark Yellow petals and OS571 Curry in the centers. Allow to dry!
Using a AB710 ¾ Flat Shader apply 2 coats of AC502 Matte Sealer to both the cap and stem of the mushroom. If the sealer is applied to thick it can turn milky. If needed add a bit of water. Allow to dry!
DO NOT FIRE!
Additional Adaptations & Tips if needed.
Make sure that you mix the AC310 Silkscreen Medium with the product of choice well.
A Palette Knife works best to mix the Medium and the color together.
Do not add any water to the color mix. If the color mix is too thin, add a small amount of more Medium or if to think add some more color product.
Make sure to clean the screen after use. You do not want the color mix to dry in the screen.
The easiest way to clean the screen is to place it into a container of water that is larger than the screen. You do not want to jam the screen into a container that is too small, it adds a lot of wrinkles to the screen.
Begin with properly fired shelf cone 04 bisque. Moisten a clean sponge and wipe bisque to remove any dust.
Center the mushroom top on the banding wheel.
Place some of the following colors on a plate: SC097 Cant-elope; SC102 Just Peachy; SC055 Yella Bout It.
Using a CB604 #4 Soft Fan Brush, starting at the top of the mushroom, apply 2-3 coats of SC055 Yella Bout It, coming down about 1/3rd of the way while spinning the banding wheel. Next apply SC102 Just Peachy about 2/3rds of the way down. Finally apply SC097 Cant-elope to the final third of the way down towards the bottom of the mushroom. Allow to dry.
Using a CB604 #4 Soft Fan Brush, apply 3 coats of SC097 Cant-elope to the inside of the mushroom top. Allow to dry.
Using a CB604 #4 Soft Fan Brush, Apply 1 coat of SC080 Basketball to the top textured section of the mushroom stem. Wipe back with a damp sponge leaving the color in the crevices. Allow to dry!
Using a CB604 #4 Soft Fan Brush, apply 2 coats of SC097 Cant-elope to textured part of the stem. Allow to dry!
Using a CB604 #4 Soft Fan Brush, apply 3 coats of SP254 Speckled Vanilla Dip to the rest of the stem. Allow to dry!
Cut out the Flower, Lady Bug, Butterfly, and a section of the Grass Silkscreen.
On a glazed tile, place a small puddle of NTBR Clear One. To this add a small amount of Jell Food Coloring and a few pinches of AC310 Silkscreen Medium and mix well with a Palette Knife to the consistency of Peanut Butter or Toothpaste. Push the mix in a puddle.
Starting with the Grass silkscreen, apply to the bottom of the stem going all the way around then to the bottom edge of the mushroom top.
Next, apply the flower centering it around the top in 3 places followed by the butterfly’s and the lady bugs. Also, the tall flower on the stem. Make sure to clean the silkscreens, do not allow color to dry in them. Allow to dry.
Using a brush for the size of the area, apply 2 coats of each color to the following areas: Flower – SC023 Jack O’Lantern, Center SC024 Dandelion; Lady Bug – SC073 Candy Apple Red; Butterfly – SC011 Blue Yonder, high light with some SC076 Carra-bien Blue: Leaves – top part SC027 Sour Apple, lower part SC052 Toad-ily Green. Grass- using a DB804 #3 stipple the area with SC043 Lettuce Alone.
On a glazed tile mix some SC026 Green Thumb with some AC310 Silkscreen Medium and mix well with a Palette Knife to the consistency of Peanut Butter or Toothpaste. Push the mix in a puddle.
Align the grass screen back over the area that was screened before on both the top and stem. Apple the SC026 Green Thumb mix. You may have to clean the screen between applications. Allow the screen to dry between cleanings.
On a glazed tile mix some SC015 Tuxedo with some AC310 Silkscreen Medium and mix well with a Palette Knife to the consistency of Peanut Butter or Toothpaste. Push the mix in a puddle.
Align the other screens and screen each with the black mix. You may have to clean the screen between applications. Allow to dry!
Using the end of a brush handle add dots of SC011 Blue Yonder, SC016 Cotton Tail and SC055 Yella Bout it in the grass areas to create small flowers. Allow to dry!
Using a CB604 #4 Soft Fan Brush, apply 1 thin coat of NTBR Clear on to each piece. Be careful when brushing the clear glaze not to smear the SC015 Tuxedo. Allow to dry!
Wipe down bisque pieces with a damp sponge to remove any dirt/dust.
Apply two coats of SW106 Alabaster with a RB144 #4 Soft Fan brush to the face of the plate.
Shake the remaining glaze colors well and pour each into a section of the paint pouring cup.
Pour out about half the paint pouring cup onto the face of the plate and tip/turn until the face of the plate is covered.
Using the remaining glaze in the pouring cup, pour the glaze over the whole vase. Excess glaze poured off the plate may be used to fill in any uncovered areas on the vase.
Allow glazes to dry.
Wipe back any glaze that may have gotten on the bottom of the pieces using a damp sponge.
Begin with properly fired shelf cone 04 bisque. Moisten a clean sponge and wipe bisque to remove any dust.
Apply 3 coats of EG005 Black Engobe to the outside, bottom, and handle of the mug. Apply using a RB140 #8 Soft Fan brush.
After applying the Engobe fire the piece to Cone 04.
Apply 3 coats of SP209 Speckled Jaded to the inside of the mug. Apply with a RB140 #8 Soft Fan brush.
Mix a 1:1 ratio of SP209 Speckled Jaded and SW420 White Melt Gloop.
Apply 3 to 4 coats going halfway down the mug and handle, making sure to really build up the bottom edge of the glaze line. Apply with a RB140 #8 Soft Fan brush.
Begin with properly fired shelf cone 04 bisque. Moisten a clean sponge and wipe bisque to remove any dust.
Apply 3 coats of EG006 Sparkle Black Engobe to the outside, bottom, and handle of the mug. Apply with a RB140 #8 Soft Fan brush.
When the shine is gone, use a paper napkin to buff the EG006 Sparkle Black Engobe to achieve more sparkles.
After applying the Engobe fire the piece to Cone 04.
Apply 3 coats of SC015 Tuxedo to the inside of the mug. Apply with a RB140 #8 Soft Fan brush.
Mix a 1:1 ratio of CG753 Sassy Orange and SW420 White Melt Gloop.
Apply 3 to 4 coats going halfway down the mug and handle, making sure to really build up the bottom edge of the glaze line. Apply with a RB140 #8 Soft Fan brush.
Begin with properly fired shelf cone 04 bisque. Moisten a clean sponge and wipe bisque to remove any dust.
Apply 3 coats of EG005 Black Engobe to the outside, bottom, and handle of the mug. Apply using a RB140 #8 Soft Fan brush.
After applying the Engobe fire the piece to Cone 04.
Apply 3 coats of SC015 Tuxedo to the inside of the mug. Apply with a RB140 #8 Soft Fan brush.
Mix a 1:1 ratio of CG1011 Frosted Berries and SW420 White Melt Gloop.
Apply 3 to 4 coats going halfway down the mug and handle, make sure to really build up the bottom edge of the glaze line. Apply with a RB140 #8 Soft Fan brush.
Wipe down bisque pieces with a damp sponge to remove any dirt/dust.
Using the RB144 #4 Soft Fan brush, apply three coats of FN304 Black Velvet to the inside of the mug, the top 1” of the outside of the mug, the center face of the plate, and the outside of the bowl, including the bottom of the pieces.
Apply two coats of SP286 Speckled Old Lace to the outside of the mug, inside of the bowl, and rim of the plate, avoiding the matte black.
To create the animal print, use two coats of SC105 Tic-Tac-Turquoise, a RB106 #6 Script Liner brush, and the ‘1-1-2’ formula: 1 large wonky “C” shape, followed by one medium shaped “C” or filled in blob, followed by two smaller blob dots. Continue until the space is filled. Add more dots/blobs as needed.
Wipe down bisque pieces with a damp sponge to remove any dirt/dust.
Using the RB144 #4 Soft Fan brush, apply three coats of SW140 Black Matte to the inside of the mug, the top 1” of the outside of the mug, the center face of the plate, and the outside of the bowl.
Apply two coats of EG005 Black Engobe to the back of the plate, foot of the mug, and foot of the bowl.
Apply two coats of SP286 Speckled Old Lace to the outside of the mug, inside of the bowl, and rim of the plate, avoiding the matte black.
To create the animal print, use two coats of SC105 Tic-Tac-Turquoise, a RB106 #6 Script Liner brush, and the ‘1-1-2’ formula: 1 large wonky “C” shape, followed by one medium shaped “C” or filled in blob, followed by two smaller blob dots. Continue until the space is filled. Add more dots/blobs as needed.
Begin with properly fired shelf cone 04 bisque. Moisten a clean sponge and wipe bisque to remove any dust.
Using an AB710 ¾ Flat Shader, basecoat the bunny head with OS489 Saddle Brown.Allow to dry!
Using a DB803 #8 Round, drybrush the bunny head with OS471 Medium Brown, then with OS467 Light Brown. Do not wash the brush between colors.Just go from one color to the next that are in the same tones. Highlight the bunny head with OS432 Ivory, then some OS431 White.
Using a DB803 #8 Round, drybrush the bunny cheeks and muzzle with OS432 Ivory the with OS431 White.
Using a DB803 #8 Round, drybrush inside the bunny’s ears, cheeks and nose by picking up some OS597 Rich Peach and some OS431 White on the brush at the same time making the peach lighter.If needed add a bit more OS431 White.
Using an AB710 ¾ Flat Shader and an AB 705 #5 Round, basecoat the bow with OS564 Pansy.Allow to dry!
Using a DB803 #8 Round, drybrush the bow with OS591 Dusty Violet then OS452 Purple.Highlight with OS450 Lilac and some OS431 White.
Using an AB710 ¾ Flat Shader and an AB 705 #5 Round, basecoat the collar with OS558 Mimi Pink.Allow to dry!!
Using a DB803 #8 Round, drybrush the collar with OS444 Light Pink, then with OS589 Pink, and then some OS431 White.
Using an AB705 #5 Round, basecoat the eyes with OS431 White.Allow to dry!!
Using an AB705 #5 Round, apply OS457 Medium Blue for the iris of the eyes, shade the iris using an AB709 3/8 Angular Shader with OS459 Bright Blue.
Using an AB705 #5 Round, apply OS476 Black to the pupil of the eyes. Allow to dry!!Add a highlight of OS431 White to the eyes.
Using an AB702 10/0 Liner, outline the eyes and add eyelashes with OS476 Black.
Using an AB702 10/0 Liner, paint stripes on the bow with OS431 White.
Using a Stylus Tool, add dots on the collar with OS431 White and OS564 Pansy.Allow to dry!!
Using an AB710 ¾ Flat Shader, apply 2 light coats of AS954 Matte Brush-on-Sealer to the whole piece. Allow to dry!!
Using an AB705 #5 Round, apply 2 coats of AS953 Gloss Brush-on-Sealer to the eyes.Allow to dry!
Using an AB702 10/0 Liner, apply 2 coats of SG880 Crystal Brush -on-Glitter to the stripes on the bow and the dots on the collar.
Allow to dry completely. DO NOT Fire!!
Tree Ring
Begin with properly fired shelf cone 04 bisque. Moisten a clean sponge and wipe bisque to remove any dust.
Using a CB604 #4 Soft Fan, apply 1 coat of SC002 Melon-choly to the tree ring.Allow to slightly dry.With a damp sponge wipe back the color leaving it in the deep crevices.Allow to dry!
Using a CB602 #2 Soft Fan, apply 3 coats of SC002 Melon-choly to all the wells in the tree ring.
In a cup, mix 2 parts of FN049 Flamingo with 4 parts NTBR Clear One.Mix well!
Using a CB604 #4 Soft Fan, apply 3 coats of the mix to the whole tree ring.Allow to dry!
Begin with properly fired shelf cone 04 bisque. Moisten a clean sponge and wipe bisque to remove any dust.
Apply 3 coats of EG005 Black Engobe to the outside, bottom, and handle of the mug. Apply using a RB140 #8 Soft Fan brush.
After applying the Engobe fire the piece to Cone 04.
Apply 3 coats of SC015 Tuxedo to the inside of the mug. Apply with a RB140 #8 Soft Fan brush.
Mix a 1:1 ratio of S2708 Oriental Carmel and SW420 White Melt Gloop.
Apply 3 to 4 coats going halfway down the mug and handle, making sure to really build up the bottom edge of the glaze line. Apply with a RB140 #8 Soft Fan brush.
Begin with properly fired shelf cone 04 bisque. Moisten a clean sponge and wipebisqueto remove any dust.
Apply 3 coats of FN009 Black to the back of the plate then apply 2 coats to the top of the plate. Apply with a CB618 Fan Brush.
Apply 2 coats of EL117 Waterfall to the top of the plate. Apply with a CB618 Fan Brush.
With a round sponge on a stick apply 2 coats of dots of PC601 ClearCascade, make sure the dots are close together. Where there is blank space between the dots apply 1 coats of smaller dots with a CB106 Script Liner.
Begin with a tile fired to cone 04 bisque. Lightly moisten a clean sponge and wipe the bisque to remove any dust.
Using a pencil, lightly sketch a scribble monster design, keeping the body large enough to cover most of the tile. Add expressive eyes and a mouth, then draw a horizontal line near the bottom of the tile to separate the foreground from the background.
Use Black Licorice French Dimensions to outline your pencil design. Apply generously so the French Dimensions appear raised and very dimensional. Allow to dry completely.
Using a script liner brush (you can use a liner brush for tight spaces if needed), apply 3 generous coats of Sunkissed to the background. Do not apply this color below the horizontal line you drew.
Using a script liner brush, puddle or pool a generous amount of Purple Reign to the bottom half of the monster body, and puddle or pool Monet’s Pond to the top half of the monster’s body.
Try to avoid the eyes or mouth area.
The French Dimension lines will act as a dam to keep the Jungle Gems glaze contained within the monster body.
Using a clean brush, gently blend the two colors together with back-and-forth strokes, leaving the top ¼ and bottom ¼ of the monster undisturbed. This will create a blend or an intermediate color.
Use a liner brush to carefully work glaze up next to the French Dimensions lines where needed.
Using the script liner brush, apply puddle Cloverfield to the base of the tile up to the Sunkissed to represent the foreground.
Using a script liner or detail liner, apply 2 coats of Cotton Tail to the eyes and teeth.
Wipe down bisque with a damp sponge to remove any dirt/dust.
Using a pencil, lightly sketch out the sun and moon combo.
Using a AB701 1/0 Detail brush, follow the sketched lines with AC302 Wax Resist.
Apply two coats of EG006 Sparkle Black Engobe to the whole outside of the cup and handle, avoiding the sun/moon. Use the RB106 #6 Script Liner brush to outline the sun/moon, and the CB604 #4 Soft Fan brush to fill out the rest of the cup.
Using the AB701 1/0 Detail brush, apply two thick coats of SC006 Sunkissed to the sun side of the face and alternating every other sun spike around the outside.
Using the AB701 1/0 Detail brush, apply two thick coats of SC105 Tic-Tac-Turquoise to the moon side and remaining spikes around the outside.
Create random stars around the mug with the AB701 1/0 Detail brush and AC302 Wax Resist.
Fill in the stars with two thick coats of SP286 Speckled Old Lace using the AB701 1/0 Detail brush.
Wax lines around the bottom and top of the mug to create a foot and lip line of glaze using the RB106 #6 Script Liner brush.
Fill in the lines from step 9 with two thick coats of SP2105 Speckled Tic-Tac-Turquoise using the RB106 #6 Script Liner brush.
Using the CB604 #4 Soft Fan brush, apply two coats of SP286 Speckled Old Lace to the inside of the mug.
Begin by wiping down the bisque with a damp sponge to remove any dirt/dust.
When the plate is dry, transfer the pattern using the AC230 Clay Carbon Paper and a pen.
Fill in the following areas with three coats of the following colors:
Elephant adornments: SP289 Speckled Cutie Pie Coral for the main parts of the adornments and accents of SP2105 Speckled Tic-Tac-Turquoise for the trim and dots. Using the CB106 #6 Script Liner brush.
Elephant Body: EL146 Raincloud on the body and EL101 Oyster Shell on the tusks and toes. Using the CB106 #6 Script Liner brush.
Background: SP286 Speckled Old Lace. Use the CB106 #6 Script Liner brush to outline the elephant, and the RB144 #4 Sot Fan brush to fill in the rest of the background.
Back of plate: EL101 Oyster Shell using the RB144 #4 Soft Fan brush.
Carefully outline all of the colors and line work with a RB110 10/0 Detail Liner brush and SC015 Tuxedo.
Begin with properly fired shelf cone 04 bisque. Moisten a clean sponge and wipe bisque to remove any dust.
Using a CB604 #4 Soft Fan brush, apply 2 coats of SC051 Poo Bear to the whole body except for the nose, chest, and mouth. Apply an additional one coat to the eyes using an AB701 1/0 Detail brush.
Apply 3 coats of SC086 Old Lace to the mouth and chest using a CB604 #4 Soft Fan brush.
Apply 2 coats of EL212 Spotted Walnut over SC051 Poo Bear on the whole body, except for the eyes, nose, and chest. Apply with a CB604 #4 Soft Fan brush.
Apply SG401 Black Designer Liner to outline and fill in the mouth, nose, eyes, and tip of the tail.
At random, apply lines of SG405 Green Designer Liner and SG409 Bright Green Designer Liner coming up from the bottom to create grass. Apply one coat.
Apply 3 to 4 small dots near each other to make flower petals on top of the grass, using one coat of SG408 Orange Designer Liner and SG410 Bright Blue Designer Liner. In the middle of each flower, apply one dot of SG407 Yellow Designer Liner.
Apply 2 coats of S2101 Crystal Clear brushing glaze to the face, grass, tail, and the bottom of the cat using the CB604 #4 Soft Fan brush.
Begin with properly fired shelf cone 04 bisque. Moisten a clean sponge and wipe bisque to remove any dust.
With a pencil, draw the head and neck of a giraffe in the middle of the platter.
Apply SC046 Rawhide on the giraffe’s head. Apply 3 coats using a CB106 #6 Script Liner brush. Do not apply to the neck.
Apply SW128 Cordovan on the giraffe’s neck. Apply 3 coats using a CB106 #6 Script Liner brush. Do not apply to the head.
From the antlers down to the mouth, apply one coat of SC025 Crackerjack Brown in a dapping motion using a dry DB804 #3 Flat brush.
Outline the eye and fill in the mane with 3 coats of SC025 Crackerjack Brown. Apply with a AB701 1/0 Detail liner.
On the top of the antlers, eyeballs, inside the ears, and nose apply 3 coats of SC034 Down To Earth. Apply with a AB701 1/0 Detail liner.
Apply SW131 Birch over top of SW128 Cordovan on only the neck. Apply 3 coats using a CB106 #6 Script Liner brush.
Apply 2 coats of SC025 Crackerjack Brown for the Giraffe’s spots on the cheek and going a little down the neck with slight overlapping. Apply with a CB106 #6 Script Liner brush.
Apply 3 coats of SW408 White Flux for the Giraffe’s spots on his neck, slightly overlapping the SC025 Crackerjack Brown spots. Apply with a CB106 #6 Script Liner brush.
Outline the whole Giraffe including the smile, nose, ears, eyelashes, and wrinkles. Apply with a SG406 Brown designer liner, one coat.
For the background of the giraffe, apply 3 coats of SW136 Weathered Blue and then 3 coats of SW105 Frost Blue over top. Apply with a CB106 #6 Script Liner brush.
For the rim of the platter, apply 3 coats of SW128 Cordovan and 3 coats of SW131 Birch. In between each notch, apply 2 coats of SW408 White Flux.
On the back of the platter, apply 3 coats of SW131 Birch with a CB618 #8 Soft fan brush.
Wipe off any glaze on the bottom rim to ensure it does not stick to the shelf.
Begin with properly fired shelf cone 04 bisque. Moisten a clean sponge and wipe bisque to remove any dust.
Apply 3 coats of SC016 Cotton Tail to the outside, bottom, handle, and inside of the mug. Apply with a RB144 #4 Soft Fan brush.
Using a pencil, draw on large drips coming from the top, then add more drips inside the large drips until you fill it in completely.
In any order apply 3 coats SP286 Speckled Old Lace, SP289 Speckled Cutie Pie Coral, and SP2105 Speckled Tic-Tac-Turquoise in each drip. Apply with an AB704 #3 Round brush.
Apply tape in vertical and horizontal lines between and under the drips.
Apply SC105 Tic-Tac-Turquoise, 3 coats in between the lines of tape, apply with an AB704 #3 Round brush.
Begin with properly fired shelf cone 04 bisque. Moisten a clean sponge and wipe bisque to remove any dust.
Draw a large rectangle in the middle of the plate. At the top and sides of the rectangle, add rectangles and round lines to make it look more like a house.
Add 3 horizontal rectangles on top of each other in the middle of the large rectangle.
The top rectangle will be filled in with 3 coats of SP2105 Speckled Tic-Tac-Turquoise and will have the word “YOU” in the middle with 3 coats of SC286 Old Lace. Apply with an AB704 #3 Round brush.
The middle rectangle will be filled in with SP286 Speckled Old Lace and will have the word “BELONG” with 3 coats of SC089 Cutie Pie Coral. Apply with an AB704 #3 Round brush.
The bottom rectangle will be filled in with SP289 Speckled Cutie Pie Coral and will have the work “HERE” with 3 coats of SC105 Tic-Tac-Turquoise. Apply with an AB704 #3 Round brush.
With a pencil make as many small squares and rectangles as you’d like inside of the lager rectangle to fill in the rest of the space. Then fill in all shapes with SC086 Old Lace, SC089 Cutie Pie Coral, and SC105 Tic Tac Turquoise. Apply 3 coats with an AB704 #3 Round brush.
Fill in every shape with stripes, dots, tress, hearts, or any designs that will fit into the shapes. Apply 3 coats of SP286 Speckled Old Lace, SP289 Cutie Pie Coral, SP2105 Tic-Tac-Turquoise using an AB701 1/0 Detail brush.
On the outside of the large rectangle apply dots of SC086 Old Lace, SC089 Cutie Pie Coral, SC105 Tic-Tac-Turquoise, SP286 Speckled Old Lace, SP289 Speckled Cutie Pie Coral, SP2105 Speckled Tic-Tac-Turquoise. Apply one coat with an AB704 #3 Round brush.
With SG402 White Designer Liner, outline every shape in the large rectangle and the words. Apply one coat.
Apply 2 coats of S2102 Crystal Clear Brushing to the entire front and back of the plate using the RB144 #4 Soft Fan brush.
Begin with properly fired shelf cone 04 bisque. Moisten a clean sponge and wipe bisque to remove any dust.
In a small cup, place 2 teaspoons of UG057 Spice Brown and 1 teaspoon of UG030 Sand. Mix well.
Using a CB425 #1/2” Oval, apply the UG-mix to the fur areas of the bunny heads, make sure to get into the crevices. Allow to dry!
With a damp Synthetic Sponge, wipe the UG- mix off the fur of the bunny heads leaving the color in the crevices. If you wipe out too much color just reapply and wipe. Allow to dry!
Left bunny head collar, using a CB406 #6 Pointed Round, apply 3 coats of UG216 Peach. The bow, apply 3 coats of UG082 Tuscan Turquoise. Apply dots of UG082 to the collar then a dot of UG051 China White in the center of it.
Middle bunny head collar, using a CB406 #6 Pointed Round, apply 3 coats of UG222 Soft Yellow. The bow, apply 3 coats of UG092 Lilac. Apply dots of UG092 Lilac to the collar then a dot of UG051 China White in the center of it.
Right Bunny Head collar, using a CB406 #6 Pointed Round, apply 3 coats of UG068 Apple Green. The bow, apply 3 coats of UG203 Squash Yellow. Apply a dots of UG203 Squash Yellow to the collar then a dot of UG051 China White in the center of it.
Using a CB202 #2 Detail Liner, apply 3 coats of UG215 Blush to the noses and inside the ears.
Using a CB406 #6 Pointed Round, apply 3 coats of UG051 China White to the muzzle.
Left bunny, using a AB708 3/8 Angular Shader, shade the collar with EZ030 Rose. Shade the bow with EZ027 Blue Turquoise.
Middle bunny, using a AB708 3/8 Angular Shader, shade the collar with UG087 Regal Purple. Shade the collar with EZ034 Orange.
Right bunny, using a AB708 3/8 Angular Shader, shade the collar with EZ 028 Leaf Green. Shade the bow with EZ058 Poppy Orange.
Using a AB708 3/8 Angular Shader, shade the ears and nose’s with EZ030 Rose.
Using a silk sponge, sponge the cheeks lightly with UG215 Blush.
Using a CB425 ½” Oval, drybrush the bunny’s body a couple of coats with UG030 Sand. Allow to dry.
Using a CB460 #6 Pointed Round, highlight the edge of the bunny’s ears and around the eyes with UG051 China White.
Using a CB202 #2 Detail Liner, apply 2 coats of UG051 China White to the eyes. Allow to dry!
Using a CB202 #2 Detail Liner, apply 2 coats of EZ031 To the iris of the eyes. Add a dot of UG051 China White for the highlight in the eyes. Allow to dry!
Using a AB708 3/8 Angular Shader, shade the iris’s with EZ035 Dutch Blue.
Using a CB110 #10/0 Liner, outline the eyes and add eye lashes to all the eyes. Allow to dry!
At this point you could fire the piece to shelf cone 04 to set the colors or continue to the glazing.
Using a CB604 #4 Soft Fan, apply 2 coats of NTBR Clear Glaze to the entire piece. Be careful when applying the first coat not to smear the colors. Allow to dry.
Stilt and fire to shelf cone 06.
Additional Adaptations & Tips if needed.
EZ Stroke’s are intense pigment and high-definition Translucent Underglazes. Perfect for brushwork and antiquing, helping you achieve the look of watercolor or detailed shading.
EZ Strokes can be used on clay, greenware, bisque or on unfired glazes such as Stroke & Coat, Foundations, Stoneware gloss glazes. Also, can be applied on top of Fundamental Underglazes.
EZ Strokes und used on clay, greenware, bisque or on Fundamentals fires matte. Clear glaze can be used to have a gloss finish.
EZ Strokes can be used to tint slip to make colored slips and used to tint clear glaze to create transparent colored glazes like Foundations Sheer’s
Challenge students to become texture adventurers! By pressing, rolling, or stamping found textures into clay, they’ll transform everyday objects into surfaces full of character.
Students will use textured slabs to build a small sculpture or vessel, celebrating the beauty of patterns.
Collect found textures—leaves, bark, lace, burlap, coins, or other classroom-safe objects.
Sketch a quick design showing placement of textures and slab sections.
Roll a slab of clay to about ¼” thickness.
Press textures firmly into the clay surface.
Cut shapes or panels from the textured slabs.
Assemble into a small vessel, box, or abstract sculpture using scoring and slipping.
Smooth edges and refine form.
Allow to dry, bisque fire, glaze, and glaze fire.
The challenge: Their final clay piece must use only textures pressed from these finds—no added drawn lines or smooth surfaces. (This constraint pushes creativity and problem-solving.)
Why Stroke & Coat Glazes Art Perfect for Textures Sculptures
Stroke & Coat works beautifully on textured clay, delivering bold color and crisp details. Because Stroke & Coat colors can be mixed together, students can invent their own colors—making every piece as unique as the artist who created it.
Variations & Extensions
Create a collaborative “texture wall” by combining slabs from the whole class.
Assign themes: “natural textures,” “urban textures,” or “fabric textures.”
Pair with a sketchbook exercise where students make rubbings of textures they find before pressing them into clay.
Form
Clay body of choice
Colors
Stroke & Coat
Miscellaneous Accessories
Rolling Pin or slab roller
Assorted found textures or texture plates (natural or household items)
Invite students to sculpt a small, lidded box that hides something special inside. Whether it is a symbolic treasure or a keepsake, these boxes combine function with imagination. The challenge: design a container with personality while making sure the lid fits snugly!
Great For
Ceramics classrooms exploring form & function
Camps or studio workshops with storytelling themes
Projects about symbolism, identity, or “hidden meanings”
Simple Directions
Begin by creating a small base form (pinch pot, slab cube, or cylinder).
Construct a fitted lid (flat, domed, or sculpted). Test fit and adjust while clay is soft.
Add surface textures, carved designs, or sculpted details that hint at what the box might “hold.”
Optional: sculpt a small clay object to place inside.
Dry completely, bisque fire, glaze, and glaze fire.
Design Plan: Each student designs a lidded box that tells a story. The outside can hint at what’s inside—through texture, symbols, or sculpted details—while the inside stays a private space for something meaningful. Tip: Skip the glaze where the lid and base touch so they will still fit together nicely after firing.
Mayco Glaze Suggestions: Mayco’s Fundamentals Underglazes are ideal for this project and your classroom. They provide solid coverage on wet clay, greenware, or bisque and can be left matte or finished with a clear glaze for shine. Blend, mix, or thin them for watercolor effects. They are perfect for creating contrast on the Hidden Compartment Box. Matte areas enhance the mystery, while glossy sections add polish. Class packs of our most popular colors are available.
Variations & Extensions
Have students sculpt a matching object that fits inside their box.
Explore cultural traditions of lidded vessels (Japanese tea caddies, African reliquary boxes, etc.).
Create a collaborative “Cabinet of Curiosities” display with all the boxes arranged together.
Begin with properly fired shelf cone 04 bisque. Moisten a clean sponge and wipe bisque to remove any dust.
Using the CB604 #4 Soft Fan brush, apply 2 coats of EG006 Sparkle Black Engobe to the rim and bottom of the bottom of the plate. Gently rub the Sparkle Black Engobe between coats, revealing the sparkles.
Fill the AC220 Detail Bottles with SW503 Orange Gloss, SW506 Bright Blue Gloss, and SW510 Blue Gloss.
Apply a pattern of dots around the rim of the plate. Apply a second coat of doats for more dimension.
Brush 2 coats of SW510 Blue Gloss on the center of the plate. Allow to dry between coats.
Randomly brush a thick coat of SW503 Orange Gloss and SW506 Bright Blue Gloss on the center of the plate. While wet, take a sponge and dab the center of the plate, removing some of the SW503 Orange Gloss and SW506 Bright Blue Gloss, revealing the SW510 Blue Gloss glaze.
Begin with properly fired shelf cone 04 bisque. Moisten a clean sponge and wipe bisque to remove any dust.
Fill AC220 Detailer and Tip Bottle with SW223 Milk Glass.
Using the Detail Bottle, apply SW223 Milk Glass in a V pattern in horizontal row on the outside of the Latte Cup. Glaze another row of the V pattern directly below the first row leaving some space in between. Repeat 3 times for a total of 5 rows.
Brush 3 coats of SW224 Tropical Teal on the inside of the Latte Cup. Allow to dry between coats.
Brush 3 coats of SW224 Tropical Teal on the outside of the Latte Cup, receding the coats from the bottom. Allow to dry between coats.
Apply 3 coats of Marine Blue or Fire Engine Red in bands to the top 1/2”, the first indent, second indent, and bottom 1/2” . You can glaze the bottom of the piece.
Apply 3 coats of Snow Gems to the unglazed bands.
Top to bottom:
SG303 Citrus Snow Gem
SG304 Berry Snow Gem
SG305 Spearmint Snow Gem
Apply 2-3 coats of SW001 Stoneware Clear to the inside of the vase. You can water down the clear to roll on the inside to evenly coat.
Begin with properly fired shelf cone 04 bisque. Moisten a clean sponge and wipe bisque to remove any dust.
Brush 1 coat of EG006 Sparkle Black Engobe on the bottom 1/3 of the mug’s outside. Allow to dry.
Using your finger, gently rub/buff the EG006 Sparkle Black Engobe, exposing the sparkles.
Repeat steps 1 and 2.
Brush 5 coats of SC006 Sunkissed on the top 2/3 of the mug’s outside.
At approximately 1 ½ inches below the top of the mug, brush 2 coats of SC050 Orange Ya Happy creating a band approximately 1 ½ inches wide. The SC006 Sunkissed should be exposed above and below the band of SC050 Orange Ya Happy.
Brush 1 coat of SC073 Candy Apple Red over the bottom exposed band of SC006 Sunkissed. The SC073 Candy Apple Red should touch the edge of the SC050 Orange Ya Happy and the edge of the EG006 Sparkle Black Engobe.
Brush 3 coats of SW515 Aqua Gloss on the inside of the mug. Allow to dry between coats.
Brush 1 coat of SW515 Aqua Gloss on the outside of the mug’s top 2/3 covering the Stroke and Coats, leaving the EG006 Sparkle Black Engobe exposed.
With low-fire terra cotta pots from garden centers, you will use the natural color of the pot. If you are working with stoneware, you can color the background with Terracotta Engobe. Apply three coats to the entire surface, except the bottom. Apply only two coats to the bottom. Applying more than two coats can cause sticking to kiln washed shelves.
Determine the design and lightly sketch outlines if desired.
Determine what colors you want on your cactus or mushrooms. Use the Snow Gems as they are designed, or you can tint them with Stroke & Coat colors. Mix small amounts on the tile. Only a few drops of Stroke & Coat are needed to tint. Remember, the base of Snow Gems is white, so it will always lighten the color you add to tint.
Apply two to three coats of Snow Gems in the colors of your choice to the cactus or mushroom designs. Allow to dry.
Use any of the Stroke & Coat colors to outline and shade the cactus or mushrooms. Notice how Stroke & Coat colors can be used right on top of Snow Gems with no fear of movement. Use a damp brush to blend any harsh edges of color. Add dots or patterns. Use the Just Froggy and detail liner to add come blades of grass coming up from the bottom.
The top clay pot has drips of color coming down from the top. This was done by dabbing large amounts of Stroke & Coat colors of choice to the top edge and allowing it to run down before firing. Stroke & Coat does not move on low fire bodies and will have slight movement on stoneware.
Dilute a small amount of Tuxedo with water and use the stiff fan brush to speckle the surface of the pots.
Fire to cone 06.
Additional Adaptations and Tips:
The pots shown in this method are clay pots purchased at a garden center and were low fired to cone 06. This same method could be done on stoneware shapes as well.
Form
Terra cotta pots from a garden center
Optional stoneware shape of choice
Colors
SG303 Spearmint
SG304 Berry
SG305 Citrus
SC008 Just Froggy
SC074 Hot Tamale
SC006 Sunkissed
SC014 Java Bean
SC097 Cant-elope
SC011 Blue Yonder
SC008 Just Froggy
SC015 Tuxedo
SC027 Sour Apple
NT-BR Clear One Brushing
EG007 Terracotta Engobe (if working with stoneware)
Begin by making three solid clay cylinders, each gradually smaller than the last to create the bodies of the sheep. Create a cylinder roughly a quarter the size of the largest cylinder to create the head of the biggest sheep. Repeat this process for the other two sheep.
Cut all cylinders in half and use the loop/carving tool to hollow out the bodies and heads of the sheep. Cover and set the excess clay aside. Score and slip all the cylinders back together, making sure to vent the parts by poking a hole between the attachment for the head and body, and another hole in the bottom of the belly of the sheep.
Roll coils about the thickness of your thumb and cut them to sizes to create the legs. Score and slip these to the bodies of the sheep.
Begin rolling small balls of clay from the excess that was set aside. Cut each ball in half and score and slip to the sheep to create the appearance of fluffy wool. Continue this process until the whole sheep is covered, leaving most of the face uncovered. If horns are desired, roll a thick tapering coil, and cut in half. Bend to shape and score and slip and attach to the head.
Allow sheep to fully dry and bisque fire to cone 04.
For the largest sheep: Apply three coats of SG305 Spearmint Snow Gem to the fluffy part of the body. Using a smaller brush, apply three coats of SC011 Blue Yonder to the legs, and three coats of SC027 Sour Apple to the face. Add three coats of SC015 Tuxedo to the hooves and horns.
For the medium sheep: Apply three coats of SG304 Berry Snow Gem to the fluffy part of the body. Using a smaller brush, apply three coats of SC073 Candy Apple Red to the legs, and three coats of SC033 Fruit of the Vine to the face. Add three coats of SC015 Tuxedo to the hooves.
For the smallest sheep: Apply three coats of SG303 Citrus Snow Gem to the fluffy part of the body. Using a smaller brush, apply three coats of SC077 Glo-worm to the legs, and three coats of SC075 Orange-a-Peel to the face. Add three coats of SC015 Tuxedo to the hooves.
Students will use textured slabs to build a small sculpture or vessel, celebrating the beauty of patterns.
Collect found textures—leaves, bark, lace, burlap, coins, or other classroom-safe objects.
Sketch a quick design showing placement of textures and slab sections.
Roll a slab of clay to about ¼” thickness.
Press textures firmly into the clay surface.
Cut shapes or panels from the textured slabs.
Assemble into a small vessel, box, or abstract sculpture using scoring and slipping.
Smooth edges and refine form.
Allow to dry, bisque fire, glaze, and glaze fire.
The challenge: Their final clay piece must use only textures pressed from these finds—no added drawn lines or smooth surfaces.(This constraint pushes creativity and problem-solving.)
Why Magic Metallics Are Perfect forTextured Sculptures:
Magic Metallicsare ideal for textured ceramic projects because they highlight and enhance surface details beautifully. Perfect for classroom use, these versatile, non-fired finishes can be applied to a variety of surfaces. Please note: Magic Metallics are for ornamental use only and are not dinnerware safe.Magic Metallics™ are water-based acrylics infused with finely ground metal particles, giving artwork an authentic metallic sheen and depth.
Variations & Extensions
Create a collaborative “texture wall” by combining slabs from the whole class.
Assign themes: “natural textures,” “urban textures,” or “fabric textures.”
Pair with a sketchbook exercise where students make rubbings of textures they find before pressing them into clay.
Form
Clay body of choice
Colors
Magic Metallics
Miscellaneous Accessories
Rolling Pin or slab roller
Assorted found textures or texture plates (natural or household items)
Begin with properly fired shelf cone 04 bisque. Moisten a clean sponge and wipe bisque to remove any dust.
Using a CB604 #4 Soft Fan, apply one coat of UG209 Jade to each section of the tree. Wipe back with a damp sponge leaving the color in the deep crevices. Do one section at a time. Allow to dry!
Using a CB425 ½” Oval, apply 3 coats of UG209 Jade to all the cup areas of the tree and to the bottom rim of the base. Allow to dry!
Using a CB604 #4 Soft Fan, apply 3 coats of FN235 Celadon to each section of the tree and the base.
Using a CB604 #4 Soft Fan, apply 1 coat of S2101 Crystal Clear Brusing to each section of the tree and base and 2 coats to the star.
While the previous glazes are still damp, using a CB604 #4 Soft Fan, apply 2 coats of SG202 White Cobblestone to the edges of all the tree branches.
Using a CB602 #2 Soft Fan, apply 1 coat of AC302 Wax Resist to all areas of the SG202 White Cobblestone before the cobblestone dries. Wash the brush immediately.
Stilt and Fire to Cone 06/05.
Place some Fired Gold onto a glazed tile.
Using a OB916G #6 Oval Shader, apply Fired Gold to the star and the bottom rim of the tree base.
Stilt and Fire to cone 018.
Apply a heavy coat of AC501 Gloss Brush On Sealer to the Globe Lights then sprinkle with Clear Glass Glitter. Place into a piece of Styrofoam to dry.
When the globe lights are dry, glue into the tree top with glue of your choice.
Additional Adaptations & Tips
Make sure to shake all the glazes and underglaze well.
Applying a coat of Wax Resist over the Cobblestone helps slow down the drying and helps prevent the glaze from popping off the piece.
The Foundations Sheer glazes allow the Fundamental Underglazes show through them.
Begin with properly fired shelf cone 04 bisque. Moisten a clean sponge and wipe bisque to remove any dust.
Using a AB705#5 Round and AB710 ¾ Flat Shader, basecoat the main body of the donuts with OS471 Medium Brown. Allow to dry!
Using a DB801 #3 Round and DB808 #8 Round, drybrush the donut bodies OS467 Light Brown, then with OS493 Sandalwood. Highlight with some OS432 Ivory in the brush.
Using a AB709 3/8 Angular Shader, shade the deep crevices with OS489 Saddle Brown.
Using a DB801 #3 Round and DB808 #8 Round, drybrush the various donuts with the following colors.
Pink – basecoat with OS558 Miami Pink, drybrush with OS589 Pink, highlight with OS432 Ivory.
Yellow – Basecoat with OS434 Lemon Yellow, drybrush with OS433 Pale Yellow, Highlight with OS432 Ivory.
Purple –basecoat with OS452 Purple, drybrush with OS450 Lilac, highlight with OS432 Ivory.
Blue – basecoat with OS457 Medium Blue, drybrush with OS456 Baby Blue, Highlight with OS432 Ivory.
Green – basecoat with OS463 Medium Green, drybrush with OS556 Lemon Grass, Highlight with OS432 Ivory.
White – basecoat with OS432 Ivory, drybrush with OS431 White.
Using a AB702 #10/0 Liner, paint the donuts with jimmies (raised decorations on the piece) various colors of your choice.
Using a AB710 ¾ Flat Shader, basecoat the icing ant the bottom of the donuts with OS467 Light Brown, drybrush with OS432 Ivory then highlight with OS431 White.
Using a AB705#5 Round and AB710 ¾ Flat Shader, basecoat the basket base inside and out with OS471 Medium Brown. Allow to dry!
Using a DB801 #3 Round and DB808 #8 Round, drybrush the basket with OS 467 Light Brown then with OS493 Sandalwood followed by OS485 French Vanilla then highlight lightly with OS432 Ivory.
Using a DB804 #3 Flat, Highlight the edges of each weave section with OS471 Medium Brown. Allow to dry!
Using a AB710 ¾ Flat Shader, apply 2 light coats of AC502 Matte Brush On Sealer on both pieces. Thin slightly with some water and do not let it puddle in any of the crevices which can get milky.
Using a AB705 #5 Round, apply 2 coats of AC501 Gloss Brush On Sealer to the jimmies (raised decorations) on the donuts that have them.
Using a DB805 #3 Fan, apply 2-3 coats of SG880 Crystal Sparklers Brush On Glitter on all the donuts but not on the raised decorations on the piece that have them.
Apply 3-4 coats of SG880 Crystal Sparklers Brush On Glitter to all the Globe Lights. Allow to dry between each coat.
Apply Brush On Sealer toa attach and apply the fake sprinkles, confetti, and colored mini foam balls to the areas that you want them. Allow to dry!
Glue the glittered globe lights into the donut tree if there are holes for them.
Additional Adaptations & Tips
Make sure to shake the Bisque Stains well.
Drybrushing is using a dry brush. You wash the brush when you are done.
You do not want any moisture in the brush.
When drybrushing you can use paper towels, paper bags, denim material to wipe the color out of the brush.
Almost always when drybrushing, you use 3 shades of a color. A dark, a medium and a light. Then an off white or white to highlight without washing the brush.
On most pieces you want to use a Matte Sealer over the drybrushed areas to make it look soft. A Gloss Sealer takes the soft look away from the piece.
Gloss Sealer is good to use on eyes, noses or any other small areas that need to be glossy.
Form
Molds by Clay Magic Inc.
4498 Donut Tree
4446 Small Basket
Colors
OS431 White
OS432 Ivory
OS433 Pale Yellow
OS434 Lemon Peel
OS450 Lilac
OS452 Purple
OS456 Baby Blue
OS457 Medium Blue
OS463 Medium Green
OS467 Light Brown
OS471 Medium Brown
OS485 French Vanilla
OS493 Sandalwood
OS556 Lemon Grass
OS558 Miami Pink
OS589 Pink
SG880 Crystal Sparklers Brush On Glitter
Decorating Accessories
BT910 Synthetic Sponge
AB702 10/0 Liner
AB703 #3 Round
AB705 #5 Round
AB709 3/8 Angular Shader
AB710 ¾ Flat Shader
DB801 #3 Round
DB802 #5 Round
DB803 #8 Round
DB804 #3 Flat
DB805 #3 Fan
Miscellaneous Accessories
Water Bowl
Paper Towels
Desert Paper Plates
Small 2oz. Plastic Cups
Medium Globe Lights
Small Globe Lights
Glue of Choice
Fake sprinkles, confetti, and colored mini foam balls from Hobby Lobby, Michaels, Etsy
Non-Fired|Molds
409|408
58757
Winter Wood and Raspberry Mist Vase – Stoneware Starter Palette
Begin with properly fired shelf cone 04 bisque. Moisten a clean sponge and wipe bisque to remove any dust.
Using a RB144 #4 Soft Fan Brush, apply 2 coats of SW155 Winter Wood to the outside of your vase
Once dry, using a RB144 #4 Soft Fan Brush apply 2 coats of SW177 Raspberry Mist to the outside of your vase
Fire to cone 6
Additional Adaptations & Tips
If you would like to glaze the inside of your vase, pour some SW155 Winter Wood into a separate container and combine 1 part water to 4 parts glaze. Pour this mixture into the vase and then slowly pick up and rotate the vase to coat the entire inside. Pour any extra glaze back into the separate container.
Begin with properly fired shelf cone 04 bisque. Moisten a clean sponge and wipe bisque to remove any dust.
Base (the bottom piece of the box)
With a mop brush, paint the entire bottom piece (inside and out, top and bottom) with 3 coats of Sea Green.
Keep coats even and a bit generous for solid color.
Lid: Underside (interior side of the top shell)
With a mop brush, paint 3 coats of Sea Green on the underside of the lid.
Lid: Segmented outer rim around the top of the shell
Using a mop brush, paint 3 coats of Sea Green on the outer segmented rim.
Make sure to paint the very edge of the lid to make sure that it meets or overlaps the coats on the underside.
Lid: Center/middle of the top shell
Using a mop brush, paint 3 coats of Ginger Root to the middle sections (inside of the rim painted step 4) of the top of the shell.
Make sure that the coats of Ginger Root touch the coats of Sea Green to ensure that there isn’t bare bisque showing after firing.
Shell Linework
Using Autumn in a writer bottle, add lines in each section of the middle part of the shell starting at the top of each section and streaking lines as shown as step 6 on the template. You will also add lines on top of the Sea Green that you painted around the top rim of the shell.
Using Copper Adventurine in a writer bottle, add lines to highlight the “top” portions of the shell sections (shown as step 7 on the template).
Using Cobblestone in a writer bottle, add lines to highlight the portions of each section as shown in step 8 on the template.
Finishing the bottom “body”
Using the writer bottle with Copper Adventurine, Make dots on the first couple of rows of textured “skin” on the front of the flippers, the nose and front part of the head. Add some lines on the base of the tail also.
Using Ginger Root in a writer bottle, make dots on the middle couple of rows of textured “skin” on the flippers, neck, and middle of the tail.
Using Autumn in a writer bottle, make dots on the back couple of rows of textured “skin” on the flippers, neck, and end of the tail.
Using Cobblestone in a writer bottle, make lines randomly on the head, flippers, and tail. Cobblestone will resemble the froth that the ocean creates, so use it sparingly.
Let dry overnight and fire to cone 06.
Dremel stilt marks and display!
Additional Adaptations & Tips
It is fun to overlap the Autumn and Copper Adventurine lines a little bit. It gives the piece a melty look.
Autumn on top of Sea Green will result in a blue-ish color. Copper Adventurine on top of Sea Green results in a rich brown color.
Thin brush strokes of Sea Green results in a brown undertone showing through. If you want your turtle to be more brown than green, use thinner coats of Sea Green. If you want your turtle to be more green, use thicker coats of Sea Green.
Form
C40541 Sea Turtle Box
Colors
EL130 Sea Green
EL145 Ginger Root
EL113 Autumn
EL121 Copper Adventurine
SG202 White Cobblestone
Decorating Accessories
Mop Brush
4 Writer Bottles (or small squeeze bottles with a small tip)
Begin with properly fired shelf cone 04 bisque. Moisten a clean sponge and wipe bisque to remove any dust.
Print off a small outline of a cat and the outline of a mountain that will be wide enough to across the plate. Cut the images out with scissors.
Apply SC099 Charming to the front and back of the plate. Apply 3 coats using a CB618 Soft Fan Brush. Allow time to dry.
Lay down the outline of the mountains slightly above the middle of the plate and use a damp sponge over the image to help it stick to the plate.
Repeat step 4 with the netting at the bottom of the plate and the cat will sit right above the netting.
Below the mountains use a sponge to apply 2 coats of SC092 Café Ole and 2 coats of SC039 Army Surplus. This will be applied over the cat and the netting.
Above the mountains, use a sponge to apply a fading sunset. Use SC042 Butter Me Up in the center right above the mountains, then apply SC097 Can’t Elope, SC002 Melon Choly and SC011 Blue Yonder around the rim of the plate. Apply 2 coats of each color.
Allow time to dry until the shine is gone from the glaze then remove the cat, mountains, and netting.
Fire to cone 06.
Form
MB102 Coupe Dinner Plate
Colors
SC002 Melon Choly
SC011 Blue Yonder
SC039 Army Surplus
SC042 Butter Me Up
SC092 Café Ole
SC097 Can’t Elope
SC099 Charming
Decorating Accessories
CB618 Fan Brush
Miscellaneous Accessories
Sponge
Water
Netting
Printed image of the outlining of a cat and mountains
Begin with properly fired shelf cone 04 bisque. Moisten a clean sponge and wipe bisque to remove any dust.
Draw an outline of a large butterfly in the middle of the bowl.
Dip your finger into SC015 Tuxedo and make one vertical line in the middle of the plate for the butterfly’s body, then with your finger, add one large dot on top of the line for the head. Apply one coat.
Still using SC015 Tuxedo, add 4 more lines coming out of the body, two at the top and two at the bottom for the butterfly wings. Apply one coat.
With your finger, apply 4 to 5 lines on each wing using SC030 Blue Dawn. Start from the outside of the wings and pull your finger in toward the body of the butterfly. Apply one coat.
Repeat step 4 with SC053 Purple Haze, overlapping SC030 Blue Dawn. Overlapping does not need to be perfect.
Repeat step 4 with SC017 Rosey Posey, overlapping SC053 Purple Haze. Overlapping does not need to be perfect.
Repeat step 4 with SC016 Cotton tail, this time starting in the middle of the butterfly wing.
On the rim of the bowl,apply 10 sets of 3 dots of SC053 Purple Haze. In-between those dots apply 2 dots of SC017 Rosey Posey or SC030 Blue Dawn. Apply one coat using your finger. This will be the caterpillars.
Use the very tip of your finger or your fingernails to make thinner lines for the antennas on all the caterpillars and butterfly. Apply one coat using SC015 Tuxedo.
Allow time to dry then apply 2 coats of S2101 Clear Glaze to the inside and outside of the bowl.
Begin with properly fired shelf cone 04 bisque. Moisten a clean sponge and wipe bisque to remove any dust.
Apply 3 coats of EG002 Speckled Buff to the inside and outside of the bowl, using a CB618 Fan Brush.
Draw an outline of a large butterfly in the middle of the bowl.
Dip your finger into SW508 Black Gloss and make one vertical line in the middle of the bowl for the body of the butterfly, then with your finger add one large dot on top for the head. Still using SW508 Black Gloss add 4 more lines coming from the body, two at the top and two at the bottom for the butterfly wings. Apply one coat.
With your finger apply 4 to 5 lines on each wing using SW252 Blue Opal. Start from the outside of the wings and pull your finger in toward the body of the butterfly. Apply one coat.
Repeat step 4 with SW134 Eggplant, overlapping SW252 Blue Opal. Overlapping does not need to be perfect.
Repeat step 4 with SW251 Pink Opal, overlapping SW134 Eggplant. Overlapping does not need to be perfect.
Repeat step 4 with SW214 Micro Pearl, this time starting in the middle of the butterfly wing.
On the rim of the bowl, apply 5 sets of 3 dots of SW134 Eggplant. In between those dots apply 2 dots of SW252 Blue Opal or SC251 Pink Opal. Apply one coat using your finger. This will be the caterpillars.
Use the very tip of your finger or your fingernails to make thinner lines for the antennas on all the caterpillars and butterfly. Apply one coat of SW508 Black Gloss.
Allow time to dry then apply SW001 Clear Glaze to the inside of the bowl. Apply 2 coats.
Begin with properly fired shelf cone 04 bisque. Moisten a clean sponge and wipe bisque to remove any dust.
Apply FN031 Corn Flower Blue to the font and back of the plate. Apply 3 coats using a CB618 Fan Brush.
Put your safety glasses on and break off 2 of the prongs on the fork. Break the far right and far left side, leaving you with only 2 prongs in the middle.
Dip your fork into FN061 Ivory Speak and pull your fork from the middle to the rim, making a straight line. Repeat this going in a circle leaving the middle empty. Not all lines need to perfect or the same length. Apply one coat.
With just one tip of your fork add dots to the ends of each line using FN061 Ivory Speak. Apply one coat.
With just the tips of your fork add dots to the middle of the dandelion. Use FN061 Ivory Speak. Apply one coat.
With just one tip of your fork apply FN021 Olive Green in one line for the stem of dandelion. Use the same method to add a leaf onto the stem. Apply with one coat.
With just the tips of your fork add dots to the middle of dandelion. Use FN021 Olive Green. Apply one coat.
Start with a soft fired (cone 04) stoneware piece that you throw, handbuild, or buy.
Using your round brush, make swooping w’s of Light Flux in 3 coats in rows down your piece. Stop 2/3 of the way down.
Using your round brush, place dots of Stroke & Coat colors in the w’s, filling the space with 3 coats. The top row uses Ruby Slippers, the second row uses Pink-A-Boo and Cutie Pie Coral combined, the third row uses Cutie Pie Coral, the fourth row uses Rosey Posey, and the fifth row uses Cotton Tail. Let dry.
Using a fan brush, glaze the top 1/3 of the piece with 3 coats of Rose Quartz.
Using a fan brush, glaze the bottom 2/3 of the piece with 3 coats of Raspberry Mist.
Using a fan brush, glaze the bottom 1/3 of the piece with Peppered Plum.
Begin with properly fired shelf cone 04 bisque. Moisten a clean sponge and wipe bisque to remove any dust.
Apply EG006 Sparkle Black Engobe to the back of the plate. Apply 3 coats using a RB140 Soft Fan. Wait for it to dry until the shine is gone and use a paper towel to softly rub the surface to let the sparkles come though.
Apply SW506 Bight Blue Gloss to the front of the plate. Apply 3 coats using a CB618 Fan Brush.
Put your safety glasses on and break off 2 of the prongs on the fork. Break the far right and far left side, leaving you with only 2 prongs in the middle.
Dip your fork into SW501 White Gloss and pull your fork from the middle to the rim, making a straight line. Repeat this going in a circle leaving the middle empty. Not all lines need to be perfect or the same length. Apply one coat.
With just one tip of your fork add dots to the ends of each line using SW501 White Gloss. Apply one coat.
With just the tips of your fork add dots to the middle of dandelion. Use SW501 White Gloss. Apply one coat.
With just one tip of your fork apply SW514 Sage Gloss in one line for the stem of dandelion. Use the same method to add a leaf onto the stem. Apply with one coat.
With just the tips of your fork add dots to the middle of dandelion. Use SW514 Sage Gloss. Apply one coat.
Begin with properly fired shelf cone 04 bisque. Moisten a clean sponge and wipe bisque to remove any dust.
Using an AB710 ¾ Flat Shader, basecoat the mushrooms with OS599 Medium Taupe.
In a small 2oz cup, mix 1 teaspoon of OS599 Medium Taupe, 1/2 teaspoon of AC502 Matte Brush-On Sealer and 1 ½ teaspoons of Play sand. Mix well!
Using a DB805 #3 Fan brush, apply 1-2 coats of the color/sand mix from step #3 to the lighter colored parts of the mushroom.
In a small 2oz cup, mix 1 teaspoon of OS472 Walnut, ½ teaspoon of AC502 Matte Brush-On Sealer and 1 1/2 teaspoon of Play Sand. Mix well!
Using a DB805 #3 Fan brush and an AB705 #5 Round, apply 1-2 coats of the color/sand mix from step #5 to the darker parts of the mushroom. The top, diamonds, bottom edge of the top and the bottom edge of the stem on the mushroom.
Using an AB709 3/8 Angular Shader, shade all the facets of the mushroom on both sides with OS489 Saddle Brown, including the top section and the diamond shapes.
Using an AB710 ¾ Flat Shader, apply 2 coats of AC502 Matte Brush-On Sealer to the mushrooms. Allow to dry between each coat!
Using a Pencil, sketch a vine line and leaves around the mushroom top and on the stems of the mushrooms.
In a small 2oz cup, mix 1 teaspoon of OS466 Avocado, ½ teaspoon of AC502 Matte Brush-On Sealer and 1 1/2 teaspoon of Play Sand. Mix well!
Using an AB703 #1 Liner, apply the Avocado mix to the vines and using an AB 705 #5 Round apply the Avocado mix to the leaves. Allow to dry!
Using an AB709 3/8 Angular Shader, shade all the leaves on one side with OS594 Limeburst.
Using a Stylus Tool or the end of a brush handle apply four dot flowers around the vein on the top of the mushroom. Highlight each dot with OS456 Baby Blue.
Using a Stylus Tool or the end of a brush handle apply dots of OS438 Orange Peel to the centers of the flowers, highlight with a small dot of OS435 Dark Yellow. Allow to dry!
Using anAB703 #1 Liner, out line the vines and leaves with OS476 Black. Allow to dry!
Using an AB710 ¾ Flat Shader, apply 1 -2 coats of Matte Brush-On Sealer over the leaves and vines and flowers. Allow to dry!
Do Not Fire!
Additional Adaptations & Tips
Make sure to shake the Bisq-Stains well.
DO Not use beach sand for this project. You need to use Play or Silica sand.
Mixing the AC502 Matte Brush-On Sealer to the mix helps hold the sand on the piece.
Apply two coats of SW178 Fool’s Gold to the whole face of the plate with the soft fan brush, allowing the glaze to dry between coats.
Using the Script liner brush, apply thick dots of SW408 White Flux over the Fool’s Gold. If desired, do a second coat of dots over the top of the first after they’ve dried.
After the dots have dried fully, apply two coats of SW167 Sand and Sea over the dots
Apply two coats of SW214 Micro Pearl to the whole face of the plate with the soft fan brush, allowing the glaze to dry between coats.
Using the Script liner brush, apply thick dots of SW407 Clear Flux over the Micro Pearl. If desired, do a second coat of dots over the top of the first after they’ve dried.
After the dots have dried, apply two coats of SW108 Green Tea over the top.
Begin with properly fired shelf cone 04 bisque. Moisten a clean sponge and wipe bisque to remove any dust.
Using pencil, draw a line straight across the middle of the base of the dish, then adding two lines on both sides to make the whole base striped. Extend those lines straight up the sides. Add two more lines on both edges to keep the sections continuing up the side, these sections will be smaller. The entire inside should be striped.
Using flat brush coat the six stripes in the middle in this order: Glo-Worm, Aqu-ward, Lavendear, Pinkie Swear, Just Peachy, and Sunkissed. Continue the pattern out to the edges, to fill each section. Repeat with three coats of each color.
Turn the dish over and using the fan brush coat the entire outside and bottom with 3 coats of Black Velvet.
Fold the pattern over on itself like an accordion fold. There should be six sections. Cut out the patterns of the two ghosts and one bat. You should have six of each.
Once the Black Velvet is dry, turn over. One by one, wet each ghost and bat and randomly place each one inside the platter. The water should adhere it to the dish.
Once all the paper shapes are placed, use the fan brush to add three layers of Black Velvet over top of the paper and the entire inside of the dish. Everything should be covered in the Black Velvet. Once this is no longer shiny, use the needle/toothpick to carefully pull up all the paper pieces.
Use the back end of a brush to add ghost eye dots using the Black Velvet.
Use the flat brush to add stripes of Snowfall around the outside edge of the bowl. Repeat until you have three layers.
Create small clay creatures that embody different emotions—like joy, sadness, worry, or excitement.
Students design a creature that shows what that feeling looks like in monster form. A great Social Emotional Learning crossover that encourages empathy, expression, and creativity.
Choose an emotion to express—think about how it feels in your body and how it might look as a creature (e.g., spiky anger, droopy sadness, energetic joy).
Sketch a quick design showing body shape, face, and texture.
Handbuild your Mood Monster using pinch, coil, or slab methods—body can be solid or hollow.
Add facial features and textures to show emotion—exaggerate the eyes, mouth, posture, etc.
Optional: Add accessories like horns, tails, teeth, or wings.
Bisque fire, then glaze using expressive colors and patterns that reflect your chosen emotion.
Why Stroke & Coat Is Perfect for Mood Monsters
Mayco Stroke & Coat glazes are perfect for bright, bold colors that match emotions (e.g., SC-74 Hot Tamale for anger, SC-11 Blue Yonder for calm, SC-6 Sunkissed for happiness). These glazes offer excellent control for small features like eyes and mouths and they don’t run— great for keeping crisp details on small surfaces.
Form
Clay body of choice
Colors
Stroke & Coat
Decorating Accessories
CB604 #4 Soft Fan
CB406 #6 Pointed Round
CB202 #2 Detail Liner
Miscellaneous Accessories
Sketch paper and pencils
Emotion word list or mood cards
Mirror (to study facial expressions)
Wooden modeling tools
Slip and scoring tools
Textured stamps or found objects (buttons, shells, LEGOs, etc.)
Sponges and water bowls
Googly eyes (attach with glaze or epoxy after firing)
Wire or pipe cleaners for wild hair or arms (added post-fire)
Beads or gems embedded before firing or glued after
Acrylic paint or metallic wax (for highlights after glaze firing)
Designer Liner for outlining features or drawing mood symbols or words
More Than Just a Name — it’s a mini self-portrait in clay!
Each student will design and sculpt a textured ceramic tile that includes their name plus symbols, patterns, or images that represent who they are, where they’re from, what they love, or how they want to be seen in the classroom or studio space.
Students can carve, press, sculpt, or layer to create personalized designs that might include:
Favorite animals, foods, or hobbies
Cultural symbols or family connections
A personal motto or initials hidden in the texture
Abstract patterns that reflect personality (bold lines for big energy, soft swirls for calm vibes, etc.)
Color choices that reflect mood or values
Tiles can be funky, elegant, mysterious, or loud—just like the artists behind them. Once glazed and fired, the option of creating a collaborative display: a wall of names that says, “This is our creative community.”
Why Stroke & Coat and Jungle Gems Are Perfect for Name Tiles
Using Mayco’s Jungle Gems and Stroke & Coat glazes together creates the perfect combination for eye-catching name tiles. Jungle Gems offer a dynamic, textured background with pops of color and visual interest, while Stroke & Coat provides smooth, stay-right-where-you-put-it coverage that is ideal for lettering and design work. This contrast helps each student’s tile stand out with personality and clarity.
Form
Clay body of choice
Colors
Stroke & Coat
Jungle Gems
Decorating Accessories
CB604 #4 Soft Fan
CB406 #6 Pointed Round
CB202 #2 Detail Liner
Miscellaneous Accessories
Alphabet stencils (for younger artists or design guides)
Reference sheets (symbols, patterns, cultural motifs, fonts)
Found objects (buttons, shells, lace, leaves, zippers, toy wheels, coins, forks)
Carving tools
Rubber stamps or texture mats
Rolling pins or slab rollers
Water containers and sponges
Old toothbrushes (great for adding grit/texture or cleaning small spots)
Begin by wiping down the bisque with a damp sponge to remove dust and dirt.
Using the soft fan brush, apply three coats of SG303 to the whole top of the mushroom cap, allowing the glaze to dry between coats.
Using the script liner brush, apply one coat of SC077 Glo-Worm to the dots on top of the mushroom. Using the same color and a fan brush, apply three coats to the bottom of the stem below the ruffle.
With the script liner brush, apply three coats of SC075 Orange-A-Peel to the gills (underside of the cap) allowing the glaze to dry between coats.
On the plate, mix SC075 and SG303 in a 1 to 1 ratio. Apply three coats of the mixture to the ruffle on the stem using the fan brush.
Begin with properly fired shelf cone 04 bisque. Moisten a clean sponge and wipe bisque to remove any dust.
Using a RB-144 #4 Soft fan brush apply two coats of UG093 Wild Violet to the entire exterior of your Wavy Mug, allowing to fully dry between coats.
Fire piece to cone 04 to ensure underglaze is adhered to the bisque form.
Once your piece has cooled, you will want to again moisten a clean sponge and wipe bisque to remove any dust.
Apply two coats of SW505 Purple Gloss to the inside of the mug using a RB-144 #4 Soft Fan Brush.
Using a small container or paint palette mix ½ Hot Pink Melt Gloop and ½ Blue Melt Gloop together until color is fully blended. Will appear as a pale shade of purple once mixed well.
Fill your AC-220 Detailer Bottle with the Melt Gloop Mixture.
Apply a line of Melt Gloop mixture to the top of both of the connection points on the handle
Apply dots that are roughly pea-sized to the top side of the handle in a domino like pattern
Apply horizontal bands of dots along the piece, spacing the dots roughly ¼” apart, ensuring the band below continues a domino-like application. Follow the cadence below to create your Melt Gloop dots:
Top band will have dots that are roughly pea-sized
Band underneath will have slightly smaller dots than top row
Continue steps 10.1 & 10.2 until piece is covered from top to bottom
Once the Melt Gloop application is complete, fire piece to cone 6.
Additional Adaptations & Tips
You will want to mix approximately 2-4 ounces of Melt Gloop mixture to complete the Melt Gloop application. More may be needed depending on how large you make your design dots.
Melt Gloop will start to run down the piece if dots become too large. Keep dots roughly pea-sized to ensure they stay in place and do not run.
If you do not bisque fire the underglaze onto your piece, it is likely that the Melt Gloop will pull some of the underglaze away when firing to cone 6. It is recommended to bisque on the underglaze first to avoid this.
Begin with properly fired shelf cone 04 bisque. Moisten a clean sponge and wipe bisque to remove any dust.
Using a RB144 #4 Soft Fan Brush apply two coats of UG220 Sage to the outside of your mug and the handle.
Bisque fire piece to cone 04.
Once cooled use a RB144 #4 Soft Fan Brush to apply 2 coats of SW162 Pink Matte to the inside of the mug.
Fill the applicator bottle with SW422 Hot Pink Melt Gloop.
Apply a line of gloop on the top side arch of the handle and at the top of the connection points of the handle where the handle meets the mug.
Apply a consistent line of Melt Gloop at the rim of the mug.
Apply lines of the Melt Gloop around the mug on every shoulder, ensuring that the lines are continuous around the mug and connect back to the starting point.
Begin with properly fired shelf cone 04 bisque. Moisten a clean sponge and wipe bisque to remove any dust.
Fill glaze syringes with Melt Gloop by putting tip of syringe into glaze while the plunger is fully pushed down. Ensure that tip of the syringe stays in the glaze while pulling up the plunger on the glaze syringe.
Once syringe is filled, clean tip of syringe with a damp sponge
Starting just below the rim of your Thumbler apply a horizontal line of SW420 White Melt Gloop with the glaze syringe, make sure to apply the line of Melt Gloop around the entire Thumbler until line of Melt Gloop connects.
Approximately ¼” underneath this line create a horizontal line of SW421 Yellow Melt Gloop making sure this line also goes around the entire thumbler and connects to itself.
Continue steps 3 & 4 until you have horizontal lines of white and yellow down your thumbler.
Allow Melt Gloop to start to dry. Once Melt Gloop no longer has a glossy sheen, continue to next step.
Using a RB144 #4 Soft Fan Brush apply two thick coats of SW136 Weathered Blue to the inside of the Thumbler and on top of the Melt Gloop.
Fire to cone 6.
Additional Adaptations & Tips
You can use the AC220 Detailer Tips & Bottle to create this project if you do not have a glaze syringe.
If your Melt Gloop begins to smear when brushing on the SW136 Weathered Blue, the Melt Gloop is too wet and needs more time to dry.
Using a damp sponge, wipe down the bisque piece to remove dirt and dust.
Apply two coats of SW196 Sand Dollar inside the grooves of the fluting using the script liner brush.
After the Sand Dollar has dried, apply two coats of SW177 Raspberry Mist to the whole inside and outside of the mug, leaving the foot of the mug unglazed.
Begin with properly fired shelf cone 04 bisque. Moisten a clean sponge and wipe bisque to remove any dust.
Cut tip with scissors to open your AC-219 Design Bottle with Writer Tip.
Fill Design Bottle with SW401 Light Flux.
Center Mixing Bowl on a banding wheel to create two lines of SW401 Light Flux on the inside of the bowl near the rim using the AC-219 Design Bottle. Second line will be roughly 3/4” lower than the first line.
Once flux has dried use a RB118 #8 Round Brush to create 2 coats of dots with SW101 Stoned Denim on top of the Light Flux. Dots should be roughly 1” apart. Apply dots to both lines of light flux making sure to stagger dots between top and bottom row.
Once dry apply 2 coats of SW129 Copper Float to the outside and inside of your bowl.
Once dry, apply 1 coat of SW191 Peppered Plum 2/3 of the way down the bowl on the inside and outside.
Fire to cone 6.
Form
SB148 Medium Mixing Bowl
Colors
SW191 Peppered Plum
SW129 Copper Float
SW101 Stoned Denim
SW401 Light Flux
Decorating Accessories
RB144 Soft Fan Brush
RB118 #8 Round Brush
AC219 Designer Bottle with Writer Tip
Miscellaneous Accessories
Sponge
Water
Scissors
Banding Wheel
Mid-Range|Stoneware Bisque
407|411
58272
Sand Dollar and Amaryllis Mug – Stoneware Starter Palette
Begin with properly fired shelf cone 04 bisque. Moisten a clean sponge and wipe bisque to remove any dust.
Using a RB144 #4 Soft Fan Brush apply two coats of SW221 Mint Speck to the inside and outside of your bowl.
Cut tip with scissors to open your AC-219 Design Bottle with Writer Tip.
Fill Design Bottle with SW401 Light Flux.
Center bowl on a banding wheel and create two rows of “W’s” on the inside of the bowl with Light Flux starting at the top rim. Second row of “W’s” will be underneath the first row.
Using RB118 #8 Round Brush create two coats of dots with either SW177 Raspberry Mist or SW166 Norse Blue in the open spaces between the “W’s”.
Fire to cone 6.
Form
SB110 Dessert Bowl
Colors
SW401 Light Flux
SW221 Mint Speck
SW177 Raspberry Mist or SW166 Norse Blue
Decorating Accessories
RB144 Soft Fan Brush
RB118 #8 Round Brush
AC219 Designer Bottle with Writer Tip
Miscellaneous Accessories
Sponge
Water
Scissors
Banding Wheel
Mid-Range|Stoneware Bisque
407|411
58270
Aurora Green and Tiger’s Eye Mug – Stoneware Starter Palette
Using a damp sponge, wipe down the bisque piece to remove dirt and dust.
Apply two coats of SW101 Stoned denim to the bottom bubble of the vace and up about ¼” on the bubble above.
After the Stoned Denim has dried, apply two coats of SW189 Cenote to the whole second bubble and ¼” of the top section of the vase. The Cenote should overlap the little bit of Stoned Denim from the section below.
After the Cenote has dried, apply two coats of SW196 Sand Dollar to the top of the vase.
Begin by applying two coats of SC015 Tuxedo to the whole face of the tile using a soft fan brush.
After the last layer of black has lost its shine, lay the pattern on top of the tile and gently trace with a pen. Remove pattern.
Using the mini liner brush, trace the lines that were left from the pattern transfer with wax resist.
For the flower petals, blob in EL127 Rose Granite with a script liner brush and immediately force dry with a hairdryer on high until cracks appear in the drying glaze.
For the leaves, blob in EL130 Sea Green with a script liner brush and immediately force dry with a hairdryer on high until cracks appear in the drying glaze.
For the inside of the flower, blob in EL145 Ginger Root with a script liner brush and immediately force dry with a hairdryer on high until cracks appear in the drying glaze.
For the background, blob in EL149 Lavender Flower with a script liner brush and immediately force dry with a hairdryer on high until cracks appear in the drying glaze.
Apply three coats of SC015 Tuxedo to the back of the plate and allow to dry normally.
Begin by applying two coats of SC015 Tuxedo to the whole face of the tile using a soft fan brush.
After the last layer of black has lost it’s shine, lay the pattern on top of the tile and gently trace with a pen. Remove pattern.
Using the mini liner prush, trace the lines that were left from the pattern transfer with wax resist.
For the flower petals, blob in CG1014 Pink Plum with a script liner brush and immediately force dry with a hairdryer on high until cracks appear in the drying glaze.
For the leaves, blob in CG987 Tree Frog with a script liner brush and immediately force dry with a hairdryer on high until cracks appear in the drying glaze.
For the inside of the flower, blob in CG753 Sassy Orange with a script liner brush and immediately force dry with a hairdryer on high until cracks appear in the drying glaze.
For the background, blob in CG999 Jazz Notes with a script liner brush and immediately force dry with a hairdryer on high until cracks appear in the drying glaze.
Begin by applying two coats of SW508 Black Gloss to the whole outside of the bud vase using a soft fan brush.
After the last layer of black has lost its shine, lay the pattern on top of the vase and gently trace with a pen. Remove pattern.
Using the mini liner brush, trace the lines that were left from the pattern transfer with wax resist.
For the inner flower petals, blob in SW515 Aqua Gloss with a script liner brush and immediately force dry with a hairdryer on high until cracks appear in the drying glaze.
For the outer flower petals, blob in SW506 Bright Blue Gloss with a script liner brush and immediately force dry with a hairdryer on high until cracks appear in the drying glaze
For the leaves and inside of the flower, blob in SW514 Aqua Gloss with a script liner brush and immediately force dry with a hairdryer on high until cracks appear in the drying glaze.
For the background, blob in SW507 Bright Green Gloss with a script liner brush and immediately force dry with a hairdryer on high until cracks appear in the drying glaze.
Begin by applying two coats of SW503 Black Gloss to the whole face of the plate using a soft fan brush.
After the last layer of black has lost its shine, lay the pattern on top of the plate and gently trace with a pen. Remove pattern.
Using the mini liner brush, trace the lines that were left from the pattern transfer with wax resist.
For the flower petals, blob in SW214 Micro Pearl with a script liner brush and immediately force dry with a hairdryer on high until cracks appear in the drying glaze.
For the leaves, blob in SW216 Micro Jade with a script liner brush and immediately force dry with a hairdryer on high until cracks appear in the drying glaze.
For the center of the flower and the undersides of the petals, blob in SW215 Micro Champagne with a script liner brush and immediately force dry with a hairdryer on high until cracks appear in the drying glaze.
For the background, blob in SW217 Micro Cerulean with a script liner brush and immediately force dry with a hairdryer on high until cracks appear in the drying glaze.
Apply three coats of SW503 Black Gloss to the rim of the back of the plate and allow to dry normally.
Begin with properly fired shelf cone 04 bisque. Moisten a clean sponge and wipe bisque to remove any dust.
Using a RB-144 #4 Soft Fan brush, apply 2 coats of EG006 Sparkle Black Engobe to the outside of the mug. Make sure that you burnish the surface with your fingers after each coat to reveal the sparkles.
Using a RB-144 #4 Soft Fan Brush apply 2 coats of SW223 Milk Glass to the handle and the inside of the mug and allow to dry.
Using a RB-144 #4 Soft Fan Brush apply 2 coats of SW222 Green Jasper on the handle and inside the mug over top SW223 Milk Glass, allow to dry.
Fill Applicator Bottles with Melt Gloop Colors
Using Starry Night as a reference guide, create your own Starry Night design on your mug using a series of small dots to create shapes.
Using SW420 White Melt Gloop and SW421 Yellow Melt Gloop to create stars.
Using SW420 White Melt Gloop to create wind swirls.
Using SW425 Black Melt Gloop to create the shadow of the cypress trees.
Using SW424 Blue Melt Gloop and SW425 Black Melt Gloop to create the hills and ground.
Fire piece to cone 6.
Additional Adaptations & Tips
Ensure that you burnish after applying each coat of EG006 Sparkle Black Engobe or the sparkles will not be as prominent in your finished piece.
Begin with properly fired shelf cone 04 bisque. Moisten a clean sponge and wipe bisque to remove any dust.
Using a RB-144 #4 Soft Fan Brush apply two coats of SW508 Black Gloss to the inside of your mug and the handle.
Fill Applicator bottles with each color of Melt Gloop (6 bottles total).
On the first side of your mug create a flower dot design.
Use SW423 Slime Green Melt Gloop to create the stem and leaf.
Use SW421 to create the flower petals.
Use SW425 to create the pistil/inside of the flower.
On the second side of your mug you will create lines of dots to mimic a rainbow.
Create lines of dots with one color at a time starting from the inside of the rainbow and following the below color pattern:
SW425 Black Melt Gloop (Inner most arch)
SW424 Blue Melt Gloop
SW423 Slime Green Melt Gloop
SW422 Hot Pink Melt Gloop
SW421 Yellow Melt Gloop
SW420 White Melt Gloop (Outer most arch)
Fire to cone 6.
Additional Adaptations & Tips
Keep in mind that if your dots become too large they can tend to run down your piece. Try to keep dots roughly pea sized or smaller to ensure they stay in the same place after firing.
If your dots are placed too closely together they may melt into each other during the firing.
Begin with properly fired shelf cone 04 bisque. Moisten a clean sponge and wipe bisque to remove any dust.
Mix 3 Parts SW004 Zinc Free Clear with 1 parts water to thin glaze.
Pour mixture of Zinc Free Clear into the vase form.
Turn the vase in a circular motion slowly while also tilting the vase to pour out any excess glaze. Be sure to coat the entirety of the inside of the form.
Take your syringe and make sure plunger is completely pushed down then submerge tip of syringe into SW423 Slime Green Melt Gloop and pull plunger up 1/3 of the way and wipe the tip of your syringe.
Submerge tip of syringe into SW422 Hot Pink Melt Gloop and pull plunger up another 1/3 of the way (syringe will now be 2/3 full) and wipe the tip of your syringe.
Submerge tip of syringe into SW421 Yellow Melt Gloop and pull plunger up another 1/3 of the way (syringe will now be full) and wipe the tip of your syringe.
Place your vase on the banding wheel and center your vase.
Start turning your banding wheel slowly and begin at the top rim of the vase by slowly pushing down the plunger on your syringe to allow Gloop to adhere to vase.
As the piece rotates slowly move your syringe down the form to create a spiral line of Gloop on the form
Once your syringe is empty repeat steps 5-7
Return to your vase on the banding wheel and begin again by turning your banding wheel slowly and adhering Gloop where your previous glaze trailing ended and continue the spiral pattern.
Continue to fill syringe as needed to complete the spiral pattern of Gloop until you reach the foot ring of the vase.
Allow Gloop glaze to dry mostly before moving to the next step. The glaze will lose its sheen/have a satin like finish. This is when you are ready to move forward.
Using a #4 Soft Fan Brush apply 2 coats of SW219 Opal Lustre allowing glaze to dry between coats.
Fire to cone 6.
Additional Adaptations & Tips
Be sure to thoroughly clean the tip of your syringe each time after filling with a sponge before dipping syringe into the next color to prevent any color contamination.
If you see the Gloop glaze streaking into your brush when applying the first coat of Opal Lustre the Gloop is still too wet and needs more time to dry.
Begin with properly fired shelf cone 04 bisque. Moisten a clean sponge and wipe bisque to remove any dust.
Mix 3 Parts SW004 Zinc Free Clear with 1 parts water to thin glaze.
Pour mixture of Zinc Free Clear into the vase form.
Turn the vase in a circular motion slowly while also tilting the vase to pour out any excess glaze. Be sure to coat the entirety of the inside of the form.
Take your syringe and make sure plunger is completely pushed down then submerge tip of syringe into SW425 Black Melt Gloop and pull plunger up ¼ of the way and wipe the tip of your syringe.
Submerge tip of syringe into SW424 Blue Melt Gloop and pull plunger up another ¼ of the way (syringe will now be half full) and wipe the tip of your syringe.
Submerge tip of syringe into SW423 Slime Green Melt Gloop and pull plunger up another ¼ of the way (syringe will now be ¾ full) and wipe the tip of your syringe.
Submerge tip of syringe into SW422 Hot Pink Melt Gloop and pull plunger up another ¼ of the way (syringe will now be full) and wipe the tip of your syringe.
Place your vase on the banding wheel and center your vase.
Start turning your banding wheel slowly and begin at the top rim of the vase by slowly pushing down the plunger on your syringe to allow Gloop to adhere to vase.
As the piece rotates slowly move your syringe down the form to create a spiral line of Gloop on the form
Once your syringe is empty begin to fill your syringe again and submerge tip of syringe into SW421 Yellow Melt Gloop and pull plunger up ¼ of the way and wipe the tip of your syringe.
Submerge tip of syringe into SW420 White Melt Gloop and pull plunger up another ¼ of the way (syringe will now be half full) and wipe the tip of your syringe.
Submerge tip of syringe into SW235 Black Melt Gloop and pull plunger up another ¼ of the way (syringe will now be ¾ full) and wipe the tip of your syringe.
Submerge tip of syringe into SW424 Blue Melt Gloop and pull plunger up another ¼ of the way (syringe will now be full) and wipe the tip of your syringe.
Return to your vase on the banding wheel and begin again by turning your banding wheel slowly and adhering Gloop where your previous glaze trailing ended and continue the spiral pattern.
Continue to fill syringe as needed to complete the spiral pattern of Gloop until you reach the foot ring of the vase.
Allow Gloop glaze to dry mostly before moving to the next step. The glaze will lose its sheen/have a satin like finish. This is when you are ready to move forward.
Using a #4 Soft Fan Brush apply 2 coats of SW223 Milk Glass allowing glaze to dry between coats.
Fire to cone 6.
Additional Adaptations & Tips
Be sure to thoroughly clean the tip of your syringe each time after filling with a sponge before dipping syringe into the next color to prevent any color contamination.
If you see the Gloop glaze streaking into your brush when applying the first coat of Milk Glass the Gloop is still too wet and needs more time to dry.
Begin with properly fired shelf cone 04 bisque. Moisten a clean sponge and wipe bisque to remove any dust.
Mix 3 Parts SW004 Zinc Free Clear with 1 parts water to thin glaze.
Pour mixture of Zinc Free Clear into the vase form.
Turn the vase in a circular motion slowly while also tilting the vase to pour out any excess glaze. Be sure to coat the entirety of the inside of the form.
Using a #4 Fan Brush apply 1 thick coat of SW425 Black Gloop onto vase and allow glaze to dry mostly before moving to the next step. The glaze will lose its sheen/have a satin like finish. This is when you are ready to move forward.
Apply 2 coats of SW162 Pink Matte, allowing pink Matte to dry between coats.
Fire to cone 6.
Additional Adaptations & Tips
If you see the Gloop glaze streaking into your brush when applying first coat of Pink Matte the Gloop is still too wet and needs more time to dry.
Gloop does not apply like a typical stoneware glaze when brushing. You may see texture from brush strokes and your coat of brushed glaze will apply thick.
Gloop will tend to break and pull apart where the glaze is applied thicker.
Begin with properly fired shelf cone 04 bisque. Moisten a clean sponge and wipe bisque to remove any dust.
RB-144 #4 Soft Fan Brush apply 2 coats of SW152 Blue Splatterware to the inside of the bowl and allow to fully dry
Once glaze is dry, turn bowl upside down on a banding wheel
Fill Applicator bottles with Melt Gloop
Starting near the rim of the bowl create a horizontal line of dots using SW424 Blue Melt Gloop, leaving roughly ¼” – ½” of space between the dots.
Continue creating lines of dots in a domino like pattern on the outside of your bowl using SW424 Blue Melt Gloop
Using SW420 White Melt Gloop layer a smaller dot of the White Melt Gloop on top of the Blue Melt Gloop starting with the first line near the rim.
Continue by adding additional dots of white to the second row of blue dots near the rim.
After this, skip a row of blue dots and apply a dot of white on top of the blue. Continue to skip a row as you work your way up the outside of the bowl.
Fire to cone 6.
Additional Adaptations & Tips
Melt Gloop will start to run down the piece if dots become too large. Keep dots roughly pea-sized to ensure they stay in place and do not run.
Wipe down bisque bowl with a damp cleaning sponge to remove any dust and prep the ware for color.
Apply two coats of Black Engobe to the back of the plate. You can also apply it to the foot, since two coats of Engobe won’t stick to most kiln wash.
Use the fan brush or sponge to really dampen the top of the plate. You want this to be wet, so the colors don’t dry fast. After applying water, apply a good coat of Thin ‘N Shade to the top of the plate to slow the drying process.
Center the plate on the banding wheel. With the writer tip on the bottles of Stroke & Coat Colors, Start the wheel turning and squeeze the color right from the bottle onto the surface of the plate in rings of color, starting in the center of the plate working out to the edge. This color should be thick, and you want to work quickly so the color does not dry.
Use the hair tip of the liner brush to pull lines out from the center of the plate, first dividing the plate in half, then quarters, then eighths, all working out from the center. Do not worry about washing the brush out between stroked through the color.
Pull lines of color from the outside edge of the plate into the center between each division created. Notice how the pattern changes.
Place the top of the brush in the very center of the plate and start the plate turning to create a swirl of color In the center.
Allow the colors to dry naturally. The plate may take a day to dry because of all the moisture you applied to keep the color from drying fast.
Wipe down bisque bowl with a damp cleaning sponge to remove any dust and prep the ware for color.
Apply one coat of Fire Engine Red, Bright Yellow, and Bright Blue randomly over the entire vase so some color is showing on every part of the surface. Allow to dry.
Apply three coats of Jet Black over the entire vase. Allow to dry between coats.
While the Jet black is still damp, use a sgraffito tool or toothpick and scratch random design lines over the shape. Use gentle pressure so you only go through the black, and not all the way through to the bisque. Allow shavings to stay on the surface until the color is dry. Brushing them away while the color is damp can cause them to embed into the color. It is best to wait until the colors are completely dry to brush them away.
Apply two coats of clear glaze for the body selected to the entire outside of the vase (dry foot if stoneware. Roll diluted clear to the interior and drain excess.
Stilt and fire earthenware items to cone 06 and dry foot and fire stoneware to cone 6.
Form
Earthenware or stoneware shape of choice (Stoneware shape shown)
Wipe down bisque bowl with a damp cleaning sponge and center the bowl on the banding wheel.
Use the fan brush to apply two coats of Black Engobe to the exterior of the bowl, including the bottom. Engobes won’t stick to most brands of kiln wash in firing when no more than two coats are applied to the area making contact with the shelf.
Thin each of the three Stroke & Coat colors with three parts color with one part water. Colors need to be thinned to achieve a nice blend of color when banding.
Begin by banding the bottom of the bowl with diluted Fruit of the Vine. While that color is still wet, band diluted Cara-bein Blue on the inside side of the bowl so it blends into Fruit of the Vine. While the Cara-bein Blue is wet, band diluted Teal Next Time along the top edge, blending the two colors together where they meet.
Dilute Cobalt Black one part color to one part water. Load a dagger brush and band fine lines of color around the edge of the bowl.
Use the drybrush fan brush to speckle diluted Cobalt Black to the interior of the bowl.
Use the fan brush to apply two coats of Stoneware Clear to the inside for the bowl and fire to cone 6.
Load the tip of the DB805 Drybrush Fan with slightly thinned EZ012 and flick the bristle toward the surface of the bowl to add a speckle over the interior.
Apply two coats of SW001 Stoneware Clear to the inside of bowl. Be careful applying the first coat of glaze since the black EZ Stroke can smear when it gets wet with glaze. (Don’t overbrush.)
Wipe bisque with a damp sponge to remove dust/dirt and allow to dry
Apply three coats of EL101 Oyster Shell to the whole plate and allow to dry until the shine is gone
Transfer the pattern to the plate by laying the pattern on the plate and pressing lightly to outline with a pen. Remove the pattern to see the indents left by the traced pattern.
Using the Mini liner brush, outline the pattern lines in AC302 Wax Resist.
Apply three coats EL 131 Turtle Shell to the main parts of the wings.
Apply three coats of EL133 Autumn to the antenna.
Apply three coats of EL128 Wheat to the body of the moth
Apply three coats of EL118 Blue Grotto to the spots and top of the wings
Apply three coats of EL129 Slate around the outside of the moth and moon.
Wipe bisque with a damp sponge to remove dust/dirt and allow to dry
Transfer the pattern to the plate with the clay carbon paper.
Fill in all the leaves with three coats of EL131 Turtle shell allowing the coats to dry between each layer.
Using the Mini liner brush, apply three coats of EL130 Sea Green to the stems of the leaves.
Apply three coats of EL127 Rose Granite and EL149 Lavender Flower to the flowers, allowing the colors to overlap slightly at the center of each petal.
Once the color has dried, apply one coat of AC302 Wax Resist to the flowers and leaves. Don’t worry about taking the wax all the way to the edge of where the color meets the bisque, focus on the center of each.
After the wax has dried, slightly water down EL129 Slate and apply to the whole plate with a soft fan brush. Apply a second and third coat after the shine has gone away.
Clean off any leftover watered down spots of EL129 Slate on the flowers using a damp brush. Leave the spots on the leaves.
Apply three coats of EL129 Slate to the back of the plate.
Mix SC027 Sour Apple and SC029 onto a paper plate, using a toothpick, and let it dry up. You will want to start drying the glaze the day before or a few hours before staring the project.
After the glaze has dried, break the glaze apart into smaller chips on the plate.
Begin with properly fired shelf cone 04 bisque. Moisten a clean sponge and wipe bisque to remove any dust.
Using a RB106 Script Liner, apply SW303 Manganese Wash in a pattern around the rim. Applied 2 rows of “w”s so there is a space to add the dried SC029 Bluegrass and SC027 Sour Apple.
Apply the dried chips of SC029 Bluegrass and SC027 sour Apple as inside of the loops made with the wash. To help the dried chips stick add a dot of SW303 Manganese Wash behind the chips.
Allow the glaze to dry.
Apply 3 coats of SW173 Amber Quartz to both the inside and the outside of the bowl. Allow the glaze to dry in between coats and avoid glazing the foot. Use A CB604 Soft Fan.
Use a damp sponge to wipe away any glaze that may have gotten on the foot.
Begin with properly fired shelf cone 04 bisque. Moisten a clean sponge and wipe bisque to remove any dust.
Using a CB604 #4 Soft Fan, apply 1 coat of UG223 Apricot to one third of the plate. Followed by UG204 Orange to the next third (middle) of the plate and finally UG207 Flame Red, blending the colors into each other. Allow to dry.
Repeat step 2 again. When dry apply a third coat blending the colors into each other. Allow to dry.
Using a CB604 #4 Soft Fan, apply 2 coats of UG050 Jet Black. Apply the second coat when the first has lost its shine.
Using a toothpick or bamboo skewer, scratch through the UG050 Jet Black allowing the color under it show through. This design was done free handed creating leaves and veins going around the outer edge of the plate. When dry dust off any crumbs from the sgraffito of the leaves.
Using a CB604 #4 Soft Fan, apply 3 coats of UG050 Jet Black to the back of the plate, either the low fire plate or the stoneware plate.
Using a CB604 #4 Soft Fan, apply 2 coats apply 2 coats of SW001 Stoneware Clear to the piece except to the foot of the piece. Allow to dry.
Begin with properly fired shelf cone 04 bisque. Moisten a clean sponge and wipe bisque to remove any dust.
Using a CB604 #4 Soft Fan, apply 1 coat of UG223 Apricot to one third of the plate. Followed by UG204 Orange to the next third (middle) of the plate and finally UG207 Flame Red, blending the colors into each other. Allow to dry.
Repeat step 2 again. When dry apply a third coat blending the colors into each other. Allow to dry.
Using a CB604 #4 Soft Fan, apply 2 coats of UG050 Jet Black. Apply the second coat when the first has lost its shine.
Using a toothpick or bamboo skewer, scratch through the UG050 Jet Black allowing the color under it show through. This design was done free handed creating leaves and veins going around the outer edge of the plate. When dry dust off any crumbs from the sgraffito of the leaves.
Using a CB604 #4 Soft Fan, apply 3 coats of UG050 Jet Black to the back of the plate, either the low fire plate or the stoneware plate.
Using a CB604 #4 Soft Fan, apply 2 coats of S2101 Crystal Clear Brushing to the low fired plate. Allow to dry.
Begin with properly fired shelf cone 04 bisque. Moisten a clean sponge and wipe bisque to remove any dust.
Using the RB144 #4 Soft Fan, apply 2 coats of the EG006 Sparkle Black Engobe to the outside of the mug (even the bottom – engobes are not a glaze and will not stick to the shelf).
Once the Engobe is dry, use a pencil to draw a grid on the mug.
Using the CB106 #6 Script Liner, carefully block out squares in the grid with AC302 Wax Resist.
Once the wax is dry, use the CB106 #6 Script Liner to apply 2 coats of SW514 Sage Gloss around the blocked-out squares and on the handle – you may need to clean glaze drops off the wax resist using a damp sponge.
Using the RB140 #8 Soft Fan, apply 2 coats of SW220 Black Timber to the inside of the mug.
Use a damp sponge to clean any excess glaze that may have got on the foot.
Place directly on the kiln shelf and fire to cone 6.
Begin with properly fired shelf cone 04 bisque. Moisten a clean sponge and wipe bisque to remove any dust.
Fill the AC222 Medium Writer Tip Kit with SW221 Mint Speck.
Apply angled stripes to create the swirl pattern. You will want the stripes to appear dimensional, but not be heavy enough that the product is dripping. If the product dries quickly – the application is thin and you will want to apply 2 coats.
Using the RB140 #8 Soft Fan, apply 2 coats of SW221 Mint Speck to the inside of the mug.
Using the RB144 #8 Soft Fan, apply 2 coats of SW224 Tropical Teal to the inside and outside of the mug (avoiding the bottom).
Use a damp sponge to clean any excess glaze that may have got on the foot.
Place directly on the kiln shelf and fire to cone 6.
Begin with properly fired shelf cone 04 bisque. Moisten a clean sponge and wipe bisque to remove any dust.
Using the RB140 #8 Soft Fan, apply 3 coats of SW115 Aqua Gloss to the outside of the mug.
Using the CB106 #6 Script Liner, apply 2 thin coats of SC102 Just Peachy to make the body of the shrimps. (You may want to mark the spacing of these with a washable marker) Each body is one swoop of a brushstroke for the shape – 2 coats total.
Apply 1 coat of SC016 Cotton tail to the belly of the shrimps.
Apply 1 coat of SC088 Tu Tu Tango to the tail and markings on the shrimps.
Using the RB140 #8 Soft Fan, apply 2 coats of SC102 Just Peachy to the inside of the mug.
Apply 1 coat of SC088 Tu Tu Tango to the inside of the mug.
Use a damp sponge to clean any excess glaze that may have got on the foot.
Place directly on the kiln shelf and fire to cone 6.
Begin with properly fired shelf cone 04 bisque. Moisten a clean sponge and wipe bisque to remove any dust.
Using a RB144 #4 Soft Fan, apply 2 coats of SW128 Cordovan to the inside of the mug, the handle, and the top ½” of the outside.
Using a CB106 #6 Script Liner, paint dots or another pattern by applying 2 coats of SW128 Cordovan – avoid applying the design to close to the bottom of the piece; this combination can be very fluid.
Using a RB144 #4 Soft Fan, apply 1 coat of SW222 Green Jasper to the outside of the mug. (2 coats if you’re a light glazer)
Use a damp sponge to clean any excess glaze that may have got on the foot.
Place directly on the kiln shelf and fire to cone 6.
Wipe down bisque with a damp sponge to get rid of any dirt or dust.
Apply three coats of SW166 Norse blue to the whole front of the plate and allow to dry.
In the mixing cup mix three parts SW165 Lavender Mist to one part water and prep the pipette with alcohol.
Working swiftly, apply one thick coat of the watered down SW165 Lavender Mist to the rim of the plate and immediately drop repeating drips of rubbing alcohol along the rim of the plate. Continue until the whole rim of the plate is done. Apply another thick coat of the mixture to the center of the plate and either drip more alcohol immediately onto the wet glaze, or just leave the glaze as-is for a more solid colored center.
Apply two coats of EG003 Brick Red to the whole plate.
Apply three coats of SW214 Micro Pearl and allow to dry.
Mix up your bubble solution with 6 parts SC031 The Blues glaze, 1 part dish soap, 2 parts water in a small cup. Stir thoroughly with the straw.
Blow the bubbles until they overflow the cup and gently scoop out and place them onto the piece. Allow the bubbles to pop naturally. Repeat until the whole plate is covered.
Mix EL106 Tidal Pool and EL144Dark Amethyst onto a paper plate using a toothpick, and let it dry up.
You will want to start drying the glaze the day before or a few hours before staring the project.
After the glaze has dried, break the glaze apart into smaller chips on the plate.
Begin with properly fired shelf cone 04 bisque. Moisten a clean sponge and wipe bisque to remove any dust.
Using a RB106 Script Liner, apply PC601 Clear Cascade in a pattern around the rim. Apply 2 rows of “w”s so there is a space to add the dried EL106 Tidal Pool and EL144Dark Amethyst.
Apply the dried chips of EL106 Tidal Pool and EL144Dark Amethyst inside of the loops made with the Clear Cascade. To help the dried chips stick, add a dot of PC601 Clear Cascade behind the chips.
Allow the glaze to dry.
Apply 2 coats of EL153Caribbean Blue to both the inside and the outside of the bowl. Allow the glaze to dry, then apply 2 coats of EL131Turtle Shell. Use A CB604 Soft Fan.
Check the ware over for any blemishes and if any are present, lightly sand the ware to remove the blemishes.
Damp sponge the ware to remove any fired dust and to condition the piece for decorating.
Place the Fundamental Colors on the palette as needed. If the product is extremely thick, thin with a few drops of water or Thin ’n Shade. Mix with a palette knife.
Using the #8 Pointed Round fully loaded with a generous amount of Bright Yellow, Flame Red and Orange, all on the brush at the same time.
Using a blooping motion, generously cover the top of the mushroom. The colors should look mottled. However, total coverage is needed. Keep reloading the Pointed Round as needed. There is no need to wash the brush. Allow the first application some drying time. Proceed to apply two more coats in the same manner.
While the top is setting; using the same brush generously loaded with Apple Green and Lime Green. Proceed to apply these two colors to the underside of the mushroom and the stem. Again, a total of three coats is needed. Allow the color to dry.
Special Note: Once the mottled basecoats have been applied, the piece can be fired to cone 04 to set the color. By firing now, this will eliminate any white areas of bisque showing through the Sgraffitoing. If you decide not to set the color, there is a good possibility that cutting through the applied color could leave white bisque exposed.
Once the decision has been made to fire or not fire the base colors, proceed as follows.
Using the ¾” Oval, apply three coats of Jet Black to the top of the mushroom and bring the Jet Black under the mushrooms lip by one-quarter inch (1/4”).
Before moving on to the stem, Sgraffito the top of the mushroom. When attempting this technique, the top layer of color must remain fairly damp. Color should feel damp but should not be so wet the color comes off on your fingers.
A pattern has been provided as a guide for the Sgraffitoing.
Lightly, if needed sketch the design onto the damp Jet Black.
To Sgraffito:
Top color should be damp.
Hold the Sgraffito tool, like a pencil.
Work towards yourself.
Use plenty of pressure on the tool.
Gently brush off the debris caused by the Sgraffitoing.
While cutting through the top color, if the color starts to chip, the top color is too dry. Spritz with water or lay a wet paper towel over the color and allow some time to rehydrate the underglaze.
Once the top of the mushroom has been Sgraffitoed; using the ¾” Oval, apply three coats of Olive to the stem of the Mushroom and its underside. Butting the Olive right next to the Jet Black.
Again, referring to the provided pattern, Sgraffito the grass like design over the stem and pull in lines to the underside of the mushroom.
Brush off any fine debris that may be present.
Allow to dry and fire the piece to shelf cone 04.
Damp sponge the ware to condition for glazing and to remove any fired dust.
With Fan Glaze brush, apply 2 to 3 coats of Crystal Clear Brushing over the entire piece.
Stilt ware and fire to shelf cone 06.
Remove Stilt marks with Dremel Tool or Stilt Stone.
Begin with properly fired shelf cone 04 bisque. Moisten a clean sponge and wipe bisque to remove any dust.
Onto a paper plate pour a little bit of EL149 Lavender Flower and mix with water; repeat this step with less water to make a thinner and thicker version of EL149 Lavender flower.
Apply the thinner version of EL149 Lavender flower first by using a RB106 Scripted Liner. Place small, medium, or large splotches round the entire bowl. Once dry repeat with the thicker version of EL149 Lavender Flower. Apply only one coat.
Repeat steps 2 and 3 with EL153 Caribbean Blue and EL130 Sea Green.
Once dry, apply SG402 White by outlining all the different splotches, one coat.
Apply NTBR Clear One Brushing glaze over the entire inside. Apply with a RB144 Soft Fan, one coat.
Apply EL130 Sea Green all around the outside of the bowl. Apply with a RB144 Soft Fan, 3 coats.
Let dry then place it on a stilt and fire it to cone 06.
MB1467 Faceted Bud Vase
Begin with properly fired shelf cone 04 bisque. Moisten a clean sponge and wipe bisque to remove any dust.
Onto a paper plate pour a little bit of EL149 Lavender Flower and mix with water; repeat this step with less water to make a thinner and thicker version of EL149 Lavender flower.
Apply the thinner version of EL149 Lavender flower first by using a RB106 Scripted Liner. Place small, medium, or large splotches in a band going around the middle of the vase. Once dry repeat with the thicker version of EL149 Lavender Flower. Apply only one coat.
Repeat steps 2 and 3 with EL153 Caribbean Blue and EL130 Sea Green.
Once dry, apply SG402 White by outlining all the different splotches, one coat.
Apply NTBR Clear One Brushing glaze over all the splotches. Apply with a RB144 Soft Fan, one coat.
Apply EL130 Sea Green all around the top and bottom of the vase. Apply with a RB144 Soft Fan, 3 coats.
Apply EL153 Caribbean Blue to the inside of the vase. Apply with a RB144 Soft Fan, 3 coats.
Let dry then place it on a stilt and fire it to cone 06.
Directions: MB885 Great Shapes Vases: Short Neck
Begin with properly fired shelf cone 04 bisque. Moisten a clean sponge and wipe bisque to remove any dust.
Onto a paper plate pour a little bit of EL149 Lavender Flower and mix with water; repeat this step with less water to make a thinner and thicker version of EL149 Lavender flower.
Apply the thinner version of EL149 Lavender flower first by using a RB106 Scripted Liner. Place small, medium, or large splotches in a band going around the middle of the vase. Once dry repeat with the thicker version of EL149 Lavender Flower. Apply only one coat.
Repeat steps 2 and 3 with EL153 Caribbean Blue and EL130 Sea Green.
Once dry, apply SG402 White by outlining all the different splotches, one coat.
Apply NTBR Clear One Brushing glaze over all the splotches. Apply with a RB144 Soft Fan, one coat.
Apply EL130 Sea Green all around the top and bottom of the vase. Apply with a RB144 Soft Fan, 3 coats.
Apply EL153 Caribbean Blue to the inside of the vase. Apply with a RB144 Soft Fan, 3 coats.
Let dry then place it on a stilt and fire it to cone 06.
Additional Adaptations & Tips
Q tips or a paper towel will be helpful to prevent running when applying the watered down glaze. Lightly dap up the excess pool of glaze.
Begin by wiping down the bisque with a damp sponge. Using the Fan Brush, coat the inside of the mug with three coats of UG010.
While the inside of the mug is drying, prep the bubble color solution. Each color of underglaze gets its own cup. Mix each color with one part glaze, one part soap, and two parts water.
Take the first color and blow bubbles in the solution with a straw. Using a spoon, stir to fluff up the bubbles and make them smaller. Use the spoon to plop sections of bubbles onto the outside of the mug. Allow the bubbles to pop naturally.
Repeat step 3 with each color.
Once the bubbles have dried, apply two coats of S2101 Crystal Clear Brushing Glaze to the whole mug.
Allow to dry, stilt, and fire to cone 06.
Additional Adaptations & Tips
To reduce possible smearing of the bubbles when applying the clear coat, bisque fire the mug to cone 04 before applying the clear glaze.
Begin with properly fired shelf cone 04 bisque. Moisten a clean sponge and wipe bisque to remove any dust.
Pour SG102 Rapid Roll Black inside the vase, then roll the vase and pour out the remainder glaze.
Apply CG963 Lemon Lime to the top half of the vase. Apply two coats with a RB144 Soft Fan.
Apply CG1001 Gogh Iris to the middle of the vase without touching top glaze. Apply two coats with a RB144 Soft Fan.
Apply CG962 Blue Azure to the bottom of the vase without touching middle glaze. Apply two coats with a RB144 Soft Fan.
Now take a RB144 Soft Fan and dip half of the brush into CG963 Lemon Lime and the other half into CG1001 Gogh Iris. This will go in the middle of both glazes to create a blend between the two. Apply two coats.
Take a RB144 Soft Fan and dip half of the brush into CG962 Blue Azure and the other half into CG1001 Gogh Iris. This will go in the middle of both glazes to create a blend between the two. Apply two coats.
Apply three coats of SC016 Cotton Tail to the top of the plate and allow to dry.
Pour the other colors of Stroke & Coat into the AC220 Detail Bottles and Tips. Cut the top of the tips off the spouts.
Take the three chunks of moist clay, roll them into balls, and press them evenly spaced onto the bottom of the plate over the foot ridge.
Press the plate and balls of clay firmly onto the pottery wheel. Give it a little wiggle to ensure that it’s properly gripping and won’t fly off.
Start up the wheel at about ¾ max speed.
Begin with your first bottle of color and squeeze out a few rings of thick color onto the spinning plate. Repeat for the other two colors.
When all the colors are squeezed onto the plate, run the wheel at full speed for a few seconds. Slowly stop the wheel and remove plate from the wheel and blobs of clay.
Allow the face of the plate to dry and add three coats of SC015 Tuxedo to the back of the plate.
Allow plate to dry, stilt, and fire to cone 06
Additional Adaptations & Tips
For a more mixed look to the colors, apply two coats of SC016 Cotton Tail to the face of the plate and allow to dry. Pour out enough color for another coat onto a paper plate and bring with to the wheel. After attaching your plate, add a third wet coat os SC016 Cotton Tail and immediately begin applying the rings of color to the fresh coat of wet glaze just like the above instructions.
Begin with properly fired shelf cone 04 bisque. Moisten a clean sponge and wipe bisque to remove any dust.
Trace the pattern on the tile using AC230 Clay Carbon Paper and a pencil.
Decide where you would like to place your color choices.
Using a CB602 #2 Soft Fan, apply 3 coats of each color to the are you would like that color. Allow to dry between each coat.
After all colors have been applied, remove the masking tape. Brush off any crumbs of dry color.
Using a CB604 #4 Soft Fan, apply 2 coats of S2101 Crystal Clear Brushing glaze to the top side of the tile. Optional: You can glaze the back of the tile if you like.
Stilt and Fire to Cone 06/05.
Additional Adaptations & Tips
Make sure to shake the Stroke & Coats well.
Be careful when applying the Speckled Stroke & Coats not to get the specks to bunch in one area.
Begin with properly fired shelf cone 04 bisque. Moisten a clean sponge and wipe bisque to remove any dust.
Place some of each Stroke & Coat color on a palette.
Using a CB604 #4 Soft Fan, randomly apply large dots of SC006 Sunkissed, SC075 Orange-A-Peel and SC074 Hot Tamale onto the plate covering the plate with all three colors.
Repeat the step above. Make sure to apply a good bit of each color.
Take a piece of plastic wrap and lay it over the plate. Using your fingers, smush the colors blending the colors into each other.
Remove the plastic wrap and immediately lay the feathers into the wet glaze pressing them down to stick. Make sure to have the spine of the feather facing up.
Note: If your glaze has dried or if your feathers are not sticking you can lightly wet the feathers with water as you apply them.
When the shine is gone from the Stroke & Coat colors, using a CB604 #4 Soft Fan, apply 2 coats of FN009 Black over the feathers covering the top of the plate.
When the shine of the second coat of FN009 Black has gone, remove the feathers before the glaze dries. Allow to dry!
Using a CB604 #4 Soft Fan, Apply 2-3 coats of FN009 Black to the back of the plate. Allow to dry!
Stilt and Fire to Cone 06/05.
Additional Adaptations & Tips
Make sure to shake the Stroke & Coats well.
Place the Stroke & Coat on a glazed tile or paper plate as a palette.
Colors can also be applied with a sponge instead of a brush.
The feathers can be washed and reused.
Other objects can be used in place of feathers such as Jute String.
Begin by coating the tile in 2 coats of FN009 black. Allow to dry.
Thin down the EL149 Lavender Flower in about a 5 part glaze to 1 part water ratio. Fill the pipette with the rubbing alcohol.
Apply one thick layer of the watered down EL149 over the top of the black tile. Immediately drip the rubbing alcohol from the pipette randomly over the tile.
Allow the tile to dry, stilt, and fire to cone 06.
Place one of each of the following colors onto a covered plate: SC006 Sunkissed, SC013 Graple, SC026 Green Thumb, SC074 Hot Tamale, SC075 Orange-A-Peel, SC076 Cara-bein Blue. Allow the colors to dry out. This may take some time.
Once the colors are dry, break the colors up to create crumbles. Keeping each color separate.
Begin with properly fired shelf cone 04 bisque. Moisten a clean sponge and wipe bisque to remove any dust.
Using a CB-604 #4 Soft Fan, apply 1 coat of FN009 Black to the top of the plate and 3 coats to the back of the plate. Allow to dry between each coat.
Using the ¼” Masking Tape. Divide the top of the plate into six sections.
Cover the sections of the plate not being worked on with paper to prevent the colors going onto each other.
Using a CB604 #4 Soft Fan, dampen one section at a time with some water. When the shine is gone, apply a coat of FN009 Black. While the FN009 Black is still wet, sprinkle the SC006 Sunkissed onto that section of the plate, press lightly to help attach to the wet glaze.
Repeat with the remaining colors creatin a color wheel.
Remove the masking tape. Allow to dry!
Stilt and Fire to Cone 06/05.
Additional Adaptations & Tips
Make sure to shake the Stroke & Coats well.
No Glaze needed over top of the Stroke & Coat Colors.
Place one of each of the listed Stroke & Coat colors onto one of each covered plate. Allow the colors to dry out. This may take some time.
Once the colors are dry, break the colors up to create crumbles. Mix all the colors together and place on a paper dinner plate.
Begin with properly fired shelf cone 04 bisque. Moisten a clean sponge and wipe bisque to remove any dust.
Pour some SG302 Rapid Roll Black Glaze into a small cup. Pour the glaze into the vas and roll the glaze around the inside of the vase slowly covering the inside of the vase. Drain the glaze out of the vase. Leave the vase upside down to fully drain. When the shine is gone, wipe off any spills with a damp sponge. Allow to dry! Note: Do not return any excess glaze back into the bottle to prevent the glaze from being contaminated.
Using a CB-604 #4 Soft Fan, apply 1 coat of FN009 Black to the bottom of the vase and 3 coats to the upper rim of the vase. Allow to dry between each coat.
Using a CB604 #4 Soft Fan, dampen lower section of the vase with some water. When the shine is gone, apply a coat of FN009 Black. While the FN009 Black is still wet, roll the vase into the plate of crumbles covering the lower section of the vase. Press lightly to help attach to the wet glaze. Allow to dry!
Stilt and Fire to Cone 06/05.
Additional Adaptations & Tips
Make sure to shake the Stroke & Coats well.
No Glaze needed over top of the Stroke & Coat Colors.
The Rapid Roll takes the guess work out of thinning the black or white glaze for inside hard to reach pieces.
Do not return any excess Rapid Roll glaze back into the bottle to prevent the glaze from being contaminated.
Begin by applying two coats of SC015 to the whole face of the tile using a soft fan brush.
After the last layer of black has lost its shine, lay the pattern on top of the tile and gently trace with a pen. Remove pattern.
Using the mini liner brush, trace the lines that were left from the pattern transfer with wax resist.
For the flower petals, blob in EL127 with a script liner brush and immediately force dry with a hairdryer on high until cracks appear in the drying glaze.
For the leaves, blob in EL130 with a script liner brush and immediately force dry with a hairdryer on high until cracks appear in the drying glaze.
For the inside of the flower, blob in EL145 with a script liner brush and immediately force dry with a hairdryer on high until cracks appear in the drying glaze.
For the background, blob in EL149 with a script liner brush and immediately force dry with a hairdryer on high until cracks appear in the drying glaze.
Begin by applying two coats of SC015 to the whole face of the tile using a soft fan brush.
After the last layer of black has lost it’s shine, lay the pattern on top of the tile and gently trace with a pen. Remove pattern.
Using the mini liner prush, trace the lines that were left from the pattern transfer with wax resist.
For the flower petals, blob in CG1014 with a script liner brush and immediately force dry with a hairdryer on high until cracks appear in the drying glaze.
For the leaves, blob in CG987 with a script liner brush and immediately force dry with a hairdryer on high until cracks appear in the drying glaze.
For the inside of the flower, blob in CG753 with a script liner brush and immediately force dry with a hairdryer on high until cracks appear in the drying glaze.
For the background, blob in CG999 with a script liner brush and immediately force dry with a hairdryer on high until cracks appear in the drying glaze.
Begin with properly fired shelf cone 04 bisque. Moisten a clean sponge and wipe bisque to remove any dust.
Quickly run the bowl under water to moisten. This will allow smoother application and blending of the glaze.
Brush 1 coat of FN004 Red on the top 1/3 of the bowl.
Brush 2 coats of FN002 Yellow on the center 1/3 of the bowl. Allow to dry between coats.
Brush a second coat of FN004 Red on the top 2/3 of the bowl.
While the FN004 Red is still wet, brush a third coat of FN002 Yellow on the center of the bowl and gradually move the brush upwards towards the top of the bowl, blending the yellow into the red. Spinning the banding wheel will make this process easier. The blending of the yellow and red glaze will create a section of orange in the bowl.
After throwing bowl on the wheel and is soft leather hard, use a #4 Soft Fan Brush (RB-144) apply 2 coats of EG007 Terracotta Engobe to the Inside and outside of the vase, including the bottom.
When engobe has had time to dry, but is still workable, carve leaf pattern from the rim down and on the inside rim of the bowl.
When dry, fire bowl to cone 04 bisque.
After firing moisten a clean sponge and wipe bisque to remove any dust. Do not oversaturate the bisque with water.
Apply 3 coats of SW 101 Stoned Denim to entire inside of the bowl and 2” down on the outside of the bowl.
Do not wipe the engobe off the foot of the piece, since engobes do not stick to the kiln shelf.
Begin with properly fired shelf cone 04 bisque. Moisten a clean sponge and wipe bisque to remove any dust.
Using a CB604 #4 Soft Fan, apply 2-3 coats of FN001 White to the piece. Allow to dry!
You can glaze the inside or the backs of your piece with FN009 Black. Allow to dry!
Balloon Prep – Take the balloon and stretch it a few times. Roll the balloon inside out. Place the pom pom or the marble in the center of the balloon. Next take the rubber band ad tie around the pom pom or the marble. Roll the balloon back to the correct side. Blow up the balloon no bigger than the palm of your hand.
Color prep – Remove the squeeze cap off the SC006 Sunkissed, SC074 Hot Tamale, and the SC097 Cant-elope. Replace with one of the AC224 Plastic Detailer Caps.
Mark where you would like the flowers to be with a pencil.
Squeeze a dot of SC006 Sunkissed in the center area of the flower.
Squeeze 7 dots of SC097 Cant-elope around the center dot.
Squeeze dots of SC074 Hot Tamale in between but just slightly past the SC097 Cant-elope dots.
Take the balloon and center it over the dots of color and press down giving just a slight rocking motion then lift straight up off the surface. Continue doing this for as many flowers you are wanting on the piece. Allow to dry!
Place some SC026 Green Thumb and some SC027 Sour Apple onto a plate.
Using a CB106 #6 Script Liner, Load the brush with the SC027 Sour Apple then side load the brush into the SC026 Green Thumb, apply stems to the flowers going to the bottom of the piece.
Reload the CB106 #6 Script Liner as in the previous step and pressure stroke leaves to the sides of the stems. Allow to dry!
Using a CB110 #10/0 liner. Outline the leaves, stems, and flowers in a slight wild fashion with SC015 Tuxedo.
Using the end of a brush handle add dots around the center of the flowers with SC015 Tuxedo. Allow to dry!
Stilt and fire to shelf con 06/05.
Optional Way to Apply the Flowers
Place some SC006 Sunkissed in the center of a glazed tile. Place some SC097 Cant-elope on each side of the Sunkissed then Place some SC074 Hot Tamale on each side of the Hot Tamale. Spread out level with a Palette Knife.
Dip the balloon into the color then onto the piece.
Apply the leaves and stems the same way as above.
Additional Adaptations & Tips
You can create any color combination of flowers with any other color Stroke & Coats.
Applying the Stroke & Coat over top of the Foundation Glazes you do not need to Clear Glaze the piece.
The AC224 Plastic Detailer Caps fits on 2oz, 8oz and 16oz squeeze bottles.
Using a damp sponge, wipe off the clay canvases to remove any dust.
Use the Clay Carbon Transfer Paper and a pen to transfer the design from the pattern to the biqsue.
Fill in the following main colors of the project with three coats: EL121 Copper Adventurine for the cloak, EL123 Patina for the hair, EL 125 Sahara Sands for the skin, EL119 Burnished Steel for the Blade. EL136 for the trim on the cloak and blade handle, EL211 Volcanic Glow for the background.
Allow colors to dry and apply one coat of AC302 Wax Resist over the top of the colors.
Using your metal tool or toothpick, scratch lines between the individual colors, and add any accent lines to help detail the image. Your scratch marks should go all the way through the glaze to the bisque.
Using the liner brush, fill in the scratched lines with a puddle coat of the following colors: EL136 Lapis Lagoon for the hair, EL101 Oyster Shell for the damascus steel lines in the blade, EL118 Blue Grotto for the edges of the cloak.
Apply three coats of EL119 Burnished Steel to the edges of the canvases.
Allow the glaze to fully dry, stilt, and fire to cone 06.
Begin with properly fired shelf cone 04 bisque. Moisten a clean sponge and wipe bisque to remove any dust. Do not oversaturate the bisque with water.
With a #4 Soft Fan Brush (RB144) apply 2 coats of EG007 Terracotta Engobe to the outside of the cup, including the bottom.
Apply 3 coats of SW224 Tropical Teal to the entire inside of the cup, and ½” down on the outside of the cup and handle using a #4 Soft Fan Brush.
With a #4 Soft Fan Brush apply 2 coats of SW195 Riptide to the outside of the mug and handle, starting just under the Tropical Teal, stopping 2” from the bottom of the cup.
Do not wipe the Engobe off the foot of the piece since Engobes do not stick to the kiln shelf.
Begin with properly fired shelf cone 04 bisque. Moisten a clean sponge and wipe bisque to remove any dust. Do not oversaturate the bisque with water.
With a #8 Soft Fan Brush (RB140) apply 2 coats of EG006 Sparkle Black Engobe to the entire outside of the vase, including the bottom.
Before the Engobe is completely dry (just when the shine is off) use a cloth or your finger to buff over the Engobe to reveal the sparkle in the Engobe.
Apply 3 coats of SW224 Tropical Teal to the entire outside of the vase stopping about 2” from the bottom of the vase using a #8 Soft Fan Brush.
With a #8 Soft Fan Brush (RB140) apply 3 coats of SW169 Frosted Lemon to the entire inside of the vase and outside over the SW224 Tropical Teal.
Do not wipe the Engobe off the foot of the piece since Engobes do not stick to the kiln shelf.
Begin with properly fired shelf cone 04 bisque. Moisten a clean sponge and wipe bisque to remove any dust. Do not oversaturate the bisque with water.
With a #4 Soft Fan Brush (RB144) apply 3 coats of SW515 Aqua Gloss to the top section and the bottom section of outside of the vase.
Using a #4 Soft Fan Brush apply 3 coats of SW 501 White Gloss to the center of the vase.
Glaze the inside of the vase with a #4 fan brush with SW502 Yellow Gloss.
Applying decorative dots with a #4 Liner brush and #0 Detail Brush with the following colors or colors of your choice. These colors can be layered on top of each other, since they are very opaque and will not show through.
SW501 White Gloss
SW502 Yellow Gloss
SW506 Bright Blue Gloss
SW512 Coral Gloss
SW514 Sage Gloss
SW515 Aqua Gloss
These dots can also be applied with a Detail Bottle, sponge on a stick, back of a fan brush or a toothpick.
Wipe off excess glaze from the bottom of the piece.
Do not stilt
Fire to cone 6
Decorative Gloss Ringed Bud Vase
Begin with properly fired shelf cone 04 bisque. Moisten a clean sponge and wipe bisque to remove any dust. Do not oversaturate the bisque with water.
With a #4 Soft Fan Brush (RB144) apply 3 coats of SW515 Aqua Gloss to the top and inside of the vase
With the Low Tack Masking Tape, section off random stripes, on the body of the vase, from the top to the bottom.
With a #4 Liner brush glaze inside the masked off section with the following colors or color combination of your choice.
SW502 Yellow Gloss
SW506 Bright Blue Gloss
SW510 Blue Gloss
SW511 Pink Gloss
SW512 Coral Gloss
SW514 Sage Gloss
SW515 Aqua Gloss
Remove tape prior to firing
Wipe off excess glaze from the bottom of the piece.
Begin with properly fired shelf cone 04 bisque. Moisten a clean sponge and wipe bisque to remove any dust. Do not oversaturate the bisque with water.
With a #4 Soft Fan Brush (RB144) apply 3 coats of SW131 Birch to the bottom carved portion of the vase.
Apply 3 coats of SW515 Aqua Gloss to the middle band of the vase using a #4 Soft Fan Brush.
With a #4 Soft Fan Brush apply 3 coats of SW224 Tropical Teal to the inside rim of the vase and to the top 1/3 of the outside of the vase stopping at the center band of SW515 Aqua Gloss.
Apply 3 coats of SW131 Birch to the inside of the vase, overlapping the SW224 Tropical Teal by about ½”.
Using a #4 Soft Fan Brush, apply 2 coats of SW224 Tropical Teal over the top ½ of the SW131 Birch on the outside carved section of the vase.
Fill a Detail Bottle (AC220) with Light Flux SW401 and apply 2 rows of “W”s on the inside of the bowl
Apply thick dots from top to bottom, inside the W loops, with a ½”oval brush or a detail bottle on the inside of the bowl using the following Stroke and Coat:
Row 1: Alternating SC02 Melon-choly and SC89 Cutie-Pie Coral
Row 2: Repeat colors in row 1
Around the top of the rim, apply small dots of SC06 Sunkissed, with a #6 round detail brush, between Melon-choly and Cutie-Pie-Coral
Once dry, using a #8 soft fan brush (RB-140) apply 2 coats over the outside and inside, using EL140 Toasted Almond
Wipe off excess glaze from the bottom of the piece.
Begin with properly fired shelf cone 04 bisque. Moisten a clean sponge and wipe bisque to remove any dust. Do not oversaturate the bisque with water.
Apply 2 coats of EG004 Dark Brown Engobe to the entire outside of the vase using a #4 Soft Fan Brush.
Using a #4 Soft Fan Brush, apply 3 coats of SW129 Copper Float the entire top of the vase stopping just past the rings.
With a #4 Soft Fan Brush apply 3 coats of SW108 Green Tea from the bottom of the rings and ½ way down the outside of the vase.
Pour some SW223 White Milk Glass onto a plate and dip a round cookie cutter into the glaze. Apply random circles over the Green Tea and Dark Brown Engobe.
With a small sponge on a stick, apply dots on top of the Green Tea and to the Copper Float.
With a #4 Soft Fan Brush, apply 3 coats of Green Tea to the inside neck of the vase.
Begin with properly fired shelf cone 04 bisque. Moisten a clean sponge and wipe bisque to remove any dust. Do not oversaturate the bisque with water.
With a #4 Soft Fan Brush (RB144) apply 2 coats of EG007 Terracotta Engobe to the Inside and outside of the vase, including the bottom.
Apply 3 coats of SW221 Mint Speck to the inside and outside of the rim, about 1” down from the top and a 2” band in the middle of the vase using a #4 Soft Fan Brush.
With a #4 Soft Fan Brush apply 3 coats of SW223 Milk Glass over the top ½ of the base, between the 2 bands of SW221 Mint Speck.
With a #4 Soft Fan Brush apply 3 coats of SW223 Milk Glass to the inside of the vase.
Using the #2 Soft Fan Brush, apply 1 light coat of SW401 Light Flux over the top of SW221 Mint Speck, on the outside rim of the vase.
Do not wipe the Engobe off the foot of the piece since Engobes do not stick to the kiln shelf.
Begin with properly fired shelf cone 04 bisque. Moisten a clean sponge and wipe bisque to remove any dust. Do not oversaturate the bisque with water.
With a #8 Soft Fan Brush (RB-140) apply 3 coats of SW204 Amber Topaz to the entire inside and outside of the bowl.
Using a #8 Soft Fan Brush, apply 1 heavy coat of SW189 Cenote to the inside of the bowl, and 2 coats to the outside of the bowl.
Wipe off excess glaze from the bottom of the piece.
Do not stilt
Fire to cone 6
Medium Vintage Mixing Bowl
Begin with properly fired shelf cone 04 bisque. Moisten a clean sponge and wipe bisque to remove any dust. Do not oversaturate the bisque with water.
With masking tape or using a pencil, section off the inside and the outside of the bowl into 2 sections, one side slightly bigger than the other.
With a #8 Soft Fan Brush (RB-140) apply 3 coats of SW204 Amber Topaz to the entire inside and outside of the bowl on ½ of the bowl.
Using a #8 Soft Fan Brush, apply 1 heavy coat of SW189 Cenote to the inside of the bowl, and 2 coats to the outside of the bowl on the 2nd section of the bowl.
Wipe off excess glaze from the bottom of the piece.
Begin with properly fired shelf cone 04 bisque. Moisten a clean sponge and wipe bisque to remove any dust.
On the canvas, lay the transfer paper down with your pattern on top. Use a pencil or a pen to trace the image onto the canvas.
Remove the pattern and outline the entire image with FD254 Black Licorice. If using from the bottle only 1 coat is needed. Apply 3 coats if you use a CB110 Mini Liner brush.
Once your outline is dry fill in two of the bottom rows of the hat, one of the stars up top, and one of the boxes on the 4th and 5th firework with SC016 Cotton Tail. Use a RB106 Script Liner brush and apply 3 coats.
Apply SC074 Hot Tamale to fill in two of the bottom rows of the hat, one of the stars up top, and one of the boxes on the 3rd, 4th and 5th firework. Use a RB106 Script Liner brush and apply 3 coats.
Apply SC030 Blue Dawn to fill in the top middle of the hat, one of the stars up top, and one of the boxes on the 3rd, 4th and 5th firework. Use a RB106 Script Liner brush and apply 3 coats.
Apply 3 coats of S2731 Kaboom at the bottom and top of the wiggly lines, then apply 1 coat in the corners over SC030 Blue Dawn in the middle of hat. Use a RB106 Script Liner brush.
In the boxes of the 1st, 2nd and 4th firework fill in with S2731 Kaboom. Use a RB106 Script Liner brush and apply 3 coats.
Once dry, apply 1 coat of SG402 White and made a star outline inside the SC030 Blue Dawn star. Add stripes on the SC074 Hot Tamale star, and the 2nd firework. 1 coat.
Apply SG404 Blue to fill in the thin line at the top of the hat. Add stripes over SC030 Blue Dawn on the 2nd firework and dots on the 5th over top of SC016 Cotton Tail. 1 coat.
Apply SG403 Red to make stripes on the 3rd firework over SC016 Cotton Tail and dots on the SC016 Cotton Tail star, then in the middle of the hat over SC030 Blue Dawn, write the word Liberty. 1 coat.
Begin with properly fired shelf cone 04 bisque. Moisten a clean sponge and wipe bisque to remove any dust. Do not oversaturate the bisque with water.
With a #8 Soft Fan Brush (RB-140) apply 1 coats of SW106 Alabaster to the entire inside of the bowl and to the top ½ of the outside of the bowl,
Using a #8 Soft Fan Brush, apply 3 coats of SW199 Purple Aster to the inside and the outside of the entire bowl.
Wipe off excess glaze from the bottom of the piece.
Do not stilt. Fire to cone 6.
Medium Vintage Nesting Bowl
Begin with properly fired shelf cone 04 bisque. Moisten a clean sponge and wipe bisque to remove any dust. Do not oversaturate the bisque with water.
With a pencil, lightly divide the inside and outside of the bowl into 2 sections, one side being slightly larger than the other.
Using a #8 Soft Fan Brush, apply 1 coat of SW106 Alabaster to one ½ of the inside of the bowl.
With a #8 Soft Fan Brush apply 3 coats of SW199 Purple Aster to the entire inside of the bowl.
Using a #4 Soft Fan Brush apply 1 coat of SW106 Alabaster to the outside top of the bowl coming down about 3” and to half of the outside section of the bowl.
With a #8 Soft Fan Brush, apply 3 coats of SW199 Purple Aster to the entire outside of the bowl, avoiding the top rim of the bowl.
Apply 3 coats. Of SC076 Cara-bein Blue to the top and outside rim of the bowl using a #4 Soft Fan Brush.
Wipe off excess glaze from the bottom of the piece.
Do not stilt. Fire to cone 6.
Small Vintage Nesting Bowl
Begin with properly fired shelf cone 04 bisque. Moisten a clean sponge and wipe bisque to remove any dust. Do not oversaturate the bisque with water.
Using a #8 Soft Fan Brush, apply 1 coat of SW106 Alabaster the entire inside and outside of the bowl avoiding the outside textured area of the bowl.
With a #8 Soft Fan Brush apply 3 coats of SW199 Purple Aster to the entire inside and outside of the bowl.
Wipe off excess glaze from the bottom of the piece.
Begin with properly fired shelf cone 04 bisque. Moisten a clean sponge and wipe bisque to remove any dust.
Using a CB408 #8 Pointed Round, apply 1 coat of SC033 Fruit Of The Vine to the area under the mushroom top and the top area of the stem. Allow to dry!
With a damp sponge, wipe back the excess color leaving the color in the deep crevices. Allow to dry!
Using a CB408 #8 Pointed Round, Apply 2 coats of SC074 Hot Tamale to the area under the mushroom top and to the top area of the stem right over the previous color. Allow to dry!
Using a CB604 #4 Soft Fan, apply 3 coats of SC033 Fruit Of The Vine to the lower section of the mushroom stem.
Stir well the SG302 Spearmint Snow Gem then put lid back on the jar and shake well to get the crystals mixed in the glaze. Place some on a paper plate or palette to keep the crystals from settling back to the bottom of the jar.
Using a CB408 #8 Pointed round, apply 2-3 coats of SG304 Berry Snow Gem to the mushroom top avoiding the dots.
Place a teaspoon of SG304 Berry Snow Gem into a small 2-ounce cup then add about 10 – 12 drops of SC033 Fruit Of The Vine, mix well.
Using a CB404 #4 Pointed Round, apply 2-3 coats of this mixed color to the dots on the mushroom top. Allow to dry!
Using a CB604 #4 Soft Fan, apply 1 coat of S2101 Crystal Clear Brushing glaze to the area under the top of the mushroom and to the mushroom stem. Allow to dry.
Stilt and fire to shelf cone 06-05.
Large Pointed Mushroom
Begin with properly fired shelf cone 04 bisque. Moisten a clean sponge and wipe bisque to remove any dust.
Using a CB408 #8 Pointed Round, apply 1 coat of SC012 Moody Blue to the area under the mushroom top. Allow to dry!
With a damp sponge, wipe back the excess color leaving the color in the deep crevices. Allow to dry!
Using a CB408 #8 Pointed Round, Apply 2 coats of SSC011 Blue Yonder to the area under the mushroom top right over the previous color. Allow to dry!
Using a CB604 #4 Soft Fan, apply 3 coats of SC027 Sour Apple to the lower section of the mushroom stem.
Stir well the SG302 Spearmint Snow Gem then put lid back on the jar and shake well to get the crystals mixed in the glaze. Place some on a paper plate or palette to keep the crystals from settling back to the bottom of the jar.
Using a CB604 #4 Soft Fan, apply 2-3 coats of SG302 Spearmint to the top half of the mushroom top.
Place 2 teaspoon of SG302 Spearmint Snow Gem into a small 2-ounce cup then add about 10 – 12 drops of SC012 Moody Blue, mix well.
Using a CB604 #4 Soft Fan, apply 2-3 coats of this mixed color to the bottom half of the mushroom top blending into the color placed on the top half. Allow to dry!’
Using a CB604 #4 Soft Fan, apply 1 coat of S2101 Crystal Clear Brushing glaze to the area under the top of the mushroom and to the mushroom stem. Allow to dry.
Stilt and fire to shelf cone 06-05.
Stoneware Amanita Mushroom
Begin with properly fired shelf cone 04 bisque. Moisten a clean sponge and wipe bisque to remove any dust.
Using a CB408#8 Pointed Round, apply 1 coat of SC033 Fruit Of The Vine to the area under the mushroom top and to the stem. Allow to dry!
With a damp sponge, wipe back the excess color leaving the color in the deep crevices. Allow to dry!
Using a CB604 #4 Soft Fan, apply 2 coats of SC074 Hot Tamale to the area under the mushroom top and to the Stem. Allow to dry!
Stir well the SG304 Berry Snow Gem then put lid back on the jar and shake well to get the crystals mixed in the glaze. Place some on a paper plate or palette to keep the crystals from settling back to the bottom of the jar.
Using a CB604 #4 Soft Fan, apply 2-3 coats of SG304 Berry Snow Gem to the mushroom top. Allow to dry!
Using a DB805 #3 Fan, apply a coat of SC074 Hot Tamale around the edge of the mushroom streaking it from the edge to war the center of the mushroom. Allow to dry!
Make sure to dry foo the piece. Do Not Stilt!
Place on a clean kiln shelf.
Fire to shelf cone 6.
Russula Mushroom
Begin with properly fired shelf cone 04 bisque. Moisten a clean sponge and wipe bisque to remove any dust.
Using a CB408 #8 Pointed Round, apply 1 coat of SC012 Moody Blue to the area under the mushroom top. Allow to dry!
With a damp sponge, wipe back the excess color leaving the color in the deep crevices. Allow to dry!
Using a CB604 #4 Soft Fan, apply 2 coats of SSC011 Blue Yonder to the area under the mushroom top right over the previous color. Allow to dry!
Using a CB604 #4 Soft Fan, apply 1 coat of SC008 Just Froggy to the stem.
With a damp sponge, wipe back the excess color leaving the color in the deep crevices. Allow to dry!
Using a CB604 #4 Soft Fan, apply 2 coats of SC027 Sour Apple to 2 the mushroom stem.
Stir well the SG302 Spearmint Snow Gem then put lid back on the jar and shake well to get the crystals mixed in the glaze. Place some on a paper plate or palette to keep the crystals from settling back to the bottom of the jar.
Using a CB604 #4 Soft Fan, apply 2-3 coats of SG302 Spearmint to the top half of the mushroom top about halfway down.
Place 2 teaspoon of SG302 Spearmint Snow Gem into a small 2-ounce cup then add about 10 – 12 drops of SC012 Moody Blue, mix well.
Using a CB604 #4 Soft Fan, apply 2-3 coats of this mixed color to the bottom half of the mushroom top blending into the color placed on the top half. Allow to dry!
Using a DB805 #3 Fan, apply a coat of SC012 Moody Blue around the edge of the mushroom streaking it from the edge to war the center of the mushroom. Allow to dry!
Make sure to dry foo the piece. Do Not Stilt!
Place on a clean kiln shelf.
Fire to shelf cone 6.
Additional Adaptations & Tips if needed.
Make sure to mix the crystals well from the bottom of the jar of Snow Gem.
Placing the mixed color on a paper plate or palette will keep the crystals from settling back in the bottom of the jar.
Be careful not to drag the crystal that it scratches the glaze. If not smoothed out it will fire as a scratch.
By placing a coat of clear glaze on the bisque surface helps keep the Snow Gem from pulling back.
Using a CB604 #4 Soft Fan, apply 3 coats of SW233 Milk Glass to the outside of the vase. Do not glaze the bottom of the vase. Make sure to taper the glaze toward the bottom of the vase. Allow to dry!
Using a pencil, sketch a diamond pattern or pattern of your choice around the vase.
Squeeze a small amount of FD258 Pure White French Dimensions out of the bottle. Take off the tip of the bottle, add about 12 -15 drops of SC012 Moody Blue to the bottle and mix well. Replace the tip.
Apply the colored French Dimension to the diamond shapes that you had drawn on the vase. Allow to dry!
Apply a line of FD254 Black Licorice French Dimensions near the bottom of the vase. This will keep the glaze from flowing off the vase.
Stir and shake the CG1010 Periwinkle Sky glaze well. Pour some on a paper plate. This will enable you to get an even application of the glaze because the crystals sink back to the bottom of the jar.
Using a CB604 #4 Soft Fan, apply 2-3 coats of CG1010 Periwinkle Sky to the outside of the vase going up to the Black French Dimensions line you had applied. Allow to dry!
Begin with properly fired shelf cone 04 bisque. Moisten a clean sponge and wipe bisque to remove any dust.
In a small cup thin some SW001 Clear Glaze tot the consistency of coffee cream. Pour the glaze into one vase at a time. Roll the glaze in the vase coating the inside then slowly pour the glaze out. Leave vase upside down for all the glaze to drain so it does not puddle in the bottom of the vase. Wipe any drips off with a damp sponge. Allow to dry!
Place some of each color Fundamental Underglaze on to a paper plate or glazed tile.
Center the vase on the banding wheel.
Starting at the top section of the vase. While the wheel is spinning, using a CB106#6 Script Liner or a CB602 #2 Soft Fan, apply UG067 Ivory on the bottom section of the top ring then fade into UG 051 China White.
On the middle section of the vase start with UG002 Sea Blue fading up into UG003 Baby Blue.
On the bottom section of the vase start with UG022 Spring Green fading into UG06 Apple Green.
After all the colors have been applied and dried. Sketch your designs or shapes or use the ones on the sample piece using a pencil.
Using the FD258 Pure White French Dimensions that was colored with the SC012 Moodey Blue, apply dots to the tope section of the vase.
Using the FD258 Pure White French Dimensions, apply swirls to the center section of the vase.
Using the FD254 Black Licorice French Dimensions, apply hashtags to the bottom section of the vase. Allow to dry!
Begin with properly fired shelf cone 04 bisque. Moisten a clean sponge and wipe bisque to remove any dust.
Using a CB604 #4 Soft Fan, apply 2 coats of FN001 White to the top side of the plate. Allow to dry!
Using AC230 Clay Carbon Paper and a pencil, trace the pattern onto the piece except the lettering.
Using a CB106#6 Script Liner, apply 3 coats of SC076 Cari-bein Blue to the top section of the popsicle.
Using a CB106#6 Script Liner, apply 3 coats of SC016 Cotton Tail to the center part of the popsicle.
Using a CB106#6 Script Liner, apply 3 coats of SC074 Hot Tamale to the bottom section of the popsicle.
Using a CB404 #4 Pointed Round, apply 3 coats of SC046 Rawhide to the popsicle stick, while the last coat is still damp, streak in some SC016 Cotton Tail for some highlights. Allow to dry!
Using AC230 Clay Carbon Paper and a pencil, trace the lettering pattern onto the piece.
Squirt some SG401 Black Designer Liner onto a palette. Using a CB110 #10/0 Liner and a CB202 #2 Detail Liner, add some water to the brush and blend with some SG401 Black to slightly thin then paint in the lettering with SG401 Black. Allow to dry!
Using the FD254 Black Licorice and FD258 Pure White French Dimensions, add some highlights to the outer edge of the popsicle and the popsicle stick. Allow to dry!
Using a DB805 #3 Fan, streak some SG404 Blue to the outer edge of the top of the plate. Allow to dry!
Using a CB604 #4 Soft Fan, apply 3-4 coats of FN006 to the back of the plate. Allow to dry!
Using a CB604 #4 Soft Fan, apply 1 coat of S2101 Crystal Clear Brushing to the top of the plate. Allow to dry!
Stilt and fire to shelf cone 06/05.
Additional Adaptations & Tips if needed.
Make sure to glaze is dry before trying to trace on the pattern, if there is any moisture the AC230 Clay Carbon will not work.
All Designer Liners and French Dimensions should be shook/ stirred well in case there is a water head on top of the colors.
Begin with properly fired shelf cone 04 bisque. Moisten a clean sponge and wipe bisque to remove any dust.
Using a CB604 #4 Soft Fan, apply 2 coats of FN001 White to the top of the plate. Allow to dry!
Using AC230 Clay Carbon Paper and a pencil, trace the pattern onto the piece.
Using a CB404 #4 Pointed Round and a CB202 #2 Detail Liner, apply 3 coats of SC074 Hot Tamale to the following letters: H, p, y, t, o, J, l and some of the stars.
Using a CB404 #4 Pointed Round and a CB202 #2 Detail Liner, apply 3 coats of SC076 Cara-bein Blue to the following letters: a, p, 4, h, f, u, y and some of the stars. Allow to dry!
Apply SG410 Bright Blue Designer Liner to the right side of the letters. (Refer to the photo).
Apply SG404 Blue and SG405 Red Designer Liner to the star bursts also add some small dots between the star bursts. Allow to dry.
Using FD258 Pure White French Dimensions, add highlights on each of the letters and the 4.
Optional: The edge of the plate can be banded or not using a banding wheel and SG403 Red Designer Liner. Allow to dry!
Using a CB604 #4 Soft Fan, apply 3-4 coats of FN004 Red to the back of the plate. Allow to dry!
Using a CB604 #4 Soft Fan, apply 1 coat of S2101 Crystal Clear Brusing glaze to the top of the plate. Allow to Dry!
Stilt and fire to shelf cone 06/05.
Additional Adaptations & Tips.
Make sure to glaze is dry before trying to trace on the pattern, if there is any moisture the AC230 Clay Carbon will not work.
Make sure to shake the Designer Liners and the French Dimensions well in case there is a water head on top of the colors.
Using a damp sponge, wipe down the bisque canvas. Transfer the pattern using AC230 Clay Carbon paper between the bisque and pattern, outline the pattern with a pen or pencil. Remove the pattern and Clay Carbon Paper and go over the line with FD254. Allow to dry. Prepare an eyedropper and small dish filled with rubbing alcohol.
In individual small dishes, prepare 4 to 1 mixtures of glaze to water with the following colors: SC018 Rosey Posey, SC094 Cant-elope, SC029 Blue Grass, SC024 Dandelion, SC015 Tuxedo
Fish
Body: 2 coats of SC024 Dandelion (not watered down) to the body, after the first two coats have dried apply your third coat and immediately apply the SC094 Cant-elope mixture over top. Use a detail liner dipped in rubbing alcohol to create the resist effect rings.
Tail/fins: SC016 Cotton Tail to the fins, face and tail after the first two coats have dried apply your third coat and immediately apply the SC015 Tuxedo mixture over top. Use a detail liner dipped in rubbing alcohol to create the resist effect rings.
Lotus Flowers
Center: Apply 2 coats of SC016 Cotton Tail to the center of the flowers. After the first two coats have dried apply your third coat and immediately apply the SC024 Dandelion mixture over top. Use a detail liner dipped in rubbing alcohol to create the resist effect rings.
Petals: Apply 2 coats of SC103 Lavendear to the petals. After the first two coats have dried apply your third coat and immediately apply the SC018 Rosey Posey mixture over top. Use a detail liner dipped in rubbing alcohol to create the resist effect rings.
Water
Apply 2 coats of SC101 Spruce It Up to the water sections. After the first two coats have dried apply your third coat and immediately apply the SC029 Blue Grass mixture over top. Use the rubbing alcohol filled eyedropper to create the large resist effect rings.
After the canvas has dried, apply three coats of SC029 Bluegrass to the edges of the canvas using the soft fan brush. Allow to dry, stilt, and fire to cone 06.
Additional Adaptations & Tips
If you get too much watered down glaze in an area, use the corner of a tissue to soak up a bit of the excess.
If you get too much glaze on the French Dimensions, take a toothpick to the top of the line to scrape off the unwanted color after the piece has dried.
With a slab roller or rolling pin, roll clay out to approximately ¼” thick.
Using a ruler, cut a 13” x 4” rectangle slab of clay.
With another piece of rolled out clay, cut a 4” circle with a pre-made template or a 4” cookie cutter.
Score and slip the outside side of the circle and inside bottom of the rectangle. Attach rectangle to outside of circle. Score and slip edges of rectangle together to form the cup.
Let clay harden for a little bit to make it easier to work with.
Cut 2 half circles to the front of the cup, spaced about 1” apart.
Attach triangle shaped nose made of clay 1” down between the 2, half circles.
With the back of a needle tool, indent 2 “eyes” under the half circle cut outs.
With a texture tool or needle tool, create texture all over the body of the piece.
When completely dry, fire to cone 04 bisque.
After bisque fire, moisten a clean sponge and wipe bisque to remove any dust. Do not oversaturate the bisque with water.
With a #4 Fan Brush apply 3 coats of FN205 Saddle Brown to the bottom half of the piece along with the bottom of the base and 3 coats of FN239 Spiced Cream to the top, ombre where they meet in the middle.
Using a #4 Fan Brush apply 3 coats of CG1008 Blue Guppy to the inside of the cup.
With a RB100 #0 Detail Liner fill in the eyes with SC015 Tuxedo and create 2 little nostril dots on the under side of the nose.
With a slab roller or rolling pin, roll clay out to approximately ¼” thick.
Using a pre-made template (if available) or cookie cutters, cut 5 squares that are 5”x 5”. These will be used as the 4 sides and the bottom of the planter.
With another piece of rolled out clay, cut 2 triangles 5” wide by 3” tall.
Score and slip the triangles to 2 of the 5”x 5” squares. These will be the front and back sides of the planter.
On the remaining 2 sides, use a texture roller to create trees. If texture roller is not available, these trees can be painted or carved on.
Score and slip all 4 sides to the bottom of the planter.
Using a cookie cutter or a needle tool, mark out the windows and the front door, but do not go all the way through the clay.
When completely dry, fire planter to cone 04 bisque.
After bisque fire, moisten a clean sponge and wipe bisque to remove any dust. Do not oversaturate the bisque with water.
If desired, you can mask off the around the windows to create crisp lines for the window trim.
Using a RB110 – 10/0 Detail Liner, apply 3 coats of SC016 Cotton Tail around the windows.
With a #4 Soft Fan Brush (RB144) apply 3 coats of SC074 Hot Tamale to the entire outside and bottom of the house, avoiding the inside of the windows, the door and the peaks of the house.
Using brush RB104 #4 Liner, apply 3 coats of SC004 Sunkissed to the window panes.
Apply 3 coats of CG1006 Purple Reign to the door with a #4 Liner Brush (RB104)
With a #4 Fan Brush, apply 3 coats of CG1016 Asteroid to the roof peaks.
With RB104 #4 Liner Brush glaze the trees using SC008 Just Froggy and SC036 Irish Luck.
Create window boxes using SC041 Brown Cow outline and create texture with SC015 Tuxedo. Flowers and leaves using SC033 Fruit of the Vine, SC071 Purple-licious and SC013 Grapel and SC008 Just Froggy
Outline all windows and doors with SC015 Tuxedo along with creating a door handle.
With a #4 Fan Brush, apply 3 coats of FN002 Yellow to the entire inside of the house.
Begin with properly fired shelf cone 04 bisque. Moisten a clean sponge and wipe bisque to remove any dust.
With a #4 Soft Fan Brush (RB144) apply 3 coats of SW128 Cordovan to the entire inside of the mug and 2” down from the top and 2” up from the bottom on the outside of the mug.
Using a #4 Soft Fan Brush, apply 2 coats of EL207 Gold Mine to the middle of the mug, overlapping the Cordovan by ½” and inch on the top and bottom.
Wipe off excess glaze from the bottom of the piece.
Apply two coats of EG003 Brick Red to the whole mug.
Apply three coats of SW214 Micro Pearl and allow to dry.
Mix up your bubble solution with 6 parts SC031 The Blues glaze, 1 part dish soap, 2 parts water in a small cup. Stir thoroughly with the straw.
Blow the bubbles until they overflow the cup and gently scoop out and place them onto the piece. Allow the bubbles to pop naturally. Repeat until the whole mug is covered.
Begin with properly fired shelf cone 04 bisque. Moisten a clean sponge and wipe bisque to remove any dust.
Apply SG101 Rapid Roll White to the inside of the vase. Quickly roll for one coat coverage, then tip the vase upside down and allow the glaze to drain until it’s no longer dripping.
On the outside and bottom of the vase apply 2 to 3 coats of SG303. Apply with a RB144 soft fan.
Once dry apply FN016, FN044, and FN052 in small squares or triangles, going from bottom to top in a curved line in the fount of your vase. Apply with a CB202 Detail Liner.
Repeat the same application with FN021, FN037, and FN043 in small squares or triangles, going from bottom to top in a curved line in the fount of your vase. Apply with a CB202 Detail Liner.
Let dry and fire to cone 06.
SG304 Berry Snow Gem Vase:
Begin with properly fired shelf cone 04 bisque. Moisten a clean sponge and wipe bisque to remove any dust.
Apply SG101 Rapid Roll White to the inside of the vase. Quickly roll for one coat coverage, then tip the vase upside down and allow the glaze to drain until it’s no longer dripping.
On the outside and bottom of the vase apply 2 to 3 coats of SG304. Apply with a RB144 soft fan.
Once dry apply FN004, FN035, and FN051 in small squares or triangles, going from bottom to top in a curved line in the fount of your vase. Apply with a CB202 Detail Liner.
Repeat the same application with FN012, FN017, and FN036 in small squares or triangles, going from bottom to top in a curved line in the fount of your vase. Apply with a CB202 Detail Liner.
Let dry and fire to cone 06.
SG305 Spearmint Snow Gem Vase:
Begin with properly fired shelf cone 04 bisque. Moisten a clean sponge and wipe bisque to remove any dust.
Apply SG101 Rapid Roll White to the inside of the vase. Quickly roll for one coat coverage, then tip the vase upside down and allow the glaze to drain until it’s no longer dripping.
On the outside and bottom of the vase apply 2 to 3 coats of SG305. Apply with a RB144 soft fan.
Once dry apply FN007, FN010, and FN053 in small squares or triangles, going from bottom to top in a curved line in the fount of your vase. Apply with a CB202 Detail Liner.
Repeat the same application with FN019, FN034, and FN041 in small squares or triangles, going from bottom to top in a curved line in the fount of your vase. Apply with a CB202 Detail Liner.
Let dry and fire to cone 06.
Additional Tips
Foundations will pull away from each other while being fired.
Begin with properly fired shelf cone 04 bisque. Moisten a clean sponge and wipe bisque to remove any dust.
Apply SG 101 Rapid Roll White to the inside of the vase. Quickly roll for one coat coverage, then tip the vase upside down and allow the glaze to drain until it’s no longer dripping.
On the inside of the lip of the vase apply 3 coats of FN021. Apply with a CB604 soft fan.
On the outside and bottom of the vase apply 3 coats of FN044. Apply with a CB604 soft fan.
Once dry apply FN043 and FN016 for the two round lines coming from the bottom of the vase. Apply 3 coats for each round line, using a CB106 Scripted Liner.
Now SG303 for the leaf design that will overlap the round lines. Apply 2 to 3 coats using a CB106 Scripted Liner.
On the rim of the vase apply 2 coats of SG303 with a CB106 Scripted Liner.
Add several dots around the leaf design using SG303, FN037, and FN052. Apply with the round end of a paint brush.
Let dry and fire to cone 06.
SG304 Berry Snow Gem
Begin with properly fired shelf cone 04 bisque. Moisten a clean sponge and wipe bisque to remove any dust.
Apply SG 101 Rapid Roll White to the inside of the vase. Quickly roll for one coat coverage, then tip the vase upside down and allow the glaze to drain until it’s no longer dripping.
On the inside of the lip of the vase apply 3 coats of FN0036. Apply with a CB604 soft fan.
On the outside and bottom of the vase apply 3 coats of FN012. Apply with a CB604 soft fan.
Once dry apply FN017 and FN035 for the two round lines coming from the bottom of the vase. Apply 3 coats for each round line, using a CB106 Scripted Liner.
Now SG304 for the leaf design that will overlap the round lines. Apply 2 to 3 coats using a CB106 Scripted Liner.
On the rim of the vase apply 2 coats of SG304 with a CB106 Scripted Liner.
Add several dots around the leaf design using SG304, FN004, and FN051. Apply with the round end of a paint brush.
Let dry and fire to cone 06.
SG305 Spearmint Snow Gem
Begin with properly fired shelf cone 04 bisque. Moisten a clean sponge and wipe bisque to remove any dust.
Apply SG 101 Rapid Roll White to the inside of the vase. Quickly roll for one coat coverage, then tip the vase upside down and allow the glaze to drain until it’s no longer dripping.
Outside on the top half of the vase apply FN034 with a CB604 soft fan, apply 3 coats.
Outside on the bottom half of the vase apply 3 coats of FN053. Apply with a CB604 soft fan.
Once dry apply FN019 and FN010 for the two round lines coming from the bottom of the vase. Apply 3 coats for each round line, using a CB106 Scripted Liner.
Now SG305 for the leaf design that will overlap the round lines. Apply 2 to 3 coats using a CB106 Scripted Liner.
In between the top and bottom half of the vase apply 2 coats of SG305 with a CB106 Scripted Liner.
Add several dots around the leaf design using SG305, FN007, and FN041. Apply with the round end of a paint brush.
On a paper plate, marble together SC028 Blue Isle and SC029 Blue Grass. Add drops of SW167 Sand and Sea and marble into the Stroke and Coat with the back of a brush. Set aside the plate to dry. (Best if left overnight or in front of a fan)
Applyu three coats of SW167 Sand and Sea to the stem and two coats to the top of the cap.
Apply three coats of SC028 Blue Isle to the gills of the mushroom and about 1/3 of the way down the stem over top of the Sand and Sea.
Break apart the dried marble glaze mixture into crumbles.
Apply a third coat of SW167 Sand and Sea to the top of the mushroom cap and sprinkle the crumbles onto the wet glaze.
Begin with properly fired shelf cone 04 bisque. Moisten a clean sponge and wipe bisque to remove any dust.
On the hat and gloves apply 3 coats of SG304 with a soft fan brush.
On the beard apply 3 coats of SC092 with a script liner brush. Once dry take a damp sponge and remove the glaze on the beard until the only glaze left is in the creases of the bread.
Once the beard is dry apply 1 coat of NTBR all over the beard.
Apply 3 coats of SC092 for the shoes using a script liner brush.
Apply 3 coats of SC020 for the nose, using a detail liner brush.
Apply 3 coats of SC085 on the entire sweater with a soft fan brush.
Use SC072 to paint 3 to 4 vertical lines with a detail liner brush, applying 3 coats. Place the lines anywhere you like on the sweater.
In the empty spaces between the SC072 lines, apply SC073 to paint one thicker vertical line with a script liner brush, applying 3 coats.
Next apply SC016 to make 4 to 5 horizontal lines, going all the way around the coat. Apply 3 coats using a detail liner brush.
Where the SC016 crosses over SC072 apply one coat of SC072 to cover SC016.
Where the SC016 crosses over SC073 apply one coat of SC073 to cover SC016.
Let dry and fire to cone 06.
Directions For: MB042 Hooray Gnome
Begin with properly fired shelf cone 04 bisque. Moisten a clean sponge and wipe bisque to remove any dust.
On the hat and gloves apply 3 coats of SG305 using a soft fan brush.
On the beard apply 3 coats of SC092 with a script liner brush. Once dry take a damp sponge and remove the glaze on the beard until the only glaze left is in the creases of the bread.
Once the beard is dry apply 1 coat of NTBR all over the beard.
Apply 3 coats of SC092 for the shoes, using a script liner brush.
Apply 3 coats of SC020 for the nose, using a detail liner brush.
Now do 3 coats of SC043 on the entire sweater. Use a soft fan brush.
Apply SC026 to paint 3 to 4 vertical lines. Using a detail liner brush, apply 3 coats. Place the lines anywhere you like on the sweater.
In the empty spaces between the SC026 lines, apply SC031 to paint one thicker vertical line. Using a script liner, apply 3 coats.
Now apply SC016 to paint 4 to 5 horizontal lines going all the way around the coat. Apply 3 coats with a detail liner brush.
Where the SC016 crosses over SC026 apply one coat of SC026 to cover SC016.
Where the SC016 crosses over SC031 apply one coat of SC031 to cover SC016.
Let dry and fire to cone 06.
Directions For: MB043 Hipster Gnome
Begin with properly fired shelf cone 04 bisque. Moisten a clean sponge and wipe bisque to remove any dust.
On the hat and gloves apply 3 coats of SG303 using a soft fan brush.
On the beard apply 3 coats of SC092 applying with a script liner brush. Once dry take a damp sponge and remove the glaze on the beard until the only glaze left is in the creases of the bread.
Once the beard is dry apply 1 coat of NTBR all over the beard.
Apply 3 coats of SC092 for the shoes using a script liner brush.
Apply 3 coats of SC020 for the nose using a detail liner brush.
Apply 3 coats of SC093 on the whole sweater. Use a soft fan brush.
Apply SC077 to paint 3 to 4 vertical lines. Using a detail liner brush, apply 3 coats. Place the lines anywhere you like on the sweater.
In the empty spaces between the SC077 lines, apply SC075 to make one thicker vertical line. Using a script liner brush, apply 3 coats.
Now apply SC016 to make 4 to 5 horizontal lines, going all the way around the coat. Apply 3 coats with a detail liner brush.
Where the SC016 crosses over SC077 apply one coat of SC077 to cover SC016.
Where the SC016 crosses over SC075 apply one coat of SC075 to cover SC016.
Begin with properly fired shelf cone 04 bisque. Moisten a clean sponge and wipe bisque to remove any dust.
With a #4 Soft Fan Brush (RB144) apply 3 coats of EL128 Wheat to the entire inside and outside of the vase, excluding the outside of the ruffle dish at bottom.
Wipe off excess glaze from the bottom of the piece. Do not stilt.
Begin with properly fired shelf cone 04 bisque. Moisten a clean sponge and wipe bisque to remove any dust.
With a #4 Soft Fan Brush (RB144) apply 3 coats of SW122 Maycoshino to the entire inside of the mug and 2” down from the top of the outside of the mug, just over the rimmed edge and top of the handle.
Using a #4 Soft Fan Brush, apply 3 coats of SW166 Norse Blue to the middle of the mug and handle, stopping 3” from the bottom.
With a #4 brush apply 2 coats of SW172 Macadamia to the bottom of the outside of the mug, starting from Norse Blue down.
Apply 2 coats of EL140 Toasted Almond 2” down on the outside of the mug, just under the rim, over the Norse Blue, stopping a 1/4 “ under the Norse Blue, with a #4 Soft Fan brush.
Do not apply EL140 on top of the SW172 Macadamia.
Wipe off excess glaze from the bottom of the piece. Do not stilt.
Begin with properly fired shelf cone 04 bisque. Moisten a clean sponge and wipe bisque to remove any dust.
Using a CB604 #4 Soft Fan, apply 1 coat of SC014 Java Bean to the bunny. Allow to sit to dry slightly. Using a BT910 Synthetic Sponge, wipe back the SC014 Java Bean leaving the color in the deep crevices. Allow to dry!
Using various size Pointed Round brushes, apply 2 coats of FN205 Saddle Tan to the bunny except the nose, muzzle and inside the ears.
Using a CB406 #6 Pointed Round, apply 2 coats of FN049 Flamingo to the inside of the ears and the nose.
Using a CB404 #4 Pointed Round, apply 2 coats of FN001 White to the muzzle and the tail. Lightly sponge some on all the tips of the feet.
Using a CB404 #4 Pointed Round, apply 2 coats of FN240 Pumpkin Orange to the carrot and apply 2 coats of FN007 Green to the carrot leaves.
Using a CB408 #8 Pointed Round and a CB602 #4 Soft fan, apply 2 coats of FN056 Heather to the pants.
Using a CB408 #8 Pointed Round and a CB602 #4 Soft fan, apply 2 coats FN032 Canton Jade to the Hat.
Using a CB110 #10/0Liner, apply 2 coats of FN032 Canton Jade to the buttons on the pants and 2 Coats of FN240 Pumpkin Orange to the stitching on the buttons.
Highlight the bottom of the pants with some FN001 White.
Allow to dry!
Using a CB604 #4 Soft Fan, apply 1 coat Of S2101 Crystal Clear Brushing to the entire piece. Allow to dry!
Stilt and fire to shelf cone 06.
Additional Adaptations & Tips if needed
Most Foundations cover well with 2 coats.
Applying a coat of S2101 Crystal Clear Brushing glaze over the two coats of Foundations will make them more transparent.
Begin with properly fired shelf cone 04 bisque. Moisten a clean sponge and wipe bisque to remove any dust.
Using a Pointed Round Bush for the size of the areas. Apply the following colors as indicated. Do Not Apply any of the Snow Gems to the bottom of the pieces.
Elephant Facet-ini
Apply 3coats of SC011 Blue Yonder to the inside of the ears, tip of the trunk and the tip of the tail.
Apply 3 Coats of SC027 Sour Apple to the pads of the feet.
Using a CB202 #2 Detail Liner, apply 2 coats of SC016 Cotton Tail to the eye area. When dry apply 2 coats of SC015 Tuxedo to the pupil of the eye.
Using a CB110 #10/0 Liner, outline the eyes with SC015 Tuxedo and apply a highlight to the eye with SC016 Cotton Tail.
Apply 2-3 coats of SG305 Spearmint Snow Gem to the remaining areas of the Elephant’s body.
Lion Facet-ini
Apply 3 coats of SC088 Tu Tu Tango the mane, lip, nose.
Apply 3 coats of SC078 Lime Light to the muzzle, pads of the feet, tip of the tail and inside the ears. Allow to dry!
Using a CB202 #2 Detail Liner, apply 2 coats of SC016 Cotton Tail to the eye area. When dry apply 2 coats of SC015 Tuxedo to the pupil of the eye.
Using a CB110 #10/0 Liner, outline the eyes with SC015 Tuxedo and apply a highlight to the eye with SC016 Cotton Tail.
Apply 2 -3 coats of SG303 Citrus Snow Gem to the remaining areas of the Lion’s body.
Unicorn Facet-ini
Apply 3 coats of SC074 Hot Tamale to muzzle, top of the feet, horn and some of the mane.
Apply 3 coats of SC033 Fruit Of The Vine to the bottoms of the feet, nose, inside the ears and remaining areas of the mane.
Using a CB202 #2 Detail Liner, apply 2 coats of SC016 Cotton Tail to the eye area. When dry apply 2 coats of SC015 Tuxedo to the pupil of the eye.
Using a CB110 #10/0 Liner, outline the eyes with SC015 Tuxedo and apply a highlight to the eye with SC016 Cotton Tail.
Apply 2-3 coats of Berry Snow Gem to the remaining areas of the body.
Apply 1 coat of S2101 Crystal Clear to the eyes and 2 coats to the bottoms of each piece.
Stilt and fire to shelf cone 06.
Additional Adaptations & Tips if needed
Do Not Apply any of the Snow Gems to the bottom of a piece. This is to prevent any scratching to a surface they may be placed on.
Be careful when applying the Snow Gems, sometimes a crystal could scratch the snow glaze and leave a mark after it is fired.
Excess application can cause the glaze to separate.
Begin with properly fired shelf cone 04 bisque. Moisten a clean sponge and wipe bisque to remove any dust.
Use SP211 on the inside, bottom, and handle of the mug. Glaze 3 coats using a Soft Fan brush.
Use 3 coats of SC045 on the outside of the mug using a Soft Fan brush.
Once dry, take the transfer paper and the pattern and trace it onto on side of the mug.
Use 3 coats of SC086 for the paper outside of the cup in the pattern, and SC054 for the paper inside the cup in the pattern. Glaze using a Detail Liner brush.
Use SC065 for the inside of the cup in the pattern. Do 3 coats using a Detail Liner brush.
Outline the cup in the pattern with SC016. Do 3 coats using a Detail Liner brush.
Use SC015 for the body, legs, and dots in at the top of the eyes of the spider. Use SC016 for the base of the eyes.
On the other side of the mug, write a little message to make it more personable. “Dad, if robots take over I’ll still have a job for you..” “Happy Father’s Day”
Begin with properly fired shelf cone 04 bisque. Moisten a clean sponge and wipe bisque to remove any dust.
Start with SC001, SC016, SC024, and SC085 for your marbling on the inside and handle of your mug. Use a cup to pour your marbled glaze.
Tape the sides of the mug you do not want to marble.
Take your bear pattern and transfer paper onto one side of your mug and trace the pattern with a pencil.
Use SC100 for the outside of the mug, do 3 coats using a Soft Fan brush. Avoid going over the pattern of the bear.
Outline the bear with SC034, doing 3 coats with a Detail Liner brush.
Once dry use SC043 to make stems and grass on the inside bottom of the bear. Add SC001, SC024 and SC085 for the head of the flowers. Do 3 coats of glaze for each color using a Detail Liner brush.
Use SC016 to add hearts around the mug. Do 3 coats using a Detail Liner brush.
On the other side of the mug add names with hearts between them to make it more personalized. Use 3 coats of SC034 with a Detail Liner brush.
Begin with properly fired shelf cone 04 bisque. Moisten a clean sponge and wipe bisque to remove any dust.
Start with 3 coats of FN211 on the inside and outside of the first vase. Use a Soft Fan brush.
Once dry, draw on as many eggs as possible to fill in the space. Then fill in the eggs with 3 coats of FN001 using a Script Liner brush.
Use a toothbrush to splatter FN213 all over the inside and outside of the vase.
With a Detail Liner brush, create any design inside the eggs. Dots, lines, small flowers, etc. Use 3 coats of FN041.
On the bottom and top rim use FN041 with a Script Liner brush.
Let dry then fire to cone 06.
Yellow Vase
Begin with properly fired shelf cone 04 bisque. Moisten a clean sponge and wipe bisque to remove any dust.
Start with 3 coats of FN232 on the bottom half and 3 coats of FN201 on the top half of the vase. Where the two glazes meet in the middle, blend FN232 and FN201 together to get an ombré effect.
Once dry, draw on as many eggs as possible to fill in the space. Then, fill in half of the eggs with 3 coats of FN001, and the other half with FN002 using a Scripted Liner brush.
On the FN002 eggs use a toothbrush to splatter them with FN001.
On the FN001 eggs use a toothbrush to splatter them with FN002, FN018, and FN051.
On the FN001 eggs, using FN002, FN018, and FN051 make a spiral with small, short lines on the outside and let the glazes mix when changing color, this will add the colors green, purple, and orange to your spirals. Use a Detail Liner brush.
Use the same technique when adding dots in a round fashion on the inside edges on the eggs. Use a Detail Liner brush.
On the inside of the vase do 3 coats of FN201 using a Soft Fan brush, then use a toothbrush to splatter FN002.
On the bottom and top rim use FN002 with a Script Liner brush.
Begin with properly fired shelf cone 04 bisque. Moisten a clean sponge and wipe bisque to remove any dust.
Place the following colors on the palette: SC073 Candy Apple Red; SC081 Cinnamon Stix: SC097 Cant-elope.
Using a CB604 #4 Soft Fan, apply 3 coats of SC073 Candy Apple Red to the bottom half of the mushroom top, followed by 3 coats of SC097 Cant-elope tot the top half of the mushroom. Use a CB404 #4 Pointed Round to apply the color to the inside of the cut-out areas.
Center the Mushroom on the banding wheel.
Using a CB604 #4 Soft Fan, pick up some water on the brush then SC073 Candy Apple Red to half of the brush. Start spinning the banding wheel then apply the brush to the area where the two colors meet and blend the Candy Apple Red into the Cant-elope. The water will help blending the colors. After the Candy Apple has dried some repeat this step with the Cant-elope coming down from the top to the middle blending it into the Candy Apple Red. This will create an hombre look.
Using a CB604 #4 Soft Fan, apply 3 coats of SC097 Cant-elope to the underside of the mushroom. Allow to dry.
Place the mushroom into a container that will hold it stable then center on the banding wheel.
Spinning the banding wheel, blend some Candy Apple Red to both the edge of the top and the edge near the stem.
Place the mushroom back right side up.
Blend some SC081 Cinnamon Stix from the bottom edge of the top going up into the Candy Apple Red. Allow to dry.
Place out some of the following colors: SC009 Jaded; SC027 Sour Apple; SC045 My Blue Heaven; SC078 Lime Light.
Using a CB604 #4 Soft Fan, apply 3 coats of SC045 My Blue Heave to the top section of the mushroom stem and 3 coats of SC078 Lime Light to the lower half of the mushroom stem. Allow to dry.
Center the Mushroom on the banding wheel.
Using a CB604 #4 Soft Fan, pick up some water on the brush then SC078 Lime Light to half of the brush. Start spinning the banding wheel then apply the brush to the area where the two colors meet and blend the Sour Apple into the SC045 My Blue Heaven. The water will help blending the colors. After the Lime Light has dried some repeat this step with the My Blue Heaven coming down from the top to the middle blending it into the Sour Apple. This will create an hombre look.
Blend some SC027 Sour Apple from the bottom edge of the stem going up into the Lime Light but not all the way. Allow to dry.
Blend some SC009 Jade from the top edge of the stem going down into the My Blue Heaven, not all the way. Allow to dry.
Stilt and fire to shelf cone 06.
Small Mushroom
Begin with properly fired shelf cone 04 bisque. Moisten a clean sponge and wipe bisque to remove any dust.
Place the following colors on the palette: SC013 Graple Red; SC103 Lavendear: SC104 Grape Expectations.
Using a CB604 #4 Soft Fan, apply 3 coats of SCo13 Graple to the bottom half of the mushroom top, followed by 3 coats ofSC103 Lavendear to the top half of the mushroom. Use a CB404 #4 Pointed Round to apply the color to the inside of the cut-out areas.
Center the Mushroom on the banding wheel.
Using a CB604 #4 Soft Fan, pick up some water on the brush then SC013 Graple to half of the brush. Start spinning the banding wheel then apply the brush to the area where the two colors meet and blend the Graple into the Lavendear. The water will help blending the colors. After the Graple has dried some repeat this step with the Lavendear coming down from the top to the middle blending it into the Graple. This will create an hombre look.
Using a CB604 #4 Soft Fan, apply 3 coats of SC103 Lavendear to the underside of the mushroom. Allow to dry.
Place the mushroom into a container (small plastic bowl) that will hold it stable then center on the banding wheel.
Spinning the banding wheel, blend some Graple to both the edge of the top and the edge near the stem.
Place the mushroom back SC104 Grape Expectations from the bottom edge of the top going up into the Graple. Allow to dry.
Using a CB604 #4 Soft Fan, apply 3 coats of SC024 Dandelion to the top section of the mushroom stem and 3 coats of SC027 Sour Apple to the lower half of the mushroom stem. Allow to dry
Center the Mushroom on the banding wheel.
Using a CB604 #4 Soft Fan, pick up some water on the brush then SC027 Sour Apple to half of the brush. Start spinning the banding wheel then apply the brush to the area where the two colors meet and blend the Sour Apple into SC024 Dandelion. The water will help blending the colors. After the Sour Apple has dried some repeat this step with the Dandelion coming down from the top to the middle blending it into the Sour Apple. This will create an hombre look.
Blend some SC052 Toad-ily Green from the bottom edge of the stem going up into the Dandelion, not all the way Allow to dry.
Blend some SC097 Cant-elope from the top edge of the stem going down into the Dandelion, not all the way. Allow to dry.
Wipe down bisque with a damp sponge to remove any dust.
Apply one coat of EL146 Raincloud to the bottom textured section of the cap.
Apply one coat of CG785 Royal fantasy to the top of the cap, overlapping the Raincloud slightly.
Apply a second coat of EL146 Raincloud to the lower half, overlapping the Royal Fantasy.
Apply a second coat of GG785 Royal Fantasy to the upper half, overlapping the Raincloud.
Apply one coat of PC602 White cascade where the two colors overlap.
Apply one coat of PC601 Clear cascade over the EL146 Raincloud and white cascade.
For the base (stem) of the mushroom, repeat steps 1-6.
Allow to dry, stilt, and fire to cone 06.
Small Mushroom Lantern
Same steps as the Large Mushroom Lantern but done in reverse with CG785 Royal fantasy on the textured areas and EL146 Raincloud on the untextured areas.
Begin with properly fired shelf cone 04 bisque. Moisten a clean sponge and wipe bisque to remove any dust.
Using a AB710 ¾” Flat Shader, basecoat the top of the mushroom with OS455 Holy Red; under the top and stem with OS440 Burnt Orange.
Using a DB803 #8 Round, drybrush the top with OS449 Bright Red. Then Drybrush the edge and the tip of the mushroom with OS438 Orange Peel blending into the red area. Highlighting with OS435 Dark Yellow.
Dry brush under the top with OS485 Dark Yellow, then with OS434 Lemon Peel, highlight with OS485 French Vanilla.
Drybrush the top of the stem with OS571 Curry then OS436 Gold adding some OS435 Dark Yellow. Highlight with OS785 French Vanilla. Allow to dry!
Using a AB710 ¾” Flat Shater, apply 2 light coats of AC502 to the entire mushroom. Allow to dry between each coat.
Using an AB705 #5 Round, apply AS964 No-Fire Snow to the dots on the top of the Mushrooms.
DO NOT FIRE!
Large Pointed Mushroom
Begin with properly fired shelf cone 04 bisque. Moisten a clean sponge and wipe bisque to remove any dust.
Using a AB710 ¾” Flat Shader, basecoat the top of the mushroom and under the top with OS564 Pansy.
Using a DB803 #8 Round, drybrush the top with OS452 Purple.
Using a DB803 #8 Round, drybrush under the top and going up to almost the tip of the top with OS558 Miami Pink, highlight with OS444 Light Pink. Highlight lightly under the top with OS431 White.
Using a AB710 ¾’ Flat Shader, basecoat the stem of the mushroom with OS468 Deep Turquoise.
Using a DB803 #8 Round, drybrush the stem with OS586 Ultramarine. Highlight with OS469 Light Turquoise.
Using the end of a brush handle to add dots of OS431 White to the top of the mushroom. Allow to dry!
Using a AB710 ¾” Flat Shater, apply 2 light coats of AC502 to the entire mushroom. Allow to dry between each coat.
DO NOT FIRE!
Additional Adaptations & Tips if needed.
When drybrusing always go from dark to light colors of the same value.
Any color can be lightened by adding White in the brush.
Paper towels, paper bags or denim material can be used to wipe the color out of the brush.
Make sure not to apply the AC502 Matte Sealer heavy. This can result in the sealer turning milky.
Form
MB1641 Large Rounded Mushroom
MB1642 Large Pointed Mushroom
Colors
AC502 Matte Sealer
AS964 No-Fire Snow
OS431 White
OS434 Lemon Peel
OS435 Dark Yellow
OS436 Gold
OS438 Orange Peel
OS440 Burnt Orange
OS444 Light Pink
OS449 Bright Red
OS452 Purple
OS455 Holly Red
OS468 Deep Turquoise
OS469 Light Turquoise
OS485 French Vanilla
OS558 Miami Pink
OS564 Pansy
OS571 Curry
OS586 Ultramarine
Decorating Accessories
AB710 ¾” Flat Shader
AB705 #5 Round
DB802 #5 Round
DB803 #8 Round
Miscellaneous Accessories
Sponge
Water Bowl
Paper Towels
Pencil
Paper Plates for a Palette
Non-Fired|Earthenware Bisque|Garden
409|403|444
52089
Large and Small Mushroom Lanterns In Bisque Stains
Begin with properly fired shelf cone 04 bisque. Moisten a clean sponge and wipe bisque to remove any dust.
Using a AB710 ¾” Flat Shader, base coat both Mushroom Lanterns with OS467 Light Brown. Allow to dry.
In a small cup mix about 2 ounces of AS964 No-Fire Snow with some each of OS467 Light Bron and some OS472 Walnut. This will create the look of the OS467 Light Brown since the No-Fire Snow will lighten the color.
Using a BT910 Synthetic Sponge, sponge a coat of this mix to each of the mushrooms creating stucco type texture. Try to keep the texture even. Apply only to the top of the mushrooms above the ribbed area and to the plain area of the mushroom stems. Allow to dry.
Using a DB803 #8 Round, drybrush the lower texture areas of the mushrooms with OS531 Rosy Tan and the upper areas of the texture with OS493 Sandalwood blending the two colors in the middle. Highlight the top and the top of the stem area with OS472 Walnut.
Using a DB805 #3 Fan, drybrush the ribbed area of the mushroom top and the stem with OS441 Cargo Pants. Then drybrush the edge of the top and the bottom edge of the stem with OS473 Black Brown. Allow to dry!
Using a AB710 ¾” Flat Shader, apply 2 light coats of AC502 Mat Sealer to both Mushrooms, Allow to dry between each coat.
Begin with properly fired shelf cone 04 bisque. Moisten a clean sponge and wipe bisque to remove any dust.
Use the ruler to mark where the tape will be placed. Make 3 vertical lines with the tape at the 3, 6, and 9 inch mark. Then make one horizontal line with tape going over top the vertical lines at the 3 inch mark on the side of the Rectangle Tray. Tape all 4 sides of the Rectangle Tray to make a border.
Mix SC006 and SC089 together, 50/50 of both glazes. This will the background color for 4 of the boxes. Glaze 3 coats of paint in every other box. Use a Soft Fan Brush.
Mix SC065 and SC070 together, 50/50 of both glazes. This will the background color for the other 4 boxes. Glaze 3 coats of paint in every other box. Use a Soft Fan Brush.
Remove tape while paint is half dry half wet.
Around all boxes, boarder, and back glaze 3 coats of SP245. Use a Flat Shader for the around the boxes and border, then use a Soft Fan brush to glaze the back.
Once all glaze is dry, lightly use a pencil to draw different shaped flowers inside of the boxes.
Use SC006 and SC089 interchangeably to glaze the petals and centers of the flower on top on the SC006 and SC089 mixed boxes. Do 4 coats of glaze for good coverage. Use a Detail Liner Brush.
Use SC065 and SC070 interchangeably to glazes the peddles and centers of the flower on top on the SC065 and SC070 mixed boxes. Do 4 coats of glaze for good coverage. Use a Detail Liner Brush.
Use SC006 and SC089 interchangeably and make the bottom dot the opposite glaze from the peddles of the flower. Once dry, make a smaller dot with the other glaze, on top on the SC006 and SC089 mixed boxes. Use the eraser part of the pencil to make dots.
Use SC065 and SC070 interchangeably and make the bottom dot the opposite glaze from the peddles of the flower. Once dry, make a smaller dot with the other glaze, on top on the SC006 and SC089 mixed boxes. Use the eraser part of the pencil to make dots.
Begin with properly fired shelf cone 04 bisque. Moisten a clean sponge and wipe bisque to remove any dust.
Place transfer paper down onto the mug. Place the pattern on top of the transfer paper. Use a pencil to trace the outline of the design.
Remove the design and transfer paper. The image should appear onto your mug.
Using the Script Liner, glaze 3 coats to the face and highlight using SC016.
Using the Script Liner, glaze 3 coats around the face and highlight using SC099. SC099 will also be used for the mouth, nose and hands, which will also need 3 coats of glaze.
Using the Script Liner, glaze 3 coats of SC002 for the heart eyes, phone, and wavy border on the top.
On the right and left side of the image draw 3 hearts. For each heart do 3 coats of either SC002, SC042, and SC085 with a Script Liner.
Do 3 coats of SC015 with a Script Liner on the whole outside base of the mug.
Now with a Soft Fan use SC015 on the inside and handle of the mug. Do 3 coats of glaze.
Using a Detail Spotter write “NO YOU HANG UP FIRST” in SC016, doing 3 coats of glaze. This will go on top and below the SC002 wavy boarder.
Finally, do one coat of SG704 on top of SC015 using a Script Liner around the design and hearts. Then use a Soft Fan Brush for the outside, inside, and handle still using SG704 on top of SC015. Only needs one coat of glaze.
Begin with properly fired shelf cone 04 bisque. Moisten a clean sponge and wipe bisque to remove any dust.
Using a pencil, trace the patter on the piece with a piece of AC320 Clay Carbon Paper under the pastern.
Using a CB404 #4 Pointed Round and a CB106 #6 Script Liner, apply 3 coats of SC074 Hot Tamale to the cupid.
Using a CB404 #4 Pointed Round, apply 3 coats of SC013 Graple to ever other heart and 3 coats of SC070 to the remaining hearts. Allow to dry!
Using a CB604 #4 Soft Fan, apply 3 coats of FN4 Red to the back of the plate.
Using a CB404 #4 Pointed Round, apply 1 coat of AC302 Wax Resist to the cupid and the hearts. Be careful not to get any wax on the bisque area of the plate just the Stroke & Coat colors. Allow to dry!
Using a CB604 #4 Soft Fan, apply 2 coats of SG702 Speckta-Clear Celebration to the top area of the plate trying to avoiding the colored areas.
Using a damp brush, remove any of the Speckta-Clear Celebration off the waxed areas.
Stilt and fire to shelf cone 06.
Tips
You can use any of the pink colors of Stroke & Coat or Foundations glazes in place of the ones listed here.
Begin with properly fired shelf cone 04 bisque. Moisten a clean sponge and wipe bisque to remove any dust.
Using water-based markers, sketch a floral design onto the surface of the vase. Alternatively, use transfer paper or stencils to transfer an image.
Fill in the design with 2-3 coats of underglaze. Expand the palette by mixing transition colors. Fire to cone 04.
Apply 2-3 coats of SW004 Zinc Free Clear over the flowers and the inside the pot, leaving the background unglazed.
Fire to cone 6.
Additional Adaptations & Tips
Although they can be applied and fired together, applying clear glaze over underglaze that has already been fired prevents potential smearing of underglaze design.
Begin with properly fired shelf cone 04 bisque. Moisten a clean sponge and wipe bisque to remove any residue.
Using the #4 Soft Fan for even coverage, apply two full coats of EG005 Black Engobe to the inside and outside of the vase. Allow glaze to dry between coats.
In the inside and at the top 1/3rd of the vase, apply two full coats of CG991 Mountain Moss. Allow glaze to dry between coats.
Overlapping the CG991 Mountain Moss on the outside of the vase, apply two full coats of CG1009 Cherry Limeade. Allow glaze to dry between coats.
Fire to Cone 6.
Additional Adaptations & Tips
Engobes may be applied to the underside of ware.
Typically, Jungle Gem glaze combinations are fluid when fired to midrange temperatures and above. Without texture to melt over and sink into, expect the glaze to drip! Leave plenty of room to avoid unwanted runoff.
Begin with properly fired shelf cone 04 bisque. Moisten a clean sponge and wipe bisque to remove any residue.
Using the #4 Soft Fan for even coverage, apply two full coats of EG005 Black Engobe to the inside and outside of the vase. Allow glaze to dry between coats.
In the inside and at the top 1/3rd of the vase, apply two full coats of CG991 Mountain Moss. Allow glaze to dry between coats.
Overlapping the CG991 Mountain Moss on the outside of the vase, apply two full coats of CG1006 Purple Reign. Allow glaze to dry between coats.
Fire to Cone 6.
Additional Adaptations & Tips
Engobes may be applied to the underside of ware.
Typically, Jungle Gem glaze combinations are fluid when fired to midrange temperatures and above. Without texture to melt over and sink into, expect the glaze to drip! Leave plenty of room to avoid unwanted runoff.
Using a #8 Soft Fan brush (RB140) apply 3 coats of SW106 Alabaster to the outside of the bowls, plates and platter.
With a #4 Soft Fan brush (RB144) apply 2 coats of SW104 Ivy in a wavy line around the top inside edge of the bowls and on the carved area for the plates and platter. Recede the second coat.
Apply 3 coats of SC009 Jaded to the entire platter and plates using a #8 Soft Fan brush (RB140).
Apply 3 coats of SC009 Jaded to the entire inside of the bowls and halfway down the outside of the bowls using a #8 Soft Fan brush (RB140).
With a #6 Script Liner (RB106) apply 2 coats of each of the following colors to the inside of the bowls: SW193 Ivy, SW194 Nimbus and SW198 Rose Quartz. Cover the entire inside of the bowls with swirls – they can touch or overlap.
For the platter and plates apply random “plops” the following colors all over the bottom with a ¾ Oval Brush (CB434) SW193 Ivy, SW194 Nimbus and SW198 Rose Quartz – they can touch or overlap. Try to get 3 coats of each “plop”.
For the platter and plates, apply 1 heavy coat of SW401 Light Flux to just the rim, over the carved texture with a #4 Soft Fan brush (RB144).
Begin with properly fired shelf cone 04 bisque. Moisten a clean sponge and wipe bisque to remove any dust.
With a #8 Soft Fan Brush (RB140) apply 3 coats of SW502 Yellow Gloss Fluted Dinner Plate
With a #8 Soft Fan Brush (RB140) apply 3 coats of SW503 Orange Gloss Fluted Salad Plate
With a #8 Soft Fan Brush (RB140) apply 3 coats of SW504 Red Gloss Fluted Small Bowl
With a #8 Soft Fan Brush (RB140) apply 3 coats of SW506 Bright Blue Gloss Fluted Oval PlatterWith a #8 Soft Fan Brush (RB140) apply 3 coats of SW507 Bright Green Gloss Fluted Large Bowl
Wipe off excess glaze from the bottom of the piece.
Use the #4 Soft Fan to apply two coats of Ivory Cream to the stems of all three mushrooms.
Select the combination of Jungle Gem colors for the mushroom tops. On the samples shown, the outermost edge and underside had three coats of the listed color applied, and immediately the color listed on the top of innermost part was applied while the first color was still wet, allowing the colors to blend or flow together a little bit. This way you don’t have a perfect line where the colors meet. Note that the matte Jungle Gems don’t move in a cone 06 firing so they will not flow or blend more during firing.
Curly Mushroom – Bottom edge Haystack and top Papaya
Ribbed Mushroom – Bottom edge Periwinkle Sky and top with Frosted Berries
Dotted Mushroom – Outer edge Asteroid and inner top Pink Plum
Use the #10/0 Detail Liner to apply strokes of Juniper on the stem of the mushroom creating grass and stems to the flowers. Notice how the E-Z Strokes can be used on top of the matte Foundation glaze since the glaze does not move so the design stays crisp. Use the other E-Z Stroke colors listed in the materials list to dot small 5 petal flowers randomly on top of the stems of grass around the mushroom. Apply a dot of Butter in the center of each flower.
Stilt and fire to cone 06. The matte Jungle Gems and stem of the mushrooms should fire out with a soft sheen of the matte glaze. A glossier finish can appear with hotter firings.
Begin with properly fired shelf cone 04 bisque. Moisten a clean sponge and wipe bisque to remove any dust.
Using a pencil, trace the patter on the piece with a piece of AC230 Clay Carbon Paper under the pastern. Place as many heart you desire.
Using a CB404 #4 Pointed Round and a CB110 #10/0 Liner, apply 2-3 coats of SC015 Tuxedo to the umbrella and the kissing couple. Using a CB110 #10/0 Liner stroke in the grass area on the plate.
Using a CB404 #4 Pointed Round, apply 3 coats of SC001 Pink-A-Boo to all the hearts you traced on the plate. Allow to dry!
Using a CB110 #10/0 Liner, apply one coat of SC070 Pink-A-Dot creating rain drops.
Using a CB604 #4 Soft Fan, apply 3 coats of FN049 Flamingo Pink to the back of the plate.
Using a CB604 #4 Soft Fan, apply 2 coats of SG702 Speckta-Clear Celebration to the top area of the plate avoiding the umbrella and the area under the umbrella to the edge of the plate.
Apply 2 coats of NTBR Clear One Brushing to the area under the umbrella, being careful to only apply 1 coat to the kissing couple. Allow to dry!
Stilt and fire to shelf cone 06.
Tips
You can use any of the pink colors of Stroke & Coat or Foundations glazes in place of the ones listed here.
Be careful not to apply the Clear glaze heavy over the SC015 Tuxedo to prevent any milking of the black.
Clear glaze or a Foundations Sheers can be used instead of the Speckta-Clear glaze.
Check the bisque ware over for blemishes. If present lightly sand with 100-grit sandpaper.
Damp sponge the ware to remove any fired dust and to condition the ware for decorating.
Pour an ounce of Cotton Tail in a paper cup and slightly thin with Thin ‘n Shade or water. Mix with a Palette Knife.
Smoothly, in one direction apply three coats of the Cotton Tail over the entire piece. Work horizontally over the ware. Allow the Stroke & Coat to lose its sheen between coats. Set piece aside to dry thoroughly. For best results overnight is a good drying time.
After the piece has dried, wad up a dry paper-towel and lightly buff the front of the canvas down, thus smoothing the Stroke & Coat application.
Using the provided pattern, red pen and clay carbon, trace the design on the front surface of the ware. Try not to score the applied Stroke & Coat.
Before Proceeding, read these instructions carefully.
All the colors are mixed with Thin ‘n Shade.
Thin ‘n Shade should be placed on the palette as well.
When shading and floating in color, the Round brushes should be loaded with Thin ‘n Shade. The Thin ‘n Shade should be removed slightly by tapping the Round gently on to a paper-towel. The towel will remove excess Thin ‘n Shade, however, the brush will still have plenty remaining Thin ‘n Shade.
The Round brushes should only be tipped loaded.
Once loaded, the color and Thin ‘n Shade should be blended together on a clean area of the palette.
Unless otherwise stated, the Round Brushes are held mostly flat against the surface of the ware.
Colors are applied in thin layers, thus generating a watercolor appearance.
Except for the trees, the colors are applied horizontally.
Place all the EZ-Strokes as needed (except Cobalt Jet Black) on to the palette. Thin with Thin ‘n Shade to a light cream consistency and mix with palette knife.
Place a small amount of Thin ‘n Shade on the palette.
Starting with the Sky and using the #8-Pointed Round. Note: Try not to apply the sky colors over the large tree in the foreground. If some color bleeds into the tree do not worry, the tree colors will cover any of the sky colors.
Blend in Cool Blue across the top of the design and down about two inches.
Do not rinse the brush.
Reload as directed with Lilac and streak in this color here and there to the sky. Work the color upward into the Cool Blue.
Rinse the brush.
Pick up Butter and begin to add the color to the middle of the sky Work in as much of the Butter as desired. Note if color appears too strong blend with Thin ‘n Shade or with White.
Add some additional Cool Blue below the yellow. However, be careful not to make a strong green shade.
Again, rinse the brush.
Gingerly tip load in Carrot. Blend this color, just along the lower edge of the sky (the area behind the trees and distant mound).
The lake will have these same colors applied in a similar manner; however, their colorization should be softer and more of the Cool Blue is blended in along the lower edge of the lake. There is a hint of Butter and Lilac also, applied to the Lake. To apply the lake colors, use the #6-Pointed Round.
Tip load the #6-Pointed Round in Thundercloud Grey, fill in the curved line area around the upper edge of the lake. Pull a small amount of the Thundercloud Grey from the edge the lake inward, thus creating a shadow.
To define and shade the snow drifts and the hills in the background use the #6-Pointed Round, tip loaded in Cool Blue. Again, using the brush on the flat, with the point of the brush on the upper side of the snowbank line, add the Cool Blue, floating the color behind each line. Also, float the shading to the lower side of the background hills.
To the foreground snowdrifts, using the #6-Pointed Round, tip loaded in Lilac add accents of color below the blue shaded snowdrifts. The point of the brush is directed up to the line (the opposite direction of the previously applied Cool Blue). Use the Lilac sparingly and do not apply to every drift.
With the Script Liner and the #6-Pointed Round loaded in Juniper Green, stipple in one to two coats of color to the background small trees. The application of color should be somewhat variegated, with more color to the bottom edges of the trees.
When the Juniper Green has dried a little, add shading here and there amongst trees with a stippling of Thundercloud Grey.
The large tree is completed with a varied application of colors. Paint in the tree as follows using the #6-Pointed Round and #2 Script Liner.
Apply Thundercloud Grey tree trunks.
Stipple in Juniper Green to the lower edges of the bough segments. One to two coats.
Over the top of the Juniper Green, stipple in Cool Blue.
Above the Cool Blue, stipple in White.
Again, Thundercloud Grey can be used for shading under the Juniper Green.
With the #2 Script Liner fully loaded with thinned Juniper Green, pull in fine lines of grasses throughout the foreground. These lines should be of varying lengths and amounts per cluster. Note how the lines are pulled out over the lower edge of the lake.
Thin Cobalt Jet Black to a light cream consistency and fully load the Script Liner. Proceed to detail the entire design with fine broken line work. The leafless trees are pulled in at this time. The more detailing the better, especially the large evergreen. This outlining will define the entire design.
Sign the piece.
Carefully stilt the ware and fire to shelf cone 06.
Remove stilt marks with Dremel Tool or Stilt Stone.
Use the CB618 #8 Soft Fan to apply two coats of Marshmallow White the front of the plate and three coats to the back.
Once the second coat on the front is dry, apply a third coat and immediately press the cheesecloth or doily into the wet glaze and allow to dry so the shiny look is gone. It’s best to complete the next steps while the color is still a little damp. Allowing it to dry completely or allowing to sit for days can cause issues or shipping of color when you try to remove the cheesecloth or doily.
Place a little bit of each E-Z Stroke color out on your palette. Dampen the sea wool sponge to soften. Dip a small bumpy area of sponge into one color, blot out a little bit on the palette, and then randomly sponge over areas of the plate. Immediately, dip the same sponge (without washing out) into the next color, and dab in other areas. Continue to do the same with each of the other colors until the plate is covered with color on the front side. Dab the colors so they blend together a little but where they meet.
Remove the cheesecloth or doily once the shiny wet look has gone away with the color. Do it while the color is still damp to avoid chipping color.
Use the round sponge to pick up some E-Z Cobalt black, blot on palette, and lightly dab on the edges of the plate.
Stilt and fire to cone 06. The plate should fire out with a soft sheen of the matte glaze. A glossier finish can appear with hotter firings.
Begin with properly fired shelf cone 04 bisque. Moisten a clean sponge and wipe bisque to remove any dust.
Apply 1 coat of SC083 Tip Taupe to the beard area of the Allow to dry! Using a damp sponge wipe back leaving the color in the deep crevices.
Apply 1 coat of SC014 Java Bean to the stem and underside of the mushroom. Allow to dry! Using a damp sponge wipe back leaving the color in the deep crevices.
Apply 1 thinned coat of SC016 Cotton Tail to the beard then drybrush the beard with 2 coats SC016 Cotton Tail leaving the Tip Taupe show through.
Apply 3 coats of SC020 Cashew Later to the nose.
Apply 3 coats of SC097 Cant-elope to the hat.
Apply 3 coats of SC011 Blue Yonder to the shirt.
Apply 2 coats of SC08 Basketball to the pants.
Apply 2 Coats of SC034 Down To Earth to the tops of the shoes and the belt. Apply 2 coats of SC054 Vanila Dip to the bottom of the shoes.
Apply 1 thinned coat of SC054 Vanila Dip to the mushroom stem, allow to dry then drybrush 2 coats of Vanilla Dip to the mushroom stem except the band around the stem which is 3 coats of SC041 Brown Cow.
Apply a thinned coat of SC041 Brown Cow to the underside of the mushroom top, allow to dry then drybrush 2 of SC041 Brown Cow to the underside of the mushroom top.
Go back and apply a coat of SC014 Java Bean to the deep crevices of the mushroom stem and the underside of the top of the mushroom.
Apply 3 coats of SC080 Basketball to the top of the mushroom. Allow to dry!
Using a sponge, sponge the edge of the mushroom and the top tip with 2 coats of SC054 Vanila Dip.
Apply 3 coats of SC052 Toad-ily Green to the grass area, you can paint under the piece but do not apply any glaze to the foot of the piece.
Using a Sponge, sponge around the edge of the grass area with SC008 Just Froggy then a few brush strokes for some blades of grass.
Make sure to clean off any glaze on the foot of the piece.
Place piece on a clean kiln washed kiln shelf. Do not stilt.
Fire to cone 6 on medium speed.
Trace the pattern onto the piece using AC-230 Clay Carbon Paper and a pencil. You may find it easy to cut slits in the pattern so that it will conform to the shape of the vase.
Using a CB-404 #4 Pointed Round, apply 1 coat of FN055 Bubble Gum to the pink flower petals. Load the brush again with FN055 Bubble Gun and side load in FN025 Raspberry Whip, stroke in each pink flower petal.
Using a CB-404 #4 Pointed Round, apply 1 coat of FN058 Apple Green to the green flower petals. Load the brush again with FN-056 Apple Green and side load in FN021 Olive, stroke in each green flower petal.
Using a CB-404 #4 Pointed Round, apply 1 coat of FN059 Cashmere to the tan flower petals. Load the brush again with FN059 Cashmere and side load in FN060 Mushroom, stroke in each tan flower petal.
Using a CB-404 #4 Pointed Round, apply 1 coat of FN056 Heather to the purple flower petals. Load the brush again with FN-056 Heather and side load in FN018 Bright Blue, stroke in each purple flower petal.
Using a CB-202 #2 Detail Liner, apply 1 coat of FN002 Yellow to each flower centers. Load the brush again with FN02 Yellow and side load in FN0220 Medium Green, stroke in each flower center.
Using a CB-404 #4 Pointed Round, load the brush with FN058 Apple Green then side load in FN020 Medium Green. Stroke both sides of each leaf.
Using a CB-110 #10/0 Liner, outline and detail the flower and the leaves with EZ0412 Cobalt Jet Black. Allow to dry!
Begin with properly fired shelf cone 04 bisque. Moisten a clean sponge and wipe bisque to remove any dust.
Using a CB604 #4 Soft Fan, apply 3 coats of FN001 White to the top side of the plate. Allow to dry!
Using a pencil and AC230 Clay Carbon Paper under the pattern and trace onto the plate.
Using a silk sponge, sponge the sky area wit EZ110 Cool Blue. When dry add some clouds with EZ013 White.
Using a CB106 #6 Script Liner, apply 2 coats of EZ109 Creamsicle to the large mushroom tops. When dry, using as silk sponge, sponge lightly the tops with EZ108 Carrot.
Using a CB106 #6 Script Liner, apply 2 coats of EZ022 Beige to the stems of the large mushrooms. Shade the stems with EZ107 Butter.
Using a CB404 #4 Pointed Round, load the brush with EZ110 Cool Blue then tip in EZ013, apply to some of the mushrooms then detail with EZ110 Cool Blue
Using a CB404 #4 Pointed Round, load the brush with EZ112 Lilac then tip in EZ013, apply to the remaining mushrooms then detail with EZ1112 Lilac and EZ063 Wine Berry.
Using a CB110 #10/0 Liner, apply EZ107 Butter to the flowers pulling the color out from the center area of the flower.
Apply EZ108 Carrot to the flower centers then highlight with EZ107 Butter.
Using a CB308 #8 Square Shader, load the brush with EZ003 Irish Green and side load with EZ028 Leaf Green then stroke in all the leaves around the flowers.
Using a CB202 #2 Detail Liner, apply EZ022 Beige to all the rocks then shade with EZ010 French Brown.
Using a CB202 #2 Detail Liner, load the brush with EZ111 Juniper Green, apply to each small leaves then apply a second coat on one side of each leaf.
Using a CB308 #8 Square Shader, stipple EZ033 Ivy Green and EZ028 Leaf Green to the grass areas. Add some EZ107 Butter to the right side and EZ111 Juniper Green to the right side of the grass areas.
Apply irregular shape dots to the tops of the large mushrooms with FD258 Pure White French Dimensions. Allow to dry!
Using a CB110 #10/0 Liner, outline and detail the design with EZ012 Cobalt Jet Black.
Using a CB604 #4 Soft Fan, apply 3 coats of FN006 Blue to the back of the plate. Allow to dry!
Stilt and fire to shelf cone o6.
Tips:
If any of the EZ Stroke colors are thick you can add a drop or two of AS957 Thin N Shade to the color to get it to a brushing consistency.
Begin with properly fired shelf cone 04 bisque. Moisten a clean sponge and wipe bisque to remove any dust.
Using a pencil, sketch you choice of wording such as here – Happy Birthday. Print the words on the top, in the middle write the words then on the bottom print the words again. Add some stars on each side.
Using a different color Designer Liner color for each Printed letter and for the stars.
Using SG401 Black write the words in the middle of the mug. Allow to dry!
Using a CB604 #4 Soft Fan, apply 2 coats of SW001 Stoneware Clear to the inside and the outside of the mug except the foot and center bottom of the mug. Allow to dry!
Remove any glaze that may have gotten onto the foot or bottom of the mug with a damp sponge. Allow to dry!
Place the mug on a clean kiln washed kiln shelf. Do not allow the handle of the mug to hang over the edge of the kiln shelf.
Fire to shelf cone 6.
Tips:
Make sure to shake all the Designer Liner colors well to mix.
Poke the plastic tip of the bottle with the metal tip per instructions on the package.
SG405 Green and SG406 Brown require SW004 Zinc Free Clear Stoneware Glaze to develop the color.
Begin with properly fired shelf cone 04 bisque. Moisten a clean sponge and wipe bisque to remove any dust.
You will need 2 copies of the pattern. Cut out one copy.
Using a CB-604 #4 Soft Fan, apply 2 coats of SC086 Old Lace to the top and side of the tile.
Place the cut out pattern onto the tile while the second coat is still wet. (Paper resist)
Place some AC302 Wax Resist onto a paper plate. Using a CB604 #4 Soft Fan, pick up some of the Wax Resist and streak it across the tile in a horizontal direction, Creating the look of wood grain. Make sure to clean your Soft Fan brush immediately from the wax resist.
Place some SC052 Toad-ily Green onto a paper plate. Using a CB604 #4 Soft Fan, apply the SC052 Toad-ily Green across the tile in a horizontal direction over the pater and the AC302 Wax Resist on the tile with the tree pattern.
Carefully remove the pattern.
Place some of the following colors onto a paper plate, SC024 Dandelion, SC025 Crackerjack, SC052 Toad-ily Green, SC088 Tu Tu Tango.
Using a CB404 #4 Pointed Round, on the tree, pick up one of the colors at a time and dab onto the tree and the area below the tree to represent falling leaves. Apply SC025 Cracker Jack to the tree trunk.
On the leaf design, pick up some of each of the colors and blend on the leaf to create a fall looking leaf.
When the glaze is mostly dry. Apply one thick coating of AC302 Wax Resist to the whole face of the tile with a soft fan brush
Allow wax to dry.
Using a pencil or toothpick, carefully carve the outline and detail of both patterns using the second pattern copy as a reference. (Sgraffito)
Carefully brush aside any bits of wax and glaze that came up when carving with a soft brush in a circular motion.
To create the faux Mishima effect, dab FN008 Brown into the carved lines using the CB404 #4 Pointed Round brush.
Allow to dry
Very lightly wipe across the line work with a slightly damp paper towel to remove any excess brown glaze outside the carved lines.
Begin with properly fired shelf cone 04 bisque. Moisten a clean sponge and wipe bisque to remove any dust.
With a #8 Soft Fan Brush (RB140) apply 3 coats of EG005 Black Engobe to the outside of the bowl.
Apply 3 coats of SP254 Speckled Vanilla Dip to 2/3 of the inside of the bowl with a RB140 #8 Soft Fan Brush.
With a RB140 #8 Soft Fan Brush apply 3 coats of SW503 Orange Gloss to the rim of the bowl along with ½ of the inside of the bowl overlapping the Speckled Vanilla Dip by and inch.
On a plate, using a palate knife, mix SW 508 Black Gloss with AC310 silkscreen medium. This should have a consistency of pancake batter.
Using your finger, apply mixed silkscreen to the pumpkin and cobwebs silkscreen inside the bowl.
Wipe off excess glaze from the bottom of the piece.
Begin with properly fired shelf cone 04 bisque. Moisten a clean sponge and wipe bisque to remove any dust.
Apply 3 coats of SP213 Speckled Grapel the entire outside of the mug and handle with a RB140 #8 Soft Fan Brush
With a RB140 #8 Soft Fan Brush apply 3 coats of SW156 Galaxy to the top 1/3 of the mug, overlapping the Speckled Grapel, and to the entire inside of the mug.
Wipe off excess glaze from the bottom of the piece.
Begin with properly fired shelf cone 04 bisque. Moisten a clean sponge and wipe bisque to remove any dust.
Place the clay carbon paper over the front of the canvas. Place fish the pattern on top. Trace over the fish pattern with a pencil. Remove the pattern and clay carbon paper. You should be able to see the fish pattern on the front of the canvas.
Use FD254 Black Licorice to trace over each fish on the canvas. Allow glaze to dry.
Using the Script Liner with CG1011 Frozen Berries, CG1012 Haystack, CG1013 Papaya, CG1014 Pink Plum, CG1015 Cloverfield, and CG1016 Asteroid, apply 2 coats to each fish. Allow glaze to dry between coats. Try to space the colors out over the canvas.
Using the Script Liner with CG1010 Periwinkle Sky, apply 3 coats to the background. Allow glaze to dry between coats.
Using the Script Liner with SC15 Tuxedo, apply 3 coats to the tail of each fish and the edges of the canvas. Allow glaze to dry between coats.
Use FD254 Black Licorice to make an eye on each fish.
Stilt and fire to cone 06.
Tips:
Don’t worry if you get some glaze on the FD254 Black Licorice. The black overpowers most other glazes and will turn out black after firing.
Begin with properly fired shelf cone 04 bisque. Moisten a clean sponge and wipe bisque to remove any dust.
Using the Pure White French Dimensions (FD258), create a small three or four petal flower blob where you’d like the center of your first flower to be.
Using the Detail Liner brush, pull the French Dimension glaze from the center of the glaze line down into the middle of the shape all the way around your small flower.
To add a new petal to the flower, connect the tip of one petal to the tip of the next one with a wiggly U shaped line of FD258.
Pull the FD from the center of the glaze line down towards the middle of each petal.
Repeat steps 3-4 for all petals.
Repeat steps 2-4 for however many flowers you desire on your piece.
Use the French Dimension to create line work leaves to fill in any gaps between the flowers.
Using the Script Liner brush, apply one coat of FN236 Miami Pink to the inside of each petal, butting the color right up to the edge of the main line of French Dimension.
Apply a second coat of FN236 to the petals, but don’t go all the way to the French Dimension line.
Apply a third coat of FN236 going only slightly below where the second coat stops.
Using the Script Liner brush, apply two coats of FN216 Sea Glass to the leaves.
Apply three coats of CG974 Bloomin’ Blue around the flowers, leaves, and stem of the mushroom with the script liner, detail liner, and fan brushes.
Allow project to dry, stilt and fire to cone 06.
Tips:
The thicker the line of French Dimension, the easier it will be to pull texture from the FD line down into the petal.
Allow the French dimension lines to set up briefly before beginning to pull the texture. The texture will disappear if pulled from too fresh of a glaze line.
Begin with properly fired shelf cone 04 bisque. Moisten a clean sponge and wipe bisque to remove any dust.
Trace the pattern on the surface using AC230 Clay Carbon Paper under the pattern.
To make straight lines on the design you can tape off sections of the snowflake. Note: the masking tape will not stick to any of the glaze when it is wet. Repeat as you go along.
Referring to the pattern, apply 3 coats of the Classic Crackle glaze as noted.
Remove the masking tape then retape another section continuing with the listed colors.
Cut out the large snowflake from the DSS0160 Vintage Holiday Screen.
Apply 3 coats of CC102 Whit to the background area of the design except the outer edge of the canvas.
Apply 3 coats of CC107 Green Tea or CC108 Chia Sea to the side edges of the canvas. Allow to dry!
Outline the snowflake using FD254 Black. Allow to dry!
Stilt and fire to shelf cone 06.
To make the crackle pattern show up, to an area apply some thinned OS476 Black to a section at a time then wipe off with a paper towel or cloth.
Begin with properly fired shelf cone 04 bisque. Moisten a clean sponge and wipe bisque to remove any dust.
With a pencil, lightly divide the inside of the bowl into 5 horizontal segments.
From top to bottom, the 1st, 3rd and 5th segments will be larger than the 2nd and 4th sections.
With a #8 Soft Fan brush, apply 3 coats of CG1008 Blue Guppy to the 3rd section of the bowl.
With a #4 Soft Fan brush, apply 3 coats of SW173 Amber Quartz to the 2nd and 4th section of the bowl.
With a #8 Soft Fan brush, apply 3 coats of CG1008 Blue Guppy to the 1st and 5th section of the bowl, overlapping the Amber Quartz by about 2”.
Using a #4 Soft Fan brush apply 2 coats down of SW173 Amber Quartz on the 1st and 5th section of the bowl over the Blue Guppy.
With a #8 Flat shader brush, apply 2 coats of CG1008 Blue Guppy down the middle of the SW173 Amber Quartz in section 2 and 4 and 2 coats of SW173 Amber Quartz down the middle of section 3 over the Blue Guppy
Wipe off excess glaze from the bottom of the piece.
Do not stilt
Fire to cone 6
Small Mixing Bowl
Begin with properly fired shelf cone 04 bisque. Moisten a clean sponge and wipe bisque to remove any dust.
With a pencil, lightly divide the inside of the bowl into 5 horizontal segments.
From top to bottom, the 1st, 3rd and 5th segments will be slightly larger than the 2nd and 4th sections.
With a #8 Soft Fan brush, apply 3 coats of SW173 Amber Quartz to the 3rd section of the bowl.
With a #4 Soft Fan brush, apply 3 coats of CG1008 Blue Guppy to the 2nd and 4th section of the bowl.
With a #8 Soft Fan brush, apply 3 coats of SW173 Amber Quartz to the 1st and 5th section of the bowl, overlapping the Blue Guppy by about 1”.
Using a #4 Soft Fan brush apply 2 coats down of CG1008 Blue Guppy on the 1st and 5th section of the bowl over the Amber Quartz
With a #8 Flat shader brush, apply 2 coats of CG1008 Blue Guppy down the middle of the SW173 Amber Quartz in section 3 and 2 coats of SW173 Amber Quartz down the middle of section 2 and 4 over the Blue Guppy.
Wipe off excess glaze from the bottom of the piece.
Using a #4 Soft Fan brush glaze the inside of the mug and to the top of flared part of the outside of the mug with 3 coats of Ink Spots CG977. You will also apply 2 coats of Ink Spots to the outside of the handle.
Apply a ghost vinyl resist directly on the outside of the bisque, or if not using a resist, draw the ghost image directly onto the bisque, using a pencil.
With a #8 Soft Fan brush, apply 3 coats of SW508 Black Gloss to the body of the mug, directly over the vinyl resist, or if the resist isn’t being used, gloss around the pencil line of the ghost. You will also apply 2 coats SW508 Black Gloss to the entire inside of the handle and to create the ghost’s eyes and mouth.
With a #8 Round Brush (RB118) apply 2 coats of SW501 White Gloss to the body of the ghost.
Once dry, using a #8 Round Brush, apply 1 light coat of CG302 Snowfall to the ghost. You want this coat to be thin in some spots and thicker in others to create texture.
If using a vinyl resist, remove from the piece before firing.
Wipe excess glaze from the bottom of the piece before firing and do not stilt.
Begin with properly fired shelf cone 04 bisque. Moisten a clean sponge and wipe bisque to remove any dust.
Cut out the large snowflake from the DSS0160 Vintage Holiday Screen.
Tape the edges of each tree branch to keep from getting any of the snowflakes onto the branches.
Divide the tree in half from the top to the bottom to help with snowflake placement.
Mix some SG401Black Designer Liner with AC310Silkscreen Medium to the consistency of peanut butter using a palette knife.
Position the snowflake on the tree starting at the top then apply the Black designer mix using your index finger. Continue working your way down the tree. Some areas will have a half a snowflake. You can get 2-3 prints then you need to clean the screen in water. Do not let any color dry in the screen.
Using a CB110 #10/0 Liner, apply 3 coats of CC108 China Sea to each snowflake.
Remove the masking tape.
Using a CB604 #4 Soft Fan, apply 3 coats of CC107 Green Tea to the back and the branches of the tree. Allow to dry!
Using a CB604 #4 Soft Fan, apply 3 coats of CC101 Transparent to the front of the tree over the snowflakes. Allow to dry!
Stilt and fire to shelf cone 06.
To make the crackle pattern show up, to an area apply some thinned OS476 Black to a section at a time then wipe off with a paper towel or cloth.
Start with properly fired cone 04 bisque wiped clean of any dust or debris.
Using a Soft Fan brush, apply 3 coats of Rawhide to the bottom waves.
Using a Soft Fan brush, apply 3 coats of Blue Yonder to the next 2 inches above the Rawhide.
Using a Soft Fan brush, while the Blue Yonder is still wet, apply 3 coats of Cara-bein Blue to the next 2 inches blending into the Blue Yonder. You can wet your brush or apply more Blue Yonder to help blend the two sections together.
Using a Soft Fan brush, while Cara-bein Blue is still wet, apply 3 coats of Sunkissed to the next inch, including the arms blending into the Cara-bein Blue.
Using a Soft Fan brush, while the Sunkissed is still wet, apply 3 coats of Cant-elope to the next inch blending into the Sunkissed.
Using a Soft Fan brush, while the Cant-elope is still wet, apply 3 coats of Tu Tu Tango to the next inch blending into the Cant-elope.
Using a Soft Fan brush, apply 3 coats of Wine About It to the next inch (bottom inch of the top section).
Using a Soft Fan brush, while the Wine About It is still wet, apply 3 coats of Grape Expectations blending into the Wine About It.
Using a Script Liner, create a sun image with Dandelion where the Sunkissed meets the Cara-bein Blue. You can taper the Dandelion down into the Cara-bein blue to create the reflection of the sunset. Apply 3 coats.
Using a Script Liner, dab 2-3 coats of Fired Snow on the wave, arms, and top wisps to create the sea foam and clouds. Dabbing will create a more uneven look.
Using a Detail Liner, apply 3 coats of Tuxedo in small, bent lines in the sky to create the birds.
Using a Detail Liner, apply 2-3 of Fired Snow in wavey lines around the blue sections of the tree to create wave breaks.
Optional: using a Detail Liner, create a crab and starfish at the bottom of the tree using a Detail Liner.
Stilt and fire to cone 06.
Form
MB1634 Small Jolly Tree
Colors
SC046 Rawhide
SC011 Blue Yonder
SC076 Cara-bein Blue
SC006 Sunkissed
SC097 Cant-elope
SC088 Tu Tu Tango
SC003 Wine About It
SC024 Dandelion
SC104 Grape Expectations
SY546 Fired Snow
SC015 Tuxedo
Decorating Accessories
CB604 #4 Soft Fan Brush
CB106 #6 Script Liner
CB110 #10/0 Detail Liner
Miscellaneous Accessories
Sponge
Water
Low-Fire|Earthenware Bisque|Boxes, Banks & Stuff|Table Top
Using the Soft Fan, apply 2 coats of FN White to the entire bowl and allow to dry.
Trace the pattern onto the bowl and create a border to the inside rim of the bowl.
Using the # 4 Round, apply 3 coats of Sour Apple, Blue Yonder, and Hot Tamale to the areas as shown in the photo, and create a fun border with various sized stripes, allowing some spaces to remain white.
Using the # 4 Round, apply 3 coats of Dandelion to the bells.
Using the Mini Liner, outline and detail the piece with Tuxedo.
Find a simple slab vase template online, or experiment with creating paper templates by folding paper “accordion style” and cutting, like making a paper doll. Unfold and join with tape to check results.
Create a paper template and cut it from a compressed ¼” slab. Assemble the form by slipping and scoring along beveled edges. Weld seams.
With a damp sponge, gently push the seams outward. Pinch and manipulate the protruding seams into undulating waves.
Roll coils and pinch them against the table surface to create flat edges. Score along flat edges and attach. Weld seams.
Set the piece on top of a slab to mark the floor. Cut the floor shape and attach it using the slip and score method. Compress the underside with a rib to prevent cracking and weld the seam upwards.
Smooth and compress the surface. In crevasses where a damp sponge won’t fit, use a brush. Stipple a dimpled texture into the clay using the back of a brush. When covering a large surface area, it may be more comfortable to tape sponges to the handle for an easier grip.
Allow to dry thoroughly and fire to cone 04.
Using CG1003 Peach Party, CG1006 Purple Reign, CG1007 Blueberry Bubblegum and CG1009 Cherry Limeade, loosely apply them in patches until the surface is covered, allowing the patches to overlap.
Roll out a slabof clay for the base and compress both sides with a rib or plastic card.
Cut a random shape from the slab to use as the base and create sand texture by poking the bristles of a stiff brush into the clay.Stack and attach offcuts to give the slab base some dimension.
Roll out a smaller slab and manipulate into a shell shaped shallow bowl. Roll and flatten two small balls of clay and attach flattened balls of clay to the top of the shell bowl. Roll out fivecoils about the diameter of a pointer fingerand length of 6”and cut in half.Attach halves of coils to the back of the shell shape and smooth. Cut off excess coil length. Drape the shell over the empty bowl to create more depth.
Gently roll up the pieces of cut coil into a ball to mimic the look of brain coral. Use the brain coil corals to help prop up the shell bowl onto the base.
Scratch and attach the coral balls, shell, and base all together.
Use the back end of a tool to add some rounded detail to the shell edges. Use a fingertip to smooth the inside of the shell bowl.
Roll out thick coil bits and attach them to create tall coral pieces. Score and slip to the base. Create texture by poking a toothpick end all over the coral.
Create small pinch pots in various sizes for the cup coral.Use the back end of a pencil or tool to help create the small cups and texturize the lip of the cups with toothpick cuts and indents on the sides with the back of a brush. Attach to the base and sides of the shell.
Create ball coral by rolling a variety of small balls of clay and use a sharpened pencil tip and poke to create deep divots. Score, slip and attach to the base and shell.
Allow clay to fully dry and bisque fire to cone 04.
Use soft glaze brushes to apply Jungle Gem colors to each area of the clay creation. Jungle Gems containfrit crystals that melt during firing and give bursts of color. In areas where you want solid color like sand, Stroke & Coat is a great option.
Stilt and fire to cone 06.
Apply three coats of SC020 Cashew Later to the sandy area of the base.
Apply two coats of CG1003 Peach Party on the outside and Day Lily in the indents of the ball corals.
Apply two coats of CG1005 Maroon Lagoon on the support brain corals (with some extra dots around them for interest).
Apply two coats of CG1008 Blue Guppy on the tall coral.
Apply two coats of CG1007 Blueberry Bubblegum to the outside and two coats of CG1009 Cherry Limeade to the inside of the cup corals.
Apply three coats of CG1004 Berry Tart with two coats of CG1006 Purple Reign layered as accents over the top to the shell trinket dish.
Create a cylindrical vessel with the Broomstick Method using a set of dowel rods with graduating thicknesses. Wedge 2 pounds of clay and slap it into a rough cylinder shape about the size of a soda can. Skewer the center of the cylinder with the smallest dowel. To establish a straight channel through the clay, it may be easier to poke through both sides and meet in the middle.
Holding both sides of the dowel, roll the clay like a rolling pin. As the hole widens, swap the dowel rod for a thicker one and continue rolling. Repeat this step until a cylinder with ¼” walls have taken shape.
Augment the cylinder using gentle pressure with a damp sponge, pressing in from the outside and pressing out from the inside to close the top. When satisfied with the shape, set the piece on top of a slab to mark the floor. Cut the floor shape and attach it to the augmented cylinder using the slip and score method. Compress the underside with a rib to prevent cracking and weld the seam upwards. Cut an optional hole in the top.
After cutting cat ears from the top of the cylinder, carve the cat pattern using a carving tool or dull pencil. Clay carving is best done in the leather-hard stage. Allow clay scraps to dry and sweep away with a fan brush.
Allow to dry thoroughly and fire to cone 04.
Using the sponge, apply SC006 Sunkissed to the top half of the cat.
Using the sponge, apply SC074 Hot Tamale to the bottom half of the cat.
Mix a 1 to 1 ratio of SC074 Hot Tamale and SC006 Sunkissed and sponge mixture in the center of the cat where the two previous colors meet.
Mix a 1 to 1 ratio of SP245 Specked My Blue Heaven and SC013 Grapel and use the Script Liner brush to apply three coats to the tail.
Using the back of the brush, apply dots of the same mixture randomly around the whole cat, avoiding the eyes and tail. Using the Detail liner, go around each dot with a thin one coat band of SC013 Grapel. Using the Script Liner brush, apply SP245 Specked My Blue Heaven in three coats around the previous circles of glaze. Using the Detail liner, go around each ring with a thin coat band of SC013 Grapel.
Mix a 1 to 1 ratio of SC016 Cotton Tail and SC012 Moody Blue. Using the Script liner brush apply three coats of the mixture in a ring around the previous rings of glaze. Using the back end of the brush, apply dots of SC013 Grapel over top of the second ring of SC013.
Apply three coats of SC016 Cotton Tail to the corners of the eye. Apply 2 coats of SC012 Moody Blue to the center of the eyes. In equal parts, mix a small amount of SC016 Cotton Tail, SC012 Moody Blue, SC006 Sunkissed, and SP245 Speckled My Blue Heaven and apply three coats of the mixture to the iris of the eyes.
Fill the designer bottle and writer tip with SC012 Moody Blue. Fill in the carved lines of the cat using the designer bottle of color.
Glaze the inside of the cat with SC012 Moody Blue.
Stilt and fire to cone 06.
Form
3 lbs of clay of choice
Colors
SC006 Sunkissed
SC011 Blue Yonder
SC012 Moody Blue
SC013 Grapel
SC016 Cotton Tail
SC023 Jack O’Lantern
SC074 Hot Tamale
SP245 Specked My Blue Heaven
Decorating Accessories
Assorted round brushes
Script liner
Detail liner
Clay cutter
Various carving tools
AC219 Writer bottle or squeeze bottle with tip
Miscellaneous Accessories
Toothpick
Dowel rods (24”) of graduating thickness (1/4”, 1/2”, and 1”)
Using the watercolor marker, create a pattern of interlocking loops and swirls.
Using the Script Liner brush, apply 3 coats of EL143 Cactus Flower, EL129 Slate, EL144 Dark Amethyst, EL158 Pine Needles, EL118 Blue Grotto and EL128 Wheat where desired, allowing the colors to overlap slightly.
Using the Soft Fan brush, apply 2 coats of FN009 Black to the back.
Begin with properly fired cone 04 bisque. Moisten a sponge and wipe bisque to remove any dust.
Squeeze around 1 TBS of SC010 Teal Next Time onto the palette. Thin with around 1 TSP of water. Using the Soft Fan, apply 1 coat to the leaves. Using a damp sponge, wipe off most of the glaze, leaving it only in the crevices. Wipe against the direction of the texture.
Squeeze around 1 TBS of SC033 Fruit of The Vine onto the palette. Thin with around 1 TSP of water. Using the Soft Fan, apply 1 coat to pumpkin. Using a damp sponge, wipe off most of the glaze, leaving it only in the crevices. Wipe against the direction of the texture.
Using the Soft Fan with SC103 Lavendear, apply 2 coats to the pumpkin. Allow glaze to dry between coats.
Using the Script Liner with SC096 Aqu-ward, apply 2 coats to every other leaf. Allow glaze to dry between coats.
Using the Script Liner with SC009 Jaded, apply 2 coats to every other leaf. Allow glaze to dry between coats.
Using the Script Liner with SC010 Teal Next Time, apply 3 coats to the stem. Allow glaze to dry between coats.
Using the Script Liner with SC001 Pink-A-Boo and SC033 Fruit of The Vine, apply 2 coats to random kernels on the pumpkin. Allow glaze to dry between coats.
Stilt and fire to cone 06.
Small Corn Pumpkin:
Begin with properly fired cone 04 bisque. Moisten a sponge and wipe bisque to remove any dust.
Squeeze around 1 TBS of SC010 Teal Next Time onto the palette. Thin with around 1 TSP of water. Using the Soft Fan, apply 1 coat to the leaves. Using a damp sponge, wipe off most of the glaze, leaving it only in the crevices. Wipe against the direction of the texture.
Squeeze around 1 TBS of SC003 Wine About It onto the palette. Thin with around 1 TSP of water. Using the Soft Fan, apply 1 coat to pumpkin. Using a damp sponge, wipe off most of the glaze, leaving it only in the crevices. Wipe against the direction of the texture.
Using the Soft Fan with SC001 Pink-A-Boo, apply 2 coats to the pumpkin. Allow glaze to dry between coats.
Using the Script Liner with SC096 Aqu-ward, apply 2 coats to every other leaf. Allow glaze to dry between coats.
Using the Script Liner with SC009 Jaded, apply 2 coats to every other leaf. Allow glaze to dry between coats.
Using the Script Liner with SC010 Teal Next Time, apply 3 coats to the stem. Allow glaze to dry between coats.
Using the Script Liner with SC103 Lavendear and SC003 Wine About It, apply 2 coats to random kernels on the pumpkin. Allow glaze to dry between coats.
On the dinner plate, using a #8 Soft Fan brush (RB140) apply 3 coats of SW250 White Opal to the entire rim of the plate.
Using a #8 Soft Fan brush, apply 2 coats of SW214 Micro Pearl to the center of the plate.
With a small sponge on a stick, apply 3 coats of SC076 Cara-bein Blue to the rim of plate. If a sponge on a stick is not available, a ½” Oval Brush (CB425) can be used.
With a #8 Round Brush (RB118) apply random spirals of the following colors: SW152 Blue Splatterware and SW123 Sapphire.
Using a #4 Soft Fan brush (RB144) apply 3 coats of SW401 Light Flux to the rim of the plate over the Stroke and Coat “dots.”
Apply 2 coats of SW214 Micro Pearl to the back of the plate.
Fire to cone 6.
Salad Plate:
Wipe dust from bisque with a damp sponge.
On the Salad plate, using a #8 Soft Fan brush (RB140) apply 3 coats of SW501 White Gloss to the center of the plate and to 2/3rd if the plate rim.
Using a #8 Soft Fan brush, apply 2 coats of SW214 Micro Pearl to the remining 1/3 of the plates rim.
On a plate, using a palate knife, mix SW510 Blue Gloss with AC310 Silkscreen Medium. This should have a consistency of pancake batter.
Apply the flower silkscreen DSS149 Designer Silkscreen Flowers 3 XL to the inside of the plate and the rim using the gloss glaze/silkscreen mixture, avoiding 1/3rd of the rim with the SW214 Micro Pearl.
With a #6 Round brush (RB116) apply a thin line (3 coats) of SW152 Blue Splatterware just under the rim of the plate, just under the SW214 Micro Pearl.
Apply 2 coats of SW214 Micro Pearl to the back of the plate.
Fire to cone 6.
Bowl:
Wipe dust from bisque with a damp sponge.
With a pencil, lightly outline where silkscreen will be placed on bowl.
Using a #4 Soft Fan brush (RB144) apply 2 coats of SW501 While Gloss only to the area where the silkscreen will be applied.
On a plate, using a palate knife, mix SW510 Blue Gloss with AC310 Silkscreen Medium. This should have a consistency of pancake batter.
Apply the flower silkscreen DSS149 Designer Silkscreen Flowers 3 XL over the White Gloss.
Using a #8 Soft Fan brush (RB140) apply 3 coats of SW250 White Opal to the inside of the bowl and the rim, avoiding the silkscreen.
With a small sponge on a stick, apply 3 coats of SC76 Cara-bein Blue to the rim of bowl. If a sponge on a stick is not available, a ½” Oval Brush (CB425) can be used.
Using a #4 Soft Fan brush (RB144) apply 3 coats of SW401 Light Flux to the rim of the plate over the Stroke and Coat “dots.”
On the outside of the bowl, apply 2 coats of SW214 Micro Pearl.
When Micro Pearl is dry, apply 2 coats of SW 152 Blue Splatterware over the Micro Pearl.
Begin with properly fired shelf cone 04 bisque. Moisten a clean sponge and wipe bisque to remove any dust.
In a small cup dilute some FN009 Black with some water to the consistency of coffee cream. Pour this glaze inside the vase and roll the glaze coating the inside. Drain any excess glaze and leave it upside down till the shine is gone to prevent the glaze from pooling in the bottom. Wipe any spills on the outside of the vase with a damp sponge. Allow it to dry.
Using a CB604 #4 Soft Fan, apply 3 coats of SC086 Old Lace to the outside of the vase. Allow it to dry!
Thin some SC051 Poo Bear to a skin milk consistency, apply a thin wash to the outside of the vase going in a horizontal direction around the vase. Allow to dry.
Using AC230 Clay Carbon Papper and a ink pen, trace the pattern onto the vase.
Place some SC052 Tod-ily Green and SC008 Just Froggy and SC014 Java Bean onto your palette.
Using a CB106 #6 Script Liner, Load the brush with SC052 Toad-ily Green, Strok in each of the leaves with 1 coat. Then, load the brush again and side load with SC008 Just Froggy and stroke in the leaves again keeping the shading to one side.
Mix some SC014 Jave Bean with some SC008 Just Froggy making a green brown.
Using a CB110 #10/0 Liner, apply this mix to all the stems.
Using a CB110 #10/0 Liner, apply SC008 Just Froggy to the word oil.
Place some SC013 Grapel and SC032 Bluebeard on your palette.
Using a CB404#4 Pointed Round, Apply 2-3 coats of SC013 Grapel to each olive.
Using a CB308 #8 Flat Shader or a CB404 #$ Pointed Round, load the brush with SC013 Graple then side load in SC032 Bluebeard and shade each olive.
Using a CB110 #10/0 Liner, outline and detail the leaves with SC015 Tuxedo. Allow to dry
Begin with properly fired cone 04 bisque. Moisten a sponge and wipe bisque to remove any dust.
Using the Script Liner brush with SC102 Just Peachy, apply 3 coats to every other section of the pumpkin. Allow glaze to dry between coats.
Using the Script Liner brush with SP275 Speckled Orange-A-Peel, apply 3 coats to the remaining sections of the pumpkin. Allow glaze to dry between coats.
Using the Script Liner brush with SC009 Jaded, apply 3 coats to the stem. Allow glaze to dry between coats.
Take AC220 Detailer Tips and 1oz Bottles and fill with SG202 White Cobblestone. Use the bottle to make decorative lines on the pumpkin.
Stilt and fire to cone 06.
Round Hammered Pumpkin:
Begin with properly fired cone 04 bisque. Moisten a sponge and wipe bisque to remove any dust.
Take the pencil and make 2 horizontal lines on each section of the pumpkin, dividing it into 3 each equal sections. This will make a checkerboard pattern on the pumpkin.
Using the Script Liner brush with SC035 Gray Hare, apply 3 coats to every other square on the pumpkin. Allow glaze to dry between coats.
Using the Script Liner brush with SP215 Speckled Tuxedo, apply 3 coats to the remaining squares. Allow glaze to dry between coats.
Using the Script Liner with SC009 Jaded, apply 3 coats to the stem. Allow glaze to dry between coats.
Take AC220 Detailer Tips and 1oz Bottles and fill with SG202 White Cobblestone. Use the bottle to outline the checkerboard pattern on the pumpkin.
Stilt and fire to cone 06.
Squatty Pumpkin:
Begin with properly fired cone 04 bisque. Moisten a sponge and wipe bisque to remove any dust.
Using the Soft Fan brush with SC001 Pink-A-Boo, apply 3 coats to the pumpkin. Allow glaze to dry between coats.
Using the Script Liner brush with SC009 Jaded, apply 3 coats to the stem. Allow glaze to dry between coats.
Take AC220 Detailer Tips and 1oz Bottles and fill with SG202 White Cobblestone. Use the bottle to make large dots going down each section of the pumpkin.
Fill a Detail Bottle (AC220) with SW401 Light Flux and apply 3 rows of “W”s on the inside and outside of the bowl.
Apply thick dots from top to bottom, inside the W loops, with a brush or a detail bottle on the inside and outside of the bowl using the following Stroke and Coat:
Row 1: Alternating SC013 Grapel and SC033 Fruit of the Vine
Row 2: SC042 Butter Me Up
Row 3: Alternating SC013 Grapel and SC033 Fruit of the Vine
Once dry, using a #8 soft fan brush (RB140) apply 2 coats over the outside and inside, avoiding the very bottom of the inside of the bowl using SW214 Micro Pearl.
Fill a Detail Bottle (AC220) with Light Flux SW401 and apply 6 rows of “W”s on the inside and outside of the bowl.
Apply thick dots from top to bottom, inside the W loops, with a brush or a detail bottle on the inside and outside of the bowl using the following Stroke and Coat:
Row 1: SC073 Candy Apple Red
Row 2: SC075 Orange A Peel
Row 3: SC006 Sunkissed
Row 4: SC026 Green Thumb
Row 5: SC076 Cara-Bein Blue
Row 6 SC033 Fruit of the Vine
Once dry, using a #8 soft fan brush (RB-140) apply 2 coats over the entire inside and outside of the bowl with SW214 Micro Pearl.
Using a #4 soft fan brush (RB144) apply 2 coats of EG002 Speckled Buff Engobe to the outside of the mug, ½ down from the rim, including the handle.
Let dry completely.
Using a pencil, lightly draw sunflower design to the middle of the mug.
With a #6 Round brush (RB116) apply wax resist (AC302) to outline the leaves of the sunflower and anywhere else glaze is not wanted.
Using a #6 Round brush (RB116) glaze sunflower leaves with SC042 Butter Me Up and SC097 Cant-Elope. With the same size brush, glaze the center of the sunflower with SC034 Down To Earth and dots of SC015 Tuxedo.
Apply 3 coats of SW131 Birch to the inside of the mug and the to 2/3 of the outside of the mug, avoiding the sunflower.
With a #4 soft fan brush (RB144) apply 3 coats of SW122 Maycoshino to the bottom 1/3 of the mug and handle.
Using a #4 soft fan brush (RB-144) apply 2 coats of SW002 Speckled Buff Engobe on the entire outside of the mug, starting about ¼” down from the rim.
Let dry completely.
Apply vinyl resist or lightly hand draw with a pencil Monogram pattern on top of engobe.
If using a vinyl resist, apply 3 coats of SW168 Coral Sands over the top 1/2 of the mug, ½ of the handle and the entire inside using a #4 soft fan brush (RB-144).
With a #4 soft fan brush (RB-144) apply 3 coats of SW119 Cinnabar on the bottom ½ of the mug and handle.
Do not fire with vinyl resist left on mug.
If hand drawing a pattern, apply (AC302) wax over the area where glazes will not be needed, using a brush dedicated solely to wax application.
After the removing the vinyl, apply 2 coats of SC043 Lettuce Alone to the Monogram leaves.
Using a #4 soft fan brush (RB-144) apply 3 coats of SP231 Speckled The Blues to the handle of the mug.
Using a #8 soft fan brush (RB-140) apply 3 coats of SW199 Purple Aster to the inside of the mug and the outside rim.
Using a #4 soft fan brush (RB-144) apply 3 coats SW510 Blue Gloss to the bottom of the mug.
Alternating the following colors, create flower patterns in the honeycombs with a 2/0 Detail Liner brush (CB220)
SW502 Yellow Gloss
SW503 Orange Gloss
SW504 Red Gloss
SW505 Purple Gloss
SW506 Bright Blue Gloss
SW507 Bright Green Gloss
SW510 Blue Gloss
SW511 Pink Gloss
SW512 Coral Gloss
Inside the remaining honeycombs, apply 3 coats of SW158 Lilac Matte using a 2/0 Detail Liner brush (CB220) and outlining the honeycomb with SW501 White Gloss.
With a piece of 1/2” low tack masking tape (MC002) mask piece slightly off center down the middle of the bisque.
On the smaller of the 2 sections apply 2 coats of EG002 Speckled Buff Engobe.
On the larger side apply 4 coats of SW251 Pink Opal.
Once the engobe is dry, apply 3 coats of SW162 Pink Matte.
Remove tape.
Down the center of the piece where the tape was, apply 2 coats of SW250 White Opal, then when the White Opal is dry, apply 1 thick coat of SW401 Light Flux.
When the Pink Opal is dry, apply 2 coats of SW219 Opal Luster to the rim and about 1” down.
Using the same about of clay create an additional pinch pot with a hole at the bottom
Flatten 3 small pieces of clay between your palms. Cut these pieces to create two wings of similar shape and size, and one belly piece.
Attach these by slipping and scoring.
Create the feather texture in the wings by pressing the eraser end of your pencil into the wings, creating impressions of the metal fastener of your pencil.
Roll two small balls as the eyes and push the eraser end of your pencil into the center of each ball to create the eyes, flatten the back against the table, slip and score to attach them to the owl.
Take a small piece of clay and mold the beak of the owl, attach this between the two eyes.
Smooth out your connections with your fingers and water.
Once your pot is completely dry, bisque fire your pot to cone 04.
Coat your pot with 3 coats of SC048 Camel Back, covering all spaces but the belly, feet, eyes, and beak.
NOTE: Always allow your glaze to dry completely in between coats.
Using a detail brush add 3 coats of SC011 Blue Yonder to the eyes.
Using 3 coats of SC006 Sunkissed, glaze the belly of your owl.
Using a detail brush apply 3 coats of SC075 Orange-A-Peel, to the feet and beak.
Using a flat surface, mold this into a longer rectangular shape (this will be the shoulders of your robot
Create an additional small rectangular pinch pot that is about ½ of the width of the first but slightly taller
Roll a small coil, about 3 inches long and the thickness of a pencil and one half
Add a ribbed texture to the coil by drawing lines in the clay with your pencil tip
Connect the two pots together using the coil as the neck, the longer pot rim down as the shoulders and the smaller pot rim up as the head. Slip and score to connect these pieces
Flatten two small pieces of clay and cut your desired shapes for the eyes and attach them to the face by slipping and scoring
Smooth out your connections with your fingers and water
Let your pot dry slowly
Once it is completely dry, bisque fire your pot to cone 04
Coat your pot with 3 coats of EL119 Burnished Steel leaving the neck and eyes blank
NOTE: Always allow your glaze to dry completely in between coats
Using a detail brush glaze the eyes and neck with three coats of EL120 Black Ice
Roll your clay out in a slab that is about 7 inches wide and ¾” thick
Smooth your slab out with your rib
Cover your cup with paper to keep clay from sticking to it
Wrap your clay slab around the outside of the covered cup to create a cylinder
Cut the end of the slab so your clay overlaps only ¼”
Attach ends together by smoothing them together with your finger, and use your rib to smooth it further
Once cylinder is created remove the cup from your clay – you may need to twist to get it out
Using your left over slab pieces (you may need to roll out a new piece) cut the base for your tumbler by placing your cylinder on top and tracing a circle
Attach base by slipping and scoring pieces together
Allow to dry until leather hard
Apply 2 coats of Jet Black Underglaze (UG-50) to the bottom half of your mug
Once underglaze is dry, carve your desired texture design using a loop tool
Allow to dry fully
Bisque fire to Cone 04
Wipe your bisqueware with a damp sponge
Apply a heavy coat of UG-46 Bright Yellow, UG-206 Fire Engine Red and UG-1 Kings Blue to the textured parts of your pot- you are trying to get the color to sit down into the texture
Allow underglaze to dry almost all the way
Wipe access underglaze away with a wet sponge, leaving the colors only in the indentations
Allow to dry completely
Clear coat your tumbler by dipping it into clear glaze (S-2000)
Moisten a clean sponge and wipe bisque to remove debris.
Apply 2 coats of SC075 Orange-A-Peel to the top 1/3 and inside of mug.
Using a palette knife, mix SG401 Black Designer Liner with AC310 Silkscreen Medium until it becomes the consistency of peanut butter. You may need to add more silkscreen medium or Designer Liner.
Place the skull design from the DSS0114 Creepy (Dark Elements) Designer Silkscreen around the mug, shiny side down. While holding the screen firmly in the center, take the squeegee and scoop out the premixed silkscreen medium. Firmly run the squeegee across the center of the skull design spreading the medium. Repeat the skull design around the mug.
Using a pencil, lightly trace circles for the eyes.
Using a #8 soft fan brush (RB140) apply 3 coats of SW508 Black Gloss to the entire bowl avoiding the eyes.
Let dry completely.
With a pencil, lightly draw lines that will become “strips”.
Using Wax Resist AC302 in a Designer Liner BottleAC219 or with a #4LinerBrush (RB104) trace the “strip” lines with wax.
Once the wax is completely dry, apply 2 coats of SG202 White Cobblestone with a broad brush #8 soft fan brush (RB140). Avoiding the eyes. *IMPORTANT* Apply the 2nd coat while the 1st coat is still damp. Do not let the Cobblestone to dry between coats. Pattern break-up is determined by the application direction of the brush stroke. Large break up heavier application, small breakup lighter application. If application is too light the cobblestone will not break up. Reapplying and touching up will not achieve a break up.
With #8 Round Brush (RB 118) apply 2 coats of SW501 White Gloss and SW 508 Black Gloss to the eyes.
Using a #4 Liner Brush (RB104) add SC077 Glo-Worm to the whites of the eyes.
Using a #8 soft fan brush (RB140) apply 3 coats of SW106 Alabaster to entire inside of the pie plate.
Using a #8 soft fan brush (RB140) apply 3 coats of SW166 Norse Blue to entire outside of the pie plate.
Let dry completely.
Using a round sponge on a stick, or fan brush apply 2 coats of SC010 Candy Apple Red, SC009 Jaded and SC006 Sunkissed in random circles and sizes on the bottom of the plate.
Using a #4 detail liner, make smaller circles inside the larger circles using the following:
Candy Apple Red with SC088 TuTu Tango, SW505 Purple Gloss, SW508 Black Gloss and lastly 3 dots of SW502 Yellow Gloss and SW508 Black gloss in the center of the flower.
Jaded: SC011 Blue Yonder, SW506 Bright Blue Gloss, SW508 Black gloss and lastly 3 dots of SW510 Blue Gloss and SW508 Black gloss in the center of the flower.
Sunkissed: SC088 TuTu Tango, SW503 Orange Gloss, SW508 Black Gloss and lastly 3 dots of SW504 Red Gloss and SW508 Black Gloss in the center of the flower.
With a #4 liner brush, make stems and leaves on the bottom of the plate with SC036 Irish Luck, filling in the leave and highlighting the stems with SC026 Green Thumb, SC027 Sour Apple and SC015 Tuxedo.
Begin with properly fired shelf cone 04 bisque. Moisten a clean sponge and wipe bisque to remove any dust
Using RB140 #8 Soft Fan, apply 3 coats of SC015 Tuxedo to the bisque. Allow to dry!
Using scissors to cut out the individual components of the pattern. Trace the pattern randomly onto the piece using AC230 Carbon paper and a pencil. If you feel comfortable, you can also free hand the vines.
Fill the AC219 Designer Bottle with SC027 Sour Apple. Trace over the vine patterns using this green. Only one coast is needed using the AC219 Designer Bottle with the Writer Tip. Rinse the bottle tip after each use.
Fill the AC219 Designer Bottle with SC086 Old Lace, SC073 Candy Apple Red or SC042 to add dots or ornaments of various sizes. Only one coast is needed using the AC219 Designer Bottle with the Writer Tip. Rinse the bottle tip after each use.
Stilt and fire to shelf cone 05-06
Note: If you opt to use a RB110 10/0 Detail Liner in lieu of the AC219 Designer Bottle with writer tip, you will need to paint 3 coats of said color.
Using the Soft Fan, apply 3 coats of Bubblegum to the entire piece.
Using the Clay Carbon paper, trace on the pattern.
Orange pot cactus: Using the Round, apply 3 coats of Glade Green to the cactus, Side load in Olive Green and shade the edges. Apply 3 coats of Orange to the pot. Shade and add doth with Red.
Teal pot cactus: Using the Round, apply 3 coats of Olive Green to the cactus, then side load and shade with Green. Apply 3 coats of Teal Blue to the pot. Shade with Mediterranean Teal.
Ivory pot cactus: Using the Round, Apply 3 coats of Green to some sections then Glade Green to the remaining sections. Shade with the opposite color. Apply 3 coats of Ivory Speck to the bottom area of the pot and 3 coats of Heather to the top rim.
Blue pot cactus: Using the Round, apply 3 coats of Apple Green, then side load and shade with Jade. Apply 3 coats of Cornflower Blue to the pot, and add stripes with Dark Blue.
Yellow pot cactus; Using the Round, apply 3 coats of Yellow to the pot, then side load and shade with Tangerine.
Begin with properly fired shelf cone 04 bisque. Moisten a clean sponge and wipe bisque to remove any dust.
Using a ruler, measure about 2” from the bottom and draw a line with a pencil. Apply masking tape along the bottom side of the line.
Using a CB604 #4 Soft Fan, apply 3 coats of SC009 Jaded to the top side of the piece. Allow to dry!
Apply the Masking tape on the edge of the Jaded and apply 3 coats of SC052 Toad-ily Green to the bottom section of the piece. Allow to dry!
Using AC230 Clay Carbon Paper and an ink pen, trace the pattern onto the Canvas. No need to trace any of the details at this time.
Using a CB604 #4 Soft Fan and a CB106 #6 Script Liner, apply 3 coats of SC045 My Blue Heaven to the ghost.
Using a CB404 #4 Pointed round and a CB110 #10/0 Liner, apply SC060 Silver Lining to the cat.
Using a CB106 #6 Script Liner, apply 3 coats of SC014 Java Bean to the pumpkin and 2 coats to the fence.
Shade the fence with SC014 Java Bean in the brush and side load with SC015 Tuxedo.
Using a CB602 #2 Soft Fan, shade the grass area with SC014 Java Bean.
Using a CB404 #4 Pointed Round, thin some SC016 Cotton Tail with water then apply clouds in the sky area.
Cut out the pattern around the outer edges of the ghost, pumpkin and cat. Line up the pattern onto the piece. Using AC230 Clay Carbon Papper and an ink pen, trace the all the details onto the piece.
Using a CB202 #2 Detail Liner, apply 2 coats of SC077 Glo Worm to the cat’s eyes and 2 coats of SC089 Cutie Pie Coral to the cat’s nose and inside the ears.
Using a CB202 #2 Detail Liner, apply 2 coats of SC015 Tuxedo to the eyes and mouth of the ghost and pumpkin also the cat’s eyes. Highlight the ghost and the cat’s eyes with SC016 Cotton tail.
Condition a brush with some hand soap. Place a small amount of AC302 Wax Resist in a small cup. Apply a good coat of the AC302 Wax Resist to all eyes, mouths of ghost and pumpkin also to the cat’s eyes, nose, ears, mouth and whisker, and paw lines.
Using a CB602 #2 Soft Fan and a CB202 # 2 Detail liner, apply 3 coats of SG302 White Cobblestone to the Ghost and Pumpkin. Once the sine is gone apply the next coat.
Using a CB404 #4 Pointed Round, Shade the outer edge of the ghost with SC045 My Blue Heaven.
Using a CB602 #2 Soft Fan, apply 1 coat of SC097 Cant-elope to the pumpkin. Highlight the pumpkin with SC024 Dandelion and Shade with SC080 Basketball.
Using a CB308 #8 Flat Shader, clean up any color on the mouths and eyes of the pumpkin and ghost. Dampen the area first so you can remove the excess color. This may take a couple of times to remove it all.
Condition a brush with some hand soap. Place a small amount of AC302 Wax Resist in a small cup. Apply a good coat of the AC302 Wax Resist over the Cobblestone on the ghost and pumpkin to protect it.
Using a CB404 #4 Pointed Round, apply 3 coats of SG301 Black Cobblestone to the cat.
Using a CB308 #8 Flat Shader, clean up any color on the eyes of the cat, nose mouth and whisker lines and the lines on the paw. Dampen the area first so you can remove the excess color. This may take a couple of times to remove it all.
Condition a brush with some hand soap. Place a small amount of AC302 Wax Resist in a small cup. Apply a good coat of the AC302 Wax Resist over the Cobblestone on the cat to protect it. Allow to dry!
Begin by wiping down the MB1629 Small Snail Planter with a damp sponge to remove dust.
Apply two coats of FN028 to the whole body of the snail, inside and out, leaving the eyes, face and bottom of foot unglazed.
Prep the Mini Liner brush for wax with a coat of soap.
Dip the soaped Mini Liner in wax resist.
Draw the shell line details and any other line work with the wax.
Allow wax to dry.
Using the Script Liner with EL136 Lapis Lagoon, apply 1 coat to every third section of the shell and the upper portion of the foot.
Using the Script Liner with EL130 Sea Green, apply 1 coat to every third section of the shell.
Using the Script Liner with EL153 Caribbean Blue, apply 1 coat to every third section of the shell.
Repeat Steps 4-6 for a second coat of color.
Repeat Steps 4-6 for a third coat of color, but only apply the glaze to the center portion of each section (the inner area ¼” from the edge of each section). It does not have to be exact, just do not glaze right next to the wax line.
Apply three coats of EL101 Oyster Shell to everything but the shell, upper foot, and eyeballs.
Apply three coats of SC015 to the eyes.
Add two small dots of SC016 to the eyes to mimic shine.
Begin by wiping down the MB1630 Small Owl Planter with a damp sponge to remove dust.
Apply two coats of FN028 to the whole body of the owl, inside and out, leaving the eyes, beak, and feet unglazed.
Prep the Mini Liner brush for wax with a coat of soap.
Dip the soaped Mini Liner in wax resist.
Draw the feather details and any other line work with the wax.
Allow wax to dry.
Using the Script Liner with EL128 Wheat, apply 3 coats to the beak and toes.
Using the Script Liner with EL136 Lapis Lagoon, apply 1 coat to a few feathers.
Using the Script Liner with EL130 Sea Green, apply 1 coat to a few feathers.
Using the Script Liner with EL153 Caribbean Blue, apply 1 coat to a few feathers.
Using the Script Liner with EL101 Oyster Shell, apply 1 coat to the main portion of the body.
Repeat Steps 5-8 for a second coat of color.
Repeat Steps 5-8 for a third coat of color, but only apply the glaze to the center portion of each section (the inner area ¼” from the edge of each section). It does not have to be exact, just do not glaze right next to the wax line.
Apply 3 coats of EL130 Sea Green to the outside ring of the eyes.
Apply three coats of SC015 to the eyes.
Add two small dots of SC016 to the eyes to mimic shine.
1. Begin with properly fired shelf cone 04$04 bisque. Moisten a clean sponge and wipe bisque to remove any dust.
2. Using a RB144 #4 Soft Fan, apply 3 coats of FN007 Geen to the inside of the Lantern including the cutout openings and just over the top rim edge. Allow to dry!
3. Moisten a clean sponge and wipe any of the green glaze that may have gotten onto the outside of the lantern.
4. Using a CB604 #4 Soft Fan, apply 2-3 coats of CG753 Sassy Orange to the lattice area of the lantern and to the area just below the rim of the lantern. Allow to dry!
5. Using a CB604 #4 Soft Fan and a CB106 #6 Script Liner, apply 3 coats of SC074 Hot Tamale to the bottom of the lantern and up to the lattice area.
6. Using a CB106 #6 Script Liner, apply 3 coats of SC097 Cante-elope to the ring just above the lattice. Allow to dry!
7. Stilt and fire to cone 06.
Form
MB002 Lattice Lantern
Colors
SC074 Hot Tamale
SC075 Orange-A-Peel
CG753 Sassy Orange
FN007 Green
Decorating Accessories
RB106 #6 Script Liner
RB144 #4 Soft Fan
Miscellaneous Accessories
Glazed Tile or a Paper Plate for a Palette
Paper Towels
Water Bowl
Sponge
Low-Fire|Earthenware Bisque|Garden|Home Décor|Table Top
Begin with properly fired shelf cone 04 bisque. Moisten a clean sponge and wipe bisque to remove any dust.
Using an AB710 ¾ Flat Shader, apply OS481 Cinnamon to the corn and bottom of the piece. Allow to Dry!
Using a DB803 #8 Round, drybrush the dark-colored corn with OS440 Burnt Orange, 2-3 coats. Then drybrush with OS454 Rust. Highlight some of the corn kernels with OS439 Hot Orange.
Using a DB803 #8 Round, drybrush the yellow-colored corn with OS588 Golden Ochre, 2-3 coats. Then drybrush with OS436 Gold. Highlight with OS432 Ivory then with OS431 White in the brush on some of the corn kernels.
DB801 #3 Round, Drybrush the spotted corn cornels with OS460 Navy then highlight with OS480 Garnet Red. Leave some with just the OS460 Navy.
Using an AB710 ¾ Flat Shader, apply OS599 Medium Portrait followed by OS485 French Vanilla then OS431 in the brush.
Using a DB802 #5 Round, drybrush the stem with OS599 Medium Taupe then OS596 Medium Portrait and a light highlighting of OS432 Ivory.
Using a AB709 3/8 Angular Shader, Shade the deep crevices of the corn with OS481 Cinnamon and the corn husks with OS599 Medium Taupe. Allow to dry!
Using an AB710 ¾ Flat Shader, apply 2 coats of AC502 Matte Brush on Sealer. Allow to Dry!
Begin with properly fired shelf cone 04 bisque. Moisten a clean sponge and wipe bisque to remove any dust.
Using an AB710 ¾ Flat Shader, apply OS481 Curry to the corn and bottom of the piece. Allow to Dry!
Using a DB803 #8 Round, drybrush the solid-colored corn with OS588 Golden Ochre, 2-3 coats. Then drybrush with OS436 Gold. Highlight with OS434 Lemon Yellow then some of the corn cornels here and there, drybrush with OS485 French Vanilla then highlight lightly with OS431 White in the brush.
Using a DB803 #8 Round, drybrush the spotted-colored corn with OS588 Golden Ochre, 2-3 coats. Then drybrush with OS436 Gold. Highlight with OS85 French Vanilla then with OS431 White in the brush. Drybrush the spotted corn cornels with OS460 Navy then highlight with OS480 Garnet Red.
Using an AB710 ¾ Flat Shader, apply OS599 Medium Taupe to the corn husks and OS489 Saddle Brown to the stem.
Using a DB803 #8 Round, drybrush the corn husks with SS127 Medium Portrait followed by OS485 French Vanilla then OS431 White in the brush. The top area of the corn husks is SS376 Limeburst Highlighted with OS432 Ivory.
Using a DB802 #5 Round, drybrush the stem with OS599 Medium Taupe then OS596 Medium Portrait and a light highlighting of OS432 Ivory.
Using a AB709 3/8 Angular Shader, Shade the deep crevices of the corn with OS571 Curry and the corn husks with OS599 Medium Taupe. Allow to dry!
Using an AB710 ¾ Flat Shader, apply 2 coats of AC502 Matte Brush on Sealer. Allow to Dry!
Begin with properly fired shelf cone 04 bisque. Moisten a clean sponge and wipe bisque to remove any dust.
Dilute about a quarter size amount of the Stroke & Coat® colors in separate small cups with two parts water to one part color.
Dab the diluted colors randomly over one half of the vase doing a small area at a time, and wet into wet. You want the colors to bleed into one another, so don’t do blotches of one color in select areas over the entire surface, because the color will dry before you add the two additional colors. You don’t need to wash the brush between colors.
Pick the vase up and allow the colors to move. For additional movement, gently mist the wet colors with water using a mister bottle. Be careful not to add too much water that you completely wash out the color.
Add additional dabs of diluted Stroke & Coat® in some areas to get more intense color.
On the bottom half of the vase, apply three coats of non-diluted Stroke & Coat® color of your choice with a Fan Brush. Stroke & Coat® becomes more opaque with each additional coat and will block out any drips of color on that area.
While the coats of Stroke & Coat® dry, apply optional lines of White Designer Liner following the outlines of color blotches.
When all the colors are dry, apply two coats of clear glaze over the entire tile.
1. Begin with properly fired shelf cone 04 bisque. Moisten a clean sponge and wipe bisque to remove any dust.
2. Using an AB710 ¾ Flat Shader, basecoat SS138 Flat Black to the canvas. Allow to Dry!
3. Using a DB805 #3 Fan Brush, apply 1 coat of MM106 Steel Metallic to the top and sides of the canvas. Make sure to mix the MM106 Steel Metallic well both stirring and shaking. Allow to dry!
4. Using a DB805 #3 Fan Brush, apply a 2nd coat of MM106 Steel Metallic to the top and sides of the canvas. While the MM106 Steel Metallic is still wet/dap, apply a heavy coat of MM305 Rapid rust to the Steel Metallic either with a brush AB710 ¾ Flat Shader, sponging, or spritzing it on. Allow to dry overnight.
5. Using an AB710 ¾ Flat Shader, Apply 2 coats of MM502 Matte Brush on Seale to the canvas over the Steel Metallic. Allow to dry between each coat.
6. Trace the pattern using Graphite Paper or Saral Transfer Paper on to the canvas tree being careful not to smear the tracing.
7. Using an AB705 #5 Round and a AB708 #10 Shader, basecoat the pumpkins with OS484 Persimmon.
8. Shade the pumpkins with OS440 Burnt Orange then OS 438 Orange Peel.
9. Using an AB709 3/8 Angular Shader, Shade the deep crevices and outer edge of the pumpkins with SS024 Chocolate Fudge.
10. Using a DB801 #3 Round, drybrush highlights on the pumpkins with OS435 Dark Yellow.
11. Using a AB704 #3 Round, apply SS194 Medium Taupe to the stems of the pumpkins.
12. Using an AB709 3/8 Angular Shader, Shade the stems with SS024 Chocolate Fudge and sone SS019 Country sage.
13. Using a RB116 #6 Round, apply one coat of SS254 Golde Ochre to each of the sunflower petals.
14. Loade the RB116 #6 Round with OS435 Dark Yello then side load in SS254 Golden Ochre. Stroke in each sunflower petal keeping the Golen Ochre to the same side of each petal.
15. Using a AB704 #3 Round, apply SS024 Chocolate Fudge to the centers of the sunflowers.
16. Using a DB801 #3 Round, stipple SS193 Medium Taupe with a little of SS019 Country Sage to the outer part of the sunflower center and SS138 Flat Black to the center part of the centers.
17. Using a AB704 #3 Round, apply SS045 Buttermilk to the top part of the candle and OS435 Dark Yellow to the bottom of the candle.
18. Using an AB709 3/8 Angular Shader, shade the candle lightly with SS024 Chocolate Fudge.
19. Using a RB116 #6 Round, Apply OS435 Dark Yellow to the flame of the candle then while still wet blend in some OS 438 Orange Peel to create the look of a flame. Mix some SS045 Buttermilk and a touch of SS138 Flat black to create a gray. Paint the candle wick with this mix.
20. Using a AB0704 #3 Round, basecoat the leaf with SS019 Country Sage then Using a AB709 3/8 Angular Shader, shade the leaf with SS057 Accent Green.
21. Using a AB710 #3/4 Shader, apply a thin coat of SS135 White (watery) to create the look of glass then add some highlights.
22. Using an AB704 #3 Round, apply 1 coat of MM102 Copper Metallic to the lantern. Allow to dry! Mix some MM102 Copper Metallic with some MM202 Green Patin together. Apply this mix to the lantern. This will give a Patina finish. Allow to Dry!
23. Using a AB702 #10/0 Liner, outline and detail the lantern and the leaf with SS138 Flat Black. Outline and detail the pumpkins and the sunflowers with SS024 Chocolate Fudge. Allow to dry!
24. Using a AB709 3/8 Angular Shader, shade around the outside of the design with SS024 Chocolate Fudge. Allow to dry!!
25. Using a AB710 ¾ Flat Shade. Apply 2 light coats of MM502 Matte Brush on Sealer to the entire canvas. Be careful not to apply to thick or it turn milky. Allow to dry!!!
Begin with properly fired shelf cone 04 bisque. Moisten a clean sponge and wipe bisque to remove any dust.
Using an AB710 ¾ Flat Shader, basecoat OS476 Black to the canvas. Allow to Dry!
Using a DB805 #3 Fan Brush, apply 1 coat of MM106 Steel Metallic to the top and sides of the canvas. Make sure to mix the MM106 Steel Metallic well both stirring and shaking. Allow to dry!
Using a DB805 #3 Fan Brush, apply a 2nd coat of MM106 Steel Metallic to the top and sides of the canvas. While the MM106 Steel Metallic is still wet/damp, apply a heavy coat of MM305 Rapid rust to the Steel Metallic either with a brush AB710 ¾ Flat Shader, sponging, or spritzing it on. Allow to dry overnight.
Using an AB710 ¾ Flat Shader, Apply 2 coats of MM502 Matte Brush on Sealer to the canvas over the MM106 Steel Metallic. Allow to dry between each coat.
Trace the pattern using Graphite Paper or Saral Transfer Paper on to the canvas tree being careful not to smear the tracing.
Using an AB705 #5 Round and a AB708 #10 Shader, basecoat the pumpkins with OS484 Persimmon.
Shade the pumpkins with OS440 Burnt Orange then OS438 Orange Peel.
Using an AB709 3/8 Angular Shader, Shade the deep crevices and outer edge of the pumpkins with SS024 Chocolate Fudge.
Using a DB801 #3 Round, drybrush highlights on the pumpkins with OS435 Dark Yellow.
Using a AB704 #3 Round, apply OS599 Medium Taupe to the stems of the pumpkins.
Using an AB709 3/8 Angular Shader, Shade the stems with OS472 Walnut and sone OS463 Medium Green.
Using a RB116 #6 Round, apply one coat of OS588 Golde Ochre to each of the sunflower petals.
Loade the RB116 #6 Round with OS435 Dark Yellow then side load in OS588 Golden Ochre. Stroke in each sunflower petal keeping the OS588 Golen Ochre to the same side of each petal.
Using a AB704 #3 Round, apply OS472 Walnut to the centers of the sunflowers.
Using a DB801 #3 Round, stipple OS599 Medium Taupe with a little of OS463 Medium Green to the outer part of the sunflower center and OS476 Black to the center part of the centers.
Using a AB704 #3 Round, apply OS432 Ivory to the top part of the candle and OS435 Dark Yellow to the bottom of the candle.
Using an AB709 3/8 Angular Shader, shade the candle lightly with OS472 Walnut.
Using a RB116 #6 Round, Apply OS435 Dark Yellow to the flame of the candle then while still wet blend in some OS438 Orange Peel to create the look of a flame. Mix some OS 432 and a touch of OS476 Black to create a gray. Paint the candle wick with this mix.
Using a AB0704 #3 Round, basecoat the leaf with OS463 Medium Green then Using a AB709 3/8 Angular Shader, shade the leaf with OS595 Accent Green.
Using a AB710 #3/4 Shader, apply a thin coat of OS431 White (watery) to create the look of glass then add some highlights.
Using an AB704 #3 Round, apply 1 coat of MM102 Copper Metallic to the lantern. Allow to dry! Mix some MM102 Copper Metallic with some MM202 Green Patin together. Apply this mix to the lantern. This will give a Patina finish. Allow to Dry!
Using a AB702 #10/0 Liner, outline and detail the lantern and the leaf with OS476 Black. Outline and detail the pumpkins and the sunflowers with OS472 Walnut. Allow to dry!
Using a AB709 3/8 Angular Shader, shade around the outside of the design with OS472 Walnut. Allow to dry!!
Using a AB710 ¾ Flat Shade. Apply 2 light coats of MM502 Matte Brush on Sealer to the entire canvas. Be careful not to apply to thick or it turn milky. Allow to dry Between each coat!!!
Begin with properly fired shelf cone 04 bisque. Moisten a clean sponge and wipe bisque to remove any dust.
Using an AB710 ¾ Flat Shader, basecoat OS556 Lemon Grass to the top side of tree. Allow to Dry!
Trace the candy cane pattern using Graphite Paper on one side of the tree being careful not to smear the tracing.
Using an AB704 #3 Round and a AB702 #10/0 Liner, apply OS558 Miami Pink to every other stripe on the candy cane and OS431 White to the other stripe.
Using an AB707 #6 Shader, shade the pink on the candy cane with OS590 Royal Fuchsia with some AS957 Thin N Shade.
Using an AB704 #3 Round and a AB702 #10/0 Liner, apply SS112 White Metallic to the white areas of the candy cane then add a stripe of OS469 Light Turquoise to the center of the white stripe. Outline the candy cane with OS590 Royal Fuchsia.
Using an AB704 #3 Round, apply OS594 Limeburst to the holly leaves.
Using a AB707 #6 Shader, shade the holly leaves with OS595 Accent Green with some AS957 Thin N Shade in the brush.
Using a AB702 #10/0 Liner, Outline and detail the holly with OS595 Accent Green. Add some pine needles with OS594 Limeburst and OS595 Accent Green.
Using a AB704 #3 Round, apply OS455 Holly Red to the holly berries then highlight with OS449 Bright Red. Add some dots of OS455 Holly Red to the pine needles.
Trace the bell & holly pattern using Graphite Paper on the other side of the tree being careful not to smear the tracing.
Using an AB704 #3 Round and a AB702 #10/0 Liner, apply OS435 Dark Yellow to the bells.
Using a AB707 #6 Shader, shade the bells with OS436 Gold with some AS957 Thin N Shade in the brush.
Using an AB704 #3 Round, apply OS594 Limeburst to the holly leaves.
Using a AB707 #6 Shader, shade the holly leaves with SS057 Accent Green with some AS957 Thin N Shade in the brush.
Using a AB702 #10/0 Liner, Outline and detail the holly with OS595 Accent Green.
Using an AB704 #3 Round and a AB702 #10/0 Liner, apply OS588 Miami Pink to the bow and ribbon tails.
Using a AB707 #6 Shader, shade the bow & ribbon tails with OS590 Royal Fuchsia with some AS957 Thin N Shade in the brush. Using an AB702 #10/0 Liner, outline and detail the bow, ribbon tails and the bell with OS476 Black.
Using an AB710 ¾ Flat Shader, basecoat OS588 Miami Pink the underside and branches of the tree. Allow to Dry!
Using a AB709 ¾ Angular Shader, shade the pink areas with OS590 Royal Fuchsia and OS594 Limeburst to the green areas. Allow to dry!
Using an AB710 ¾ Flat Shader, apply 2 thin coats of AC502 Matte Brush on Sealer to the entire tree, allow to dry between each coat.
Using an AB704 #3 Round and a AB702 #10/0 Liner, apply UM951 Solid Gold to the bell clapper and trim on the bell. Also add SG882 Glittering Gold to the trim of the bell.
Using an AB702 #10/0 Liner, apply AC501 Gloss Brush on Sealer to the holly berries, bell clapper and candy cane.
DB805 #3 Fan Brush, apply AS964 No-Fire Snow to the tips of the branches. Allow to dry!
1. Begin with properly fired cone 04 bisque. Moisten a sponge and wipe bisque to remove any dust.
2. Using the Soft Fan with FN001 White, apply 1 coat to the body of the tree. You do not need to glaze the swirls.
3. On the DSS0112 Flowers screen, draw an outline around each flower in permanent marker. Cut them out with excess screen around the edges.
4. Squeeze out around 1 TBS of SC012 Moody Blue onto the palette. Add a pinch of AC310 Silkscreen Medium. Mix with a palette knife until it becomes the consistency of peanut butter. You may need to add more silkscreen medium or glaze.
5. Choose which flowers you would like to use. Place one screen on the tree, shiny-side down. While holding the screen firmly in place, take a small amount of premixed silkscreen medium, and gently rub in circles starting in the center and working outward. Remove the screen. Repeat with the same flower or other flowers.
6. Using the Script Liner with SC012 Moody Blue, apply 3 coats to the swirls. Allow glaze to dry between coats.
7. Using the Soft Fan with NT-BR Clear One Brushing, apply 1 coat to the body of the tree.
1. Begin with properly fired shelf cone 04 bisque. Moisten a clean sponge and wipe bisque to remove any dust.
2. Using a CB604 #4 Soft Fan, apply 1 coat of SC025 Crackerjack Brown to each Pumpkin. Allow to dry slightly. With a damp sponge wipe back the color leaving it in the crevice.
3. Using s CB106 #6 Script Liner and a CB604 #4 Soft Fan, apply 3 costs of El107 Amber Ash to the corn area of the Tall Pumpkin. Allow to dry!
4. Using s CB106 #6 Script Liner and a CB604 #4 Soft Fan, apply 2 costs of El128 Wheat to the corn area of the Short Pumpkin. Allow to dry!
5. Using a CB202 #2 Detail liner, apply 2 coats of SC003 Wine About It to some of the corn kernels here and there. Do the same thing with SC058 The Blues. This will create the look of Indian Corn.
6. Using a CB106 #6 Script Liner, apply 2 coats of EL140 Toasted Almond to the corn husk area of both corn pumpkins.
7. Using a CB106 #6 Script Liner, apply 2 coats of El113 Spanish Moss to the stem of each corn pumpkin.
8. Using a CB106 #6 Script Liner, apply 2 coats of EL160 Foliage Green applying the color starting at the stem then pulling down into the husks leaving some of the El140 Toasted Almond showing. Also, apply some to the high areas of the stem.
9. Using an AB709 3/8 Angular Shader, shade the deep crevices of the corn to create some depth between them.
10. Using a CB604 #4 Soft Fan, apply 1 coat of SG701 Speckta-Clear Stardust to the corn area of the Short Pumpkin. Allow to dry!
Wipe down bisque bowl with a damp cleaning sponge.
Use a RB140 #8 Soft Fan brush to apply three coats of EG002 Speckled Buff to the inside of the bowl. While the last coat is still damp (darker in color but not shiny wet) polish with a shammy cloth of facial tissue without lotion. It’s best to prewash the shammy to soften and make it less abrasive. This shammy material can be purchased at most dollar stores. As you rub in a small circular motion, the engobe will become very smooth and shiny. If it dries completely before polishing, use the soft fan with a little water to dampen the color, wait for shiny wetness to go away, and polish. You may see a small amount of color on the shammy or facial tissue, but not a lot. Polishing the surface will allow you to stamp color, without lifting the engobe color.
Use the RB140 #8 Soft fan to apply two coats of EG005 Black Engobe to the exterior of the bowl. Allow to dry.
Load a sponge roller with EZ012 Cobalt black. Roll the color in thoroughly so you don’t have parts of the roller with little color (showing white areas), and other parts with dripping color. Roll and lift about 20 times for even application.
Gently roll the loaded sponge roller loaded with Cobalt Black over the raised areas of stamp. You will see the shiny wet color on the raised areas.
Quickly lift the stamp and flip it over and place it on the surface of the polished Speckled Buff Engobe area. Hold one side while pressing the other. Switch and hold the other side of the stamp while pressing. Try to do this quickly, or the thin application of color will dry on the stamp. Work your way with various stamps, slightly overlapping each as you cover the entire interior of the bowl. You may only use part of the stamp to fill in areas along the edge of the bowl. Apply color to the stamp each time it is used. It will only stamp once with an application of color. Dry color on the stamp will look greyer in color.
Center the bowl on a banding wheel and use a dagger brush loaded with slightly thinned EZ012 to band the lines around the edge of the bowl.
Load the tip of the DB805 Fan Dry Brush with slightly thinned EZ012 and flick the bristle toward the surface of the bowl to add a speckle over the interior.
Apply two coats of SW001 Stoneware Clear to the inside of bowl. Be careful applying the first coat of glaze since the black EZ Stroke can smear when it gets wet with glaze. (Don’t overbrush.)
Wipe down bisque bowl with a damp cleaning sponge.
Use a RB140 #8 Soft Fan brush to apply three coats of EG002 Speckled Buff to the inside of the bowl.
While the third coat of Speckled Buff is still wet, load the DB805 Drybrush Fan with EZ010 French brown and flick spots of the color over the Speckled Buff. Do the same with EZ012 and EZ038 Medium Mahogany.
Center the bowl on the banding wheel and spin while touching down the RB140 #8 Soft Fan to streak the EZ Stroke colors into the wet Speckled Buff. You need to work quickly while the colors are wet to create a good blend.
Use the RB140 #8 Soft fan to apply two coats of SW199 Purple Aster to the exterior of the bowl.
While the bowl is still centered on a banding wheel, use a dagger brush loaded with slightly thinned EZ012 Cobalt Black to band the lines around the edge of the bowl.
Load the tip of the DB805 #3 Fan Dry Brush with slightly thinned EZ012 and flick the bristle toward the surface of the bowl to add a speckle over the interior.
Apply two coats of SW002 Stoneware Matte Clear to the inside of bowl. Be careful applying the first coat of glaze since the black EZ Stroke can smear when it gets wet with glaze. (Don’t overbrush.)
Using a #4 soft fan brush (RB144) apply 2 coats of EG002 Speckled Buff Engobe to the to the bottom ½ of the mug.
Let dry completely.
When engobe is dry, using a #4 soft fan brush (RB144) apply 3 coats of SW165 Lavender Mist to the outside of the mug, overlapping the engobe by about 2” including the handle.
Apply 3 coats of SW214 Micro Pearl to the outside of the mug, over the Lavender Mist, including the handle and to the entire inside of the mug.
Using a #8 soft fan brush (RB140) apply 2 coats of EG002 Speckled Buff Engobe to bottom ½ of the outside of the bowl.
Let dry completely.
Using a #4 soft fan brush (RB144) apply 3 coats of SW216 Micro Jade to the top 1/2 of the outside of the nesting bowl.
On the top 1/4 of the outside of the bowl apply 3 coats of SW219 Opal Lustre over Micro Jade.
Using a #8 soft fan brush (RB140) apply 3 coats SW219 Opal Lustre to the inside of the bowl.
Using a #4 soft fan brush (RB144) apply 3 coats of SW217 Micro Cerulean over the Opal Lustre, about 3” down from the top and in the middle of the inside of the bowl.
Apply a third coat to the neck of the vase. This will result in a rougher textured finish.
Heat kiln to 1850°F.
At 1850°F carefully remove piece from kiln with metal tongs, and place into trash can with combustibles. Quickly place lid over can, causing reduction to occur.
Allow the combustion chamber to cool. Remove the pot and wipe carbon residue off with clean cloth.
Using a #4 soft fan brush (RB144) apply 3 coats of EG002 Speckled Buff Engobe to the mug starting just below the lip of the mug.
Let dry completely.
Using a #4 soft fan brush (RB144) apply 2 coats of SW141 White Matte to entire mug, over the engobe, stopping 2/3 from the bottom.
In a ½ circle, apply 2 coats of SC097 Cant-Elope to create the sun.
While the White Matte is still damp, carve the “rays” of the sun.
Once the mug is dry, use the #8 Round brush (RB118) and apply 2 coats of SW001 Stoneware Clear over the rays. If this step is eliminated, overglaze will not be glossy, it will be matte.
Fire to cone 6
After cone 6 firing, apply lines of OG805 Premium Gold overglaze on the “rays”
Let overglaze dry completely then fire to cone 019.
Using a #4 soft fan brush (RB144) apply 2 coats of EG004 Dark Brown Engobe to the bottom 2/3 of the mug and bottom 2/3 of handle.
Let dry completely.
Using #4 soft fan brush (RB144) apply 3 coats of SW199 Purple Aster to top ½ of mug and entire inside of the mug.
When engobe is completely dry, apply 3 coats of the following Stroke and Coat® glazes, in 2” bands in the middle of the mug:
SC033 Fruit of the Vine
SC045 Blue Yonder
SC031 The Blues
Before Stroke and Coat® dries, using the carving tool of your choice, carve pattern into the Stroke and Coat, carefully not to carve through the engobe.
Using a #8 soft fan brush (RB140) apply 2 coats of EG002 Speckled BuffEngobe to entire bowl.
Let dry completely.
Apply vinyl resist or lightly hand draw with a pencil leaf pattern on top of engobe.
If using a vinyl resist, apply 3 coats of SW166 Norse Blue over entire engobe. Remove resist before the Engobe dries completely prior to firing. Do not fire with vinyl resist left on mug.
If hand drawing a pattern, apply (AC302) Wax Resist over the area where glaze will not be needed, using a brush dedicated solely to wax application.
When wax is completely dry, apply 3 coats of SW166 Norse Blue over entire bowl.
Fire to cone 6.
Medium Nesting Bowl:
Wipe dust from bisque with a damp sponge
Using a #8 soft fan brush (RB140) apply 2 coats of EG004 Dark BrownEngobe to entire bowl.
Let dry completely.
Apply vinyl resist or lightly hand draw with a pencil leaf pattern on top of engobe.
If using a vinyl resist, apply 3 coats of SW172 Macadamia over entire Engobe. Remove resist before the Engobe dries completely prior to firing. Do not fire with vinyl resist left on mug.
If hand drawing a pattern, apply (AC302) Wax Resist over the area where glaze will not be needed, using a brush dedicated solely to wax application.
When wax is completely dry, apply 3 coats of SW172 Macadamia over entire bowl.
Using a #4 soft fan brush (RB-144) apply 2 coats of SW 002 Speckled BuffEngobe to the bottom 2/3 of the mug and bottom 2/3 of handle.
Let dry completely.
Apply vinyl resist or lightly hand draw with a pencil leaf pattern on top of engobe.
If using a vinyl resist, apply 2 coats of Brick Red Engobe over entire Speckled Buff Engobe. Remove resist before the Brick Red Engobe dries completely prior to firing. Do not fire with vinyl resist left on mug.
If hand drawing a pattern, apply (AC302) Wax Resist over the area where Brick Red Engobe will not be needed, using a brush dedicated solely to wax application.
When wax is completely dry, apply 2 coats of Brick Red Engobe over entire Speckled Buff Engobe.
When engobe is dry, apply 3 coats of SW166Norse Blueto top 1/3 of the mug and the top of handle.
Using a #8 Round Brush (RB118) apply random stripes of EG002 Speckled Buff Engobe and EG004 Dark Brown Engobe to the bottom 2/3 of the mug and bottom 2/3 of handle.
Let dry completely.
Using #4 soft fan brush (RB144) apply 3 coats of SW196 Sand Dollar to top ½ of mug and handle along with the entire inside of the mug.
Using a #8 soft fan brush (RB140) apply 3 coats of SW216 Micro Jade to the top 1/3 of the vase.
Let dry completely.
With a #6 round brush (RB116) apply random lines and patterns of EG002 Speckled Buff Engobe and EG004 Dark Brown Engobe to body of the vase, creating the camo effect.
With a pencil, lightly divide the vase into 4 equal parts horizontally.
Using a #8 soft fan brush (RB-140) apply 2 coats of the following engobes, top to bottom:
EG002 Speckled Buff Engobe
EG003 Brick Red Engobe
EG004 Dark Brown Engobe
EG005 Black Engobe
Let dry completely.
Apply vinyl resist or lightly hand draw a pencil leaf pattern on top of engobes.
If using a vinyl resist, apply 3 coats of SW176 Macadamia over entire vase. Remove resist before the glaze dries completely prior to firing. Do not fire with vinyl resist left on mug.
If hand drawing a pattern, apply (AC302) wax over the area where the Macadamia will not be, using a brush dedicated solely to wax application.
Begin by wiping down the MB1359 Asian Dragon Bisque with a damp sponge to remove any dust.
Using the soft fan brush, apply two coats of FN009 Black allowing the glaze to dry between coats.
With a damp sponge, softly wipe back the black glaze from the raised textures on the dragon.
Lightly hit the wiped back sections of the bique with the sanding pad to bring out the white of the bisque.
Using the fan, script liner, and detail liner brushes, apply the Jungle Gems to the following areas with two coats of glaze:
S2723 Grape Divine to the underbelly.
CG756 Firecracker to the inside of the mouth.
CG983 Koi Pond to the main scaled parts of the body.
CG987 Tree Frog where the lower part of the fur connects to the body, going about halfway up the fur.
S2729 Citrus Splash to the top section of the fur, dragging down into the Tree Frog color to create a gradient.
Using the Detail Liner brush, apply three coats of Grape Divine to the eyes, removing any crystals.
Using the Detail Liner brush, apply two coats of s2101 Crystal Clear brushing to the eyes, teeth, and any other places that may not have been covered with the Jungle Gems or Foundations glazes.
Paint a section of the vase using 2 coats of SC016 Cotton tail (this is where the astronaut will be sketched).
While the glaze is still damp, lightly trace the astronaut shape (the tracing should leave an indent. If you press too hard and can see the bisque, fill in the area with Cotton Tail).
Paint bottom on vase using 3 coats of SC015 Tuxedo avoiding painting in the astronaut.
Paint top of vase using 3 coats SC104 Grape Expectations avoiding painting in the astronaut.
On the face shield of the astronaut helmet, outline the interior with a wide band of SC104 Grape Expectations with 2 coats. Using a clean brush and clean water blend the edge of the interior line so it fades into the middle of the face shield. The outline that touches the astronaut helmet will remain solid.
Paint the face shield with 2 coats of SC103 Lavendear. Paint over the darker purple, it will come through in the firing.
Add some pink SC100 Makin Me Blush patches on the face shield.
Using the same SC103 Lavendear and shade the helmet and suit.
Sketch on 2 rows of fluffly rounded top clouds on the vase using a marker or pencil.
The bottom row of clouds are 2 coats of SC103 Lavendear with a thin blended layer of paint blended at the bottom of the cloud.
The top row of clouds are 2 coats of SC100 Makin Me Blush with a thin blended layer of paint blended at the bottom of the cloud.
Outline astronaut using SC015 Tuxedo and a liner brush.
Add stars, dots and white highlight on the face shield, using a liner brush or designer bottle.
Paint inside of vase using 3 coats of SC103 Lavendear.
Dab one coat of CG1006 Purple Reign on the base of each row of clouds and a patch on face shield.
Tape off the divide between the tapered bottom and the top part of the vase.
Draw 3 horizontal, organic squiggle lines around the whole vase.
Draw vertical organic squiggle lines around the whole vase, space them farther out to make big squares, space them closer to make smaller squares (farther apart recommended).
Mark where you are going to paint what color. Sample uses SC102 Makin’ Me Blush and SC101 Spruce it up.
Paint 3 coats of each color in respective squares.
Using the dotting gyre or you can use the end of a paint brush or eraser, make 5 point dot flowers with SC102 Just Peachy.
After they dry, add a dot to the center of the flowers with SC024 Dandelion.
Remove the tape.
Paint 2-3 coats of CG1003 Peach around the bottom.
Add 3 coats of CG1003 Just Peachy or any color you want on the inside!.
Begin with properly fired shelf cone 04 bisque. Moisten a clean sponge and wipe bisque to remove any dust.
Divide the tree sections, in groups of two. You will have a total of two sections of each color.
Using a CB106 #6 Script Liner, apply 2 coats of SP274 Speckled Hot Tamale to the inside of the stars and the circles on the red stripe of the tree. Then using a CB604 #4 Soft Fan apply 3 coats of SP274 Speckled Hot Tamale to the stripe.
Using a CB106 #6 Script Liner, apply 2 coats of SP212 Speckled Moody Blue to the inside of the stars and the circles on the blue stripe of the tree. Then using a CB604 #4 Soft Fan apply 3 coats SP212 Speckled Moody Blue to the stripe.
Using a CB106 #6 Script Liner, apply 2 coats of S2731 Kaboom liquid, no crystals to the inside of the stars and the circles on the red stripe of the tree. Then using a CB604 #4 Soft Fan apply 2 coats to the S2731 Kaboom to the stripe.
Using a CB604 #4 Soft Fan, apply 3 coats of FN001 White to the base area of the trees. Allow to dry!
Begin with properly fired cone 04 bisque. Moisten a sponge and wipe bisque to remove any dust.
Using the Soft Fan with FN001 White, apply 1 coat to the front of the plate.
Cut out the mushroom pattern. Wet the back and place in the center of the plate. Press around the edges with a damp sponge to make sure they stay down.
Using the Soft Fan with FN001 White, apply 1 coat over the edges of the mushroom pattern.
Using the Soft Fan with FN061 Ivory Specks, apply 3 coats to the front and back of the plate. Remove the pattern on the front of the plate before the glaze is completely dry.
Allow glaze to dry completely.
Using MC002 12mm Low Tack Masking Tape, apply a horizontal piece going across the front of the plate. This will separate the grass from the sky.
Using the Soft Fan with FN058 Green Apple, apply 3 coats to the bottom half of the plate. Do not glaze over the mushrooms. Allow glaze to dry between coats. Remove the tape before the glaze is bone dry.
Using MC001 12mm Low Tack Masking Tape, tape off the bottom half of the plate. Then tape off rays coming out from the mushrooms. Use MC001 6mm Low Tack Masking Tape to tape off smaller rays.
Using the Soft Fan with FN057 Periwinkle, apply 3 coats to the upper half of the plate. Do not glaze over the mushrooms. Allow glaze to dry between coats. Remove the tape before the glaze is bone dry.
Using the Script Liner with FN055 Bubblegum, apply 3 coats to the large mushroom cap. Allow glaze to dry between coats.
Using the Script Liner with FN056 Heather, apply 3 coats to the small mushroom cap. Allow glaze to dry between coats.
Using the Script Liner with SC006 Sunkissed, apply 3 coats to the small mushroom stem. Allow glaze to dry between coats.
Using the Script Liner with SC097 Cant-elope, apply 3 coats to the large mushroom stem. Allow glaze to dry between coats.
Squeeze out 1 tsp SC001 Pink-A-Boo and 1 tsp SC013 Grapel onto the palette. Dip the eraser of the pencil into SC001 Pink-A-Boo and stamp the large mushroom cap. Repeat until it is covered in dots. Dip the eraser of the pencil into SC013 Grapel and stamp the small mushroom cap. Repeat until it is covered in dots.
Begin with properly fired shelf cone 04 bisque. Moisten a clean sponge and wipe bisque to remove any dust.
Thin a small amount of FN057 Periwinkle with water to the consistency of coffee cream in a small cup. Pour the glaze into the vase then roll the glaze pouring it out slowly. Leave the vase upside down to drain till the shine is gone.
Using a CB604 #4 Soft Fan, apply 1 coat of FN001 White to the outside of the vase.
Cut out 2 copies of each pattern.
Position the pattern on the piece and attach by wetting the surface with water ten place the pattern, dab with a damp sponge. When all patterns are applied dab the area with a paper towel to help secure the pattern to the piece.
Using a CB604 #4 Soft Fan, apply 3 coats of FN057 Periwinkle to the outside side of the vase. Allow to dry!
Using a pencil and AC230 Clay Carbon Paper, trace the patterns onto the vase.
Outline each design using FD258 Black Licorice French Dimensions. Allow to dry!
Using a CB202 #2 Detail Liner apply 3 coats of SC013 Graple and SC074 Hot Tamale to alternating stripes in the middle and bottom of the pink & purple balloon.
Apply 2 puddled coats of CG1004 Berry Tart and CG1006 Purple Reign to every other stripe on the pink & purple balloon.
Balloon with squares, apply 2 puddled coats of CG1002 Day Lilly to the top of the balloon and every other square then CG1008 to the other squares.
Balloon with long stripes, apply 2 puddled coats of CG1003 Peach Party and CG1007 Blueberry Bubblegum to every other stripe on the balloon.
Using a CB202 #2 Detail Liner apply 3 coats of SC041 Brown Cow to the basket of all balloons.
Using a CB110 #10/0 Liner, detail the balloon baskets and add the strings with SC015 Tuxedo.
Using a sponge, dab some SC16 to create clouds in the background then apply SG302 Snowfall over top of it to give more dimension. Allow to dry!
Begin with properly fired shelf cone 04 bisque. Moisten a clean sponge and wipe bisque to remove any dust.
Thin a small amount of FN057 Periwinkle with water to the consistency of coffee cream in a small cup. Pour the glaze into the vase then roll the glaze pouring it out slowly. Leave the vase upside down to drain till the shine is gone.
Using a CB604 #4 Soft Fan, apply 1 coat of FN001 White to the outside of the vase.
Cut out 2 copies of each pattern.
Position the pattern on the piece and attach by wetting the surface with water ten place the pattern, dab with a damp sponge. When all patterns are applied dab the area with a paper towel to help secure the pattern to the piece.
Using a CB604 #4 Soft Fan, apply 3 coats of FN057 Periwinkle to the outside side of the vase. Allow to dry!
Using a pencil and AC230 Clay Carbon Paper, trace the patterns onto the vase.
Outline each design using FD258 Black Licorice French Dimensions. Allow to dry!
Using a CB202 #2 Detail Liner apply 3 coats of SC054 Vanila Dip.
Using a CB202 #2 Detail Liner apply 2 puddled coats of CG1006 Purple Reign and CG1004 Berry Tart to every other stripe on the pink & purple popsicle.
Using a CB202 #2 Detail Liner apply 2 puddled coats of CG1009 Chery Limeade and CG1007 Blueberry Bubblegum to every other stripe on the blue & Lime popsicle. Allow to dry!
Using a CB104 #4 Soft Fan, apply 1 thin coat of SG702 Speckta-Clear Celebration over the FN047 Periwinkle glaze
Begin with properly fired shelf cone 04 bisque. Moisten a clean sponge and wipe bisque to remove any dust.
Thin a small amount of FN060 Mushroom with water to the consistency of coffee cream in a small cup. Pour the glaze into the vase then roll the glaze pouring it out slowly. Leave the vase upside down to drain till the shine is gone.
Using a CB604 #4 Soft Fan, apply 1 coat of FN001 White to the outside of the vase.
Cut out 2 copies of each pattern.
Position the pattern on the piece and attach by wetting the surface with water ten place the pattern, dab with a damp sponge. When all patterns are applied dab the area with a paper towel to help secure the pattern to the piece.
Using a CB604 #4 Soft Fan, apply 3 coats of FN059 Cashmere to the upper part of the outside side of the vase and FN057 Periwinkle to the lower half. Allow to dry!
Using a pencil and AC230 Clay Carbon Paper, trace the patterns onto the vase. Remove the patterns before the glaze dries.
Outline each design using FD258 Black Licorice French Dimensions. Allow to dry!
Using a CB202 #2 Detail Liner apply 2 puddled coats of CG1003 Beach Party to the starfish.
Using a CB202 #2 Detail Liner apply 2 puddled coats of CG1006 Purple Reign to one of the seashells and CG1005 Maroon Lagoon to the other seashell.
Using a CB202 #2 Detail Liner apply 2 puddled coats of CG1009 Chery Limeade to the main part of the shell of the turtle and CG1007 Blueberry Bubblegum to edge of the shell. Allow to dry!
Using a CB202 #2 Detail Liner apply 2 puddled coats of CG1008 Blue Guppy to the body of the turtle.
Using a CB604 #4 Soft Fan, apply 2 coats of the FN057 Periwinkle around the middle of the vase creating a wave effect followed by 1- 2 coats ofSC016 Cotton Tail then SG302 Snowfall. Allow to dry!
Using the Soft Fan, apply 2 coats of EG002 Speckled Buff Engobe to the center section and inside of the mug.
Using the Soft Fan, apply 2 coats of SW214 Micro Pearl to the inside, top and lower ribbed sections of the mug, plus the handle. Do not apply to the bottom or foot of the mug.
Mix a small amount of the Silkscreen Medium to the Black Designer Liner to the constancy of peanut butter.
Holding the silkscreen shiny side down in place, rub the Designer Liner mixture over the silkscreen, then carefully lift off the silkscreen.
Place the silkscreen into a container of water to make cleanup easier.
Place onto a well kiln washed shelf and fire to shelf cone 6.
Begin with properly fired cone 04 bisque. Moisten a sponge and wipe bisque to remove any dust.
Using the Script Liner with SC016 Cotton Tail, apply 3 coats to the eyes. Allow glaze to dry between coats.
Using the Script Liner with SC097 Cant-elope, apply 3 coats to the beak. Allow glaze to dry between coats.
Using the Script Liner with SC088 Tu Tu Tango, apply 3 coats to the comb and waddles. Allow glaze to dry between coats.
Use the pencil to draw a pupil at the top of the eyes.
Using the Detail Liner with SC015 Tuxedo, apply 2 coats to each pupil. Allow glaze to dry between coats.
Using the Detail Liner with SC016 Cotton Tail, apply 1 dot to each pupil.
Squirt out around 1 Tbsp of SC055 Yella Bout It, SC-6 Sunkissed, and SC097 Cant-elope onto the palette.
Dip the Soft Fan into SC055 Yella Bout It and glaze the inner 1/3 of the tail. While the glaze is still wet, dip the same brush into SC006 Sunkissed and blend out to the middle 1/3 of the tail. Dip the same brush into SC097 Cant-elope and blend out to the tip of the tail. Repeat 2 times for a total of 3 coats. Allow glaze to dry between coats.
Repeat Step #9 for each wing. Do not glaze the upper portion of the wing.
Using the Script Liner with SC011 Blue Yonder, apply 3 coats to the upper portion of each wing.
Using the Script Liner and Soft Fan with CG1007 Blueberry Bubblegum, apply 2 coats to the rest of the rooster. Allow glaze to dry between coats.
Stilt and fire to cone 06.
Ethyl Hen:
Begin with properly fired cone 04 bisque. Moisten a sponge and wipe bisque to remove any dust.
Using the Script Liner with SC016 Cotton Tail, apply 3 coats to the eyes. Allow glaze to dry between coats.
Using the Script Liner with SC097 Cant-elope, apply 3 coats to the beak. Allow glaze to dry between coats.
Using the Script Liner with SC-88 Tu Tu Tango, apply 3 coats to the comb and waddles. Allow glaze to dry between coats.
Use the pencil to draw a pupil at the top of the eyes.
Using the Detail Liner with SC015 Tuxedo, apply 2 coats to each pupil. Allow glaze to dry between coats.
Using the Detail Liner with SC016 Cotton Tail, apply 1 dot to each pupil.
Squirt out around 1 Tbsp of SC078 Lime Light, SC007 Leapin’ Lizard, and SC011 Blue Yonder onto the palette.
Dip the Soft Fan into SC078 Lime Light and glaze the inner 1/3 of the tail. While the glaze is still wet, dip the same brush into SC007 Leapin’ Lizard and blend out to the middle 1/3 of the tail. Dip the same brush into SC011 Blue Yonder and blend out to the tip of the tail. Repeat 2 times for a total of 3 coats. Allow glaze to dry between coats.
Repeat Step #9 for each wing. Do not glaze the upper portion of the wing.
Using the Script Liner with SC077 Glo-Worm, apply 3 coats to the upper portion of each wing.
Using the Script Liner and Soft Fan with CG1009 Cherry Limeade, apply 2 coats to the rest of the hen. Allow glaze to dry between coats.
Begin with properly fired cone 04 bisque. Moisten a sponge and wipe bisque to remove any dust.
Using the Script Liner with SC016 Cotton Tail, apply 3 coats to the eyes. Allow glaze to dry between coats.
Using the Script Liner with SC075 Orange-A-Peel, apply 3 coats to the beak. Allow glaze to dry between coats.
Using the Script Liner with SC074 Hot Tamale, apply 3 coats to the comb and waddles. Allow glaze to dry between coats.
Use the pencil to draw a pupil at the bottom of the eyes.
Using the Detail Liner with SC015 Tuxedo, apply 2 coats to each pupil. Allow glaze to dry between coats.
Using the Detail Liner with SC016 Cotton Tail, apply 1 dot to each pupil.
Draw a scalloped line going around the rooster’s neck.
Using FD254 Black Licorice, trace over the line going around the neck. Outline each feather on the tail and wings.
Using the Script Liner with SC006 Sunkissed, apply 3 coats to the center section on each wing. Apply 3 coats to the center section of the tail. Skip 2 sections and glaze the 3rd section down from the top on both sides of the tail. Allow glaze to dry between coats.
Using the Script Liner with SC075 Orange-A-Peel, apply 3 coats to the section right next to the previously glazed sections on the wings and tail. Allow glaze to dry between coats.
Using the Script Liner with SC074 Hot Tamale, apply 3 coats to the remaining sections of the wings and tail. Allow glaze to dry between coats.
Using the Script Liner with CG970 Masquerade, apply 2 coats to the head and neck of the rooster (area above the neckline). Apply 2 coats to the upper section of each wing. Allow glaze to dry between coats.
Using the Script Liner and Soft Fan with CG977 Ink Spots, apply 2 coats to the rest of the rooster. Allow glaze to dry between coats.
Stilt and fire to cone 06.
Ethyl Hen:
Begin with properly fired cone 04 bisque. Moisten a sponge and wipe bisque to remove any dust.
Using the Script Liner with SC016 Cotton Tail, apply 3 coats to the eyes. Allow glaze to dry between coats.
Using the Script Liner with SC075 Orange-A-Peel, apply 3 coats to the beak. Allow glaze to dry between coats.
Using the Script Liner with SC074 Hot Tamale, apply 3 coats to the comb and waddles. Allow glaze to dry between coats.
Use the pencil to draw a pupil at the bottom of the eyes.
Using the Detail Liner with SC015 Tuxedo, apply 2 coats to each pupil. Allow glaze to dry between coats.
Using the Detail Liner with SC016 Cotton Tail, apply 1 dot to each pupil.
Using FD254 Black Licorice, outline each feather on the tail and wings.
Using the Script Liner with SC006 Sunkissed, apply 3 coats to the center section on each wing. Apply 3 coats to the center section of the tail. Skip 2 sections and glaze the 3rd section down from the top on both sides of the tail. Allow glaze to dry between coats.
Using the Script Liner with SC075 Orange-A-Peel, apply 3 coats to the section right next to the previously glazed sections on the wings and tail. Allow glaze to dry between coats.
Using the Script Liner with SC074 Hot Tamale, apply 3 coats to the remaining sections of the wings and tail. Allow glaze to dry between coats.
Using the Script Liner and Soft Fan with CG970 Masquerade, apply 2 coats to the rest of the hen. Allow glaze to dry between coats.
Begin with properly fired cone 04 bisque. Moisten a sponge and wipe bisque to remove any dust.
Using the Soft Fan with EL125 Saharah Sands, apply 2 coats to the stem and underside of the cap. Allow glaze to dry between coats.
Using the Soft Fan with EL208 Moss Creek, apply 2 coats to the top of the cap. Allow glaze to dry between coats.
Using the Script Liner with PC601 Clear Cascade, apply 1 coat in the ridges on the top of the cap.
Using the Soft Fan with EL101 Oyster Shell, apply 2 coats to the top of the cap. Allow glaze to dry between coats.
Stilt and fire to cone 06.
Ribbed Mushroom:
Begin with properly fired cone 04 bisque. Moisten a sponge and wipe bisque to remove any dust.
Using the Soft Fan with EL125 Saharah Sands, apply 2 coats to the stem and underside of the cap. Allow glaze to dry between coats.
Using the Soft Fan with EL118 Blue Grotto, apply 2 coats to the top of the cap. Allow glaze to dry between coats.
Using the Script Liner with PC601 Clear Cascade, apply 1 coat in the ridges on the top of the cap.
Using the Soft Fan with EL101 Oyster Shell, apply 2 coats to the top cap. Allow glaze to dry between coats.
Stilt and fire to cone 06.
Dotted Mushroom:
Begin with properly fired cone 04 bisque. Moisten a sponge and wipe bisque to remove any dust.
Using the Soft Fan with EL125 Saharah Sands, apply 2 coats to the stem and underside of the cap (do not glaze to ruffle on the upper part of the stem). Allow glaze to dry between coats.
Using the script Liner with EL131 Turtle Shell, apply 2 coats to the top of the cap. Try to avoid the dots. Allow glaze to dry between coats.
Using the Script Liner with PC601 Clear Cascade, apply 1 coat to the indentations on the top of the cap.
Using the Script Liner with EL101 Oyster Shell, apply 2 coats to the top of the cap. Try to avoid the dots. Allow glaze to dry between coats.
Using the Script Liner with EL143 Cactus Flower, apply 2 coats to each dot on the cap. Apply 2 coats to the ruffle on the upper part of the stem. Allow glaze to dry between coats.
Transfer the pattern to the ware using a pencil and Clay Carbon (trim pattern with scissors if necessary).
Wipe ware with a dampened sponge.
Place My Blue Heaven and Peri-Twinkle on palette and thin to a light creamy consistency. With the fan glaze pull in a horizontal stroke to sky with both colors in your brush. Color should be transparent and light in application.
Load the #10 Flat Shader with My Blue Heaven, half load with Blue Yonder and corner load with Blue Isle, and blend lightly on brush. Pull in rolling wave motion by staring on the flat of the brush and lift off in a curling motion. Complete for each wave.
Script Liner load with Midnight Blue and accent each wave with a pressed line.
Sand is pulled in with Shader loaded with Vanilla Dip and side load with Tiger Tail and blend. Keep Tiger Tail to top of sand mounds.
With smaller Shader, pull in leaves to flowers working from base to tip loaded with Lettuce Alone and side load with Leapin’ Lizard, keeping darker color to outer edge of leaf.
For tree bark, load smaller Shader with Poo Bear and side load with Cracker Jack Brown. Keep darker color to each bark section and add rings to the palm tree trunk.
With Shader load with Sour Apple and side load with Army Surplus. Pull in frons to palm tree keeping darker color toward top of each segment.
Flower petals are the Shader loaded with Pink a Boo and side loaded with Rosey Posey, again keep darker color to outer edge of flower petal.
The flower centers and sun are shader loaded with Sunkissed and side loaded with Orange Ya Happy. Keep the Orange to outer edges of flower centers and to the left side of the Sun.
Create a Sun reflection in water with a wash of Sunkissed below sun. Also radiate reflection into sky by dry brushing uneven streaks of both colors from Sun edge working outward into sky a little.
Detail sand with the Script Liner and Brick. The remaining design areas are detailed with Cobalt Jet Black.
Apply 3 coats of Bluebeard to the back of plate and trim edge of plate as well.
When dry, apply one coat to back and 2 coats to front of Pure Brilliance using the Fan Glaze.
Thin SW503 Orange Gloss with water to a cream consistency in a plastic cup to roll inside of the latte cup.
Pour thinned glaze inside of cup and roll around to cover. Pour out any remaining glaze.
Place SW503 Orange Glass and SW504 Red Gloss on the palette.
Starting at the top of the cup load the glaze brush with Orange Glaze and apply about one third of the way down including handle.
Half load the glaze brush with the Orange Gloss and the other half with Red Gloss and apply to the middle third of the cup blending into the Orange at the top third.
Finally load the glaze brush with Red Gloss and apply to bottom third of cup blending into the middle third of cup.
Repeat steps 5-7 until you have applied three coats.
If you get any glaze on the very bottom of the cup remove it with a dampened sponge so glaze when not stick to shelf during firing.
When dry, transfer the pattern to the cup with clay carbon and pencil. Trim the pattern with scissors for easier application.
Apply 1 coat of EZ012 Cobalt Jet Black to pattern using the Shader and Round brushes.
When dry place on the kiln shelf and fire to a cone 6.
Tip:
Make sure EZ Stroke is thinned properly to a light cream consistency before application. If over applied when doing a majolica technique EZ Stroke can bubble.
Place inverted pie tin on newspaper and using pencil trace outline of tin.
Using a ruler and pencil measure ½” beyond the tracing line all around the tracing to allow for slope of the side wall of the tin.
Use scissors to cut out the template.
Place clay on another piece of newspaper and with the rolling pin, roll out clay to ¼” thickness making sure the template fits the rolled clay.
Place the template on clay and cut out the clay circle.
Place a paper towel over the edge of circle and gently rub edge of circle with finger to smooth edge. Turn clay circle over and repeat on other side edge.
Using lace or various stamps decorate the top side of the clay circle as desired. A pine tree rolling stamp was used for the edge on the sample.
You can also use the sgraffito tool to carve in a design of your own as was done with the mountains and the pine trees in the center.
Cover the outside of the pie tin with a piece of plastic so the clay will not stick to the pan. You can either use the inside of the pan for a deeper bowl or over the back side of the tin, as done here for a larger bowl.
Place the printed clay circle onto the plastic covered pie tin and form onto pan.
You may prefer to leave the edges flat or slightly ruffle.
Place 3-4 holes about ½” in from edge for string for hanging.
When clay is dry bisque fire to shelf cone 04.
Thin EZ024 Royal Blue Green to a wash consistency with water and apply with the glaze brush over the entire front and back of the piece.
Wipe with a dampened sponge to bring up the details.
Apply a coat of EZ010 French Brown to the pine tree trunks followed by a coat of EZ047 Thundercloud Grey to mountains using the round brush.
When the color is dry apply 2 coats of Pure Brilliance with the Fan Glaze to the entire piece.
When glaze is dry, stilt and fire to shelf cone 06.
Cut lengths of jute roping for hanging. Place string through holes and knot on underside of bird bath. Pull lengths of rope evenly and tie to hanger.
Begin with properly fired shelf cone 04 bisque. Moisten a clean sponge and wipe bisque to remove any dust.
Using an AB710 ¾ Flat Shader, basecoat the puppy with OS472 Walnut. Allow to Dry!
Using a DB803 #8 Round, drybrush the puppy with OS599 Medium Taupe, then OS467 Light Brown. Highlight the feet, chest, muzzle, tip of tail and edges of the ears with OS432 Ivory then OS431 White.
Using an AB704#3, drybrush the dog’s tongue with OS597 Rich Peach then highlight with some OS431 White in the brush.
Using an AB704#3, drybrush the puppy’s nose and the pads of its feet with OS476 Black then pick up some OS431 White in the brush and highlight.
Using an AB710 ¾ Flat Shader, basecoat the hat with OS487 Olive Moss. Allow it to Dry!
Using a DB803 #8 Round, drybrush the hat with OS466 Avocado, then highlight with OS466 Avocado with some OS431 White in the brush.
With a pencil. trace or sketch small dog bones on the hat.
Using an AB706 #2 Filbert, paint the dog bones with SS194 Medium Taupe.
Using an AB702 #10/0 Liner or a AB701 #0 Detail, outline the dog bones with OS476 Black.
Using a AB709 3/8 Angled Shader, Shade the deep crevices of the puppy body with OS472 Walnut. Allow to dry!
Using an AB710 #3/4 Shader, apply 2 coats of AC-502 Matte Brush-on-Sealer to the piece. Allow to dry between each coat.
Using an AB704 #3 Round, apply 2 coats of AC-501 Gloss Brush-on-Sealer to the nose tongue, pads of the feet. Allow to dry between each coat!
Begin with properly fired shelf cone 04 bisque. Moisten a clean sponge and wipe bisque to remove any dust.
Using an AB710 ¾ Flat Shader, basecoat the kitten with OS476 Black. Allow to Dry!
Using a DB803 #8 Round, drybrush the kitten with OS475 Charcoal then OS567 Ash. Highlight the feet, chest, muzzle, tip of tail and edges of the ears with OS474 Grey then OS431 White.
Using an AB704#3, drybrush the kitten’s nose, inside the ears and the pads of its feet with OS597 Rich Peach then pick up some OS431 White in the brush and highlight.
Using an AB710 ¾ Flat Shader, basecoat the hat with OS541 Northern Blue. Allow it to Dry!
Using a DB803 #8 Round, drybrush the hat with OS459 Bright Blue. Highlight with OS457 Medium Blue with some OS431 White in the brush to lighten then OS431 White. Allow to dry!
Using a AB709 3/8 Angular Shader, shade the deep crevices of the kitten with OS476 Black.
With a pencil. trace or sketch small fish bones on the hat.
Using an AB701 #0 Detail and a AB702 #10/) Liner, paint the fish bones with OS459 Bright Blue then add a dot of SS138 Flat Black for the eye. Allow to dry!
Using an AB710 #3/4 Shader, apply 2 coats of AC-502 Matte Brush-on-Sealer to the piece. Allow to dry between each coat.
Using an AB704 #3 Round, apply 2 coats of AC-501 Gloss Brush-on-Sealer to the nose tongue, pads of the feet. Allow to dry between each coat!
Begin with properly fired cone 04 bisque. Moisten a sponge and wipe bisque to remove any dust.
Using the Soft Fan with SC075 Orange-A-Peel, apply 1 coat to the body of the kitten. Allow glaze to dry. Using a damp sponge, wipe off most of the glaze, leaving it only in the crevices.
Using the Script Liner with SC024 Dandelion, apply 1 coat to the body of the kitten. Use SC016 Cotton Tail on the muzzle, chest, and paws. Blend into the surrounding areas with SC-24 Dandelion. Allow glaze to dry. Repeat for a second coat.
Using the Script Liner with SC001 Pink-A-Boo, apply 3 coats to the nose, feet pads, and ears. Allow glaze to dry between coats.
Squirt out around 1 Tbsp of SP275 Speckled Orange-A-Peel and SP288 Speckled Tu Tu Tango onto the palette. Using the Soft Fan/Script Liner with SP288 Speckled Tu Tu Tango, apply 1 coat to the bottom half of the hat. Dip the same brush into SP275 Speckled Orange-A-Peel and blend up to the top of the hat. Allow glaze to dry. Repeat for a total of 3 coats.
Dip into NTCLR Clear One Dipping.
Stilt and fire to cone 06.
Puppy:
1. Begin with properly fired cone 04 bisque. Moisten a sponge and wipe bisque to remove any dust.
2. Using the Soft Fan with SC034 Down To Earth, apply 1 coat to the body of the puppy. Allow glaze to dry. Using a damp sponge, wipe off most of the glaze, leaving it only in the crevices.
3. Using the Script Liner with SC025 Crackerjack Brown, apply 1 coat to the body of the puppy. Use SC016 Cotton Tail on the muzzle, chest, and paws. Use SC034 Down to Earth on the tips of the ears. Blend into the surrounding areas with SC025 Crackerjack Brown. Allow glaze to dry. Repeat for a second coat.
4. Using the Script Liner with SC001 Pink-A-Boo, apply 3 coats to the tongue. Allow glaze to dry between coats.
5. Using the Script Liner with SC034 Down To Earth, apply 3 coats to the nose and foot pads. Allow glaze to dry between coats.
6. Squirt out around 1 Tbsp of SP209 Speckled Jaded and SP210 Speckled Teal Next Time onto the palette. Using the Soft Fan/Script Liner with SP210 Speckled Teal Next Time, apply 1 coat to the bottom half of the hat. Dip the same brush into SP209 Speckled Jaded and blend up to the top of the hat. Allow glaze to dry. Repeat for a total of 3 coats.
Begin with properly fired cone 04 bisque. Moisten a sponge and wipe bisque to remove any dust.
There are 2 ways to transfer the pattern to the plate:
Place the tissue paper over the pattern. Trace with the pencil. Cut out the pattern you traced on the tissue paper. Only cut along the dotted lines. Place the tissue paper pattern over the plate. Trace the design with the permanent marker.
Cut out the shapes in the original pattern. Then place them on the plate and trace around them with the pencil.
Squeeze out around 1 TBS of the following glazes onto the palette: SC-11 Blue Yonder, SC-12 Moody Blue, SC-24 Dandelion, and SC-74 Hot Tamale.
To make the green glaze, squeeze out 2 parts SC-24 Dandelion and 1 part SC-11 Blue Yonder. Mix thoroughly.
Using the Script Liner with the glazes from Step #3 & #4, apply 2 coats to each section on the plate. Refer to the patterns for color placement. Allow glaze to dry between coats.
Use the pencil eraser to make decorative dots on your pattern. You can use any of the colors on your palette.
Using the Detail Liner with SC-15 Tuxedo, outline your pattern. Add decorative lines. Use the Soft Fan to apply 2 coats to the back of the plate. Allow glaze to dry between coats.
Using the Soft Fan with SG-702 Celebration, apply 2 coats to the front of the plate. Allow glaze to dry between coats.
Begin with properly fired cone 04 bisque. Moisten a sponge and wipe bisque to remove any dust.
Use the pencil to draw a jagged line going around the base of the neck. This will separate the top and bottom colors on the hen.
Using the Soft Fan with EL-118 Blue Grotto, apply 2 coats to the bottom half of the hen. Make random, irregular strokes around the neckline, so that there won’t be a distinct border between the top and bottom.
Using the Soft Fan with S-2702 Northern Lights, apply 1 coat to the top half of the hen. Avoid the eyes, beak, comb, and waddles. Overlap the glaze on the bottom half by around 1 inch. Make random, irregular strokes around the neckline, so that there won’t be a distinct border between the top and bottom.
Pour out around 2 TBS of EL-101 Oyster Shell onto the palette (don’t use the glaze from the jar because you might pick up some crystals from Step #4 while applying this glaze). Use the Soft Fan to apply 2 coats over the top half of the hen. Avoid the eyes, beak, comb, and waddles. Overlap the glaze on the bottom half by around 1 inch. Make random, irregular strokes around the neckline, so that there won’t be a distinct border between the top and bottom. Allow glaze to dry between coats.
Use an X-ACTO knife or damp sponge to remove any glaze from the eyes, beak, waddles, and comb.
Using the Script Liner with SC-16 Cotton Tail, apply 2 coats to the eyes. Allow glaze to dry between coats.
Using the Script Liner with EL-143 Cactus Flower, apply 2 coats to the beak. Allow glaze to dry between coats.
Using the Script Liner with EL-127 Rose Granite, apply 2 coats to the comb and waddles. Allow glaze to dry between coats.
Squeeze out around 1 tsp of SC-15 Tuxedo onto the palette. Dip the pencil eraser into the glaze and stamp a pupil on one eye. Repeat for the other eye.
Cut out a small square of cardboard. Around 1.5” on each side. You will be using the side with only straight lines (not the corrugated side).
Pour out around 1 TBS of EL-101 Oyster Shell, EL-118 Blue Grotto, PC-601 Clear Cascade, and PC-602 White Cascade onto the palette.
Take your piece of cardboard and dip one of the edges with straight lines into PC-602 White Cascade. Stamp around the neck of the hen, where the 2 glazes overlap. Continue dipping and stamping until you go completely around the neck.
Repeat Step #12 with EL-118 Blue Grotto. Make sure to stamp over some of the glaze from Step #12.
Repeat Step #12 with EL-101 Oyster Shell. Make sure to stamp over some of the glaze from Step #12 and Step #13.
Repeat Step #12 with PC-601 Clear Cascade. Make sure to stamp over some of the glaze from Step #12, #13, and #14.
Roll a variety of clay balls from 3/4ths of the clay. Each ball should be about half an inch to one inch in diameter.
Pinch or roll one side of each ball into a cone shape to create clay teardrop shapes.
Press your thumb into the thick part of the tear drop and drag out to the tip to create an indent and slight bend in the teardrop shape.
Repeat step 4 on all your balls of clay.
For the base of the succulent, roll the remaining 1/4th of clay into a ball and press flat.
Scratch and attach the largest of the indented teardrop shapes to the outside of your base circle.
Smooth the clay from each attached teardrop into the base clay.
After your outside ring of teardrops have been attached, begin with the next row repeating steps 7 and 8.
Continue working your way around the base circle, attaching the next smallest teardrop until you hit the center of the base, attaching your smallest piece there. 11. Allow the clay to fully dry. 12. Bisque fire to cone 04.
Begin with a properly bisque fired clay piece. 2. Clean with a damp sponge if needed.
Using a fan brush, apply three coats of EL 131 to the whole piece, allowing each coat to dry in between the next.
Use a detail liner brush to help poke glaze down in the tight to reach places in the succulent.
Drag a damp sponge across the top of the succulent, wiping the glaze off the tips of the “leaves” as you go.
Using a script liner brush, apply three coats of EL127 to the wiped off tips of the succulent, allowing your colors to overlap.
Base coat the whole tile face with a fan brush and SC097.
Allow to dry.
Using a script liner brush, apply one coat of randomized squiggles of SC15 to the face of the tile.
Using the detail liner brush, line the outside edges of the black squiggles where they meet the orange background with SC073.
Apply a second coat of SC15 over the black squiggles with the script liner brush.
Using the detail liner brush, apply a line of SC006 to the very insides of the orange areas as a highlight.
With the script liner brush, apply one thick coat of SG201 Black Cobblestone over top of the black squiggle areas, overlapping slightly onto the red and yellow areas.
Once the first coat of cobblestone loses its shine, apply a second coat in random areas to vary the thickness of the cobblestone cracks during firing.
Add randomized drops of cobblestone onto the orange areas.
Begin with properly fired shelf cone 04 bisque. Moisten a clean sponge and wipe bisque to remove any dust.
Thin a small amount of FN009 Black with water to the consistency of coffee cream in a small cup. Pour the glaze into the vase then roll the glaze pouring it out slowly. Leave the vase upside down to drain till the shine is gone.
Using a pencil and AC230 Clay Carbon Paper, trace the fish patterns onto the vase. Large fish on the bottom and the smaller fish on the top.
Apply the colors to the large fish as follows: White head with green dots – 3 coats of SC027 Sour Apple to the top side of the fish; 3 coat of SC006 Sunkissed to the lower part of the fish; dots of SG409 Bright Green th the head of the fish. Apply 3 coats of SG202 Whit Cobblestone to the SC027 Sour Apple area; Apply 1 coat of SG703 Speckta-Clear Autumn to the SC006 area of the fish and 3 coats of CC101 Transparent Crackel to the head and tail of the fish. Orange Head – 3 coats of SC024 Dandelion to the top of the fish; Lines of SG410 Bright Blue to the bottom of the fish; SC097 Cat-elope to the head with dots od SG408 Orange; 1 coat of SG703 Speckta-Clear Celebration over the SC024 Dandelion; 3 coats of CC108 China Sea over the bottom section of the fish; 3 coats of CC101 Transparent to the tail.
Apply the colors to the small fish as follows: Green head – SC027 Sour Apple to the head of the fish; 3 coats of SC011 Blue Yonder to the top of the fish; stripes of SG408 Orange to the bottom of the fish; apply wavey lines over the SC011 Blue Yonder; 3 coats of CC107 Green Tea on the top of the fish; 3 coats of CC101 Transparent to the tail. Red Head – 3 coats of SC073 Candy Apple Red to the head; 3 coats of SC097 Cant-elope to the bottom of the fish; 3 coats of SG302 Snowfall to the top of the fish; apply 3 coats of SG201 Black Cobblestone over the SC097 Cant-elope; apply 1 coat of SC007 Leapin Lizard followed by dots of SG302 Snowfall; 3coats of CC101 Transparent to the tail.
Using Low Tack Masking Tape, apply the tape along the bottom of the vase about 1.75 inch.
Using a CB604 #4 Soft Fan, apply 3 coats of FN001 to the vase above the tape line around the fish. Remove the tape after the last coat. Allow to dry!
Using a CB604 #4 Soft Fan, apply 3 coats of SC011 Blue Yonder to the bottom section of the vase. Allow to dry!
Apply a dot of SC016 Cotton Tail to all the eyes followed by a dot of SC015 Tuxedo to the center of the white dot.
Using FD258 Black Licorice French Dimensions outlining the fish.
Using FD254 Pure White, create wave on the blue area at the bottom and a linne where the blue touches the white.
Stilt and fire to cone 06/05.
Use some thinned SS138 Flat Black Softees Acrylic to antique all the Crackle glaze areas.
Squirt a layer of shaving cream into the cookie sheet.
Smooth out the shaving cream with a plastic card.
Using a fan brush, glaze two coats of SC103 to the whole face of a properly fired 6×6 bisque tile.
Set tile aside.
Squirt lines of alternating stroke and coat colors onto the prepared shaving cream.
Drag a toothpick through the glaze in the opposite direction of the squirted glaze lines. Alternatively, create random swirls with the toothpick through the shaving cream for a less uniform pattern.
Flip the tile face down onto the shaving cream and glaze.
Let the tile sit for a few seconds.
Remove the tile from the shaving cream.
Turn on the water faucet to a constant thin continuous stream. (NOT full blast)
Gently run the water over the face of the tile to remove most of the shaving cream.
Begin with properly fired shelf cone 04 bisque. Moisten a clean sponge and wipe bisque to remove any dust.
Using an AB710 ¾ Flat Shader, basecoat the bunny with OS467 Light Brown. Allow to Dry!
Using a DB803 #8 Round, drybrush the puppy with SS045 Buttermilk, then SS135 White. Highlight the feet, chest, muzzle, tip of tail and edges of the ears with an extra coat of SS135 White.
Using an AB704#3, drybrush the bunny nose & inside the ears with SS183 Rich Peach then highlight with some SS135 White in the brush.
Using an AB710 ¾ Flat Shader, basecoat the hat with OS488 Christmas Green. Allow it to Dry!
Using a DB803 #8 Round, drybrush the hat with SS019 Country Sage, then highlight with SS376 Limeburst then with some SS135 White in the brush.
Using an AB710 ¾ Flat Shader and a AB704 #3 Round, basecoat the jeans with OS565 Blue Jean Blue.
Using a DB803 #8 Round and a DB802 #5 Round, drybrush the jeans with SS331 Medium Blue then SS331 Medium Blue with some SS135 White in the brush, highlight with SS135 White.
Using a AB704 #3 Round, basecoat the large carrot with SS024 Chocolate Fudge.
Using a DB803 #3 Round, drybrush the carrot with SS399 Terra Cotta then SS210 Orange, highlight with some SS111 Brightest Yellow
Using an AB709 Angular Shader, shade the deep crevices of the bunny body with OS467 Light Brown. Shade the jeans with OS565 Blue Jean Blue and the hat with SS057 Accent Green.
Using an AB701 Detail, apply MM102 Copper Metallic to the jean’s buttons and SS399 Terra Cotta to the stiches.
Using an AB AB704 #3 Round, basecoat the top of the large carrot with SS57 Accent Green.
Using a DB803 #3 Round, drybrush the top of the large carrot with SS019 Country Sage and highlight with SS111 Brightest Yellow.
Using an AB AB704 #3 Round, paint carrots on the hat with SS399 Terra Cotta. Highlight with SS210 Orange and SS111 Brightest Yellow.
Using an AB702 #10/0 Liner, Paint the carrot tops with SS057 Accent Green and SS019 Country Sage. Outline the carrot with OS476 Black
Using various colors, paint patches on the jean’s
Using an AB710 #3/4 Shader, apply 2 coats of AC-502 Matte Brush-on-Sealer to the piece. Allow to dry between each coat.
Using an AB710 ¾ Flat Shader, apply 1 coat of SS112 White metallic to the jeans and 1 coat of SS113 White Iridescent to the hat.
Using an AB704 #3 Round, apply 2 coats of AC-501 Gloss Brush-on-Sealer to the nose and buttons. Allow to dry between each coat!
DO NOT FIRE!!
Form
MB1598 Bunny Gnome
Colors
SS019 Country Sage
SS024 Chocolate Fudge
SS045 Buttermilk
SS057 Accent Green
SS111 Brightest Yellow
SS112 White Metallic
SS113 White Iridescent
SS135 White
SS183 Rich Peach
SS210 Orange
SS331 Medium Blue
SS376 Limeburst
SS399 Terra Cotta
OS476 Black
OS467 Light Brown
OS488 Christmas Green
OS565 Blue Jean Blue
MM102 Copper Metallic
AC501 Gloss Brush on Sealer
AC502 Matte Brush on Sealer
Decorating Accessories
AB701 #0 Detail
AB702 #10/0 Liner
AB704 #3 Round
AB708 #10 Shader
AB709 3/8 Angular Shader
AB710 ¾ Flat Shader
DB801 #3 Round
DB802 #5 Round
DB803 #8 Round
DB804 #3 Flat
Miscellaneous Accessories
Sponge
Water
Foam Plates or Aluminum Foil for Palette
Paper Towels
Non-Fired|Earthenware Bisque|Home Décor|Holiday
409|403|460|462
48855
Mother’s Day Granny Square Plates and Wine Tumbler
Begin with properly fired cone 04 bisque. Moisten a sponge and wipe bisque to remove any dust.
Using the Soft Fan with FN239 Spiced Cream, apply 3 coats to the back of the plate. Allow glaze to dry between coats.
Using the Soft Fan with FN239 Spiced Cream, apply 3 coats to the front of the plate. Allow glaze to dry between coats.
Cut out the granny square pattern.
After the glaze is dry to the touch, place the pattern in the center of the plate. Lightly trace with the pencil. You should be able to faintly see the pattern in the glaze. Do not press hard enough to go down to the bisque.
Move the pattern around the plate and trace. The squares should be lined up like the squares on a granny square blanket.
Take the three AC220 Bottles and fill them with SC027 Sour Apple, SC095 Pinkie Swear, and SC097 Cant-elope. Label the outside of the bottles with the permanent marker. Screw the tip onto each bottle.
Use the bottle filled with SC097 Cant-elope to outline the inner 4 ovals on each square. Make 1 line going down the center of each oval.
Use the bottle filled with SC095 Pinkie Swear to outline the middle 8 ovals on each square. Make 2 lines going down the center of each oval.
Use the bottle filled with SC027 Sour Apple to outline the outer 12 triangles. Make 3-4 lines going down the center of each triangle. Make a dot between each triangle on the outer edge.
Stilt and fire to cone 06.
Salad Plate:
Begin with properly fired cone 04 bisque. Moisten a sponge and wipe bisque to remove any dust.
Using the Soft Fan with FN239 Spiced Cream, apply 3 coats to the back of the plate. Allow glaze to dry between coats.
Using the Soft Fan with FN239 Spiced Cream, apply 3 coats to the front of the plate. Allow glaze to dry between coats.
Cut out the granny square pattern.
After the glaze is dry to the touch, place the pattern in the center of the plate. Lightly trace with the pencil. You should be able to faintly see the pattern in the glaze. Do not press hard enough to go down to the bisque.
Move the pattern around the plate and trace. The squares should be lined up like the squares on a granny square blanket.
Take the three AC220 Bottles and fill them with SC027 Sour Apple, SC095 Pinkie Swear, and SC097 Cant-elope. Label the outside of the bottles with the permanent marker. Screw the tip onto each bottle.
Use the bottle filled with SC095 Pinkie Swear to outline the inner 4 ovals on each square. Make 1 line going down the center of each oval.
Use the bottle filled with SC027 Sour Apple to outline the middle 8 ovals on each square. Make 2 lines going down the center of each oval.
Use the bottle filled with SC097 Cant-elope to outline the outer 12 triangles. Make 3-4 lines going down the center of each triangle. Make a dot between each triangle on the outer edge.
Stilt and fire to cone 06.
Wine Tumbler
Begin with properly fired cone 04 bisque. Moisten a sponge and wipe bisque to remove any dust.
Using the Soft Fan with FN239 Spiced Cream, apply 3 coats to the outside of the tumbler. Allow glaze to dry between coats.
Cut out the text and the flower from the pattern.
After the glaze is dry to the touch, place the “Mom” pattern at the top of the tumbler. Lightly trace with the pencil. You should be able to faintly see the pattern in the glaze. Do not press hard enough to go down to the bisque.
Take the flower pattern and place it directly below the “Mom”. Trace lightly with the pencil. Repeat on either side of the middle flower, only slightly higher on the tumbler. Make sure both sides are symmetrical.
Take the three AC-220 Bottles and fill them with SC027 Sour Apple, SC095 Pinkie Swear, and SC097 Cant-elope. Label the outside of the bottles with the permanent marker. Screw the tip onto each bottle.
Use the bottle filled with SC095 Pinkie Swear to outline the “Mom” and make a dot in the center of each flower.
Use the bottle filled with SC097 Cant-elope to outline the flower petals. Make 2 lines going down the center of each oval.
Use the bottle filled with SC027 Sour Apple to outline the stems and leaves. Make 2 lines going down the center of each leaf.
Begin with properly fired cone 04 bisque. Moisten a sponge and wipe bisque to remove any dust.
Using the Soft Fan with FN239 Spiced Cream, apply 3 coats to the back of the plate. Allow glaze to dry between coats.
Using the Soft Fan with FN239 Spiced Cream, apply 3 coats to the front of the plate. Allow glaze to dry between coats.
After the glaze is dry to the touch, place the pattern over the front of the plate. Lightly trace with the pencil. You should be able to faintly see the pattern in the glaze. Do not press hard enough to go down to the bisque.
Take the three AC-20 Bottles and fill them with SC035 Gray Hare, SC060 Silver Lining, and SC099 Char-ming. Label the outside of the bottles with the permanent marker. Screw the tip onto each bottle.
Use the bottle filled with SC035 Gray Hare to outline the mustaches labeled 1. Draw 2 wavy lines going down the inside of those mustaches.
Use the bottle filled with SC060 Silver Lining to outline the mustaches labeled 2.
Use the bottle filled with SC099 Char-ming to outline the mustaches labeled 3. Add dots to the inside of those mustaches.
Stilt and fire to cone 06.
Salad Plate:
Begin with properly fired cone 04 bisque. Moisten a sponge and wipe bisque to remove any dust.
Using the Soft Fan with FN-239 Spiced Cream, apply 3 coats to the back of the plate. Allow glaze to dry between coats.
Using the Soft Fan with FN-239 Spiced Cream, apply 3 coats to the front of the plate. Allow glaze to dry between coats.
After the glaze is dry to the touch, place the pattern over the front of the plate. Lightly trace with the pencil. You should be able to faintly see the pattern in the glaze. Do not press hard enough to go down to the bisque.
Take the three AC-220 Bottles and fill them with SC-35 Gray Hare, SC-60 Silver Lining, and SC-99 Char-ming. Label the outside of the bottles with the permanent marker. Screw the tip onto each bottle.
Use the bottle filled with SC-99 Char-ming to outline “dad”.
Use the bottle filled with SC-35 Gray Hare to outline the mustache.
Use the bottle filled with SC-60 Silver Lining to make dots going around the edge of the plate.
Begin with properly fired cone 04 bisque. Moisten a sponge and wipe bisque to remove any dust.
Use FD254 Black to outline all the facets. Allow glaze to dry.
Using the Script Liner with CG981 Fruity Freckles, apply 2 coats to one of the facets on the top row of the cap. Skip 3 facets. Apply 2 coats to the next facet. They should be directly across from each other. Allow glaze to dry between coats.
Using the Script Liner with CG1002 Day Lily, apply 2 coats to the two facets on the top row of the cap that do not touch the facets glazed in Step #3. They should be directly across from each other. Allow glaze to dry between coats.
Using the Script Liner with CG981 Fruity Freckles, apply 1 coat to the remaining facets on the top of the cap. Allow glaze to dry. Using the Script Liner with CG1002 Day Lily, apply 1 coat over those facets. This will create a new color.
Repeat Steps #3-5 for the second row of facets.
Using the Script Liner with FN232 Sun Yellow, apply 3 coats to the small diamond facets on the top of the cap, the center faceted on the very top of the cap, and the large, upper facets on the stem. Allow glaze to dry between coats.
Using the Script Liner with FN207 Orange Slice, apply 3 coats to the border of facets going around the top of the cap, and the bottom of the stem. Allow glaze to dry between coats.
Using the Script Liner with FN230 Poppy, apply 3 coats to the underside of the cap. Allow glaze to dry between coats.
Stilt and Fire to cone 06.
Small:
Begin with properly fired cone 04 bisque. Moisten a sponge and wipe bisque to remove any dust.
Use FD254 Black to outline all the facets. Allow glaze to dry.
Using the Script Liner with CG962 Blue Azure, apply 2 coats to one of the facets on the top row of the cap. Skip 3 facets. Apply 2 coats to the next facet. They should be directly across from each other. Allow glaze to dry between coats.
Using the Script Liner with CG1008 Blue Guppy, apply 2 coats to the two facets on the top row of the cap that do not touch the facets glazed in Step #3. They should be directly across from each other. Allow glaze to dry between coats.
Using the Script Liner with CG962 Blue Azure, apply 1 coat to the remaining facets on the top of the cap. Allow glaze to dry. Using the Script Liner with CG1008 Blue Guppy, apply 1 coat over those facets. This will create a new color.
Repeat Steps #3-5 for the second row of facets.
Using the Script Liner with FN214 Pastel Jade, apply 3 coats to the border of facets going around the top of the cap, and the bottom of the stem. Allow glaze to dry between coats.
Using the Script Liner with FN231 Clearly Jade, apply 3 coats to the underside of the cap. Allow glaze to dry between coats.
Begin with properly fired cone 04 bisque. Moisten a sponge and wipe bisque to remove any dust.
Take the AC220 1oz Bottles and fill them ¾ full with SC003 Wine About It, SC020 Cashew Later, and SC095 Pinkie Swear. Fill them the rest of the way with water. Screw the tips on and shake.
Using the Soft Fan with FN001 White, apply 1 coat to the top of the cap. While the glaze is still wet, generously squirt the top of the cap with the bottles from Step #2. Rotate the mushroom to help the glaze marbleize. Once the top of the cap is covered, place it upright to dry. It is helpful to do this over a paper plate.
Use a damp sponge to remove any glaze that dripped down to the underside of the cap.
Using the Soft Fan with SC-16 Cotton Tail, apply 3 coats to the large sections of the stem. Allow glaze to dry between coats.
Using the Soft Fan with SC-20 Cashew Later, apply 3 coats to the underside of the cap. Use the Script Liner to apply 3 coats to the bottom edge of the stem. Allow glaze to dry between coats.
Using the Script Liner with SC-3 Wine About It, apply 3 coats to the small diamonds on the cap. Allow glaze to dry between coats.
After the glaze is bone dry, use SG-401 Black to outline the facets.
Begin with properly fired cone 04 bisque. Moisten a sponge and wipe bisque to remove any dust.
Pour out around 1 Tbsp of CG753 Sassy Orange and CG756 Firecracker onto the palette. Using the Soft Fan with CG756 Firecracker, apply 1 coat to the lower half of the top of the cap. Dip the same brush into CG753 Sassy Orange and blend up to the top of the cap. After the glaze is dry, repeat for a second coat.
Using the Script Liner with SC075 Orange-A-Peel, apply 3 coats to the underside of the cap. Allow glaze to dry between coats.
Using the Script Liner with SC087 Ruby Slippers, apply 3 coats going around the bottom lip of the cap. Allow glaze to dry between coats. Squeeze out around 1 tsp onto the palette. Dip the sponge into the glaze and sponge around the bottom edge of the cap.
Using the Soft Fan with SP216 Speckled Cotton Tail, apply 3 coats to the stem.
Stilt and Fire to cone 06.
Ribbed Mushroom:
Begin with properly fired cone 04 bisque. Moisten a sponge and wipe bisque to remove any dust.
Pour out around 1 Tbsp of CG987 Tree Frog and CG1009 Cherry Limeade onto the palette. Using the Soft Fan with CG987 Tree Frog, apply 1 coat to the lower half of the top of the cap. Dip the same brush into CG1009 Cherry Limeade and blend up to the top of the cap. After the glaze is dry, repeat for a second coat.
Using the Script Liner with SC075 Orange-A-Peel, apply 3 coats to the underside of the cap. Allow glaze to dry between coats.
Squeeze out around 1 tsp of SC026 Green Thumb onto the palette. Dip the sponge into the glaze and sponge around the bottom edge of the cap.
Using the Soft Fan with SP216 Speckled Cotton Tail, apply 3 coats to the stem.
Stilt and Fire to cone 06.
Dotted Mushroom:
Begin with properly fired cone 04 bisque. Moisten a sponge and wipe bisque to remove any dust.
Using the Script Liner with SC077 Glo-Worm, apply 3 coats to the dots on the top of the cap and the underside of the cap. Allow glaze to dry between coats.
Using the Script Liner with SC075 Orange-A-Peel, apply 3 coats to the ruffle on the top of the stem. Allow glaze to dry between coats.
Using the Script Liner with CG1007 Blueberry Bubblegum, apply 2 coats to the top of the cap. Do not glaze over the dots. Allow glaze to dry between coats.
Using the Script Liner with SC076 Cara-bein Blue, apply 3 coats going around the bottom lip of the cap. Allow glaze to dry between coats. Squeeze out around 1 tsp onto the palette. Dip the sponge into the glaze and sponge around the bottom edge of the cap.
Using the Script Liner with SP216 Speckled Cotton Tail, apply 3 coats to the rest of the stem.
Check the ware over for blemishes and if present sand gently with 100-grit sandpaper to remove. Proceed to damp sponge ware to remove any fired dust and to condition the piece for decorating.
Place about 1½ ounces of Kings Blue into a paper cup. If the color is extremely thick, thin with a few drops of water. Mix with a palette knife.
Using the Soft Fan, apply three flowing coats of the Kings Blue over the entire piece, inside and out. However, do not apply color to the bottom of the piece. Allow the underglaze to dry thoroughly.
Cut out the pattern for ease of use.
Using the pattern, the White Saral and red pen, trace the pattern onto the ware. The Saral will burn away during firing. (Note: if the Saral still appears after the first firing it will disappear during the mid-range firing.)
With the #4 and #8 Pointed Round, careful apply three coats of the China White to all of the leaves. The China White is opaque and will block out the underneath color of Kings Blue. Be sure each coat of the China White is dry before proceeding onto the next coat.
Place the following EZ-Strokes on the palette: Yellow Orange, Irish Green, Leaf Green and Ivy Green. If extremely thick add a few drops of water and mix with Palette Knife.
Complete leaves as follows:
Smoothly cover the white basecoat with a smooth application of Irish Green. Allow to set.
Using either the Rounds or the Shader begin to shade and highlight the leaves. Fully load the desired brush with Irish Green and side load with Yellow Orange for highlighting. Use Leaf and Ivy Green for shading. Blend the desired colors on the palette and apply to each leaf following its contours. For best results, apply color smoothly and remove heavy ridges of color.
Be sure and darken the areas where a leaf overlaps another with Ivy Green.
Place Cobalt Jet Black on the palette and thin. Fully load the #2 Detail Liner and proceed to outline the leaves and add broken vein accents to each leaf. The outlining will define which leaf over-laps the other.
Using the Green Designer Liner, carefully apply stems to the Lily of the Valley. Apply the stems to one third of the nesting bowl and allow to dry, before proceeding to the next third. It is very easy to smear the fresh wet lines.
While the Green Designer Liner is drying, place Pure White French Dimensions on the palette. Add an equal amount of White E-Z Stroke to the French Dimensions. Mix with palette knife.
Using the #0 Detail fully loaded, apply a generous coat of the Pure White/White mix to each of the Lily of the Valley flowers. Again, work in thirds around the piece. When the color has set apply a second coat. The flowers should appear raised.
Tap in dots streaming down from the flowers here and there throughout the design. These are very small and can be grouped together.
Thin the Pure White/White mix with a few drops of water. Fully load the #2 Detail Liner with this thinned mix. Accent the green stem with a highlight of this white. One coat is sufficient, and the highlights are randomly applied.
Apply a thin wash of Yellow Orange to the very top of each flower using the #0 Detail.
Go back to the Green Designer Liner and place a tiny dot where the flower connects to the stem.
To set color, fire the ware to shelf cone 04.
Damp sponge the ware to remove any fired dust and to condition the piece for glazing.
Place Zinc Clear into a paper cup and if extremely thick, thin with water.
With #8 Soft Fan, apply three smooth flowing coats of glaze over piece, except the bottom of the ware. Be sure to allow color drying time between each coat.
When dry fire to shelf cone 6 with a ten-minute hold.
An Important Note
This project can be completed as written with low-fire white earthenware. However, there are a few minor changes.
1. Earthenware greenware or 04 Bisque may be used.
2. To set painted color, fire to cone 04. (same as before)
3. When final glazing is applied use S-1121 Crystal Clear Brushing.
Begin with properly fired shelf cone 04 bisque. Moisten a clean sponge and wipe bisque to remove any dust.
Using an AB710 #3/4 Flat Shader, base coat each Mushroom with SS138 Flat Black. Allow to dry!
Shake and stir well MM102 Copper Metallic. There are real metallic particles in this product. Place some on a palette.
Using an AB710 #3/4 Flat Shader Brush and a AB708 #10 Shader, apply 1 coat of MM102 Copper Metallic to every other section of the Mushroom. Allow to dry!
Apply a 2nd coat of the MM102 Copper Metallic to the same sections. While the MM102 Copper Metallic is still wet/damp use an AB710 ¾ Flat Shader or a CB102 #2 Soft Fan apply a coat of MM202 Green Patina over the wet MM102 Copper Metallic. In about 20 minutes or so you will start to see Patina forming. Allow to dry!
Using an AB710 ¾ Flat Shader or a AB708 #10 Shader, apply 2 coats of AC502 Matte Brush on Sealer to the Patina areas. This will stop the Patina action. Allow to dry!
Using a small Sea Wool Sponge, sponge some MM102 Copper Metallic over the patina areas.
Using an AB708 #10 Shader, apply 1 coat of MM106 Steel Metallic to the areas next to the Patina areas. Allow to dry!
Apply a 2nd coat of the MM106 Steel Metallic to the same sections. While the MM106 Steel Metallic is still wet/damp use an AB710 ¾ Flat Shader or a CB102 #2 Soft Fan apply a coat of MM305 Rapid Rust over the wet MM106 Steel Metallic. In about 20 minutes or so you will start to see Rust forming. Allow it to dry over night for best Rust performance!
Using AB708 #10 Shader, apply 1 coat of SS138 Flat Black to the very top and to the diamond shapes of the Mushrooms. Allow to dry!
Using an AB710 #3/4 Flat Shader, apply 2 coats of AC502 Matte Brush on Sealer to the Mushrooms and 2 coats of AC501 Gloss Brush on Sealer to the black areas on the top of the mushrooms. Allow to dry!
Begin with properly fired cone 04 bisque. Moisten a sponge and wipe bisque to remove any dust.
Cut out the pattern. Place on one side of the bird. Trace with a pencil. Flip the pattern over and trace on the other side. Use the pencil to draw a line connecting the chest on both sides of the bird. Draw a continuous line going around the beak.
Using the Script Liner with SC-16 Cotton Tail, apply 2 coats to the chest. Allow glaze to dry between coats.
Cut a piece of lace fabric that is big enough to cover one side of the chest and the front of the chest. Place the lace over one side of the chest. Dip the Soft Fan in water and brush over the lace to help it stick to the glaze. Use the wet Soft Fan to smooth the lace over the front of the chest. Cut off any extra lace. Using the Script Liner with SC-16 Cotton Tail, apply 1 coat over the lace.
Cut a piece of lace fabric that is big enough to cover the remaining side of the chest. Place the lace over the side of the chest and brush with the wet Soft Fan. Using the Script Liner with SC-16 Cotton Tail, apply 1 coat over the lace.
Using the Script Liner with SC-103 Lavendear, apply 1 coat over the entire chest. Allow glaze to loose it’s shine, but not dry completely. Remove the lace.
Using FD-258 Pure White, outline the wings, chest, and beak.
Using the Script Liner with SC-103 Lavendear, apply 1 puddle coat to the wings.
Using the Script Liner with SC-16 Cotton Tail, apply 1 puddle coat to the beak.
Using the Script Liner and Soft Fan with CG-998 Pink Pixie, apply 2 coats to the rest of the body.
In a separate bowl mix 1 part SW501 White gloss and 1 part SW507 Bright Green Gloss to create a custom lighter green color glaze.
Using a vinyl resist apply flowers to the outside of bowl. If not using vinyl resist, these can be drawn in lightly using a pencil.
Using #4 soft fan brush (RB144) glaze the inside and outside of the bowl, with custom green glaze mixed in step 2. If not using vinyl resist, avoid painting over pencil drawings.
On a separate plate, pour desired amount (approximately the size of a quarter) of the following Stroke and Coat colors:
SC006 Sunkissed,
SC102 Just Peachy
SC088 TuTu Tango
SC100 Makin Me Blush
SC003 Wine About It
SC097 Cant-elope
SC055 Yella Bout It
SC033 Fruit of the Vine
SC085 Orkid
SC008 Just Froggy
SC043 Lettuce Alone
Remove vinyl resist flowers and using 2/0 Detail Liner (CB220) brush, apply 3 coats of the following Stroke and Coat glaze to the flowers, leaves and stems.
Using a vinyl resist or draw lightly with a pencil “BRING MAY FLOWERS “ on the inside rim of the bowl. Using SC043 Lettuce Alone glaze wording with a 2/0 Detail Liner (CB220).
Using either a vinyl resists or lightly hand drawing with a pencil, draw in clouds to the inside and outside of the bowl. Along with clouds, create an umbrella and rain drops to the outside of the bowl using vinyl resist or pencil.
Glaze clouds with SW501 White Gloss using a #6 Pointed Round brush (CB406)
In a separate bowl mix 1 part SW501 White gloss and 1 part SW510 Blue Gloss to create a custom lighter blue color glaze
Using #4 soft fan brush (RB144) glaze the inside and outside of the bowl, avoiding clouds, umbrella and raindrops, with custom blue glaze mixed in step 4.
If using a vinyl resist, remove and glaze raindrops with SC045 My Blue Heaven and SC011 Blue Yonder. If hand drawn, avoid pencil shapes while glazing.
Glaze umbrella with SC024 Dandelion, SC050 Orange Ya Happy, SC043 Lettuce Alone and SC073 Candy Apple Red. Glaze the handle of the umbrella with SC015 Tuxedo and SC035 Gray Hare.
Before clouds are completely dry, highlight cloud shapes using a 2/0 Detail Liner (CB220) with a slightly watered down SW510 Blue Gloss to create shadows and depth.
When the clouds inside the bowl are completely dry, apply vinyl lettering or hand write using a #4 Pointed Round Brush “APRIL SHOWERS” with SW510 Blue Gloss
Wheel throw, coil build, or begin with a pre-formed vessel at the leather hard stage.
Using a paddle or flat ruler, pat the sides of the leather hard vessel to flatten the front and back.
Using a carving tool, carve out chunks of texture over the whole form to give the illusion of brush stroke texture.
Allow form to completely dry.
Bisque fire to cone 04.
Apply three coats of SC042 to the top half of the vessel with the CB624 fan brush.
Allow to dry.
Apply three coats of SC054 to the bottom half of the vessel with the CB624 fan brush.
Allow to dry.
Apply a single thin layer of SC024 to the top half of the vessel over the SC042.
Apply highlights to the top portion of the vessel with SC016 to mimic the highlights seen in the paintings.
Using the RB100 detail brush, apply accent lines of SC05 along the edges of the vessel and add “Vincent” where VanGogh would have signed his work on the painting.
Allow to dry.
Stilt and fire to cone 06.
Flowers
Roll out one large slab of clay to make multiple flowers, or multiple small slabs for individual flowers.
Compress the clay slabs front and back with a plastic card.
Using a needle tool or toothpick, lightly draw a flower shape on the clay. You can do round flowers, petal flowers, or a mix of both.
Cut out the drawn flower shape and remove excess clay.
If you’re doing a flower with petals, carve away a thin layer of clay on the background petals to make them appear farther away.
For both round flowers and petal flowers, add in the same carved texture that was added on the vessel to emulate brush stroke texture to the front and back of each flower.
Roll a ball of clay and flatten to create the inner part of the flower.
Add dots with the back end of a pencil or paintbrush to the flattened round piece of clay.
Scratch and attach the inner portion to the flower.
Scratch and attach a coil to the back of each flower using a pencil or dowel rod to create a bump of space between the coil and flower. This will create the slot to put the dowel rod stem into the flower later.
Allow to fully dry.
Bisque fire to cone 04
Using the CB624 fan brush, apply 3 coats of SC026 to the backs of the flowers.
With the same brush, apply 2 coats of CG963 to the back of the flowers as well.
Using the CB624 fan brush, apply two coats of SC042 to the front of the flowers (petal area), leaving the raised center portion of the flower unpainted.
Apply one thin layer of SC006 to the petals to add a little bit of bright yellow highlight.
Apply two coats of S2729 to the petals.
In the center seed area of the flowers, apply 3 coats of S2725 with the CB624 fan brush.
Allow to dry.
Stilt and fire to cone 06.
Assemble! Use found sticks or painted dowel rods to become the flower stems. Floral foam in the bottom of the vessel helps the flowers stand up straight.
Begin with properly fired shelf cone 04 bisque. Moisten a clean sponge and wipe bisque to remove any dust.
Using an AB710 ¾ Flat Shader, basecoat each chicken with OS476 Black. Allow to Dry!
Using a DB803 #8 Round, drybrush OS489 Saddle Brown body and top part of the wing of each chicken also the area between the tail feathers followed by OS471 Medium Brown then OS598 Light Umber. Highlight the upper wing area with OS431 White
Using a DB803 #8 Round, drybrush OS598 Light Umber to the heard and upper part of the body, then OS445 French Vanilla followed by OS431 White.
Using a DB803 #8 Round and a DB802 #5 Round, (refer to the photo) drybrush parts of the tail and the wing as follows:
Green area –OS595 Accent Green then OS488 Christmas Green then highlighted with OS466 Avocado with a touch of OS431 White in the brush blending the colors.
Blue areas – OS541 Northern Blue then OS459 Bright Blue followed by OS457 Medium Blue.
Purple areas – OS569 Concord then OS591 Dusty Violet followed by OS591 Dusty Violet with a touch of OS431 White in the brush.
Using a DB801 #3 Round, drybrush the comb and waddle with OS503 Barnyard Red then OS455 Holly Red highlight with OS449 Bright Red.
Using a DB801 #3 Round, drybrush the beak with OS598 Light Umber then with OS436 Gold highlight with a little OS431 White in the brush.
Using a AB701 #0 Detail and a AB702 #10/0 Liner, paint he eyes with OS476 Black then add highlights of OS457 Medium Blue and OS431 White.
Using a AB702 #10/0 Liner, detail in-between the wing and tail feathers with OS476 Black.
Using an AB710 ¾ Flat Shader, apply 2 coats of AC502 Matte Brush on Sealer to the chickens. Allow to dry between each coat.
Using an AB710 ¾ Flat Shader, apply 1 coat of SS113 White Iridescent to the tail feathers of the rooster (Fred).
Using an AB701 #0 Detail, apply 2 coats of AC501 Gloss Brush on Sealer to the eyes and the beak of the chickens. Allow to Dry!
Begin with properly fired shelf cone 04 bisque. Moisten a clean sponge and wipe bisque to remove any dust.
In a small cup, thin some FN056 Heather to the consistency of coffee cream. Pour the glaze slowly; roll the glaze around inside the vase pouring out the excess. Leave the vase upside down to fully drain. Allow to dry!
Using a CB604 #4 Soft Fan, apply 4 coats of FN301 Marshmallow White to the outside of the vase. Allow to dry!
Trace the pattern onto the piece using AC230 Clay Carbon Paper and a pencil. You may find it easy to cut slits in the pattern so that it will conform to the shape of the vase.
Using a CB404 #4 Pointed Round, apply 1 coat of FN055 Bubble Gum to the pink flower petals. Load the brush again with FN055 Bubble Gun and side load in FN025 Raspberry Whip, stroke in each pink flower petal.
Using a CB404 #4 Pointed Round, apply 1 coat of FN058 Apple Green to the green flower petals. Load the brush again with FN056 Apple Green and side load in FN021 Olive, stroke in each green flower petal.
Using a CB404 #4 Pointed Round, apply 1 coat of FN059 Cashmere to the tan flower petals. Load the brush again with FN059 Cashmere and side load in FN060 Mushroom, stroke in each tan flower petal.
Using a CB404 #4 Pointed Round, apply 1 coat of FN056 Heather to the purple flower petals. Load the brush again with FN056 Heather and side load in FN018 Bright Blue, stroke in each purple flower petal.
Using a CB-202 #2 Detail Liner, apply 1 coat of FN002 Yellow to each flower centers. Load the brush again with FN02 Yellow and side load in FN020 Medium Green, stroke in each flower center.
Using a CB404 #4 Pointed Round, load the brush with FN058 Apple Green then side load in FN020 Medium Green. Stroke both sides of each leaf.
Using a CB110 #10/0 Liner, outline and detail the flower and the leaves with EZ0412 Cobalt Jet Black. Allow to dry!
Begin with properly fired shelf cone 04 bisque. Moisten a clean sponge and wipe bisque to remove any dust.
In a small cup, thin some FN055 Bubble Gum to the consistency of coffee cream. Pour the glaze slowly; roll the glaze around inside the vase pouring out the excess. Leave the vase upside down to fully drain. Allow to dry!
Using a CB604 #4 Soft Fan, apply 3 coats of FN001 White to the outside of the vase. Allow to dry!
Trace the pattern onto the piece using AC230 Clay Carbon Paper and a pencil. Do not trace the details of the leaves just the basic shape.
Using a CB404 #4 Pointed Round, apply 2 coats of FN055 Bubble Gum to each flower petal.
When dry, take the pattern and cut out the shape. Place the pattern over the painted flower and trace the flower petals using the AC230 Clay Carbon Paper under the pattern.
Using a CB308 #8 Flat Shader, side load with FN025 Raspberry Whip and shade the lower section of each flower petal.
Using a CB404 #4 Pointed Round, apply 2 coats of FN058 Apple Green to the leaves.
Using a CB308 #8 Flat Shader, side load some FN020 Medium Green and shade the leaves.
Using a CB202 #2 Detail Liner, apply 2 coats of FN002 Yellow to the center of the flower.
Using a CB308 #8 Flat Shader, side load with some FN057 Periwinkle and shade around the outer edge of the flower and leaves on the background.
Using a CB110 #10/0 Liner, outline and detail the flower and the leaves with EZ047 Thundercloud Grey. Allow to dry!
Begin with properly fired shelf cone 04 bisque. Moisten a clean sponge and wipe bisque to remove any dust.
In a small cup, thin some FN057 Periwinkle to the consistency of coffee cream. Pour the glaze slowly; roll the glaze around inside the vase pouring out the excess. Leave the vase upside down to fully drain. Allow to dry!
Using a CB604 #4 Soft Fan, apply 3 coats of FN001 White to the outside of the vase. Allow to dry!
Trace the pattern onto the piece using AC230 Clay Carbon Paper and a pencil. Do not trace the detail of the bird, just the basic shape.
Using a CB404 #4 Pointed Round, apply 2 coats of FN057 Periwinkle to the entire bird.
When dry, take the pattern and cut out the bird. Place the pattern over the painted bird and trace the details on the bird using the AC230 Clay Carbon Paper.
Using a CB308 #8 Flat Shader, side load some FN028 Wisteria Purple and shade the bird’s wing, chest, and tail.
Using a CB404 #4 Pointed Round, apply 2 coats of FN055 Bubble Gum to the flower petals. Apply 2 coats of FN058 Apple Green to the leaves.
Using a CB202 #2 Detail Liner, apply 2 coats of FN002 Yellow to the centers of the flowers and to the beak of the bird.
Using a CB308 #8 Flat Shader, side load with some FN025 Raspberry Whip and shade around the flower centers.
Using a CB110 #10/0 Liner, outline and detail as follows: Bird – FN028 Wisteria Purple; Leaves – FN020 Medium Green; flower – FN025 Raspberry Whip. Allow to dry!
Using your chosen carving tool, hollow out the two halves of the ball of clay leaving two small clay bowls with walls around1/4th inch thick.
Smoosh the excess clay from hollowing out the sphere back into another ball. Cover and set aside.
Pinch the sides of both halves of the hollowed-out sphere to compress and slightly widen the two bowl shapes.
Scratch and attach the two bowls back together into a hollow sphere.
Remove the ball of excess clay from under the cover and make one cut slightly off center all the way through the ball.
With the larger of the halves, use a pinch pot technique to form a cone shape. This will be the nose.
Cut the smaller half of the ball into 4 equal parts. These will be the legs.
Punch a small hole in the main sphere where you’d like your nose to sit.
Scratch and attach the nose to the main sphere over the hole.
Round off the legs and cut off excess clay until they’re as short as you’d like them.
Roll the extra clay from cutting down the legs into a ball.
Cut this ball in half. One half will be the nose tip, the other will make the ears and tail.
Scratch and attach legs, nose, and tail.
Use the back end of a paintbrush or carving tool to press eyes into the head.
Outline with the toothpick where you’d like the quill area to start and stop. You can use a carving tool to carve away a little clay from the outside of the line to help the quill area stand out better.
Press in and drag the toothpick in short strokes backwards all over the back of the hedgehog to imitate the look of quills.
Scratch and attach the ears over the quill area slightly above where the eyeballs sit.
IMPORTANT: In the bottom of the hedgehog, punch a hole through the body to the hollowed-out center.
Allow to dry completely.
Bisque fire to cone 04.
Using a script liner brush, apply two coats of EL125 to the body and ears of the hedgehog.
Using the script liner brush, apply 3 coats of your chosen elements glaze to the quill area of the hedgehog.
Dip the back of your brush into SC016 and apply in the hole for the eyes.
Once the SC016 is dry, put a tiny dot of SC015 on the tip of your brush and insert into the eye hole for the pupil.
Allow glaze to fully dry.
Carefully stilt or wipe the bottom of the feet to remove any excess glaze before placing on the kiln shelf.
Begin with properly fired shelf cone 04 bisque. Moisten a clean sponge and wipe bisque to remove any dust.
Using a CB604 #4 Soft Fan, apply 1 coat of FN001 White to the top side of the plate. Allow to dry!
Print 2 copies of the pattern. Place both copies on top of each other and cut out around the outside edge of the bunny pattern not the lettering.
Position one of the patterns on the plate. Using a CB604 #4 Soft Fan, load the brush with water then lift half of the pattern, apply the water to the plate then lay the pattern down. Repeat with the other side of the bunny pattern. Using a piece of paper towel, lay the paper towel over the bunny pattern and press on the paper towel. This will help absorb any extra water and secure the pattern to the plate. There should be no edges of the patten sticking up, if so re-wet and press with the paper towel to secure.
Using a CB604 #4 Soft Fan, apply 3 coats of FN057 Periwinkle to the top of the plate. Do not brush the glaze toward the pattern but away from the pattern to avoid the glaze going under the pattern.
Remove the pattern from the plate before the glaze dries. Allow the plate to dry!
Place the other cut out pattern in position, slide a sheet of AC230 Clay Carbon paper under the pattern and trace the details of the pattern. Also, trace the lettering.
Using a CB404 #4 Pointed Round, apply 3 coats of SC100 Making Me Blush to the inside of the ears, feet and on the nose. Allow to dry!
Using a CB404 #4 Pointed Round and a CB202 #2 Detail, referring to the pattern, apply 3 coats each of the Stroke & Coat colors to the egg. Add dots with the end of a brush handle or a stylus.
Using a CB202 #2 Detail, apply 3 coats of SC104 Grape Expectations to the lettering Happy Easter.
Place some EZ047 Thundercloud Grey and EZ030 Rose onto a palette, using a CB308 #8 Flat Shader, shade around the bunny’s body and the muzzle with the EZ047 Thundercloud Grey. Shade the ears, feet, and nose with EZ030 Rose.
Using a CB110 #10/0 Liner, outline and detail the bunny and the egg with EZ012 Cobalt Jet Black.
Using a CB604 #4 Soft Fan, apply 3 coats of FN058 Matcha to the back of the plate. Allow to dry!
Begin with properly fired shelf cone 04 bisque. Moisten a clean sponge and wipe bisque to remove any dust.
Using a CB604 #4 Soft Fan, apply 3 coats of FN031 Ivory Speck to the top side of the plate and to the outside of the mug but not on the handle. Allow to dry!
Using a pencil and AC230 Clay Carbon Paper, trace the pattern onto the plate and the outside of the mug.
Place some of each EZ Stroke on a palette.
Using a CB106 #6 Script Liner, apply 1 coat of EZ026 Yellow Orange to the outer half of each flower petal then apply 1 coat of EZ002 Cinderella Pink to the lower half of each petal blending into the EZ026 Yellow Orange. Repeat this step for a second coat.
Using a CB106 #6 Script Liner or a CB310 #10 Flat Shader, shade the outer part of each petal with EZ026 Yellow Orange. Also apply 2 coats to the center of the flower.
Using a CB106 #6 Script Liner, shade the lower half of each petal with EZ030 Rose.
Using a CB110 #10/0 Liner, stroke in some fine vein lines from the center of the flower out with EZ030 Rose.
Using a CB106 #6 Script Liner, apply 2 coats of EZ003 Irish Green to the leaves and stems of the flower.
10. Using a CB310 #10 Flat Shader, Shade the leaves and stem with EZ033 Ivy Green.
11. Using a CB110 #10/0 Liner, apply 2 coats of EZ030 Rose to the Happy Mother’s Day.
12. Using a CB110 #10/0 Liner, outline the flower and the leaves with EZ012 Cobalt Jet Black.
13. Apply dots of FD258 Pure White to the flower centers. When dry apply 1 coat of EZ026 Yellow Orange over the dots.
14. Using a CB604 #4 Soft Fan and a CB404 #4 Pointed Round, apply 3-4 coats of FN055 Raspberry Smoothie to the back of the plate, to the inside of the mug and the handle of the mug. Allow to dry!
Set pot on its side so the opening can become your monsters mouth and smooth out any cracks with your finger.
Using small pieces of clay sculpt features for your monster (eyes, teeth, tongue, arms, legs, tail, fins, etc.).
Attach the features to your pot by slipping and scoring them together.
Smooth out your connections with your fingers and water.
Let your pot dry slowly.
Once it is completely dry, bisque fire your pot to cone 04.
Glaze:
Wipe your bisqueware with a damp sponge.
Coat your pot with 3 coats of your favorite Jungle Gem or Element (Jungle Gems Pictured: CG-785 Royal Fantasy, CG-707 Woodland Fantasy, CG-998 Pink Pixie, CG-718 Blue Caprice, S-2702 Northern Lights ) (Elements Pictured:EL-124 Stormy Blue, EL-123 Patina, EL-132 Rust Red)
Using a detail brush apply 3 coats of SC-16 CottonTail to the eyes and teeth
Using a detail brush create the pupils with SC-15 Tuxedo, apply 3 coats
Add color to the tongue using a detail brush and 3 coats of SC-95 Pinkie Swear
Use stilts to fire pieces to cone 06
Form
1.5 -2 pounds of white clay per piece (Laguna’s EM-210)
Begin with properly fired shelf cone 04 bisque. Moisten a clean sponge and wipe bisque to remove any dust.
Using a CB604 #4 Soft Fan, apply 3 coats of FN001 White to each piece except the beak, comb, and wattle. Allow to dry!
Trace the pattern onto the piece using AC230 Clay Carbon Paper and a pencil. Adjust the pattern to fit the areas or place as many that you want.
Using a CB404 #4 Pointed Round. Apply 2 coats of SC088 Tu Tu Tango to the orange flowers and 2 coats of SC012 Moody Blue to the blue flowers.
Using a CB308 #8 Flat Shader, load the brush with SC052 Toad-ily Green. Stroke in each leaf one side at a time. After all leaves are painted, load the brush with SC036 Irish Luck then stroke in on one side of each leaf.
Using a pencil, sketch in the scallops on the wings, tail and around the neck.
Using a CB202 #2 Detail Liner and a CB404 # 4 Pointed Round, apply 3 coats of SC012 Moody Blue to all the scallops.
Using a CB404 #4 Pointed Round, apply 3 coats of SC074 Hot Tamale to the comb and the waddle of each chicken.
Using a CB202 #2 Detail Liner, apply 3 coats of SC024 Dandelion to each beak.
Using the end of a brush handle and a pencil eraser, apply dots of SC012 Moody Blue to the tail and wing areas. Refer to the color photo. Allow to dry!
Add a dot of SC016 Cotton Tail to the center of each of the SC012 Moody Blue dots. Allow to dry!
Using a CB404 #4 Pointed Round, side load the brush with SC002 Melon-choly and shade the cheeks.
Using a CB110#10/0 Liner, outline and detail including the eyes with EZ012 Cobalt Jet Black. Allow to dry!
Begin with properly fired cone 04 bisque. Moisten a sponge and wipe the bisque to remove any dust.
Using CB604 Soft Fan to apply 3 coats of FN001 White. Let dry.
Trace the pattern of the basic mushrooms and fern stems only using AC230 Clay Carbon and a pencil
Place the EZ-Strokes out onto a tile.
Thin EZ-022 Beige to a milk consistency and fully load the CB-602 Soft Fan with color and flood in the large mushroom and stem, the middle mushroom and stem and only to the tallest mushroom stem.Add some EZ047 Thundercloud Grey to the Beige color to darken and apply to the tallest mushroom cap.Let dry.It is important to let the color dry before continuing with the floating of the other EZ-Strokes over the previous color.If the color is still damp, the color can be lifted off.
Use some of the same darkened Beige/Thundercloud Grey mixture to shade the stems of the mushrooms using CB404 Pointed Round towards the lower sections where they go behind the large mushroom.
Slightly thin some EZ055 Brick.When applying thinned color to shade and area, you can always add more layers of color to darken than trying to remove to heavy of color to an area.Load the CB-404 Pointed Round with water and tip the brush with the thinned color.Apply it to the sides of the mushrooms to give dimension.While the color is still wet, rinse the brush, reload it with water and soften the inner edges of the color.Shade the mushrooms stems in the same manner.The shading is darker where the stems go behind the larger mushroom.Under the large mushroom, shade the left side and up under the cap.Shade the bottom edges of the mushrooms in an uneven manner.Let dry.
Use CB110 Liner to apply thinned EZ47 Thundercloud Grey to the gills on the middle mushroom.
To add depth to the bottom edges of the mushrooms use EZ055 Brick and further darken the indentations with thinned EZ010 French Brown.Add some detail to the stems with both colors.
To the spots in the mushroom caps apply very thin EZ055 Brick and thin EZ034 Orange.Darken with more thinned EZ055 Brick and EZ010 French Brown.
Use a damp Silk Decorating Sponge (not the Synthetic Sponge) loaded with EZ018 Chartreuse tipped with EZ042 Teal to pounce in the grass areas near the mushroom stems and the towards the right side of the ground.Rinse the sponge and load with some thinned EZ055 Brick to sponge in the two lower left areas of the ground.
The stems to the ferns are thinned EZ071 Dark Olive using CB110 Liner.To paint in the leaves to the fern use EZ018 Chartreuse to the smaller leaves towards the top of the ferns.As you move down on painting the leaves use EZ003 Irish Green and towards the bottom leaves, use thinned EZ028 Leaf Green.You can vary the strength of the color and intersperse some thinned EZ071 Dark Olive and thinned EZ042 Teal to give variety the green leaves.
Use CB-110 Liner loaded with the EZ018 Leaf Green, EZ071 Dark Olive and EZ042 Teal to paint in the grass blades in the pattern.Vary the height and colors when painting in the grass blades.
Begin with properly fired cone 04 bisque. Moisten a sponge and wipe the bisque to remove any dust.
Use CB604 Soft Fan to apply 3 coats of FN053 Mint to the entire platter. Let dry.
Use the Scissors to cut out the individual components of the pattern. Place the bunny pattern in the center of the platter and trace it using AC-230 Clay Carbon and a Pencil. Trace the individual pieces of the pattern randomly to the platter field. Change the orientation of the pieces of the pattern. The spacing of the pieces should be about 1” apart. Try not to place the same piece next to one another as well. The field should look random and balanced.
Apply 3 coats of SC016 Cotton Tail to the bunny excluding the shaded areas on the pattern using CB-404 Pointed Round. Apply 3 coats of SC001 Pink-A-Dot to the shaded areas using CB404 Pointed Round.
Using CB404 Pointed Round to apply 3 coats of SC045 My Blue Heaven to some of the eggs, other eggs are 3 coats of SC103 Lavendear or SC102 Just Peachy.
Fill the AC-219 Designer Bottle with Writer Tip with about ½” of one of the Stroke and Coat colors and fill in the individual pieces of the pattern as noted. Only one coat is needed using the Designer Bottle with the Writer Tip. Rinse the bottle and tip after each use.SC028 Blue Isle to the 7 leaf shapes and stems.SC042 Butter Me Up to the single flowers and to the daisy centers.SC052 Toad-ily Green to the daisy leaves and Queen’s Ann Lace stems and leaves.SC016 Cotton Tail to the daisy petals and dots to the Queen’s Ann Lace.
Roll a coat of Black Rapid Roll on the interior of your shape. Apply three coats of Black Foundation to the exterior of the bisque shape.
Trace over the dragonfly or butterfly design while the black is still wet to make a slight impression of the outline.
Apply two to three coats of White Cobblestone to the dragonfly and butterfly wings, body and tail. Three coats will give you a bigger, chunkier look, and two coats will give you a small crackle pattern.
Before the Cobblestone completely dries, apply Stroke & Coat colors of your choice to the wings. Only apply one coat and blend the colors where they overlap.
Do not overbrush the colors to the point they soften and move the Cobblestone or mix with the Cobblestone. Over brushing or thick application of the color can affect the Cobblestone pattern. It is also important that the color be applied before the Cobblestone gets dry and flaky. Applying color at this point can cause the Cobblestone to come off.
Apply a coat of Wax Resist over the Cobblestone areas before they are completely dry. This will help hold the product in place until it can be placed in the kiln. The wax will burn away in firing.
Add dots of white French Dimension to the background area.
Begin with properly fired shelf cone 04 bisque. Moisten a clean sponge and wipe bisque to remove any dust.
Using a CB604 #4 Soft Fan brush apply 2 coats of SW177 Raspberry Mist to the top and bottom of the plate.
Once dry, use a CB604 #4 Soft Fan brush to apply 2 coats of SW101 Stoned Denim over top of the SW177 Raspberry Mist.
Once dry, using a RB118 #8 Round Brush or a Sponge on a Stick, paint 2 coats of SW408 White Flux in circles in various sizes in the top center section of the plate. Be sure to leave a small amount of space between painted circles.
Using a RB118 #8 Round Brush, glaze a line of SW408 White Flux with 2 coats around the edge of the plate rim.
Begin with properly fired shelf cone 04 bisque. Moisten a clean sponge and wipe bisque to remove any dust.
Cut around the outside edge of each pattern. Tape the patterns together along the straight edge. Make sure the pattern lines up correctly in the middle.
Place the pattern over the front of the plate. Slide the AC230 Clay Carbon Paper under the pattern and trace with a pencil. Move the AC230 Clay Carbon Paper as you trace each section until the entire pattern is traced.
Using RB106 #6 Scrip Liner with EL149 Lavender Flower, EL118 Blue Grotto, and EL130 Sea Green, apply 2 coats to each flower. After the second coat is dry, apply a thick, irregular coat to the center of each flower section. Refer to the pattern for color placement. Allow glaze to dry between coats.
Using RB106 #6 Scrip liner with AC302 Wax resist, apply 1 coat over the center of each flower section, leaving a small border of glaze around each flower section. Do not get any wax onto the bare bisque.
Using RB106 #6 Script Liner with EL101 Oyster Shell, apply 2 puddle coats between the flowers. Allow glaze to dry between coats. The wax will keep the glaze from covering the flowers, allowing it to combo with the edge colors.
Using RB144 #4 Soft Fan with EL101 Oyster Shell, apply 3 coats to the back of the plate. Allow glaze to dry between coats.
Use a #4 Soft Fan brush to paint the outside of the planter with 2 coats of Spruce It Up.
When the glaze is dry, sketch the design onto the planter using a pencil.
Use a #4 Round to fill in the centers of the daisies with 2 coats with Glo-Worm and Orange-A-Peel, alternating the color for every daisy.
Use a #6 Script Liner to fill in the petals of the Orange-A-Peel daisy with 2 coats of Snow Gems Citrus.
Use a #6 Script Liner to add a scoop of Moody Blue to the remaining Snow Gems on your palette. Fill in the petals on the Glo-Worm daisies with the tinted Snow Gems.
Use a #6 Script Liner to add stems and leaves to the daisies, Lavendear for the Orange-A-Peel daisies, and Orange-A-Peel for the Glo-Worm daisies.
Use the #4 Soft Fan brush to paint the inside of the planter with 3 coats of Glo-Worm.
Use the 10/0 Liner to outline the entire design with 1-2 thick and even coats of Moody Blue. Add a grid pattern to the feet of the planter.
Use the eraser end of a pencil to add Moody Blue dots along the rim of the planter.
Check to make sure no areas of the planter are unglazed.
Wipe down bisque with a damp sponge to remove any dirt or dust.
Prepare a 1:1 ratio of each Stroke & Coat color with water in a portion cup and mix together. If the color is too thin or translucent, add a bit more Stroke & Coat to the mixture.
Beginning with the darkest color, apply drips of the water and glaze mixture all over the piece using the Script Liner brush.
Apply drips of the second darkest color to white bisque areas using the Script Liner brush.
Apply drips of the third and lightest color to the left over white bisque areas with the Script Liner brush.
Go back and fill in any leftover areas of white bisque using the colors of your choice. Overlap new drips in any areas that may need more color variety.
Allow the piece to dry.
Using the Designer Liner, outline larger areas of color or where the colors transition.
(Optional) Brush on or dip in clear glaze.Note: no clear glaze will result in a matte finish for both the Stroke & Coat and Designer Liner.
Allow piece to dry.
Stilt and fire to cone 06.
Form
MB1626 Small Faceted Mushroom
MB1636 Small Tree Silhouette
Colors
SC006 Sunkissed (1 oz)
SC089 Cutie Pie Coral(1 oz)
SC095 Pinkie Swear (1 oz)
SG402 White (1 oz)
Optional
NTBR Clear One Brushing
Decorating Accessories
RB106 Script LinerBrush
Miscellaneous Accessories
Sponge
Water
2oz portion cups
Low-Fire|Earthenware Bisque|Home Décor
406|403|460
47740
Product Discovery: Compare & Contrast Foundations and Stroke & Coat
Begin with properly fired cone 04 bisque. Moisten a sponge and wipe bisque to remove any dust.
On the back of the canvas, use SG-401 Black to write “Stroke and Coat” on the top half and “Foundations” on the bottom half.
Use the ruler to measure 3” down from the top on both sides of the canvas. Mark with a pencil. Use the MC-001 6mm Low Track Masking Tape to make a line going through the marks. Make sure the tape goes completely down both sides of the canvas.
Using the Soft Fan with SC-11 Blue Yonder, apply 3 coats above the tape. Allow glaze to dry between coats.
Using the Soft Fan with FN-018 Bright Blue, apply 3 coats below the tape. Allow glaze to dry between coats.
Pull up the tape before the glaze is completely dry.
Use the scissors to cut the fish from the pattern. Place them on the canvas and trace around them with the pencil.
Using the Script Liner with SC-97 Cant-elope, apply 3 coats to the upper fish. Avoid the eye. Allow glaze to dry between coats.
Using the Script Liner with FN-052 Tangerine, apply 3 coats to the lower fish. Avoid the eye. Allow glaze to dry between coats.
Using the Script Liner with SC-16 Cotton Tail, make a large dot for the eye and dots coming from the mouth on the upper fish.
Using the Script Liner with FN-001 White, make a large dot for the eye and dots coming from the mouth on the lower fish.
Using the Detail Liner with SC-15 Tuxedo, outline the details on the upper fish. Use the Script Liner to fill in the dividing line on the canvas.
Using the Detail Liner with FN-009 Black, outline the detail on the lower fish.
Begin with properly fired cone 04 bisque. Moisten a sponge and wipe bisque to remove any dust.
Place a stencil onto the canvas.
Take the plastic key card and scoop out around 1 TBS of SG-501 Sculpting Medium. While holding the stencil in place, evenly spread the sculpting medium over the stencil.
Gently lift the stencil.
While the sculpting medium is drying, use SG-405 Green, SG-408 Orange and SG-411 Purple to make dots and lines around the design. Allow it to dry completely.
Using the Soft Fan with FN-212 Blue Diamond, apply 3 coats over the front and sides of the canvas. Allow glaze to dry between coats.
Fire to cone 06.
Form
MB-1352 6×6” Square Clay Canvas
Colors
FN-212 Blue Diamond
SG-405 Green
SG-408 Orange
SG-411 Purple
SG-501 Sculpting Medium
Decorating Accessories
RB-144 #4 Soft Fan
Stencil
Miscellaneous Accessories
Sponge
Water
Pencil
Plastic Key Card
MCP Projects (Private)
1129
47759
Product Discovery: Compare Sculpting Medium and Snowfall
Begin with properly fired cone 04 bisque. Moisten a sponge and wipe bisque to remove any dust.
Use MC-001 6mm Low Track Masking Tape to tape the canvas off into 4 equal squares.
Using the Soft Fan with SC-9 Jaded, SC-30 Blue Dawn, SC-88 Tu Tu Tango or SC-97 Cant-elope, apply 3 coats to each of the squares. Allow glaze to dry between coats.
Remove the tape before the glaze is dry.
Using the 1.5” circle stamp, punch 6 holes in the paper. Cut them out from the paper leaving at least ¼” around each circle.
Place 1 circle in the center of the square glaze with SC-88 Tu Tu Tango and 2 circles in the square glazed with SC-9 Jaded. Using the Script Liner with SG-501 Sculpting Medium, apply 1 thick coat to the circles. Carefully lift up the paper.
Place 1 circle in the center of the square glazed with SC-30 Blue Dawn and 2 circles in the square glazed with SC-97 Cant-elope. Using the Script Liner with SG-302 Snowfall, apply 1 thick coat to the circles. Carefully lift up the paper.
Allow all circles to completely dry.
Using the Script Liner with SC-88 Tu Tu Tango, apply 1 coat to a circle in each of the squares with 2 circles. Using the Script Liner with SC-97 Cant-elope, apply 1 coat to the other circle in the squares with 2 circles.
Using the Script Liner with S-2101 Clear Brushing Glaze, apply 2 coats to the lines where the tape was located. Allow glaze to dry between coats.
Begin with properly fired cone 04 bisque. Moisten a sponge and wipe bisque to remove any dust.
Use the scissors to cut out the cactus pattern.
Place the pattern on the canvas and trace with the pencil.
Using the Script Liner with EL-142 Grass, apply 2 coats to the cactus. Brush slightly past the pencil line. Allow glaze to dry between coats.
After the glaze is dry, brush with water and place the pattern back down. Press the pattern to stick it to the glaze. Blot with a paper towel.
Using the Soft Fan EL-145 Ginger Root, apply 2 coats to the background and sides of the canvas. Make sure to brush over the edges of the paper. Remove the paper before the second coat is dry.
Use SG-401 Black to outline the cactus. The glaze must be dry to use the tip, otherwise use the Detail Liner.
Using the Script Liner with SG-401 Black, shade the edges of the cactus. Use thinned SG-401 Black with the Detail Liner to make the lines on the cactus.
Using the Detail Liner with SG-402 White, press in marks on the cactus. Use SG-401 Black to make tick marks over the white.
Begin with properly fired cone 04 bisque. Moisten a sponge and wipe bisque to remove any dust.
Center the SL-446 Atomic Stencil on the canvas. Trace with the pencil.
Use SG-404 Blue and SG-410 Bright Blue to trace over the pattern. Add lines and dots to make the pattern more interesting. Allow Designer Liner to dry completely before continuing.
Using the Soft Fan, apply 3 coats of CC-101 Transparent to the top of the canvas. Allow glaze to dry between coats.
Using the Soft Fan, apply 3 coats of SP-212 Speckled Moody Blue to the edges of the canvas. Allow glaze to dry between coats.
Fire to cone 06.
Thin SS-138 with water. Use a sponge to apply over the top of the canvas. Wipe off with a paper towel.
Form
MB-1352 6×6” Square Clay Canvas
Colors
CC-101 Transparent
SG-404 Blue
SG-410 Bright Blue
SP-212 Speckled Moody Blue
SS-138 Flat Black
Decorating Accessories
RB-144 #4 Soft Fan
SL-446 Atomic Stencil or another stencil of choice
Begin with properly fired cone 04 bisque. Moisten a sponge and wipe bisque to remove any dust.
Using the Soft Fan, apply 2 coats of EL-118 Blue Grotto to the pinwheel. Allow glaze to dry between coats.
Pour around 2 TBS of PC-601 Clear Cascade, PC-602 White Cascade, EL-211 Volcanic Glow and EL- 118 Blue Grotto onto the palette.
Using the same Soft Fan, dip it into the PC-601 Clear Cascade and glob it randomly onto pinwheel several times.
Using the same Soft Fan, dip it into the EL-211 Volcanic Glow and glob it randomly onto pinwheel. Make sure to put some globs over the PC-601 Clear Cascade.
Using the same Soft Fan, dip it into PC-602 White Cascade and add glob it randomly onto the pinwheel. Make fewer, smaller globs.
Using the same Soft Fan, dip it into EL-118 Blue Grotto and add some more globs to the pinwheel. Make sure to go over some of the PC-602 White Cascade.
Begin with properly fired cone 04 bisque. Moisten a sponge and wipe bisque to remove any dust
Using the Soft Fan with SC-55 Yella Bout It, apply 3 coats to the front and sides of the canvas. Allow glaze to dry between coats.
Before the glaze is bone dry, lay the pattern over the canvas and trace with the pencil. You should be able to see the pattern in the glaze.
Using the Script Liner with SC-74 Hot Tamale, apply 1 coat to the top/left flower, 2 coats to the top/right flower and 3 coats to the bottom flower. Allow glaze to dry between coats
Using the Detail Liner with SC-15 Tuxedo, outline the flowers and lettering.
Squeeze a small amount of SC-15 Tuxedo onto the palette. Thin with water. Use the soft fan to apply a thin coat over the bricks. Wipe off any excess with a damp sponge.
Draw your logo on a piece of paper or use the pattern. Make sure it will fit on the slab of clay if you draw your own.
Place the pattern over the slab of clay. Trace the pattern with the pencil. You should be able to see your lines in the clay.
Using the Script Liner with SC-73 Candy Apple Red, apply 1 coat to the top of the logo. Using the Script Liner with SC-87 Ruby Slippers, apply 1 coat to the bottom of the logo and blend with the top. Apply a total of 3 coats. Allow glaze to dry between coats.
Using the Detail Liner with SC-16 Cotton Tail, make a thick outline around the lettering. Apply a second coat after the first one is dry.
Using the Script Liner with SC-16 Cotton Tail, make dots of various sizes around and touching the logo.
Using the Script Liner with SC-6 Sunkissed, SC-11 Blue Yonder, SC-73 Candy Apple Red or SC-87 Ruby Slippers, apply 2 coats inside each of the circles.
Using the Script Liner with SC-16 Cotton Tail, add highlights to the logo.
Using the Detail Liner with SC-15 Tuxedo, outline the lettering and circles.
Begin with properly fired cone 04 bisque. Moisten a sponge and wipe bisque to remove any dust.
Use MC-001 6mm Low Tack Masking Tape to tape the canvas off into 4 equal squares.
Using the Soft Fan with SC-9 Jaded, SC-30 Blue Dawn, SC-88 Tu Tu Tango or SC-97 Cant-elope, apply 3 coats to each of the squares. Allow glaze to dry between coats.
Remove the tape before the glaze is dry.
Using the pattern, cut out the circles.
Place 1 circle in the center of the square glaze with SC-88 Tu Tu Tango and 2 circles in the square glazed with SC-9 Jaded. Using the Script Liner with SG-501 Sculpting Medium, apply 1 thick coat to the circles. Carefully lift up the paper.
Place 1 circle in the center of the square glazed with SC-30 Blue Dawn and 2 circles in the square glazed with SC-97 Cant-elope. Using the Script Liner with SG-302 Snowfall, apply 1 thick coat to the circles. Carefully lift up the paper.
Allow all circles to completely dry.
Using the Script Liner with SC-88 Tu Tu Tango, apply 1 coat to a circle in each of the squares with 2 circles. Using the Script Liner with SC-97 Cant-elope, apply 1 coat to the other circle in the squares with 2 circles.
Using the Script Liner with S-2101 Clear Brushing Glaze, apply 2 coats to the lines where the tape was located. Allow glaze to dry between coats.
Begin with properly fired cone 04 bisque. Moisten a sponge and wipe bisque to remove any dust.
Using the Soft Fan with SC-27 Sour Apple, apply 3 coats to the front and sides of the canvas. Allow glaze to dry between coats.
Using the ruler and pencil, make a diagonal line across the front of the canvas. Then make 2 lines perpendicular to the first line. They should be spaced to create similar sized areas.
Using the Detail Liner with AC-302 Wax Resist, trace over the pencil lines.
Using the Script Liner with SG-201 Black Cobblestone, apply 1, 2 and 3 coats to each area above the diagonal line. Only apply additional coats after the glaze is no longer shiny. It is important to make coats even.
Using the Script Liner with SG-202 White Cobblestone, apply 1, 2 and 3 coats to each area below the diagonal line. Only apply additional coats after the glaze is no longer shiny. It is important to make coats even.
Using the Script Liner with SC-11 Blue Yonder, apply 1 coat to the border of each section glazed with SG-202 White Cobblestone. Only apply after the glaze is no longer shiny.
Split the ball in half and set aside one of the halves.
Form the mushroom cap by pinching the edges of the cut side.
Pinch up the center of the top of the half sphere to form a rounded point.
Carve gills into the underside of the mushroom cap with a toothpick. Set aside.
Roll the remaining half of the sphere into a thick coil slightly thicker on one end to form the base of the stem.
Cut the stem to size and hollow out the stem.
Fit stem to underside of the mushroom cap.
Remove stem, slip and score the area where the stem connects to the cap and attach the two pieces together.
Using the Soft Fan with FN009 Black, apply 2 coats to the whole mushroom. Allow glaze to dry between coats.
Using the script liner brush, apply two coats of SC104 to the underside/gills of the cap.
Using a drybrush technique with the script liner brush, apply 1 coat of SC103 to highlight the ridges of the gills.
Using the Script Liner with SG202 White Cobblestone, apply 2-3 coats to the cap of the mushroom. When the final coat loses its shine, apply 1 coat of SC101 to the main portion of the cap and SC103 to the dots.
Using the Script Liner with SG202 White Cobblestone, apply 2-3 coats to the stem of the mushroom. When the final coat loses its shine, apply 1 coat of SC103.
Allow to fully dry, leaving the bottom and inside of the mushroom unglazed.
Fire to cone 04.
VARIATIONS AND ADAPTATIONS: Uneven coats of White Cobblestone will give more variation in your cobblestone effect after firing.
Begin with properly fired cone 04 bisque. Moisten a sponge and wipe bisque to remove any dust.
Using the Soft Fan with FN009 Black, apply 2 coats to the whole mushroom. Allow glaze to dry between coats.
Using the Detail Liner with AC302 Wax Resist, outline circles on the cap of the mushroom.
Using the script liner brush, apply two coats of SC104 to the underside/gills of the cap.
Using a drybrush technique with the script liner brush, apply 1 coat of SC103 to highlight the ridges of the gills.
Using the Script Liner with SG202 White Cobblestone, apply 2-3 coats to the cap of the mushroom. When the final coat loses its shine, apply 1 coat of SC-101 to the main portion of the cap and SC103 to the dots.
Using the Script Liner with SG202 White Cobblestone, apply 2-3 coats to the stem of the mushroom. When the final coat loses its shine, apply 1 coat of SC103.
Stilt and fire to cone 06.
VARIATIONS AND ADAPTATIONS: Uneven coats of White Cobblestone will give more variation in your cobblestone effect after firing.
Apply three coats of FN054 to the whole tile with the fan brush, allowing to dry between coats.
Once the background is dry, place the Clay Carbon Transfer Paper down over the tile and the pattern on top.
Trace the pattern with a pencil.
Remove pattern and transfer paper.
Apply two coats of FN017 to the eggs with the script liner.
Once the background is dry, apply two to three coats of SG202 to the eggs, leaving a small line of FN017 uncovered on the outside of each egg.
When the shine on the cobblestone is gone, apply one coat of the following colors to the eggs with the script liner brush: 1. Egg 1: SC101 over the whole thing, Stripes of SC102. 2. Egg 2: SC102 over the whole thing, dots of SC103. 3. Egg 3: SC103 over the whole thing, zigzags of SC101.
Using the back of a brush or pencil eraser, make dots from the Stroke & Coat colors in groupings of 5 to create flowers.
Begin with properly fired cone 04 bisque. Moisten a sponge and wipe bisque to remove any dust.
Using the Soft Fan with FN009 Black, apply 2 coats to the tile. Allow glaze to dry between coats.
Once the tile has lost its shine, place the pattern over the top.
Very lightly trace the pattern with a pencil and remove from the tile.
Using the Detail Liner with AC302 Wax Resist, apply 1 coat over the lines.
Replace the glaze caps with AC224 Plastic Detailer Caps.
Fill in each section with a single layer of color. SC100 for the gills, SC102 for the stem, SC101 for the dots and ground, SC103 for the main cap, SC104 for the background
As soon as all sections are filled in, use a hair dryer to force dry the skin of the glaze. Make sure not to put the hair dryer too close while it is wet, or it will move the glaze. Dry until you see cracking in the skin.
Wipe bisque tile with a damp sponge to remove dust.
Using the ruler, split the tile into three equal 2”x6” sections.
Apply three coats of FN037 to the top section using a fan brush, allowing the glaze to dry between coats.
Apply three coats of FN048 to the middle section using a fan brush, allowing the glaze to dry between coats.
Apply three coats of FN018 to the bottom section using a fan brush, allowing the glaze to dry between coats.
Once all three sections are dry, lay the clay carbon paper down over the tile with the “Neon” word pattern over the top and trace with a pencil.
Remove the carbon paper and pattern.
Trace over the “Neon” words with the detail liner brush and wax resist.
Once the wax resist has dried, cover the whole tile with one layer of EL120 coming right up next to the wax lines.
After the first layer has dried add a second layer of EL120, but back away from the lines about a quarter inch.
When the second layer has dried, add the third layer by backing off another quarter inch. These stepped layers will create a haze effect around the neon letters.
Allow to dry.
Stilt and fire to cone 06.
VARIATIONS AND ADAPTATIONS: The harder you press with the detail liner brush and wax resist, the wider your line will be for the neon color to show through. Use the detail liner brush with a bit of water to wipe off any glaze that gets on top of the wax lines.
Begin with a properly-fired cone 04 bisque tile. Moisten a sponge and wipe bisque to remove any dust.
Cut out the butterflies from the pattern. You can also stamp paper using the paper stamps if you would like to use a different shape. Set aside.
Squeeze out around 1 TBS of SC-6 Sunkissed onto the palette.
Take the edges of the bubble wrap and pull them up together so that you have a ball of bubble wrap between your thumb and index finger. There should be a flat surface of bubbles on the bottom of your ball.
Dip the bottom of your bubble wrap ball into SC-6 Sunkissed. Stamp the tile until you run out of glaze. Dip the ball back into the glaze and repeat until the tile is covered in a thick, bumpy layer of SC-6 Sunkissed.
Squeeze out around 1 TBS of SC-75 Orange-A-Peel onto the palette.
Take the same bubble wrap ball and dip it into SC-75 Orange-A-Peel. Stamp over the tile. Only stamp around 50% of the tile, so that you don’t cover up the previous color.
Place your butterflies (or other stamped shape) onto the wet glaze. Press with a paper towel. Remove the paper towel.
Squeeze around 1 TBS of SC-10 Teal Next Time onto the palette
Take the same bubble wrap ball and dip it into SC-10 Teal Next Time. Stamp the tile until you run out of glaze. Repeat until the tile is covered in a thick, bumpy layer of SC-10 Teal Next Time.
Begin with properly fired cone 04 bisque. Moisten a sponge and wipe bisque to remove any dust.
Using the Soft Fan with FN001 White, apply 1 coat to the body of the rooster (area that will remain white). If you do not do this, it will not look bright white.
Take the pencil and draw a jagged line going around the bottom of the rooster’s neck.
Using the Script Liner with SC016 Cotton Tail, apply 2 coats to the eyes. Allow glaze to dry between coats.
Using the Script Liner with SC075 Orange-A-Peel, apply 3 coats to the beak. Allow glaze to dry between coats.
Using the Script Liner with SC074 Hot Tamale, apply 3 coats to the comb and waddles. Allow glaze to dry between coats.
Use the pencil to draw a pupil at the top of the eyes.
Using the Detail Liner with SC015 Tuxedo, apply 2 coats to each pupil. Allow glaze to dry between coats.
Using the Detail Liner with SC016 Cotton Tail, apply 1 dot to each pupil.
Using the Script Liner with SC060 Silver Lining, apply 3 coats to the center section on each wing. Apply 3 coats to the center section of the tail. Skip 2 sections and glaze the 3rd section down from the top on both sides of the tail. Allow glaze to dry between coats.
Squeeze out ½ Tbsp of SC035 Gray Hare and ½ Tbsp of SC060 Silver Lining onto the palette. Mix them to create a new color.
Using the Script Liner with the new color, apply 3 coats to the section right next to the previously glazed sections on the wings and tail. Allow glaze to dry between coats.
Using the Script Liner with SC035 Gray Hare, apply 3 coats to the remaining sections of the wings and tail. Allow glaze to dry between coats.
Using the Script Liner with SC015 Tuxedo, apply 2 coats to the head and neck of the rooster (area above the neck line). Apply 2 coats to the upper section of each wing. Apply 2 coats to the underside of the tail. Allow glaze to dry between coats.
Squeeze out around 1 tsp SC015 Tuxedo onto the palette. Dip the pencil eraser in the glaze and stamp onto white portion of the body. Repeat until the body is covered in dots.
Using the Detail Liner with SC015 Tuxedo, outline the details on the rooster.
Dip into NT-CLR Clear One Dipping.
Stilt and fire to cone 06.
Ethyl Hen:
Begin with properly fired cone 04 bisque. Moisten a sponge and wipe bisque to remove any dust.
Using the Soft Fan with FN001 White, apply 1 coat to the head, neck, and body of the hen (area that will remain white). If you do not do this, it will not look bright white.
Using the Script Liner with SC016 Cotton Tail, apply 2 coats to the eyes. Allow glaze to dry between coats.
Using the Script Liner with SC075 Orange-A-Peel, apply 3 coats to the beak. Allow glaze to dry between coats.
Using the Script Liner with SC074 Hot Tamale, apply 3 coats to the comb and waddles. Allow glaze to dry between coats.
Use the pencil to draw a pupil at the top of the eyes.
Using the Detail Liner with SC015 Tuxedo, apply 2 coats to each pupil. Allow glaze to dry between coats.
Using the Detail Liner with SC016 Cotton Tail, apply 1 dot to each pupil.
Using the Script Liner with SC060 Silver Lining, apply 3 coats to the center section on each wing. Apply 3 coats to the center section of the tail. Skip 2 sections and glaze the 3rd section down from the top on both sides of the tail. Allow glaze to dry between coats.
Squeeze out ½ Tbsp of SC035 Gray Hare and ½ Tbsp of SC060 Silver Lining onto the palette. Mix them to create a new color.
Using the Script Liner with the new color, apply 3 coats to the section right next to the previously glazed sections on the wings and tail. Allow glaze to dry between coats.
Using the Script Liner with SC035 Gray Hare, apply 3 coats to the remaining sections of the wings and tail. Allow glaze to dry between coats.
Using the Script Liner with SC015 Tuxedo, apply 2 coats to the upper section of each wing. Apply 2 coats to the underside of the tail. Allow glaze to dry between coats.
Squeeze out around 1 tsp SC015 Tuxedo onto the palette. Dip the pencil eraser in the glaze and stamp onto white portion of the body. Repeat until the body is covered in dots.
Using the Detail Liner with SC015 Tuxedo, outline the details on the hen.
Begin with properly fired cone 04 bisque. Moisten a sponge and wipe bisque to remove any dust.
Use the pencil to draw a jagged line going around the base of the neck. This will separate the top and bottom colors on the chick.
Using the Soft Fan with EL128 Wheat, apply 3 coats to the bottom half of the chick. Make random, irregular strokes around the neckline, so that there won’t be a distinct border between the top and bottom.
Using the Soft Fan with EL101 Oyster Shell, apply 3 coats to the top half of the chick. Overlap the glaze on the bottom half by around ½ inch. Make random, irregular strokes around the neckline, so that there won’t be a distinct border between the top and bottom.
Use an X-ACTO knife or damp sponge to remove any glaze from the eyes and beak.
Using the Script Liner with SC016 Cotton Tail, apply 3 coats to the eyes. Allow glaze to dry between coats.
Using the Script Liner with EL143 Cactus Flower, apply 3 coats to the beak. Allow glaze to dry between coats.
Use the pencil to draw pupils in the eyes. Using the Detail Liner with SC015 Tuxedo, apply 2 coats to the pupils. Allow glaze to dry between coats. Use the Detail Liner with SC016 Cotton Tail to apply a dot to each pupil.
Cut out a small square of cardboard. Around ¾” on each side. You will be using the side with only straight lines (not the corrugated side).
Pour out around 1 TBS of EL101 Oyster Shell, EL128 Wheat, PC601 Clear Cascades, and PC602 White Cascades onto the palette.
Take your piece of cardboard and dip one of the edges with straight lines into PC602 White Cascades. Stamp around the neck of the chick, where the 2 glazes overlap. Continue dipping and stamping until you go completely around the neck.
Repeat Step #11 with EL128 Wheat. Make sure to stamp over some of the glaze from Step #11.
Repeat Step #11 with EL101 Oyster Shell. Make sure to stamp over some of the glaze from Step #11 and Step #12.
Repeat Step #11 with PC601 Clear Cascades. Make sure to stamp over some of the glaze from Step #11, #12, and #13.
Begin with properly fired cone 04 bisque. Moisten a sponge and wipe bisque to remove any dust.
Using the Soft Fan with FN002 Yellow, apply 3 coats to the body of the chick (avoid the eyes and beak). Allow glaze to dry between coats.
Using the Script Liner with SC016 Cotton Tail, apply 3 coats to the eyes. Allow glaze to dry between coats.
Using the Script Liner with SC075 Orange-A-Peel, apply 3 coats to the beak. Allow glaze to dry between coats.
Using the Detail Liner with SC015 Tuxedo, make a large dot in the center of each eye.
After glaze is dry to the touch, take the pencil, and make a scalloped line going around the neck of the chick. Using the Detail Liner with AC302 Wax Resist, apply a coat of wax to the line.
Using the Soft Fan with SG202 White Cobblestone, apply 3 even coats to the body of the chick (area below the scalloped border). Apply each coat as soon as the shine is gone. Do not wait until the glaze is completely dry, or it will start to crack and could flake off.
Using #4 soft fan brush (RB144) apply 3 coats of SW511 Pink Gloss to inside of mug, outside top and bottom rim and handle.
Using #4 soft fan brush (RB144) apply 2 coats of SW501 White Gloss to outside message part of mug.
Using #4 soft fan brush (RB144) and apply 3 coats of SW504 Red Gloss to outside of mug.
Apply heart shaped sticker to center of mug.
On a separate plate, pour desired amount (approximately the size of a quarter) of the following Stroke and Coat colors:
SC003 Wine About It
SC017 Cheeky Pink
SC018 Rosey Posey
SC073 Candy Apple Red
SC074 Hot Tamale
SC085 Orkid
SC013 Grapel
SW511 Pink Gloss
SW504 Red Gloss
Using the end of a toothpick, pencil or paintbrush apply random Stroke and Coat color dots all the way around the outside of the heart, creating a dot pattern.
Remove heart sticker before dots dry completely.
With a #0 Detail Liner brush (CB200) write the word “LOVE” in the middle of the heart using SW504 Red Gloss.
On the inside rim of the mug, using a #4 (CB404) Pointed Round brush, write “BE MINE” using SW504 Red Gloss.
Using #8 Soft Fan Brush (CB618) glaze ½ bowl and entire rim of bowl in a swirl pattern with Jungle Gems CG1006 Purple Reign.
Using #8 Soft Fan Brush (CB618) glaze second ½ of the bowl in SW106 Alabaster.
With a #8 Pointed Round Brush (CB408) glaze 3 horizontal lines, about 2” apart, of Stroke and Coat SC33 Fruit of the Vine over the SW106 Alabaster. Apply 3 coats of Fruit of the Vine.
Once dry, use a #2 Soft Fan brush (CB602) apply “plops” of SW401 Light Flux around the rim of the bowl.
Begin with properly fired cone 04 bisque. Moisten a sponge and wipe bisque to remove any dust.
Using the Soft Fan with FN-001 White, apply 1 coat to the front of the plate. Allow glaze to dry.
Place the pattern over the plate. Slide AC-230 Clay Carbon Paper under the pattern. Trace over the hearts. Remove the pattern and clay carbon paper.
Using the Script Liner with SC-1 Pink-A-Boo, SC-33 Fruit of the Vine, SC-74 Hot Tamale, SC-103 Lavendear, SP-201 Speckled Pink-A-Boo, and SP-274 Speckled Hot Tamale, apply 3 coats to half of the hearts on the plate. Allow glaze to dry between coats.
Once the hearts are no longer shiny, take the skewer and carve designs into each heart. This must be done before the glaze is dry. This is why it is recommended to work on half at a time.
Repeat Steps #4 and #5 for the remaining hearts.
Using the Soft Fan with SC-74 Hot Tamale, apply 3 coats to the back of the plate. Allow glaze to dry between coats.
Wait for the front of the plate to be completely dry. Use a dry sponge or firm brush to brush away all of the glaze crumbs on the front of the plate.
Dip into NR-CLR Clear One Dipping.
1Stilt and fire to cone 06.
Coupe Salad Plate (black background):
Begin with properly fired cone 04 bisque. Moisten a sponge and wipe bisque to remove any dust.
Using the Soft Fan with FN-001 White, apply 1 coat to the front of the plate. Allow glaze to dry.
Place the pattern over the plate. Slide AC-230 Clay Carbon Paper under the pattern. Trace over the hearts. Remove the pattern and clay carbon paper.
Using the Script Liner with SC-1 Pink-A-Boo, SC-33 Fruit of the Vine, SC-74 Hot Tamale, SC-103 Lavendear, apply 3 coats to the hearts on the plate. Go slightly over the outline of each heart. Allow glaze to dry between coats.
Cut out the hearts from the pattern. Take 1 heart and sponge the back with water. Place it on the corresponding heart on the plate (wet side down). Sponge over the edges to make sure it is secure. Using the Script Liner with the corresponding heart color, apply 1 coat going around the edge of the heart. Repeat for all hearts.
Using the Soft Fan with FN-009 Black, apply 2 coats to the front and back of the plate. Allow glaze to dry between coats.
Use the skewer to help pull up the paper hearts on the front of the plate.
Once the hearts are no longer shiny, take the skewer and carve designs into each heart. This must be done before the glaze is dry. Do not try to brush away the crumbs at this point, or they may get stuck to the background.
Wait for the front of the plate to be completely dry. Use a dry sponge or firm brush to brush away all of the glaze crumbs on the front of the plate.
Begin with properly fired cone 04 bisque. Moisten a sponge and wipe bisque to remove any dust.
Squeeze out around 1 Tbsp of SC001 Pink-A-Boo onto the palette. Dip the sponge into the glaze and sponge the front of the plate. Repeat until the front of the plate is covered. Allow glaze to dry.
Place the pattern over the plate. Slide AC230 Clay Carbon Paper under the pattern. Trace over the rectangles and hearts. Remove the pattern and clay carbon paper.
Take MC001 6mm Low Tack Masking Tape and tape around the rectangles. This will give you crisp lines.
Squeeze out 1 Tbsp of SP201 Speckled Pink-A-Boo and SP274 Speckled Hot Tamale onto the palette. Make a third color by mixing ½ Tbsp of SP201 Speckled Pink-A-Boo and ½ Tbsp of SP274 Speckled Hot Tamale.
Using the Script Liner with SP201 Speckled Pink-A-Boo, apply 3 coats to the heart on the left side of the plate. Allow glaze to dry between coats.
Using the Script Liner with SP274 Speckled Hot Tamale, apply 3 coats to the 2 hearts on the right side of the plate. Allow glaze to dry between coats.
Using the Script Liner with the mixed color, apply 3 coats to the heart in the center. Allow glaze to dry between coats.
Squeeze out 1 Tbsp of SC035 Gray Hare and SC060 Silver Lining onto the palette. Make a third color my mixing ½ Tbsp of SC035 Gray Hare and ½ Tbsp of SC060 Silver Lining.
Using the Script Liner with SC035 Gray Hare, apply 3 coats to the background of the heart on the left side of the plate. Allow glaze to dry between coats.
Using the Script Liner with SC060 Silver Lining, apply 3 coats to the background of the 2 hearts on the right side of the plate. Allow glaze to dry between coats.
Using the Script Liner with the mixed color, apply 3 coats to the background of the heart in the center. Allow glaze to dry between coats.
Remove the tape before the glaze is completely dry.
Using the Detail Liner with SC015 Tuxedo, outline the hearts. Use the Soft Fan to apply 2 coats to the back of the plate.
Begin with properly fired cone 04 bisque. Moisten a sponge and wipe bisque to remove any dust.
Cut out the circle divider, so that it fits in the center of the plate. Use the pencil to make a dot above each “12” on the circle divider (onto the rim of the plate). Remove the circle divider. Make 3 more dots between each set of dots from the circle divider. Try to evenly space them.
Use a ruler to draw a straight line going through each set of dots that are directly across from each other. Draw the straight line on the rim of the plate only.
Squeeze out 1 TBS of SC001 Pink-A-Boo, SC055 Yella Bout It, and SC103 Lavendear onto the palette.
Dip the pencil eraser into SC-1 Pink-A-Boo. Stamp a dot of glaze onto one of the lines, right next to the inner rim of the plate. Stamp a dot onto every 3rd line.
Repeat Step #5 with SC055 Yella Bout It. Stamp the line next to the previous dots.
Repeat Step #5 with SC103 Lavendear. Stamp the remaining lines.
Repeat Step #5-7 for the middle and outer dots. Make sure you do not stamp the same color next to itself.
Dip into NR-CLR Clear One Dipping.
Stilt and fire to cone 06.
Coupe Salad Plate:
Begin with properly fired cone 04 bisque. Moisten a sponge and wipe bisque to remove any dust.
Place the pattern over the plate. Slide AC-230 Clay Carbon Paper under the pattern. Trace with a pencil.
Using the Script Liner with SC001 Pink-A-Boo, SC055 Yella Bout It, and SC103 Lavendear, apply 3 coats to each of the hearts. Allow glaze to dry between coats.
Allow glaze to dry to the touch.
Place the pattern back over the hearts. You can also cut out each heart, if that is easier. Lightly trace over the lettering with a pencil. You should be able to see a faint line in the glaze. Do not press too hard.
Allow hearts to dry completely.
Using SG403 Red, go over the lettering on the hearts.
Check the bisque ware over for any blemishes. If any are present gently sand with 100-grit Sandpaper.
Damp sponge ware to remove any fired dust and to condition the piece for decorating.
Place one ounce of Baby Blue in one of the paper cups and a similar amount of Sand in another paper cup. Add a few drops of water, if needed and mix with Palette Knife. The Fundamentals need to be a cream like consistency.
To the stem and under side of the Mushroom, apply three smooth coats of the Sand using the #8 Soft Fan. Bring up to the curved outer edge of the mushroom’s cap. Allow to set between coats.
To the cap of the Mushroom, apply three coats of Baby Blue with the #8 Soft Fan. Bring the Baby Blue downward overlapping in a feathered manner over the Sand. Allow to set between coats.
For best result allow to dry thoroughly.
Cut the butterfly pattern apart to easily trace on the butterflies.
Randomly apply the butterflies onto the mushroom cap over the Baby Blue, using the provided patterns, clay carbon and red pen.
Using the leaf pattern as a guide, sketch in the vine like leaf design over the stem and in between the traced butterflies using the #2 Pencil.
As needed place the EZ-Strokes on the page protector palette and if color is extremely thick, thin with water or Thin ‘n Shade. Mix with Palette Knife.
The butterflies are completed with Light Blue, Blue Turquoise, Dutch Blue, Midnight Blue and Cobalt Jet Black using the #4 or #6 Round and #2 Detail Liner.
Using the Round of choice fully load with Light Blue, side load with Blue Turquoise and on the same side pull the brush through the Dutch Blue. Blend on clean area of palette. Working from the outer edge of wings to the body, tip, press and lift the blue tones over the wings. The narrower wings will need two strokes and the wider wings three to four strokes. Reload the Round as needed in the same manner each time. Note: keep the darker Dutch Blue tone to upper and outer edges of the wings. Also, as color is applied go back and blend and smooth out any ridges of color. Wings should appear soft and blended.
Fully load the #2 Detail Liner with slightly thinned Midnight Blue. Hold the Liner straight up, outline the wings with flowing Liner work. Pull in some shading lines over wings, from the body out and from the narrow tips of the wings inward. These lines should be very fine and of varying lengths pulled from one point.
Fully load the #2 Detail Liner with thinned Cobalt Jet Black and press, pull and lift the bodies in place. Work from the neck to tapered tail. Tip and press the butterflies’ heads in place with a teardrop stroke. Tip of brush is placed on the neck and the stroke is pressed in place. Holding the brush straight up, pull out a few fine detail lines to the wings, pull out two feelers from the head and add legs to the butterflies.
There are dots on the wings in White, these are added later.
The leaves are a pressure stroke using Irish Green, Leaf Green, Ivy Green and detailed with Royal Blue Green.
Fully load the #4 or #6-Pointed Round with Irish Green, side load with Leaf Green and tip in Ivy Green. Working from the base of leaf outward, press firmly, pull and lift off to create the leaf in one stroke. Note the more pressure on the brush as the stroke is started will generate a larger leaf.
All the leaves are completed in the same manner, however smaller leaves have less pressure applied to the brush. Reload as needed.
To the Ivy Green add a few drops of Royal Blue Green, thus making a slightly darker shade of green.
With the #2 Liner fully loaded in Ivy Green and side loaded in Royal Blue Green mix, pull in the flowing vine stem work. Proceed to outline the leaves in stylized flowing strokes and add a center vein to each.
Using the Pure White French Dimension, press in small descending dots along the outer edge of the butterflies’ wings. To achieve uniform dots, hold the French Dimension bottle at a 45-degree angle to the ware and be sure the nip touches the ware.
Fire the piece to shelf cone 04. Thus, setting the color and maturing the French Dimension.
Damp sponge the fired ware to condition the piece for glazing.
With #8 Soft Fan apply three flowing coats of Crystal Clear Brushing to entire piece.
Stilt and fire to shelf cone 06.
Remove stilt marks with Stilt Stone or Dremel Tool.
Check the vase over for any blemishes. If present, lightly sand to remove using the 100-grit sandpaper.
Damp sponge the ware down to remove any fired dust and to condition the piece for decorating. To condition and clean the inside of vase pour a small amount of water into the vase. Quickly swirl the water around and pour out any remaining water.
Place approximately one ounce of Blue Green in the paper cup. If needed add water or Thin ‘n Shade to thin to a cream like consistency.
With a water dampened #8 Soft Fan, apply three coats of Blue Green to the entire outside of vase and to the inside lip. For the inside apply color about 2’’ inside the neck. Allow to dry between coats.
Set aside to dry thoroughly.
Using the provided pattern as a guide, lightly sketch the flowers and leaf pattern over the ware with a standard pencil. If you feel more comfortable with a traced pattern, use White Saral instead of Clay Carbon. Clay Carbon will not show up on such a dark base color. Cover the entire outside of vase with the design. (See the photograph for placement)
The design work is completed using Pure White French Dimensions. Some tips, when using are as follows:
Thoroughly shake and squeeze the bottle.
Use the product at room temperature.
Squeeze a small amount out onto a paper towel to ensure the right consistency is flowing from the nip.
If color does not leave the bottle easily, the French Dimension may need some stirring. Use a wooden skewer to stir the product deep inside the bottle.
To apply the French Dimension, hold the bottle at a 45-degree angle and gently apply pressure to the bottle with thumb and index finger.
The nip should touch the ware as the color is applied.
The angle is very important when adding the dots. If dots are applied with the bottle at 90-degrees to the surface, they will be more pointed and sharp.
Periodically wipe the nip to remove any unwanted color that will accumulate on the outer edge of the nip.
Work on one area at a time, allow that area to dry before moving on around the vase. It is very easy to smear the wet French Dimension.
Outline flower petals first, then pull in the leaves with a center vein. (Complete 3 or 4 flowers then allow to dry.)
After the petals and leaves are applied, add the tiny dots for the center of the flowers.
Throughout the background add dots in groups of three.
Add tiny dots around the top edge of the fluted vase.
Fire ware to a shelf cone 04. Note ware does not need to be stilted since Fundamentals will not stick to the shelf when fired.
Damp sponge ware after firing to remove any fired dust and to condition the piece for glazing.
Pour a small amount of Crystal Clear Brushing in to a paper cup and thin with water to a light cream consistency. Roll the inside of the vase and drain off excess. Wipe back any drips or runs from the outside of ware.
Apply 3 coats of the Crystal Clear Brushing to the outside of vase with the #8 Soft Fan. Glaze needs to dry between coats.
Stilt ware and fire to shelf cone 06.
Remove stilt marks with Dremel Tool or Stilt Stone.
Form
MB885 Great Shape Vases
Colors
UG230 Blue Green
FD258 Pure White
S2101 Crystal Clear Brushing
Decorating Accessories
CB618 #8 Soft Fan
Miscellaneous Accessories
Sponge
Water
100-grit Sandpaper
2 3-oz paper cups
Paper Towels
Standard Pencil
Water Bowl
White Saral (if pattern need to traced on instead of sketched on)
Check the vase over for any blemishes. If present, lightly sand to remove using the 100-grit sand paper.
Damp sponge the ware down to remove any fired dust and to condition the piece for decorating. To condition and clean the inside of vase pour a small amount of water into the vase. Quickly swirl the water around and pour out any remaining water.
Place the weighting material inside of the vase.
Place the ware onto the banding wheel and make sure the ware is centered. If the ware is not centered properly it will have skips of color as the piece is banded.
Place the EZ Strokes on the page protector palette and thin with water or Thin ‘n Shade to a very light cream consistency.
With the #4 Soft Fan loaded with Neon Yellow and rapidly turning the banding wheel, apply the color to the inside rim, the top and about inch down the outside of vase. Do not wash the brush.
Pick up Yellow Orange and over lapping about a ¼” of the Neon Yellow band another inch or so down the vase. Do not wash the brush.
Pick up Poppy Orange, proceed to band another inch down the vase. Remember to overlap the 1/4” of the previous color. Do not wash the brush.
Pick up Coral Red, proceed to band another inch down the vase again over lapping the previous applied color.
Finally pick up the Passion Red and band this color to the bottom of the ware. Now wash the Fan Brush and remove excess water.
Repeat steps 6 through 10 again making sure that the coloration blends from the lighter yellow at the top of the vase downward to the deeper tone of the Passion Red.
Allow to dry thoroughly before proceeding.
Trace the provided pattern onto a piece of tissue paper with the standard pencil.
Align the pattern on the vase. With the water-based marker trace over the penciled design on the tissue paper. The marker will bleed through the tissue paper.
Thin Cobalt Jet Black slightly with a few drops of water or Thin ‘n Shade
With the #4 Pointed Round, block in the traced design with two thin coats of the Cobalt Jet Black. The Cobalt Jet Black is also applied to the bottom of the vase.
Load #2 Liner with Cobalt Jet Black and smooth out the outline of the Egret, add grasses and black detailing to the Egret.
Fire ware to a shelf cone 04. Note ware does not need to be stilted since EZ Strokes will not stick to the shelf when fired.
Damp sponge ware after firing to remove any fired dust and to condition the piece for glazing.
Pour a small amount of Crystal Clear Brushing in to a paper cup and thin with water to a light cream consistency. Roll the inside of the vase and drain off excess. Wipe back any drips or runs from the outside of ware.
Apply 3 coats of the Crystal Clear Brushing to the outside of vase with the #8 Soft Fan. Glaze needs to dry between coats.
Stilt ware and fire to shelf cone 06.
Remove stilt marks with Dremel Tool or Stilt Stone.
Form
MB885 Great Shape Vase
Colors
EZ012 Cobalt Jet Black
EZ026 Yellow Orange
EZ057 Coral Red
EZ058 Poppy Orange
EZ075 Passion Red
EZ101 Neon Yellow
S2101 Crystal Clear Brushing
Decorating Accessories
CB202 #2 Detail Liner
CB404 #4 Pointed Round
CB604 #4 Soft Fan
CB608 #8 Soft Fan
Miscellaneous Accessories
Sponge
Water
100-grit Sandpaper
1 3 oz Paper Cup
Quality Banding Wheel
Tissue Paper
Ultra fine water-based marker
Standard Pencil
2 cups rice or beans or sand to weight the vase while banding
Apply 3 coats of SW 501 White Gloss to entire bowl avoiding the bottom foot. Let dry.
Place all E-Z Stroke colors on palette and thin to a light creamy consistency.
Dampen sea wool sponge with water and squeeze out into a paper towel.
Load sponge with Poppy Orange and begin to sponge in a lacy pattern irregular circles being careful not to fill in the center. You can let some go inside of bowl and on the bottom. Make circles as large or small as you want.
Do not wash sponge and load with Passion Red and apply over the Poppy Orange making sure not to cover all of the Poppy Orange.
Load Script Liner with Black E-Z Stroke and create petal outlines and add radial lines from center out onto the petals.
Sponge in centers first with Yellow Orange and shade with Brick E-Z Stroke.
Detail center with Black and the script Liner
Sponge in leaf shapes with Chartreuse and then add Leaf green to leaves for accent.
Detail leaves with Script Liner and Black.
Add accents for stems to connect design and tendrils with the Liner and Black.
Begin with properly fired shelf cone 04 bisque. Moisten a clean sponge and wipe bisque to remove any dust.
This tree comes with a wiring hook up and multicolored Medium Twist plastic lights.
Using a CB-604 #4 Soft Fan, apply 3 coats of El-131 Turtle Shell to the tree and the base. Allow to dry between coats.
Using a CB-404 #4-Pointed Round and a CB-110 #10/0 Liner, apply 2 coats of SG-302 Snowfall to all the tips and liners rising up from the tips. Allow to dry!
Stilt and fire to cone 06-05.
Using an OB-901 Mother of Pearl Brush, apply 1 thin brushed out coat of OG803 Mother of Pearl to the tree and the base. The thinner and more swirls as you apply the better result you will have.
Clean your brush with OA901 Essence. This bottle should be kept just for the Mother of Pearl.
Stilt and fire to cone 020.
Glue the lights into the tree and put the pinch plug wiring into the base.
Begin with properly fired shelf cone 04 bisque. Moisten a clean sponge and wipe bisque to remove any dust.
In a small cup, thin some FN004 Red to the consistency of coffee cream. Pour the glaze slowly; roll the glaze around inside the vase pouring out the excess. Leave the vase upside down to fully drain. Allow to dry!
Using a CB604 #4 Soft Fan, apply 4 coats of FN301 Marshmallow White to the outside of the vase. Allow to dry!
Trace the pattern onto the piece using AC230 Clay Carbon Paper and a pencil.
Place some of each of the following EZ Stroke colors onto a palette, EZ011 Sienna Brown, EZ038 Medium Mahogany, EZ030 Rose and EZ075 Passion Red.
Using a CB308 #8 Flat Shader, pick up some EZ011 Sienna Brown on the chisel edge of the brush and stipple the color onto the bear’s body. Repeat this step using EZ038 Medium Mahogany lightly over top of the EZ011 Sienna Brown.
Using a CB202 #2 Detail Liner, apply EZ-030 Rose to the nose, inside of the ears and pads of the feet.
Using a CB310 #10 Flat Shader, shade the heart with EZ075 Passion Red. Using a CB-110 #10/0 Liner, detail the heart with EZ075 Passion Red.
Using a CB110 #10/0 Liner outline and detail the bear with EZ012 Cobalt Jet Black.
Center the vase on a banding wheel and band the top portion of the vase with EZ075 Passion Red. Allow to dry!
Begin with properly fired shelf cone 04 bisque. Moisten a clean sponge and wipe bisque to remove any dust.
In a small cup, thin some FN005 Pink to the consistency of coffee cream. Pour the glaze slowly; roll the glaze around inside the vase pouring out the excess. Leave the vase upside down to fully drain. Allow to dry!
Using a CB604 #4 Soft Fan, apply 3 coats of FN-001 White to the outside of the vase. Allow to dry!
Trace the pattern onto the piece using AC230 Clay Carbon Paper and a pencil.
Place some EZ075 Passion Red onto a palette. Using a AB710 #/4 Flat Shader, pick up some water on the brush, touch the brush to a paper towel to remove the excess water. Load on side of the brush with EZ075 Passion Red then shade around the heart shape, when dry, repeat.
Place out the following colors, EZ057 Coral Red, EZ030 Rose and EZ057 Passion Red, EZ033 Ivy Green and EZ003 Irish Green onto a palette.
Using a CB202 #2 Detail Liner, apply 2 coats of EZ002 Cinderella Pink to the top rose on the left of the heart, EZ075 Passion Red to the middle rose and EZ030 Rose to the lower rose and the rose on the top right.
Using a CB202 #2 Detail Liner, apply 2 coats of EZ003 Irish Green to all the leaves.
Using a CB408 #8 Flat Shader, shade all the leaves with EZ033 Ivy Green.
Place some EZ012 Cobalt Black onto a palette.
Using a CB110 #10/0 Liner, outline and detail the design with EZ012 Cobalt Black.
Using the FD254 Black Licorice French Dimensions to the word Love. Allow to dry!
Begin with properly fired shelf cone 04 bisque. Moisten a clean sponge and wipe bisque to remove any dust.
In a small cup, thin some FN005 Pink to the consistency of coffee cream. Pour the glaze slowly; roll the glaze around inside the vase pouring out the excess. Leave the vase upside down to fully drain. Allow to dry!
Using a CB604 #4 Soft Fan, apply 3 coats of FN005 Pink to the outside of the vase. Allow to dry!
Cut out 3 of each size hearts. Place the hearts on the vase using a CB604 #4 Soft Fan and water. Press over the hearts with a paper towel.
Place some EZ075 Passion Red and EZ030 Rose onto a palette.
Center the vase on a banding wheel upside down.
Using a DB805 #3 Fan, slightly thin some EZ075 Pashion Red, band this color on the bottom section of the vase coming up slightly over the bump out of the vase. Turn the vase right side up when done and recenter it on the banding wheel.
Band the top section of the vase with EZ030 Rose blending the color into the EZ075 Passion Red to create a hombre look.
Peel off the paper hearts before the vase completely dries. Allow to dry!
Stilt and fire to cone 06/05.
Using a OB901 Mother of Pearl ¼” Shader, apply 1 thin coat of OG803 Mother of Pearl to each of the hearts. Allow to dry!
Begin with properly fired cone 04 bisque. Moisten the sponge and wipe bisque to remove any dust.
Using the Soft Fan with SC102 Just Peachy, apply 3 coats to the entire lantern. Allow glaze to dry between coats.
Using a pencil, lightly sketch some leaves and vines, clusters or single circles for flowers on the leaves, and large circles for the background.
Using the Script Liner with SC27 Sour Apple, apply 2 coats to the large circles around the top of the lantern. Allow glaze to dry between coats.
Using the Script Liner with SC76 Cara-Bein Blue, apply 2 coats to the leaves around the top of the lantern. Allow glaze to dry between coats.
Using the Script Liner with SC16 Cotton Tail, make random clusters of small circles over the large circles and leaves. Apply 2 coats. Allow glaze to dry between coats.
Squeeze out around 1 tsp of SC15 Tuxedo onto the palette. Dip the pencil eraser in the glaze. Stamp the center of the white circles. Repeat until all white circles have a black center.
Using the Script Liner with SC27 Sour Apple, apply 2 coats to the bottom rim, closest to the lattice. Allow glaze to dry between coats.
Using the Script Liner with SC76 Cara-Bein Blue, apply 2 coats to the bottom rim. Allow glaze to dry between coats.
Use FD258 Pure White to outline the white circles at the top of the lattice. Make dots down the center of each lattice.
Begin with properly fired shelf cone 04 bisque. Moisten a clean sponge and wipe bisque to remove any dust.
Using the 1 inch flat brush, paint 3 coats of Cotton Tail on the mushroom top covering the top and theunder side of the top.
Using the 1 inch flat brush, paint 3 coats of Sunkissed on the stem of the mushroom.
Once the top has dried, use a pencil to trace the flower onto the tissue paper.
Position the tissue paper flower on the mushroom and trace with a washable marker. The marker should soak through the tissue paper and leave an outline of the flower on your mushroom top.
Using the round brush, paint (dab) 2 coats of Day Lily on the petals. Letting the first coat dry before adding the 2nd coat. Leave the center of the flower unpainted.
Using the round brush, paint 2 coats of Tuxedo on the middle of the flower.
Using the liner brush and Tuxedo Stroke and coat, paint a loose outline around the petals.
Using the liner brush, dab dots of Cotton Tail in the center of the flower.
Begin with properly fired shelf cone 04 bisque. Moisten a clean sponge and wipe bisque to remove any dust.
Draw out your shapes on the top of the mushroom, no wrong or right shapes, but make sure you have ample space between shapes on because you will be painting with the jungle gems and they can run a bit! Make sure you have 8 shapes/sections to paint. Start with a shape on the tip/top of the mushroom then continue with the rest!
Draw out the funky shapes on the stem of the mushroom – both are open to your creativity. Start towards the bottom of the stem and just build around it!
Number or label your sections with a letter or number to correspond to each Jungle Gem color you’re using. Paint 2-3 coats of each glaze in a shape.
Once that is dry, you can paint the underneath of the mushroom a Stroke & Coat if you would like – sample was left white to match the top.
When painting the stem, numbering what colors you want to go where is suggested. Paint 2-3 coats of each color – start with the section closest to the bottom and work to the top. Use any colors you want. The colors in the sample match the colors in the Jungle Gems.
Clear glaze the top of the shroom if you left some white/bisque.
Begin with properly fired cone 04 bisque. Moisten a sponge and wipe bisque to remove any dust.
Using the Script Liner with FN018 Bright Blue, apply 3 coats to the top and bottom of the mug and bowl. The areas above and below the mosaic design. Allow glaze to dry between coats.
Using SG404 Blue, outline the upper and lower row of circles.
Using SG410 Bright Blue, outline the diamonds in the center of the upper and lower circles.
Using SG407 Yellow, make stars in the center of each diamond. Make a line of dots in the section around each diamond.
Using the Soft Fan with FN002 Yellow, apply 3 coats to the inside of the mug and bowl. Allow glaze to dry between coats.
Using the Soft Fan with FN211 Sheer Blue, apply 3 coats to the outside of the mug and bowl. Allow glaze to dry between coats.
Stilt and fire to cone 06.
Form
MB1614 Mosaic Bowl
MB1617 Mosaic Mug
Colors
FN002 Yellow
FN018 Bright Blue
FN211 Sheer Blue
SG404 Blue
SG407 Yellow
SG410 Bright Blue
Decorating Accessories
RB144 #4 Soft Fan
RB106 #6 Script Liner
Miscellaneous Accessories
Sponge
Water
Low-Fire|Earthenware Bisque|Table Top
406|403|461
47552
Foundations and Designer Liner Chevron Mug and Bowl
Begin with properly fired cone 04 bisque. Moisten a sponge and wipe bisque to remove any dust.
Using the Script Liner with FN007 Green, apply 3 coats to the top and bottom of the mug and bowl. The areas above and below the chevron design. Allow glaze to dry between coats.
Using SG405 Green, outline the top, middle, and bottom horizontal lines.
Using SG409 Bright Green, outline the remaining 2 horizontal lines.
Using SG405 Green, SG409 Bright Green, and SG407 Yellow, make repeating lines and dots between the horizontal lines.
Using the Soft Fan with FN002 Yellow, apply 3 coats to the inside of the mug and bowl. Allow glaze to dry between coats.
Using the Soft Fan with FN216 Sea Glass, apply 3 coats to the outside of the mug and bowl. Allow glaze to dry between coats.
Stilt and fire to cone 06.
Form
MB1615 Chevron Bowl
MB1618 Chevron Mug
Colors
FN002 Yellow
FN007 Green
FN216 Sea Glass
SG405 Green
SG407 Yellow
SG409 Bright Green
Decorating Accessories
RB144 #4 Soft Fan
RB106 #6 Script Liner
Miscellaneous Accessories
Sponge
Water
Low-Fire|Earthenware Bisque|Table Top
406|403|461
47554
Foundations and Designer Liner Scalloped Mug and Bowl
Begin with properly fired cone 04 bisque. Moisten a sponge and wipe bisque to remove any dust.
Using the Script Liner with FN003 Orange, apply 3 coats to the top and bottom of the mug and bowl. The areas above and below the scalloped design. Allow glaze to dry between coats.
Using SG407 Yellow, outline the top of each upper arch. Make vertical lines going across each arch.
Using SG408 Orange, outline the top of each center arch. Make dots going down the center of each arch.
Using SG403 Red, outline the top of each bottom arch. Make 3 decorative lines going down to the bottom point of each arch.
Using the Soft Fan with FN002 Yellow, apply 3 coats to the inside of the mug and bowl. Allow glaze to dry between coats.
Using the Soft Fan with FN203 Dry Champagne, apply 3 coats to the outside of the mug and bowl. Allow glaze to dry between coats.
Begin with properly fired shelf cone 04 bisque. Moisten a clean sponge and wipe bisque to remove any dust.
Print 2 copies of the pattern. Cut both ornament patterns out, cutting on the outside edge of the line.
Using a CB-106 #6 Script Liner, apply 1 coat of FN-001 White to the center area of the tree where the ornament pattern will go. Allow to dry.
Apply 1 of each ornament to the tree on the FN-001 White area using a CB-604 #4 Soft Fan and water. After placing the ornament on the tree, press with a paper towel to make sure the paper is stuck to the tree.
Using a CB-604 #4 Soft Fan, apply 3 coats of FN-053 Mint to the tree except not on the branches that are flipped up.
After the 3 coats of the FN-053 Mint have been applied, remove the paper pattern. Allow to dry.
Using the second set of ornament patterns, trace on the ornament patterns and the holly boughs using the AC-230 Clay Carbon Paper, Also if you are painting the Merry Christmas on the other side you can trace this now.
Using a CB-202 #2 Detail Brush, apply 3 coats of SC-74 Hot Tamale to the long ornament on the left, the 3 sections of the center ornament and the bows on the top of the ornaments and the ornament hooks.
Using a CB-202 #2 Detail Brush, apply 3 coats of SC-26 Green Thumb to the 2 remaining stripes on the center ornament. Using a CB-106#6 Script Liner, apply 3 coats of SC-26 Green Thumb to the ornament on the right.
Using a CB-110 #10/0 Liner, apply 2-3 coats of SC-74 Hot Tamale to the Merry Christmas and to the bows.
Using a CB-110 #10/0 Liner, apply 2 coats of SC-14 Java Bean to the stems of the pine boughs. Stroke in the pine needles using the CB-110 #10/0 Liner with SC-26 Green Thumb and SC-8 Just Froggy. Allow to dry.
Using a CB-110 #10/0 Liner, outline the ornament pattern with SC-15 Tuxedo, also add the hanging string.
Using a CB-604 #4 Fost Fan and a CB-106 # 6 Script Liner, apply 3 coats of CG -1009 Cherry Limeade to the underside of all the branches. Allow to dry.
Using a CB-604 #4 Sot Fan, apply 1-2 coats of SG-302 Snowfall to the top side of the branches and or where you like snow to be. Allow to dry.
Stilt and fire to cone 05-06.
Using an OB-910G #0 Detail brush, apply OG805 Premium Gold to the ornament caps and to the design on the ornament on the right-hand side. Clean your brush in OA901 Essence. Allow to dry.
Begin with properly fired cone 04 bisque. Moisten a sponge and wipe bisque to remove any dust.
Use the pencil to draw a scalloped line going around the neck.
Use scissors to cut out the wing pattern. Place it on one side of the hen and trace around the edges. Flip the pattern and repeat on the other side.
Draw a line on the back side of the hen, along the edge that separates the top and bottom. It should go between the 2 wings.
Using the Script Liner with SC-16 Cotton Tail, apply 3 coats to the eyes. Allow glaze to dry between coats.
Use the pencil to draw pupils on the eyes. Using the Script Liner with SC-15 Tuxedo, apply 2 coats to the pupils. Allow glaze to dry between coats.
Using the Detail Liner with SC-16 Cotton Tail, make a dot in each pupil.
Using the Script Liner with SC-6 Sunkissed, apply 3 coats to the beak. Allow glaze to dry between coats.
Using the Script Liner with SC-75 Orange-A-Peel, apply 3 coats to the comb and waddles. Allow glaze to dry between coats.
Using the Script Liner and Soft Fan with SC-6 Sunkissed, apply 2 coats to the bottom half of the hen (area below the scallops in the front, going towards the back, up to the line in the back). Allow glaze to dry between coats.
After the glaze is dry, place the lace over the glaze from Step #9. Wet the Soft Fan with water and brush over the lace to help it stay in place. Use scissors to cut the lace to help it lay flat over the bottom half of the hen. Trim off any excess lace.
Using the Soft Fan with SC-6 Sunkissed, apply 1 coat over the lace. Allow glaze to dry.
Using the Soft Fan with SC-75 Orange-A-Peel, apply 2 coats over the lace. Allow the glaze to dry between coats. Remove the lace after the last coat loses its shine but is not yet bone dry.
Using the Script Liner with SC-16 Cotton Tail, apply 3 coats to the wings. Allow glaze to dry between coats.
Using the Script Liner with SP-211 Speckled Moody Blue, apply 3 coats to the upper half of the hen (area above the scalloped line).
Using the Script Liner with SC-27 Sour Apple, apply 3 coats to the back of the hen. Allow glaze to dry between coats.
Squeeze out around 1 tsp of SC-16 Cotton Tail onto the palette. Dip the pencil eraser into the glaze. Stamp dots around the neck and tail of the hen.
Using the Detail Liner with SC-15 Tuxedo, outline the details.
Begin with properly fired cone 04 bisque. Moisten a sponge and wipe bisque to remove any dust.
Using the Script Liner with SC-16 Cotton Tail, apply 2 coats to the eyes. Allow glaze to dry between coats.
Use the pencil to draw irises on the eyes. Using the Script Liner with SC-24 Dandelion, apply 2 coats to the irises. Allow glaze to dry between coats.
Use the pencil to draw pupils on the eyes. Using the Script Liner with SC-15 Tuxedo, apply 2 coats to the pupils. Allow glaze to dry between coats.
Using the Detail Liner with SC-16 Cotton Tail, make a dot in each pupil.
Use the pencil to draw a line of feathers going around the neck of the rooster. Draw flowers, leaves, swirls, and random shapes on the bottom half of the rooster.
Using the Script Liner with SC-6 Sunkissed, apply 2 coats to the beak. Allow glaze to dry between coats.
Using the Script Liner with SC-74 Hot Tamale, apply 2 coats to the comb and waddles. Allow glaze to dry between coats.
Using the Script Liner with SC-75 Orange-A-Peel, apply 2 coats to the neck. Allow glaze to dry between coats.
Using the Script Liner with SC-6 Sunkissed, SC-11 Blue Yonder, SC-12 Moody Blue, SC-24 Dandelion, SC-27 Sour Apple, SC-33 Fruit of the Vine, SC-74 Hot Tamale, and SC-75 Orange-A-Peel, apply 2 coats to your designs on the bottom half. Allow glaze to dry between coats.
Add decorative dots using the eraser of the pencil and any glaze from Step #9.
Using the Detail Liner with SC-15 Tuxedo, outline the details of the eyes, beak, comb, and waddles. Outline the designs on the bottom half and add decorative lines and dots.
Begin with properly fired cone 04 bisque. Moisten a sponge and wipe bisque to remove any dust.
Take the blue shop towel and lay it flat. Randomly squirt lines and dots of SC-6 Sunkissed, SC-11 Blue Yonder, SC-27 Sour Apple, and SP-211 Speckled Moody Blue. You should cover around half of the towel. Fold the towel in half and lightly press so that the glaze covers the inside of the towel. Gently open the towel and place over the hen. Press down and remove. Repeat until the hen is covered in glaze.
Use a damp sponge to remove most of the glaze from the eyes, comb, waddles, and beak.
Using the Script Liner with SC-16 Cotton Tail, apply 3 coats to the eyes. Allow glaze to dry between coats.
Use the pencil to draw irises on the eyes. Using the Script Liner with SC-6 Sunkissed, apply 2 coats to the irises. Allow glaze to dry between coats.
Use the pencil to draw pupils on the eyes. Using the Script Liner with SC-15 Tuxedo, apply 2 coats to the pupils. Allow glaze to dry between coats.
Using the Detail Liner with SC-16 Cotton Tail, make a dot in each pupil.
Using the Script Liner with SC-75 Orange-A-Peel, apply 3 coats to the beak. Allow glaze to dry between coats.
Using the Script Liner with SC-11 Blue Yonder, apply 3 coats to the waddles. Allow glaze to dry between coats.
Using the Script Liner with SP-211 Speckled Moody Blue, apply 3 coats to the comb. Allow glaze to dry between coats.
Using the Detail Liner with SC-15 Tuxedo, outline the details.
Begin with properly fired cone 04 bisque. Moisten a sponge and wipe bisque to remove any dust.
Using the Script Liner with SC-16 Cotton Tail, apply 3 coats to the eyes. Allow glaze to dry between coats.
Use the pencil to draw irises on the eyes. Using the Script Liner with SC-27 Sour Apple, apply 2 coats to the irises. Allow glaze to dry between coats.
Use the pencil to draw pupils on the eyes. Using the Script Liner with SC-15 Tuxedo, apply 2 coats to the pupils. Allow glaze to dry between coats.
Using the Detail Liner with SC-16 Cotton Tail, make a dot in the pupil of each eye.
Using the Soft Fan and Script Liner with SC-6 Sunkissed, apply 3 coats to the body of the rooster. Allow glaze to dry between coats.
Using the Script Liner with SC-75 Orange-A-Peel, apply 3 coats to the beak. Allow glaze to dry between coats.
Using the Script Liner with SC-74 Hot Tamale, apply 3 coats to the comb and waddles. Allow glaze to dry between coats.
Using the Detail Liner with SC-15 Tuxedo, outline the details of the eyes, beak, comb, and waddles.
Cut the cardboard into a small piece – around 1.5” square. You will be using the edge with straight lines, not the corrugated edge.
Squeeze out around 1 TBS of SC-97 Cant-elope, SC-75 Orange-A-Peel, SC-74 Hot Tamale, SC-27 Sour Apple, SC-11 Blue Yonder, and SC-76 Cara-Bein Blue onto the palette.
Take the cardboard square and dip the straight edge into SC-97 Cant-elope. Press vertically onto the neck of the rooster. Repeat until you go around the neck. Lines should be random, not evenly spaced or angled.
Repeat Step #11 with SC-75 Orange-A-Peel, going further down the rooster.
Repeat Step #11 with SC-74 Hot Tamale, going further down the rooster.
Repeat Step #11 with SC-27 Sour Apple, going further down the rooster.
Repeat Step #11 with SC-11 Blue Yonder, down further down the rooster.
Repeat Step #11 with SC-76 Cara-Bein Blue, going down to the bottom of the rooster.
Begin with properly fired cone 04 bisque. Moisten a sponge and wipe bisque to remove any dust.
Using the Script Liner with SC-16 Cotton Tail, apply 3 coats to each eye. Allow glaze to dry between coats.
Use the pencil to draw a pupil in each eye. Using the Script Liner with SC-15 Tuxedo, apply 2 coats to each pupil. Allow glaze to dry between coats.
Using the Detail Liner with SC-16 Cotton Tail, make a dot in each pupil.
Using the Script Liner with SC-75 Orange-A-Peel, apply 3 coats to the beak. Allow glaze to dry between coats.
Using the Script Liner with SC-74 Hot Tamale, apply 3 coats to the waddles and comb. Allow glaze to dry between coats.
Using the Detail Liner with SC-15 Tuxedo, make a line separating the top and bottom of the beak.
Take the 1” circle punch and punch the paper until you have around 50 circles.
Take a paper circle and trace it onto the hen. Repeat with the same circle, until the hen is covered. Try to evenly space the circles.
Using the Script Liner with SC-6 Sunkissed, SC-11 Blue Yonder, SC-27 Sour Apple, SC-74 Hot Tamale, and SC-75 Orange-A-Peel, apply 3 coats to each circle. Extend the glaze past the outlines of the circles. Try to avoid having the same color right next to each other. Allow glaze to dry between coats.
Take a paper circle and dip it in water. Place it over one of the glazed circles from Step #10. Press down with a damp sponge. Repeat, until all of the circles from Step #10 are covered with paper circles. While the paper is still damp, take the Script Liner and apply a line of glaze going around the edge of the circle. It should be the same color as the glaze beneath the circle.
Allow glaze to dry.
Using the Script Liner and Soft Fan with SC-15 Tuxedo, apply 2 coats over the entire chicken body. Allow glaze to dry between coats.
Before the glaze is bone dry, take the needle tool and lift up each circle. Make sure you remove every circle. You might want to count how many circles you have, so that you can be sure you have removed them all.
Begin with properly fired cone 04 bisque. Moisten a sponge and wipe bisque to remove any dust.
Squeeze out around 1 Tbsp of SC-5 Tiger Tail, SC-25 Crackerjack Brown, SC-46 Rawhide, and SC-51 Poo Bear onto the palette.
Using the Soft Fan with SC-5 Tiger Tail, apply 2 coats to the front of the plate. Allow glaze to dry between coats.
Position the plate so that the handle is going away from you.
While the glaze from Step #3 is still wet, take the Script Liner and make random vertical lines on the front of the plate using the glazes from Step #2. They should be thick lines of glaze, with some overlapping.
Dip the Soft Fan in water and go back and forth vertically over the front of the plate. This will blend the colors together.
Cut around the pattern, so that it will fit on the plate. There is a separate pattern for each plate (small/large). You can also make your own pattern. After the front of the plate is dry to the touch, place the pattern over the top and lightly trace with the pencil. You want to see a faint line in the glaze.
Using the Soft Fan with SC-48 Camel Back, apply 3 coats to the back and edges of the plate. Allow glaze to dry between coats.
After the front is completely dry, use SG-401 Black to outline the design on the front of the plate.
Using an AB-710 #3/4 Flat Shader, basecoat the vest and inside the hat area with 1-2 coats of OS455 Holy Red. Allow to dry!
Using an AB-708 #10 Shader, paint vertical stripes on the vest and the hat with OS480 Garnet Red. When dry, paint the horizontal stripes on the vest and the hat. Then paint in the square where the two stripes cross with SS-138 Flat Black.
Using an AB-709 ¾ Angular Shader to shade the crevices and edge of the vest and the inside of the hat with OS480 Garnet Red.
Base coat the outside area of the hat, gloves, and the nose with SS-234 Medium Mocha. Drybrush the hat and the gloves with SS-194 Medium Taupe then highlight with SS192 Light Taupe.
Drybrush the nose with SS-211 Orange Rust then with SS210 Orange then highlight the tip of the nose with SS-135 White.
Using an AB-709 ¾ Angular Shader to shade the crevices and edge of the hat with SS-234 Medium Mocha.
Base coat the cuffs of the gloves with OS480 Garnet Red. Drybrush with SS-OS455 Holy Red then highlight with OS449 Bright Red. Touch up any areas on the body that are white first with OS500 Snowcloud to block out any of the red that got on the body.
Basecoat the Snowman body with SS-135 White. Allow to dry!
Drybrush the cheeks with SS-183 Rich Peach with some SS135 White mixed in the brush to lighten.
Using an AB-709 ¾ Angular Shader to shade the crevices of the snowman body with OS546 Baby Blue.
Paint the center of the buttons with OS455 Holly Red then with SS-81 Shimmering Silver.
Using an AB-701 #0 Detail, paint the eyes with SS-138 Flat Black, highlight with SS-135 White. Paint the mouth area with SS-138 Flat Black.
Using an AB710 #3/4 Flat Shader, apply 2 coats of AC-502 Matte Sealer the snowman.
Using an AB-704 #3 Round, apply 2 coats of AC-501 Gloss Sealer to the eyes and buttons.
DO NOT FIRE!
MB-1607 Clark Snowman
Using an AB710 #3/4 Flat Shader, basecoat the center part of the hat and the gloves with SS-480 Garnet Red.
Using a DB-803 #8 Round, drybrush with OS455 Holly Red then highlight with OS449 Bright Red.
Basecoat the scarf, brim of the hat and top pom pom with SS-57 Accent Green
Drybrush with SS-19 Country Sage then with SS-376 Limeburst. Highlight with SS-135 White.
Basecoat the nose with SS-234 Medium Mocha. Drybrush the nose with SS-211 Orange Rust then with SS-210 Orange then highlight the tip of the nose with SS-135 White.
Touch up any areas on the body that are white first with OS500 Snowcloud to block out any of the red that got on the body.
Basecoat the Snowman body with SS-135 White. Allow to dry!
Drybrush the cheeks with SS-183 Rich Peach with some SS135 White mixed in the brush to lighten.
Using an AB-709 ¾ Angular Shader to shade the crevices of the snowman body with OS546 Baby Blue.
Paint the center of the buttons with OS455 Holly Red then with SS-81 Shimmering Silver.
Using an AB-701 #0 Detail, paint the eyes with SS-138 Flat Black, highlight with SS-135 White. Paint the mouth area with SS-138 Flat Black.
Using an AB710 #3/4 Flat Shader, apply 2 coats of AC-502 Matte Sealer the snowman.
Using an AB-704 #3 Round, apply 2 coats of AC-501 Gloss Sealer to the eyes and buttons.
Begin with properly fired cone 04 bisque. Moisten a sponge and wipe bisque to remove any dust.
Squeeze out around 1 Tbsp of SC-5 Tiger Tail, SC-25 Crackerjack Brown, SC-46 Rawhide, and SC-51 Poo Bear onto the palette.
Using the Soft Fan with SC-5 Tiger Tail, apply 2 coats to the front of the plate. Allow glaze to dry between coats.
Position the plate so that the handle is going away from you.
While the glaze from Step #3 is still wet, take the Script Liner and make random vertical lines on the front of the plate using the glazes from Step #2. They should be thick lines of glaze, with some overlapping.
Dip the Soft Fan in water and go back and forth vertically over the front of the plate. This will blend the colors together.
Cut around the pattern, so that it will fit on the plate. There is a separate pattern for each plate (small/large). You can also make your own pattern. After the front of the plate is dry to the touch, place the pattern over the top and lightly trace with the pencil. You want to see a faint line in the glaze.
Using the Soft Fan with SC-48 Camel Back, apply 3 coats to the back and edges of the plate. Allow glaze to dry between coats.
After the front is completely dry, use SG-401 Black to outline the design on the front of the plate.
Begin with properly fired cone 04 bisque. Moisten the sponge and wipe bisque to remove any dust.
Using the Soft Fan with SC-36 Irish Luck, apply 1 coat to the tree and base. Allow glaze to dry.
Take a damp sponge and wipe away most of the glaze, leaving it only in the crevices.
Using the Soft Fan with FN-216 Sea Glass, apply 3 coats to the tree and base. Allow glaze to dry between coats.
Take the needle tool and run it in a circular motion around the inside of each light hole on the tree. This will remove any excess glaze that could clog the hole.
Outline all traced lines with the metal tip secured onto the Black Designer Liner.
Using the Round, apply 2 coats of Cotton Tail to the snow area, then side load in The Blues and shade along the top area.
Using the Round, apply 3 coats of Crackerjack Brown to the body of the deer.
Using the Round, apply 3 coats of Tip Taupe to the antlers.
Using the Round, apply 3 coats of Java Bean to the hooves.
Using the Round, apply 3 coats of Ivory Tower to the spots.
Using the Liner, apply 2 coats of each color to lights: Hot Tamale, Dandelion and The Blues.
Using the Round or Liner, apply 2 coats of Cotton Tail to the rear area of the eye, then The Blues to the center area, and 2 coats of Tuxedo to the pupil and to the nose.
Using the Liner, apply 1 slightly thinned coat of Designer Liner Green to the needles on the branches.
Using the Fan, apply 3 coats of Tree Green to the back and rim of the plate.
Using the Fan, apply 1 coat of Clear to the front of the plate.
Using the Fan, apply 1 coat of Peppermint to the front of the plate.
Begin with properly fired cone 04 bisque. Moisten the sponge and wipe bisque to remove any dust.
Use the pencil to draw 4 wavy lines on the tree. This will separate the tree into 5 sections. Try to space the sections out equally.
Using the Script Liner with SC-78 Lime Light, apply 3 coats to the top and bottom section. Glaze the inside edge of the stars and circles. Allow glaze to dry between coats.
Using the Script Liner with SC-27 Sour Apple, apply 3 coats to the next 2 sections. Glaze the inside edge of the stars and circles. Allow glaze to dry between coats.
Using the Script Liner with SC-26 Green Thumb, apply 3 coats to the center section. Glaze the inside edge of the stars and circles. Allow glaze to dry between coats.
Using the Script Liner with SC-74 Hot Tamale, apply 3 coats to the base of the tree. Allow glaze to dry between coats.
Using the Soft Fan with SG-704 Peppermint, apply 1 coat to the outside of the tree.
Stilt and fire to cone 06.
Large Starlight Tree:
Begin with properly fired cone 04 bisque. Moisten the sponge and wipe bisque to remove any dust.
Using the Script Liner with SC-78 Lime Light, apply 3 coats to every other section of the tree. Glaze the inside edge of the stars and circles. Allow glaze to dry between coats. ,
Go around the tree and label the remaining sections: 1, 2, 3, 4, 5, and 6.
Use MC-001 6mm Low Tack Masking Tape to tape off the odd numbered sections.
Using the Script Liner with SC-27 Sour Apple, apply 3 coats to the odd numbered sections. Glaze the inside edge of the stars and circles. Allow glaze to dry between coats. Remove the tape before the glaze is bone dry.
Use MC-001 6mm Low Tack Masking Tape to tape off the even numbered sections.
Using the Script Liner with SC-26 Green Thumb, apply 3 coats to the even numbered sections. Glaze the inside edge of the stars and circles. Allow glaze to dry between coats. Remove the tape before the glaze is bone dry.
Using the Script Liner with SC-74 Hot Tamale, apply 3 coats to the base of the tree. Allow glaze to dry between coats.
Using the Soft Fan with SG-704 Peppermint, apply 1 coat to the outside of the tree.
Begin with properly fired cone 04 bisque. Moisten a sponge and wipe bisque to remove any dust.
Using the Soft Fan with FN-233 Ruby Red, apply 3 coats to the textured portion of the container. Allow glaze to dry between coats.
Using the Soft Fan with SC-27 Sour Apple, apply 3 coats to the bottom the container. Allow glaze to dry between coats.
Using the Script Liner with SC-27 Sour Apple, apply 2 coats going around the rim of the container. Allow glaze to dry between coats.
Using the Soft Fan with SG-704 Peppermint, apply 1 coat to the outside of the container. Apply 2 coats to the inside. Allow glaze to dry between coats.
Stilt and fire to cone 06.
Flourish Container:
Begin with properly fired cone 04 bisque. Moisten a sponge and wipe bisque to remove any dust.
Using the Soft Fan with SC-26 Green Thumb, apply 1 coat over the textured, flourish border on the top and bottom of the container. Allow glaze to dry.
Using a damp sponge, wipe the textured border until most of the glaze is gone, leaving it only in the crevices. Wiping vertically, away from the center of the container, is best with the flourish pattern.
Use scissors to cut out the pattern and clay carbon paper so that they will both fit around the center of the container. Place the clay carbon paper around the center of the container and tape in place. Place the pattern on top and tape in place. Trace the pattern with the pencil. Remove the pattern and clay carbon paper.
Use the pencil to draw stems and berries coming from the leaves.
Using the Script Liner with SC-27 Sour Apple, apply 3 coats to the leaves. Allow glaze to dry between coats.
Using the Detail Liner with SC-26 Green Thumb, outline the leaves and stems.
Squeeze out around 1 tsp of SC-74 Hot Tamale onto the palette. Dip the pencil eraser in the glaze and stamp a berry on the container. Repeat until all the berries have been stamped.
Use MC-001 6mm Low Tack Masking Tape to tape off the 4 raised lines going around the container.
Using the Script Liner with SC-74 Hot Tamale, apply 2 coats to each of the 4 raised lines and the bottom of the container. Allow glaze to dry between coats. Remove the tape before the glaze is bone dry.
Using the Soft Fan with NT-BR Clear One Brushing, apply 2 coats to the center section of the container. Allow glaze to dry between coats.
Using the Soft Fan with SG-704 Peppermint, apply 2 coats over the flourish sections for the container and the inside. Allow glaze to dry between coats.
Cover the floral foam cone in a layer of plastic wrap to keep the clay from sticking to the form.
Begin by rolling out a couple lengths of coils.
Starting at the base of the tree, wrap the coils around the cone form.
Stop wrapping every few inches and score the clay on the coil below and the coil that will be lying on top.
Touch a couple drops of water to the scored areas to help adhere the clay to itself.
Repeat steps 4 and 5 until you reach the top of the cone.
Use your finger to blend any areas where the clay coils connected to make them look like one seamless coil.
A toothpick can be used to press in definition between coils.
Carefully remove the coils from the form and throw away the plastic wrap.
Using a finger (or plastic knife/fettling knife) smoosh and blend together the coils from the inside.
Carefully manipulate the tree to create soft bends so it isn’t straight up and down from the cone form.
Roll small balls of clay to create the bulbs.
Scratch and attach bulbs to the tree.
Using any excess clay, create a star for the top.
Scratch and attach the star.
Allow to fully dry.
Bisque fire to cone 04.
Wipe bisque with a damp sponge to remove any dust.
Using three coats of SC-26 Green Thumb, glaze the main part of the coil tree with the script liner brush, leaving the bulbs and star untouched.
Glaze a variety of bulbs using SC-11 Blue Yonder, SC-73 Candy Apple Red, SC-6 Sunkissed, and SC-16 Cotton Tail with the script liner brush making sure to apply three coats on each.
Begin with properly fired cone 04 bisque. Moisten the sponge and wipe bisque to remove any dust.
Using the pencil sketch leaves and stems going down and coming up from the bottom on each vase.
Posy Vase
Using the Script Liner alternate SC-6 Sunkissed and SP-206 Speckled Sunkissed on the leaves and stems that are going down. (We also added a few going up in these colors.) Apply two coats, allowing glaze to dry between coats.
Using the Script Liner alternate SC-9 Jaded and SP-209 Speckled Jaded to the leaves and stems that are going up. Apply two coats, allowing the glaze to dry in between coats.
Use the Script Liner with SP-211 Speckled Blue Yonder to create dots randomly around the vase. Apply two coats, allowing glaze to dry between coats.
Use the pencil eraser with SP-201 Speckled Pink-A-Boo to create dots randomly around the vase.
Use the Soft Fan to apply two coats of SP-211 Speckled Blue Yonder inside the neck of the vase.
Dip into NT-CLR Clear Dipping Glaze.
Stilt and fire to cone 06.
Blossom Vase
Using the Script Liner alternate SC-1 Pink-A-Boo and SP-201 Speckled Pink-A-Boo on the leaves and stems that are going down. Apply two coats, allowing glaze to dry between coats.
Using the Script Liner alternate SC-11 Blue Yonder and SP-211 Speckled Blue Yonder to the leaves and stems that are going up. Apply two coats, allowing the glaze to dry in between coats.
Use the Script Liner with SP-227 Sour Apple to create dots randomly around the vase. Apply two coats, allowing glaze to dry between coats.
Use the pencil eraser with SP-206 Speckled Sunkissed to create dots randomly around the vase.
Use the Soft Fan to apply two coats of SP-206 Speckled Sunkissed inside the neck of the vase.
Dip into NT-CLR Clear Dipping Glaze.
Stilt and fire to cone 06.
Flora Vase
Using the Script Liner alternate SC-27 Sour Apple and SP-227 Speckled Sour Apple on the leaves and stems that are going down. Apply two coats, allowing glaze to dry between coats.
Using the Script Liner alternate SC-9 Jaded and SP-209 Speckled Jaded to the leaves and stems that are going up. Apply two coats, allowing the glaze to dry in between coats.
Use the Script Liner with SP-201 Pink-A-Boo to create dots randomly around the vase. Apply two coats, allowing glaze to dry between coats.
Use the pencil eraser with SP-206 Speckled Sunkissed to create dots randomly around the vase.
Use the Soft Fan to apply two coats of SP-201 Speckled Pink-A-Boo inside the vase.
Use a damp sponge to wipe any debris from the bisque.
Using a Soft Fan brush, apply 3 coats of SW-174 Leather to the bottom 1/2 of the outside of the bowl. Do not apply to the foot of the piece. Allow glaze to dry between coats.
Using a Soft Fan brush, apply 3 coats of SW-196 Sand Dollar to the top 1/2 of the outside of the bowl overlapping the Leather about 1/2″ to 1″. Allow glaze to dry between coats.
Apple 3 coats of SW-196 Sand Dollar to the inside of the bowl. Allow glaze to dry between coats.
Once the Sand Dollar is dry, apply 3 coats of Peppered Plum using a CB-140 #4 Fan Brush in circles inside the bowl about 1″-1.5″ apart. Leave room between the circles. Allow glaze to dry between coats.
Apply 3 coats of Leather to each side of the Peppered Plum circles overlapping the edges of Peppered Plum slightly. Allow glaze to dry between coats.
Use a damp sponge to wipe any debris from the bisque.
Using a Soft Fan brush, apply 3 coats of SW-174 Leather to the bottom 1/2 of the outside of the bowl. Do not apply to the foot of the piece. Allow glaze to dry between coats.
Using a Soft Fan brush, apply 3 coats of SW-191 Peppered Plum to the top 1/2 of the outside of the bowl overlapping the Leather about 1/2″ to 1″. Allow glaze to dry between coats.
Apple 3 coats of SW-196 Sand Dollar to the inside of the bowl. Allow glaze to dry between coats.
Once the Sand Dollar is dry, apply 3 coats of Peppered Plum using a CB-106 #6 Script Liner in a swirl shape. Leave room between the swirl lines. Allow glaze to dry between coats.
Apply 3 coats of Leather to each side of the Peppered Plum swirl lines overlapping the edges of Peppered Plum slightly. Allow glaze to dry between coats.
Using the Soft Fan, apply 2 coats of White to the entire piece.
Using the Clay Carbon paper, trace on the pattern.
Using the Pointed Round, load in Crackerjack and tip in Java Bean. Starting from the bottom of the pinecone to the top, apply 2 coats to each segment of the pinecone.
Using the Liner, add a center line for the pine branches using Java Bean.
Using the Liner add pine needles starting with Green Thumb, then Irish Luck and finishing with Blue Grass.
Using the Liner, outline and detail with Tuxedo.
Using the Liner, add Snowfall to the branches and pinecone.
Stilt and fire to shelf cone 06.
Small Silhouette Bird
Using the Soft Fan, apply 2 coats of White to the entire piece.
Using the Clay Carbon paper, trace on the pattern.
Using the Pointed Round, apply 2 coats of Green Thumb to the holly leaves, then side load in Irish Luck and shade the edges.
Using the Liner, add a center line for the pine branches using Java Bean.
Using the Liner add pine needles starting with Green Thumb, then Irish Luck and finishing with Blue Grass.
Using the Round, apply 2 to 3 coats of Hot Tamale to the holly berries.
Using the Liner loaded in Java Bean, add branches for the winter berries.
Using a brush handle, add dots to the branches using Hot Tamale, Cutie Pie Coral and Sour Apple.
Using the Liner, outline and detail with Tuxedo.
Using the Liner, add Snowfall to the branches, top of the holly leaves and top of the berries.
Use a damp sponge to wipe any debris from the bisque.
Using a Soft Fan brush, apply SC-77 Glo-Worm to the bottom 1/2 of the tile.
Using a Soft Fan brush, apply SC-27 Sour Apple to the top 1/2 of the tile overlapping the SC-77 Glo-Worm.
Using a Soft Fan brush, apply another coat of SC-77 Glo-Worm. While the glaze is still wet, apply another coat of SC-27 Sour Apple and overlap the wet Glo-Worm to start blending the colors together.
Repeat step #4.
Allow glaze to dry.
Using a Script Liner, coat the bristles in dish soap.
Once coated with dish soap, using AC-302 Wax Resist, create different circles or shapes. The area painted with wax resist will show the ombre background.
After the wax has dried, apply 3 coats of SC-76 Cara-bein Blue to the whole tile. The wax should resist the glaze. You may need to use a separate wet brush or sponge to lightly remove any glaze that doesn’t automatically resist.
Use a damp sponge to wipe any debris from the bisque.
Using a Soft Fan brush, apply 3 coats of SW-196 Sand Dollar to the top 1/2 of the mug and handle. Allow glaze to dry between coats.
Using a Soft Fan brush, apply 3 coats of SW-174 Leather to the bottom 1/2 of the mug and handle overlapping the Sand Dollar slightly. Do not apply to the foot of the piece. Allow glaze to dry between coats.
Apply 2 coats of Peppered Plum in a 1/2″ band where Leather overlaps Sand Dollar with a Script Liner brush.
Apply 3 coats of Sand Dollar to the inside of the mug. Allow glaze to dry between coats.
Fire to cone 6.
Note: this combo will run. Take caution when applying the glaze and firing.
Use a damp sponge to wipe any debris from the bisque.
Using a Soft Fan brush, apply 4 coats of SC-25 Crackerjack Brown to the entire piece except for the top and the arms. Let dry between coats.
Apply 3 coats of SC-16 Cotton Tail to the top and arms using a Soft Fan brush.
Using RB-104 #4 Liner brush, apply SC-74 Hot Tamale in stripes over the Cotton Tail on the arms and top (optional: Some may find adding thin strips of tape to outline the stripes to help instead of free handing). Apply 3 coats.
Use FD258 Pure White to draw on your windows and doors. Apply lines at the top above the window to create strings for the lights.
Using a Soft Fan brush and a Script Liner, apply 3 coats of SG-302 Snowfall to the bottom of the tree and the swirls, the tips of the arms and the top.
Using the back of a brush, dot SC-74 Hot Tamale and SC-8 Just Froggy along the French Dimensions outlines, string lights, and around the bottom of the tree.
Begin with properly fired shelf cone 04 bisque. Moisten a clean sponge and wipe bisque to remove any dust.
Using a CB-604 #4 Soft Fan, basecoat a 1:1 mix FN-001 White & FN-039 Light Grey, apply 2 coats. Allow to dry!
Using a pencil and AC-230 Clay Carbon, trace on pattern.
Using a CB-106 #6 Script Liner, apply 3 coats of SC-31 The Blues to the coat, hat, mittens & shoes.
Using a CB-106 #6 Script Liner Shade the coat with SC-12 Moody Blue. Highlight with SC-16 Cotton Tail.
Using a CB-106 #6 Script Liner, apply 2- 3 coats of SC-16 Cotton Tail to the snowman & bird’s body. Shade with SC-45 My Blue Heaven.
Using a CB-106# 6 Script Liner, shade the snowman body with SC-45 My Blue Heaven.
Using a CB-202 #2 Detail Liner, apply 2-3 coats of SC-92 Cafe -Ole to every other stripe of the scarf and coat trim. Shade with SC-34 Down to Earth.
Shade remaining scarf and coat stripes with SC-99 Char-ming.
Using a CB-202 #2 Detail Liner, apply 2 coats of SC-97 Cant-elope to the bird and snowman nose’s, shade with SC-34 Down to Earth.
Using a CB-202 #2 Detail Liner, apply 2 coats of SC-35 Gray Hare to the bells on hats.
Place a small amount of SG-401 Black Designer Liner on a palette, with a CB-110 #1/0 Liner, outline, and detail the design following the pattern.
Using a CB-106 #6 Script Liner, apply 1 coat of SG-302 Snowfall to each of the branches of the tree starting at the bottom of the tree stroking in each branch.
Using a CB-106 #6 Script Liner, shade around the outer edge entire design with SC-92 Café-Ole.
Using a CB-604 #4 Soft Fan, apply 1 coat of S-2101 Crystal Clear to the top of the canvas. Make sure the design is dry first.
Using a CB-604 #4 Soft Fan, apply coats of FN-019 Dark Blue to the sides of the canvas. Allow to dry!
Begin with properly fired shelf cone 04 bisque. Moisten a clean sponge and wipe bisque to remove any dust.
Using a CB-604 #4 Soft Fan, 2 flowing coats of FN-001 White to the top of the plate. Allow to dry!
Print 2 copies of the pattern. Cut the pattern out around the outside edge of it.
Place and line up one of the cutout patterns on the App Plate. Lift one half of the pattern up and apply water to the plate with a CB-604 #4 Soft Fan brush and place back down then repeat with the other side. If needed, you can put a slit in the pattern so it can conform to the shape of the plate. Then place a paper towel over the pattern to secure it to the glaze and remove any excess water.
Place some of each of the following colors on a palette: SC-53 Purple Haze, SC-45 My Blue Heaven and SC-31 The Blues.
Condition a silk sponge then start sponging the bottom background sky area on the right side of the piece with the SC-53 Purple Haze then work in some SC-45 My Blue Heaven in the middle section then SC-31 The Blues blending the colors were the meet. Remove the pattern.
Place the second copy of the pattern down and put a piece of clay Carbon paper under the pattern and trace it on with a pencil.
Using a CB-106 #6 Script Liner, shade the inside edges of the snowman body with SC-11 Blue Yonder.
Using the silk sponge, sponge the cheeks with SC-2 Melon-choly to the cheeks. You can lighten with some SC-16 Cotton Tail.
Using a CB-106 #6 Script Liner, apply 3 coats of SC-97 Cant-elope to the nose. Shade with SC- 80 Basketball.
Using a CB-106 #6 Script Liner and a CB-110 #10/0 Liner, apply 3 coats of SC-99 Char-ming to the stripes in the scarf also the hat brim and top.
Using a CB-106 #6 Script Liner, shade the scarf with SC-99 Char-ming. Shade the hat with SC-99 Char-ming with a touch of SC-16Cotton Tail to lighten.
Using a CB-106 #6 Script Liner, apply 3 coats of SC-87 Rubby Slippers to the hat band. Shade with some SC-16 Cotton Tail added to thSC-87 Rubby Slippers.
Using a CB-202 #2 Detail, apply 2 coats of SC-15 Tuxedo to the mouth and eyes. Allow to dry!
Moisten a clean sponge and wipe bisque to remove any dust.
Using a CB-604 #4 Soft Fan, apply 4 coats of FN-301 Marshmallow White to the top & sides of the tile. Allow it to dry.
Using a pencil, trace the pattern on the tile using AC-230 Clay Carbon Paper under the pattern.
Place some EZ018 Chartreuse and EZ028 Leaf Green on a palette.
Using a CB-604 #4 Soft Fan, pick some water on the brush then pick up EZ018 Chartreuse and EZ028 Leaf Green on the corner of the brush. Apply the color on the tile blending it to create a mottled background.
Using a CB-106 #6 Script Liner. Apply EZ026 Yellow Orange to each of the flower petals and the center of the flower.
Using the CB-106 #4 Soft Fan shade one side and the upper half of the petals with EZ030 Rose. Shade the bottom of the petals with EZ033 Ivy Green and the side of the bud petals. Shade the bottom half of the flower center with EZ010 French Brown and the top half with EZ034 Orange.
Load the CB-106 #6 Script Liner with EZ028 Leaf Green and side load with EZ033 Ivy Green. Stroke in the flower stem and the leaves.
Using a CB-110 #10/0 Liner, accent the petals with EZ030 Ivy Green. Detail the Flower and the leaves with EZ012 Cobalt Jet Black.
Add dots of EZ034 Orange to the center of the flower.
Clean your properly fired 6×6 bisque tile with a damp sponge.
Base coat the tile with three coats of SC-104 Grape Expectations using a fan brush.
When the glaze has lost its shine, lay the pattern over the top of the tile.
Trace the pattern lines with a pencil using gentle pressure.
Remove the pattern. You should see an impression of the pattern lines in the glaze.
Using a toothbrush, dip and splatter SC-11 Blue Yonder, SC-6 Sunkissed, and SC-97 Cant-elope on the tile, trying to avoid the planet outlines.
Fill in the stars using 3 coats of a glaze color of your choice with a detail liner brush.
Mix SC-6 Sunkissed and SC-11 Blue Yonder to create a green. Fill in the smaller planet with 3 coats using the script liner brush. When the green has lost its shine add dot details with SC-70 Pink-A-Dot and SC-11 Blue Yonder.
Apply 3 coats of SC-11 Blue Yonder to the larger planet. When the glaze has lost its shine, add stripes of SC-97 Cant-elope and SC-6 Sunkissed.
Fill in the ribbon around the planets with SC-97 Cant-elope. While the 3rd coat is still wet, add the crushed-up chips of dry Stroke & Coat.
Using a wet sponge, wipe down the bisque tile to remove dirt and dust.
Lightly trace three circles onto the tile with a pencil.
Apply one coat of SC-75 Orange-A-Peel in each circle with the script liner brush. Allow to dry
Apply a second coat in only two of the circles. Allow to dry.
Apply a third coat in one of the two coat circles. Allow to dry.
Using SC-26 Green Thumb and the script liner brush, create one leaf by the one coat orange, two leaves by the two coat orange, and three leaves by the three coat orange.
Using the Brown Designer Liner, draw a stem coming from each of the oranges and onto each of the leaves. Add an upside down “U” shape under the stem and dots on the orange to show texture.
Allow to dry.
Apply 2 coats of S-2101 Crystal Clear Brushing with a fan brush over the whole tile.
Moisten a sponge and wipe bisque to remove any dust.
Using the Soft Fan with FN-304 Black Velvet, apply 3 coats to the tile. Allow glaze to dry between coats.
After glaze is dry to the touch, place the pattern over the tile and trace with the pencil. Press down hard enough to see a faint line, but not hard enough to see the bisque under the glaze.
Using the Detail Liner with AC-302 Wax Resist, outline the pattern on the front of the tile.
Using the Script Liner with SP-275 Speckled Orange-A-Peel, apply 3 coats to the pumpkin on the left. Allow glaze to dry between coats.
Using the Script Liner with SC-24 Dandelion, apply 3 coats to the gourd on the right. Allow glaze to dry between coats.
Using the Script Liner with SC-27 Sour Apple, apply 3 coats to the leaf. Allow glaze to dry between coats.
Using the Script Liner with SC-25 Crackerjack Brown, apply 3 coats to the stems. Allow glaze to dry between coats.
Begin with properly fired cone 04 bisque. Moisten a sponge and wipe bisque to remove any dust.
Take the AC-220 Detailer Tip and 1 oz Bottle and fill it halfway with SC-15 Tuxedo. Fill the remaining space halfway with water. Shake until it is mixed.
Add the rubbing alcohol to the spray bottle. You will only need a few sprays.
Pour out around 1 Tbsp of EL-103 Sea Spray, EL-118 Blue Grotto, and EL-149 Lavender Flower onto the palette.
Dip the Soft Fan into EL-103 Sea Spray and randomly plop glaze onto the tile. Cover around 1/3 of the tile.
Dip the same brush into EL-118 Blue Grotto and randomly plop glaze onto the tile. Cover around 1/3 of the tile. Be sure to plop over some areas that already have glaze from step #5.
Dip the same brush into EL-149 Lavender Flower and randomly plop glaze onto the tile. Cover around 1/3 of the tile. Be sure to plop over some areas that already have glaze from steps #5 and #6.
Dip the same brush back into El-103 Sea Spray and randomly plop over a few areas on the tile. Make sure there are no bare spots.
Take your 1 oz bottle and squirt randomly lines and dots over the tile. Make sure to do this while the glaze from previous steps is still wet.
Immediately spray the tile with rubbing alcohol. Spray 1-3 times. You should see the black lines and dots start to move.
Begin with a properly fired cone 04 bisque tile. Moisten a sponge and wipe bisque to remove any dust.
Add 1 Tbsp water, 1 Tbsp SC-76 Cara-Bein Blue and 2 drops of liquid dish soap to the first disposable cup. Mix with the straw. Use the straw to blow bubbles in the cup. As the bubbles extend out of the cup, scrape them off with the palette knife and place them on the tile. Do this until half of the tile is covered in bubbles.
Add 1 Tbsp water, 1 Tbsp of SC-11 Blue Yonder and 2 drops of liquid dish soap to the second disposable cup. Mix with the straw. Use the straw to blow bubbles in the cup. As the bubbles extend out of the cup, scrape them off with the palette knife and place them on the tile.
Repeat until the tile is covered in bubbles.
Place AC-230 Clay Carbon Paper over the tile. Place the patten on top and trace the crab with the pencil. Remove from the tile.
Using the Script Liner with SC-16 Cotton Tail, apply 1 coat to the crab.
Using the Script Liner with SC-74 Hot Tamale, apply 2 coats to the body and claws. Allow glaze to dry between coats.
Using the Script Liner with SC-75 Orange-A-Peel, apply 2 coats to the arms and antenna. Allow glaze to dry between coats.
Using the Script Liner with SC-16 Cotton Tail, apply 2 coats to the eyes. Allow glaze to dry between coats.
Squeeze out around 1 tsp of SC-15 Tuxedo onto the palette. Dip the pencil eraser into the glaze and stamp onto the eye. Repeat for the second eye. Use the Detail Liner to outline details on the crab.
Squeeze out around 1 tsp of SC-75 Orange-A-Peel onto the palette. Dip the pointy end of the pencil in the glaze and stamp onto the pinchers and body of the crab. Repeat until you have enough dots.
Using the Soft Fan with NT-BR Clear One Brushing, apply 2 coats to the front of the tile.
Begin with properly fired cone 04 bisque. Moisten a sponge and wipe bisque to remove any dust.
Take your three AC-220 Detailer Tips and 1 oz Bottles and fill each one ¾ of the way full with the following glazes: FN-213 Saffire Blue, FN-236 Miami Pink, and FN-237 Light Turquoise.
Fill them up the rest of the way with water. Shake to mix.
Take the Soft Fan and dip it in water. Brush the tile with water a few times, until it’s saturated.
The following steps need to be done as rapidly as possible.
Take the bottle with FN-236 Miami Pink and randomly squirt the tile until around ¼ of the tile is covered.
Take the bottle with FN-237 Light Turquoise and randomly squirt the tile until around ½ of the tile is covered.
Take the bottle with FN-213 Saffire Blue and randomly squirt the tile until around ¾ of the tile is covered.
Take the tile over a sink or trash can and rotate up and down until the glaze is swirled and the entire tile is covered in glaze.
If you end up with any bare spots, you can squirt on some extra glaze.
Begin with properly fired cone 04 bisque. Moisten a sponge and wipe bisque to remove any dust.
Place the pattern over the tile. Slide AC-230 Clay Carbon Paper under the pattern. Trace with the pencil.
Remove the pattern.
Take FD-254 Black Licorice and outline the pattern on the tile. Allow glaze to dry.
Using the Script Liner with SC-6 Sunkissed, apply a puddle coat to the sections of the outer wings on the large butterfly.
Using the Script Liner with SC-9 Jaded, apply a puddle coat to the body of the large butterfly.
Using the Script Liner with SC-75 Orange-A-Peel, apply a puddle coat to the sections of the outer wings on the small butterfly.
Using the Script Liner with SC-76 Cara-Bein Blue, apply a puddle coat to the body of the small butterfly.
Using the Script Liner with CG-981 Fruity Freckles, apply a puddle coat to the inner wing sections on both butterflies.
Using the Script Liner with CG-997 Seafoam, apply 2 coats to the background. Allow glaze to dry between coats.
Squeeze out around 1 tsp of SC-9 Jaded onto the palette. Dip the sponge in the glaze and sponge around the edge of the background. Go in around an inch from the edge.
Begin with properly fired shelf cone 04 bisque. Moisten a clean sponge and wipe bisque to remove any dust.
Using a CB-604 #4 Soft Fan, apply 2 coats of FN-008 Brown to the front & sides of the tile. Allow it to dry.
Using a pencil, trace the pattern on the tile.
Cut pieces of the Jute Twine the length of the sides of each petal.
Using a CB-106 #6 Script Liner, apply some FN-008 Brown to one side of a petal then lay a piece of the Jute twine into the wet glaze and then apply more glaze over the top of the jute twine.
Repeat step 1 for each petal.
When all the petals are complete, take a piece of paper towel, lay the paper towel on the tile, and press to secure the jute twine to the tile and remove any excess glaze.
Using the CB-106 #4 Soft Fan, apply 1 coat of SC-27 Sour Apple to the background areas of the tile.
Using the CB-106 #4 Soft Fan, apply a puddle coat of CG-756 Firecracker to the lower half of the large petals then apply a puddle coat of CG-753 Sassy Orange to the upper half of each flower petal.
Using the CB-106 #4 Soft Fan, apply a puddle coat of S-2729 Citrus Orange to the smaller petals.
Begin with properly fired shelf cone 04 bisque. Moisten a clean sponge and wipe bisque to remove any dust.
Using a pencil, trace the pattern on the tile using AC230 Clay Carbon Paper under the pattern.
Place some EZ002 Cinderella Pink and EZ030 Rose or EZ050 Plum Purple on a pallet.
Using a CB-106 #6 Script Liner, load the brush with EZ002 Cinderella Pink and side load in either EZ030 Rose for a Pink Pink flower or EZ050 Plum Purple for a pink-purple flower petal.
Using a CB-106 #6 Script Liner, apply 1 coat of EZ026 Yellow Orange to the flower centers Then shade with EZ058 Poppy Orange.
Load the CB-106 #6 Script Liner with EZ033 Ivy Green and stroke in the stems of the flower.
Using a CB-110 #10/0 Liner, detail the Flower and the leaves with EZ012 Cobalt Jet Black. Using a wiggle stroke on the outside of the flower center, petals and stems and veins with straight lines. Allow it to dry.
Bisque fire to cone 04.
Using a CB-604 #4 Soft Fan, apply 2 coats of S-2101 Crystal Clear the top and sides of the tile. Allow to dry!
Moisten a sponge and wipe bisque to remove any dust.
Squeeze out around 1 TBS of SC-48 Camel Back on to the palette.
Dip the sponge into the glaze and sponge the bottom side of the child’s left hand.
Take the hand and press it onto the center of the tile. Make sure the fingers are spread apart. Allow glaze to dry.
Take the pattern and line it up so that the head of the monkey is over the thumb and the vine is going through the fingers.
Slide a piece of AC-230 Clay Carbon paper under the pattern. Trace over the pattern with the pencil.
Using the Script Liner with SC-16 Cotton Tail, apply 2 coats to the eyes. Allow glaze to dry between coats.
Using the Script Liner with SC-20 Cashew Later, apply 2 coats to the bottom half of the monkey’s face and the inner ears. Allow glaze to dry between coats.
Using the Script Liner with SC-48 Camel Back, apply 2 coats to the rest of the monkey. Allow glaze to dry between coats.
Using the Script Liner with SC-26 Green Thumb, apply 2 coats to the vine and leaves. Allow glaze to dry between coats.
Using the Detail Liner with SC-15 Tuxedo, outline the monkey, vine, and leaves. Add a nose, mouth and pupils to the monkey’s face.
Using the Detail Liner with SC-16 Cotton Tail, apply dots to the pupils of the eyes.
Middle School+
Using the Soft Fan with FN-203 Dry Champagne, apply 3 coats to the front of the tile. Allow glaze to dry between coats.
Using the Script Liner with SC-15 Tuxedo, apply 1 coat going around the edge of the tile.
Begin with properly fired shelf cone 04 bisque. Moisten a clean sponge and wipe bisque to remove any dust.
Using a CB-604 #4 Soft Fan, apply 3 coats of UG-67 Ivory to the top of the tile. Allow to dry!
Center the tile on a banding wheel. Using a Cb-604 #4 Soft Fan, load the brush with water and then side load into the UG-31 Chocolate, spin the banding wheel and apply the UG-31 Chocolate creating a light circle of color. Allow to dry!
Using a pencil, trace the pattern on the tile using AC-230 Clay Carbon Paper under the pattern.
Using a pencil, trace the pattern on the tile using AC-230 Clay Carbon Paper under the pattern.
Using a CB-604 #4 Soft Fan and a CB-110 #10/0 Liner, apply the colors to the dragonfly as follows:
Body of the dragonfly 2 coats of UG-225 Plum.
Top wings – outer edge apply 3 coats of UG- 204 Orange, next larger section apply 3 coats of UG-223 Apricot and the smallest section with 3 coats of UG-58 Harvest Gold.
Lower wings – inner section, apply 3 coats of UG-209 Jade and the outer section with 3 coats of UG-91 True Teal.
Using the pencil tip, Add dots of UG-67 Ivory to the top and bottom sections of the wings or anywhere else you may like.
Using a CB-110 #10/0 Liner, detail the Dragonfly with UG-50 Jet Black. Allow it to dry.
Bisque fire to cone 04.
Using a CB-604 #4 Soft Fan, apply 2 coats of S-2101 Crystal Clear the top and sides of the tile. Allow to dry!
Squish the sides of the pinch pot to create an oblong bowl shape and set aside.
From the other half of the clay, tear off a small chunk to create the eyestalks and mouth later. Cover to keep moist.
With the remaining clay, roll a thick coil with one side larger than the other.
Using your thumb and the side of your pointer finger, pinch the edges of both sides of the large coil to create the side ruffles. Lightly pull a few sections of the ruffle up on each side to give more movement.
Bend the back end of the ruffle coil to one side to form the tail section.
Lift the thick end up to form the head section.
Take the leftover clay and roll a chunky coil.
Cut the coil into two eyestalks. Remove excess length.
With the excess, roll two balls for the eyes and one small coil for the mouth.
Scratch and attach the two balls to the eyestalks.
Attach the eyestalks to the top of the head portion of the large ruffle coil.
Scratch and attach the mouth to the head.
Add texture to the body of the snail. And carve in any extra details (we used the rounded back end of a brush).
Set the pinch pot on the snail’s back close to the lifted part that makes up the head.
Mark the location of the bowl on the back of the snail and remove the bowl.
Carve down an indent on the back of the snail between the marks for the bowl to sit in.
Scratch and attach the bowl to the body.
Carve in the spiral on the bowl “shell” 10. Allow the snail to set up a bit and carve out the excess clay from the base of the body.
Allow snail to fully dry. Bisque fire to shelf cone 04.
Wipe bisque snail with a damp sponge to remove any dust or dirt.
Using a script liner brush, apply three coats of glaze to the following areas: A. Snail underbelly and spiral on shell: FN- 4 Red
Snail Shell: FN-18 Light Blue
Top of snail body: FN-20 Medium Green
Dots on snail body: FN-6 Blue
Eyes and mouth: FN-9 Black and FN-1 White
25. Allow glaze to dry. Stilt and fire to cone 06.
Roll out a slab about a quarter of an inch thick using the pound of low fire clay and a rolling pin.
Compress the front and back of the slab with the plastic card.
Cut out a 6×6” square from the slab using a toothpick.
Press a few of your plantain seed stems down flat on one side of the slab and lightly roll the rolling pin over to help press down into the clay.
Remove seed stems and select one larger stem.
Using the larger stem, lay it on its side and roll onto the blank side of the clay slab to create a snakeskin effect. Allow to dry.
Bisque fire to cone 04.
Apply two coats of SC-26 Green Thumb to the side with the multiple plantain imprints using the fan brush.
Wipe back the SC-26 Green Thumb with a damp sponge so the color stays in the lowered grooves of the imprint.
Apply SC-26 Green Thumb and SC-7 Leapin‘ Lizards in a gradient over the scale texture area and wipe back with a wet sponge. Be sure to frequently change out the water to not drag too much extra color into unwanted areas.
Using the Script liner brush, create a rough diamond pattern over the top of the SC-26 Green Thumb and SC-7 Leapin‘ Lizards with SC-28 Blue Isle.
Carefully wipe back the SC-28 Blue Isle with a damp sponge.
Use the Detail brush to add small accents of SC-11 Blue Yonder around the diamond areas. Allow to dry.
Apply 2 coats of S-2101 Crystal Clear Brushing over the top of the whole tile using the fan brush. Allow to dry.
Pick scroll work to go at the top of the shield if desired (Helmet and scroll).
Combine all these elements onto a 6×6” sized piece of paper.
Roll out the pound of clay about a third of an inch thick.
Compress the front and back of the clay slab with the plastic card.
Cut out a 6×6” tile from the clay slab using a toothpick.
Lay your combined elements heraldry drawing on top of the clay and trace over with a ballpoint pen or dull pencil.
Remove the paper and you should see the outline of your tracing pressed into the clay.
Using carving tools, start removing the excess clay from around the shield and leaving a bit of a border at the edge. Think about background, middle ground, and foreground when deciding how deep to carve into the tile.
Add details with the toothpick.
Apply your three chosen heraldry colors to the carved greenware. Two coats of each will be enough (SC-16 Cotton Tail, SC-6 Sunkissed, SC-28 Blue Isle ).
Roll out the pound of clay into a slab with a rolling pin.
Compress both sides of the slab with a plastic card.
Roll out a few lengths of coil.
Scratch and attach the coils in a design using circles and squares.
Add a couple of clay dots for accents.
Carve down small chunks in the base tile with the loop tool to add texture.
Apply two coats of each color of Stroke & Coat (except for SC-15) to each individual section, trying not to have the same colors side by side. Mix SC-16 and SC-15 to create the gray color.
Apply two coats of SC-15 to the raised coils separating the sections.
Begin with properly fired shelf cone 04 bisque. Moisten a clean sponge and wipe bisque to remove any dust.
Using a CB-604 #4 Soft Fan and a CB 202 # 2 Detail Brush, apply 3 coats of FN-001 White to both tree and the base. Allow to dry!
Stilt and fire to cone 06, 05.
Using an OB-901G #0 Liner Gold Handle and a OB-916G #6 Filbert Gold Handle brush, apply 1 coat of OG805 Premium Gold to the inside all the star and circle cutouts. Also apply to the base of tree.
Clean your brush with OA901 Essence. This bottle should be just used for the OG805 Premium Gold.
Stilt and fire to cone 018.
Put the multicolored tea light inside the tree and enjoy.
Begin with properly fired shelf cone 04 bisque. Moisten a clean sponge and wipe bisque to remove any dust.
This tree comes with a wiring hook up and multicolored Medium Twist plastic lights. The Medium Twist plastic lights were changed out for Clear Medium Globe lights.
Using a CB-604 #4 Soft Fan, apply 1 coat of SC-33 Fruit of the Vine to the tree and the base. Allow to dry!
With a damp sponge, wipe back the color leaving the color in the crevices and the detail. Rinse the sponge out often as you go.
Using a CB-604 #4 Soft Fan, apply 2 coats of FN-236 Miami Pink to the tree and the base. Allow to dry between coats.
Using a CB-604 #4 Soft Fan, apply 1 coat of S-2101 Crystal Clear Brushing over the FN-236 Miami Pink. Allow to dry!
Stilt and fire to cone 06, 05.
Using an OB-901 Mother of Pearl Brush, apply 1 thin brushed out coat of OG803 Mother of Pearl to the tree and the base. The thinner and more swirls as you apply the better result you will have.
Clean your brush with OA901 Essence. This bottle should be just for the Mother of Pearl.
Stilt and fire to cone 020.
Glue the lights into the tree and put the pinch plug wiring into the base.
Begin with properly fired cone 04 bisque. Moisten a sponge and wipe bisque to remove any dust.
Pour around 1/4 cup of NT-BR Clear One Brushing into the disposable cup. Thin with water until it is easily poured. Pour into the vase and rotate until the inside is covered. Pour out the excess.
Use the pencil to make 2 uneven lines going around the top of the vase. This will divide the outside of the vase into 3 different colors.
Using the Script Liner with FN-001 White, apply 3 coats to the top section of the vase. Allow glaze to dry between coats.
Using the Script Liner with FN-052 Tangerine, apply 3 coats to the next section of the vase. Allow glaze to dry between coats.
Using the Script Liner with FN-051 Strawberry, apply 3 coats to the next section of the vase. Allow glaze to dry between coats.
Using the Soft Fan with CG-1002 Day Lily, apply 2 coats to the bottom section of the vase. Allow glaze to dry between coats.
Stilt and fire to cone 06.
Blossom Vase:
Begin with properly fired cone 04 bisque. Moisten a sponge and wipe bisque to remove any dust.
Pour around 1/4 cup of NT-BR Clear One Brushing into the disposable cup. Thin with water until it is easily poured. Pour into the vase and rotate until the inside is covered. Pour out the excess.
Use the pencil to make 2 uneven lines going around the top of the vase. This will divide the outside of the vase into 3 different colors.
Using the Script Liner with FN-001 White, apply 3 coats to the top section of the vase. Allow glaze to dry between coats.
Using the Script Liner with FN-012 Lavender, apply 3 coats to the next section of the vase. Allow glaze to dry between coats.
Using the Script Liner with FN-028 Wisteria Purple, apply 3 coats to the next section of the vase. Allow glaze to dry between coats.
Using the Soft Fan with CG-1006 Purple Reign, apply 2 coats to the bottom section of the vase. Allow glaze to dry between coats.
Stilt and fire to cone 06.
Flora Vase:
Begin with properly fired cone 04 bisque. Moisten a sponge and wipe bisque to remove any dust.
Pour around 1/4 cup of NT-BR Clear One Brushing into the disposable cup. Thin with water until it is easily poured. Pour into the vase and rotate until the inside is covered. Pour out the excess.
Use the pencil to make 2 uneven lines going around the top of the vase. This will divide the outside of the vase into 3 different colors.
Using the Script Liner with FN-001 White, apply 3 coats to the top section of the vase. Allow glaze to dry between coats.
Using the Script Liner with FN-048 Bright Pink, apply 3 coats to the next section of the vase. Allow glaze to dry between coats.
Using the Script Liner with FN-025 Raspberry Whip, apply 3 coats to the next section of the vase. Allow glaze to dry between coats.
Using the Soft Fan with CG-1005 Maroon Lagoon, apply 2 coats to the bottom section of the vase. Allow glaze to dry between coats.
Begin with properly fired cone 04 bisque. Moisten the sponge and wipe bisque to remove any dust.
Using the Soft Fan with FN-301 Marshmallow White, apply 4 coats to the tree and base. Allow glaze to dry between coats.
Take the needle tool and run it in a circular motion around the inside of each light hole on the tree. This will remove any excess glaze that could clog the hole.
Using the Script Liner with SC-45 My Blue Heaven, apply 3 coats to the drips on the top third of the tree. Allow glaze to dry between coats.
Using the Script Liner with SC-11 Blue Yonder, apply 3 coats to the drips on the middle third of the tree. Allow glaze to dry between coats.
Using the Script Liner with SC-76 Cara-Bein Blue, apply 3 coats to the drips on the lower third of the tree. Apply 3 coats to the textured areas on the base. Allow glaze to dry between coats.
Begin with properly fired cone 04 bisque. Moisten a clean sponge and wipe the bisque to remove any dust.
Switch the cap of SC-103 Lavendear with a plastic detailer cap and apply large dots around the inside rim of the piece (about ½” in diameter).
Switch the cap of SC-102 Just Peachy with a plastic detailer cap and apply a smaller dot inside the larger Lavendear dot (the sample alternated dots instead of applying it in every dot). Apply an additional row of Just Peachy dots under the single Lavendear dots that remain.
Using a RB-144 #4 Soft Fan, apply 3 coats of SW-106 Alabaster to the inside of the bowl.
Using a CB-106 #6 Script Liner and RB-144 #4 Soft Fan, apply 3 coats of SC-101 Spruce it Up to the handle and outside of the bowl, avoiding the bottom.
Use a clean sponge to wipe the excess glaze off the foot.
Begin with properly fired cone 04 bisque. Moisten a clean sponge and wipe the bisque to remove any dust.
Using a RB-144 #4 Soft Fan, apply 2 coats of SC-101 Spruce it Up as a thick band spiraling around the piece. Using a banding wheel is super helpful for this step!
Put some SW-401 Flux into the Large Detailer Bottle, follow the top edge of the spiral to create a line of Flux. (Don’t apply it as thick near the bottom).
Switch out the cap on SC-104 Grape Expectations for the AC-224 Plastic Detailer Cap; follow the bottom edge of the spiral to create a line of SC.
Using a RB-144 #4 Soft Fan, apply 3 coats of SW-108 Green Tea to the piece, avoiding the bottom. You will want to recede your coats here.
Using a RB-144 #4 Soft Fan, apply 3 coats of SC-100 Makin Me Blush to the inside of the piece.
Use a clean sponge to wipe the excess glaze off the foot.
Begin with properly fired cone 04 bisque. Moisten a clean sponge and wipe the bisque to remove any dust.
Using a CB-106 #6 Script Liner, apply 3 coats of SC-103 Lavendear in evenly spaced bands down the piece. The sample had about ½” wide bands with equal space in between. Using a banding wheel is super helpful for this step!
Using a RB-144 #4 Soft Fan, apply 3 coats of SW-110 Oyster to the entire piece, avoiding the bottom.
Use a clean sponge to wipe the excess glaze off the foot.
Begin with properly fired cone 04 bisque. Moisten a clean sponge and wipe the bisque to remove any dust.
Using a CB-106 #6 Script Liner, apply 3 coats of SW-110 Oyster in evenly spaced bands down the piece. The sample had about ½” wide bands with equal space in between. Using a banding wheel is super helpful for this step!
Using a RB-144 #4 Soft Fan, apply 3 coats of SW-253 Green Opal to the entire piece, avoiding the bottom.
Use a clean sponge to wipe the excess glaze off the foot.
Begin with soft fired stoneware bisque; moisten a clean sponge and wipe bisque to remove any dust.
Apply 3 coats of SW-501 White Gloss to the body of the mug.
Once the glaze is dry, use a pencil to divide the mug into 6 even sections. Use the lines to guide where to draw the design; draw various sizes of circles up along the middle of the line.
Fill each row of circles in with 3 coats of either SW-511 Pink Gloss or SW-512 Coral Gloss. Alternate between the two for each row that you fill in.
Apply 2 coats of SW-501 White Gloss as a large dot inside the Coral rows. Add a dot of SW-513 Brown Gloss inside of that dot.
Apply 2 coats of SW-512 Coral Gloss to make a large dot inside of the Pink Rows and add a SW-501 White Gloss dot inside of that.
Use the liner brush to apply 2 coats of SW-513 Brown Gloss outlining the rows.
Apply 3 coats of SW-112 Tiger’s Eye to the rest of the stein, avoiding the bottom.
Use a clean sponge to wipe the excess glaze off of the foot.
Begin with soft fired stoneware bisque; moisten a clean sponge and wipe bisque to remove any dust.
Apply 3 coats of SW-501 White Gloss to the outside of the mug, avoiding the bottom and handle.
Use the script liner to load a brush with SW-512 Coral Gloss. Dip the tip in the SW-507 Bright Green Gloss. Apply by pressing the brush down onto the bisque and as you pull back, raise and twist the brush away from the bisque to create a tear drop shaped brush stroke.
Repeat as desired until the design is filled in.
Use the mini liner loaded with SW-508 Black Gloss to outline the design; you will need to apply 2 coats. Once it is outlined, add the detail lines and thicken the outline.
Use a soft fan to apply 3 coats of SW-508 Black Gloss to the inside and handle.
Use a clean sponge to wipe the excess glaze off of the foot.
Begin with soft fired stoneware bisque; moisten a clean sponge and wipe bisque to remove any dust.
Use the SG-401 Designer Liner to create the design directly to the bisque surface. Focus on moving away from the line to avoid clogging the tip.
Once the Designer Liner is completely dry, apply 2 coats of SW-250 White Opal to the top ¼ and the entire inside of the piece.
Use a soft fan to apply 3 coats of SW-198 Rose Quartz to the outside of the mug; receede the coats significantly or this combination can create excessive movement. Bring one coat down to the foot, finish the next coat up about an inch, and the third coat up an additional 2 inches.
Use a clean sponge to wipe the excess glaze off of the foot.
Begin with soft fired stoneware bisque; moisten a clean sponge and wipe bisque to remove any dust.
Use the SG-401 Designer Liner to create the design directly to the bisque surface. Focus on moving away from the line to avoid clogging the tip.
Once the Designer Liner is completely dry, apply 2 coats of SW-135 Wintergreen to the entire mug, avoiding the bottom. Add an extra coat to the inside and handle (where there won’t be a glaze combination).
Use a soft fan to apply 2 coats of SW-165 Lavender Mist to the outside of the mug.
Use a clean sponge to wipe the excess glaze off of the foot.
Check the two pieces over for blemishes and if any are present lightly sand with 100-grit sand paper.
Review the pattern and trim to make tracing easier on the rounded surface of the chickens.
Using provided patterns, Clay Carbon and Red Pen, trace the designs onto both sides of each chicken. If using the tissue paper method of tracing the design onto the ware: trace the design onto the tissue paper with a standard pencil. Proceed to align the traced pattern on the ware and slowly retrace with the Ultra-Fine Sharpie Marker. The marker will bleed through the tissue paper thus leaving the design.
Damp sponge ware to remove any fired dust and to condition the piece for decorating.
The Bows and Ribbons are completed as follows, using the #6 Script Liner and #10/Detail Liner with the following colors: Coral Red, Passion Red and Cobalt Jet Black. As needed place the colors on the page protector palette and if extremely thick, thin with water. Use the shaded pattern as a guide for deepening of the color.
Each section of the ribbon and the bow are pulled in with the #6 Script Liner that has been loaded with Coral Red and tipped with Passion Red. Start at the narrowest point of the ribbon or bow section. Start the stroke by tipping and slowly pressing the Liner against the ware to broaden the stroke and slowly lift off. The coloration should be darker at the beginning of the stroke and then lighten slightly as the stroke is completed.
Reload the #6 Script Liner in the same manner and starting at the opposite narrow end of the previous applied color, repeat the motion. Thus, creating a ribbon/bow with the deeper shade at the narrow beginnings and endings of the segment.
Complete each segment of the ribbon in the same manner using the shaded pattern as a guide where to deepen the ribbon and bow.
To enhance the shading of the color, using the #10/0 Detail Liner, feather in more of the Passion Red.
To further enhance the shading on the ribbon add a drop or two of Cobalt Jet Black to the Passion Red and with the #10/0 Detail Liner add a few more shading lines and accent outline both the ribbon and bow.
Be sure to paint in the ribbon around the necks of both chickens and stop at the bell or heart.
Holly leaves are completed using Irish Green, Leaf Green, Ivy Green and Royal Blue Green and the #10 or #8 Flat Shader as follows:
Smoothly block in holly leaves with one coat of Irish Green. Fully load the Shader of choice and apply color following the leaves’ contour. (Brush stroke will be visible).
Lightly sketch in the middle vein line with a pencil.
Reload the Shader with Irish Green, side load with Leaf Green and corner load the same side of Shader with Ivy Green. Blend on palette. Using soft C like strokes, apply color to the leaves with the darker shade to the outer edge of the leaf. Reload as needed. For best results add this color to the left side of each leaf first. Remember the lightest shade (Irish Green) is to the middle of the leaf.
When the left side of all the leaves are shaded. Reload the brush in the same manner and apply shading colors to the right side of the leaves with the darker tones to the outer edge of each leaf. Again, the Irish Green will be in the middle of the Holly Leaf.
Thin the Royal Blue Green slightly. Dampen the Shader with water and pat off excess water. Precede to corner load the left corner of the Shader and blend on clean area of palette. Float the Royal Blue Green down the left side of all the leaves. Also, float color down the penciled in center vein. Remember to use the shader on the flat.
Fully load #10/0 Detail Liner with the thinned Royal Blue Green and outline the holly, add a center vein and pull-out side veins.
Thin French Brown slightly and fully load #10/0 Detail Liner. Barely touching the ware with the liner’s tip, twist and pull the branches in throughout the design. Remember to lift up on the Liner as the branch ends, thus creating a fine tip at the ending.
Using the #10 Detail Liner fully loaded with all four shades of the green, pull in wisps of pine needles throughout the design.
To complete the eyes, using Liner of choice:
Horizontally sketch in an upper lid line with a pencil. This line cuts the eye opening in half.
To the lower half of the eye, apply two coats of Yellow Orange, using the #6 Round. The upper half of the eye opening does not have color.
Shade the upper half of the Yellow Orange with a float of Poppy Orange. While doing this, apply two coats of the Poppy Orange to both beaks.
Add a Cobalt Jet Black round pupil to the eye.
Finish off the eye with a lower and upper lid line, fine eye lashes, eyebrows and nostril marks on the beaks, all in the Cobalt Jet Black.
Add a White highlight to the eyes.
Rudy Rooster’s bell and clasp are blocked in with two coats of Yellow Orange. When dry, float in Poppy Orange around the outer edge of the bell and clasp with Poppy Orange. The French Brown is used to outline the bell and clasp, add the tinny tie string and paint in the opening to the bottom of the bell.
Holly Hen’s heart is painted in with three coats of Flame Red. The clasp is completed the same as Rudy Rooster’s clasp. French Brown is used to outline the heart, tie string and clasp.
To the combs and waddles to both birds, apply three coats of the Flame Red.
Sign the piece with E-Z Stroke color of choice.
The berry like dots, are added last with the handle of a brush using Flame Red. Dots should always be completed last to prevent smearing.
Fire the ware to shelf cone 04.
Damp sponge the ware to remove any fired dust and to condition the piece for glazing.
Pour enough Crystal-Clear Brushing into a paper cup, apply three coats of glaze to both birds using the soft fan. Allow drying between coats.
Before firing, pieces should dry 24-hours for best results.
Stilt Rudy and Holly and fire to shelf cone 06.
Remove stilt marks with Dremel Tool or Stilt Stone.
Form
MB-1596 Rudy Rooster
MB-1597 Holly Hen
Colors
UG-207 Flame Red
EZ003 Irish Green
EZ010 French Brown
EZ012 Cobalt Jet Black
EZ013 White
EZ024 Royal Blue Green
EZ026 Yellow Orange
EZ028 Leaf Green
EZ033 Ivy Green
EZ057 Coral Red
EZ058 Poppy Orange
EZ075 Passion Red
S-2101 Crystal Cleat Brushing
Decorating Accessories
CB-406 #6 Pointed Round or CB-408 #8 Pointed Round
CB-308 #8 Flat Shader
CB-310 #10 Flat Shader
CB-106 # 6 Script Liner
RB-110 #10/0 Detail Liner
RB-140 Soft Fan
Miscellaneous Accessories
Sponge
Water Bowl
3 oz Plastic or Paper Cup (1)
100-grit sandpaper
Clay Carbon
Heavy Duty Plastic Page
Paper Towels
Red Pencil
Scissors
Standard Pencil
If using Tissue Paper Method to transfer the design
Check the ware over for any blemishes and remove if present by sanding with 100-grit sand paper.
Using provided pattern, clay carbon and red pen, carefully trace the design on to the ware. For best result be sure and trace everything on the pattern.
Damp sponge ware to remove dust and to condition the piece for decorating. Sponging will not harm the traced design if the clay carbon has been used.
On the page protector palette place a small amount of Cobalt Jet Black and thin with water to a thin creamy consistency. If color is too thick it will not flow off the Liner easily.
Dampen the Liner of choice with water and pinch out excess.
Fully load the Liner with the thinned Cobalt Jet Black. Pull the brush across a clean area of the palette to reshape the fine tip.
Holding the Liner as upright as possible, proceed to completely outline the entire traced design with very fine lines. Keep lines as fine as possible, thus creating a pen and ink style of detailing.
Fire the ware to shelf cone 06 or 04, thus setting color.
Place the needed Stroke ‘n Coats on the palette and slightly thin with water.
Using the Shader and the Rounds to apply the colors as follows:
Thinly and smoothly apply one thin coat of Leapin’ Lizard to all the Holly Leaves, following the contour of each leaf. Use the Round of choice. Allow to dry.
Blend in Green Thumb to one side of each holly leaf and additional shading where one leaf is overlapped by another and the where the apples overlap the leaves. Smooth the shading color out into the Leapin’ Lizard.
Holding the #6 Pointed Round upright, carefully puddle in one coat Crackerjack Brown to the branch and apple stem.
When the Crackerjack Brown has set. To one side of the branch puddle in Brown Cow.
With the #4 Liner fully loaded with Hot Tamale, carefully fill in the berries and the thin ribbon throughout the design.
Complete the apples with the #10 Shader using Dandelion, Cant-elope, Candy Apple and Hot Tamale. The colors are blended thinly with the Dandelion and Cant-elope applied to the middle of both apples and feathered out to the left and right of center. Proceed to load Shader with Candy Apple and side load with Hot Tamale. Keeping the Hot Tamale to the outer edge of the apples begin to blend the reds from the outer, inward toward the middle of each apple. The yellow/orange tones will show through the applied reds. Since apples are the focal point to the project a second blended coat will be need. Please note: Since the Stroke and Coats are applied so thinly the fired Cobalt Jet Black will show through the color after the glaze firing.
Thin down both the Blue Dawn and The Blues to a wash consistency. Fully load the #8 Pointed Round with water (brush needs to have plenty of water) proceed to tip load with both of the blues. Laying the brush nearly flat against the ware and the tip of the brush directed toward the outline of design, float the blues around the entire design. Some areas should appear to be deeper blue in tone and other areas are lighter. Reload the pointed Round as needed and be sure to load first with the water, tipping with the Blue Dawn and The Blues.
Allow the Stroke & Coats some drying time.
Place an ounce of the Crystal-Clear Brushing in to a paper cup.
If extremely thick thin with a few drops of water and thoroughly mix with Palette Knife.
With the Soft Fan apply three coats to the entire piece. Allow some drying time between coats.
Stilt the glazed piece and fire to shelf cone 06.
Remove stilt marks with Stilt Stone or Dremel Tool.
To add the Premium Gold rim
With a soft cloth or paper towel wipe the rim down, thus removing any hand grease or film.
Gently dip a cotton swab into the bottle of Premium Gold. Allow the liquid gold to seep into the cotton.
Holding the loaded cotton swab at a 45-degee angle to the rim, pressing firmly against the area, pull the cotton swab around the rim. Work slowly as the Premium Gold is applied. (Color should be flag red in appearance). One coat is sufficient and the cotton swab will need to be reloaded, possibly two more times.
Allow the Premium Gold to dry.
Stilt and fire to shelf cone 018.
Remove any stilt marks with Dremel Tool or Stilt Stone.
Check the bisque ware over for any blemishes and lightly sand off with 100-grit sandpaper.
Damp sponge ware to remove any fired dust and to condition for decorating.
Into the 3 oz cup, pour about 1 to 2 ounces of the Ivory Pearl. Mix with palette knife and if extremely thick add a few drops of water. For this project the Fundamentals need to be slightly thinner than normal. If the underglaze is too thick the recessed areas of the ware will fill up with color.
Dampen the 1” Glaze Brush with water, then fully load with Ivory Pearl and scrub apply two to three coats over the entire tree including the base. By scrubbing the color in the detail of the fired ware will not be overfilled.
Fire the piece to shelf cone 04.
In the paper cup place a teaspoon of Sienna Brown add at least 4 parts of water to the color to thin to an ink like consistency.
Using the #3 Fan, apply the Sienna Brown wash over the entire Wicker Tree. Make sure all the recessed areas are covered.
Set piece aside to dry for a while.
Dampen the sponge with water and remove excess water by placing in a paper towel and firmly squeezing the sponge. The paper towel helps remove the excess water from the sponge. Note: if the sponge is too wet, too much color can easily be removed from the ware.
With the damp sponge begin to wipe back the wash of Sienna Brown. Work vertically over the tree and horizontally around the base. Keep wiping back until desired effect is achieved.
Allow the tree to dry overnight.
Pour about an ounce of the Matt Transparent Brushing in to a paper cup. Thin with water to a light cream consistency.
Apply 2 to 3 coats of the Matte Transparent Brushing to entire piece using the 1” Glaze Brush. To prevent over applying the glaze, scrub in the glaze rather than laying the glaze on in the normal manner.
Set aside to dry.
Stilt ware and fire to shelf cone 06.
Place a very small of Premium Gold Overglaze on a clean piece of Aluminum Foil or 6” tile.
Fully load the #6 Filbert with the Premium Gold and carefully apply to the top of the tree. One thin coat is needed and when finished, the unfired gold should be a flag red color.
When finished wrap the #6 Filbert in a piece foil for future use. The wrapped brush will become hard in the foil. However, when the brush is used again with the same Premium Gold the bristle will soften and become pliable again.
Stilt ware and fire to shelf cone 018. Note: the Premium Gold will fire more matte for it has been applied over a matte glaze.
Check for stilt marks and remove with Stilt Stone or Dremel Tool.
Use a Clean-Up Tool to remove any seam lines, carve any lost detail and to drill the openings for the twig arms. Holes should be about ¼” or slightly larger in diameter. Use a moistened Synthetic Sponge to wipe any dust from the ware.
To the well cleaned stoneware greenware, apply 3 coats of UG-208 Dragon Red to the hat excluding the fur area using CB-404 Pointed Round. Apply 3 coats of UG-231 Lime Green to the scarf areas using the same brush. Apply 2-3 coats of UG-204 Orange to the nose with the same brush.
Fire to Shelf Cone 04.
On a Tile or Pallet thin some SW-301 Iron Wash to a creamy consistency. Using CB-604 Soft Fan loaded with water and then tip one corner edge of the brush the slightly thinned SW-301 Iron Wash to then shade the crevices of the scarf and hat with the Iron Wash. Shade lightly along the bottom edge of the fur areas over the face. Shade the crevice areas on the snowman next to the scarf’s edge. Shade along the bottom edge of the snowman.
Use a dampened Synthetic to antique the Iron Wash from the painted areas. Try to keep the color only in the folds and crevices where the Iron Wash was applied. Don’t over sponge the Iron Wash onto the snowman body and face. You can darken the folds in the hat with a single brushstroke of the Iron wash using CB-404 Pointed Round. The Iron Wash may appear to be left on the Underglaze surfaces but will be fine as it may appear stained or dirty looking before glazing and firing. The Iron Wash residue will be insignificant if it is light in color on the Underglaze surfaces. Let dry.
Apply 1 coat of SC-16 Cottontail to the fur areas on the hat using CB-404 Pointed Round. Then apply 2-3 coats of SG-302 Snowfall over the Cottontail using the same brush. This can be applied unevenly.
Apply 2-3 coats of SW-001 Stoneware Clear over the hat excluding the fur and to the nose areas using CB-404 Pointed Round.
Apply 2 coats of SG-704 Peppermint Speckta-Clear over the scarf area using CB-404 Pointed Round. Try to evenly apply the crystals while painting. Back off the second coat slightly (a pencil line width) along the bottom edges of the scarf.
Apply 3 coats of SW-106 Alabaster using CB-404 Pointed Round and CB-604 Soft Fans to the snowman’s face and body excluding the buttons. Keep the color approximately 1/8” from the bottom.
Paint in the eyes and buttons with 2 coats of SC-15 Tuxedo using CBf-110 Liner.
Before firing, wipe off any color and glaze from the bottom of the ware with the moistened Synthetic Sponge. Fire on the kiln shelf to Shelf Cone 5-6. Do not stilt the piece. Make sure the bottom surface is fully on the shelf.
Form
Greenware Clay Magic #3793 Plain Snowman with Scarf or like piece cast in Cone 5-6 Stoneware Slip.
Use a damp Synthetic Sponge to wipe down the plate to remove any dust.
Apply 3 coats of FN-001 White to the entire plate. Let dry.
Use Scissors to cut out pattern. Using AC-230 Clay Carbon and a pencil to transfer the pattern to the plate. Align the pattern to where the center line divides the plate into equal parts. The pattern will aid you with the approximate positioning with the noted dotted lines for the edge of the plate.
Using CB-404 Pointed Round tipped with SC-93 Honey Dew List to shade the left inner edge of the peppermint.
Use CB-110 Liner to paint in the middle lines radiating from the center of the peppermint with SC-26 Green Thumb. 1 to 2 coats of color will be needed for solid coverage. To paint in the two other lines, use SC-73 Candy Apple Red with the same brush. Outline the peppermint with SC-73.
Use CB-404 Pointed Round and CB-110 Liner to paint in the yellow portions of the lettering with 2-3 coats of SC-24 Dandelion.
Use the ¾” Blue Masking Tape to section off the lower section of the pattern. The bottom edge of the tape will run along the top edge of the marked off lower portion of the pattern. Make sure the tape is completely adhered to the surface of the ware to prevent bleeding of the color.
Apply 2-3 coats of SP-74 Speckled Hot Tamale using any brush listed to apply the color. Make sure that the crystal specks in the color are evenly dispersed on the background area. Once the third coat of color has been applied and has dried to a dark dull look, you can remove the tape before the color has completely dried to overcome any chipping of the color.
Detail the lettering with SC-15 Tuxedo using CB-110 Liner. 1-2 coats should be enough to achieve solid coverage. This is where you can clean up any edges in the lettering and background areas. Water down some SC-15 and very lightly outline the outer edge of the peppermint with one coat of color.
Stilt and Fire the plate to Shelf Cone 05-06.
Clean the area to apply the Gold Luster with the Denatured Alcohol and lint free cloth. Let dry before applying the Gold Luster.
Using the OB-916 G #6 Filbert Brush to apply OG-805 Gold Luster to the rim of the plate. Load the brush with the Gold Luster and hold the side of the brush along the plate’s rim to achieve a fine border line. You can use a Q-Tip swab in the same manner to apply the Gold Luster. Use OA-901 Essence to clean the Gold Luster Brush.
Roll out a slap of B-Mix Stoneware Clay to a ¼” thickness larger than the pattern and enough to make the leaf onto the Canvas Fabric.
Cut out the pattern with the Scissors. Trace the edge of the patterns onto the clay. Using a Fettling Knife to cut out the clay shapes.
Make coils of clay approximately ½”-3/4” in diameter. You will need enough coils to fit around the edge of the pear shape. Score the surface edges of the pear slab and the coils using a Scoring Tool. Apply some slip/slurry with a brush to the scored edge of the pear and coil. Use a flat board or surface to press and adhere the coil to the slab. This enforces the adhering of the two surface and creates the flat top edge on the pear. Shape and wedge the edges of the coil onto the flat pear shape. The inner surface edge of the pear should be a gentle slope.
Make a trapezoid shape with clay for the stem of the pear. Score the edges and use the slip/slurry to attach the pieces.
Use a Modeling Tool to incise the center and radiating veins to the leaf. Slightly fold the leaf into along the center vein. Give the leaf a bit of a twist as well for movement. Score the back edge of the leaf and where you are going to apply it to the pear. Use the slip/slurry to attach the leaf to the wear. Use the Modeling tools to wedge the edges of the leaf and stem to the pear’s outer surface. Let the piece dry flat until at least leather hard stage at a minimum.
Once the ware has dried to the leather-hard stage. Use the modeling tools to further shape the inside and outer edges of the ware. Use a dampened Synthetic Sponge to smooth out the surfaces. You can weigh down the center of the ware with a weight to aid in keeping the ware from warping. Cover in plastic to slow down the drying process if needed.
Let the ware to completely dry before firing.
Fire to Shelf Cone 04-05.
Apply 3 coats of SW-155 Winter Wood to the inside area of the plate using CB-604 Soft Fan. You can extend one coat with few crystals to the top edge of the plate rim.
Apply 2-3 coats of SC-14 Java Bean to the stem using CB-404 Pointed Round.
Apply 2-3 coats of SC-27 to the top rim and sides of the pear plate using CB-604 Soft Fan. Do not extend the color to the very bottom edge of the plate. Keep the color about 1/8” from the bottom.
Apply 2-3 coats of SW-193 Ivy to the leaf using CB-404 Pointed Round. Back off the second and third coats of glaze where the leaf and SC-27 meet along the outside surface of the pear. This glaze can flow during the firing.
Use a Synthetic Sponge to remove any glaze from the bottom of the plate. Make sure to keep a 1/8” separation from the glaze and the bottom.
Fire flat to a Shelf Cone 5-6. Do not stilt the ware. Make sure the bottom of the piece is fully placed on a shelf surface.
Form
Cone 5-6 Moist Stoneware Clay. Smooth B-Mix without grog/sand.
Use a dampened Synthetic Sponge to wipe down the ware to remove any dust or debris.
Using CB-608 Soft Fan to apply 3-4 even smooth coats of FN-301 Marshmallow White to the entire front and back surfaces. Let dry.
Cut off the edges of the paper around the pattern with the Scissors. Use AC-230 Clay Carbon and a pencil to transfer the pattern. The detail in the leaves/needles doesn’t need to be individually drawn in, just draw in some movement lines to show the placement and direction of them. Save the pattern for later use.
On a Tile or Pallet thin the all the E-Z Strokes excluding EZ031 to a brushing consistency.
Use CB-310 Flat Shader side loaded (1/4 loaded) with EZ047 Thundercloud Grey to the inner edges of the pattern. Use the pattern for guidance. Notice that some areas around the inner edge of the owl is wider and heavier than others. Shade over the eye, the feathers around the beak and neck. Shade under each layer of wing feathers. Shade the leg and feet feathers.
Starting with the bottom edge of the tail feathers, use CB-602 Soft Fan loaded with some thinned EZ047 Thundercloud Grey to apply color to the tail section. This color should fade out about the middle of the lower chest area. Shade the other wing sections as well with the same color fading the color as you move up the wing sections concentrating the color to the wing tips using CB-602 Soft Fan.
Paint in EZ026 Yellow Orange to the iris of the eye using CB-110 Liner. Shade the eye with EZ036 Orange and thinned EZ011 Siena Brown. Paint in the pupil with EZ012 Cobalt Black. Paint in a line of EZ047 Thundercloud Grey over the eye using the Liner brush. Add a finer line of EZ012 Cobalt Black to accent the eye lid. Use some thinned EZ047 and EZ034 to paint in the beak and then detail and shade half with thinned EZ012.
To paint in the markings in the chest and wing feathers mix a bit of EZ012 Cobalt Black into EZ047 Thundercloud Grey to darken and then thin with a bit of water. Paint in the markings in the wing and tail feather as well as the chest feathers using CB-308 Flat Shader. To darken these markings, use some thinned EZ012 Cobalt Black. You can always go back over an area with thinned color to further darken and area but it is hard to remove to dark of a color once it is applied.
Apply a thin wash of EZ011 Sienna Brown to the branches and pine cone (oval) shapes using CB-404 Pointed Round. Do not paint the branches to the full end of the branch at this time. Detail the grain markings in the branches with EZ055 Brick using CB-110 Liner. Add a few detail lines of EZ010 French Brown keeping this color towards the lower half of the branches and finally add a thinned EZ012 line to the bottom edge of the branch. The pine cones use the same colors to add the detail in them. This detail is a simple line in an alternating layer of lines using EZ055 then darken slightly with EZ010.
The leaves/needles of the tree are painted using CB-308 Flat Shader fully loaded with EZ-071 Dark Olive. To add depth, pick up some EZ-042 in the brush and stroke is some leaves/needles. Use the brush to the fullest when stroking in the leaves/needles. Some of the strokes are “C” strokes or side strokes with the brush. Vary the placement and stroke as you paint in the leaves/needles. Once the leaves/needles are painted use CB-110 Liner to add some branches back in between the leaves/needles. Break up this detail to make it appear that they are amongst them.
Use a thin mixture of EZ047 and EZ012 to outline the bird and detail the feather separations using CB-110 Liner. Check the overall look of the bird to see if you need any accent lines or added depth to the feathers around the beak, chest and wing marking. Use this thinned mixture to add these details.
In a small container, mix some EZ031 Light Blue to a 2:1 ratio of water to color. Fill the cup reservoir with color to test the air brush and color on a piece of scrap paper before painting the sky. You can cut out the owl portion of the pattern to use as a black out stencil to facilitate getting the color around the owl. Use a piece of blue masking tape to affix the cutout stencil so it won’t move during the air brushing of the sky. Once the reservoir cup is loaded and full, apply the color to the sky area of the platter. This may take 2-3 coats or passing with the air brushing color for color saturation. Make sure you use an approved protective face mask and the backdraft ventilation system when spraying the color.
Apply vinyl word decals to rim of bowl. Using round #6 brush (RB-116) apply 2 coats SW-501 White Gloss over lettering.
Once dried, apply thin coat of AC-302 Wax Resist to words using RB-110 10/0 dedicated solely for wax work. Let wax dry completely before next step.
Using #4 fan brush (RB-144) apply 3 coats SW-510 Blue Gloss to rim and underside of bowl.
Inside of bowl apply 2 coats SW-152 Blue Splatterware to top ½ of bowl using #4 fan brush (RB-144).
Using #4 fan brush (RB-144) apply 2 coats SW-501 White Gloss to bottom of bowl.
Apply word decal to bottom of bowl. With round #6 brush (RB-116) ombre SW-152 Blue Splatterware to top ½ of word and SW-510 Blue Gloss to bottom ½ of word.
With AC-220 Detailer Bottle filled with SW-401 Light Flux, apply 2 rows of “W”s to the right side of the platter.
Using AC-220 Detailer Bottle filled with SC-76 Cara-bein Blue and SC-11 Blue Yonder, place alternating color dots inside the loops on top and bottom “W”s.
Using #8 fan brush (RB-140) apply 3 coats SW-189 Cenote over right side of plate, covering flux and Stroke & Coat and to the bottom of the platter.
On left side of platter apply 2 coats SW-501 White Gloss.
On left side of platter, place DSS-0164 Continuous Swirls.
On plate, mix SW-510 Blue Gloss with small amount of AC-310 Silkscreen Medium. Mix into a paste.
Applying with finger, push color through silkscreen.
With #4 soft fan brush (RB-144) ombre UG-51 China White and UG -72 Wedgewood Blue, light to dark on center message part of mug.
Using #4 soft fan brush (RB-144) apply 3 coats SW-166 Norse Blue to inside, rim and handle of mug.
Using #4 soft fan brush (RB-144) apply 3 coats of SW-166 Norse Blue. With same size brush apply 3 coats of SW-165 Lavender Mist over Norse Blue.
Apply decal lettering and snowflakes to message part and rim of mug.
Using #8 round brush (RB-118) fill in lettering and snowflakes with UG-1 Kings Blue and UG-51 China White to snowflakes on rim.
Apply 2 coats SW-001 Stoneware clear to message part of mug.
Fire to cone 6.
After mug has cooled, wipe mug with rubbing alcohol where overglaze will be applied. Let dry completely. Using #0 Lining silver overglaze brush (OB-910W) apply dots of OG802 White Gold overglaze to tips of snowflake and lettering. Let dry completely before second fire.
Using #8 fan brush (RB-140) apply 3 coats SW-180 Desert Dusk all over bottom of pan and up ⅔ of side.
Using #8 fan brush (RB-140) apply 1 heavy coat SW-401 Light Flux ⅓ down inside of dish, very slightly overlapping SW-180 Desert Dusk.
Using detailer bottle AC-220 filled with SW-401 Light Flux and another filled with SC-101 Spruce It Up and apply random “plops” of Light Flux and Spruce It Up along top rim of pan.
Using #8 fan brush (RB-140) apply 2 coats SW-198 Rose Quartz all over inside of bowl and 1 coat SW-198 Rose Quartz in alternating stripes inside bowl.
Using detailer bottles AC-220 filled with SC-28 Blue Isle and SC-101 Spruce It Up place alternating color dots along outside rim of bowl, about 1” long.
Under the Stroke and Coat dots using #4 fan brush (RB-144), apply 1 inch line of SW-401 Light Flux.
Cover entire outside of bowl with 3 coats SW-166 Norse Blue followed by 3 coats of SW-153 Indigo Rain.
Fire to cone 6.
Medium Nesting Bowl
Wipe dust off bisque with wet sponge.
Using #8 fan brush (RB-140) apply 2 coats SW-198 Rose Quartz all over inside of bowl and 1 coat SW-198 Rose Quartz in alternating stripes inside bowl.
Using detailer bottle AC-220 filled with SC-103 Lavendear and SC-104 Grape Expectations place alternating color dots along outside rim of bowl, about 1” long.
Under the Stroke and Coat dots using #4 fan brush (RB-144) apply 1 inch line of SW-401 Light Flux.
Cover entire outside of bowl with 3 coats SW-165 Lavender Mist followed by 3 coats of SW-153 Indigo Rain.
Fire to cone 6.
Small Nesting Bowl
Wipe dust off bisque with wet sponge.
Using #8 fan brush (RB-140) apply 2 coats SW-198 Rose Quartz all over inside of bowl and 1 coat SW-198 Rose Quartz in alternating stripes inside bowl.
Using detailer bottle AC-220 filled with SC-3 Wine About It and SC-100 Makin’ Me Blush place alternating color dots along outside rim of bowl, about 1” long.
Under the Stroke and Coat dots using #4 fan brush (RB-144) apply 1 inch line of SW-401 Light Flux.
Cover entire outside of bowl with 3 coats SW-177 Raspberry Mist followed by 3 coats of Indigo Rain SW-153.
Check the ware over for blemishes and if any are present lightly sand with the 100-girt sandpaper.
Damp sponge the ware on the outside and pour a small amount of water to the inside of the piece. Swirl this water around and drain off. This will remove any fired dust that may be on the inside of the ware.
Cover the hole in the teapot spout with a piece of Blue Tape.
Into the paper cup place the Tu Tu Tango Stroke and Coat and thin with water to a cream flowing consistency. Thoroughly mix with Palette Knife.
Pour the thinned Tu Tu Tango into the teapot and roll the inside. Make sure the Stroke ‘n Coat fills the spout and that the color covers the total inside area to the teapot.
For the inside of the lid it is easier to brush three coats of the Tu Tu Tango.
Special Note: Make sure that inner rim of the teapot and the outer rim of the lid do not have any Stroke ‘n Coat applied. If any color is on these areas, when fired, the pieces will fuse together. Remove any color present, with a damp sponge.
Set the piece aside to dry. Note, the Clay Carbon will not work on damp or wet ware.
Cut the provided pattern apart.
Using the provided pattern, clay carbon and red pen, trace the design onto the ware. The large pattern is applied to both sides of the teapot. Smaller three leaves to the lid.
Place a small amount of the needed Fundamentals, on the page protector palette.
If needed add a drop or two of water to the underglaze colors.
Before applying the color, lightly sketch in the center vein line down each leaf.
The Pointed Rounds are used to pull in the strokes for the leaves. Size of the brush is a personal choice. Try out all three to determine which brush or brushes work well for you.
To complete the leaves, use the color photo as a guide. Note: how the leaves are a multitude of the different colors, which are placed on the palette. When applying the colors reload the Round as desired and rarely rinse the previously applied colors out of the brush. By not rinsing you will truly achieve a blending of colors. Please note: if the brush does become over loaded with color, you may need to rinse and blot dry the Round before reloading. In most cases, three to four colors are loaded on the brush.
It should be noted that the leaves usually have two or three color tones on the leaf. Leaves can be yellowish and then greens are added. Or the leaves can be Orange in tone with red throughout the orange. The more variety of colors tones applied, the more natural the leave will appear; as long and the colors are smoothly blended together.
Here are some examples of loading the Round:
Load with Bright Yellow, side load with Squash Yellow, side load other side with Harvest Gold and tip with Orange.
Load with Pear Green, side load with Apple Green and tip with Spring Green.
Load with Orange Sorbet, side load with Orange, and side load the other side with Flame Red.
To change the look, load in Flame Red, side load in Orange and tip in Orange Sorbet.
Be cautious when using Forest Green, Cinnamon and Chocolate. These colors are very dark and should be used sparingly.
When completing the Oak leaves use pressure strokes. Start pulling in color from the tip of the leaf toward the leaf’s base. When doing the side segments of the leaf, work from the rounded outside edge inward to the sketched in center line. Reload as needed and press, pull and lift the colors in place and have the strokes over-lap one another. As the colors are stroked in, blend out any heavy ridges of color. One to two coats are needed. A second will often insure easier blending. Complete all of the leaves.
The acorns are completed as follows with the smaller Round:
Block in one side of the acorn bottom with Bright Yellow and the other side with Pear Green. Two coats will be needed and blend the colors together. Allow to dry.
Apply two coats of Spiced Brown to the caps of each acorn. Allow to dry.
To the top of the acorn (not the cap) float in Harvest Gold that has been side loaded onto a water-dampened #4 Round. This will add shading under the cap
Side load the water-dampened #4 Round with Cinnamon. Proceed to float color on to the top of the cap. Darken the small round nub in the middle of the cap.
Place French Brown on the palette and thin as needed to milk-like consistency.
Fully load the #2 Detail Liner with Spiced Brown, side load with Chocolate and tip generously with the thinned French Brown. Pull in the stem work throughout the background of the design by laying the Liner almost flat and slightly rotating the brush between fingers. Start at the heavier section of the stem and pull, rotate and lift off as the narrow ends of the branches are approached.
Proceed to outline the leaves, add center and side veins, pull out finer stems connecting the acorns to the design and outline the acorns. Use the #2 Detail Liner loaded with both thinned Chocolate and French Brown. Be sure to add crisscrossed lines at the top of the acorn cap.
Sign the piece with French Brown.
Place the ware on a kiln washed shelf and fire to cone 6.
Remove piece and if the lid appears stuck, lightly tap to loosen. High-fired pieces sometime will stick together during the firing.
The piece can lightly be sanded with 100-grit sandpaper to polish slightly.
Begin with properly fired shelf cone 04 bisque. Moisten a clean sponge and wipe bisque to remove any dust.
Cut out the pattern on the outer edge of each section of the pumpkin and the outer edge of each leaf. You can also use your own design.
Place some SC-6 Sunkissed and SC-74 Hot Tamale on a palette.
Take a piece of Plastic Wrap and pull the ends of the Plastic Wrap corner to corner to create a puff like pouncer. You will need to this only once for the project, but is used for all the colors.
Pick up some of SC-6 Sunkissed with the Plastic Wrap, pounce the SC-6 Sunkissed on to the tile moving across the tile till there is no bisque showing. While the Sunkissed is still wet, pick up some SC-74 Hot Tamale on the pouncer then dab onto the tile evenly creating a blend of the two colors.
While the color is still wet (this is a must) place the pattern pieces onto the tile lightly pressing them down.
Take a piece of paper towel and lay on top of the tile them press to make the pattern stick to the color and absorb any excess color.
Place some SC-15 Tuxedo onto the palette. Using the same piece of Plastic Wrap, pounce the SC-15 Tuxedo over the top and sides of the tile. This will create a hammered look to the final glaze finish.
Before the glaze dries, carefully remove the paper pattern. Allow to dry!
Begin with properly fired cone 04 bisque. Moisten a sponge and wipe bisque to remove any dust.
Using the Soft Fan with FN-009 Black, apply 2 coats to the front and sides of the tile. Allow glaze to dry between coats.
As soon as glaze is dry to the touch, place the sunflower pattern on the front of the tile. Trace over the pattern with the pencil. You should be able to see a faint line in the glaze. Don’t press down so hard that you start to see bisque. Remove the pattern.
Using the Detail Liner with AC-302 Wax Resist, trace over the pattern on the front of the tile. Make a line going around the edge of the tile.
Using the Script Liner with EL-128 Wheat, apply 1 coat to the inner flower petals.
Using the Script Liner with EL-143 Cactus Flower, apply 1 coat to the outer flower petals and outer section of the center.
Using the Script Liner with EL-142 Grass apply 1 coat to inner portion of the center, the stem, and leaves.
Using the Script Liner with EL-130 Sea Green, apply 1 coat to the background.
Repeat Steps 5-8.
Repeat Steps 5-8, but only apply the glaze to the center portion of each section (the inner area ¼” from the edge of each section). It does not have to be exact, just do not glaze right next to the wax line.
Stilt and fire to cone 06.
Chicken:
Begin with properly fired cone 04 bisque. Moisten a sponge and wipe bisque to remove any dust.
Using the Soft Fan with FN-009 Black, apply 2 coats to the front and sides of the tile. Allow glaze to dry between coats.
As soon as glaze is dry to the touch, place the Chicken pattern on the front of the tile. Trace over the pattern with the pencil. You should be able to see a faint line in the glaze. Don’t press down so hard that you start to see bisque. Remove the pattern.
Using the Detail Liner with AC-302 Wax Resist, trace over the pattern on the front of the tile. Make a line going around the edge of the tile.
Using the Script Liner with EL-128 Wheat, apply 1 coat to the head and wing.
Using the Script Liner with EL-143 Cactus Flower, apply 1 coat to the body, comb, and beak.
Using the Script Liner with EL-142 Grass apply 1 coat to the tail.
Using the Script Liner with EL-130 Sea Green, apply 1 coat to the background.
Repeat Steps 5-8.
Repeat Steps 5-8, but only apply the glaze to the center portion of each section (the inner area ¼” from the edge of each section). It does not have to be exact, just do not glaze right next to the wax line.
1. Begin with properly fired cone 04 bisque. Moisten a sponge and wipe bisque to remove any dust.
2. Slightly thin FN001 White. Pour into the vase and rotate until the inside is covered. Pour out and drain excess glaze and discard. Place the vase upside down on a few paper towels to drain.
3. Using the Soft Fan with EL149 Lavender Flower, apply 2 coats to the outside of the vase. Allow glaze to dry between coats.
4. Using the Soft Fan with CG981 Fruity Freckles, apply 2 coats to the outside of the vase. Allow glaze to dry between coats.
Wipe dust and debris off bisque with a damp sponge.
Apply 2 coats of SW172 Macadamia using a Soft Fan Brush to the bottom 1/3 of the mug and handle. Let dry between coats.
Apply 2 coats of SP209 Speckled Jaded using a Soft Fan Brush to the middle 1/3 of the mug and handle overlapping the Macadamia slightly. Let dry between coats.
Apply 2 coats of SC029 Blue Grass using a Soft Fan Brush to the top 1/3 of the mug and handle overlapping the Speckled Jaded slightly. Let dry between coats.
Apply 2 coats of SC029 Blue Grass using a Soft Fan brush to the inside of the mug. Let dry between coats.
Using a Script Liner, apply 2 coats of SW401 Light Flux in a stripe where each glaze meets on the mug and handle.
Fire to cone 6. Do not stilt!
Form
Bisque Imports S2201 Stoneware Malia Mug
Colors
SW172 Macadamia
SP209 Speckled Jaded
SC029 Blue Grass
SW401 Light Flux
Decorating Accessories
RB144 #4 Soft Fan
RB106 #6 Script Liner
Miscellaneous Accessories
Sponge
Water
Mid-Range|Stoneware Bisque
407|411
49670
Micro Pearl, Green Tea, and Dark Brown Engobe Bowl
Wipe dust and debris off bisque with a damp sponge.
Apply 2 coats of EG004 Dark Brown Engobe to half of the inside and outside of bowl using a Soft Fan Brush.
Using a Soft Fan Brush, apply 2 coats of SW214 Micro Pearl to the inside of the bowl and 1/2 way down the outside of the bowl.
Using a Soft Fan Brush, apply 2 coats of SW108 Green Tea to the inside of the bowl and 1/2 way down the outside of the bowl overlapping the Micro Pearl.
Fire to cone 6. Do not stilt!
Form
SB110 Dessert Bowl
Colors
EG004 Dark Brown Engobe
SW214 Micro Pearl
SW108 Green Tea
Decorating Accessories
RB144 #4 Soft Fan
Miscellaneous Accessories
Sponge
Water
Mid-Range|Stoneware Bisque
407|411
45524
Jungle Gem Facet-ini Monkey, Teddy Bear, and Chicken
Begin with properly fired cone 04 bisque. Moisten a sponge and wipe bisque to remove any dust.
Using the Script Liner with SC-16 Cotton Tail, apply 2 coats to the eyes. Allow glaze to dry between coats.
Draw pupils in the eyes with a pencil.
Using the Detail Liner with SC-15 Tuxedo, apply 2 coats to the pupils. Allow glaze to dry between coats.
Using the Detail Liner with SC-16 Cotton Tail, apply a dot to each pupil.
Using the Script Liner with SC-102 Just Peachy, apply 3 coats the face and belly. Allow glaze to dry between coats.
Using the Script Liner with SC-75 Orange-A-Peel, apply 3 coats to the hands, feet, and inner ears. Allow glaze to dry between coats.
Using the Script Liner with SC-74 Hot Tamale, apply 2 coats to the pads of the feet. Allow glaze to dry between coats.
Using the Script Liner with CG-982 Mixed Melon, apply 2 coats to the rest of the body. Allow glaze to dry between coats.
Using the Detail Liner with SC-15 Tuxedo, outline the eyes, nose holes, and mouth.
Fire to cone 06.
Teddy Bear
Begin with properly fired cone 04 bisque. Moisten a sponge and wipe bisque to remove any dust.
Using the Script Liner with SC-16 Cotton Tail, apply 2 coats to the eyes. Allow glaze to dry between coats.
Draw pupils in the eyes with a pencil.
Using the Detail Liner with SC-15 Tuxedo, apply 2 coats to the pupils. Allow glaze to dry between coats.
Using the Detail Liner with SC-16 Cotton Tail, apply a dot to each pupil.
Using the Script Liner with SC-102 Just Peachy, apply 3 coats the hands and feet. Allow glaze to dry between coats.
Using the Script Liner with SC-75 Orange-A-Peel, apply 3 coats to the nose and 2 coats to the pads of the feet. Allow glaze to dry between coats.
Using the Script Liner with SC-101 Spruce It Up, apply 3 coats to the inner ears, muzzle, belly, and facet around the eyes. Allow glaze to dry between coats.
Using the Script Liner with CG-981 Fruity Freckles, apply 2 coats to the rest of the body. Allow glaze to dry between coats.
Using the Detail Liner with SC-15 Tuxedo, outline the eyes and mouth.
Fire to cone 06.
Chicken
Begin with properly fired cone 04 bisque. Moisten a sponge and wipe bisque to remove any dust.
Using the Script Liner with SC-16 Cotton Tail, apply 2 coats to the eyes. Allow glaze to dry between coats.
Draw pupils in the eyes with a pencil.
Using the Detail Liner with SC-15 Tuxedo, apply 2 coats to the pupils. Allow glaze to dry between coats.
Using the Detail Liner with SC-16 Cotton Tail, apply a dot to each pupil.
Using the Script Liner with SC-103 Lavendear, apply 3 coats the head and lower wing feathers. Allow glaze to dry between coats.
Using the Script Liner with SC-75 Orange-A-Peel, apply 3 coats to the beak and feet. Allow glaze to dry between coats.
Using the Script Liner with SC-33 Fruit of the Vine, apply 3 coats to the comb, waddle, and upper wing feathers. Allow glaze to dry between coats.
Using the Script Liner with CG-998 Pink Pixie, apply 2 coats to the rest of the chicken. Allow glaze to dry between coats.
Using the Detail Liner with SC-15 Tuxedo, outline the eyes and make a line separating the top and bottom of the beak.
Pre-print a variety of silhouettes for your students.
Hand out prints and scissors and have them cut out the silhouette.
Wipe off the tile with a damp sponge.
Set aside cutouts and apply 2 coats of SC-15 over the whole tile.
While the 2nd coat is still wet, place the cutout silhouette on the tile and apply a 3rd coat of SC-15.
Allow to dry and apply 2 coats of SC-16.
Set aside tile and get out the 6 cups and brushes.
Pour a quarter size amount of red (SC-73), yellow (SC-6), and blue (SC-11) each in their own cup and set aside.
Pour a dime size amount of both red and yellow in one cup, yellow and blue in one cup, and blue and red in the last cup.
Pour a little water in each cup so the base of the cup is covered.
Mix each color thoroughly with its own brush
Hold your tile vertically and starting with the warm tones (Red, orange, yellow) drag the brush along one edge of the tile forcing the water and glaze to squeegee out of the brush.
Rotate to a new edge and repeat previous step with cool colors (Green, Blue, Purple).
Rotate again and repeat step 1.
Rotate to the final side and repeat step 2.
When the shine is gone from the wet glaze, peel up and remove the paper silhouette.
While coat #2 is drying, crisscross the strips of cheesecloth across the tile. Leave a larger gap between the cloth in the top third of the piece for eyes.
Apply a thinned down coat of SC-35 over the whole piece to seal in the cheesecloth.
When the SC-35 has lost its shine, apply one coat of SC-46 over the whole piece.
When the top coat has lost it’s shine, carefully peel back the cheesecloth.
Allow to dry.
Dip your fan brush back into SC-46 and remove most of the glaze onto a paper towel.
Lightly sweep the fan brush over the piece to highlight the texture of the cloth.
With the script liner brush, fill in the larger eye space with SC-15 and let dry.
Add two circles of SC-16, let dry.
Add two smaller circles of SC-7 over the white circles
Add two smaller circles of SC-15 over the green circles.
With the back end of the brush, place two small dots of SC-16 on each eye for highlights.
With a script liner, create large swooping arcs with FN-42.
Connect the arcs to form bending oblong feather shapes.
Fill in with FN-42.
When dry, add FN-36 to the center of the feathers, starting at one point and extending almost to the far end. Feather the color out for a fuzzy effect.
Add accent lines of FN-37 to the feather at the tip and a few in the main part of the feather.
Using the rounded back of a brush, dip into FN-49.
Apply dots to the negative space around the feathers. Try to keep consistent spacing.
Using a fan brush, apply 3 coats of UG 31, alternating application direction.
To burnish underglaze, the color needs to be slightly damp yet not tacky to the touch. Make a ball out of a few tissues (or soft cloth) then wrap one sheet over the ball creating a powder puff ball.
When the color has lost its sheen from the final coat of underglaze and the color is still damp but not tacky, begin to polish the surface. If the tissue grabs the surface of the tile wait a couple of minutes more before polishing.
Start out buffing the surface ever so lightly. Once the sheen starts to appear you can apply more pressure to the surface to a semi-gloss surface. The appearance should look like a polished wax surface.
Let dry.
Transfer the pattern using a pencil and AC-230 Clay Carbon.
Outline the transferred pattern lines and inside spaces with UG 34 using a thin liner brush.
Fill in the outlines with UG 30 using the same liner brush.
Fill in the flowers with UG 219.
Go back with UG 34 and add line accents to create depth.
Dip the rounded back end of a paintbrush in UG 34 to create the dots around the outside curves. Repeat over the top with UG219.
When the underglaze has dried, go over the top of only the floral patterns with S2101 using a script liner brush.
Apply three coats of glaze to your tile with a fan brush, allowing the layers to dry between coats.
Remove any large crystals from the center of the tile. This will help your animal body not to become too distorted. Crystals removed can be reapplied or put back in the jar.
Using the image of your chosen animal as a reference, glaze the animal print in the corners or along the bottom and top of the tile using the detail liner brush.
Trying not to use any linework (though it may be used to distinguish small areas), use the pattern of the animal to recreate the shape of the animal’s body in the center of the tile.
Stilt and fire the finished tile to cone 06.
Form
6” tile
Colors
SC-15 Tuxedo
light colored Mayco Jungle Gems glaze of your choice
Moisten a clean sponge and wipe bisque to remove any dust.
Using a CB-604 #4 Soft Fan, apply 2 coats of FN-001 White to the top of the tile.
Allow it to dry.
On the napkin, it is easier to work in sections for a larger piece. Using a CB-106 #6 Script Liner to stroke in the various Stroke & Coat colors. Follow the colors on the napkin, changing any pink flowers to SC-74 Hot Tamale.
While the glaze is still damp on the napkin, place the painted side on the glazed tile. Pat the color. If the color is dry and not transferring to the tile, pat the back of the napkin with a damp sponge.
Remove the paper napkin. The color should now be on the tile.
Using a CB-106 #6 Script Liner to brush stroke over any of the color that did not transfer.
Using a CB-110 #10/0 Liner, accent the petals and leaves with SC-15 Tuxedo.
When the base coat has lost its shine, lay the pattern on top and lightly trace with a pen or pencil. The pattern will appear in the soft glaze when the paper is removed.
Touch up any areas that the tracing went through the glaze to the bisque with FN-009.
With a Script Liner, fill in the background area with SC-11.
Fill in the base area with SC-6.
Start with one coral at a time. Apply three coats of SG-202 waiting for the glaze to lose its shine before applying the next coat. Do not let it completely dry!
After the final coat of cobblestone is applied and has lost its shine, add one coat of your desired Stroke & Coat color.
Repeat steps 3 & 4 for each coral.
Remember that Stroke and Coat glazes are intermixable! A dime size of SC-73 and SC-6 will give you orange, SC-11 and SC-6 for green, and SC-11 and SC-73 for purple.
Allow to dry (You will see cracks begin to form where the cobblestone is applied).
Begin with properly fired cone 04 bisque. Moisten the sponge and wipe bisque to remove any dust.
Use the pencil to label each section of the tree as 1, 2, and 3. Repeat going around the tree.
Using the Script Line with SC-6 Sunkissed, apply 3 coats to each section labeled 1. Allow glaze to dry between coats.
Use MC-001 6mm Low Tack Masking Tape to tape over the right edge of each section labeled 1. The glaze needs to be completely dry.
Using the Script Line with SC-27 Sour Apple, apply 3 coats to each section labeled 2. Allow glaze to dry between coats. Remove the tape before glaze is completely dry.
Use MC-001 6mm Low Tack Masking Tape to tape over the left side of section 1 and the right side of section 2. This will leave section 3 open with borders of tape on either side. The glaze needs to be completely dry.
Using the Script Liner with SC-28 Blue Isle, apply 3 coats to each section labeled 3. Allow glaze to dry between coats. Remove the tape before glaze is completely dry.
Using the Script Liner with SC-89 Cutie Pie Coral, apply 3 coats to the base of the tree. Allow glaze to dry between coats.
Stilt and fire to cone 06.
Large Starlight Tree:
Begin with properly fired cone 04 bisque. Moisten the sponge and wipe bisque to remove any dust.
Use the pencil to label each section of the tree as 1, 2, and 3. Repeat going around the tree.
Using the Script Line with SC-97 Cant-elope, apply 3 coats to each section labeled 1. Allow glaze to dry between coats.
Use MC-001 6mm Low Tack Masking Tape to tape over the right edge of each section labeled 1. The glaze needs to be completely dry.
Using the Script Line with SC-89 Cutie Pie Coral, apply 3 coats to each section labeled 2. Allow glaze to dry between coats. Remove the tape before glaze is completely dry.
Use MC-001 6mm Low Tack Masking Tape to tape over the left side of section 1 and the right side of section 2. This will leave section 3 open with borders of tape on either side. The glaze needs to be completely dry.
Using the Script Liner with SC-9 Jaded, apply 3 coats to each section labeled 3. Allow glaze to dry between coats. Remove the tape before glaze is completely dry.
Using the Script Liner with SC-6 Sunkissed, apply 3 coats to the base of the tree. Allow glaze to dry between coats.
Roll your clay out in a slab that is about 7 inches wide and ¾” thick.
Smooth your slab out with your rib.
Cover your cup with paper to keep clay from sticking to it.
You can also use a soda can.
Wrap your clay slab around the outside of the covered cup to create a cylinder.
Cut the end of the slab so your clay overlaps only ¼”.
Attach ends together by smoothing them together with your finger.
Use your rib to smooth it further.
.Once cylinder is created remove the cup from your clay
You may need to twist to get it out.
Using your left over slab pieces (you may need to roll out a new piece) cut the base for your mug by placing your cylinder on top and tracing a circle.
Attach base by slipping and scoring pieces together.
Smooth attachment with water and a sponge.
Create handle by cutting a strip of clay from your remaining slab.
Curve your piece into a handle shape (like an ear) and attach to the side of your mug by slipping and scoring.
Allow to dry until leather hard.
Apply 2 coats of Jet Black underglaze (UG-50) to the bottom half of your mug.
Once underglaze is dry, carve your desired texture design using a loop tool.
Allow to dry fully.
Bisque fire to Cone 04.
Glaze:
Wipe your bisqueware with a damp sponge.
Clear coat your mug by dipping it into clear glaze (S-2000).
Use stilts to glaze fire your piece to cone 06.
Form
About 1 1/2 pounds of low-fire white clay- per piece (Laguna’s EM-210)
Begin with properly fired cone 04 bisque. Moisten the sponge and wipe bisque to remove any dust.
Use MC-002 12mm Low Tack Masking Tape to tape over the cut outs in the tree.
Pour about 1/4 cup of FN-001 White into the disposable cup. Thin with water. Pour into the tree and rotate to completely cover the inside. Drain the excess glaze.
Remove the tape.
Use the Script Liner to remove any excess glaze from inside the cutouts.
Using the Soft Fan with FN-001 White, apply 3 coats to the base of the tree. Allow glaze to dry between coats.
Using the Soft Fan with EL-153 Caribbean Blue, apply 3 coats to the outside of the tree. Try not to get any glaze into the cutouts if you want them to stay white. You can also use the Script Liner to go around the cutouts. Allow glaze to dry between coats.
Stilt and fire to cone 06.
Large Starlight Tree
Begin with properly fired cone 04 bisque. Moisten the sponge and wipe bisque to remove any dust.
Use MC-002 12mm Low Tack Masking Tape to tape over the cut outs in the tree.
Pour about 1/4 cup of FN-001 White into the disposable cup. Thin with water. Pour into the tree and rotate to completely cover the inside. Drain the excess glaze.
Remove the tape.
Use the Script Liner to remove any excess glaze from inside the cutouts.
Using the Soft Fan with FN-001 White, apply 3 coats to the base of the tree. Allow glaze to dry between coats.
Using the Soft Fan with S-2702 Northern Lights, apply 1 coat to the outside of the tree. Try not to get any glaze into the cutouts if you want them to stay white. You can also use the Script Liner to go around the cutouts.
Using the Soft Fan with EL-153 Caribbean Blue, apply 2 coats to the outside of the tree. Try not to get any glaze into the cutouts if you want them to stay white. You can also use the Script Liner to go around the cutouts. Allow glaze to dry between coats.
Moisten a sponge and wipe bisque to remove any dust.
Place AC-230 Clay Carbon Paper over the tile.
Place the pattern on top and trace with the pencil.
Squeeze out around 1 tsp SC-15 Tuxedo and SC-16 Cotton Tail onto the palette. These will be your pure black and white.
Squeeze out around 1 tsp of SC-16 Cotton Tail on 3 different sections of the palette.
Add SC-15 Tuxedo to each section to make light gray, medium gray, and dark gray. Since the unfired colors are black and white, the colors you mix will look very similar to how they will appear after firing. Just note that they will get lighter as they dry on the tile.
Using the Script Liner with your palette of glazes, shade from the forehead down to the chin. You can wet your brush to help blend if the glaze is drying too fast. You will need to work fast to get good blending.
Apply a dark gray to the hair and beard.
Add darker and lighter strands of hair using the detail liner.
If you would like to check your progress, you can always lightly spray the tile with some water, and they will darken to their original color.
Shade down the neck.
Glaze the shirt light and medium gray.
Glaze the jacket black.
Using the Detail Liner with SC-15 Tuxedo, outline the details.
Using the Soft Fan with SC-16 Cotton Tail, add any extra highlights to the face.
Lightly spray with a water bottle to see if you need to fix any areas.
Let glaze dry.
Using the Soft Fan with NT-BR Clear One Brushing, apply 2 coats to the tile. Allow glaze to dry between coats.
Using the Script Liner with SC-15 Tuxedo, apply 1 coat to the edge of the tile.
Roll out your pound of clay into a slab 1/3” thick.
Compress the slab with a plastic card.
Using a straight edge, cut out a 6”x6” section.
Using the Soft Fan with SC-6, apply 3 coats to the tile. Allow glaze to dry between coats.
Place the pattern onto the tile. Trace with the pencil. Use enough pressure so that you see a faint line in the glaze. You should not be able to see any clay.
Using the Script Liner with SC-75, apply 2 coats to the sections on the upper wings. Allow glaze to dry between coats.
Using the Script Liner with SC-97, apply 2 coats to the sections on the lower wings. Allow glaze to dry between coats.
Using the Script Liner with SC-15, apply 2 coats to the body, antennae, and wing borders. Allow glaze to dry between coats.
Squeeze out around 1 tsp of SC-16 onto the palette. Dip the pencil eraser in the glaze and stamp around the outer border of the wings.
Begin with properly fired cone 04 bisque. Moisten a sponge and wipe bisque to remove any dust.
Using the Soft Fan with UG-51 China White, apply 3 coats to the front of the tile. Allow glaze to dry between coats. Allow glaze to dry completely.
Place AC-230 Clay Carbon Paper onto the front of the tile. 4. Place the pattern on top and trace with the pencil.
Using the Script Liner with UG-1 Kings Blue (large fish), UG-2 Sea Blue (medium fish), and UG-72 Wedgewood Blue (small fish), apply 3 coats to each fish. Allow glaze to dry between coats.
Before the fish are dry, use the wooden skewer to scratch a design into each fish.
After the glaze is dry, use a dry brush to brush away any glaze crumbs.
Using the Soft Fan with CC-101 Transparent, apply 3 even coats to the front of the tile. Allow glaze to dry between coats.
Using the Script Liner with SC-15 Tuxedo, apply 1 coat around the edge of the tile.
Stilt and fire to cone 06.
After the tile is cool, apply SS-335 Rich Blue over the front with a sponge. You should see it filling in the cracks. If you don’t have many cracks, wait one day, and try again. Wipe off excess paint with a paper towel.
Moisten a sponge and wipe bisque to remove any dust.
Place the bubble wrap over the tile. Cut the bubble wrap so that it is the same size as the tile.
Using the Soft Fan with SC-45, apply 3 coats to the front of the tile. Allow glaze to dry between coats.
Squeeze out around 1 TBS of SC-11 onto the palette.
Dip the sponge in the glaze and sponge the textured side of the bubble wrap.
Repeat until the texture is covered. Place the bubble wrap, textured side down, onto the front of the tile. Remove the bubble wrap.
After the glaze is dry to the touch, place the pattern over the front of the tile.
Trace over the pattern with the pencil. Press down just hard enough so that you can see a faint line in the glaze. You should not be able to see any bisque.
Use FD-254 Black Licorice to outline your pattern on the tile. Allow lines to dry.
Using the Script Liner with SC-2, apply a plop coat to the nose and inner ear.
Using the Script Liner with SC-16, apply a plop coat to the eyes.
Using the Script Liner with SC-15, make a dot for the pupil of each eye.
Squeeze out around 1 tsp of SC-16 onto the palette. Dip the pencil tip into the glaze. Make a dot in the pupil of each eye.
Using the Script Liner with SG-302 Snowfall, apply a thick, textured coat to the rest of the bunny.
Using the Script Liner with SC-15, apply 1 coat going around the edge of the tile.
Begin with properly fired cone 04 bisque. Moisten a sponge and wipe bisque to remove any dust.
Using the Script Liner with SC-100 Makin Me Blush, apply 3 coats to the vest. Allow glaze to dry between coats.
Using the Script Liner with SC-96 Aqu-ward, apply 3 coats to the inner portions of the hat (areas around head). Allow glaze to dry between coats.
Using the Script Liner with SC-9 Jaded, apply 3 coats to the border of the hat (thin area going around the areas just glazed). Allow glaze to dry between coats.
Using the Script Liner with SC-10 Teal Next Time, apply 3 coats to the rest of the hat. Allow glaze to dry between coats.
Using the Script Liner with SC-23 Jack O’Lantern, apply 3 coats to the nose. Allow glaze to dry between coats.
Using the Script Liner with SC-1 Pink-A-Boo, apply 3 coats to the gloves. Allow glaze to dry between coats.
Using the Script Liner with SC-70 Pink-A-Dot, apply 3 coats to the cuffs above the gloves. Allow glaze to dry between coats.
Using the Script Liner with SC-9 Jaded, apply 3 coats to the buttons. Allow glaze to dry between coats.
Using the Detail Liner with SC-10 Jaded, line the snowflakes on the buttons.
Using MC-002 12mm Low Tack Masking Tape, tape off vertical lines on the vest. Try to make them as even as possible. Using the Script Liner with SC-1 Pink-A-Boo, apply 2 coats to the vest. Allow glaze to dry between coats. Remove the tape.
Using MC-002 12mm Low Tack Masking Tape, tape off horizontal lines on the vest. Try to make them as even as possible. Using the Script Liner with SC-1 Pink-A-Boo, apply 2 coats to the vest. Allow glaze to dry between coats. Remove the tape.
Using the Script Liner with SC-70 Pink-A-Dot, apply 2 coats to each square where the vertical and horizontal lines meet. Allow glaze to dry between coats.
Using the Detail Liner with SC-10 Teal Next Time, apply a line going down each vertical and horizontal section of the pattern.
Using the Detail Liner with SC-15 Tuxedo, apply 2 coats to the pupils of each eye. Allow glaze to dry between coats. Outline the eyes and mouth.
Squeeze out around 1 tsp of SC-1 Pink-A-Boo onto the palette. Dip the sponge in the glaze and lightly sponge the cheeks of the snowman.
Dip into NT-CLR Clear One Dipping.
Clark Snowman
Begin with properly fired cone 04 bisque. Moisten a sponge and wipe bisque to remove any dust.
Using the Script Liner with SC-96 Aqu-ward, apply 3 coats to the scarf. Allow glaze to dry between coats.
Using the Script Liner with SC-100 Makin Me Blush, apply 3 coats to the center portion of the hat. Allow glaze to dry between coats.
Squeeze out around 1 tsp of SC-1 Pink-A-Boo onto the palette. Dip the pencil eraser into the glaze. Stamp a dot onto the hat. Repeat until the hat is covered in dots.
Using the Script Liner with SC-70 Pink-A-Dot, apply 3 coats to the top (pom pom) and bottom rim of the hat. Allow glaze to dry between coats.
Using the Script Liner with SC-23 Jack O’Lantern, apply 3 coats to the nose. Allow glaze to dry between coats.
Using the Script Liner with SC-1 Pink-A-Boo, apply 3 coats to the gloves. Allow glaze to dry between coats.
Using the Script Liner with SC-70 Pink-A-Dot, apply 3 coats to the cuffs above the gloves. Allow glaze to dry between coats.
Using the Script Liner with SC-1 Pink-A-Boo, apply 3 coats to the buttons. Allow glaze to dry between coats.
Using the Detail Liner with SC-70 Pink-A-Dot, line the snowflakes on the buttons.
Using MC-001 6mm Low Tack Masking Tape, tape off vertical lines on the scarf. Try to make them as even as possible. Using the Script Liner with SC-9 Jaded, apply 2 coats to the scarf. Allow glaze to dry between coats. Remove the tape.
Using the Script Liner with SC-10 Teal Next Time, apply 3 coats to the fringe on the scarf. Allow glaze to dry between coats.
Using the Detail Liner with SC-15 Tuxedo, apply 2 coats to the pupils of each eye. Allow glaze to dry between coats. Outline the eyes and mouth.
Squeeze out around 1 tsp of SC-1 Pink-A-Boo onto the palette. Dip the sponge in the glaze and lightly sponge the cheeks of the snowman.
Begin with properly fired cone 04 bisque. Moisten a sponge and wipe bisque to remove any dust.
Using the Soft Fan with FN-009 Black, apply 3 coats to the back of the plate. Allow glaze to dry between coats.
Using the Soft Fan with FN-009 Black, apply 2 coats to the front of the plate. Allow glaze to dry between coats.
As soon as glaze is dry to the touch, place the pattern on the front of the plate. Trace over the pattern with the pencil. You should be able to see a faint line in the glaze. Don’t press down so hard that you start to see bisque. Remove the pattern.
Using the Detail Liner with AC-302 Wax Resist, trace over the pattern on the front of the plate. Make a line going around the rim of the plate.
Using the Script Liner with EL-128 Wheat, apply 2 coats to the inner flower petals. Allow glaze to dry between coats. Apply a 3rd coat just to the center portion (the inner area ¼” from the edge of the area you just glazed).
Using the Script Liner with EL-143 Cactus Flower, apply 2 coats to the outer flower petals and outer section of the center. Allow glaze to dry between coats. Apply a 3rd coat just to the center portion (the inner area ¼” from the edge of the area you just glazed).
Using the Script Liner with EL-142 Grass apply 2 coats to inner portion of the center, the stem, and leaves. Allow glaze to dry between coats. Apply a 3rd coat just to the center portion (the inner area ¼” from the edge of the area you just glazed).
Using the Script Liner with EL-130 Sea Green, apply 2 coats to the background. Allow glaze to dry between coats. Apply a 3rd coat just to the center portion (the inner area ¼” from the edge of the area you just glazed).
Use a slightly moistened Synthetic Sponge to wipe down the piece to remove any dust.
Using CB-604 Soft Fan to apply 3 even coats of UG-224 Rose to the tile. Change directions with each application.
To polish underglaze, the color needs to be slightly damp yet not tacky to the touch. Make a ball out of a few Kleenex tissues then wrap one sheet over the ball creating a powder puff ball. When the color has lost its sheen from the final coat of underglaze and the color is still damp but not tacky is when you start the polishing of the surface. If the tissue grabs the surface of the tile wait a couple of minutes more before polishing. Start out buffing the surface ever so lightly. Once the sheen starts to appear you can apply more pressure to the surface to a semi-gloss surface. The appearance should look like a polished wax surface. Let dry.
Note: If you are doing a larger surface that cannot be polished in a given time, you can work in sections. Use can use AS957 Thin and Shade to remoisten an area slightly overlapping a previously polished area and continue the polishing of the underglaze. Also, some colors of Fundamentals Underglazes will polish more easily than other due to their chemical formulation.
Transfer the pattern using a pencil and AC-230 Clay Carbon. If you are working on still damp color, use a film type transfer paper. The clay carbon is rather light on the underglaze surface. You can retrace over the lines with a pencil if the design is difficult to see.
Apply 2-3 coats of SC-24 to the center of the flower using CB-110 Liner.
Apply 2-3 coats of SC-52 Toad-ily Green to the leaves and stem using CB-110 Liner.
Apply 2-3 coats of S-2101 Crystal Clear Brushing or FN-209 Floral Pink to the petals using CB-404 Pointed Round or CB-110 Liner.
Fire to shelf cone 04.
Form
6”x 6” Greenware Tile, leather hard preferred
Colors
UG-224 Rose
SC-24 Dandelion
SC-52 Toad-ily Green
S-2101 Crystal Clear Brushing or FN-209 Floral Pink
Decorating Accessories
CB-604 Soft Fan
CB-110 Liner
CB-404 Pointed Round
Miscellaneous Accessories
Sponge
Water
Black Carbon Film Transfer Paper or AC-230 Clay Carbon
Use a slightly moistened Synthetic Sponge to wipe down the tile to remove any dust.
Using CB-604 Soft Fan to apply 3 even coats of UG-225 Plum to the tile. Change directions with each application.
To polish underglaze, the color needs to be slightly damp yet not tacky to the touch. Make a ball out of a few Kleenex tissues then wrap one sheet over the ball creating a powder puff ball. When the color has lost its sheen from the final coat of underglaze and the color is still damp but not tacky is when you start the polishing of the surface. If the tissue grabs the surface of the tile wait a couple of minutes more before polishing. Start out buffing the surface ever so lightly. Once the sheen starts to appear you can apply more pressure to the surface to a semi-gloss surface. The appearance should look like a polished wax surface. Let dry.
Note: If you are doing a larger surface that cannot be polished in a given time, you can work in sections. Use can use AS957 Thin and Shade to remoisten an area slightly overlapping a previously polished area and continue the polishing of the underglaze. Also, some colors of Fundamentals Underglazes will polish more easily than other due to their chemical formulation.
Transfer the pattern using a pencil and AC-230 Clay Carbon. If you are working on still damp color, use a film type transfer paper. The clay carbon is rather light on the underglaze surface. You can retrace over the lines with a pencil if the design is difficult to see.
Using CB-110 Liner or CB-404 Pointed Round to apply 3 coats of SC-52 Toad-ily Green to the leaves and stem.
Apply 2 coats S-2101 Crystal Clear Brushing to the plum area using CB-404 Pointed Round.
Fire to shelf cone 04.
Form
6”x 6” Greenware Tile, leather hard preferred
Colors
UG-225 Plum
SC-52 Toad-ily Green
S-2101 Crystal Clear Brushing
Decorating Accessories
CB-604 Soft Fan
CB-110 Liner
CB-404 Pointed Round
Miscellaneous Accessories
Sponge
Water
Black Carbon Film Transfer Paper or AC-230 Clay Carbon
Use a lightly moistened Synthetic Sponge to wipe down the piece to remove any dust.
Use CB-604 Soft Fan to apply 3 very even coats of UG-230 Blue Grass to the tile. Change directions when applying the underglaze.
To polish underglaze, the color needs to be slightly damp yet not tacky to the touch. Make a ball out of a few Kleenex tissues then wrap one sheet over the ball creating a powder puff ball. When the color has lost its sheen from the final coat of underglaze and the color is still damp but not tacky is when you start the polishing of the surface. If the tissue grabs the surface of the tile wait a couple of minutes more before polishing. Start out buffing the surface ever so lightly. Once the sheen starts to appear you can apply more pressure to the surface to a semi-gloss surface. The appearance should look like a polished wax surface. Let dry.
Note: If you are doing a larger surface that cannot be polished in a given time, you can work in sections. Use can use AS957 Thin and Shade to remoisten an area slightly overlapping a previously polished area and continue the polishing of the underglaze. Also, some colors of Fundamentals Underglazes will polish more easily than other due to their chemical formulation.
Transfer the pattern using a pencil and AC-230 Clay Carbon. If you are working on still damp color, use a film type transfer paper. The clay carbon is rather light on the underglaze surface. You can retrace over the lines with a pencil if the design is difficult to see.
Apply 1 thin coat of SC-16 Cottontail using CB-404 Pointed Round or CB-110 Liner to the white areas of the design. You can paint over the entire dorsal fin. This will overcome any skips or pulling of the color during firing. If you want brighter green areas on the fishes fin’s, you can apply one coat of Cottontail to the tail and pelvic fin areas also.
Redefine the sections in the dorsal fin with a pencil. Apply 2-3 Coats of SC-75 to the lower section in the dorsal fin using CB-110 Liner. Apply 2-3 Coats of SC-27 Sour Apple to the green dorsal and pelvic fins and tail areas using CB-110 Liner or CB-404 Pointed Round.
Apply 2-3 more coats of SC-16 Cottontail to the white areas of the fish using CB-110 Liner or CB-404 Pointed Round.
Apply 2-3 coats of SC-15 Tuxedo to the face marking, eye and sections in the tail fin using CB-110 Liner or CB-404 Pointed Round.
Fire to shelf cone 04.
Glaze the body area with 2-3 coats of S-2101 Crystal Clear Brushing using CB-404 Pointed Round. You can apply one coat on the other areas of the fish to produce an even shinier surface.
Fire to shelf cone 05-06.
Form
6”x 6” Greenware Tile, leather hard preferred
Colors
UG-230 Blue Grass
SC-15 Tuxedo
SC-16 Cottontail
SC-27 Sour Apple
SC-75 Orange A-Peel
S-2101 Crystal Clear Brushing
Decorating Accessories
CB-604 Soft Fan
CB-110 Liner
CB-404 Pointed Round
Miscellaneous Accessories
Sponge
Water
Black Carbon Film Transfer Paper or AC-230 Clay Carbon
Wipe down the tile with a slightly moistened Synthetic Sponge to remove any dust and to rehydrate the tile. If dry greenware is used, use CB-604 Soft Fan loaded with water to apply a couple of coats of water to rehydrate the clay some before completing Step 2. It is easier to sgraffito the design on leather hard greenware that color has been applied. When dry greenware is used it is more difficult to carve through the color and clay. Several passes of the sgraffito tool should be made instead of one bold cut into the color. If the greenware and color are both very dry, extra care should be given when carving the lines as chipping of the underglaze can occur. Bisque tiles can be used but the look is slightly different and is a bit more difficult to carve the lines into the color.
Sketch or trace the basic shapes of the owl, leaves and branch using a pencil.
Place some of all the colors out onto a tile excluding UG-50 Jet Black. Using CB-602 Soft Fan to apply a mottled collage of UG-226 Lavender, UG-236 Grey and UG-227 Concord Grape to the sky areas of the pattern. Use less of the Concord Grape color than the other two. Wet blend the colors while making “X” strokes when applying the color to the sky. Repeat this application of color 2-3 times.
To the branch apply 2-3 coats of UG-30 Sand using CB-404 Pointed Round.
Apply 2-3 coats of UG-31 Chocolate to the owl using CB-404 Pointed Round.
The leaves are a mottling of UG-223 Apricot and UG-232 Olive. Use CB-404 Pointe Round to apply 2-3 coats of the colors. The colors do not have to be exact in their placement within the pattern.
Sketch or trace the owl, branch and leaves of the pattern using the pencil.
Use the sgraffito tool to sgraffito the lines of the owl, branch and leaves. Vary the width of the lines by applying more or less pressure to the tool. Keep the sgraffito lines loose and free when carving. Use the side of the sgraffito tool to carve bolder scoops for the feathers around the eyes. Use the pattern for guidance. Use a dry CB-604 Soft Fan to brush away any debris from the carving before firing or while working on the design. Let dry.
Use CB-110 Liner to fill in the eye with UG-50 Jet Black.
Fire to shelf cone 04.
Use a slightly moistened Synthetic Sponge to wipe down the tile to remove any dust or debris before glazing.
Use CB-604 Soft Fan to apply 2-3 coats of S-2101 Crystal Clear Brushing to the entire tile.
Wipe down the tile with a slightly moistened Synthetic Sponge to remove any dust and to rehydrate the tile. If dry greenware is used, use CB-604 Soft Fan loaded with water to apply a couple of coats of water to rehydrate the clay some before completing Step 2. It is easier to sgraffito the design on leather hard greenware that color has been applied. When dry greenware is used it is more difficult to carve through the color and clay. Several passes of the Sgraffito Tool should be made instead of one bold cut into the color. If the greenware and color are both very dry, extra care should be given when carving the lines as chipping of the underglaze can occur. Bisque tiles can be used but the look is slightly different and is a bit more difficult to carve the lines into the color.
Sketch or trace the basic shapes of the leaves and grapes using a pencil.
Place some of the colors out onto a tile except the UG-222 Soft Yellow.
Use CB-404 Pointed Round to paint in the grapes using UG-226 Lavender. The application of the color does not need to be perfect or exact. Apply 1-2 uneven coats of the color. Keep the painting loose. Darken the grapes where they overlap or toward the bottoms with UG-227 Concord Grape applying 1-2 uneven coats using the same brush.
Use CB-404 Pointed Round to apply 2-3 uneven coats of UG-232 Olive to the leaves. Shade with 1-2 coats of UG-230 Blue Grass to the leaf edges.
Apply 3 coats of UG-222 Soft Yellow to the background using CB-404 Pointed Round and CB-604 Soft Fan.
Sketch or trace the grape and leaf pattern using the pencil.
Use the sgraffito tool to sgraffito the lines of the grapes and leaves. Vary the width of the lines by applying more or less pressure to the tool. Keep the sgraffito lines loose and free when carving. Use the side of the sgraffito tool to carve bolder scoops for the highlights in the grapes and center veins of the leaves. Keep the side veins that radiate from the center vein finer. Use the pattern for guidance. Use a dry CB-604 Soft Fan to brush away any debris from the carving before firing or while working on the design. Let dry.
Fire to shelf cone 04.
Use a slightly moistened Synthetic Sponge to wipe down the tile to remove any dust or debris before glazing.
Use CB-604 Soft Fan to apply 2-3 coats of S-2101 Crystal Clear Brushing to the entire tile.
Wipe down the tile with a slightly moistened Synthetic Sponge to remove any dust and to rehydrate the tile. If dry greenware is used, use CB-604 Soft Fan loaded with water to apply a couple of coats of water to rehydrate the clay some before completing Step 2. It is easier to sgraffito the design on leather hard greenware that color has been applied. When dry greenware is used it is more difficult to carve through the color and clay. Several passes of the sgraffito tool should be made instead of one bold cut into the color. If the greenware and color are both very dry, extra care should be given when carving the lines as chipping of the underglaze can occur. Bisque tiles can be used but the look is slightly different and is a bit more difficult to carve the lines into the color.
Place some of each of the underglaze colors out onto a tile. Use a slightly moistened Synthetic Sponge to pounce on 1 coat of UG-230 Blue Grass to the top third of the tile. The area should be slightly angled. Clean the sponge and then apply 1 coat of UG-232 Olive to the rest of the tile overlapping the Blue Grass edge. Repeat this step two more times to complete the three coats of colors. The olive color should blend into the blue grass color with no harsh demarcation to the colors.
Sketch or trace the bamboo pattern using the pencil.
Use the sgraffito tool to sgraffito the lines of the bamboo and leaves. Vary the width of the lines by applying more or less pressure to the tool. Use the side of the sgraffito tool to carve bolder scoops for the texture to the bamboo canes and center veins of the leaves. Use the pattern for guidance. Use a dry CB-604 Soft Fan to brush away any debris from the carving before firing or while working on the design.
Fire to shelf cone 04.
Use a slightly moistened synthetic sponge to wipe down the tile to remove any dust or debris before glazing.
Use CB-604 Soft Fan to apply 2-3 coats of S-2101 Crystal Clear Brushing to the entire tile.
Begin by wedging the clay on a board covered with canvas.
Roll out a piece of the clay between 2 – ¼” slat boards on the canvas covered board, creating 4 slabs of clay about 14” x 18”. Keep extra clay covered while not using to keep moist.
Wrap a Styrofoam cone with a piece of paper towel. This will help the clay from sticking to the Styrofoam. One at 10” another at 8”
Wrap the Styrofoam cone with a slab of clay. Score & slip the sides together. Trim excess clay with a knife. Do both cones. Keep covered when not working on one of them.
With another slab of clay start cutting out the 1” diameter tear drops. For the bottom row of the larger tree, you need about 15 tear drops to start.
Texture each of the teardrops with a plastic fork. Score & slip each tear drop onto the cone starting at the bottom of the tree and keep working up cutting and texturing more tear drops as you work your way to the top of both trees.
On the smaller tree you will need to cut the top two rows with the ¾” cutter.
Clean any rough edges with a damp brush.
Allow to completely dry!
Bisque Fire to cone 04.
Using a CB-604 #4 Soft Fan, apply 3 coats of FN-219 Luster Green to the large tree and 3 coats of EL-161 Bottle Green to the smaller tree. Allow to dry!
Wipe down the tile with a slightly moistened Synthetic Sponge to remove any dust and to rehydrate the tile. If dry greenware is used, use CB-604 Soft Fan loaded with water to apply a couple of coats of water to rehydrate the clay some before completing Step 2. It is easier to sgraffito the design on leather hard greenware that color has been applied. When dry greenware is used it is more difficult to carve through the color and clay. Several passes of the sgraffito tool should be made instead of one bold cut into the color. If the greenware and color are both very dry, extra care should be given when carving the lines as chipping of the underglaze can occur. Bisque tiles can be used but the look is slightly different and is a bit more difficult to carve the lines into the color.
Place some of each of the underglaze colors out onto a tile. Use a slightly moistened Synthetic Sponge to pounce on 1 coat of UG-204 Orange to the center of the tile. Approximately 2-2 ½” circle. Clean the sponge and then apply 1 coat of UG-223 Apricot to the rest of the tile overlapping the orange center edge. Repeat this step two more times to complete the three coats of colors. The orange color should blend into the apricot color with no harsh demarcation to the colors.
Sketch or trace the basic outline of the flower with the pencil.
Use the sgraffito tool to sgraffito the lines of the flower. Vary the width of the lines by applying more or less pressure to the tool. Use the side of the sgraffito tool to carve bolder scoops in the center of the flower. Use the pattern for guidance. Sgraffito fine lines to the petals outward from the center of the flower as well as any overlapping petals. Use a dry CB-604 Soft Fan to brush away any debris from the carving before firing or while working on the design. Let dry.
Fire to shelf cone 04.
Use a slightly moistened Synthetic Sponge to wipe down the tile to remove any dust or debris before glazing.
Use CB-604 Soft Fan to apply 2-3 coats of S-2101 Crystal Clear Brushing to the entire tile.
Wipe down the tile with a slightly moistened Synthetic Sponge to remove any dust and to rehydrate the tile. If dry greenware is used, use CB-604 Soft Fan loaded with water to apply a couple of coats of water to rehydrate the clay some before completing Step 2. It is easier to sgraffito the design on leather hard greenware that color has been applied. When dry greenware is used it is more difficult to carve through the color and clay. Several passes of the Sgraffito Tool should be made instead of one bold cut into the color. If the greenware and color are both very dry, extra care should be given when carving the lines as chipping of the underglaze can occur. Bisque tiles can be used but the look is slightly different and is a bit more difficult to carve the lines into the color.
Use CB-604 Soft Fan to apply 3 even coats of UG-228 Midnight Blue to the front and sides of the tile.
Use a pencil to sketch out the basic stem and leaves if needed.
Starting at the center of the dandelion, use the Sgraffito Tool to “chip” out 5 small pecks for the dandelion center. Continue the sgraffito “pecks” in concentric circles around the initial center. Continue with about 5 concentric circles to complete the dandelion. The sgraffito-ed pecks should be alternating in-between the placement outward with the previous circle.
Sgraffito the stem to the dandelion. Sgraffito the center veins to the leaves. By applying more or less pressure to the tool the edge of the leaves will appear wider and thinner. . Keep the Sgraffito lines loose and free while carving. This should give you a variation in the width of the line. Use a dry CB-604 Soft Fan to brush away any debris from the carving before firing or while working on the design. Let dry.
Fire to Shelf Cone 04.
Use a slightly moistened Synthetic Sponge to wipe down the tile to remove any dust or debris before glazing.
Apply 2-3 coats of S-2101 Crystal Clear Brushing to the entire tile.
Check the ware over for any blemishes, if present sand with 100-grit sandpaper.
Damp sponge ware to condition for glazing and to remove any fired dust or dirt on the ware’s surface.
Using the #8 Soft Fan, apply three flowing even coats of White Matte to the inner surface of the casserole dish. Bring the color up the inside edges and slightly just over the inner rim.
Allow the applied glaze time to dry.
Using provided pattern, clay carbon and a red pen, trace the pattern onto the ware.
As needed place the Stroke ‘n Coat on the palette. Condition with palette knife and thin only if color is extremely thick.
For the upper pumpkin use the following Stroke ‘n Coats: Cotton Tail, Silver Lining and Gray Hare. Use the #8 or #6 Pointed Round. Note: All detailing is completed when all the pumpkins are painted in.
Load the Round with Cottom Tail, side load with Silver Lining, and blend the two colors on the palette. Following the contour of each of the side segments, blend in one coat with the darker (Silver Lining) to the inner edge of each segment. Note: segments on the left of pumpkin are shaded on the right side of each segment. Segments on the right side are shaded to the left side. The middle segment is light in the center and shaded to the left and right of the middle.
With#6 Pointed Round fully loaded in Silver Lining and tipped in Gray Hare pull in two coats of color to the small segments behind the unpainted stem. Two coats are needed.
Reload the Round with Cotton Tail, side load with Silver Lining and Gray Hare on the same side of the Round. Blend on clean area of palette. Following the instruction in step 7a, add additional shading to each segment to the pumpkin. Work out all ridges of color.
The second pumpkin is the darkest in tone. Use the following Stroke ‘n Coats: Jaded and Blue Jade.
Fully load the Round with Jaded, side load with Blue Jade, and blend on clean area of palette. Following the same approach as in step 7a, apply the two colors to each of the segments with darker color to the inner edge of the segment.
The middle segment is completed with the same two colors, however this time the darker color is to the outer edge of the segment. A few blended streaks of Cotton Tail can be added to this middle section.
Load the #6 Round with Jaded, tip with Blue Jade and pull in the four smaller segments to the left and right of the unpainted stem.
Again, loading in the same manner, apply a second coat of the two colors to each segment.
When dry, if more intensity of color is desired, deepen the shading to the segments with a float of Blue Jade to the inner edge of the segments.
The bottom pumpkin is a combination of colors. Colors used are Cotton Tail, Silver Lining, Jaded and Blue Jade.
Fully load the Round with Cotton Tail, heavily side load with Silver Lining and Jaded on the same side of Round. As before (step 7a), apply color to each segment and keep the deeper Jaded tone to the inner edge of the segments and to the outer edge of the middle segment.
Fully load the #6 Pointed Roundwith Silver Lining, tipped in both Jaded and Blue Jade, pull the small segments to the left and right of the unpainted stem.
Repeat step 9a, for a second coat of color. Allow to dry.
Side load a water loaded Pointed Round with Blue Jade and float in shading to the inner edges of each of the side segments and to the outer edge of the middle segment.
Fully load the #6 Pointed Round with Camel Back and carefully apply two coats to the three stems.
Place Cobalt Jet Black EZ-Stroke on the palette and thin with a few drops of water or Thin ‘n Shade.
Fully load the #2 Detail Liner with the thinned Cobalt Jet Black, with very fine lines, detail the pumpkins, also, add a few accent marks here and there on the segments and clearly define the stems. Be sure to deepen the shading closest to the base of the Camel Back stems.
The filler leaves throughout the background of the design are completed with #8 Round fully loaded in Lettuce Alone and tipped in Jaded. Press, pull and lift these leaves in place.
Thinned Gray Hare is fully loaded onto #2 Detail Liner and fine accent stems are added amongst the background leaves and a fine middle vein is pulled in to the background leaves.
Sign the piece with thinned Cobalt Jet Black and the #2 Detail Liner.
Stir and shake the Winter Wood glaze thoroughly. There are small crystals in this glaze.
Pour about 1 and ½ ounces of glaze into a paper cup. Add a few drops of water if glaze is too thick. Mix with palette knife.
Using #8 Soft Fan, apply two to three coats of glaze to the side of the casserole and the top rim. Carefully butt the Winter Wood next to the White Matte. When glazing the sides of the casserole leave a ¼” unglazed area at the bottom edge of the ware. Also, make sure that the bottom of the ware is free of any glaze or Stroke ‘n Coat.
Place ware on a thoroughly kiln washed kiln shelf.
Fire to shelf cone 6.
Form
SB-102 9” x 9” Casserole Dish
Colors
EZ012 Cobalt Jet Black
SC-9 Jaded
SC-16 Cotton Tail
SC-28 Blue Jade
SC-35 Gray Hare
SC-43 Lettuce Alone
SC-48 Camel Back
SC-60 Silver Lining
SW-101 Matte White
SW-155 Winter Wood
Decorating Accessories
CB – 406 #6 Pointed Round
CB – 408 #8 Pointed Round
CB – 202 #2 Detail Liner
RB – 140 #8 Soft Fan
Miscellaneous Accessories
Sponge
Water
Palette knife
100 grit sandpaper
3 oz Plastic or Paper Cup (2) for Glaze
AC-230 Clay Carbon one sheet
Heavy Duty Plastic Page Protector for palette or glazed tile
Check the pieces over for any blemishes and if present remove them by sanding with 100-grit sand paper.
Damp sponge to condition the piece for decorating and to remove any dust from the ware’s surface.
Place the Acrylic colors as needed on the Aluminum Foil or Page Protector Palette.
Precede to basecoat rooster and hen with a very smooth coat of Burnt Orange, using the ¾” Flat Shader. Do not cover the eyes, comb, waddle or beak with the Burnt Orange. Use the #8 Pointed Round to cut color in around the unpainted areas. If color appears streaked or sparse, when dry apply another coat of the Burnt Orange.
Using the Pointed Round of choice apply the following colors to the following areas:
Comb and Waddle – Fire Thorn
Eyes – Lemon Peel
Beak – Gold *If colors appear streaked, a second coat will be needed.*
Place Cinnamon on the palette and add a few drops of Water or Thin ‘n Shade, mix with palette knife.
Water dampen the #6 Flat Shader and corner load with thinned Cinnamon. Proceed to float in shading under the comb, around the beak, around the waddle and around the eyes. Keep the Cinnamon side of the brush next to the area to be shaded and the rest of brush held flat against the body and head of the rooster or hen.
Using the float method again, corner load the #6 Flat Shader with Gold and float in shading to the upper half of the eye.
Float a hint of Burnt Orange to the beak where it joins the head.
Proceed to dry brush Bright Red using the #5 Round Dry Brush. Several passes over the Fire Thorn will be needed. Try to achieve a somewhat brighter and highlighted look.
With a piece of white chalk, sketch in the flowing lines somewhat copying the provided pattern. The chalked lines start at the top of the head between the comb and eye ball.
To the palette, add the following colors and if needed add more of the previously used colors: Ivory, Pale Yellow, Dark Yellow, Orange Peel, Avocado, Walnut, Garnet Red, Persimmon, Olive Moss. These colors along with the others on the palette will be used for the comma strokes and detailing.
Instructions for completing the design work:
Use all sizes of the Pointed Rounds. The bigger the brush number the larger the brush thus the larger the stroke.
Dampen the brush before starting and pinch out all excess water.
Fully load the brush with your color choice (normally a lighter tone) then proceed to side load with a different color or two and tip with another color.
In most cases the brush does not need to be washed out between strokes and color combinations. Wash when the brush becomes over loaded with color.
The decorating stroke is known as a comma stroke. To complete the stroke:
Load the brush.
Hold the brush straight up.
Press the brush against the ware thus forming the wider, rounded start to the stroke.
Pull the brush and slowly lift off the ware forming a distinct tail. The total motion is Press, Pull and Lift.
As the strokes are pulled in, they curve slightly to the left or right forming a soft comma like design.
Strokes can over-lap one another.
Change the loading, side-loading and tipping colors often and wash the brushes only when they become too full of color.
Please note, work one side of the Rooster or Hen then allow drying before doing the other side of pieces.
Here are some examples of loading, side loading and tipping.
Load in Ivory, side load in Persimmon and Dark Yellow and tip in Bright Red.
Load in Pale Yellow, side load in Dark Yellow, tip in both Avocado and a hint of Olive Moss.
Load in Gold, side load in Orange Peel and Garnet Red and tip in Ivory.
Load in Bright Red, side load in Fire Thorn, tip in Pale Yellow and Ivory.
Other combinations work well.
Remember: Allow one side of the ware to dry thoroughly before adding strokes to the other side of the ware.
Soft smaller Ivory comma strokes can be added to some of the deeper tones and larger comma strokes. By doing this, highlights will be created.
Thin down the Walnut slightly with a few drops of water or Thin ‘n Shade. Mix with palette knife.
Fully load the #2 Detail Liner with the thinned Walnut. Working from the fine tip of the comma strokes outward, add fine lines to some of the dried comma strokes, accent outline a few of the comma strokes. Pull out some simple scroll-work throughout the design.
There are a few small hat pin style strokes painted over some of the comma strokes and in the background. To complete these, fully load the liner with the thinned Walnut, pull in a fine line, then press the brush against the ware and lift off; thus creating the stroke.
A variation of this stroke would be to pull out a fine line, press brush against the ware, lift slightly and pull out forming a tail at the end of the stroke. Add nostrils and mouth line.
With the #4 Pointed Round loaded in Black, paint in the large pupils to the eyes.
With #2 Detail Liner, pull in a fine upper lid line and a lower lid line. Using Black.
When dry, add highlights to the eyes with Ivory.
With handle of a brush, add tiny dots of Pale Yellow in groups of three throughout the design.
At the ends of the pulled in scroll-work add a dot of Hot Orange.
Sign the pieces.
With the softer ¾” Flat Shader, apply two smooth coats of Brush on Matte Sealer over the entire hen and rooster. Be sure to apply as smooth as possible and allow some drying time between coats.
Form
MB 1596 Rudy Rooster
MB 1597 Holly Hen
Colors
OS432 Ivory
OS433 Pale Yellow
OS434 Lemon Peel
OS435 Dark Yellow
OS436 Gold
OS438 Orange Peel
OS439 Hot Orange
OS440 Burnt Orange
OS449 Bright Red
OS466 Avocado
OS472 Walnut
OS476 Black
OS480 Garnet Red
OS481 Cinnamon
OS484 Persimmon
OS487 Olive Moss
OS568 Fire Thorn
AC-502 Matte Sealer
Decorating Accessories
AB-710 3/4” Flat Shader
CB-404 #4 Pointed Round
CB-406 #6 Pointed Round
CB-408 #8 Pointed Round
CB-306 #6 Flat Shader
CB-202 #2 Detail Liner
DB-802 #5 Round Dry Brush
Miscellaneous Accessories
Sponge
Palette knife
Aluminum Foil for palette or Heavy-Duty Plastic Page Protector
Start with properly-fired bisque. Wipe away any dust with a damp sponge.
With AC-220 filled with SW-401 Light Flux, apply 2 rows of “W”s.
Using CB-106 #6 Script Liner (or AC-224 Plastic Caps on the bottles), place dots of SC-103 Lavendear inside the loops of the top row of “W”s. Apply 2 coats.
Using CB-106 #6 Script Liner (or AC-224 Plastic Caps on the bottles), place dots of SC-101 Spruce It Up inside the loops of the bottom row of “W”s. Apply 2 coats.
Apply 3 coats of SW-194 Nimbus to the outside of the bowl avoiding the foot using CB-140 #4 Soft Fan. Let dry between coats. Nimbus is very mobile. Take caution when applying. We suggest receding your coats.
Apply 3 coats of SW-194 Nimbus to the inside of the bowl using CB-140 #4 Soft Fan. Let dry between coats.
Research culinary treats that are typically cut into slices. (Ex. Cheese, pie, cake, etc…) Specifically, what that food looks like once it’s cut away from the larger piece.
Cut a rectangle of cardstock or cardboard 12”x 4”
Fold at the halfway point (6”).
Decide how thick or thin you want your slice to be by how wide the angle is after folding, and measure between the two end pieces (ours is 3”).
Cut a rectangle from cardstock that is your endpiece measurement by your width (ours is 3”x4”).
Roll out a slab of clay about ¼” thick.
Compress the slab with a plastic card.
Lay your rectangle patterns on the slab and trace.
Remove the pattern and cut out the pieces with a toothpick.
Take your 12” long rectangle of clay and fold in half to form a V.
Slip and score the two end pieces to the smaller rectangle.
Take two thin coils and press into the corners to reinforce the structure.
Take the triangle of walls and set on top of the remainder of the clay slab.
Trace the outside edge of the walls around the triangle shape two different times and cut. One triangle will be the base, the other the lid.
Slip and score the base to the bottom of the walls.
Reinforce with coils
To make a lid, run coils along the face of the last triangle, inside where the walls will sit when it’s flipped over. Double check to make sure the lid coils will fit inside the box.
Using coil building, carving, and sculptural effects, add the details that will make your treat look realistic.
Pay attention to the textures on things like cake, crust, fillings, icing, etc…
Use Mayco’s Fundamentals Underglaze directly on greenware to color your piece.
Bisque fire to shelf cone 04.
Clear glaze any areas that need to be shiny. Add any other lowfire glazes you’d like to use during this step.
Knead the mold trimmings from the casting and moisten if necessary. Roll clay trimmings out into about a ¼” slab approximately 3”x 5”X ¼. Place face pattern onto clay. Trace the basic placement of the beak, eyes and rings of feathers. Use a Clean Up Tool to cut out the shape of the face. Use the AC-219 Bottle’s opening to press in the pupil circles for the eyes. Use the bottle cap to press in the ring around the eyes, rotating the edge of the bottle to form texture around the pupil Use the curved end of the Clean Up Tool to press in the concentric design detail around the eyes. Rock the tool’s curved point towards the while pressing firmly enough to cause a good imprint.
Score and attach the face to the center of the oval vase using some slip. Roll a small amount of clay into a cone shape. Towards the fat end of the cone, pinch the end between your thumb and index finger to reshape the top end into a slight peak. Score and slip the beak onto the face. Use the Clean Up Tool to make two indentations in the top of the beak.
Trace the chest feathers onto the front of the oval container centering the feathers under the beak. Use a Sgraffito Tool to carve the edge and basic shapes of the feathers. Carve the detail lines in each feather.
Use the Clean Up Tool to fettle the seam lines. Use the Green Grit Cloth to further refine the seam lines. Use a moistened Synthetic Sponge to wipe down the piece to remove any dust before firing.
Let the piece dry thoroughly before firing. Fire to Shelf Cone 04.
6. Use a slightly moistened Synthetic Sponge to wipe down the piece before painting. Check to make sure that no debris is attached to the incised lines on the feathers.
Place some SC-14 Java Bean onto a tile and thin with water to a milky consistency. Use CB-604 Soft Fan to apply color to the Face and Chest Feathers. Use a Synthetic Sponge to wipe back the highlights. Rinse sponge often. Let Dry.
Use CB-406Pointed Round to dry brush some SC-45 My Blue Heaven onto the highlights on the face feathers. Accent the outer edges with some SC-11 Blue Yonder with the same brush.
Apply 2-3 coats SC-34 Down To Earth to the pupils of the eyes using CB-110 Liner. Paint the beak with the same color. To the iris of the eye apply 2-3 coats of SC-5 Tiger Tail using CB-110 Liner.
To the chest feathers apply 2-3 coats of thinned SC-5 Tiger Tail using the CB-406Pointed Round. Try to apply the color to the feathers while not allowing the color to fill in the crevices of the detail.
Apply 3 coats of FN-08 Brown to the inside of the canister using CB-604 Soft Fan.
Apply 2-3 coats of CG-965 Mocha Marble to the body of the canister using CB-604 Soft Fan or CB-406Pointed Round. Try to evenly disperse the crystals while not allow clumps of crystals to form. Apply 1-2 coats of S-2102 Crystal Clear Brushing to the face and chest feathers using CB-406Pointed Round
Stilt and Fire the piece to Shelf Cone 05-06.
Note. The design can be painted if you don’t have a wet piece of greenware to modify. There are some slightly different steps to painting if you don’t modify the piece. No antiquing of the face and chest feathers would be done. Paint the blue colors to the face then detail the pattern with the Java Bean replacing the incised lines. The eyes and beak are painted the same. For the chest feathers, apply 2-3 thinned coats of the Tiger Tail wash and then detail with Java Bean. Apply 1-2 coats of Crystal Clear Brushing over these areas.
Form
CD-1284 Oval Canister, WET greenware.
Note: Keep the mold trimmings from mold casting. If you don’t have access to wet greenware the piece can be accomplished just by painting in the pattern. Read the notation at the end of the instructions for guidance.
Use a moistened Synthetic Sponge to wipe down the ware to remove any dust.
Use a pencil and AC-230 Clay Carbon to transfer the basic shape of the moon and raven.
Starting with the left side of the moon, use CB-404Pointed Round to start dabbing in SC-55 Yella Bout It, transition to SC-42 Butter Me Up as you move up towards the top of the moon around the Raven. Towards the middle top of the moon introduce SC-24 Dandelion. As you move around to the left side of the moon bring in some SC-50 Orange Ya Happy then to some SC-25 Crackerjack Brown and finally some SC-81 Cinnamon Stix about middle of the moon. Then start reversing the order of the colors towards the bottom of the moon where it meets the Raven. Repeat this step for the applications of the colors and blending them as you apply each coat. Work the colors back and forth over one another to aid in the blending process. Slightly extend the color past the moon’s edge as well.
If necessary, redefine the outline of the moon and Raven. Apply 3 coats of SC-33 Fruit of the Vine to the Raven using CB-406Pointed Round.
Trace the details in the Raven and lettering onto the ware. The detail in the bird excluding the beak and pupil are reversed from the pattern. i.e., the markings in the bird as shown would be what you don’t paint. They will show as highlights in the bird. Paint in the beak outlines and detail and the pupil excluding the highlight with SC-15 Tuxedo using CB-110 Liner. Apply 1 coat of slightly thinned SC-15 Tuxedo to the bird using CB-110 Liner or CB-404Pointed Round. Carry a full brush of color when painting. Start at the head and work backwards and downward omitting the highlights in the Raven. If you paint the brushstrokes as the feathers would lay, any thin applications of color will show hints of the purple underneath further enhancing the Raven.
Apply 2-3 coats of SC-15 Tuxedo to the background around the Moon and Raven using CB-106 Script Liner, CB-404Pointed Round and CB-602 Soft Fan.
If you are painting in the lettering, use AB-706 Filbert loaded with SC-81 Cinnamon Stix. Use CB-110 Liner to outline the lettering with a fine line of thinned SC-15 Tuxedo. Let dry.
Shake well SG-701 Star Dust Clear. The specks have a tendency to settle in the jar. To the background excluding the moon and Raven apply 1 good even coat of SG-701 Star Dust Clear using CB-404Pointed Round and CB-602 Soft Fan. Let dry.
Plan out what kind of three fish you’d like to make.
On a piece of paper, draw out a round body outline with a top and back fin, plus a little jut out for the jaw.
Cut out your outline.
Find a variety of objects (natural or manmade) to use to press into the clay for texture. Some of the textures we used on our fish were netting, dandelion leaves, cardboard, and the backs of paintbrushes.
Pick out at least two colors of glaze per fish. We used two foundations and one jungle gem color per fish.
Roll out and compress a slab of clay from your two pounds of clay about a 1/3rd inch thick
Lay your paper template on the slab of clay and trace with a toothpick.
Remove the template and cut all the way through your traced area.
With the remaining clay, cut out a round shape (for the eye) and heart shape (for the fin) attachment and set aside.
Lay your found objects on the areas of the clay you would like to print.
Press item down with your fingertips.
Using a plastic card, smooth the object down onto the clay
Carefully peel the texture objects up out of the clay
Using your toothpick, scratch into the back side of your clay eye and fin attachments.
Scratch the surface of the main fish body where you want your attachments to be.
Take a small drop of water and drip onto the scratched portion of the body.
Press and wiggle attachments onto the body where you placed your drop of water. 5. Allow to dry 6. Bisque fire to shelf cone 04
Apply 3 coats of Foundations Sheers to the textured areas of your fish.
3 coats of Jungle Gems glaze can be applied to the less textured areas.
Trace shapes onto cardboard or cardstock to use as stencils for cutting clay.
Decide what pet or animal to base your box off of.
Draw your animal ideas onto your stencils.
Roll out a slab that is about a quarter-inch thick.
Compress slab with a plastic card.
Using a fettling toothpick, trace and cut out shapes from compressed slab.
If using the pattern, cut out 1 of shape A (top), 4 of shape B (sides), and 1 of shape C (bottom).
Smooth out cut edges with a damp sponge.
Cut a beveled edge on all sides of each shape with a fettling knife. To create a beveled edge, bring your clay slab to the end of the table and use the table to hold your fettling knife or bevel cutter sturdy at a 45-degree angle to cut.
Attach the beveled angles together by scoring and slipping.
Roll a thin coil and press into each corner as extra support at the seam.
Smoosh ends together and smooth out the seam
Repeat steps 1-3 with all sides of the box.
With a damp sponge, clean up surfaces.
Attach ear shapes to the top of the box by scoring and slipping.
Allow the clay to reach a semi-leatherhard state.
Using a craft knife, carefully cut off the top of the box to form the lid.
Cut at an angle to ensure the lid doesn’t slip off the box when put together.
With a soft fan brush, apply 3 coats of your glaze to the sides and top of boxes. Be sure to not get glaze where the lid and body of the box meet.
When glaze is no longer shiny, use a loop tool and/or toothpick to carve your animal details through the glaze and into the box.
With the lid off the box, allow the box and lid to dry completely.
Stack a variety of bowls and cups to make a rounded cone shape.
Put a sheet of plastic wrap over the form, tucking the edges in under the form.
Pull off smaller chunks of clay from your 2lb block.
With gentle, even pressure, roll out a long coil about the thickness of a pinky finger.
Wrap the coil around the base of your form.
When the coil begins to overlap with the coil beneath it, take a toothpick and score the top of the base coil, and the bottom of the coil you are wrapping.
Dip your finger in the water bowl and place a drop of water on the scored section of the bottom coil.
Sandwich your scored coils together and repeat as you build up your form.
When you finish coiling, take the toothpick, and run it at an angle between the coils to help clean up score marks and press the connection points together.
Cut a hole about 3” wide somewhere in the base for the “door”.
From the excess clay, make little signs to score and attach to the coils.
Bees can be made by rolling two tiny balls. One ball is attached as the body. The other ball is pinched into a teardrop shape and then cut in half to make the wings. Attach these next to the body. 5. For the big top bee, hollow out a larger ball and attach it to the top of your skep.
Carefully remove the form from the inside of the piece and allow your skep to dry. Do not allow the project to dry on the form or the clay will crack as it shrinks.
Bisque fire to cone 04.
Glaze the whole piece, inside and out, with three coats of EL-107 Amber Ash, taking care to avoid any additions attached to your skep. (Bees, signs, etc.)
Glaze your bees with Stroke and Coat glazes # 15,16, and 6. Be sure to use three coats for solid coverage.
Clean all glaze off the foot of the piece, or stilt, and fire to cone 06.
Use a moistened Synthetic Sponge to wipe down the ware to remove any dust.
Using AC-230 Clay Carbon and a pencil to trace the division line of the face from the hat and sky areas. Apply 2 coats of FN-01 White to the hat and sky area using CB-604 Soft Fan. Let dry.
Reposition the pattern and trace the hat and hat band area as before.
Using CB-604 Soft Fan to apply 1-2 coats of SC-45 My Blue Heaven and SC-103 Lavendear to the sky area and wet blend where the two colors overlap. My Blue Heaven color to one side of the sky and darken the other side with the Lavendear.
Apply 2-3 coats of SP-254 Speckled Vanilla Dip to the hat excluding the hat band using CB-406 or CB-404Pointed Round.
Load CB-604 Soft Fan with FN-022 Tan applying 3 even coats of the color to the face area on the front of the plate and to the entire back of the plate.
On a tile, thin some SC-14 Java Bean to almost a dirty water consistency. Use CB-110 Line loaded with the very thin color to paint in the line texture of the burlap to the face. Try to keep the lines completely horizontal and vertical when painting. The lines look better if they vary in thickness and spacing between each other. It should look like a loose weave burlap when completed done. Let Dry.
Retrace the pattern to the face as before.
Apply 2-3 coats of SC-23 Jack-O-Lantern to the hat band and nose using CB-404 Pointed Round.
Apply 2-3 coats of SC-16 Cottontail to the eye areas using CB-404Pointed Round. Let dry. Detail the outline of the eyes and pupil with SC-15 Tuxedo using CB-110 Liner. Paint in the eyebrow and mouth lines using CB-110 Liner. The mouth line is thicker than the eyebrow lines. Thin some Tuxedo with water and paint in the fine stitching lines to the eyebrows, mouth and nose.
Thin some SC-14 Java Bean for shading of the hat and hat band. Load the CB-404Pointed Round with the slightly thinned color to apply the shading in the hat and hat band in a scruffy haphazard manner. Darken the shading with some thinned SC-34 Down To Earth in the same manner. Paint in some random cross hatched lines to resemble the woven hat texture.
Detail the outlines of the hat with thinned down SC-34 Down to Earth using CB-110. Keep the lines uneven and broken to give the lines a free styled appearance.
To create the paint chips, place the stroke and coat colors onto a piece of foil and bake in the oven for about 30 to 45 minutes at 250 degrees. Remove from the foil and crush individual colors into small pieces.
Divide the plate into 2 sections.
Using the Soft Fan, apply 2 coats of Clear to the back, keeping off the foot and inside areas.
Using the Fan, apply 2 coats of Sand Dollar to 1 side of the divided plate, and Nimbus to the opposite side.
Using the Liner, apply in sections Sand Dollar, and while wet, sprinkle on the brown colored Stroke and Coat chips. Continue until the entire tan section is completed.
Using the Liner, apply in sections Nimbus, and while still wet, sprinkle on the blue colored Stroke and Coat chips. Continue until the entire blue section is completed.
If you are concerned that the chips will move/get loose, spray a few light coats of hair spray to hold them in place.
Place on a well kiln washed shelf and fire to shelf cone 6
To create the paint chips, place the stroke and coat colors onto a piece of foil and bake in the oven for about 30 to 45 minutes at 250 degrees. Remove from the foil and crush individual colors into small pieces.
Divide the plate into 2 sections.
Using the Soft Fan, apply 2 coats of Clear to the back, keeping off the foot and inside areas.
Using the Fan, apply 2 coats of Ivy to 1 side of the divided plate, and Nimbus to the opposite side.
Using the Liner, apply in sections Ivy, and while wet, sprinkle on the green colored Stroke and Coat chips. Continue until the entire green section is completed.
Using the Liner, apply in sections Nimbus, and while still wet, sprinkle on the blue colored Stroke and Coat chips. Continue until the entire blue section is completed.
If you are concerned that the chips will move/get loose, spray a few light coats of hair spray to hold them in place.
Place on a well kiln washed shelf and fire to shelf cone 6
Outline the entire design with the Black Designer Liner.
Using the Round and Liner, apply 2 coats of Sunkissed to the yellow leaves, Tu Tu Tango to the red colored leaves and Can’t Elope to the orange leaves and to the letters.
Using the liner, apply 2 coats of Tiger Tail to the stems.
Using the Soft Fan and Script Liner, apply 2 coats of Amber Quartz to the rim and back of the plate, excluding the foot and recessed area.
Using the Soft Fan and Script Liner, apply 1 coat of Autumn to the background, keeping off the painted areas.
Apply 1 coat of clear over the Autumn areas.
Place on a well kiln washed shelf and fire to shelf cone 6
Set pot on its side so the opening can become your monsters mouth and smooth out any cracks with your finger.
Using small pieces of clay sculpt features for your monster (eyes, teeth, tongue, arms, legs, tail, fins, etc.).
Attach the features to your pot by slipping and scoring them together.
Smooth out your connections with your fingers and water.
Let your pot dry slowly.
Once it is completely dry, bisque fire your pot to cone 04.
Glaze:
Wipe your bisqueware with a damp sponge.
Coat your pot with 3 coats of your favorite Jungle Gem (Pictured: CG-785 Royal Fantasy, CG-707 Woodland Fantasy, CG-998 Pink Pixie, CG-718 Blue Caprice, S-2702 Northern Lights).
Using a detail brush apply 3 coats of SC-16 CottonTail to the eyes and teeth.
Using a detail brush create the pupils with SC-15 Tuxedo, apply 3 coats.
Add color to the tongue using a detail brush and 3 coats of SC-95 Pinkie Swear.
Use stilts to fire pieces to cone 06.
Form
1/2-3/4 of a pound of white clay per piece (Laguna’s EM-210)
Using the back of your needle tool or a pencil, draw lines into the sides of your tumbler (optional)
Allow to dry fully
Bisque fire to Cone 04
Glaze:
Wipe Bisque tile clean with a damp sponge removing any dust
In a small cup mix 1 teaspoon of your chosen underglaze and 2 drops of liquid soap into 2 teaspoons of water. Mix thoroughly
Tilt cup slightly and use a straw to blow gently into the mixture until bubbles overflow
Use the straw to pull the bubbles from the cup onto the tile and let them pop on their own. Do not touch the bubbles or let them slide around once on the tile for best results
Allow bubble background to dry completely
Option to add jet black accents to texture by applying jet black with a detail brush
Once underglaze is dry, fully dip in clear glaze
Glaze fire to Cone 06 on stilts
Form
Wheel thrown tumbler – 1 ½ to 2 pounds of low-fire white clay per piece (Laguna’s EM-210)
Using about 1 lb of clay, roll out a ¾” thick slab
Smooth out both sides of the slab with a rib
Cut your desired shape out of the slab for your wall plaque (I chose a flower shape)
Using a ½ lb of clay, make a small pinch pot
Smooth out pinch pot and cut it in half using your wire tool, so you have one half of the pot
Attach the cut pot to your wall plaque shape by sliping and sociring the prices together
Add optional drain holes to the bottom of your pot with your needle tool
If you added drain holes, mold a small drip tray using the remainder of your clay and attach it to the plaque under where the water would drain
Create a nail hole for hanging your planter on the top of your plaque with the back side of your needle tool or a pencil
Smooth out any flaws with your finger or a sponge
Allow to dry fully
Bisque fire to Cone 04
Glaze:
Wipe Bisque tile clean with a damp sponge removing any dust
Use masking tape to tape off the area you do not want bubble glazed
In a small cup mix 1 teaspoon of your chosen underglaze and 2 drops of liquid soap into 2 teaspoons of water. Mix thoroughly
Tilt cup slightly and use a straw to blow gently into the mixture until bubbles overflow
Use the straw to pull the bubbles from the cup onto the tile and let them pop on their own. Do not touch the bubbles or let them slide around once on the tile for best results
Allow bubble background to dry completely
Remove masking tape and apply 3 coats of China White to the non-bubble glazed area
Once underglaze is dry, fully dip in clear glaze
Glaze fire to Cone 06 on stilts
Form
½ to 2 pounds of low-fire white clay- per piece (Laguna’s EM-210)
Begin with properly fired cone 04 bisque. Moisten a sponge and wipe bisque to remove any dust.
Using the Soft Fan brush with FN001 White, apply 1 coat to the front of the platter.
Place the pattern over the front of the platter. Lightly trace the strawberries with a pencil. You should be able to see a faint outline in the glaze.
Squeeze out 1/2 tbsp SP201 Speckled Pink-A-Boo and 1/2 tbsp SP274 Speckled Hot Tamale onto the same spot on the palette. Mix the two glazes to create a new color. Squeeze out 1 tbsp SP201 Speckled Pink-A-Boo and 1 tbsp SP274 Speckled Hot Tamale onto different parts of the palette.
Using the Script Liner brush with SP201 Speckled Pink-A-Boo, SP274 Speckled Hot Tamale, and the mixed color, apply 3 coats to each strawberry. Allow glaze it dry between coats. Try to evenly space the different colors.
After the glaze is dry to the touch, take the skewer and scrape decorative lines onto each of the strawberries. Do not brush off the glaze crumbs immediately or they can smear onto the platter. Wait for the glaze to dry, then gently brush off the glaze crumbs.
Take AC220 Detailer Tips and 1 oz Bottle and fill the bottle halfway with SC007 Leapin’ Lizard. Use the bottle to make a stem and leaves at the top of each strawberry.
Using the Detail Liner brush with SC015 Tuxedo, loosely outline each strawberry.
Squeeze out Squeeze out 1/2 tbsp SP201 Speckled Pink-A-Boo and 1/2 tbsp SP274 Speckled Hot Tamale onto the same spot on the palette. Mix the two glazes to create a new color again. Using the Soft Fan brush, apply 3 coats to the back of the platter. Allow glaze to dry between coats.
Squeeze out 1 tbsp of SC015 Tuxedo to the palette. Take a pencil and dip the eraser into the glaze. Stamp a circle on the rim of the platter. Repeat to create a border around the front edge of the platter.
Begin with properly fired cone 04 bisque. Moisten a sponge and wipe bisque to remove any dust.
Take the scissors and cut out the large set of patterns.
Take one pattern and place it on the matching side of the bird. Slide AC-230 Clay Carbon Paper under the pattern and trace with the pencil. Repeat for the other side of the bird.
Using the Script Liner with SC-2 Melon-Choly, apply 3 coats to the flowers. Allow glaze to dry between coats.
Squeeze out around 1 tsp of SC-89 Cutie Pie Coral onto the palette. Take the pencil eraser and dip it into the glaze. Stamp the center of one flower. Repeat for each flower.
Using the Script Liner with SC-33 Fruit of the Vine, apply 3 coats to the flat edges of the bird. Allow glaze to dry between coats.
Dip into NT-CLR Clear One Dipping.
Stilt and fire to cone 06.
Small Bird:
Begin with properly fired cone 04 bisque. Moisten a sponge and wipe bisque to remove any dust.
Take the scissors and cut out the small set of patterns.
Take one pattern and place it on the matching side of the bird. Slide AC-230 Clay Carbon Paper under the pattern and trace with the pencil. Repeat for the other side of the bird.
Using the Script Liner with SC-103 Lavendear, apply 3 coats to the flowers. Allow glaze to dry between coats.
Squeeze out around 1 tsp of SC-33 Fruit of the Vine onto the palette. Take the pencil eraser and dip it into the glaze. Stamp the center of one flower. Repeat for each flower.
Using the Script Liner with SC-89 Cutie Pie Coral, apply 3 coats to the flat edges of the bird. Allow glaze to dry between coats.
Begin with properly fired cone 04 bisque. Moisten a sponge and wipe bisque to remove any dust.
Take the scissors and cut out the large set of patterns.
Take one pattern and place it on the matching side of the bird. Slide AC-230 Clay Carbon Paper under the pattern and trace with the pencil. Repeat for the other side of the bird.
Take SG-404 Blue and trace over the patterns on both sides of the bird. Allow the lines to dry.
Using the Script Liner with SC-76 Cara-Bein Blue, apply 3 coats to the flat edges of the bird. Allow glaze to dry between coats.
Dip into NT-CLR Clear One Dipping.
Stilt and fire to cone 06.
Small Bird:
Begin with properly fired cone 04 bisque. Moisten a sponge and wipe bisque to remove any dust.
Take the scissors and cut out the small set of patterns.
Take one pattern and place it on the matching side of the bird. Slide AC-230 Clay Carbon Paper under the pattern and trace with the pencil. Repeat for the other side of the bird.
Take SG-404 Blue and trace over the patterns on both sides of the bird. Allow the lines to dry.
Using the Script Liner with SC-76 Cara-Bein Blue, apply 3 coats to the flat edges of the bird. Allow glaze to dry between coats.
Begin with properly fired cone 04 bisque. Moisten a sponge and wipe bisque to remove any dust.
Using the Soft Fan with EL-122 Malachite, apply 2 coats to the outside of the monstera container. Allow glaze to dry between coats. Apply 3 coats to the inside. Allow glaze to dry between coats.
Using the Soft Fan with EL-137 Black Adventurine, apply 2 coats to the outside of the mushroom container. Allow glaze to dry between coats. Apply 3 coats to the inside. Allow glaze to dry between coats.
Using the Soft Fan with EL-124 Stormy Blue, apply 2 coats to the outside of the sun container. Allow glaze to dry between coats. Apply 3 coats to the inside. Allow glaze to dry between coats.
Using an AB710 #3/4 Flat Shader, basecoat the bird with OS483 Real Red. Allow to dry!
Using an DB-802 #5 Round, drybrush the bird with a mix of some OS438 Orange Peel and OS483 Real Red. The highlight the bird with OS438 Orange Peel.
Using an DB-802 #5 Round, drybrush the birds wing and tail highlighting the whittles with OS476 Black.
Using an AB-704 #3 Round, paint in the mask area and the eyes of the bird with OS476 Black.
Using an AB-702 #10/0 Liner, add small feathers around the mask area and detail the eye with OS431 White
Using an AB-704 #3 Round, paint the beak of the bird with OS438 Orange Peel then shade with OS-483 Real Red. Allow to dry!
Using an AB710 #3/4 Flat Shader, apply 2 coats of AC-502 Matte Sealer the bird.
Using an AB-704 #3 Round, apply 2 coats of AC-501 Gloss Sealer to the eyes and beak.
DO NOT FIRE!
MB-1601 Round Whittle Bird – as a Chickadee
Using an AB710 #3/4 Flat Shader, basecoat the bird with OS431 White.
Mix a small amount of OS431White with a couple drops of OS476 Black to make a dark grey. Apply this mix to the wings and tail. Allow to dry!
Add some more OS431 White to the grey mix to make a lighter grey. Using an DB-802 Round, drybrush the wing and tail with the light grey.
Mix a small amount of OS435 Dark Yellow with a drop or two of OS489 Saddle Brown to make a darker yellow. Using an AB-708 #10 Shader, shade under the wings with this mix.
Using an AB-708 #10 Shader, shade around the wings and tail with OS476 Black.
Using an AB-705 #5 Round, apply OS476 Black to the head, upper chest area and the beak of the bird.
Highlight the eye with OS431 White. Allow to dry!
Using an AB710 #3/4 Flat Shader, apply 2 coats of AC-502 Matte Sealer the bird.
Using an AB-704 #3 Round, apply 2 coats of AC-501 Gloss Sealer to the eyes and beak.
Begin with properly fired cone 04 bisque. Moisten a sponge and wipe bisque to remove any dust.
Take AC-230 Clay Carbon Paper and lay it over one side of the large bird. Take the corresponding pattern and place on top. Trace over the pattern with the pencil. Repeat for all five sides of the bird (left side, right side, front, top, and back). Repeat for the small bird.
Using the Script Liner with SC-6 Sunkissed, SC-11 Blue Yonder, SC-12 Moody Blue, SC-27 Sour Apple, SC-74 Hot Tamale and SC-74 Orange-A-Peel, apply 2 coats to the corresponding sections on each bird. Refer to the pattern.
Squeeze out around 1 tsp of SC-12 Moody Blue onto the palette. Use the pencil eraser as a stamp to make dots around the neck and in the tear drops on the small bird. Make dots on the tips of the flower petals on the large bird.
Squeeze out around 1 tsp of SC-75 Orange-A-Peel onto the palette. Use the pencil eraser as a stamp to make dots around the neck of the large bird.
Using the Detail Liner with SC-15 Tuxedo, outline the designs. Add decorative lines.
Using the Soft Fan with SG-702 Celebration, apply 2 coats to each bird. Allow glaze to dry between coats.
Pull off two thirds of your pound of clay and separate into two equal sized balls.
Create two equal sized pinch pots from the clay balls and set aside.
Roll a smaller ball for the head.
Create a small triangle of clay.
Roll out a coil for the tail (Mouthpiece and fipple) thicker than your straw.
With the scissors, cut two lengths of straw about an inch and a half and two inches. The longer straw will be the tail and the shorter straw will be the head.
Take one of the pinch pots, flip it upside down, and push the first straw through so it sticks out about halfway.
Do the same with the 2nd straw.
Clean out any clay that is caught in the straws.
With your toothpick, Scratch and attach the two pinch pots together to form a hollow ball with the straws sticking out.
Poke the ball through the shorter straw, remove, score the ball and body where they connect, and reattach. Remove excess clay from straw.
Cut your triangle in half.
Scratch and attach triangles to the ball of the head over the straw poking out.
Carefully poke the longer straw up through the coil.
Leaving about half an inch of clay coil after the straw ends, cut off any excess coil.
Repeat step 2 with the coil to attach.
With the coil attached to the body, take your toothpick and poke down the center of the coil and round out a hole. This should connect to the straw still in the middle of the coil.
Remove excess clay from the hole/straw.
Place your popsicle stick in the hole to where it meets the straw. This provides a flat surface to cut into.
Cut the rounded tip off another popsicle stick and push straight through the clay down into the inserted popsicle stick 3 times forming a “U” shape towards the body of the bird.
The fourth and final cut needs to be made at a 45 degree angle to properly split the airstream to produce a whistle sound.
Note: the above steps can be challenging, especially for younger students. The angles need to be exact to produce the whistling sound. The instructor may wish to complete these steps themselves at the leatherhard stage.Study the colors and patterns of real birds.
Using Mayco Fundamentals Underglazes, apply colors to the birds to mimic what can be found in nature.
Use Mayco’s S2101 Crystal Clear Brushing glaze to strategically darken the color of the underglaze in spots, and cover the tip of the tail where the mouthpiece is. Do not put clear glaze on the bottom of the bird.
Fire to Cone 04.
After firing, fill the whistle with water just to where the neck and tail pieces start to curve up. Blow into the mouthpiece to produce a burbling whistle! Note: The whistle is not water tight and the water will naturally evaporate out of the bird whistle over time.
Pour out extra water after playing.
Variations and Adaptations:
Instead of making the whistle look like a real bird, incorporate patterns or unique design elements from nature.
Besides birds, what other animals can be made using this building technique?
Getting the exact angle for the whistle to work can be tough, especially for younger students. Leave out the sound hole and fill the bird partially with soapy water for a bubble bird.
Begin with properly fired shelf cone 04 bisque. Moisten a clean sponge and wipe bisque to remove any dust.
Using a CB-604 #4 Soft Fan, apply 1 Coat of SC-41 Brown Cow to the entire piece. Allow too slightly dry!
Using a BT-910 Synthetic Sponge, wipe bay the SC-41 Brown Cow leaving the color in the crevices. Allow to dry!
Starting in the center of the blanket, using a CB-106 #6 Script Liner, apply 3 coats of SP-288 Tu Tu Tango. The next ring of the blanket, apply 3 coats of SP-209 Speckled Jaded.
Next area of the blanket, using a CB-202 #2 Detail Liner, apply the following colors, middle diamond is 3 coats of SC-73 Candy Apple Red. The top and bottom diamond is 3 coats of SC-6 Sunkissed.
The final section of the blanket is 3 coats of SC-13 Grapel.
Using a CB-404 #6 Pointed Round, drybrush 2 coats of SC-73 Candy Apple Red to the tassels. The using a CB-202 #2 Detail Liner, apply 3 coats oof SC-6 Sunkissed to the ties of the tassels.
Using a CB-602 #2 Soft Fan Brush, apply 2 thin coats of SC-46 Rawhide to the face area of the llama excluding the eyes.
Using a CB-602 #2 Soft Fan Brush, apply 2 thin coats of SC-2 Melon-Choly to the inside of the ears. Using a CB-202 #2 Detail Liner, apply 3 coats of SC-2 Melon-Choly to the nose.
Using a Silk Sponge, Highlight the area around the nose and the chin with SC-16 Cotton Tail. Highlight the cheeks with SC-2 Melon-Choly.
Using a CB-604 #4 Soft Fan, drybrush 1 coat SC-86 Old Lace to the fur. Then highlight the with some SC-16 Cotton Tail.
Using a CB-202 #2 Detail liner, apply 2-3 coats of SC-16 Cotton Tail to the eye area. Apply 3 coats of SC-11 Blue Yonder the iris of the eyes. Shade the iris with SC-12 Moody Blue. Apply 2 coats of SC-15 Tuxedo to the pupil of the eyes.
Outline and detail the eyes with SC-15 Tuxedo. Add a highlight with SC-16 Cotton Tail.
Using a CB-604 #4 Soft Fan, apply 2 coats of FN-201 Golden Clear to the entire llama. Allow to dry!
Stilt and fire to Cone 06/05.
Form
Clay Magic Mold 4325 Lucy Llama
Colors
FN-201 Golden Clear
SC-2 Melon-Choly
SC-6 Sunkissed
SC-11 Blue Yonder
SC-12 Moody Blue
SC-13 Grapel
SC-15 Tuxedo
SC-16 Cotton Tail
SC-41 Brown Cow
SC-46b Rawhide
SC-86 Old Lace
SP-209 Speckled Jaded
SP-288 Speckled Tu Tu Tango
Decorating Accessories
CB-106 #6 Script Liner
CB-110 #10/0 Liner
CB-202 #2 Detail Liner
CB-404 #6 Pointed Round
CB-602 #2 Soft Fan
CB-604 #4 Soft Fan
Miscellaneous Accessories
Palette
Paper Towels
Water Bowl
BT-910 Synthetic Sponge
Silk Sponge
Water
Low-Fire|Molds|Home Décor
406|408|446
44624
Bright Jungle Gems Chickens with Striped Neck Line
. Begin with properly fired cone 04 bisque. Moisten a sponge and wipe bisque to remove any dust.
Take the pencil and draw a line going around the neck of each chicken. This will separate the 2 colors.
Using the Script Liner with SC-6 Sunkissed (hen 1), SC-27 Sour Apple (hen 2) and SC-97 Cant-elope (rooster), apply 3 coats to the top half of the chickens. Avoid the eyes, beak, waddles, and comb. Allow glaze to dry between coats.
Using the Script Liner with SC-16 Cotton Tail, apply 3 coats to the eyes. Allow glaze to dry between coats.
Squeeze out around 1 tsp SC-15 Tuxedo onto the palette. Dip the pencil eraser in the glaze and stamp onto the eye. This will make the pupil. Repeat for the second eye.
Using the Script Liner with SC-75 Orange-A-Peel, apply 3 coats to the beaks. Allow glaze to dry between coats.
Using the Script Liner with SC-74 Hot Tamale, apply 3 coats to the comb and waddles. Allow glaze to dry between coats.
Using the Soft Fan with CG-753 Sassy Orange (hen 2), CG-756 Firecracker (rooster) and CG-987 Tree Frog (hen 1), apply 3 coats to the bottom half of each chicken. Allow glaze to dry between coats.
Cut the cardboard into 3 small pieces – around 1.5” squares. You will be using the edge with straight lines, not the corrugated edge.
Squeeze out around 1 TBS of SC-74 Hot Tamale, SC-75 Orange-A-Peel, and SC-16 Cotton Tail onto the palette.
Take 1 cardboard square and dip the straight edge into SC-74 Hot Tamale. Press vertically onto the neck of one of the chickens. It should be centered between the top and bottom colors. Repeat until you go around the neck. Repeat for all chickens.
Repeat Step #11 with a new piece of cardboard and SC-75 Orange-A-Peel.
Repeat Step #11 with a new piece of cardboard and SC-16 Cotton Tail.
Stilt and fire to cone 06.
Form
MB-1594 1596 Rudy Rooster
MB-1597 Holly Hen
Colors
CG-753 Sassy Orange
CG-756 Firecracker
CG-987 Tree Frog
SC-6 Sunkissed
SC-15 Tuxedo
SC-16 Cotton Tail
SC-27 Sour Apple
SC-74 Hot Tamale
SC-75 Orange-A-Peel
SC-97 Cant-elope
Decorating Accessories
RB-144 #4 Soft Fan
RB-106 #6 Script Liner
Miscellaneous Accessories
Sponge
Water
Pencil
Palette
Cardboard
Scissors
Low-Fire|Earthenware Bisque|Home Décor
406|403|460
44621
Bright Jungle Gems Chickens with French Dimensions
Begin with properly fired cone 04 bisque. Moisten a sponge and wipe bisque to remove any dust.
Take the pencil and draw a wavy line going around the neck of each chicken. This will separate the 2 colors.
Using the Script Liner with SC-77 Glo-Worm, apply 3 coats to the top half of the chickens. Avoid the eyes, beak, waddles, and comb. Allow glaze to dry between coats.
Using the Script Liner with SC-16 Cotton Tail, apply 3 coats to the eyes. Allow glaze to dry between coats.
Squeeze out around 1 tsp SC-15 Tuxedo onto the palette. Dip the pencil eraser in the glaze and stamp onto the eye. This will make the pupil. Repeat for the second eye.
Using the Script Liner with SC-97 Cant-elope, apply 3 coats to the beaks. Allow glaze to dry between coats.
Using the Script Liner with SC-88 Tu Tu Tango, apply 3 coats to the comb and waddles. Allow glaze to dry between coats.
Using FD-258 Pure White, make a line going around the wavy line separating the top and bottom of the chicken. You can also make decorative feathers on top of the neck area.
Using the Soft Fan with CG-753 Sassy Orange (orange hen), CG-756 Firecracker (red rooster) and CG-987 Tree Frog (green hen), apply 3 coats to the bottom half of each chicken. Allow glaze to dry between coats.
Begin with a grapefruit sized ball of low-fire clay.
To make the body of the frog, separate the clay to create a smaller ball, about the size of a clementine. Set aside and cover the rest of the clay.
Create a pinch pot from this smaller ball.
Lay the pinch pot on its side to begin drying. The mouth of the pot will sag into an oblong shape as it firms up.
Using clay set aside, roll a 6-inch coil about the width of a dime and cut into two 3-inch coils with your needle tool to create the front legs of the frog.
Carefully bend gentle arches in the middle of your two coils.
Use your finger to smooth and compress both sides of each arch to alleviate any cracks and to prevent cracking during drying and firing.
Lightly pinch one end of each coil to create flat feet and allow coils to firm up with the arches sitting upright.
Using clay set aside, roll an 8-inch coil about the width of a nickel and cut into two 4-inch coils with your needle tool to create the back legs of the frog.
Repeat steps 6 & 7
Using clay set aside, roll an additional 4-inch coil about the width of a nickel to make the tongue. Gradually flatten your coil with wet fingers and curve the flattened coil into a slope.
Allow the flattened, sloped coil to firm up while laying on its side to prevent the curve from straightening as it dries.
Using clay set aside, create the eyes by rolling two smaller balls of clay. Roll a third, slightly larger ball of clay for the fly.
Assemble your frog in the order it was created. Slip and score with your needle tool to attach the legs to the underside of your pinch pot. Follow by slipping and scoring the tongue into the inside wall. As you firmly join the legs underneath and tongue inside, expect the underside of your pinch pot to flatten a bit.
Slip and score with your needle tool to attach the eyes on top of the body, and fly on top of the tongue. Press the underside of the tongue as you attach the fly to prevent the slope from flattening.
Use a toothpick to create toes by cutting two notches into each foot. Allow your frog to dry slowly under plastic.
Forming the Lily Pad
Slap together all remaining clay and roll into a slab about 1/4” thick.
Use a rib to firmly compress both surfaces of the slab to prevent cracking during drying and firing.
Use your needle tool to cut a circle about 4 ½” in diameter from the slab and cut a wedge from the circle as if cutting a slice of pizza. Run a damp sponge along the cut surfaces to soften sharp edges. Allow your lily pad to dry slowly with your frog under plastic.
Glazing with the Green Frog with Mayco Fundamentals Underglaze.
Apply 2-3 coats of UG-216 Peach to the tongue of the frog using a CB-106 #6 Script Liner brush.
If using clay that is not white, apply 2-3 coats of UG-51 China White to the front of the eyeballs of the frog using the #6 Script Liner.
Apply 2-3 coats of UG-22 Spring Green to the body of the frog using a CB-602 #2 Soft Fan. Switch to a #0 Detail when painting a circle around the eyes of the frog.
Use a CB-200 #0 Detail to apply 2-3 coats of UG-209 Jade as irises in the eyes of the frog, then switch to a #2 Soft Fan and cover both sides of the lily pad with 2-3 coats of the same color.
Apply 2-3 coats of UG-91 True Teal to the inside of the mouth using a #6 Script Liner, switching to a #0 Detail brush to cover the edge where the tongue rests inside the mouth. Dampen a clean sponge and pat the same color around the edges and in the center of the lily pad.
Dampen a clean sponge and pat UG-21 Leaf Green onto the back of the frog, including the backs of the eyes, as well as on the bends of the legs.
Use the back of a brush to apply polka-dots of UG-68 Apple Green on top of the sponged UG-21 Leaf Green on the frog, and on top of the sponged UG-91 True Teal in the center of the lily pad.
Apply 2-3 coats of UG-50 Jet Black with a #6 Script Liner to the body of the fly.
Use the back of a brush to apply two dots of UG-51 China White onto the body of the fly for eyes.
Add pupils into the eyes of the frog and the fly with UG-50 Jet Black using a #0 Detail brush.
Bisque fire both pieces to Cone 04.
Clear Glazing
Dampen a clean sponge and wipe bisque to remove debris.
Using a #2 Soft Fan, apply two coats of S-2101 Crystal Clear Brushing to all surfaces of both the frog and lily pad.
Begin with properly fired cone 04 bisque. Moisten a sponge and wipe bisque to remove any dust.
Squeeze out around 2 TBS of SC-15 Tuxedo. Thin with around 2 tsp water. Using the Soft Fan with thinned SC-15 Tuxedo, apply 1 coat to each gnome. Allow glaze to dry.
Take a damp sponge and remove most of the glaze from each gnome, leaving it only in the crevices. Drag the sponge against the direction of the texture so that you don’t remove all of the glaze from the crevices.
Using the Script Liner with EL-125 Sahara Sands, apply 2 coats to the noses and hands. Allow glaze to dry between coats.
Using the Script Liner with EL-101 Oyster Shell, apply 2 coats to the mustaches. Allow glaze to dry between coats.
Using the Script Liner with EL-146 Rain Cloud, apply 2 coats to the beards. Allow glaze to dry between coats.
Using the Script Liner with EL-144 Dark Amethyst, apply 2 coats to the shoes. Allow glaze to dry between coats.
Refer to below steps to finish each gnome.
High Five Gnome
Using the Soft Fan with EL-128 Wheat, apply 2 coats to the hat. Allow glaze to dry between coats.
Using the Script Liner with EL-130 Sea Green, apply 2 coats to the body. Allow glaze to dry between coats.
Stilt and fire to cone 06.
Hooray Gnome
Using the Soft Fan with EL-142 Grass, apply 2 coats to the hat. Allow glaze to dry between coats.
Using the Script Liner with EL-118 Blue Grotto, apply 2 coats to the body. Allow glaze to dry between coats.
Stilt and fire to cone 06.
Hipster Gnome
Using the Soft Fan with EL-127 Rose Granite, apply 2 coats to the hat. Allow glaze to dry between coats.
Using the Script Liner with EL-149 Lavender Flower, apply 2 coats to the body. Allow glaze to dry between coats.
Begin with properly-fired cone 04 bisque. Moisten a sponge and wipe bisque to remove any dust.
Take the pencil and draw 2 scalloped lines going around the neck of each chicken. This will separate the 3 colors. If you want wings, draw those on at this time. You can cut out the pattern and trace it on or use your own pattern.
Using the Script Liner with SC-96 Aqu-ward, apply 3 coats to upper portions of the chickens. Avoid the eyes, beak, waddles, and comb. Apply 3 coats to the front sections of the wings. Allow glaze to dry between coats.
Using the Script Liner with SC-9 Jaded, apply 3 coats to the middle portion of the chickens. Apply 3 coats to the back section of the wings. Allow glaze to dry between coats.
Using the Script Liner with SC-16 Cotton Tail, apply 3 coats to the eyes. Allow glaze to dry between coats.
Squeeze out around 1 tsp SC-10 Teal Next Time onto the palette. Dip the pencil eraser in the glaze and stamp onto the eye. This will make the pupil. Repeat for the second eye.
Using the Script Liner with SC-9 Jaded, apply 3 coats to the beaks. Allow glaze to dry between coats.
Using the Script Liner with SC-10 Teal Next Time, apply 3 coats to the comb and waddles. Allow glaze to dry between coats.
Using FD-258 Pure White, make a line going around the scalloped lines separating the top, middle, and bottom of the chicken. Make a line going around the wings. You can also add decorative lines or dots.
Using the Soft Fan with CG-962 Blue Azure apply 3 coats to the bottom half of each chicken. Allow glaze to dry between coats.
Begin with properly fired cone 04 bisque. Moisten a sponge and wipe bisque to remove any dust.
Using the Soft Fan and Script Liner with SC-6 Sunkissed, apply 3 coats to the outside of the container. Try to avoid the raised areas and feet. Allow glaze to dry between coats.
Use a damp sponge to remove any glaze on the raised sun portion of the container.
Using the Script Liner with CG-753 Sassy Orange, apply 2 coats to the sun. Allow glaze to dry between coats.
Using the Script Liner with CG-756 Firecracker, apply 2 coats to the rays going out from the sun. Allow glaze to dry between coats.
Using the Script Liner with CG-718 Blue Caprice, apply 2 coats to the lines below the sun. Allow glaze to dry between coats.
Using the Soft Fan with SC-27 Sour Apple, apply 3 coats to the inside of the container. Allow glaze to dry between coats.
Using the Script Liner with SC-97 Cant-elope, apply 3 coats to the feet. Allow glaze to dry between coats.
Begin with properly fired cone 04 bisque. Moisten a sponge and wipe bisque to remove any dust.
Using the Soft Fan and Script Liner with SC-11 Blue Yonder, apply 3 coats to the outside of the container. Try to avoid the raised areas and feet. Allow glaze to dry between coats.
Use a damp sponge to remove any glaze on the raised leaf portion of the container.
Using the Script Liner with SC-97 Cant-elope, apply 2 coats to the veins and stems on the 2 leaves.
Using the Script Liner with CG-987 Tree Frog, apply 2 coats to the leaves. Allow glaze to dry between coats.
Using the Soft Fan with SC-88 Tu Tu Tango, apply 3 coats to the inside of the container. Allow glaze to dry between coats.
Using the Script Liner with SC-6 Sunkissed, apply 3 coats to the feet. Allow glaze to dry between coats.
Begin with properly-fired cone 04 bisque. Moisten a sponge and wipe bisque to remove any dust.
Using the Soft Fan and Script Liner with SC-27 Sour Apple, apply 3 coats to the outside of the container. Try to avoid the raised areas and feet. Allow glaze to dry between coats.
Use a damp sponge to remove any glaze on the raised mushroom portion of the container.
Using the Script Liner with SC-6 Sunkissed, apply 3 coats to the stems of the mushrooms. Allow glaze to dry between coats.
Using the Script Liner with SC-88 Tu Tu Tango, apply 3 coats to the underside of each mushroom head. Allow glaze to dry between coats.
Using the Script Liner with CG-718 Blue Caprice, apply 2 coats to every other mushroom cap. Allow glaze to dry between coats.
Using the Script Liner with CG-753 Sassy Orange, apply 2 coats to the remaining mushroom caps. Allow glaze to dry between coats.
Using the Soft Fan with SC-97 Cant-elope, apply 3 coats to the inside of the container. Allow glaze to dry between coats.
Using the Script Liner with SC-88 Tu Tu Tango, apply 3 coats to the feet. Allow glaze to dry between coats.
Use a moistened sponge to wipe down the bisque to remove any dust.
Apply 3 smooth coats of FN-1 White to the top of the tray using CB-604 Soft Fan.
To the edge, back and feet of the tray apply 3 coats of FN-19 Dark Blue using CB-604 Soft Fan.
Using AC-230 Clay Carbon and a pencil to transfer the design outlines.
On a tile put out some of each of the E-Z Strokes and thin slightly to a creamy consistency using a Pallet Knife. Mix some of the EZ101 Neon Yellow with EZ013 White to create a soft yellow.
Starting with the gill and from the face of the fish paint in the top portion of the gills with the yellow mixture using CB-404 Pointed Round. Streak it in with the curvature of the gills. Fade this as you go up around the eye.
Paint around the eye with some thinned EZ032 Peacock Green shaded with EZ035 Dutch Blue. Add final details around the eye with EZ023 Midnight Blue using CB-110 Liner keeping the lines very fine. Pupil of the eye is darkened with EZ024 Royal Blue Green.
Use the brush loaded with EZ058 Poppy Orange to shade the face and below the eye and add a few spots over the eye as well. Darken the front of the face and a small area under the eye with EZ-057 Coral Red as well as the smaller spots over the eye. Darken the edge and some spots under and over the eye with EZ075 Passion Red.
To the mouth area paint in some EZ032 Peacock Green and darken the upper lip with some EZ035 Dutch Blue and EZ024 Royal Blue Green.
To the body behind the gill area apply some EZ002 Princess Pink and shade with some very thin EZ050 Pueblo Purple. Keep the purple shading light next to the gill area.
To the body of the fish use a lightly moistened Silk Decorating Sponge loaded with EZ032 Peacock Green to pounce in the back and top area. Keep this color somewhat light in the middle of the body. There should be no hard delineation of the color to where the color fades to nothing. The color can be darker towards the back of the fish next to the tail.
Streak in some thin washes of EZ032 to the top and bottom fins. You can apply multiple layers of the washes to darken areas and to indicate the sections to the fins. Darken the front and back areas of the top and bottom fins first with EZ035 Dutch Blue and accent further with EZ023 Midnight Blue. Add some spots of first EZ058 Poppy Orange in the top fin and darken with EZ075 Passion Red. Add some thinned EZ050 Pueblo Purple to the front portion of the lower fin. Shade over the Peacock Green area near the tail fin with some EZ035 Dutch Blue and darken with some EZ023 Midnight Blue. Add some very thin EZ028 Leaf Green color to the lower fin for some variation of color.
To the tail fin paint in some strokes of EZ032 Peacock Green. Leave some white areas. Paint in a couple of spotted areas with EZ058 Poppy Orange and accented with EZ075 Passion Red. Darken the top and bottom edges with some EZ035 Dutch Blue and accented with some EZ023 Midnight Blue.
To create the spots on the body, thin some EZ035 Dutch Blue. Paint in some random spots behind the gills, along the top and lower back portion of the body. After painting the spots of color, take a clean but slightly damp Silk Decorating Sponge and blot the color to lighten the spots if too dark.
Detail the fish in a broken line using CB-110 Liner loaded with EZ023 Midnight Blue. Keep this line very fine and broken.
Mix some EZ018 Chartreuse with some EZ011 Sienna Brown to create an olive color. You can make another portion with a bit of EZ028 Leaf Green to brighten the color. Paint in the bulbous portion of the kelp with the color and shade with the greener mixture. Use the ½” Dagger Brush to paint in the leaves of the kelp loaded with the olive mixture. You can tip the brush with EZ024 Royal Blue Green to create depth and shadows in the kelp when painting. Use the brush to paint in the kelp in a ribbon stroke.
To detail the kelp, use the olive color darkened with some EZ028 Leaf Green and thinned EZ024 Royal Blue Green. Outline the kelp and pods with this darkened color using CB-110 Liner.
Shake and Stir CG-722 Seawind. Pour out a teaspoon full into a shallow dish and wash the glaze from the crystals (like panning for gold.) Add some thinned S-2101 Crystal Clear Brushing to the crystals. This mixture should be very thin. Using CB-604 Soft Fan to brush on one thin coat of crystal mixture to the background areas of the pattern dispersing the crystals evenly.
Using a slightly moistened sponge to wipe down the ware. Let dry.
Trace on the pattern outline of the butterfly using a pencil and AC-230 Clay Carbon.
Using FD254 Black Licorice to outline the wings and body of the butterfly including the antennae. Keep the antennae as fine as possible.
Apply 3 coats of FN-205 Saddle Tan to the top wing sections of the butterfly using CB-406-Pointed Round. Try not to get any color on the outlining of the butterfly.
Shade the top wing with SC-50 Orange Ya Happy next to the body fading the color outward using CB-406 Pointed Round.
Shake and stir S-2725 Safari. Apply 2-3 coats to the lower sections of the wings using CB-406 Pointed Round. Apply the crystals kind of heavily to the lower wing sections.
Retrace the detail in the upper wings with AC-230 Clay Carbon and a pencil.
Paint in the detail in the upper wing with SC-15 Tuxedo using CB-110 Liner. One good coat is all that is needed. Fill in the body with 3 coats of SC-15 Tuxedo.
Stilt and fire to shelf cone 05-06.
If needed, plot/sketch out the design in the lower wing with the Red Fine Point Sharpie.
Fill the cup on the Fluid Writer Pen with OG801 Bright Gold. Outline the butterfly. Add a fine line to the antennae. Using your plotted lines in the wing sections, apply a fine line to the detail in the upper and lower wings. Add detail in the body. Clean the Fluid Writer Pen with a Q-Tip and OG901 Essence.
Stilt and Fire to Shelf Cone 018.
Apply 1-2 coats of OS487 Olive Moss to the background. Let dry. Buff with a dry soft cloth.
Using a slightly moistened sponge to wipe down the ware. Let dry.
Trace on the pattern outline of the butterfly using a pencil and AC-230 Clay Carbon.
Using FD254 Black Licorice to outline the wings and body of the butterfly including the antennae. Keep the antennae as fine as possible.
Fill in the body with 3 coats of SC-15 Tuxedo using CB-110 Liner.
Shake and stir S-2718 Cosmic Black. Apply 2-3 coats of glaze to the wings of the butterfly using CB-604 Pointed Round. Apply the crystals kind of heavily. Keep the glaze off the outline of the butterfly.
Shake and stir CG-986 Smoke & Fire. Using CB-406 Pointed Round apply 2-3 coats to the lower wings. Apply the crystals kind of heavy. Keep the color off the outline of the butterfly.
Stilt and fire to shelf cone 05-06.
If needed, plot/sketch out the design in the lower wing with the Red Fine Point Sharpie.
Fill the cup on the Fluid Writer Pen with OG801 Bright Gold. Outline the butterfly. Add a fine line to the antennae. Using your plotted lines in the wing sections, apply a fine line to the detail in the upper and lower wings. Add detail in the body. Clean the Fluid Writer Pen with a Q-Tip and OG901 Essence.
Stilt and Fire to Shelf Cone 018.
Apply 1-2 coats of OS439 Hot Orange to the background using CB-406-Pointed Round and CB-110 Liner. Let dry. Buff with a soft dry cloth.
Using a slightly moistened sponge to wipe down the ware. Let dry.
Trace on the pattern outline of the butterfly using a pencil and AC-230 Clay Carbon.
Using FD254 Black Licorice to outline the wings and body of the butterfly including the antennae. Keep the antennae as fine as possible.
Fill in the body with 3 coats of SC-15 Tuxedo using CB-110 Liner.
Shake and Stir S-2725 Safari. Apply 2-3 coats of glaze to the wings of the butterfly using CB-604 Pointed Round. Apply the crystals kind of heavily. Keep the glaze off the outline of the butterfly.
Stilt and fire to shelf cone 05-06.
If needed, plot/sketch out the design in the lower wing with the Red Fine Point Sharpie.
Fill the cup on the Fluid Writer Pen with OG801 Bright Gold. Outline the butterfly. Add a fine line to the antennae. Using your plotted lines in the wing sections, apply a fine line to the detail in the upper and lower wings. Add detail in the body. Clean the Fluid Writer Pen with a Q-Tip and OG901 Essence.
Stilt and Fire to Shelf Cone 018.
Apply 1-2 coats of OS471 Medium Brown to the background using CB-406-Pointed Round and CB-110 Liner. Let dry. Buff with a soft dry cloth.
Using a slightly moistened sponge to wipe down the ware. Let dry.
Trace on the pattern outline of the butterfly using a pencil and AC-230 Clay Carbon Paper.
Use FD254 Black French Dimensions to outline the wings and body of the butterfly including the antennae. Keep the antennae as fine as possible.
Fill in the body with 3 coats of SC-15 Tuxedo using CB-110 Liner.
Shake and stir CG-983 Koi Pond. Apply 2-3 coats of glaze to wings using CB-604-Pointed Round. Keep the glaze off the butterfly outline. Apply the crystals glaze kind of heavily.
Stilt and Fire to Shelf Cone 05-06.
If needed, plot/sketch out the design in the wings with the Red Fine Point Sharpie.
Fill the cup on the Fluid Writer Pen with OG801 Bright Gold. Outline the butterfly. Add a fine line to the antennae. Using your plotted lines in the wing sections, apply a fine line to the detail in the upper and lower wings. Add detail in the body. Clean the Fluid Writer Pen with a Q-Tip and OG901 Essence.
Stilt and Fire to Shelf Cone 018.
Apply 1-2 coats of OS-458 Wedgewood Blue to the background using CB-406-Pointed Round or CB-110 Liner. Let Dry. Buff with a soft dry cloth.
Begin by wiping down the MB1630 Small Owl Planter with a damp sponge to remove dust.
Apply two coats of FN042 Teal Blue to the feathers around the eyes.
Apply two coats of FN003 Orange to the rings around the eyes, wings, and feet.
Apply two coats of FN054 Pistachio to the body, beak, and eyeballs.
Draw the feather details and any other line work with the wax using the detail liner brush and allow the wax to dry.
Using the Script Liner and Fan brush with EL129 Slate, apply 3 coats over all the FN areas except for the eyes. The first two coats should go right up to the wax lines, but back off the third coat by about a quarter of an inch from the wax lines.
Apply three coats of SC015 Tuxedo to the eyes and add two small dots of SC016 Cotton Tail to the eyes to mimic shine.
Allow glaze to completely dry, stilt, and fire to cone 06.
Begin with properly fired shelf cone 04 bisque. Moisten a clean sponge and wipe bisque to remove any dust.
Using a 1/2 “ Oval brush CB-425 make 5 circles of PC601 Clear Cascade, in thick “plops” about 1” or a little bigger than a quarter, around the inside of the bowl, ¼” down from the rim, spacing them about 1-2” apart.
When the Clear Cascade is dry on the inside of the bowl, using a RB106 #6 Round, apply 2 thick coats of SC033 Fruit of the Vine in a wavy line over the Clear Cascade, creating a circle.
Once dry apply 5 thick “plops” of PC602 White Cascade in-between the plops of Clear Cascade, over Fruit of the Vine and 5 smaller “plops” around the center of the bowl, on the inside.
Apply 2 thick dots of Fruit of the Vine on the White Cascade “plops” in the center of the bowl.
When the White Cascade is dry on the outside of the bowl, using a RB106 #6 Round, apply 2 thick coats of SC033 Fruit of the Vine in a wavy line over the White Cascade in a circle.
With the RB118 – #6 Round “plop” PC602 White Cascade on the outside of the bowl, inter the rim, leaving space between for PC601 Clear Cascade. Before applying “plops of Clear Cascade, add a way line of SC33 Fruit of the Vine, in a circle over the White Cascade.
Apply “plops” of Clear Cascade over the Fruit of the Vine circle on the outside of the bowl.
Apply 3 coats of SC033 Fruit of the Vine to the entire top rim of the bowl.
Apply 2 coats of SW196 Sand Dollar over the entire inside and outside of the bowl.
Wipe off excess glaze from the bottom of the piece.
Apply 3 flowing coats of white foundations to the entire mushroom. Allow the mushroom to dry for a few minutes.
When the white is dry, place the gecko patterns where you’d like them. Apply as many as you’d like, we did 3 on the cap and 2 on the stem.
Use a ballpoint pen to firmly trace over the lines of the NCR gecko patterns. This will leave light lines on the platter for you to follow.
The exact colors that you use for each gecko do not matter. However, because the colors will overlap and blend, it’s best if the colors that touch each other are colors that mix well together. You can use the rainbow spectrum for guidance: green looks good with either yellow or blue overlapping, Orange looks good with either yellow or pink overlapping etc.
Let’s start with the green color, Cloverfield. Use the script liner to apply 2 coats of Cloverfield wherever you’d like green on the geckos. When applying color to the feet, the thin liner brush may be easier.
Next, we will apply the yellow glaze, Haystack. Apply two coats wherever you’d like the geckos to be yellow. Allow the color to overlap with the green where they meet.
For orange, we will use two coats of Wildfire. Again, allowing it to overlap where it meets any yellow.
Next, we will apply two coats of Peppermint anywhere that we would like pink on the Geckos. Allow the pink to overlap where it meets with any orange.
For the purple, we will use two coats of Purple Reign. Allow the purple to overlap with any pink.
Now, let’s apply two coats of Blue Caprice wherever we would like the Geckos to be blue. Allow the blue to overlap with any green or purple that it comes up against.
If you desire a few more crystals on any of the colors, you can add one more layer on each color. Remember to let the colors overlap where they meet.
Thin down some Tuxedo Stroke & Coat with 50% water to 50% paint. Use the thin liner brush to apply a thin, broken outline around the geckos. Use the photo as inspiration; it looks nice if it’s just a partial outline.
Next, we are going to add the splatters to the platter. To do this, thin down a little bit of each of the colors with 50% water and 50% paint.
We focused on the splatter colors to coordinate with the color of the gecko. For example, if the body of the gecko is yellow, we splattered yellow next to it.
Work one color at a time for the splatter. Dip the round brush into the color. Gently pull the bristles back to flick the paint onto the Mushroom. The splatter will overlap with the geckos and each other, that’s a good thing!
When the mushroom is dry, flip it over and apply 3 flowing coats of white foundations to the bottom.
Sign your name and the date and it’s ready to be fired! Remember, this does not get dipped into clear glaze.
Sketch the snakes on the glass by drawing a wavy line, snaking down one side of the glass. Reverse the snake on the opposite side so that the tail is at the top and the head is at the bottom.
Use a #6 Script Liner to fill in the snake body on the front with 2-3 coats of Cant-elope. Paint the other snake with 2-3 coats of Spruce It Up.
Use a #6 Script Liner and #10 Liner to fill in the background with 2-3 coats of Rawhide.
When the snakes are dry, use a #10 Liner to add a diamond pattern going down the back of the snakes. The Cant-elope snake pattern is Spruce It Up and the Spruce It Up snake pattern is done with Cant-elope. Paint 2-3 coats of color to make sure it’s nice and bold.
Use a #10 liner to add an eye on the snake with 1 thick coat of Rawhide.
Sketch the sideways diamond pattern on the base of the glass.
Use a #6 Script Liner to fill in the pattern alternating between Spruce It Up and Cant-elope.
Use the #6 Script Liner to paint the base of the glass with 2-3 coats of Basketball.
When the base is dry, outline the pattern with 2-3 coats of Bluebeard using the # 10 Liner.
When the snakes are dry, use a #10 Liner to add detail to the snake. 2-3 coats of Basketball stripes on the tail of the snake for rattlers. Eyes, tongue, stars, and outlines with 2-3 coats of Bluebeard.
Use the back of paintbrush to add Bluebeard dots along the body of the snake.
Use the Fan Brush to paint the inside of the glass with 2-3 coats of Dandelion.
Use the eraser of a pencil to dot the rim of the glass with Bluebeard.
Begin with properly fired shelf cone 04 bisque. Moisten a clean sponge and wipe bisque to remove any dust.
Take MC001 Low Tack Masking Tape and place a long piece horizontally down the center of the center of the tray. This will divide the tray into 2 equal halves. Take 2 shorter pieces and place them vertically on the tray. Try to evenly space them so you create 3 equal vertical sections. This will create 6 equal sections on the tray.
Cut out the flower patterns.
Using the Soft Fan with FN001 White, apply 1 coat to the center of each of the 6 sections. Large enough to fit a flower.
Take a flower and dip the back in water. Place in the center of one of the 6 sections. Press the edges with a damp sponge. This will help keep the edges down. Using the Soft Fan with FN001 White, apply 1 coat over the edges of the flower. Repeat for the other 5 flowers.
Squeeze out around 1 TBS of SP209 Speckled Jaded and SP254 Speckled Vanilla Dip onto the palette. Squeeze out ½ TBS of SP209 Speckled Jaded and ½ TBS of SP254 Speckled Vanilla Dip onto the same spot on the palette. Mix to create a third color.
Using the Soft Fan with SP209 Speckled Jaded, apply 2 coats to 2 of the squares. Apply it over the flowers. Allow glaze to dry between coats.
Using the Soft Fan with SP254 Speckled Vanilla Dip, apply 2 coats to 2 of the remaining squares. Apply it over the flowers. Allow glaze to dry between coats.
Using the Soft Fan with your mixed color, apply 2 coats to the remaining 2 squares. Apply it over the flowers. Allow glaze to dry between coats.
After the shine has left the glaze, remove the flowers and tape.
Using the Script Liner with SP209 Speckled Jaded, SP254 Speckled Vanilla Dip, and the mixed color, apply a circle of glaze to the center of each flower. Repeat for a second coat.
Allow glaze to dry.
Using the Soft Fan with FN216 Sea Glass, apply 3 coats to the front and back of the tray. Allow glaze to dry between coats.
Tear strips of newspaper to your desired width of the trees.
Dip the paper in water, then apply to the plate, and press down firmly with a paper towel to seal the edges.
Using the CB-604 #4 Soft Fan, starting from the bottom to the top. Apply the following colors and do not wash your brush in between colors, and allowing them to overlap.
Bottom area is CG-979 Meadow, center area is S-2714 Herb Garden and top area is CG-987 Tree Frog.
Remove the paper strips before the color dries to avoid any chipping.
Using the CB-106 #6 Script Liner, apply 2 coats of SG-202 White Cobblestone.
Using the CB-106 #6 Script Liner, apply 1 coat of SC-83 Tip Taupe over the Cobblestone.
Using the CB-110 #10/0 Liner, outline and add horizontal lines to the trees to look like tree bark with SC-15 Tuxedo.
Begin with properly fired cone 04 bisque. Moisten a sponge and wipe bisque to remove any dust.
Take the pencil and draw the top and bottom lines for the sweater on each bird.
Take MC-002 12mm Low Tack Masking Tape and tape off the top and bottom lines of the sweater so that you can glaze the head and tail first. The tape should be inside the sweater lines.
Using the Soft Fan with SC-5 Tiger Tail, apply 2 coats to the head and tail of each bird. Allow glaze to dry between coats.
Squeeze out around 1 tsp of SC-51 Poo Bear, SC-5 Tiger Tail and SC-25 Crackerjack Brown onto the palette. Take the Script Liner with SC-51 Poo Bear and make random, irregular lines on the head. Make sure lines are going in the same direction. Repeat with SC-5 Tiger Tail and SC-25 Crackerjack brown. Dip the Soft Fan in water and pat dry. Take the soft Fan and brush over your lines of color to blend them together. Do not let your lines of color dry before you blend them. Repeat for the tail. Make sure lines are going in the same direction as the head.
Repeat Step #5 for the second bird.
Remove the tape before glaze is dry. Let glaze dry before moving onto the next step.
Take MC-002 12mm Low Tack Masking Tape and tape over the edge of the head and tail that you just glazed on each bird. You should be able to see the entire sweater on each bird.
Using the Soft Fan with SC-101 Spruce It Up (large bird) and SC-103 Lavendear (small bird), apply 2 coats to the sweaters. Allow glaze to dry.
Take the lace and cut it wide/long enough to wrap around each bird. Do one bird at a time. Lay the bird flat and place the lace over the flat side. Take the Soft Fan and dip it in water. Apply the water over the lace to help it stick to the bird. Repeat going over the back of the bird and work your way over to the other flat side. You might need to cut off some lace to help it lay flat when going over the back. Use the Soft Fan to apply 1 coat of the base color over the lace. Repeat for the second bird.
Using the Soft Fan with SC-10 Teal Next Time (large bird) and SC-33 Fruit of the Vine (small bird), apply 1 coat over the lace. After the glaze is dry to the touch (not bone dry), remove the lace.
Begin with properly fired cone 04 bisque. Moisten a sponge and wipe bisque to remove any dust.
Draw small hearts on the paper (3-5). Cut them out. Set them aside for the hat.
Using the Script Liner with SC-54 Vanilla Dip, apply 2 coats to the antlers. Allow glaze to dry between coats.
Using the Script Liner with SC-54 Vanilla Dip, apply 1 coat to the outer portion of the inner ear. Shade to the inside with SC-1 Pink-A-Boo. Repeat for a second coat.
Using the Script Liner with SC-54 Vanilla Dip, apply 1 coat to the muzzle. Shade the inside with SC-1 Pink-A-Boo. Repeat for a second coat.
Using the Script Liner with SC-16 Cotton Tail, apply 2 coats to the scarf. Apply 2 coats to the area of the hat that you would like the hearts. Allow glaze to dry.
Dip each heart in water and press onto the hat. Only place over the area you glazed in Step #6. Using the Soft Fan with SC-16 Cotton Tail, apply 1 coat over each heart.
Using MC-001 6mm Low Tack Masking Tape, apply vertical stripes to the scarf.
Using the Script Liner with SC-74 Hot Tamale, apply 2 coats over the scarf. Allow glaze to dry between coats. Remove the tape after glaze is dry to the touch, but not bone dry.
Using the Script Liner with FN-236 Miami Pink, apply 3 coats to the sweater. Allow glaze to dry between coats.
Using the Script Liner with SC-48 Camel Back, apply 2 coats to the fur. Allow glaze to dry between coats.
Using the Script Liner with SC-15 Tuxedo, apply 2 coats to the hooves and nose. Allow glaze to dry between coats. You can also use SC-1 Pink-A-Boo or SC-74 Hot Tamale for the nose.
Using the Detail Liner with SC-15 Tuxedo, apply any accent dots or lines.
Using the Script Liner and Soft Fan with SP-274 Speckled Hot Tamale, apply 2 coats to the hat. Allow glaze to dry between coats. Remove the hearts with an X-ACTO knife before the glaze is bone dry.
Begin with properly fired cone 04 bisque. Moisten a sponge and wipe bisque to remove any dust.
Using the Script Liner with SC-16 Cotton Tail, apply 3 coats to the eyes. Allow glaze to dry between coats.
Using the Script Liner with SC-75 Orange-A-Peel, apply 3 coats to the beak. Allow glaze to dry between coats.
Using the Script Liner with SC-74 Hot Tamale, apply 3 coats to the waddles and comb. Allow glaze to dry between coats.
Using the Detail Liner with SC-15 Tuxedo, make a large dot in the center of each eye.
Using the Script Liner and Soft Fan with FN-009 Black, apply 3 coats to the rest of the rooster. Make sure your coats are not thin, or it could cause problems with the cobblestone (popping off, seeing bisque between the cobbles).
After glaze is dry to the touch, take the pencil, and make a scalloped line going around the neck of the rooster. Using the Detail Liner with AC-302 Wax Resist, apply a coat of wax to the line.
Using the Soft Fan with SG-202 White Cobblestone, apply 3 even coats to the body of the rooster (area below the scalloped border). Apply each coat as soon as the shine is gone. Do not wait until the glaze is completely dry, or it will start to crack and could flake off.
After the last coat from Step #8 is no longer shiny, apply 1 coat of SC-35 Gray Hare using the Soft Fan.
Stilt and fire to cone 06.
Holly Hen
Begin with properly fired cone 04 bisque. Moisten a sponge and wipe bisque to remove any dust.
Using the Soft Fan with FN-001 White, apply 3 coats to the body of the hen and eyes. Make sure your coats are not thin, or it could cause problems with the cobblestone (popping off, seeing bisque between the cobbles).
Using the Script Liner with SC-75 Orange-A-Peel, apply 3 coats to the beak. Allow glaze to dry between coats.
Using the Script Liner with SC-74 Hot Tamale, apply 3 coats to the waddles and comb. Allow glaze to dry between coats.
Using the Detail Liner with SC-15 Tuxedo, make a large dot in the center of each eye. Outline the eyes.
After glaze is try to the touch, take the pencil, and make a scalloped line going around the neck of the hen. Using the Detail Liner with AC-302 Wax Resist, apply a coat of wax to the line.
Using the Soft Fan with SG-201 Black Cobblestone, apply 3 even coats to the body of the hen (area below the scalloped border). Apply each coat as soon as the shine is gone. Do not wait until the glaze is completely dry, or it will start to crack and could flake off.
Begin with properly fired cone 04 bisque. Moisten a sponge and wipe bisque to remove any dust.
Using the Script Liner with FN-221 Milk Glass White, apply 3 coats to the fur on the bunny. Allow glaze to dry between coats.
Using the Script Liner with FN-221 Milk Glass White, apply 1 coat to the top half of the inner ear. Use the same brush with FN-236 Miami Pink to blend down to the bottom of the inner ear. Repeat for a total of 3 coats.
Pour out around 1 tsp of FN-236 Miami Pink onto the palette. Dip the sponge in the glaze and sponge the muzzle under the nose.
Using the Script Liner with FN-236 Miami Pink, apply 3 coats to the nose and buttons. Allow glaze to dry between coats.
Using the Script Liner and Soft Fan with FN-237 Light Turquoise, apply 3 coats to the overalls. Allow glaze to dry between coats.
Using the Script Liner with FN-207 Orange Slice, apply 3 coats to the carrot. Allow glaze to dry between coats.
Using the Script Liner with FN-216 Sea Glass, apply 3 coats to the end of the carrot. Allow glaze to dry between coats.
Using the Soft Fan and Script Liner with FN-232 Sun Yellow, apply 3 coats to the hat. Allow glaze to dry between coats.
After the hat is dry, use the pencil to draw a simple flower on the hat.
Using the Script Liner with SC-16 Cotton Tail, apply 2 coats to the flower petals. Allow glaze to dry between coats.
Using the Script Liner with FN-207 Orange Slice, make a dot in the center of the flower.
Begin with properly fired cone 04 bisque. Moisten a sponge and wipe bisque to remove any dust.
Use the pencil to draw a jagged line going around the base of the neck. This will separate the top and bottom colors on the rooster.
Using the Soft Fan with EL-130 Sea Green, apply 3 coats to the bottom half of the rooster. Make random, irregular strokes around the neckline, so that there won’t be a distinct border between the top and bottom.
Using the Soft Fan with EL-101 Oyster Shell, apply 3 coats to the top half of the rooster. Overlap the glaze on the bottom half by around 1 inch. Make random, irregular strokes around the neckline, so that there won’t be a distinct border between the top and bottom.
Use an X-ACTO knife or damp sponge to remove any glaze from the eyes, beak, waddles and comb.
Using the Script Liner with SC-16 Cotton Tail, apply 3 coats to the eyes. Allow glaze to dry between coats.
Using the Script Liner with EL-143 Cactus Flower, apply 3 coats to the beak. Allow glaze to dry between coats.
Using the Script Line with EL-127 Rose Granite, apply 3 coats to the comb and waddles. Allow glaze to dry between coats.
Use the pencil to draw pupils in the eyes. Using the Script Liner with SC-15 Tuxedo, apply 2 coats to the pupils. Allow glaze to dry between coats. Use the Detail Liner with SC-16 Cotton Tail to apply a dot to each pupil.
Cut out 4 small square of cardboard. Around 1.5” on each side. You will be using the side with only straight lines (not the corrugated side).
Pour out around 1 TBS of EL-101 Oyster Shell, EL-130 Sea Green, PC-601 Clear Cascades, and PC-602 White Cascades onto the palette.
Take your piece of cardboard and dip one of the edges with straight lines into PC-602 White Cascades. Stamp around the neck of the rooster, where the 2 glazes overlap. Continue dipping and stamping until you go completely around the neck.
Repeat Step #12 with EL-130 Sea Green. Make sure to stamp over some of the glaze from Step #12. Use a different piece of cardboard.
Repeat Step #12 with EL-101 Oyster Shell. Make sure to stamp over some of the glaze from Step #12 and Step #13. Use a different piece of cardboard.
Repeat Step #12 with PC-601 Clear Cascades. Make sure to stamp over some of the glaze from Step #12, #13, and #14. Use a different piece of cardboard.
Stilt and fire to cone 06.
Holly Hen
Begin with properly fired cone 04 bisque. Moisten a sponge and wipe bisque to remove any dust.
Use the pencil to draw a jagged line going around the base of the neck. This will separate the top and bottom colors on the hen.
Using the Soft Fan with EL-118 Blue Grotto, apply 3 coats to the bottom half of the hen. Make random, irregular strokes around the neckline, so that there won’t be a distinct border between the top and bottom.
Using the Soft Fan with EL-101 Oyster Shell, apply 3 coats to the top half of the hen. Overlap the glaze on the bottom half by around 1 inch. Make random, irregular strokes around the neckline, so that there won’t be a distinct border between the top and bottom.
Use an X-ACTO knife or damp sponge to remove any glaze from the eyes, beak, waddles and comb.
Using the Script Liner with SC-16 Cotton Tail, apply 3 coats to the eyes. Allow glaze to dry between coats.
Using the Script Liner with EL-143 Cactus Flower, apply 3 coats to the beak. Allow glaze to dry between coats.
Using the Script Liner with EL-127 Rose Granite, apply 3 coats to the comb and waddles. Allow glaze to dry between coats.
Use the pencil to dry pupils in the eyes. Using the Script Lien with SC-15 Tuxedo, apply 2 coats to the pupils. Allow glaze to dry between coats. Use the Detail Liner with SC-16 Cotton Tail to apply a dot to each pupil.
Cut out 4 small square of cardboard. Around 1.5” on each side. You will be using the side with only straight lines (not the corrugated side).
Pour out around 1 TBS of EL-101 Oyster Shell, EL-118 Blue Grotto, PC-601 Clear Cascades, and PC-602 White Cascades onto the palette.
Take your piece of cardboard and dip one of the edges with straight lines into PC-602 White Cascades. Stamp around the neck of the hen, where the 2 glazes overlap. Continue dipping and stamping until you go completely around the neck.
Repeat Step #12 with EL-118 Blue Grotto. Make sure to stamp over some of the glaze from Step #12. Use a different piece of cardboard.
Repeat Step #12 with EL-101 Oyster Shell. Make sure to stamp over some of the glaze from Step #12 and Step #13. Use a different piece of cardboard.
Repeat Step #12 with PC-601 Clear Cascades. Make sure to stamp over some of the glaze from Step #12, #13, and #14. Use a different piece of cardboard.
Begin with properly-fired cone 04 bisque. Moisten a sponge and wipe bisque to remove any dust.
Using the Script Liner with SC-6 Sunkissed, apply 2 coats to the veins on both leaves. Allow glaze to dry between coats.
Using the Script Liner with SC-88 Tu Tu Tango, apply 2 coats to one leaf. Using the Script Liner with SC-9 Jaded, apply 2 coats to the other leaf. Allow glaze to dry between coats.
Using the Script Liner with SC-27 Sour Apple, apply 2 coats to the feet on the bottom of the container. Allow glaze to dry between coats.
Using the Soft Fan with SC-97 Cant-elope, apply 2 coats to the inside of the container. Allow glaze to dry between coats.
Using the Soft Fan with FN-203 Dry Champagne, apply 3 coats to the outside of the container and 1 coat to the inside. Allow glaze to dry between coats.
Begin with properly fired cone 04 bisque. Moisten a sponge and wipe bisque to remove any dust.
Using the Script Liner with SC-6 Sunkissed, apply 2 coats to the underside of each mushroom cap. Allow glaze to dry between coats.
Using the Script Liner with SC-97 Cant-elope, apply 2 coats to each mushroom stem. Allow glaze to dry between coats.
Using the Script Liner with SC-9 Jaded, apply 2 coats to every other mushroom cap. Apply SC-27 Sour Apple to the remaining mushroom caps. Allow glaze to dry between coats.
Take AC-220 Detailer Tips and 1oz Bottles (2) and cut the very end of the tips off. Fill one bottle with around 1/2oz of SC-6 Sunkissed. Fill the other bottle with around 1/2oz of SC-97 Cant-elope. Use the two bottles to make dots on the mushroom caps.
Using the Script Liner with SC-88 Tu Tu Tango, apply 2 coats to the feet on the bottom of the container. Allow glaze to dry between coats.
Using the Soft Fan with SC-6 Sunkissed, apply 2 coats to the inside of the container. Allow glaze to dry between coats.
Using the Soft Fan with FN-203 Dry Champagne, apply 3 coats to the outside of the container and 1 coat to the inside. Allow glaze to dry between coats.
Begin with properly fired cone 04 bisque. Moisten a sponge and wipe bisque to remove any dust.
Using the Script Liner with SC-6 Sunkissed, apply 2 coats to the rays above the sun. Allow glaze to dry between coats.
Using the Script Liner with SC-88 Tu Tu Tango, apply 2 coats to the sun. Allow glaze to dry between coats.
Using the Script Liner with SC-9 Jaded, apply 2 coats to top and bottom line below the sun. Allow glaze to dry between coats.
Using the Script Liner with SC-27 Sour Apple, apply 2 coats to the middle line below the sun. Allow glaze to dry between coats.
Take AC-220 Detailer Tips and 1oz Bottles (1) and cut the very end of the tip off. Fill the bottle with around 1/2oz of SC-97 Cant-elope. Use the bottle to make dots on the rays above the sun.
Using the Script Liner with SC-97 Cant-elope, apply 2 coats to the feet on the bottom of the container. Allow glaze to dry between coats.
Using the Soft Fan with SC-27 Sour Apple, apply 2 coats to the inside of the container. Allow glaze to dry between coats.
Using the Soft Fan with FN-203 Dry Champagne, apply 3 coats to the outside of the container and 1 coat to the inside. Allow glaze to dry between coats.
Using a round brush, apply 2 coats of Spanish Moss to the center of the flower.
When the center of the flower is dry, use a fanbrush to apply 2 flowing coats of Amber Ash all over the inside of the flower dish; both the petals and center of the flower.
When the inside if the dish is dry, use a fan brush to apply 2 flowing coats of Rose Granite to the petals.
When the front of the dish is dry, flip it over and apply 2 flowing coats of Amber Ash to the back of the dish.
After the back of the dish is dry, apply 2 flowing coats of Rose Granite to the back of the dish.
Begin with properly fired cone 04 bisque. Moisten a sponge and wipe bisque to remove any dust.
Place AC-230 Clay Carbon Paper onto the front of the tile. Place the pattern on top and trace the pattern. Remove paper and pattern.
Using the Script Liner with SC-27 Sour Apple, apply 2 coats to the center of the flower. Allow glaze to dry between coats.
Using the Script Liner with SC-24 Dandelion, apply 2 coats to flower petals. Allow glaze to dry between coats.
Using the Soft Fan with SC-11 Blue Yonder, apply 2 coats to the background. Allow glaze to dry between coats.
The following steps will use a Q-Tip to make the color variation and texture. You will dip the Q-Tip into the glaze and make a short, quick motion to add a heavy, short line of color. Re-dip the Q-Tip after a couple strokes. If the Q-Tip starts unraveling, use scissors to cut off the excess cotton.
Squeeze around 1 TSP of SC-11 Blue Yonder, SC-24 Dandelion, SC-25 Crackerjack Brown, SC-75 Orange-A-Peel, and SC-76 Cara-Bein Blue onto the palette.
Dip the Q-Tip into SC-25 Crackerjack Brown and make arched lines around the edge of the center of the flower. Bring them towards the center. Then dip the Q-Tip into SC-24 Dandelion and continue making arched lines to the center. Go back over some of the brown lines.
Dip the Q-Tip into SC-76 Cara-Bein Blue and make lines in the background. Start at the edges of the flower petals and work outward. Then dip the Q-Tip into SC-11 Blue Yonder and continue to the edge of the tile.
Dip the Q-Tip into SC-25 Crackerjack Brown and make lines around the base and edges of the flower petals. Then dip the Q-Tip into SC-75 Orange-A-Peel and make lines in the center of the petals. Go back over some of the brown lines and extend into the background. Dip the Q-Tip into SC-24 Dandelion and go over the edges of the petals and extend into the background.
Begin with properly fired cone 04 bisque. Moisten a sponge and wipe bisque to remove any dust.
Using the Soft Fan with FN-009 Black, apply 2 coats to the front and sides of the tile. Allow glaze to dry between coats.
As soon as glaze is dry to the touch, place the mushroom pattern on the front of the tile. Trace over the pattern with the pencil. You should be able to see a faint line in the glaze. Don’t press down so hard that you start to see bisque. Remove the pattern.
Using the Detail Liner with AC-302 Wax Resist, trace over the pattern on the front of the tile.
Using the Script Liner with EL-128 Wheat, apply 1 coat to the bottom of the mushroom head and stem.
Using the Script Liner with EL-127 Rose Granite, apply 1 coat to the top of the mushroom head.
Using the Script Liner with EL-130 Sea Green, apply 1 coat to the background.
Repeat Steps 5-7.
Repeat Steps 5-7, but only apply the glaze to the center portion of each section (the inner area ¼” from the edge of each section). It does not have to be exact, just do not glaze right next to the wax line.
With a damp sponge, wipe SB-126 Ramekin to remove dust.
Apply 2 coats of SW-196 Sand Dollar to inside and out.
Apply 2 coats of SW-191 Peppered Plum to the sides of the inside of the ramekin, leaving an unglazed area in the middle.
Apply 2 coats of SW-190 Passion Flower to the center of the ramekin, overlapping a small portion of SW-191 Peppered Plum.
Apply SW-191 Peppered Plum to the outside rim of the ramekin. Use caution applying the crystal glazes on the outside of the ramekin, as they will flow and move. Application should be on the rim only.
Cast the snowman mold in the usual manor. While still leather hard, punch out different shape stars and holes in the hat. Clean the greenware and fire to shelf cone 04.
Begin with properly fired shelf cone 04 bisque. Moisten a clean sponge and wipe bisque to remove any dust.
Using an CB-604 #4 Soft Fan, apply 1 coat of SC-34 Down To Earth to the tree trunk and snowman arms. Allow to dry! With a damp sponge, wipe back leaving the color in the crevices.
Using a CB-604 #4 Soft Fan, Apply 1 coat of SC-8 Just Froggy to the tree and the garland over the door. Allow to dry! With a damp sponge, wipe back leaving the color in the crevices.
Using a CB-106 #6 Script Liner, apply 2 coats of SC-48 Camel Back to the tree trunk.
Using a CB-106 #6 Script Liner, apply 2 coats of SC-25 Crackerjack Brown to the arms of the snowman.
Using a CB-425 ½” Oval Glaze, apply 1 coat of SC-52 Toad-ily Green then 1 coat of SC-26 Green Thumb. Do the same to the garland using a CB-106 #6 Script Liner.
Using a CB-202 #2 Detail, apply 2 coats of SC-74 Hot Tamale to the berries on the garland.
Using a CB-106 #6 Script Liner, apply 3 coats of SC-16 Cotton tail to the body of the snowman. Allow to dry!
Sponge the cheeks with SC-2 Melon-choly with some SC-16 Cotton tail to lighten.
Using a CB-106 #6 Script Liner, Shade the snowman body and the snow base with SC-11 Blue Yonder.
Using a CB-106 #6 Script Liner, apply 3 coats of SC-9 Jaded to the scarf and the center part of the hat.
Using a CB-106 #6 Script Liner, shade the scarf and the center part of the hat with SC-10 Teal Next Time.
Using a CB-106 #6 Script Liner, apply 3 coats of SC-74 Hot Tamale to the brim of the hat and the door.
Mix a couple drops of SC-15 Tuxedo to a small amount of SC-74 Hot Tamale to darken it. Apply 1 coat to the ball on the top of the hat. Wipe back with a damp sponge. Allow to dry, then apply 2 light coats of SC-74 Hot Tamale to the ball. Also shade the brim of the hat and the door with this mix.
Using a CB-202 #2 Detail, apply 3 coats of SC-83 Tip Taupe to the step, windowsill, and the stones on top of the window.
Using a CB-106 #6 Script Liner, shade the step, windowsill, and the stone on top of the window with SC-48 Camel Back.
Using a CB-202 #2 Detail, apply 3 coats of SC-97 Cant-elope to the nose then shade with SC-48 Camel Back.
Using a CB-202 #2 Detail, apply 2 coats of SC-11 Blue Yonder to the iris of the eyes. When Dry, apply 2 coats of SC-15 Tuxedo to the pupil of the eyes.
Using a CB-110 #10/0 Liner, outline the eyes, add eyelashes, trim the mouth, and trim the door with SC-15 Tuxedo. Add a highlight of SC-16 Cotton Tail to the eyes.
Using a CB-425 ½” Oval Glaze, dab SG-302 Snowfall to the tree, hat, scarf windowsill and the snow base. Allow to dry!
Using the Soft Fan with SW-301 Iron Wash, apply 1 coat over the raised message portion on the mug. Wipe off most of the wash using a damp sponge. Try not to wipe off any of the wash going around the border of the message section.
Pour out around 1/2 TBS of SG-401 Black onto the palette. Add a pinch of AC-310 Silkscreen Medium. Mix with a palette knife until it becomes the consistency of peanut butter. You may need to add more silkscreen medium or designer liner.
Take DSS-0128 The Farm Screen and find the barn. Draw a border around the screen with the permanent marker. Cut it out.
Place the screen shiny side down towards the bottom of the message section. While holding the screen firmly in place, scoop a small amount of premixed silkscreen medium onto the squeegee and pull across the screen. Remove the screen.
Use the pencil to write lettering on the message section of the mug. Use the Detail Liner with SG-401 Black to trace over your lettering.
Using the Soft Fan with SW-118 Sea Salt, apply 2 coats to the outside of the mug. Do not glaze over the message section. Allow glaze to dry between coats.
Using the Soft Fan with SW-166 Norse Blue, apply 2 coats to the outside of the mug. Do not glaze over the message section. Recede the 2nd coat around 1/4” from the bottom of the mug to prevent dripping. Allow glaze to dry between coats.
Using the Script Liner with PC-602 White Cascade, apply ½” band going around the top of the mug.
Fill AC-220 Detailer Tips and 1 oz Bottles with SC-76 Cara-Bein Blue. You only need to fill the bottle ¼ full. Make dots going around the rim of the mug, right over the pottery cascades.
Using the Soft Fan with SW-508 Black Gloss, apply 3 coats to the inside of the mug. Allow glaze to dry between coats.
Fire to cone 6.
Thumbler
Begin with soft fired stoneware bisque.
Using the Soft Fan with SW-155 Winter Wood, apply 2 coats to the outside of the mug. Allow glaze to dry between coats.
Using the Soft Fan with SW-165 Lavender Mist, apply 2 coats to the outside of the mug. Recede the 2nd coat around 1/4” from the bottom of the mug to prevent dripping. Allow glaze to dry between coats.
Using the Script Liner with PC-602 White Cascade, apply ½” band going around the top of the mug.
Fill AC-220 Detailer Tips and 1 oz Bottles with SC-2 Melon-Choly. You only need to fill the bottle ¼ full. Make dots going around the rim of the mug, right over the pottery cascades.
Using the Soft Fan with SW-508 Black Gloss, apply 3 coats to the inside of the mug. Allow glaze to dry between coats.
Fire to cone 6.
Joe Mug
Begin with soft fired stoneware bisque.
Using the Soft Fan with SW-166 Norse Blue, apply 2 coats to the outside of the mug. Allow glaze to dry between coats.
Using the Soft Fan with SW-180 Desert Dusk, apply 2 coats to the outside of the mug. Recede the 2nd coat around 1/4” from the bottom of the mug to prevent dripping. Allow glaze to dry between coats.
Using the Script Liner with PC-602 White Cascade, apply ½” band going around the top of the mug.
Fill AC-220 Detailer Tips and 1 oz Bottles with SC-75 Orange-A-Peel. You only need to fill the bottle ¼ full. Make dots going around the rim of the mug, right over the pottery cascades.
Using the Soft Fan with SW-508 Black Gloss, apply 3 coats to the inside of the mug. Allow glaze to dry between coats.
Begin with properly fired cone 04 bisque. Moisten a sponge and wipe bisque to remove any dust.
Take the pattern and cut around “Carrots for the Reindeer” to get rid of the excess paper. Place the pattern on the far-right side of the plate. Slide AC-230 Clay Carbon Paper under the pattern. Trace with a pencil.
On the DSS-0162 Holiday Icons screen, locate the reindeer. Cut it out with excess screen around the edges. Color over the shiny side of the screen with the dry erase marker. Wipe off with a piece of paper towel. You should be able to see the reindeer.
Pour around 2 TBS of NT-BR Clear One Brushing onto the palette. Add a few drops of food coloring. Add a pinch of AC-310 Silkscreen Medium. Mix with a palette knife until it becomes the consistency of peanut butter. You may need to add more silkscreen medium or glaze.
Place the reindeer screen on the bottom-left section of the plate. While holding the screen firmly in place, take a small amount of premixed silkscreen medium, and gently rub in circles starting in the center and working outward. Remove the screen, rinse, and dry it.
Using the Script Liner with SC-25 Crackerjack Brown, SC-46 Rawhide, and SC-48 Camel Back, apply 2 coats of glaze to the corresponding screened area. Allow glaze to dry between coats.
Squeeze around 2 TBS of SC-15 onto the palette. Add a pinch of AC-310 Silkscreen Medium. Mix with a palette knife until it becomes the consistency of peanut butter. You may need to add more silkscreen medium or glaze.
Repeat step #5. Make sure to line up the screen. You will be rescreening the same image in black.
Cut the carrot out from the pattern. Take it and place it along the lip of the plate. Trace around the pattern with a pencil. Repeat until you have a border of carrots going around the plate.
Using the Script Liner with SC-23 Jack O’Lantern, apply 2 coats to each carrot. Allow glaze to dry between coats.
Using the Script Liner with SC-27 Sour Apple, apply 2 coats to carrot tops. Allow glaze to dry between coats.
Using the Detail Liner with SC-15 Tuxedo, outline the carrots and the lettering.
Using the Soft Fan with SC-73 Candy Apple Red, apply 2 coats to the back and rim of the plate. Allow glaze to dry between coats.
Using the Soft Fan with SG-704 Peppermint, apply 2 coats to the front of the plate and 1 coat to the back. Allow glaze to dry between coats.
Fire to cone 06.
Santa Plate
Begin with properly fired cone 04 bisque. Moisten a sponge and wipe bisque to remove any dust.
Take the pattern and cut around “Cookies for Santa” to get rid of the excess paper. Place the pattern on the far-left side of the plate. Slide AC-230 Clay Carbon Paper under the pattern. Trace with a pencil.
On the DSS-0162 Holiday Icons screen, locate the Santa. Cut him out with excess screen around the edges. Color over the shiny side of the screen with the dry erase marker. Wipe off with a piece of paper towel. You should be able to see the Santa.
Pour around 2 TBS of NT-BR Clear One Brushing onto the palette. Add a few drops of food coloring. Add a pinch of AC-310 Silkscreen Medium. Mix with a palette knife until it becomes the consistency of peanut butter. You may need to add more silkscreen medium or glaze.
Place the Santa screen on the bottom-right section of the plate. While holding the screen firmly in place, take a small amount of premixed silkscreen medium, and gently rub in circles starting in the center and working outward. Remove the screen, rinse, and dry it.
Using the Script Liner with SC-6 Sunkissed, SC-27 Sour Apple, SC-46 Rawhide, and SC-73 Candy Apple Red, apply 2 coats of glaze to the corresponding screened area. Allow glaze to dry between coats.
Squeeze around 2 TBS of SC-15 onto the palette. Add a pinch of AC-310 Silkscreen Medium. Mix with a palette knife until it becomes the consistency of peanut butter. You may need to add more silkscreen medium or glaze.
Repeat step #5. Make sure to line up the screen. You will be rescreening the same image in black.
Cut the tree out from the pattern. Take it and place it along the lip of the plate. Trace around the pattern with a pencil. Repeat until you have a border of trees going around the plate.
Using the Script Liner with SC-46 Rawhide, apply 2 coats to each tree. Allow glaze to dry between coats.
Using the Script Liner with SC-26 Green Thumb, apply 2 coats to the inner triangle on each tree. Allow glaze to dry between coats.
Using the Script Liner with SC-25 Crackerjack Brown, apply 2 coats to the inner square on each tree trunk. Allow glaze to dry between coats.
Using the Detail Liner with SC-15 Tuxedo, outline the trees and the lettering.
Using the Soft Fan with SC-73 Candy Apple Red, apply 2 coats to the back and rim of the plate. Allow glaze to dry between coats.
Using the Soft Fan with SG-704 Peppermint, apply 2 coats to the front of the plate and 1 coat to the back. Allow glaze to dry between coats.
Use a moistened Synthetic Sponge to wipe down the piece to remove any dust and debris from the ware.
To the interior of the Casserole apply 3 coats of SW-501 White using CB-604 Soft Fan. Use a moistened Synthetic Sponge to remove any glaze on the top edge of the Casserole. Let dry.
Find the center of the Casserole using a ruler. Cut out the pattern for ease of transferring. Use Blue Masking Tape to adhere the design while transferring. Use AC-230 Clay Carbon and a Pencil to transfer the design.
On a tile squeeze out some SG-401 Black Designer Liner and thin slightly with water to a brushing consistency. Using CB-110 Liner loaded with color to complete the lines in the pattern. To the sections of the pattern that has a dotted background apply the dots using the Liner brush. Keep the dots small and random to fill in the area.
Apply 2 coats of SC-28 to all the circles/dots, small triangles in bottom of flower and top band of zigzags in middle of flower using CB-110 Liner. Refer to photo for placement.
Apply 2 coats of SC-52 Toad-ily Green to the inner portions of the leaves using CB-110 Liner.
On a tile place some SW-304 Copper Wash and thin to a 0% skim milk consistency. Apply 1 coat to the outer sections in the leaves using CB-110 Liner.
To the remaining portions of the flower excluding the dotted areas, apply 2-3 coats of SW-134 Eggplant using CB-110 Liner.
Use a pencil to draw a line about ¼” from the bottom of the Casserole. This will be your bottom edge for not glazing.
Using CB-604 Soft Fan apply 3-4 coats of SW-134 Eggplant to the top edge and sides of the Casserole while not going past your pencil line. Let dry.
Use a moistened Synthetic Sponge to remove any glaze from the bottom of the ware. Check to make sure the glaze doesn’t extend past your pencil line around the bottom edge.
Place the ware into the kiln making sure the edge of the Casserole doesn’t align with a kiln element and make sure the ware is fully placed on the shelf with no overhanging of the ware. Do not stilt.
Fire to Shelf Cone 6 (Mid-range) with a 5 min hold.
Wipe down the greenware with a damp Silk Decorating Sponge to remove any dust from the ware. Check the inside for any debris as well.
Pour out some UG-51 China White and UG82 Tucson Turquoise into separate Plastic Cups. Apply 1 even coat of UG-51 China White starting at the bottom edge of the can working to the top edge using CB-604 Soft Fan. Tip one corner of the Soft Fan brush with UG-82 Tucson Turquoise and apply the color from the top edge downward using large “X” crisscross strokes to wet blend the color about 1/3 of the way down from the top rim edge. The color should be darkest next to the top edge and fade out to white. Repeat this step two more times. By the third coat the can should appear a light turquoise blue starting at the top rim fading downward to white. The blue area should be a soft mottling of color that fades into white from the top third of the can. Let dry.
Using a pencil and AC-230 Clay Carbon to trace the pattern. This is only a guide. No detail of the grass area needs to be filled in.
Trace the egg shapes onto the Shirt Cardboard using the Fine Tip Sharpie. Cut out the egg shapes allowing about 1/2” border around the edge using the Scissors. Save both pieces of the egg shapes. This will give you a positive and negative egg shape. Negative shape will be used to paint in the egg shape. The positive will be used to block out a previous egg shape.
The basic painting of the pattern is completed using a Silk Decorating Sponge. This type of sponge will give you the finest texture of any sponge. Loading of the sponge is done by first moistening the sponge. Then loading of the sponge with color is done by tipping the edge of the sponge with color and then pouncing up and down to blend the color before painting. Start with the largest egg (Pink) and then completing the eggs to the left and finally the egg to the right of the pink egg. Make sure you let each coat dry before adding another coat or shading. Doing so before the first coat has dried will lead to removing the previous coat of color. When adding shading to an egg, start the pouncing of color on the edge of the stencil and moving inward. This will give you a gradation to the shading. If you color isn’t dark enough, let it dry and re-sponge an area. Use masking tape to secure the stencil to the ware but never over the EZ-Strokes areas painted. When you are painting one egg and need to block a previous painted egg, place the positive egg shape down first and then the negative over to complete the painting of an egg.
Pink Egg: Mix equal parts EZ-030 Rose with EZ-013 White. White will help opacify any color. Sponge on one coat of color. Do not completely fill in the bottom edge of any egg when sponging. Shading is done with a mixture of EZ-030 Rose with a drop or two of EZ-057 Coral Red.
Yellow Egg: Mix equal parts of EZ-101 Neon Yellow with EZ-013 White. Sponge on one coat. Apply a second coat of EZ-101, let dry and shade with EZ-034 Orange.
Blue Egg: Sponge on EZ-027 Blue Turquoise. Shade with EZ-035 Dutch Blue.
Purple Egg: Sponge on EZ-030 Rose. Shade with EZ-050 Plum Purple.
Green Egg: Mix equal parts EZ-028 Leaf Green with EZ-013 White and sponge on one coat. Shade with EZ-028.
To the ground area, sponge on EZ-018 Chartreuse with some shading of EZ-038 Mahogany around the bottom edges of the eggs. Color should be slightly brown up along the bottom edge of the eggs fading down to Chartreuse to the bottom of the can. Shading is done with the various “grass” stencils. You can use either side of the stencil as long as no wet color is on it. Shading is done with EZ-033 Ivy Green, EZ-024 Royal Blue Green and EZ-038 Mahogany. Use the Royal Blue Green and Mahogany in moderation when doing the shading. Use those colors when a sharp contrast is needed to distinguish the grass blades or over a darker color.
Detail the grass with thinned EZ-033 Ivy Green and EZ-024 Royal Blue Green using CB-101 Liner
Use CB-110 Liner to paint in the Lady Bugs with EZ-057 Coral Red. Detail with EZ-037 Black.
Apply 3 coats of UG-19 to the top trim and edge of can, bottom edge trim and bottom as well as the side grommets using CB-106 Script Liner,CB-404 Pointed Round and CB-604 Soft Fan.
Fire to Shelf Cone 04.
Check the inside of the can for any fired debris before glazing. Thin some S-2101 Crystal Clear Brushing to a melted ice cream consistency. Pour the thinned glaze into the can. While working quickly, rotate the piece to cover the interior of the can. Pour out excess and drain upside down to dry.
Apply 2-3 coats of S-2101 Crystal Clear Brushing to the outside of the can using CB-604 Soft Fan.
Stilt and fire the piece to Shelf Cone 05-06.
Form
CD1404 Gallon Paint Can, Greenware
Colors
EZ013 White
EZ018 Chartreuse
EZ024 Royal Blue Green
EZ027 Blue Turquoise
EZ028 Leaf Green
EZ30 Rose
EZ034 Orange
EZ035 Dutch Blue
EZ037 Black
EZ038 Medium Mahogany
EZ050 Plum Purple
EZ057 Coral Red
EZ101 Neon Yellow
UG-19 Ultra Blue
UG-82 Tucson Turquoise
UG-51 China White
S-2101 Crystal Clear Brushing
Decorating Accessories
CB-106 Script Liner
CB-110 Liner
CB-604 Soft Fan
AC-230 Clay Carbon
Miscellaneous Accessories
Pencil
Scissors
Thin Slick Cardboard (Post Card Thickness, Ad Flyer Mailers)
Begin with properly fired shelf cone 04 bisque. Moisten a clean sponge and wipe bisque to remove any dust.
Place pieces on a couple layers of paper towels.
Basecoat each piece with SS-138 Flat Black. Allow to dry!
Mix MM-102 Copper Metallic well. Apply 1 coat of MM-102 Copper Metallic to the wings, face, hands, and legs. Allow to dry! Apply a second of MM-102 Copper Metallic to the wings, face, hands, and legs. While the MM-102 Copper Metallic is still wet, apply the MM-202 Green Patina with an AB-710 ¾ Flat Shader. In about 10-20 minutes you will start to see the Patina action starting.
Mix MM-106 Steel Metallic by stirring and shaking well.
For the dress and shoes, you can either put on 1 coat of the MM-106 Steel Metallic, let it dry then apply a 2nd coat, while the 2nd coat is still wet apply the MM-305 Rapid Rust with an AB-710 ¾” Flat Shader. Or you can put some MM-106 Steel Metallic in a small cup then add some MM-305 Rapid Rust, mix well then apply 2-3 coats to the dress and shoes.
Allow to dry!
Using an AB-710 ¾” Flat Shader, apply 2 coats of AC-502 Matte Brush-on Sealer. Allow to dry!
Using an DB-804 #3 Flat, drybrush the wings, face, hands, and legs with MM-102 Copper Metallic.
Using an DB-804 #3 Flat, drybrush the hair with MM-104 Dark Bronze Metallic then with MM-1005 Gold Metallic. Also, drybrush the bottom edge of the dress, the collar, and the cuffs with the MM-105 Gold Metallic.
Using an AB-705 #5 Round, apply 2-3 coats of MM-105 Gold Metallic to the Angle with the heart.
Using a Stylus Tool, apply dots to create a 5-petal flower at the bottom of the Heart Angle with SS-317 Turquoise, highlight with SS-135 White. Also apply SS-137 Turquoise dots around the Collar and cuffs of the dress.
Using a Stylus Tool, apply dots to create a 5-petal flower at the bottom of the Open Arms Angle with SS-183 Rich Peach, highlight with SS-135 White. Also apply SS-183 Rich Peach dots around the collar and cuffs of the dress.
Using a CB-110 #10/0 Liner, paint stems and leaves with SS-376 Limeburst.
Begin with properly fired cone 04 bisque. Moisten a sponge and wipe bisque to remove any dust.
Place the pattern over a piece of AC-230 Clay Carbon Paper. Cut around the pattern so that it will be small enough to fit on the app plate. You should end up with the pattern and a matching piece of clay carbon paper.
Keep the clay carbon paper under the pattern and place onto the app plate. Trace the pattern with a pencil. Remove the pattern and clay carbon paper. You should be able to see the pattern on the bisque.
Using the Script Liner with SC-37 Ivory Tower, apply 3 coats to the whipped cream on the pie. Allow glaze to dry between coats.
Using the Script Liner with SC-51 Poo Bear, apply 3 coats to the crust. Allow glaze to dry between coats.
Using the Script Liner with SC-50 Orange Ya Happy, apply 3 coats to the top of the pie. Allow glaze to dry between coats.
Using the Script Liner with SC-23 O’Lantern, apply 3 coats to the side of the pie. Allow glaze to dry between coats.
Using the Detail Liner with SC-15 Tuxedo, outline the pie and lettering.
Using the Soft Fan with NT-BR Clear One Brushing, apply 2 coats over flat portion on the front of the app plate. The area with the design. Allow glaze to dry between coats.
Using the Soft Fan with SC-15 Tuxedo, apply 3 coats to the back and rim of the app plate. Allow glaze to dry between coats.
Using the Soft Fan with SG-703 Autumn, apply 2 coats to the sides and handle on the front of the app plate. If you would like, you can brush some of the specks from the sides down towards your design. (Note: if you would like to go over your design with SG-703 Autumn, skip Step #9. Then apply 2 coats of SG-703 Autumn to the entire front of the app plate.)
Stilt and fire to cone 06.
Apple Plate
Begin with properly fired cone 04 bisque. Moisten a sponge and wipe bisque to remove any dust.
Place the pattern over a piece of AC-230 Clay Carbon Paper. Cut around the pattern so that it will be small enough to fit on the app plate. You should end up with the pattern and a matching piece of clay carbon paper.
Keep the clay carbon paper under the pattern and place onto the app plate. Trace the pattern with a pencil. Remove the pattern and clay carbon paper. You should be able to see the pattern on the bisque.
Using the Script Liner with SC-55 Yella Bout It, apply 3 coats to the apples in the pie filling. Allow glaze to dry between coats.
Using the Script Liner with SC-42 Butter Me Up, apply 3 coats to the filling around the apples. Allow glaze to dry between coats.
Using the Script Liner with SC-5 Tiger Tail, apply 3 coats to the top of the crust. Allow glaze to dry between coats.
Using the Script Liner with SC-25 Crackerjack Brown, apply 3 coats to the sides of the crust. Allow glaze to dry between coats.
Using the Detail Liner with SC-15 Tuxedo, outline the pie and lettering.
Using the Soft Fan with NT-BR Clear One Brushing, apply 2 coats over flat portion on the front of the app plate. The area with the design. Allow glaze to dry between coats.
Using the Soft Fan with SC-15 Tuxedo, apply 3 coats to the back and rim of the app plate. Allow glaze to dry between coats.
Using the Soft Fan with SG-703 Autumn, apply 2 coats to the sides and handle on the front of the app plate. If you would like, you can brush some of the specks from the sides down towards your design. (Note: if you would like to go over your design with SG-703 Autumn, skip Step #9. Then apply 2 coats of SG-703 Autumn to the entire front of the app plate.)
Stilt and fire to cone 06.
Pecan Plate
Begin with properly fired cone 04 bisque. Moisten a sponge and wipe bisque to remove any dust.
Place the pattern over a piece of AC-230 Clay Carbon Paper. Cut around the pattern so that it will be small enough to fit on the app plate. You should end up with the pattern and a matching piece of clay carbon paper.
Keep the clay carbon paper under the pattern and place onto the app plate. Trace the pattern with a pencil. Remove the pattern and clay carbon paper. You should be able to see the pattern on the bisque.
Using the Script Liner with SC-51 Poo Bear, apply 3 coats to the crust. Allow glaze to dry between coats.
Using the Script Liner with SC-5 Tiger Tail, apply 3 coats to the filling. Allow glaze to dry between coats.
Using the Script Liner with SC-25 Crackerjack Brown, apply 3 coats to the top of the pie. Allow glaze to dry between coats.
Take the pattern and place it back over the pie. Gently trace over the pecans on the top of the pie. Check to make sure you can see a faint line in the glaze. Do not press hard enough to go down to the bisque. Remove the pattern.
Using the Detail Liner with SC-15 Tuxedo, outline the pie, lettering, and pecans. Add an irregular, double line going down the center of each pecan.
Using the Soft Fan with NT-BR Clear One Brushing, apply 2 coats over flat portion on the front of the app plate. The area with the design. Allow glaze to dry between coats.
Using the Soft Fan with SC-15 Tuxedo, apply 3 coats to the back and rim of the app plate. Allow glaze to dry between coats.
Using the Soft Fan with SG-703 Autumn, apply 2 coats to the sides and handle on the front of the app plate. If you would like, you can brush some of the specks from the sides down towards your design. (Note: if you would like to go over your design with SG-703 Autumn, skip Step #9. Then apply 2 coats of SG-703 Autumn to the entire front of the app plate.)
Stilt and fire to cone 06.
Turkey Plate
Begin with properly fired cone 04 bisque. Moisten a sponge and wipe bisque to remove any dust.
Place the pattern over a piece of AC-230 Clay Carbon Paper. Cut around the pattern so that it will be small enough to fit on the app plate. You should end up with the pattern and a matching piece of clay carbon paper.
Keep the clay carbon paper under the pattern and place onto the app plate. Trace the pattern with a pencil. Remove the pattern and clay carbon paper. You should be able to see the pattern on the bisque.
Using the Script Liner with SC-51 Poo Bear, SC-50 Orange Ya Happy, and SC-87 Ruby Slippers, apply 3 coats to the feathers. Allow glaze to dry between coats.
Using the Script Liner with SC-25 Crackerjack Brown, apply 3 coats to the body. Allow glaze to dry between coats.
Using the Script Liner with SC-48 Camel Back, apply 3 coats to the top of the wing. Allow glaze to dry between coats.
Using the Script Liner with SC-74 Orange-A-Peel, apply 3 coats to the beak. Allow glaze to dry between coats.
Using the Script Liner with SC-74 Hot Tamale, apply 3 coats to the snood hanging from the turkey’s beak. Allow glaze to dry between coats.
Squeeze around 1oz of SC-16 Cotton Tail into AC-220 Detailer Tips and 1oz Bottles. Use the bottle to make white lines or dots on the feathers.
Using the Detail Liner with SC-15 Tuxedo, outline the turkey and lettering.
Using the Soft Fan with SC-15 Tuxedo, apply 3 coats to the back and rim of the app plate. Allow glaze to dry between coats.
Using the Soft Fan with NT-BR Clear One Brushing, apply 1 coat over the front of the app plate. Allow glaze to dry between coats.
Using the Soft Fan with SG-703 Autumn, apply 1 coat over the front of the app plate. (Note: If you would like more dots of color, skip Step #12. Then apply 2 coats of SG-703 Autumn to the entire front of the app plate.)
Begin with properly fired cone 04 bisque. Moisten a sponge and wipe bisque to remove any dust.
Squeeze out 1 tbsp. of SC-53 Purple Haze and 1 tbsp. of SC-16 Cotton Tail onto the palette and thoroughly mix. Thin with around 1 tsp. of water. Use the Soft Fan to apply 1 coat to the outside of the container.
Using a damp sponge, wipe the outside of the container until most of the glaze is gone, leaving it only in the crevices.
Pour out around 1 TBS of FN-209 Floral Pink and 1 TBS FN-212 Blue Diamond onto the palette and thoroughly mix. Add 2 TBS NT-BR Clear One Brushing and thoroughly mix. Use the Soft Fan to apply 3 coats to the outside of the container.
Using the Soft Fan with FN-001 White, apply 3 coats to the inside of the container. Allow glaze to dry between coats.
Stilt and fire to cone 06.
Using the Mother of Pearl Brush with OG-803 MOP Brush-On, apply 1 coat to the outside of the container. Apply a thin, even coat using a circular motion.
Fire to cone 020.
Flourish Container:
Begin with properly fired cone 04 bisque. Moisten a sponge and wipe bisque to remove any dust.
Squeeze out 1 tbsp. of SC-23 Jack O’Lantern and 1 tbsp. of SC-16 Cotton Tail onto the palette and thoroughly mix. Thin with around 1 tsp. of water. Use the Soft Fan to apply 1 coat to the upper and lower sections of the container with the scrolls.
Using a damp sponge, wipe the outside of the container until most of the glaze is gone, leaving it only in the crevices.
Use the scissors to cut a square around the pattern. Place the pattern on the center of the container. Slide the clay carbon paper under the pattern and trace the pattern with the pencil.
Using the Detail Liner with SC-15 Tuxedo, apply 1 coat to the traced pattern. You can also make your own pattern if you would like a different saying on your container. Allow glaze to dry.
Pour out around 1 tbsp. of FN-207 Orange Slice and 2 tbsp. NT-BR Clear One Brushing and thoroughly mix. Use the Soft Fan to apply 3 coats to the outside of the container.
Using the Soft Fan with FN-001 White, apply 3 coats to the inside of the container. Allow glaze to dry between coats.
Stilt and fire to cone 06.
Using the Mother of Pearl Brush with OG-803 MOP Brush-On, apply 1 coat to the outside of the container. Apply a thin, even coat using a circular motion.
Fire to cone 020.
Wicker Container:
Begin with properly fired cone 04 bisque. Moisten a sponge and wipe bisque to remove any dust.
Squeeze out 1 tbsp. of SC-91 Seabreeze. Thin with around 1 tsp. of water. Use the Soft Fan to apply 1 coat to the outside of the container.
Using a damp sponge, wipe the outside of the container until most of the glaze is gone, leaving it only in the crevices.
Pour out around 1 tbsp. of FN-214 Pastel Jade and 1 tbsp. NT-BR Clear One Brushing and thoroughly mix. Use the Soft Fan to apply 3 coats to the outside of the container.
Using the Soft Fan with FN-001 White, apply 3 coats to the inside of the container. Allow glaze to dry between coats.
Stilt and fire to cone 06.
Using the Mother of Pearl Brush with OG-803 MOP Brush-On, apply 1 coat to the outside of the container. Apply a thin, even coat using a circular motion.
Roll the clay piece up in your hands to create a pebble. Note: pebbles should range in approximate size from large pea to grape.
Put the pebble in a plastic bowl to keep from rolling everywhere.
Repeat steps 2-4 until your clay chunk is gone.
Place saran wrap in the inside of the paper bowl.
Tuck the pebbles of clay close together starting at the bottom of the inside of the bowl and work your way up the sides.
Give them a little squish occasionally to flatten the pebbles and help them connect. Note: small gaps may still appear. These aren’t a problem, but large gaps should be filled in with a small pebble.
Continue steps 7-8 until the sides of the bowl are covered, tearing off more chunks of clay to make pebbles as needed.
Once the inside of the bowl is covered with pebbles, compress the bottom of the bowl using your hand.
Take your thumb from the top edge of the clay pebbles and with pressure, slide down to the center of the bowl. This will get rid of the individual pebble texture,but will connect and compress the clay. The pebble texture will remain on the outside.
Continue pressing and sliding down until the whole inside of the bowl is relatively smooth. Remember: pressure is important to make sure the clay is compressed and doesn’t crack as it dries!
Let the clay dry a bit inside the paper bowl before removing. The bowl can be removed immediately, but the shape of the pebble bowl may warp and it’s a little tougher to remove.
Let fully dry and bisque fire to cone 04.
Glaze using your favorite Mayco glaze that highlights texture on the piece. Foundations Sheers would be great option for showing texture!
Adaptations: Pebbles can also be rolled one handed on a table surface instead of between both hands, or pinched into a round shape rather than rolled. A tool, like a spoon, could be used to compress and connect the pebbles together instead of using your thumb.
Dampen a clean sponge and wipe bisque to remove debris.
Apply 3 coats of SC-79 It’s Sage diagonally on the lower 1/3rd-2/3rd of the piece. Let dry between coats. Wipe away all excess glaze from the foot.
Once dry, apply a thin coat of AC-302 Wax Resist over the SC-79 It’s Sage with a flat shader brush and let dry completely. Wash brush immediately.
Once the wax has dried thoroughly, use a damp sponge to gently wipe back any SC-79 It’s Sage above the edge of where the wax was applied for a clean line.
Use a soft fan brush to apply heavy slaps and drizzles of SW-155 Winter Wood onto the unglazed upper section of the outside of the cup. Tilt and shake the piece to control movement and direction of drips.
In the same section, repeat step 5 using SW-144 Lava Rock.
In the same section, repeat step 5 using SW-252 Blue Opal.
In the same section, repeat step 5 using SW-109 Capri Blue.
Once completely dry, wipe away all excess glaze from the Wax Resist
Apply 2 coats of SW-144 Lava Rock to the inside of the cup with a soft fan brush. Let dry between coats.
Apply 2 coats of SW-146 Aurora Green to the inside of the cup with a soft fan brush. Let dry between coats.
Fire to cone 5/6. Sample was fired to Cone 6.
Tips:
Allow the glazes to be slightly wet between steps 5-8 so they can marble together on the piece.
Give your stoneware glazes plenty of room to drip and flow over your Stroke & Coat during firing.
Joe Mug
Dampen a clean sponge and wipe bisque to remove debris.
Apply 3 coats of SC-79 It’s Sage to the angled bottom sectionof the piece. Wipe away all excess glaze from the foot.
Once dry, apply a thin coat of AC-302 Wax Resist over the SC-79 It’s Sage with a flat shader brush and let dry completely. Wash brush immediately.
Once the wax has dried thoroughly, use a damp sponge to gently wipe back any SC-79 It’s Sage above the edge of where the wax was applied for a clean line.
Use a soft fan brush to apply 3 receded coats of SW-155 Winter Wood from the top edge of SC-79 It’s Sage and up 2 ¼”. Let dry.
Use a #6 Script Liner to apply 3 coats of SW-252 Blue Opal in a ¼” bandabove Winter Wood. Let dry.
Use a #2 Soft Fan to apply 3 coats of SW-109 Capri Blue in a 1” stripe, overlapping the SW-252 Blue Opal completely, and overlapping the SW-155 Winter Wood by ¼” (the top edge). Let dry.
Use a #2 Soft Fan to apply 3 coats of SW-144 Lava Rock in a ½” stripe from the lip of the cup, overlapping ¼” (the top edge) of the SW-109 Capri Blue.
Apply 2 coats of SW-144 Lava Rock to the inside of the cup with a #4 Soft Fan brush, and 3 coats on the handle. Let dry between coats.
Layer 2 coats of SW-146 Aurora Green on top of the SW-144 Lava Rock in the inside of the cup.
Fire to cone 5/6. Sample was fired to Cone 6.
Message Mug
Dampen a clean sponge and wipe bisque to remove debris.
With 1/4” tape, square off the message board on the front of the piece. With more tape, divide the window into 4 even sections with crossed horizontal and vertical lines.
Apply 3 coats of SW-501 White Gloss into the windowpanes. Let dry completely.
Once the SW-501 is fully dried, use Stroke & Coat and water to paint a landscape in a watercolor style using a script liner brush. This sample shows SC-32 Bluebeard used as the sky, SC-51 Pooh Bear as the sunshine in the clouds, SC-29 Bluegrass as the mountains, SC-12 Moody Blue as the snow, and SC-39 Army Surplus, SC-79 It’s Sage, and SC-14 Java Bean as the trees.
Gently remove the tape and apply 3 coats of SW-144 Lava Rock where the tape was using a flat shader brush for precision. Glaze the bottom section of the piece with 3 coats of SW-144 Lava Rock as well, using a soft fan brush. Let glaze dry between coats.
Apply 3 coats of SC-79 to the handle. Allow to dry between coats.
When fully dry, apply a careful coat of wax resist over the entire window, handle, and foot of the piece with a flat shader brush and dry completely. Wash brush immediately. For crisp edges, wipe away any glaze that is not protected by wax.
Apply 3 receded coats of SW-155 Winter Wood to the lower 2/3rds of the body of the piece in an uneven line, like a hilly landscape. Allow glaze to dry between coats.
Use a script liner to apply 3 coats of SW-252 Blue Opal in a thin bandabove the SW-155 Winter Wood. Let dry between coats.
With a soft fan brush, apply three coats of Capri Blue in a wavy line about 2” thick reaching nearly the lip of the piece, overlapping the SW-252 Blue Opal and partially overlapping the SW-155 Winter Wood.
Apply 3 coats of SW-144 Lava Rock in a wavy line with a soft fan brush to cover the bare bisque at the top of the piece and partially overlapping the SW-109 Capri Blue. Apply 2 coats to the lip and the inside of the pi Allow to dry between coats.
Apply 2 coats of SW-149 Aurora Green on top of the SW-144 Lava Rock on the lip and in the inside of the cup. * If you do not wish for this glaze combination to drip onto the body of the piece, recede the coats of SW-146 Aurora Green and brush away any large crystals on the *
Fire to cone 5/6. Sample was fired to cone 6.
Tips:
Be careful to avoid overbrushing! The SW-501 White Gloss will soften as it gets wet, and overbrushing will wipe it away or mix it into your Stroke & Coat. Let one color dry before layering another color.
If you would like to practice your watercolor brush strokes, you can use the side of the piece and wipe it off with a damp sponge.
Once fully dry, you may use a toothpick to lightly scratch the surface of your watercolor landscape to reveal crisp lines of glossy white.
Using the Soft Fan with SW-301 Iron Wash, apply 1 coat over the raised message portion on the mug. Wipe off most of the wash using a damp sponge. Try not to wipe off any of the wash going around the border of the message section.
Pour out around 1/2 TBS of SG-401 Black onto the palette. Add a pinch of AC-310 Silkscreen Medium. Mix with a palette knife until it becomes the consistency of peanut butter. You may need to add more silkscreen medium or designer liner.
Take DSS-0128 The Farm Screen and find the barn. Draw a border around the screen with the permanent marker. Cut it out.
Place the screen shiny side down towards the bottom of the message section. While holding the screen firmly in place, scoop a small amount of premixed silkscreen medium onto the squeegee and pull across the screen. Remove the screen.
Use the pencil to write lettering on the message section of the mug. Use the Detail Liner with SG-401 Black to trace over your lettering.
Using the Soft Fan with SW-118 Sea Salt, apply 2 coats to the outside of the mug. Do not glaze over the message section. Allow glaze to dry between coats.
Using the Soft Fan with SW-166 Norse Blue, apply 2 coats to the outside of the mug. Do not glaze over the message section. Recede the 2nd coat around 1/4” from the bottom of the mug to prevent dripping. Allow glaze to dry between coats.
Using the Script Liner with PC-602 White Cascade, apply ½” band going around the top of the mug.
Fill AC-220 Detailer Tips and 1 oz Bottles with SC-76 Cara-Bein Blue. You only need to fill the bottle ¼ full. Make dots going around the rim of the mug, right over the pottery cascades.
Using the Soft Fan with SW-508 Black Gloss, apply 3 coats to the inside of the mug. Allow glaze to dry between coats.
Using the Soft Fan with SW-155 Winter Wood, apply 2 coats to the outside of the mug. Allow glaze to dry between coats.
Using the Soft Fan with SW-165 Lavender Mist, apply 2 coats to the outside of the mug. Recede the 2nd coat around 1/4” from the bottom of the mug to prevent dripping. Allow glaze to dry between coats.
Using the Script Liner with PC-602 White Cascade, apply ½” band going around the top of the mug.
Fill AC-220 Detailer Tips and 1 oz Bottles with SC-2 Melon-Choly. You only need to fill the bottle ¼ full. Make dots going around the rim of the mug, right over the pottery cascades.
Using the Soft Fan with SW-508 Black Gloss, apply 3 coats to the inside of the mug. Allow glaze to dry between coats.
Using the Soft Fan with SW-166 Norse Blue, apply 2 coats to the outside of the mug. Allow glaze to dry between coats.
Using the Soft Fan with SW-180 Desert Dusk, apply 2 coats to the outside of the mug. Recede the 2nd coat around 1/4” from the bottom of the mug to prevent dripping. Allow glaze to dry between coats.
Using the Script Liner with PC-602 White Cascade, apply ½” band going around the top of the mug.
Fill AC-220 Detailer Tips and 1 oz Bottles with SC-75 Orange-A-Peel. You only need to fill the bottle ¼ full. Make dots going around the rim of the mug, right over the pottery cascades.
Using the Soft Fan with SW-508 Black Gloss, apply 3 coats to the inside of the mug. Allow glaze to dry between coats.
With a CB-618 #8 Soft Fan brush, apply 3 coats of FN-301 Marshmallow White Matte foundations.
Use fake leaves or create your own leaf design by sketching or tracing with a pencil. Optional: wipe some of the extra graphite off of the piece to remove residue.
For the canvas, apply 2 coats of EL-103 Sea Spray to fill in the leaves design with a CB-408 #8 Pointed Round brush.
For the Holiday plate, use a CB-408 #8 Pointed Round brush to apply 2 coats of EL-150 Fern for the leaves and combined FN-221 Milk Glass White.
Use an RB-118 #8 Round Brush with SC-81 Cinnamon Stix for berries.
Sketch lines on for the design (can use a ruler, free hand or tape).
Sample: 1cm lines
Use SC-79 It’s Sage, SC-58 501 Blues, SC-91 Seabreeze, SC-45 My Blue Heaven and SC-16 Cotton Tail for each section. Tinted SC-58 501 Blues and SC-79 It’s Sage with SC-16 Cotton Tail to have a lighter shade of it for color variations.
Use water to dilute the colors so it will not require 3 coats and will be simple to paint.
Use a CB-310 #10 Flat Shader to fill in color in each section.
Sample: used a brush that is the same width as the sections to fill in the color with one or two brushstrokes.
Once all the lines are painted, use SC-16 Cotton Tail to mimic the stitches to hold each section together with a CB-200 #0 Detail brush.
Finish by painting 1 coat of Milk Glass White on the top of the piece, and 3 coats on the back with a CB-618 #8 Soft Fan brush.
Begin with properly fired cone 04 bisque. Moisten a sponge and wipe bisque to remove any dust.
Squeeze out 1 tbsp. of SC-96 Aqu-ward onto the palette. Thin with around 1 tsp. of water. Use the Soft Fan to apply 1 coat to the textured area of the tree (everything besides the tip and base).
Using a damp sponge, wipe the textured area of the tree until most of the glaze is gone, leaving it only in the crevices.
Pour out around 1 tbsp. of FN-216 Sea Glass and 1 tbsp. NT-BR Clear One Brushing onto the palette and thoroughly mix. Use the Soft Fan to apply 3 coats to the textured areas on the outside of the tree (everything besides the tip and base).
Using the Script Liner with SC-16 Cotton Tail, apply 3 coats to the tip and base of the tree. Allow glaze to dry between coats.
Stilt and fire to cone 06.
Using the Mother of Pearl Brush with OG-803 MOP Brush-On, apply 1 coat to the outside of the tree. Apply a thin, even coat using a circular motion.
Fire to cone 020.
Medium Tree:
Begin with properly fired cone 04 bisque. Moisten a sponge and wipe bisque to remove any dust.
Squeeze out 1 tbsp. of SC-60 Silver Lining onto the palette. Thin with around 1 tsp. of water. Use the Soft Fan to apply 1 coat to the textured area of the tree (everything besides the tip and base).
Using a damp sponge, wipe the outside of the tree until most of the glaze is gone, leaving it only in the crevices.
Pour out around 1 tbsp. of FN-211 Sheer Blue and 1 tbsp. NT-BR Clear One Brushing and thoroughly mix. Use the Soft Fan to apply 3 coats to the textured areas on the outside of the tree (everything besides the tip and base).
Using the Script Liner with SC-16 Cotton Tail, apply 3 coats to the tip and base of the tree. Allow glaze to dry between coats.
Stilt and fire to cone 06.
Using the Mother of Pearl Brush with OG-803 MOP Brush-On, apply 1 coat to the outside of the tree. Apply a thin, even coat using a circular motion.
Fire to cone 020.
Small Tree:
Begin with properly fired cone 04 bisque. Moisten a sponge and wipe bisque to remove any dust.
Squeeze out 1 tbsp. of SC-1 Pink-A-Boo. Thin with around 1 tsp. of water. Use the Soft Fan to apply 1 coat to the textured areas on the outside of the tree (everything besides the tip and base).
Using a damp sponge, wipe the outside of the tree until most of the glaze is gone, leaving it only in the crevices.
Pour out around 1 tbsp. of FN-209 Floral Pink and 2 tbsp. NT-BR Clear One Brushing and thoroughly mix. Use the Soft Fan to apply 3 coats to the textured areas on the outside of the container (everything besides the tip and base).
Using the Script Liner with SC-16 Cotton Tail, apply 3 coats to the tip and base of the tree. Allow glaze to dry between coats.
Stilt and fire to cone 06.
Using the Mother of Pearl Brush with OG-803 MOP Brush-On, apply 1 coat to the outside of the container. Apply a thin, even coat using a circular motion.
Begin with properly fired cone 04 bisque. Moisten a sponge and wipe bisque to remove any dust.
Using the Soft Fan with EL-125 Sahara Sands, apply 3 coats to the back of the plate. Allow glaze to dry between coats.
Using the Soft Fan with EL-125 Sahara Sands, apply 2 coats to the front of the plate. Allow glaze to dry between coats.
Cut your lace or doilies to the size you would like for the front of the plate. Place them on the front of the plate and sponge them with water to help that stick to the plate. You want to use the least amount of water as possible.
Using the Soft Fan with EL-125 Sahara Sands, apply 1 thin coat over your lace or doilies. Allow glaze to dry to the touch.
Using the Soft Fan with SC-10 Teal Next Time or SC-88 Tu Tu Tango (you can also use a different S&C color of your choice), apply 1 coat over your lace or doilies. Allow glaze to lose it’s shine. Do not wait until it is bone dry. Remove the lace or doilies.
Begin with properly fired cone 04 bisque. Moisten a sponge and wipe bisque to remove any dust.
With the #4 Soft Fan Brush apply 3 coats of FN-304 Black Velvet about half way up the tree.
With the #4 Soft Fan Brush apply 2 coats of EL-120 Black Ice from the top of the tree slightly overlapping the dried FN-304 Black Velvet
With the #4 Soft Fan Brush apply 2 heavy coats of FN-1 White to the base of the tree
Use the #6 Script Liner Brush with EL-120 Black Ice and dab on abstract dot shapes around the base.
Fire to cone 06.
Large Wicker Tree
Begin with properly fired cone 04 bisque Moisten a sponge and wipe bisque to remove any dust.
Apply 3 coats of AS-510 White Opal (painting in different directions each coat for full coverage. Be sure to shake the bottle first to mix in crystals) to the base of the tree.
Apply 2 heavy coats of FN-301 Marshmallow White with the #4 Soft Fan Brush to the top woven wicker section of the tree.
Once the FN-301 Marshmallow White is dried use the #6 Script Liner Brush to paint dashed lines across the raised wicker sections with SP-215 Speckled Black Tuxedo.
With the #4 Soft Fan Brush apply 2 heavy coats of EL-120 Black Ice to the very top of the tree and under the FN-301 Marshmallow Whitesection.
Once the sections of the tree painted with EL-120 Black Ice are dried, apply 1 heavy coat of SG-701 Speckta-Clear Star Dust.
Begin with properly fired cone 04 bisque. Moisten a sponge and wipe bisque to remove any dust.
Apply 2 coats of EL-113 Spanish Moss with RB-144 #4 Soft Fan Brush to the woven wicker.
Apply 2 coats of a 50/50 mixture of EL-110 Mudslide and EL-204 Glowing Embers with RB-106 #6 Script Liner Brush to the braided wicker sections towards the top of the tree and bottom of the tree.
Apply 2 coats of FN-14 Antique White with RB-144 #4 Soft Fan Brush to the base.
With the Script Liner water down SC-81 Cinnamon Six and paint 2 horizontal lines around the base. Layer over with SC-79 It’s Sage with vertical stripes and SC-39 with vertical and horizontal stripes as plaid
Fire to cone 06.
Medium Wicker Tree
Begin with properly fired cone 04 bisque. Moisten a sponge and wipe bisque to remove any dust
Apply 2 coats of EL-113 Spanish Moss with RB-144 #4 Soft Fan Brush to the scalloped wicker.
Apply 2 coats of EL-204 Glowing Embers with RB-106 #6 Script Liner Brush to the braided wicker sections towards the top and bottom of the tree, and the flat vertical pieces around the tree.
Apply 2 coats of FN-14 Antique White with RB-144 #$ Soft Fan Brush to the base.
With the Script Liner water down SC-39 Army Surplus and paint vertical lines around the base. Laver over with horizontal stripes SC-79 It’s Sage as plaid
Fire to cone 06.
Large Wicker Tree
Begin with properly fired cone 04 bisque. Moisten a sponge and wipe bisque to remove any dust.
Apply 2 coats of EL-113 Spanish Moss with RB-144 #4 Soft Fan Brush to the woven and crossed wicker sections.
Apply 2 coats of EL-110 Mudslide with RB-106 #6 Script Liner Brush to the braided wicker sections around the tree
Apply 2 coats of FN-14 Antique White with RB-144 #$ Soft Fan Brush to the base
With the Script Liner water down SC-15 Tuxedo and paint 2 horizontal lines around the base. Later over with SC-81 Cinnamon Stix vertical stripes and a 50/50 mix of SC-15 Tuxedo and SC-81 Cinnamon Stix vertical & horizontal stripes.
Begin with properly fired cone 04 bisque. Moisten a sponge and wipe bisque to remove any dust.
Apply 2 heavy coats of EL-110 Mudslide with the #4 Soft Fan Brush to the base of the tree.
Apply 2 coats of FN-32 Canton Jade with the #4 Soft Fan Brush on the tree
Once the FN-32 Canton Jade is dried, apply 2 coats of EL-106 Tidal Pool with the #4 Soft Fan Brush on the tree.
Fire to cone 06.
Medium Wicker Tree
Begin with properly fired cone 04 bisque. Moisten a sponge and wipe bisque to remove any dust.
Apply 2 heavy coats of EL-110 Mudslide with the #4 Soft Fan Brush to the base of the tree.
Apply 2 coats of EL-106 Tidal Pool to the tree.
Once the EL-106 Tidal Pool is dried, apply 2 coats of EL-113 Spanish Moss from the bottom of the tree to the top of the tree underneath the 3 braided wicker lines, so the top section of the tree is just EL-106 Tidal Pool.
Fire to cone 06.
Large Wicker Tree
Begin with properly fired cone 04 bisque. Moisten a sponge and wipe bisque to remove any dust.
With the #4 Soft Fan Brush apply 1 heavy coat of IN1037 Leaf Green.
With a damp sponge, wipe the IN1037 from the raised textures of the tree. Be sure to not wipe too much from the inset crevices
Mix equal parts FN-216 Sea Glass and IN1037 Leaf Green and apply 2 heavy coats on the tree
Begin with properly fired cone 04 bisque. Moisten a sponge and wipe bisque to remove any dust.
Apply 2 heavy coats of FN-1 White with the #4 Soft Fan Brush to the tree.
Apply 2 coats of CG-998 Peppermint Twist to the base of the tree with the #4 Soft Fan Brush.
Apply 2 coats of CG-997 Seafoam to the very top section of the tree.
Once the FN-1 White is dried, randomly apply dots of FN-214 Pastel Jade, FN-231 Clearly Jade, IN1032 Miami Pink and IN1005 Ruby Red with cotton swabs or a dotting tool around the tree as decorations.
Fire to cone 06.
Medium Wicker Tree
Begin with properly fired cone 04 bisque. Moisten a sponge and wipe bisque to remove any dust.
Start painting at the bottom of the tree with a #4 Soft Fan Brush with IN1005 Ruby Red, about 1/3 way up, feather the paint so there is a smooth blend between colours.
With a different, or clean #4 Soft Fan Brush, apply IN1032 Miami Pink and slightly overlap the feathered edge of IN1005 Ruby Red. Paint upwards about 2/3 of the tree. Feather the paint so there is a smooth blend between colours.
With another different, or clean #4 Soft Fan Brush, apply CG-968 Peppermint Twist to the top of the tree and slightly overlap the feathered edge of IN1032 Miami Pink.
Once the tree is dried, repeat steps 2-4.
Apply 2 coats of FN-1 White to the base of the with a #4 Soft Fan Brush
Fire to cone 06
Large Wicker Tree
Begin with properly fired cone 04 bisque. Moisten a sponge and wipe bisque to remove any dust.
Start painting at the bottom of the tree with a #4 Soft Fan Brush with FN-231 Clearly Jade, about 1/3 way up, feather the paint so there is a smooth blend between colours.
With a different, or clean #4 Soft Fan Brush, apply FN-214 Pastel Jade and slightly overlap the feathered edge of FN-231 Clearly Jade. Paint upwards about 2/3 of the tree. Feather the paint so there is a smooth blend between colours.
With another different, or clean #4 Soft Fan Brush, apply CG-997 Seafoam to the top of the tree and slightly overlap the feathered edge of FN-2134 Pastel Jade.
Once the tree is dried, repeat steps 2-4.
Apply 2 coats of FN-1 White to the base of the with a #4 Soft Fan Brush.
Begin with properly fired shelf cone 04 Bisque. Moisten a clean Sponge and wipe Bisque to remove any dust.
Using a CB-604 #4 Soft Fan, apply 2 Coats of FN-008 Brown to the top of the tile only.
Pencil in the position of the flowers and the stems. Precut the eyelash yarn for the flower size. Brush water over the space for the flower head, then lay in the eyelash yarn shape into a circle. Brush back over the yarn with FN-008 Brown.
Brush some FN-008 Brown over the stem area working one stem at a time. Lay in the jute or heavy linen string then brush over with another coat of FN-008 Brown.
Allow to dry just until the shine leaves the Glaze.
Using a CB-604 #4 Soft Fan, apply 1 coat of SC-86 Old Lace over the entire tile. Using a CB-106 #6 Script Liner, apply 2 Coats of SC-28 Blue Isle on the flower area. Apply 2 Coats Coats of SC-5 Tiger Tail on the centers of the flowers.
Using a CB-604 #4 Soft Fan, apply SC-5 Tiger Tail mixed with some of the SC-86 Old Lace towards the bottom of the tile adding more of the SC-86 Old Lace toward the top.
Brush in some SC-85 Orkid in a random fashion. Brush in some SC-76 Cara-bein Blue to follow some of the spiral vines near the top.
Using a CB-106 #6 Script Liner, apply a thinned coat of CG-718 Blue Caprice over the SC-28 Blue Isle flowers.
Allow to dry until the shine leaves the Glaze. Pull off all the string and yarn. Allow to dry.
Begin with properly fired shelf cone 04 bisque. Moisten a clean sponge and wipe bisque to remove any dust.
Cut out the paper pattern.
Position the pattern on the tile, trace around the flower and the bird.
Using a CB-106 #6 Script Liner, apply 3 coats of SC-88 Tu Tu Tango to the flower area, brush over the center and past the pencil lines.
Cut the paper flower from the stem and the bird. After the third coat of glaze, while the glaze is still damp, brush lightly with water, then place the cut out paper flower on the glaze, press down to secure the edges from lifting.
Using a CB-106 #6 Script Liner and a CB-604 #4 Soft Fan, apply 2 coats of FN-009 Black to the remaining area of the tile.
While the glaze is damp, brush lightly with water, then press in the remaining paper pattern. Press with paper towel to remove excess water.
When nearly dry, Using a CB-310 #10 Flat Shader brush to brush thin even, crosshatching stokes of SC-78 Lime Light around the bird’s body, blend in with SC-76 Cara-bein Blue to the remainder of the tile, add in some SC-10 Teal Next Time in the SC-76 Cara-bein blue area. Apply at least 3 thin coats.
Remove the paper.
Using CB-110 #10/0 Liner, apply2 coats of SC-10 Teal Next Time to the stems, and center.
Dot around the center using the tip of the brush handle with FN-009 Black. Allow to dry.
Begin with properly fired shelf cone 04 bisque. Moisten a clean sponge and wipe bisque to remove any dust.
Using an CB-604 #4 Soft Fan, apply 3 coats of FN-033 Mediterranean Teal to the inside and outside of the Tumbler. Allow to dry!
Stilt and fire to cone 06. Use a Coffee Filter to remove the tree from the kiln to prevent getting any fingerprints on them.
Place some OG801 Bright Gold onto a glazed tile. Using an OG-916G #6 Filbert (Gold Handle), apply a coat of OG801 Bright Gold to the outside of the Tumbler. Clean brush with OA901 Essence that is reserved for the OG801 Bright Gold.
Stilt and fire the Tumbler to cone 022. This is a soft firing temperature for the Gold. If left this way, it will rub off. We want it like this for this technique.
Using a Scrubby with a little Cleanser on it, rub the Fired Gold off the top surface of the Tumbler, leaving it in the deep crevices. Do not rub off the top rim. Rinse with clean water and allow to dry.
Begin with properly fired shelf cone 04 bisque. Moisten a clean sponge and wipe bisque to remove any dust.
Remove any of the Ornament Caps from the Ornament Balls.
Using an CB-604 #4 Soft Fan, apply 3 coats of FN-004 Red to one of the Ornament Balls.
Apply 3 coats of CC-101 Transparent Crackleto the second Ornament Ball
Apply 3 coats of EL-134 Mirror Blue to the third Ornament Ball. Allow to dry!
Stilt and fire to cone 06. Use a Coffee Filter to remove the Ornaments from the kiln to prevent getting any fingerprints on them.
Using a container larger than the Ornament Balls, line it with a plastic bag for ease of clean up.
Fill the container with warm water (do not use cold water) about 2” from the top.
Using a Toothpick, dip the Toothpick into the bottle of Fired Gold. Place a drop to the top surface of the water so that OG801 Bright Gold will float on top of the water.
Bend a coat hanger so that it will fit into the pour hole of the Red and the Blue Ornament Ball. This will help when dipping.
Dip one of the Ornaments in the water with the floating Bright Gold. Hang to dry!
Repeat with the Blue Ornament Ball. You may need to add another drop of Bright Gold.
You can dip each ornament a second time if you wish to get more Gold on them. Dry!
White Ornament Ball: Using an OB-916G #6 Filbert (Gold Handle), apply a band of Bright Gold to the center of the Ornament also to the top and bottom of the Ornament. Clean the brush using OA901 Essence that is reserved for Fired Gold to prevent contamination.
Stilt and fire all the Ornament Balls to cone 018.
Once fired, apply OG803 Mother of Pearl to the crackle ornament. Fire again to cone 020.
Antique the Ornament with CC-101 Transparent Crackle with SS-138 Flat Black.
Put the Ornament Caps on the top of the Ornaments and Enjoy!
Begin with properly fired shelf cone 04 bisque. Moisten a clean sponge and wipe bisque to remove any dust.
Using an CB-604 #4 Soft Fan, apply 3 coats of FN-009 Black to the inside and the outside of the Tumbler. Allow to dry!
Stilt and fire to cone 06. Use a Coffee Filter to remove the Tumbler from the kiln to prevent getting any fingerprints on them.
Place the Tumbler on a Banding Wheel and center it.
Using OB-901 Mother of Pearl ¼” Shader, apply OG803 Mother of Pearl in a horizontal pattern around the Tumbler. Clean brush with OA901 Essence that is reserved for the OG803 Mother of Pearl.
Begin with properly fired shelf cone 04 bisque. Moisten a clean sponge and wipe bisque to remove any dust.
Thin some FN-003 Orange to the consistency of coffee cream. Pour the glaze inside the vase and roll the glaze coating the inside of the vase. Drain the vase as you are rolling the glaze into a small cup. Leave vase upside down to drain. Wipe off any drips with a damp sponge. Allow to dry!
Using an CB-604 #4 Soft Fan, apply 3 coats of FN-003 Orange to the neck of the vase.
Using an CB-604 #4 Soft Fan, apply 2- 3 coats of CG-987 Tree frog to the bottom half of the vase. Allow to dry!
Stilt and fire to cone 06. Use a Coffee Filter to remove the Tumbler from the kiln to prevent getting any fingerprints on them.
Using an OB-916G #6 Filbert (Gold Handle), apply 1 coat of OG805 Premium Gold to the rim of the Vase.
Stilt and fire to cone 018.
Using an OB-901 Mother of Pearl ¼” Shader, apply OG803 Mother of Pearl swirling it over the Tree Frog glaze of the Vase. The more you swirl the more color you will get. Clean brush with OA901 Essence that is reserved for the OG803 Mother of Pearl.
Begin with properly fired shelf cone 04 bisque. Moisten a clean sponge and wipe bisque to remove any dust.
Using an CB-604 #4 Soft Fan, apply 3 coats of C-300 Matte Transparent to the tree. Allow to dry!
Stilt and fire to cone 06. Use a Coffee Filter to remove the Tumbler from the kiln to prevent getting any fingerprints on them.
Using an OB-916G #6 Filbert (Gold Handle), apply 1 coat of OG805 Premium Gold to the Base and tip of the tree.
Stilt and fire to cone 018.
Using an OB-901 Mother of Pearl ¼” Shader, apply the Dirty Mother of Pearl swirling it over the entire tree. The more you swirl the more color you will get. Clean brush with OA901 Essence that is reserved for the OG803 Mother of Pearl.
Begin with properly fired shelf cone 04 bisque. Moisten a clean sponge and wipe bisque to remove any dust.
Using an CB-604 #4 Soft Fan, apply 3 coats of FN-221 Milk Glass White to the tree. Allow to dry!
Stilt and fire to cone 06. Use a Coffee Filter to remove the Tumbler from the kiln to prevent getting any fingerprints on them.
Using an OB-916W #6 Filbert (Silver Handle), apply 1 coat of OG802 White Gold to the Base and tip of the tree.
Stilt and fire to cone 018.
Using a jar of OG803 Mother of Pearl add a drop of OG801 Bright Gold to it. Mix gently not to create air bubbles.
Using an OB-901 Mother of Pearl ¼” Shader, apply the Dirty Mother of Pearl swirling it over the wicker part of the tree. The more you swirl the more color you will get. Clean brush with OA901 Essence that is reserved for the OG803 Mother of Pearl.
Begin with properly fired shelf cone 04 bisque. Moisten a clean sponge and wipe bisque to remove any dust.
Using an CB-604 #4 Soft Fan, apply 3 coats of FN-211 Sheer Blue to Tree. Allow to dry!
Stilt and fire to cone 06. Use a Coffee Filter to remove the Tree from the kiln to prevent getting any fingerprints on them.
Using an OB-916W #6 Filbert (Silver Handle) apply OG802 White Gold to the tree streaking it upward from the bottom of the branches.
Stilt and fire to cone 018.
Use a Coffee Filter to remove the Tree from the kiln to prevent getting any fingerprints on them.
Using an OB-901 Mother of Pearl ¼” Shader, apply OG803 Mother of Pearl in a circular pattern around the Tree going over the White Gold. Clean brush with OA901 Essence that is reserved for the OG803 Mother of Pearl.
Begin with properly fired shelf cone 04 bisque. Moisten a clean sponge and wipe bisque to remove any dust.
Using an CB-604 #4 Soft Fan, apply 3 coats of FN-221 Milk Glass White. Allow to dry!
Stilt and fire to cone 06. Use a Coffee Filter to remove the tree from the kiln to prevent getting any fingerprints on them.
Using a container larger than the tree, line it with a plastic bag for ease of clean up.
Fill the container with warm water (do not use cold water) about 2” from the top.
Using a Toothpick, dip the Toothpick into the bottle of Fired Gold. Place a drop or two to the top surface of the water so that the Fired Gold will float on top of the water.
Bend a coat hanger so that it will fit into the pour hole of the tree. This will help when dipping.
Dip the tree in the water with the floating Fired Gold. Hang to dry!
You can dip the tree a second time if you wish to get more Gold on it. Allow to Dry!
Stilt and fire all the tree to cone 018
The result of this technique you will get Gold and some purple areas on the piece. The purple is where the Gold is on the thin side, so you get a two-tone look. With some White peeking through.
Moisten a clean sponge and wipe bisque to remove debris.
With a marker, draw four large half-circles on the top left, top right, bottom left, and bottom right side of the platter surface. Draw a small circle in the center of the platter, and a two more circles creating a 2-inch ring in the space between the outer edge of the platter and the outer edge of the center circle.
With a fan brush, apply 2-3 coats of SW-168 Coral Sands in the center circle. Let dry between coats.
With a fan brush, apply 2-3 coats of SW-166 Norse Blue in the four large half-circles, but do not glaze where the 2-inch ring overlaps the half-circles. Let dry between coats.
With a fan brush, apply 2-3 coats of SW-177 Raspberry Mist in the unmarked and unglazed sections of the surface, covering the 2-inch ring as it overlaps only on the right and left side.
With a fan brush, apply 2-3 coats of SW-165 Lavender Mist in the unglazed portions of the 2-inch ring on platter surface. Let dry between coats.
With a fan brush, apply 2-3 coats of SW-167 Sand & Sea to the outside of the platter.
Dampen a clean sponge to wipe away all excess glaze from the foot.
Any kind of marker will work to create your circle pattern, and there is no need for a template! Free-handing your circles gives a more organic look and perfectly even spacing is not necessary for this design.
Skip the wax resist and perfectionism, straying outside the lines and allowing your glazes to overlap creates more depth.
Moisten a clean sponge and wipe bisque to remove debris.
With a marker, draw two small half-circles at the top and bottom of the platter surface. Draw two larger half-circles on the right and left sides of the platter surface. Add add a 2-inch border around the larger circles.
With a fan brush, apply 2-3 coats of SW-177 Raspberry Mist in the two small half-circles. Let dry between coats.
With a fan brush, apply 2-3 coats of SW-166 Norse Blue in the two larger circles. Let dry between coats.
With a fan brush, apply 2-3 coats of SW-165 Lavender Mist in the borders around the larger circles. Let dry between coats.
With a fan brush, apply 2-3 coats of SW-168 Coral Sands in the unglazed section of the platter surface. Let dry between coats.
With a fan brush, apply 2-3 coats of SW-167 Sand & Sea to the handles and outside of the platter.
Dampen a clean sponge to wipe away all excess glaze from the foot.
Any kind of marker will work to create your circle pattern, and there is no need for a template! Free-handing your circles gives a more organic look and perfectly even spacing is not necessary for this design.
Skip the wax resist and perfectionism, straying outside the lines and allowing your glazes to overlap creates more depth.
Begin with properly fired cone 04 bisque. Moisten a sponge and wipe bisque to remove any dust.
Pour around ¼ cup of EL-101 Oyster Shell into the disposable cup. Thin with water until it is easily poured (start with 1 TBS). Pour into the vase and rotate until the inside is covered. Pour out the excess.
Take your 3 AC-220 Detailer Tips and 1 oz Bottles and fill each one with the following glazes: EL-101 Oyster Shell, EL-127 Rose Granite and EL-132 Rust Red.
Using the Soft Fan with EL-101 Oyster Shell, apply 1 coat to the outside of the vase.
Holding the vase above the paper plate (or sink), take your 3 bottles of glaze and randomly squirt the outside of the vase until it is covered. Do this quickly so the glaze does not dry in place. Rotate the vase until it is as marbled as you would like. Firmly shake the vase until the excess glaze has dripped off.
Stilt and fire to cone 06.
Make sure your disposable bowl is large enough to fit the vase lengthwise. Fill your bowl with water that is slightly warmer than room temperature. Take OG-801 Bright Gold and pour out 3-5 drops onto the water. It should disperse on the top of the water. You might have some that sinks to the bottom. Make sure you can see a film on the top of the water.
Take your vase and rotate it across the surface of the water. You should see some of the gold depositing on the vase. Repeat if you would like more gold.
Fire to cone 018.
Form
MB-1467 Faceted Bud Vase
Colors
EL-101 Oyster Shell
EL-127 Rose Granite
EL-132 Rust Red
OG-801 Bright Gold
Decorating Accessories
AC-220 Detailer Tips and 1 oz Bottles (3)
RB-144 #4 Soft Fan
Miscellaneous Accessories
Sponge
Water
Disposable Cup
Paper Plate
Disposable Bowl (big enough for the vase to fit in lengthwise)
Begin with properly fired cone 04 bisque. Moisten a sponge and wipe bisque to remove any dust.
Pour around ¼ cup of EL-103 Sea Spray into the disposable cup. Thin with water until it is easily poured (start with 1 TBS). Pour into the vase and rotate until the inside is covered. Pour out the excess.
Take your 3 AC-220 Detailer Tips and 1 oz Bottles and fill each one with the following glazes: EL-103 Sea Spray, EL-118 Blue Grotto and EL-130 Sea Green.
Using the Soft Fan with EL-103 Sea Spray, apply 1 coat to the outside of the vase.
Holding the vase above the paper plate (or sink), take your 3 bottles of glaze and randomly squirt the outside of the vase until it is covered. Do this quickly so the glaze does not dry in place. Rotate the vase until it is as marbled as you would like. Firmly shake the vase until the excess glaze has dripped off.
Stilt and fire to cone 06.
Make sure your disposable bowl is large enough to fit the vase lengthwise. Fill your bowl with water that is slightly warmer than room temperature. Take OG-802 White Gold and pour out 3-5 drops onto the water. It should disperse on the top of the water. You might have some that sinks to the bottom. Make sure you can see a film on the top of the water.
Put on your nitrile gloves. Take your vase and rotate it across the surface of the water. You should see some of the gold depositing on the vase. Repeat if you would like more gold.
Dispose of the bowl or use it only for this technique.
Fire to cone 018.
Form
MB-1467 Faceted Bud Vase
Colors
EL-103 Sea Spray
EL-118 Blue Grotto
EL-130 Sea Green
OG-802 White Gold
Decorating Accessories
AC-220 Detailer Tips and 1 oz Bottles (3)
RB-144 #4 Soft Fan
Miscellaneous Accessories
Sponge
Water
Disposable Cup
Paper Plate
Disposable Bowl (big enough for the vase to fit in lengthwise)
Begin with properly fired cone 04 bisque. Moisten a sponge and wipe bisque to remove any dust.
Center the pattern on the canvas. Take AC-230 Clay Carbon Paper and slide it under the pattern. Trace with the pencil. Remove pattern and clay carbon paper.
Using the Script Liner with SP-212 Speckled Moody Blue, apply 3 coats to the 2 thick arches and heart on the rainbow. Use the Soft Fan to apply 3 coats to the edges of the canvas. Allow glaze to dry between coats.
Use SG-410 Bright Blue to make decorative lines and dots on the rainbow.
Using the Soft Fan, apply 3 coats of CC-101 Transparent to the top of the canvas. Allow glaze to dry between coats.
Stilt and fire to cone 06.
Sponge SS-138 Flat Black over the top of the canvas. Wipe off with a paper towel. You should be able to see the cracks in the glaze.
Begin with properly fired cone 04 bisque. Moisten a sponge and wipe bisque to remove any dust.
Using the Soft Fan with FN-001 White, apply 3 coats to the front and sides of the canvas. Allow glaze to dry between coats.
Use the pencil to draw a half circle on the front of the canvas. Try to center it along the bottom edge.
Use MC-002 12mm Low Tack Masking Tape to make lines going from the outer edge of the half circle to the edge of the canvas. Make around 5-9 lines. Use the tape to go around the circle in sections. You are just trying to make a bottom border for your sunrays.
Using the Script Liner with CG-753 Sassy Orange, CG-756 Firecracker and CG-998 Pink Pixie, apply 2 coats to each of the sections. Choose 1 color for each sunray. Allow glaze to dry between coats.
Remove the tape before the glaze is bone dry.
Take the pencil and draw another half circle, inside your original half circle. This will be the border of the sun. You don’t want it to directly touch the rays.
Using the Script Liner with CG-753 Sassy Orange, CG-756 Firecracker or CG-998 Pink Pixie apply 2 coats to the sun. Allow glaze to dry between coats.
Begin with properly fired cone 04 bisque. Moisten a sponge and wipe bisque to remove any dust.
Pour around ¼ cup of NT-CLR Clear One Dipping into the vase. Rotate to cover the inside of the vase. Pour out any excess glaze. (Note: no need to mix water to thin the dipping glaze. It is already thin enough to pour.)
Using the Soft Fan, apply 2 coats of CG-979 Meadow to the outside of the vase. Allow glaze to dry between coats.
Using the Soft Fan, apply 2 coats of CG-962 Blue Azure to the outside of the vase. Allow glaze to dry between coats.
Begin with properly fired cone 04 bisque. Moisten a sponge and wipe bisque to remove any dust.
Pour around ¼ cup of NT-CLR Clear One Dipping into the vase. Rotate to cover the inside of the vase. Pour out any excess glaze. (Note: no need to mix water to thin the dipping glaze. It is already thin enough to pour.)
Using the Soft Fan, apply 2 coats of CG-981 Fruity Freckles to the outside of the vase. Allow glaze to dry between coats.
Using the Soft Fan, apply 2 coats of S-2724 Lotus Blossom to the outside of the vase. Allow glaze to dry between coats.
Stilt and fire to cone 06.
Pink Combo Vase
Begin with properly fired cone 04 bisque. Moisten a sponge and wipe bisque to remove any dust.
Pour around ¼ cup of NT-CLR Clear One Dipping into the vase. Rotate to cover the inside of the vase. Pour out any excess glaze. (Note: no need to mix water to thin the dipping glaze. It is already thin enough to pour.)
Using the Soft Fan, apply 2 coats of CG-993 Lavender Sprigs to the outside of the vase. Allow glaze to dry between coats.
Using the Soft Fan, apply 2 coats of S-2702 Northern Lights to the outside of the vase. Allow glaze to dry between coats.
Stilt and fire to cone 06.
Form
MB-1556 Textured Bud Vases
Colors
Teal Combo
CG-981 Fruity Freckles
S-2724 Lotus Blossom
NT-CLR Clear One Dipping
Pink Combo
CG-993 Lavender Sprigs
S-2702 Northern Lights
NT-CLR Clear One Dipping
Decorating Accessories
RB-144 #4 Soft Fan
Miscellaneous Accessories
Sponge
Water
MCP Projects (Private)
1129
42155
Green and Blue Elements Combo with Pottery Cascades
Begin with properly fired cone 04 bisque. Moisten a sponge and wipe bisque to remove any dust.
Pour around ¼ cup of EL-130 Sea Green into the disposable cup. Add around 1 TBS of water and mix. You want the glaze to be thin enough to be easily poured. Pour the glaze in to the vase. Rotate to cover the inside of the vase. Pour out any excess glaze.
Using the Soft Fan, apply 2 coats of EL-130 Sea Green to the outside of the vase. Allow glaze to dry between coats.
Pour around 2 TBS of PC-601 Clear Cascade, PC-602 White Cascade, EL-208 Moss Creek, and EL-130 Sea Green onto the palette.
Using the same Soft Fan, dip it into the PC-601 Clear Cascade and glob it randomly onto vase several times. You want to cover at least ¼ of the outside.
Using the same Soft Fan, dip it into the EL-208 Moss Creek and glob it randomly onto vase. Make sure to put some globs over the PC-601 Clear Cascade. You want to cover at least ¼ of the outside.
Using the same Soft Fan, dip it into PC-602 White Cascade and add glob it randomly onto the vase. Make fewer, smaller globs.
Using the same Soft Fan, dip it into EL-130 Sea Green and add some more globs to the vase. Make sure to go over some of the PC-602 White Cascade.
Stilt and fire to cone 06.
Blue Combo Vase
Begin with properly fired cone 04 bisque. Moisten a sponge and wipe bisque to remove any dust.
Pour around ¼ cup of EL-118 Blue Grotto into the disposable cup. Add around 1 TBS of water and mix. You want the glaze to be thin enough to be easily poured. Pour the glaze in to the vase. Rotate to cover the inside of the vase. Pour out any excess glaze.
Using the Soft Fan, apply 2 coats of EL-118 Blue Grotto to the outside of the vase. Allow glaze to dry between coats.
Pour around 2 TBS of PC-601 Clear Cascade, PC-602 White Cascade, EL-211 Volcanic Glow and EL-118 Blue Grotto onto the palette.
Using the same Soft Fan, dip it into the PC-601 Clear Cascade and glob it randomly onto vase several times. You want to cover at least ¼ of the outside.
Using the same Soft Fan, dip it into the EL-211 Volcanic Glow and glob it randomly onto vase. Make sure to put some globs over the PC-601 Clear Cascade. You want to cover at least ¼ of the outside.
Using the same Soft Fan, dip it into PC-602 White Cascade and add glob it randomly onto the vase. Make fewer, smaller globs.
Using the same Soft Fan, dip it into EL-118 Blue Grotto and add some more globs to the vase. Make sure to go over some of the PC-602 White Cascade.
Begin with properly fired cone 04 bisque. Moisten a sponge and wipe bisque to remove any dust.
Pour around ¼ cup of EL-149 Lavender Flower into the disposable cup. Add around 1 TBS of water and mix. You want the glaze to be thin enough to be easily poured. Pour the glaze in to the vase. Rotate to cover the inside of the vase. Pour out any excess glaze.
Using the Soft Fan, apply 2 coats of EL-149 Lavender Flower to the outside of the vase. Allow glaze to dry between coats.
Pour around 2 TBS of PC-601 Clear Cascade, PC-602 White Cascade, EL-209 Night Sky and EL-149 Lavender Flower onto the palette.
Using the same Soft Fan, dip it into the PC-601 Clear Cascade and glob it randomly onto vase several times. You want to cover at least ¼ of the outside.
Using the same Soft Fan, dip it into the EL-209 Night Sky and glob it randomly onto vase. Make sure to put some globs over the PC-601 Clear Cascade. You want to cover at least ¼ of the outside.
Using the same Soft Fan, dip it into PC-602 White Cascade and add glob it randomly onto the vase. Make fewer, smaller globs.
Using the same Soft Fan, dip it into EL-149 Lavender Flower and add some more globs to the vase. Make sure to go over some of the PC-602 White Cascade.
Begin with properly fired cone 04 bisque. Moisten a sponge and wipe bisque to remove any dust.
Cut out the football pattern. Place in the center of the plate and trace around the edge. Remove the pattern.
Using MC-001 6mm Low Tack Masking Tape, make horizontal lines going across the front of the plate.
Using the Soft Fan with SC-27 Sour Apple, apply 2 coats to the front of the plate. Do not glaze inside of the football. Allow glaze to dry between coats.
Squeeze out around 1 TBS of SC-8 Just Froggy onto the palette. Dip the sponge in the glaze and sponge the front of the plate. Do not sponge inside of the football.
Remove the tape before the glaze is bone dry.
Use the tape to make laces in the center of the football.
Using the Script Liner with SC-87 Ruby Slippers, apply 2 coats to the football. Allow glaze to dry between coats.
Remove the tape before the glaze is bone dry.
Using the Script Liner with SC-35 Gray Hare, apply 2 coats to the laces. Allow glaze to dry between coats.
Using the Soft Fan with SC-15 Tuxedo, apply 2 coats to the back of the plate. Allow glaze to dry between coats.
Using the Soft Fan with SG-703 Speckta-Clear Autumn, apply 1 coat to the entire plate.
Before applying your magic metallics, your leather piece should be cut, burnished, and shaped. Make sure it is fully dry. Note: Sewing can be done before or after the painting process.
Using AB-307 3/4 Angular Shader Acrylic Brush, apply one thin layer of Copper Magic Metallic. you will see streaks, but that’s not a problem at this point.
Let dry for a few minutes.
Apply a second layer and let dry.
Add a third and final layer to ensure full coverage if streaks still appear, but many times only two layers will be sufficient.
Cover with a flexible clear sealer right away to retain the bright copper penny look or wait a week+ before sealing and the copper will begin to take on a darker tone. The clear sealant will slow the change in color dramatically, but like the leather itself, it will begin to take on different characteristics over time.
After your second coat of copper, work in small areas to apply a third coat of copper.
Do not let this third coat dry!
Follow immediately with AB-704 #3 Round Acrylic Brush loaded with the Patina and go over the wet copper paint. Be generous with the patina!
Seal with a flexible clear sealant or leave alone to let nature work its magic over time!
Click ‘Download Printable PDF’ to download the step-by-step instructions and photos for this project.
The Pattern
Use a plate or other larger round object to trace a circle on a large sheet of paper.
With a ruler, divide the circle into even “pie” sections. The pattern seen here uses three lines to create six pie sections. (Fig. 1)
Draw an arc from one end of a line to the other and repeat on the opposite side to draw a shape like a long football. (Fig 2.)
Repeat on each line. All the lines should now resemble a flower shape in the center of your traced circle. (fig.3)
Cut out the flower shape by following the outside of the arcing lines. (Fig. 4)
Accommodations: Make one pattern and copy. Let students cut with scissors or precut the shape for them. For older/advanced students, allow them to decide the size of the circle and the number of “petals” they would like their pattern to have.
The Pumpkin
Using a rolling pin, roll a slab about 1/8th inch thick that is large enough for your petal pattern to fit into.
Compress your clay slab using the plastic card.
Texturize the slab using found objects, lace, or stamps. This pumpkin uses lace pressed into the glaze with the plastic card. (Fig 6)
Place your petal pattern on the slab and cut around the pattern with your needle tool. (Fig 7)
Cut out two small freehand oval shapes to use as the leaves. (Fig 7)
Set aside and cover the remaining clay
Flip the clay cutout upside down so the texture faces the table.
Wad up a small amount of paper towel and place in the center of your clay cutout. (Fig 8)
Fold one of the petals up over the wadded paper towel. The tip of the petal should fold over the top of the paper towel ball. Add or subtract paper towels as needed until you reach the correct size. (Fig. 9)
Score the tip of the petal and add a small drop of water.
Score the tip of the next petal and overlap the tip of the previous petal. (Fig. 10)
Continue steps 10 and 11 until all petals are connected at the top. Note: Do not be afraid to squish the top of the pumpkin a bit as you go to help the petals fit over the top of each other.
To make the stem, uncover the leftover clay and use a bit to roll a coil that is thin on one end and thick on the other. (Fig.11)
Score the underside of the stem and two leaves, plus the location where you would like to attach them on the pumpkin.
Add a little drop of water to the scored areas of the pumpkin and attach the stem and leaves. Give them a little wiggle to lock them in place.
Let dry and Bisque fire to cone 04. Note: do not remove the paper. It will safely burn out in the kiln.
Apply 3 coats of EL-133 Autumn to the body of the pumpkin, letting the glaze dry between coats.
Repeat step 17 with EL-130 Sea Green glaze for the leaves, and EL-125 Sahara Sands glaze for the stem
Stilt and fire to cone 06
Accommodations: Pre-roll the slabs for your students. Make sure they are covered so as not to lose any moisture before the students start working. Pre-cut the petal pattern and leaves, and texture can be added after the pattern is cut out.
Begin with properly fired shelf cone 04 bisque. Moisten a clean sponge and wipe bisque to remove any dust.
In a small cup, thin some FN-009 Black. Pour the glaze into the vase and roll around coating the inside of the vase. Leave the vase turned upside down to drain. When done draining, wipe off any spills of glaze with a damp sponge.
Using a CB-604 #4 Soft Fan, apply 3 coats of AS-512 Black Diamond to the lower portion of the outside of the vase. Allow to dry!
Using a CB-604 #4 Soft Fan, apply 3 coats of FN-009 to the upper portion of the vase. Allow to dry!
Place some AC-302 Wax Resist onto a foam plate. Apply a coat of Wax Resist about a half inch above the AS-512 Black Diamond on the FN-009 Black glaze. Allow to dry! With a Sea Wool Sponge, sponge 1 coat of the AC-302 Wax Resist over the AS-12 Black Diamond creating a lace effect. Allow to dry!
Using a CB-604 #4 Soft Fan, apply 1 coat of S-2101 Crystal Clear Brushing glaze over the wax area. Allow to dry!
Stilt and fire to cone 06.
Using an OB-901 Mother of Pearl ¼” Shader, apply 1 coat of OG803 Mother of Pearl to the outside of the vase. Clean the brush with OA901 Essence. Allow to dry!
Begin with properly fired cone 04 bisque. Moisten a sponge and wipe the bisque to remove any dust.
Center the pattern on the plate, bowl or mug. Slide AC-230 Clay Carbon Paper under the pattern. Trace over the pattern with the pencil.
Take the two AC-220 Detailer Tips and cut off the very end of each tip. Do not cut too much off. You want to cut off small amounts until you see the hole in the end.
Take the two AC-220 bottles and squeeze SC-26 Green Thumb into one (1/2 oz) and SC-74 Hot Tamale into the other bottle (1oz). Screw the tips on the bottles.
Take the bottle with SC-74 Hot Tamale or SC-26 Green Thumb and trace the design.
Take the bottle with the opposite color than used in step 5 (Green Thumb or Hot Tamale) and fill in the trees, leaving a white border around the red line.
Using the Soft Fan with SC-26 Green Thumb or SC-74 Hot Tamale, apply 2 coats to the back of the plate. Allow glaze to dry between coats.
Using the Soft Fan with SG-704 Speckta-Clear Peppermint, apply 2 coats to the front of the plate and 1 coat to the back. Allow glaze to dry between coats.
Begin a freshly wedged ball of earthenware clay, about the size of a grapefruit.
Separate the clay to create a smaller ball, about the size of a clementine. Set the rest of the clay underneath plastic to retain moisture.
Holding the smaller ball of clay, push thumb into the center of the ball and start pinching. Rotate your piece between pinches to form walls about ¼ of an inch thick all the way around. Smooth any cracks with a damp sponge and lay the pinch pot on its side to begin drying. The mouth of the pot will sag into an oblong shape as it firms up. This will be your frog body! (It’s okay if your pinch pot doesn’t have a perfectly even surface; pinch pots can be lumpy and so can frogs.)
Using clay set aside, roll a 6-inch coil about width of dime and cut into two 3-inch coils with your needle tool.
Carefully bend gentle arches in the middles of your two 3-inch coils to make the shapes of inchworms. Use your finger to smooth and compress both sides of each arch to alleviate any cracks and to prevent cracking during drying and firing. These will be your front frog legs!
Lightly pinch one end of each coil to create flat feet and allow coils to firm up with the arches sitting upright.
Using clay set aside, roll an 8-inch coil about the width of a nickel and cut into two 4-inch coils with your needle tool.
Carefully bend taller arches in the middles of your two 4-inch coils to make the shape of an inchworm. As practiced in Step 5, use your finger to smooth and compress both sides of each arch to alleviate any cracks and to prevent cracking during the drying and firing. These will be your back frog legs!
As practiced in Step 6, lightly pinch one end of each coil to create flat feet and allow coils to firm up with the arches sitting upright.
Using clay set aside, roll an additional 4-inch coil about the width of a nickel. Gradually flatten your coil with wet fingers, as if petting a snake, and curve the flattened coil into a slope. Allow the flattened, sloped coil to firm up while laying on its side to prevent the curve from straightening as it dries. This will be your frog tongue!
Using clay set aside, roll two balls of clay about the size of malted milk balls. These will be your frog eyes! Roll a third, slightly larger ball of clay about the size of a gumball. This will be your fly!
Begin to assemble your frog in the order it was created. Slip and score with your needle tool to attach the legs to the underside of your pinch pot, pressing together gently at first to ensure the placement is correct. Follow by slipping and scoring the tongue into the inside wall. As you firmly join the legs underneath and tongue inside, expect the underside of your pinch pot to flatten a bit.
Slip and score with your needle tool to attach the eyes on top of the body, and the fly on top of the tongue. Press the underside of the tongue as you attach the fly to prevent the slope from flattening. Inspect for any cracks in the joined surfaces that may need to be smoothed.
Use a toothpick to create toes by cutting two notches into each foot. Allow your frog to dry slowly under plastic.
Slap together all remaining clay under the plastic and roll into a slab about 1/4” thick. Use a rib to firmly compress both surfaces of the slab to prevent cracking during drying and firing.
Use your needle tool to cut a circle about 4 ½” in diameter from the slab and cut a wedge from the circle as if cutting a slice of pizza. Run a damp sponge along the cut surfaces to soften sharp edges. This is your lily pad! Allow your lily pad to dry slowly with your frog under plastic.
Underglaze:
Apply 2-3 coats of UG-216 Peach to the tongue of the frog using CB-106 #6 Script Liner.
If using clay that is not white, apply 2-3 coats of UG-51 China White to the front of the eyeballs of the frog using CB-106 #6 Script Liner.
Apply 2-3 coats of UG-22 Spring Green to the body of the frog using CB-602 #2 Soft Fan. Switch to CB-200 #0 Detail when painting a circle around the eyes of the frog.
Use a CB-200 #0 Detail to apply 2-3 coats of UG-209 Jade as irises in the eyes of the frog, then switch to a CB-602 #2 Soft Fan and cover both sides of the lily pad with 2-3 coats of the same color.
5. Apply 2-3 coats of UG-91 True Teal to the inside of the mouth using a CB-106 #6 Script Liner, switching to a CB-200 #0 Detail to cover the edge where the tongue rests inside the mouth. Dampen a clean BT-910 Synthetic Sponge and pat the same color around the edges and in the center of the lily pad.
Dampen a clean BT-910 Synthetic Sponge and pat UG-21 Leaf Green on to back of the frog, including the backs of the eyes, as well as on the bends of the legs.
Use the back of a brush to apply polka-dots of UG-68 Apple Green on top of the sponged UG-21 Leaf Green on the frog, and on top of the sponged UG-91 True Teal in the center of the lily pad.
Apply 2-3 coats of UG-50 Jet Black with a CB-106 #6 Script Liner to the body of the fly.
Use the back of a brush to apply two dots of UG-51 China White onto the body of the fly for eyes.
Add pupils into the eyes of the frog and the fly with UG-50 Jet Black using a CB-200 #0 Detail.
Bisque fire both pieces to Cone 04.
Clear:
Dampen a clean BT-910 Synthetic Sponge and wipe bisque to remove debris.
Using a CB-602 #2 Soft Fan, apply two coats of S-2101 Crystal Clear Brushing to all surfaces of both the frog and lily pad.
Stilt and fire to Cone 06.
Tips:
Waiting for your pieces to firm up into a leatherhard stage will strengthen them and help to avoid losing shape as they are joined together.
Unless working extremely quickly or in an especially humid environment, keeping earthenware clay under plastic while not in use is critical to keeping it pliable!
Drying finished pieces slowly allows them to dry more evenly. Clay shrinks as it dries, and uneven shrinking causes tension that can cause your piece to crack or even come apart.
All listed measurements can be freely approximated or altered for perfectly successful interpretations of the same design.
Patiently allow your underglaze to dry before applying more coats; do not rapidly dry your underglaze with a fan or hair dryer! This may cause the underglaze to crack and flake.
The use of small brushes is helpful for crisp edges and detail but can cause a streaky appearance when used to cover larger areas. Utilize a larger brush wherever possible for the most even application.
Begin with properly fired cone 04 bisque. Moisten a sponge and wipe bisque to remove any dust.
Take an 8.5×11” piece of paper and cut out lengthwise strips. Use the ruler and pencil to make sure they are even. They can be whatever thickness you would like. I used varying thicknesses.
Cut out the plain circle pattern.
Using the Soft Fan with FN-001 White, apply 1 coat to the front of the plate.
Take the plain circle pattern and wet the back with a damp sponge. Place the pattern in the center of the plate. Sponge the edges with water to make sure they are down. Using the Soft Fan with FN-001 White, apply 1 coat over the edges.
Repeat Step #5 with the strips of paper. Place them going across the plate. Use as many as you would like.
Using the Soft Fan with FN-044 Yellow-Orange, apply 2 coats to the front of the plate. Allow glaze to dry between coats.
Squeeze out around 1 TBS of SC-97 Cant-elope and SC-55 Yella Bout It onto the palette. Dip the sponge into SC-97 Cant-elope and lightly sponge the front of the plate. Repeat with SC-55 Yella Bout It.
Carefully remove the pattern before the glaze is bone dry.
Cut out the pattern with the flower inside. Cut around the inner circle. Place the circle in the center of the circle on the plate. Trace around the circle with the pencil.
Using the Script Liner with SC-88 Tu Tu Tango, apply 2 coats to inner circle. Allow glaze to dry between coats.
Wait for the inner circle to be dry to the touch. Take the pattern and place it back over the inner circle. Use the pencil to trace over the flower. You should be able to see a faint line in the glaze. Check to make sure you are not pressing too hard or too light.
Using the Script Liner with SC-9 Jaded, apply 2 coats to the 4 large petals of the flower. Allow glaze to dry between coats.
Using the Script Liner with SC-10 Teal Next Time, apply 2 coats to the 4 smaller petals of the flower. Allow glaze to dry between coats.
Squeeze out around 1 TSP of SC-24 Dandelion onto the palette. Dip the pencil eraser in the glaze and press onto the center of the flower to make a dot.
Using the Soft Fan with SC-88 Tu Tu Tango, apply 3 coats to the back and rim of the plate. Allow glaze to dry between coats.
Dip into NT-CLR Clear One Dipping glaze.
Large App Plate:
Begin with properly fired cone 04 bisque. Moisten a sponge and wipe bisque to remove any dust.
Print the 2 patterns. The large one will be used for masking. The small one will be used to trace the design within the pattern.
Use the scissors to cut out each of the 3 sections of the large pattern.
Using the Soft Fan with FN-001 White, apply 1 coat to the front of the plate.
Take the center piece from the pattern and wet the back with a damp sponge. Place that piece going down the center of the plate. Sponge the edges with water to make sure they are down. Using the Soft Fan with FN-001 White, apply 1 coat over the edges.
Repeat Step #5 with the 2 other side pieces of the pattern. Place them evenly between the center pattern and the bottom edge of the plate (where the bottom meets the side).
Using the Soft Fan with FN-043 Bright Jade, apply 2 coats to the front of the plate. Allow glaze to dry between coats.
Squeeze out around 1 TBS of SC-10 Teal Next Time and SC-96 Aqu-ward onto the palette. Dip the sponge into SC-10 Teal Next Time and lightly sponge the front of the plate. Repeat with SC-96 Aqu-ward.
Carefully remove the pattern before the glaze is bone dry.
Take the small pattern and cut out the circle with the flower inside. Place the circle in the center of one of the circles on the plate. Trace around the circle. Repeat until all of the circles on the plate.
Using the Script Liner with SC-24 Dandelion, apply 2 coats to each of the inner circles on the plate. Allow glaze to dry between coats.
Wait for the inner circles to be dry to the touch. Take the small pattern and place it back over one of the inner circles. Use the pencil to trace over the flower. You should be able to see a faint line in the glaze. Check to make sure you are not pressing too hard or too light. Repeat for all of the circles.
Using the Script Liner with SC-88 Tu Tu Tango, apply 2 coats to each of the flowers. Allow glaze to dry between coats.
Squeeze out around 1 TSP of SC-10 Teal Next Time onto the palette. Dip the pencil eraser in the glaze and press onto the center of a flower to make a dot. Repeat for all flowers.
Using the Soft Fan with FN-033 Mediterranean Teal, apply 3 coats to the back and rim of the plate. Allow glaze to dry between coats.
Begin with properly fired cone 04 bisque. Moisten a sponge and wipe bisque to remove any dust.
Using the Script Liner with SC-16 Cotton Tail, apply 2 coats to the wings. Allow glaze to dry between coats.
Using the Script Liner with SC-6 Sunkissed, apply 2 coats to the dress. Allow glaze to dry between coats.
Using the #4 Liner with SC-75 Orange-A-Peel, apply 2 coats to the shoes. Allow glaze to dry between coats.
Using the #4 Liner with SC-73 Candy Apple Red, apply 2 coats to the heart. Allow glaze to dry between coats.
Using the Script Liner and #4 Liner with SC-25 Crackerjack Brown, apply 2 coats to the face, hands, and legs. Allow glaze to dry between coats.
Using the Script Liner and #4 Liner with SC-34 Down To Earth, apply 2 coats to the hair. Allow glaze to dry between coats.
Squeeze out around 1 TSP of SC-11 Blue Yonder, SC-27 Sour Apple and SC-75 Orange-A-Peel onto the palette. Use the #4 Liner to make lines of these colors going around the bottom of the dress.
Use the pencil to draw dots on the wings, a decorative heart on the heart, eyes, lips and 2 dots for the cheeks.
Using the Detail Liner with SC-73 Candy Apple Red, apply 2 coats to the lips. Allow glaze to dry between coats.
Squeeze out around 1 TSP of SC-2 Melon-Choly onto the palette. Dip the rounded brush handle into the glaze. Press onto the 2 cheek dots.
Squeeze out around 1 TSP of SC-15 Tuxedo onto the palette. Dip the rounded brush handle into the glaze. Press onto the dots on the wings. Make dots on the eyes.
Using the Detail Liner with SC-15 Tuxedo, make a line going through the lips and outline the decorative heart.
Dip into NT-CLR Clear One Dipping glaze.
Stilt and fire to cone 06.
Open Arms Angel:
Begin with properly fired cone 04 bisque. Moisten a sponge and wipe bisque to remove any dust.
Use the pencil to make a line going around the angel’s waist. This will separate the 2 sections of the dress.
Using the Script Liner with SC-16 Cotton Tail, apply 2 coats to the bottom half of the dress. Allow glaze to dry between coats.
Using the Script Liner and #4 Liner with SC-20 Cashew Later, apply 2 coats to the face, hands, and legs. Allow glaze to dry between coats.
Using the Script Liner with SC-27 Sour Apple, apply 2 coats to the wings. Allow glaze to dry between coats.
Using the Script Liner with SC-11 Blue Yonder, apply 2 coats to the top half of the dress. Allow glaze to dry between coats.
Using the #4 Liner with SC-73 Candy Apple Red, apply 2 coats to the shoes. Allow glaze to dry between coats.
Using the Script Liner with SC-48 Camel Back, apply 2 coats to the hair. Allow glaze to dry between coats.
Use the pencil to draw swirls on the wings, dots on the shoes and dress, eyes, lips and 2 dots for the cheeks. Draw 2 equally spaced lines going around the bottom half of the dress. Then draw vertical lines between those lines to make a checkered pattern. Make sure you have an even number of squares going around the dress (so you don’t end up with 2 black or white squares right next to each other).
Using the Detail Liner with SC-73 Candy Apple Red, apply 2 coats to the lips. Allow glaze to dry between coats.
Squeeze out around 1 TSP of SC-2 Melon-Choly onto the palette. Dip the rounded brush handle into the glaze. Press onto the 2 cheek dots.
Squeeze out around 1 TSP of SC-15 Tuxedo onto the palette. Dip the rounded brush handle into the glaze. Press onto the dots on the dress and shoes. Make dots on the eyes.
Using the Detail Liner with SC-15 Tuxedo, make a line going through the lips and outline the swirls on the wings.
Using the #4 Liner with SC-15 Tuxedo, apply 2 coats to every other square on the bottom half of the dress. Allow glaze to dry between coats.
Begin with properly fired shelf cone 04 bisque. Moisten a clean sponge and wipe bisque to remove any dust.
Using a CB-604 #4 Soft Fan, apply 3 coats of FN-001 White to the top of the canvas. Allow to dry!
Using a pencil, trace on the patter wit AC-230 Clay Carbon Paper under the patter. Glaze needs to be dry for the Clay Carbon Paper will transfer.
Place some of each of the EZ Strokes onto a tile or foam plate for a pallet. If any of the colors are real thick add a drop or two of AS957 Thin N Shade to thin the color to a brushing consistency.
Refer to patter color placement for where each color goes. You can also change the color locations or add additional EZ Strokes.
Using a CB-602 #2 Soft Fan, wet the brush with water, touch a paper towel to remove excess water then lay the brush flat on the pallet and wiggle the brush up to the color to get the color on the brush. Apply the color to the marked area of the flower. You can adjust the color saturation with the amount of color you add to the flower area.
Using a CB-408 #8 Pointed Round, Stroke in the leaves with the colors marked on the color placement page, some have two colors or two coats for color saturation. Also apply the flower centers with EZ 012 Cobalt Jet Black.
Using a CB-110 #10/0 Liner, outline, and detail with EZ 012 Cobalt Jet Black.
Stilt and fire to cone 06.
Using a OB-901G #0 Liner (Gold Handle), detail the design with OG 801 Bright Gold. Clean Brush with OA 901 Essence.
Begin with properly fired shelf cone 04 bisque. Moisten a clean sponge and wipe bisque to remove any dust.
Using a CB-604 #4 Soft Fan, apply 4 coats of FN-304 Black Velvet to the top and sides of the canvas. Allow to dry between each coat.
Using a pencil, trace on the pattern with a sheet of AC-230 Clay Carbon Paper under the pattern.
Using a CB-106 #6 Script Liner, apply 2 coats of SC-16 Cotton Tail to each of the flower petals. For the third coat, mix some Silica Sand into the SC-16 Cotton Tail and stroke in each petal of the flower. (NOTE: Be sure not to use beach sand, it can damage the kiln elements.)
Using a CB-106 #6 Script Liner, apply 2 coats of SC-26 Green Thumb to all stems and to the leaf. For the third coat, mix some Silica Sand into the SC-26 Green Thumb and stroke in each of the stems and the leaf.
Using a CB-106 #6 Script Liner, apply 2 coats of SC-42 Butter Me Up to the flower centers. For the third coat, mix some Silica Sand into the SC-42 Butter Me Up and stroke in each of the stems and the leaf.
Allow for all colors to dry!
Using a CB-106 #6 Script Liner, shade the design areas with the following colors: Flower petals and around the flower center with – SC-35 Gray Hare. Flower centers with SC-97 Cant-elope then to the left side with SC-14 Java Bean also add some tine dots over the same area. Stems and leaf – SC-36 Irish Luck. Outline the leaf and stems and vein the leaf with SC-36 Irish Luck with a bit of SC-15 Tuxedo to darken it. Allow to dry!
Begin with properly fired cone 04 bisque. Moisten a sponge and wipe bisque to remove any dust.
Using the Soft Fan with FN-009 Black, apply 3 coats to the back of the platter. Allow glaze to dry between coats.
Take the pencil and draw a long triangular shape in the center of the platter, coming from the side. See image below.
Using the Soft Fan with CC-108 China Sea, apply 3 coats to the top half (lengthwise) of the triangular shape. Allow glaze to dry between coats.
Using the Soft Fan with CC-107 Green Tea, apply 3 coats to the bottom half (lengthwise) of the triangular shape. Make sure to overlap at least ¼” with the glaze from Step #4. Allow glaze to dry between coats.
Using the soft Fan with EL-118 Blue Grotto, apply 2 coats to the portion of the platter above the triangular shape. Allow glaze to dry between coats.
Pour around 2 TBS of each of the following glazes onto your palette: EL-103 Sea Spray, EL-118 Blue Grotto, PC-601 Clear Cascade and PC-602 White Cascade. Be sure to label each color because some look similar.
Dip your Soft Fan into PC-602 White Cascade, randomly plop the glaze on the upper portion of the platter glazed in Step #6. Make some plops overlapping the upper side of the triangular shape. Around ¼ of the area should be covered with plops.
Dip the same Soft Fan (without cleaning) into EL-118 Blue Grotto and repeat Step #8. Make sure to overlap your previous plops of glaze.
Dip the same Soft Fan (without cleaning) into EL-103 Sea Spray and repeat Step #8. Make sure to overlap your previous plops of glaze.
Dip the same Soft Fan (without cleaning) into PC-601 Clear Cascade and repeat Step #8. Make sure to overlap your previous plops of glaze.
Pour out around 1 TSP of EL-118 Blue Grotto onto the palette. Dip the Script Liner into water and mix with the glaze. Dip the brush back into the thinned glaze. Take the brush and tap against your finger, above the platter. Make random dots over the top half of the platter. You want some to get into the triangular portion. The top section of the platter is now complete.
Using the soft Fan with EL-208 Moss Creek, apply 2 coats to the portion of the platter below the triangular shape. Allow glaze to dry between coats.
Pour around 2 TBS of each of the following glazes onto your palette: EL-103 Sea Spray, EL-208 Moss Creek, PC-601 Clear Cascade and PC-602 White Cascade. Be sure to label each color because some look similar.
Dip your Soft Fan into PC-602 White Cascade, randomly plop the glaze on the lower portion of the platter glazed in Step #13. Make some plops overlapping the lower side of the triangular shape. Around ¼ of the area should be covered with plops.
Dip the same Soft Fan (without cleaning) into EL-208 Moss Creek and repeat Step #15. Make sure to overlap your previous plops of glaze.
Dip the same Soft Fan (without cleaning) into EL-103 Sea Spray and repeat Step #15. Make sure to overlap your previous plops of glaze.
Dip the same Soft Fan (without cleaning) into PC-601 Clear Cascade and repeat Step #15. Make sure to overlap your previous plops of glaze.
Pour out around 1 TSP of EL-208 Moss Creek onto the palette. Dip the Script Liner into water and mix with the glaze. Dip the brush back into the thinned glaze. Take the brush and tap against your finger, above the platter. Make random dots over the bottom half of the platter. You want some to get into the triangular portion. The bottom section of the platter is now complete.
Pour out around 1 TSP FN-009 Black onto the palette. Dip the Script Liner into water and mix with the glaze. Dip the brush back into the thinned glaze. Take the brush and make fast, straight movements over the top of the platter. You might want to practice this with paper. You should be making random lines and dots.
Begin with properly fired cone 04 bisque. Moisten a sponge and wipe bisque to remove any dust.
Squeeze out around 3 TBS of SC-18 Rosey Posey onto the palette. Add around 1 TSP of water and mix. You are just trying to thin the glaze enough so that it easily soaks into the crevices on the trees.
Using the Soft Fan with thinned SC-18 Rosey Posey, apply 1 coat to the outside of the trees. Allow glaze to dry. Use a damp sponge to remove most of the glaze, leaving it only in the crevices.
Using the Soft Fan with FN-209 Floral Pink, apply 3 coats to the outside of the trees. Allow glaze to dry between coats.
Stilt and fire to cone 06.
Using the Filbert with OG-801 Bright Gold, apply 1 even coat to the tip and base of the trees.
Fire to cone 018.
Using the Shader with OG-803 MOP Brush-On, apply 1 coat to the trees. Swirl the brush in circles as you apply the MOP.
Begin with properly fired cone 04 bisque. Moisten a sponge and wipe bisque to remove any dust.
Squeeze out around 1 TBS of SC-87 Ruby Slippers onto the palette. Thin with around ½ TSP of water. Just enough so that it flows easily into the texture on the large tree.
Using the Soft Fan with thinned SC-87 Ruby Slippers, apply 1 coat over the textured area of the large tree. Allow glaze to dry. Use a damp sponge to wipe off most of the glaze, leaving it only in the crevices.
Using the Soft Fan with CC-102 White, apply 3 coats to the textured area of the large tree (not the tip or base). Allow glaze to dry between coats.
Using the Soft Fan with SC-87 Ruby Slippers, apply 3 coats to the tip and base of the large tree. Allow glaze to dry between coats.
Stilt and fire to cone 06.
Wait 1 day after firing before moving to step #8 for the maximum number of crackles.
Using the shader with SS-138 Flat Black, apply 1 coat over the texture area of the large tree. Before the paint dries, wipe it off with a damp sponge and paper towels. You should be able to see the tiny cracks in the glaze.
Medium Tree:
Begin with properly fired cone 04 bisque. Moisten a sponge and wipe bisque to remove any dust.
Squeeze out around 1 TBS of SC-29 Blue Grass onto the palette. Thin with around ½ TSP of water. Just enough so that it flows easily into the texture on the medium tree.
Using the Soft Fan with thinned SC-29 Blue Grass, apply 1 coat over the textured area of the medium tree. Allow glaze to dry. Use a damp sponge to wipe off most of the glaze, leaving it only in the crevices.
Using the Soft Fan with CC-108 China Sea, apply 3 coats to the textured area of the medium tree (not the tip or base). Allow glaze to dry between coats.
Using the Soft Fan with SC-29 Blue Grass, apply 3 coats to the tip and base of the medium tree. Allow glaze to dry between coats.
Stilt and fire to cone 06.
Wait 1 day after firing before moving to step #8 for the maximum number of crackles.
Using the shader with SS-138 Flat Black, apply 1 coat over the texture area of the medium tree. Before the paint dries, wipe it off with a damp sponge and paper towels. You should be able to see the tiny cracks in the glaze.
Small Tree:
Begin with properly fired cone 04 bisque. Moisten a sponge and wipe bisque to remove any dust.
Squeeze out around 1 TBS of SC-8 Just Froggy onto the palette. Thin with around ½ TSP of water. Just enough so that it flows easily into the texture on the small tree.
Using the Soft Fan with thinned SC-8 Just Froggy, apply 1 coat over the textured area of the small tree. Allow glaze to dry. Use a damp sponge to wipe off most of the glaze, leaving it only in the crevices.
Using the Soft Fan with CC-107 Green Tea, apply 3 coats to the textured area of the small tree (not the tip or base). Allow glaze to dry between coats.
Using the Soft Fan with SC-8 Just Froggy, apply 3 coats to the tip and base of the small tree. Allow glaze to dry between coats.
Stilt and fire to cone 06.
Wait 1 day after firing before moving to step #8 for the maximum number of crackles.
Using the shader with SS-138 Flat Black, apply 1 coat over the texture area of the small tree. Before the paint dries, wipe it off with a damp sponge and paper towels. You should be able to see the tiny cracks in the glaze.
Begin with properly fired cone 04 bisque. Moisten a sponge and wipe bisque to remove any dust.
Using the Soft Fan with EL-149 Lavender Flower, apply 3 coats to the large tree. Allow glaze to dry between coats.
Using the Soft Fan with PC-601 Clear Cascade, apply random “plops” of glaze to the top half of the large tree. Allow glaze to dry.
Using the Soft Fan with CG-993 Lavender Sprigs, apply 2 coats to the top half of the large tree. The bottom edge of your coats should be irregular, not a straight line going around the tree. Allow glaze to dry between coats.
Using the Soft Fan with PC-601 Clear Cascade, apply a few random “plops” of glaze to the top half of the large tree.
Stilt and fire to cone 06.
Medium Tree:
Begin with properly fired cone 04 bisque. Moisten a sponge and wipe bisque to remove any dust.
Using the Soft Fan with EL-130 Sea Green, apply 3 coats to the medium tree. Allow glaze to dry between coats.
Using the Soft Fan with PC-601 Clear Cascade, apply random “plops” of glaze to the top half of the medium tree. Allow glaze to dry.
Using the Soft Fan with CG-996 Spring Rain, apply 2 coats to the top half of the medium tree. The bottom edge of your coats should be irregular, not a straight line going around the tree. Allow glaze to dry between coats.
Using the Soft Fan with PC-601 Clear Cascade, apply a few random “plops” of glaze to the top half of the medium tree.
Stilt and fire to cone 06.
Small Tree:
Begin with properly fired cone 04 bisque. Moisten a sponge and wipe bisque to remove any dust.
Using the Soft Fan with EL-127 Rose Granite, apply 3 coats to the small tree. Allow glaze to dry between coats.
Using the Soft Fan with PC-601 Clear Cascade, apply random “plops” of glaze to the top half of the small tree. Allow glaze to dry.
Using the Soft Fan with CG-995 Foggy Mist, apply 2 coats to the top half of the small tree. The bottom edge of your coats should be irregular, not a straight line going around the tree. Allow glaze to dry between coats.
Using the Soft Fan with PC-601 Clear Cascade, apply a few random “plops” of glaze to the top half of the small tree.
On a tile, thin some SC-41 Brown Cow 1:1 with water. Use CB-604 Soft Fan to apply to the middle section. Let dry. Use a damp Synthetic Sponge to wipe back the highlight on the basket weave.
Apply SC-34 Down To Earth to the rope sections on the tree. Use the damp Synthetic Sponge to highlight the ropes.
Thin slightly SC-51 Poo Bear and apply 2 coats using CB-404 Pointed Round in a dry brush technique over the basket weave middle section.
To the rope trims apply 2 thin wash coats of SC-14 Java Bean using CB-404 Pointed Round.
To the base of the tree apply 3 coats of SC-36 Irish Luck. Let dry.
Apply 1-2 coats of S-2101 Crystal Clear Brushing over the entire tree using CB-604 Soft Fan. Apply an extra coat to the finial cap on the tree.
Medium Tree
On a tile, thin some SC-36 Irish Luck 1:1 with water and apply it to the six panels on the tree. Use a damp Synthetic Sponge to wipe back the highlights. Apply 2 coats of SC-27 Sour Apple in a dry brush technique using CB-404 Pointed Round to every other panel over the green antiquing. To the other three panels apply SC-52 Toad-ily Green in a dry brush manner.
To the rope trim apply 1 thin coat of SC-34 Down To Earth using CB-404 Pointed Round. Wipe back the highlights with a damp Synthetic Sponge. Apply 2 thin coats of SC-25 Cracker Jack over the rope trim sections.
To the vertical trim between the panels apply 2 thin coats of SC-51 Poo Bear using CB-404 Pointed Round.
To the base of the tree apply 3 coats of SC-34 Down to Earth using CB-404 Pointed Round. Let dry.
Apply 1-2 coats of S-2101 Crystal Clear Brushing over the entire tree using CB-604 Soft Fan. Apply an extra coat to the finial cap on the tree.
Large Tree
On a tile, thin some SC-34 Down to Earth 1:1 with water and using CB-604 Soft Fan to the entire tree. Use a damp Synthetic Sponge to wipe back the highlights. Use CB-404 Pointed Round to dry brush 3 coats of SC-51 Poo Bear to the basket weave sections. Paint on 2-3 coats of SC-51 Poo Bear to the vertical and “X” sections of trim.
To the rope sections apply 2 thin coats of SC-14 Java Bean using CB-404 Pointed Round.
To the panels between the “X” sections on the tree paint in 1 thin coat of SC-36 Irish Luck using CB-110 Liner.
To the base apply 3 coats of SC-41 Brown Cow using CB-404 Pointed Round. Let dry.
Apply 1-2 Coats of S-2101 Crystal Clear Brushing using CB-604 Soft Fan over the entire tree. Apply an extra coat to the finial cap on the tree.
All 3 trees
Stilt and Fire all pieces to Shelf Cone 05-06.
Clean the tree finial caps with Denatured Alcohol using a lint free cloth. Let dry. Apply 1 coat of OG-805 Premium Gold to the finials using OB-916G Filbert. Clean the brush using OG-901 Essence designated for Gold.
With provided pattern, clay carbon and red pen or pencil, trance the design onto the ware. Arrange the cookies as desired and one cookie may overlap another. Be sure to trace the word cookie and the scroll. The pine needles do not need to be tranced. Use the photograph as a guide for placement.
Cut the stencils out using the cookie patterns, X-acto knife, stencil paper or index card. Center each cookie cutter pattern on stencil paper or index card, place the two on a glazed tile and with the X-acto knife cut through both the pattern and the paper. Carefully remove the cut center and retain both.
Note: The Negative Stencil is the part with the opening cut-out. The negative is used to place colors on the ware. The Positive Stencil is the part you have cut-out of the stencil. The positive protects the area to be painted.
When completing two cookies that overlap (in this case the tree over the bell and the star overlaps the holly leaf). You will be using both a negative and positive portion of the stencil. For the tree with the bell; place bell negative on the ware. Slide the tree positive stencil over the corner of the bell.
Place the EZ-Strokes as needed on the page protector palette, thin with water if color is extremely thick
Firmly hold stencils in place.
a. Using a slightly damp sponge pick up Sienna Brown and pat off excess color on clean area of palette. With a gently pouncing motion, sponge in the Sienna Brown through the opening in the stencil. Create a textured appearance.
b. Proceed to pick up Medium Mahogany on a clean area of the sponge. Very lightly sponge a lacey coat of the Medium Mahogany over the previously applied Sienna Brown.
c. Pick up a small amount of French Brown on the sponge proceed to add this deeper color around the cut edge of the stencil.
d. Carefully remove both positive tree and the negative bell.
e. Align the tree negative stencil, so that the opening butts-up to the bell. Repeat steps a, b and c.
f. When the tree stencil is removed, the tree should appear to be overlapping the bell.
g. The star and holly leaf are completed in the same manner.
h. The remaining cookie stencils are completed just using the negative portion (stencil with opening.
Complete lettering with Cobalt Jet Black, #1 Detail and #2 Detail Liner. Carefully fill in each letter, with two thin coats of color.
On the palette squeeze out Red Designer Liner, thin slightly and fully load #2 Detail Liner with color. Generally following the pattern, pull in the scroll work to the left and right sides of pizza stone.
The cookies are decorated by using the Designer Liners. You can decorate the cookies as desired. For this sample, various colors were used. You may choose only to use white to achieve a white icing appearance.
On the palette squeeze out both Green and Bright Green Designer Liner and thin with water to brushing consistency. Fully load the #10/0 Mini Liner with both thinned greens and pull in pine needles through out the design. Pine needles are pulled out from the edge of the cookies.
Add a smooth outline here and there along the outer edge of cookies with thinned Cobalt Jet Black. Again, using Liner of choice.
Fire the piece to cone 04 to set the color. Thus avoiding any chance of smearing when the Clear Glaze is applied.
Damp sponge ware to condition the piece for glazing.
Pour about one ounce of Clear (cone 5-10) into a paper cup. With a dampened #8 Soft Fan, apply two coats to the top surface of the Pizza Stone (now a cookie baking sheet). The side of the ware and the back side of ware should remain free of any glaze.
If available spread a thin layer of Aluminum Hydrate or Silica Sand on a clean full kiln shelf.
Place the glazed ware onto the self.
Fire the ware to shelf cone 6.
Wipe off any Aluminum Hydrate from the back of the piece.
Remove the shelf with the Aluminum Hydrate and vacuum the kiln.
Check the piece over for blemishes and sand with 100-grit sand paper if any are present.
Damp Sponge ware to remove any fired dust and to condition for decorating.
Into a paper cup pour about one to two ounces of UG-30 Sand. If the UG-30 Sand is extremely thick add water to thin to a smooth creamy brushing consistency.
Fully load Glaze Fan with UG-30 Sand and apply over the front and backside of the ware. Allow color to set between coats and apply as smoothly as possible. Be sure to work out any ridges of color as the underglaze is applied.
Allow to dry thoroughly before proceeding.
Using the provided simple pattern, the clay carbon and red pen, trace the design to the front of the basecoated ware. If the painted ware has dried sufficiently, you will easily see the pattern and the ware will not be scored (indented) by the tracing with the pen. Note: the red pen helps keep track of the parts of the design that have been traced. Also, a red pencil may have too soft of lead for the tracing to be seen, therefore, the need for the red pen.
Instructions for loading the Flat Shader for floating of color. For this project we will half load (side load) the Shader and corner load the Shader.
Dampen the Flat Shader with water.
Tap the wet brush onto a paper towel and allow the water to seep out the brush on to the towel. (This will remove excess water.)
Side load the left side of the Flat Shader with desired color. In this case UG-213 Cinnamon. It is best to load the darker color to the left side of the Shader. By doing this you will always know the shading color is to your left. The brush can be turned over to shade in the opposite direction.
Once side loaded and using the brush on the flat, blend on clean area of palette.
If completed correctly the left side of the stroke will have color and gradually fade away on the right side of the brush.
When doing the stroke, always use the brush on the flat to achieve a good soft float of color.
When the instruction calls for a corner loaded float of color, the procedure remain the same as above, however, only about 1/8th of the left corner is loaded with color. In this case UG-31 Chocolate. Be sure and blend the color and water on the palette.
Side load the #8 Flat shader with UG-213 Cinnamon and blend on palette. Using the detail pattern as a guide, begin to float in color throughout the design. Shading is being added to areas where one petal covers another petal or leaf. Note: The leaves also have a float of UG-213 Cinnamon down one side of the middle vein. Allow to dry.
Be sure to add some floating of color to the center, thus creating some shadowing.
Proceed to corner load the #8 Shader with UG-31 Chocolate and add an additional float of color over the UG-213 Cinnamon.
On the palette thin EZ010 French Brown to light cream consistency with water and mix with palette knife.
Fully load #10/0 Liner with the EZ-010 French Brown and with a smooth flowing outline, detailing the entire pattern. The leaves have side veins; whereas the poinsettia petals only have a middle vein. Also, define detail in the small pistols and stamens to the center of the flower.
Scroll work is pulled out from the edges of leaves as shown on the pattern using the EZ010French Brown.
Sign the piece.
Place on kiln shelf and fire to cone 04.
Damp sponge ware to condition the piece for glazing and to remove any fired dust.
Place one to two ounces of Matte Clear in a 3 oz paper cup and thin slight (if needed with water).
With Glaze Fan apply two to three thinned coats of the Matte Clear to the entire plate.
When dry, stilt ware and fire to shelf cone 06.
Remove stilt marks.
Gold Overglaze Instructions
Wipe the piece down with 91% rubbing alcohol and allow drying. This will remove any hand film from the ware.
Place a small amount of the Premium Gold Overglaze on the glaze tile. Please, note the Premium Gold Overglaze is Red in color.
Fully load the #0 Liner with the overglaze.
Holding the loaded Liner straight up, add a single gold line down the center vein of all the petals and leaves. Slightly accent detail the pistols and stamen with fine gold out-lining.
The leaves are partially accented with fine lines of gold here and there along their edges. The scroll work has accents of gold as well.
To achieve an even band of color around the plate’s rim complete as follows.
Use a cotton swab.
Press any loose fibers back into the swab.
Carefully dip the cotton swab into the gold.
Firmly place the gold loaded cotton swab along the edge of the plate and slowly press and pull the cotton swap along the rim.
Reload as needed and try to keep the pressure the same as the gold is applied to the rim. Take your time when applying the overglaze.
Check the bisque over for any blemishes and remove any by lightly sanding with fine sandpaper.
Using the provided pattern, the clay carbon and a pen/pencil trace the design onto the ware.
Damp sponge the ware to remove any fired dust and to condition the piece for decorating. The damp sponging will not harm the traced design.
Make a copy of the simple pattern. Using this copy cut out the mountain range along the top edge that meets the sky.
Place the Stroke ‘n Coats as needed on the palette and thin if needed if color is extremely thick.
Complete the sky area as follows with Cotton Tail, My Blue Heaven, Peri-Twinkle and Blue Dawn.
Align the top of the cutout mountain range with the traced pattern. Dampen the area under the paper cut out and dampen the piece of paper. The wetness will help secure the paper mountain range to the bisque. Thus, protecting the traced mountain range from color.
Dampen a sponge and remove all excess water.
Pick up Cotton Tail with sponge, pounce two coats to the denoted circle on the pattern. Sponging creates a slightly textured surface. Do not rinse the sponge out.
Pick up My Blue Heaven, proceed to sponge color around the Cotton Tail and along the edge of the cutout pattern. Work this color from papers edge upward about 1/3rd of the way into the sky area. Apply two coats Do not rinse sponge. Proceed to pick up Peri-Twinkle and blend this color down into the My Blue Heaven and upward another 1/3rd. Keep sponging the color onto the ware, blending out all sharp lines of color. Again, two coats will be needed. Do not rinse sponge.
The remaining sky area is completed by sponge Blue Dawn from the top of plate downward into the My Blue Heaven. Again, the color is blended into the previously applied color and two coats are needed.
Allow the sky colors to set.
Carefully resketch in the large tree with pencil.
With a Sgraffito Tool or Cleanup Tool remove the sky colors form the sketched tree, thus exposing the bisque.
The mountain range is applied next using the following colors Cotton Tail, Silver Lining, Gray Hare and Char-ming. Use the #8 Shader and #2 Detail Liner. If having difficulty with the #8 Shader use the #6 Pointed Round.
Following the contour of the individual mountain section, block in a basecoat of Silver Lining. Apply the color so that you can determine the individual segments or the range. Do not paint the mountains over the sketched in tree.
Proceed to fully load Silver Lining and corner load with Cotton Tail on to the #8 Shader Keeping the Cotton Tail to the upper edge of the Mountain, blending over the previously applied Silver Lining. Repeat the highlighting here and there along the mountain’s top and outer edges. Work out all ridges of color.
Again, fully load the #8 Shader with Silver Lining and side load with Gray Hare. Blend the two colors on a clean area of palette. Pull in shading along the bottom edge of the mountain range and upward along one or two sides of the mountain. Refer to the provided detailed pattern for placement of this darker color. Please note: This shading will help define the mountain segments.
Keep working the shading colors over the entire mountain range.
Water dampen the #8 Shader and remove excess water. Corner load with Char-ming and blend on clean area of palette. . Again, referring to the provided detail pattern, float in additional shading to the mountain, thus enhancing the ridges and peaks of the mountain range. Note: make sure all the colors look blended and soft when finished.
Thin the Char-ming down and fully load the Mini Liner with the thinned color. Proceed to detail the mountains with thick and thin fine broken lines.
To complete the snowfield, use Cotton Tail, Peri-Twinkle and Blue Dawn and the #8 Shader.
Work the fields in by sections. The sections are numbered for reference with their application. Start with snowfield to the left of the design, #1. Work across the plate and downward. As each section is applied. Be sure to keep the tree free of color.
Fully load the Shader with the Cotton Tail and smoothly block in the section.
Let the Cotton Tail set for a minute or two.
Fully load the Shader again with Cotton Tail, side load with Peri-Twinkle and corner load the same side of the Shader with Blue Dawn. Pat blend on clean area of palette. Begin to add shading to the lower edge of each section. As the shading is applied reload as needed and proceed to apply a full second coat of Cotton Tail above the shaded area. If color appears too pronounced soften with Cotton Tail.
When all the snow has been applied, thin Blue Dawn, fully load the Mini-Liner and with fine broken lines accent detail the individual section of the snow field.
On the Palette place Tiger Tail, Cracker Jack, Camel Back and Down to Earth. These colors may need thinning. It seems that the families of brown have a tendency to thicken. Therefore, they may need thinning. The large tree, and the branches of the two berry bushes will be completed in brown tones. Complete the tree as follows with #6 Pointed Round, #2 Detailed Liner and Mini Liner.
Block in the tree with a smooth solid coat of Tiger Tail.
Fully load the Round with Tiger Tail and side load with Cracker Jack. Proceed to apply colors to both sides of the tree trunk and to lower side of the larger branches
The same shading can be deepened with Camel Back. As shading colors are added try to achieve a bark like appearance.
With thinned Down to Earth fully loaded on the Mini-Liner proceed to detail the tree on both sides, pull out tinier wispy branches from the bolder larger branches.
Liner of choice, pull in the branches to the two berry bushes with one to two coats of the thinned Down to Earth.
With the thinned Down to Earth and Mini Liner pull in the various clusters of dried grass through out the design. Grass should be of varying lengths and thickness. Note the grass in the foreground should be much longer than the grasses that are represented closer to the mountains.
Sign the piece with Down to Earth
Place Tu Tu Tango and Candy Apple Red on the palette. Using the pointed end of a brush handle, a stylist or/and pencil point, tab in many dots of these two colors over the branches to the bittersweet berry bushes.
Allow project to dry 24-hours before glazing.
Place Crystal Clear Brushing into the paper cup. If need thin slightly with water.
Using Soft Fan apply two to three flowing coats of the clear over the entire plate.
Allow to dry thoroughly.
Stilt ware and fired to shelf cone 06.
With Stilt Stone or Dremel Tool remove stilt marks.
Form
MB-102 Coupe Dinner Plate
MB-103 Coupe Salad Plate
Colors
SC-5 Tiger Tail
SC-16 Cotton Tail
SC-25 Cracker Jack
SC-30 Blue Dawn
SC-34 Down to Earth
SC-35 Gray Hare
SC-45 My Blue Heaven
SC-48 Camel Back
SC-60 Silver Lining
SC-65 Peri-Twinkle
SC-73 Candy Apple Red
SC-88 Tu Tu Tango
SC-99 Char-ming
S-2101 Crystal Clear Brushing
Decorating Accessories
CB-110 Mini Liner
CB-202 #2 Detail Liner
CB-308 #8 Shader
CB-406 #6 Pointed Round
CB-618 Soft Fan
AC-230 Clay Carbon Transfer Paper
Miscellaneous Accessories
3 oz. paper cup
Fine Sand paper
Glaze tile for Palette or Heavy Duty Plastic Page Protector
Begin with properly fired cone 04 bisque. Moisten a sponge and wipe bisque to remove any dust.
Use the pencil to outline the pattern onto the inner “stitched” portion of the mug. Refer to the patterns below. The reindeer will be on one side of the mug and Santa will be on the other side.
Using the Script Liner with SC-16 Cotton Tail, SC-27 Sour Apple, SC-73 Candy Apple Red, SC-48 Camel Back, and SC-15 Tuxedo apply 2 coats to each of the corresponding sections on the reindeer pattern. Allow glaze to dry between coats. Use colors in that order (light to dark) to get the best coverage between sections.
Using the Script Liner with SC-16 Cotton Tail, SC-20 Cashew Later, SC-27 Sour Apple, SC-73 Candy Apple Red, and SC-15 Tuxedo apply 2 coats to each of the corresponding sections on the Santa pattern. Allow glaze to dry between coats. Use colors in that order (light to dark) to get the best coverage between sections.
Using the Script Liner with SC-73 Candy Apple Red, apply 2 coats to the top and bottom sections of the mug, including the bottom. Allow glaze to dry between coats.
Using the Script Liner with SC-8 Just Froggy, apply 2 coats to the border stitches and handle. Allow glaze to dry between coats.
Using the Soft Fan with SG-704 Speckta-Clear Peppermint, apply 2 coats to the inside of the mug. Allow glaze to dry between coats. Apply 1 coat to the outside of the mug.
Begin with properly fired cone 04 bisque. Moisten a sponge and wipe bisque to remove any dust.
Use the pencil the outline the pattern onto the inner “stitched” portion of the mug. Refer to the patterns below. The Santa suit will be on one side of the mug and Elf suit will be on the other side.
Using the Script Liner with SC-16 Cotton Tail, SC-6 Sunkissed, SC-73 Candy Apple Red and SC-15 Tuxedo, apply 2 coats to each of the corresponding sections on the Santa suit pattern. Allow glaze to dry between coats. Use colors in that order (light to dark) to get the best coverage between sections.
Using the Script Liner with SC-6 Sunkissed, SC-27 Sour Apple, SC-73 Candy Apple Red and SC-15 Tuxedo, apply 2 coats to each of the corresponding sections on the Elf suit pattern. Allow glaze to dry between coats. Use colors in that order (light to dark) to get the best coverage between sections.
Using the Script Liner with SC-16 Cotton Tail, apply 2 coats to the border stitches and handle. Allow glaze to dry between coats.
Using the Script Liner with SC-8 Just Froggy, apply 2 coats to the upper and lower sections of the mug, including the bottom. Allow glaze to dry between coats.
Using the Soft Fan with SG-704 Speckta-Clear Peppermint, apply 2 coats to the inside of the mug. Allow glaze to dry between coats. Apply 1 coat to the outside of the mug.
Begin with properly fired cone 04 bisque. Moisten a sponge and wipe bisque to remove any dust.
Use the pencil the outline the pattern onto the inner “stitched” portion of the mug. Refer to the patterns below. Each tree pattern with be on different sides of the mug. The patterns are the same, but the colors of the trees are different.
Using the Script Liner with SC-6 Sunkissed, SC-27 Sour Apple, SC-26 Green Thumb, SC-73 Candy Apple Red and SC-48 Camel Back, apply 2 coats to each of the corresponding sections on the patterns. Allow glaze to dry between coats. Use colors in that order (light to dark) to get the best coverage between sections.
Using the Script Liner with SC-27 Sour Apple, apply 2 coats to the upper and lower sections of the mug, including the bottom. Apply 2 coats to the handle. Allow glaze to dry between coats.
Using the Script Liner with SC-8 Just Froggy, apply 2 coats to the stitching around the border. Allow glaze to dry between coats.
Using the Soft Fan with SG-704 Speckta-Clear Peppermint, apply 2 coats to the inside of the mug. Allow glaze to dry between coats. Apply 1 coat to the outside of the mug.
Begin with properly fired cone 04 bisque. Moisten a sponge and wipe bisque to remove any dust.
Using the Soft Fan SC-46 Rawhide, apply 3 coats to the pumpkin. Do not glaze the stem. Allow glaze to dry between coats.
Use the pencil to draw the giraffe spots. They are just closely fitting irregular shapes. Try to make them a variety of sizes.
Using the Script Liner with SC-5 Tiger Tail, apply 2 coats to each spot. Allow glaze to dry between coats.
Using the Script Liner with SC-15 Tuxedo, apply 3 coats to the stem. Allow glaze to dry between coats.
Stilt and fire to cone 06.
Round Hammered Pumpkin (leopard)
Begin with properly fired cone 04 bisque. Moisten a sponge and wipe bisque to remove any dust.
Using the Soft Fan SC-46 Rawhide, apply 3 coats to the pumpkin. Do not glaze the stem. Allow glaze to dry between coats.
Using the Script Liner with SC-25 Crackerjack Brown, apply large dots (around the size of a dime) to the pumpkin. Space them out so they will not overlap.
Using the Script Liner with SC-15 Tuxedo, make an irregular outline around each dot. Try to make them different so they do not look the same.
Using the Script Liner with SC-15 Tuxedo, apply 3 coats to the stem. Allow glaze to dry between coats.
Stilt and fire to cone 06.
Squatty Pumpkin (tiger)
Begin with properly fired cone 04 bisque. Moisten a sponge and wipe bisque to remove any dust.
Using the Soft Fan with SC-5 Tiger Tail, apply 3 coats to the pumpkin. Do not glaze the stem. Allow glaze to dry between coats.
Use the pencil to draw the tiger stripes.
Using the Script Liner with SC-15 Tuxedo, apply 2 coats to the stripes. Allow glaze to dry between coats.
Using the Script Liner with 46 Rawhide, apply 3 coats to the stem. Allow glaze to dry between coats.
On the canvas material, roll out a slab of clay using the two ¼” Wooden Slats and the Rolling Pin. Smooth the textured surface from the canvas with the Rubber Rib if necessary.
Cut out a piece slightly larger than the shape of the mold. Drape the clay down into the Negative (Slump) portion of the mold. Use a dry sponge to gently coax the clay down into the cavity of the mold. Once the clay is into the mold, use the dry sponge to compress the shape into the mold. Use a Fettling Knife to trim along the top of the mold the excess clay leaving it flush with the top surface of the mold. Roll out a coil of clay about 3/8” in diameter and long enough to encircle the inside of the clay form. Score (texture) the inner lip and apply slip to the area. Attach the coil around the inner edge of the oval form webbing the clay pieces together. Let set for a few minutes. Remove the form from the mold and invert to sit on a flat surface.
Repeat Step 2 but don’t remove the form from the mold. Score (texture) the edges of both sections and apply a generous lather of slip to the textured areas. Align and apply the first section to the one in the mold and gently but firmly press the two halves together. Once the pieces are completely together, remove from the mold. Use a Modeling Tool to smooth and web the clay seam together to form an oval shape. You can use one of the flat ¼” Slats to gently “paddle” the shape to further form it if necessary. Once the shapes have been put together and the seams have been fused, pierce a hole with the Needle Tool into the top side of the oval form. This will allow you to deform the bottom of the piece without splitting the seam by allowing the air to escape. Once the bottom has been flattened, seal the small needle hole, this will aid in keeping the oval shape.
Cut out two pieces of clay using the pattern for the ears. Fold them creating a center fold. Bend them slightly and allow to set for a few minutes to firm up before attaching them to the oval body. Score (texture) the ear bases and body where you want to attach them. Apply some slip/slurry to each piece and attach. Web the clay into the piece and blending the clay into the body. You may need to add some clay to help reinforce the ear attachments. Blend and smooth these areas using a Modeling Tool and Rubber Rib.
Use the Clean Up Tool to cut out an opening between the ears. You may need to use the Rubber Rib to further smooth the overall surface of the piece. Let the piece dry to leather hard
consistency. Check the inside seams to make sure they are fused well and to smooth up before it dries further.
Clean up the surface and other areas of the rabbit with various Modeling Tools. Drape loosely with a plastic bag to allow the piece to dry slowly.
Before painting, check the piece to make sure it is completely dry. Use the Clean Up Tool to refine any area that needs attention. Use a damp Synthetic Sponge to wipe down the piece.
If your clay isn’t “white” you can apply 2-3 coats of UG-51 China White to the front side (tummy area) of your rabbit. Let dry.
Note*** This step can be omitted if you want and are careful about applying the color around the tummy area. Use a Pencil to mark off the tummy section of the rabbit. Condition CB-604 Soft Fan with Liquid Detergent. Place some AC-302 Wax Resist on a piece of Aluminum Foil. Apply 1 good coat of AC-302 Wax Resist to the tummy area. Wash Brush in warm soapy water after use. Let the piece dry.
Apply 3 smooth even coats of a Fundamental Underglaze of your choice to the bunny excluding the tummy area. Try not to get any of the color onto the wax area. The color should bead up and roll away from the waxed areas. Use a damp Synthetic Sponge to remove any color off the wax.
Draw in the features on the bunny with a Pencil. Use CB-110 Liner to paint in the face using UG-50 Jet Black
Make sure the piece is completely dry before firing. Fire the piece to Shelf Cone 04. Allow extra venting time during the first part of the bisque firing process due to the wax burning off the ware.
Place some AC-302 Wax Resist on a piece of Aluminum Foil. Dampen the Natural Sea Wool Sponge and then dip it into the Wax Resist. Print (Veil) a pattern of wax over the body of the rabbit excluding the face, tummy and inside of the ears. Let dry. Wash Sponge with Liquid Detergent and cool water immediately after use.
Thin some S-2101 Crystal Clear Brushing into a Plastic Cup to a melted ice cream consistency. While working quickly, pour the thinned glaze into the vase rotating to completely cover the inside of the vase. Pour out excess glaze and invert to drain and dry. Apply 2-3 coats of S-2101 Crystal Clear Brushing to the entire outside of the bunny. You will notice that the glaze will bead up over the waxed areas. This is what it is supposed to happen. Do not wipe off excess glaze from the wax areas. Let dry.
Stilt and Fire to Shelf Cone 05-06. Allow extra venting time during the first part of the firing process due to the wax burning off.
Form
Approx. 4-5 lbs Moist low-fire Clay, slip or slurry made from the same clay used
Cut out the pattern around the edge for ease of transfer. Center and transfer the pattern onto the damp Leather Hard greenware using a Ball Point Pen over the pattern. You want to press hard enough to transfer the pattern on to the wet greenware but not deform the piece.
Place the ware onto a Banding Wheel for ease of working on the piece. When cutting out the fret work, always try to cut towards solid areas when possible. Use either a Scapple or Fret Tool to cut the design out. A Clean Up Tool has too large of a blade to do the intricate detail. Start with the finer cutout areas in the trees and windows of the church, then move onto the middle areas and work out to the outer edges of the pattern. Take your time and try to cut into the ware at a right angle to the ware. Let the piece dry.
Using a Clean Up Tool to remove the seam lines in a diagonal motion. Use the Green Grit Cloth to refine and remove any flaws in the ware. Be care when using the Grit Cloth around the cutout areas as they are delicate and easily broken. Use CB-802 Round Brush dipped in water to clean out any of the finer cutouts in the pattern. Be care not to over wet any of these areas when cleaning the design. Gently remove any sharp edges inside of the design area. Let Dry.
Wipe down the piece with a moistened Synthetic Sponge being careful over the cutout areas. Make sure no debris is in the inside of the piece.
Fire the piece to Shelf Cone 04.
Wipe out the inside of the ware with a moistened Synthetic Sponge to remove any dust and debris. Be careful when doing this to not break off any of the design.
Using CB-604 Soft Fan to apply 3 coats of SP-212 Speckled Moody Blue to the inside of the piece. Be careful applying the color to where it doesn’t come through any of the cutout areas in the pattern. Use water and CB-802 Round to remove any glaze that may have come through onto the front of the pattern or cutout areas. Make sure no blue is left on the outside of the ware. Let Dry.
Use CB-602 Soft Fan and CB-604 Soft Fan to apply 3-4 smooth even coats of S-301 Marshmallow White to the outside of the ware excluding the top rim and flange, bottom trim and bottom and the handle knobs. The smaller fan brush will help you get into the finer cutout areas of the pattern.
Use CB-404 Pointed Round or CB-604 Soft Fan to apply 2-3 Coats of S-2101 Crystal Clear Brushing to the unpainted top flange and trim and bottom trim, bottom of can and to the handle knobs. Let dry.
Stilt and Fire the piece to Shelf Cone 05-06.
Use Denatured Alcohol and a lint free cloth to clean the ware before applying Fired White Gold Luster. Let dry. Use OB-916W #6 Filbert to apply 1 even coat of OG-802 White Gold to top trim and flange, bottom trim (not the actual bottom of ware) and to the handle knobs. Let dry. Clean the brush with OG-901 Essence designated for the White Gold (Silver) only.
Stilt and Fire the ware to Shelf Cone 018
Form
CD1404 Gallon Paint Can (Leather Hard (wet) Greenware)
Remove the seams with the Clean Up Tool in a diagonal motion across the seam line. Use the Green Grit Cloth to further smooth the seam line. With a dampened Synthetic Sponge remove any dust and debris from the ware.
Use a Pencil and AC-230 Clay Carbon to transfer the pattern to the wings. Some of the pattern can be freehanded.
Use the Sgraffito Tool to incise the lines of the pattern. Do not try to carve the depth you want in one pass of the tool. Start out slowly and gently carve into the pattern. Continue carving over the lines to get an even width and depth to all the lines. Use the Duster Brush to remove any dust and debris from the ware.
Use the Wire Texture Tool to incise the fine lines to the back of the head and to the two sections on the wings. You might need to moisten the ware first to adequately create the fine texture with the tool. Use the Duster Brush to remove any dust and debris.
Fire the piece to Cone 04.
To the front stomach feathers apply a “V” line across the lower part of each of SC-15 Tuxedo using CB-110 Liner. One side should be heavier than the other.
Apply 2-3 coats of FN-203 Dry Champagne to the entire piece using CB-604 Soft Fan.
On a tile mix a 1:1 ratio of FD-258 Pure White with SC-16 Cottontail using the Pallet Knife. To the noted wing sections and feathers on the head from the pattern, apply 2 coats of the mixture using CB-110 Liner.
Stilt and Fire to Shelf Cone 05-06.
Clean the piece with Denatured Alcohol and a lint free cloth and let it dry thoroughly. Use the pattern as a guide to apply the OG802 White Gold and OG805 Premium Gold using a separate designated brushes for each Metallic Luster. Larger areas on the White gold use the larger OB-916W Filbert brush. It may be easier to apply some of the Metallic Lusters to a portion of the piece, let that dry to ease in the application to where you don’t smear the wet color. The feet and beak are OG805 Premium Gold. Lower sections to the eye are OG802 White Gold. Clean the brushes using OG901 Essence designated for each Luster. Do not use the same bottle of Essence for both brushes as you will contaminate the brushes and Essence.
Use a small piece of a Silk Decorating Sponge dipped into the OG805 Premium Gold to veil a fine lacy pattern around the eyes and the outer edges of the facial feathers.
Stilt and Fire the piece to Shelf Cone 018
Form
CD-1285 Large Owl Jar (Greenware cast slightly heavier than normal)
Moisten a clean sponge and wipe bisque to remove debris.
Apply blended bands of UG-92 Lilac, UG-87 Regal Purple, and UG-93 Wild Violet into the inside of the bowl. Keep UG-92 Lilac in the center and UG-93 Wild Violet in the outer edge, with UG-87 Regal Purple in the middle. *Use of a banding wheel is extremely helpful but not required. Easiest blending occurs while colors are wet. Brush water over the underglaze if it dries as you are still blending*
Copy hydrangea pattern twice onto transfer paper, and transfer the hydrangea pattern twice into the inside of the bowl, overlapping slightly. *Using two different colors of markers to transfer the pattern may be helpful in visualizing the overlap. Trimming away excess transfer paper from edges of pattern will reduce any crinkling*
Pour UG-3 Baby Blue into AC-219 Designer Bottle with Writer Tip and cover one hydrangea, leaving the centers of the flowers. Let dry.
Pour UG-2 Sea Blue into AC-219 Designer Bottle with Writer Tip and cover the second hydrangea. Let dry.
Using SG-407 Yellow, cover the centers of the flower. Let dry.
Cover inside of the bowl with 2 coats of SW-001 Stoneware Clear.
Apply 3 generous coats of SW-170 Blue Hydrangea to the rim and underside of the bowl.
Dampen a clean BT-910 Synthetic Sponge to wipe away all excess glaze from the foot.
Note: UNDERGLAZE IN POWDER FORM IS A RESPIRATORY HAZARD. THIS TECHNIQUE REQUIRES USE OF RESPIRATORY PROTECTION.
Begin with soft fired stoneware bisque.
Moisten a clean sponge and wipe bisque to remove debris.
Apply a generous even coat of UG-218 Pear Green to outside of pan. Let dry.
Apply a speckling of dots with SG-408 Orange over the UG-218 Pear Green.
Apply a generous even coat of UG-91 True Teal over the outside of pan. Let dry.
Apply a speckling of dots with SG-409 Bright Green. Let dry.
Apply a generous even coat of UG-50 Jet Black over the outside of pan. Let dry. *Be sure it has dried completely, this technique will not work if there is any moisture remaining in underglaze*
While wearing a respirator in a well-ventilated space, carefully use sandpaper to sand the outside of the pan, revealing layers of underglaze and dots underneath, being mindful of leaving outer layer visible. For this design, keep all sandpaper motion horizontal. Fold sandpaper for more precision. Brush away all underglaze debris with a DB-805 #3 Fan Dry Brush.
Apply 2 coats of SW-004 Zinc-Free Clear to outside of pan.
Apply 3 coats of SW-129 Copper Float to inside of pan and handles.
Use a clean sponge to wipe away all excess glaze from the foot.
Wipe down the plate with a slightly moistened Synthetic Sponge to remove any dust and debris.
Use AC-230 Clay Carbon and a Pencil to transfer the pattern onto the ware. Use the pattern twice to complete the full design of 8 feathers.
Use the 1 ¼ “Sponge on a Stick to apply 2-3 coats of SC-11 Blue Yonder to the large portion of the peacock feather eye.
Use the ½ “Sponge on a Stick to apply 2 coats of SC-32 Bluebeard to the top of the peacock eye (pupil) center. You can use a brush to make it a tear drop shape along the bottom edge of the eye (pupil).
To the side portions on the peacock eye apply 3 coats of SC-97 Can’t-elope using CB-110 Liner. Completely load the brush to where the color is almost dripping off.
Use CB-110 Liner loaded to where the color is almost dripping off the brush to apply 3 coats of SC-27 Sour Apple to the feather’s tear drop portions of the design. Also paint in the feather stripes that trail up and embrace along the peacock eye.
Apply heavy dots of SC-32 Bluebeard along the lower tier on the rim of the plate. This may need to be done twice. Then apply heavy dots of SC-11 Blue Yonder above the previous dots. Along the rim of the plate apply heavy dots of SC-97 Can’t-elope.
Fill the AC-219 Designer Bottle with Metal Tip with SW-303 Manganese Wash. Apply a line of Manganese Wash using the pattern as your guide. Detail the pattern with the Manganese Wash. A thicker line down the shaft of the feather up to the eye. Try to keep the center vein on the feather as straight as possible. The lines of color should be heavier along the center vein. The detail lines around the peacock eye and side feathers can be lighter/thinner. Detail the top rim of the plate with a fine line also. Empty and wash the bottle and tip after use.
Fill the AC-219 Designer Bottle and the metal tip with SW-401 Light Flux. Make scallop half loops over and around the dots of Bluebeard and Blue Yonder along the rim of the plate. Let dry.
Apply 2 coats of SW-173 Amber Quartz over the front and back of plate excluding the foot and inner portion of the foot. Apply and extra coat of glaze to the back of the plate keeping it about ½” from the foot.
Wipe off any glaze from the foot of the plate before firing using a moistened Synthetic Sponge. This piece sits flat on the kiln shelf requiring no glaze be on the foot of the plate.
Place the plate fully on a kiln shelf and Fire to Shelf Cone 6 (mid-range) with a 10 min hold.
Begin with properly fired shelf cone 04 bisque. Moisten a clean sponge and wipe bisque to remove any dust.
Using a CB-604 #4 Soft Fan, apply 2-3 coats of C-300 Matte Transparent to the tree and the base. Allow to dry between each coat.
Using a CB-106 #6 and a CB-110 #10/0 Liner, apply 2 coats of S-2101 Crystal Clear Brushing to all the scalloped detail on the tree. Allow to dry!
Stilt and fire to cone 06.
Using an OV-910G #0 Liner and a OB-916G #6 Filbert, apply 1 coat of OG801 Bright Gold to all the scalloped detail on the tree (over the S-2101 Crystal Clear Brushing glaze). Clean the brush’s with OA901 Essence. Allow to dry!
Stilt and fire to cone 018.
Wire the base of the tree with a large tree wire kit and put medium clear globe lights in the holes of the tree.
Begin with properly fired cone 04 bisque. Moisten a sponge and wipe bisque to remove any dust.
Using the Soft Fan with SC-75 Orange-A-Peel, apply 1 coat to each pumpkin. Do not glaze the stems. Use a damp sponge to wipe off most of the glaze, leaving it only in the crevices.
Using the Soft Fan with FN-207 Orange Slice, apply 3 coats to each pumpkin. Do not glaze the stems. Allow glaze to dry between coats.
Using the Soft Fan with SC-6 Sunkissed, apply 2 coats to the stems. Allow glaze to dry between coats.
Stilt and fire to cone 06.
Using the Filbert with OG-801 Bright Gold, apply 1 even coat to the stems. Make sure to apply in a well ventilated area. Clean brush with Gold Essence.
Fire to Cone 018.
Using the Shader with OG-803 MOP Brush-On, apply 1 coat to the pumpkins. Brush in a circular motion. Do not glaze the stems.
Outline the entire pattern with the Green Designer Liner.
Using the Mini Liner, apply 2 coats of Hot Tamale to the lettering.
Using the Pointed Round, apply 2 coats of Green Thumb to the top area of the light bulbs.
Using the round, apply 2 coats of Dandelion to the yellow light bulbs.
Using the Round, apply 2 coats of Sour Apple to the green light bulbs.
Using the Round, apply 2 coats of Jack O Lantern to the orange light bulbs.
Using the Round, apply 2 coats of The Blues to the blue light bulbs.
Using both the Script Liner and Soft Fan, apply 3 coats of Red Gloss to the inside side walls.
Using both the Script Liner and the Soft Fan, apply 3 coats of Dark Green Gloss to the rim and outside wall, stopping about ¼” from the bottom edge, as Stoneware gets fired dry footed.
Using the Script Liner and Soft Gan, apply 1 coat of Clear to the background areas around the lights.
Using the Script Liner and Soft Fan, apply 1 coat of Peppermint to the background over the Clear.
Remove any color from the bottom of the piece.
Place on a well kiln washed shelf and fore to shelf cone 6
Outline and detail the pattern with the Black Designer Liner using the metal tip.
Using the Script Liner, apply 2 coats of The Blues to the lower section for the ice area.
Using the Pointed Round, apply 2 coats of Dandelion to the beak.
Using the Pointed Round, apply 2 coats of the Speckled Cotton Tail to the white areas on the penguin.
Using the Pointed Round, apply 2 coats of Speckled Tuxedo to the black areas on the penguin.
Using the Pointed Round and Script Liner, apply Fruit of the Vine to areas of the hat, scarf and handle.
Using the Pointed Round and Soft Fan, apply 2 coats of Blue Isle to areas on the scarf, hat, skates and inside the mug.
Using the Soft Fan and Script Liner, apply 2 coats of Clear to the areas around the design, not the pattern areas, handle, inside or bottom of the piece, as Stoneware needs to be fired dry footed.
Remove any color from the foot area of the mug and place on a well kiln washed shelf and fire to shelf cone 6.
Using the OB-901 MOP Brush, apply 1 coat to the background areas.
Using the Soft Fan, apply 2 coats of FN White to the entire bowl and allow to dry.
Trace on the pattern and create a border to the inside rim of the bowl.
Using the # 4 Round, apply 3 coats of Sour Apple, Blue Yonder, and Hot Tamale to the areas as shown on the photo, and create a fun border with various sized stripes, allowing some spaces to remain white.
Using the # 4 Round, apply 3 coats of Dandelion to the bells.
Using the Mini Liner, outline and detail the piece with Tuxedo.
Stilt and fire to shelf cone 06.
Vintage Tree Plate
Create a ½” boarder to the outside edge using a pencil or water color marker.
Using the AC-230 Clay Carbon paper, trace on the Pattern.
Using the CB-404 # 4 Pointed Round, apply 3 coats of Sour Apple, Blue Yonder, Hot Tamale and Dandelion to the areas as shown on the photo. The Dandelion is used where the fired gold will be used.
Outline the design and divide the segments with the CB-110 # 10/0 Mini Liner and Tuxedo.
Apply 2 coats of Crystal Clear Brushing to the entire plate.
Stilt and fire to shelf cone 06.
Using both the OB-901 and 916 brushes, apply 1 even coat of the OG805 Premium Gold to the Dandelion areas.
Clean the OB brushes with OS-901 Essence.
Stilt and fire in a well ventilated kiln to shelf cone 018.
Pour CD048+ Retro Tree mold ¼” thick. Refer to casting instructions.
Once it is firm enough to handle, use the sponge to smooth down casting lines.
Use the ¼” punch to make holes for the lights.
Use a damp sponge to smooth down any rough edges.
Fire to cone 04.
Using the Soft Fan with SC-18 Rosey Posey, apply 1 coat to the outside of the tree and base. Use a damp sponge to remove most of the glaze, leaving it only in the crevices.
Using the Soft Fan with FN-209 Floral Pink, apply 3 coats to the outside of the tree and base. Allow glaze to dry between coats.
After the piece is dry, make sure to clean out any glaze in the holes.
Stilt and fire to cone 06.
Using the Liner and Filbert with OG802 White Gold, apply 1 even coat to each of the smooth “drips” on the tree. Make a line going around base.
Fire to cone 018.
Using the Shader with OG803 MOP Brush-On, apply 1 coat to the tree and base. Try to avoid the white gold.
Fire to cone 020.
Glue the swirl lights into the holes using epoxy.
Assemble the light kit and attach the light to the base.
Begin with properly fired cone 04 bisque. Moisten a sponge and wipe bisque to remove any dust.
Using the Soft Fan with FN-009 Black, apply 3 coats to the back of the plate. Allow glaze to dry between coats.
Using the Soft Fan with FN-009 Black, apply 2 coats to the front of the plate. Allow glaze to dry between coats.
Cut around the border of the 2 patterns and tape together to form a circular pattern. Place the pattern over the front of the plate after the glaze is dry to the touch, but not bone dry. Trace over the pattern with the pencil. Check to make sure you are not pressing too hard or too soft. You want to be able to see the lines, but not scrape down to the bisque. Remove the pattern.
Take your 5 AC-220 Detailer Tips and 1 oz Bottles and fill each one around half-way full with the following glazes: EL-103 Sea Spray, EL-128 Wheat, EL-142 Grass, EL-143 Cactus Flower, and EL-148 Smoked Lilac. Make sure to label each bottle because some of the glazes will look similar.
Use the bottles from Step #5 to make large dots on the lines of the pattern. You want the dots to be close to each other, but not touching. You can choose which color to use for each part of the pattern. Refer to the “Color” section for how each Element will look after it is fired. Doing the dots over FN-009 Black will change the glaze color from its usual appearance.
Begin with properly fired cone 04 bisque. Moisten a sponge and wipe bisque to remove any dust.
Pour around 1/4 cup of EL-118 Blue Grotto, EL-130 Sea Green and EL-149 Lavender Flower into each of the disposable cups. Thin with water until it is easily poured. Pour into each vase (1 at a time) and rotate until the inside is covered. Pour out the excess.
Take the pencil and sketch the texture you would like on each vase. You can do dots, lines, scallops, or other patterns.
Take FD-258 Pure White and apply over the “texture” you drew with the pencil. Allow it dry before moving onto the next step.
Using the Soft Fan with EL-118 Blue Grotto, EL-130 Sea Green and EL-149 Lavender Flower, apply 3 coats to the outside of each vase. Make sure to use the same glaze on the outside as you applied to the inside.
Moisten a clean sponge and wipe bisque to remove any dust.
Use the Round Brush to apply ¼” of AC-302 Wax Resist around the outside bottom of the dish. Follow the instructions on the bottle for conditioning the brush prior to use. Wash brush immediately after use.
On the inside, use another Round Brush to apply SW-401 Light Flux in a pattern of 1” thick crisscrosses. Apply 2 coats.
Using the Round Brush to apply 2 coats of SC-76 Cara-Bein Blue, SC-31 The Blues, and SC-26 Green Thumb in the blank space between the Light Flux. Alternate the colors and overlap the Light Flux slightly. It is helpful to label the spaces prior to painting to ensure variety.
Use the Soft Fan to apply 2 coats of SW-118 Sea Salt on the entire bowl, except the bottom.
Begin with soft fired stoneware bisque. Moisten a sponge and wipe bisque to remove any dust.
Using the Soft Fan with SW-501 White Gloss, apply 4 coats to the inside of the casserole dish and loaf pans. Allow glaze to dry between coats.
Using the Soft Fan with SW-152 Blue Splatterware, apply 3 coats to the outside of the casserole dish and loaf pans (do not glaze the rim or handles). Allow glaze to dry between coats.
Using the Script Liner with SW-510 Blue Gloss, apply 4 coats to the rim and handles of the casserole dish and loaf pans. Allow glaze to dry between coats.
Begin with soft fired stoneware bisque. Moisten a clean sponge and wipe bisque to remove any dust.
Using the AC-222 Medium Writer Tip Kit, apply SW-401 Light Flux in an “X” pattern around the inside edge of the rim. Let glaze dry and apply a second coat.
Exchange the cap on your SC-76 bottle for an AC-224 Plastic Detailer Cap and apply SC-76 Cara-Bein Blue as dots inside of the “X” patterns. Let glaze dry and apply a second coat.
Use the Soft Fan to apply 3 coats of SW-166 Norse Blue to the entire bowl.
Use the Soft Fan to apply 2 coats of SW-141 White Matte to the only rim of the bowl.
Use a clean sponge to wipe the excess glaze off the foot.
Pour around ¼ cup of SW-508 Black Gloss into the disposable cup. Add around 1 TBS of water and mix. It should be slightly thicker than water. Pour into the jug and rotate. Pour out any excess glaze.
Pour out around 2 TBS of SW-505 Purple Gloss. Add a pinch of AC-310 Silkscreen Medium. Mix with a palette knife until it becomes the consistency of peanut butter. You may need to add more silkscreen medium or glaze.
Take DSS-0164 Continuous Swirls Screen and place it going around the bottom half of the jug, shiny side down. It is helpful to tape it in place to prevent it from slipping.
While holding the screen firmly in place, scoop a small amount of premixed silkscreen medium onto the squeegee and pull across the screen. Repeat until the entire bottom half of the jug has been screened.
Using the Soft Fan with SW-004 Zinc-Free Clear, apply 3 coats over the screened area on the bottom half of the jug. Allow glaze to dry between coats.
Using the Script Liner with SW-401 Light Flux, apply 3 coats to the lip above the screened area. Allow flux to dry between coats.
Using the Soft Fan with CG-998 Pink Pixie, apply 1 coat to the upper half of the jug (above the screened area). Apply right over the flux.
Using the Soft Fan with SW-165 Lavender Mist, apply 3 coats to the upper half of the jug (above the screened area). Apply right over the flux. Allow glaze to dry between coats.
Fire to cone 6.
Copper Jug
Begin with soft fired stoneware bisque.
Pour around ¼ cup of SW-508 Black Gloss into the disposable cup. Add around 1 TBS of water and mix. It should be slightly thicker than water. Pour into the jug and rotate. Pour out any excess glaze.
Using the Script Liner with SW-401 Light Flux, apply 3 coats to the upper rim on the jug. Allow glaze to dry between coats.
Using the Soft Fan with SW-129 Copper Float, apply 3 coats to the bottom half of the jug (flat area below the upper lip). Allow glaze to dry between coats.
Using the Soft Fan with SW-180 Desert Dusk, apply 3 coats to the upper half of the jug. Apply over the flux. Allow glaze to dry between coats.
Fire to cone 6.
Continuous Fronds Jug
Begin with soft fired stoneware bisque.
Pour around ¼ cup of SW-508 Black Gloss into the disposable cup. Add around 1 TBS of water and mix. It should be slightly thicker than water. Pour into the jug and rotate. Pour out any excess glaze.
Pour out around 2 TBS of SW-509 Dark Green Gloss. Add a pinch of AC-310 Silkscreen Medium. Mix with a palette knife until it becomes the consistency of peanut butter. You may need to add more silkscreen medium or glaze.
Take DSS-0163 Continuous Fronds Screen and place it going around the bottom half of the jug, shiny side down. It is helpful to tape it in place to prevent it from slipping.
While holding the screen firmly in place, scoop a small amount of premixed silkscreen medium onto the squeegee and pull across the screen. Repeat until the entire bottom half of the jug has been screened.
Using the Soft Fan with SW-004 Zinc-Free Clear, apply 3 coats over the screened area on the bottom half of the jug. Allow glaze to dry between coats.
Using the Script Liner with SW-401 Light Flux, apply 3 coats to the lip above the screened area. Allow flux to dry between coats.
Using the Soft Fan with S-2714 Herb Garden, apply 1 coat to the upper half of the jug (above the screened area). Apply right over the flux.
Using the Soft Fan with SW-253 Green Opal, apply 3 coats to the upper half of the jug (above the screened area). Apply right over the flux. Allow glaze to dry between coats.
Fire to cone 6.
Psychedelic Jug
Begin with soft fired stoneware bisque.
Pour around ¼ cup of SW-508 Black Gloss into the disposable cup. Add around 1 TBS of water and mix. It should be slightly thicker than water. Pour into the jug and rotate. Pour out any excess glaze.
Using the Soft Fan with SW-508 Black Gloss, apply 3 coats to the outside of the jug. Allow glaze to dry between coats.
Cut along the edge of the pattern, so that it fits on the bottom half of the jug. Place the pattern around the jug and tape the seam together so that it stays in place. Trace over the pattern with the pencil. Check to make sure you are using the correct amount of pressure. You should be able to see your lines, without going down to the bisque. Remove the pattern.
Using the Detail Liner with AC-302 Wax Resist, apply 1 coat to the pattern you just traced.
Using the Script Liner with SW-501 White Gloss, SW-502 Yellow Gloss, SW-503 Orange Gloss and SW-504 Red Gloss, apply 1 thick coat to each of the areas created by the lines. Try not to have the same color in adjacent areas.
Begin with soft fired stoneware bisque. Moisten a sponge and wipe bisque to remove any dust.
Using the Soft Fan with SW-501 white Gloss, apply 4 coats to the outside of the bowl. Allow glaze to dry between coats. Make sure your final coat is just dry to the touch when moving onto the next step. You will not be able to trace your pattern if the glaze is bone dry.
Cut along the edges of the pattern, so that it fits around the outside of the bowl. You will need to tape the two pieces together to form one long pattern. Tape the two ends with a black vertical line. Place the pattern around the bowl and tape the seam together so that it stays in place. Trace over the pattern with the pencil. Check to make sure you are using the correct amount of pressure. You should be able to see your lines, without going down to the bisque. Remove the pattern. (Note: you can substitute a different name in the pattern, do this before you put the pattern on the bowl)
Using the Script Liner with SW-506 Bright Blue Gloss, SW-507 Bright Green Gloss and SW-510 Blue Gloss, apply 2 coats to the paw prints. Allow glaze to dry between coats.
Using the Detail Liner with SW-508 Black Gloss, apply 1 coat to the name.
Pour out around 1 TSP of SW-508 Black Gloss onto the palette. Dip the eraser on the pencil into the glaze and press onto the bowl to make the decorative dots.
Using the Soft Fan with SW-506 Bright Blue Gloss, apply 4 coats to the inside of the bowl. Allow glaze to dry between coats.
Moisten a clean sponge and wipe bisque to remove any dust.
Use the Round Brush to apply ¼” of AC-302 Wax Resist around the outside bottom of the dish. Follow the instructions on the bottle for conditioning the brush prior to use. Wash brush immediately after use.
On the inside, use another Round Brush with SW-401 Light Flux to create two 1” wide wavy flowers. Apply 2 coats.
On the outside of the bowl, use the same brush to create one 1” wide wavy ribbon with Light Flux. Apply 2 coats.
On the inside, on top of each wave, apply 1” of SC-9 Jaded slightly overlapping the Light Flux. Apply 2 coats. Repeat on the outside wave.
On the inside of the bowl: apply 1” of SC-13 Grapel to the bottom of the top wave, overlapping the Light Flux. Apply 2 coats. Repeat on the outside wave.
On the inside: apply a 1” ribbon of SC-28 Blue Isle to the middle of the bottom wave, overlapping the Light Flux. Apply 2 coats. Repeat on the outside below SC-13 Grapel.
Use the Soft Fan to apply 2 coats of SW-146 Aurora Green to the entire bowl, except the bottom.
Begin with soft fired stoneware bisque. Moisten a clean sponge and wipe bisque to remove any dust.
Use the Soft Fan to apply 3 coats of SW-146 Aurora Green to 2/3 of the bowl (front and back).
Use the Soft Fan to apply 3 coats of SW-106 Alabaster to 2/3 of the bowl, overlapping the Alabaster (front and back). You can increase the overlap of the colors to create more dramatic effects.
Use a clean sponge to wipe the excess glaze off the foot.
Begin with soft fired stoneware bisque. Moisten a sponge and wipe bisque to remove any dust.
Pour out around 2 TBS of SW-509 Dark Green Gloss onto the palette. Add a pinch of AC-310 Silkscreen Medium. Mix with a palette knife until it becomes the consistency of peanut butter. You may need to add more silkscreen medium or glaze.
Take DSS-0163 Continuous Fronds Screen and place it on top of the plate, shiny side down. Make sure it covers the rim of the bowl.
While holding the screen firmly in place, scoop a small amount of premixed silkscreen medium onto the squeegee and pull across the rim of the bowl. Repeat until the entire rim of the bowl is screened.
Using the Soft Fan with SW-253 Green Opal, apply 1 coat to the front of the bowl and 3 coats to the back. Allow glaze to dry between coats. After the back is dry, flip the bowl back over to the front.
Pour around ½ oz of SW-401 Light Flux, SC-9 Jaded and SC-96 Aqu-ward into each of the AC-220 Detailer Tips and 1 oz Bottles.
Take the bottle with SW-401 Light Flux and make a scalloped line going around the upper, inside of the bowl.
Take the bottle with SC-96 Aqu-ward and make dots above the scalloped line. One dot where each scallop goes down.
Take the bottle with SC-9 Jaded and make dots below the scalloped line. One dot where each scallop goes up.
Allow glaze to dry.
Using the Soft Fan with SW-253 Green Opal, apply 2 coats to the front of the bowl. Allow glaze to dry between coats.
Moisten a clean sponge and wipe bisque to remove any dust.
Use the Round Brush to apply ¼” of AC-302 Wax Resist around the outside bottom of the dish. Follow the instructions on the bottle for conditioning the brush prior to use. Wash brush immediately after use.
Use the Soft Fanto apply two coats of SW-106 Alabaster to the entire dish, except the bottom.
Use the Writer Bottles + Tips to apply one coat each of the following colors in a striped wavy pattern: SC-7 Leapin’ Lizard, SC-23 Jack O’Lantern, SC-42 Butter Me Up, SC-72 Grape Jelly, SC-76 Cara-Bein Blue, and SC-87 Ruby Slippers. Apply the colors to the inside, top edge, handle and on the outside as pictured.
Begin with soft fired stoneware bisque. Moisten a sponge and wipe bisque to remove any dust.
Using the Soft Fan with SW-101 Stoned Denim, apply 3 coats to the back of the bowl. Allow glaze to dry between coats. Flip the bowl back over to the front.
Using the Soft Fan with SW-101 Stoned Denim, apply 3 coats to the front of the bowl. Allow glaze to dry between coats.
Using the Soft Fan with SW-179 Muddy Waters, apply 1 thick, irregular coat going down the center of the bowl.
Pour around ½ oz of SW-401 Light Flux into the AC-220 Detailer Tip and 1 oz Bottle. Quickly squeeze out the flux as you go back and forth across the center of the plate. Follow the same direction as the glaze from Step #4. Make 3-5 lines.
Begin with soft fired stoneware bisque. Moisten a sponge and wipe bisque to remove any dust.
Using the Soft Fan with SW-165 Lavender Mist, apply 3 coats to the back of the bowl. Allow glaze to dry between coats. Flip the bowl back over to the front.
Use the pencil to draw 2 lines going down the front of the bowl. You want to create 2 large sections on either side and 1 thin section going down the middle.
Using the Soft Fan with SW-165 Lavender Mist, apply 3 coats to the 2 outer sections. Allow glaze to dry between coats.
Using the Soft Fan with SW-143 Abalone, apply 3 coats to the center section, overlapping around 1” over the outer sections. Allow glaze to dry between coats.
Pour around ½ oz of SW-401 Light Flux into the AC-220 Detailer Tip and 1 oz Bottle. Quickly squeeze out the flux as you go back and forth across the center of the plate. Follow the direction of your lines. Make 3-5 lines.
Begin with soft fired stoneware bisque. Moisten a clean sponge and wipe bisque to remove any dust.
Apply letter and shape stickers to the desired areas.
Use the Soft Fan to apply 3 coats of SW-130 Copper Jade to the entire bowl.
Remove the stickers.
Use the Soft Fan to apply 1 coat SW-001 Clear to the bottom inside of the bowl and the outside of the bowl (below the rim).
Use a clean sponge to wipe the excess glaze off the foot.
Fire to cone 5/6. (Sample was fired to cone 6)
Splatter Paw Print Bowl
Begin with soft fired stoneware bisque. Moisten a clean sponge and wipe bisque to remove any dust.
Using the water-based marker or pencil draw pawprints around the outside of the bowl.
Use the Script Liner to fill in the pawprints with 3 coats of the following colors: SW-502 Yellow Gloss, SW-503 Orange Gloss, SW-504 Red Gloss, and SW-510 Blue Gloss. Alternate the colors as you go around the bowl.
Use the Soft Fan to apply 3 coats of SW-508 Black Gloss to the inside of the bowl.
Use the Soft Fan to splatter SW-508 Black Gloss on the outside of the bowl.
Use the Soft Fan to apply 1 coat of Clear on the outside of the bowl.
Use a clean sponge to wipe the excess glaze off the foot.
Begin with soft fired stoneware bisque. Moisten a sponge and wipe bisque to remove any dust.
Pour out around 2 TBS of SW-509 Dark Green Gloss onto the palette. Add a pinch of AC-310 Silkscreen Medium. Mix with a palette knife until it becomes the consistency of peanut butter. You may need to add more silkscreen medium or glaze.
Take DSS-0163 Continuous Fronds Screen and place it on top of the plate, shiny side down. Make sure it covers the rim of the bowl.
While holding the screen firmly in place, scoop a small amount of premixed silkscreen medium onto the squeegee and pull across the rim of the bowl. Repeat until the entire rim of the bowl is screened.
Using the Soft Fan with SW-004 Zinc-Free Clear, apply 3 coats over the screened area on the bowl. Allow glaze to dry between coats.
Using the Soft Fan with SW-509 Dark Green Gloss, apply 4 coats to the rest of the bowl. Allow glaze to dry between coats.
Moisten a clean sponge and wipe bisque to remove any dust.
Use the Round Brush to apply ¼” of AC-302 Wax Resist around the outside bottom of the dish. Follow the instructions on the bottle for conditioning the brush prior to use. Wash brush immediately after use.
Use another Round Brush to apply two ribbons of SW-401 Light Flux inside the bowl and one ribbon of Light Flux outside the bowl.
Use the Round Brush to paint the following colors in ribbons around the Light Flux: alternate SC-28 Blue Isle, SC-29 Blue Grass, and SC-7 Leapin’ Lizard. Repeat on the outside of bowl. Apply 2 coats on the inside and outside ribbons.
On the inside of the bowl, use the Soft Fan to create a circle of SW-176 Sandstone in the center. Working up in layers, slightly overlap each color as you move to the top: SW-212 Peacock, SW-109 Capri Blue, and SW-211 Glacier Blue. Apply 2 coats.
Once dry, apply 1 heavy coat of SW-150 Celeadon Bloom (SW150) on top of the Glacier Blue.
On the outside, starting at the bottom, apply 2” of Sandstone (SW176). Moving up on the bowl, apply Peacock, slightly overlapping with Peacock (SW212). Moving up, apply Glacier Blue (SW211) slightly overlapping Peacock. Apply 2 coats on all of these colors. Apply 1 heavy coat of Celedon Bloom (SW150) on top of the Glacier Blue.
Cast the mold in usual manner. Allow to dry! Clean the greenware with a Clean-Up Tool and sponge. Do not fire!
Using a CB-604 #4 Soft Fan, apply 3 coats of AS-512 Black Diamond. Do not apply to the bottom of the vase, (can scratch surface it is put on when finished).
Bisque Fire to cone 04.
Thin some FN-009 Black to the consistency of coffee cream. Pour inside the vase and roll around to coat the inside. Drain any excess glaze and leave the vase upside down to finish draining. Wipe any drips with a damp sponge.
Using a CB-604 #4 Soft Fan, apply 2 – 3 coats of FN009 Black to the bottom of the vase. Allow to dry!
The leaving some space glazes being applied next will be applied in a plopping motion using the side of the fan brush leaving some spaces in between the colors (do not apply solid). Do not was your brush out just wipe between a paper towel then go onto the next color.
Using a CB-604 #4 Soft Fan Brush, plop 1 coat of FN-150 Fern to the top portion of the vase. Next you plop on EL-130 Sea Green. Followed by PC-602 White Cascade then some PC-601 Clear Cascade. Allow to dry!
Using a CB-604 #4 Soft Fan, apply 1 good coat of EL-208 Night Sky. Allow to dry!
Moisten a clean sponge and wipe bisque to remove any dust.
Use the Round Brush to apply ¼” of AC-302 Wax Resist around the outside bottom of the dish. Follow the instructions on the bottle for conditioning the brush prior to use. Wash brush immediately after use.
Using another Round Brush, apply 1” wide ribbon in a crisscross pattern inside the bowl using SW-401 Light Flux. Apply 2 coats.
Inside the bottom of the bowl, use a Round Brush and AC-302 Light Flux to create a 1” wide lattice pattern. Apply 2 coats.
On the outside of the bowl, use the Round Brush and AC-302 Light Flux to create a wavy line around the top 1/3. Apply 2 coats.
On the inside pattern, fill in the empty spaces alternating between SC-29 Blue Grass and SC-32 Bluebeard. Apply two coats, overlapping the flux slightly.
On the outside of the bowl, fill the space above the Flux line, slightly overlapping with one color. Fill below the Flux line, slightly overlapping, with the other color.
Use the Soft Fan to apply 2 coats of SW-176 Sandstone over the entire bowl, excluding the bottom.
Begin with properly fired shelf cone 04 bisque. Moisten a clean sponge and wipe bisque to remove any dust.
Using a CB-604 #4 Soft Fan, apply 3 coats of UG-85 Orange Sorbet to the pumpkin. Allow to dry between each coat thoroughly! Do Not force dry!
Using a CB-408 #8 Pointed Round, apply 3 coats of UG-31 Chocolate to the Stem. Allow to dry between each coat. When last coat has dried, drybrush the high areas of the stem with UG-220 Sage.
Using a CB-604 #4 Soft Fan, highlight the pumpkin with UG-203 Squash Yellow.
Using a CB-604 #4 Soft Fan, apply 1 coat of UG -31 Chocolate and UG-220 sage from the stem down about 2 inches. The apply 1 coat of UG-57 Spice Brown from the bottom up.
Using a CB-604 #4 Soft Fan, load the brush with water, pat excess off on a paper towel. Load one side of the brush with UG-31 Chocolate and shade the deep crevices of the pumpkin. Allow to dry!
At this point you can either fire the Fundamental colors at this time to a cone 04to set the colors. Or go to the next step.
Using a CB-604 #4 Soft Fan, apply 3 coats of CC-101 Transparent Crackle glaze to the pumpkin. Allow to dry between each coat.
Stilt and fire to cone 06.
To make the crackle pattern to show up. Wait a couple of days for the crackle pattern to develop. Then use some form of stain like SS-138 Flat Black or India Ink. Apply the color in a small area then wipe back with a paper towel or soft cloth.
Moisten a clean sponge and wipe bisque to remove any dust.
Use the Soft Fan to apply three coats of SC-30 Blue Dawn inside the mug.
Use the Script Liner to paint the bottom rim with three coats of SC-26 Green Thumb.
Apply three coats of SC-78 Lime Light on the handle.
Using the Detail Liner, paint all stems and leaves with SC-78 Lime Light.
On the thicker stems and larger leaves, go over the SC-78 Lime Light with a wispy coat of SC-26 Green Thumb.
Choose random flowers on each side for each of the other colors (or any of your favorite colors). For lighter colors, add a second coat. For darker colors, a single coat provided sufficient coverage for me.
Moisten a clean sponge and wipe bisque to remove any dust.
Use the Soft Fan to apply two coats of SC-30 Blue Dawn to the bottom third of the tumbler.
Apply two coats of SC-12 Moody Blue to the middle third of the tumbler, slightly overlapping SC-30 Blue Dawn.
Apply two coats of SC-32 Bluebeard to the top third of the tumbler, slightly overlapping SC-12 Moody Blue.
Apply three coats of SC-32 Bluebeard to the inside of the tumbler.
With a damp sponge brush, dab a thin layer of Blue Dawn over the line where it meets Moody Blue. Then dab a thin layer of Moody Blue over the line where it meets Bluebeard.
Once the piece is completely dry, go back over the blended line with the last step again if you want a more subtle transition.
Artist’s Note: The Retro Mug has 20 diamond shapes. I chose a rainbow palette of 10 colors that repeat once.
Moisten a clean sponge and wipe bisque to remove any dust.
Use the Script Liner to paint each section with three solid coats of the assigned color, leaving no space between the sections. Colors: SC-12 Moody Blue, SC-24 Dandelion, SC-26 Green Thumb, SC-28 Blue Isle, SC-30 Blue Dawn, SC-40 Blueberry Hill, SC-53 Purple Haze, SC-74 Hot Tamale, SC-75 Orange-A-Peel, and SC-78 Lime Light.
Use the Soft Fan to paint three coats of SC-28 Blue Isle inside the mug.
Once all colors are completely dry, paint the handle, the top rim and the bottom rim with two coats of SC-15 Tuxedo.
Use the Detail Liner to outline each section with SC-15 Tuxedo being careful to cover any unpainted bisque.
Dip into NT-CLR Clear Dipping Glaze. NOTE: You do not have to dip a piece that has three coats of Stroke & Coat; however, many people dip all their Stroke & Coat projects.
Moisten a clean sponge and wipe bisque to remove any dust.
Use the Soft Fan and Script Liner to apply 3 coats of SC-9 Jaded on the inside of the cup and on the bottom. Let dry.
Using a sponge, dab the following colors in large swatches around the cup: SC-74 Hot Tamale, SC-75 Orange-A-Peel, SC-6 Sunkissed, SC-27 Sour Apple, SC-11 Blue Yonder, and SC-13 Grapel. You can blend them where they run into each other, but it doesn’t have to be perfect! Let Dry.
With a clean, damp sponge, wipe away the color on the raised areas of the cup. Take care to leave color in the indentions. Use a clean part of the sponge with each wipe so you take the paint away rather than pushing it around. Let dry.
Use the Writer Bottle + Tip with SC-15 Tuxedo to draw a circle around one of the indents. Then, create 5 petals coming from the center to finish the flower. Add a stem from the flower to the base of the cup (wavy or straight lines) Then, add leaves to the stem. Continue around the cup, painting flowers at 1” – 2” inch intervals. Let dry.
Using the same writer bottle, draw grass in a flicking motion from the base. Fill in all the spaces between flowers with grass. Let dry.
Use the Script Liner with SC-15 Tuxedo to line the rim – approx. ¼” thick. Let dry.
OPTION: Use a toothbrush or stiff brush with SC-15 Tuxedo to add splatters by flicking the brush with your finger towards the piece. Let dry.
Moisten a clean sponge and wipe bisque to remove any dust.
Paint the bottom row of shapes with 3 coats of the following colors in this order: SC-74 Hot Tamale, SC-75 Orange-A-Peel, SC-23 Jack O’Lantern, SC-6 Sunkissed, SC-27 Sour Apple, SC-9 Jaded, SC-11 Blue Yonder, SC-53 Purple Haze, SC-13 Grapel, and SC-3 Wine About It. Let dry.
For the top row of shapes, you will combine colors. Each shape on top is equal parts the colors directly before and after it (in a zig zag pattern from bottom to top,) with an added half amount of SC-16 Cotton Tail. Paint the top row with three coats of the combination colors. Let dry.
For example: The shape on top between Sunkissed and Sour Apple on the bottom is a mixture of the two + Cotton Tail. It would be: 1/3 Sunkissed, 1/3 Sour Apple, 1/3 Cotton Tail.
Use the Script Liner and Soft Fan to apply 3 coats of SC-14 Java Bean to inside and background of the mug. Let dry.
Use the Script Liner to paint the base and bottom rim/foot with 3 coats of SC-5 Tiger Tail. Let dry.
Use the Writer Bottle + Tip with SC-16 Cotton Tail to outline the top and bottom row of shapes. Let dry.
Moisten a clean sponge and wipe bisque to remove any dust.
Paint the faceted area with 2-3 coats SC-16 Cotton Tail, leaving the flat rim area on the outside unpainted. This allows for full coverage on the entire piece. Let dry.
With a sponge (dry or damp but rung out thoroughly) sponge SC-9 Jaded over the faceted area, taking care to mostly cover the raised areas and leaving the indents white. Let dry.
With the same sponge, add SC-10 Teal Next Time lightly to the raised areas. Leave some of the SC-9 Jaded and SC-16 Cotton Tail visible. This is an accent. Let dry.
Use the Soft Fan and Script Liner to apply 3 coats of SC-15 Tuxedo to the inside of the cup, the top rim (coming down to where the faceted area meets the rim), the bottom rim, and the bottom of the cup. Let dry.
Use the Writer Bottle + Tip with SC-15 Tuxedo to outline the raised facets. Follow the indent to create triangles. Let dry.
Cast the mold in usual manner. Allow to dry! Clean the greenware with a Clean-Up Tool and sponge. Do not fire!
Golden Sand Astro Gem Flowerpot
Using a CB-604 #4 Soft Fan, apply 3 coats of AS-513 Golden Sand to the outside of the flowerpot. Allow to dry! Bisque fire to shelf cone 04.
Using a CB-604 #4 Soft Fan, apply 3 coats of EL-134 Mirror Blue to the inside of the flowerpot. And about 1.5” on the outer to rim of the flowerpot. Allow to dry!
Using a CB-604#4 Soft Fan, plop some PC-602 White Cascade on the tope edge of the flowerpot over the EL-134 Mirror Blue followed by plopping PC-601 Clear Cascade in between the White Cascade. Allow to dry!
Using a CB-604 #4 Soft Fan, apply 1 coat of EL-207 Gold Mine over the glazes on the outer rim of the flowerpot. Allow to Dry!
Stilt and fire to cone 06.
Black Diamond Astro Gem Flowerpot
Using a CB-604 #4 Soft Fan, apply 3 coats of AS-512 Black Diamond to the outside of the flowerpot. Allow to dry! Bisque fire to cone 04.
Using a CB-604 #4 Soft Fan, apply 3 coats of FN-009 Black to the inside of the flowerpot. Allow to dry!
Using a CB-604 #4 Soft Fan, apply 3 coats of CG-970 Masquerade to the outer edge of the flowerpot in an irregular shape. Allow to dry!
Stilt and fire to shelf cone 06.
White Opal Astro Gem Flowerpot
Using a CB-604 #4 Soft Fan, apply 3 coats of AS-510 White Opal to the outside of the flowerpot. Allow to dry! Bisque fire to cone 04.
Using a CB-604 #4 Soft Fan, apply 3 coats of FN-007 Green to the inside of the flowerpot. Allow to dry!
Using a CB-604 #4 Soft Fan, apply 2 coats of CG-2715 Spotted Kiwi to about 1.5” of the top of the outside of the flowerpot.
Using a CB-604#4 Soft Fan, plop some PC-602 White Cascade on the tope edge of the flowerpot over the CG-2715 Spotted Kiwi followed by plopping PC-601 Clear Cascade in between the White Cascade. Allow to dry!
Using a CB-604 #4 Soft Fan, apply 1 coat of EL-208 Moss Creek over top the other glazes. Allow to dry!
Begin with properly fired shelf cone 04 bisque. Moisten a clean sponge and wipe bisque to remove any dust.
If you would like the inside of your Pumpkin Stack to be yellow. Tape the cutout areas with masking tape. Thin some FN002 Yellow to the consistency of Coffee cream, pour the glaze inside of the pumpkin and roll covering the inside. Drain any excess glaze out. Allow to dry!
Remove the masking tape and wipe off any spills with a damp sponge.
Read the instructions first before starting your painting.
Working one pumpkin at a time. Start with the top pumpkin finish that one, then go to the middle pumpkin, finish it then go to the bottom pumpkin.
Using a CB-604 #4 Soft Fan, apply 3 coats of FN-008 Brown to the pumpkin. When the first coat loses its shine apply the second coat. When that coat loses its shine, apply the third coat.
When the third coat of FN-008 Brown loses its shine, using a CB-604 #4 Soft Fan, apply 1 coat of SG-202 White Cobblestone. When the first coat loses its shine apply the second coat. When that coat loses its shine, apply the third coat.
When the third coat of FN-008 Brown loses its shine, apply 1 coat of SC-86 Old Lace over the SG-202 White Cobblestone. Highlight the pumpkin with SC-16 Cotton Tail.
Using a CB-604 #4 Soft Fan, shade the deep crevices SC-41 Brown Cow.
Using an old brush, apply a good coat of AC-302 Wax Resist over the top pumpkin. Allow to dry!
Middle pumpkin, repeat step # 4 and 5.
When the third coat of FN-008 Brown loses its shine, apply 1 coat of SC-79 It’s Sage over the SG-202 White Cobblestone. Highlight the pumpkin with SC-77 Glow Worm.
Using a CB-604 #4 Soft Fan, shade the deep crevices SC-39 Army Surplus.
Using an old brush, apply a good coat of AC-302 Wax Resist over the middle pumpkin. Allow to dry!
Repeat steps #4 and 5.
When the third coat of FN-008 Brown loses its shine, apply 1 coat of SC-97 Cant-elope over the SG-202 White Cobblestone. Highlight the pumpkin with SC-24 Dandelion.
Using a CB-604 #4 Soft Fan, shade the deep crevices SC-80 Basketball.
Using an old brush, apply a good coat of AC-302 Wax Resist over the top pumpkin. Allow to dry!
Stilt and fire to cone 06.
Note: The AC-302 Wax Resist will help keep the Cobblestone from popping off the piece.
Moisten a clean sponge and wipe bisque to remove any dust.
Use a soft fan to plop the cascades around the rim of the bowl. Apply about a 1” plop and alternate between the white and clear cascade. Apply a total of 3 coats to each.
Use a fan brush to apply 2 coats of Wine About It to the outside of the bowl, avoiding the foot. Let dry between coats.
Apply a dot of Wine About It on top of each plop of cascades.
Use a fan brush to apply 3 coats of Oyster to the inside of the bowl.
Use a clean sponge to wipe the excess glaze off of the foot.
Fire to cone 5/6. (Sample was fired to cone 6)
Alternative color options below
3 coats PC-601 and PC-602 (plops), 3 coats SW-116 Robin’s Egg, 2 coats SC-45 My Blue Heaven (outside of bowl)
3 coats PC-601 and PC-602 (plops), 3 coats SW-146 Aurora Green, 2 coats SC-39 Army Surplus (outside bowl)
3 coats PC-601 and PC-602 (plops), 3 coats SW-169 Frosted Lemon, 2 coats SC-55 Yella Bout It (outside bowl)
3 coats PC-601 and PC-602 (plops), 3 coats SW-170 Blue Hydrangea, 2 coats SC-65 Peri-Twinkle (outside bowl)
Cast the mold in usual manner. Allow the greenware to dry! Clean the greenware with a Clean-Up Tool and sponge. Bisque fire to cone 04.
Begin with properly fired shelf cone 04 bisque. Moisten a clean sponge and wipe bisque to remove any dust.
Using an AB-710 #3/4 Flat Shader and an AB-705 #5 Round, basecoat the gnome’s hat, shoes, and gloves with SS-24 Chocolate Fudge.
Using a BT-910 Synthetic Sponge, sponge the hat with 2 coats of SS-24 Chocolate Fudge letting it dry between each coat. This will create a slight texture for the hat.
Using a DB-803 #8 Round, drybrush the hat, shoes, and gloves with Medium Mocha. Highlight with SS- 192 Light Taupe.
Using a Basecoat Brush and an AB-705 #5 Round, basecoat the gnome’s shirt with SS-211 Orange Rust. Allow to dry!
Using an DB-803 #8 Round, drybrush the shirt with SS-210 Orange. Highlight with SS-247 Bright Yellow.
If the deep crevices get filled in just float some SS-24 Chocolate Fudge in them.
Using an AB-705 #5 Round, basecoat the beard with OS567 Ash.
Using a DB-802 #5 Round Dry Brush, drybrush the beard with SS-130 Medium Gray then highlight with SS-135 White.
Shade the center of the beard with some Medium Mocha.
Using an AB-705 #5 Round, basecoat the nose with SS-192 Light Taupe.
Using an AB-708 #10 Shader, shade the noses with SS-183 Rich Peach.
Add some patches on the shirt with different colors of your choice. Allow to dry!
Apply 2 light coats of SS342C Matte Spray Sealer to the piece. Allow to dry!
Attach some Raffia to the Gnome arm, in between the feet around the hat with some hot glue.
Attach a band of burlap around the hat rim and make some patches for the hat.
Begin with properly fired shelf cone 04 bisque. Moisten a clean sponge and wipe the bisque to remove any dust.
Using the Soft Fan brush, apply 2-3 coats of SC-42 Butter Me Up to the center of the plate as the cheese. Leave space unglazed on the edges and lip. Allow to dry.
Using a sponge, lightly dab the flat side of the sponge into SC-6 Sunkissed. Use a paper towel to dab the majority of the paint off. Quickly pounce the sponge in the center of the plate, over SC-42 Butter Me Up (the cheese).
Using the Pointed Round brush, apply 2-3 coats of Poo Bear to the unglazed area on the edge and lip of the plate. This will be the crust
Using the Pointed Round brush, outline sections over Poo Bear (the crust) and around SC-42 Butter Me Up (the cheese) with irregular waves of SC-74 Hot Tamale. This will be the sauce.
Using the Pointed Round brush, apply 2 coats of Rawhide in irregular waves randomly over Poo Bear, avoiding the very edge of the plate to add highlights to the crust.
Using the Liner brush, write text of your choice using SC-99 Char-ming to the center of the plate.
Using the Pointed Round brush, apply 2-3 coats of circles around the text with SC-74 Hot Tamale. This will be the pepperoni.
Using the back of a brush handle, add dots of SC-81 Cinnamon Stix to the center of SC-74 Hot Tamale (the pepperonis) and in random areas on over SC-42 Butter Me U(the cheese) to reflect red pepper flakes.
Using SC-46 Rawhide add small waves using the Pointed Round brush and dots using the back of the bush as cheese highlights.
Apply 2-3 coats of SC-51 Poo Bear to the back of the plate with the Soft Fan brush.
Begin with properly fired cone 04 bisque. Moisten a sponge and wipe bisque to remove any dust.
Use the pencil and ruler to create 4 equal sections on the plate.
On the DSS-0121 Fruits screen, locate the lemon. Cut it out and lay it shiny side up. Take the dry erase marker and color over the lemon. Take the paper towel and wipe off the screen, leaving the marker only in the lines of the lemon.
Pour around 1 TBS NT-BR Clear One Brushing onto the palette. Add a few drops of food coloring. Add a pinch of AC-310 Silkscreen Medium. Mix with a palette knife until it becomes the consistency of peanut butter. You may need to add more silkscreen medium or glaze.
Place the screen in the center of one of the sections (shiny side down). While holding the screen firmly in place, take a small amount of premixed silkscreen medium, and gently rub in circles starting in the center and working outward. Clean screen. Repeat for all 4 sections of the plate.
Using the Script Liner and Soft Fan with SC-6 Sunkissed, SC-11 Blue Yonder, SC-27 Sour Apple and SC-75 Orange-A-Peel apply 2 coats to the area around the lemon in each of the 4 sections. Allow glaze to dry between coats.
Using the Script Liner with SC-6 Sunkissed, SC-11 Blue Yonder, SC-27 Sour Apple and SC-75 Orange-A-Peel apply 2 coats to each of the lemons. Allow glaze to dry between coats.
Squeeze around 2 TBS of SC-15 Tuxedo onto the palette. Add a pinch of AC-310 Silkscreen Medium. Mix with a palette knife until it becomes the consistency of peanut butter. You may need to add more silkscreen medium or glaze.
Repeat Step #5. You will be rescreening the same images in black. Make sure to position the screen so that it matches the previously screened lemons.
Using the Soft Fan with SC-15 Tuxedo, apply 2 coats to the back and edges of the plate. Allow glaze to dry between coats.
Using the Soft Fan with NT-BR Clear One Brushing, apply 1 coat to the front and back of the plate.
Cast the mold in usual manner. Allow the greenware to dry! Clean the greenware with a Clean-Up Tool and sponge. Bisque fire to cone 04.
Begin with properly fired shelf cone 04 bisque. Moisten a clean sponge and wipe bisque to remove any dust.
Using a Basecoat Brush and an AB-705 #5 Round, basecoat the gnome’s shirt with SS-57 Accent Green. Allow to dry!
Using an DB-803 #8 Round, drybrush the shirt with SS-19 Country Sage then with SS-376 Lime Burst. Highlight with SS-247 Bright Yellow.
Using an AB-710 #3/4 Flat Shader and an AB-705 #5 Round, basecoat the gnome’s Hat and gloves with OS569 Concord.
Using a DB-803 #8 Round, drybrush the hat and gloves with SS-368 Dusty Violet. Highlight with SS-28 Hushed Violet
If the deep crevices get filled in just drybrush them with the base coat color to deepen them again.
Using an AB-705 #5 Round, basecoat the beard with OS567 Ash.
Using a DB-802 #5 Round Dry Brush, drybrush the beard with SS-130 Medium Gray then highlight with SS-135 White.
Using an AB-705 #5 Round, basecoat the nose with SS-192 Light Taupe.
Using an AB-708 #10 Shader, shade the noses with SS-183 Rich Peach.
Using scissors, cut out the bats for the hat and the belt for the hat. Trace around these with a pencil. Using an AB-704 #3 Round, apply 2 coats of UM951 Solid Gold to the buckle and OS476 Black to the belt. Using an AB-702 #10/0 Liner, apply OS476 Black to the bats.
Using an AB-708 #10 Shader, Shade around the beard with OS476 Black.
Basecoat the shoes with OS476 Black and drybrush with OS567 Ash.
Add dots of SS-210 Orange to the bat’s eyes around the cuffs of the shirt and bottom of the shirt. Allow to dry!
Apply 2 light coats of SS342C Matte Spray Sealer to the piece. Allow to dry!
Using an AB-704 #3 Round, apply 2-3 coats of SG882 Glittering Gold Sparklers to the buckle on the hat.
Using Mod Podge, apply to the hat band then sprinkle with Black Glitter. Allow to dry!
Cast the mold in usual manner. Allow the greenware to dry! Clean the greenware with a Clean-Up Tool and sponge. If adding anything in the gnomes’ hands, drill a small hole in each hand. Bisque fire to cone 04.
Begin with properly fired shelf cone 04 bisque. Moisten a clean sponge and wipe bisque to remove any dust.
Using a Basecoat Brush and an AB-705 #5 Round, basecoat the gnome’s shirt with OS480 Garnet Red. Allow to dry!
Using an DB-803 #8 Round, drybrush the shirt with SS-176 Christmas Red.
Create ½” stripes on the gnome’s shirt using ½” masking tape. Make sure the tape is down on the edges to prevent color leaking under the tape.
Using a DB-803 #8 Round, stipple SS-130 Medium Gray on the white stripe first. Next, stipple 2 coats of SS-135 White.
Using an AB-710 #3/4 Flat Shader and an AB-705 #5 Round, basecoat the gnome’s hat with OS460 Navy.
Drybrush the hat with SS-SS-183 Rich Blue. Followed by highlighting with SS-131 Medium Blue.
If the deep crevices get filled in just drybrush them with the base coat color to deepen them again.
Using an AB-705 #5 Round, basecoat the beard with SS-130 Medium Gray
Using a DB-802 #5 Round Dry Brush, drybrush the beard with SS-135 White.
Using an AB-705 #5 Round, basecoat the nose with SS-127 Medium Portrait
Using an AB-708 #10 Shader, shade the noses with SS-183 Rich Peach.
Using a star paper punch, trace the stars on to the hat.
Using an AB-704 #3 Round, first basecoat the stars with SS-130 Medium Gray. This will help block out the blue to come through the white. Allow to dry. Then apply 1-2 coats of SS-135 White to the stars. Allow to dry!
Apply 2 light coats of SS342 C Matte Spray Sealer to the piece. Allow to dry!
Using an AB-704 #3 Round, apply 2-3 coats of SG880 Crystal Sparklers to the stars
You can add some decorative star and flag to the gnome. Glue into the small hole you drilled in each hand. Or you can drill in bisque with a Dremel Drill.
Begin with properly fired cone 04 bisque. Moisten a sponge and wipe bisque to remove any dust.
Using the Soft Fan with EL-118 Blue Grotto, apply 2 coats to the outside of the mug. Apply 3 coats to the inside of the mug. Allow glaze to dry between coats.
Using the Soft Fan with EL-130 Sea Green, apply 2 coats to the outside of the mug. Allow glaze to dry between coats.
Pour around 1 TBS of PC-601 Clear Cascade onto the palette. Use the Soft Fan to pat “globs” going around the top inch of the mug.
Stilt and fire to cone 06.
Mug with White Cascade:
Begin with properly fired cone 04 bisque. Moisten a sponge and wipe bisque to remove any dust.
Using the Soft Fan with EL-118 Blue Grotto, apply 2 coats to the outside of the mug. Apply 3 coats to the inside of the mug. Allow glaze to dry between coats.
Pour around 1 TBS of PC-602 White Cascade onto the palette. Use the Soft Fan to pat “globs” around the top inch of the mug. Allow glaze to dry.
Using the Soft Fan with EL-130 Sea Green, apply 2 coats to the outside of the mug. Allow glaze to dry between coats.
Begin with properly fired cone 04 bisque. Moisten a sponge and wipe bisque to remove any dust.
Using the Soft Fan with EL-118 Blue Grotto, apply 2 coats to the outside of the 2 mugs. Apply 3 coats to the inside of the mugs. Allow glaze to dry between coats.
Using the Soft Fan with CG-962 Blue Azure, apply 2 coats to the outside of first mug. Using the Soft Fan with CG-1001 Gogh Iris, apply 2 coats to the outside of the second mug. Allow glaze to dry between coats.
Stilt and Fire to cone 06.
Mugs with EL-130 Sea Green as the base:
Begin with properly fired cone 04 bisque. Moisten a sponge and wipe bisque to remove any dust.
Using the Soft Fan with EL-130 Sea Green, apply 2 coats to the outside of the 2 mugs. Apply 3 coats to the inside of the mugs. Allow glaze to dry between coats.
Using the Soft Fan with CG-962 Blue Azure, apply 2 coats to the outside of first mug. Using the Soft Fan with CG-1001 Gogh Iris, apply 2 coats to the outside of the second mug. Allow glaze to dry between coats.
Begin with properly fired stoneware bisque. Moisten a sponge and wipe bisque to remove any dust.
Using RB-144 #4 fan brush, apply 3 coats of PC-601 Clear Cascade by plopping to the inside and outside of the mug. Leave space in between each plop. Allow glaze to dry between coats.
Using RB-144 #4 fan brush, apply 3 coats of PC-602 White Cascade by plopping in between each plop of PC-601 Clear Cascade to the inside and outside of the mug. Allow glaze to dry between coats.
Apply 3 coats of SW-168 Coral Sands to the inside and outside of the mug using RB-144 #4 fan brush. Do not apply to the handle. Allow glaze to dry between coats.
Apply 3 coats of SC-50 Orange Ya Happy to the handle. Allow glaze to dry between coats.
Use a clean sponge to remove excess glaze off of the foot.
Begin with properly fired cone 04 bisque. Moisten a sponge and wipe bisque to remove any dust.
Pour around ¼ cup FN-007 Green into the disposable cup. Thin with around 1 TBS of water. Pour the thinned glaze into the vase and rotate the vase to cover the inside. Pour out excess glaze. Place the vase upside down on a few paper towels for around 1 minute. Turn the vase right side up and wipe off any glaze drips.
Using the Soft Fan with CG-1001 Gogh Iris, apply 2 coats to the top 2/3 of the vase (outside only). Allow glaze to dry between coats.
Using the Soft Fan with CG-962 Blue Azure, apply 2 coats to the bottom 2/3 of the vase (outside only). Allow glaze to dry between coats.
The middle 2/3 will be a combination of the 2 crystal glazes.
Begin with properly fired cone 04 bisque. Moisten a sponge and wipe bisque to remove any dust.
Using the Soft Fan with FN-001 White, apply 3 coats to the black of the plate. Allow glaze to dry between coats. Apply 1 coat to the front.
After the glaze on the front of the plate is dry to the touch, place the pattern on top. Trace the pattern with the pencil. Check to make sure you are using the right amount of pressure. You should be able to see a faint line in the glaze.
Squeeze around 1 TBS of SC-24 Dandelion, SC-28 Blue Isle and SC-88 Tu Tu Tango onto the palette. Create Color Mix #1 by mixing ½ TBS of SC-28 Blue Isle + 1 TBS of SC-24 Dandelion. Create Color Mix #2 by mixing ½ TBS SC-88 Tu Tu Tango + 1 TBS SC-24 Dandelion.
Using the Script Liner with colors from the previous step, apply 2 coats to the corresponding section of the pattern. Refer to the pattern for color placement. Allow glaze to dry between coats.
Using the Sgraffito Tool or Sharp Skewer, remove a line of glaze between the different colors on the plate. It will be like tracing the pattern again. You should end up with white lines separating the different colors. Allow the glaze to dry, then brush away any “crumbs” of glaze made by the lines.
Using the Soft Fan with SG-702 Celebration, apply 1 coat over the front of the plate.
Stilt and fire to cone 06.
Form
MB-102 Coupe Dinner Plate
Colors
FN-001 White
SC-24 Dandelion
SC-28 Blue Isle
SC-88 Tu Tu Tango
SG-702 Celebration
Color Mix #1 (SC-28 Blue Isle + SC-24 Dandelion 1:2)
Color Mix #2 (SC-88 Tu Tu Tango + SC-24 Dandelion 1:2)
Begin with properly fired cone 04 bisque. Moisten a sponge and wipe bisque to remove any dust.
Using the Soft Fan with FN-043 Bright Jade, apply 3 coats to the front and back of the plate. Allow glaze to dry between coats.
When the front of the plate is dry to the touch, place the pattern on top. Trace with the pencil. Check to make sure you are using the right amount of pressure. There should be a faint line in the glaze.
Using the Detail Liner with AC-302 Wax Resist, apply 1 coat to the pattern lines on the plate.
Using the Script Liner with SG-202 White Cobblestone, apply 1 coat to the wings (each coat should be thick and even). As soon as the shine is gone, apply a second coat. As soon as the shine is gone, apply a third coat.
Using the Script Liner with SG-202 White Cobblestone, apply 1 coat to the head and middle body stripe (each coat should be thick and even). As soon as the shine is gone, apply a second coat. As soon as the shine is gone, apply 1 coat of SC-24 Dandelion.
Using the Script Liner with SG-201 Black Cobblestone, apply 1 coat to the antennae.
Using the Script Liner with SG-201 Black Cobblestone, apply 1 coat to two the remaining body stripes (each coat should be thick and even). As soon as the shine is gone, apply a second coat.
Begin with properly fired cone 04 bisque. Moisten a clean sponge and wipe bisque to remove any dust.
Use AC-310 Silkscreen Medium to thicken some SW-302 Rutile Wash.
Apply the silkscreens around the bottom of the vase.
Use a fan brush to apply EL-110 Mudslide. You will apply 3 coats in total, bringing each coat up a couple of inches from the bottom. If the Mudslide is applied to thick over the silkscreens, they will not show very well. We are looking for the darker variation of Mudslide to create contrast, which is why we are only applying 1 coat around the very bottom.
Moisten a clean sponge and wipe bisque to remove any dust.
Use a mini liner to apply the line work details of your design. (You may want to apply the design with a washable marker first). No need to be very tight and precise with these lines, we will clean them up later.You will want to apply 2-3 coats.
Once dry, use a mini liner brush to apply the wax resist to the lines (this is where you will want precision with your line work).
Once the wax has dried thoroughly, use a damp sponge to gently wipe back along the lines to clean them up.
Use a script liner the fill in the design details, 3 coats. Use a damp brush to clean glaze off of the wax if it accumulates there.
Use a soft fan to apply the stoneware glaze to the outside and rim of the bowl.
Use a clean sponge to wipe the excess glaze off of the foot.
Begin with properly fired cone 04 bisque. Moisten a sponge and wipe bisque to remove any dust.
Using the Soft Fan with FN-009 Black, apply 3 coats to the front and sides of the canvas. Allow glaze to dry between coats.
When glaze is dry to the touch, place the pattern on the canvas. Trace over the pattern with the pencil. Check to make sure you are using the correct amount of pressure. If you press too light, you will not see your lines. If you press too heavy, you will expose the underlying bisque.
Using the Detail Liner with AC-302 Wax Resist, outline the pattern on the canvas. Outline the border between the front and sides of the canvas.
Using the Script Liner with SG-202 White Cobblestone, apply 3 coats to each section of the pattern (not the background). Allow glaze to lose its shine before applying the 2nd and 3rd coats. Wait for the 3rd coat to lose its shine before moving on to Step #6.
Using the Script Liner with EL-121 Copper Adventurine, EL-128 Wheat, EL-143 Cactus Flower and EL-150 Fern, apply 1 coat to each section of the pattern (not the background). Refer to the pattern for color placement.
Using the Script Liner with EL-150 Fern, apply 2 coats to the background. Allow glaze to dry between coats. Apply a 3rd coat to the center of the background (around ¼” inward from the border of the background). Try not to apply even coats. Uneven coats will create more color variation.
Begin with properly fired cone 04 bisque. Moisten a sponge and wipe bisque to remove any dust.
Using the Soft Fan with FN-009 Black, apply 3 coats to the front and sides of the canvas. Allow glaze to dry between coats.
When glaze is dry to the touch, place the pattern on the canvas. Trace over the pattern with the pencil. Check to make sure you are using the correct amount of pressure. If you press too light, you will not see your lines. If you press too heavy, you will expose the underlying bisque.
Using the Detail Liner with AC-302 Wax Resist, outline the pattern on the canvas. Outline the border between the front and sides of the canvas.
Using the Script Liner with SG-202 White Cobblestone, apply 3 coats to each section of the pattern (not the background). Allow glaze to lose its shine before applying the 2nd and 3rd coats. Wait for the 3rd coat to lose its shine before moving on to Step #6.
Using the Script Liner with EL-128 Wheat, EL-143 Cactus Flower and EL-150 Fern, apply 1 coat to each section of the pattern (not the background). Refer to the pattern for color placement.
Using the Script Liner with EL-110 Mudslide, apply 2 coats to the background. Allow glaze to dry between coats. Apply a 3rd coat to the center of the background (around ¼” inward from the border of the background). Try not to apply even coats. Uneven coats will create more color variation.
Begin with properly fired shelf cone 04 bisque. Moisten a clean sponge and wipe bisque to remove any dust.
Using an AB-710 ¾” Flat Shader, basecoat the owl with OS476 Black. Allow to dry!
Using a DB-803 #8 Flat Round, drybrush the entire owl except the rock base with SS-24 Chocolate Fudge.
Using a DB-803 #8 Flat Round, drybrush all feather areas with SS-234 Medium Mocha, try not to drybrush the facets, leaving the previous color showing.
Using a DB-803 #8 Flat Round, drybrush the bottom sections of the chest, top of the head with SS-45 Buttermilk followed by SS-135 White then tip the bottom sections of the chest feathers with OS476 Black. The face is SS-45 Buttermilk then SS-135 White on the outer area and the inner area around the eyes is OS476 Black.
The wings and the back of the head is the SS-45 Buttermilk on the top section of each wing feather and head feather followed by SS-135 White.
The large section of the eye area is drybrushed with SS-45 Buttermilk then a couple of coats of SS-135 White.
Using a DB-802 #5 Round, drybrush the beak and feet with couple coats of SS-3 Honey Toast then highlight with SS-45 Buttermilk.
Using a DB-803 #8 Flat Round, drybrush the rock area with OS567 Ash then add some highlights of SS-130 Medium Gray followed by some OS487 Olive Moss and SS-24 Chocolate Fudge creating the look of a rock. Highlight the facets with OS476 Black.
Using an AB-705 #5 Round, apply 2 coats of SS-3 Honey Toast lightened with some SS-45 Buttermilk.
Using an AB-708 #10 Shader, shade around the outer edge of the eye with SS-3 Honey Toast.
Using an AB-705 #5 Round, apply a coat of OS476 Black to create the pupil of the eye. Add a highlight of SS-135 White.
Using an AB-702 #10/0 Liner, outline the facets on the beak and in the white are of the eye with SS-234 Medium Mocha also add lines to the feet.
Using an AB-705 #5 Round, apply 2 coats of AC-502 Matte Brush-On Sealer to entire piece. Allow to dry!
Using an AB-705 #5 Round, apply 2 coats of AC-501 Gloss Brush-On Sealer to the eyes and beak. Allow to dry!
Begin with properly fired cone 04 bisque. Moisten a sponge and wipe bisque to remove any dust.
Using the Soft Fan with FN-001 White, apply 3 coats to the entire pumpkin. Allow glaze to dry between coats.
Using the Soft Fan with SG-202 White Cobblestone, apply 3 coats to the body of the pumpkin (not the stem). Allow glaze to lose its shine before applying the second and third coats, but do not wait until it is dry enough to crack.
Using the Soft Fan with FN-042 Teal Blue, apply 1 coat to the body of the pumpkin (not the stem). Do this after the final coat from step #3 loses its shine, but do not wait until it is dry enough to crack.
Stilt and fire to cone 06.
Hammered Pumpkin #2:
Begin with properly fired cone 04 bisque. Moisten a sponge and wipe bisque to remove any dust.
Using the Soft Fan with FN-001 White, apply 3 coats to the body of the pumpkin (not the stem). Allow glaze to dry between coats.
Using the Soft Fan with FN-042 Teal Blue, apply 3 coats to the stem. Allow glaze to dry between coats.
Using the Soft Fan with SG-202 White Cobblestone, apply 3 coats to the body of the pumpkin (not the stem). Allow glaze to lose its shine before applying the second and third coats, but do not wait until it is dry enough to crack.
Pour out around 1 TBS of FN-001 White and FN-042 Teal Blue onto the palette. Using the Soft Fan with FN-001 White, apply 1 coat to the top half of the pumpkin (not the stem). Dip the same brush into FN-042 Teal Blue and blend down to the bottom of the pumpkin. Do this after the final coat from step #4 loses its shine, but do not wait until it is dry enough to crack.
Stilt and fire to cone 06.
Squatty Pumpkin #1
Begin with properly fired cone 04 bisque. Moisten a sponge and wipe bisque to remove any dust.
Using the Soft Fan with FN-001 White, apply 3 coats to the stem. Allow glaze to dry between coats.
Using the Soft Fan with FN-042 Teal Blue, apply 3 coats to the body (not the stem). Allow glaze to dry between coats.
Using the Soft Fan with SG-202 White Cobblestone, apply 3 coats to the body of the pumpkin (not the stem). Allow glaze to lose its shine before applying the second and third coats, but do not wait until it is dry enough to crack.
Stilt and fire to cone 06.
Squatty Pumpkin #2
Begin with properly fired cone 04 bisque. Moisten a sponge and wipe bisque to remove any dust.
Pour out around 2 TBS of FN-001 White and FN-042 Teal Blue onto the palette. Using the Soft Fan with FN-001 White, apply 1 coat to the top half of the pumpkin (not the stem). Dip the same brush into FN-042 Teal Blue and blend down to the bottom of the pumpkin. Repeat for a total of 3 coats.
Using the Soft Fan with FN-042 Teal Blue, apply 3 coats to Stem. Allow glaze to dry between coats.
Using the Soft Fan with SG-202 White Cobblestone, apply 3 coats to the body of the pumpkin (not the stem). Allow glaze to lose its shine before applying the second and third coats, but do not wait until it is dry enough to crack.
Begin with properly fired cone 04 bisque. Moisten a sponge and wipe bisque to remove any dust.
Use the pencil to draw 4 wavy lines going around the tumbler. This will create 5 different sections. The directions will refer to each section as 1st, 2nd, 3rd, 4th, and 5th going from top to bottom.
Using the Script Liner with SC-28 Blue Isle, apply 2 coats to the 5th section and bottom of the tumbler. Allow glaze to dry between coats.
Using the Script Liner with SC-80 Basketball, apply 2 coats to the 2nd and 4th sections. Allow glaze to dry between coats.
Using the Script Liner with SC-51 Poo Bear, apply 2 coats to the 1st and 3rd sections. Allow glaze to dry between coats.
Squeeze out around 1 TSP of SC-99 Charming onto the palette. Take the back of the brush handle and dip it into the glaze. Press in the middle of the 3rd section, going around the tumble. Repeat until you have a line of dots going around the tumbler.
Using the Soft Fan with SC-96 Aqu-ward, apply 2 coats to the inside of the tumbler.
Dip into NT-CLR Clear One Dipping Glaze.
Stilt and fire to cone 06.
Arched Tumbler:
Begin with properly fired cone 04 bisque. Moisten a sponge and wipe bisque to remove any dust.
Using the Script Liner with SC-51 Poo Bear, apply 2 coats to the outside of the mug, around the arches. Allow glaze to dry between coats.
Using the Script Liner with SC-58 501 Blues, apply 2 coats to the outer arches. Allow glaze to dry between coats.
Using the Script Liner with SC-79 It’s Sage, apply 2 coats to the inner arches. Allow glaze to dry between coats.
Using the Soft Fan with SC-99 Charming, apply 2 coats to the bottom lip and bottom of the tumbler. Allow glaze to dry between coats.
Using the Detail Liner with SC-99 Charming, make a line going around each arch. Use the groove as a guide.
Squeeze out around 1 TSP of SC-80 Basketball onto the palette. Take the back of the brush handle and dip it into the glaze. Press in a line going around the arches. Repeat until you have a line of dots going around the arches.
Using the Soft Fan with SC-80 Basketball, apply 2 coats to the inside of the tumbler. Allow glaze to dry between coats.
Dip into NT-CLR Clear One Dipping glaze.
Stilt and fire to cone 06.
Retro Mug:
Begin with properly fired cone 04 bisque. Moisten a sponge and wipe bisque to remove any dust.
Using the Soft Fan with SC-42 Butter Me Up, apply 2 coats to the outside of the mug (not foot or bottom). Allow glaze to dry between coats.
After glaze from Step #2 is bone dry, use MC-001 6mm Low Tack Masking Tape to tape around the borders of the “scooped” sections of the mug.
Using the Script Liner with SC-28 Blue Isle, SC-50 Orange Ya Happy and SC-79 It’s Sage, apply 2 coats to each “scoop” going around the mug. Allow glaze to dry between coats. Remove tape before glaze is bone dry.
Using the Soft Fan with SC-99 Charming, apply 2 coats to the foot and bottom of the mug. Allow glaze to dry between coats.
Using the Soft Fan with SC-28 Blue Isle, apply 2 coats to the inside of the mug. Allow glaze to dry between coats.
Begin with properly fired shelf cone 04 bisque. Moisten a clean sponge and wipe bisque to remove any dust.
Using a CB-604 #4 Soft Fan, apply 2-3 coats of FN-014 Antique White to the top side of the plate. Allow to dry.
Using AC-230 Clay Carbon Paper under the pattern, trace the pattern onto the plate.
Using a CB-106 #6 Script Liner, apply 3 coats each of the following colors to the areas listed: SC-20 Cashew Later to the nose and hands of the gnome. SC-16 Cotton Tail to the beard. SC-55 Yella Bout It to the wings and flower petals. SC-42 Butter Me Up to the hat, every other stripe on the body, and the flower center. SC-15 Tuxedo to the antennae, shoes, and every other stripe in the body.
Using a CB-310 #10 Flat Shader, shade the nose and hands with SC-2 Melon Choly. Shade the wings and flower petals with SC-51 Poo Bear. Shade the SC-42 Butter Me Up areas with SC-5 Tiger Tail. Shade the shoes with SC-35 Grey Hare and stipple some on the antennae.
Using a CB-106 #6 Script Liner, blend some streaks of SC-35 Grey Hare in the beard.
Using a CB-110 #10/0 Liner, Apply 2 coats of SC51 Poo Bear to the honeycomb. Allow to dry.
Outline the entire design using French Dimensions FD254 Black Licorice. Allow to dry.
Using a CB-604 #4 Soft Fan, apply 3 coats of FN-009 Black to the back of the plate. Allow to dry.
Begin with properly fired shelf cone 04 bisque. Moisten a clean sponge and wipe bisque to remove any dust.
Using a CB-604 #4 Soft Fan, apply 2 coats of SC-7 Leapin’ Lizard to the top side of the plate. Allow to Dry!
Using a BT-910 Synthetic Sponge, dampen the sponge in water then squeeze out all the water then roll in between paper towel to remove any remaining water. You want the sponge damp not wet. All the colors are applied one after another blending on the plate, do not was the sponge between colors. Starting with SC-7 Lepeain’ Lizard sponge the plate first. Next sponge some SC-43 Lettuce Alone then some SC-77 Glo Worm then add in some SC-96 Aqu-ward finally you will add some SC-36 Irish Luck to one corner of the plate. Allow to dry!
Using AC-230 Clay Carbon Paper under the patter, trace the pattern onto the plate.
Using a CB-106 #6 Script Liner, apply 2-3 coats of SC-1 Pink-A-Boo to the flower petals. Allow to dry!
Using a CB-106#6 Script Liner, load the brush with SC-17 Cheeky Pinky then pull the color down the petal, while the color is still wet pull in Some SC-95 Pinkie Swear then pull in some SC-3 Wine about it. (do not was brush between each color)
Using a CB-106 #6 Script Liner, apply 2-3 coats of SC-34 Down to Earth to the center of the flower.
Using a CB-202 #2 Detail Liner, apply the seeds in the center of the flower with SC-41 Brown Cow doing a pressure stroke, 1 coat. Load the brush with SC-41 Brown Cow and side load with SC-25 Crackerjack Brown applying a second coat. Apply a highlight of SC-97 Cant-elope to the right side of the seed. When dry, use the end of the brush handle to apply dots of SC-55 Yella Bout It to the tops of the seeds.
Using a C110 #10/0 and a CB-106 #6 Script Liner, add veins to the flower petals and fill in between the petals with SC-15 Tuxedo.
Using a CB-202 #2 Detail Liner, apply 3 coats of SC-16 Cotton Tail to the wings, the butt end of the bee and the yellow stripes on the bee.
Using a CB-202 #2 Detail Liner, apply 3 coats of SC-42 Butter Me Up to the yellow stripes on the bee.
Using a CB-202 #2 Detail Liner, shade the wings and the white area on the bee with SC-35 Grey Hare. Shade the yellow stripe with SC-97 Cant-elope and add some to the wings.
Using a CB-202 #2 Detail Liner, apply 2 coats of SC-15 Tuxedo to the remaining are of the bee.
Using a CB-110 #10/0 Liner, add some shading of SC-41 Brown Cow to the legs and face area of the bee.
Using a CB-110 #10/0 Liner, detail the wings of the bee and add fine lines of SC-15 Tuxedo creating the look of fur. Allow to dry!
Using a CB-604 #4 Soft Fan, apply 3 coats of FN-009 Black to the back of the plate. Allow to dry!
Use the Clean Up Tool to remove the seam lines from the ware. Use the Green Grit Cloth to further smooth the seam line and any imperfections on the piece. Use a moistened Synthetic Sponge to wipe down the piece to remove any dust.
Fire to Shelf Cone 04-05.
To the top third of the pumpkin apply 2 coats of SC-23 Jack O’Lantern using CB-604 Soft Fan. Let dry.
Apply 2 heavy coats SC-97 Cant-elope to the high points on the pumpkin sections over the Jack O’Lantern using CB-406 Pointed Round. Tapper the glaze as you move down the sides of the pumpkin.
Apply 1 coat of SW-164 Satin Patina to the stem using CB-406 Pointed Round.
Stir and shake SW-155 Winter Wood. Use CB-604 Soft Fan to apply 1 coat of SW-155 Winter Wood to the pumpkin excluding the bottom and stem. For the second coat of glaze, tapper the amount of glaze and crystal towards the bottom of the piece. Do not glaze the bottom of the piece as it is not stilted in Firing. Apply only 1 coat of Winter Wood over the stem.
Wipe off the bottom of the piece using a moistened Synthetic Sponge to ensure there is no glaze on the bottom before Firing
Fire the piece to Shelf Cone 5-6 (Mid-range).
Form
CD524 9” Small Slim Pumpkin (poured in Cone 5-6 Stoneware slip)
Use a moistened Synthetic Sponge to wipe down the Stoneware Bisque Bowl to remove any dust and debris.
Use a Ruler and Pencil to divide up the bowl into quarters.
Use the 1” Sponge-on-a-Stick to apply two coats of SC-74 Hot Tamale below the rim markings to the equally divided marks. Let each coat of color dry between coats. Paint in two lines around inside border of bowl along the rim.
Use the ¼” Sponge-on-a-Stick to apply two coats of three alternating rows of SC-72 Candy Appy Red. Let each coat of color dry between coats.
Fill AC-220 Detailer Bottle with SC-73 Candy Apple Red and trail two alternating heavy lines of color along rimmed lines on bowl border. Empty bottle after use for next color.
Fill AC-220 with SW-402 Dark Flux and make scalloped lines above each row of SC-73. Trail a heavy line of flux above and between each line of color along rim border. Let Dry
Apply 2-3 coats of SW-112 Tiger Eye using CB-604 Soft Fan over entire surface excluding foot and bottom of bowl. Back off third coat of glaze near the bottom of the bowl.
Use a moistened Synthetic Sponge to wipe off any glaze from foot and bottom of bowl before firing.
Do not Stilt ware for Firing. Fire to Shelf Cone 5-6 (Mid-range) with a 10 min hold. Do not span the foot of the bowl over edge of kiln shelf during firing.
Wipe down the bisque platter with a moistened Synthetic Sponge to remove any dust and debris.
Place on the Tile the four Speckled Stroke and Coats. Load the CB-604 Soft Fan with some SP-216 Speckled Cotton Tail. Start applying the color in a crisscross motion, pick up some of one of the colors and wet blend the color onto the back ground. Repeat this process with the other colors until the entire surface is covered. There should be no harsh delineations in the colors. A random mottled effect is what the background should look like. Let dry.
Using a Pencil and AC-230 Clay Carbon to transfer the pattern. Use the Scissors to cut up the pattern to ease in the application of the pattern.
On a tile place all of the other Stroke and Coats. Note the colors on the tile. The painting process is a water color effect. Load the brush with water and then tip the brush into the desired color to paint. Rinse the brush often during painting.
SC-23 Jack-O-Lantern to the pumpkin and some areas of the oak leaves.
SC-97 Cant-elope to the highlight on the pumpkin, to the flower shading and some edges of oak leaves.
SC-24 Dandelion to the flower petals.
SC-32 Bluebeard to the ends of the berries.
SC-40 Blueberry Hill to other half of berries.
SC-82 Tuscan Red to the ends of the berry leaves.
SC-8 Just Froggy to the berry leaves near the stems, parts of oak leaves.
SC-52 Toad-ily Green to some of the oak leaves, pumpkin leaves.
SC-25 Crackerjack to the bottom portions on acorns.
SC-10 Teal Next Time to the shadows on pumpkin leaves. Keep this color light.
SC-14 Java Bean to branches.
Use CB-110 Liner to detail the pattern loaded with SC-39 Army Surplus on the leaves. Pumpkin, acorn and flower are detailed with SC-14 Java Bean, SC-34 Down To Earth to branches, acorns and stamens.
Use CB-404 # 4 Round to paint in the lettering loaded with SC-34 Down To Earth. Two coats are necessary for solid coverage. Take your time in painting the lettering. Break down the strokes of the lettering when painting as you would with a calligraphy ink pen.
Apply 3 coats of FN-008 Brown to the back of the platter using CB-604 Soft Fan.
Use CB-604 Soft Fan to apply 1- 2 coats of S-2101 Crystal Clear Brushing to the front of the platter.
To the damp greenware remove the seams using a Clean Up Tool.
Use the Pen to trace the pattern onto the ware.
Take a piece of Moist Clay about ¼” thick and form a “fan” shape about the size of the leaf. Thin out the bottom of the fan shape by squeezing the edge between your thumb and index finger. This will give the illusion of a thinner leaf. The bottom edge should have a ruffle look to it. Use the Clean Up Tool to score (scratch) some lines where the leaves will be placed. Using CB-404 Pointed Round to apply Slip to the leaf and vase. Adhere the leaf to the vase. Repeat this for the second leaf. Do not completely attach the bottom edges of the leaf to the ware. Lift the edges and give them shape.
Using the ¼” half round circle die in the Handheld Extruder loaded with Moist Clay to squeeze out about 7” long piece. Score the area where the stem will be place and attach with Slip. The one stem overlapping the other may will need some extra clay to build up the stem.
Use a Modeling Tool to shape the turn-backs along the sides of the leaves. Use the curved end of the Clean Up Tool to scratch in the texture to the leaves excluding the turn-backs. Once the basic structure of the leave are completed, drape a Plastic Shopping Bag over the piece to retard the drying process.
Once the piece has firmed up but isn’t completely dry is the time to finish cleaning up the vase and leaves that you have sculpted. Refine the edges of the leaves.
Loosely drape the piece again with the Plastic Shopping Bag and let it completely dry. Check the piece for any imperfections before firing. Make any final modifications to the leaves. Make sure the piece is fully dry before firing.
Fire the piece to Shelf Cone 04.
Thin some FN-009 Black in a Plastic Cup to a melted ice cream consistency. Pour the thinned glaze into the vase. While working quickly, rotate the piece to coat the inside of the vase. Pour out excess glaze and invert it to drain. Wipe off any excess glaze from the ware using a moistened Synthetic Sponge.
Apply 1 coat of FN-001White to the leaves and stem using a brush sized for the area.
To the top leaf and stem apply 2 coats of EL-128 Wheat with CB-404 Pointed Round. Steak in some EL-142 Grass using CB-110 Liner in the leaf and along the edge of the stem next to the background. Apply some EL-143 Cactus Flower randomly toward the bottom edge of the leaf using CB-404 Pointed Round.
To the bottom leaf apply 2 random coats of EL-143 Cactus Flower to where the leaf still has no glaze on it.. Apply two coats of Cactus Flower to stem. Use CB-110 Liner to streak in some EL-142 Grass green in the leaf and along the edge of the stem next to background. Apply some EL-128 Wheat to the leaf where you have no Cactus Flower and to the turn-backs using CB-404 Pointed Round.
Share and Stir CG-798 Iris Black. Use CB-604 Soft Fan and CB-404 Pointed Round to apply 2-3 coats to the outside of the vase excluding the leaves and stems. Let dry.
Stilt and Fire the piece to Shelf Cone 05-06.
Form
CD815 Short Envelope Vase (Keep the piece damp after pouring)
Check the bisque ware over for any blemishes and remove by lightly sanding with fine sandpaper.
Center the provided pattern with pencil and the Clay Carbon trace the design onto the ware.
Damp sponge ware to remove any dust and to condition the piece for decorating. The damp sponging will not harm the traced design.
Place the Stroke ‘n Coat as needed on the palette and condition with a few drops of water if product is extremely thick.
Place Java Bean, Cracker Jack and Down to Earth on palette. These should be thinned to a milk like consistency. Add water and mix with Palette Knife. (Note: Brown tones have a tendency to be thicker in the jar than other Stroke ‘n Coat colors.
Using a water dampened #8 Pointed Round fully loaded with thinned Cracker Jack and heavily tip in the thinned Java Bean. Working horizontally, with the point of the brush directed upward to the horizon line begin the streak in the foreground. Hold the brush almost on the flat work back and forth several times to achieve complete streaked coverage to the ground. Water can be used to soften the color. Reload often and make sure the application of color remains straight across the bottom section of the plate. Allow to set.
With water dampened #8 Pointed Round pick up Down to Earth on its tip and blend on the palette. Again, with the point of the Round directed upward to the horizon add soft shading, along the horizon line under the pumpkin and leaves. Also, streak in some shading here and there to the foreground.
Note Steps 6 and 7 may need to be repeated a second time if application appear extremely thin.
Place Sour Apple, Toad-ily Green, Irish Luck, Sunkissed and Cant-elope. These colors will be used on the leaves.
Block in the leaves with a smooth coat of Sour Apple, using #6 Pointed Round.
Reload with Sour Apple and side load Toad-ily Green, with the Toad-ily to the left side of each leaf apply color from the base to tip working the loaded brush across the leaf.
Side load the #6 Pointed Round with Sunkissed and float color down the right side of the leaf.
Side load the #6 Pointed Round with Cant-elope and float in color over the Sunkissed.
Allow to dry.
Corner load #8 Flat Shader with Irish Luck and float in shading to the leaves, under pumpkin, down the left side of each leaf and the center of the leaf. Be sure to use Shader on the flat.
Detailing will be done later.
Complete the Ghost as follows:
Fully load #6 Pointed Round with Cotton Tail and block in one coat to entire Ghost
Reload the Round with the Cotton Tail and side load with Silver Lining. Keeping the Silver Lining to the outside edge of Ghost apply a second coat. The Silver Lining will create a shadow around the entire Ghost.
Paint in the mouth with a coat of Silver Lining.
Paint in the eyes with Sour Apple.
Detailing will be done later.
To the palette add Jack o’ Lantern, Orange Ya Happy, and more Cant-elope.
Complete the Pumpkin as follows working one segment at a time. For best result work for the outer segments inward. Do not cover the cut-out design of the face while painting in the segments.
Block in segment with Cant-elope using the #4 or #6 Pointed Round. One smooth coat is sufficient.
Reload the Round with Cant-elope and side load with both Jack O’ Lantern and Orange Ya Happy. Blend the colors together on palette. With the darker shades direct to the inner edge of each segment apply a second coat. Be sure to app pressure to the brush thus softening the bending of the darker colors.
Repeat the process for all segment except for the middle piece.
When the color has set side load the Round with Orange Ya Happy and float another coat along the darker edge of the painted segments.
The middle segment should be kept lighter in tone, therefore apply two coats of Cant-elope to the remaining segment
With #0 Detail block in two coats of Sunkissed to the small cuts to the mouth and the eyes.
Fill in the eyes and mouth with two to three coats of Tuxedo using the #4 Pointed Round. The pumpkin will be detailed later.
The stem is completed in two segments. To the lower segment apply two coats of Java Bean, with #4 Pointed Round. When dry shade the upper edge, down one side of the stem and from the bottom of stem upward with Down to Earth. Follow the contour of the stem.
The upper segment is block in with two coats of Java Bean and the upper edge is shaded with Down to Earth.
Detail the stem with thinned Down to Earth and Tuxedo using 10/0 Liner
Place Orkid, Grapel, Blue Yonder and Blue Dawn thin the colors to a wash consistency. These colors will be used for the soft “water-color” background. To the right of the pumpkin more of the purple tones were used and to the left more of the blue tone. The color merge and overlap each other at the top of the plate. Use the # 8 Pointed Round that is fully load with water and then tip with a color. The brush is used on the flat.
Start with Grapel and work color away from the ground, leaves and ghost. Swish and swirl the color in place and try to stay off the of the previously applied color. Reload as needed.
As the color is pulled out about an 1½“ away from the design pick up the lighter Orkid color and bring color out to the edge of plate. Apply color over the unpainted spider web.
To the left side of the Pumpkin use the Blue Yonder and Blue Dawn. The Blue Yonder is used closest to the leaves, ground and Pumpkin pulled out in the same manner as the purple tones.
Proceed to pick up the Blue Dawn and swish and swirl the color to the outer edge of the plate.
As the two colors meet work one over the other blending the two colors together.
With #4 Pointed Round and #10/0 Mini Liner pull is the tree to the left of the design using all three of the Browns (Cracker Jack, Java Bean and Down to Earth. Work from the base of tree upward. Try to create a bark like finish with coloration.
Thin down the Tuxedo to a milk like consistent and with the #10/0 Mini Liner pull in the spider web. By moving slowly one coat should be enough for good coverage, however if color appears light carefully apply a second coat.
The thinned Tuxedo should be used to:
Detail the Ghost adding an outline, outlining the eyes, painting the pupils and accent the mouth
Accent outline the stem with fine lines.
Accent the tree with fine Lines
With the #0 Detail add tiny leaves to the tree using Sour Apple tip with Toad-ily Green. Additional leaves are added with Sunkissed and tipped with Jack 0’ Lantern. These leaves are small and should be randomly applied with tiny pressure strokes.
With thinned Irish Luck and #10/0 Liner
Outline and detail the leaves around the pumpkin
Pull in the scroll like tendrils,
Pull in the tuffs of grass as shown on pattern working from the group upward.
With thinned Down to Earth with broken line outline the segments of the pumpkins. Add a few detail lines here and there on the Pumpkin. Sign your name as well.Also accent the ground with a few fine lines. All using the #10/0 Liner.
Place the plate on a turntable and center.
Thin the Tuxedo slightly and dampen the 1” Foam Brush. Fully load one side of the foam brush and proceed to band the rim of the plate. Two to three passes may be needed.
Allow to dry 24-hours.
With slightly thinned Crystal Clear Brushing apply two coat over the entire plate. Allowing some drying time between coats.
Stilt ware and fire to shelf cone 06.
Remove stilt marks with Dremel Tool or Stilt Stone.
Check the bisque ware over for any blemishes and remove by lightly sanding with fine sandpaper.
Damp sponge ware to remove any dust and to condition the piece for decorating.
Into a paper cup place Tuscan Turquoise, using the entire 2 oz bottle.
Also into the paper cup add approximating ½ ounce of Matte Transparent. Mix thoroughly with palette knife.
Pour the mix on to the palette.
Pick up the mixed Tuscan Turquoise on to the sponge and proceed to pounce sponge the three solid textured coats over the canvas ware, including the side and small rim on the back of canvas. Allow each coat some drying time. When finished set piece aside to thoroughly dry.
Using the Clay Carbon, provided pattern and pencil/pen carefully trace the design onto the ware. Try not to score the ware while tracing. Note: the Clay Carbon will not work if the ware is damp from the color application.
Place Snowfall onto the palette and condition with palette knife. Do not thin the color, work the palette knife through the Specialty Glaze, thus making the painting easier to brush with.
Fully load the #6 Pointed Round with the conditioned Snowfall. Begin to apply two heavy coats of the Snowfall to the flower petals. As the color is applied create raised area here and there along the outer edges of the petals. Try to achieve some dimension to each of the petals.
The center of the two flowers should be filled with a generous build up of Snowfall which should appear more raised than the actual applied petals.
Allow the Snowfall some drying time.
Place Marine Blue on the palette and thin slightly with a few drops of water. Mix with palette knife. Consistency should be of light cream.
Dampen the #8 Flat Shader with water. Remove excess water onto a paper towel. Proceed to corner load the Shader with the slightly thinned Marine Blue.
The leaves are floated in with color using the corner loaded #8 Flat Shader, keeping the color to the outer edges of each leaf. For best results work from base of the to the tip, use the shader on the not just the corner loaded edge. Reload as needed. If leaves are completed correctly the center of each leaf will be free of the Marine Blue.
Fully load the 10/0 Mini Liner with Marine Blue and outline the leaves with a smooth outline, add a center and side veins to each leaf and finally pull in a gnarled looking branch and twig attached. One coat should be sufficient
Corner loading the Shader with Marine Blue float in shading to the petals were the applied center overlap the petals. Complete the shading one petal at a time.
Float in shading to the petals along the inner edge of the raised edge. Also shade the petals where an overlapping petal would create a shadow on its neighboring petals. Be sure to keep the shading soft and blended in appearance. Again reload as needed.
With #6 Pointed Round loaded with Marine Blue press, pull and lift three small pressure strokes to the base of the bud to form a calyx.
To opened flowers (not the bud) pull in five to seven fine vein lines from the center outward on to each petal. These lines should be of varying lengths. Complete these lines with the #10/0 Mini Liner.
Add tinny Marine Blue dots to the center of the fully opened flowers, using the tip #10/0 Mini Liner.
Sign the piece.
Since Matte Transparent Clear has been added to the Fundamentals proceed to stilt the piece and fire to shelf cone 04 or 06.
Special note: If this piece were to be glaze with either a matte or gloss glaze the intensity of the Marine Blue will be diminished due to the fact there is only a thin application of color. By adding the Matte Transparent to the original base coat help intensifies the over all look of the non-glazed Fundamentals.
Special Note: When work with the EZ-Strokes color over an unfired glaze type surface, try not to apply the colors too heavily. Heavy color application will sometime cause the color the blister on the glaze surface during firing, There for blend out all heavy ridges of color.
Check the ware over for any blemishes, if present sand them off with 100-grit sandpaper.
Damp sponge the ware to condition for decorating and to remove any fired dust or dirt from the ware’s surface.
Place approximately 2 ounces of Really White into a paper and thin slightly with a few drop of water.
Using the #8 Soft Fan apply three very smooth coats of the Really White to inside and side of the ware. Do not apply any glaze to the bottom of the ware. Also leave ¼” from the bottom upward without any Concept color.
Allow ware to dry 24-hours.
Using the Clay Carbon, provided pattern and pen/pencil trace the pattern onto the center of the ware. Try not to score the ware when tracing.
Place the EZ-Stroke Colors on the palette as need and if color is extremely thick add a few drops of water.
The leaves are blending of the EZ-Strokes that have been loaded on to the #4 or #6 Pointed, side loaded with another color and tip in a third. Work from the rounded tip of each segment back towards the base of the leaf. Strokes should overlap one another and the overlapping should be blended out. One coat should be sufficient for coverage. However, a second thin application of colors may be applied if the need arises.
Here are a few examples of color loading for the leaves. Be sure to change the colors and two toned leaves can be created Use the color photograph as a guide.
Load with Chartreuse, side load with Leaf Green and tip with Ivy Green
Load with Yellow Orange, side load with Poppy Orange and tip with Passion Red
Load with Poppy Orange, side load with Passion Red tip with Yellow Orange
Load with Yellow Orange, tip in Leaf Green and tip again in Ivy Green
If desired Sienna Brown may be added to some the red/orange leaves.
Any combinations of colors will work, however be careful with the reds with the greens, this combination can muddy out and turn brownish.
The bottom section of the four acorns are blocked in with a thin coat of Yellow Orange, using the #8 Flat Shader. When applying the color follow the contour of the acorn. Allow to set before proceeding.
Using the #4 Pointed Round block in the tops of acorn’s with two thin coats of Sienna Brown. The single acorn cap should be painted in as well.
Reload #8 Flat Shader with the Yellow Orange and corner load on the same corner of the brush with Poppy Orange and Passion Red. Working with the flat of the brush shade the two darker colors under the Sienna Brown cap and down the left side of each acorn bottom section. Rinse the brush.
Corner load with #8 Flat Shader with Chartreuse and float the color down the right side of acorn’s bottom section.
Corner load the #8 Flat Shader with French Brown and float in shading to the top edge of the all the caps and to the middle section of the cap only to the right of the design.
Thin down the French Brown slightly, with the #10/0 Liner fully loaded begin to detail the entire design.
Outline and vein the leaves
Outline the acorns and add the cross-hatching to the top of the caps.
Pull in the stems
Sign the piece.
Place the pie plate on the turntable and center it.
Thin down Poppy Orange slightly and dampen the 1” foam brush with water.
Fully load one side of the foam brush with the thinned Poppy Orange. Proceed to band the edge of the pie plate with the loaded foam brush. Several passes will be needed, since the foam brush has a tendency to remove damp color.
Using an old tooth brush with French Brown spatter the entire inside of pie plate.
Place ware on a kiln washed kiln shelf and fire to cone 6.
Begin with properly fired shelf cone 04 bisque. Moisten a clean sponge and wipe bisque to remove any dust.
Using an AB-708 #10 Shader, apply AC-523 Non-Fired Snow around the edge of both gnomes’ hats creating a textured edge to the hats. Allow to dry!
Using a Basecoat Brush, basecoat the hats including the fur trim, dress and shirt of the gnomes with OS435 Dark Yellow. Allow to dry!
Measure ½” stripes on the boy gnome’s shirt and the girl gnome’s hat. You can use either a ruler to measure or ½” masking tape.
Referring to the photo. Using an AB-708 #10 Shader, shade every other stripe with SS-254 Golden Ochre on the boy gnome’s shirt and the girl gnome’s hat. Also, you want to shade in all the deep crevices of the dress and shirt and above the fur trim on the boy’s hat.
Using an AB-705 #5 Round, apply SS-254 Golden Ochre under both hats and under the sleaves edge.
Using a DB-802 #5 Round Dry Brush, drybrush the fur trim with OS435 Dark Yellow then highlight it with OS433 Pale Yellow.
Using an AB-702 #10/0 Liner and an AB-705 #5 Round, apply SS-138 Flat Black to all the black stripes on the boy’s shirt and the girl’s dress.
Using an AB-705 #5 Round, basecoat the boy’s beard with OS475 Charcoal and the Girl’s hair with OS567 Ash.
Using a DB-802 #5 Round Dry Brush, drybrush the boy’s beard with OS567 Ash then with SS-130 Light Gray, highlight with SS-135 White.
Using a DB-802 #5 Round Dry Brush, drybrush the girl’s hair with SS-130 Light Gray then highlight with SS-135 White
Using an AB-705 #5 Round, basecoat both noses with SS-192 Light Taupe.
Using an AB-708 #10 Shader, shade the noses with SS-183 Rich Peach.
Add dots to the boy’s hat using the end of a brush handle with SS-138 Flat Black.
Using an AB-705 #5 Round, apply a pressure stroke to create each petal of the flower with SS-130 Medium Gray. This is done to block out the yellow color.
Using an AB-705 #5 Round, apply a pressure stroke to create each petal of the flower with SS-135 White.
Using the end of a brush handle, add a dot of OS435 Dark Yellow to create the flower center. Shade one side of the center with SS-210 Orange.
Using an AB-705 #5 Round, apply a pressure stroke to create the leaves with SS-19 Country Sage then reload the brush with the SS-19 Country Sage then tip into SS-57 Accent Green to shade each leaf.
Using an AB-702 #10/0 Liner, add some vein lines to each petal with SS-130 Medium Gray.
The hair bands on the girl are OS435 Dark Yellow shaded with SS-254 Golden Ochre.
Allow to dry!
Apply 2 coats of SS342 C Matte Spray Sealer to each piece. Allow to dry!
You can add some decorative little bees to each gnome.
Begin with properly fired cone 04 bisque. Moisten a sponge and wipe bisque to remove any dust.
Take the ruler and place it vertically on the outside of the mug. Use the pencil to mark the center point between the top and bottom of the mug. Mark the center point going around the mug. This will help you place the tape in the next step.
Take MC-002 12mm Low Tack Masking Tape and place a continuous piece going around center of the mug. The top edge of the tape should be below your dots, so that you can glaze the upper half of the mug first.
Using the Soft Fan with FN-001 White, apply 3 coats to the top half of the mug. Allow glaze to dry between coats. Remove the tape. Allow glaze to dry.
Take MC-002 12mm Low Tack Masking Tape and place a continuous piece going around center of the mug. The bottom edge of the tape should be lined up with the bottom edge of the area you glazed in Step #4.
Using the Soft Fan with FN-002 Yellow, apply 3 coats of glaze to the bottom half of the mug, handle, bottom and inside. Allow glaze to dry between coats. Remove the tape.
Squeeze around 1 TBS of SG-408 Orange onto the palette. Add a pinch of AC-310 Silkscreen Medium. Mix with a palette knife until it becomes the consistency of peanut butter. You may need to add more silkscreen medium or Designer Liner.
Take DSS-0164 Continuous Swirls Screen and place it going around the bottom of the mug, shiny side down. It is helpful to tape it in place to prevent it from slipping.
While holding the screen firmly in place, scoop a small amount of premixed silkscreen medium onto the squeegee and pull across the screen. Repeat until the entire bottom half of the mug has been screened.
Place the pattern over the top half of the mug. Slide AC-230 Clay Carbon Paper under the pattern. Trace with the pencil.
Outline the pattern on the top half of the mug with FD-254 Black Licorice. Allow glaze to dry.
Using the Script Liner with CG-788 Dutch Enamelware, apply 1 puddle coat to each of the wings.
Using the Script Liner with CG-798 Black Iris, apply 1 puddle coat to the black sections of the bees.
Using the Script Liner with S-2729 Citrus Splash, apply 1 puddle coat to the yellow sections of the bees.
Begin with properly fired cone 04 bisque. Moisten a sponge and wipe bisque to remove any dust.
Using the Soft Fan with FN-001 White, apply 3 coats to the outside of the mug (everything but the handle and inside). Allow glaze to dry between coats.
Using the Soft Fan with FN-002 Yellow, apply 3 coats to the handle and inside of the mug. Allow glaze to dry between coats.
Place the pattern over the outside of the mug. Slide AC-230 Clay Carbon Paper under the pattern. Trace with the pencil. It is helpful to tape the pattern in place.
Use the pencil to make wavy lines going around the bees. These will be the different areas of dots.
Outline the bees with FD-254 Black Licorice. Allow glaze to dry.
Using the Script Liner with CG-788 Dutch Enamelware, apply 1 puddle coat to each of the wings.
Using the Script Liner with CG-798 Black Iris, apply 1 puddle coat to the black sections of the bees.
Using the Script Liner with S-2729 Citrus Splash, apply 1 puddle coat to the yellow sections of the bees.
Using SG-408 Orange, SG-409 Bright Green and SG-410 Bright Blue, make dots in each of the different sections created by your lines from Step #5.
Begin with properly fired cone 04 bisque. Moisten a sponge and wipe bisque to remove any dust.
Use the scissors to cut out the lettering from the pattern.
Using the Soft Fan with FN-001 White, apply 1 coat to the front of the plate.
Use the sponge to wet the back of the lettering, then place in the center of the plate. Press down on the edges with the damp sponge. Using the Soft Fan with FN-001 White, apply 1 coat over the edges of the lettering.
Use the scissors to cut out 10-20 thin strips of paper (1/4” – 1” thick). Cut the paper horizontally, so that the strips are long enough to go across the plate.
Squeeze out around 1 TBS of SC-24 Dandelion, SC-28 Blue Isle and SC-88 Tu Tu Tango onto the palette.
Take 1 strip of paper and glaze the back with one of the glazes from Step #6. Then press the paper (glaze side down) onto the top of the plate. Remove and discard. The paper should be going horizontally across the plate. Repeat, going down the plate.
Remove the “dad” pattern.
Using the Detail Liner with SC-15 Tuxedo, outline “Dad”.
Using the Soft Fan with SC-15 Tuxedo, apply 2 coats to the back of the plate. Allow glaze to dry between coats.
Using the Soft Fan with SG-702 Speckta-Clear Celebration, apply 2 coats to the front of the plate. Allow glaze to dry between coats.
Begin with properly fired cone 04 bisque. Moisten a sponge and wipe bisque to remove any dust.
Place AC-230 Clay Carbon Paper over the front of the plate. Place the pattern on top and trace with the pencil. You can also draw your own Georgia O’Keeffe inspired flower. You just need to choose a flower and draw it “zoomed in” on the center.
Squeeze out around 1 TBS of SC-1 Pink-A-Boo, SC-16 Cotton Tail, SC-24 Dandelion, SC-88 Tu Tu Tango and SC-97 Cant-elope onto the palette.
Using the Script Liner with SC-16 Cotton tail, apply 1 coat to the inner half of 1 petal (choose from the 5 in the foreground). While the glaze is still wet, use the same brush with SC-1 Pink-A-Boo to blend out to the edge of the petal. While the glaze is still wet, use the same brush with SC-88 Tu Tu Tango to blend color into the outer edge of the petal. Repeat for a second coat. Then repeat for all 5 petals.
Using the Script Liner with SC-97 Cant-elope, make small accents of color on the petals. Try to concentrate them on the outer edge and borders of the petals.
Using the Script Liner with SC-88 Tu Tu Tango, apply 1 coat to the inner half of 1 petal (choose from the 5 in the background). While the glaze is still wet, use the same brush with SC-1 Pink-A-Boo to blend out to the edge of the petal. Repeat for a second coat. Then repeat for all 5 petals.
Using the Script Liner with SC-97 Cant-elope, apply 1 coat around the outer edge of the center of the flower. While the glaze is still wet, use the same brush with SC-24 Dandelion to blend to the center. Repeat for a second coat.
Dip the end of your brush handle into SC-16 Cotton Tail. Press onto the center of the flower. Repeat until it’s full of white dots.
Using the Detail Liner with SC-15 Tuxedo, outline the center and petals of the flower.
Using the Script Liner with SC-15 Tuxedo, apple 2 coats to the background on the front of the plate. Allow glaze to dry between coats.
Using the Soft Fan with SC-15 Tuxedo, apply 2 coats to the back of the plate. Allow glaze to dry between coats.
Begin with properly fired cone 04 bisque. Moisten a sponge and wipe bisque to remove any dust.
Using the Soft Fan with FN-009 Black, apply 2 coats to the front of the plate. Allow glaze to dry between coats.
After the glaze is dry, place AC-230 Clay Carbon Paper over the front of the plate. Place the pattern on top and trace with the pencil.
Using the Detail Liner with AC-302 Wax Resist, trace over the pattern on the front of the plate. Make a line going around the rim of the plate.
Using the Script Liner with EL-142 Grass, apply 2 coats to the center of the flower. Allow glaze to dry between coats. Apply a 3rd coat just to the center portion (the inner area ¼” from the edge of the area you just glazed).
Using the Script Liner with EL-127 Rose Granite, apply 2 coats to the row of small petals. Allow glaze to dry between coats. Apply a 3rd coat just to the center portion (the inner area ¼” from the edge of the area you just glazed).
Using the Script Liner with EL-128 Wheat apply 2 coats to the large petals. Allow glaze to dry between coats. Apply a 3rd coat just to the center portion (the inner area ¼” from the edge of the area you just glazed).
Using the Script Liner with EL-130 Sea Green, apply 2 coats to the background. Allow glaze to dry between coats. Apply a 3rd coat just to the center portion (the inner area ¼” from the edge of the area you just glazed).
Using the Soft Fan with FN-009 Black, apply 3 coats to the back of the plate. Allow glaze to dry between coats.
Begin with properly fired cone 04 bisque. Moisten a sponge and wipe bisque to remove any dust.
Using the Soft Fan with FN-009 Black, apply 2 coats to the front of the plate. Allow glaze to dry between coats.
After the glaze is dry, place AC-230 Clay Carbon Paper over the front of the plate. Place the pattern on top and trace with the pencil. You can also draw your own Frida portrait with the pencil.
Using the Detail Liner with AC-302 Wax Resist, trace over the pattern on the front of the plate. Make a line going around the rim of the plate.
Using the Script Liner with EL-110 Mudslide, apply 2 coats to the skin. Allow glaze to dry between coats. Apply a 3rd coat just to the center portion (the inner area ¼” from the edge of the area you just glazed).
Using the Script Liner with EL-101 Oyster Shell, apply 2 coats to the jewelry, eyes and flower petals (center and right flower). Allow glaze to dry between coats. Apply a 3rd coat just to the center portion (the inner area ¼” from the edge of the area you just glazed). Apply a dot to the center of the 2 flowers on the left and the 3 small ones on the right.
Using the Script Liner with EL-128 Wheat apply 2 coats to outer portion of the 2 flowers on the left. Allow glaze to dry between coats. Apply a 3rd coat just to the center portion (the inner area ¼” from the edge of the area you just glazed). Apply a dot to the center of the flower in the center on the right.
Using the Script Liner with EL-127 Rose Granite, apply 2 coats to the lips and the inner portion of the 2 flowers on the left. Allow glaze to dry between coats. Apply a 3rd coat just to the center portion (the inner area ¼” from the edge of the area you just glazed).
Using the Script Liner with EL-148 Smoked Lilac, apply 2 coats to the 3 small flowers on the right. Allow glaze to dry between coats. Apply a 3rd coat just to the center portion (the inner area ¼” from the edge of the area you just glazed).
Using the Script Liner with EL-130 Sea Green, apply 2 coats to the background. Allow glaze to dry between coats. Apply a 3rd coat just to the center portion (the inner area ¼” from the edge of the area you just glazed).
Using the Soft Fan with FN-009 Black, apply 3 coats to the back of the plate. Allow glaze to dry between coats.
Apply 3 coats of CC-108 China Sea to the top 2/3 of vase.
Apply 3 coats of CC-102 White to the bottom 1/3 of vase.
Heat kiln to 1850F.
At 1850F carefully remove piece from kiln with metal tongs, and place into trash can with combustibles. Quickly place lid over can, causing reduction to occur.
Allow the combustion chamber to cool. Remove the pot and wipe carbon residue off with clean cloth.
Vase #2
Begin with properly fired bisque.
Apply 2 coats of RK-106 Peacock Matte.
Apply a third coat to the neck of the vase. This will result in a rougher textured finish.
Heat kiln to 1850F.
At 1850F carefully remove piece from kiln with metal tongs, and place into trash can with combustibles. Quickly place lid over can, causing reduction to occur.
Allow the combustion chamber to cool. Remove the pot and wipe carbon residue off with clean cloth.
Vase #3
Begin with properly fired bisque.
Apply 3 coats of RK-100 Black.
Heat kiln to 1850F.
At 1850F carefully remove piece from kiln with metal tongs, and place into trash can with combustibles. Quickly place lid over can, causing reduction to occur.
Allow the combustion chamber to cool. Remove the pot and wipe carbon residue off with clean cloth.
Vase #4
Begin with properly fired bique.
Apply 3 coats of RK-105 Copper Penny
Heat kiln to 1850F.
At 1850F carefully remove piece from kiln with metal tongs, and place into trash can with combustibles. Quickly place lid over can, causing reduction to occur.
Allow the combustion chamber to cool. Remove the pot and wipe carbon residue off with clean cloth.
Begin with properly fired cone 04 bisque. Moisten a sponge and wipe bisque to remove any dust.
Using the Soft Fan with FN-001 White, apply 1 coat to the front of the plate.
Use the scissors to cut out the rooster pattern. Place the pattern on the front of the plate and trace around the pattern with the pencil. Then trace over the inner portions of the pattern (you should be able to see an indent in the glaze). Keep the pattern on the plate for the next step.
Squeeze around 1 TBS of SC-92 Café Ole onto the palette. Place ST-133 Wood Grain Stamp textured-side up on a flat surface. Use the sponge on a stick to sponge the glaze onto the stamp (stamp the palette to remove any excess glaze). Gently press the stamp (vertically) onto the plate. Repeat, going across the plate. Use one hand to hold the rooster pattern down. This will keep the stamping off of the area where the rooster will be.
Remove the caps from the bottles of SC-9 Jaded, SC-10 Teal Next Time, SC-24 Dandelion, SC-74 Hot Tamale and SC-75 Orange-A-Peel. Screw on an AC-224 Plastic Detailer Cap to each bottle.
Take the bottles of SC-24 Dandelion, SC-75 Orange-A-Peel and SC-74 Hot Tamale and make dots on the rooster’s body (in that order from top to bottom). Dots should be around ¼” to ½” apart. Quickly, take your finger and smear each dot in a small, downward stroke. Start at the top and work down.
Take the bottles of SC-10 Teal Next Time, SC-9 Jaded and SC-24 Dandelion and make dots on the rooster’s tail (in that order from bottom to top). Dots should be around ¼” to ½” apart. Quickly, take your finger and smear each dot in a long, upward stroke (to look like long tail feathers).
Take the bottle of SC-10 Teal Next Time and make a few dots at the top of the rooster’s legs, going toward the tail. Dots should be around ¼” to ½” apart. Quickly, take your finger and smear each dot in a small, downward stroke.
Replace the Detailer Caps with the original caps.
Using the Script Liner with SC-24 Dandelion, apply 2 coats to the beak and legs. Allow glaze to dry between coats.
Using the Script Liner with SC-74 Hot Tamale, apply 2 coats to the comb and wattle. Allow glaze to dry between coats.
Using the Detail Liner with SC-15 Tuxedo, outline the rooster and add dots around the eye.
Using the Soft Fan with SC-15 Tuxedo, apply 2 coats to the back and rim of the plate. Allow glaze to dry between coats.
Begin with properly fired cone 04 bisque. Moisten a sponge and wipe bisque to remove any dust.
Using the Soft Fan with SP-215 Speckled Tuxedo, apply 2 coats to the outside of the tumbler. Allow glaze to dry between coats.
Squeeze around 1 TBS of SC-16 Cotton Tail onto the palette. Place ST-366 Fruit Blossoms Stamp textured-side up on a flat surface. Use the sponge on a stick to sponge the glaze onto the stamp (stamp the palette to remove any excess glaze). Gently press the stamp (vertically) onto the tumbler. Repeat, going around the tumbler.
Using the Soft Fan with EL-103 Sea Spray, apply 2 coats to upper half of the tumbler. It looks better if the bottom edge of the section is wavy instead of straight across the tumbler. Apply 3 coats to the inside of the tumbler. Allow glaze to dry between coats.
Using the Soft Fan with EL-103 Sea Spray, apply a third coat to the upper half of the tumbler, but do not go all of the way down to where the 1st and 2nd coats ended. Leave at least ½”. This should be a very thick, drippy coat.
Begin with properly fired cone 04 bisque. Moisten a sponge and wipe bisque to remove any dust.
On the DSS-0166 Tropical Leaves screen, locate the 3 monstera leaves. Draw an outline around them in permanent marker. Cut them out with excess screen around the edges.
Using the Soft Fan with FN-001 White, apply 2 coats to the outside of the mug. Allow glaze to dry between coats.
Squeeze around 2 TBS of SC-28 Blue Isle, SC-36 Irish Luck and SC-97 Cant-elope onto the palette. Add a pinch of AC-310 Silkscreen Medium to each glaze. Mix with a palette knife until they become the consistency of peanut butter. You may need to add more silkscreen medium or glaze.
Place the large monstera screen shiny-side down on the outside of the mug. While holding the screen firmly in place, take a small amount of premixed silkscreen medium (SC-97), and gently rub in circles starting in the center and working outward. Repeat in different locations on the outside of the mug.
Place the medium monstera screen shiny-side down on the outside of the mug. While holding the screen firmly in place, take a small amount of premixed silkscreen medium (SC-28), and gently rub in circles starting in the center and working outward. Repeat in different locations on the outside of the mug. Be sure to overlap some of the leaves from Step #5.
Place the small monstera screen shiny-side down on the outside of the mug. While holding the screen firmly in place, take a small amount of premixed silkscreen medium (SC-36), and gently rub in circles starting in the center and working outward. Repeat in different locations on the outside of the mug. Be sure to overlap some of the leaves from Steps #5 & #6.
Using the Soft Fan with SC-24 Dandelion, apply 2 coats to the inside and rim of the mug. Allow glaze to dry between coats.
Using the Soft Fan with S-2714 Herb Garden, apply 2 coats to the bottom half of the mug. Allow glaze to dry between coats.
Begin with properly fired shelf cone 04 bisque. Moisten a clean sponge and wipe bisque to remove any dust.
Divide the tile in to 3 uneven sections using a pencil.
Using a CB-604 #4 Soft Fan, apply 2-3 heavy coats of CC-108 China Sea to the smallest section of the divided tile.
Using a CB-604 #4 Soft Fan, apply 2 coats of EL-110 Mudslide to one section of the tile overlapping onto the CC-108 China Sea.
Using a CB-604 #4 Soft Fan, apply 2 coats of EL-209 Night Sky to the remaining section of the tile overlapping the other two colors.
Using a CB-604 #4 Soft Fan, plop 1 generous coat of PC-601 Clear Cascade over areas where each of the colors meet, leaving some space open between the plops. Without washing the brush plop some PC-602 White Cascade in between the spots left open and some here and there on the EL-209 Night Sky and the EL-110 Mudslide. Note: If you put to much of the Cascades onto the piece you can add more of the EL-209 Night Sky over that area and EL-110 Mudslide over that area.
Using a CB-110 #10/0 Liner, apply veins of SC-15 Tuxedo. Allow to dry!
Begin with properly fired shelf cone 04 bisque. Moisten a clean sponge and wipe bisque to remove any dust.
With a pencil, sketch on the Frog pattern, a foam plate was used to create the 3 different shapes of the frogs and a penny to create the eyes.
Place some SC-6 Sunkissed onto a plate. Using your finer tip apply 2 coats to the eyes to create the iris of the eye. Allow to dry!
Place a small amount of SC-8 Just Froggy onto a palette.
Using a CB-106 #6 Script Liner or a Round Brush, apply 2-3 coats of SC-8 Just Froggy to the middle Frog.
Add some more of the SC-8 Just Froggy to the palette. Add about 12 drops of SC-16 Cotton Tail to the SC-8 Just Froggy and mix well to create a lighter green color.
Using a CB-106 #6 Script Liner or a Round Brush, apply 2-3 coats of the lighter green mix to the frog in the front of the middle frog. Avoid getting any green on the eyes.
Add some more of the SC-8 Just Froggy to the palette in a different spot. Add about 6-8 drops of SC-15 Tuxedo, mix well to create a darker green color.
Using a CB-106 #6 Script Liner or a Round Brush, apply 2-3 coats of the darker green color to the frog in the back of the design.
Place a small amount of SC-15 Tuxedo to the palette.
Using a CB-106 #6 Script Liner or a Round Brush, apply 2-3 coats of the SC- 15 Tuxedo the remaining area of the tile. Add a line of SC-15 Tuxedo to each frog creating a mouth line with a CB-106 #6 Script Liner
Using your small finger, pick up some SC-15 Tuxedo and add a dot to the eyes creating the iris on each frog. With the end of the brush handle, add a small dot of SC-16 Cotton Tail to the eyes for a highlight.
Using a pencil eraser, dip into the SC-8 Just Froggy then add dots to the lightest frog. Add dots of the SC-8 Just Froggy SC-16 Cotton Tail mix to the frog in the back and dots of the SC-8 Just Froggy SC-15 Tuxedo mix to the middle frog. Allow to dry!
Begin with properly fired cone 04 bisque. Moisten a sponge and wipe bisque to remove any dust.
Using the Soft Fan with EL-130 Sea Green or EL-127 Rose Granite, apply 2 coats to the outside of the tumbler. Apply 3 coats to the inside. Allow glaze to dry between coats.
Using the Soft Fan with EL-101 Oyster Shell, apply 2 coats to the outside. Allow glaze to dry between coats.
Using the Script Line with PC-601 Clear Cascade, apply a ½” band going around the outer, top.
Stilt and fire to cone 06.
Knit Mug
Begin with properly fired cone 04 bisque. Moisten a sponge and wipe bisque to remove any dust.
Using the Soft Fan with SC-3 Wine About It, apply 1 coat over the knitted areas on the mug. Allow glaze to dry. Wipe most of the glaze off with a damp sponge, leaving it only in the crevices.
Using the Script Liner with SC-1 Pink-A-Boo, SC-3 Wine About It, SC-13 Grapel and SC-89 Cutie Pie Coral, apply 2 coats to each of the corresponding “stiches” in the patten. Refer to the pattern below. Allow glaze to dry between coats.
Using the Script Liner with SC-1 Pink-A-Boo, apply 2 coats to the border “stitches”. Allow glaze to dry between coats.
Using the Script Liner with SC-3 Wine About It, apply 3 coats to handle and areas above and below the stitching. Allow glaze to dry between coats.
Using the Soft Fan with SC-1 Pink-A-Boo, apply 2 coats to the inside of the mug. Allow glaze to dry between coats.
Dip into NT-CLR Clear One Dipping glaze.
Stilt and fire to cone 06.
Meadow Mug
Begin with properly fired cone 04 bisque. Moisten a sponge and wipe bisque to remove any dust.
Using the Soft Fan with SC-10 Teal Next Time, apply 1 coat over the flowers. Allow glaze to dry. Wipe most of the glaze off with a damp sponge, leaving it only in the crevices.
On the DSS-0113 Bugs screen, locate the small butterflies. Draw an outline around them in permanent marker. Cut them out with excess screen around the edges.
Squeeze around 1 TBS of SC-10 Teal Next Time onto the palette. Add a pinch of AC-310 Silkscreen Medium. Mix with a palette knife until it becomes the consistency of peanut butter. You may need to add more silkscreen medium or glaze.
Place one butterfly on the outside of the mug (shiny-side down). While holding the screen firmly in place, take a small amount of premixed silkscreen medium, and gently rub in circles starting in the center and working outward. Repeat going around mug with the different butterflies.
Using the Script Line with SC-6 Sunkissed, SC-9 Jaded, SC-13 Grapel, SC-89 Cutie Pie Coral and SC-97 Cant-elope apply 2 coats to the flowers and butterflies. Allow glaze to dry between coats.
Using the Soft Fan with SC-1 Pink-A-Boo, apply 2 coats to the inside of the mug. Allow glaze to dry between coats.
Using the Soft Fan with FN-203 Dry Champagne, apply 3 coats to the outside of the mug and 1 coat to the inside. Allow glaze to dry between coats.
Begin with properly fired cone 04 bisque. Moisten a sponge and wipe bisque to remove any dust.
Using the Soft Fan with PC-601 Clear Cascade, apply 1 coat over the flowers on the Meadow Mug. Once the glaze is dry, use a damp sponge to remove most of the glaze, leaving it only in the crevices.
Using the Soft Fan with EL-130 Sea Green, apply 2 coats to the outside of each piece. Apply 3 coats to the inside. Allow glaze to dry between coats.
Using the Soft Fan with EL-101 Oyster Shell, apply 2 coats to the outside of each piece. Allow glaze to dry between coats.
Using the Script Line with PC-601 Clear Cascade, apply a ½” band going around the outer, top of each piece.
Begin with properly fired cone 04 bisque. Moisten a sponge and wipe bisque to remove any dust.
Using the Soft Fan with EL-118 Blue Grotto, apply 2 coats to the outside and bottom of each piece. Apply 3 coats to the inside. Allow glaze to dry between coats.
Using the Soft Fan with EL-101 Oyster Shell, apply 2 coats to the outside of each piece (do not coat the bottom with EL-101 Oyster Shell). Allow glaze to dry between coats.
Using the Script Liner with PC-601 Clear Cascade, apply a ½” band going around the outer, top of each piece.
Begin with properly fired cone 04 bisque. Moisten a sponge and wipe bisque to remove any dust.
Squeeze out around 1 TBS of SC-9 Jaded and SC-43 Lettuce Alone onto the palette.
Dip the Soft Fan into SC-9 Jaded and apply 1 coat to the bottom half of the tumbler. While the glaze is still wet, dip the same brush into SC-43 Lettuce Alone and blend up to the top of the tumbler. Allow glaze to dry.
Use a damp sponge to wipe away most of the glaze, leaving it only in the crevices.
Pour out around 2 TBS of FN-216 Sea Glass and FN-221 Milk Glass White onto the palette.
Dip the Soft Fan into FN-216 Sea Glass and apply 1 coat to the bottom half of the tumbler. While the glaze is still wet, dip the same brush into FN-221 Milk Glass White and blend up to the top of the tumbler. Repeat for a total of 3 coats. Allow glaze to dry between each coat.
Using the Soft Fan with FN-221 Milk Glass White, apply 3 coats to the inside of the tumbler. Allow glaze to dry between coats.
Begin with properly fired cone 04 bisque. Moisten a sponge and wipe bisque to remove any dust.
Using the Soft Fan with SC-12 Moody Blue, apply 1 coat over the flowers. Allow glaze to dry.
Use a damp sponge to wipe away most of the glaze, leaving it only in the divots.
Pour out around 2 TBS of FN-211 Sheer Blue, FN-212 Blue Diamond, and FN-221 Milk Glass White onto the palette.
Dip the Soft Fan into FN-211 Sheer Blue and apply 1 coat to the bottom third of the mug. While the glaze is still wet, dip the same brush into FN-212 Blue Diamond and blend up to the middle third of the mug. While the glaze is still wet, dip the same brush into FN-221 Milk Glass White and blend up to the top of the mug. Repeat for a total of 3 coats. Allow glaze to dry between each coat.
Using the Soft Fan with FN-221 Milk Glass White, apply 3 coats to the inside of the mug. Allow glaze to dry between coats.
Begin with properly fired cone 04 bisque. Moisten a sponge and wipe bisque to remove any dust.
Using the Script Liner with SC-11 Blue Yonder, SC-12 Moody Blue and SC-45 My Blue Heaven, apply 2 coats to each of the “stitches” in the pattern. Allow glaze to dry between coats. Refer to the pattern below for color placement.
Using the Script Liner with SC-12 Moody Blue, apply 2 coats to the “border” stitches around the top, bottom and 2 sides. Allow glaze to dry between coats.
Using the Soft Fan with FN-212 Blue Diamond, apply 1 coat to the outside of the mug.
Using the Soft Fan with FN-211 Sheer Blue, apply 2 coats to the outside of the mug. Allow glaze to dry between coats.
Using the Soft Fan with FN-221 Milk Glass White, apply 3 coats to the inside of the mug. Allow glaze to dry between coats.
Begin with properly fired cone 04 bisque. Moisten a sponge and wipe bisque to remove any dust.
Using the Script Liner with SP-211 Speckled Blue Yonder, SP-212 Speckled Moody Blue and SP-231 Speckled The Blues, apply 2 coats to each of “scoops” on the mug. Alternate between colors so that the same color is not next to itself. Allow glaze to dry between coats.
Take MC-002 12mm Low Tack Masking Tape and wrap it around the foot of the mug to separate the foot from the body.
Using the Script Liner with FN-212 Blue Diamond, apply 3 coats to the outside of the mug. Do not glaze to foot or bottom. Allow glaze to dry between coats.
Remove the tape before the glaze is bone dry.
Using the Soft Fan with FN-221 Milk Glass White, apply 3 coats to the foot, bottom and inside of the mug. Allow glaze to dry between coats.
Begin with properly fired cone 04 bisque. Moisten a sponge and wipe bisque to remove any dust.
Using the Script Liner with SC-7 Leapin’ Lizard, apply 2 coats to the outer portion each arch. Allow glaze to dry between coats.
Using the Script Liner with SC-77 Glo-Worm, apply 2 coats to the inner portion of each arch. Allow glaze to dry between coats.
Take MC-002 12mm Low Tack Masking Tape and wrap it around the foot of the tumbler to separate the foot from the body.
Using the Script Liner with FN-216 Sea Glass, apply 3 coats to the outside of the tumbler. Do not glaze foot or bottom. Allow glaze to dry between coats.
Remove the tape before the glaze is bone dry.
Using the Soft Fan with FN-221 Milk Glass White, apply 3 coats to the foot, bottom and inside of the tumbler. Allow glaze to dry between coats.
Begin with properly fired cone 04 bisque. Moisten a sponge and wipe bisque to remove any dust.
Using the Script Liner with SC-28 Blue Isle, apply 2 coats to the bottom side of the facets. Allow glaze to dry between coats.
Using the Script Liner with SC-9 Jaded, apply 2 coats to the side facing facets. Allow glaze to dry between coats. Leave the tops of the facets unglazed.
Using the Soft Fan with FN-214 Pastel Jade, apply 3 coats to the outside of the tumbler. Allow glaze to dry between coats.
Using the Soft Fan with FN-221 Milk Glass White, apply 3 coats to the inside of the tumbler. Allow glaze to dry between coats.
Begin with properly fired bisque Cone 04 Jolly Tree.
Basecoat with SS-45 Buttermilk 2 coats over the entire tree.
Trace on bee hive (I used tissue paper trace design of hive with pencil then place tissue paper on tree and retrace with sharpie extra fine marker)
Using a sponge lightly pounce around the hive with SS-234 Medium Mocha (see picture for placement). Then apply 3 coats of SS-3 Honey Toast to hive let dry.
Using a shader brush corner load with SS-234 Medium Mocha shade around each section of the hive. Then highlight with SS-135 White on upper section of each row.
Then using a sponge pounce on SS-276 Forest Green around bottom of hive then sponge on SS-57 Accent Green on top leaving some of the Forest Green show through.
Using a stylus, dot on flowers 4 – 5 petals per flower using colors of choice. (Colors used on my tree SS-32Razzberri, SS-28 Hushed Violet, OS483 Real Red, SS-135 White, SS-111 Brightest Yellow) outline in SS-138 Flat Black.
Trace on bees and door on hive using the method from step 3.
Fill in bee bodies with SS-111 Brightest Yellow (will take at least 2 coats)
Fill in wings with SS135 White (will take at least 2 coats)
Shade around the wings with mixture of SS-317 Turquoise and SS-135 White (half and half)
Fill in the door with SS-138 Flat Black.
Put stripes on bees with SS-138 Flat Black.
Using shader brush corner load with SS-111 Brightest Yellow and shade around each wave on tree.
When dry, using the Liner Brush and SS-138 Flat Black make flight dashes on the waves and behind the bees.
Taking the Medium Twist ceramic Christmas tree lights (gold) and Medium Flower ceramic Christmas tree lights (gold) paint the tops of each with 2 coats of SS-111 Bright Yellow. When dry, paint black stripes on the medium twist lights and using SS-234 Medium Mocha paint the center of the flower. Let dry.
Bee
Basecoat body of bee with SS-111 Brightest Yellow, wings are base coated with turquoise and white mixture. When dry apply stripes to bee body and drybrush wings with SS-135 White.
Clean the greenware in the usual manner. Bisque fire to cone 04.
Begin with properly fired shelf cone 04 bisque. Moisten a clean sponge and wipe bisque to remove any dust.
Thin some IN1003 Sunflower in a small cup. Pour the glaze into the back opening of the sunflower. Roll the glaze around and drain out any excess glaze.
Using a CB-604 #4 Soft Fan, apply 1 coat of IN-1673 Espresso to the flower center and to the rib around the center.
Using a damp sponge, wipe back the glaze leaving it in the deep crevices. Allow to dry!
Using a CB-604 #4 Soft Fan, apply 1 coat of IN-1673 Espresso to the flower center and a second coat to the very center. Do not apply any of this glaze to the outer rib area of the center. Allow to dry!
Using a CB-604 #4 Soft Fan, apply 1 coat of IN-1781 Pumpkin Orange to all flower petals on the top side of the sunflower. Allow to dry!
Using a damp sponge, wipe back the glaze leaving it in the deep crevices. Allow to dry!
Using a CB-604 #4 Soft Fan, apply 2 coats of IN-1003 Sun yellow to the top of the flower petal going over the orange glaze. Allow to dry!
Using a CB106 #6 Script Liner, apply 1-2 coats of IN-1781 Pumpkin Orange to the center outer rib of the flower center.
Using a CB-602 #2 Soft Fan, apply 1 coat of IN1781 Pumpkin Orange feathering in the glaze from the outer rib area into the flower. (refer to the color photo)
Using a CB-604 #4 Soft Fan, apply 1 coat of FN-205 to the flower center.
Using a CB-604 #4 Soft Fan, apply 1 coat of FN-201 to the top side of each flower petal. Allow to dry!
Using a CB-604 #4 Soft Fan, apply 3 coats of FN-201 Golden Clear to the back of the Sunflower Bowl. Allow to dry!
Cast the mold in usual manner. If cutting out like shown in photo, you can trace on the pattern, cut out the carrot, then use a small hole tool to cut out the carrot tops.
Allow Greenware to dry. Clean the greenware with a Clean-Up Tool. Bisque fire to cone 04.
Begin with properly fired shelf cone 04 bisque. Moisten a clean sponge and wipe bisque to remove any dust.
Using a Basecoat Brush, basecoat the Bunny’s Body with 1-2 coats of SS-24 Chocolate Fudge.
Using various size Drybrush’s, drybrush the bunny’s body as follows:
SS-234 Medium Mocha followed by OS467 Light Brown.
Highlight with SS-45 Buttermilk then SS-135 White to the tips of the feet, hands, face area, tail and heavier on the muzzle.
Drybrush the inside of the ears and nose with SS-183 Rich Peach with some SS-45 Buttermilk on the brush blending the color to tone down the SS-183 Rich Peach. Highlight the nose with SS-45 Buttermilk.
Using a Basecoat Brush, basecoat the overalls with OS541 Northern Blue.
Drybrush with SS-335 Rich Blue followed by SS-331 Medium Blue. Highlight with OS456 Baby Blue then some SS-135 White.
Using a Basecoat Brush, basecoat the hat with OS571 Curry.
Drybrush with OS435 Gold then with SS-111 Brightest Yellow.
Basecoat the carrot with SS-24 Chocolate Fudge and the carrot tops with SS-57 Accent Green.
Drybrush the carrot with SS-399 Terra Cotta then SS-210 Orange. Highlight with SS-111 Brightest Yellow.
Drybrush the carrot tops with SS-19 Country Sage then Highlight with SS-111 Brightest Yellow.
Using an Angle Shader, float SS-24 Chocolate Fudge in all the deep crevices of the Bunny’s Body.
Using a CB-202 #2 Detail Liner, apply 2 coats of UM953 Bronze to the overall buttons. Apply SS-210 Orange to the button stitching. Allow to dry!
Apply 2 coats of SS-342C Matte Spray Sealer to piece. Allow to dry!!
Using a CB-202 #2 Detail Liner, apply 2 coats of AC-501 Gloss Brush on Sealer to the buttons. Allow to dry!
Moisten a clean sponge and wipe bisque to remove any dust.
Use a soft fan to plop the cascades around the rim of the bowl. Apply about a 1” plop and alternate between the white and clear cascade. Apply a total of 3 coats to each.
Use a fan brush to apply 2 coats of Blue Isle to the outside of the bowl, avoiding the foot. Let dry between coats.
Apply a dot of Blue Isle on top of each plop of cascades.
Use a fan brush to apply 3 coats of Green Tea to the inside of the bowl.
Use a clean sponge to wipe the excess glaze off of the foot.
Fire to cone 5/6. (Sample was fired to cone 6)
Alternative color options below
3 coats PC-601 and PC-602 (plops), 3 coats SW-116 Robin’s Egg, 2 coats SC-45 My Blue Heaven (outside of bowl)
3 coats PC-601 and PC-602 (plops), 3 coats SW-146 Aurora Green, 2 coats SC-39 Army Surplus (outside bowl)
3 coats PC-601 and PC-602 (plops), 3 coats SW-169 Frosted Lemon, 2 coats SC-55 Yella Bout It (outside bowl)
3 coats PC-601 and PC-602 (plops), 3 coats SW-170 Blue Hydrangea, 2 coats SC-65 Peri-Twinkle (outside bowl)
Place around 1 TBS of clay into a small bowl or cup. Add around 1 TBS of water and let it sit. Mash up the clay to make slip. You might need to add more water or clay to make it the right consistency. It should have a similar consistency to gravy.
Cut off 3 pieces of clay: 1 large, 1 medium and 1 small. They should correspond to the size ball you would like for your chicks. Take each piece of clay and roll it into a ball. Then take each ball and firmly hit it against the table to make the bottom flat.
Cut off another piece of clay and roll it out with a rolling pin until it is around 1/8” thick. Use the pencil to draw the combs and wings you would like for your chicks (1 comb & 2 wings for each). Cut them out with the X-ACTO knife.
Take the needle tool and score the bottom edge of the combs, as well as the tops of the chicks, where the combs will be located. Add slip to each scored surface. Press the combs onto the tops. Take a small amount of clay and roll it into the smallest coil that you can. Place the coil around the base of each comb and spread it into the joint using the wood modeling tool.
Take the 2 wings and score the backs, as well as the sides of the chicks, where the wings will be located. Add slip to each scored surface. Press the wings onto the chicks. Take a small amount of clay and roll it into the smallest coil that you can. Place the coil around the wing joints. Use the wood modeling tool to smooth it out. You can position the wings however you would like.
Take a small amount of clay and roll it into a small coil, around ¼” diameter. Take the X-ACTO knife and cut off 3 pieces that will become the beaks. After you cut off each beak, roll one end to make a pointed tip. Use the X-ACTO knife to score the flat end. Then score the face, where the beak will be located. Add slip to each scored surface. Press the beaks on the faces. Take a small amount of clay and roll it into the smallest coil that you can. Place the coil around the base of the beak and spread it into the joint using the wood modeling tool. Take the X-ACTO knife and cut down the center of the beak.
Take the needle tool and make 2 dots above each beak for the eyes.
Place small pieces of damp paper towel over the combs, beaks and wings. This will prevent them from drying faster than the bodies and breaking off.
Once the chicks are firm enough to handle, take the loop tool and hollow out the inside of each chick.
Allow chicks to dry.
Using the Script Liner with SC-6 Sunkissed, apply 2 coats to the body of each chick (do not glaze the bottom). Allow glaze to dry between coats.
Using the Script Liner with SC-74 Hot Tamale, apply 2 coats to the combs of each chick. Allow glaze to dry between coats.
Using the Script Liner with SC-75 Orange-A-Peel, apply 2 coats to the beaks of each chick. Allow glaze to dry between coats.
Using the Detail Liner with SC-15 Tuxedo, make a dot in each eye.
Fire to cone 04.
Variations/Adaptations/Tips&Tricks
After step 10, bisque fire to cone 04 and then glaze and fire to cone 6
Using the Round brush, apply 2 slightly thinned coats of EZ-26 Yellow Orange to alternating openings on the pumpkin, then side load and shade with Poppy Orange.
Using the Round brush, apply 2 slightly thinned coats of EZ-58 Poppy Orange to the remaining openings, and side load and shade with EZ-75 Passion Red.
Using the Round brush, apply 2 slightly thinned coats of EZ-18 Chartreuse to the leaf.
Side load the Round brush in EZ-28 Leaf Green and shade the leaf.
Using the Round brush, apply 2 slightly thinned coats of EZ-11 Sienna Brown to the stem, then side load in EZ-10 French Brown and shade the edges and add ridge lines on the stem.
Using the Round brush, apply 2 slightly thinned coats of EZ-32 Peacock Green to the background.
Using the Liner brush, outline and detail with slightly thinned EZ-37 Black.
Using the Soft Fan brush, apply 2 to 3 coats of FN-9 Black to the back of the plate.
Using the Soft Fan brush, apply 2 coats of S-2102 Crystal Clear Brushing to the front.
Using the Soft Fan, apply 2 to 3 coats of White Gloss to the inside of the mug.
Using the Soft Fan, apply 3 coats of Orange Gloss to the top section of the mug.
Using the Soft Fan, apply 3 coats of Yellow Gloss to the lower section of the mug, excluding the foot area and very bottom.
Using the Script Liner, apply 3 coats of Black Gloss to the handle of the mug.
Using the Clay Carbon Paper, trace on the pattern where desired.
Using the Mini Liner loaded in slightly thinned Black Designer Liner, apply 1 coat to the pattern lines.
Using a damp sponge, remove any color that may have gotten onto the foot area of the mug, as Stoneware gets placed directly on a kiln shelf and is not stilted.
Place on a well kiln washed shelf and fire to shelf cone 6.
Apply 2-3 coats of SW-507 Bright Green Gloss over entire plate. Allow to dry between coats.
Using various sizes of sponges on sticks, apply SW-503 Orange Gloss, SW-505 Purple Gloss, SW-506 Bright Blue Gloss and SW-508 Black Gloss over the plate.
Apply 2 coats of SW-508 Black Gloss over entire plate. Allow to dry between coats.
Liberally spray plate with water bottle.
With overloaded fan brushes, randomly drizzle SW-503 Orange Gloss, SW-505 Purple Gloss, SW-506 Bright Blue Gloss and SW-507 Bright Green Gloss over the plate.
Tilt the plate in all directions, causing colors to run.
Before the glaze dries, with the tip of the brush handle, scratch away the colored glazes revealing the black glaze.
Begin with properly fired cone 04 bisque. Moisten a sponge and wipe bisque to remove any dust.
Use the pencil to draw an oval around the inner edge of the platter. It should separate the platter into two sections (red watermelon and green rind).
Squeeze out 1 TBS of SC-73 Candy Apple Red and 1 TBS of SC-27 Sour Apple onto the palette. Add around ½ TBS of water to each glaze and mix. Use the Soft Fan to apply 1 coat of thinned SC-73 Candy Apple Red to the center section of the platter. Use the Soft Fan to apply 1 coat of thinned SC-27 Sour Apple to the outer section of the platter.
Squeeze out ½ TBS of SC-87 Ruby Slippers and ½ TBS of SC-26 Green Thumb onto the palette. Add ½ TBS of SC-16 Cotton Tail to each of the glazes. Mix. Use the Script Liner to apply large dots to each of the corresponding sections (SC-87 Ruby Slippers + SC-16 Cotton Tail = inner, red section, SC-26 Green Thumb + SC-16 Cotton Tail = outer, green section).
Using the Script Liner with SC-87 Ruby Slippers, irregularly outline each of the dots in the inner, red section. They should resemble leopard print. See guide below.
Using the Script Liner with SC-26 Green Thumb, irregularly outline each of the dots in the outer, green section. They should resemble leopard print. See guide below.
Allow glaze to dry. Take the pattern and place it in the center of the platter. Slide AC-220 Clay Carbon Paper under the pattern. While holding the pattern in place, trace with the pencil.
Using the Detail Liner with SC-15 Tuxedo, apply 1 coat to the lettering.
Slightly thin SC-15 Tuxedo and use the Script Liner to splatter the color onto the plate.
Using the Soft Fan with SC-36 Irish Luck, apply 3 coats to the rim and back of the platter. Allow glaze to dry between coats.
Dip into NT-CLR Clear One Dipping Glaze
Stilt and fire to cone 06.
Watermelon Bowl
Begin with properly fired cone 04 bisque. Moisten a sponge and wipe bisque to remove any dust.
Use the pencil to draw a wavy circle going around the inside, bottom of the bowl. It should separate the bowl into two sections (red watermelon and green rind).
Squeeze out 1 TBS of SC-73 Candy Apple Red and 1 TBS of SC-16 Cotton Tail onto the palette. Mix the glazes together. Use the Soft Fan to apply 1 coat to the bottom section of the bowl. Allow glaze to dry to the touch.
Use the pencil to draw another wavy circle going around the bottom of the bowl, inside the section you just glazed.
Squeeze out 1 TBS of SC-73 Candy Apple Red and ½ TBS of SC-87 Ruby Slippers onto the palette. Mix the glazes together. Use the Script Liner to apply 2 coats to the inside of the new outline. Allow glaze to dry between coats.
Use the pencil to draw another wavy circle going around the bottom of the bowl, inside the section you just glazed. Using the Script Liner with SC-87 Ruby Slippers, apply 3 coats to that section. Allow glaze to dry between coats.
Squeeze out 1 TBS of SC-27 Sour Apple and 1 TBS of SC-16 Cotton Tail onto the palette. Mix the glazes together. Use the Soft Fan to apply 1 coat to the top section of the bowl. Allow glaze to dry to the touch.
Use the pencil to draw another wavy circle going around the top half of the bowl, closer to the red section.
Squeeze out 1 TBS SC-27 Sour Apple and ½ TBS of SC-26 Green Thumb onto the palette. Mix the glazes together. Use the Script Liner to apply 2 coats above the new outline. Allow glaze to dry between coats.
Use the pencil to draw another wavy circle going around the top of the bowl. It should divide the remaining portion of the upper bowl. Using the Script Liner with SC-26 Green Thumb, apply 3 coats to that upper section. Allow glaze to dry between coats.
Slightly thin SC-15 Tuxedo and use the Script Liner to splatter the color onto the plate.
Using the Soft Fan with SC-36 Irish Luck, apply 3 coats to the rim and back of the bowl. Allow glaze to dry between coats.
Begin with properly fired shelf cone 04 bisque. Moisten a clean sponge and wipe bisque to remove any dust.
Using a pencil, make 4 round marks equally distant from each other right underneath the ledge of the pie plate, and three in the bottom of the plate in the shape of a triangle.
Using the drill with the carbide bit, drill out the holes.
Using the CB-604 Soft Fan Brush, apply 3 coats of SW-119 Cinnabar to the outside of the pie plate and the entire inside, leaving the bottom of the plate unglazed. Use a damp sponge to wipe off any glaze that may have gotten onto the bottom. Let dry completely.
Using the pencil, divide the rim of the plate into 24 equal sections. Start by dividing it into 4 quarters, divide those in 2, and divide each resulting section into two again.
Run a piece of MC-001 ¼” masking tape on each mark that extends down the inside of the plate to where the side meets the bottom, and on the outside of the plate to where the notches begin.
Using the CB-604 Soft Fan Brush, apply 3 coats of SW-169 Frosted Lemon to every fourth section that is taped off. Repeat with the SW-168 Coral Sands, SW-166 Norse Blue, and SW-167 Sand and Sea. Each color should be on 6 total sections.
Wait a few minutes until the glaze isn’t shiny and wet, then remove the tape.
Do not stilt or hang over the edge of the kiln shelf.
Fire to cone 5/6.
1Cut two pieces of hanging wire approximately 28” long. Thread one end into one of the 4 holes underneath the plate rim and twist it around the rest of the wire to secure it. Thread the other end into the opposite hole and do the same. Repeat for the other piece of wire.
Wrap small pieces of duct tape around the wrapped ends to prevent fraying.
Fill the feeder with bird seed and hang using both wires. The holes in the bottom will prevent rain from accumulating.
Begin with properly fired shelf cone 04 bisque. Moisten a clean sponge and wipe bisque to remove any dust.
Using the CB-604 Soft Fan Brush, apply 3 coats of SW-510 Blue Gloss to the back sides of the platter and on the front rim, leaving the foot and the bottom unglazed. Use a damp sponge to wipe any glaze off the foot that may have gotten on it.
Using a pencil and the clay carbon paper, trace the pattern onto the platter.
Add some SW-508 Black Gloss to one of the AC-222 Medium Writer Tip Kits. Use it to go over the lines from the pattern.
Using the CB-404 #4 Pointed Round brush, apply 2 coats of each glaze to the dogs, surfboard, and sun, using the pattern as a reference. Use a CB-210 #10/0 Detail Liner to get into any tight spaces. Let dry.
Precondition the CB-404 #4 Pointed Round brush with dish soap. Apply wax resist to the dogs, surfboard and sun. Be careful not to get wax outside the lines onto the unglazed portion of the platter. Rinse the wax off of the brush and clean well with more dish soap.
Precondition the CB-210 #10/0 Detail Liner with dish soap. Apply wax resist to the ‘DAYS OF SUMMER’. Be careful not to go outside the lines. If preferred, you can use an AC-222 writer tip kit filled with wax resist to do this part. Let dry.
Using the CB-604 Soft Fan Brush, apply 3 coats of SW-172 Macadamia to the top 2/3 of the platter.
Using the CB-604 Soft Fan Brush, apply 3 coats of SW-166 Norse Blue to the bottom 2/3 of the platter. The middle third should be 3 coats of Macadamia under 3 coats of Norse Blue.
Do not stilt or hang over the edge of the kiln shelf.
Begin with properly fired shelf cone 04 bisque. Moisten a clean sponge and wipe bisque to remove any dust.
Using the drill with the carbide bit, drill a hole in the bottom of the bowl for drainage.
Using the CB-604 Soft Fan Brush, apply 3 coats of SW-189 Cenote to the inside of the bowl.
Using a pencil and the clay carbon paper, trace the pattern onto the bowl. You can skip the cheeks for now.
Add some SW-508 Black Gloss to one of the AC-222 Medium Writer Tip Kits. Use it to trace the facial features and to fill in the eyebrows and pupils.
Using the CB-604 Soft Fan Brush, apply 3 coats of SW-172 Macadamia to the rest of the outside of the bowl. Use a smaller brush to get into any tight spaces.
Using the CB-404 #4 Pointed Round Brush, apply 2 coats of SW-506 Bright Blue Gloss to the irises of the eyes.
Using the CB-404 #4 Pointed Round Brush, apply 2 coats of SW-504 Red Gloss to the lips.
Use the pencil to draw the circles for the cheeks. Using the CB-404 #4 Pointed Round Brush, apply 2 coats of SW-251 Pink Opal to the circles.
Add some SW-501 White Gloss to the other AC-222 Writer Tip Kit. Use it to fill in the whites of the eyes and add highlights to the pupils, irises and lips.
Dip the back end of a brush into SW-122 Maycoshino and dab it onto the cheeks, nose and forehead to make freckles.
Do not stilt or hang over the edge of the kiln shelf.
After removing the Mushroom from the mold. In the leather stage of the Mushroom, trace on the patterns being careful not to smash the Mushroom. Using the X Eacto Knife, cut out the opening for the door and windows. Using the Sgrafito Tool, carve the outline of the door and windows then scratch in a wood texture to each.
Pour some slip on the flat side of a mold to create a small slab of clay. Using the Kemper Tools – PCSA – Pattern Cutter Set, Flower shape cutter. Cut out 9 flowers and attach to the Mushroom top. Roll some balls of clay to create the flower centers and attach to the flower center with some slip. Cleanup any excess slip with a damp brush. Or you can use Cone 04 Low Fire Clay to press the flowers and centers out of the clay.
Using the pattern, cut out an oval shape for the sign above the door and attach with slip.
Using the round Cutter press into the Mushroom Top creating plain circles.
Allow Greenware to dry! Clean the greenware with a Clean-Up Tool. Bisque fire to cone 04.
Begin with properly fired shelf cone 04 bisque. Moisten a clean sponge and wipe bisque to remove any dust.
Using a CB-106 #6 Script Liner, apply 3 coats of SC-16 Cotton Tail to the flower petals and the pressed circles. Apply 3 coats of SC-24 Dandelion up to the daisy centers. Shade the flower centers with SC-97 Cant-elope. Allow to dry!
Using the Portable Reinforcements – Staples item #636156 (hole protectors) apply one to each of the circles. Make sure all edges a press down firmly.
Using a CB-106 #6 Script Liner and a CB-602 #2 Soft Fan, apply 3 coats of SC-74 Hot Tamale to the mushroom top going around the flower petals and over the circles.
Using a CB-602 #2 Soft Fan, drybrush some SC-48 Camel Back the edge of the Mushroom over the SC-74 Hot Tamale. Remove the Portable Reinforcements – Staples item #636156 (hole protectors) before the glaze dries.
Using a CB-106 #6 Script Liner, apply 1 coat of SC-34 Down To Earth to the door and windows trim. Allow to dry! With a damp sponge wipe back the SC-34 Down to Earth from the door and windows leaving the color in the crevices. Allow to dry!
Using a CB-106 #6 Script Liner, apply 2 coats of SC-25 Crackerjack Brown to the door and window trim. Using a CB-106 #6 Script Liner, apply 2 coats of SC-11 Blue Yonder to the door.
Using a CB-602 #2 Soft Fan, apply 3 coats of SC-54 Vanilla Dip to the under portion of the Mushroom Top and the sign. Shade the under portion of the Mushroom top and the sign with SC-48 Camel Back.
Using a CB-106 #6 Script Liner and a CB-602 #2 Soft Fan, apply 3 coats of SP254 Speckled Vanilla Dip to the Mushroom stem and inside the Toad House.
Using AC-230 Clay Carbon Paper, trace on the words to the sign.
Using a CB-110 #10/0 Liner, apply DSS-401 Black to the words.
Using a CB-604 #4 Soft Fan, drybrush some SC-27 Sour Apple around the bottom of the Mushroom to create grass. Without cleaning the Brush, pick up some SC-8 Just Froggy and go over the SC-27 Sour Apple to give a two tone grass look.
Using a CB-604-4 Soft Fan, apply 1 coat of S-2101 Crystal Clear Brushing Glaze to the outside of the Mushroom. Allow to dry!
Cast the molds in usual manner. After removing the Mushroom from the mold, pour some slip on a mold with a flat surface. While still wet set the Mushroom onto the wet slip and allow to set up. When Mushroom can be removed from the mold trim the excess slip around the edge of the Mushroom. This will create a solid bottom to the piece. Using a small piece o the trimming, roll a small ball to create a door knob.
In the leather stage of the Mushroom, trace on the patterns being careful not to smash the Mushroom. Using the X Eacto Knife, cut out the opening for the Bird House (Do Not Cut out the windows). Using the Sgraffito Tool, carve the outline of the door and windows then scratch in a wood texture to each.
Using the CD778 Flowers and Leaf Press Tool mold, using Cone 04 Low Fire Slip, cast 3 large leaves, 2 small leaves, 3 large daisy and 3 half daisy flowers. Or you can use Cone 04 Low Fire Clay to press the flowers and leaves out of the mold.
Attach the Flowers & Leaves by scoring each piece and the area on the Mushroom they will go. One at a time, apply some slip to the back of the flower & leaves then attach to the Mushroom top. Clean up any slip that has oozed from under with a damp brush. Attach the door knob.
Allow Greenware to dry! Clean the greenware with a Clean-Up Tool. Bisque fire to cone 04.
Begin with properly fired shelf cone 04 bisque. Moisten a clean sponge and wipe bisque to remove any dust.
Thin some S-2101 Crystal Clear Bushing Glaze in a small cup to the consistency of coffee cream. Pour the clear glaze inside the Mushroom and gently roll the glaze around to coat the inside surface, Drain all excess glaze. Allow to dry!
Using a CB-106 #6 Script Liner, apply 3 coats of SC-16 Cotton Tail to the daisy petals and 3 coats of SC-42 Butter Me up to the daisy centers. Shade the flower centers with SC-97 Cant-elope.
Using a CB-106 #6 Script Liner, apply 3 coats of SC-27 Sour Apple to all the leaves. Shade the leaves with SC-8 Just Froggy on the outer edges of the leaves. Using a CB-110 #10/0 Liner, add the vein lines to the leaves with SC-8 Just Froggy.
Using a CB-106 #6 Script Liner, apply 1 coat of SC-34 Down To Earth to the door and windows trim. Allow to dry! With a damp sponge wipe back the SC-34 Down to Earth from the door and windows leaving the color in the crevices. Allow to dry!
Using a CB-106 #6 Script Liner, apply 2 coats of SC-25 Crackerjack Brown to the door and window trim. Using a CB-106 #6 Script Liner, apply 2 coats of SC-88 Tu Tu Tango to the door.
Using a CB-202 #2 Detail Liner, apply 2-3 coats of SC-15 Tuxedo to the window centers and to the door knob.
Using a CB-106 #6 Script Liner, apply 3 coats of SC-24 Dandelion to the Mushroom stem and under the Mushroom top. Shade the crevices under the Mushroom top with SC-88 Tu Tu Tango.
Using a CB-106 #6 Script Liner and a CB-106 #6 Script Liner, apply 3 coats of SP-288 Speckled TuTu Tango to the mushroom top being carful going around the flowers and leaves.
Using a Sponge, sponge the very top and the edge of the Mushroom top with 2 coats of SC-24 Dandelion to give a slight highlight.
Using a CB-604 #4 Soft Fan, drybrush some SC-27 Sour Apple around the bottom of the Mushroom to create grass. Without cleaning the Brush, pick up some SC-8 Just Froggy and go over the SC-27 Sour Apple to give a two tone grass look.
Using a CB-604-4 Soft Fan, apply 1 coat of S-2101 Crystal Clear Brushing Glaze to the outside of the Mushroom. Allow to dry!
Begin with properly fired cone 04 bisque. Moisten a sponge and wipe bisque to remove any dust.
If you do not want to draw your own face, place the pattern over the front of the plate. Slide AC-230 Clay Carbon Paper between the pattern and plate. Trace the pattern with the pencil. Skip to step #7
If you want to draw your own face, take the pencil and draw a profile of a face going down the center of the plate.
On the left side, use the pencil to draw an eyebrow, eye, nostril and mouth as if the person is awake.
On the right side, use the pencil to draw an eyebrow, eye and mouth as if the person is asleep.
Use the pencil to add decorative shapes to both sides of the face.
Using the Soft Fan with SC-6 Sunkissed, apply 2 coats to the left side of the plate. Allow glaze to dry between coats.
Using the Soft Fan with SC-11 Blue Yonder, apply 2 coats to the right side of the plate. Allow glaze to dry between coats.
Using the Script Liner with SC-27 Sour Apple, SC-74 Hot Tamale and SC-75 Orange-A-Peel apply 2 coats to the features on the left side of the face (awake side = energizing colors). Allow glaze to dry between coats.
Using the Script Liner with SC-12 Moody Blue, SC-45 My Blue Heaven and SC-76 Cara-Bein Blue, apply 2 coats to the features on the right side of the face (asleep side = calming colors). Allow glaze to dry between coats.
Using the Detail Liner with SC-15 Tuxedo, outline the details on the face and add any decorative lines and/or dots.
Using the Soft Fan with SC-15 Tuxedo, apply 2 coats to the back of the plate. Allow glaze to dry between coats.
Begin with properly fired cone 04 bisque. Moisten a sponge and wipe bisque to remove any dust.
If you do not want to draw your own shapes, place the pattern over the front of the plate. Slide AC-230 Clay Carbon Paper between the pattern and plate. Trace the pattern with the pencil. Skip to step #4.
If you want to draw your own shapes, use your pencil to draw one large circle (around 4.5” diameter) on the upper center of the plate. Draw 3 smaller circles (around 1.5” diameter) around the larger circle. Draw a wave-like scroll at the bottom of the plate.
Using the Soft Fan with SC-6 Sunkissed, apply 2 coats to the large circle. Allow glaze to dry between coats.
Using the Soft Fan with SC-16 Cotton Tail, apply 1 coat to the small circles and scroll.
Using the Soft Fan with SC-76 Cara-Bein Blue, apply 2 coats to the background. Allow glaze to dry between coats.
The following steps will use a Q-Tip to make the design. You will dip the Q-Tip into the glaze and make a short, quick motion to add a heavy, short line of color. This will mimic Van Gogh’s brush strokes.
Squeeze around 1 TSP of SC-6 Sunkissed, SC-77 Glo-Worm and SC-97 Cant-elope on to the palette. Place 1 Q-Tip in each of the glazes. Use the Q-Tips with SC-6 Sunkissed and SC-97 Cant-elope to make a crescent moon in the large circle. Use the Q-Tip with SC-77 Glo-Worm to add color on the large circle and in the crescent moon.
Squeeze around 1 TBS of SC-12 Moody Blue, SC-76 Cara-Bein Blue and SC-11 Blue Yonder. Place 1 Q-Tip in each of the glazes. Go back and forth between colors to make the background. Try to go in a circular direction around the circles, then extend into the shared space.
Squeeze around 1 TSP of SC-16 Cotton Tail onto the palette. You will also be using the colors from Step #9. Go back and forth between these colors to make the wave-like scroll. Use SC-16 Cotton Tail to really highlight the scroll. Try to follow the scroll shape when making your lines of color.
Use the SC-97 Cant-elope Q-Tip to make a large dot in the center of each of the small circles. Then use the Q-Tips with SC-11 Blue Yonder, SC-16 Cotton Tail, SC-77 Glo-Worm and SC-97 Cant-elope to make lines on the small circles. Try to follow the circular shape and extend out into the background. Use those colors to extend the edge of the large circle into the background.
Draw the “mountains” on the bottom of the plate with the pencil, or cut out the pattern and trace.
Using the Script Liner with SC-15 Tuxedo apply 2 coats to the “mountains”. Allow glaze to dry between coats.
Using the Soft Fan with SC-15 Tuxedo, apply 2 coats to the back of the plate. Allow glaze to dry between coats.
Mix the SG-401 Black Designer Liner with a small amount of Silkscreen Medium until it is the constancy of thin peanut butter.
Using a variety of the leaves, hold the silkscreen shinny side down and rub the designer liner mixture over the silkscreen with your finger, then remove the screen. Continue until the background is complete.
Remove the tape, and add a larger leaf to the center square.
Using the Round, apply 1 slightly thinned coat of the EZ stroke colors as desired, using the Poppy Orange and Passion Red for accenting the tips of the leaf. Most of the leaves use all 3 greens, from lighter in the center to darker to the outside edges.
Using the Designer Liner and metal tip, add the border to the square.
Using the Soft Fan, apply 2 coats of Transparent Matte to the entire plate. Be careful when applying over the silkscreen areas, as excessive brushing can cause the designer liner to soften and smear.
Begin with properly fired cone 04 bisque. Moisten a sponge and wipe bisque to remove any dust.
Using the Soft Fan with FN-001 White, apply 2 coats to the front of the plate. Allow glaze to dry to the touch, but not bone dry.
Place pattern #1 over the plate and trace the 3 “dashed line” monstera leaves with the pencil. Check to make sure you are pressing hard enough to see a line. Remove the pattern.
Cut out the 3 monstera leaves from pattern #2. Place each leaf over the 3 leaves traced on the plate. They should each match up with one of the traced leaves (small, medium and large).
Dip the Soft Fan in water. Lift up each leaf, one at a time, and brush water under the leaf. Place the leaf back down and press with a damp sponge. Make sure to press the edges down.
Using the Soft Fan with FN-001 White, apply 1 coat around the edges of the 3 leaves to keep them securely in place. Allow glaze to dry to the touch.
Using the Soft Fan with FN-002 Yellow, apply 2 coats over the front of the plate. Allow glaze to dry between coats.
Remove the paper monstera leaves before the glaze is bone dry.
Place pattern #1 back over the plate. Try to line up the pattern with the 3 monstera leaves on the plate. Trace with the pencil. Check to make sure you are pressing hard enough to see a line.
Using the Script Liner with FN-043 Bright Jade, apply 2 coats to the two rounded-looking fern leaves. Allow glaze to dry between coats.
Using the Script Liner with FN-0007 Green, apply 2 coats to the 3 pointed-looking fern leaves. Allow glaze to dry between coats.
Using the Script Liner with FN-052 Tangerine, apply 2 coats to the 2 monstera leaves. Allow glaze to dry between coats.
Pour around 1 TSP of FN-001 White onto the palette. Dip the pencil eraser into the glaze and press onto the background. Repeat until you have the desired amount of dots.
Using the Soft Fan with FN-002 Yellow, apply 2 coats to the back of the plate. Allow glaze to dry between coats.
Begin with properly fired cone 04 bisque. Moisten a sponge and wipe bisque to remove any dust.
Using the Soft Fan with FN-001 White, apply 2 coats to the front of the plate. Allow glaze to dry to the touch, but not bone dry.
Place pattern #1 over the plate and trace the 3 “dashed line” monstera leaves with the pencil. Check to make sure you are pressing hard enough to see a line. Remove the pattern.
Cut out the 3 monstera leaves from pattern #2. Place each leaf over the 3 leaves traced on the plate. They should each match up with one of the traced leaves (small, medium and large).
Dip the Soft Fan in water. Lift up each leaf, one at a time, and brush water under the leaf. Place the leaf back down and press with a damp sponge. Make sure to press the edges down.
Using the Soft Fan with FN-001 White, apply 1 coat around the edges of the 3 leaves to keep them securely in place. Allow glaze to dry to the touch.
Using the Soft Fan with FN-032 Canton Jade, apply 2 coats over the front of the plate. Allow glaze to dry between coats.
Remove the paper monstera leaves before the glaze is bone dry.
Place pattern #1 back over the plate. Try to line up the pattern with the 3 monstera leaves on the plate. Trace with the pencil. Check to make sure you are pressing hard enough to see a line.
Using the Script Liner with FN-041 Medium Blue, apply 2 coats to the two rounded-looking fern leaves. Allow glaze to dry between coats.
Using the Script Liner with FN-0007 Green, apply 2 coats to the 3 pointed-looking fern leaves. Allow glaze to dry between coats.
Using the Script Liner with FN-042 Teal Blue, apply 2 coats to the 2 monstera leaves. Allow glaze to dry between coats.
Pour around 1 TSP of FN-001 White onto the palette. Dip the pencil eraser into the glaze and press onto the background. Repeat until you have the desired amount of dots.
Using the Soft Fan with FN-032 Canton Jade, apply 2 coats to the back of the plate. Allow glaze to dry between coats.
Begin with properly fired cone 04 bisque. Moisten a sponge and wipe bisque to remove any dust.
Tear off a piece of plastic wrap. It should be around 12” long. Make sure it is enough to completely cover the bunny.
Place the plastic wrap flat on the table. Take SC-1 Pink-A-Boo, SC-45 My Blue Heaven, SC-55 Yella Bout It and SC-85 Orkid and squirt random lines on the plastic wrap. Cover about half of the entire area.
Fold the plastic wrap in half. Use your fingers to spread out the glaze so that there are no bare spots.
Carefully unfold the plastic wrap and place it (glaze side down) over the top of the bunny. Press all areas of the bunny. Remove the plastic wrap. If there are any bare areas on the bunny, use any leftover glaze that is still on the plastic wrap, then discard.
If you have areas of dripping glaze, tear off a small piece of plastic wrap and press onto the area. This will spread out the glaze.
Dip into NT-CLR Clear Dipping Glaze.
Fire to cone 06.
Polka Dot Bunny
Begin with properly fired cone 04 bisque. Moisten a sponge and wipe bisque to remove any dust.
Using the Soft Fan with SC-55 Yella Bout It, apply 2 coats to the entire bunny. Allow glaze to dry between coats.
Squeeze out around 1 TSP of SC-1 Pink-A-Boo, SC-45 My Blue Heaven and SC-85 Orkid onto the palette. Take the pencil eraser and dip it into one of the glazes, then press onto the bunny. Repeat until you have the desired number of dots for all glazes.
Dip into NT-CLR Clear Dipping Glaze.
Fire to cone 06.
Ombre Crystal Bunny:
Begin with properly fired cone 04 bisque. Moisten a sponge and wipe bisque to remove any dust.
Squeeze out around 1 TBS of SC-1 Pink-A-Boo, SC-55 Yella Bout It and SC-45 My Blue Heaven onto the palette.
Using the Soft Fan with SC-1 Pink-A-Boo, apply 1 coat going around the bottom 1/3 of the bunny.
While the glaze is still wet, dip the same brush into SC-55 Yella Bout It and blend up to the center of the bunny.
While the glaze is still wet, dip the same brush into SC-45 My Blue Heaven and blend up to the top of the bunny.
Mix and shake CG-998 Pink Pixie. Pour out around 1 TBS onto the palette. You will be using this instead of SC-1 Pink-A-Boo for the next steps.
Using the Soft Fan with CG-998 Pink Pixie, apply 1 coat going around the bottom 1/3 of the bunny. Repeat Step #4 & Step #5.
Begin with properly fired cone 04 bisque. Moisten a sponge and wipe bisque to remove any dust.
Using the Soft Fan with EL-127 Rose Granite, EL-128 Wheat, EL-130 Sea Green, and EL-151 Deep Water, apply 2 coats to each bunny. Allow glaze to dry between coats.
Using the Soft Fan with CG-998 Pink Pixie, apply 2 coats to each bunny. Allow glaze to dry between coats.
Begin with properly fired cone 04 bisque. Moisten a sponge and wipe bisque to remove any dust.
Place AC-230 Clay Carbon Paper over the front of the canvas. Place pattern on top and trace with a pencil.
Determine the images that you will be using on DSS-0166 Tropical Leaves screen. On the shiny side, rub over each selected image with a dry erase marker, then wipe off the excess color. Cut out each leaf with the scissors, leaving as much screen around each leaf as possible.
Squeeze about 1 TBS of SC-35 Gray Hare onto the palette. Add a pinch of AC-310 Silkscreen Medium. Mix with a palette knife until it becomes the consistency of peanut butter. You may need to add more silkscreen medium or glaze.
Place a leaf on the canvas, shiny side down. While holding the screen firmly in place, take a small amount of premixed silkscreen medium, and gently rub in circles starting in the center and working outward. Repeat until your canvas is covered in leaves.
Using the Script Liner with SC-1 Pink-A-Boo, SC-9 Jaded, SC-35 Gray Hare, SC-51 Boo Bear and SC-65 Peri-Twinkle, apply 2 coats to the corresponding sections of the canvas. If shapes overlap, complete the bottom shape before starting the top shape. Allow glaze to dry between coats. Refer to the pattern for color placement.
Using the Detail Liner with SC-15 Tuxedo, add decorative lines and dots.
Using the Soft Fan with SC-15 Tuxedo, apply 2 coats to the edges of the canvas. Allow glaze to dry between coats.
Use a moistened BT-910 Synthetic Sponge to wipe down the ware to remove any dust.
Use CB-604 Soft Fan to apply 2-3 Coats of FN-001 to the entire surface. Let dry.
Transfer the design onto the ware using AC-230 Clay Carbon and a Pencil.
Optional step: If you have the small foam stickers you can apply them to the stars in the pattern to act as a stencil. Make sure the edges are firmly adhered to the surface.
Apply 3 coats of SC-74 Hot Tamale using CB-404 or CB-406 Pointed Round to the second, fourth and sixth stripes.
Using CB-404 and CB-406 Pointed Rounds to apply 3 coats of SC-12 Moody Blue to the background field around the stars. If you didn’t use the sticker, be careful applying the color around the stars.
Optional step: After you have applied the last coat of Moody Blue to the background field and the color hasn’t completely dried but is still damp, carefully remove the star stickers. Let dry.
Using CB-604 to apply 1 thin coat of S-2101 Crystal Clear Brushing to the entire plate.
Using a moistened BT-910 Synthetic Sponge to wipe down the Cone 04 Bisque Vase. Check the inside for any debris.
In a Plastic Cup mix FN-009 Black with some water to a melted ice cream consistency. Pour the thinned glaze into the vase. While working quickly, rotate the vase to coat the inside with glaze. Pour out excess glaze and invert to dry. Let dry.
Using a Pencil and AC-230 to transfer the design onto the vase using the Blue Masking Tape to secure the pattern to the vase. Use Scissors to cut the pattern to accommodate the shape of the vase if necessary.
Shake FD-254 Black Licorice. Outline the pattern with FD-254 Black Licorice. It is best to not drag the tip on the bisque surface. Try to keep the tip of the bottle just above the surface while applying the color. If you drag the tip along the bisque, you run the risk of sanding down the tip of the bottle, clogging the tip and creating a split bead to the outlining.
Apply 2-3 coats of the following colors to the noted areas using a brush sized for the area.
SC-10 Teal Next Time; Large branches/stems.
SC-23 Jack O’Lantern; Three top berries.
SC-24 Dandelion; Bird Beak, marking in wing, centers on small sized flowers.
SC-33 Fruit of the Vine; Medium sized flower petals.
SC-50 Orange Ya Happy; Daisy centers, two back (shadowed) berries.
SC-53 Purple Haze; Small flower petals.
SC-97 Cant-elope; Medium flower centers.
S-2101 Crystal Clear Brushing; Daisy petals, top portion of small leaves around small flowers.
S-2711 Tahiti Grape; One coat with crystals to bird excluding wing marking.
CG-717 Pistachio; One coat over top clear glazed portion on small leaves, two coats to bottom portions of small leaves.
CG-716 Pagoda Green; Top half of large leaves around branches fading out over lower half of leaf.
CG-780 Mystic Jade; Bottom portion of large leaves around branches overlapping slightly the CG-716 in leaves.
S-212 Blue Diamond; Over S-2711 portion of the bird.
EL-125 Sahara Sands; Apply 2 medium coats to background around pattern and back of vase.
Stilt and Fire to Shelf Cone 06 with a 5 to10 minute hold.
To the well cleaned greenware, use BT-910 Synthetic Sponge to wipe down the ware to remove any dust.
Apply 3 coats of UG-57 Spice Brown using CB-604 Soft Fan to the top and bottom portions of the pedestal trim. Let dry.
Using a Pencil to divide the top and bottom portions into four parts. Sketch in some lines to mimic the wood grain texture and four ¼” circles to each section near the dividing lines. When creating the wood grain texture, vary the line and width of the lines to better simulate the wood grain. You can create some “knots” in the wood grain too.
Shade on each side of the dividing lines using CB-406 Pointed Round tipped in UG-213 Cinnamon two times. Shade the outside edges of the ¼” circles.
Paint in the lines of the wood grain using AB-704 Round and CB-110 Liner loaded with two coats of UG-31 Chocolate. The lines do not need to be even. They are best when painted with irregular and varying widths of lines. When painting the second coat of Chocolate, its better if you aren’t exact as the overlaps will be darker after firing giving the appearance of subtle shading to the lines. Outline the ¼” circles with 2 coats of Chocolate.
On a tile, place some SG-404 Blue Designer Liner. Sprinkle on some AC-310 Silkscreen Medium. Use a Pallet Knife to mix the color and Medium. Keep adding and mixing Silkscreen Medium until you get the texture of peanut butter. Make sure the color is well mixed.
Use the different shell shapes from the two Silkscreens to create and evenly spaced pattern. It is best if you cut out the individual screens for ease of use. (Note: You can use an Erasable Marker on the shiny side of the Silkscreens to amplify the image for ease of use and wiping off excess color with a paper towel.) Place and hold down the Silkscreen with the shiny side next to the ware. Using your index finger to apply the thickened SG-404 Blue to the Silkscreen in a circular motion starting from the center and working towards the outside edge. Lift the Silkscreen immediately after applying the color. Wash the Silkscreen with cool water after use.
Fire the ware to Shelf Cone 04.
Using CB-604 Soft Fan to spatter the middle section of the pedestal with thinned SG-404 Blue Designer Liner and UG-31 Chocolate. Wipe off any errant spots of color from the top and bottom sections of the pedestal.
To the shells, apply two coats of S-2101 Crystal Clear Brushing using CB-406 Pointed Round. Try not to get any glaze on the background areas.
Apply 2 coats of EL-103 Sea Spray to the background areas around the seashells in the middle section using a brush sized for the area. Apply a third coat of Sea Spray to the entire middle section including over the seashells.
Apply 3 even coats of C-300 Transparent Matte to the top and bottom sections of the pedestal using CB-604 Soft Fan.
Stilt and Fire the ware to Shelf Cone 05-06 with a 5 to 10minute hold.
Begin with a properly fired terra cotta flower pot. Moisten a sponge and wipe pot to remove any dust.
Using the Soft Fan with FN-001 White, apply 3 coats to the outside of the pot. Allow glaze to dry between coats.
Choose 1-3 monstera leaves from the pattern, selecting the sizes that will work best with your pot. Cut out each leaf then trace around the patterns onto the pot with the pencil. You can either cut out the holes in the leaves to trace or draw the leaf holes directly onto the pot. NOTE: If your glaze is slightly damp, tracing the pattern can create an indent to follow instead of an outline. If you prefer to trace the pattern on dry glaze, use AC-230 Clay Carbon Paper to trace each leaf.
Use the pencil to draw 5-10 random, circular shapes around the pot. Be sure to have some shapes overlapping.
Using the Script Liner with SC-2 Melon-Choly, SC-20 Cashew Later, and SC-65 Peri-Twinkle, apply 2 coats to desired shapes. Allow glaze to dry between coats and colors (if overlapping).
Using the Script Liner with SC-35 Gray Hare, apply 2 coats to the leaves. Allow glaze to dry between coats.
Using the Script Liner with CG-998 Pink Pixie, apply 2 coats to the desired shapes.
Use FN-254 Black Licorice, make decorative lines, flowers, leaves, or dots on the pot.
Begin with properly fired cone 04 bisque. Moisten a sponge and wipe bisque to remove any dust.
Use scissors to cut out the partial circle with “shine” on it from the pattern. Place it on the bottom of the plate and trace around the circle with the pencil. Remove the pattern.
Take MC-002 12mm Low Track Masking Tape and place one strip going from the top of the circle to the upper edge of the plate to create sections for each ray. Continue to do this down the left and right sides from the center. You can space the tape evenly or randomly, depending on if you want the rays to be the same or different sizes.
Take MC-002 12mm Low Track Masking Tape and place small pieces going around the edge of the circle. This will make a bottom border for each ray. Or draw a line around the pattern 1/2” higher for the border.
Using the Script Liner with SC-97 Cant-elope, SC-42 Butter Me Up, SC-5 Tiger Tail, and SC-1 Pink-A-Boo, apply 2 coats to each of the rays. Try not to have the same color on consecutive rays. Allow glaze to try between coats. Remove the tape before the glaze is completely dry.
Using the Soft Fan with SC-97 Cant-elope, apply 2 coats to the circle of the sun. Allow glaze to dry between coats.
Squeeze around 1 TBS of SC-50 Orange Ya Happy, SC-24 Dandelion, SC-25 Crackerjack Brown, and SC-95 Pinkie Swear onto the palette. Use the sharp end of the pencil or end of a paint brush to make small dots on the bottom half of each of the rays. Use the eraser to make larger dots towards the top half of the rays. You can also make a line of dots around the edge of the sun. Below is a chart of the colors as shown.
Base Color
Dot Color
SC-97 Cant-elope
SC-50 Orange Ya Happy
SC-42 Butter Me Up
SC-24 Dandelion
SC-5 Tiger Tail
SC-25 Crackerjack Brown
SC-1 Pink-A-Boo
SC-95 Pinkie Swear
Place the pattern back over the sun. Trace “Shine” with a pencil. Press hard enough so that you can see an indent. If your glaze is bone dry, you can also use AC-230 Clay Carbon Paper to trace the patter. There are also patterns for “Bright” and “Happy”, if you would rather use those words.
Using the Detail Liner with SC-15 Tuxedo, outline the lettering. Add lines, dots or dashes between the rays. Allow glaze to dry to the touch.
Pour out around 2 TBS of FN-203 Dry Champagne and FN-207 Orange Slice onto the palette. Using the Soft Fan with FN-207 Orange Slice, apply 1 coat over the sun, extending outward around 2 inches. Dip the same brush into FN-203 Dry Champagne and blend with the edge. Continue to the top of the plate. Repeat for a second coat.
Using the Soft Fan with SC-15 Tuxedo or FN-, apply 2 coats to the back of the plate. Allow glaze to dry between coats.
Begin with properly fired cone 04 bisque. Moisten a sponge and wipe bisque to remove any dust.
Using the Soft Fan with EL-101 Oyster Shell, apply 2 coats to the inside of the bowl. Brush the glaze horizontally following the shape of the bowl. Allow glaze to dry between coats.
Using the Soft Fan with EL-150 Fern, apply 1 coat to the inside of the bowl over the Oyster Shell. Brush the glaze horizontally, following the shape of the bowl.
Take the three AC-220 Detailer Tips and 1 oz Bottles and cut the ends off of the tips. Fill the first bottle with PC-602 White Cascade. Fill the second bottle with PC-601 Clear Cascade. Fill the third bottle with SC-77 Glo-Worm. Screw the tips back on the bottles.
Use the bottle with PC-602 White Cascade to make a scalloped line going around the inner edge of the bowl. It should be around 1/4 inch down from the edge. The points should be facing up, like below:
Use the bottle with PC-601 Clear Cascade to make a large dot between each of the points on the upper side of the scalloped line. As you make each dot, spread it out into a solid, circle shape. They should be at least 1/4 inch in diameter.
Use the bottle with SC-77 Glo-Worm to make a large dot in the center of each circle from the previous step.
Using the Soft Fan with EL-150 Fern, apply 1 coat to the inside of the bowl. Brush the glaze horizontally around the bowl. After you finish your coat, dip the brush into the glaze and apply thick, horizontal lines of glaze with the side of the brush. Only do that towards the top of the bowl. This will create more color variation.
Using the Soft Fan with EL-101 Oyster Shell, apply 2 coats to the outside of the bowl. Brush the glaze horizontally following the shape of the bowl. Allow glaze to dry between coats.
Using the Soft Fan with EL-150 Fern, apply 1 coat to the outside of the bowl, but not the bottom. Brush the glaze horizontally around the bowl. After you finish your coat, dip the brush in the glaze and apply thick, horizontal lines of glaze with the side of the brush. Only do that towards the top of the bowl. This will create more color variation.
Allow glaze to dry.
Stilt and fire to cone 06.
Form
MB-105 Rice Bowl
Colors
EL-101 Oyster Shell
EL-150 Fern
PC-601 Clear Cascade
PC-602 White Cascade
SC-77 Glo-Worm
Alternative options: EL-151 Deep Water with SC-70 Pink-A-Dot
Alternative options: EL-129 Slate with SC-96 Aqu-ward
Begin with properly fired cone 04 bisque. Moisten a sponge and wipe bisque to remove any dust.
Use the scissors to cut out the hexagon pattern. Place the pattern onto the center of the plate and trace. Save the pattern.
Using the Soft Fan with FN-001 White, apply 3 coats to the hexagon area, extending slightly beyond the edge of the outline.
Once the third coat is dry, wet the paper pattern and place on top of the glazed area. Press the pattern down so that the edges are sealed. Use the sponge to remove glaze that extends outside of the pattern. Gently dab the sponge over the edges of the pattern to make sure they are down.
Using the Soft Fan with FN-048 Bright Pink, apply 3 coats to the front of the plate. Allow glaze to dry between coats. Be sure to brush away from the paper so the glaze does not seep underneath.
Remove the hexagon pattern before the last coat of Bright Pink dries.
Squeeze about 2 TBS of SC-16 Cotton Tail onto the palette. Add a pinch of AC-310 Silkscreen Medium. Mix with a palette knife until it becomes the consistency of peanut butter. You may need to add more silkscreen medium or glaze.
After the plate is dry to the touch, place the screen over the plate, shiny side down.
While holding the screen firmly in place, take a small amount of premixed silkscreen medium, and gently rub in circles starting in the center and working outward. You can also use a squeegee. Remove the screen.
Place the bee pattern in the center of the plate. Trace with a pencil. You should be able to see the outlines in the glaze. If your glaze is bone dry, you can use AC-230 Clay Carbon Paper to trace the pattern.
Using the Script Liner with SC-16 Cotton Tail, apply 1 coat to all of the flowers and leaves.
Using the Script Liner with SC-24 Dandelion, apply 2 coats to the bee. Allow glaze to dry between coats.
Using the Script Liner with SC-45 My Blue Heaven, apply 2 coats to the wings. Allow glaze to dry between coats.
Using the Script Liner with SC-89 Cutie Pie Coral, apply 2 coats to the 2 flowers on the left. Allow glaze to dry between coats.
Using the Script Liner with SC-16 Cotton Tail, apply 2 coats to the flower on the bottom. Allow glaze to dry between coats.
Using the Script Liner with SC-24 Dandelion, apply 2 coats to the flower on the right. Allow glaze to dry between coats.
Using the Script Liner with SC-24 Dandelion and SC-89 Cutie Pie Coral, apply a dot of the center of the flowers.
Using the Script Liner with SC-9 Jaded, apply 2 coats to the leaves. Allow glaze to dry between coats.
Squeeze around 1 TSP SC-89 Cutie Pie Coral onto the palette. Dip the sponge in the glaze and sponge the palette a few times to remove the excess glaze. Sponge the cheeks on the bee.
Using the Detail Liner with SC-15 Tuxedo, outline the design, add stripes to the bee, and add lines going around the border.
Using the Soft Fan with FN-048 Bright Pink, apply 3 coats to the back of the plate.
Begin with properly fired cone 04 bisque. Moisten a sponge and wipe bisque to remove any dust.
Using the Soft Fan with FN-009 Black, apply 2 coats to the front of the plate. Allow glaze to dry between coats.
After the glaze is dry, place AC-230 Clay Carbon Paper over the front of the plate. Place the pattern on top and trace with the pencil.
Using the Detail Liner with AC-302 Wax Resist, trace over the pattern on the front of the plate. Make a line going around the rim of the plate.
Using the Script Liner with EL-128 Wheat, apply 2 coats to the top portion of each “drop”. Allow glaze to dry between coats. Apply a 3rd coat just to the center portion (area ¼” from the edge line).
Using the Script Liner with EL-129 Slate, apply 2 coats to the middle portion of each “drop”. Allow glaze to dry between coats. Apply a 3rd coat just to the center portion (area ¼” from the edge line).
Using the Script Liner with SC-11 Blue Yonder, apply a drop coat to the bottom portion of each “drop”
Using the Soft Fan with FN-009 Black, apply 2-3 coats to the back of the plate. Allow glaze to dry between coats.
Begin with properly fired cone 04 bisque. Moisten a sponge and wipe bisque to remove any dust.
Using a Basecoat Brush, apply 1 coat of SS-138 Flat Black to the bee. Allow to dry completely.
Shake and stir MM-105 Gold Metallic.
Using a Basecoat Brush, apply 1 coat of MM-105 Gold Metallic to the bee. Allow to dry completely.
Take MM-202 Green Patina and remove cap. Add MM-600 Spritzer Cap to the bottle.
Using a Basecoat Brush, apply a 2nd coat of MM-105 Gold Metallic to the bee.
While paint is still wet, spray with MM-202 Green Patina. Wait an hour or longer.
Once you have the desired amount of patina, use the Basecoat Brush and apply 1 coat of AC-502 Matte Brush-On Sealer to the bee. This will stop the patina process and seal the piece. Allow to dry completely.
Use the pencil to draw a few flowers and leaves on the bee’s belly.
Using a small Acrylic Brush with SS-111 Brightest Yellow, apply 2 coats to the flowers. Allow paint to dry between coats.
11. Using a small Acrylic Brush with SS-376 Limeburst, apply 2 coats to the leaves. Allow paint to dry between coats.
Using a small Acrylic Brush with SS-317 Turquoise, apply a dot to the center of each flower.
Using an Acrylic Detail Brush with SS-138 Flat Black, outline the flowers and leaves.
Using a small Acrylic Brush with AC-501 Gloss Brush-On Sealer, apply 1 coat over the flowers and leaves.
Fox
Begin with properly fired cone 04 bisque. Moisten a sponge and wipe bisque to remove any dust.
Using a Basecoat Brush, apply 1 coat of SS-138 Flat Black to the fox. Allow to dry completely.
Shake and stir MM-102 Copper Metallic.
Using a Basecoat Brush, apply 1 coat of MM-102 Copper Metallic to the fox. Allow to dry completely. Apply a 2nd coat to the inner ears, muzzle, chest and tip of the tail. Allow to dry completely.
Take MM-202 Green Patina and remove cap. Add MM-600 Spritzer Cap to the bottle.
Using an Acrylic Brush with AC-501 Gloss Brush-On Sealer, apply 1 coat to the inner ears, muzzle, chest and tip of the tail. Allow to dry.
Using an Acrylic Brush with MM-102 Copper Metallic, apply 1 coat to all other areas of the fox.
While paint is still wet, spray with MM-202 Green Patina. Wait an hour or longer.
Use a damp paper towel to wipe off any patina on the inner ears, muzzle, chest and tip of the tail.
Once you have the desired amount of patina, use the Basecoat Brush and apply 1 coat of AC-502 Matte Brush-On Sealer to those areas. This will stop the patina process and seal the piece.
Using a small Acrylic Brush with SS-211 Orange Rust, apply 1 coat to the inside of the ears and make decorative lines on the muzzle, chest and tip of the tail. Allow to dry.
Using a Basecoat Brush with AC-501 Gloss Brush-On Sealer, apply 1 coat to the inside of the ears, muzzle, chest and tip of the tail.
Fish
Begin with properly fired cone 04 bisque. Moisten a sponge and wipe bisque to remove any dust.
Using a Basecoat Brush, apply 1 coat of SS-138 Flat Black to the fish. Allow to dry completely.
Shake and stir MM-103 Dark Bronze Metallic.
Using a Basecoat Brush, apply 1 coat of MM-103 Dark Bronze Metallic to the fish. Allow to dry completely.
Take MM-202 Green Patina and remove cap. Add MM-600 Spritzer Cap to the bottle.
Squeeze around 1 TBS of MM-103 Dark Bronze Metallic onto the palette. Dip the sponge in the paint and sponge the bottom half of the fish.
While paint is still wet, spray generously with MM-202 Green Patina. Wait an hour or longer.
Once you have the desired amount of patina, use the Basecoat Brush and apply 1 coat of AC-502 Matte Brush-On Sealer. This will stop the patina process and seal the piece.
Using a small Acrylic Brush with SS-317 Turquoise, outline the facets on the fish.
Owl
Begin with properly fired cone 04 bisque. Moisten a sponge and wipe bisque to remove any dust.
Using a Basecoat Brush, apply 1 coat of SS-138 Flat Black to the owl. Allow to dry completely.
Using an Acrylic Brush, apply 2 coats of SS-183 Rich Peach, SS-179 Antique Red, SS-194 Medium Taupe, SS-198 Chocolate and SS-211 Orange Rust to each facet. Leave a black line between each facet. Try not to have the same color on adjacent facets. Allow to dry completely.
Shake and stir MM-106 Steel Metallic. Squeeze around 1 TBS onto the palette. Use an Acrylic Brush to randomly apply to the owl. Try to concentrate the paint in the crevices and spread out thin over the large areas. Allow to dry completely.
Take MM-305 Rapid Rust and remove cap. Add MM-600 Spritzer Cap to bottle.
Repeat Step #4. While paint is still wet, spray generously with MM-305 Rapid Rust. Wait an hour or longer.
Once you have the desired amount of rust, use the Basecoat Brush and apply 1 coat of AC-502 Matte Brush-On Sealer. This will stop the rusting process and seal the piece.
Pour CD-1495 Garden Pedestal, CD-044 Large Sunflower Bowl and CD-045 Small Sunflower Bowl molds ¼” thick. Refer to casting instructions.
Once they are firm enough to handle, use the sponge to smooth down any casting lines.
Fire to cone 04.
Using the Soft Fan with UG-50 Black, apply 1 coat to the front of the sunflowers and top and bottom sections of the pedestal. Allow glaze to dry. Using a damp sponge, wipe off most of the underglaze, leaving it only in the crevices.
Using the Soft Fan with EL-128 Wheat, apply 2 coats to the leaves on the sunflowers. Brush vertically from bottom to top of each leaf. Allow glaze to dry between coats.
Using the Script Liner with EL-133 Autumn, apply 2 coats to the inner circle of leaves going around the seeds. Allow glaze to dry between coats. Apply 3-5 random strokes going up on each the large leaves.
Using the Soft Fan with EL-121 Copper Adventurine, apply 3 coats to the center of the sunflowers. Allow glaze to dry between coats.
Using the Script Liner with PC-601 Clear Cascade, apply 1 coat to the tips of the large leaves. Apple a circle in the center of the seeds.
Using the Soft Fan with EL-128 Wheat, apply 2 coats to the back of the sunflowers. Allow glaze to dry between coats.
Using the Soft Fan with EL-142 Grass, apply 3 irregular coats to the pedestal. Brush horizontally around the pedestal. Allow glaze to dry between coats.
On the DSS-0111 Botanical – Leaves screen, locate the round leaf. Draw an outline around it in permanent marker. Cut it out with excess screen around the edges.
Squeeze about 2 TBS of SC-15 Tuxedo onto the palette. Add a pinch of AC-310 Silkscreen Medium. Mix with a palette knife until it becomes the consistency of peanut butter. You may need to add more silkscreen medium or glaze.
Place the leaf on the pedestal, shiny side down. While holding it firmly in place, take a small amount of premixed silkscreen medium and gently rub in circles staring in the center and working outward. Repeat around the pedestal.
Pour CD046 Fairy Plaque mold ¼” thick. Refer to casting instructions.
Once it is firm enough to handle, use the sponge to smooth down casting lines.
Fire to cone 04.
Using the Script Liner with SC-3 Wine About It, apply 1 coat to the dress. Allow glaze to dry. Use a damp sponge to wipe off most of the glaze, leaving it only in the crevices.
Using the Script Liner with SC-25 Crackerjack Brown, apply 1 coat to the hair. Allow glaze to dry. Use a damp sponge to wipe off most of the glaze, leaving it only in the crevices.
Using the Script Liner with SC-29 Blue Grass, apply 1 coat to the wings. Allow glaze to dry. Use a damp sponge to wipe off most of the glaze, leaving it only in the crevices.
Using the Script Liner with SC-46 Rawhide, apply 1 coat to skin (do not glaze eyes). While glaze is still wet, blend SC-51 Poo Bear down to the edges of each section. This will give the skin areas more dimension. Repeat for a 2nd coat.
Squeeze out around 1 TSP of SC-2 Melon-Choly onto the palette. Dip the sponge in the glaze and sponge the palette a couple times to remove any excess glaze. Sponge the cheeks.
Using the Detail Liner with SC-28 Blue Isle, apply 2 coats to the iris of each eye. Allow glaze to dry between coats. Using the same brush with SC-15 Tuxedo, apply a dot to each eye for the pupil. Outline the eyes and add eyelashes.
Using the Detail Liner with SC-16 Cotton Tail, apply 1 dot to each eye.
Using the Detail Liner with SC-25 Crackerjack Brown, apply 1 line to each eyebrow. Use the same brush with SC-15 to add individual hairs to the eyebrows.
Using the Detail Liner with SC-3 Wine About It, apply 1 coat to the lips.
Using the Detail Liner with SC-15 Tuxedo, add a line between the lips and dots in the nostrils.
Using the Script Liner with SC-42 Butter Me Up, apple 2 coats to the hair. Allow glaze to dry between coats. Using the same brush with SC-16 Cotton Tail, apply a few strokes to the high points of the hair for highlights.
Using the Script Liner with SC-1 Pink-A-Boo, apply 2 coats to the dress. Allow glaze to dry between coats.
Using the Detail Liner with SC-3 Wine About It, apply 2 coats to the ribbons on the dress. Use the Script Liner to apply 2 coats to the inside of the dress at the bottom. Allow glaze to dry between coats.
Using the Script Liner with SC-65 Peri-Twinkle, apply 2 coats to boots. Allow glaze to dry between coats.
Using the Script Liner with SC-28 Blue Isle, apply 1 coat to the section of the wing closest to the body. Blend with SC-45 My Blue Heaven, until you reach the scallop going down the wing. Do one wing at a time so that the glaze does not dry why you are trying to blend. Repeat for a 2nd coat. Repeat for all wings.
Using the Script Liner with SC-96 Aqu-ward, apply 1 coat to the outer, ribbed section of the wing. As you get close to the edge, dip the brush into SC-9 Jaded and blend out to the edge. Repeat for a 2nd coat. Repeat for all wings.
Using the script Liner with SC-29 Blue Grass, apply 2 coats to the scallops on the wings. Allow glaze to dry between coats.
Using the Soft Fan with NT-BR Clear One Brushing, apply 1 coat to the fairy.
Fire to cone 06.
Using CB-425 1/2” Oval Glaze Mop with OG-803 Mother of Pearl, apply 1 coat to the wings.
Cast the mold in the usual manor. Allow the greenware to dry, then clean and wipe down with a damp sponge. Bisque fire to a shelf cone 04.
Using the Rounds, base coat the hair with SS-237 Dark Brown, flesh area with SS-194 Medium Taupe, wings with SS-211 Orange Rust and the dress and shoes with SS-368 Dusty Violet.
Using the Dry Brushes, apply several coats of SS-198 Chocolate to the hair, followed with SS-212 Light Umber.
Using the Dry Brushes, apply several coats of SS-247 Bright Yellow to the section of the wings closest to the body, them the center area with SS-254 Golden Orche followed with SS-210 Orange to the outer wings with a SS-571 Curry highlight.
Using the Dry Brushes, apply several coats of SS-28 Hushed Violet to the dress and shoes, followed with SS-92 Royal Fuchsia for the trim and inner dress area.
Using the Dry Brushes, apply several coats of SS-192 Light Taupe to the flesh areas, followed with SS-127 Light Parchment.
Using the Dry Brushes, apply a very light application of SS-32 Razzberri mixed with SS-127 Medium Portrait to the lips and cheeks.
Using the Liner, apply 1 to 2 coats of SS-135 White to the eyes.
Using the Liner, apply 2 coats of SS-198 Chocolate to the iris of the eyes.
Using the Liner, apply 1 coat of SS-138 Flat Black to the pupils, and outline and add eyelashes to the eyes.
Using the Round, apply 2 coats of AC-502 Matte Sealer to the dress, flesh and hair.
12) Using the Liner, apply 1 coat of AC-501 Gloss sealer to the eyes and lips.
13) Using the Round, apply 1 coat of SG-880 Crystal Brush on Sparklers to the wings.
Cast the mold in the usual manor. Allow the greenware to dry, then clean and wipe down with a damp sponge. Bisque fire to a shelf cone 04.
Using the Rounds, base coat the fur area with SS-138 Flat Black, the carrot with SS-237 Dark Brown, the overalls with SS-335 Rich Blue and the hat with SS-57 Accent Green.
Using the Dry Bushes, apply several light coats of SS-130 Medium Gray to the fur areas.
Using the Dry Brushes, apply several light coats of SS-376 Lime Burst to the hat.
Using the Dry Brushes, apply several light coats of SS-317 Turquoise to the overalls, followed with SS-29 Dew Drop Blue, keeping off the button.
Using the Dry Brushes, apply several coats of SS-211 Orange Rust to the carrot, followed with SS-210 Orange.
Using the Dry Brushes, apply several coats of SS-288 Bright Green to the carrot tops, followed with SS-376 Lime Burst.
Using the Dry Brushes, apply several coats of SS-141 Light Pink to the inside of the ears, followed with SS-31 Razzberri.
Using the Dry Brushes, apply several coats of SS-130 Buttermilk to the muzzle, followed with SS-45 Buttermilk.
Using the Soft Rounds, apply 1 to 2 coats of SS-502 Matte Sealer to the piece, excluding the nose.
Using the Round, apply 1 to 2 coats of SS-501 Gloss Sealer to the nose.
Pour CD-047 Bjorn Bunny Gnome mold ¼” thick. Refer to casting instructions.
Once it is firm enough to handle, use the sponge to smooth down casting lines.
Fire to cone 04.
Using the Script Liner with SC-16 Cotton Tail, apply 1 coat to the top half of the inner ear. Use the same brush with SC-1 Pink-A-Boo to blend down to the bottom of the inner ear. Repeat for a 2nd coat.
Using the Script Liner with SC-16 Cotton Tail, apply 1 coat to the outer edges of the “cheeks” below the nose. Use the same brush with SC-1 Pink-A-Boo to blend towards the center. Repeat for a 2nd coat.
Using the Script Liner with SC-1 Pink-A-Boo, apply 2 coats to the nose. Allow glaze to dry between coats. Using the Script Liner with SC-16 Cotton Tail, apply a highlight to the nose.
Using the Script Liner and Soft Fan with FN-221 Milk Glass White, apply 3 coats to the fur on the bunny. Allow glaze to dry between coats.
Using the Script Liner and Soft Fan with FN-209 Floral Pink, apply 3 coats to the overalls and 2 coats to the inner ears. Allow glaze to dry between coats.
Using the Script Liner with FN-207 Orange Slice, apply 3 coats to the carrot. Allow glaze to dry between coats.
Using the Script Liner with SC-85 Orkid, apply 2 coats to the buttons. Allow glaze to dry between coats.
Using the Script Liner and Soft Fan with FN-216 Sea Glass, apply 3 coats to the end of the carrot and hat. Allow glaze to dry between coats.
Using the Detail Liner with SC-15 Tuxedo, outline the mouth and add dots to the holes on the cheeks.
Fire to cone 06.
Using CB-425 1/2” Oval Glaze Mop with OG-803 Mother of Pearl, apply 1 coat to the wings.
Paint the entire fish in SC-16 Cotton Tail, three coats. Let dry between coats.
Paint three coats on the fins in contrasting colors, they can match or you can mix up the colors.
Use the liner brush and SC-7 Leapin’ Lizard to paint on the green leaves and vines. Let dry and add a second coat.
Fill in the eyes with three coats of SC-16 Cotton Tail, SC-28 Blue Isle and SC-15 Tuxedo.
Once all the background colors are dry, add accent designs, such as flowers and polka dots.
Let dry and dip and fire to cone 06
Bee:
Paint three coats of SC-20 Cashew Later on the face and arms.
Use the thin liner brush to add details to face – the eyes, and mouth.
Paint each section of the body a different color, three coats. Let dry between coats.
Use the back end of the paintbrush as the thin liner brush to add accents to each section. Make sure to use a contrasting color. For example: (Body)SC-76 Cara-bein Blue, topped with SC-88 TuTu Tango (feet) and SC-6 Sunkissed (top). SC-28 Blue Isle topped with SC-87 Ruby Slippers. SC-11 Blue Yonder topped with SC-6 Sunkissed
Paint the wing with SC-6 Sunkissed, three coats and the embossed lines with SC-88 TuTu Tango.
Paint his head SC-53 Purple Haze and accented with SC-95 Pinkie Swear
Fire to cone 06
Penguin:
Each alebrije comes to life through the energy and creativity of the artist. Use your intuition to create your own custom alebrije!
Here are some guidelines to help:
Think of your color in opposites. Paint each section of the penguin in a different color, three coats.
Use a bold and contrasting color to go on top of each section and use dashes, dots, hash marks, even hearts to add interesting character to your alebrije.
Give it a name and a superpower!
Glaze and fire to cone 06
Form
MB-1572 Penguin Facet-ini
MB-1573 Fish Facet-ini
MB-1574 Bee Facet-ini
Colors
Fish
SC-16 Cotton Tail
SC-87 Ruby Slippers
SC-6 Sunkissed
SC-7 Leapin Lizard
SC-53 Purple Haze
SC-76 Cara-bein Blue
SC-28 Blue Isle
SC-24 Dandelion
SC-15 Tuxedo
Bee
SC-16 Cotton Tail
SC-20 Cashew Later
SC-87 Ruby Slippers
SC-6 Sunkissed
SC-7 Leapin Lizard
SC-53 Purple Haze
SC-76 Cara-bein Blue
SC-28 Blue Isle
SC-24 Dandelion
SC-15 Tuxedo
SC-95 Pinkie Swear
SC-88 Tu Tu Tango
SC-11 Blue Yonder
Penguin
SC-16 Cotton Tail
SC-87 Ruby Slippers
SC-6 Sunkissed
SC-7 Leapin Lizard
SC-53 Purple Haze
SC-76 Cara-bein Blue
SC-28 Blue Isle
SC-24 Dandelion
SC-15 Tuxedo
Decorating Accessories
RB-104 #4 Liner Brush
RB-118 #8 Round Brush
RB-110 10/0 Detail Liner Brush
Miscellaneous Accessories
Sponge
Water
Low-Fire|Earthenware Bisque|Garden|Home Décor
406|403|459|460
35807
Crystal and Stroke & Coat Facet-inis (Bee, Fish & Penguin)
Begin with properly fired cone 04 bisque. Moisten a sponge and wipe bisque to remove any dust.
Using the Script Liner with SC-16 Cotton Tail, apply 1 coat to the face and belly of the penguin. Apply a 2nd coat to the face.
Using the Script Liner with SC-6 Sunkissed, apply 1 coat to the upper part of the belly. Shade with SC-16 Cotton Tail down to the feet.
Using the Script Liner with SC-75 Orange-A-Peel, apply 2 coats to the beak and feet. Allow glaze to dry between coats.
Use the pencil to draw the eyes.
Using the Detail Liner with SC-11 Blue Yonder, apply 2 coats to the eyes.
Using SG-401 Black, outline the facets on the front of the penguin. Add pupils to the eyes.
Using the Detail Liner with SC-16 Cotton Tail, make a dot in each pupil.
Using the Script Liner with NT-BR Clear One Brushing, apply 1 coat to the front of the penguin (over areas you just glazed).
Using the Script Liner and Soft Fan with CG-970 Masquerade, apply 2 coats to the rest of the penguin. Allow glaze to dry between coats.
Fire to cone 06.
Fish
Begin with properly fired cone 04 bisque. Moisten a sponge and wipe bisque to remove any dust.
Use the pencil to draw a circle around the face of the fish. This will separate the smooth face from the body with “scales”.
Using the Script Liner with SC-11 Blue Yonder, apply 1 coat to the outer edge of the face. Shade towards the mouth with SC-45 My Blue Heaven. Repeat when dry.
Using the Script Liner with SC-75 Orange-A-Peel, apply 1 coat to the inner part of a fin. Dip the same brush into SC-6 Sunkissed and shade towards the outer part. Repeat for each fin. Then repeat for a second coat.
Using the Detail Liner with SC-15 Tuxedo, apply a dot to the pupils of the eyes.
Using the Detail Liner with SC-16 Cotton Tail, make a dot in each pupil.
Using SG-404 Blue, outline the facets on the face and fins.
Using the Script Liner with NT-BR Clear One Brushing, apply 1 coat to the face and fins (over areas you just glazed).
Using the Script Liner and Soft Fan with CG-983 Koi Pond, apply 2 coats to the rest of the fish. Allow glaze to dry between coats.
Fire to cone 06.
Bee
Begin with properly fired cone 04 bisque. Moisten a sponge and wipe bisque to remove any dust.
Using the Script Liner with SC-6 Sunkissed, apply 1 coat to the outer edge of the face. Dip the same brush into SC-16 Cotton Tail and shade to the center of the face. Repeat.
Using the Script Liner with SC-6 Sunkissed, apply 2 coats to the tops of the antennae. Allow glaze to dry between coats.
Using the Script Liner with SC-11 Blue Yonder, apply 1 coat to the center of a wing. Dip the same brush into SC-45 My Blue Heaven. Shade towards the edge of the wing. Repeat for all wings. Repeat for a second coat.
Use the pencil to draw the eyes.
Using the Detail Liner with SC-11 Blue Yonder, apply 2 coats to the eyes. Allow glaze to dry between coats.
Using SG-401 Black, outline the facets on the antennae and the details on the face.
Using the Detail Liner with SC-16 Cotton Tail, make a dot in each pupil.
Using SG-404 Blue, outline the facets on the wings.
Using the Script Liner with NT-BR Clear One Brushing, apply 1 coat to the face, antennae and wings (over areas you just glazed).
Using the Script Liner with CG-1000 Mardi Gras, apply 2 coats to the 2nd and 4th sections of the body (from the top). Allow glaze to dry between coats.
Pour around 1 TBS of CG-1000 Mardi Gras onto the palette. Pick out some of the crystals with the Detail Liner. Place the crystals around the edge of the face.
Using the Script Line and Soft Fan with SC-15 Tuxedo, apply 2 coats the rest of the bee. Allow glaze to dry between coats.
Begin with properly fired cone 04 bisque. Moisten a sponge and wipe bisque to remove any dust.
On the DSS-0162 Holiday Icons screen, locate snowflakes. Draw an outline around them in permanent marker. Cut them out with excess screen around the edges.
Squeeze around 1 TBS of SG-401 Black onto the palette. Add a pinch of AC-310 Silkscreen Medium. Mix with a palette knife until it becomes the consistency of peanut butter. You may need to add more silkscreen medium or designer liner.
Place a snowflake on the belly or face of the penguin. While holding the screen firmly in place, take a small amount of premixed silkscreen medium, and gently rub in circles starting in the center and working outward.
Wash the screen and repeat as pictured.
Using SG-401 Black, make dots on the belly and face. Outline the eyes, beak, feet and border of the belly/face. Make a pupil in the eyes.
Using the Script Liner with EL-101 Oyster Shell, apply 2 coats to the face and belly. Allow glaze to dry between coats.
Using the Script Liner with NT-BR Clear One Brushing, apply 2 coats to the eyes. Allow glaze to dry between coats.
Using the Script Liner with EL-143 Cactus Flower, apply 2 coats to the beak and feet. Allow glaze to dry between coats.
Using the Script Liner and Soft Fan with EL-134 Mirror Blue, apply 3 coats to the body. Allow glaze to dry between coats.
Fire to cone 06.
Fish
Begin with properly fired cone 04 bisque. Moisten a sponge and wipe bisque to remove any dust.
Use the pencil to draw a line separating the face from the body.
Using the Script Liner with SC-16 Cotton Tail, apply 2 coats to the eyes. Allow glaze to dry between coats.
Using the Script Line with SC-88 Tu Tu Tango, apply 2 coats to the top fin and mouth. Allow glaze to dry between coats.
Using the Script Liner with SC-6 Sunkissed, apply 2 coats to the back fin. Allow glaze to dry between coats.
Using the Script Liner with SC-9 Jaded, apply 2 coats to the side fins. Allow glaze to dry between coats.
Using the Script Liner with SC-76 Cara-Bein Blue, apply 3 coats to the face. Allow glaze to dry between coats.
Using the Script Liner and Soft Fan with FN-009 Black, apply 3 coats to the body only. Allow glaze to dry between coats.
Using the Detail Liner with SC-15 Tuxedo, outline the eyes, mouth and fins. Apply 2 coats to the pupils. Allow glaze to dry between coats.
Using the Detail Liner with AC-302 Wax Resist, outline the facets on the body.
Using the Script Liner with SG-202 White Cobblestone, apply 2 coats to each facet on the body. Allow glaze to lose its shine before applying the second coat, but do not wait until it is dry enough to crack.
Using the Script Liner with SC-6 Sunkissed, SC-11 Blue Yonder, SC-27 Sour Apple, SC-33 Fruit of the Vine and SC-97 Cant-elope, apply 1 coat to each of the facets with cobblestone.
Using FD-258 Pure White, add decorative dots and lines to the fins and face.
Fire to cone 06.
Bee
Begin with properly fired cone 04 bisque. Moisten a sponge and wipe bisque to remove any dust.
Use the pencil to draw the “tear drops” coming down the facets on the body and around the face.
Using the Script Liner with SC-6 Sunkissed, apply 2 coats to the “tear drops” on the 2nd and 4th row of facets on the body and the tops of the antenna. Allow glaze to dry between coats.
Using the Script Liner with SC-15 Tuxedo, apply 2 coats to the “tear drops” on the 1st and 3rd row of facets on the body, arms and feet. Allow glaze to dry between coats. Use the Detail Liner to outline the eyes, nose, mouth and yellow “tear drops”.
Using the Script Liner with FN-203 Dry Champagne, apply 2 coats to the 2nd and 4th row of facets on the body and face. Allow glaze to dry between coats.
Using the Script Liner with FN-220 Sooty Gray, apply 2 coats to the 1st and 3rd row of facets on the body and the head (not face). Allow glaze to dry between coats.
Using the Script Liner with CC-108 China Sea, apply 3 coats to the wings. Allow glaze to dry between coats.
Fire to cone 06.
Using the Script Liner with SS-138 Flat Black, apply 1 coat to the wings. Wipe off with a damp sponge.
Begin with properly fired cone 04 bisque. Moisten a sponge and wipe bisque to remove any dust.
On the DSS-0165 Mushrooms screen, draw an outline around each mushroom in permanent marker. Cut them out with excess screen around the edges.
Squeeze out around 1 TBS of SC-15 Tuxedo onto the palette. Add a pinch of AC-310 Silkscreen Medium. Mix with a palette knife until it becomes the consistency of peanut butter. You may need to add more silkscreen medium or glaze.
Choose which mushrooms you would like to use. Place one screen on the platter, shiny-side down. While holding the screen firmly in place, take a small amount of premixed silkscreen medium, and gently rub in circles starting in the center and working outward. Repeat for the rest of the mushrooms.
Use the pencil to draw a wavy line at the end of the platter. This will be the line between the screened section and the colored section.
Using the Soft Fan with NT-BR Clear One Brushing, apply 2 coats to the front of the platter. Only to the larger half made by the line. Allow glaze to dry between coats.
Using the Soft Fan with FN-009 Black, apply 2 coats to the front of the platter. Only to the smaller half made by the line. Also apply 2 coats to the edges and back of the platter. Allow glaze to dry between coats.
Using the Script Liner with EL-125 Sahara Sands, apply 2 coats over the smaller half of the platter glazed in Step #7. Apply a 3rd coat just to the center of the section.
Begin with properly fired cone 04 bisque. Moisten a sponge and wipe bisque to remove any dust.
On the DSS-0166 Tropical Leaves screen, draw an outline around each leaf in permanent marker. Cut them out with excess screen around the edges.
Squeeze out around 1 TBS of SC-15 Tuxedo onto the palette. Add a pinch of AC-310 Silkscreen Medium. Mix with a palette knife until it becomes the consistency of peanut butter. You may need to add more silkscreen medium or glaze.
Choose which leaves you would like to use. Place one screen on the platter, shiny-side down. While holding the screen firmly in place, take a small amount of premixed silkscreen medium, and gently rub in circles starting in the center and working outward. Repeat for the rest of the leaves.
Use the pencil to draw a wavy line towards the end of the platter. This will be the line between the screened section and the colored section.
Using the Soft Fan with NT-BR Clear One Brushing, apply 2 coats to the front of the platter. Only to the larger half made by the line. Allow glaze to dry between coats.
Using the Soft Fan with FN-009 Black, apply 2 coats to the front of the platter. Only to the smaller half made by the line. Also apply 2 coats to the edges and back of the platter. Allow glaze to dry between coats.
Using the Script Liner with EL-142 Grass, apply 2 coats over the smaller half of the platter glazed in Step #7. Apply a 3rd coat just to the center of the section.
Begin with properly fired cone 04 bisque. Moisten a sponge and wipe bisque to remove any dust.
Use the pencil to draw a wavy line towards the end of the platter. This will be the line between the screened section and the colored section.
Squeeze out around 2 TBS of SC-15 Tuxedo onto the palette. Add a pinch of AC-310 Silkscreen Medium. Mix with a palette knife until it becomes the consistency of peanut butter. You may need to add more silkscreen medium or glaze.
Place the DSS-0164 Continuous Swirls screen over the platter, shiny side down. While holding the screen firmly in the center, take the squeegee and scoop out around 1 TSP of premixed silkscreen medium. Silkscreen up to the pencil line. Firmly run the squeegee across the center of the plate spreading the medium. Repeat with more medium until the center is covered. Then repeat going up from the center to the outside of the platter.
Using the Soft Fan with NT-BR Clear One Brushing, apply 2 coats to the silkscreen area. Do not apply clear glaze where the Elements glaze is applied. Allow glaze to dry between coats.
Using the Soft Fan with FN-009 Black, apply 2 coats to the small area that is not silkscreened on the front of the plate. Allow glaze to dry between coats.
Using the Script Liner with EL-127 Rose Granite, apply 2 coats over the smaller half of the platter glazed in Step #6. Apply a 3rd coat just to the center of the section.
Apply three coats of FN-009 Black to the back of the plate.
Begin with properly fired cone 04 bisque. Moisten a sponge and wipe bisque to remove any dust.
Use the pencil to draw a wavy line towards the end of the platter. This will be the line between the screened section and the colored section.
Squeeze out around 2 TBS of SC-15 Tuxedo onto the palette. Add a pinch of AC-310 Silkscreen Medium. Mix with a palette knife until it becomes the consistency of peanut butter. You may need to add more silkscreen medium or glaze.
Place the DSS-0163 Continuous Fronds screen over the platter, shiny side down. While holding the screen firmly in the center, take the squeegee and scoop out around 1 TSP of premixed silkscreen medium. Firmly run the squeegee across the center of the plate spreading the medium. Silkscreen up to the pencil line. Repeat with more medium until the center is covered. Then repeat going up from the center to the outside of the platter.
Using the Soft Fan with NT-BR Clear One Brushing, apply 2 coats to the silkscreened area only. Allow glaze to dry between coats.
Using the Soft Fan with FN-009 Black, apply 2 coats to the small area that is not silkscreened. Allow glaze to dry between coats.
Using the Script Liner with EL-148 Smoked Lilac, apply 2 coats over the smaller half of the platter glazed in Step #6. Apply a 3rd coat just to the center of the section.
Using the Soft Fan brush apply three coats of FN-009 Black to the back of the plate and rim.
Begin with properly fired cone 04 bisque. Moisten a sponge and wipe bisque to remove any dust.
On the DSS-0165 Mushrooms screen, draw an outline around each mushroom in permanent marker. Cut them out with excess screen around the edges.
Position the pattern over the platter. Slide AC-230 Clay Carbon Paper under the pattern. Trace with the pencil.
Using the Script Liner with SC-1 Pink-A-Boo, SC-24 Dandelion, SC-25 Crackerjack Brown and SC-46 Rawhide, apply 2 coats to each of the corresponding sections. Refer to the pattern.
Squeeze out around 1 TBS of SC-15 Tuxedo onto the palette. Add a pinch of AC-310 Silkscreen Medium. Mix with a palette knife until it becomes the consistency of peanut butter. You may need to add more silkscreen medium or glaze.
Choose which mushrooms you would like on each section of the platter. Place one screen on the platter, shiny side down. While holding the screen firmly in place, take a small amount of premixed silkscreen medium, and gently rub in circles starting in the center and working outward. Repeat for the rest of the mushrooms.
Using the Detail Liner with SC-15 Tuxedo, make decorative lines and dots on the platter.
Using the Soft Fan with SP-703 Autumn, apply 2 coats to the front of the platter. Allow glaze to dry between coats.
Using the Soft Fan with SC-15 Tuxedo, apply 2 coats to the back and edges of the platter. Allow glaze to dry between coats.
Begin with properly fired cone 04 bisque. Moisten a sponge and wipe bisque to remove any dust.
On the DSS-0166 Tropical Leaves screen, draw an outline around each leaf in permanent marker. Cut them out with excess screen around the edges.
Position the pattern over the platter. Slide AC-230 Clay Carbon Paper under the pattern. Trace with the pencil.
Using the Script Liner with SC-2 Melon-Choly, SC-9 Jaded, SC-45 My Blue Heaven and SC-77 Glo-Worm, apply 2 coats to each of the corresponding sections. Refer to the pattern.
Squeeze out around 1 TBS of SC-15 Tuxedo onto the palette. Add a pinch of AC-310 Silkscreen Medium. Mix with a palette knife until it becomes the consistency of peanut butter. You may need to add more silkscreen medium or glaze.
Choose which leaves you would like on each section of the platter. Place one screen on the platter, shiny side down. While holding the screen firmly in place, take a small amount of premixed silkscreen medium, and gently rub in circles starting in the center and working outward. Repeat for the rest of the leaves.
Using the Detail Liner with SC-15 Tuxedo, make decorative lines and dots on the platter.
Using the Soft Fan with SP-702 Celebration, apply 2 coats to the front of the platter. Allow glaze to dry between coats.
Using the Soft Fan with SC-15 Tuxedo, apply 2 coats to the back and edges of the platter. Allow glaze to dry between coats.
Begin with properly fired cone 04 bisque. Moisten a sponge and wipe bisque to remove any dust.
Squeeze out around 2 TBS of SC-10 Teal Next Time onto the palette. Add a pinch of AC-310 Silkscreen Medium. Mix with a palette knife until it becomes the consistency of peanut butter. You may need to add more silkscreen medium or glaze.
Place the DSS-0163 Continuous Fronds screen over the platter, shiny side down. While holding the screen firmly in the center, take the squeegee and scoop out around 1 TSP of premixed silkscreen medium. Firmly run the squeegee across the center of the plate, spreading the medium. Repeat with more medium until the center is covered. Then repeat going up from the center to the outside of the platter.
Using the Soft Fan with FN-216 Sea Glass, apply 2 coats to the front of the platter. Allow glaze to dry between coats.
Once the glaze is dry to the touch, place 1 piece of MC-002 12mm Low Track Masking Tape going across the center.
Using the Soft Fan with FN-231 Clearly Jade, apply 1 coat below the tape. Remove the tape before the glaze is bone dry.
Once the glaze is dry to the touch, place another piece of MC-002 12mm Low Track Masking Tape going across the center of the previously glazed section.
Using the Soft Fan with FN-231 Clearly Jade, apply 1 coat below the tape. Remove the tape before the glaze is bone dry.
Using the Soft Fan with SC-10 Teal Next Time, apply 3 coats to the back and edge of the platter. Allow glaze to dry between coats.
Begin with properly fired cone 04 bisque. Moisten a sponge and wipe bisque to remove any dust.
Squeeze out around 2 TBS of SC-12 Moody Blue onto the palette. Add a pinch of AC-310 Silkscreen Medium. Mix with a palette knife until it becomes the consistency of peanut butter. You may need to add more silkscreen medium or glaze.
Place the DSS-0164 Continuous Swirls screen over the platter, shiny side down. While holding the screen firmly in the center, take the squeegee and scoop out around 1 TSP of premixed silkscreen medium. Firmly run the squeegee across the center of the plate, spreading the medium. Repeat with more medium until the center is covered. Then repeat going up from the center to the outside of the platter.
Using the Soft Fan with FN-212 Blue Diamond, apply 2 coats to the front of the platter. Allow glaze to dry between coats.
Once the glaze is dry to the touch, place 1 piece of MC-002 12mm Low Track Masking Tape going across the center.
Using the Soft Fan with FN-213 Saffire Blue, apply 1 coat below the tape. Remove the tape before the glaze is bone dry.
Once the glaze is dry to the touch, place another piece of MC-002 12mm Low Track Masking Tape going across the center of the previously glazed section.
Using the Soft Fan with FN-213 Saffire Blue, apply 1 coat below the tape. Remove the tape before the glaze is bone dry.
Using the Soft Fan with SC-12 Moody Blue, apply 3 coats to the back and edge of the platter. Allow glaze to dry between coats.
Moisten a clean sponge and wipe bisque to remove any dust.
Use a palette knife to mix the AC-310 Silkscreen Medium with UG-50 Jet Black until it is the thickness of loose peanut butter. Use your finger to apply the thickened mixture through the screen.
Use a script liner and fan brush to apply 2 coats of SW-111 Wrought Iron to the rim and back of the plate; avoiding the foot.
Use a fan brush to apply 3 coats of SW-201 Turquoise to the entire plate; avoiding the foot.
Use a clean sponge to wipe the excess glaze off of the foot.
Moisten a clean sponge and wipe bisque to remove any dust.
Use a palette knife to mix the AC-310 Silkscreen Medium with UG-50 Jet Black until it is the thickness of loose peanut butter. Use your finger to apply the thickened mixture through the screen. You can use the screen repeatedly, but be sure to rinse and thoroughly dry once the screen gets gummy/is not transferring as well. Lightly applying a grid on the plate with a pencil can help with making an even pattern.
Use a script liner and fan brush to apply 2 coats of UG-50 Jet Black to the rim and back of the plate; avoiding the foot.
Use a fan brush to apply 3 coats of SW-139 Lemon Meringue to the entire plate; avoiding the foot.
Use a clean sponge to wipe the excess glaze off of the foot.
Moisten a clean sponge and wipe bisque to remove any dust.
Use a soft fan for each glaze to apply SW-502 Yellow Gloss and SW-507 Bright Green Gloss. Begin with Yellow Gloss in the center and then add the Bright Green by the edge, blend together where they meet. Apply 3 coats using this technique. A banding wheel is super helpful!
Once completely dry, use a palette knife to mix the AC-310 Silkscreen Medium with UG-50 Jet Black until it is the thickness of loose peanut butter. Use your finger to apply the thickened mixture through the leaf screen. You can use the screen repeatedly, but be sure to rinse and thoroughly dry once the screen gets gummy/is not transferring as well.
Use a fan and liner brush to apply 3 coats of SW-111 Wrought Iron to the inside/back and rim; avoiding the foot.
Use a clean sponge to wipe the excess glaze off of the foot.
Moisten a clean sponge and wipe bisque to remove any dust.
Create stripes on plat using masking tape.
Use a fan brush to apply 2 coats of UG-90 Green Mist to the plate – be sure to brush the glaze out so it is smooth and does not pool around the tape edges.
Allow underglaze to dry to the touch (not bone dry) and remove the tape.
Use a palette knife to mix the AC-310 Silkscreen Medium with SW-301 Iron Wash until it is the thickness of a loose peanut butter. Use your finger to apply the thickened mixture through the leaf screen. You can use the screen repeatedly, but be sure to rinse and thoroughly dry once the screen gets gummy/is not transferring as well. Lightly applying a grid on the plate with a pencil can help with making an even pattern.
Allow the screened images to dry completely before using a fan brush to apply SW-201 Turquoise. Apply the first coat very carefully! SW-301 Iron Wash will smear easily with a brush. Apply a total of 3 coats and be sure to brush out the second 2 because the first one will be gloppy (since you can’t brush it out as much).
Use a script liner and fan brush to apply SW-128 Cordovan to the rim and back of the plate – avoiding the foot.
Use a clean sponge to wipe the excess glaze off of the foot.
Moisten a clean sponge and wipe bisque to remove any dust.
Use a fan brush to apply 1 coat of SW-203 Squash Yellow to the face of the plate. Be somewhat mindful of the brush strokes as they may be visible. Adding a bit of water to your brush and mixing into the UG can help the application be smoother. Use big broad brush strokes.
Use a fan brush to apply 1 coat of UG-217 Red Coal as dots over the face of the plate. Load the brush and swirl onto the plate to create a loose and imperfect dot.
Use a palette knife to mix the AC-310 Silkscreen Medium with UG-01 True Teal and UG-94 Pansy Purple until they are the thickness of a loose peanut butter. Use your finger to apply the thickened mixture through the screen. You can use the screen repeatedly, but be sure to rinse and thoroughly dry once the screen gets gummy/is not transferring as well. Lightly applying a grid on the plate with a pencil can help with making an even pattern. Begin with one color and then follow up with the second by off-setting the images.
Use a script liner and fan brush to apply 3 coats of SW-134 Eggplant to the rim and back of the plate – avoiding the foot. (or the inside and handle of the mug)
Use a fan brush to apply 2 coats of SW-001 Stoneware Clear to the face of the plate.
Use a clean sponge to wipe the excess glaze off of the foot.
Each alebrije comes to life through the energy and creativity of the artist. Use your intuition to create your own custom alebrije! Here are some guidelines to help!
Think of your color in opposites. Paint each section of the penguin in a different color, three coats.
Use a bold and contrasting color to go on top of each section and use dashes, dots, hash marks, even hearts to add interesting character to your alebrije.
Begin with properly fired shelf cone 04 bisque. Moisten a clean sponge and wipe bisque to remove any dust.
If desired, drill a hole with the carbide bit through the center of the bottom of the bowl.
Bee Instructions:
Using the CB-604 Soft Fan Brush, apply 2 coats of SW-501 White Gloss to the outside of the bowl. Make sure you don’t get any glaze on the rim. Let dry completely.
Using the pencil and AC-230 Clay Carbon Paper, trace the pattern onto the upside down bowl. You will have to adjust the pattern as you go along so that it is laying flat on the section you are working on. Use a pencil to extend the lines down for the stripes.
Using the CB-106 Script Liner, apply 2 coats of SW-502 Yellow Gloss to the face of the bee and every other stripe, leaving the eyes and wings white. Use the photo as a guide.
Using the CB-106 Script Liner, apply 2 coats of SW-508 Black Gloss to the rest of the stripes.
Fill the AC-219 Designer Bottle with Writer tip with SW-508 Black Gloss. Use it to outline the facial features and the lines on the wings.
Fill the AC-219 Designer Bottle with Writer tip with SC-97 Cant-Elope. Use it to draw squiggles onto the yellow sections of the bee and on his eyelids.
Use the SB-110 Mini Liner to apply 2 coats of SW-506 Bright Blue Gloss to the eyes.
Use a damp sponge to remove any glaze that got onto the rim.
Fire the bowl upside down. Do not stilt or hang over the edge of the kiln shelf.
Fire to cone 5/6.
Insert the threaded rod into the drilled hole and secure with the nuts and the washers to make a garden stake. You may have to use the drill to make the hole a little bigger if it shrank during firing.
Ladybug Instructions:
Using the pencil and AC-230 Clay Carbon Paper, trace the pattern onto the upside down bowl. You will have to adjust the pattern as you go along so that it is laying flat on the section you are working on. Trace the legs on both sides of the bowl.
Using the CB-604 Soft Fan Brush, apply 3 coats of SW-504 Red Gloss to the body of the ladybug, leaving the face, back side triangle and feet unglazed. Use the photo as a guide.
Using the CB-106 Script Liner, apply 3 coats of SW-508 Black Gloss to the face, the feet, and the back side triangle. Don’t glaze the eyes.
Using the CB-106 Script Liner, apply 2 coats of SW-501 White Gloss to the eyes. Let dry completely.
Fill the AC-219 Designer Bottle with Writer tip with SW-508 Black Gloss. Use it to outline the eyes, the line down the back, and his antennae. Also use it to make polka dots on the back.
Fill the AC-219 Designer Bottle with Writer tip with SW-501 White Gloss. Use it to add highlights to the face, feet and dots. Draw in the smile and the nose.
Use the SB-110 Mini Liner to apply 2 coats of SW-506 Bright Blue Gloss to the eyes.
Use the SB-110 Mini Liner to apply 2 coats of SW-504 Red Gloss to the eyelids.
Use a damp sponge to remove any glaze that got onto the rim.
Fire the bowl upside down. Do not stilt or hang over the edge of the kiln shelf.
Fire to cone 5/6.
Insert the threaded rod into the drilled hole and secure with the nuts and the washers to make a garden stake. You may have to use the drill to make the hole a little bigger if it shrank during firing.
Use a moistened Synthetic Sponge to wipe down the piece. Check the inside of the bisque vase for any loose debris as well. Do not use your Silk Decorating Sponge for this step.
Apply the Blue Masking Tape around the outer lip of the vase. Use the tape to cover a portion of the neck area as well.
In a Plastic Cup mix FN-304 Black Velvet with water to a melted ice cream consistency. Pour the thinned glaze into the vase. While working quickly, rotate the vase to cover the inside of the vase. Pour out any excess glaze trying not to get any color onto the outer portion of the vase.
Invert the vase to drain and dry. Immediately wipe off any drips of glaze from the taped area and vase with a damp Synthetic Sponge. This step may need to be repeated for adequate coverage. When dry, remove the tape from the vase. Check to make sure no black glaze remains on the outside of the vase.
Apply 3-4 even and smooth coats of FN-301 Marshmallow White Matte to the outside of the vase using CB-604 Soft Fan. Let dry.
Transfer the basic design onto the vase using AC-230 Clay Carbon and a pencil. Cut out the individual flower patterns creating stencils.
On a tile place the EZ-Strokes and thin slightly with water.
Load the edge/tips of a slightly damp Silk Decorating Sponge with Some EZ-018 Chartreuse. While holding the full flower stencil onto the ware of the pattern, sponge/pounce around the stencil edge placing the color slightly over onto the stencil. The color should be the most concentrated around the edge of the stencil then fading out to nothing onto the background. This should extend only about ½”-1” around the pattern. Where the top flower shadows the lower flower, keep the color light and not extended as far.
Without rinsing the sponge, tip it next into the EZ-028 Leaf Green and repeat this process.
Pick up some of the EZ-011 Sienna Brown and EZ-032 Peacock Green and add some variation to the background edges. These colors should blend yet remain as individual colors extending in an uneven manner.
Remove the full flower stencil. Place the second lower flower stencil and repeat this shading with the Silk Decorating Sponge. Lightly apply some of the colors along the stem of the hanging leaves for shadow.
The leaves are done by pouncing in one coat of EZ-018 Chartreuse. Without rinsing the sponge, shade them with EZ-028 Leaf Green and then with EZ-033 Ivy Green. Keep the darker colors to the top portion of the leaves as well as the base of the leaves next to the flowers.
Use a clean Silk Decorating Sponge tipped with EZ-002 Cinderella Pink used to shade the flower petals. The color is darkest next to the flower center. To add further depth and shading, tip the sponge with EZ-030 Rose and darken the shading next to the flower center. The color should be darkest next to the center and fading out to nothing onto the petals. The petals are not fully covered with color.
Use the Silk Decorating Sponge loaded with EZ-026 Yellow Orange to pounce in the flower centers. Keep the shape of the centers a flattened oval shape. Tip the sponge in EZ-018 Chartreuse to shade the right upper portion of the center. Then shade the lower left portion of the center with EZ-011 Sienna Brown.
Load CB-106 Script Liner and CB-110 Liner loaded with EZ-012 Cobalt Black to detail the pattern. Follow the pattern on how to shape the lines on the pattern. Notice that the detail lines for the most part start out at a point, widen as they shape the leaf and then come to a fine point at the tip of the leaves. You want a bold and spontaneous look to the detail lines.
Condition the CB-106 Script Liner with Liquid Detergent. Do not rinse brush. Place a small amount of AC-302 Wax Resist in a Plastic Cup. Apply 1 coat of the wax over the leaves along the top of the flowers where the banded line will run. Wash brush immediately after use with warm water and Liquid Detergent. Let wax dry.
Center the vase onto the Banding Wheel. Use CB-106 Script Liner loaded with slightly thinned EZ-012 Cobalt Black. Brace your arm against something to aid in your stability while painting the banded line. Paint in a ½” band along the hip of the vase where it will intersect the leaves. Let dry. Use a moistened brush to remove any beads of color on the waxed area.
Stilt and Fire the vase to Self Cone 05-06.
Form
CD-1128 Medium Vase, Bisque
Colors
EZ-02 Cinderella Pink
EZ-011 Sienna Brown
EZ-012 Cobalt Black
EZ-018 Chartreuse
EZ-026 Yellow Orange
EZ-028 Leaf Green
EZ-032 Peacock Green
EZ-030 Rose
EZ-033 Ivy Green
FN-301 Marshmallow White (Matte)
FN-304 Black Velvet (Matte).
Decorating Accessories
CB-110 Liner
CB-106 Script Liner
CB-604 Soft Fan.
AC-230 Clay Carbon
AC-302 Wax Resist
Miscellaneous Accessories
Water
Silk Decorating Sponge (There is a difference in the usage of a Silk Decorating Sponge over other types, for that reason, the Silk Decorating Sponge should be used for this decorating process. A Synthetic Sponge does not produce the same effect as a Silk Decorating Sponge and will alter the overall look of the piece.)
Trace on the pattern to the greenware using a pencil and AC-230 Clay Carbon.
Place some of the EZ-Strokes onto a tile and thin slightly. Using a Silk Decorating sponge to pounce in 1-2 coats of EZ-026 Yellow Orange to the lemons. Let dry. If you don’t feel you can control the sponge to apply the shading around the edges of the lemons, you can cut the pattern to make a stencil to use to aid you in the shading.
Reload the edge of the sponge with EZ-011 Sienna Brown and shade the edges of the lemons. The color should be darkest along the edge of the lemon fading to nothing towards the center of the lemon.
Rinse the sponge and load with EZ-018 Chartreuse and sponge in a highlight on the main lemon.
Lightly outline the lemons with EZ-011 Sienna Brown using CB-110 Liner.
The leaves are blocked in with 1 coat of EZ-032 Peacock Green using CB-406 Pointed Round.
Shade the leaves with EZ-028 Leaf Green, EZ-033 Ivy Green and EZ-023 Midnight Blue. Keep the darkest color to the edges and base of the leaves.
Block in the stems to the leaves and lemons with EZ-011 Sienna Brown using CB-406 Pointed Round.
Detail the stem with EZ-010 French Brown using CB-110 Liner.
Use a Sgraffito Tool to scratch in the veins on the leaves.
Condition CB-406 Pointed Round with Liquid Detergent. Do not rinse brush.
Place some AC-302 Wax Resist into a Small Plastic Cup. Apply on coat of wax over the lemons and leaves. Apply the Wax Resist to the background area on the platter using the conditioned CB-406 Pointed Round. You want to apply one generous coat to the background portion around the filigree design. Keep the edges even and straight when painting the Wax Resist.
Paint in the dots in the filigree pattern with one coat of Wax Resist. Do not get any wax on the rest of the filigree areas. Wash the brush immediately after use with warm water and Liquid Detergent. Let dry.
Mix some EZ-013 White and EZ-032 Peacock Green about equal parts. Thin slightly with water.
Using the Silk Decorating Sponge to pounce in one coat to the filigree areas on the plate. Try not to go beyond the filigree pattern and onto the waxed areas if possible. A moistened brush with water should pick up any color left onto the waxed areas.
Darken the mixture with some EZ-023 Midnight Blue to a medium-dark blue. Sponge the color to the right and lower sections of the filigree pattern. Try not to get any color onto the waxed areas of the background. Again, use a moistened brush to lift any remaining droplets of color on the waxed areas.
Fire to Shelf Cone 04-03.
Use a moistened Synthetic Sponge to wipe down the piece to remove any debris or unattached droplets of color left after the bisque firing. Check the piece carefully.
Use CB-604 Soft Fan to apply 2-3 coats of S-2101 Crystal Clear Brushing to the front of the platter.
Apply 3-4 coats of FN-044 Yellow Orange to the back of the platter using CB-604 Soft Fan.
Stilt and fire the platter to Shelf Cone 05-06.
Form
CD-1307 Handled Platter, Greenware
Colors
EZ-010 French Brown
EZ-011 Sienna Brown
EZ-013 White
EZ-018 Chartreuse
EZ-023 Midnight Blue
EZ-026 Yellow Orange
EZ-028 Leaf Green
EZ-032 Peacock Green
EZ-033 Ivy Green
FN-044 Yellow Orange
S-2101 Crystal Clear Brushing
Decorating Accessories
CB-106 Script Liner
CB-406 Pointed Round
CB-604 Soft Fan
AC-230 Clay Carbon
AC-302 Wax Resist
Miscellaneous Accessories
Water
Silk Decorating Sponge (There is a difference in the usage of a Silk Decorating Sponge over other types, for that reason, the Silk Decorating Sponge should be used for this decorating process. A Synthetic Sponge does not produce the same effect as a Silk Decorating Sponge and will alter the overall look of the piece.)
Use the X-Acto Knife to cut off the neck to the to the leather hard greenware vase. The opening should be about 2 ½” in diameter to accommodate the lid. Check to make sure the lid fits loosely. Let dry.
Clean the vase using a Clean Up Tool to remove the seams and neck of the vase. Use the Green Grit Cloth to sand the seam lines further. Use a dampened Synthetic Sponge to remove any dust from the ware. Check the inside of the vase for debris.
Fire the vase and lid to Shelf Cone 03-04.
Use a dampened Synthetic Sponge to wipe down the ware and check the inside for any debris.
In a Plastic Cup thin some FN-053 Mint with water to a melted ice cream consistency. Pour the thinned glaze into the vase. While working quickly, rotate the vase to completely cover the inside of the vase. Pour out excess glaze and invert to dry. Repeat this for the lid as well.
Apply 3 coats of FN-053 Mint to the outside of the vase and lid using CB-604 Soft Fan. Let dry.
Trace the design onto the ware using AC-230 Clay Carbon. The pattern may need to have darts cut along the edge to accommodate the shape of the ware. Use the Blue Masking Tape to keep the pattern in place while tracing.
Fill in the top left shamrock with 2-3 coats of SC-78 Lime Light using CB-404 Pointed Round. To the right of that shamrock (middle top), fill it in with SC- 27 Sour Apple as before. Next shamrock to the far right is SC-52 Toad-ily Green. Center large shamrock is SC-26 Green Thumb.
Detail the pattern with 1-2 coats of slightly thinned SC-8 Just Froggy using CB-110 Liner. Keep the lines as fine as possible. The lines should have a nice even flow to them.
The veins in the shamrocks are done with thinned SC-8 Just Froggy as well. The large center shamrock is detailed with thicker SC-8 Just Froggy.
To the lid, apply 2 coats of SC-8 Just Froggy to the top finial portion and lower section of the lid. Do not paint in the middle bead of the lid. This will allow you to more easily apply the Gold Luster later.
Stilt and Fire the pieces to Shelf Cone 05-06.
Place some OG801 Bright Gold Luster onto a tile to air thicken slightly before applying. Apply 1 even coat of OG801 Detail Gold Luster to the middle bead on the lid using OB-916G #6 Filbert Brush reserved for Gold Luster only. Clean brush in OA901 Essence reserved for Gold Luster.
Stilt and Fire the lid to Shelf Cone 018.
Form
CD-910 Vase, large, Wet greenware
CD-1445A Small Finial Jar, Lid only, greenware
Colors
FN-053 Mint
SC-8 Just Froggy
SC-26 Green Thumb
SC-27 Sour Apple
SC-52 Toad-ily Green
SC-78 Lime Light
OG801 Bright Gold Luster
OA901 Essence
Decorating Accessories
CB-110 Liner
CB-404 Pointed Round
CB-604 Soft Fan
OB-916G #6 Filbert Brush (reserved for gold luster only)
Using the SG-401 Designer Liner Black, outline the pattern lines.
Using the # 6 Script Liner, apply 3 coats of EL-103 Sea Spray to the sky area.
Using the # 6 Script Liner, apply 3 coats of EL-150 Deep Waters to the water area.
Using the # 6 Script Liner, apply 3 coats of EL-122 malachite to the top center mountain.
Using the # 6 Script Liner, apply 3 coats of EL-218 Green Sapphire to the left mountain.
Using the # 6 Script Liner, apply 3 coats of EL-219 Lustre Green to the right mountain.
Using the # 6 Script Liner, apply 3 coats of EL-150 Fern to the meadow area, then at random add some CG-987 Tree Frog to add flowers to the field.
Using both the # 6 Script Liner and # 6 Soft Fan, apply 3 coats of SW-188 landslide to the rim and back of the plate, excluding the foot and inside the foot area.
Place on a well kiln washed shelf and fire to shelf cone 6.
Lightly sand ware to remove any blemishes. With Paper Towel brush off any dust.
Using provided pattern and clay carbon (ncr paper), with Red Pencil trace the design onto the ware.
Damp sponge ware to remove any dust and to condition the piece for decorating. The damp sponging will not harm the tracing of design. Also, be aware that the clay carbon does not work on damp or wet ware.
As needed, place the Fundamental colors on the palette. If extremely thick, mix in a few drops of water using a palette knife.
To complete project the following brushes will be used, #6 Pointed Round, #4 Pointed Round and the #10/0 Liner.
Using the #6 Round, block in the leaves with a smooth coat of Apple Green. Reload the brush as needed. It is easier to work from base of leaf to its tip.
Fully load #6 Round with Apple Green and side load with Leaf Green. Again, working from base of leaf to its tip, apply a second coat of color to the leaves. Keep the darker shade (Leaf Green) to one side of the leaf and the lighter shade to the opposite side. Be sure to blend the colors. Allow to set.
Side load the water dampened #6 Round with Bright Yellow. Float this color down the lighter side of the leaf. The Bright Yellow will give a highlight effect.
Mix a few drops of Forest Green into the Leaf Green, making a slighter darker shade of green. Again, side loading the water damped Round with the new shade, float down the darker side of leaf and add a float of shading under the lemons where the lemons overlap the leaves.
Allow the leaves some drying time.
For best results, complete the lemons following these steps.
Basecoat lemons marked 1 and 2 with a smooth coat of Bright Yellow.
When the basecoat has set, load the #6 Round with Bright Yellow and stipple in a second coat of yellow over both basecoated Lemons. Try to achieve a texture raised appearance. Be sure to cover the lemons thoroughly.
Change the brush to #4 Round and pick up Squash Yellow, proceed to stipple the color along the edge of the lemon where its neighbor overlaps the lemon being shaded. Refer to the provided detail pattern. Work in a pouncing up and down motion, blending this darker shade into the Bright Yellow. Allow to set.
To the opposite side of the Squash Yellow and using the same brush that is loaded with a small amount of Apple Green, stipple a hint of the green along the lemon’s edge. Again, keep the color soft and blended.
A soft blended highlight can be stippled in with China White just off center. The highlight helps generate the round look of a lemon.
Add additional stippled shading over the Squash Yellow with Orange Sorbet.
Following the above steps complete Lemon #3 in the same manner. Note that the Squash Yellow/Orange Sorbet should be applied where the two leaves at the top of the design overlap the Lemon. The green accent maybe added to either side of the Lemon. Note: detailing will be completed last.
To create the soft washed out background place the following on the palette: Baby Blue, Sea Blue, Wild Violet and Regal Purple. Thin colors to a light cream consistency.
Fully load #6 Round with water and pat off excess into a paper towel. Some water should remain in the brush, tip load with both of the purple tones and blend on palette. Holding the Round on the flat and directing the tip to the design begin to float a wash of color around a leaf. Keep reloading the Round in the same manner using all four of the colors creating a blue/purple wash background. Color needs to be strongest next to the design. Note this is to be a thin application of these four Fundamentals. Vary the color as you proceed around the leaves and lemons.
With #4 Round loaded with Spiced Brown and side loaded with Chocolate, pull in the stems with two blended coats. For the finer twigs pull in the same two colors keeping the application narrow and twig like. The branch is applied over the background wash of colors.
Thin down Forest Green with water. Fully load the #10/0 Liner with the green, proceed to outline the leaves with a broken, thick and thin line. Also, add a center vein down the middle of each leaf and pull out fine side veins.
The Lemons are detailed with thinned Chocolate and the #10/0 Liner. Use a broken, hit and miss soft outline. Add tiny accent dots to the lemons, just a few.
Accent the stems with fine hints of Black here and there along the stems. Be sure to sign the piece, again using #10/0 Liner.
If desired, center piece on a banding wheel, thin down Regal Purple with water. Dampen the 1” foam brush with water. Soak up the thinned Regal Purple to one side of the foam brush. Proceed to add a thin band of color around the edge of plate.
Fire the ware to cone 04.
Damp sponge ware to remove any fired dust and to condition the piece for glazing.
Apply with Fan Brush, two to three coats of Crystal Clear to entire plate, front and back. Piece may also be dipped with Clear Glaze.
Stilt ware and fire to shelf cone 06.
Remove stilt marks with Dremel Tool or Stilt Stone.
Place around 1 TBS of clay into a small bowl or cup. Add around 1 TBS of water and let sit. Mash up the clay to make slip. You might need to add more water or clay to make it the right consistency. It should have a similar consistency as gravy.
Roll out clay with a rolling pin until it is around 1/8” thick.
Using the ruler, square and knife, cut out a rectangle that is 4” wide by 12” long.
Find something circular that has at least a 4” diameter. Place it on the clay and cut out the circle.
Lift up the circle and rectangle to make sure they are not stuck to your work surface.
Take your jewelry and press them into a scrap piece of clay. Remove them to see what impression they make. Once you find the ones you like, press them into the rectangular slab to make a textured design.
Use the pencil to score the front, right side of the rectangle. It should just be the least ½” from the side. Use the pencil to score the back, left side of the rectangle. It should just be the least ½” from the side. Cover the scored areas with slip and join them together to form a cylinder.
Take the circle of clay and score ½” around the edge. Score the bottom edge of the cylinder. Add slip to both scored areas. Place the cylinder onto the circle. Take the knife and trim off any excess from the circle. Use the rib to smooth down the joint at the bottom.
Allow piece to air dry until it is firm enough to handle.
Using the Soft Fan with UG-72 Wedgewood Blue or UG-209 Jade, apply 1 coat to the bottom half of the candle holder (do not glaze the actual bottom). Dip the same brush into UG-51 China White and shade up to the top of the candle holder. Repeat for a total of 3 coats.
Using the Soft Fan with UG-51 China White, apply 3 coats to the inside of the candle holder.
Using the Soft Fan with NT-BR Clear One Brushing, apply 2 coats to the outside (not bottom) and inside of the candle holder.
Place spots of Jaded, Teal Next Time and Cara-bein Blue on a palette. Completely load the ¾” wash brush with Jaded and tip one edge with Teal Next Time and the other edge with Cara-bein Blue. Go to a clean area of palette and work the brush back and forth in the same spot to blend the colors in the brush.
Leaving about a three-inch center area blank in the inside bottom of the bowl, create a stroke with the wash brush going out toward the edge of the bowl. The stroke does not have to go all the way to the edge.
Repeat the strokes around the bowl by flipping the brush so where the strokes overlap, the colors match. So, the Cara-bein Blue always overlaps and the Teal Next Time overlaps. Repeat this around the entire inside of bowl, leaving the center three inches blank. Remember, strokes don’t all have to go all the way to the edge of the bowl. You’ll probably reload the brush with colors every couple of strokes.
Apply a generous coat of Cotton Tail to about a quarter of the center area in the bottom of the bowl. Use the liner brush to pick up some Cara-bein Blue and create S strokes in the white. Immediately dip the same liner brush (without washing) into the Teal Next time and create more S strokes, blending them wet into wet with Cotton Tail and Cara-bein Blue. Repeat this process with Jaded, creating a marble look with the four colors. Repeat this process with the other four quarters of the center bottom of the bowl.
Add spots of Sunkissed, Leapin’ Lizard, and Just Froggy to your palette. Fully load the ¾” wash brush with Sunkissed. Corner load one edge with Leapin’ Lizard and the other edge with Just Froggy and work back in forth on a bare spot on the palette to get a nice blend of the three colors on the brush.
On the outside of the bowl, create leaf strokes with the Just Froggy to the outside edge. Flip the brush over and create another stroke so the Leapin’ Lizard is overlapping in the center of the leaf. Pivot the brush so it comes to a point at the tip of each stroke.
Dilute a little bit of the Cara-bein Blue and create a wash of color between the leaves.
Dilute some Tuxedo and use the liner brush of choice to loosely outline flower petals inside the bowl. Add veining in the petals by pulling strokes at different lengths out from the outer edge of the center circle.
Dab dots of Tuxedo around the outer edge of the center circle inside of bowl. Create a fade of Tuxedo dots going in slightly to the center.
Outline and vein the leaves on the outside of the bowl with thinned Tuxedo.
Thin some Tuxedo and pick up just a little bit with the bristle fan brush. Flick the bristles back at the inside and outside of the bowl to speckle. Be careful not to get the specks on other items.
Use the sponge to pick up a little Tuxedo and dab along the top edge of the bowl and bottom foot areas.
Use a brush handle to add Cotton Tail dots to the tips of some of the flower veins. Add some dots in the center area. Add dots along rim of bowl.
Allow to dry, dip in choice of clear, and fire to cone 06.
Using the liner brush, add short dashes of Hot Tamale following the shape of the top arch to resemble a straight stitch. Reload your brush every few dashes to keep the coats thick and even.
Use the #6 Script Liner to paint the second arch with 2 coats of SC23 Jack-O-Lantern and the third arch with 2 coats of SC42 Butter Me Up.
Use a dotting tool to add SC52 Toadily Green dots along the fourth arch, taking care to evenly space them apart to resemble french knots.
Use the liner brush with SC28 Blue Isle to add a herringbone stitch to the fifth arch by painting a line in the middle of the arch and adding V shapes along the line. Add a second coat on the herringbone stitch.
Use the #6 Script Liner to paint the sixth arch with 2 coats of SC103 Lavendear.
Use the liner brush to add a buttonhole stitch to the seventh arch by painting a line following the arch, then adding dashes coming down from the line, following the shape of the arch.
Use the fan brush to paint the inside of the planter with 3 coats of SC33 Fruit of the Vine.
Use the fan brush to paint the top and back of the planter with 3 coats of SC74 Hot Tamale.
When the planter has dried, paint 2 even coats of SG703 Autumn Speckta-clear to the front, top and back of the planter.
Do not clear glaze. Fire to cone 06.
Tie the twine and knot by the holes in the hanger once fired. Optional: add a dot of super glue to the knot for extra security.
Begin with properly fired cone 04 bisque. Moisten a sponge and wipe bisque to remove any dust.
Pour White Roll-A-Coat into the 2oz disposable cup. Pour into the vase and rotate until the inside is covered. Pour out the excess into the disposable cup. Discard. If you would like to tint the White Roll-A-Coat, see tinting directions below.
Using the sponge with EL-101 Oyster Shell, apply 2 coats to the outside of the vase. Allow glaze to dry between coats. This will be the only glaze on the bottom.
Pour around 1 TBS of CG-1008 Blue Guppy, EL-101 Oyster Shell, PC-601 Clear Cascade, PC-602 White Cascade, SC-10 Teal Next Time, and SC-96 Aqu-ward onto the palette.
Dip the sponge into PC-602 White Cascade. Randomly sponge the vase until around ¼ of the vase is covered. The glaze should be thick, but not dripping.
Dip the same sponge into CG-1008 Blue Guppy. Randomly sponge the vase until around ½ of the vase is covered. The glaze should be thick, but not dripping. Make sure to sponge over some of the glaze from Step #5.
Dip the same sponge into EL-101 Oyster Shell. Randomly sponge the vase until around ½ of the vase is covered. The glaze should be thick, but not dripping. Make sure to sponge over some of the glaze from Step #5 and #6.
Dip the same sponge into PC-601 Clear Cascade. Randomly sponge the vase until around ¼ of the vase is covered. The glaze should be thick, but not dripping. Make sure to sponge over some of the glaze from Step #5, #6, and #7.
At this point, the entire vase should have a third coat.
Dip the same sponge into SC-96 Aqu-ward. Randomly sponge the vase until around ¼ of the vase is covered.
Dip the same sponge into SC-10 Teal Next Time. Randomly sponge the vase until around ¼ of the vase is covered.
Stilt and fire to cone 06.
Orange Vase:
Begin with properly fired cone 04 bisque. Moisten a sponge and wipe bisque to remove any dust.
Pour White Roll-A-Coat into the 2oz disposable cup. Pour into the vase and rotate until the inside is covered. Pour out the excess into the disposable cup. Discard. If you would like to tint the White Roll-A-Coat, see tinting directions below.
Using the sponge with EL101 Oyster Shell, apply 2 coats to the outside of the vase. Allow glaze to dry between coats. This will be the only glaze on the bottom.
Pour around 1 TBS of CG1002 Day Lily, EL101 Oyster Shell, PC601 Clear Cascade, PC602 White Cascade, SC024 Dandelion, and SC088 Tu Tu Tango onto the palette.
Dip the sponge into PC602 White Cascade. Randomly sponge the vase until around ¼ of the vase is covered. The glaze should be thick, but not dripping.
Dip the same sponge into CG1002 Day Lily. Randomly sponge the vase until around ½ of the vase is covered. The glaze should be thick, but not dripping. Make sure to sponge over some of the glaze from Step #5.
Dip the same sponge into EL101 Oyster Shell. Randomly sponge the vase until around ½ of the vase is covered. The glaze should be thick, but not dripping. Make sure to sponge over some of the glaze from Step #5 and #6.
Dip the same sponge into PC601 Clear Cascade. Randomly sponge the vase until around ¼ of the vase is covered. The glaze should be thick, but not dripping. Make sure to sponge over some of the glaze from Step #5, #6, and #7.
At this point, the entire vase should have a third coat.
Dip the same sponge into SC024 Dandelion. Randomly sponge the vase until around ¼ of the vase is covered.
Dip the same sponge into SC088 Tu Tu Tango. Randomly sponge the vase until around ¼ of the vase is covered.
Moisten a clean sponge and wipe bisque to remove any dust.
Mark the bowl to divide the bowl into even sections.
Apply 2 coats of SW196 Sand Dollar in “V”s. Using the mapped sections to evenly place them.
Use a squeeze bottle to apply 2 coats of SW100 Blue Surf as a line on top of the brushed design (we placed ours centered in the middle of the brush stroke).
Apply 3 coats of SW130 Copper Jade to the inside and outside of the bowl, avoiding the foot.
Use a clean sponge to wipe any excess glaze off the foot.
Begin with properly fired cone 04 6×6” bisque tile. Moisten a sponge and wipe bisque to remove any dust.
Using the Soft Fan brush with FN009 Black, apply 2 coats to the front and edges of the tile. Allow glaze to dry between coats.
When glaze is dry to the touch, place the pattern on the tile.
Using very light pressure, trace over the pattern with the pencil.
Using the Detail Liner, coat bristles with liquid soap, then use AC302 Wax Resist to outline the pattern on the tile.
Using the Script Liner with SG202 White Cobblestone, apply 3 coats to each section of the pattern (not the background). Allow glaze to lose its shine before applying the 2nd and 3rd coats. Wait for the 3rd coat to lose its shine before moving on to Step #7.
Using the Script Liner with SC100 Making Me Blush (background), SC101 Spruce it up (stem and dots), SC102 Just Peachy (ground), SC103 Lavendear (cap), SC104 Grape Expectations (gills) apply 1 coat to each section of the pattern as indicated between the parentheses.
Using a round brush, apply 2 coats of Amber Ash to the center of the flower.
Use a fan brush to apply 2 flowing coats of Rose Granite to the remainder of the plate, including the edges.
When the center of the flower is dry, use a round brush to apply one generous coat of Peppermint Twist to the center of the flower.
Starting about 1/4” in from the edge of the plate,
Use a fan brush to apply 2 flowing coats of Oyster Shell to the petals. By leaving the tips of the petal without Oyster Shell, it will give us some variation in the petal color.
When the front of the plate is dry, flip it over and apply 3 flowing coats of Rose Granite to the back of the plate.
Begin with properly fired shelf cone 04 bisque. Moisten a clean sponge and wipe bisque to remove any dust.
If desired, drill a hole with the carbide bit through the center of the bottom of the bowl.
Bee Instructions:
Using the CB-604 Soft Fan Brush, apply 2 coats of SW-501 White Gloss to the outside of the bowl. Make sure you don’t get any glaze on the rim. Let dry completely.
Using the pencil and AC-230 Clay Carbon Paper, trace the pattern onto the upside down bowl. You will have to adjust the pattern as you go along so that it is laying flat on the section you are working on. Use a pencil to extend the lines down for the stripes.
Using the CB-106 Script Liner, apply 2 coats of SW-502 Yellow Gloss to the face of the bee and every other stripe, leaving the eyes and wings white. Use the photo as a guide.
Using the CB-106 Script Liner, apply 2 coats of SW-508 Black Gloss to the rest of the stripes.
Fill the AC-219 Designer Bottle with Writer tip with SW-508 Black Gloss. Use it to outline the facial features and the lines on the wings.
Fill the AC-219 Designer Bottle with Writer tip with SC-97 Cant-Elope. Use it to draw squiggles onto the yellow sections of the bee and on his eyelids.
Use the SB-110 Mini Liner to apply 2 coats of SW-506 Bright Blue Gloss to the eyes.
Use a damp sponge to remove any glaze that got onto the rim.
Fire the bowl upside down. Do not stilt or hang over the edge of the kiln shelf.
Fire to cone 5/6.
Insert the threaded rod into the drilled hole and secure with the nuts and the washers to make a garden stake. You may have to use the drill to make the hole a little bigger if it shrank during firing.
Ladybug Instructions:
Using the pencil and AC-230 Clay Carbon Paper, trace the pattern onto the upside down bowl. You will have to adjust the pattern as you go along so that it is laying flat on the section you are working on. Trace the legs on both sides of the bowl.
Using the CB-604 Soft Fan Brush, apply 3 coats of SW-504 Red Gloss to the body of the ladybug, leaving the face, back side triangle and feet unglazed. Use the photo as a guide.
Using the CB-106 Script Liner, apply 3 coats of SW-508 Black Gloss to the face, the feet, and the back side triangle. Don’t glaze the eyes.
Using the CB-106 Script Liner, apply 2 coats of SW-501 White Gloss to the eyes. Let dry completely.
Fill the AC-219 Designer Bottle with Writer tip with SW-508 Black Gloss. Use it to outline the eyes, the line down the back, and his antennae. Also use it to make polka dots on the back.
Fill the AC-219 Designer Bottle with Writer tip with SW-501 White Gloss. Use it to add highlights to the face, feet and dots. Draw in the smile and the nose.
Use the SB-110 Mini Liner to apply 2 coats of SW-506 Bright Blue Gloss to the eyes.
Use the SB-110 Mini Liner to apply 2 coats of SW-504 Red Gloss to the eyelids.
Use a damp sponge to remove any glaze that got onto the rim.
Fire the bowl upside down. Do not stilt or hang over the edge of the kiln shelf.
Fire to cone 5/6.
Insert the threaded rod into the drilled hole and secure with the nuts and the washers to make a garden stake. You may have to use the drill to make the hole a little bigger if it shrank during firing.
Begin with properly fired shelf cone 04 bisque. Moisten a clean sponge and wipe bisque to remove any dust.
Using the pencil and AC-230 Clay Carbon Paper, trace the bee from the pattern onto the inside side of the plate 7 times, leaving equal amounts of space between each.
Using the SG-401 Black Designer Liner, go over the traced lines of each bee and fill in every other stripe of the body.
Using the SG-401 Black Designer Liner, make rows of dots between the bees. Use the photo as a reference.
Using the SG-407 Yellow Designer Liner, fill in the stripes of the bees’ bodies that aren’t black.
Using the CB-604 Soft Fan Brush, apply 3 coats of SW-510 Blue Gloss to the outside of the pie plate and to the top rim, leaving the bottom of the plate unglazed. Use a damp sponge to wipe off any glaze that may have gotten onto the bottom.
Using the CB-604 Soft Fan Brush, apply 3 coats of SW-136 Weathered Blue to the inside of the plate including over the bees.
Do not stilt or hang over the edge of the kiln shelf.
Fire to cone 5/6.
To use as a bee bath, put a layer of glass pebbles (available at Dollar Tree or craft stores) into the plate and fill it with water just so that the pebbles are covered.
Begin with properly fired shelf cone 04 bisque. Moisten a clean sponge and wipe bisque to remove any dust.
Using the pencil and AC-230 Clay Carbon Paper, trace only the outline of the dog onto the front of the stein.
Using the CB-604 Soft Fan Brush, apply 3 coats of SW-133 Rusted Iron to the inside of the stein, the outside rims and the handle. Use a smaller brush to get hard to reach areas if desired.
Using the CB-604 Soft Fan Brush, apply 3 coats of SW-109 Capri Blue to the outside of the stein around the dog.
Using the CB-106 Script Liner, apply 2 coats of SW-501 Gloss White to the dog and let dry completely.
Using the pencil and AC-230 Clay Carbon Paper, trace the words and shapes onto the inside of the dog. Cut out the pattern if desired to make it easier to line up properly.
Fill the AC-219 Designer Bottle with Writer tip with SW-508 Black Gloss. Use it to outline the dog and for the words and shapes inside the dog.
Using the CB-110 Mini Liner brush, apply 2 coats of SW-504 Red Gloss to the heart on the dog.
Fire to cone 5/6. Do not stilt or hang over the edge of the kiln shelf.
Begin with properly fired cone 04 bisque. Moisten a sponge and wipe bisque to remove any dust.
Pour around 1/4 cup of EL-101 Oyster Shell into the disposable cup. Thin with water until it is easily poured. Pour into the vase and rotate until the inside is covered. Pour out the excess.
Pour around ½ oz of PC-601 Clear Cascade into one of the 1oz bottles. Pour around ½ of PC-602 White Cascade into the other bottle. Screw on the detailer tips and cut the ends off until you can see a small hole.
Using the Soft Fan with EL-101 Oster Shell, apply 2 coats to the outside of the vase. Allow glaze to dry between coats.
Using the 1oz bottle with PC-602 White Cascade, apply a continuous line going from the top of the vase to the bottom. The less perfect, the better.
Pour around 1oz of EL-101 Oyster Shell, EL-129 Slate and S-2718 Cosmic Black onto the palette.
Dip the Soft Fan into EL-101 Oyster Shell and gently “pat” the glaze randomly onto the vase. You should cover around 1/3 of the surface.
Repeat with the same brush and EL-129 Slate. Be sure to go over some of the glaze from Step #7.
Repeat with the same brush and S-2718 Cosmic Black. Be sure to go over some of the glaze from Steps #7 and #8.
Repeat with the same brush and EL-101 Oyster Shell, just in a few spots.
Using the 1oz bottle with PC-601 Clear Cascade, apply a continuous line going from the top of the vase to the bottom. The less perfect, the better.
Begin with properly fired cone 04 bisque. Moisten a sponge and wipe bisque to remove any dust.
Place AC-230 Clay Carbon Paper over the front of the tray. Trace the pattern using the pencil.
Using the Round Brush with EZ 018 Chartreuse, EZ 023 Midnight Blue, EZ 026 Yellow Orange, EZ 030 Rose, EZ 058 Poppy Orange and EZ 075 Passion Red apply 1 coat to the flowers as pictured.
Using the Round Brush with EZ 027 Navajo Turquoise, EZ 028 Leaf Green and EZ 032 Peacock Green, apply 1 coat to the leaves as pictured.
Using the Detail Liner with EZ 037 Black, loosely outline the flowers and leaves. Add decorative lines and dots.
Using the Soft Fan with FN-009 Black, apply 2 coats to the back of the plate. Allow glaze to dry between coats.
Moisten a clean sponge and wipe bisque to remove any dust.
Use the script liner to load a brush with EZ-018 Chartreuse. Dip the tip in the EZ-027 Blue Turquoise. Apply by pressing the brush down onto the bisque and as you pull back, raise and twist the brush away from the bisque to create a tear drop shaped brush stroke.
Repeat as desired until design is filled in. It can be helpful to keep the design close to the top lip of the mug (see step #8).
Use the mini liner loaded with EZ-012 Cobalt Jet Black to outline the design. Once it is outlined, add the detail lines and thicken the outline.
Add dots of EZ-013 White as you please.
Once dry, use a script liner to apply SW-001 Stoneware Clear over the design.
Use a script liner to glaze around the design with 3 coats of SW-255 Gray Opal. Apply using a variety of brush strokes to prevent streaks. If the Gray Opal is applied heavily above the design, it may sag down. Applying you design closer to the top lip of the piece can help prevent this.
Use a soft fan to apply 3 coats of SW-508 Black Gloss to the inside and handle.
Use a clean sponge to wipe the excess glaze off of the foot.
Fire to cone 5/6. (Sample was fired to cone 6)
Form
SB-135Carmen Mug
Colors
EZ-018Chartreuse
EZ-027 Blue Turquoise
EZ-012 Cobalt Jet Black
EZ-013 White
SW-255 Gray Opal
SW-508 Black Gloss
Decorating Accessories
RB-144 #4 Soft Fan
CB-106 #6 Script Liner
CB-110 #10/0 Mini Liner
Miscellaneous Accessories
Sponge
Water
Duncan|Mid-Range|Stoneware Bisque
874|407|411
36109
“Spin, Drop, and Coat” Wash and Flux Trailing Bowl
Moisten a clean sponge and wipe bisque to remove any dust.
Fill an AC-223 Large Writer Tip kit with SW-401 Light Flux. Apply 2 bands of Flux around the edges of the rim.
Once the Flux is Dry, apply 2 coats of SW-305 Cobalt Wash dots on the bands of Flux using an eye dropper.
Once all of the trailing has dried, use a fan brush to apply 2 coats of SW-129 Copper Float to the inside and rim of the bowl. Apply 3 coats to the outside avoiding the foot.
Use a soft fan to apply 2 coats of SW-179 Muddy Waters to the inside and rim of the bowl.
Use a clean sponge to wipe the excess glaze off of the foot.
Trace on the pattern using the AC-230 Clay Carbon Paper.
Thin all the EZ Stroke colors to a light cream consistency using water or AC-957 Thin N Shade.
Using the CB-404 # 4 Pointed Round, apply 1 coat of EZ026 Yellow Orange to the center tulip.
Using the CB-404 # 4 Pointed Round, side load in EZ058 Poppy Orange and shade the petals.
Using the CB-404 # 4 Pointed Round, apply 1 coat of EZ030 Rose to the tulip on the left.
Using the CB-404 # 4 Pointed Round, side load in EZ075 Passion Red and shade the petals.
Using the CB-404 # 4 Pointed Round, apply 1 coat of EZ013 White to the tulip on the right.
Using the CB-404 # 4 Pointed Round, side load in EZ050 Plum Purple and shade the petals.
Using the CB-404 # 4 Pointed Round, apply 1 coat of EZ028 Leaf Green to the leaves.
Using the CB-404 # 4 Pointed Round, side load in EZ033 Ivy Green and shade the leaves and apply 1 coat to the stems.
Using the CB-110 #10/0 Mini Liner, outline and detail the design with SG-401 Designer Liner Black.
Using both the CB-106 # 6 Script Liner and CB-604 # 4 Soft Fan, apply 2 coats of SW-110 Oyster to the rim and back, excluding the foot area and recessed area on the bottom as Stoneware needs to be fired dry-footed, never stilted.
Using the CB-106 # 6 Script Liner, apply 2 coats of SW-001 Clear to the center area of the plate.
Place on a well kiln washed shelf and fire to shelf cone 6.
Trace on the pattern using the AC-230 Clay Carbon Paper.
Thin all the EZ Stroke colors to a light cream consistency using water or AC957 Thin N Shade.
Using the CB-404 # 4 Pointed Round, apply 1 coat of EZ075 Passion Red to the strawberries.
Using the CB-404 # 4 Pointed Round, side load in EZ018 Chartreuse and shade the edges of the strawberries.
Using the CB-404 # 4 Pointed Round, apply 1 coat of EZ028 Leaf Green to the leaves.
Using the CB-404 # 4 Pointed Round, side load in EZ033 Ivy Green and shade the leaves.
Using the CB-106 # 6 Script Liner, load in EZ033 Ivy Green and add the caps and stems.
Using the CB-404 # 4 Pointed Round, apply 1 coat of EZ002 Cinderella Pink to the petals.
Using the Round, apply 1 coat of EZ026 Yellow Orange to the flower centers.
Using the CB-106 # 6 Script Liner, apply 1 coat of EZ023 Midnight Blue to the grid and filler designs.
Using the CB-106 # 6 Script Liner, outline and detail the design with SG-401 Designer Liner Black.
Using both the CB-106 # 6 Script Liner and CB-604 # 4 Soft Fan, apply 3 coats of SW-504 Red to the rim and back, excluding the foot area and recessed and on the bottom.
Using the Soft Fan, apply 2 coats of SW-001 Clear to the center area of the plate.
Place on a well kiln washed shelf and fire to shelf cone 6.
Begin with properly fired cone 04 bisque. Moisten a sponge and wipe bisque to remove any dust.
Use the pencil to draw a line around the bottom of the hat and the ends of the sleeves. This will be where the white “trim” meets the red “fabric”.
Using the Script Liner with SC-16 Cotton Tail, apply 2 coats to the “trim”, gloves and beard. Allow glaze to dry between coats.
Using the Script Liner with SC-74 Hot Tamale, apply 3 coats to the hat, coat and pants. Allow glaze to dry between coats.
Using the Script Liner with SC-20 Cashew Later, apply 2 coats to the nose. Allow glaze to dry between coats.
Using the Script Liner with SC-15 Tuxedo, apply 2 coats to the boots. Allow glaze to dry between coats.
Using SG-401 Black, outline the facets on the gloves and nose. Outline between areas of different color.
Dip into NT-CLR Clear Dipping Glaze.
Fire to cone 06.
Use the hot glue gun to glue the white pom-pop to the tip of the hat.
Reindeer:
Begin with properly fired cone 04 bisque. Moisten a sponge and wipe bisque to remove any dust.
Use the pencil to draw a line ¼” above the hooves. This will be the white area between the hooves and fur. Also sketch the pupils of the eyes.
Using the Script Liner with SC-86 Old Lace, apply 2 coats to inside of the ears, outside of the tail, muzzle, chest and area above the hooves. Allow glaze to dry between coats.
Using the Script Liner with SC-25 Crackerjack Brown, apply 3 coats to the fur Allow glaze to dry between coats.
Using the Script Liner with SC-74 Hot Tamale, apply 2 coats to the nose. Allow glaze to dry between coats.
Using the Script Liner with SC-15 Tuxedo, apply 2 coats to the hooves and pupils. Allow glaze to dry between coats.
Using SG-401 Black, outline the facets on the white areas and nose.
Dip into NT-CLR Clear Dipping Glaze.
Fire to cone 06.
Use the scissors to cut two 1-inch pieces from the pipe cleaner. Fold each piece in half. Hot glue (cut side facing down) to the top of the head. You can also make large antlers if desired
Moisten a clean sponge and wipe bisque to remove any dust.
Use a soft fan to apply 3 coats of SW-140 Black Matte to the bottom section and handle of the mug. Avoiding the foot.
Use a soft fan to apply 2 coats of SW-253 Green Opal to the top section and inside of the mug.
Use a soft fan to apply 2 coats of SW-146 Aurora Green to the top section and inside of the mug. Be sure to load it really well with crystals! These are what create the beautiful movement and variation in the combination.
Use a clean sponge to wipe the excess glaze off of the foot.
Moisten a clean sponge and wipe bisque to remove any dust.
Use the SG-401 Designer Liner to create the design around the lip of the mug. Using a pencil to create even sections is very helpful for creating an even pattern!
Once the Designer Liner is completely dry, apply 3 coats of SW-250 White Opal to the outside of the mug, avoiding the foot and handle.
Use a soft fan to apply 2 coats of SW-2165 Lavender Mist to the outside of the mug.
Use a soft fan and script liner to apply 3 coats of SW-140 Black Matte to the inside and handle of the mug.
Use a clean sponge to wipe the excess glaze off of the foot.
Fire to cone 5/6. (Sample was fired to cone 6)
Form
SB-135Carmen Mug
Colors
SW-140 Black Matte
SW-165 Lavender Mist
SW-250 White Opal
SG-401 Black Designer Liner
Decorating Accessories
RB-144 #4 Soft Fan
CB-106 #6 Script Liner
Miscellaneous Accessories
Sponge
Water
Mid-Range|Stoneware Bisque
407|411
36114
“Spin, Drop and Coat” Stroke & Coat and Flux Trailing Bowl
Moisten a clean sponge and wipe bisque to remove any dust.
Replace the SC-10 Teal Next Time cap with an AC-224 Plastic Detailer Cap and trail along the top edge of the bowl, creating a series of “w”s. We applied 2 rows.
Fill an AC-223 Large Writer Tip kit with SW-401 Light Flux. Apply dots of Flux inside of the “w”s from the SC.
Allow the glaze to dry from steps 3 and 4 and repeat!
Once all of the trailing has dried, use a fan brush to apply 2 coats of SW-253 Green Opal to the inside of the bowl.
Use a soft fan to apply 2 coats of SW-110 Oyster to the inside of the bowl and 3 coats to the outside, avoiding the foot.
Use a clean sponge to wipe the excess glaze off of the foot.
Begin with properly fired cone 04 bisque. Moisten a sponge and wipe bisque to remove any dust.
Pour around 1/2 cup of EL-107 Amber Ash into the disposable cup. Thin with water until it is easily poured. Pour into the vase and rotate until the inside is covered. Pour out the excess.
Pour around 1 TBS of SW-303 Manganese Wash onto the palette. Dip the sponge on a stick into the wash and sponge the stamp. Press the stamp onto the top half of the vase, 1 face at a time. Repeat until all 8 faces are stamped.
Using the Soft Fan with SW-303 Manganese Wash, apply 2 coats to the bottom half of the vase. Allow wash to dry between coats. Dip the regular sponge in the wash and sponge over where the brushed area meets the stamped area. You don’t have to do that if you would rather have a straight line between the 2 areas.
Using the Soft Fan with EL-107 Amber Ash, apply 2 coats to the upper 2/3 of the vase. Allow glaze to dry between coats. Dip the regular sponge into the glaze and sponge over the bottom of the glazed area. You don’t have to do that if you would rather have a straight line.
Begin with properly fired cone 04 bisque. Moisten a sponge and wipe bisque to remove any dust.
Using the Soft Fan with EL-121 Copper Adventurine, apply 3 coats to the outside of the bowl. Allow glaze to dry between coats.
Using the Soft Fan with EL-121 Copper Adventurine, apply 3 coats to the inside of the bowl.
Take the two AC-220 Detailer Tips and 1 oz Bottles and cut the ends off of the tips. Fill one bottle with PC-601 Clear Cascade. Fill the other bottle with SC-96 Aqu-ward. Screw the tips back on the bottles.
Use the bottle with PC-601 Clear Cascade to make a scalloped line going around the inner edge of the bowl. It should be around 1 inch down from the edge. The points should be facing up, like below:
Use the same bottle to make a large dot between each of the points on the upper side of the scalloped line.
Use the bottle with SC-96 Aqu-ward to make a large dot directly on top of the dot from the previous step.
Allow glaze to dry.
Using the Soft Fan with EL-121 Copper Adventurine, apply 1 coat to the inside of the bowl.
Using the Soft Fan with EL-140 Toasted Almond, apply 1 coat to the upper half of the inside of the bowl.
Begin with properly fired cone 04 bisque. Moisten a sponge and wipe bisque to remove any dust.
Use the pencil to sketch a sweater on the yeti.
Using the Soft Fan with SC-96 Aqu-ward, apply 2 coats to the fur on the yeti. Do not glaze where the sweater will be located. Allow glaze to dry between coats.
Using the Script Liner with SC-16 Cotton Tail, apply 2 coats to the eyes. Allow glaze to dry between coats.
Using the Script Liner with SC-9 Jaded, apply 3 coats to the face, hands and feet. Allow glaze to dry between coats.
Use the pencil to draw the eyes.
Using the Script Liner with SC-10 Teal Next Time, apply 2 coats to the irises of the eyes and the toenails. Allow glaze to dry between coats.
Using the Script Liner with SC-73 Candy Apple Red, apply 2 coats to the nose. Allow glaze to dry between coats.
Using the Script Liner with SC-42 Butter Me Up, apply 2 coats to the teeth and horns. Allow glaze to dry between coats.
Using the Script Liner and Soft Fan with SC-73 Candy Apple Red, apply 2 coats to the sweater. Allow glaze to dry between coats.
Use the pencil to draw a line going around the yeti for the lights.
Using the Detail Liner with SC-10 Teal Next Time, apply a thick line over the pencil line.
Squeeze around 1 TSP of SC-27 Sour Apple, SC-42 Butter Me Up and SC-73 Candy Apple Red on to the palette. Dip the Script Liner into each color and dab onto the line for the lights. Repeat until the line has lights going all of the way from start to finish.
Using the Soft Fan with SG-704 Speckta-Clear Peppermint, apply 1 coat to the entire yeti, avoiding the face and feet and hands. You can apply all over if you prefer.
Fire to cone 06.
Mug:
Begin with properly fired cone 04 bisque. Moisten a sponge and wipe bisque to remove any dust.
Place the pattern on the mug. Slide AC-230 Clay Carbon Paper under the pattern. Trace with the pencil.
Use the pencil to sketch a hat and scarf on the yeti.
Using the Script Liner with SC-16 Cotton Tail, apply 2 coats to the “fur” on the hat, eyes and scarf. Allow glaze to dry between coats.
Using the Script Liner with SC-42 Butter Me Up, apply 2 coats to the teeth and horns. Allow glaze to dry between coats.
Using the Script Liner with SC-96 Aqu-ward, apply 3 coats to the fur on the yeti. Do not glaze where the scarf will be located. Allow glaze to dry between coats.
Using the Script Liner with SC-9 Jaded, apply 3 coats to the face, hands and feet. Allow glaze to dry between coats.
Use the pencil to draw the eyes.
Using the Script Liner with SC-10 Teal Next Time, apply 2 coats to the irises of the eyes and the toenails. Allow glaze to dry between coats.
Using the Script Liner with SC-73 Candy Apple Red, apply 2 coats to the nose and hat. Allow glaze to dry between coats. Use the Detail Liner to make stripes on the scarf.
Using the Script Liner with SC-27 Sour Apple, apply 2 coats to the trees on either side of the yeti. Allow glaze to dry between coats.
Using the Script Liner with SC-10 Teal Next Time, apply 2 coats to the last tree. Allow glaze to dry between coats.
Using the Detail Liner with SC-15 Tuxedo, outline the yeti, trees and lettering.
Using the Detail Liner with SC-73 Candy Apple Red, apply 1 coat to the lines around “for”.
Using the Soft Fan with SC-27 Sour Apply, apply 2 coats to the inside of the mug. Allow glaze to dry between coats.
Using the Soft Fan with SG-704 Speckta-Clear Peppermint, apply 1 coat to the entire mug, avoiding the yeti. You can apply all over if you prefer.
Moisten a clean sponge and wipe bisque to remove any dust.
Use a soft fan to apply 3 coats of SW-140 Black Matte to the entire plate, avoiding the foot.
Once the glaze is completely dry, transfer the pattern onto the platter using a pen and AC-230 Clay Carbon Transfer Paper.
Using the Detail Liner with AC-302 Wax Resist, apply 1 coat over the lines of the pattern.
Mix the Stoneware Gloss glazes to create some browns. We used a scale to ensure accurate measurements and consistent colors. For a darker brown (SC-34), mix 3 parts SW-504 Red Gloss with 1 part SW-509 Dark Green Gloss. For the lighter brown (SC-25), mix 1 part of SW-504 Red Gloss, with 3 parts of SW-507 Bright Green Gloss. And for a medium brown (SC-48), mix these two together. (The SC #s are on the pattern because this is a low-fire project that has been converted for Stoneware! Do not use the SC colors here, use the Gloss mixtures)
Use a CB-106 Script Liner to glob a thick, puddle like, coat of glaze onto the corresponding sections of the tray. Work in sections. Glaze approximately 1/3 of the tray and move to the next step. Refer to the patterns for color placement. NOTE: If the glaze is too heavy, it will crawl. If it is too light, you will not achieve the batik look.
Use a hair dryer on low to force dry the top layer (skin) of the glaze. Make sure not to put the hair dryer too close while it is wet or it will move the glaze. Dry until you see cracking in the skin.
Repeat steps 7 & 8 until the entire pattern is glazed. Work in sections to prevent the glaze from drying prematurely, which will cause less cracks.
Using the Script Liner with SW-117 Honeycomb, apply 2 coats to the background. Allow glaze to dry between coats. Apply a 3rd coat, but only in the center of each background section.
Use a clean sponge to wipe the excess glaze off of the foot.
Begin with properly fired shelf cone 04 bisque. Moisten a clean sponge and wipe bisque to remove any dust.
Turn the bowl upside down and drill a hole with the ¼” carbide bit through the center of the bottom. Wipe away any dust with the damp sponge.
Using the CB-604 Soft Fan Brush, apply 3 coats of SW-504 Red Gloss to the inside of the bowl and to the top of the rim.
Using the CB-604 Soft Fan Brush, apply 2 coats of SW-501 White Gloss to the outside of the bowl. Don’t glaze the bottom or the foot. Let dry completely.
Turn the bowl upside down. Using the carbon paper and a pencil, trace the pattern onto the bowl.
Using the CB-604 Script Liner, apply 2 coats of SW-504 Red Gloss to the ribbon, the lips, and around the outside of the foot.
Using the CB-604 Script Liner, apply 2 coats of SW-509 Dark Green Gloss to the leaves of the mistletoe.
Fill an AC-219 Designer Bottle with Writer Tip with SW-508 Black Gloss. Outline the design and use it to write ‘PUCKER UP’ on the lips. Retrace the letters onto the lips if desired.
Fill an AC-219 Designer Bottle with Writer Tip with SW-501 White Gloss. Add highlights to the leaves, ribbon, letters and lips, using the photo as a guide.
Do not stilt or hang over the edge of the kiln shelf.
Fire to cone 5/6.
Cut a 12” piece of string or cord. Fold it in half and make a knot about half way down, forming a loop. Thread the loop through the hole through the inside of the bowl. If your knot is too small and slips up through the hole, double knot it or tie it around a bead, washer or something similar. Tie another knot to keep it from slipping back out of the hole. Use the strings that are hanging down inside the bowl to attach your piece of mistletoe.
Begin with properly fired shelf cone 04 bisque. Moisten a clean sponge and wipe bisque to remove any dust.
Using the CB-604 Soft Fan Brush, apply 3 coats of SW-108 Green Tea to the inside and to the bottom half of the outside of the bowl. The edge where the glaze ends doesn’t need to be straight. The more jagged it is, the more random and flowy the glaze will look when it’s fired. Do not glaze the bottom or foot of the bowl.
Using the CB-604 Soft Fan Brush, apply 2 coats of SW-144 Lava Rock on top of the Green Tea inside and to the bottom half of the outside of the bowl.
Using the CB-604 Soft Fan Brush, apply 2 coats of SW-180 Desert Dusk on the top half of the outside of the bowl.
Using the CB-604 Soft Fan Brush, apply 2 coats of SW-112 Tiger Eye on top of the Desert Dusk on the top half of the outside of the bowl.
Using the CB-604 Soft Fan Brush, apply 1 or 2 coats of SW-401 Light Flux to the top 1” of the inside of the bowl up to and including the rim, and in a one-inch strip over where the two colors meet on the outside of the bowl. The flux can be thicker inside the bowl, but shouldn’t be too thick on the outside so it doesn’t run off the bowl. Two thin coats or one thicker coat is enough.
Using the CB-604 Script Liner, apply 3 coats of SC-10 Teal Next Time onto the top 1/3 of flux on the inside and outside of the bowl. See pattern for details.
Using the CB-604 Script Liner, apply 3 coats of SC-75 Orange-Peel to the center third of the flux and SC-11 Blue Yonder to the bottom 1/3 of the flux on the inside and outside of the bowl.
Do not stilt or hang over the edge of the kiln shelf.
Begin with properly fired shelf cone 04 bisque. Moisten a clean sponge and wipe bisque to remove any dust.
Using the CB-604 Soft Fan Brush, apply 2 coats of FN-010 Tree Green to the outside of the Jolly Tree.
Using the CB-404 #4 Pointed Round brush, apply one thick coat of FN-054 Pistachio to the flat parts of the front of the tree, using individual strokes to give the appearance of branches. Load the brush and push down with it onto the tree so that the glaze is thicker on the sides and thinner in the middle of the stroke. They should look streaky. Don’t apply these to the curly parts of the tree. See pattern for more details. Let dry completely.
Using a pencil and the clay carbon paper, trace the pattern onto the front of the tree.
Using the CB-404 #4 Pointed Round brush, apply two coats of SC-23 Jack O’ Lantern to the cat except for his belly and his eyes.
Using the CB-404 #4 Pointed Round brush, apply two coats of SC-16 Cotton Tail to the cat’s belly and his eyes.
Using the CB-404 #4 Pointed Round brush, apply two coats of SC-74 Hot Tamale to make random small circles on the front of the tree for ornaments. Repeat with SC-97 Cantelope, SC-11 Blue Yonder, and SC-76 Cara-Bein Blue.
Fill the AC-219 Designer Bottle with Writer Tip with SC-15 Tuxedo. Outline the cat and the ornaments, and draw in his facial features.
Fill the AC-219 Designer Bottle with Writer Tip with SC-16 Cotton Tail. Add highlights to the ornaments and add small dots all over the front of the tree.
Fill the AC-219 Designer Bottle with Writer Tip with SC-75 Orange-A-Peel and draw in the stripes on the cat according to the photo.
Using the CB-110 Mini Liner Brush, fill in the cat’s nose and ear with SC-95 Pinkie Swear.
Using the CB-604 Soft Fan Brush, apply 2 coats of CR-931 Appletini to the rest of the tree around the flat area of the front where the design is painted.
Begin with properly fired cone 04 bisque. Moisten a sponge and wipe bisque to remove any dust.
Using the Soft Fan with FN-001 White, apply 2 coats to the front of the plate. Allow glaze to dry between coats.
After the glaze is dry to the touch, place the pattern on the front of the plate and trace with the pencil.
Using the Script Liner with SC-6 Sunkissed, SC-9 Jaded, SC-8 Just Froggy, SC-27 Sour Apple, SC-77 Glo-Worm, SC-92 Café Ole and SC-96 Aqu-ward, apply 2 coats to the corresponding section of the pattern. Allow glaze to dry between coats.
Using the Detail Liner with SC-15 Tuxedo, outline the tree, add lines to the star and trunk and outline the lights.
Replace the cap on SC-74 Hot Tamale with AC-224 Plastic Detailer Cap. Squeeze dots along the line for lights.
Using the Soft Fan with SC-74 Hot Tamale, apply 3 coats to the back of the plate. Allow glaze to dry between coats.
Moisten a clean sponge and wipe bisque to remove any dust.
Use a soft fan to apply 3 coats of SW-141 White Matte to the inside of the bowl/outside of the mug (avoiding the rim).
Use a palette knife to mix the AC-310 Silkscreen Medium with each underglaze color until it is the thickness of peanut butter. Use your finger to apply the thickened mixture through the leaf screen. You can use the screen repeatedly for the same color, but be sure to rinse and thoroughly dry between colors.
Use a fan and liner brush to apply 3 coats of SW-203 Root Beer to the inside/back and rim; avoiding the foot.
Use a clean sponge to wipe the excess glaze off of the foot.
Begin with properly fired cone 04 bisque. Moisten a sponge and wipe bisque to remove any dust.
On the DSS-0160 Vintage Holiday screen, locate the three ornaments. Draw an outline around them in permanent marker. Cut them out with excess screen around the edges.
Squeeze around 1 TBS of SC-36 Irish Luck and SC-87 Ruby Slippers onto the palette (in separate areas). Add a pinch of AC-310 Silkscreen Medium to each. Mix with a palette knife until they become the consistency of peanut butter. You may need to add more silkscreen medium or glaze.
Place the screens on the tray one at a time. While holding the screen firmly in place, take a small amount of premixed silkscreen medium (either the red or the green), and gently rub in circles starting in the center and working outward.
Repeat step #4 until the tray is covered in ornaments.
Use SG-403 Red, SG-405 Green and SG-409 Bright Green to add lines and dots to the ornaments. You can also add bows to the tops of the ornaments.
Using the Soft Fan with SC-87 Ruby Slippers, apply 3 coats to the back of the tray. Allow glaze to dry between coats.
Using the Soft Fan with SG-704 Speckta-Clear Peppermint, apply 2 coats to the front of the tray. Allow glaze to dry between coats.
Begin with properly fired cone 04 bisque. Moisten a sponge and wipe bisque to remove any dust.
On the DSS-0160 Vintage Holiday screen, locate the three ornaments. Draw an outline around them in permanent marker. Cut them out with excess screen around the edges.
Squeeze around 1 TBS of SC-15 Tuxedo onto the palette. Add a pinch of AC-310 Silkscreen Medium. Mix with a palette knife until it becomes the consistency of peanut butter. You may need to add more silkscreen medium or glaze.
Place the screens on the tray one at a time. While holding the screen firmly in place, take a small amount of premixed silkscreen medium, and gently rub in circles starting in the center and working outward.
Repeat step #4 until you have a line of ornaments across the flat portion of the tray.
Using the Script Liner and Detail Liner with SC-28 Blue Isle, SC-88 Tu Tu Tango and SC-92 Café Ole, apply 2 coats to different areas of the ornaments. If you would like any areas white, do not glaze. Allow glaze to dry between coats.
Using the Script Liner and Soft Fan with SC-37 Ivory Tower, apply 2 coats to the background. Allow glaze to dry between coats.
Squeeze around 1 TBS of SC-92 Café Ole onto the palette. Dip the sponge on a stick in to the glaze and sponge ST-129 Mini Fern stamp. Press onto the background. Repeat until the background is covered.
Using FD 254 Black Licorice, outline the ornaments and make bows on top. Make a scalloped edge and dots going around the border.
Using the Soft Fan with SC-15 Tuxedo, apply 2 coats to the back of the tray. Allow glaze to dry between coats.
Begin with properly fired shelf cone 04 bisque. Moisten a clean sponge and wipe bisque to remove any dust.
Using a CB-604 #4 Soft Fan, apply 1 coats of FN-001 White to the canvas. Allow to dry!
Print 2 copies of the pattern. Line up the 2 copies of the pattern and cut around the pattern. Set 1 pattern aside.
Line up the pattern on the piece. Lift up one of the corners of the pattern. With a Soft Fan Brush wet the canvas with water and immediately lay the pattern back down. Continue to the other side. Make sure there was water under the pattern. Now take a paper towel flat on the piece and press to absorb any excess water.
Using a CB-604 #4 Soft Fan, Apply 3 coats of FN-031 Big Blue Sky to the piece brushing from the pattern out. This helps prevent the glaze from going under the patter.
Using an old Tooth Brush, splatter the piece with SC-16 Cotton Tail.
Remove the pattern.
Place the second copy of the pattern in place with a sheet of AC-203 Clay Carbon Paper under it and trace the pattern onto the piece.
Using a CB-404 #4 Pointed Round, apply 3 coats of SC-20 Cashew Later to Santa’s face.
Using a CB-106 #6 Script Liner, apply 3 coats of SC-46 Raw Hide to the Reindeer antlers.
Using a CB-404 #4 Pointed Round, apply 3 coats of SC-41 Brown Cow the reindeers body and 3 coats of SC-14 Java Bean to the inside of the ears and the bottom of the hove.
Using a CB-404 #4 Pointed Round, apply 3 coats of SC-87 Ruby Slippers to the left side of the Santa hat, 3 coats of SC-74 Hot Tamale to the center section and 3 coats of SC-73 Candy apple Red to the right section.
Using a CB-106 #6 Script Liner, apply 3 coats of SC-74 to Santa’s nose, mittens and the nose on Rudolf.
Using a CB-106 #6 Script Liner, shade the antlers with SC-42 Brown Cow. Shade all Red areas with SC-81 Cinnamon Stix.
Using a CB-202 #2 apply 2 -3 coats of SC-16 Cotton Tail to the eye areas. Apply 2 coats of SC-15 Tuxedo to the eyes then add a Highlight with SC-16 Cotton Tail. Also add white highlights to the noses and Santa mittens.
Using a CB-110 #10/0 Liner, outline with SG-406 Designer Liner Brown.
Using a CB-106 #6 Script Liner, apply 1 coat of S-2101 Crystal Clear Brushing Glaze to the ball and trim of Santa’s hat. Allow to dry!
Apply 2 – 3 coats of SG-302 Snowfall to the ball and trim of Santa’s hat and 2 coats to the tips of the antlers.
Punch out some snowflakes creating a stencil. Attach to the piece with water under the paper, blot with a paper towel. Apply 2 -3 coats of SC-16 Cotton Tail. Remove the stencil before the color dries.
Optional: You can apply add the Merry Christmas by tracing the pattern on with AC-230 Clay Carbon Paper and then apply 2 coats of SC-8 Just Froggy with a CB-110 #10 Liner. Allow to dry!
Begin with properly fired cone 04 bisque. Moisten a sponge and wipe bisque to remove any dust.
Squeeze around 1 TBS of SP-211 Speckled Blue Yonder, SP-216 Speckled Cotton Tail and SP-245 Speckled My Blue Heaven onto the palette. Dip the Soft Fan into SP-211 Speckled Blue Yonder and apply 1 coat to the bottom 1/3 of the hat. While that glaze is still wet, dip the same brush into SP-245 Speckled My Blue Heaven, blend with the edge and glaze up to the top 1/3 of the hat. While that glaze is still wet, dip the same brush into SP-216 Speckled Cotton Tail, blend with the edge and glaze up to the top. Repeat.
Pour about 2 TBS of NT-BR Clear One Brushing onto the palette. Add a pinch of AC-310 Silkscreen Medium. Mix with a palette knife until it becomes the consistency of peanut butter. You may need to add more Silkscreen Medium or glaze. Add a drop of food color and mix.
On the DSS-0158 Buggin’ Out screen, locate the butterfly. On the DSS-0159 Gnomeland screen, locate the leaves. On the DSS-0161 Woodland Critters screen locate the 2 birds. Draw an outline around them in permanent marker. Cut them out with excess screen around the edges.
Place the butterfly towards the top of Lindy’s hat (shiny side down). While holding it firmly in place, take a small amount of premixed Silkscreen Medium, and gently rub in circles starting in the center and working outward. Slowly pull up the screen to avoid smearing. Repeat with the leaves.
Place one bird at the top of Lars’ hat. While holding it firmly in place, take a small amount of premixed Silkscreen Medium, and gently rub in circles starting in the center and working outward. Slowly pull up the screen to avoid smearing. Repeat with the other bird and leaves.
Using the Script Liner with SC-6 Sunkissed, SC-11 Blue Yonder, SC-27 Sour Apple, SC-45 My Blue Heaven and SC-97 Cant-elope, apply 2 coats to the corresponding sections of the screens. Allow glaze to dry between coats.
Squeeze around 1 TBS of SC-15 Tuxedo and SC-34 Down to Earth onto the palette. Thin them both with around 1 TSP of water. Apply 1 coat of thinned SC-15 Tuxedo to Lars’ beard. Apply 1 coat of thinned SC-34 Down to Earth to Lindy’s hair. Use a damp sponge to wipe off most of the glaze, leaving it only in the crevices.
Using the Scrip Liner with SC-46 Rawhide, apply 2 coats to their noses. Allow glaze to dry between coats.
Using the Script Liner with SC-16 Cotton Tail, apply 2 coats to Lars’ beard. Allow glaze to dry between coats.
Using the Script Liner with SC-6 Sunkissed, apply 2 coats to Lindy’s hair. Allow glaze to dry between coats.
Using the Script Liner and Soft Fan with SC-6 Sunkissed, apply 1 coat to Lars’ body. Apply a second coat and shade with SC-97 Cant-elope. Allow glaze to dry between coats.
Using the Script Liner and Soft Fan with SC-27 Sour Apple, apply 1 coat to Lindy’s body. Apply a second coat and shade with SC-26 Green Thumb. Apply 2 coats to Lars’ gloves. Allow glaze to dry between coats.
Using the Script Liner with SC-97 Cant-elope, apply 2 coats to Lindy’s gloves. Allow glaze to dry between coats.
Use a pencil to sketch a few mushrooms going around the bottom of Lars’ body. Using the Script Liner with SC-73 Candy Apple Red, apply 2 coats to the tops of the mushrooms. Using the Script Liner with SC-46 Rawhide, apply 2 coats to the base of the mushrooms. Allow glaze to dry between coats.
Squeeze around 1 TSP SC-16 Cotton Tail onto the palette. Dip the end of the bush in the glaze press on the tops of the mushrooms to make dots.
Using the Detail Liner with SC-15 Tuxedo, outline the designs on the hats. Outline the details on their bodies and add dot/lines going around Lindy’s dress and cuffs.
Using the Soft Fan with NT-BR Clear One Brushing, apply 1 coat over each gnome.
Begin with properly fired cone 04 bisque. Moisten a sponge and wipe bisque to remove any dust.
Squeeze around 1 TBS of SG-401 Black onto the palette. Thin with around 1 TSP of water. Apply 1 coat of thinned SG-401 Black to Lars and Lindy (not on hats). Use a damp sponge to wipe off most of the glaze, leaving it only in the crevices.
Using the Soft Fan with CG-999 Jazz Notes, apply 1 coat to Lindy’s hat.
Using the Soft Fan with CG-998 Pink Pixie, apply 1 coat to Lars’ hat.
Use the scissors to cut the tip off of AC-220 Detailer Tip. Pour around 1oz of PC-602 White Cascade into the 1oz Bottle. Screw the tip onto the bottle. Squeeze PC-602 White Cascades onto their hats, going in a circle motion. There should be a spiral of glaze going down their hats. Let glaze dry.
Using the Soft Fan with EL-150 Fern, apply 2 coats to Lars’ hat. Allow glaze to dry between coats.
Using the Soft Fan with EL-151 Deep Water, apply 2 coats to Lindy’s hat. Allow glaze to dry between coats.
Using the Script Liner with EL-125 Sahara Sands, apply 2 coats to their noses and hands. Allow glaze to dry between coats.
Using the Script Liner with EL-101 Oyster Shell, apply 2 coats to Lars’ beard. Allow glaze to dry between coats.
Using the Script Liner with EL-128 Wheat, apply 2 coats to Lindy’s hair. Allow glaze to dry between coats.
Using the Script Liner with EL-129 Slate, apply 2 coats to Lars’ body. Apply a 3rd coat to the inner sections of his body only. Allow glaze to dry between coats.
Using the Script Liner with EL-127 Rose Granite, apply 2 coats to Lindy’s body. Apply a 3rd coat to the inner sections of her body only. Allow glaze to dry between coats.
Begin with properly fired cone 04 bisque. Moisten a sponge and wipe bisque to remove any dust
Squeeze around 1 TBS of SC-15 Tuxedo onto the palette. Thin with around 1 TSP of water. Apply 1 coat of thinned SC-15 Tuxedo to Lars and Lindy (not on hats). Use a damp sponge to wipe off most of the glaze, leaving it only in the crevices.
Using the Script Liner with SC-60 Silver Lining, apply 2 coats to Lars’ beard. Allow glaze to dry between coats.
Using the Script Liner with SC-27 Sour Apple, apply 2 coats to their noses and hands. Apply 2 coats to the pumpkin stem. Allow glaze to dry between coats.
Using the Script Liner with SC-75 Orange-A-Peel, apply 2 coats to Lindy’s braids and Lars’ body. Allow glaze to dry between coats.
Using Script Liner and Soft Fan with SC-13 Grapel, apply 2 coats to Lindy’s body. Allow glaze to dry between coats.
Use the pencil to draw or trace Halloween silhouettes on their bodies – spiders, bats, cats, skulls, etc.
Use the Detail Liner with SC-15 Tuxedo to outline and fill in the Halloween designs. Outline the details on their bodies. Make a dot on Lindy’s nose for a wart.
Using the Script Liner with SC-15 Tuxedo, apply 2 coats to the underside of their hats. Allow glaze to dry between coats.
Using the Soft Fan with SC-15 Tuxedo, apply 3 coats to Lindy’s hat and the body of the pumpkin. Allow glaze to dry between coats.
Squeeze around 1 TBS of SC-13 Grapel, SC-27 Sour Apple and SC-75 Orange-A-Peel onto the palette. Dip the Soft Fan in SC-13 Grapel and apply 1 coat around the bottom 1/3rd of the Lar’s hat. Dip the same brush into SC-27 Sour Apple and shade with the edge of the previous color. Then apply 1 coat to the middle 1/3rd of the hat. Dip the same brush into SC-75 Orange-A-Peel and shade with the edge of the previous color. Then apply 1 coat to the top 1/3rd of the hat. Repeat for a total of 3 coats.
Using the Soft Fan with SG-201 Black Cobblestone, apply 1 coat to Lar’s hat. As soon as that coat loses its shine, apply a second coat to the bottom 2/3rd of the hat. As soon as that coat loses its shine, apply a third coat to the bottom 1/3rd of the hat.
Using the Soft Fan with SG-202 White Cobblestone, apply 1 coat to Lindy’s hat. As soon as that coat loses its shine, apply a second coat to the bottom 2/3rd of the hat. As soon as that coat loses its shine, apply a third coat to the bottom 1/3rd of the hat.
Using the Soft Fan with SG-202 White Cobblestone, apply 1 coat to the body of the pumpkin. As soon as that coat loses its shine, apply a second coat.
Squeeze around 1 TBS of SC-13 Grapel, SC-27 Sour Apple and SC-75 Orange-A-Peel onto the palette. Dip the Soft Fan in SC-75 Orange-A-Peel and apply 1 coat around the bottom 1/3rd of Lindy’s hat and the body of the pumpkin. Dip the same brush into SC-13 Grapel and shade with the edge of the previous color. Then apply 1 coat to the middle 1/3rd of the hat. Dip the same brush into SC-27 Sour Apple and shade with the edge of the previous color. Then apply 1 coat to the top 1/3rd of the hat.
Begin with properly fired cone 04 bisque. Moisten a sponge and wipe bisque to remove any dust.
Position the pattern on top of the platter. Slide AC-230 Clay Carbon Paper under the pattern. Trace the pattern with a pencil.
Using the Script Liner with SC-7 Leapin’ Lizard, SC-8 Just Froggy, SC-23 Jack O’ Lantern, SC-96 Aqu-ward, SP-209 Speckled Jaded, SP-227 Speckled Sour Apple, apply 2 coats to the corresponding section of the design. Allow glaze to dry between coats. Refer to the pattern.
Using the Detail Liner with SC-15 Tuxedo, outline the noses, faces and smiles. Add dots for the eyes.
Using FD-258 Pure White, outline the hat and scarves. Add decorative lines, dots and snowflakes.
Using the Soft Fan with SC-15 Tuxedo, apply 2 coats to the back of the plate. Allow glaze to dry between coats.
Begin with properly fired cone 04 bisque. Moisten a sponge and wipe bisque to remove any dust.
Using the Soft Fan with EL-118 Blue Grotto, apply 2 coats to the tree. Allow glaze to dry between coats.
Mix CG-996 Spring Rain, CG-1001 Gogh Iris and CG-974 Bloomin’ Blue with the palette knife. Pour around 2 oz of each glaze onto the palette. Keep them separate.
Using the Soft Fan with CG-996 Spring Rain, apply 1 coat to the top 1/3rd of the tree.
Dip the same brush into CG-1001 Gogh Iris and blend with the bottom of the previous coat. Then glaze the middle 1/3rd of the tree.
Dip the same brush into CG-974 Bloomin’ Blue and blend with the bottom of the previous coat. Then glaze the bottom 1/3rd of the tree.
Cast the molds in usual manner. Allow greenware to dry! Clean the greenware with a Clean-Up Tool.
Bisque fire to cone 04.
Begin with properly fired shelf cone 04 bisque. Moisten a clean sponge and wipe bisque to remove any dust.
CD041 Waving Gnome
Using a Basecoat Brush, basecoat the coat with 1 – 2 coats of SS-57 Accent Green. Basecoat the hat, gloves, shoes and beard with SS-24 Chocolate Fudge. Allow to dry!
Using various size drybrushes, drybrush as follows – Coat: SS-276 Forest Green then OS-487 Olive Green followed by OS-466 Avocado. Highlight with SS-19 Country Sage.
Drybrush the hat, gloves and shoes with SS-234 Medium Mocha then OS-571 Curry. Highlight lightly with SS-3 Honey Toast.
Drybrush the beard with SS2345 Medium Mocha then OS-567 Ash followed by OS-474 Grey. Highlight with SS-130 Medium Gray then SS-135 White.
Basecoat the nose with SS-234 Medium Mocha then shade with SS-24 Chocolate Fudge.
Shade/float around the coat with SS-57 Accent Green to deepen the crevices.
Add scallops around the edge of the hat using a Shader Brush and SS-24 Chocolate Fudge.
CD042 Hands Up Gnome
Basecoat the hat, coat and gloves with OS-586 Ultramarine.
Drybrush the hat, coat and gloves with OS-468 Deep Turquoise then SS-317 Turquoise then OS-469 Light Turquoise. Highlight only the hat and gloves with SS-135 White.
Basecoat the beard with SS-130 Medium Gray. Drybrush with OS-500 Snowcloud Grey then highlight with SS-135 White.
Basecoat the nose with SS-192 Light Taupe, shade with SS-183 Rich Peach.
Basecoat the Shoes with SS-138 Flat Black then highlight with a little SS-135 White in the brush.
CD043 Hands on Hip Gnome
Basecoat the hat and gloves with 1 – 2 coats of OS-480 Garnet.
Drybrush the hat, and gloves with SS-179 Antique Red then SS-176 Christmas Red. Highlight with OS-449 Bright Red.
Basecoat the coat and shoes with SS-138 Flat Black.
Drybrush with OS-475 Charcoal then OS-567 Ash. Highlight with SS-130 Medium Gray.
Basecoat the beard with OS-475 Charcoal. Drybrush with SS-130 Medium Gray followed by OS-500 Snowcloud Grey. Highlight the beard with SS-135 White. Highlight the Shoes with SS-130 Medium Gray.
Basecoat the nose with SS-1278 Medium Portrait. Shade with SS-234 Medium Mocha.
Add various size dots on the Hat with SS-138 Flat Black. Allow to dry!
Using Graphite Transfer Paper, trace the daisy pattern on the hat. Basecoat the flower petals with SS-130 Medium Gray to block out the red and black. Then basecoat with SS-135 White. Shade the petals with OS-469 Light Turquoise. Add dots of Shade lightly with SS-234 Medium Mocha. Basecoat the leaves with SS-19 Country Sage then shade with SS-57 Accent Green.
Finishing All Gnomes
Using a Soft Brush, apply 2 coats of AC-502 Matte Brush-On Sealer to each gnome. Allow to dry between each coat. Then apply 2 coats of AC-501 Gloss Brush-On Sealer the all shoes and noses.
Squeeze around 1 TBS of SC-15 Tuxedo onto the palette. Thin with around 1/2 TSP of water. Using the Soft Fan, brush 1 coat over the entire piece.
Using a damp sponge, wipe most of the glaze off, leaving it only in the crevices.
Using the Script Liner with SC-54 Vanilla Dip, apply 2 coats to the antlers. Allow glaze to dry between coats.
Using the Script Liner with SC-60 Silver Lining, apply 2 coats to the sweater. Shade the edges and creases with SC-3 Gray Hare. Allow glaze to dry between coats.
Using the Script Liner with SC-27 Sour Apple, apply 2 coats to the scarf. Allow glaze to dry between coats.
Using the Script Liner with SC-16 Cotton Tail, make vertical stripes on the scarf.
Using the Detail Liner with SC-26 Green Thumb, make vertical lines between the white lines. Use the Script Liner to apply 2 coats to the fringe. Allow glaze to dry between coats.
Using the Detail Liner with SC-74 Hot Tamale, make vertical lines going through the white stripes. Then make a horizonal line going down the scarf.
Using the Script Liner with SC-54 Vanilla Dip, apply 1 coat to the inside of the ear and shade the edges with SC-48 Camel Back. Repeat for a second coat.
Using the Script Liner with SC-54 Vanilla Dip, apply 1 coat to the muzzle and shade the edges with SC-48 Camel back. Continue with SC-48 Camel Back on the rest of the head, ears and legs. Repeat for the 2nd
Using the Script Liner with SC-15 Tuxedo, apply 2 coats to the hooves. Allow glaze to dry between coats.
Squeeze around 1 TSP SC-2 Melon-Choly onto the palette. Dip the sponge in the glaze and sponge inside the ears and on the muzzle. Use the Script Liner to apply 2 coats to the nose. Allow glaze to dry between coats.
Using the Script Liner and Soft Fan with SP-274 Speckled Hot Tamale, apply 2 coats to the hat. Allow glaze to dry between coats.
Check out the video at the bottom of this page to learn how to create this project!
Begin with a properly fired bisque. Use a damp sponge to remove any dust.
Using the tape, build a wall around the canvas to trap the paints from pouring off the side.
Fill pouring cup with SC-15 Tuxedo, SC-16 Cotton Tail, SC-11 Blue Yoder, SC-26 Green Thumb, and SC-6 Sunkissed.
Begin pouring the glazes over the canvas and move the pouring cup around to fill the canvas.
Using the mister bottle, mist the areas that are empty of glazes then tilt to fill all the way to the edge of the canvas.
Remove one side of tape and mist the edge to help the glaze fall as you tilt to cover the edge with glaze. You can use a Xiem brush to help full in the edges. Continue with the same technique on the other edges pulling the tape off one edge at a time.
Fire to cone 05.
Tips:
You can use Stroke & Coat or Foundations
You have to thin Stroke & Coat by 15% (15 mL – 100 mL)
Foundations is already thin enough to produce nearly identically results
Can use small plastic cups and layer glaze inside the cup instead of using pre-made pouring cups
If you are using hand built pieces, you will need to leave space for gases to escape
You can glaze the piece before you pour so there is glaze already there incase you miss a spot
Higher firing temperatures tend to burn out the colors
Spraying the sides while the tape is still intact helps with flowing glaze over the side
The longer you stay in one area pouring glaze the finer the lines you’ll get
If you have small empty gaps you can mist them or use a brush and dab the glaze to fill the spot
This technique can be done on greenware to shorten the firing process
Choosing monochromatic, analogous or other compatible color combinations will keep from creating muddy neutrals in your pour
It takes just under 4 ounces of glaze to cover an 8″x10” clay canvas (use this when deciding how much glaze you will need)
Do not force dry. It will cause cracks
You can twice fire pieces to correct issues if necessary
Begin with properly fired cone 04 bisque. Moisten a sponge and wipe bisque to remove any dust.
Apply MC-002 12mm Low Track Masking Tape over the holes in the branches of the cactus. Leave the large center hole open.
Pour around ¼ cup of EL-103 Sea Spray into the disposable cup. Thin with water until it is easily poured. Pour into the top of the cactus and rotate until the inside is covered. Pour out the excess. Remove the tape.
Using the Soft Fan with EL-103 Sea Spray, apply 2 coats to the outside of the cactus. Allow glaze to dry between coats.
Pour around 1 TBS of PC-602 White Cascade onto the palette. Dip the Soft Fan into the glaze and randomly “glob” the glaze onto the cactus. Repeat until around ¼ of the cactus is covered. Allow glaze to dry.
Using the Soft Fan with EL-208 Moss Creek, apply 2 coats to the outside of the cactus. Recede the final coat to prevent dripping. Allow glaze to dry between coats.
Pour around 1 TBS of PC-601 Clear Cascade onto the palette. Dip the Soft Fan into the glaze and randomly “glob” the glaze onto the 3 upper sections (Where the holes in the top are located. Go to about 1-2 inches down from the holes).
Fire to cone 06.
Cactus Bowl:
Begin with properly fired cone 04 bisque. Moisten a sponge and wipe bisque to remove any dust.
Using the Soft Fan with EL-103 Sea Spray, apply 3 coats to the inside of the bowl. Apply 2 coats to the outside. Allow glaze to dry between coats.
Pour around 1 TBS of PC-602 White Cascade onto the palette. Dip the Soft Fan into the glaze and randomly “glob” the glaze going around the middle of the bowl (on outside only). Allow glaze to dry.
Using the Soft Fan with EL-208 Moss Creek, apply 2 coats to the outside of the bowl. Recede the final coat to prevent dripping. Allow glaze to dry between coats.
Pour around 1 TBS of PC-601 Clear Cascade onto the palette. Dip the Soft Fan into the glaze and randomly “glob” the glaze going around the rim of the bowl (on the outside only).
Fire to cone 06.
Cactus Plate:
Begin with properly fired cone 04 bisque. Moisten a sponge and wipe bisque to remove any dust.
Use the scissors to cut the cactus out of the paper pattern. You are going to use the negative cactus image as the pattern, so do not cut through the paper to get to the cactus.
Using the Soft Fan with EL-103 Sea Spray, apply 2 coats to the top of the plate. Apply 3 coats to the back of the plate. Allow glaze to dry between coats.
Using the Soft Fan with EL-208 Moss Creek, apply 2 coats to the top of the plate. Allow glaze to dry between coats.
Place the pattern over the top of the plate.
Pour around 1 TBS of PC-602 White Cascade onto the palette. Use the Soft Fan to apply 2 coats to the pattern. Allow glaze to dry between coats. Remove pattern.
Pour around 1 TBS of PC-601 Clear Cascade onto the palette. Dip the Soft Fan into the glaze and randomly “glob” the glaze going around the rim of the plate (on the top only).
Begin with properly fired cone 04 stoneware bisque. Moisten a sponge and wipe bisque to remove any dust.
Use a fan brush to apply 2 coats of SW-173 Amber Quartz to the entire vase, inside and out, avoiding the bottom.
Use a fan brush to apply 2 coats of SW-180 Desert Dusk to the outside of the vase, below the neck, avoiding the bottom.
To achieve the blues and purples in the photo, use heavy coats and a good amount of crystals.
Use a clean sponge to wipe any excess glaze off of the foot.
Fire to cone 5/6. (Sample was fired to cone 6)
Note: Amber Quartz is the base glaze of Desert Dusk. If you do not have Amber Quartz, you can still achieve this with just Desert Dusk by not applying any crystals to the neck of the vase.
Push thumb into the center of the ball and start pinching, rotating your piece slightly each time you pinch to form walls all the way around.
Continue rotating and pitching until the walls are slightly thicker than a pencil and your piece is twice the size of the original ball.
Mold pot to sit open side down.
Smooth out any cracks with your fingers, adding a small amount of water if needed.
Create ridges of the cactus by pressing the side of your pencil firmly into your pot and rocking up and down until an impression is made.
Draw out a flower pattern on a piece of paper and cut it out to use as a stencil.
Flatten the remaining ¼ of your clay with your hand to be slightly thinner than your pencil, smooth out any cracks if needed.
Trace flower onto clay with pencil tip and cut out with a knife. Set scraps aside.
Roll a small ball out of your scrap clay for the flower center.
Score on the back and center of the flower by making small hatch marks with a pencil tip.
Add a small amount of water to the scored area with your finger and attach pieces by pressing down firmly.
Mold flower petals with your hands.
Attach the bottom of your flower to the top of your cactus with the same slip and scoring technique.
Add texture to the center of your flower and around your cactus by making small holes with the tip of your pencil.
Clean up your ridges and any imperfections by smoothing the clay with your finger or pencil eraser.
Repeat the above steps to make varying height sizes.
Allow to dry and fire to cone 04
Glazing:
Apply three coats of EL-142 Grass to the entire cactus body.
Using EL-148 Smoked Lilac and EL-149 Lavender Flower, paint the flower petals. Lavender Flower was used for the largest and smallest flower. Smoke Lilac was used for the middle flower.
Apply EL-213 Painted Desert to the center of the flower
Begin with properly fired cone 04 bisque. Moisten a sponge and wipe bisque to remove any dust.
Using the Soft Fan with EL-110 Mudslide, apply 2 coats to the outside of the mug. Apply 3 coats to the inside of the mug. Allow glaze to dry between coats.
Using the Soft Fan with EL-118 Blue Grotto, apply 2 coats to the outside of the mug. Allow glaze to dry between coats.
Pour around 1 TBS of PC-601 Clear Cascade onto the palette. Use the Soft Fan to pat “globs” going around the top inch of the mug.
Fire to cone 06.
Mug with White Cascade:
Begin with properly fired cone 04 bisque. Moisten a sponge and wipe bisque to remove any dust.
Using the Soft Fan with EL-110 Mudslide, apply 2 coats to the outside of the mug. Apply 3 coats to the inside of the mug. Allow glaze to dry between coats.
Pour around 1 TBS of PC-602 White Cascade onto the palette. Use the Soft Fan to pat “globs” around the top inch of the mug. Allow glaze to dry.
Using the Soft Fan with EL-118 Blue Grotto, apply 2 coats to the outside of the mug. Allow glaze to dry between coats.
Begin with properly fired cone 04 stoneware bisque. Moisten a sponge and wipe bisque to remove any dust.
Using the AC-222 Medium Writer Tip Kit, apply SW-303 Manganese Wash in a pattern around the rim. We applied 2 rows of “w”s so there is a space to add the Stroke and Coat.
Exchange the cap on you SC for an AC-224 Plastic Detailer Cap and apply SC-29 Bluegrass as dots inside of the loops made with the wash.
Allow to dry and repeat steps 2 and 3.
Allow the glaze to dry.
Using a fan brush, apply 3 coats of SW173 Amber Quartz to both the inside and the outside of the bowl. Allow the glaze to dry in between coats and avoid glazing the foot.
Use a damp sponge to wipe away any glaze that may have gotten on the foot.
Pour CD041 Waving Gnome, CD042 Hands Up Gnome and CD043 Hands on Hips Gnome molds ¼” thick. Refer to casting instructions.
Once they are firm enough to handle, use the sponge to smooth down any casting lines.
Use the pencil to sketch stars on the hats. You can also trace around star printouts or stickers if you do not want to draw them.
Cut out the stars using the X-ACTO knife. Smooth down the edges using a damp sponge.
Fire to cone 04.
Cover the stars with MC-002 12mm Low Track Masking Tape.
Squeeze around ¼ cup of SC-55 Yella Bout It into the disposable cup. Thin with water until the glaze is easily poured. Pour into each of the gnomes and rotate to cover the inside. Drain excess glaze.
Remove the tape.
Waving Gnome
Using the Soft Fan with SC-29 Blue Grass, apply 1 coat to the gnome.
Use a damp sponge to wipe off most of the glaze, leaving it only in the crevices.
Using the Soft Fan with CC-108 China Sea, apply 3 coats to the gnome. Allow glaze to dry between coats.
Fire to cone 06.
Using the Flat Shader with SS-138 Flat Black, apply 1 coat over the gnome. Wipe off using a damp sponge. You should be able to see the cracks.
Hands Up Gnome
Using the Soft Fan with SC-8 Just Froggy, apply 1 coat to the gnome.
Use a damp sponge to wipe off most of the glaze, leaving it only in the crevices.
Using the Soft Fan with CC-107 Green Tea, apply 3 coats to the gnome. Allow glaze to dry between coats.
Fire to cone 06.
Using the Flat Shader with SS-138 Flat Black, apply 1 coat over the gnome. Wipe off using a damp sponge. You should be able to see the cracks.
Fire to cone 06.
Hands on Hips Gnome
Using the Soft Fan with SC-99 Charcoal, apply 1 coat to the gnome.
Use a damp sponge to wipe off most of the glaze, leaving it only in the crevices.
Using the Soft Fan with CC-102 White, apply 3 coats to the gnome. Allow glaze to dry between coats.
Fire to cone 06.
Using the Flat Shader with SS-138 Flat Black, apply 1 coat over the gnome. Wipe off using a damp sponge. You should be able to see the cracks.
Begin with properly fired cone 04 bisque. Moisten a sponge and wipe bisque to remove any dust.
Position pattern on top of the platter. Slide AC-230 Clay Carbon Paper under the pattern. Trace the pattern with a pencil.
Using the RB-106 #6 Script Liner with SC-6 Sunkissed, SC-24 Dandelion, SC-88 Tu Tu Tango and SC-97 Cant-elope, apply 2 coats to the corresponding section of the design. Allow glaze to dry between coats. Refer to the pattern.
Prepare AC-220 Detailer Tip and 1oz Bottle. Trim the end of the tip off with scissors (just enough so you can see a hole). Squeeze SC-15 Tuxedo into the bottle until it is about half full. Screw the tip on the bottle. Outline the leaves and stems. Add decorative lines on the leaves.
Using the Soft Fan with SC-15 Tuxedo, apply 2 coats to the back of the plate. Allow glaze to dry between coats.
Using the Soft Fan with SG-703 Speckta-Clear Autumn, apply 2 coats to the front of the plate. Allow glaze to dry between coats.
Begin with properly fired cone 04 stoneware bisque. Moisten a sponge and wipe bisque to remove any dust.
Using the AC-222 Medium Writer Tip Kit, apply SW-303 Manganese Wash in a pattern around the rim. We applied 2 rows of “w”s so there is a space to add the Stroke & Coat.
Exchange the cap on you SC for an AC-224 Plastic Detailer Cap and apply SC-29 Bluegrass as dots inside of the loops made with the wash.
Allow to dry and repeat steps 2 and 3.
Allow the glaze to dry.
Apply 3 coats of SW173 Amber Quartz to both the inside and the outside of the bowl. Allow the glaze to dry in between coats and avoid glazing the foot.
Use a damp sponge to wipe away any glaze that may have gotten on the foot.
Fire to cone 5/6. *Sample piece was fired to cone 6*
Moisten a clean sponge and wipe bisque to remove any dust.
Use a pencil to divide the top of the vase into even sections. This is to help layout a symmetrical design.
Use the SG-401 Black Designer Liner to add lines to divide the sections and then fill the sections in with circles.
Think SW-111 Wrought Iron slightly (about the consistency of heavy cream) and roll the inside of the vase. Use a Script Liner to apply the not thinned Wrought Iron as a band about 2/3 of the way down.
Use a fan brush to apply 3 coats of CC-108 China Sea to the top section of the vase.
Use a fan brush to apply 2 coats of SG-201 Black Cobblestone to the bottom section of the vase.
Use a clean sponge to wipe the excess glaze off of the foot.
Moisten a clean sponge and wipe bisque to remove any dust.
Use a fan brush to apply 2-3 coats of SW-404 Black Mudcrack to the bottle.
Use a fan brush to apply 2-3 coats of SW-403 White Mudcrack to the bottle. If you want to see the blue hues, you will want to overlap the Mudcrack colors slightly.
Use a clean sponge to wipe the excess glaze off of the foot.
Begin with properly fired cone 04 bisque. Moisten a sponge and wipe bisque to remove any dust.
Place AC-230 Clay Carbon Paper over the front of the canvas. Trace the pattern using the pencil.
Mix SG-302 Snowfall with the palette knife. Using the Pointed Round, apply 1 thick coat to each section of the cactus.
Mix SG-501 Sculpting Medium with the palette knife. Pour around ½ oz into AC-220 Detailer Bottle. Cut the top off of the Detailer Tip and screw onto the bottle. Squirt a line on the flower outlines. Squirt a line going around the oval on the top of the vase. Then Squirt the vertical lines on the vase.
Using the Script Liner, dip into SG-501 Sculpting Medium and apply 1 thick coat to the oval at the top of the vase. The coat should be as thick as the line going around the section.
Allow SG-302 Snowfall and SG-501 Sculpting Medium to dry.
Squeeze around 1 TSP SC-89 Cutie Pie Coral onto the palette. Dip the sponge in the glaze and sponge around the edges of the canvas. Sponge down the sides.
Using the Script Liner with SC-89 Cutie Pie Coral, apply 1 thick drop coat into the outlines of the flowers.
Squeeze around 1 TBS of SC-10 Teal Next Time and SC-27 Sour Apple onto the palette. Thin each glaze with around 1 TSP of water.
Using the Script Liner with thinned SC-10 Teal Next Time, apply 1 coat around the edges of 1 section of the cactus. Dip the same brush into thinned SC-27 Sour Apple and apply to the center of that section. Repeat for all sections of the cactus.
Using the Script Liner with SC-24 Dandelion, apply 2 coats over the vase. Allow glaze to dry between coat.
Using the Detail Liner with SC-15 Tuxedo, outline the design. Add spines to the cactus.
Using the Script Liner and Soft Fan with CC-101 Transparent, apply 3 coats to the background. Allow glaze to dry between coats.
Fire to cone 06.
Using the Script Liner with SS-138 Flat Black, apply 1 coat to the background. Before it dries, wipe off with a damp sponge. You should be able to see the cracks in the glaze.
Begin with properly fired bisque. Use a damp sponge to wipe off any access dust.
Using RB-140 #8 Soft Fan brush, apply 1 heavy coat of SC-28 Blue Isle to the top 3/4 of the pumpkin. Leave the bottom 1/4 clear.
Let dry then use a sponge to wipe off SC-28 Blue Isle leaving the color in the grooves.
Using RB-140 #8 Soft Fan brush, apply 3 coats of FN-214 Pastel Jade to the top 3/4 (same area as the Blue Isle). Leave bottom 1/4 clear. Let glaze dry between coats.
Use RB-140 Soft Fan brush to apply 3 coats of SC-92 Cafe Ole to the bottom 1/4 and the stem. Let glaze dry between coats.
With RB-140 #8 Soft Fan brush, apply 1 coat of SG-703 Speckta-Clear Autumn over SC-92 Cafe Ole.
Use RB-106 #6 Script Liner brush, dab SG-302 Snowfall where SC-28 Blue Isle and SC-92 Cafe Ole meet.
Fire to cone 06.
Optional: Use a hot glue gun to apply sea shells to the top around the stem.
MB-1658 Round Hammered Pumpkin
Begin with properly fired bisque. Use a damp sponge to remove any access dust.
Using RB-140 #8 Soft Fan brush, apply 1 heavy coat of SC-15 Tuxedo over entire pumpkin (except stem). Let dry then wipe off with a sponge leaving color in grooves.
Using RB-140 #8 Soft Fan brush, apply 3 coats of EL-133 Autumn over the same area.
Use RB-140 #8 Soft Fan brush to apply 3 coats of CG-967 Green Agate or CG-716 Pagoda Green to the stem.
Fire to cone 06.
MB-1043 Squatty Pumpkin
Begin with properly fired bisque. Use a damp sponge to remove any access dust.
With RB-140 #8 Soft Fan brush, apply 1 heavy coat of SC-51 Poo Bear to the entire pumpkin. Let dry then use a sponge to wipe off from the pumpkin (except the stem) leaving the color in the grooves.
Using RB-118 #8 Round brush, add different leaf designs with SC-81 Cinnamon Stix, SC-23 Jack-O-Lantern, and SC-24 Dandelion.
Use RB-140 #8 Soft Fan brush to apply 3 coats of FN-3 Orange to entire pumpkin (including the stem).
Roll clay into a slab that is at least 16”x20” and about 1/8” thick
Compress slab with rib
Using your fettling knife and a straight edge cut a 8”x10” rectangle to use as your canvas
Smooth out cut edges with a damp sponge and set aside
Lay pattern on top of remaining slab and draw over lines with pencil- this will leave an indentation in your clay
Pull pattern away to reveal lines in clay
Using a fettling knife or xacto knife, cut sections of the image out at a time, cleaning cut edges with a damp sponge of finger once removed
Assemble image on canvas and attach pieces by slipping and scoring them on (You may need to adjust pieces slightly)
Smooth attachments with a wet brush or dull pencil
Allow tile to dry slightly, loosely covered with plastic
Add Color layers:
Once clay is about leather hard start adding in color, focusing on big blocks of color at first
See mixed colors section to reference color mixing formulas
Using a soft bristled brush, apply 2 coats of the background color to the background, allowing each coat to dry before adding the next
If you accidentally paint an area that you did not mean to you can just scratch the color away from the clay using the back of your brush or your fingernail
Apply 2 coats of the mixed table color in the same way, while the 2nd coat is still wet brush in some brown as the shadow on the table
Continue to black in color in the vase and flowers, applying 2 coats of color using all of your yellows, oranges, reds, browns, and green
Allow tile to continue to dry slowly
Once completely dry bisque fire tile to Cone 04
Wipe bisqued piece down with a damp sponge to remove any dust
Apply additional layers of color as needed to define shapes in more detail
Allow underglaze to dry fully (leave overnight)
You can continue to fire piece and add more layers of color if desired
Variations/Adaptations/Tips&Tricks
Instead of leaving the piece matte, apply 2 coats of Clear brushing glaze (S2101) to vase and flowers.Fire glazed piece to Cone 06
Form
EM100 3lbs of Low-fire white clay
Colors
All found in UGKIT1:
UG-206 Fire Engine Red
UG-50 Jet Black
UG-31 Chocolate
UG-51 China White
UG-68 Apple Green
UG-204 Orange
UG-97 Bright Blue
UG-208 Dragon Red
S-2101 Crystal Clear Brushing
Mixed Colors:
Background Color= 3 parts Apple green + 2 parts China White + 1 part Bright Blue
Bright Orange= 2 parts Fire Engine Red + 1 part Bright Yellow
Light Yellow= 1 part Bright Yellow + 1 part China White
Yellow Ocher= 5 parts Bright Yellow + 1 part Chocolate + 1 part Fire Engine Red
Dark Green= 2 parts Leaf Green + 1 part Chocolate + 1 part Jet Black
Dark Orange= 3 parts orange + 1 part Chocolate + 1 part Jet Black
Table Color= 2parts Bright Yellow + I part Chocolate + 1 part Orange
Light Orange= 2 parts Bright Yellow + 1 part Orange
Use a clean up tool to remove the collar of the leather-hard greenware vase creating an approximate 2 ½” opening. If you use the rim of the vase as a guide to cut straight downward, it should give you the proper 2 ½” opening. Make sure the lid fits the new opening. Let dry.
Remove the seam lines from the greenware using a clean up tool. Sand the seams and any imperfections in the ware using the green grit cloth. Wipe down the ware with a damp synthetic sponge to remove any dust. Check the inside for any debris as well.
In a lidded jar mix 6 teaspoons of UG-1 Kings Blue with 1 teaspoon of UG-50 Jet Black and 2 teaspoons of C-300 Matte Transparent Brushing. Stir and shake the color well, making sure the color is blended thoroughly.
Use CB-604 Soft Fan to apply 3 even smooth coats of the Underglaze mixture to the outside of the vase and to the lid excluding the middle bead trim. Allow to dry between coats.
Trace the pattern onto the ware using a AC-230 Clay Carbon and a pencil.
Place some FD-258 Pure White onto a tile. Add a drop or two of water to slightly thin the color to a brushing consistency. Load CB-404 Pointed Round with color and using a “pressure point” stroke to make the petal. The petal is made with three separate strokes. The center stroke of the petal is completed first. One separate side stroke is made next to the first stroke to complete the petal. There should be ridges of the French Dimensions when you complete each stroke forming a texture to the petal.
Using CB-110 Liner loaded with FN-258 Pure White to add a fine line of color to the outside ridge of each petal. Using the FD-258 French Dimension bottle to apply a fine line of white to the one side of the leaf as noted in the pattern. Dot in the flower centers.
Precondition CB-110 Liner with liquid detergent. Using CB-110 Liner loaded with AC-302 Wax Resist to apply the center vein and side veins. Be careful not to get wax on other areas of the design.
Use CB-110 Liner loaded with S-2101 Crystal Clear Brushing to apply 1 good coat to the leaves. The wax resist areas should allow the color to bead up and form the center vein and side veins to the leaves. Apply 1 coat of SG-701 Star Dust over the clear glazed areas of the leaves.
Use the pointed end of the Clean Up Tool to sgraffatio in three small lines through the white portions of the petals from the center outward. Do not carve too deeply as to go through the blue color.
Stilt and fire the pieces separately to shelf cone 03-04.
Check the inside of the vase and remove any debris and dust left during the firing
In a plastic cup mix FN-009 Black with water to a melted ice cream consistency. Pour the thinned glaze into the vase. While working quickly, rotate the piece to coat the inside. Pour out the excess glaze and invert to dry. Repeat this step to the lid.
To the outside of the lid apply 1-2 coats of S-2101 Crystal Clear Brushing using CB-604 Soft Fan. Let dry. Shake SG-701 Star Dust before using, then apply 1 coat of SG-701 Star Dust over the top finial of the lid and bottom section of the lid. Exclude the middle bead on the lid.
Stilt and fire both pieces to shelf cone 05-06.
Using a RG-104 Liner designated for OG-803 White Gold Luster apply 1 coat of OG-803 White Gold on the middle bead of the lid. Clean the brush with OS-901 Essence.
Stilt and Fire the lid to shelf cone 018.
Optional Step: This will give you added protection for dirt and fingerprints on the unglazed areas of the vase. Apply 2 coats of a Clear Tile and Grout Sealer to the vase using CB-604 Soft Fan allowing drying time between coats. Wash the brush in liquid detergent and warm water.
Form
MB-910 Vase (large) and MB-1444 Finial Small Jar (Lid only). Both wet greenware.
Colors
UG-1 Kings Blue
UG-50 Jet Black
FD-258 Prue White
FN-009 Black
SG-701 Star Dust
S-2101 Crystal Clear Brushing
C-300 Matte Transparent Brushing
Decorating Accessories
CB-110 Liner
CB-404 Pointed Round
CB-604 Soft Fan
RB-104 Liner (designated for White Gold Luster only)
Wipe off the bisque with a damp sponge and add 1 coat of wax resist to the outside bottom .”.
Cut out a template of the grid and fit to the inside bottom of the bowl. Transfer the design to the bottom of the piece using transfer paper or trace the design onto tissue paper with a pen or pencil, cut out and then trace over to the inside with a Sharpie Marker.
Using a pencil, connect the lines to create triangles up to the top around the inside wall in equal distances. Some of you may need to cheat a little.
Space the colors out evenly by marking each square or triangle with a 1, 2 or 3. Start with the center square and mark with #1 (SC-28 Blue Isle). This color will be every other square like a checkerboard. Then starting with the top row of squares, mark one row with #2 (SW-155 Winter Wood) in the blank square. In the second row, mark each blank square with a #3 (SW-166 Norse Blue). For the triangles along the side wall, every triangle with the point at the top will be SC-28. Every other going down will be SW-155 Winter Wood and SW-166 Norse Blue, alternating each one.
Using SW-401 Light Flux, create a thin line over all of the lines that were traced, 2 coats each about .” wide. Go all the way to the top and stop at the bottom of the outside rim.
Starting with SC-28 Blue Isle, fill in #1 squares with 2 coats, overlapping the flux 1/8” or so. Then fill in all the #3 squares with 2 coats of SW-166. Let it dry.
Cover the inside of each PAINTED square up to this point with 1 coat of wax resist leaving a .” along the outside color untouched by the wax resist. You want some of the color to be exposed so it can be covered with the SW-155 Winter Wood. Let Dry.
Fill in all the remaining squares along with the exposed flux lines and any color still exposed with 2 coats of SW-155 Winter Wood.
Apply 2 coats of SW-166 Norse Blue to the outside wall of the bowl, ignoring the top rim. Then add 2 wavy coats of SW-155 Winter Wood to the top 1/3 of the bowl.
Sign the bottom of the bowl with a black Designer liner.
Using the Soft Fan brush, paint the entire top of the plate with 2 coats of SC-16 Cotton Tail.
2. Allow the Cotton Tail to dry well.
3. Use a pen to apply your Pineapple pattern (make sure you have the paper going the right side up, you can always test a
small line before tracing the whole thing).
4. We are going to paint the background of the plate with 2 coats of SC-45 My Blue Heaven working our way around the
pineapple.
5. Next, to add some depth, we are going to add SC-11 Blue Yonder to the background close to the pineapple. It’s best to do
this step while both colors are wet to allow them to blend. We will do 2 coats on this shading.
6. Use RB-116 #6 Round brush to paint in the sections of the pineapple on the right side with 2 heavy coats of SC-97 Cantelope.
7. Next, paint the remaining sections of the pineapple on the left side with 2 heavy coats of SC-89 Cute Pie Coral.
8. Paint the sections of the leaves with 2 heavy coats of SC-27 Sour Apple.
9. To fill in the lines on the pineapple, we are going to use SC-27 Sour Apple and RB-106 #6 Liner brush to apply 2 coats.
10. Then randomly highlight the lines on the right side with SC-9 Jaded, and the lines on the left side with SC-26 Green Thumb.
We did 2 coats on those lines.
Next we are going to fill in the space between the leaves with 2 coats of SC-26 Green Thumb.
Flip your plate over and paint 3 coats of SC-16 Cotton Tail to the back and edges. We are not clear glazing this plate so we want to make sure all the bisque is covered.
We are going to add some texture to our pineapple and background using Jungle Gems. We aren’t going for full coverage, just doing one coat to get the crystals to adhere. Stir your CG-718 Blue Caprice Jungle Gems and apply one coat concentrating the crystals close to the pineapple and leaves.
Next, stir up your CG-756 Firecracker and add lines to your Cutie Pie Coral sections, we just did a line on two of the four sides.
Repeat step 15, this time using CG-753 Sassy Orange on the Cant-elope sections.
Add one coat of CG-987 Tree Frog to the lighter green part of your leaves.
Finally, add a dot of SC-16 Cotton Tail to the center of each section to highlight.
Mix 1-1.5 ounces of FN-1 White with distilled water and pour inside the opening of the vase. Roll the vase around, letting the thinned glaze cover the inside of the vase. Repeat as needed to cover the inside of the vase.
Sketch or transfer the design onto the vase.
Using a fan brush, paint around the cheetah, moon, leaves, and ground with 3 coats of Raw-Hide.
Using RB-106 #6 Script Liner brush, paint the moon and ground with 3 coats of SC-45 My Blue Heaven.
Using the RB-104 #4 Liner brush, paint the leaves with 3 coats of SC-85 Orkid.
Using the RB-106 #6 Script Liner brush, paint the cheetah with 3 coats of SC-97 Cant-elope. When dry, use RB-104 #4 Liner brush to add sections of SC-16 Cotton Tail to the face, eyes, ears, and side of the cheetah.
When the vase has dried, use a RB-10/0 Detail Liner brush to outline the cheetah with 1-2 thick and even coats of SC-15 Tuxedo. Add detail to the face and tail. Optional: Outline the leaves.
Use a liner brush to add cheetah spots with SG-201 Black Cobblestone all over the cheetah.
Use a RB-116 #6 Round to add rocks on the ground, spots in the moon, and detail work on the leaves with SG-201 Black Cobblestone. The thicker you apply the product, the more cobbled effect you’ll see when fired. Play around with different layers of glaze for a more interesting look.
Paint the base of the vase with 3 coats of SC-45 My Blue Heaven using a RB-144 Soft Fan Brush.
Begin with properly fired cone 04 bisque. Moisten a sponge and wipe bisque to remove any dust.
Cut around the pattern to get rid of the excess paper. It will be easier to lay on the platter. Place the pattern on the platter. While holding the pattern in place, slide AC-230 Clay Carbon Paper underneath. Trace with a pencil.
Using the Script Liner with SC-45 My Blue Heaven (large bird), SC-6 Sunkissed (medium bird), and SC-97 Cant-elope (small bird), apply 2 coats to each bird. Do not glaze the wings. Allow glaze to dry between coats.
Take the pattern and cut out the large and medium birds. Remove the wings and beaks. Each bird should be separated. Take the large bird body and place it over the piece of lace fabric. Cut out the lace to match the pattern. Take the medium bird body and place it over the piece of paper doily. Cut out the doily to match the pattern. Take your piece of ribbon and cut it into 5 pieces (they will be used on the small bird).
Place the lace fabric onto the large bird. Dip the Soft Fan in water and brush over the lace to help it stick to the glaze. Using the Script Liner with SC-45 My Blue Heaven, apply 1 coat over the lace.
Place the paper doily onto the medium bird. Dip the Soft Fan into water and brush over the paper to help it stick to the glaze. Using the Script Liner with SC-6 Sunkissed, apply 1 coat over the paper doily.
Dip one of the pieces of ribbon into water. Place it going vertically on the center of the small bird. Repeat for the other 4 pieces of ribbon going towards the front and back of the bird. Using the Script Liner with SC-97 Cant-elope, apply 1 coat over the ribbon.
Wait for the glaze from Steps #5-7 to be dry to the touch.
Using the Script Liner with SC-28 Blue Isle, apply 1 coat over the body of the large bird.
Using the Script Line with SC-27 Sour Apple, apply 1 coat over the body of the medium bird.
Using the Script Line with SC-89 Cutie Pie Coral, apply 1 coat over the body of the small bird.
Remove the lace, doily, and ribbon before the glaze is bone dry.
Using the Script Liner with SC-89 Cutie Pie Coral (large bird), SC-28 Blue Isle (medium bird), and SC-27 Sour Apple (small bird), apply 2 coats to the wings. Allow glaze to dry between coats.
Using the Script Liner with SC-97 Cant-elope, apply 2 coat to the beaks on the large and medium birds. Allow glaze to dry between coats.
Using the Script Liner with SC-6 Sunkissed, apply 2 coats to the beak on the small bird.
Using SG-401 Black, make eyes and decorative wing accents on each of the birds. Add a line on each beak. Add legs and feet to the large bird.
Using the Soft Fan with FN-052 Tangerine, apply 3 coats to the rim and back of the app plate. Allow glaze to dry between coats.
Using the Soft Fan with SG-702 Celebration, apply 2 coats to the front of the app plate. Allow glaze to dry between coats.
Stilt and fire to cone 06.
Small Stacked Bird Plate
Begin with properly fired cone 04 bisque. Moisten a sponge and wipe bisque to remove any dust.
Cut out the small and medium birds from the pattern. Position them so that they will fit on the small app plate. I put them going in the same direction. While holding the patterns in place, slide AC-230 Clay Carbon Paper underneath. Trace with a pencil.
Using the Script Liner with SC-45 My Blue Heaven (medium bird) and SC-97 Cant-elope (small bird), apply 2 coats to each bird. Do not glaze the wings. Allow glaze to dry between coats.
Remove the wings and beaks from the small and medium bird patterns. Each bird should be separated. Take the medium bird body and place it over the piece of lace fabric. Cut out the lace to match the pattern. Take your piece of ribbon and cut it into 5 pieces (they will be used on the small bird).
Place the lace fabric onto the medium bird. Dip the Soft Fan in water and brush over the lace to help it stick to the glaze. Using the Script Liner with SC-45 My Blue Heaven, apply 1 coat over the lace.
Dip one of the pieces of ribbon into water. Place it going vertically on the center of the small bird. Repeat for the other 4 pieces of ribbon going towards the front and back of the bird. Using the Script Liner with SC-97 Cant-elope, apply 1 coat over the ribbon.
Wait for the glaze from Steps #5-6 to be dry to the touch.
Using the Script Liner with SC-28 Blue Isle, apply 1 coat over the body of the medium bird.
Using the Script Line with SC-89 Cutie Pie Coral, apply 1 coat over the body of the small bird.
Remove the lace and ribbon before the glaze is bone dry.
Using the Script Liner with SC-6 Sunkissed (medium bird) and SC-28 Blue Isle (small bird), apply 2 coats to the wings. Allow glaze to dry between coats.
Using the Script Liner with SC-97 Cant-elope, apply 2 coat to the beak on the medium bird. Allow glaze to dry between coats.
Using the Script Liner with SC-6 Sunkissed, apply 2 coats to the beak on the small bird. Allow glaze to dry between coats.
Using SG-401 Black, make eyes and decorative wing accents on each of the birds. Add a line on each beak.
Using the Soft Fan with FN-052 Tangerine, apply 3 coats to the rim and back of the app plate. Allow glaze to dry between coats.
Using the Soft Fan with SG-702 Celebration, apply 2 coats to the front of the app plate. Allow glaze to dry between coats.
Stilt and fire to cone 06.
Stacked Bird Wine Tumbler
Begin with properly fired cone 04 bisque. Moisten a sponge and wipe bisque to remove any dust.
Cut out the small bird from the pattern. Position the small bird on the outside of the tumbler. The beak should be pointed upwards. Trace around the pattern with a pencil. Lift the pattern and place next to the one you just traced. The top, tip of the wing should overlap the body of the bird you just traced. Trace with a pencil. Repeat until you have a line of 4 birds going around the tumbler.
Use a pencil to draw in the wings and beaks. You can also cut them from the pattern and trace them if you don’t want to free-hand them.
Using the Script Liner with SC-6 Sunkissed, apply 2 coats to every other bird. Apply SC-97 Cant-elope to the other two birds. Do not glaze the wings. Allow glaze to dry between coats.
Take your 4 pieces of ribbon and cut them each into 5 pieces.
Dip one of the pieces of ribbon into water. Place it going vertically on the center of the first small bird. Repeat for the other 4 pieces of ribbon going towards the front and back of the bird. Using the Script Liner with SC-97 Cant-elope or SC-6 Sunkissed, apply 1 coat over the ribbon (same color as the base color). Repeat for the other 3 birds.
Wait for the glaze from Steps #6 to be dry to the touch.
Using the Script Liner with SC-27 Sour Apple, apply 1 coat over the body of the small birds with a base of SC-6 Sunkissed.
Using the Script Line with SC-89 Cutie Pie Coral, apply 1 coat over the body of the small birds with a base of SC-97 Cant-elope.
Remove the lace and ribbon before the glaze is bone dry.
Using the Script Liner with SC-28 Blue Isle, apply 2 coats to the wings. Allow glaze to dry between coats.
Using the Script Liner with SC-97 Cant-elope or SC-6 Sunkissed, apply 2 coat to the beaks. Allow glaze to dry between coats.
Using SG-401 Black, make eyes and decorative wing accents on each of the birds. Add a line on each beak. Add legs and feet.
Using the Soft Fan with FN-052 Tangerine, apply 3 coats to the inside of the tumbler. Allow glaze to dry between coats.
Using the Soft Fan with SG-702 Celebration, apply 2 coats to the outside of the tumbler. Allow glaze to dry between coats.
Begin with properly fired cone 04 bisque. Moisten a sponge and wipe bisque to remove any dust.
Using the Soft Fan with FN-009 Black, apply 3 coats to the back of the plate. Allow glaze to dry between coats.
Using the Soft Fan with FN-009 Black, apply 2 coats to the front of the plate. Allow glaze to dry between coats.
Place the pattern over the front of the plate after the glaze is dry to the touch, but not bone dry. Trace over the pattern with the pencil. Check to make sure you are not pressing too hard or too soft. You want to be able to see the lines, but not scrape down to the bisque. Remove the pattern.
Using the Detail Liner with AC-302 Wax Resist, outline the pattern. Make a line going around the rim of the plate.
Take your 3 AC-220 Detailer Tips and cut the very top of the tip off with scissors. You should be able to see a tiny hole in the tip.
Take your 3 AC-220 1 oz Bottles and fill each one around half-way full of the following glazes: EL-103 Sea Spray, EL-128 Wheat, and EL-149 Lavender Flower. Make sure to label each bottle because some of the glazes will look similar. Screw on the tips.
Using the bottles of EL-103 Sea Spray and EL-149 Lavender Flower, fill each cactus with dots. The dots should be around the size of a pencil eraser. They should be close, but not touching. You can make your dots in lines or randomly within the cactuses. EL-103 Sea Spray produces the light blue dot. EL-149 Lavender Flower produces the purple dot.
Using the bottle with EL-128 Wheat, make dots going along the inside of the horizontal line at the bottom of the plate. Continue the dots down to the bottom of the plate. Make a single dot in the center of each flower.
Using the Script Liner with EL-127 Rose Granite, apply 2 coats to each of the flower petals. Apply a 3rd coat just to the very center of each flower petal (area ¼” from the edge line). Allow glaze to dry between coats.
Using the Script Liner with EL-142 Grass, apply 2 coats to the background of the plate. Apply a 3rd coat just to the very center of each section of the background (area ¼” from the edge line). Allow glaze to dry between coats.
Stilt and fire to cone 06.
Flower Plate
Begin with properly fired cone 04 bisque. Moisten a sponge and wipe bisque to remove any dust.
Using the Soft Fan with FN-009 Black, apply 3 coats to the back of the plate. Allow glaze to dry between coats.
Using the Soft Fan with FN-009 Black, apply 2 coats to the front of the plate. Allow glaze to dry between coats.
Place the pattern over the front of the plate after the glaze is dry to the touch, but not bone dry. Trace over the pattern with the pencil. Check to make sure you are not pressing too hard or too soft. You want to be able to see the lines, but not scrape down to the bisque. Remove the pattern.
Using the Detail Liner with AC-302 Wax Resist, outline the pattern. Make a line going around the rim of the plate.
Take your 3 AC-220 Detailer Tips and cut the very top of the tip off with scissors. You should be able to see a tiny hole in the tip.
Take your 3 AC-220 1 oz Bottles and fill each one around half-way full of the following glazes: EL-103 Sea Spray, EL-128 Wheat and EL-142 Grass. Make sure to label each bottle because some of the glazes will look similar. Screw on the tips.
Using the bottle of EL-142 Grass, make dots in the outer petals. They can be staggered in lines or random. The dots should be around the size of a pencil eraser. They should be close, but not touching.
Repeat Step #8 with EL-128 Wheat for the inner petals.
Repeat Step #8 with EL-103 Sea Spray for the line going around the center of the flower.
Using the Script Liner with EL-127 Rose Granite, apply 2 coats to the center of the flower. Apply 1 3rd coat just to the very center of the flower center (area ¼” from the edge line). Allow glaze to dry between coats.
Using the Script Liner with EL-103 Sea Spray, apply 2 coats to the background of the plate. Apply a 3rd coat just to the very center of the background (area ¼” from the edge line). Allow glaze to dry between coats.
Stilt and fire to cone 06.
Circle Plate
Begin with properly fired cone 04 bisque. Moisten a sponge and wipe bisque to remove any dust.
Using the Soft Fan with FN-009 Black, apply 3 coats to the back of the plate. Allow glaze to dry between coats.
Using the Soft Fan with FN-009 Black, apply 2 coats to the front of the plate. Allow glaze to dry between coats.
Place the pattern over the front of the plate after the glaze is dry to the touch, but not bone dry. Trace over the pattern (only trace the circle) with the pencil. Check to make sure you are not pressing too hard or too soft. You want to be able to see the line, but not scrape down to the bisque. Remove the pattern.
Using the Detail Liner with AC-302 Wax Resist, outline the circle. Make a line going around the rim of the plate.
Take your 4 AC-220 Detailer Tips and cut the very top of the tip off with scissors. You should be able to see a tiny hole in the tip.
Take your 4 AC-220 1 oz Bottles and fill each one around half-way full of the following glazes: EL-103 Sea Spray, EL-127 Rose Granite, EL-128 Wheat, and EL-149 Lavender Flower. Make sure to label each bottle because some of the glazes will look similar. Screw on the tips.
Using the bottle of EL-127 Rose Granite, make dots going around the inside of the center circle. The dots should be around the size of a pencil eraser. They should be close, but not touching. Repeat, going towards the center of the plate.
Repeat Step #8, using EL-128 Wheat.
Repeat Step #8, using EL-149 Lavender Flower.
Repeat Step #8, using EL-103 Sea Spray.
Repeat Step #8, using EL-149 Lavender Flower.
Using the bottle of EL-127 Rose Granite, make dots to fill in the center of the circle.
Using the Script Liner with EL-128 Wheat, apply 2 coats to the outer border of the plate. Apply a 3rd coat just to the very center of the border (area ¼” from the edge line). Allow glaze to dry between coats.
Stilt and fire to cone 06.
Small Cactus Plate
Begin with properly fired cone 04 bisque. Moisten a sponge and wipe bisque to remove any dust.
Using the Soft Fan with FN-009 Black, apply 3 coats to the back of the plate. Allow glaze to dry between coats.
Using the Soft Fan with FN-009 Black, apply 2 coats to the front of the plate. Allow glaze to dry between coats.
Place the pattern over the front of the plate after the glaze is dry to the touch, but not bone dry. Trace over the pattern with the pencil. Check to make sure you are not pressing too hard or too soft. You want to be able to see the lines, but not scrape down to the bisque. Remove the pattern.
Using the Detail Liner with AC-302 Wax Resist, outline the pattern. Make a line going around the rim of the plate.
Take your 2 AC-220 Detailer Tips and cut the very top of the tip off with scissors. You should be able to see a tiny hole in the tip.
Take your 2 AC-220 1 oz Bottles and fill each one around half-way full of the following glazes: EL-128 Wheat and EL-142 Grass. Make sure to label each bottle because the glazes will look similar. Screw on the tips.
Using the bottle of EL-142 Grass, make dots in the body of the large cactus. They can be staggered in lines or random. The dots should be around the size of a pencil eraser. They should be close, but not touching.
Repeat Step #8 with EL-128 Wheat for the other two cactuses.
Using the Script Liner with EL-103 Sea Spray, apply 1 puddle coat to the flowers on top of the cactuses.
Using the Script Liner with EL-149 Lavender Flower, apply 2 coats to the background of the plate. Apply a 3rd coat just to the very center of the background (area ¼” from the edge line). Allow glaze to dry between coats.
Begin with properly fired bisque. Use a damp sponge to wipe off any debris.
Use a pencil to mark off the area above the fawn’s front leg, extending downward to the front foot.
Using RB-144 #4 Soft Fan brush, paint the area above the leg with 3 coats of SC-20 Cashew Later. Allow glaze to dry between coats.
Using RB-144 #4 Soft Fan brush, paint the leg area with 3 coats of SC-43 Lettuce Alone, loosely mixing in a little bit of SC-24 Dandelion. Allow glaze to dry between coats.
Use a pencil to help plan where your darker fur color will go.
Using RB-144 #4 Soft Fan brush, paint the planned darker colors with 2 thick coats of SC-80 Basketball. Allow glaze to dry between coats.
Optional: use RB-106 #6 Script Liner brush and a bit of watered down SC-16 Cotton Tail and SC-15 Tuxedo to add highlights and/or lowlights around the fawn’s ears and face.
Use a pencil to sketch out flowers and leaves on the green area. Mix it up and use different shapes.
Use a RB-104 #4 Liner brush to paint 1 thick coat of the flowers and the leaves. Utilize different colors and experiment with mixing colors/shading.
Paint the eyes and nose with 2 coats of SC-15 Tuxedo using RB-104 #4 Liner brush.
Use the back of a brush to add a dot of SC-16 Cotton Tail to the corner of the eye.
Use RB-104 #4 Liner brush to carefully outline flowers and leaves with SC-15 Tuxedo. Add black/white dots to unpainted background areas using the back of a brush.
Use RB-106 #6 Script Liner brush and 1 or 2 thick coats of SC-16 Cotton Tail to add brush strokes to the top of the fawn’s head and back.
Use a pencil to mark areas around wings, eyes (inner and outer), beak, and feet.
Paint the owl belly with 3 coats of CG-783 Strawberry Sundae with RB-144 #4 Soft Fan brush. Allow glaze to dry between coats.
Paint the outer eye with 2 coats of SC-1 Pink-A-Boo with RB-118 #8 Round brush. Allow glaze to dry between coats.
Use RB-100 #0 Detail Liner brush to add thin brush strokes of CG-783 Strawberry Sundae over the pink-a-boo.
Using RB-118 #8 Round brush, paint the inside of the eye with 3 coats of SC-16 Cotton Tail. Allow glaze to dry between coats.
Using RB-118 #8 Round brush, paint the beak and the feet with 3 coats of SC-24 Dandelion. Allow glaze to dry between coats.
Using RB-144 #4 Soft Fan brush, paint the rest of the body (head, wings, back) with 4 coats of FN-304 Black Velvet. Allow glaze to dry between coats.
Use RB-104 #4 Liner brush to make loose brush stroke (“feather”) marks on the owl head, wings, and back using 1 coat of SG-701 Speckta-Clear Star Dust.
Use RB-100 #0 Detail Liner brush to add a black pupil to center of eye with 3 coats of SC-15 Tuxedo. Allow glaze to dry between coats.
Once dry, use the back of a paint brush to add a dot with SC-16 Cotton Tail in the corner of the pupil.
Start with properly fired MB-1564 Koala Facet-ini.
Use a damp sponge to wipe off any dust.
With a RB-144 #4 Soft Fan brush, apply 2 coats of SC-60 Silver Lining to the entire bisque. Allow glaze to dry between coats.
Using a clean RB-144 #4 Soft Fan Brush, applyonecoatin a randommannerto the koala, not covering the entire surface.
Using the RB-104 #4 Liner with SC-15 Tuxedo, applytwo coats tofill in the eyes and nose. Allow glaze to dry between coats.
Using the RB-104 #4 Liner with SC-15 Tuxedo, apply one coat of dashes along the facets. Randomly add squiggles, x’s, waves and other fun designs to different areas of the koala.
Begin with properly fired cone 04 bisque. Moisten a sponge and wipe bisque to remove any dust.
Using the RB-144 #4 Soft Fan, apply three coats of SC-16 Cotton Tail to the entire bunny. Allow glaze to dry between coats.
Using the RB-110 10/0 Detail Liner with SC-15 Tuxedo, apply two coats to outline, fill in the eye and add eyelashes. Allow glaze to dry between coats.
Using the RB-106 #6 Script Liner with SC-1 Pink-A-Boo, apply two coats to the inside of the ears and an upside-down triangle for the nose. Allow glaze to dry between coats.
Using the RB-110 10/0 Detail Liner with SC-54 Vanilla Dip (mixed with a little SC-41 Brown Cow) apply one coat to outline the facets.
Fire cone 06.
Form
MB-1565 Bunny Facet-ini
Colors
SC-1 Pink-A-Boo
SC-15 Tuxedo
SC-16 Cotton Tail
SC-54 Vanilla Dip (mixed with a little SC-41 Brown Cow)
Wipe down the bisque shape with a moistened synthetic sponge to remove any dust and debris.
Cut out the pattern with scissors.Center the pattern onto the ware and place blue masking tape to secure the pattern to the ware. Use AC-230 Clay Carbon and a pencil to transfer the design onto the ware.
Make a small receptacle out of aluminum foil or use a small plastic cup.Place some AC-304 Wax Resist in it and add a couple of drops of food coloring to tint the wax.The food coloring will aid in seeing where you have applied the wax resist when painting.
Condition CB-110 Liner with the liquid detergent.Apply 1 heave coat of the wax resist to the design.Only one coat is needed but it needs to be a heavy coat.Let dry.
Apply 3-4 smooth even coats of FN-304 Black Velvet to the entire piece using CB-604 Soft Fan and CB-404 Pointed Round around the pattern.Try not to apply the glaze over the waxed areas.The wax should resist the glaze.If any glaze remains on the waxed areas, use as moistened brush to remove any glaze.
Stilt and fire the piece to shelf cone 05-06.
Place some SG-881 Glittering Silver onto some aluminum foil or plastic cup.Use CB-110 Liner to apply 1-2 coat(s) of color to the teardrop portions of the pattern for solid coverage.
Using CB-110 Liner to apply 1-2 coat(s) of SG-882 Glittering Gold to the star and numbers in the pattern for solid coverage.
Wipe down bisque with a moistened synthetic sponge to remove any dust or debris from the ware.Check inside as well for any debris.
Apply 2-3 coats of FN-014 Antique White to the middle section of the can.Let Dry.
Transfer the design onto the ware using a pencil and AC-230 Clay Carbon.
Condition CB-110 Liner with Liquid Detergent.Place some AC-302 Wax Resist in a small Plastic Cup or Aluminum Foil and add a drop or two of food coloring to tint the wax.This will aid in seeing where the wax has been applied.Wash brush immediately with warm water and liquid detergent.Let the wax dry.
Using CB-602 Soft Fan apply 2-3 coats of SC-87 Ruby Slippers to the middle section allowing drying time between coats. Try not to apply the color over the waxed area.Remove any color from the waxed area using a moistened brush.Let dry.
Use the ½” Blue Masking Tape to section off the horizontal plaid portions on the ware.Use small scrap pieces of tape to use as a spacing guides for the taped off areas.Make sure the edges are securely affixed to the surface.On a tile place some SC-81 Cinnamon Stix and add a drop or two of SC-15 Tuxedo to darken.Mix the color well.Apply 2-3 coats of color to the bands (untaped areas) around the can.Allow the color to dry between coats.When the last coat of color has been applied and has lost its sheen, remove the tape from the pattern.Let dry.
Using the ½” Blue Masking Tape to section off the vertical sections of the plaid pattern by starting on the left to the front of the design. By starting on left side on the design front next to the handle knob you will insure that the front spacing is even and any adjustments to spacing can occur on the back side that doesn’t show. Again, use scrap pieces of tape to use as spacing guides.The spacing may need to be adjusted in order to accommodate the circumference of the can.Make sure that edges of the tape are securely affixed.Apply 2-3 coats of the darkened SC-81 Cinnamon Stix using CB-310 Flat Shader to the vertical lines allowing drying time between coats.When the last coat of color has lost its shine, remove the tape from the ware.Let dry.
Use CB-110 Liner loaded with slightly thinned SC-15 Tuxedo to fill in the squares where the plaid crosses.Keep the edges square and sharp when defining the square space.
Apply 3 coats of FN-09 Black to the inside of the ware, can bottom and trim edges along both top and bottom using CB-602 Soft Fan and CB-404 Pointed Round.Let dry.
Check to make sure no color remains on the waxed areas of the design.Use a moistened brush to remove any color off of the wax.
Stilt and Fire the piece to Shelf Cone 05-06.
Use a wire coat hanger to create the can handle and attach it through the holes in the can.
Wipe down the bisque with a moistened synthetic sponge to remove and dust and debris. Check the inside of the ware also.
Using CB-604 Soft Fan apply 3 coats of FN-01 White to the middle section of the can.Let dry.
Cut out the snowman from the pattern.Do not cut out arm portions of the design.Just the basic shape of the snowman and hat.
Apply water to the back of the cut-out portion of the pattern and place it onto the can. Position the pattern to where the snowman aligns with the bottom edge of the can.
Place some of each of the Speckled Stroke & Coats onto a tile.Using a damp synthetic sponge, load the edge of the sponge then pounce on 1 coat of SC-253 Speckled Purple Haze about half way up from the bottom of the can.
Pick up some SP-211 Speckled Blue Yonder and about 1/3 of the way up from the bottom of the can pounce on the color blending over the previous color.
Pick up some SP-212 Speckled Moody Blue and start from the top of the can pouncing downward about 1/3 of the way blending the color out over the lighter blue.The colors should appear darkest near the top of the can fading to the lighter blue towards the middle and then to the purple at the bottom.You can overlap the edge of the paper stencil slightly but not completely cover it.Repeat this process 2 more times for solid coverage.Once the last coat of color has been applied to the background and the glaze it has lost its shine, remove the snowman stencil.Let dry.
Retrace the pattern onto the snowman including the branch arms.
Shade the inner edges of the snowman with SC-45 My Blue Heaven and SC-85 Orkid using CB-406 Pointed Round loaded with water and tipped with color.Use SC-45 My Blue Heaven to shade the cheeks and highlight top edge with SC-11 Blue Yonder. Shade above the eyes with SC-85 Orkid.Outline the Snowman’s edges and paint in the iris of the eye with SC-30 Blue Dawn using CB-110 Liner.
Block in the hat area with 2 thinned coats of SC-81 Cinnamon Stix using CB-310 Flat Shader.If needed, draw in the stitching before painting to get the pattern correct.Detail the stitching in the hat with 2 coats of SC-73 Candy Apple Red using CB-110 Liner.For the pompom, apply 3 coats of SC-73 Candy Apple Red and pull off some fine lines to create a fuzzy texture along the outer edge using CB-110 Liner.
Block in 1-2 coats of SC-27 Sour Apple to the scarf using CB-310 Flat Shader.Shade the edges and knot of the scarf with SC-39 Army Surplus.Detail the scarf with SC-73 Candy Apple Red and SC-39 Army Surplus using CB-110 Liner.
Block in the branch arms with 2-3 coats of SC-48 Brown Cow using CB-406 Pointed Round and CB-110 Liner.Detail the graining of the branch with thinned SC-34 Down To Earth and SC-15 Tuxedo using CB-110 Liner.
Block in the ear muffs with 1-2 coats of SC-99 Char-ming using CB-406 Pointed Round.Paint in the eyebrows using CB-110 Liner.Stipple in the shading of the ear muffs with SC-15 Tuxedo using CB-310 Flat Shader.You want to make them look fuzzy by stippling in the color over the edges a wee bit.
Fill in the carrot nose with 2 coats of SC-97 Cant-elope using CB-110 Liner.Shade the bottom edge with thinned SC-25 Crackerjack Brown.Detail the lower edge with thinned SC-25.To the top edge shade with a thin mixture of SC-97 tinted with SC-73 Candy Apple Red to make a red orange.
Paint in the detail of the eyes and mouth with SC-15 Tuxedo using CB-110 Liner.Scratch in a highlight to the pupil using a clean up tool.
To paint in the trees load CB-406 Pointed Round with SC-26 Green Thumb.Start at the top of the tree and stroke downward with the color, start adding the branches but keep them pointing slightly upward.As you paint in the lower branches start to keep them more horizontal but with a slight upward tilt.You can pick up some SC-36 Irish Luck and stroke over the already painted green color to add depth and variation to the trees.The trees are somewhat abstract and not very detailed with the green color.
Using FD-258 White French Dimensions to add in the snow on the pattern.Keep the snow light on the detail for the snowman using small connected dots of color over using a solid line of color.Heavier detailing can be done on the trees.Easier to add more color if needed than to get too much too soon. The snow will be more individual dots of color towards the top of the trees and as you move down on the lower branches the color is more vertical to indicate the layers on the branches.Let Dry.
Apply 1-2 coats of S-2101 Crystal Clear Brushing over the middle section of the can using CB-604 Soft Fan.
To the inside and bottom of the can apply 3-4 coats of FN-019 Dark Blue using CB-604 Soft Fan and CB-406 Pointed Round along the edges where it meets the middle portion of the can.
Stilt and fire to shelf cone 05-06.
Use grapevine wire to create the handle. It is made up of 3 pieces of wire where it twists and wraps around one another to create more of a grapevine texture. Use the floral wire to attach the Christmas tree buttons to simulate a string of lights.
Holes need to be drilled in greenware prior to bisque firing for lamp cord and hardware.Center hole in top should be 5/16” in diameter. Hole for cord (3/16” in diameter) should be along the trim about 1” from the bottom of the ware.
Glazing:
Wipe down the bisque with a moistened synthetic sponge.
Trace the basic shapes of the design onto the middle section of the pedestal using a pencil and AC-230 Clay Carbon.If you feel confident enough you can freehand the placement of the flowers and leaves to avoid the tracing of the pattern.
On a tile put out some SG-405 Green Designer Liner.Thicken it with some AC-310 Silk Screen Medium until a peanut butter consistency.Use the Pallet Knife to fully mix the medium into the color. Color will thicken up after initial mixing as it absorbs more moisture from the color.Store the color into some airtight jars for later use.Repeat this mixing process with 3 parts SG-410 Bright Blue Designer Liner with 1 part SG-404 Blue Designer Liner to the same consistency as peanut butter. Store mixture in an air tight jar for later use. This is easier to mix up a larger quantity and use it as needed than to be constantly mixing color to use.
Cut out the hydrangea flowers from the DSS-0149 Botanical Flowers sheet of screen designs. Allow at least ½” border around each screen you cut out.
Cut out separately each of the three leaves from the DSS-0111 Leaves Screen.The pattern shows you some of the various leaf placement, and you can also use the leaves from the hydrangea screen as single leaves on the overall design.
You can rotate the flower screen when printing the design to give a different look, too.Some of the leaves can overlap the flowers and the flower can hide portions of the leaves to give added interest in the design.
With the shiny side of the screen next to the ware, pick up some of the thickened blue mixture and start rubbing firmly in a circular motion over the screen’s center and moving outward until the entire screen has been covered (you can secure it with some blue masking tape to aid in keeping the screen in place while printing).Do not go past the edge of the screen. When you have completed rubbing the color over the screen, lift the screen up.
Using the screen more than one printing is possible but a washing of the screen may be necessary between printing.Use a paper towel to dry the screen between uses.
Use the various leaf and stem screens to complete the design using the green mixture over the screens.Let dry.
Load CB-404 Pointed Round with water and tip with SC-76 Cara-Bein Blue to shade under the individual petals of the flowers.Keep the shading heavier towards the outer petals of the flower ball to give dimension to the flowers.
Use CB-404 Pointed Round to apply 1-2 coats of the various colors to paint in the petals of the flowers with SC-1 Pink-A-Boo, SC-65 Peri-Twinkle, SC-96 Aqu-ward and CN-261 Light Grape.Depending on your needs, you can apply more of one color than others to compliment your décor.
Use CB-404 Pointed Round to apply 1-2 coats of thinned amounts of the various colors (SC-10 Teal Next Time, SC-25 Crackerjack Brown, SC-39 Army Surplus and SC-52 Toad-ily Green) for the leaves and stems in a watercolor technique. The colors should be transparent enough to still see the underlying dark green screen printing of the leaves.Let dry.
The darker colors are used to shade overlaps and where the flowers appear over the leaves.
Apply 2-3 coats of S-2101 Crystal Clear Brushing using CB-604 Soft Fan over the middle section of the pedestal and over the design.
Apply 3 coats of FN-001 White to the top and bottom trim of the pedestal using CB-604 Soft Fan.For a bolder look you can apply a Foundation color rather than white.
Stilt and fire the ware to shelf cone 05-06.
Wire lamp to completion.
Form
CD1495 Garden Pedestal
Colors
FN-001 White
S-2101 Crystal Clear Brushing
SC-1 Pink-A-Boo
SC-10 Teal Next Time
SC-24 Dandelion
SC-25 Crackerjack Brown
SC-39 Army Surplus
SC-52 Taod-ily Green
SC-65 Peri-Twinkle
SC-76 Cara-Bein Blue
SC-96 Aqu-ward
CN-261 Light Grape
SG-404 Blue
SG-405 Green
SC-410 Bright Blue.
Decorating Accessories
CB-110 Liner
CB-404 Pointed Round
SC-604 Soft Fan.
DSS-0111 Botanical Leaves (Large tear drop leaf, Large long tapered leaf, twig with single leaf attached)
Pour CD041 Waving Gnome, CD042 Hands Up Gnome and CD043 Hands on Hips Gnome molds ¼” thick. Refer to casting instructions.
Once they are firm enough to handle, use the sponge to smooth down any casting lines.
Fire to cone 04.
Squeeze around 2 TBS of SC-15 Tuxedo onto the palette. Thin with around 1/2 TSP of water. Using the Soft Fan, brush 1 coat over each piece.
Using a damp sponge, wipe most of the glaze off, leaving it only in the crevices.
Waving Gnome
Using the Script Liner with SC-27 Sour Apple, apply 2 coats to the coat. Allow glaze to dry between coats.
Using the Script Liner with SC-74 Hot Tamale, apply 2 coats to the mittens. Allow glaze to dry between coats.
Using the Script Liner with SC-48 Camel Back, apple 2 coats to the beard and mustache. Allow glaze to dry between coats.
Using the Script Liner with SC-34 Down To Earth, apply 2 coats to the nose. Allow glaze to dry between coats.
Using the Soft Fan with SP-216 Speckled Cotton Tail, apply 2 coats to the hat. Allow glaze to dry between coats.
Draw a heart on the hat with a pencil.
Using the Script Liner with SC-74 Hot Tamale, apply 2 coats to the heart. Allow glaze to dry between coats.
Using the Script Liner with SC-15 Tuxedo, apply 2 coats to the bottom of the hat and feet. Allow glaze to dry between coats. Use the Detail Liner to outline the details and add stitches around the heart.
Dip into NT-CLR Clear One Dipping.
Fire to cone 06.
Hands Up Gnome
Using the Script Liner with SC-16 Cotton Tail, apply 2 coats to the coat. Allow glaze to dry between coats. Apply 1 coat to the hat.
Using the Script Liner with SC-46 Rawhide, apply 2 coats to the nose. Allow glaze to dry between coats.
Using the Script Liner with SC-83 Tip Taupe, apply 2 coats to the beard. Allow glaze to dry between coats.
Using the Script Liner with SC-27 Sour Apple, apply 2 coats to the mittens. Allow glaze to dry between coats.
Take MC-001 6mm Low Track Masking Tape and apply it in circles going around the hat to make stripes. Make sure it is firmly pressed down.
Using the Soft Fan with SP-274 Speckled Hot Tamale, apply 2 coats to the hat. Allow glaze to dry between coats.
Remove the tape before the glaze is bone dry.
Using the Script Liner with SC-15 Tuxedo, apply 2 coats to the bottom of the hat and feet. Allow glaze to dry between coats. Use the Detail Liner to outline the details.
Dip into NT-CLR Clear One Dipping.
Fire to cone 06.
Hands on Hips Gnome
Using the Script Liner with SC-16 Cotton Tail, apply 2 coats to the mittens. Allow glaze to dry between coats. Apply 1 coat to the hat.
Using the Script Liner with SC-42 Butter Me Up, apply 2 coats to the beard. Allow glaze to dry between coats.
Using the Script Liner with SC-25 Crackerjack Brown, apply 2 coats to the nose. Allow glaze to dry between coats.
Using the Script Liner with SC-74 Hot Tamale, apply 2 coats to the coat. Allow glaze to dry between coats.
Take the hole punch and punch out 25-50 holes from the paper. Take the “dots” and dip each one in water and place on the hat. Using the Soft Fan with SC-16 Cotton tail, apply 1 coat over the dots.
Using the Soft Fan with SP-227 Speckled Sour Apple, apply 2 coats to the hat. Allow glaze to dry between coats.
Remove the “dots” before the glaze is bone dry.
Using the Script Liner with SC-15 Tuxedo, apply 2 coats to the bottom of the hat and feet. Allow glaze to dry between coats. Use the Detail Liner to outline the details.
Begin with properly fired shelf cone 04 bisque. Moisten a clean sponge and wipe bisque to remove any dust.
Use the CB-604 #4 Soft Fan to apply three coats of FN-014 Antique White to the top of the platter. Let Dry.
Use the AC-230 Clay Carbon Paper to trace the leaves pattern onto the platter.
Thicken SC-34 Down To Earth and SC-39 Army Surplus with AC-310 Silkscreen Medium, using a palette knife, to the consistency of peanut butter. Use a couple of leaves from DSS-0111 Botanical-Leaves to screen onto the platter as shown. Rub the thickened glaze over the screen with the shiny side down. Gently clean the screen with water.
For the large leaf, use CB-106 #6 Script Liner to apply SC-81 Cinnamon Stix to part of the leaf. Blend the color into SC-25 Crackerjack Brown, then into SC-97 Cant-elope. Apply two coats of each color.
For the smaller leaves use a combination of SC-81 Cinnamon Stix, SC-26 Green Thumb and SC-97 Cant-elope. Vary the colors, by leaving one of the colors out of each leaf.
Use CB-110 #10/0 Liner to outline and vein the leaves with SC-34 Down to Earth and SC-15 Tuxedo.
Use a stiff toothbrush to spatter SC-34 Down to Earth onto the platter. Use a squeegee to drag on SC-39 Army Surplus to the edges of the tray so it is uneven.
Use the Script Liner to apply SC-15 Tuxedo to the rim and inside the handles
Use the Soft Fan to apply three coats of FN-014 Antique White to the back of the platter. Use the toothbrush to splatter SC-34 Down To Earth onto the back of the platter.
Begin with properly fired shelf cone 06 bisque. Moisten a clean sponge and wipe bisque to remove any dust.
Using CB-604 Soft Fan, apply FN-004 Red to the backside and along the side edge of the plate. Allow glaze to lose its shine between coats. Apply 3 coats. Seminar mode: glaze the back of the plate last. The front of the plate dries quicker.
With AC-230 Clay Carbon Paper, trace the pattern onto the front of the bisque with a pencil.
Using SG-401 Black, outline the traced image. Dip the CB-106 #6 Script Liner in water, then sideload the brush with a small amount SG-401 Black and brush along the previously drawn SG-401 Black line. Repeat process with dipping the CB-106 #6 Script Liner in water, then sideloading into SG-401 Black until the entire outline has been faded. Be sure to brush along the eyebrow and lower eyelid of the elephant.
To add flowers on the elephant’s head, draw a quarter-sized circle with SG-410 Bright Blue on the forehead and bottom of the ear. Using CB-110 #10/0 Liner, evenly brush to a solid colored circle. Allow to dry.
On top of the SG-410 Bright Blue circle (on the forehead and ear), draw a slightly smaller circle using SG-403 Red. Using CB-110 #10/0 Liner, evenly brush to a solid colored circle. Allow to dry.
On top of the SG-403 Red circle (on the forehead and ear), draw a slightly smaller circle using SG-407 Yellow. Using CB-110 #10/0 Liner, evenly brush to a solid colored circle. Allow to dry.
On top of the SG-407 Yellow circle (on the forehead and ear), draw and fill in a smaller circle using SG-405 Green. Allow to dry.
With alternating colors, use SG-403 Red, SG-407 Yellow, SG-408 Orange, SG-409 Bright Green, and SG-410 Bright Blue to add small dots and decorate the previously drawn circles.
Using SG-405 Green, draw vines on the head and ears, filling in the leaves with a thin coat. Allow to dry. Add dots of SG-407 Yellow on leaves.
Using SG-407 Yellow, SG-403 Red, and SG-404 Blue, draw small flowers around the vines.
Go back through the design and add dots along with the design with all of the Designer Liner Colors. Allow to dry.
Using CB-110 #10/0 Liner, dot on SC-16 Cotton Tail to the eyes.
Using SG-404 Blue, SG-403 Red, and SG-409 Bright Green, apply a border by dotting along the outer edge of the bisque. Alternate colors as shown.
Allow to dry. Apply clear glaze of choice to the interior and exterior of bisque.
Begin with properly fired cone 04 bisque. Moisten a sponge and wipe bisque to remove any dust.
Place AC-230 Clay Carbon Paper over the front of the plate. Trace the pattern using a pencil.
Using the RB-106 #6 Script Liner with SC-26 Green Thumb, SC-27 Sour Apple, SC-48 Camel Back, SC-60 Silver Lining, SC-73 Candy Apple Red and SC-87 Ruby Slippers, apply 2 coats to the corresponding sections of the pattern. Refer to the pattern.
The hat has two colors: SC-27 Sour Apple with SC-26 Green Thumb shading around the edges.
Using the RB-110 10/0 Detail Liner with SC-15 Tuxedo, outline each section of the pattern and add decorative lines.
Use the RB-106 #6 Script Liner to make a string going around the antlers and letters for the lights.
Squeeze around 1 TSP of SC-26 Green Thumb, SC-27 Sour Apple,SC-73 Candy Apple Red and SC-87 Ruby Slippers onto the palette. Use the eraser on the pencil to dip into the glaze and create dots on the “string” for the lights. Don’t make a dot on a letter if it’s the same color, or you won’t be able to see it. Alternate between the reds and greens.
Using the RB-144 #4 Soft Fan with SC-15 Tuxedo, apply 2 coats to the back of the plate. Allow glaze to dry between coats.
Using the RB-144 #4 Soft Fan with SG-704 Speckta-Clear Peppermint, apply 2 coats to the front of the plate. Allow glaze to dry between coats.
Begin with properly fired cone 04 bisque. Moisten a sponge and wipe bisque to remove any dust.
Using the Soft Fan with EL-132 Rust Red, apply 1 coat to the body of the large pumpkin. You do not need to glaze the stem.
Use a damp sponge to wipe off most of the glaze, leaving it only in the crevices.
Using the Soft Fan with EL-132 Autumn, apply 2 coats to the entire large pumpkin including the stem. Allow glaze to dry between coats.
Using the Soft Fan with S-2708 Oriental Carmel, apply 2 coats to the top half of the pumpkin. Do not glaze the stem. Allow glaze to dry between coats.
Using the Soft Fan with EL-142 Grass, apply 2 coats to the entire medium pumpkin including the stem. Allow glaze to dry between coats.
Using the Soft Fan with CG-716 Pagoda Green, apply 2 coats to the top half of the medium pumpkin. Do not glaze the stem. Allow glaze to dry between coats.
Using the Soft Fan with EL-101 Oyster Shell, apply 2 coats to the entire small pumpkin including the stem. Allow glaze to dry between coats.
Using the Soft Fan with S-2726 Cheetah, apply 2 coats to the top half of the small pumpkin. Do not glaze the stem. Allow glaze to dry between coats.
Fire to cone 06.
Using the Liner with OG-801 Bright Gold, apply 1 even coat to the stems. Make sure to apply in a well-ventilated area. Clean brush with Gold Essence.
Begin with properly fired shelf cone 04 bisque. Moisten a clean sponge and wipe bisque to
remove any dust.
Using the CB-604 Soft Fan Brush, apply 3 coats ofSW-505 Purple Gloss to the back side and entire front of the plate. Do not glaze the bottom or the foot. Let dry well.
Using the carbon paper and a pencil, transfer the pattern onto the platter.
Using the CB-106 Script Liner, apply 2 coats of SW-508 Black Gloss to the house and the hill. Use the CB-404 #4 Pointed Round to get into any tight spaces.
Using the CB-404 #4 Pointed Round, apply 2 coats of SW-501 White Gloss to the windows of the house
Using the CB-404 #4 Pointed Round, apply 2 coats of SW-502 Yellow Gloss to the moon.
Using the CB-404 #4 Pointed Round, mix a small amount of SW-508 Black Gloss and SW-501White Gloss together on a plate to make gray. Apply 2 coats to the front of the tombstones.
Fill an AC-222 Large Bottle and Writer Tip with SW-508 Black Gloss and use it to fill in the bats, the sides of the tombstones and write RIP on each one.
Using the CB-106 Script Liner, apply 2 coats of SW-165 Lavender Mist to the sky. Don’t apply tothe rim. Use a smaller brush if you wish to get into the tight areas around the house and moon.
Do not stilt or hang over the edge of the kiln shelf.
Begin with properly fired cone 04 bisque. Moisten a sponge and wipe bisque to remove any dust.
Using the Soft Fan with SC-15 Tuxedo, apply 3 coats to the koala. Allow glaze to dry between coats.
Using the Detail Liner with AC-302 Wax Resist, outline all of the facets. Apple 1 coat to the nose and eyes.
Using the Script Liner with SG-202 White Cobblestone, apply 1 coat to the inside of the ears and chest.
Using the Script Liner with SG-202 White Cobblestone, apply 2 coats to the rest of the koala. Work in sections to prevent over-drying between coats. The second coat should be applied as soon as the shine on the first coat is gone.
After the second coat of SG-202 White Cobblestone is dry, apply 1 coat of SC-35 Gray Hare to those sections.
Begin with properly fired cone 04 bisque. Moisten a sponge and wipe bisque to remove any dust.
Squeeze around 1 TBS SC-34 Down to Earth onto the palette. Thin with around 1 TSP of water. Using the Soft Fan, apply 1 coat to fawn. Use a damp sponge to wipe away most of the glaze, leaving it in the crevices.
Using the Script Liner with SC-86 Old Lace, apply 1 coat to the face, chest and tail. Apply a second coat and shade with SC-25 Crackerjack Brown.
Using the Script Liner with SC-48 Camel Back, apply 2 coats on the eyes, nose and hooves. Allow glaze to dry between coats.
Using the Detail Liner with SC-15 Tuxedo, make a pupil in the eye. Add a dot of SC-16 Cotton Tail after it dries.
Using the Script Liner with CG-79 Yadro Print, apply 2 coats to the rest of the fawn. Allow glaze to dry between coats.
Begin with properly fired cone 04 bisque. Moisten a sponge and wipe bisque to remove any dust.
Squeeze around 1 TBS SC-15 Tuxedo onto the palette. Thin with around 1 TSP of water. Using the Soft Fan, apply 1 coat to the bunny. Use a damp sponge to wipe away most of the glaze, leaving it in the crevices.
Using the Script Liner with SC-15 Tuxedo, apply 2 coats to the nose, eyes and tail. Add decorative dots going down the face and back. Allow glaze to dry between coats.
Using the Detail Liner with SC-15 Tuxedo, make lines 2 lines going down each foot.
Using the Soft Fan with CC-101 Transparent, apply 3 coats to the entire bunny. Allow glaze to dry between coats.
Fire to cone 06.
Squeeze around 1 TSP SS-138 Flat Black onto the palette. Thin with around ½ TSP of water. Use the Soft Fan to apply 1 coat over the bunny. Wipe off with a damp sponge. You should be able to see the crackles in the glaze.
Begin with properly fired cone 04 bisque. Moisten a sponge and wipe bisque to remove any dust.
Squeeze around 1 TBS SC-15 Tuxedo onto the palette. Thin with around 1 TSP of water. Using the Soft Fan, apply 1 coat to the owl. Use a damp sponge to wipe away most of the glaze, leaving it in the crevices.
Use a pencil to sketch the designs on the owl.
Using the Script Liner with SC-9 Jaded, SC-10 Teal Next Time and SC-96 Aqu-ward, apply 2 coats to the different parts of the design. Allow glaze to dry between coats.
Using the Detail Liner with SC-15 Tuxedo, outline the designs and add decorative lines and dots. Apply 2 coats to the eyes. Allow glaze to dry between coats.
Using the Detail Liner with SC-16 Cotton Tail, make a dot in the center of each eye.
Using the Soft Fan with FN-216 Sea Glass, apply 2 coats to the owl. Allow glaze to dry between coats.
Begin with properly fired cone 04 bisque. Moisten a sponge and wipe bisque to remove any dust.
Place AC-230 Clay Carbon Paper over the front of the plate. Trace the pattern using a pencil.
Using the RB-106 #6 Script Liner with SC-5 Tiger Tail, SC-9 Jaded, SC-15 Tuxedo, SC-42 Butter Me Up, SC-50 Orange-Ya-Happy, SC-60 Silver Lining and SC-81 Cinnamon Stix, apply 2 coats to the corresponding sections of the pattern.
Using the RB-110 10/0 Detail Liner with SC-5 Tiger Tail, make diagonal lines on the letter “F”. Use the handle of the brush with SC-50 Orange-Ya-Happy to make dots on the first letter “L”. Make dots on the second “L” with SC-81 Cinnamon Stix.
Using the RB-110 10/0 Detail Liner with SC-15 Tuxedo, outline each section of the pattern and add decorative lines.
Make a letter “A” in the pumpkin.
Using the RB-144 #4 Soft Fan with SC-15 Tuxedo, apply 2 coats to the back of the plate. Allow glaze to dry between coats.
Using the RB-144 #4 Soft Fan with SG-703 Speckta-Clear Autumn, apply 2 coats to the front of the plate. Allow glaze to dry between coats.
Cast the molds in usual manner.Allow Greenware to dry!Clean the greenware with a Clean-Up Tool.
Bisque fire to cone 04.
Begin with properly fired shelf cone 04 bisque.Moisten a clean sponge and wipe bisque to remove any dust.
Glaze the inside of the Wooden Crate with Clear Glaze or your choice of any Color Gloss Glaze. Fire to shelf cone 06.
Using a Basecoat Brush, basecoat all the pieces with 1 – 2 coats of SS-24 Chocolate Fudge. Allow to dry!
Scarecrow Lid Topper
Using various size Drybrush’s, drybrush as follows – Face/Hands: SS-194 Medium Taupe then with SS-127 Medium Portrait.Highlight the Cheeks with SS-183 Rich Peach.
Drybrush the Shirt: SS-276 Forest Green then SS-19 Country Sage followed by SS-376 Limeburst.Highlight with SS-111 Brightest Yellow.
Drybrush the Pants: OS-541 Northern Blue then OS-459 Bright Blue Followed by OS-458 Wedgewood Blue.Highlight with SS-135 White.
Drybrush the Straw/Hair: Drybrush OS-471 Medium Brown then SS-254 Golden Ochre followed by SS-3 Honey toast.Highlight with SS-45 Buttermilk.
Drybrush the Pumpkin: OS-454 Rust then OS484 Persimmon followed by OS-438 Orange Peel.Highlight with SS-111 Brightest Yellow.
Drybrush the Hat: OS-481 Cinnamon then OS454 Rust Followed by OS-503 Barnyard Red.Highlight with SS-45 Buttermilk.
Drybrush the Shoes:OS-471 Medium Brown, Highlight with SS-45 Buttermilk.
Drybrush the Patches on Hat & Pants:Use various colors. Highlight with a lighter color or SS-45 Buttermilk.
Using a CB-110 #10/0 Liner, Apply stripes to the shirt with SS-254 Golden Ocher and SS-45 Buttermilk.
Apply 1-2 coats of MM-102 Copper Metallic to the buttons on the pants.
Eyes – Using a CB-110 #10/0 Liner, apply 1 – 2 coats of SS-135 White to the eye area. Iris of the eye is SS-29 Dew Drop Blue. Shade with OS-541 Northern Blue.Pupil and eyelashes are OS-476 Black.Add a highlight with SS-135 White.Allow to dry!
Float some SS-24 Chocolate Fudge in the deep crevices of the Scarecrow.Allow to dry!
Apply 2 coats of AS-494 Matte Sealer to the piece. Allow to dry!
Apply 2 coats of AS-493 Gloss Sealer to the eyes and buttons.Allow to dry!
DO NOT FIRE!
Straw/Leaves Lid
Using various size Drybrush’s, drybrush as follows –Straw: Drybrush OS-471 Medium Brown then SS-254 Golden Ochre followed by SS-3 Honey toast.Highlight with SS-45 Buttermilk.
Drybrush the Leaves on one side with SS-276 Forest Green then SS-19 Country Sage followed by SS-376 Limeburst.Highlight with SS-111 Brightest Yellow
On the other side of the leaf blend the two colors where they meet, drybrush with OS-454 Rust then OS484 Persimmon followed by OS-438 Orange Peel.Highlight with SS-111 Brightest Yellow.
Float some SS-24 Chocolate Fudge around the leaves.
Wooden Crate
Using a Basecoat Brush, Basecoat the wooden part of the crate with 1 – 2 coats of SS-24 Chocolate Fudge. Allow to dry!
Using various size Dry Brushes, Drybrush the crate with SS234 Medium Mocha then with SS212 Light Umber.
Bend in some SS-192 Light Taupe and SS-130 Medium Gray to make the woodgrain look old.
Basecoat the corners of the crate with SS-138 Flat Black.Drybrush with OS-475 Charcoal then OS-567 Ash.Highlight with SS-130 Medium Gray.Allow to dry!
Apply some MM-106 Steel Metallic on the center area of the corners.Allow to dry!
Mix some MM-305 Rapid rust into some MM-106 Steel Metallic and apply a second coat of the MM-106 Steel Metallic mix.
Using a CB-202 #2 Detail Liner, apply SS-138 Flat Black to the rivets on the corners.Allow to dry!
Float some SS-24 Chocolate Fudge in the deep crevices of the crate.
Apply 2 coats of AS-494 Matte Sealer to the outside of the crate. Allow to dry!
Begin with properly fired shelf cone 04 bisque. Moisten a clean sponge and wipe bisque to
remove any dust.
Using scissors, cut out the candy corn from the pattern.
Using the pen or marker, trace the candy corn onto the contact paper 8 times.
Using the scissors, cut out the 8 candy corns.
Remove the backing from each candy corn and adhere them to the bowl, making sure all the edges are sealed down well. If you space them slightly less than an inch apart you should be able to fit 8 around the circumference of the bowl near the top.
Using the CB-604 Soft Fan Brush, apply 3 coats of SW-140 to the inside and outside of the bowl.Do not glaze the bottom or the foot. Let dry.
When the glaze is no longer shiny but still a bit damp, use the skewer to gently lift up the edges of the contact paper candy corns and peel them off. If you got any glaze underneath the contact paper, you can use the pointed end of the skewer to scrape it off.
Using a pencil, draw in the lines on each candy corn to separate into 3 different sections.
Using the CB-404 #4 Pointed Round, apply 2 coats of SW-501 White Gloss to the top section of each candy corn.
Using the CB-404 #4 Pointed Round, apply 2 coats of SW-503 Orange Gloss to the middle section of each candy corn.
Using the CB-404 #4 Pointed Round, apply 2 coats of SW-502 Yellow Gloss to the bottom section of each candy corn.
Do not stilt or hang over the edge of the kiln shelf.
Cast the molds in usual manner.Allow Greenware to dry. Clean the greenware with a Clean-Up Tool.
Bisque fire to cone 04.
Begin with properly fired shelf cone 04 bisque.Moisten a clean sponge and wipe bisque to remove any dust.
Using a Basecoat Brush, basecoat the Bird with 1 – 2 coats of SS-138 Flat Black.
Basecoat the Pine Boughs with SS-57 Accent Green and the Pine Cones with SS-24 Chocolate Fudge.
Basecoat the Greenery Lid with SS-57 Accent Green.Allow to dry!
Using various size Drybrush’s, drybrush as follows:
Birds body: OS-480 Garnet Red then OS-483 Real Red followed by OS-455 Holly Red.Highlight with OS-484 Persimmon.Highlight the Chest, Tail, cheeks and beak with SS-210 Orange.
Drybrush the Scarf with OS-468 Deep Turquoise then SS-217 Turquoise followed by lightly with OS-469 Light Turquoise then highlight with SS-135 White.
Drybrush the Tail & Top of Head with SS-138 Black.
Using a CB-110 #10/0 Liner, add stripes on Scarf with SS-135 White.
Drybrush the Pine Cones with SS-234 Medium Mocha then with OS-471 Medium Brown.Highlight with OS-471 Medium Mocha and SS-45 Buttermilk in the brush.
Drybrush the Pine Boughs with SS-276 Forest Green then OS-488 Christmas Green followed by OS-466 Avocado.Highlight with SS-19 Country Sage.
Using a CB-110 #10/0 Liner, paint the Legs/Feet & Eyes with SS-138 Flat Black with a little SS-135 White.
Greenery Lid – Drybrush Pine Boughs & Small Leaves with SS-276 Forest Green then SS-276 Forest Green with a little OS-488 Christmas Green in the brush. Drybrush the outer edges of Pine with OS488 Christmas Green followed by OS-466 Avocado.Highlight with SS-19 Country Sage.
Drybrush the Small Leaves with OS-466 Avocado then OS-466 Avocado with SS-45 Buttermilk in the brush.
Apply 2 coats of AC-502 Matte Sealer to both Songbird and Greenery Lid. Allow to dry!
Apply 2 coats of AC-501 Gloss Sealer to the Bird Eyes.Allow to dry!
Moisten a clean sponge and wipe bisque to remove any dust.
Use a pencil to divide the mug and draw the carrot shapes.
Use a script liner to apply 3 coats of UG-85 Orange to fill in the carrots.
Use a script liner to apply 3 coats of UG-31 Chocolate to the dirt. *Do not layer the orange over the brown or you will get blistering. Chocolate fluxes at cone 6 so applying a not fluxing UG over it can create surface issues.*
Use a fan brush to apply 3 coats of UG-82 Tucson Turquoise to create the sky.
Fire to cone 04 to set UG. *This step is not 100% necessary, but is helpful when applying the Designer Liner.*
Use the SG-408 Orange to add details to the carrots, SG-405 Green to create the leaves, and SG-401 to create the outline.
Use a fan brush to apply 3 coats of SW-155 Winter Wood to the inside of the tumbler.
Use a clean sponge to wipe the excess glaze off of the foot.
Begin with properly fired cone 04 bisque. Moisten a sponge and wipe bisque to remove any dust.
Using the Soft Fan with CN-081 Light Wine, apply 2 coats to the front of the platter. Allow glaze to dry between coats. Allow final coat to dry to the touch, but not to bone dry.
Cut out a circle around the pineapple pattern. Place the pineapple on the tray and trace with the pencil. Repeat, moving and twisting the pattern, until the tray is full.
Using the Script Liner with SC-16 Cotton Tail, apply 2 coats to each pineapple. Allow glaze to dry between coats.
Using the Script Liner with SC-6 Sunkissed, apply 2 coats to the body of each pineapple. Allow glaze to dry between coats.
Using the Script Liner with SC-26 Green Thumb, apply 1 coat to a few of the leaves on the top of each pineapple. Dip the brush in glaze and make 1 firm stroke for each leaf.
Allow glaze to dry completely.
Using FD-258 Pure White, squeeze a design on the body of each pineapple. You can use lines, dots or squiggles.
Using SG-401 White, outline the pineapples and make accent lines inside the green leaves. Make lines, dots or squiggles to fill in some of the background on the platter.
Using the Soft Fan with SC-15 Tuxedo, apply 2 coats to the back of the platter. Allow glaze to dry between coats.
Begin with properly fired cone 04 bisque. Moisten a sponge and wipe bisque to remove any dust.
Using the Soft Fan with SC-16 Cotton Tail, apply 2 coats to the front of the plate. Allow glaze to dry between coats.
Print out 2 copies of the pattern. Cut along the vertical edge of one pattern and place it on top of the other pattern. Tape the 2 patterns together. You want to create one large pattern to fit your plate.
Take your pattern and place over the front of your plate. Trace with a pencil. Lift up your pattern to make sure you are using the right amount of pressure.
Squeeze out around 1 TBS of SC-6 Sunkissed, SC-27 Sour Apple and SP-211 Speckled Blue Yonder onto your palette.
Using the Script Liner, apply 3 coats of the glazes from Steps #5 & #6, to each bird. Try to space them out so you don’t have birds of the same color next to each other. Allow glaze to dry between coats.
Squeeze around ½ TBS of SC-6 Sunkissed, SC-27 Sour Apple and SP-211 Speckled Blue Yonder on to a different section of your palette. Add 1-3 drops of SC-15 Tuxedo to each color. Mix to create a different shade of the original colors.
Cut out the wing pattern. Trace the pattern on your paper towel around 10 times and cut them out.
Using the Sponge on a stick, dip it in one of the glazes from Step #8. Sponge a paper towel wing and press it glaze side down onto one of the birds of the same base color. Press it down onto another bird, then discard. Repeat with all 3 colors until every bird has a wing.
Using the Detail liner with SC-15 Tuxedo, outline the bottom side of the wings. Add a dot for the eyes and a triangle for the beaks. Make 2 lines for the legs. Refer to the sample picture for placement.
Using the Soft Fan with SC-15 Tuxedo, apply 2 coats to the back of the plate. Allow glaze to dry between coats.
Begin with properly fired cone 04 bisque. Moisten a sponge and wipe bisque to remove any dust.
Using the Soft Fan with SC-16 Cotton Tail, apply 2 coats to the front of the plate. Allow glaze to dry between coats.
Print out 2 copies of the pattern. Cut along the vertical edge of one pattern and place it on top of the other pattern. Tape the 2 patterns together. You want to create one large pattern to fit your plate.
Take your pattern and place over the front of your plate. Trace with a pencil. Lift up your pattern to make sure you are using the right amount of pressure.
Squeeze out around 1 TBS of SC-6 Sunkissed, SC-13 Grapel, SC-27 Sour Apple and SP-275 Speckled Orange-A-Peel onto your palette.
Squeeze out around ½ TBS of SC-6 Sunkissed, SC-13 Grapel, SC-27 Sour Apple and SP-275 Speckled Orange-A-Peel onto a different section of your palette. Then add ½ TBS of SC-16 Cotton Tail to each of those glazes. Mix to created to tint the original colors.
Using the Script Liner, apply 3 coats of the glazes from Steps #5 & #6, to each bird. Try to space them out so you don’t have birds of the same color next to each other. Allow glaze to dry between coats.
Squeeze around ½ TBS of SC-6 Sunkissed, SC-13 Grapel, SC-27 Sour Apple and SP-275 Speckled Orange-A-Peel on to a different section of your palette. Add 1-3 drops of SC-15 Tuxedo to each color. Mix to create a different shade of the original colors.
Cut out the wing pattern. Trace the pattern on your paper towel around 10 times and cut them out.
Using the Sponge on a stick, dip it in one of the glazes from Step #8. Sponge a paper towel wing and press it glaze side down onto one of the birds of the same base color. Press it down onto another bird, then discard. Repeat with all 3 colors until every bird has a wing.
Using the Detail liner with SC-15 Tuxedo, outline the bottom side of the wings. Add a dot for the eyes and a triangle for the beaks. Make 2 lines for the legs. Refer to the sample picture for placement.
Using the Soft Fan with SC-15 Tuxedo, apply 2 coats to the back of the plate. Allow glaze to dry between coats.
Roll clay out into a slab that is about 1/8” thick and compress with rib
Using a fettling knife cut base tile shape to your desired size and save extra slab pieces
Use extra slabs to create hills in the foreground and middle ground of your image by flattening them more with your hands and cutting them to size
Slip and score to attach pieces to base slab
Roll out multiple coils to create tree design and attach by slipping as scoring
Add additional texture details to slab with your pencil by drawing in lines or creating a “hammered metal” texture in the sky
Allow tile to dry slowly
Once fully dry, bisque fore to Cone 04
Glaze:
Wipe down bisque with a damp sponge to remove any dust
Using a soft bristled brush, apply 3 coats of FN-37 Chartreuse to the hill in the background, allowing glaze to dry in between coats
Using the same glazing technique, apply 3 coats of FN-7 Green to the middle ground hill and 3 coats of FN-21 Olive Green to the hill in the foreground
Apply 3 coats of FN-212 Blue Dimond to the sky, 3 coats of FN-29 Rich Chocolate to the tree truck and branches and 3 coats of FN-21 Olive Green to the tree’s leaves
Allow to dry completely
Glaze fire to Cone 06
Form
LEM100 1.5 lbs Low-fire White Clay
Colors
FN-212 Bule Dimond
FN-21 Olive Green
FN-7 Green
FN-37 Chartreuse
FN-29 Rich Chocolate
Miscellaneous Accessories
Water
Sponge
Fettling knife
Pencil
Slab roller or rolling pin
Rib
Brushes for glazing
Lesson Plan|Low-Fire|Earthenware Bisque|Garden|Table Top
Draw in a different repetitive pattern or mark in each section until your plate is fully covered in designs
Assign different colors to different sections of your zen tangle
Using the designer liner in supplied bottle with writer tip, trace lines with designer liner
Once designer liner lines are dry, use a wet brush to pull color from the lines to add a lighter background color to your design- looking similar to watercolor
To add more color- squirt a small amount if the designer liner on your palette, with a wet brush pick up some color and apply to design
Allow design to dry fully
Apply 2 coats of brushing S-2101 – clear glaze to plate
Begin with properly fired cone 04 bisque. Moisten a clean sponge and wipe bisque to remove any dust.
Use a soft fan to apply 1 coat of SW-304 Copper Wash over the texture of the mug. Allow to dry and wipe back over the texture with a damp sponge, leaving the product in the low points.
Use a soft fan to apply 2 coats of PC-602 White Cascade around the lip of the mug.
Use a soft fan to apply 3 coats of EL-103 Sea Spray to the entire mug.
Allow to dry completely.
Stilt and fire to cone 06.
Note: Washes (SW301-305) are the only SW# glazes that can be used at low fire (cone 06). We do not recommend any other SW glazes be used at cone 06.
Begin with properly fired cone 04 bisque. Moisten a clean sponge and wipe bisque to remove any dust.
Mix a bit of SW-301 Iron Wash with the AC-310 Silkscreen Medium to thicken the product until it has lost a hint of its gloss and is about the consistency of peanut butter.
Use a soft fan to apply 1 coat of SW-301 Iron Wash to the inside of the bowl.
Use a soft fan to apply 3 coats of EL-145 Giner Root to the entire bowl.
Allow to dry completely.
Stilt and fire to cone 06.
Note: Washes (SW301-305) are the only SW# glazes that can be used at low fire (cone 06). We do not recommend any other SW glazes be used at cone 06.
Begin with properly fired cone 04 bisque. Moisten a clean sponge and wipe bisque to remove any dust.
Use a soft fan to apply 1 coat of SW-305 Cobalt Blue Wash over the texture of the mug. Allow to dry and wipe back over the texture with a damp sponge, leaving the product in the low points.
Use a soft fan to apply 3 coats of EL-146 Rain Cloud to the entire mug.
Allow to dry completely.
Stilt and fire to cone 06.
Note: Washes (SW301-305) are the only SW# glazes that can be used at low fire (cone 06). We do not recommend any other SW glazes be used at cone 06.
In the 4 oz. jar mix 1 part UG-57 Spice Brown with 1 part UG-213 Cinnamon. Stir and shake well to make sure the color is blended well.
To the well cleaned greenware apply 3 coats of the Fundamental UG mixture using CB-604 Soft Fan.
Fire to Shelf Cone 04.
On a tile mix 3 parts FN-001 White with 1 part FD-298 Pure White. Mix well with a Pallet Knife. Using a dampened Mediterranean Sponge apply 2-3 coats to the entire piece. The glaze surface should have a high-low texture to it after applying the glaze coats. There should be no bare spots showing the underlying color to peak through. Let dry.
Use the pattern as your guide to paint in the design with the noted Stroke and Coat colors using CB-404 Pointed Round. Place the colors out separately onto a tile and thin with a drop or two of water for brushability. The SC-36 Irish Luck should be thinned to an ink like consistency for painting.TIP: Here are some of the major points when painting the pattern. The shading on the pumpkin has a highlight of SC-39 on the top portions of the sections. Two coats of SC-23 Jack O’Lantern is best with the darker orange color towards the bottom of the pumpkin sections. The leaves have the darkest colors up next to the gourds and pumpkin. Berries have a highlight made with a water moistened brush to rub out a highlight. Pear shaped gourd has the lighter green towards the stem and darker gold color towards the bottom. The acorn squash has the teal color towards the bottom with the dark green towards the top. The acorn leaves are green towards the center with the tips the lighter golds/oranges. The teardrop leaves have the thinned red color to one side with the dark green on the other half, overlap the colors to blend. Let dry.
Use SG-406 Brown to detail the pattern keeping the lines as fine as possible.
Thin some SG-406 Brown with water to a milk consistency. Use the Spatter Brush or Old Stiff Toothbrush to spatter the ware. Let dry.
Apply 1 coat of S-2101 Crystal Clear Brushing using CB-604 Soft Fan.
Begin with properly fired shelf cone 04 bisque. Moisten a clean sponge and wipe bisque to remove any dust.
Using the CB-604 Soft Fan Brush, apply 3 coats of SW-128 Cordovan to the front and back of the pie plate, including the bottom.
Using the CB-604 Soft Fan Brush, apply 3 coats of SW-128 Cordovan to the front and back of the dessert bowl, including the bottom but leave the top lip unglazed. You will be firing this upside down so the lip is what will be touching the kiln shelf.
Place the Clay Carbon paper underneath the pattern and line up the center ‘star’ of the pattern with the center of the pie plate. Trace the pattern onto the plate. Use the pencil to extend the lines up the side of the pie plate and down the back.
Flip the Dessert Bowl upside down and use the pencil to draw similar lines onto the back, using the pattern as a guide.
Using the CB-604 Script Liner, apply 3 coats of SW-108 Green Tea to the ‘U’ sections of the plate. Use the notations on the pattern as a guide. Start at the U and fill in the whole section, continuing down the back side of the plate.
Using the CB-604 Script Liner, apply 3 coats of SW-131 Birch to the section next to the Green Tea, leaving about 1/8 inch gap between the two colors. Follow the lines to apply the glaze up the front side and down the back.
Using the CB-604 Script Liner, apply 3 coats of SW-180 Desert Dusk to the rest of the plate, front and back, leaving a 1/8 inch gap between this color and the Birch.
Use the Script Liner to apply the Green Tea, Birch, and Desert Dusk to the back of the Dessert Bowl in the same order.
Turn the Dessert Bowl upside down and place it in the kiln. Make sure you wipe away any glaze that may have gotten on the rim. Place the pie plate on top of the bowl, ensuring that the center of the pie plate is resting on the bottom of the bowl. When fired, they will fuse together.
Do not stilt or hang over the edge of the kiln shelf.
Begin with properly fired cone 04 bisque. Moisten a sponge and wipe bisque to remove any dust.
Squeeze around 1 TSP SC-34 Down to Earth onto the palette. Thin with a few drops of water. Using the Soft Fan, apply 1 coat to the koala. Use a damp sponge to wipe away most of the glaze, leaving it in the crevices.
Using the Script Liner with SC-1 Pink-A-Boo, SC-9 Jaded, SC-51 Poo Bear, SC-80 Basketball, SC-92 Café Ole and SC-96 Aqu-ward apply 2 coats to the facets on the koala. Try not to glaze facets that share a side with the same color.
Using the Detail Liner with SC-15, make dashes between the facets. Add pupils to the eyes.
Dip into NT-CLR Clear Dipping Glaze.
Fire to cone 06.
Bunny
Begin with properly fired cone 04 bisque. Moisten a sponge and wipe bisque to remove any dust.
Squeeze around 1 TSP SC-34 Down to Earth onto the palette. Thin with a few drops of water. Using the Soft Fan, apply 1 coat to the bunny. Use a damp sponge to wipe away most of the glaze, leaving it in the crevices.
Using the Script Liner with SC-1 Pink-A-Boo, SC-9 Jaded, SC-51 Poo Bear, SC-80 Basketball, SC-92 Café Ole and SC-96 Aqu-ward apply 2 coats to the facets on the bunny. Try not to glaze facets that share a side with the same color.
Using the Detail Liner with SC-15, outline the facets. Then add decorative dots, dashes, lines and squiggles inside some of the facets. Add pupils to the eyes.
Dip into NT-CLR Clear Dipping Glaze.
Fire to cone 06.
Fawn
Begin with properly fired cone 04 bisque. Moisten a sponge and wipe bisque to remove any dust.
Squeeze around 1 TSP SC-34 Down to Earth onto the palette. Thin with a few drops of water. Using the Soft Fan, apply 1 coat to fawn. Use a damp sponge to wipe away most of the glaze, leaving it in the crevices.
Use the pencil to sketch overlapping shapes on the fawn. Make them various sizes.
Using the Script Liner with SC-92 Café Ole, apply 2 coats to the feet, tail and eyes. Allow glaze to dry between coats.
Using the Script Liner with SC-1 Pink-A-Boo, SC-96 Aqu-ward, SC-80 Basketball, SC-51 Poo Bear, SC-92 Café Ole and SC-9 Jaded, apply 2 coats each of your shapes. Allow glaze to dry between coats. Use the color in that order (lightest to darkest coverage).
Using the Detail Liner with SC-15, loosely outline your shapes. Then add decorative dots, dashes, lines and squiggles inside some of the shapes. Add pupils to the eyes.
Dip into NT-CLR Clear Dipping Glaze.
Fire to cone 06.
Owl
Begin with properly fired cone 04 bisque. Moisten a sponge and wipe bisque to remove any dust.
Squeeze around 1 TSP SC-34 Down to Earth onto the palette. Thin with a few drops of water. Using the Soft Fan, apply 1 coat to the owl. Use a damp sponge to wipe away most of the glaze, leaving it in the crevices.
Use a pencil to sketch a rainbow with 5 sections on the belly of the owl.
Using the Script Liner with SC-80 Basketball, SC-1 Pink-A-Boo, SC-51 Poo Bear, SC-96 Aqu-ward and SC-9 Jaded, apply 2 coats to each section of the rainbow. Start on the outer section and work your way to the middle using the glaze in that order.
Using the Script Liner with SC-92 Café Ole, apply 2 coats to the facets on the feet, beak and inner eyes. Allow glaze to dry between coats.
Using the Script Liner with SC-1 Pink-A-Boo, SC-9 Jaded, SC-51 Poo Bear, SC-80 Basketball, SC-92 Café Ole and SC-96 Aqu-ward apply 2 coats to the rest of the facets on the owl. Try not to glaze facets that share a side with the same color.
Using the Detail Liner with SC-15, outline the rainbow with lines, dots or dashes. Add decorative lines or dots to the eyes and wings.
Begin with properly fired cone 04 bisque. Moisten a sponge and wipe bisque to remove any dust
Using the Soft Fan with FN-001 White, apply 2 coats to the front and sides of the canvas. Allow glaze to dry between coats.
Place AC-230 Clay Carbon Paper over the front of the canvas. Trace the pattern using the pencil.
Using the Script Liner with CG-756 Firecracker, CG-954 Wildfire, S-2729 Citrus Splash, CG-979 Meadow, CG-718 Blue Caprice, S-2703 Berryberry Pie and S-2723 Grape Divine, apply 2 coats to each section of the rainbow. Allow glaze to dry between coats.
Using the Liner with SC-15 apply 1 coat to the lettering. Make lines between each sections of the rainbow. They can be solid lines, dots or dashes.
Begin with properly fired cone 04 bisque. Moisten a sponge and wipe bisque to remove any dust.
Squeeze around 1 TBS of SC-73 Candy Apple Red, SC-75 Orange-A-Peel, SC-6 Sunkissed, SC-27 Sour Apple, SC-11 Blue Yonder and SC-33 Fruit of the Vine onto the palette. Use water to thin each color.
Using the Soft Fan with thinned SC-73 Candy Apple Red, apply 1 coat to the head and front feet. Using the same brush, apply each of the colors from Step #2 in order, blending as you work your way to the back of the unicorn.
After the glaze is completely dry, use SG-402 White to outline the facets.
Using the Soft Fan with S-2101 Clear Brushing, apply 2 coats to the entire unicorn. Or dip into NT-CLR Clear Dipping.
Begin with properly fired cone 04 bisque. Moisten a sponge and wipe bisque to remove any dust.
Using the Soft Fan with EL-134 Mirror Blue, apply 1 coat to each pumpkin. Do not glaze the stems. Use a damp sponge to wipe off most of the glaze, leaving it only in the crevices.
Using the Soft Fan with EL-136 Lapis Lagoon, apply 2 coats to the pumpkins. Allow glaze to dry between coats. Do not glaze the stems.
Fire to cone 06.
Using the Flat Shader with MM-105 Gold Metallic, apply 2 coats to the stems. Allow paint to dry between coats.
Using the Flat Shader with AC-501 Gold Metallic, apply 2 thin coats to the stems. Allow paint to dry between coats
Begin with soft fired stoneware bisque. Moisten a clean sponge and wipe bisque to remove any dust.
Use a soft fan to apply 2 coats of SP-288 Speckled TuTu Tango in a band around the rim – about 1”-1.5” wide. Be sure to brush the coats out well and not glob them on with this particular color. It can get some texture at cone 6 if it is applied thick.
Use a fan brush to apply 2 coats of SW-100 Blue Surf to outside of the bowl, avoiding the bottom and to the inside, slightly overlapping the Speckled TuTu Tango. The thinner the application, the more green will appear, the thicker the application, the more blue.
Use a clean sponge to wipe the excess glaze off of the foot.
Begin with soft fired stoneware bisque. Moisten a clean sponge and wipe bisque to remove any dust.
Use a script Liner to apply 3 bands that are evenly spaced from the neck of the vase down. You will want to apply 3 coats of glaze to each.
Use a fan brush to apply 2 coats of SW-166 Norse Blue to the entire vase. (You may want to roll the glaze on the inside of the vase by thinning a small portion of glaze with water. It should be about the consistency of heavy cream)
Use a fan brush to apply 2 coats of SW-153 Indigo Rain to the outside of the vase. Note the crystal concentration near the bottom of the vase, which can enhance mobility. Recede your last coat if necessary.
Use a clean sponge to wipe the excess glaze off of the foot.
Begin with soft fired stoneware bisque.Moisten a clean sponge and wipe bisque to remove any dust.
Use a soft fan to apply 3 coats of SW-109 Capri Blue to the inside and the top section of the outside of the bowl.
Apply dots of SW-305 Cobalt Wash around the bottom of the Capri Blue section.
Use a soft fan to apply 3 coats of SW-187 Himalayan Salt to the bottom section of the bowl, overlapping the Cobalt Wash slightly and avoiding the bottom. Recede the coats at the bottom of the piece to avoid possible glaze run off.
Use a clean sponge to wipe the excess glaze off of the foot.
Begin with soft fired stoneware bisque.Moisten a clean sponge and wipe bisque to remove any dust.
Use a soft fan to apply 3 coats of SW-140 Black Matte to the inside and the top section of the outside of the bowl.
Apply design details using SG-401 Black Designer Liner.
Use a soft fan to apply 3 coats of SW-187 Himalayan Salt to the bottom section of the bowl, overlapping the Black Matte slightly and avoiding the bottom. Recede the coats at the bottom of the piece to avoid possible glaze run off.
Use a clean sponge to wipe the excess glaze off of the foot.
Begin with soft fired stoneware bisque.Moisten a clean sponge and wipe bisque to remove any dust.
Use a fan brush to apply 2 coats of SW-117 Honeycomb to the bottom section and handle of the mug.
Apply 2 coats of SW-189 Cenote to the rest of the mug, but be sure to leave about ½”-1” near the bottom to allow for movement. (Layering 2 crystals glazes together can potentially cause movement depending on the thickness and crystal concentration. We suggest allowing some space for this movement by leaving space near the bottom without a combo)
Use a clean sponge to wipe the excess glaze off of the foot.
Begin with soft fired stoneware bisque.Moisten a clean sponge and wipe bisque to remove any dust.
Use a soft fan to apply 3 coats of SW-107 Dunes to the outside of the tumbler, avoiding the bottom.
Use sponge on a stick to apply SW-301 Iron Wash to the MT-002 Wood Grain Mat – be sure to dab excess product off before applying it to the mat and apply it on a flat surface.
Carefully pick the mat up with you hand and transfer the design onto the tumbler. Press firmly, but do not pull or slide your hand across the mat. Repeat until the tumbler is covered.
Use a soft fan to apply 3 coats of SW-203 Root beer to the inside of the tumbler and just rolling over the lip.
Use a clean sponge to wipe the excess glaze off of the foot.
Begin with soft fired stoneware bisque.Moisten a clean sponge and wipe bisque to remove any dust.
Use a soft fan brush to apply 1 or 2 swirls of SW-301 IronWash to the inside and outside of the bowl. If the swirls overlap creating 2 coats, more brown variation will appear.
Use a soft fan brush to apply 3 coats of SW-169 Frosted Lemon to the entire bowl, avoiding the bottom.
Use a clean sponge to wipe the excess glaze off of the foot.
Begin with soft fired stoneware bisque.Moisten a clean sponge and wipe bisque to remove any dust.
Use a soft fan to apply 2 coats of SW-121 Smoke as a swirled brushstroke across or around the plate. We applied ours on a banding wheel to apply a swift swirl.
Pour or splatter some SW-128 Cordovan to the face of the plate. We applied our along our swirl.
Use a fan brush to apply 3 coats of SW-176 Sandstone to the face of the plate.
Use a fan brush and script liner to apply 3 coats of SW-128 Cordovan to the rim and back of the plate, avoiding the bottom.
Use a clean sponge to wipe the excess glaze off of the foot.
Begin with soft fired stoneware bisque.Moisten a clean sponge and wipe bisque to remove any dust.
Apply masking tape in your desired pattern.
Use a fan brush to apply 1 coat of SW-302 Rutile wash to the outside of the vase.
Remove the tape and apply 3 coats of SW-128 Cordovan to the entire vase, avoiding the bottom. (You may want to roll the glaze on the inside of the vase by thinning a small portion of glaze with water. It should be about the consistency of heavy cream)
Use a clean sponge to wipe the excess glaze off of the foot.
Begin with soft fired stoneware bisque.Moisten a clean sponge and wipe bisque to remove any dust.
Use a fan brush to apply 2 coats of SW-181 Night Moth to the outside of the mug, avoiding the bottom.
Once dry, apply 2 coats of SW-189 Cenote over the Night Moth, but only bring one coat all the way down and be sure to leave about 1/4“-1/2” near the bottom for the second coat. (Layering 2 crystals glazes together can potentially cause movement depending on the glaze performance, thickness, and crystal concentration. We suggest allowing some space for this movement by leaving space near the bottom)
Use a fan brush and script liner to apply 3 coats of SW-508 Black Gloss to the inside and handle.
Use a clean sponge to wipe the excess glaze off of the foot.
Begin with soft fired stoneware bisque.Moisten a clean sponge and wipe bisque to remove any dust.
Apply the SG-401 Designer Liner Black in circles or a design of your choice.
Use a script liner to apply 3 coats of SW-303 Manganese Wash to the rim.
Use a soft fan to apply 3 coats of SC-77 Glo-Worm to the outside of the bowl, avoiding the bottom, and just over the rim overlapping the manganese wash.
Use a soft fan to apply 3 coats of SW-201 Turquoise to the inside of the bowl.
Use a clean sponge to wipe the excess glaze off of the foot.
Begin with properly fired cone 04 bisque. Moisten a sponge and wipe bisque to remove any dust.
MB-1567 Tall Knit Pumpkin
Using the Soft Fan with EL-118 Blue Grotto, apply 2 coats to the large pumpkin. Do not glaze the stem. Allow glaze to dry between coats.
Using the Soft Fan with EL-103 Sea Spray, apply 2 coats to the large pumpkin. Allow glaze to dry between coats. Recede the last coat by around ½” to prevent dripping. Do not glaze the stem.
Using the Soft Fan with EL-131 Turtle Shell, apply 2 coats to the medium pumpkin. Do not glaze the stem. Allow glaze to dry between coats.
Using the Script Liner with SC-42 Butter Me Up, apply 2 coats to the stems. Allow glaze to dry between coats.
Fire to cone 06.
Using the Liner with OG-801 Bright Gold, apply 1 even coat to the stems. Make sure to apply in a well-ventilated area. Clean brush with Gold Essence.
Fire to Cone 018.
MB-1568 Round Hammered Pumpkin
Using the Soft Fan with EL-131 Turtle Shell, apply 2 coats to the medium pumpkin. Do not glaze the stem. Allow glaze to dry between coats.
Using the Soft Fan with EL-103 Sea Spray, apply 2 coats to the medium pumpkin. Allow glaze to dry between coats.
Using the Script Liner with SC-42 Butter Me Up, apply 2 coats to the stems. Allow glaze to dry between coats.
Fire to cone 06.
Using the Liner with OG-801 Bright Gold, apply 1 even coat to the stems. Make sure to apply in a well-ventilated area. Clean brush with Gold Essence.
Fire to cone 018.
MB-1043 Squatty Pumpkin
Using the Soft Fan with EL-144 Dark Amethyst, apply 2 coats to the small pumpkin. Do not glaze the stem. Allow glaze to dry between coats.
Using the Soft Fan with EL-101 Oyster Shell, apply 2 coats to the small pumpkin. Allow glaze to dry between coats. Recede the last coat by around ½” to prevent dripping. Do not glaze the stem.
Using the Script Liner with SC-42 Butter Me Up, apply 2 coats to the stems. Allow glaze to dry between coats.
Fire to cone 06.
Using the Liner with OG-801 Bright Gold, apply 1 even coat to the stems. Make sure to apply in a well-ventilated area. Clean brush with Gold Essence.
Begin with properly fired cone 04 bisque. Moisten a sponge and wipe bisque to remove any dust.
Using the Soft Fan with FN-013 Light Yellow, apply 2 coats to the front of the plate. Allow glaze to dry between coats.
Using the Soft Fan with SC-15 Tuxedo, apply 2 coats to the back of the plate. Allow glaze to dry between coats. (Seminar teaching – glaze the back of the plate last so that the front dries quicker. When painting front and back it traps moisture in the bisque and slows the drying process.)
If the front of your plate is completely dry, place AC-230 Clay Carbon Paper on top of it. Then place the pattern on top and trace with a pencil. If the glaze is not completely dry, just place the pattern on top and trace with a pencil. Check to make sure you are pressing just enough to see the pattern in the glaze.
Using the Script Liner with SC-2 Melon-Choly, SC-9 Jaded, SC-10 Teal Next Time, SC-45 My Blue Heaven and SC-89 Cutie Pie Coral, apply 2 coats to the corresponding section of the pattern. Allow glaze to dry between coats.
Using the Detail Liner with SC-15 Tuxedo, outline the pattern. Use the Script Liner to make lines and dots going around the rim of the plate.
Squeeze around 1 TSP of SC-15 Tuxedo onto the palette. Thin slightly with water. Dip the toothbrush in the glaze. Hold the brush, bristle side down over the plate. Run the bristles across your thumb to splatter the glaze on the front of the plate. Do as little or as much to your liking.
Fire to cone 06.
Foundations Sheer
Begin with properly fired cone 04 bisque. Moisten a sponge and wipe bisque to remove any dust.
Place AC-230 Clay Carbon Paper over the front of the plate. Then place the pattern on top and trace with a pencil.
Using the Script Liner with SC-2 Melon-Choly, SC-9 Jaded, SC-10 Teal Next Time, SC-45 My Blue Heaven and SC-89 Cutie Pie Coral, apply 2 coats to the corresponding section of the pattern. Allow glaze to dry between coats.
Using the Detail Liner with SC-15 Tuxedo, outline the pattern. Use the Script Liner to make lines and dots going around the plate rim.
Squeeze around 1 TSP of SC-15 Tuxedo onto the palette. Thin slightly with water. Dip the toothbrush in the glaze. Hold the brush, bristle side down over the plate. Run the bristles across your thumb to splatter the glaze on the front of the plate. Do as little or as much to your liking.
Using the Soft Fan with FN-009 Black, apply 2 coats to the back of the plate. Allow glaze to dry between coats.
Using the Soft Fan with FN-209 Floral Pink, apply 2 coats to the front of the plate, over the design. Allow glaze to dry between coats.
Fire to cone 06.
Foundations Matte
Begin with properly fired cone 04 bisque. Moisten a sponge and wipe bisque to remove any dust.
Using the Soft Fan with FN-301 Marshmallow White, apply 3 coats to the front of the plate. Allow glaze to dry between coats.
If the front of your plate is completely dry, place AC-230 Clay Carbon Paper on top of it. Then place the pattern on top and trace with a pencil. If the glaze is not completely dry, just place the pattern on top and trace with a pencil. Check to make sure you are pressing just enough to see the pattern in the glaze.
Using the Script Liner with SC-2 Melon-Choly, SC-9 Jaded, SC-10 Teal Next Time, SC-45 My Blue Heaven and SC-89 Cutie Pie Coral, apply 2 coats to the corresponding section of the pattern. Allow glaze to dry between coats.
Using the Detail Liner with SC-15 Tuxedo, outline the pattern. Use the Script Liner to make lines and dots going around the plate rim.
Squeeze around 1 TSP of SC-15 Tuxedo onto the palette. Thin slightly with water. Dip the toothbrush in the glaze. Hold the brush, bristle side down over the plate. Run the bristles across your thumb to splatter the glaze on the front of the plate. Do as little or as much to your liking.
Using the Soft Fan with FN-009 Black, apply 2 coats to the back of the plate. Allow glaze to dry between coats.
Trace the pattern on to the ware using provided pattern, clay carbon and pencil (red pencil is helpful).
Lightly damp sponge the ware to remove any dust and to condition the piece for decorating. The pattern will not be harmed by the sponging.
Place the EZ-Stroke colors onto the palette and thin if needed with a drop or two of water and mix with palette knife.
Leaves are completed as follows:
Fully load #6 Round with Leaf Green, side load with Yellow Orange, the other side with Ivy Green and tip with Passion Red.
Starting at the base of leaf and working toward the tip, press firmly, pull and lift each leaf in place. Note: the harder the round is pressed against the ware the wider the stroke.
For larger leaves, two side by side strokes will be needed.
Reload the Round as needed; leaves will appear different in coloration, with some being more yellow or redder. Variety is important to the design.
Allow some drying time.
Additional shading is added randomly with a float of Passion Red and/or Ivy Green. To float in the color; water dampen the Round, then pull one side of Round through desired color and blend on palette. Add shading between overlapping leaves and under the one turnback.
Flowers are completed with #10/0 Detail Liner using Passion Red, Poppy Orange and Yellow Orange. If needed, add a few drops of water to each color and mix. When using a Liner, colors should be slightly thinner than normal. All flowers are completed in the same colors and manner.
Fully load Liner with Yellow Orange, for the side view flower work from the calyx, for the full view flower work from the center pulling out multiple very fine lines. Some lines can have a slight curve but for the most part the lines are straight.
Proceed to repeat the process with Poppy Orange, adding additional fine lines.
Continue adding fine lines with Passion Red. Pull in plenty of these fine Passion Red lines for the River Red Gum flowers are vibrant in their red coloration.
With both Passion Red and Poppy Orange loaded onto the Liner, tap in fine dots to the outer edges of each flower, thus denoting pollen.
To the centers of the full view flowers, stipple in both Yellow Orange and Poppy Orange.
The calyx to the side view flowers are pulled with #6 Round that has been loaded with Leaf Green, side loaded with Ivy Green and tipped slightly in Passion Red. Press and pull the Round forming the shaded calyx. Two small strokes are recommended.
For the stems and detailing of the leaves a new color needs to be created. To make a more bold and brownish color place Ivy Green on palette. Pick up some Passion Red on a palette knife, add to Ivy Green and mix. Keep adding more Passion Red until a deep greenish brown is produced. Note: to achieve brown tones you can mix two complimentary colors together.
Thin the mix as needed and fully load #10/0 Liner and pull in the stems.
Outline the leaves with thick and thin broken lines using the same mix of green and red. For the center and side veins pull in smoother flowing lines. The calyx is also shaded and detailed with the same mix of color.
Sign the piece
Fire the piece to shelf cone 04 – 06 to set the color.
Lightly damp sponge ware to remove any fired dust and to condition the piece for decorating.
Thin 2 ounces or more of Bright Straw with water to a cream like consistency and mix thoroughly.
Pour the mix into the ware and roll the inside with color. Drain off the excess and remove any drips or runs from the outside of ware with damp sponge.
Set aside to dry.
To the inside of ware brush on one coat of Pure Brilliance using Glaze Fan.
To the outside of the vase apply 2 to 3 coats of Pure Brilliance. Note the sample has three coats.
Stilt the ware and fire to shelf cone 06.
Remove stilt marks with Dremel Tool or Stilt Stone.
Form
MB-1145 Flat Tulip Vase or CD-1145 Flat Tulip Vase Mold
Colors
Duncan
EZ026 Yellow Orange
EZ028 Leaf Green
EZ033 Ivy Green
EZ058 Poppy Orange
EZ075 Passion Red
CN012 Bright Straw
PG Pure Brilliance Clear Glaze
Decorating Accessories
RB-144 #4 Soft Fan
RB 116 #6 Round
RB 110 10/0 Detail Liner
AC-230 Clay Carbon Transfer Paper
Miscellaneous Supplies
Sponge
Palette Knife
Glazed tile for palette or heavy duty page protector
Begin with properly fired cone 04 bisque. Moisten a sponge and wipe bisque to remove any dust.
Pour around 1/4 cup EL-151 Deep Water into the disposable cup. Thin with around 1 TBS of water. The glaze should be easily poured. Pour the glaze into the vase and rotate the inside. Place upside down on a few paper towels for a minute. Turn the vase over and wipe off any excess glaze with a damp sponge.
Squeeze around 1 TBS of SC-15 Tuxedo onto the palette. Place the stamp down on a flat surface, textured side up. Dip the sponge on a stick in the glaze and sponge the stamp. Take the stamp and press it vertically on the lower half of the vase. Repeat until the lower half is covered.
Using the Script Liner with SC-2 Melon-Choly, apply 1 coat to the flowers made by the stamp.
Using the Script Liner with SC-26 Green Thumb and SC-27 Sour Apple, apply 1 coat to the leaves made by the stamp.
Using the Soft Fan with NT-BR Clear One Brushing, apply 2 coats over the bottom half of the vase, including the bottom. Allow glaze to dry between coats.
Using the Soft Fan with EL-151 Deep Water, PC-601 Clear Cascades, EL-151 Deep Water and PC-602 White Cascades, apply 1 coat of each glaze to the upper half of the vase, in that order. Make sure glaze is dry between each coat.
Wipe down bisque with a damp sponge to remove any dust or debris
Using a soft fan brush apply 3 coats of Poo Bear (SC-51) to the pants and hat leaving a few facets on the hat empty for the patches.
Allow each coat to dry before applying the next coat
Apply 3 coats of Blue Yonder (SC-11) to the shirt also leaving a few facets empty for patches
Using a pointed round apply 3 coats of Cant-elope (SC-97) to the empty patches on the hat and 3 coats of The Blues (SC-31) to the empty patched on the shirt
Apply 3 coats of Pink-A-Boo (SC-01) to the nose and hands
Apply 3 coats of Tuxedo (SC-15) to the shoes
Using a mini liner, line patches and features with Tuxedo and add stitch marks to the patches
Wipe any glaze away from the bottom of the piece and the beard
Fire to Cone 06
Note: do not dip in clear glaze. Beard, bottom and inside must be unglazed to grow chia seeds on
Plant:
Once fired, submerge your gnome in water and let soak for at least 30 minutes
While your plater is soaking, in a separate bowl or cup, mix 2 teaspoons of chia seeds with ¼ cup of water. Stir thoroughly and let stand for 10 minutes. The mixture should form into a gel-like paste.
Empty the water from your submerged gnome and place a small sponge inside the piece, be sure that the sponge sits inside the beard area- this will help your planter hold moisture
Place gnome on plate or drip tray
Using your finger, apply an even coat of seeds to the beard of the gnome
Let gnome and seeds dry untouched for 2 days
On day 3 water your gnome by flipping it upside down and filling the inside with water
You may need to water a few times at first to get the sponge fully hydrated
Cover the bottom of the gnome with your drip tray and flip it back over to hold the water in
Refresh water everyday
Chia seed should start to grow within 2-3 days
Enjoy your chia gnome for 2-4 weeks
Once chias start to die out you can remove seeds, wash off your gnome and re-plant in soil.
Begin with properly fired cone 04 bisque. Moisten a sponge and wipe bisque to remove any dust.
Using the Soft Fan with FN-001 White, apply 1 coat to the front of the canvas.
After the glaze is dry to the touch, place the pattern on top and trace with the pencil. Lift up the pattern to make sure you’re using the correct amount of pressure.
Squeeze around SC-24 Dandelion, SC-28 Blue Isle, SC-45 My Blue Heaven and SC-88 Tu Tu Tango onto the palette. Create Color Mix #1 and Color Mix #2 by mixing ½ TBS of each color (listed in color section). Label the colors on your palette – they will look similar.
Using the Script Liner with colors from the previous step, apply 2 coats to the corresponding section of the pattern. Refer to the pattern for color placement. Allow glaze to dry between coats.
Using Sgraffito Tool or Sharp Skewer, trace over the lines of the pattern. You should end up with white lines separating the different colors.
Using the Soft Fan with SG-702 Celebration, apply 2 coats over the front of the canvas. Allow glaze to dry between coats.
Using the Soft Fan with SC-15 Tuxedo, apply 2 coats to the edges of the canvas.
Fire to cone 06.
Form
MB-1353 8×10” Clay Canvas
Colors
FN-001 White
SC-15 Tuxedo
SC-24 Dandelion
SC-28 Blue Isle
SC-45 My Blue Heaven
SC-88 Tu Tu Tango
SG-702 Celebration
Color Mix #1 (SC-24 Dandelion + SC-88 Tu Tu Tango 1:1)
Color Mix #2 (SC-28 Blue Isle + SC-45 My Blue Heaven 1:1)
Begin with properly fired cone 04 bisque. Moisten a sponge and wipe bisque to remove any dust.
Using the Soft Fan with FN-001 White, apply 1 coat to the front of the canvas.
After the glaze is dry to the touch, place the pattern on top and trace with the pencil. Lift up the pattern to make sure you’re using the correct amount of pressure.
Squeeze around 1 TBS of SC-14 Java Bean, SC-34 Down to Earth, SC-41 Brown Cow and SC-48 Camel Back onto the palette. Create Color Mix #1 and Color Mix #2 by mixing ½ TBS of each color (listed in color section). Label the colors on your palette – they will look similar.
Using the Script Liner with colors from the previous step, apply 2 coats to the corresponding section of the pattern. Refer to the pattern for color placement. Allow glaze to dry between coats.
Using Sgraffito Tool or Sharp Skewer, trace over the lines of the pattern. You should end up with white lines separating the different colors.
Using the Soft Fan with SG-703 Autumn, apply 2 coats over the front of the canvas. Allow glaze to dry between coats.
Using the Soft Fan with SC-15 Tuxedo, apply 2 coats to the edges of the canvas.
Fire to cone 06.
Form
MB-1353 8×10” Clay Canvas
Colors
FN-001 White
SC-14 Java Bean
SC-15 Tuxedo
SC-34 Down to Earth
SC-41 Brown Cow
SC-48 Camel Back
SG-703 Autumn
Color Mix #1 (SC-14 Java Bean + SC-34 Down to Earth 1:1)
Color Mix #2 (SC-41 Brown Cow + SC-48 Camel Back 1:1)
Begin with properly fired cone 04 bisque. Moisten a sponge and wipe bisque to remove any dust.
Freehand a fun design or position Pattern #1 on top of the platter. Slide AC-230 Clay Carbon Paper under the pattern. Trace the pattern with a pencil.
Using the Soft Fan with SC-16 Cotton Tail, apply 2 coats to the right side of the tray. Allow glaze to dry between coats.
Using the Soft Fan with SC-1 Pink-A-Boo, apply 2 coats to the left side of the try. Allow glaze to dry between coats.
Using the Script Liner with SC-9 Jaded, SC- 45 My Blue Heaven and SC-77 Glo-Worm, apply 2 coats to the corresponding sections of the pattern. Allow glaze to dry between coats.
After the glaze is dry to the touch, place Pattern #2 over the tray. Trace over the pattern with a pencil. Lift the pattern to make sure you aren’t pressing too lightly or too hard.
Using the Script Liner with SC-9 Jaded, SC-10 Teal Next Time, SC-45 My Blue Heaven and SC-77 Glo-Worm, apply 2 coats to the corresponding sections of the pattern. Allow glaze to dry between coats.
Using the Detail Liner with SC-15 Tuxedo, apply decorative lines and dots to the pattern. You can use a pencil eraser to make dots.
Using the Soft Fan with SC-15 Tuxedo, apply 2 coats to the back of the platter. Allow glaze to dry between coats.
Begin with properly fired cone 04 bisque. Moisten a sponge and wipe bisque to remove any dust.
Squeeze approximately 2 TBS of SC-34 Down to Earth on the palette. Thin with around 1 TSP of water. Using the Soft Fan, apply 1 coat to each pumpkin. Using a damp sponge, wipe off most of the glaze, leaving it only in the crevices.
Using the Soft Fan with SC-54 Vanilla Dip, apply 2 coats to the small pumpkin. Allow glaze to dry between coats.
Using the Soft Fan with SC-96 Aqu-ward, apply 2 coats to the medium pumpkin. Allow glaze to dry between coats.
Using the Soft Fan with SC-50 Orange Ya Happy, apply 2 coats to the large pumpkin. Allow glaze to dry between coats.
Using the Script Liner with SC-25 Crackerjack Brown, apply 2 coats to the stems. Allow glaze to dry between coats.
Moisten a clean sponge and wipe bisque to remove any dust.
Use AC-230 Clay Carbon Transfer Paper to transfer a pattern to the middle section of the dish. You may trace the patterns to the rest of the dish, but it will look more natural if it is drawn in with pencil to reflect to contour of the dish.
Use a detail liner brush to fill in 3 coats of each Stoneware Gloss color.
Use a fan brush to apply 3 coats of SW-502 Yellow to the back of the dish.
Use a clean sponge to wipe excess glaze off the foot.
Apply 1 coats of UG-50 to the entire piece and wipe back with a sponge, leaving the underglaze in the details/texture.
Once dry, use the CB-624 #4 glaze fan to apply 3 coats of EL-118 Blue Grotto to the background and sun rays. Using a stiff brush will help apply the glaze into the texture without applying it too thick. Be sure to fully brush out the coats to avoid pooling of the glaze in the texture.
Use the script liner to apply 3 coats of EL-128 Wheat to the face and sun rays.
Allow to dry completely.
Stilt and fire to cone 06/05. Sample was fired to cone 06.
Apply 1 coats of UG-50 to the entire piece and wipe back with a sponge, leaving the underglaze in the details/texture.
Once dry, use the CB-624 #4 glaze fan to apply 3 coats of EL-118 Blue Grotto to the entire piece. Using a stiff brush will help apply the glaze into the texture without applying it too thick. Be sure to fully brush out the coats to avoid pooling of the glaze in the texture.
Use the script liner to apply 2 coats of PC-602 White Cascade to the wind.
Apply 1 coat of EL-101 Oyster to highlighted areas.
Allow to dry completely.
Stilt and fire to cone 06/05. Sample was fired to cone 06
Apply 1 coats of UG-50 to the entire piece and wipe back with a sponge, leaving the underglaze in the details/texture.
Once dry, use the fan to apply 2 coats of EL-132 Rust Red to the outside layer of flames. Do not be too precise about the edge of the color. You will want this to overlap a bit with the next to create a smooth transition.
Use the fan to apply 3 coats of EL-133 Autumn to the next layer of flames. Again, do not be too precise about the edge of the color.
Apply 2 coats of EL-107 Amber Ash to the face, overlapping with the edge of the Autumn.
Repeat the previous step, but with EL-128 Wheat.
Allow to dry completely.
Stilt and fire to cone 06/05. Sample was fired to cone 06.
Apply 1 coats of UG-50 to the entire piece and wipe back with a sponge, leaving the underglaze in the details/texture.
Once dry, use the CB-624 #4 glaze fan to apply 3 coats of EL-142 Grass to all of the leaves. Using a stiff brush will help apply the glaze into the texture without applying it too thick. Be sure to fully brush out the coats to avoid pooling of the glaze in the texture.
Use the script liner to apply 3 coats of EL-110 Mudslide on the face.
Allow to dry completely.
Stilt and fire to cone 06/05. Sample was fired to cone 06.
Begin with properly fired cone 04 bisque. Moisten a sponge and wipe bisque to remove any dust.
Antique the Gnome Facetini with sC-14 Java Bean.
Paint 2 coats of SC-16 Cotton Tail on the beard.
Paint 2 coats of your choice of skin tone on the nose and hands. This sample is painted
with SC-5 Tiger Tail.
Paint 2 watery coats of the following colors on the different facets on the hat: SC-77 Glo-worm, SC-78 Lime Light, and SC-27 Sour Apple. Alternate colors.
Paint 2 watery coats of SC-26 Green Thumb on his shirt and pants
Paint 3 coats of SC-16 Cotton Tail on the daisy petals.
Paint 2 coats of SC-6 Sunkissed on the daisy middles.
Paint 3 coats of SC-7 Leapin’ Lizard on the leaves.
Paint 2 coats of SC-36 Irish Luck to make scalloped edges on the bottom of the shirt and sleeves.
Paint 2 coats of SC-73 Candy Apple Red to add ladybugs on the hat. Using the back of the brush handle as a stamp, add SC-15 Tuxedo dots to their backs
Outline the flowers, leaves, ladybugs, and scallops with Tuxedo.
Begin with properly fired cone 04 bisque. Moisten a sponge and wipe bisque to remove any dust.
Antique the Fox Facetini with Tuxedo. Water down some SC-5 Tiger Tail and SC-50 Orange Ya Happy until they have a milky consistency. With a small fan brush or large round brush, apply the two colors like watercolor to the entire fox. Use two different brushes, one for each color. The glaze will blend better while they are still wet, so move at a quick and steady pace. Alternately apply each color while you blend them.
Apply 2 washy coats of SC-16 Cotton Tail on the cheeks and tip of the tail.
Paint 2 coats of SC-15 Tuxedo on the eyes, nose, paws, and tips of the ears.
With a liner brush, add a thick swipe of SC-16 Cotton Tail on the left side of the nose for glare.
Using the back of the brush handle as a stamp, make SC-16 Cotton Tail dots on the left side of the eyes for eye shine.
. With a toothbrush, add SC-25 Crackerjack Brown splatters all over the fox.
Roll out clay with a rolling pin or on a slab roller to create a slab that is about 1/8” thick
Compress slab with rib
Cut out 3 medallion shapes of desired size by drawing and cutting shape with fettling knife or using cookie cutters
Use pencil to create hole at the top of each shape
Smooth all edges with a damp sponge
Allow to dry flat
Once dry bisque fire to Cone 04
Glaze:
Moisten a sponge and wipe medallions to remove any dust
Prepare your pallet by adding 6 colors:
Squirt out 1 teaspoon of the fallowing for use: SC-6 Sunkissed , SC-73 Candy Apple red and SC-76 Cara-Bein Blue
Mix green using ½ teaspoon of SC-6 Sunkissed and ½ teaspoon of SC-76 Cara-Bein Blue
Mix orange using ½ teaspoon of SC-6 Sunkissed and ½ teaspoon of SC-73 Candy Apple Red
Mix violet using ½ teaspoon of SC-73 Candy apple red and ½ teaspoon of SC-76 Cara-Bein Blue
Lay out medallions and assign colors to them in rainbow order, each medallion will have two colors – be sure to mark both sides (red, orange, yellow, green, blue, violet)
Using a soft fan brush apply one coat of each color to its designated area on each medallion allowing glaze to overlap where they meet- be sure to glaze both sides
When dry, apply two more coats of each color to medallions allowing each coat to dry fully before applying the next
Allow glaze to dry completely
To print pattern, sponge SC-15 Tuxedo to a small portion of the sole of your shoe and press medallion into shoe to stamp
Stamp both sides of each medallion, sponging more glaze onto sole of shoe as needed
For different patterns try stamping your friends’ shoe, too
Remember to clean glaze off your shoe before putting your foot back down
Allow to dry completely
Fire to Cone 06 using stilts or bead tree
Assemble:
Lay out stick and medallions as you would like them to hang
Cut string at desired lengths and tie to medallions
Attach other end of strings to the stick
Tie one larger piece of string from each edge of the chime and connect to make something to hang from
Hang and enjoy
Form
3 Bisque Medallions (MBQKIT3) if not making your own
½ lb of Low-fire white clay (to make your own medallions)
Colors
SC-6 Sunkissed
SC-15 Tuxedo
SC-73 Candy Apple Red
SC-76 Cara-Bein Blue
Decorating Accessories
Your Shoe
Fettling knife or cookie cutters
Miscellaneous Accessories
Rolling pin or slab roller
Rib
Pallet
Sponge
Water
Brushes
Pencil
String or Twine
Stick
Lesson Plan|Low-Fire|Earthenware Bisque|Garden|Table Top
Use the Dremel with 562 Tile Cutting Bit to drill 1 large hole in the center of the bowl. It should be 1-2” in diameter. Drill 1 hole on the upper rim of the plate.
Moisten a sponge and wipe bisque to remove any dust.
lace the bowl (facing down) on the center plate and trace around the rim with the pencil. Remove the bowl and draw wavy, triangular sunrays coming from the line to the edge of the plate.
Using the Soft Fan with SC-6 Sunkissed, apply 3 coats to the center of the plate and sunrays. On the third coat, shade the tips of the sunrays with SC-97 Cant-elope. Allow glaze to dry between coats.
Using the Script Liner with SC-11 Blue Yonder, apply 3 coats to the background of the plate. Use the Soft Fan to apply 3 coats to the back of the plate. Allow glaze to dry between coats.
Using the Detail Liner with SC-15 Tuxedo, outline the sunrays and add decorative swirls and dots.
Using the Soft Fan with SC-6 Sunkissed, apply 3 coats to the inside of the bowl and 1 coat to the outside of the bowl. Allow glaze to dry between coats.
Using the Soft Fan with CG-1000 Mardi Gras, apply 2 coats to the outside of the bowl. Allow glaze to dry between coats.
Pour around 1/2oz of SC-97 Cant-elope into AC-220 Detail Tip and 1oz Bottle. Thin with water until it is easily squirted from the bottle. Snip the tip of the bottle off with scissors. Squeeze over the outside of the bowl using a circular motion. Place the bowl onto the center of the plate (facing down).
Fire to cone 06.
Cut 1 piece of Natural Polished Hemp #80 around 20”. Loop through the hole on the plate and tie a knot.
Hang outside. Be sure to bring in during the winter to prevent cracking.
Begin with properly fired cone 04 bisque. Moisten a sponge and wipe bisque to remove any dust
Using the Soft Fan with FN-001 White, apply 3 coats to the front and back of the plate. Allow glaze to dry between coats.Before the glaze is bone dry, place the pattern over the plate and trace with a pencil. Check to make sure you are pressing hard enough.
Follow the set of directions below for glazing each leaf.
Fire to cone 06.
Green Leaf:
Using the Script Liner with CG-987 Tree Frog, apply 2 coats to the leaf. Allow glaze to dry between coats.
Using the Script Liner with SC-7 Leapin’ Lizard, apply 2 coats to the stem. Allow glaze to dry between coats.
Using the Detail Liner with SC-15 Tuxedo, outline the leaf.
Red Leaf:
Using the Script Liner with CG-756 Firecracker, apply 1 coat to the inner half of the leaf.
While the glaze is still wet, dip the same brush in CG-753 Sassy Orange. Shade to the tips of the leaves.
Using the Script Liner with SC-74 Hot Tamale, apply 1 coat to the stem and shade the center of the leaf (Glaze from steps 1-2 should still be wet).
Using the Script Liner with SC-6 Sunkissed, shade the tips of the leaves.
Repeat steps 1-4.
Using the Detail Liner with SC-15 Tuxedo, outline the leaf.
Blue Leaf:
Using the Script Liner with S-2716 Celestial Blue, apply 1 coat to the center third of the leaf.
Using the same brush with CG-718 Blue Caprice, apply 1 coat to the middle third of the leaf. Shade with previous coat.
Using the same brush with CG-788 Dutch Enamelware, apply 1 coat to the outer third of the leaf. Shade with the previous coat.
Using the Scrip Liner with SC-12 Moody Blue, apply 1 coat to the stem.
Repeat steps 1-4.
Using the Detail Liner with SC-15 Tuxedo, outline the leaf.
Begin with properly fired shelf cone 04 Bisque. Moisten a clean sponge and wipe bisque to remove any dust.
Using a water-based marker laid flat against the table, draw a line around the bottom of the piece. This is the “no paint line.”
Use the Soft Fan to apply four coats of SW-250 White Opal to the inside, handle and top inch on the outside rim of the mug.
Blue Mug: Apply four coats of SW-166 Norse Blue overlapping the White Opal about 1/2″. Make ridges of glaze with the brush for an interesting effect. Orange Mug: Same application using SW-168 Coral Sands.
Use the sponge to remove any glaze that may have gotten below the “no paint line.”
Fire to Cone 6 on a kiln washed shelf.
Form
SB-103 Wavy Mug Stoneware Bisque or CD103+ Wavy Mug Mold
Colors
SW-166 Norse Blue
SW-168 Coral Sands
SW-250 White Opal
Begin with properly fired shelf cone 04 Stoneware bisque. Moisten a clean sponge and wipe bisque to remove any dust.
Lay the water based marker on the table, press the mug up against the marker and rotate around. This applies a line at the bottom of the mug which is considered the “no paint” line. Do not apply glaze past this point.
Using the soft fan brush apply two coats of SW-131 Birch to the outside of the mug. Avoid the handle.
Allow the shine to fade before applying the next coat of glaze.
Now apply two coats of SW-128 Cordovan to the entire mug, inside, over the SW-131 and Birch.
Again, let the glaze dry or shine fade before applying another coat of glaze.
Using the sponge, remove any glaze from the no paint line or the bottom of the cup.
Begin with properly fired shelf cone 04 Stoneware bisque. Moisten a clean sponge and wipe bisque to remove any dust.
Start with a fan brush and apply one quick coat of SC-16 Cotton Tail all over.
Transfer your pattern onto your piece using AC-230 Clay Carbon Paper. You can build your design any way you would like.
Use a round brush and a mix of SC-97 Cant-elope and SC-75 Orange-A-Peel to make your oranges. Use SC-24 Dandelion for the inside of the oranges if they are cut in half. Apply 2 or 3 coats of these colors.
Use a liner brush to fill in the leaves with 2 or 3 coats.
Go back and add detail dots and lines to your oranges.
Use SC-012 Moody Blue to add little details anywhere else you would like.
Begin with properly fired shelf cone 04 Stoneware bisque. Moisten a clean sponge and wipe bisque to remove any dust.
Using the fan brush, apply 2 coats of SW-506 Bright Blue Gloss to the outside of the bowl. Follow the contour of the bowl.
Using the fan brush, apply 2 coats of SW-502 Yellow Gloss to the inside of the bowl. Follow the contour of the bowl.
Using the script liner, apply a scalloped edge of Bright Blue Gloss to the inside rim of the bowl. Let dry and apply a second coat.
Mix together SG-401 Black Designer Liner or (SW-508 Black Gloss) and AC-310 Silkscreen Medium using a palette knife. Combine until it is the consistency of peanut butter. Adjust ratios as necessary.
Place the large boy gnome from DSS-0159 Gnomeland Silkscreen onto the plate, shiny side down. Use your finger to work the thickened wash through the screen. Remove the screen immediately and rinse or place in water to preserve the screen.
Use a sponge to clean any glaze off the bottom of the piece and allow to dry completely. NOTE: You may also fill in the gnome design and add embellishments using SW-501 White Gloss, SW-504 Red Gloss, SW-505 Purple Gloss and SW-506 Bright Blue Gloss.
Place on a properly kiln washed shelf and fire to cone 06.
To the well cleaned greenware that has been wiped down with a moistened BT-901 Synthetic Sponge to remove any excess dust and debris to the ware. Check the inside of the vase for any debris also.
Cut out the pattern and cut in some darts along the edges of the pattern to better conform the pattern to the ware. Use a pencil and AC-230 Clay Carbon to transfer the pattern.
On a Tile or Pallet place separately all of the EZ-strokes. Mix slightly with some water for brushing ability.
Using CB-406 Pointed Round loaded with EZ-026 Yellow Orange to block in two coats of color to the bird. When stroking in the color for the bird, paint in the strokes from head to tail when possible.
Load a CB-406 Pointed Round with EZ-027 Blue Turquoise and tip the brush with EZ-023 Midnight Blue and paint in one half of the leaves keeping the darker color to the outside edge of the leaf. For the other half of the leaves, stroke in EZ-028 Leaf Green and allow the color to overlap slightly onto the blue portion of the leaf.
Use CB-404 Pointed Round to paint in the branches with EZ-058 Poppy Orange. Two coats may be needed for color saturation on the branches. Lightly shade the edge of the bird from the lower beak back to the tail and under the wing. Lightly shade the area behind the neck marking.
Use CB-404 Pointed Round loaded with EZ-050 Plum Purple to shade the right side and lower portions of the branches. Paint in a center vein in the leaves as well.
Mix some EZ-058 Poppy Orange and EZ-028 Leaf Green to make a brownish color. Fill in the beak and leg areas using CB-404 Pointed Round.
Mix some EZ-037 Black with water to an almost dirty water consistency. Use CB-404 Pointed Round to shade under the wing. Paint in the detail to the wings and darken the lower section of the beak using CB-110 Liner. Paint in the markings in the tail. Using some Black that is slightly darker/thicker to reinforce the markings in the tail and wings using CB-110 Liner.
Apply some EZ-037Black to the neck marking section of the bird using CB-404 Pointed Round. The color can thin out as it gets lower towards the edge of the bird.
Paint in the iris of the eye with EZ-058 Poppy Orange using CB-110 Liner. Add the detail to the pupil and eye markings with EZ-037 Black. Use a Clean Up Tool to scratch out a highlight in the pupil.
Paint in the berries with EZ-058 Poppy Orange using CB-404 Pointed Round. Moisten the brush with water and rub out a highlight to each berry. Shade the lower sections of each berry with EZ-023 Midnight Blue.
Using SG-408 Orange Designer Liner to detail the tops of each berry and the left side or top of the branches.
Use SG-404 Blue Designer Liner to detail the leaves, bird, lower portion of the berries, berry stems and dots, leg, outer edges of the bird and the right side of and lower portion of the branches.
Fire to Shelf Cone 04.
Mix some FN-006 Blue in a Plastic Cup with some water to a melted ice cream consistency. Pour the glaze into the vase, while working quickly, rotate the vase to cover the inside surface of the vase. Pour out excess color and invert to drain and dry. Use a moistened Synthetic Sponge to wipe off any drips from the outside of the vase. Use CB-604 Soft Fan to brush the inside neck of the vase. Make sure you get all the color residue from the blue glaze off the vase.
Using either CB-110 Liner or CB-404 Pointed Round to apply 2 coats of S-2101 Crystal Clear Brushing to the pattern. Do not go past the edges of the pattern.
Optional Firing. You can fire the vase to ease in the application of the background glaze if you want. It can make the application of the Matte Glaze much easier but not necessary to continue with the background. Having the fired glaze surface will repel the background glaze as you apply it and allow the two glazes to butt up against one another without any missed areas after firing. You can wipe off any background glaze from the fired glaze surface easily. Fire to Shelf Cone 05-06.
Apply 3-4 coats of FN-301 Marshmallow White to the background of the vase. Use a brush sized for the area being painted to apply the glaze while making sure that there are not any ridges or lumps in the glaze surface.
Begin with properly fired cone 04 bisque. Moisten a sponge and wipe bisque to remove any dust.
Use MC-001 6mm Low Tack Masking Tape to tape the canvas off into 4 equal squares.
Using the Soft Fan with SC-9 Jaded, SC-30 Blue Dawn, SC-88 Tu Tu Tango or SC-97 Cant-elope, apply 3 coats to each of the squares. Allow glaze to dry between coats.
Remove the tape before the glaze is dry.
Using the pattern, cut out the circles.
Place 1 circle in the center of the square glaze with SC-88 Tu Tu Tango and 2 circles in the square glazed with SC-9 Jaded. Using the Script Liner with SG-501 Sculpting Medium, apply 1 thick coat to the circles. Carefully lift up the paper.
Place 1 circle in the center of the square glazed with SC-30 Blue Dawn and 2 circles in the square glazed with SC-97 Cant-elope. Using the Script Liner with SG-302 Snowfall, apply 1 thick coat to the circles. Carefully lift up the paper.
Allow all circles to completely dry.
Using the Script Liner with SC-88 Tu Tu Tango, apply 1 coat to a circle in each of the squares with 2 circles. Using the Script Liner with SC-97 Cant-elope, apply 1 coat to the other circle in the squares with 2 circles.
Using the Script Liner with S-2101 Clear Brushing Glaze, apply 2 coats to the lines where the tape was located. Allow glaze to dry between coats.
Begin with properly fired cone 04 bisque. Moisten a sponge and wipe bisque to remove any dust.
Using the Soft Fan with SC-27 Sour Apple, apply 3 coats to the front and sides of the canvas. Allow glaze to dry between coats.
Using the ruler and pencil, make a diagonal line across the front of the canvas. Then make 2 lines perpendicular to the first line. They should be spaced to create similar sized areas.
Using the Detail Liner with AC-302 Wax Resist, trace over the pencil lines.
Using the Script Liner with SG-201 Black Cobblestone, apply 1, 2 and 3 coats to each area above the diagonal line. Only apply additional coats after the glaze is no longer shiny. It is important to make coats even.
Using the Script Liner with SG-202 White Cobblestone, apply 1, 2 and 3 coats to each area below the diagonal line. Only apply additional coats after the glaze is no longer shiny. It is important to make coats even.
Using the Script Liner with SC-11 Blue Yonder, apply 1 coat to the border of each section glazed with SG-202 White Cobblestone. Only apply after the glaze is no longer shiny.
Begin with properly fired cone 04 bisque. Moisten a sponge and wipe bisque to remove any dust.
Use the scissors to cut out the cactus pattern.Place the pattern on the canvas and trace with the pencil.
Using the Script Liner with EL-142 Grass, apply 2 coats to the cactus. Brush slightly past the pencil line. Allow glaze to dry between coats.
After the glaze is dry, brush with water and place the pattern back down. Press the pattern to stick it to the glaze. Blot with a paper towel.
Using the Soft Fan EL-145 Ginger Root, apply 2 coats to the background and sides of the canvas. Make sure to brush over the edges of the paper. Remove the paper before the second coat is dry.
Use SG-401 Black to outline the cactus. The glaze must be dry to use the tip, otherwise use the Detail Liner.
Using the Script Liner with SG-401 Black, shade the edges of the cactus. Use thinned SG-401 Black with the Detail Liner to make the lines on the cactus.
Using the Detail Liner with SG-402 White, press in marks on the cactus. Use SG-401 Black to make tick marks over the white. Fire to cone 06.
Begin with properly fired shelf cone 04 bisque. Moisten a clean sponge and wipe bisque to remove any dust.
Basecoat all 4 tiles with SS-138b Flat Black. Allow to dry.
Tile #1 – Measure and divide it into 4 sections with the ¼” Masking Tape.
Pour some of each of the metallics onto a disposable palette. Apply 1 coat of each of the metallics to one section on the tile starting with the Copper Metallic, Dark Bronze Metallic, Gold Metallic, and Steel Metallic. Allow to dry.
Apply a second coat of the metallics about 1/3rd the way down going to the bottom edge of the tile. While this coat is still wet lay a piece of paper on the tile covering the top 2/3rd. Using a spritzer bottle, spray MM-202 Green Patina onto the lower third of the Copper, Dark Bronze, and Gold Metallics. Spritz MM-306 Rapid Rust onto the lower 1/3 of the Stainless Steel area. Allow to dry.
Tile #2 and Tile #3 – Cut a BT-910 Synthetic Sponge in half. Line up the two pieces of bubble wrap. Using one of the cut sponges, load the flat edge of the sponge with MM-102 Copper Metallic, then sponge the bubbles of the bubble wrap with the Copper. Place one of the base coated tiles onto the bubble wrap. Carefully pick up the tile with the bubble wrap placing the tile upright. With your fingertips lightly press the bubble wrap on the tile. Then remove the bubble wrap. While the Copper is still wet, spritz the tile with Green Patina. Use the other half of the cut sponge to apply MM-106 Steel Metallic to the third tile. Follow the steps for flipping the tile over, remove bubble wrap, and spritz with the MM-305 Rapid Rust. Clean sponges right after use. Allow to dry.
On the fourth tile. Using the sponge with the copper in it, Sponge the ST-367 Leafy Border stamp on one side with Copper Metallic and the other half with Gold Metallic. Align the stamp with the edge of the tile and lightly press down with your fingertips, then remove the stamp. Repeat and stamp the other end of the tile.
Using a pencil, write a word such as welcome or another design. Mix some Copper Metallic with Green Patina and paint over your word/design.
Use the CB-110 #10/0 Liner to apply 2 coats of this mix to the wording. Allow to dry overnight.
Apply 2 thin coats of AC-502 Matte Brush On Sealer to each of the tiles. Be sure not to apply heavy or it will turn milky.
Begin with properly fired cone 04 bisque. Moisten a sponge and wipe bisque to remove any dust.
Use the scissors to cut out the cactus pattern.Place the pattern on the canvas and trace with the pencil.
Using the Script Liner with EL-142 Grass, apply 2 coats to the cactus. Brush slightly past the pencil line. Allow glaze to dry between coats.
After the glaze is dry, brush with water and place the pattern back down. Press the pattern to stick it to the glaze. Blot with a paper towel.
Using the Soft Fan EL-145 Ginger Root, apply 2 coats to the background and sides of the canvas. Make sure to brush over the edges of the paper. Remove the paper before the second coat is dry.
Use SG-401 Black to outline the cactus. The glaze must be dry to use the tip, otherwise use the Detail Liner.
Using the Script Liner with SG-401 Black, shade the edges of the cactus. Use thinned SG-401 Black with the Detail Liner to make the lines on the cactus.
Using the Detail Liner with SG-402 White, press in marks on the cactus. Use SG-401 Black to make tick marks over the white. Fire to cone 06.
Begin with properly fired cone 04 bisque. Moisten a sponge and wipe bisque to remove any dust.
Using the Soft Fan with SC-55 Yella Bout It, apply 3 coats to the front and sides of the canvas. Allow glaze to dry between coats.
Before the glaze is bone dry, lay the pattern over the canvas and trace with the pencil. You should be able to see the pattern in the glaze.
Using the Script Liner with SC-74 Hot Tamale, apply 1 coat to the top/left flower, 2 coats to the top/right flower and 3 coats to the bottom flower. Allow glaze to dry between coats.
Using the Detail Liner with SC-15 Tuxedo, outline the flowers and lettering.
Begin with properly fired cone 04 bisque. Moisten a sponge and wipe bisque to remove any dust.
Using the Soft Fan, apply 2 coats of EL-118 Blue Grotto to the pinwheel. Allow glaze to dry between coats.
Pour around 2 TBS of PC-601 Clear Cascade, PC-602 White Cascade, EL-211 Volcanic Glow and EL-118 Blue Grotto onto the palette.
Using the same Soft Fan, dip it into the PC-601 Clear Cascade and glob it randomly onto pinwheel several times.
Using the same Soft Fan, dip it into the EL-211 Volcanic Glow and glob it randomly onto pinwheel. Make sure to put some globs over the PC-601 Clear Cascade.
Using the same Soft Fan, dip it into PC-602 White Cascade and add glob it randomly onto the pinwheel. Make fewer, smaller globs.
Using the same Soft Fan, dip it into EL-118 Blue Grotto and add some more globs to the pinwheel.
Make sure to go over some of the PC-602 White Cascade.
Use the Dremel with 562 Tile Cutting Bit to drill 4 holes on the upper edge of the rice bowl. Each hole is spaced about 4.5” apart. Drill 4 holes on the edge of the plate and 1 in the center. Try to evenly space the holes.
Moisten a sponge and wipe bisque to remove any dust.
Using the Soft Fan with SC-6 Sunkissed, apply 3 coats to the inside of the plate and bowl. Allow glaze to dry between coats.
Using the Soft Fan with SC-13 Grapel, apply 3 coats to the outside of the bowl and the outside rim of the plate. Allow glaze to dry between coats.
Using the Script Liner with CG-999 Jazz Notes, make a thick line around the outer rim of the bowl. Extend the glaze downward from the line to make drips. After that coat dries, apply a 2nd coat.
Using the Soft Fan with CG-999 Jazz Notes, apply 2 coats to the outer center section of the plate. Allow glaze to dry between coats. Use the Script Liner to make drips coming from the center, down towards the rim. After those drips dry, apply a 2nd coat.
Fire to cone 06.
Cut 4 pieces of Natural Polished Hemp #80 around 20” long. Tie the end of each piece to one of the 4 holes on the edge of the bowl. Tie a triple knot on each piece around 4-5” from the bowl.
Cut 1 piece of Natural Polish Hemp #80 around 30” long. Knot the end and run through the top of the plate. Take the plate and run the 4 strings from the bowl through the holes on the sides. Gather the 5 strings at the top and tie a knot around 10” from the plate. Cut off the excess from the 4 short strings. Tie a loop at the end of the long string for hanging.
Hang outside. Be sure to bring it in during the winter to prevent cracking.
Use the Dremel with 562 Tile Cutting Bit to drill 1 large hole in the center of the bowl.
Moisten a sponge and wipe bisque to remove any dust.
Using the Soft Fan with CG-1001 Gogh Iris, apply 1 coat to the outside of the bowl.
Using the Soft Fan with SC-76 Cara-Bein Blue, apply 2 coats to the outside of the bowl and 3 coats to the inside. Allow glaze to dry between coats.
Using the Soft Fan with SC-16 Cotton Tail, apply 1 coat to the top of the plate.
Pour around 1 oz of CG-1001 Gogh Iris, SC-11 Blue Yonder SC-15 Cotton Tail and SC-76 Cara-Bein Blue into separate cups. Thin with enough water so that they are easily poured. Randomly pour them onto the top of the plate. Rotate until the entire plate is covered in glaze. Pour off any excess glaze. Allow glaze to dry.
Using the Soft Fan with SC-76 Cara-Bein Blue, apply 3 coats to the back of the plate. Allow glaze to dry between coats.
Place the bowl upside down and place the plate on top.
Fire to cone 06.
Place outside and pour water onto the plate. Bring inside during the winter to prevent cracking.
Form
MB-1116 Casualware Dinner Plate
MB-105 Rice Bowl
Colors
CG-1001 Gogh Iris (2oz)
SC-11 Blue Yonder (2oz)
SC-15 Cotton Tail (3oz)
SC-76 Cara-Bein Blue (3oz)* Can substitute SC-11 Blue Yonder or SC-76 Cara-Bein Blue to match your décor.
Begin with properly fired cone 04 bisque. Moisten a sponge and wipe bisque to remove any dust.
Place AC-230 Clay Carbon Paper over the front of the canvas. Place the pattern on top and trace using the pencil.
Using the Script Liner SC-6 Sunkissed, SC-35 Gray Hare, SC-41 Brown Cow, SC-46 Rawhide, SC-88 Tu Tu Tango and SC-97 Cant-elope, apply 2 coats to each corresponding section of the pattern. Allow glaze to dry between coats.
Using the Detail Liner with SC-15 Tuxedo, outline the design and lettering. Add “stitches” to the roller skate and background sections. Use the Soft Fan to apply 2 coats to the edge of the canvas. Allow glaze to dry between coats.
Using the Soft Fan with FN-203 Dry Champagne, apply 2 coats to the front of the canvas. Allow glaze to dry between coats.
Wipe bisque down with a damp sponge to remove any dust
Trace on the pattern.
Following the numbers on the pattern, and using the 4 Round, apply 3 coats of color to the tail feathers. Harvest Gold, Squash Blossom and Orange Sorbet.
Using the 4 Round, apply 3 coats of Cinnamon to the body area.
Using the 4 Round, apply 3 coats of Spice Brown to the neck and head.
Using the 4 Round, apply 3 coats of Red Coral to the comb and waddle.
Sideload the 4 Round in Cinnamon and shade around each tail feather and around the head and neck.
Sideload in Chestnut Brown and shade around the body.
Using the Liner, apply 3 coats of Squash Yellow to the legs, feet and beak.
Using the Liner, outline and detail with slightly thinned Black Designer Liner.
Using both the Script Liner and Soft Fan, apply 3 coats of Frosted Lemon to the rim and back of the plate. Do not apply to the foot area, as Stoneware sits on the kiln shelf and does not get stilted.
Using the Soft Fan, apply 2 coats of Clear to the front of the plate, staying off the rim.
Using the Script Liner, apply 1 coat of Speckta-clear Autumn to the background going around the turkey.
Place on a well kiln washed shelf and fire to shelf cone 6.
Using the X-Acto Knife, Scalpel or Fret Tool to cut off the collar of the wet leather-hard greenware vase just below the neck of the vase. You want to make a 3 1/2” opening for the lid. If you use the rim of the vase as a guide, you can cut straight down and it will give you the approximate size opening for the lid. Let dry.
Use the Clean Up Tool to remove the seams from the ware and check to make sure the lid fits well on the vase. Use the Green Grit Cloth to further sand the seam lines and any imperfections in the vase. Use a moistened BT-901 Synthetic Sponge to wipe down the vase and to remove any lingering dust. Check the inside of the vase for any debris as well.
Fire the vase and lid to Shelf Cone 04.
In a Plastic Cup mix some FN-003 Orange to a melted ice cream consistency with some water. Pour the thinned glaze into the vase, while working quickly, rotate the vase to cover the inside of the vase with glaze. Pour out excess glaze. Invert the vase to drain and dry. Repeat this step for the lid also. Wipe off any glaze drips with a moistened Synthetic Sponge. Let dry.
Apply 3 coats of FN-001 White to the outside of the vase using CB-604 Soft Fan. Use CB-106 Script Liner to paint the middle bead on the lid. Let dry.
To the lower section of the lid apply 3 coats of FN-003 Orange using CB-604 Soft Fan.
Use the ruler and pencil to mark off 16 equal sections around the vase. Lightly draw a vertical line from each point. Use the Banding Wheel to mark off 11 equal horizontal lines approximately every ¾” apart. Starting from the top on the first vertical line where the line intersects with the horizontal line to mark it with a small “x” using the Red Fine Tip Sharpie Marker. Alternate the marking of the “x” to every other vertical line along the first horizontal line. Repeat this around the vase to complete 8 markings. Move down to the next horizontal line and mark an “x” to every other line between the first row. Repeat this process down the vase to complete the diamond pattern. You should start to see a pattern of diamonds with the “x” markings. Lightly sketch a diagonal line starting at the top of one point spiraling downward to the bottom of the vase. Repeat this 8 times in one diagonal direction. Reverse this diagonal line in the other direction to complete the diamond pattern.
Shake and Stir CG-961 Fruity Freckles. Use CB-106 Script Liner to apply one coat of CG-961 Fruity Freckles to the diamond pattern about the width of the brush hairs. To make the completion of the pattern easier, paint all the diagonal lines of one direction and then do the reverse diagonal lines. This will ensure that each line is completed. Let dry. Repeat this for asecond coat as before. Let dry. It is important to let the coats of crystal glaze to dry between coats.
Pour out some of the crystal glaze onto a tile or pallet to make it easier to pick up more crystals than glaze. Apply the third coat and try to build up a heavy line of crystals over the previous 2 coats of glaze. Check to make sure there are no blank spots of crystals along the lines. Fill in the open spaces if needed. Let dry.
Apply 2-3 coats of CG-981 Fruity Freckles to the top finial on the lid down to the middle bead.
Make sure the crystal glaze on the vase has dried before firing. Stilt and fire the vase and lid to Shelf Cone 06 with a medium ramping and a 5 min hold on the kiln program. This is to avoid any pulling in the glaze surface and to adequately melt the crystals.
Pour out a small amount of OG-801 Bright Gold onto a Tile or Pallet. Let the luster air thicken slightly before applying. Apply 1 coat of OG-801 Bright Gold Luster to the middle bead on the lid using RB-104 Liner. Let dry. Use OA-901 Essence to clean the brush.
Stilt and Fire the lid to Shelf Cone 018.
Form
CD-1128 Medium Vase. mold (Wet, leather hard greenware)
CD-1145 Large Finial Jar mold (lid only, preferably wet, leather hard greenware)
Wipe bisque down with a damp sponge to remove any dust
Mark off a border about 1” wide.
Scrunch up the tissue paper, then tear into workable pieces.
Apply a small amount of thinned glue, then press the tissue paper pieces down to the area inside the marked area, continuing until the inside area is completely covered.
Using the #6 Round, apply 2 coats of Buttermilk to the tissue paper area.
Using the # 6 Round, apply 2 to 3 coats of Terra Cotta to the rim and back of the plate.
Trace on the pattern.
Thin Chocolate to a wash, and using the # 6 Round apply over the textured area, then gently blot with a paper towel allowing the color to remain in the creases.
Using the # 4 Round, apply 2 coats of Orange Rust to the pumpkin.
Side load in Orange and add some shading to the ribs, and then follow with Honey Toast at random.
Using the Detail, apply Medium Mocha to the stem, and shade with Chocolate.
Using the # 4 Round, apply Honey Toast to the smaller leaves.
Side load and shade with both Bright Yellow and Limeburst.
Using the # 4 Pound, apply Limeburst to the medium leaves,
Shade with both Bright Yellow and Honey Toast.
Using the # 4 Round, apply Brightest Yellow to the sunflower petals.
Shade 1 shed with Honey Toast and the opposite side with Orange.
Using the # 4 Round, apply Chocolate to the flower center, and shade with Dark Chocolate.
Using the # 4 Round, apply Country Sage to the sunflower leaves, and shade with Accent Green.
Using the Liner, outline and detail the piece with Dark Brown.
Using a toothbrush, spatter the piece with Dark Brown.
Using the # 6 Round, apply 2 coats of matte Sealer to the entire piece.
Starting with a leather hard wheel thrown cylinder, draw pattern in to surface with a pencil. Choose a simple shape to repeat around your cylinder to create a pattern
Cut out shapes using a fettling knife, needle tool or Exacto knife- depending on how detailed the shape is you may need to switch tools
Save cut out shapes to add back into design
Add shapes back into design by attaching them to the surface of your cylinder by slip and scoring
Clean all edges with a damp sponge or fingers to smooth
Allow to dry completely
Bisque fire to Cone 04
Glaze:
Wipe bisque down with a damp sponge to remove any dust
Using a soft fang brush, apply 3 coats of Rainforest (SW185) to your piece, allowing each coat to dry in between application and leaving the bottom of the piece clean of glaze
Begin with properly fired cone 04 bisque. Moisten a sponge and wipe bisque to remove any dust.
Place AC-230 Clay Carbon Paper over the front of the plate. Trace the pattern using the pencil.
Using the Script Liner with SC-6 Sunkissed, SC-9 Jaded, SC-10 Teal Next Time, SC-46 Rawhide, SC-60 Silver Lining, SC-70 Pink-A-Dot, SC-88 Tu Tu Tango and SC-97 Cant-elope, apply 2 coats to the corresponding sections of the pattern. Allow glaze to dry between coats.
Using the Detail Line with SC-15 Tuxedo, outline each section of the pattern and add decorative lines and dots.
Using the Soft Fan with SC-15 Tuxedo, apply 2 coats to the back of the plate. Allow glaze to dry between coats.
Using the Soft Fan with SG-702 Speckta-Clear Celebration, apply 2 coats to the front of the plate. Allow glaze to dry between coats.
Begin with properly fired cone 04 bisque. Moisten a sponge and wipe bisque to remove any dust.
Place AC-230 Clay Carbon Paper over the front of the plate. Trace the pattern using the pencil.
Using the Script Liner with CN201 Light Grey, CN501 Neon Yellow, CN502 Neon Blue, CN504 Neon Orange, CN505 Neon Green and CN507 Neon Red, apply 2 coats to the corresponding sections of the pattern. Glaze the outside of the hammock with only CN501 Neon Yellow. Allow glaze to dry between coats.
Using MC-001 6mm Low Track Masking Tape and MC-002 12mm Low Track Masking Tape, make vertical lines on the outside of the hammock. Using the Script Liner with CN502 Neon Blue, CN504 Neon Orange, CN505 Neon Green and CN507 Neon Red apply 1 coat to each stripe. Remove tape before glaze dries.
Using the Detail Liner with SC-15 Tuxedo, outline each section of the pattern and add decorative lines and dots. Use the Script Liner to fill in the inside of the hammock.
Using the Soft Fan with SC-15 Tuxedo, apply 2 coats to the back of the plate. Allow glaze to dry between coats.
Using the Soft Fan with SG-702 Speckta-Clear Celebration, apply 2 coats to the front of the plate. Allow glaze to dry between coats.
Begin with properly fired cone 04 bisque. Moisten a sponge and wipe bisque to remove any dust.
Pour around 1/4 cup FN-018 Bright Blue into the disposable cup. Thin with around 1 TBS of water. The glaze should be easily poured. Pour the glaze into the vase and rotate the inside. Place upside down on a few paper towels for a minute. Turn the vase over and wipe off any excess glaze with a damp sponge.
Using the Soft Fan with CG-964 Kaleidoscope, apply 2 coats to the outside of the vase. Allow glaze to dry between coats.
Using the Soft Fan with CG-1000 Mardi Gras, apply 2 coats to the outside of the vase. Recede the last coat around ¼” from the bottom of the vase. This will prevent dripping.
Squeeze around 1 TBS SC-11 Blue Yonder onto the palette. Thin with around 1 TSP of water. Just enough so the glaze moves when you tilt the palette.
Using the Script Liner with thinned SC-11 Blue Yonder, cover the brush with glaze. Take the brush and forcefully tap it against your finger over the vase. Try to make dots and splatter lines on the vase. Do as much or as little as you would like.
Moisten a clean sponge and wipe bisque to remove any dust.
Add water to slightly thin SW-188 Landslide to the consistency of heavy cream. Roll to coat the inside of the vase.
Use a fan brush to apply 3 coats of SW-188 Landslide, leaving the top ¼ of the vase unglazed. You will need to recede each coat due to the mobile nature of Landslide as well as Jungle Gems at 6. Take the first coat down to the bottom, leaving about ¼”-1/2” for safety. Take the second coat about ½ way down and the third should just be the top ¼ of the glazed section.
Use a fan brush to apply 2 coats of S-2726 Cheetah to the unglazed section of the vase, slightly overlapping the Landslide.
Use a clean sponge to wipe any excess glaze off of the foot.
Fire to cone 5/6. (Sample was fired to cone 6)
Blue Vase
Begin with soft fired stoneware bisque.
Moisten a clean sponge and wipe bisque to remove any dust.
Add water to slightly thin SW-186 Azurite to the consistency of heavy cream. Roll to coat the inside of the vase.
Use a fan brush to apply 3 coats of SW-186 Azurite, leaving the top ¼ of the vase unglazed. You will need to recede each coat due to the mobile nature of Azurite as well as Jungle Gems at 6. Take the first coat down to the bottom, leaving about ¼”-1/2” for safety. Take the second coat about ½ way down and the third should just be the top ¼ of the glazed section.
Use a fan brush to apply 2 coats of S-2701 Peacock to the unglazed section of the vase, slightly overlapping the Azurite.
Use a clean sponge to wipe any excess glaze off of the foot.
Fire to cone 5/6. (Sample was fired to cone 6)
Green Vase
Begin with soft fired stoneware bisque.
Moisten a clean sponge and wipe bisque to remove any dust.
Add water to slightly thin SW-185 Rainforest to the consistency of heavy cream. Roll to coat the inside of the vase.
Use a fan brush to apply 3 coats of SW-185 Rainforest, leaving the top ¼ of the vase unglazed. You will need to recede each coat due to the mobile nature of Rainforest as well as Jungle Gems at 6. Take the first coat down to the bottom, leaving about ¼”-1/2” for safety. Take the second coat about ½ way down and the third should just be the top ¼ of the glazed section.
Use a fan brush to apply 2 coats of S-2714 Herb Garden to the unglazed section of the vase, slightly overlapping the Rainforest.
Use a clean sponge to wipe any excess glaze off of the foot.
Begin with properly fired cone 04 bisque. Moisten a clean sponge and wipe bisque to remove any dust.
Using a soft fan brush, apply 2 coats of FN-001 White to the bottom ¾ of the outside of the piece and apply 3 coats or roll the glaze to coat the inside.
Use a pencil or carbon paper to apply your desired plant design. We used a pencil to draw on some monstera leaves.
Apply 1 coat of AC-302 Wax resist to your design.
Adhere masking tape to section off part 2/4 and ¾. Creating a large middle section. Also adhere 2 pieces to the center of the handle.
Use a soft fan to apply 2 coats of SC-93 Honeydew list to the middle section of the pitcher. Be sure to wipe off glaze build up from the wax resist.
Use a script liner to apply 2 coats of SC-88 Tu Tu Tango to create the aloe planter, top band, and handle.
Draw on aloe leaves with a pencil and apply wax resist to the lines as well as over the planter.
Use a soft fan brush to apply 3 coats of CN302 Bright Caribbean to the bottom section and use a script liner to apply 3 coats to the aloe leaves. Be sure to wipe off glaze build up from the wax resist.
Use a fan brush to apply 3 coats of CN293 Dark Purple to the top section of the vase and handle.
Remove all of the masking tape.
Use a pencil to draw where the vines will go.
Use a mini liner to apply 1 coat of CN293 Dark Purple to the vines.
Use a script liner to create leaves using a single brush stroke (or two!).
Allow to dry completely.
Stilt and fire to shelf cone 05/06. (Sample was fired to cone 06)
Begin with properly fired cone 04 bisque. Moisten a sponge and wipe bisque to remove any dust.
Using the Soft Fan with FN-009 Black, apply 2 coats to front and back of the tray. Allow glaze to dry between coats.
Once the front of the tray is bone dry, place AC-230 Clay Carbon Paper in the center of the tray. Place the pattern on top and trace with the pencil.
Using the Detail Liner with AC-302 Wax Resist, apply 1 coat over the pattern.
Replace the glaze caps on the 2oz Stroke & Coat bottles with AC-224 Plastic Detailer Caps.
Squeeze a thick puddle coat of glaze onto the corresponding sections of the tray. Work in sections. Glaze approximately 1/3 of the tray and move to the next step. Refer to the patterns for color placement. NOTE: If the glaze is too heavy, it will crawl. If it is too light, you will not achieve the batik look.
Use a hair dryer on low to force dry the top layer (skin) of the glaze. Make sure not to put the hair dryer too close while it is wet or it will move the glaze. Dry until you see cracking in the skin.
Repeat steps 8 & 9 until the entire pattern is glazed. Work in sections to prevent the glaze from drying prematurely, which will cause less cracks.
Using the Script Liner with EL-204 Glowing Embers, apply 2 coats to the background. Allow glaze to dry between coats. Apply a 3rd coat, but only in the center of each background section.
Begin with properly fired cone 04 bisque. Moisten a sponge and wipe bisque to remove any dust.
Apply some designs using SG-401 Black Designer Liner. It doesn’t have to be precise; the glaze is semi-opaque so the designs may not even show though perfectly. Keep that in mind during application.
Using a liner brush, apply 3 coats of EL-130 Sea Green to the pants, EL-142 Grass to the shirt, EL-145 Ginger Root to the nose and hands, EL-146 Rain Cloud to the beard, and EL-147 Creek Bed to the boots.
Begin with properly fired cone 04 bisque. Moisten a clean sponge and wipe bisque to remove any dust.
Apply designs using SG-401 Black Designer Liner. We focused the design to the feet/legs/ and back of the ears. Also be sure to add the nose and mouth.
Use a liner brush to apply 3 coats of CC-102 White Crackle to the chest, inside of the ears, and tip of the tail.
Use the same brush to apply 3 coats of EL-133 Autumn to the rest of the fox, avoiding the eyes.
Use a mini liner to apply 2 coats of SC-16 Cotton tail to the eyes. Outline the eyes and add pupils using the mini liner with SG-401 Black Designer Liner.
Begin with properly fired cone 04 bisque. Moisten a sponge and wipe bisque to remove any dust.
Using the Script Liner with SC-16 Cotton Tail, SC-37 Ivory Tower and SC-55 Yella Bout It, apply 2 coats to the facets on the beard. Allow glaze to dry between coats.
Using the Script Liner with SC-97 Cant-elope, apply 2 coats to the facets on the shirt. Allow glaze to dry between coats.
Using the Script Liner with SC-88 Tu Tu Tango, apply 2 coats to the facets on the pants. Allow glaze to dry between coats.
Using the Script Liner with SC-48 Camel Back, apply 2 coats to the nose and hands. Allow glaze to dry between coats.
Using the Script Liner with SC-9 Jaded, SC-10 Teal Next Time and SC-96 Aqu-ward, apply 2 coats to the facets on the hat. Allow glaze to dry between coats.
Using the Script Liner with SC-15 Tuxedo, apply 2 coats to the facets on the shoes and under the hat. Allow glaze to dry between coats.
After glaze is completely dry, outline the facets with SG-401 Black.
Begin with properly fired cone 04 bisque. Moisten a sponge and wipe bisque to remove any dust
Using the Script Liner with SC-86 Old Lace, apply 2 coats to the facets on the chest and tip of the tail. Allow glaze to dry between coats.
Using the Script Liner with SC-6 Sunkissed, SC-24 Dandelion and SC-97 Cant-elope, apply 2 coats to the facets on the body. Allow glaze to dry between coats.
Using the Script Liner with SC-48 Camel Back, apply 2 coats to the inside of the ears and feet. Allow glaze to dry between coats.
After glaze is completely dry, outline the facets with SG-401 Black. Fill in the eyes and top of the ears.
Begin with properly fired cone 04 bisque. Moisten a sponge and wipe bisque to remove any dust.
Use the pencil to sketch a sun on the hat, flowers on the body and a few bugs here and there.
Squeeze around 1 TSP of SC-11 Blue Yonder on the palette. Thin with water. Using the Script Liner, apply 1 coat to the entire gnome.
Using the Script Liner or Detail Liner with SC-6 Sunkissed, SC-11 Blue Yonder, SC-13 Grapel, SC-24 Dandelion, SC-27 Sour Apple, SC-55 Yella Bout It, SC-73 Candy Apple Red, SC-85 Orkid and SC-97 Cant-elope, apply 1 coat to your designs.
Using the Detail Liner with SC-15 Tuxedo, outline your designs.
Using the Script Liner with SG-702 Celebration, apply 1 coat to the hat.
Begin with properly fired cone 04 bisque. Moisten a sponge and wipe bisque to remove any dust.
Apply MC-002 12mm Low Track Masking Tape just above the texture on the mug. Go around the entire circumference.
Using the Soft Fan with IN 1032 Miami Pink (Stitched Mug), IN 1053 Harvest (Hobnail Mug) or IN 1062 Light Kiwi (Fluted Mug), apply 3 coats to the inside of the mug, above the tape and on the handle. Allow glaze to dry between coats. Remove tape before glaze is dry.
Apply MC-002 12mm Low Track Masking Tape just above the bottom edge of the glaze going around the rim of the mugs.
Using the Soft Fan with CR 901 Waterfall (Stitched Mug), CR 911 Ocean Mist (Hobnail Mug) or CR 903 Emerald Falls (Fluted Mug), apply 2 coats below the tape and on the bottom. Allow glaze to dry between coats.
Begin with properly fired cone 04 bisque. Moisten a sponge and wipe bisque to remove any dust.
Stitched Mug
Using the Soft Fan with EL-103 Sea Spray, apply 2 coats to the outside the mug. Allow glaze to dry between coats.
Using the Soft Fan with EL-127 Rose Granite, apply 2 coats to the outside of the mug. Recede the second coat to prevent running. Allow glaze to dry between coats.
Using the Soft Fan with EL-103 Sea Spray, apply 3 coats to the inside of the mug. Allow glaze to dry between coats.
Hobnail Mug
Using the Soft Fan with EL-101 Oyster Shell, apply 2 coats to the outside the mug. Allow glaze to dry between coats.
Using the Soft Fan with EL-131 Turtle Shell, apply 2 coats to the outside of the mug. Recede the second coat to prevent running. Allow glaze to dry between coats.
Using the Soft Fan with EL-101 Oyster Shell, apply 3 coats to the inside of the mug. Allow glaze to dry between coats.
Fluted Mug
Using the Soft Fan with EL-101 Oyster Shell, apply 2 coats to the outside the mug. Allow glaze to dry between coats.
Using the Soft Fan with EL-118 Blue Grotto, apply 2 coats to the outside of the mug. Recede the second coat to prevent running. Allow glaze to dry between coats.
Using the Soft Fan with EL-101 Oyster Shell, apply 3 coats to the inside of the mug. Allow glaze to dry between coats.
Begin with properly fired cone 04 bisque. Moisten a sponge and wipe bisque to remove any dust.
Stitched Mug
Use the pencil to draw a vertical line between the stiches so that it looks like there are 2 sets of leaves (pointing up) on either side of the line. Use the pencil to sketch simple flower heads above the stems. Draw one more flower head on the inside of the mug.
Using the Script Liner with SC-52 Toad-ily Green, apply 2 coats to the leaves. Allow glaze to dry between coats.
Using the Script Liner and Detail Liner with SC-28 Blue Isle, SC-42 Butter Me Up, SC-50 Orange Ya Happy and SC-70 Pink-A-Dot, apply 2 coats to the various parts of the flowers. Allow glaze to dry between coats.
Using the Detail Liner with SC-15 Tuxedo, outline the leaves and flowers. Add decorative lines or dots to the flowers. Add a line going down the handle of the mug.
Using the Script Liner with SC-15 Tuxedo, apply 1 coat to the rim.
Using the Soft Fan with FN-203 Dry Champagne, apply 3 coats to the entire mug. Allow glaze to dry between coats.
Fire to cone 06.
Hobnail Mug
Use the pencil to sketch 3 concentric circles on the inside of the mug
Using the Script Liner with SC-52 Toad-ily Green, SC-28 Blue Isle, SC-42 Butter Me Up, SC-50 Orange Ya Happy and SC-70 Pink-A-Dot, apply 2 coats to the hobnails. Try to space out the different colors
Using the Detail Liner with SC-52 Toad-ily Green, SC-28 Blue Isle, SC-42 Butter Me Up, SC-50 Orange Ya Happy and SC-70 Pink-A-Dot, apply 2 coats in a circular shape around each hobnail. Pick a different color from the hobnail color.
Using the Detail Liner with SC-52 Toad-ily Green, SC-28 Blue Isle, SC-42 Butter Me Up, SC-50 Orange Ya Happy and SC-70 Pink-A-Dot, apply 2 coats in a circular shape around 1/3 of the circles on the mug. Pick a different color from previous circle.
Using the Detail Liner with SC-15 Tuxedo, outline the circles. Try to be irregular with your lines.
Using SG-401 Black, make vertical lines around the outer rim of the mug. Make horizonal lines down the outside of the handle on the mug. Make dots between the circles.
Using the Script Liner with SC-15 Tuxedo, apply 1 coat to the rim.
Using the Soft Fan with FN-203 Dry Champagne, apply 3 coats to the entire mug. Allow glaze to dry between coats.
Fire to cone 06.
Fluted Mug
Use the pencil to sketch the upside-down rainbows on the outside of the mug. Sketch one on the inside of the mug, right-side up.
Using the Script Liner with SC-28 Blue Isle, SC-42 Butter Me Up and SC-52 Toad-ily Green, apply 2 coats to each section of the rainbows. Allow glaze to dry between coats.
Using the Script Liner with SC-50 Orange Ya Happy, apply 2 coats to the area between the rainbows and the upper line of flutes. Allow glaze to dry between coats.
Using the Script Liner with SC-42 Butter Me Up, apply 2 coats to the upper line of flutes. Allow glaze to dry between coats.
Using the Script Liner with SC-70 Pink-A-Dot, apply 2 coats to the middle line of flutes. Allow glaze to dry between coats.
Using the Script Liner with SC-28 Blue Isle, apply 2 coats to the lower line of flutes. Allow glaze to dry between coats.
Using the Detail Liner with SC-15 Tuxedo, outline the rainbows and add accent lines to the flutes. Try to be irregular with your lines.
Using SG-401 Black, make dots around the rainbows, in the flutes and going down the handle.
sing the Script Liner with SC-15 Tuxedo, apply 1 coat to the rim.
Using the Soft Fan with FN-203 Dry Champagne, apply 3 coats to the entire mug. Allow glaze to dry between coats.
Trace pattern on the piece with red pen using clay carbon. Note: Before removing pattern raise up partially to make sure the pattern is completely traced.
With a damp sponge lightly wipe the piece to remove dust and to condition the piece ready to paint.
Using French Dimensions, shake and test on a paper towel making sure you have an even flow of product. Holding tip at a 45% angle to the plate outline the pattern. When done all lines should be touching so glaze will stay contained. Allow to dry.
Place on palette Pumpkin Orange, Ruby Red, and Sun Yellow.
One petal at a time; using a liner brush, puddle Sun Yellow from top of each petal, continue until the product is 1/3— 1/2 down the petal then pick up Pumpkin Orange on the brush and puddle in the remainder of the petal.
With the tip of the brush pull the two colors back and forth from center to tip – blending the two colors.
Repeat step 5 and 6 until all petals are completed.
Please make sure that all glaze inside the petals is butted up against the piping, if not the color could pull back.
Using Ruby Red and liner brush, pull color onto each petal giving accent lines, refer to photo 1.
Using Pumpkin Orange and liner, puddle in the outer circle of center.
Add Espresso to the palette and with liner brush, puddle in the inner circle of the center.
Again, check and make sure all glaze is touching piping.
Add Light Turquoise and Caribbean Blue to the palette.
On the top of plate: puddle in Light Turquoise to the entire background. Allow to dry, then brush a light coat of Caribbean Blue over the Light Turquoise only.
Back of plate: with brush apply 2 coats of Light Turquoise, let dry. Using the same brush, apply 1 coat of Caribbean Blue on top of the Light Turquoise.
With French Dimensions apply dots to the center of flowers, this includes both the Pumpkin Orange and Expresso. Also put a few dots out on the petals, refer to photo 2.
Allow to dry overnight, then stilt and fire to shelf cone 06.
With a damp sponge lightly wipe the piece to remove dust and to condition the piece ready to paint.
For background of the inside of the bowl: place on palette, spaced apart, a dime size amount of Neon Yellow, Neon Green, Light Grey, Light Grape, and Dark Pink. Add enough White to each of these colors to make a 50/50 mix. Then add some water to each mix to make the consistency similar to regular milk. Using a fan glaze brush, fully load with 1 of the colors then in a circular motion paint in 1 coat only of an irregular circle shape. Continue with each color leaving areas of bare bisque between the color shapes. More than one of each color shapes may be applied depending on how large you decide to make your shapes. These circles/shapes are not intended to be a perfect circle—you may want to pencil in your shape before painting. Refer to pattern/picture page. Let dry.
Strawberry placement: using pencil lightly pencil a “T”, about the size of your thumb, where you want the strawberries to be. Pencil in a 0 for top view strawberries. Remember to space the berries apart with enough room to allow for their calyx.
Add Really Red to the palette . For all strawberries, 3 coats will be needed. Where you have T’s, using either round brush, fully load in Really Red. Stroke in Really Red from the side of T down to the bottom of the T, then apply the same to other side-similar to making a heart. Fill in the center if your stroke did not cover the entire strawberry. Refer to pattern/picture page. Continue until all strawberries are painted 1 coat, let dry—then repeat 2 times. Where you have 0’s just apply 1 coat of Really Red completely filling a somewhat irregular circle, let dry—then repeat 2 times.
For the calyx: with a pencil lightly draw a straight line where each calyx will be. Refer to pattern/picture page. Add to palette Bright Kiwi, this will be our base coat. Using small Project Bisque: Mayco 1114 Casual Serving Bowl Project Colors: Best of Duncan Concepts: CN074 Really Red CN182 Bright Kiwi CN201 Light Grey CN244 White CN253 Black CN261 Light Grape CN343 Dark Pink CN501 Neon Yellow CN505 Neon Green Glaze: Pure Brilliance Clear Glaze Brushes: Fan Glaze Brush No. 10/0 & 1 Liner No. 4 & 6 Round Detail brush (optional) Miscellaneous Palette for Paint Paper Towels Pencil Water Container Replacement Sponge Sponge Brush on stick Palette Knife BEST OF Designed by Dru Woodward, Duncan Ambassador round or no. 1 liner fully load with Kiwi and paint each calyx from center out to tip. Complete one berry at a time until they have all been painted.
Add another dime size of Kiwi to the palette, to this add 1 or 2 drops of Black to get an olive looking green. Using the same brush as previously, load in Kiwi and side load in Mix apply 1 coat on top of Kiwi to all calyx in the same manner as before. It does not matter which side the darker color is placed on the calyx. Once all are painted. Let dry.
Add Black to the palette. This will be used for the detail—therefore thin with water so that the paint will flow off the liner brush, do not thin too much or color may look washed out after firing. The strawberry outline is not detailed in a traditional way. The outline is completed by starting from under the calyx slightly off the unpainted edge of the strawberry shape then continuing down to the bottom edge of the strawberry following contours. Then the opposite side is done by starting at calyx slightly inside the edge of the strawberry on top of the red continuing down again following the contours until meeting the “offset” at the bottom of the strawberry. After all the strawberries have all been outlined then outline all calyx, remember to paint in a vein to the middle of the calyx also. Use end of brush handle or toothpick to make small dots for the strawberry seeds. If needed refer to the pattern/picture page. Let dry
Add to the palette just a little of the original 5 colors used for the background shapes. Neon Yellow, Light Grey, Dark Pink, Light Grape, and Neon Green.
Using a 10/0 liner or detail brush dipped lightly into one of these above colors, apply small brush prints randomly to an unpainted area of approximately 2 inches. Use each color at least one time or more if desired.
Add a small amount of White to the palette. Using the same liner or detail brush also apply some brush prints randomly on top of colored shapes. Let dry.
Rim: fully load dampened sponge brush with black. Hold the sponge brush on edge and apply black by slowly turning to cover the top edge all the way around the entire bowl. Note the painted edge can be made wider by tilting sponge when applying. Let dry and apply 2 additional coats to the rim.
Back of bowl: using a fan glaze brush apply 3 coats of Black to entire back of piece, let dry between coats.
When black is thoroughly dry, apply 2 coats of Pure Brilliance to front of bowl overlapping the black edge a little.
Allow to dry 24 hours, then stilt and fire to shelf cone 06.
Begin with properly fired shelf cone 04 bisque. Moisten a clean sponge and wipe bisque to remove any dust.
Using the carbon paper and a pencil, transfer the pattern onto the platter. It will be difficult to get the pattern into the small bowls so you may have to cut it so it fits. If you feel comfortable, it will be easier to hand draw the pattern instead. Use a different line of text for each bowl.
Fill the AC-222 bottle with SW-508 Black Gloss and attach writer tip.
Use the applicator bottle with the Black Gloss to go over all of the lines from the pattern.
Using the CB-604 Soft Fan Brush, apply 3 coats of SW-169 Frosted Lemon to the back side of the bowl. Do not glaze the bottom or the foot.
Using the CB-106 Script Liner, apply 3 coats of Frosted Lemon to the inside rim of the bowl and the ice cream.
Using the CB-106 Script Liner, apply 3 coats of SW-166 Norse Blue to the bowl.
Using the CB-106 Script Liner, apply 2 coats of SW-504 Red Gloss to the cherry.
Using the CB-106 Script Liner, apply 2 coats of SW-001 Stoneware Clear to the areas around the ice cream, bowl, and cherry. You can paint over the black lines.
Repeat all steps for the other three bowls, substituting SW-168 Coral Sands, SW-108 Green Tea, and SW-177 Raspberry Mist for the Frosted Lemon.
Do not stilt or hang over the edge of the kiln shelf.
Begin with properly fired shelf cone 04 bisque. Moisten a clean sponge and wipe bisque to remove any dust.
Using a drill with a ¼” carbide bit, drill holes into the bisque according to the diagrams on the pattern. You will be drilling 3 holes around the top rims of both bowls and one into the bottom of the vase.
Using a drill with a 1/2” carbide bit, drill 4 holes in the neck of the vase according to the diagram on the pattern. You will have drilled 11 holes total. According to the pattern, neck should be base of the vase.
Use masking tape to tape over the holes in the vase.
Thin down some SW-509 Green Gloss with water so that it is the consistency of cream. The ratio should be about 1 part water and 3 parts glaze. Pour the glaze into the vase and roll it around until the entire inside is coated. Pour out any excess glaze.
Using a pencil, divide the outside of the vase into three sections – upper, middle and bottom.
Using the CB-604 Soft Fan Brush, apply 2 coats of SW-156 Galaxy to the middle section of the vase.
Using the CB-604 Soft Fan Brush, apply 2 coats of SW-509 Green Gloss over the Galaxy on the middle section of the vase.
Using the CB-604 Soft Fan Brush, apply 2 coats of SW-128 Cordovan to the front and back of the SB-110 Dessert Bowl and to the top section of the vase. The dessert bowl will be fired upside down so you should paint the foot and the bottom, but leave the top rim unglazed. You can use a wet sponge to remove any glaze that may have gotten on it.
Using the CB-604 Soft Fan Brush, apply 2 coats of SW-108 Green Tea over the Cordovan on the back of the dessert bowl and the top section of the vase.
Using the CB-604 Soft Fan Brush, apply 2 coats of SW-104 Black Walnut to the front and back of the SB-106 Rimmed Bowl and the bottom section of the vase. Leave the foot and bottom of the bowl unglazed, but glaze the foot and bottom of the vase.
Using the CB-604 Soft Fan Brush, apply 2 coats of SW-108 Green Tea over the Black Walnut on the front and back of the Rimmed Bowl and to the bottom section of the vase.
Using the CB-604 Soft Fan Brush, apply 2 coats of SW-401 Light Flux to the areas on all three pieces as indicated in the pattern
Do not stilt the pieces or hang over the edge of the kiln shelf.
Place the vase in the center of the rimmed bowl in the kiln so they will fuse together. Load the dessert bowl upside down.
Fire to cone 5/6.
Cut the rope or cord into 3 equal lengths.
String one bead onto one piece of rope and tie a knot at one end so the bead stays on. Repeat for the other two pieces.
Turn the dessert bowl upside down and place it on top of the vase
Thread one of the pieces of rope up through a hole from the outside of the rimmed bowl and up through a hole from the inside of the dessert bowl. Repeat with the other 2 strings and tie all three together with a knot about 6 inches above the feeder. The dessert bowl should lift up and slide freely up and down the strings so you can fill the feeder.
Begin with properly fired shelf cone 04 bisque. Moisten a clean sponge and wipe bisque to remove any dust.
Using the CB-604 Soft Fan Brush, apply 2 coats of SW-504 Red Gloss to the back side and front rim of the plate. Do not glaze the bottom or the foot.
Using the CB-604 Soft Fan Brush, apply 2 coats of SW-501 White Gloss to the inside of the plate and let dry well.
Using the carbon paper and a pencil, transfer the pattern onto the platter. You’ll have to extend the lines of the ear and the flag with a pencil. Use the photo for reference.
Fill the AC-222 bottles with SW-508 Black Gloss and attach writer tip.
Use the applicator bottle with the Black Gloss to go over all of the lines from the pattern.
Using the CB-106 Script Liner, apply 2 coats of SW-506 Bright Blue Gloss to the head, ear and body of the dog.
Note: If you have additional bottles with writer tips, you can use them instead of the brushes for the next few steps if you prefer.
Using the Script Liner, apply two coats of SW-510 to the dog’s hat (leave alternating stripes white) and around the stars on the flag. Use the photo as a reference.
Using the CB-202 #2 Detail Liner, apply 2 coats of SW-502 Yellow Gloss to the flag pole.
Using the #2 Detail Liner, apply 2 coats of SW-504 Red Gloss to the ribbon on the hat and to alternating stripes on the flag.
Using the #2 Detail Liner, apply two coats of Red Gloss, Bright Blue Gloss, and Blue Gloss to the sparks of the fireworks.
Using the back end of the #2 Detail Liner, apply White Gloss to make the dots on the ribbon on the hat.
Do not stilt or hang over the edge of the kiln shelf.
Choose who you will be creating a pop art style portrait of. Maybe a pop culture icon, historical figure, or leader in your community. Print out a reference photo or create a sketch to base your portrait off of.
Place tracing paper or tissue paper over your reference photo. Trace silhouette and any identifying features you would like eliminating unnecessary details
Transfer traced design to cardboard by placing tissue over cardboard and tracing lines with a permanent marker. You may need to trace lines more than once to get them to show up on the cardboard
If using tracing paper, transfer image by using the traditional pencil transfer method of tracing lines on the reverse side with graphite and then placing tracing paper over cardboard and tracing original lines again to transfer
Cut out silhouette
Determine what features you would like to amplify with added texture. Apply Snow (AC-523) with a pallet knife to areas where you would like added texture
Allow snow to dry
Cut cardboard for your portrait background and coat with background color we used Brightest Yellow (SS-111)
When Snow is dry, start adding portrait color, we used Royal Fuchsia (SS-92), Medium Blue (SS-331), and Flat Black (SS-138)
Use one thick coat or two thinner coats for full coverage
With a small detail brush, outline features with Flat black
Begin with properly fired cone 04 bisque. Moisten a sponge and wipe bisque to remove any dust.
Squeeze around ¼ cup of SC-42 Butter Me Up into the disposable cup. Thin with water until it is easily poured. Pour into the vase and rotate until the inside is covered. Pour out the excess.
Squeeze around 2 TBS of SC-42 Butter Me Up, SC-16 Cotton Tail and SC-60 Silver Lining onto the palette.
Use the same Soft Fan for all steps – do not clean.
Dip the Soft Fan into SC-42 Butter Me Up and apply 1 coat to the upper row of facets on the vase.
Dip the brush into SC-16 Cotton Tail and shade down to the next row of facets.
Dip the brush into SC-60 Silver Lining and shade halfway down the next row of facets.
Dip the brush into SC-16 Cotton Tail and shade halfway down the last row of facets.
Dip the brush into SC-42 Butter Me up and shade down to the bottom of the vase.
Repeat Step #4 two times for a total of 3 coats. Allow glaze to dry.
Place the pattern and AC-230 Clay Carbon Paper on the center of the vase. Trace with the pencil.
Using the Detail Liner with SC-15 Tuxedo, apply 1 coat to the lettering and stars.
Begin with properly fired cone 04 bisque. Moisten a sponge and wipe bisque to remove any dust.
Squeeze around ¼ cup of SC-35 Gray Hare into the disposable cup. Thin with water until it is easily poured. Pour into the vase and rotate until the inside is covered. Pour out the excess.
Squeeze around 2 TBS of SC-6 Sunkissed, SC-16 Cotton Tail and SC-35 Gray Hare onto the palette.
Dip the Soft Fan into SC-35 Gray Hare and apply 1 coat to the upper neck of the vase. Dip the same brush into SC-16 Cotton Tail and shade with the bottom the previous coat. Wash the brush and continue with SC-16 down to the middle of the vase. Dip the same brush into SC-6 and shade down to the bottom of the vase.
Repeat Step #4 two times for a total of 3 coats. Allow glaze to dry.
Using SG-401 Black, outline the facets around the neck line. Add a vertical line down the center of each facet. Make 5 diagonal lines coming off of each side of the center lines.
1. Begin with properly fired cone 04 bisque. Moisten a sponge and wipe bisque to remove any dust.
2. Apply MC-002 12mm Low Track Masking Tape over the holes in the branches of the cactus. Leave the large center hole open.
3. Pour around ½ cup of NT-CLR Clear Dipping into the top of the cactus and rotate until the inside is covered. Pour out the excess. Remove the tape. Wipe off any glaze on the outside of the cactus.
4. Fire to cone 06.
5. Using the Soft Fan with SS-138 Flat Black, apply 1 coat to the outside of the cactus. Allow paint to dry.
6. Remove the cap from MM-202 Green Patina. Replace it with MM-600 Spritzer Cap.
7. Using the Soft Fan with MM-105 Gold Metallic, apply 1 coat to the outside of the cactus. Allow paint to dry. Apply a second coat. Do not let it dry.
8. Spritz the entire cactus with MM-202 Green Patina. Let it sit overnight.
9. If you are happy with the way it looks, move onto step #10. If you don’t have enough patina (bluish green areas), apply MM-105 Gold Metallic to the bare areas with a sponge and spritz again. If you have too much patina, add more MM-105 Gold Metallic with a sponge.
10. Using the Soft Fan with AC-502 Matte Brush on Sealer, apply 2 coats over the entire cactus. This will stop all oxidation, so you will be able to add an acrylic design to the cactus.
11. Draw 3 simple flowers on the cactus using the pencil.
12. Using the Script Liner with SS-32 Razzberri, apply 1 coat to the flowers. Allow paint to dry. Apply a second coat and shade the middle of the petals with SS-92 Royal Fuchsia.
13. Using the Script Liner with SS-247 Bright Yellow, add a dot to the middle of each flower.
14. Using the Detail Liner with SS-138 Flat Black, outline the flowers.
15. Using the Script Liner with AC-501 Gloss Brush-On Sealer, apply 1 coat to the flowers.
1. Begin with properly fired cone 04 bisque. Moisten a sponge and wipe bisque to remove any dust.
2. Place AC-230 Clay Carbon Paper over the front of the plate. Trace the pattern using the pencil. Or draw your own pattern using simple shapes.
3. Use FD 254 Black Licorice to outline the pattern. Allow it to dry completely.
4. Using the Script Liner with CN 201 Light Grey, CN 501 Neon Yellow, CN 504 Neon Orange, CN 507 Neon Red, CN 502 Neon Blue and CN 505 Neon Green apply 2 coats to the corresponding sections of the pattern. Allow glaze to dry between coats.
5. Use FD 254 Black Licorice to make dots in the background.
6. Using the Soft Fan with CN 253 Black, apply 2 coats to the back of the plate. Allow glaze to dry between coats.
7. Dip in Pure Brilliance Clear Dipping.
8. Fire to cone 06.
Form
MB-1116 Casualware Dinner Plate
Colors
CN 201 Light Grey
CN 253 Black
CN 501 Neon Yellow
CN 504 Neon Orange
CN 507 Neon Red
CN 502 Neon Blue
CN 505 Neon Green
FD 254 Black Licorice
Pure Brilliance Clear Dipping (NT-CLR Clear Dipping)
Cast the mold in usual manner. Allow to dry! Clean the greenware with a Clean-Up Tool. Bisque fire to cone 04.
Using a CB-604 #4 Soft Fan, apply 2 coats of S2101 Crystal Clear glaze to the inside of the Vintage Tub. Clean up any drips of glaze with a damp sponge.
Fire the Vintage Tub to cone 06.
Begin with properly fired shelf cone 04 bisque. Moisten a clean sponge and wipe bisque to remove any dust.
Using a Basecoat Brush, basecoat the Vintage Tub with SS-81 Shimmering Silver. Allow to dry!
Mix some SS-81 Shimmering Silver with a few drops of SS-138 Flat Black creating a dark silver. Condition a Sea Wool sponge by wetting it then squeezing out the water then roll in a paper towel to remove any more moisture. Using the conditioned Sea Wool Sponge, Sponge the tub with the color mixture. Make sure to turn the sponge in different directions to create a even pattern.
Using the same Sea Wool Sponge, Sponge over the tub with SS-81 Shimmering Silver. Allow to dry!
Apply 2 coats of AC-502 Matte Brush on Sealer to the outside of the tub only. Allow to dry!
Cast the mold in usual manner. Allow to dry! Clean the greenware with a Clean-Up Tool. Bisque fire to cone 04.
Begin with properly fired shelf cone 04 bisque. Moisten a clean sponge and wipe bisque to remove any dust.
Using a Basecoat Brush, basecoat each piece with SS-237 Dark Brown. Allow to dry.
Puppy on the right – Using various size Drybrush’s, drybrush as follows – SS-234 Medium Mocha then lightly with OS- 452 Peach Fuzz. Highlight the paws, face and down the back with SS-45 Buttermilk then SS-135 White. Scarf – drybrush with OS-468 Deep Turquoise then OS-469 Light Turquoise. Highlight with SS-317 Turquoise then SS-135 White. Using a XST02 Stylus Tool add dots with SS-135 White.
Puppy on the left – Using various size Drybrush’s, drybrush as follows – OS-471 Medium Brow, then SS-234 Medium Mocha followed by SS-2324 Medium Mocha with some SS-45 Buttermilk in the brush. Highlight the paws, muzzle, ears and stripe on the head with SS-45 Buttermilk then SS-145 White. Scarf – Drybrush with OS-480 Garnet Red then OS-449 Bright Red. Highlight with SS-210 Orange. Using a CB-110 #10/0 Liner, add stripes with SS-135 White then OS-476 Black.
Grass – Drybrush with SS-57 Accent Green then OS- 187 Olive Moss. Highlight with SS-19 Country Sage then lightly with SS-276 Lime light.
Ball – Using a drybrush, stipple with SS-276 Lime Light then SS-111 Brightest Yellow. Highlight with SS-135 White.
Bone – Drybrush with OS-492 Peach Fuzz then SS-45 Buttermilk. Highlight with SS-135 White.
Noses and mouth lines – Using a CB-110 #10/0 Liner, apply OS-476 Black.
Eyes – Using a CB-110 #10/0 Liner, apply 1 – 2 coats of SS-135 White to the eye area. Iris of the eye is SS-234 Medium Mocha. Shade with OS-237 Dark Brown. Pupil and eyelashes are OS-476 Black. Add a highlight with SS-135 White. Allow to dry!
Apply 2 coats of AS-494 Matte Sealer to the piece. Allow to dry!
Apply 2 coats of AS-493 Gloss Sealer to the eyes and noses. Allow to dry!
Cast the mold in usual manner. Allow to dry! Clean the greenware with a Clean-Up Tool. Bisque fire to cone 04.
Begin with properly fired shelf cone 04 bisque. Moisten a clean sponge and wipe bisque to remove any dust.
Using a Basecoat Brush, basecoat the cats only with OS-476 Black. Allow to dry!
Kitten on the right – Using various size Drybrush’s, drybrush as follows – OS-475 Charcoal then with OS-474 Grey. Highlight paws, face, ears down the back and tail with SS-45 Buttermilk then OS-431 White,
Kitten on the left – Using various size Drybrush’s, drybrush as follows – SS-24 Chocolate Fudge then ss-234 Medium Mocha followed by AA-127 Medium Portrait. Highlight the paws, face area, ears and tail with SS-45 Buttermilk then OS-431 White.
Using a Basecoat Brush, basecoat the straw area and the yarn with SS-24 Chocolate Fudge. Allow to dry!
Straw – Drybrush with SS-194 Medium Taupe then SS-254 Golden Ochre Followed by SS-3 Honey toast. Highlight with SS-45 Buttermilk.
Re-basecoat the yarn on the straw with SS-24 Chocolate Fudge. Drybrush the yarn with SS-92 Royal Fuchsia then with OS-558 Mimi Pink. Highlight with OS-431 White.
Noses and mouth lines – Using a CB-110 #10/0 Liner, apply OS-476 Black.
Eyes – Using a CB-110 #10/0 Liner, apply 1 – 2 coats of OS-431 White to the eye area. Iris of the eye is SS-19 Country Sage. Shade with SS-57 Accent Green. Pupil and eyelashes are OS-476 Black. Add a highlight with SS-135 White. Allow to dry!
Apply 2 coats of AS-494 Matte Sealer to the piece. Allow to dry!
Apply 2 coats of AS-493 Gloss Sealer to the eyes and noses. Allow to dry!
Begin with properly fired shelf cone 04 Bisque. Moisten a clean sponge and wipe bisque to remove any dust.
Use the Soft Fan to apply two coats of FN-001 White to the front of the tray. Let dry.
Use AC-230 Clay Carbon Paper and a pen to trace the pattern onto the piece.
Use the Script Liner and Liner to apply one coat of SC-302 Wax Resist to the trees and most of the snow foreground, leaving un-waxed areas for shadows. Clean the brush thoroughly after using Wax Resist.
Use a toothbrush to spatter wax to the sky area.
Use the Soft Fan to apply slightly thinned SC-31 The Blues to the lower sections of the sky. Brush a coat over the trees to allow color to bead up for the first coat only. Remove some of the beaded color if too much is applied.
Add thinned SC-12 Moody Blue to the brush to the finish the upper sky. Let dry completely then apply a second and third coat of the thinned color to avoid a streaky look. Avoid the trees on the second and third coats. The Script Liner can be used between the branches.
Use Script Liner to apply one coat of thinned SC-12 Moody Blue or SC-31 The Blues to the snow banks. The un-waxed area will tint with this color and create shadows.
Use the Soft Fan to apply three coats of FN-001 White to the back of the tray. Alternatively, you can apply two coats of SG-701 Star Dust to the back for a sparkly look.
Using the Black Designer Liner and metal tip, outline and detail the traced lines.
Using the Round, apply 1 thinned coat of Copper Wash to the trees.
Using the Round, apply 2 coats of tree trunks, inside the coffee cup and tire.
Using the Round, apply 2 coats of Basketball to the hot dogs and the band around the compass.
Using the Round, apply 2 coats of Sunkissed to the window.
Using the Round, apply 2 coats of Crackerjack Brown to the sticks holding the food.
Using the Round, apply 2 coats of Old Lace to the marshmallow, every 3rd flag and the center band on the camper.
Using the round and Liner, apply 2 coats of Can’t Elope to the rim on the tire, stem on the compass and needle, the camper stand, every 3rd flag and the doorknob.
Using the Round, apply 2 coats of Teal Next Time to the door and lower section on the camper.
Using the Round, apply 2 coats of Blue Yonder to the areas above and below the Old Lace band on the camper.
Using the Soft Fan, apply 3 coats of Stoned Denim to the rim and back of the plate up to the foot area, leaving the bottom dry footed.
Using the Soft Fan, apply 2 coats of matte Clear to the center area of the plate.
Place on a well kiln washed shelf and fire to shelf cone 5/6.
Cut a round base out from the slab by tracing a circular item of the desired size.
Begin building coil pot by rolling out coils from pieces of clay.
Attach around the rim of the base using a slip & scoring technique.
Once coils are attached, smooth over texture with your finger to straighten the connection and create a smooth surface.
Continue to build up vase, curving slightly outward or inward to achieve desired shape.
Once vase is built, smooth out outer texture by using a serrated rib on the outside of the pot and then going over it with a smooth metal rib to re-distribute the clay into a smooth surface finish.
Allow pot to dry slowly, once fully dry bisque fire to Cone 04.
Planning Your Comic Strip:
While waiting for vase to be bisque fired take the time to plan out your comic strip by considering the following:
What story would I like to tell on my vase?
How can I depict this story with only imagery and symbols (no text)?
Who are my characters?
How many panels will I need to tell my story? (recommended 3 or 4)
Make a sketch of your comic strip to base your final draft off of.
Comic Design:
Once vase is out of the bisque kiln, use a string to measure around the section of the vase the comic strip will go. Cut out pieces of paper of equal sizes to represent your comic strip panels.
Draw out your final draft comic strip onto these panels.
Trace panels onto tissue paper, indicating size of each panel by tracing full shape.
Put materials aside to be used in decoration.
Wipe bisque with a damp sponge to remove any dust.
Using a soft fan brush, apply 3 coats of Apple Green (UG-68) to your vase, allowing underglaze to dry in between coats.
Coat inside of vase with brush if you can reach inside. If you cannot reach inside- thin underglaze to a heavy cream consistency with a little bit of water and pour into the vase, shake around and pour out.
Start by applying a thin coat of Leaf Green (the darkest green) to the bottom 1/3 to 1/2 of the vase.
Apply a thin coat of Apple Green (the lightest green) to the top 1/3 to . of your vase.
Apply a thin coat of Spring Green (the medium green) in the middle of the two other greens.
While underglaze is wet, work quickly switching between color applying thin layers of glaze to blend. Allow underglaze to dry overnight.
Allow Apple Green to dry overnight.
Apply color bland over base coat using soft bristled brush(s) and UG-68 Apple Green, UG-22 Spring Green, UG-21 Leaf Green.
It is the easiest to apply a color blend if you have a brush for each color- if you do not have enough brushes- clean your brush off well when alternating.
Sgraffito:
Using masking tape, lightly tape panels in place on vase lining up the tops of the panels.
Holding tissue paper in place, trace drawn lines with magic marker to transfer image to pot.
Once all lines have been traced, remove tissue paper from pot revealing comic panels.
Using a small brush first, establish the borders of each frame- edges may need to be altered slightly to accommodate the gradual angle of the vase.
With various sizes of soft bristled detail brushes, apply Jet Black (UG-50) to one section of your design at a time.
Give the underglaze a moment to set (count to 5) and then while the black is still wet, go in with your sgraffito tool to create the lines in your drawing.
If you pull away too much you can re-apply the black.
Be sure to clean off the end of your tool while using it so that you create clean sgraffito marks.
Continue using this wet sgraffito technique to realize the designs in each of your comic panels.
(Optional) to create a decorative boarder using this same technique surrounding the comic panels or at the top or bottom of your vase.
Allow underglaze to dry fully overnight.
If no clear glaze is desired- fire vase to cone 06 for a full matte finish.
Clear Glaze
For a gloss finish, add 2 coats of S2101 Crystal Clear Brushing to your pot using a soft bristled brush.
Thin the Crystal Clear Brushing glaze with a little bit of water to a heavy cream constancy and pour glaze into inside of your pot.
Swirl around and dump extra out- coating the whole inside.
Allow glaze to dry fully.
If you have glazed the bottom of your vase be sure to use stilts when firing to Cone 06.
Begin with properly fired cone 04 bisque. Moisten a sponge and wipe bisque to remove any dust.
Trace the pattern onto the tile using AC-230 Clay Carbon Paper and a pencil.
Squeeze out around 1 TSP of SG-409 Bright Green onto the palette. Using the Script Liner, apply 1 coat to the gray portions of the pattern.
Using SG-401 Black in the bottle, trace over the lines of the pattern. You can smear the lines with the tip to make them thicker in different areas. This will make the pattern look more fluid.
After the Designer Liner is dry, apply 3 coats of CC-101 Transparent using the Soft Fan. Allow glaze to dry between coats.
Fire to cone 06.
After tile has completely cooled, squeeze around 1 TBS of SS-138 Flat Black onto the palette. Use the sponge to apply the paint over the tile. Wipe off with a damp sponge or paper towel.
Begin with properly fired cone 04 bisque. Moisten a sponge and wipe bisque to remove any dust.
Place AC-230 Clay Carbon Paper over the front of the tumbler. Trace the lettering using the pencil of freehand ‘love’. Try to center it on the tumbler.
Place the ½” and 1” heart stickers around the lettering. Outline the hearts with a pencil.
Place the bubble wrap on a flat surface, textured-side up. Squeeze around 1 TBS of CN 202 Bright Grey onto the palette. Dip the sponge on a stick into the glaze and sponge the bubbles. Repeat until all bubbles have glaze on them. Take the bubble wrap and press the glazed side around the tumbler.
Remove all stickers.
Using the Script Liner with CN 081 Light Wine, CN 261 Light Grape and CN 292 Bright Purple, apply 1-2 coats to the hearts. One coat will produce pastel colors (as shown). Two coats will produce more vibrant colors. Allow glaze to dry between coats.
Using the Detail Liner with CN 253 Black, outline the hearts and lettering.
Using the Soft Fan with CN 081 Light Wine, apply 2 coats to the inside of the tumbler. Allow glaze to dry between coats.
Dip in Pure Brilliance Clear Dipping.
Fire to cone 06.
Form
MB-1455 Stemless Wine Tumbler
Colors
Duncan colors / Mayco colors
CN 081 Light Wine – SC-1 Pink-A-Boo
CN 202 Bright Grey – SC-35 Gray Hare
CN 253 Black – SC-15 Tuxedo
CN 261 Light Grape – SC-85 Orkid
CN 292 Bright Purple – SC-53 Purple Haze
Pure Brilliance Clear Dipping – NTCLR Clear One Dipping
Begin with properly fired cone 04 bisque. Moisten a sponge and wipe bisque to remove any dust.
Place AC-230 Clay Carbon Paper over the front of the tray. Trace the pattern using the pencil.
Place the ½” circular stickers onto the large pot (5-10). Place the ¾” stickers onto the small pot (10-15).
Using the Script Liner with CN 022 Bright Saffron/SC 24 Dandelion, apply 2 coats to the bottom 1/3 of the tray. Allow glaze to dry between coats.
Using the Script Liner with CN 201 Light Grey/ SC 60 Silver Lining, apply 2 coats to the inside of the large pot. Allow glaze to dry between coats.
Using the Script Liner with CN 182 Bright Kiwi/SC 26 Green Thumb, apply 2 coats to the corresponding dark green leaves. Allow glaze to dry between coats.
Using the Script Liner with CN 151 Light Blue Spruce/ SC 96 Aqu-ward, apply 2 coats to the corresponding light teal leaves. Allow glaze to dry between coats.
Squeeze CN 182 Bright Kiwi/SC 26 Green Thumb and CN 151 Light Blue Spruce/SC 96 Aqu-ward onto the palette to make the third leaf color. Mix 1:4 parts. Using the Script Liner, apply 2 coats to the remaining leaves. Allow glaze to dry between coats.
Using the Script Liner with CN 253 Black/SC 15 Tuxedo, apply 2 coats to the pots. Apply over the edges of the dots, but do not completely cover. Completely covering them can cause the adhesive to stick to the tray. Allow glaze to dry between coats. Remove dots as soon as the glaze loses its shine.
Using the Detail Liner with CN 253 Black/SC 15 Tuxedo, outline the leaves, stems and pots. Use the Soft Fan to apply 2 coats to the back of the tray. Allow glaze to dry between coats.
Use FN 254 Black Licorice or SG401 Black Designer Liner to make dots on the background. If using Designer Liner, be sure to not apply too thick or the glaze will pop off in firing.
Dip in Pure Brilliance Clear Dipping or NTCLR Dipping
Fire to cone 06.
Form
MB-882 Rectangle Tray
Colors
Duncan colors / Mayco colors
CN 022 Bright Saffron – SC24 Dandelion
CN 151 Light Blue Spruce – SC96 Aqu-ward
CN 182 Bright Kiwi – SC26 Green Thumb
CN 201 Light Grey – SC60 Silver Lining
CN 253 Black – SC15 Tuxedo
FD 254 Black Licorice – SG401 Black Designer Liner
Pure Brilliance Clear Dipping – NTCLR Clear One Dipping
Wipe down the bisque with a damp Synthetic Sponge to remove any dust.
Optional step. If you are placing the piece outside environment the inside of the piece should be glazed to retard the absorption of water. Thin some S-2101 Crystal Clear Brushing in the Plastic Cup to the consistency of heavy cream. Pour the thinned glaze into the sphere and/or pedestal. While working quickly, rotate the piece to cover the inside of the piece. Pour out the excess glaze to drain and dry. Use a damp Synthetic Sponge to remove any glaze from the outside of the ware. Let dry.
Apply 3 coats of EL-124 Stormy Blue to the Sphere. Apply 3 coats to the top and bottom trim on the pedestal. Back off the 3rd coat about ¼” from the top edge where the main portion of the pedestal starts.
Shake and Stir CG-722 Seawind. Apply 2-3 coats to the middle section of the pedestal evenly dispersing the crystals.
Stilt and Fire the piece to Shelf Cone 05. The slightly higher glaze firing temperature will produce the silvery sheen to the glaze. Firing to Cone 06 will not produce the silvery metallic sheen in the glaze
Begin with properly fired cone 04 bisque. Moisten a sponge and wipe bisque to remove any dust.
Pour around 1 TBS of SG-501 Sculpting medium onto the palette. Pour around ½ oz into the AC-220 Detailer Tip and 1 oz Bottle. Cut off the very end of the tip.
Dip the sponge into the sculpting medium and sponge the rim of the hat and gloves.
Use the detailer bottle with sculpting medium to make a design on the collar. I did 2 parallel lines around the edge of the collar and dots in the triangles created by the upper line.
Using the Script Liner with SC-16 Cotton Tail, apply 2 coats to the eyes. Allow glaze to dry between coats.
Using the Script Liner with SC-20 Cashew Later, apply 3 coats to the face. Allow glaze to dry between coats.
Using the Script Liner with SC-26 Green thumb, apply 2 coats to the irises of the eyes. Allow glaze to dry between coats.
Using the Script Liner with SC-48 Camel Back, apply 3 coats to the hair. Use the Detail Liner to apply 1 coat to the eyebrows. Allow glaze to dry between coats.
Squeeze 1 TSP of SC-2 Melon-Choly onto the palette. Dip the sponge in the glaze and sponge the cheeks. Use the Detail Liner to apply 1 coat to the lips.
Take MC-001 6mm Low Track Masking Tape and make horizontal stripes on the pants. Be sure to press down firmly.
Using the Script Liner with SC-73 Candy Apple Red, apply 2 coats to the pants. Allow glaze to dry between coats. Before the last coat is completely dry, remove the tape.
Using the Script Liner with SC-73 Candy Apple Red, apply 2 coats to the shirt and hat. Allow glaze to dry between coats.
Using the Script Liner with SC-27 Sour Apple, apply 2 coats to the gloves. Allow glaze to dry between coats.
Using the Script Liner with SC-15 Tuxedo, apply 2 coats to the boots. Allow glaze to dry between coats.
Using the Detail Liner with SC-15 Tuxedo, outline the details on the elf.
Using the Soft Fan with SG-704 Speckta-Clear Peppermint, apply 1 coats elf, avoiding the face and hair. Apply a 2nd coat to the areas that were plain bisque (hat band, collar, stripes on pants)
Cast the mold in usual manner. Allow to dry! Clean the greenware with a Clean-Up Tool. Bisque fire to cone 04.
Begin with properly fired shelf cone 04 bisque. Moisten a clean sponge and wipe bisque to remove any dust.
Using a Basecoat Brush, basecoat each piece with OS-474 Grey. Allow to dry.
Using a Basecoat Brush, apply thinned OS-471 Medium Brown to an area at a time and wipe back with a soft cloth, leaving the color in the crevices.
Using various size Drybrush’s, Drybrush as follows: Sven’s beard with OS-474 Grey then with OS-431 White. Astrid’s hair – drybrush with a 2 coats of OS-493 Sandalwood OS-436 Gold then OS 485 French Vanilla – highlight with OS 432 Ivory.
Noses – Drybrush with OS-471 Medium Brown then with OS-467 Light Brown.
All Red areas: Astrid’s – coat, dress, hair bands – Sven’s hat, mittens, pants – Drybrush – OS-568 Fire Thorn, at least 2 coats, then with OS-449 Bright Red, then some OS-439 Hot Orange – highlight with OS- 438 Orange peel.
All Green areas: Astrid’s hat and mittens. Sven’s coat – SS-57 Accent Green then OS464 Bright Green then OS-463 Medium Green, highlight with OS-556 Lemon Grass.
Astrid’s apron – drybrush with OS-556 Lemon Grass then with OS- 431 White.
Shoes – drybrush with 2 coats of OS-476 Black. Highlight the tips of the shoes with OS-474 Grey.
Using the both the XST02 and the XST03 Stylus Tool, add OS-431 White dots to the hat edges then connect using a CB-110 #10/0 Liner to create snowflakes. Using the XST02 Stylus tool ad dots of OS-483 Real Red to the edge of Astrid’s apron. Allow to dry!
Apply 2 coats of AS-494 Matte Sealer to each piece. Allow to dry!
Apply 2 coats of AS-974 Glittering Snow to the tops of the hats. Allow to dry!
Begin with properly fired shelf cone 04 bisque. Moisten a clean sponge and wipe bisque to remove any dust.
Using the CB-604 Soft Fan Brush, apply three coats of IN1026 Very Black to the back of the tray.
Using a pencil, draw the design on the front of the tray using the photo as a guide.
Using FD254 Black Licorice, go over all of your pencil lines. Let dry completely.
Fill the five AC-222 Applicator bottles with the five colors of Neon Concepts – CN501 Neon Yellow, CN502 Neon Blue, CN504 Neon Orange, CN505 Neon Green, CN507 Neon Red. Make sure the glaze is the consistency of milk. Add a small amount of water to the glaze if you need to
Apply two colors to each section by first applying one around the edge, then while still wet add a second color to the middle. Roughly swirl them together as you apply the second color. Use the following combinations: Red/Orange, Orange/Yellow, Yellow/Green, Green/Blue, Yellow/Red. Let dry.
Using the CB-604 Soft Fan Brush, apply 2 coats of PG Pure Brilliance Brushing onto the front of the plate.
Stilt and fire to cone 06.
Form
MB-1064 Tray
Colors
Dunan colors
CN501 Neon Yellow
CN502 Neon Blue
CN504 Neon Orange
CN505 Neon Green
CN507 Neon Red
FD254 Black Licorice
IN1026 Very Black
PG Pure Brilliance Clear Brush-on
Decorating Accessories
5 AC-222 Large Bottles and Writer Tips
CB-604 Soft Fan Brush
Miscellaneous Accessories
Water
Pencil
Sponge
Duncan|Low-Fire|Earthenware Bisque|Home Décor|Table Top
Begin with properly fired shelf cone 04 bisque. Moisten a clean sponge and wipe bisque to remove any dust
Pour about 1/4 cup of IN1026 Very Black into the cup and thin slightly with a splash of water. Ratio should be about 5 parts glaze to 1 part water.
Mix up thinned glaze and pour into the inside of the vase. Roll it around until the inside is coated and pour out any extra glaze.
Pour out about a quarter sized puddle of each color of EZ Stroke onto the palette.
Using a wet CB-310 Flat Shader, load the brush with EZ028 Leaf Green and apply one coat to one of the facets at the top of the vase The strokes should go straight up and down and should look translucent. If the EZ Strokes go on too thick, go over it with a brush loaded with plain water to thin it out. There should be four ‘stripes’ on each facet. Repeat on the facet directly across from it on the vase, leaving three facets in between.
Repeat step 5 on the facet one space over and one space down. Keep repeating until you get to the bottom. The painted facets should be in a diagonal line.
Repeat steps 5 and 6 for the other three colors – EZ050 Pueblo Purple, EZ058 Poppy Orange and EZ075 Passion Red.
Test both colors of French Dimensions on the palette or piece of paper. They should flow easily out of the bottle. Use a needle tool if you need to unclog the tip. If the product is too thick and won’t easily come out of the bottle, add some water and stir well with a wooden skewer.
Using the FD254 Black Licorice French Dimensions, draw an L shape with a spiral at the end on each red and green facet.
Using the FD258 Pure White French Dimensions, draw the same shape on each orange and purple facet. Let dry.
Using the CB-604 Soft Fan Brush, apply 2 coats of PG Pure Brilliance Brush-on onto the vase.
To make stamp: Cardboard and liquid glue (such as Elmer’s or wood glue)
Create Stamp:
Cut a desired size of cardboard large enough for your stamp design
Draw design with liquid glue and let dry completely
Check design by placing under paper and rubbing crayon overtop to reveal design
Add more glue if needed
Prepare your surface:
Using a soft bristled brush, apply one coat of Flat Black (SS-138) or other desired base coat color to front of cardboard.
Let dry completely
Printing:
Using one leaf at a time, sponge desired color of Magic Metallic (Copper Metallic MM-102 or Gold Metallic MM-105) onto leaf (or other printing object) using a small flat sided sponge. You may want to cut a larger sponge into small pieces
Once one side of the leaf is covered make your first test print by placing the leaf painted side down onto a scrap piece of paper. Use a clean sponge to firmly press the leaf into the paper
After pressing the full surface of the leaf down on the paper, peel back the leaf to reveal the print
This test print will show you if you applied too much paint or not enough paint to the leaf before printing. If your print does not have the desired amount of texture in it maybe try using the opposite side of the leaf for printing. You can test print you leaf as many times as needed
When ready to print your leaf, apply desired amount of metallic paint to your leaf and place it paint side down onto your prepared cardboard surface
Press leaf down with your clean sponge as you did when test printing, then pull leaf back to reveal print
Continue to print leaves of different sizes and shapes using both of the Magic Metallic colors
To create a patinaed leaf, print leaf with Magic Metallic paint as instructed, immediately after pulling the leaf back to reveal your print lay a layer of Green Patina (MM-202) on top of the wet paint with a brush.
Watch the Green Patina color develop as oxidation occurs
Note: for oxidation to occur the Green Patina liquid must be applied while the metallic paint is wet
Any metallic paint layered over an area where wet Green Patina liquid is will also patina
Continue to print leaves using all printing techniques above until you are satisfied with your composition
You can touch up any areas of un-wanted metallic marks with a single coat of the acrylic used for your background color
Form
Flat piece of Cardboard. You may also use any craft of ceramic surface.
Colors
Flat Black (SS-138)
Alternative Background Color: Accent Green (SS-57)
Begin with properly fired cone 04 bisque. Moisten a sponge and wipe bisque to remove any dust.
Place AC-230 Clay Carbon Paper onto the plate. Position the pattern over the paper and trace with the pencil.
Using the Script Line with SC-6 Sunkissed, apply 2 coats to the lemons. Allow glaze to dry between coats.
Using the Script Liner with SC-1 Pink-A-Boo, SC-96 Aqu-ward, SC-89 Cutie Pie Coral and SC-9 Jaded (in that order), apply 2 coats to the different background sections. Refer to pattern for which color to use on each section.
After the background glaze is dry to the touch, place the pattern over the platter, lining it up with the lemons. Trace the leaves with the pencil. You should be able to see a slight indent in the glaze.
Using the Detail Liner with SC-15 Tuxedo, outline the lemons and leaves. Add random hash marks to 3 different sections of the background.
Using the Script Liner with EL-101 Oyster Shell, apply 1 coat over the bare areas in the lemons. After those areas are dry, use the Soft Fan to apply 1 coat to the front of the platter.
Using the Soft Fan with EL-101 Oyster Shell, apply 3 coats to the back of the platter.
Begin with properly fired cone 04 bisque. Moisten a sponge and wipe bisque to remove any dust.
Cut out the flamingo pattern. Just cut around the edges and between flamingos 2 & 3, so that you end up with a silhouette.
Using the Soft Fan with SC-16 Cotton Tail, apply 1 coat to the front of the tray.
Once the glaze is dry to the touch, place the pattern on the tray. Use the pencil to trace over the details of each flamingo.
Keep the pattern in place on the tray. Lift up sections of the pattern and sponge the back with water. Press down onto the tray. Sponge over edges to make sure the pattern is secure.
Using the Soft Fan with SC-16 Cotton Tail, apply 1 coat to the background of the tray, slightly going over the edges of the pattern. After that coat is dry, apply a 2nd coat to the top half of the tray, then dip the same brush into SC-99 Charming. Shade down to the bottom of the background, going from white to gray to create a light ombre look.
Take the bubble wrap and place it textured-side up. Dip the sponge on a stick into SC-99 Charming and sponge the bubble wrap. Place textured-side down over the background of the tray and press down. Remove the bubble wrap and the pattern.
Trace over the indented pattern of the flamingos with a pencil, so that you can see the lines better.
Mix the colors for the flamingos:
Flamingo #1 = 4-parts SC-16 Cotton Tail, 1-part SC-23 Jack O’ Lantern, 1-part SC-73 Candy Apple Red
Begin with properly fired cone 04 bisque. Moisten a sponge and wipe bisque to remove any dust.
Using the Soft Fan with FN-009 Black, apply 2 coats to the front of the plate. Allow glaze to dry between coats.
After the glaze is dry to the touch, place the pattern on top and trace with the pencil. You should be able to see the pattern in the glaze.
Using the Detail Liner with wax, apply one coat over the lines made by the pattern. Make a line around the edge of the plate. Allow wax to dry. Tip: When applying the wax, be sure to make the line wide enough to create separation between colors.
Using the Script Liner with the Speckled glazes, apply 2 coats to the pattern. Allow glaze to dry between coats. Refer to the patterns for which Speckled glaze to use.
Using the Soft Fan with FN-009 Black, apply 2 coats to the back of the plate. Allow glaze to dry between coats.
Begin with properly fired cone 04 bisque. Moisten a sponge and wipe bisque to remove any dust.
Using the Soft Fan with FN-304 Black Velvet, apply 4 coats to the front of the plate. Allow glaze to dry between coats. Allow glaze to dry completely.
Pour around 2 TBS of NT-BR Clear One Brushing onto the palette. Add a pinch of AC-310 Silkscreen Medium. Mix with a palette knife until it becomes the consistency of peanut butter. You may need to add more silkscreen medium or glaze.
Place the screens on the plate one at a time, shiny side down. While holding the screen firmly in place, take a small amount of premixed silkscreen medium, and gently rub in circles starting in the center and working outward.
Using the Script Liner and Detail Liner with SC-6 Sunkissed, SC-11 Blue Yonder, SC-16 Cotton Tail, SC-20 Cashew Later, SC-23 Jack O’Lantern, SC-27 Sour Apple and SC-73 Candy Apple Red, apply 2 coats of glaze to the corresponding screened area. Allow glaze to dry between coats.
SC-6 Sunkissed = small tree, hair on girl
SC-11 Blue Yonder = shirts
SC-16 Cotton Tail = buttons on girl, beard on guy, dots on mushrooms
SC-20 Cashew Later = noses, base of mushroom
SC-23 Jack O’Lantern = tree trunks, mittens
SC-27 Sour Apple = large tree, shoes
SC-73 Candy Apple Red = hats, mushroom tops, berries on trees
Squeeze around 2 TBS of SC-15 onto the palette. Add a pinch of AC-310 Silkscreen Medium. Mix with a palette knife until it becomes the consistency of peanut butter. You may need to add more silkscreen medium or glaze.
Repeat step 5. You will be re-screening the same images in black.
Using the Detail Liner with NT-BR Clear One Brushing, make a horizontal line below the scene and add random lines to look like grass.
Using the Soft Fan with FN-304 Black Velvet, apply 4 coats to the back of the plate. Allow glaze to dry between coats.
Fire to cone 06.
Form
MB-1115 Casualware Salad Plate
Colors
FN-304 Black Velvet (2oz)
NT-BR Clear One Brushing (1oz)
SC-6 Sunkissed (1/2oz)
SC-11 Blue Yonder (1/2oz)
SC-15 Tuxedo (1oz)
SC-16 Cotton Tail (1/2oz)
SC-20 Cashew Later (1/2oz)
SC-23 Jack O’Lantern (1/2oz)
SC-73 Candy Apple Red (1/2oz)
Decorating Accessories
AC-310 Silkscreen Medium
DSS-0159 Gnomeland (small male/female, trees, small mushroom)
Begin with properly fired cone 04 bisque. Moisten a sponge and wipe bisque to remove any dust.
Cut around the border of the pattern, set aside.
Using the Soft Fan with FN-009 Black, apply 2 coats to back of the tray. Allow glaze to dry between coats.
Using the Soft Fan with FN-009 Black, apply 2 coats to the front of the tray. Allow glaze to dry between coats.
Once the front of the tray is dry to the touch, place the pattern in the center of the tray. Trace with the pencil. Be sure to also trace around the edge of the pattern. Press hard enough so that you can just see the pattern in the glaze.
Using the Detail Liner with AC-302 Wax Resist, apply 1 coat over the lines.
Replace the glaze caps on the 2oz Stroke & Coat bottles with AC-224 Plastic Detailer Caps.
Squeeze a thick puddle coat of glaze onto the corresponding sections of the tray. Work in sections. Glaze around 1/3 of the tray and move to the next step. Refer to the patterns for color placement.
NOTE: If the glaze is too heavy, it will crawl. If it is too light, you will not achieve the batik look.
Use a hair dryer on low to force dry the skin of the glaze. Make sure not to put the hair dryer too close while it is wet or it will move the glaze. Dry until you see cracking in the skin.
Repeat steps 8 & 9 until the entire pattern is glazed. Working in sections prevents the glaze from drying prematurely, causing less cracks.
Using the Script Liner with CG-999 Jazz Notes, apply 1 drop coat to the corresponding section. Refer to pattern for color placement.
Begin with properly fired cone 04 earthenware bisque. Moisten a clean sponge and wipe bisque to remove any dust.
Pour about an ounce or two of glaze into a cup/palette and thin with water at an approximate ratio of 1 part water to 2 parts glaze. Roll this glaze mixture inside of the vase to coat. Drain and allow to dry upside down.
Use a fan brush to apply 3 coats of SC-65 Peri-twinkle to the body section of the vase and 2 heavy coats of SC-16 Cotton Tail to the top section of the vase.
Mix SC-76 Cara-bein Blue and AC-310 Silkscreen medium together using a palette knife until it is the consistency of peanut butter.
Select the tree screens that you will be using, we used a pine tree and 2 different smaller trees. We applied the smallest tree higher up on the bottle to create depth in the design. Apply a slightly larger tree lower and leave the “closest” trees room to be hand painted lowest on the vase.
Use your finger to press the product through the silkscreens. Apply a couple of the tree designs multiple times. If you move quickly, you can screen multiple transfers without washing the screen. If the transfer quality seems poor, you may need to thin the mixture more with glaze or rinse and dry the screen before making additional transfers.
Transfer the hand painted tree designs using the AC-230 Clay Carbon paper or draw them on lightly with a pencil. When using the transfer paper, be sure that the background glaze is completely dry and use a pen for the best transfer quality. The transfer paper is one sided so check before transferring!
Use a script liner to apply 2 coats of CN182 Bright Kiwi to the pine trees and use a mini liner to apply 2 coats of CN232 Bright Briarwood to the berry trees and the bases of the pine trees.
Use a script liner to apply 3 coats of SC-30 Blue Dawn to create the background landscape and apply 2 heavy coats of SC-16 Cotton Tail to create the foreground landscape.
Use the back end of a brush to dip and dot CN074 Really Red to add berries to the foreground trees.
Use a Sponge-on-a-Stick to apply SC-65 Peri-twinkle to the ST-102 Snow Stamp. Be sure to dab extra glaze off of the sponge and apply the glaze to a stamp on a flat surface. We applied 1 large snowflake at a time for precise placement.
Repeat previous step using SC-76 Cara-bein Blue.
Use a script liner to apply 2 coats of CN074 Really Red to the band in the center of the vase and the inside of the neck.
Apply masking tape along the edges of the brims and apply 2 coats of CN232 Bright Briarwood. Allow to set until tacky and remove the tape.
Use a script Liner to apply 1 heavy coat of SY546 Snow to the trees and around the bases.
Begin with properly fired cone 04 bisque. Moisten a sponge and wipe bisque to remove any dust.
Using the Soft Fan with FN-009 Black, apply 2 coats to the front and back of the plate. Allow glaze to dry between coats.
Before the glaze is bone dry, use the pencil to trace over the pattern. You should be able to see a slight indent in the glaze.
Using the Detail Liner with AC-302 Wax Resist, outline the pattern.
Using the Script Liner with EL-130 Sea Green, apply 2 coats to the background sections. Allow glaze to dry between coats. Apply a third coat, but only in the center of each section. This will make the glaze more variegated.
Using the Script Liner with EL-148 Smoked Lilac, apply 2 coats to the flowers. Allow glaze to dry between coats. Apply a third coat, but only in the center of flower section.
Using the Script Liner with EL-150 Fern, apply 2 coats to the leaves. Allow glaze to dry between coats. Apply a third coat, but only in the center of each leaf.
Begin with properly fired cone 04 bisque. Moisten a sponge and wipe bisque to remove any dust.
Using the Soft Fan with FN-001 White, apply 3 coats to the back of the plate. Allow glaze to dry between coats. Flip plate over and apply 2 coats to the front of the plate. Allow glaze to dry between coats.
Place a 4oz glaze jar in the center of the plate and trace around the circle with the pencil.
Squeeze around 1 TBS of SC-15 Tuxedo onto the palette. Dip the bottom of the fork in the glaze and stamp around the circle. The points should be facing outward. Make a second or third row of stamps, extending towards the edge of the plate. Allow glaze to dry to the touch.
Spoon around 1 TBS of FN-002 Yellow, FN-051 Strawberry and FN-052 Tangerine randomly onto the center of the plate.
Using the straw, blow the glaze from the center of the plate, towards the edge of the plate. Make sure you are allowing the different colors to mix. Allow glaze to dry to the touch.
Using the Script Liner with SC-16 Cotton Tail, apply 1 thick coat to make eyes and/or teeth.
Using the Detail Liner with SC-15 Tuxedo, make dots in the center of the eyes and outline the mouth.
Begin with properly fired cone 04 bisque. Moisten a sponge and wipe bisque to remove any dust.
Using the Soft Fan with IN 1100 White/FN-001 White, apply 2 coats to the entire truck. Allow glaze to dry between coats.
Using the Script Liner with CN 151 Light Blue Spruce/SC-96 Aqu-ward, apply 2 coats to the windows. Shade the corners with CN 302 Bright Caribbean/SC-9 Jaded.
Using the Script Liner with CN 074 Really Red/SC-74 Hot Tamale, apply 2 coats to the wheel wells and trim. Allow glaze to dry between coats.
Use the pencil to sketch flowers with 5 petals, ivy leaves and single, small leaves in groups of 2 or 3. They do not need to be perfect, just try to evenly space them out. Add berries in the bare spots (groups of 3 dots). If you want to add a logo to the door or hood, leave that area blank. Trace your logo using the pencil and AC-230 Clay Carbon Paper.
Using the Script Liner and Detail Liner with CN 507 Neon Red/SC-73 Candy Apple Red, apply 2 coats to the flowers. Allow glaze to dry between coats.
Using the Detail Liner with CN 182 Bright Kiwi/SC-26 Green Thumb, apply 2 coats to the ivy leaves. Allow glaze to dry between coats.
Using the Detail Liner with CN-181 Light Kiwi/SC-27 Sour Apple and CN 302 Bright Caribbean/SC-9 Jaded, apply 2 coats to the small, single leaves. Allow glaze to dry between coats.
Using the Detail Liner with CN 074 Really Red/SC-74 Hot Tamale, apply a dot of glaze to each of the berries.
Using the Script Liner with CN 151 Light Blue Spruce/SC-96 Aqu-ward, apply 2 coats to the hubcaps.
Using the Script Liner with CN 302 Bright Caribbean/SC-9 Jaded, apply 1 coat to the outer edge of the hubcaps.
Using the Script Liner with CN 151 Light Blue Spruce/SC-96 Aqu-ward, apply 2 coats to the lights. Allow glaze to dry between coats.
Using the Script Liner with CN-201 Light Grey/SC-60 Silver Lining, apply 2 coats to the bumpers and grille. Allow glaze to dry between coats.
Using the Detail Liner with CN-202 Bright Grey/SC-35 Gray Hare, apply 1 coat to the crevices on the grille.
Using the Detail Liner with colors of your choice, apply 2 coats to your logo. Outline with CN 253 Black/SC-15 Tuxedo.
Using the Script Liner with CN 253 Black/SC-15 Tuxedo, apply 2 coats to the tires. Allow glaze to dry between coats. Use the Detail Liner to outline the details and design on the truck.
Fire to cone 06.
Using the Pointed Round, apply AS 974 Glittering No-Fire Snow/AC-523 Non-Fired Snow to the truck. Allow to dry 24-48 hours.
Form
MB-1535 Truck Container bisque
Colors
Dunan colors / Mayco colors
AS 974 Glittering No-Fire Snow / AC-523 Non-Fired Snow
Begin with properly fired cone 04 bisque. Moisten a sponge and wipe bisque to remove any dust.
Using the Soft Fan with FN-001 White, apply 2 coats to the entire truck. Allow glaze to dry between coats.
Using the Script Liner with SC-96 Aqu-ward, apply 2 coats to the windows. Shade the corners with CN 302 Bright Caribbean.
Using the Script Liner with CN 074 Really Red, apply 2 coats to the wheel wells, top and trim. Allow glaze to dry between coats.
Use the pencil to sketch flowers with 5 petals, ivy leaves and single, small leaves in groups of 2 or 3. They do not need to be perfect, just try to evenly space them out. Add berries in the bare spots (groups of 3 dots).
Using the Script Liner with CN 507 Neon Red apply 1 coat to the flowers. Apply a second coat and shade the edges with SC-74 Hot Tamale.
Using the Detail Liner with SC-26 Green Thumb, apply 2 coats to the ivy leaves. Allow glaze to dry between coats.
Using the Detail Liner with SC-27 Sour Apple and SC-9 Jaded, apply 2 coats to the small, single leaves. Allow glaze to dry between coats.
Using the Detail Liner with CN 074 Really Red, apply a dot of glaze to each of the berries.
Using the Script Liner with SC-96 Aqu-ward, apply 2 coats to the hubcaps.
Using the Script Liner with SC-9 Jaded, apply 1 coat to the outer edge of the hubcaps.
Using the Script Liner with SC-96 Aqu-ward, apply 2 coats to the lights. Allow glaze to dry between coats.
Using the Script Liner with CN 253 Black, apply 2 coats to the tires. Allow glaze to dry between coats. Use the Detail Liner to outline the details and design on the truck.
Fire to cone 06.
Using the Detail Liner with OG802 White Gold, apply a thin, even coat to the bumpers, grille and door handles.
Fire to cone 018.
Using the Glaze Mop with OG803 Mother of Pearl, apply a thin, even coat over the entire truck. Apply using a circular motion.
Fire to cone 020.
Using the Pointed Round, apply AS 974 Glittering No-Fire Snow to the truck. Allow to dry 24-48 hours.
Form
MB-1508 Vintage Truck Container bisque or CD1508 Vintage Truck mold
Use a moistened Synthetic Sponge to wipe down the piece.
Visually divide the ware from lower left to upper right corners. Apply 1 coat of UG-92 Lilac to the lower right portion of the plate using CB-602 Soft Fan. Apply 1 coat of UG-3 Baby Blue to the upper portion of the plate and wet blending the blue down over the Lilac. Wet blend the upper left corner with some UG-219 Marine Blue over the Baby Blue. It is best to use “X” cross strokes when wet blending the colors over one another to avoid harsh breaks in the colors. Repeat the applications of colors for a total of 3 coats, wet blending the colors each time over the others. By the third coat, the upper left side of the plate should be slightly darker then transitioning to the Baby Blue and down onto the lower right portion of the plate to the Lilac. Let dry.
Transfer the design onto the plate using AC-230 Clay Carbon and a pencil. Use the 1” Blue Masking Tape to tape off the sides of the trees. Make a break in the areas where the branch crosses over in the design. Apply 2 coats of UG-53 Silver Grey to the left tree trunk using CB-602 Soft Fan. On the third coat, tip the side of the brush with UG-221 Cement to shade the edges of the trunk. Avoid the shading where the branch crosses over the edge. Let dry. Place the MC-001 6mm Tape over the branch area where it crosses over the second trunk.
Apply 2 coats of UG-221 Cement on the second tree trunk using CB-602 Soft Fan. On the third coat, tip the brush with UG-198 Dark Grey to shade the edges of the trunk. Remove the taped areas.
Using CB-404 Pointed Round loaded with UG-53 Silver Grey to paint 3 coats onto the branch. Shade with some UG-221 Cement to the upper and lower edges of the branch.
Apply 1-2 even coats of UG-51 China White to the bird using CB-404 Pointed Round. Let dry
Retrace the detail of the pattern onto the plate using the AC-230 Clay Carbon and a pencil. Be careful tracing in the detail on the bird sections.
Apply 1 coat of EZ-027 Navajo Turquoise to the blue sections on the bird. Shade the Turquoise areas of the bird with thinned EZ-023 Midnight Blue using CB-220 Detail Liner.
Mix some EZ-013 White with a touch of EZ-037 Black to make a light grey color. Thin the color for shading. Shade the backside of the eye marking, chest, under the wing and abdomen of the bird using CB-220 Detail Liner. Darken the grey mixture slightly and paint in the legs, feet and beak.
Detail the black markings on the bird with EZ-012 Cobalt Black using CB-110 Liner.
Scratch in some highlights on the crown of the bird and flight feathers using a Clean Up Tool.
To detail the bark of the trees, thin some EZ-013 Cobalt Black to slightly more than dirty water. Apply the thinned color to the breaks in the bark using CB-220 Detail Liner. If the color is too light you can always go back and apply more color to darken. Further detail the bark breaks with the pure Cobalt Black to accent the markings.
Fire to Shelf Cone 04-05.
Using CB-604 Soft Fan to apply 2-3 coats of S-2101 Crystal Clear Brushing to the entire plate.
Wipe off the bisque with a moistened Synthetic Sponge to remove any dust
Using a pencil and AC-230 Clay Carbon to transfer the pattern to the ware.
Use an old Tooth Brush or Splatter Brush to spatter EZ-075 Passion Red to the area around the main portion of the pattern of leaves.
Apply 3 smooth even coats of UG-22 Spring Green to the leaves and stem using CB-404 Pointed Round. Let dry.
Sketch or trace the detail back onto the leaves.
Place the EZ-Strokes onto a tile.
Using CB-404 Pointed Round loaded with water tipped with EZ-033 Ivy Green to shade the edges and veins on the leaves.
Add shading to the shadows on the leaves with thinned EZ-023 Midnight Blue and thinned EZ-037 Black using the CB-404 Pointed Round.9. Detail the leaves using CB-110 Liner loaded with EZ-033 Ivy Green.
Apply EZ-075 Passion Red to the berries. Apply some EZ-050 Pueblo Purple to some parts of some of the berries. Use the brush loaded with water to rub out a highlight on the berries.
Using CB-110 Liner to detail the berries with a fine line of EZ-075 Passion Red and then EZ-037 Black. Add the blossom ends of the berries with EZ-037 Black.
Detail the stems with EZ-033 Ivy Green, EZ-75 Passion Red and EZ-037 Black. Make a mixture of Ivy Green and Passion Red to make a dirty green/brown color as well for the detailing.
Fire to Shelf Cone 04-05.
Apply 2-3 coats of S-2101 Crystal Clear Brushing using CB-604 Soft Fan.
Stilt and Fire to Shelf Cone 05-06.
Pour out a few drops of OG-801 Bright Gold onto a tile. Using CB-104 Liner (reserved for Gold Luster only) to apply to the rim of the plate. Using OA-901 Essence to clean the brush.
Use the Clean Up Tool and Green Grit Cloth to remove the seams and sand any imperfections to the greenware. Use a dampened Synthetic Sponge to remove any dust and debris from the ware inside and out.
Use a pencil to sketch out a rough outline area where the pine cones and boughs will go to visualize the placement of the background colors. You will notice that there is a golden area near the handle and darker blue area around the spout. There will be streaks of other colors flowing down under the boughs as well. Using CB-604 Soft Fan to apply 3 coats of UG-3 Baby Blue to the pitcher excluding the area where the gold color is near the handle. Exclude handle as well. To the gold area next to the handle apply 3 coats of UG-58 Harvest Gold. Wet blend this color down over the blue area. The top portion of the pitcher is wet blended with UG-72 Wedgewood Blue and darkened with UG-219 Marine Blue around the spout near the pine cones. These colors should appear seamless in the blending. Streak in UG-91 True Teal, UG-210 Forest Green and a bit of UG-58 Harvest Gold vertically where the boughs will go. Dip the brush into water to fade out the color as it moves down the ware. The streaks of the three colors should not be harsh, but subtle. If the color appears to harsh you can reapply some Baby Blue to soften the blending. Let dry.
Using AC-230 Clay Carbon to trace the pine cones outline of the pattern. The detail will be retraced or sketched in after the blocking in of the basic colors. Apply 2-3 coats of UG-31 Chocolate to the second background pine cone using CB-404 Pointed Round. Apply 2-3 coats of UG-57 Spice Brown to the foreground pine cone. Let dry.
Sketch in or retrace the detail of the pine cone detail. Draw in some of the directional lines to the boughs.
On a tile place the EZ-Strokes. Load CB-404 Pointed Round with water and tip with EZ-13 Cobalt Black. Shade the recessed areas of the pine cones to give it dimension to each scale (apophysis.)
To the pointy highlights (umbo) on the individual scales use CB-110 Liner loaded with EZ-058 Poppy Orange. Detail and outline the pine cones with EZ-012 Cobalt Black.
Thin slightly EZ-033 Ivy Green and using RB-104 Liner to paint in the individual pine needles. Start the stroke of the needle up next to the pine cones trailing it down the pitcher. Vary the saturation of the color for some of the needles. To give the individual needles movement and a flowing feeling to the overall pattern, paint them with a slight arc to each one and trailing to a point. Some of the shorter needles can be straighter.
Fire to Shelf Cone 04.
In a Plastic Cup thin some FN-029 Rich Chocolate to a melted ice cream consistency. Pour the thinned glaze into the inside. While working quickly, rotate the piece to cover the inside of the pitcher. Pour out any excess color. Use CB-604 Soft Fan to brush any runs or missed areas on the inside. Apply 3 coats of FN-029 Rich Chocolate to the handle using a brush(es) sized for the area.
Use FN-258 White to make the snow on the pine cones and needles. The heavier application should be on the top left sides of the pine cones. Vary the application of the white to break up the snow areas. Let Dry.
Apply 2-3 coats of S-2101 to the outside area of the pitcher.
Begin with properly fired cone 04 earthenware bisque. Moisten a clean sponge and wipe bisque to remove any dust.
Apply 2 pieces of masking tape longways down the plate leaving a section in the center for the blend.
Begin blending the colors together 2 at a time, so apply SC86 and brush out to the right and then apply SC54 and blend between. Repeat 3x and move onto the next color. The sequence from light to dark is: SC86, SC54, SC46, SC20, SC51, SC5, SC25, SC41, SC48, SC14, SC34
Once the entire blend is complete, remove the masking tape and apply 3 coats of SC-34 Down to Earth to one side and SC-86 Old Lace to the other.
Begin with properly fired cone 04 earthenware bisque. Moisten a clean sponge and wipe bisque to remove any dust.
Apply 11 pieces of masking tape spaced evenly down the plate. These will be where the true Stroke and Coat colors go and we will be filling in between with blends. It is helpful to write on the masking tape which Stroke and Coat color will go there. In order from lightest to darkest: SC86, SC54, SC46, SC20, SC51, SC5, SC25, SC41, SC48, SC14, SC34
Fill in between the masking tape with the blends. We mixed 1 part of each color to make a 50/50 blend. The space between SC86 and SC54 will be filled by mixing 1 part SC86 and 1 part SC54. Mix together completely and apply 3 coats of the blend. Continue this process down through all of the colors.
Carefully remove the masking tape.
Apply 3 coats of the appropriate Stroke and Coat colors to complete the gradient.
Once dry, label each section with the corresponding Stroke and Coat color or blend.
Apply 3 coats of SC-15 Tuxedo to the back of the plate.
Apply 1 coat of NT-BR to the front of the plate so the Designer Liner is glossy.
Apply 3 coats of White to the center area of the plate using the # 6 Soft fan.
Apply 3 coats of Orange to the rim and back of the plate up to the foot area using the Soft fan and Script Liner. Keep color off the foot, as stoneware does not get stilted.
Print out a photo of the plate to help with color placement.
Using the Round, apply 3 coats of Red Gloss to the red flowers.
Using the Round, apply 3 coats of Orange Gloss to the orange flowers and orange flower centers.
Using the Round, apply 3 coats of Yellow to the yellow flowers and yellow flower centers.
Using the Round, apply 3 coats of Bright Blue to the blue flowers.
Using the Round, apply 3 coats of Purple to the purple flowers.
Using the Round, apply 3 coats of Dark Blue to the flower centers.
Using the Round, apply 3 coats of Bright Green to the leaves.
Using the Liner, apply 1 coat of Dark Green to the stems and smaller leaves.
Using the Liner, thin the Black Designer Liner with water to a brushing constancy and outline and add detail.
Following the photo, add brush handle dots to the flowers with the desired colors.
Wipe off any color that may be on the bottom of the piece.
Place on a well kiln washed shelf and fire to shelf cone 6.
Begin with properly fired shelf cone 04 bisque. Moisten a clean sponge and wipe bisque to remove any dust.
Using the CB-604 Soft Fan Brush, apply 3 coats of SW-504 Red Gloss to the backside of the Modern Dinner Plate and the rim on the front. Make sure not to glaze the bottom of the plate and wipe off any glaze that may have gotten on it.
Using the CB-604 Soft Fan Brush, apply 2 coats of SW-501 White Gloss to the center of the plate and let dry well.
Using a pencil and the AC-230 Clay Carbon Paper, transfer the pattern to the plate. You will have to extend the scallops on the top and bottom of the plate using the pencil.
Fill the AC-222 bottle with SW-508 Black Gloss.
Use the applicator bottle with the Black Gloss to draw over the lines of the pattern except for the spirals on the rim. Fill in alternating sections on the striped side of the heart and fill in around the dots on the other side. Let dry.
Replace the cap on the AC-302 Wax Resist with the AC-224 Plastic Detailer Cap. Draw over the black lines and the striped and dotted sections of the heart with wax resist. The wax line will be thicker than the black lines in most areas. Let dry.
Pour a small amount of each of the following gloss glazes onto the palette – SW-506 Bright Blue Gloss, SW-504 Red Gloss, SW-507 Bright Green Gloss, SW-505 Purple Gloss, SW-502 Yellow Gloss, SW-503 Orange Gloss
Using the CB-604 Soft Fan Brush, add enough water to each color to make them the consistency of tinted water. Starting with red, use a swirling motion to add one watery coat to most of the heart. Use your finger while still wet to make a squiggle on one section. If your coat is too thick and you aren’t getting a watercolor effect, add some plain water with your brush and gently swirl it around. Avoid swirling or scrubbing so hard that you re-wet the white layer underneath. Don’t be afraid to make puddles. If your glaze is too thin, you can apply another coat.
While the paint is still wet, load your brush with purple and apply it the same way next to the red. Let the two colors puddle together and mix. Use a brush with plain water to help them blend until you are satisfied.
Repeat this step with the rest of the colors, using the photo as a guide for where to apply each one.
Fill an AC-222 Bottle and Writer tip with SW501 White Gloss and use it to make the spirals inside the scallops on the rim and the dots around them. Also, add a little squiggle to the inside of the heart.
Do not stilt or hang over the edge of the kiln shelf.
Begin with properly fired shelf cone 04 bisque. Moisten a clean sponge and wipe bisque to remove any dust.
Using the CB-604 Soft Fan Brush, apply 3 coats of SW-101 Stoned Denim to the backside of the SB-118 12” Stoneware Platter and the rim on the front. Make sure not to glaze the bottom of the plate and wipe off any glaze that may have gotten on it.
Using a pencil and the AC-230 Clay Carbon Paper, transfer the pattern to the plate.
Fill the AC-222 bottle with SW-508 Black Gloss.
Use the applicator bottle with the Black Gloss to draw over the lines of the patter. Do not draw the dotted line around the moon.
Using the CB-106 Script Liner, apply 2 coats of each of the following colors to the front of the plate according to the pattern – SW-176 Sandstone, SW-252 Blue Opal, SW-169 Frosted Lemon, SW-117 Honeycomb, SW-170 Blue Hydrangea. Let dry.
Using the CB-106 Script liner, apply two coats of SW-181 Night Moth over each section of the plate except the rim, the houses, the moon and the dotted circle around it, and the stars. Paint in the direction of the swirls when glazing the sky. Apply one coat to the dotted section around the moon (not the moon itself) and the outer circle of the stars.
Using the CB-202 Detail Liner, apply coats of SW-501 White Gloss and SW-502 Yellow Gloss to the houses according to the photo, and add Yellow Gloss to make a smaller moon inside the big one.
Do not stilt or hang over the edge of the kiln shelf.
Begin with properly fired shelf cone 04 bisque. Moisten a clean sponge and wipe bisque to remove any dust.
Using the CB-604 #4 Fan Brush, apply two coats of S-2101 Crystal Clear Brushing Glaze to the inside of both pieces of the MB-1544 Gnome Jar
Using the CB-604 #4 Fan Brush, apply two coats of alternating 1” strips of CG-999 Jazz Notes and CG-1001 Gogh Iris to the hat, loosely following the indentations of the folds. Repeat for shirt of the gnome.
Using the CB-604 #4 Fan Brush apply 3 coats of SC-90 Elephant Ears to the beard.
Using the CB-106 Script Liner, apply 3 coats of SC-20 Cashew Later to the nose and hands.
Using the synthetic sponge, sponge 2 coats of SC-16 Cotton Tail to the beard.
Using the synthetic sponge, sponge coat of SC-70 Pink-A-Dot to the nose.
Using a CB-106 Script Liner fully loaded with SC-73 Candy Apple Red, dab a row of large dots around the bottom of the hat. Push down on the brush so that your dots become elongated and a heavy ‘blob’ of glaze is applied. Reload the brush after every dab. Refer to the photo for placement.
Repeat the above step with SC-23 Jack O’ Lantern making a row above the Candy Apple Red, then with SC-76 Cara-bien Blue. Keep repeating until the entire hat is covered with dabs, leaving some white showing in between each. Repeat with the shirt.
Pour CD-1095 Funky Tree mold ¼” thick. Refer to casting instructions.
Once it is firm enough to handle, use the sponge to smooth down casting lines.
Use the X-ACTO knife to cut out a hole in the bottom, back for the pinch light. It should be around 1” in diameter.
Use the ¼” punch to make holes for the lights.
Use a damp sponge to smooth down any rough edges.
Fire to cone 04.
Using the Soft Fan with SC-16 Cotton Tail, apply 1 coat to the tree.
Fill each of the Dixie cups half full with SC-1 Pink-A-Boo, SC-16 Cotton Tail and SC-70 Pink-A-Dot (1 glaze per cup). Thin with water until it is easily poured from the cup.
Over a sink or trash can, pour half of each glaze over the tree and rotate. You want to make fast back and forth movements while you pour. This will create lines and dots of glaze all over the tree. Pour the rest of the glazes over the tree and rotate until you achieve the desired look.
After the piece is dry, make sure to clean out any glaze in the holes.
Fire to cone 06.
Glue the swirl lights into the holes using epoxy.
Insert the pinch light.
Easter Egg Funky Tree
Pour CD-1095 Funky Tree mold ¼” thick. Refer to casting instructions.
Once it is firm enough to handle, use the sponge to smooth down casting lines.
Use the X-ACTO knife to cut out a hole in the bottom, back for the pinch light. It should be around 1” in diameter.
Use the Xiem small wire tool to carve designs that would be seen on an Easter egg. These could be straight lines, zig-zags or dots.
Use the ¼” punch to make holes for the lights.
Use a damp sponge to smooth down any rough edges.
Fire to cone 04.
Using the Script Liner with SC-1 Pink-A-Boo, SC-45 My Blue Heaven, SC-55 Yella Bout It, SC-85 Orkid and SC-96 Aqu-ward, apply 2 coats to each section of the tree. Allow glaze to dry between coats.
Dip into NT-CLR Clear Dipping.
Fire to cone 06.
Glue the large globe lights into the holes using epoxy.
Insert the pinch light.
Form
CD1095 Funky Tree
Colors
Egg Tree
NT-CLR Clear Dipping
SC-1 Pink-A-Boo
SC-45 My Blue Heaven
SC-55 Yella Bout It
SC-85 Orkid
SC-96 Aqu-ward
Marble Tree
SC-1 Pink-A-Boo
SC-16 Cotton Tail
SC-70 Pink-A-Dot
Decorating Accessories
RB-144 #4 Soft Fan
RB-106 #6 Script Liner
Miscellaneous Accessories
Sponge
Water
3 Dixie Cup (for marble tree)
¼” circle punch
X-ACTO knife
Xiem small wire tool (pointed tip)
Pinch light
Large Globe Lights (multicolor) or Swirl lights (pink and clear)
Use a moistened Synthetic Sponge to wipe down the piece and check the inside for any debris.
Thin FN-004 Red in a Plastic Cup to the consistency of heavy cream. Pour the thinned glaze into the vase. While working quickly, rotate the piece to cover the inside of the piece. Pour out the excess glaze. Use CB-604 Soft Fan to brush any runs or missed areas. Invert the piece to drain and dry. Wipe off any glaze drips from the outside of the ware with a moistened Synthetic Sponge.
Apply 2 coats of FN-001 White to the outside of the vase using CB-604 Soft Fan. Let dry.
Cut the pattern to fit the vase using the Scissors. Using AC-230 Clay Carbon and the pencil to transfer the pattern onto the ware. Make sure the pattern is continuous and evenly spaced around the ware.
Using CB-110 Liner and CB-404 Pointed Round loaded with SC-15 Tuxedo to paint in the design. Thin the color slightly to more easily paint in the finer lines on the pattern.
Use CB-110 Liner loaded with SC-73 Candy Apple Red to paint in the hearts along the top portion of the pattern.
Shake and stir CG-977 Ink Spot. Apply 1-2 coats to the middle section of the vase using CB-604 Soft Fan. Let dry.
Thin some S-2101 Crystal Clear Brushing to a milk consistency in a Plastic Cup. Apply 1 coat to the entire outside of the vase.
Use a moistened Synthetic Sponge to wipe down the ware to remove any dust.
Optional Step: If the piece will be exposed to the environment. Thin some S-2101 Crystal Clear Brushing in a Plastic Cup to a milk consistency. Pour the thinned glaze into the piece. While working quickly, rotate the piece for full coverage. Pour out excess glaze and allow to drain and dry.
On a tile thin some SC-48 Camel Back with water to a milk consistency. Apply one coat over the entire piece. Let dry. Use a damp Synthetic Sponge to wipe back/antique the piece. Strive for an even color to the antiquing. Make sure the areas around the face are even and crisp. Let dry.
On a tile thin the remaining colors to a milk consistency with water. Apply 1-2 coats of the following colors to the designated areas using a Pointed Round sized for the area and keeping the color even:
SC-20 Cashew Later to face and arms.
SC-25 Cracker Jack to hair. Paint in the eyebrows as well using CB-110 Liner. Paint in the eyes with SC-15 Tuxedo.
SC-52 Toad-ily Green to flower stem.
SC-72 Grape Jelly to the petticoat.
SC-83 Tip Taupe to the wings.
SC-70 Pink-A-Dot to the cheeks. Make the color darker on the cheekbone fading out to nothing over the flesh area. Paint the flower petals on the head with 2-3 coats for color saturation.
Do not stir or shake the glaze. Use CB-602, CB-604 Soft Fans or CB-404 Pointed Round to apply 2-3 coats of CG-998 Pink Pixie to the entire dress excluding the petticoat. There should be few crystals in the glaze mix as you apply the color. For the third coat, shake and stir the crystals into the glaze. Apply 1 coat of crystals from the bottom edge of the skirt upwards trailing the crystals to nothing about halfway up the dress.
Apply 1 coat of S-2101 Crystal Clear Brushing over the other areas of the piece excluding the dress area with the crystal glaze.
Pour CD031 Vintage Tub mold ¼” thick. Refer to casting instructions.
Once it is firm enough to handle, use the sponge to smooth down casting lines.
Fire to cone 04.
Using the Soft Fan with SC-60 Silver Lining, apply 2 coats to the entire tub. Allow glaze to dry between coats.
Apply a 3rd coat of SC-60 Silver Lining in sections. While the glaze is still wet, shade the exterior sides of the tub with SC-35 Gray Hare (above and below ridges around tub) and SC-16 Cotton Tail (on top of ridges and on corners of tub).
On the DSS-0103 Flourishes screen, locate the 2 small flourishes. On the DSS-0153 Farmhouse Screen, locate the “farm to table” screen. On the DSS-0162 Holiday Icons screen, locate the snowflake. Draw an outline around them in permanent marker. Cut them out with excess screen around the edges.
Squeeze around 2 TBS of SC-15 onto the palette. Add a pinch of AC-310 Silkscreen Medium. Mix with a palette knife until it becomes the consistency of peanut butter. You may need to add more silkscreen medium or glaze.
Place each screen, one at a time, onto the tub. While holding the screen firmly in place, take a small amount of premixed silkscreen medium, and gently rub in circles starting in the center and working outward. Do the “farm to table” with flourishes for a rustic tub. Do the snowflakes for a winter themed tub.
Using the Detail Liner with SC-11 Blue Yonder, apply 1 coat to the inner portion of the snowflakes. Shade with SC-76 Cara-Bein Blue to the outer portion of the snowflakes.
Begin with properly fired shelf cone 04 bisque. Moisten a clean sponge and wipe bisque to remove any dust.
Using a CB-604 #4 Soft Fan, apply 3 coats of SC-20 Cashew Later to the face and neck area. Remember to do the back of the neck. Allow to dry!
Using a Pencil and AC-230 Clay Carbon Paper, transfer the elf face pattern onto the tree.
Using the MC-002 Low Tack Masking Tape, tape off the top of the hair line under the hat.
Using a CB-106#6 Script Liner, stroke in hair and eyebrows with SC-41 Brown Cow. Apply a second coat with the brush loaded with the SC-41 Brown Cow then side load with SC-14 Java Bean on one side of the brush and a little of SC-15 Tuxedo on the other side to create the hair. Remove the masking tape before the color dries to prevent chipping.
Using a CB-406#6 Pointed Round, shade the ears and around the nose.
Using a Silk Sponge, shade the cheeks with SC-2 Melon-Choly.
Using a CB-110#10/0 Liner, outline the ears and nose with SC-14 Java Bean.
Using a CB-202 #2 Detail Liner, Apply SC-15 Tuxedo to the eyes and mouth.
Using a CB-604 #4 Soft Fan and a CB-106 #6 Script Liner apply 3 coats of SC-27 Sour Apple to the top parts of the hat and top part of the shirt.
Using a CB-604 #4 Soft Fan and a CB-106 #6 Script Liner apply 3 coats of SC-74 Hot Tamale to the under parts of the hat, triangles on the hat and the shirt.
Using a XST03 Stylus Tool, apply dots of SC-26 Green Thumb to the edges of the SC-27 Sour Apple on the shirt and hat, also on the triangles on the hat. Using the XST02 Stylus Tool add Dots of SC-16 Cotton tail to the top of the triangles and the highlight in the eyes.
Using a CB-406#6Pointed Round and a CB-604 #4 Soft Fan, apply 2 – 3 coats of SG-302 Snowfall to the rim of the hat and the collar of the shirt. Allow to dry!
Optional: You can apply 1 coat of S-2101 Crystal Clear Brushing Glaze to the piece but not on the SG-302 Snowfall. Allow to dry.
Stilt and fire to cone 06.
Form
MB-1462 Jolly Christmas Tree or CD-1462 Jolly Christmas Tree
Cast the mold in usual manner. Allow to dry! Clean the greenware with a Clean-Up Tool. Bisque fire to cone 04.
Begin with properly fired shelf cone 04 bisque. Moisten a clean sponge and wipe bisque to remove any dust.
Using a CB-604 #4 Soft Fan, apply 2 coats of S-2101 Crystal Clear Brushing to the inside of the Vintage Tub. Allow to dry.
Bisque Fire to cone 06.
Basecoat the outside of the Vintage Tub with 1-2 coats of SS-415 Buttermilk. Allow to dry!
Place some SS-194 Medium Taupe onto your pallet, thin with some water. Apply some of the thinned SS-194 Medium Taupe to a small area of the piece at a time. Wipe back with a soft cloth to antique the piece. Allow to dry!
Place some SS-138 Flat Black on a palette. Sprinkle some AC-310 Silkscreen Medium on top of the SS-138 Flat Black. Mix well with a Palette Knife to the consistency of peanut butter.
Place the Merry Christmas on the center of the Vintage Tub. Using your finger tip, apply some of the SS-138 Flat black mix rubbing from the center out. Remove the silkscreen and place immediately into a bowl of water to prevent the mix drying on the silkscreen.
Using your choice of Holly Silkscreens, apply the same way as the step above. NOTE: you can use the silkscreen on all four corners before washing the silkscreen. Allow to dry!
Using a CB-110#100 Liner, color the Holly Leaves with thinned SS-19 Country Sage. Add dots of SS-176 Christmas Red to the berries then highlight with SS-210 Orange.
Allow to dry!
Apply 1-2 coats of AC-502 Matte Sealer to the piece.
Cast the mold in usual manner. Allow to dry! Clean the greenware with a Clean-Up Tool. Bisque fire to cone 04.
Begin with properly fired shelf cone 04 bisque. Moisten a clean sponge and wipe bisque to remove any dust.
Using a CB-604 #4 Soft Fan, apply 2 coats of S-2101 Crystal Clear Brushing to the inside of the Vintage Tub. Allow to dry.
Bisque Fire to cone 06.
Basecoat the outside of the Vintage Tub with 1-2 coats of SS-415 Buttermilk. Allow to dry!
Place some SS-194 Medium Taupe onto your pallet, thin with some water. Apply some of the thinned SS-194 Medium Taupe to a small area of the piece at a time. Wipe back with a soft cloth to antique the piece. Allow to dry!
Using Saral Transfer Paper or Graphite Paper under the pattern. Transfer the pattern onto the piece.
Using various size Round brushes, basecoat and shade the pansy pattern as follows: back pansy petals – SS-28 Hushed Violet – shade with SS-368 Dusty Violet; front pansy petals – SS-111 Brightest Yellow – shade with SS-3 Honey Toast – highlight with SS210 Orange; leaves – SS-376 Limeburst – shade with SS-57 Accent Green;
Using the end of a brush handle, add a dot of SS-111 Brightest Yellow to the center of the pansy.
Mix some SS-57 Accent Green with a drop of SS-138 Flat Black; float around the design.
Using a CB-110 #10/0 Liner, outline and detail the design with SS-138 Flat Black.
Allow to dry!
Apply 1-2 coats of AC-502 Matte Sealer to the piece.
Draw desired plaque shape with your pencil tip on the clay, mistakes can be smoothed over with a rib and re-drawn
Cut desired plaque shape using fettling knife
Smooth out cut edges with damp sponge
Add texture to your plaque with a texture roller by rolling in desired area
Add two holes at the top pf your plaque for your hanging string
Push the back of your pencil into the clay to create holes at least ½” in from the top edge of the plaque and at least 4 inches apart
Clean up holes with damp sponge of finger
Allow plaque to dry slowly, lightly covered with plastic to keep piece from warping
Drying plaque between two ware boards can also help keep your piece flat
You can uncover plaque when it is no longer leather hard and allow it to continue to dry until bone dry
Bisque fire clay to Cone 04
Glazing:
Begin with properly fired cone 04 bisque. Moisten a sponge and wipe bisque to remove any dust
Use the pencil to draw different types of lines, dividing the piece into at least 4 sections
Using a liner brush or Soft Fan (depends on if your sections are large or small) 2 coats of glaze to each section, alternating all colors except SC-15 Tuxedo. Allow glaze to dry between coats
Once glaze is dry, take an item you found and brush it with SC-15 Tuxedo using the Script Liner or Soft Fan (depending on the size of the item). Gently press it onto a section of your piece and repeat
Samp each found item into desired sections of the piece
Once design is complete, allow glaze to dry fully and fire piece to Cone 06
Form
Low fire white clay (EM 100) or Bisque Plate (MB-1116 Casualware Dinner Plate)
Roll a slab that is at least 18” long and about 1/8” thick
Compress slab with rib
Inflate a balloon to about 4” in diameter
Using a straight edge and your fettling knife, cut a strip of clay that is about 6” wide
Place balloon down on clay strip and wrap clay around balloon while rolling until the clay makes it all the way around
Mark where clay overlaps and cut off access
Smoosh ends of clay together so the balloon is fully surrounded by a clay cylinder (It is best if the clay angles in a bit at the top leaving the bottom wider)
Smooth seam with rib
Place your clay form on an un-used piece of your slab to create the bottom of the shell
Smoosh clay down onto the slab using your finger to smooth clay from the form to down to the base
Use fettling knife to cut base to size creating the angular shape of the shell, first buy cutting a square and then cutting an additional plane at each corner to create an octagon
Smooth edges with a damp sponge and create a wavy edge
Using bottle cap, layout shell pattern by gently twisting to mark each section of the shell being sure to have an even number of circles around the shell. Shell should measure 2 bottle caps high
Using a fettling knife, cut scalloped edge at the top of the shell, tracing the marks made by the bottle caps
Smooth out edges with damp sponge and curve from even more over the balloon
Start defining the light circular marks into more hexagonal shapes by carving into the clay with a dull pencil
Allow diamond shapes to be created in between hexagons
Once pattern is carved clean up surface with a damp sponge, fingers or a rib
To create legs, roll a coil that is about ½” thick and cut into 4 equal pieces
Tap each piece down to table to create additional thickness and bend in legs
Once all legs are at the same height, slip and score to attach them to the bottom of the shell, attaching gently at first to ensure the placing is correct
Roll an additional coil into a teardrop shape for the turtle’s head. Attach the thin end to the bottom of the shell by slipping and scoring and bend head upward
Roll two small balls to attach for eyes, once attached push pencil tip into the center of each ball to create a pupil
Create tail by attaching a small triangle of clay that peaks of from under the turtle’s shell in the back
Smooth out all edges and connections with a damp sponge
Let dry slowly under plastic
Before clay becomes leather hard, pop the balloon and smooth the inside with a damp sponge
Let dry completely
Bisque fire to Cone 04
Glaze
Wipe bisque with a damp sponge to remove any dust
Using a small round brush, apply one thick coat of Irish Luck (SC-36) to the lines in the turtle’s shell
When glaze is almost dry, begin to wipe away with a damp sponge leaving the glaze only in the carved lines
With a small round brush, apply 3 coats of Irish Luck (SC-36) to the top and bottom rims of the shell as well as the center diamond shapes, allowing each coat to dry completely
Apply 3 coats of Tuxedo (SC-15) to the bottom and the inside of the shell, allowing each coat to dry completely
Apply 3 coats of Just Froggy (SC-8) to the turtle’s legs, head, neck and tail avoiding the eyes, allow each coat to dry completely
With a small round brush apply 3 coats of Jazz Notes (CG-999) to every other hexagon in the shell, allowing each coat to dry completely
a. Be sure to shake your jar well before use to get the crystals that have settled to the bottom of the jar
Apply 3 coats of Gogh Iris (CG-1001) to the unglazed hexagons in the shell, allowing each coat to dry completely
Create the white of the turtle’s eyes applying 2 coats of Jazz Notes (CG-999) onto the eye balls avoiding the crystals
Using a small detail liner, apply Tuxedo (SC-15) to the pupils of the eyes
Allow to dry completely
Fire to Cone 06
Variations/Adaptations/Tips&Tricks
For the shell size, you may need to play around with bottle cap size and spacing.
use a rib to smooth over unintentional marks
Be sure to shake your jar well before use to get the crystals that have settled to the bottom of the jar
If you get crystals on the eyes, use the back of the brush or your finger to knock them off and apply more of the white base glaze
Wipe Bisque tile clean with a damp sponge removing any dust
In a small cup mix 1 teaspoon of Tuxedo (SC-15), 1 teaspoon of Green Thumb (SC-26) and 2 drops of liquid soap into 2 teaspoons of water. Mix thoroughly
Tilt cup slightly and use a straw to blow gently into the mixture until bubbles overflow
Use the straw to pull the bubbles from the cup onto the tile and let them pop on their own. Do not touch the bubbles or let them slide around once on the tile for best results
Allow bubble background to dry completely
Cut out shapes for desired pattern
Once background is dry, use a pencil to trace shapes onto the tile fallowing the corresponding turtle pattern
Mix your colors on your pallet:
Mix Dark green using 1 teaspoon of Tuxedo (SC-15) and 1 teaspoon of Green Thumb (SC-26)
Mix light green using 1 teaspoon of Cotton Tail (SC-16) and 1 teaspoon of Green Thumb (SC-26)
Also put out for use, 1 teaspoon of Tuxedo (SC-15), 1 teaspoon of Cotton Tail (SC-16) and 1 teaspoon of Green Thumb (SC-26) adding more to your pallet as needed
Using a soft detail brush, apply one coat of the dark green mixture to all shell lines and let dry
Apply 3 coats of Green Thumb to the inside of the shell shapes, allowing each coat to dry before applying the next
Line the head, fins and tail with one coat of Green Thumb (SC-26) and let dry
Apply 3 coats of light green mixture to the inside of head, fin and tail shapes, letting coats dry in between applying
Apply 2 more coats of dark green mixture to the lines of the shell
Apply 2 more coats of Green Thumb to the lines of the head, fins and tail
Once dry apply 2 dots of Cotton Tail with a brush onto turtle’s head as the eyes
Apply 1 smaller dot of Tuxedo inside each eye create pupil
Apply 2 coats of desired Stroke & Coat color to tile.
It is ok that first coat of glaze does not fully cover the tile. Allow the rough coat to dry (when shine is gone) and then apply your second coat which will fully cover the tile now that the glaze has something to “grab” to.
Allow glaze to dry completely
Sketch out design with a pencil on the dry surface
Scratch away at the layer of glaze to create sgraffito design, revealing the white tile underneath
Once finished fire tile to Cone 06
Watercolor & Ink
Wipe away any dust with damp sponge and dry tile
Using primary color pallet (SC-6 Sunkissed, SC-73 Candy Apple Red and SC-76 Cara-Bien Blue) begin watercolor sketch by painting desired design
Using a small round brush apply only one coat of color to achieve a watercolor look
Mix desired secondary colors using the 3 primaries
Any mistakes can be wiped away with a sponge
Allow glaze to dry once sketch is complete
Add “ink lines” using a detail liner brush and SC-15 Tuxedo
Line variation in encouraged to create a loose and flowing look
Once finished allow glaze to dry and fire tile to Cone 06
Thumbprint
Wipe away any dust with damp sponge and dry tile
To create flower, use thumb to stamp SC-73 Candy Apple Red onto tile to create petal. Stamp 5 prints in a circle to create a flower
Stamp SC-6 Sunkissed in the center of flowers with your fingertip
Using a detail liner brush and SC-15 Tuxedo, add optional line details around flowers
Once finished allow glaze to dry and fire tile to Cone 06
Fall Pointallism
Wipe away any dust with damp sponge and dry tile
Using primary color pallet (SC-6 Sunkissed, SC-73 Candy Apple Red and SC-76 Cara-Bien Blue) build leaf image by stamping small dots of color with your fingertip
Mix desired secondary colors using the 3 primaries
Any mistakes can be wiped away with a sponge
Once dry, option to line leaf using a detail liner brush and SC-15 Tuxedo for more definition
Once finished allow glaze to dry and fire tile to Cone 06
Cut out shapes from pattern and trace onto cardboard or cardstock to use as stencils for cutting clay
If creating your own shapes, use cardboard or cardstock and masking tape to build your prototype by cutting a verity of shapes and building with them to create your own vase
Roll out a slab that is about 1/8 inch thick and compress with a rib
Using a fettling knife, trace and cut out shapes
If using pattern cut out a of shape A, 4 of shape B and 1 of Shape C
Smooth out cut edged with a damp sponge
When ready to build, start at the base layer. Cut a beveled edge on the long sides of each of the 4 shapes in the bottom rom (shape B)
To create a beveled edge, bring your clay slab to the end of the table and use the table to hold your fettling knife or bevel cutter sturdy at a 45-degree angle to cut. You can also use a bevel cutter
Attach the beveled angles together by slipping and scoring
Roll a thin coil to attach inside each corner as extra support at the seam
Cut beveled edges onto the 3 longer sides of the next layer of shapes (Shape A) leaving the shortest end unbeveled
Slip and score beveled edges together
Attach rim by wrapping Shape C around the top of the vase creating a small cylinder
Smoosh ends together and smooth out seam
Slip and score points of contact to attach to the top
Smoosh together and smooth out seam on inside and outside. Option to alter the shape of the rim to angle in or out
To create bottom, place vase onto of an unused slab and cut piece to fit
Slip and score edges together and smooth extra clay over the seam
With a damp sponge clean up surfaces
Create texture by gently pushing the eraser side of a pencil into the clay to make the large marks and the tip of the pencil to make the small marks
Smooth out any unwanted marks with sponge
Allow vase to dry slowly, draped with plastic
When dried completely bisque fire to Cone 04
Glazing
Wipe vase with a damp sponge to remove any dust
Create a thinned mix of Fern (EL-150) by mixing 2-parts glaze and 1-part water into a separate container to create a mixture that is the consistency of heavy cream.
Pour mixture into vase and turn to coat inside. Place your hand over the opening to keep glaze from spilling out while coating
When you feel that you have fully coated the inside pour extra glaze back into your mixing container. This can be saved to use for pouring insides of other projects by covering with an airtight lid
Establish your half way mark by drawing a line around the outside of your vase where the two glazes will meet
With a soft fan brush apply 3 coats of Fern (EL-150) to the top half of the vase, stopping at the center line
Allow each coat to dry before applying the next
With a soft fan brush apply 3 coats of Deep Water (EL-151) to the bottom half of the vase, from the center line down
Allow each coat to dry before applying the next
When dry, apply one coat of Clear Cascade (PC-601) stating one-inch above the midline and extending about ½ -inch down from the centerline with a soft fan brush. Let dry
Apply a second coat to the top 2/3 of where the Clear Cascade was applied. Allow to dry completely
Begin with properly fired cone 04 bisque. Moisten a sponge and wipe bisque to remove any dust.
Using the Script Liner with SC-1 Pink-A-Boo, make random, large sized shapes on the vase (around 5-9). Try to space them out evenly. Once they are dry, apply a 2nd coat of glaze.
Using the Script Liner with SC-96 Aqu-ward, make random, large sized shapes on the vase (around 5-9). can overlap 1 or 2 with the shapes from Step #2. Once they are dry, apply a 2nd coat.
Using the Script Liner with SC-77 Glo-Worm, make random, medium sized shapes on the vase (around 9-13). You can overlap a few with the shapes from Steps #2 & #3. Once they are dry, apply a 2nd coat.
Using the Script Liner with SC-65 Peri-Twinkle, make random, medium sized shapes on the vase (around 9-13). You can overlap a few with the shapes from Steps #2, #3 & #4. Once they are dry, apply a 2nd coat.
Using the Script Liner with SC-88 Tu Tu Tango, make random, small sized shapes on the vase (around 13-19). Try to make them overlap areas that already have some overlapping shapes. Once they are dry, apply a 2nd coat.
Using the Script Liner with SC-10 Teal Next Time, make random, tiny shapes in clusters around areas that have overlapping. Once they are dry, apply a 2nd coat.
Dip in NT-CLR Clear Dipping glaze.
Fire to cone 06
Form
MB-1466 Faceted Vase
Colors
NT-CLR Clear Dipping Glaze (at studio, not in kit)
Begin with properly fired cone 04 bisque. Moisten a sponge and wipe bisque to remove any dust.
Place the tissue paper over the pattern. Trace with the pencil.
Place the vase on its side. Place the center of the pattern on the center facet of the vase. Start tracing the pattern with the permanent marker. Rotate the vase until the entire pattern has been traced.
Using the Script Liner, work your way from the bottom of the rainbow to the top. Allow glaze to dry between coats.
Apply 3 coats of SC-80 Basketball to the bottom stripe.
Apply 3 coats of SC-55 Yella Bout It to the next stripe.
Apply 3 coats of SC-1 Pink-A-Boo to the next stripe.
Apply 3 coats of SC-5 Tiger Tail to the next stripe.
Apply 3 coats of SC-1 Pink-A-Boo to the next stripe.
Apply 3 coats of SC-48 Camel Back to the next stripe.
Using the Script Liner, work your way from the center of the sun to the outer stripe. Allow glaze to dry between coats.
Apply 3 coats of SC-5 Tiger Tail to the center.
Apply 3 coats of SC-48 Camel Back to the first stripe.
Apply 3 coats of SC-1 Pink-A-Boo to the outer stripe.
Using the Detail Liner with SC-15 Tuxedo, apply 1 coat to the lettering.
Dip in NT-CLR Clear Dipping glaze
Fire to cone 06.
Form
MB-1466 Faceted Vase
Colors
NT-CLR Clear Dipping Glaze (at studio, not in kit)
Begin with properly fired cone 04 bisque. Moisten a sponge and wipe bisque to remove any dust.
On the DSS-0162 Holiday Icons screen, locate the holly with 3 leaves. Draw an outline around it in permanent marker. Cut it out with excess screen around the edges.
Squeeze around 2 TBS of SC-15 onto the palette. Add a pinch of AC-310 Silkscreen Medium. Mix with a palette knife until it becomes the consistency of peanut butter. You may need to add more silkscreen medium or glaze.
Place the holy on the top center of the plate, going slightly off of the plate. While holding the screen firmly in place, take a small amount of premixed silkscreen medium, and gently rub in circles starting in the center and working outward.
Repeat, going down the center of the plate. Rotate the screen so they are not all gong in the same direction. Repeat, going down either side of the center.
Squeeze 1 TSP of SC-8 Just Froggy, SC-27 Sour Apple and SC-73 Candy Apple Red onto the palette.
Using the Script Liner with SC-73 Candy Apple Red, place a dot in each berry. Then dip the brush in water to spread the glaze, filling up the entire berry.
Using the Script Liner with SC-8 Just Froggy and SC-27 Sour Apple, apply the glaze to a small portion of the leaves. Then dip the brush in water to spread the glaze, filling up the leaves. Alternate between colors without cleaning your brush.
Allow glaze to dry completely.
Using MC-001 6mm Low Track Masking Tape and MC-002 12mm Low Track Masking Tape, make vertical lines on the plate. Use the 2 sizes randomly and space them randomly. You don’t want it to look uniform or perfect.
Squeeze 1 TBS of SC-73 Candy Apple Red and SC-81 Cinnamon Stix onto the palette. Apply 1 coat to the areas between the tape. Do not glaze right next to the holly, leave a small gap. Randomly use each color. Do not clean your brush.
Remove tape before glaze is completely dry.
Using the Soft Fan with SC-15 Tuxedo, apply 2 coats to the back of the plate. Allow glaze to dry between coats.
Begin with properly fired cone 04 bisque. Moisten a sponge and wipe bisque to remove any dust.
On the DSS-0159 Gnomeland screen, locate the large gnome with fluffy beard and the gnome with his hands in his pockets. Draw an outline around them in permanent marker. Cut them out with excess screen around the edges.
On the DSS-0160 Vintage Holiday screen, locate the large tree. Draw an outline around it in permanent marker. Cut it out with excess screen around the edges.
Squeeze around 2 TBS of SC-15 onto the palette. Add a pinch of AC-310 Silkscreen Medium. Mix with a palette knife until it becomes the consistency of peanut butter. You may need to add more silkscreen medium or glaze.
Place the large gnome on the left side of the plate, going slightly off of the plate. While holding the screen firmly in place, take a small amount of premixed silkscreen medium, and gently rub in circles starting in the center and working outward.
Repeat, with the other gnome and tree going towards the right side of the plate.
Using the Script Liner with SC-6 Sunkissed, SC-8 Just Froggy, SC-27 Sour Apple, SC-73 Candy Apple Red and SC-81 Cinnamon Stix, apply 2 coats to the corresponding sections of the screens. Allow glaze to dry between coats.
Using the Detail Liner with SC-8 Just Froggy and SC-73 Candy Apple Red, glaze stripes on the larger gnome’s hat.
Using the Detail Liner with SC-81 Cinnamon Stix, glaze dots on the smaller gnome’s hat.
Position “the Gnomes” portion of the pattern at the top of the plate. Slide AC-230 Clay Carbon Paper under the pattern and trace with a pencil. Repeat at the bottom of the plate with the pattern for “made me do it”.
Using the Detail Liner with SC-15 Tuxedo, glaze the lettering.
Dip into NT-CLR Clear Dipping.
Fire to cone 06.
Form
MB-102 Coupe Dinner Plate
Colors
NT-CLR Clear Dipping
SC-6 Sunkissed (1/2 oz)
SC-8 Just Froggy (1/2 oz)
SC-15 Tuxedo (2 oz)
SC-27 Sour Apple (1/2 oz)
SC-73 Candy Apple Red (1 oz)
SC-81 Cinnamon Stix (1 oz)
Decorating Accessories
AC-230 Clay Carbon Paper
AC-310 Silkscreen Medium
DSS-0159 Gnomeland (lg. gnome with fluffy beard, gnome with hands in pockets)
Using a damp sponge, wipe bisque to remove any dust.
Using a soft fan, apply 2 coats of FN-001 White to the inside and outside of the mug.
Allow to dry completely.
Use the AC-230 Clay Carbon Transfer Paper to transfer the image to the mug using a pen. The transfer paper is one-sided so be sure to check that you are using the correct side of the paper before transferring!
Using a liner brush, apply 2 coats of SC-26 Green Thumb and SC-14 Java bean to the trees. Apply 1-2 coats of SC-16 Cotton Tail and SC-27 Sour Apple to add highlights and snow.
Using a liner brush, apply a wash of SC-11 Blue Yonder to shade the snow people and the ground. Also, apply a wash of SC-6 Sunkissed to the moon.
Using a combination of a fan and liner brush, fill in around the design with 3 coats of SP-212 Speckled Moody Blue.
Using a liner brush, apply 2 coats of SC-14 Java Bean to the arms and SC-75 Orange-A-Peel to the noses.
Allow to dry completely.
Stilt and fire to cone 06 if cast with earthenware slip from mold.
Using a damp sponge, wipe the bisque to remove any dust.
Use the AC-230 Clay Carbon Transfer Paper to transfer the image to the mug using a pen. The transfer paper is one-sided so be sure to check that you are using the correct side of the paper before transferring!
Using a script liner, fill in the penguin with 3 coats of each glaze (colors marked on pattern).
Using a combination of a fan and liner brush, fill in around the penguin with 3 coats of SP-245 My Blue Heaven.
Using a mini liner, apply some outlining to the face and hat of the penguin.
Using a soft fan, apply 3 coats of FN-006 Blue to the inside, handle, and rim of the mug.
Allow to dry completely.
Stilt and fire to cone 06 if cast with earthenware slip from mold.
Using a damp sponge, wipe the bisque to remove any dust.
Using a palette knife, mix some SC-15 Tuxedo and AC-310 Silkscreen Medium together until they are about the consistency of peanut butter.
Apply the silkscreen to the mug (shiny side down) and use your finger to rub the thickened Tuxedo through the screen. Once the entire image has been transferred, immediately remove the screen and rinse or place in water to clean later.
Using a liner brush, apply a thin wash of SC-76 Cara-bein blue behind and around the snowman to add some weight/shading and to separate from the background.
Using a liner brush, apply 1 coat of SC-14 Java Bean to the skis, SC-75 Orange-A-Peel to the nose, and SC-76 Cara-bein Blue to the mittens, scarf, and hat.
Using a liner or fan, apply 1-2 coats of SC-7 Leapin’ Lizard and SC-8 Just Froggy in alternating stripes around the top flare.
Using a fan brush, apply 3 coats of SP-274 Hot Tamale to the inside and handle.
Apply 2 coats of S-2101 Crystal Clear Brushing to the outside of the mug, avoiding the handle.
Allow to dry completely.
Stilt and fire to cone 06 if cast with earthenware slip from mold.
Pour CD127 Stoneware Teapot, CD133 Stoneware Stein, CD1334+ Tall Pitcher Vase, CD1336 Asian Teapot and CD1371 Dancing Teapot molds ¼” thick. Refer to casting instructions.
Once they are firm enough to handle, use the sponge to smooth down casting lines.
Fire to cone 04.
Pour 2-4 oz (depending on size of piece) of FN-009 Black into the disposable cup and thin with water. Pour into piece and rotate to cover the inside. Place piece upside down for a minute to drain the excess glaze. Turn right side up and use a damp sponge to remove any drips. Repeat for all pieces, except for CD111 Handled Bowl.
Using the Soft Fan with FN-009 Black, apply 2 coats to the outside of the pieces. Allow glaze to dry between coats.Before the glaze is bone dry, use the pencil to trace over the pattern. You should be able to see a slight indent in the glaze.
Using the Detail Liner with AC-302 Wax Resist, outline the patterns. Make an outline between different areas on each piece. Refer to the patterns for a list of lines to make.
Using the Script Liner with an Element glaze, apply 2 coats to each section. Allow glaze to dry between coats. Apply a third coat, but only in the center of the section. This will make the glaze more variegated. Refer to each piece below for colors to use on each section.
Fire to cone 06.
Samples were fired to cone 06 using earthenware slip and mold shapes.
CD127 Stoneware Teapot
EL-125 Sahara Sands = lid
EL-127 Rose Granite = flowers
EL-130 Sea Green = spout, handle, handle on lid
EL-142 Grass = leaves
EL-148 Smoked Lilac = background
CD133 Stoneware Stein
EL-125 Sahara Sands = background
EL-127 Rose Granite = 2 stripes on top and bottom, front and back of handle
EL-142 Grass = leaves
EL-148 Smoked Lilac = flowers, sides of handle
CD1334+ Tall Pitcher Vase
EL-110 Mudslide = flowers
EL-142 Grass = leaves, handle
EL-143 Cactus Flower = background
CD1336 Asian Teapot
EL-103 Sea Spray = side
EL-130 Sea Green = background, top and bottom of spout, underside of handle, sides of lid
EL-142 Grass = leaves
EL-148 Smoked Lilac = flower, outer handle, front and back of spout and lid
Pour CD019 Small Weathered Wood Angel mold ¼” thick. Refer to casting instructions.
Once it is firm enough to handle, use the sponge to smooth down casting lines.
Fire to cone 04.
Squeeze around 1 TBS SG-401 Black onto the palette and thin with water. Use the Soft Fan to brush over the entire angel. After glaze is dry, use a damp sponge to wipe off the glaze, leaving it in the crevices.
Using the Script Liner with EL-150 Fern, apply 2 coats to the eyes and stem of the hat. Allow glaze to dry between coats.
Using the Script liner with EL-127 Rose Granite, apply 2 coats to the petals of the hat and around the collar of her dress. Allow glaze to dry between coats.
Using the Script Liner with EL-125 Sahara Sands, apply 2 coats to her face and arms. Allow glaze to dry between coats.
Using the Script Liner with EL-144 Dark Amethyst, apply 2 coats to her hair. Allow glaze to dry between coats.
Using the Script Liner with EL-110 Mudslide, apply 2 coats to her wings. Allow glaze to dry between coats.
Using the Script Liner and Soft Fan with EL-151 Deep Water, apply 2 coats to her dress. Allow glaze to dry between coats.
Using the Script Liner with EL-150 Fern, apply 2 coats to the bottom portion of her dress. Allow glaze to dry between coats.
Using the Script Liner with CG-962 Blue Azure, apply 2 coats to the top half of her dress. Allow glaze to dry between coats.
Pour CD024+ Garden Cart mold ¼” thick. Refer to casting instructions.
Once it is firm enough to handle, use the sponge to smooth down casting lines.
Fire to cone 04.
Using the Script Line with SC-48 Camel Back, apply 3 coats to the center panels on each side of the cart. Allow glaze to dry between coats.
Squeeze 1 TBS of SC-34 Down to Earth onto the palette. Place the stamp textured-side up on the table. Dip the sponge on a stick into the glaze and dab off any excess. Sponge the stamp. Press the stamp over 1 of the center panels on the cart. Repeat for all 4 panels.
Using the Script Liner with SC-48 Camel Back, apply 3 coats to the spokes of the wheels and the legs on the bottom of the cart. Allow glaze to dry between coats.
Using the Soft Fan and Script Liner with SC-34 Down to Earth, apply 3 coats to the rest of the cart (not the wheels). Allow glaze to dry between coats.
Using the Detail Liner and Script Liner with SC-15 Tuxedo, apply 2 coats to the tires and the areas between the spokes. Allow glaze to dry between coats.
Using the Detail Liner with SC-15 Tuxedo, outline the details on the cart and add nail heads.
Begin with properly fired cone 04 bisque. Moisten a sponge and wipe bisque to remove any dust.
Pour around 1oz SC-73 Candy Apple Red into the disposable cup. Thin with enough water so that it is easily poured. Pour into the vase and rotate until the inside is covered with glaze. Place the vase upside down on paper towels for 1 minute. Turn right-side up and remove any excess glaze with a damp sponge.
On the DSS-0162 Holiday Icons screen, locate the holly with 3 leaves. Draw an outline around it in permanent marker. Cut it out with excess screen around the edges.
Squeeze around 2 TBS of SC-15 onto the palette. Add a pinch of AC-310 Silkscreen Medium. Mix with a palette knife until it becomes the consistency of peanut butter. You may need to add more silkscreen medium or glaze.
Place the screen, shiny side down, above the ribs of the planter. While holding the screen firmly in place, take a small amount of premixed silkscreen medium, and gently rub in circles starting in the center and working outward.
Repeat, going around the planter. Rotate the screen so they are not all gong in the same direction.
Repeat steps 5 &6 for the vase.
Using the Script Liner with SC-73 Candy Apple Red and SC-74 Hot Tamale, apply 1 coat to the berries.
Using the Script Liner with SC-27 Sour Apple and SC-26 Green Thumb, apply 1 coat to the leaves.
Using the Script Liner with SC-87 Ruby Slippers, apply 2 coats to the ribs on the vase. Allow glaze to dry between coats.
Using the Script Liner with SC-36 Irish Luck, apply 2 coats to the ribs on the planter. Allow glaze to dry between coats.
Using the Soft Fan with SC-27 Sour Apple, apply 2 coats to the inside of the planter. Allow glaze to dry between coats.
Using the Soft Fan with SG-704 Peppermint, apply 1 coat over the areas of the planter and vase that are bare bisque. After that coat is dry, apply a 2nd coat over the entire planter and vase.
Begin with properly fired cone 04 bisque. Moisten a sponge and wipe bisque to remove any dust.
Pour around 1 TBS of SG-501 Sculpting medium onto the palette.
Dip the sponge into the sculpting medium and sponge the jacket.
Using the Script Liner with SC-16 Cotton Tail, apply 2 coats to the head and eyes. Allow glaze to dry between coats.
Using the Script Liner with SC-26 Green thumb, apply 2 coats to the irises of the eyes. Allow glaze to dry between coats.
Using the Script Liner with SC-23 Jack O’ Lantern, apply 2 coast to the nose. Allow glaze to dry between coats.
Squeeze 1 TSP of SC-2 Melon-Choly onto the palette. Dip the sponge in the glaze and sponge the cheeks.
Using the Script Liner with SC-73 Candy Apple Red, apply 2 coats to the jacket and band on the hat. Allow glaze to dry between coats.
Using the Script Liner with SC-27 Sour Apple, apply 2 coats to the scarf. Allow glaze to dry between coats.
Using the Script Liner with SC-26 Green Thumb, apply 2 coats to the gloves. Allow glaze to dry between coats.
Using the Detail Liner with SC-26 Green Thumb, apply vertical stripes to the scarf. Use SC-73 Candy Apple Red to apply 2 horizontal stripes to the scarf and 1 vertical stripe between the green stripes.
Using the Script Liner with SC-15 Tuxedo, apply 2 coats to the buttons and hat. Allow glaze to dry between coats.
Using the Detail Liner with SC-15 Tuxedo, outline the details on the snowman.
Using the Soft Fan with SG-704 Speckta-Clear Peppermint, apply 1 coat to the snowman, avoiding the head. Apply a 2nd coat to the areas that were plain bisque (body).
Begin with properly fired cone 04 bisque. Moisten a sponge and wipe bisque to remove any dust.
Using the fan brush, apply 3 coats of each color to the bud vase. Allow to dry between coats.
Be sure to pick up enough crystals with your brush when working with the Jungle Gems. Where you see the crystals lie is where they will bloom when fired.
Begin with properly fired cone 04 bisque. Moisten a sponge and wipe bisque to remove any dust.
Using the Script Liner with SC-16 Cotton tail, apply 2 coats to the entire head. Allow glaze to dry between coats.
Using the Script Liner with SC-96 Aqu-ward, apply 2 coats to the belly. Allow glaze to dry between coats. Apply a 3rd coat and shade along the edges and in the crevices with SC-9 Jaded.
Using the Script Liner with SC-85 Orkid, apply 2 coats to the inside of the wings. Allow glaze to dry between coats. Apply a 3rd coat and shade the upper areas with SC-13 Grapel.
Using the Script Liner with SC-13 Grapel, apply 3 coats to the webbing on the wings. Allow glaze to dry between coats.
Using the Script Liner with SC-6 Sunkissed, apply 2 coats to the teeth and 3 coats to the spines. Allow glaze to dry between coats.
Using the Script Liner with SC-9 Jaded, apply 2 coats to the irises of the eyes. Allow glaze to dry between coats.
Using the Soft Fan and Script Liner with CG-999 Jazz Notes, apply 2 coats to the body. Allow glaze to dry between coats. Use the Script Liner to bring some of the crystals up to the face. Avoid the eyes, nostrils and teeth.
Squeeze 1 TSP of SC-2 Melon-Choly onto the palette. Dip the sponge in the glaze and sponge off any excess. Sponge the cheek. It is ok to go over the crystals.
Using the Detail Liner with SC-15 Tuxedo, outline the details.
Begin with properly fired cone 04 bisque. Moisten a sponge and wipe bisque to remove any dust.
Using the Script Liner with SC-20 Cashew Later, apply 3 coats to the face (do not get any on eyes), arms and belly. Allow glaze to dry between coats.
Using the Script Liner with SC-16 Cotton Tail, apply 2 coats to her eyes and the beads on her head. Allow glaze to dry between coats.
Using the Detail Liner with SC-27 Sour Apple, apply 2 coats to the irises of the eyes. Allow glaze to dry between coats.
Squeeze 1 TSP of SC-2 Melon-Choly onto the palette. Dip the sponge in the glaze and blot off any excess. Sponge the cheeks.
Using the Detail Liner with SC-89 Cutie Pie Coral, apply 1 coat to the lips.
Using the Soft Fan and Script liner with SC-6 Sunkissed, apply 1 coat over the areas of hair with texture. After the glaze is dry, wipe off with a damp sponge, leaving it in the crevices.
Using the Soft Fan and Script Liner with SC-55 Yella Bout It, apply 2 coats to the hair. Shade the edges with SC-6 Sunkissed. Allow glaze to dry between coats.
Using the Script Liner with SC-89 Cutie Pie Coral, apply 1 coat to the shell on her head. After the glaze is dry, wipe off with a damp sponge, leaving it in the crevices.
Using the Script Liner with SC-2 Melon-Choly, apply 2 coats to the shell. Allow glaze to dry between coats.
Using the Script Liner with SC-13 Grapel, apply 3 coats to the starfish in her hands. Allow glaze to dry between coats.
Using the Script liner with SC-27 Sour Apple, apply 1 coat to the tip of her tail. Dip the same brush into SC-11 Blue Yonder and shade up to the base of her tail. Repeat for a total of 3 coats.
Using the Script Liner with SC-11 Blue Yonder, apply 3 coats to her top and the band on her tail. Allow glaze to dry between coats.
Using the Soft Fan and Script Liner with CG-1001 Gogh Iris, apply 2 coats to her tail. Allow glaze to dry between coats.
Using the Detail Liner with SC-15 Tuxedo, outline the details.
Begin with properly fired cone 04 bisque. Moisten a sponge and wipe bisque to remove any dust.
Using the Script Liner with SC-15 Cotton Tail, apply 3 coats to the horn and upper sections of the mane and tail. Allow glaze to dry between coats.
Using the Script Liner with SC-85 Orkid, apply 3 coats to the middle sections of the mane and tail. Allow glaze to dry between coats.
Using the Script Liner with SC-13 Grapel, apply 3 coats to the lower sections of the mane and tail. Allow glaze to dry between coats.
Using the Script Liner and Soft Fan with SC-1 Pink-A-Boo, apply 1 coat to the body and legs. Apply 2 coats to the face and ears. Allow glaze to dry between coats.
Using the Script Liner with SC-1 Pink-A-Boo, apply 1 coat to the face and ears and shade the eyelid, nostrils and inner ears with SC-16 Cotton Tail.
Using the Script Liner with SC-11 Blue Yonder, apply 3 coats to the feet. Allow glaze to dry between coats.
Using the Script Liner and Soft Fan with CG-998 Pixie Pink, apply 2 coats to the body and around the face. Avoid the eyes and nose. Allow glaze to dry between coats.
Using the Detail Liner with SC-15 Tuxedo, outline the details.
Begin with properly fired cone 04 bisque. Moisten a sponge and wipe bisque to remove any dust.
Using the Script Liner with SC-16 Cotton tail, apply 2 coats to the eyes and 3 coats to the teeth. Allow glaze to dry between coats.
Using the Script Liner with SC-11 Blue Yonder, apply 2 coats to the irises of the eye and 3 coats to the toenails. Allow glaze to dry between coats.
Using the Detail Liner with SC-89 Cutie Pie Coral, apply 3 coats inside the mouth. Allow glaze to dry between coats.
Using the Script Liner with SC-85 Orkid, apply 2 coats to the belly. Apply a 3rd coat and shade the edges with SC-13 Grapel. Allow glaze to dry between coats.
Using the Script Liner with SC-6 Sunkissed, apply 3 coats to the head, avoiding the eyes and mouth. Allow glaze to dry between coats.
Using the Soft Fan and Script Liner with CG-1000 Mardi Gras, apply 2 coats to the body. Allow glaze to dry between coats. Use the Script Liner to bring some of the crystals onto the face. Avoid the eyes, nostrils and teeth.
Squeeze 1 TSP of SC-89 onto the palette. Dip the sponge in the glaze and blot off any excess. Sponge the cheek. It is ok to go over the crystals.
Using the Detail Liner with SC-15 Tuxedo, outline the details.
Pour CD-028 Stack O’ Lantern mold ¼” thick. Refer to casting instructions.
Once it is firm enough to handle, use the sponge to smooth down the faces and casting lines.
Fire to cone 04.
Using the Soft Fan with FN-001 White, apply 3 coats to the outside of the pumpkins. Allow glaze to dry between coats.
Use the pencil to sketch the pattern. Bottom Pumpkin: Make a line down each vertical section of the pumpkin. Make a second vertical line, dividing each section in half. Make 6 evenly spaced horizontal lines. They do not have to be exact. You should now have a checkered pattern. Middle Pumpkin: Make a line down each vertical section of the pumpkin. Make a second vertical line dividing the front, back and side sections. Top Pumpkin: None.
Using the Script Liner with FN-009 Black, apply 2 coats to every other stripe on the middle pumpkin. Allow glaze to dry between coats.
Using the Flat Shader with FN-009 Black, apply 2 coats to every other square on the bottom pumpkin. Allow glaze to dry between coats.
Fire to cone 06.
Place the Self-Adhesive Reinforcement Labels, ¼” Round on the top pumpkin.
Using the Detail Liner with Gold Overglaze, apply a thin, even coat to the stem on the top pumpkin. Apply 1 coat to the inside of the circles. On the middle pumpkin, outline the stipes. On the bottom pumpkin, outline the squares.
Pour CD030 Gnapping Gnome Topper mold ¼” thick. Refer to casting instructions.
Once it is firm enough to handle, use the sponge to smooth down casting lines.
Fire to cone 04.
Using the Soft Fan with SC-15 Tuxedo, apply 1 coat to the textured areas. Wipe off glaze with a damp sponge, leaving it in the crevices.
Using the Detail Liner with SC-13 Grapel, apply 2 coats to the upper petals on the flowers. Allow glaze to dry between coats.
Using the Detail Liner with SC-85 Orkid, apply 2 coats to the middle and lower petals on the flowers. Shade the middle of the lower petal with SC-16 Cotton Tail. Allow glaze to dry between coats.
Using the Detail Liner with SC-6 Sunkissed, make a dot in the center of the flowers. Apply 2 coats to the mittens. Allow glaze to dry between coats.
Using the Script Liner with SC-11 Blue Yonder, apply 2 coats to the jacket. Allow glaze to dry between coats.
Using the Script Liner with SC-97 Cant-elope, apply 2 coats to the pants. Allow glaze to dry between coats.
Using the Detail Liner with SC-20 Cashew Later, apply 2 coats to the nose. Allow glaze to dry between coats.
Squeeze 1 TSP SC-2 Melon-Choly onto the palette. Dip the sponge in the glaze and dab off any excess onto the palette. Sponge the tip of the nose.
Using the Script Liner with SC-74 Hot Tamale apply 3 coats to the hat. Allow glaze to dry between coats.
Using the Script Liner with SC-27 Sour Apple, apply 2 coats to the ferns and leaves. Allow glaze to dry between coats.
Using the Script Liner with SC-26 Green Thumb, apply 2 coats to the grass. Allow glaze to dry between coats.
Using the Script Liner with SC-15 Tuxedo, apply 2 coats the rim under the topper. Allow glaze to dry between coats. Use the Detail Liner to outline the details on the topper.
Using the Soft Fan with NT-BR, apply 1 coat to the topper, leaving the top of the mushroom heads bare. After the first coat is dry, apply a second coat to the beard and mushroom stems.
Using the Script Liner with CG-998 Pixie Pink, apply 2 coats to the top of the large mushroom head. Allow glaze to dry between coats.
Using the Script Liner with CG-1000 Mardi Gras, apply 2 coats to the tops of the 2 small mushroom heads. Allow glaze to dry between coats.
Cast the mold in usual manner. Allow to dry! Clean the greenware with a Clean-Up Tool. Bisque fire to cone 04.
Begin with properly fired shelf cone 04 bisque. Moisten a clean sponge and wipe bisque to remove any dust.
Basecoat the piece with 1 – 2 coats of SS-130 Medium Gray. Allow to dry!
Place some SS-234 Medium Mocha onto your pallet, thin with some water. Apply some of the thinned SS-234 Medium Mocha to a small area of the piece at a time. Wipe back with a soft cloth to antique the piece. Allow to dry!
Using various size drybrush’s, drybrush the pieces as follows.
Beard – Drybrush 2-3 coats of SS-130 Medium Gray then with 2-3 coats of SS-135 White.
Pants – Drybrush with SS-335 Rich Blue then with SS-29 Dew Drop Blue then highlight with SS-135 White.
Coat – Drybrush with 1-2 coats of SS-211 Orange Rust then drybrush with SS-210 Orange, highlight with SS-111 Brightest Yellow.
Shoes & hat – Drybrush with 1-2 coats of SS-376 Limeburst then with SS-111 Brightest Yellow. Highlight with SS-135 White.
Mittens – Drybrush with SS-3 Honey Toast then highlight with SS-135 White.
Mushroom Stems & under mushroom caps – Drybrush with SS-212 Light Umber, SS194 Medium Taupe then with SS-192 Light Taupe, Highlight with SS-45 Buttermilk. Under the mushroom tops drybrush same as the stems then drybrush SS-212 Light Umber close to the stem.
Mushroom Tops – drybrush 2-3 coats with SS -176 Christmas Red. You will have to give some drying time between coats. Then drybrush using the same brush with SS-210 Orange. Add some dots to the mushroom tops with SS-45 Buttermilk.
Grass – drybrush with SS-276 Forest Green then with SS-19 Country Sage, highlight with some SS-3 Honey toast.
Leaves – drybrush with SS-57 Accent Green then with SS-376 Limeburst.
Flowers – drybrush the back petals with SS-368 Dusty Violet with a small amount of SS-138 Flat Black to darken, then with SS-368 Dusty Violet, highlight with SS-135 White. Front petals are drybrushed with SS-3 Honey Toast then some SS-3 Honey Toast with some SS-135 White to lighten. Float some SS-210 Orange on the center bottom petal. Using a CB-110 #10 Liner, add some veins of SS-138 Flat Black.
Float some SS-24 Chocolate Fudge around the mushrooms and the gnome to darken some of the deep crevices. Float some SS-57 Accent Green around the leaves and the gnome where he is touching the grass.
Allow to dry!
Apply 1-2 coats of AC-502 Matte Sealer to the piece.
Cast the mold in usual manner. If you are wanting to put Pin Lights in the trees, punch out the holes for them while the greenware is leather hard. Allow to dry! Clean the greenware with a Clean-Up Tool. Bisque fire to cone 04.
Begin with properly fired shelf cone 04 bisque. Moisten a clean sponge and wipe bisque to remove any dust.
Basecoat the trees with SS-57 Accent Green. Allow to dry! Drybrush with SS-19 Country Sage then Highlight with SS-376 Limeburst.
All Snow Folks Faces – basecoat with SS-29 Dew Drop Blue. Drybrush with SS-135 White. Noses – basecoat with SS-211 Orange Rust, Drybrush with SS-210 Orange. Eyes and mouths are SS-138 Flat Black.
Mr. Snowman – basecoat the coat and hat band with a mix of SS-179 Antique Red with a touch of SS-138 Black to deepen. Drybrush with SS-176 Christmas Red 2 – 3 coats then with SS-210 Orange, highlight with SS-135 White. Using a CB-110 #10/0 Liner, paint stripes of SS-130 Medium Gray, SS-138 Flat Black and SS-135 White. Scarf- basecoat with SS-276 Forest Green with some SS-3 Honey Toast to make a olive green. Drybrush with mix lightened with SS-135 White, Highlight with SS-135 White. Mitten – Basecoat with SS-234 Medium Mocha, drybrush with SS-3 Honey Toast, highlight with SS-135 White.
Mrs. Snowman – basecoat the coat and hat with SS-317 Turquoise with a touch of black to deepen. Drybrush with SS-317 Turquoise 2-3 coats then highlight with SS-135 White. Scarf and mitten – same as Mr. Snowman’s coat.
Snow Kids – Left – basecoat the scarf with SS-335 Rich Blue with a touch of SS-138 Black to deepen. Drybrush with SS-29 Dew Drop Blue and highlight with SS-135 White. Using a CB-110 #10/0 Liner add small stars to the scarf. Hat and coat – basecoat with SS-29 Dew Drop Blue, drybrush with SS-135 White. Mittens – Basecoat with SS-234 Medium Mocha, drybrush with SS-3 Honey Toast, highlight with SS-135 White.
Middle Snow Kid – Hat, scarf, hat trim and coat see Mr. Snowman’s colors.
Right Snow Kid – scarf – same as Mrs. Snowman’s coat. Using a CB-110 #10/0 Liner, add stripes of SS-176 Christmas Red and SS-135 White. Mittens and earmuffs – basecoat SS-376 Limeburst then highlight with SS-135 White.
All buttons – basecoat with SS-138 Flat Black then highlight with SS-135 in the brush making a gray color.
Allow to dry!
Apply 1-2 coats of AC-502 Matte Sealer to the piece.
Apply AC-523 Non Fired Snow to the tree tips and some on the Snow Folk.
Pour CD029 Snow Folks and Tree Topper mold ¼” thick. Refer to casting instructions.
Once it is firm enough to handle, use the sponge to smooth down casting lines.
Fire to cone 04.
Using the Script Liner with SC-26 Green Thumb, apply 1 coat to the large tree. Apply a second coat and shade with SC-8 Just Froggy. Using the Soft Fan with SC-27 Sour Apple, lightly brush over the ends of the branches.
Using the Script Liner with SC-27 Sour Apple, apply 1 coat to the small tree. Apply a second coat and shade with SC-26 Green Thumb. Using the Soft Fan with SC-93 Honeydew List, lightly brush over the ends of the branches.
Using the Script Liner with SC-16 Cotton Tail, apply 2 coats to the faces. Allow glaze to dry between coats.
Using the Detail Liner with SC-11 Blue Yonder, apply 1 coat to the irises of their eyes.
Using the Detail Liner with SC-23 Jack O’ Lantern, apply 2 coats to the noses. Allow glaze to dry between coats.
Squeeze around 1 TSP of SC-2 Melon-Choly onto the palette. Take the sponge and dip it into the glaze. Blot off excess glaze onto the palette. Sponge the cheeks.
Using the Detail Liner and Script Liner with SC-1 Pink-A-Boo, SC-16 Cotton Tail, SC-33 Fruit of the Vine, SC-55 Yella Bout It, SC-74 Hot Tamale and SC-85 Orkid, apply 2 coats to the corresponding sections on the side with 2 snow folks. Allow glaze to dry between coats.
Using the Detail Liner and Script Liner with SC-11 Blue Yonder, SC-12 Moody Blue, SC-45 My Blue Heaven and SC-76 Cara-Bein Blue apply 2 coats to the corresponding sections of the side with 3 snow folks. Allow glaze to dry between coats.
Using the Detail Liner with SC-15 Tuxedo, outline the details on the snow folks.
Dip into NT-CLR Clear Dipping.
Pour around ½ oz of SG-302 Snowfall into one AC-220 Detailer Tip and 1oz Bottle. Cut the tip off of the bottle. Squeeze the snowfall on the edges of the branches to look like snow.
Wipe down the bisque with a moistened Synthetic Sponge to remove any dust and debris. Check the inside as well.
Apply 2-3 coats of FN-001 White using CB-604 Soft Fan to the entire piece (inside and out.) Let Dry.
Using a tape measure to mark off an even number of spaces to the top rim and lower portion of the bowl of the jar along the stem. Using a pencil to draw in soft “S” shapes that connect the top and bottom markings. The connecting points are 2 spaces off from the top to create the spiral effect of the lines. If the lines aren’t prefect, remember you can adjust the line as you paint. The line is there as a guide and isn’t absolute. This is done to the base and top finial as well.
Using CB-110 Liner loaded with SC-73 Candy Apple Red to apply 2-3 coats to in the lines. Load the brush fully and start at the top of the jar bowl. The lines are thicker at the top and trail off to a fine line towards the bottom at the stem. If the brush runs out of color while painting the line, reload the brush and restart back slightly where the brush stroke ended. Paint in the lines on the base and finial in the same manner. Let dry.
Apply 3 coats of SC-73 Candy Apple Red to the lid excluding the top and middle finial and to the large middle bead on the stem using CB-604 Soft Fan and CB-404 Pointed Round.
Apply 1 good coat of S-2101 Crystal Clear Brushing to over the outside jar and lid using CB-604 Soft Fan.
Stilt and Fire to Shelf Cone 05-06.
Using a brush reserved for Fire Gold Luster only, apply 1 coat of the Gold Luster to the lid’s middle knob, two beads on the stem and to the top rim of the jar bowl. Clean brush with Gold Essence.
Stilt and Fire to Shelf Cone 018.
Form
CD-1445+ Small Finial Jar
Colors
FN-001 White
SC-73 Candy Apple Red
S-2101 Crystal Clear Brushing
Decorating Accessories
CB-110 Liner
CB-404 Pointed Round
CB-604 Soft Fan
Miscellaneous Accessories
Pencil, Tile or Pallet
Ruler or sewing tape measure
Fired Gold Luster
Gold Essence
CB-404 Pointed Round (reserved for fired Gold Luster)
Wipe down the bisque with a moistened Synthetic Sponge to remove any dust or debris from the ware.
Optional Step; If the piece will be outside, apply S-2101 Crystal Clear Brushing to the inside of the frog by thinning the glaze and rolling the inside with color.
Apply 3 coats of FN-007 Green to the feet to about 2” from the toe tips using CB-604 Soft Fan. Use the brush loaded with water to wash away the edge of the green back towards the leg. Toe tips and feet should be solid green fading up the leg to nothing. Apply 3 coats to the bottom of the frog only.
Paint in the eyes with 2-3 coats of SC-24 Dandelion using CB-404 Pointed Round. Shade the iris of the eye with SC-25 Crackerjack using the same brush. Paint in the pupil using CB-220 Detail Liner loaded with SC-15 Tuxedo. Let Dry.
Apply 1 coat of S-2101 Crystal Clear Brushing to the eyes using CB-220 Detail Liner.
Shake and Stir CG-982 Mixed Melon. Apply 3 full coats of glaze with crystals to the frog excluding the eyes and solid green areas of the feet. Trail one coat of crystal glaze over the thin areas of green on the wrist of the frog feet. A heavier application of the crystals on the frog makes a nicer pattern to the glaze after firing. A little over half to about two-thirds of a jar of glaze was used on the frog.
Stilt and Fire to Shelf Cone 05-06.
Form
MB-645 Medium Frog Wall Climber Bisque or CD645 Mold
Clean the greenware seams using a Clean-up Tool. Further sand the seam lines and neck opening with the Green Grit Cloth. Using an old pen, incise the edge of the inset panel to the rim of the vase panel. This will aid in painting after firing. Use a dampened Synthetic Sponge to wipe down the vase to remove any dust. Check the inside for any debris as well.
Fire the piece to Shelf Cone 04.
Wipe down the ware with a moistened Synthetic Sponge. Do not over saturate the ware with water. The pattern transfer and tape adhesion will be impaired with a damp surface.
Using a pencil to trace the pattern onto the ware using a pencil and AC-230 Clay Carbon.
Using various sizes of Tapes (MC-001, MC-002) to complete the pattern of the snowflake. Start with the main six points of the snowflake when masking off the pattern. Use the scissors to cut any various angles needed to complete the pattern. Tape can overlap onto other areas as long as the pattern isn’t compromised. If the pattern has any round circles to it, use the various sizes of the ½” or ¾” Round Stickers to complete the snowflake. Make sure all edges are securely down on the tape and stickers.
Using CB-604 Soft Fan to apply 1 thin coat of S-2101 over the inset panel of the vase over the mask taped areas. Applying the one coat of clear glaze will inhibit crawling of the snowfall during firing. Try not to get any color onto the bottle trim.
Apply 1 coats of SG-302 Snowfall using CB-602 Soft Fan to the inset panel over the clear glaze. Sponge on two additional coats of Snowfall using a Synthetic Sponge.
Shake and Stir CG-2701 Peacock Eyes. Pour out some glaze onto to a tile/pallet and thin with water slightly. Using CB-602 Soft Fan to apply one coat with crystals to the inset panel over the Snowfall. Watch the placement of the crystals to evenly distribute them over the Snowfall. Use the brush to manipulate the crystals off the taped areas as well. Let the color dry for a short time until the glaze on the taped areas has gone matte. Remove the tape and stickers from the pattern before color has completely dried. Chipping off the glaze can occur if the glaze has dried too much. Note the removal of the tape and stickers to make sure all areas have them removed from the pattern. Use a clean-up tool to aid in removing the tape and stickers. Should any areas be lacking of crystals, use CB-404 Pointed Round to place crystals in the deficient areas.
Use a damp sponge to remove any excess glaze that is on the trim and edge of the vase.
Fire to Shelf Cone 05-06.
Thin some FN-19 Dark Blue in a Plastic Cup to the consistency of melted ice cream. Pour the thinned glaze into the vase, while working quickly, rotate the piece to coat the inside of the vase. Pour out the excess color and invert the vase to dry. Wipe off any drips using the moistened Synthetic Sponge.
Using CB-106 Script Liner, CB-404 Pointed Round and CB-604 Soft Fan to apply 3 good coats of FN-19 Dark Blue to the edges and trim of the bottle.
Apply 3 coats of FN-34 Big Sky Blue to Snowflake using CB-106 Script Liner or CB-404 Pointed Round. SC-53 Purple Haze was substituted for the Big Sky Blue on the offset snowflake pattern as an option.
Clean the greenware seams using a Clean-up Tool. Further sand the seam lines and neck opening with the Green Grit Cloth. Using an old pen, incise the edge of the inset panel to the rim of the vase panel. This will aid in painting after firing. Use a dampened Synthetic Sponge to wipe down the vase to remove any dust. Check the inside for any debris as well.
Fire the piece to Shelf Cone 04.
Wipe down the ware with a moistened Synthetic Sponge. Do not over saturate the ware with water. The pattern transfer and tape adhesion will be impaired with a damp surface.
Using a pencil to trace the pattern onto the ware using a pencil and AC-230 Clay Carbon.
Using various sizes of Tapes (MC-001, MC-002 and Blue Masking) to complete the pattern of the snowflake. Start with the main six points of the snowflake when masking off the pattern. Use the scissors to cut any various angles needed to complete the pattern. Tape can overlap onto other areas as long as the pattern isn’t compromised. If the pattern has any round circles to it, use the various sizes of the ½” or ¾” Round Stickers to complete the snowflake. Make sure all edges are securely down on the tape and stickers.
Using CB-604 Soft Fan to apply 1 thin coat of S-2101 over the inset panel of the vase over the mask taped areas. Applying the one coat of clear glaze will inhibit crawling of the snowfall during firing. Try not to get any color onto the bottle trim.
Apply 1 coats of SG-302 Snowfall using CB-602 Soft Fan to the inset panel over the clear glaze. Sponge on two additional coats of Snowfall using a Synthetic Sponge.
Shake and Stir CG-2701 Peacock Eyes. Pour out some glaze onto to a tile/pallet and thin with water slightly. Using CB-602 Soft Fan to apply one coat with crystals to the inset panel over the Snowfall. Watch the placement of the crystals to evenly distribute them over the Snowfall. Use the brush to manipulate the crystals off the taped areas as well. Let the color dry for a short time until the glaze on the taped areas has gone matte. Remove the tape and stickers from the pattern before color has completely dried. Chipping off the glaze can occur if the glaze has dried too much. Note the removal of the tape and stickers to make sure all areas have them removed from the pattern. Use a clean-up tool to aid in removing the tape and stickers. Should any areas be lacking of crystals, use CB-404 Pointed Round to place crystals in the deficient areas.
Use a damp sponge to remove any excess glaze that is on the trim and edge of the vase.
Using the Clean-up Tool to remove the seams on the ware. Sand further the seams with the Green Grit Cloth. Remove any dust from the ware using a moistened Synthetic Sponge.
In a 4 oz. jar, mix 3 parts of 1 ½ TBSP of UG-19 Ultra Blue with 2 parts of 1 TBSP of C-300 Matte Transparent Brushing glaze. This mixture will make a semi-vitreous surface after firing. Shake and stir the color well.
Apply 3 even and smooth coats of the Fundamental Underglaze mixture to the top portion of the tree using CB-604 Soft Fan. Apply 3 coats to the foot of the tree as well. The color can slightly extend over the edge of the tree top onto the base/underside. Let dry.
Transfer the pattern onto the tree top using AC-230 Clay Carbon and a pencil. You can cut the pattern along the noted dotted lines and securing the pattern using Blue Masking tape. Make the pattern continuous while conforming to the shape of the tree.
Apply 3-4 coats of SC-73 to the cardinal excluding the beak and face mask using CB-404 Pointed Round and CB-220 Detail Liner. Detail the face with 2 thinned coats of SC-15 Tuxedo using CB-220 Detail Liner. Paint in the beak with 2 coats of SC-97 Cant-elope. Detail the beak separation line with SC-15 Tuxedo using CB-110 Liner. Paint in the areas marked as shading on the pattern with 1-2 coats of SC-81 Cinnamon Stix using CB-110 Liner.
Fill (about 1/3) the AC-219 Designer Bottle with SC-60 Silver Lining and attach the metal tip. Paint/Fill in the stems and branches of the pattern. Apply an extra coat to the thicker branch areas of the pattern. Let dry.
Apply 1 thin coat of S-2101 Crystal Clear Brushing to the brranch areas in the pattern where you want the snow. Using CB-110 Liner to apply 1-2 coats of SG-302 Snowfall to the clear glazed areas previously painted for the snow accumulations.
Using a Synthetic Sponge to apply 3 coats of SG-302 Snowfall to the lower portion of the tree trunk/stem. Do not apply glaze to the foot of the tree.
Apply 1-2 coats of S-2101 Crystal Clear Brushing to the cardinal using CB-404 Pointed Round.
Using a Spatter Brush or old stiff Toothbrush loaded with SC-16 Cotton Tail to spatter the tree with falling snow effect.
Wipe down the bisque with a moistened Synthetic Sponge to remove any dust and debris. Check the inside of the vase as well.
Using CB-604 Soft Fan to apply 3-4 coats of FN-51 Strawberry to the inside of the vase. Wipe off any color from the outside using a dampened Synthetic Sponge. Any bright color can be used as a contrast to match your décor. (i.e. FN-002 Yellow, FN-018 Bright Blue, FN-37 Chartreuse.)
Apply 3 coats of FN-009 Black to the outside of the vase using CB-604 Soft Fan. Let Dry.
Fill about half of the AC-219 Designer Bottle with SG-202 Cobblestone and replace the metal tip. If you are unsure of your design, practice on a piece of paper to get the feel of the squiggle doodle pattern. You can use the pattern provided as a guide. You can use the pencil to sketch in the pattern prior to painting if needed.
Starting from the top of the vase, apply one coat of the cobblestone to form the pattern using the Designer Bottle. A thicker heavier line will break up more than a thin line. Try to keep the lines even while painting while completing the design.
Begin with a properly fired shelf cone 04 Bisque. Moisten a clean sponge and wipe bisque to remove dust.
Brush the piece with two to three coats of SW-173 Amber Quartz to the inside and out with CB-604 Soft Fan. The heavier the application, the more color variation.
Clean up any glaze that may have gotten on the foot with a sponge.
Begin with a properly fired shelf cone 04 Bisque. Moisten a clean sponge and wipe bisque to remove dust.
Brush the piece with two coats of SW-171 Enchanted Forest inside and out with CB-604 Soft Fan. Be sure to pick up crystals with the brush and redistribute them for even coverage during the second coat. Allow to dry in between coats.
Brush the outside of the piece with two coats of SW-181 Night Moth to the outside of the mug with CB-604 Soft Fan. Be sure to pick up crystals with the brush and redistribute them for even coverage during the second coat. Allow to dry in between coats.Allow to dry in between coats.
Clean up any glaze that may have gotten on the foot with a sponge.
Begin with a properly fired shelf cone 04 Bisque. Moisten a clean sponge and wipe bisque to remove dust.
Brush the piece with two coats of SW-116 Robin’s Egg inside and out with CB-604 Soft Fan. Be sure to pick up crystals with the brush and redistribute them for even coverage during the second coat. Allow to dry in between coats.
Brush the piece with two coats of SW-504 Red Gloss inside and out with CB-604 Soft Fan. Allow to dry in between coats.
Clean up any glaze that may have gotten on the foot with a sponge.
Cast the mold in usual manner. While in the leather state, using the star cookie cutter press out the star shape. Allow to dry. Clean the greenware with a Clean-Up Tool.
Bisque fire the pumpkin and the leaves to cone 04.
Using a Basecoat Brush, basecoat the bottom pumpkin with SS-211 Orange Rust, middle pumpkin with SS-254 Golden Ochre, the top pumpkin with SS-45 Buttermilk stem with SS-24 Chocolate Fudge
Using a soft brush to antique. Apply a thinned coat of SS-234 Medium Mocha to a small area at a time to the top pumpkin wipe back with a soft cloth. Continue till the entire pumpkin has been antiqued.
Dry brush the bottom pumpkin with SS-211 Orange Rust then using the same brush with SS-210 Orange. Highlight with SS-3 Honey Toast.
Dry brush the middle pumpkin with SS-254 Golden Ochre then with SS-3 Honey Toast. Highlight with SS-111 Brightest Yellow.
Dry brush the top pumpkin with SS-45 Buttermilk then highlight with SS-135 White.
Dry Brush the stem with SS-234 Medium Mocha, highlight lightly with SS-45 Buttermilk. Allow to Dry!
Apply 1-2 coats of AC-502 Matte Sealer to the piece.
Begin with properly fired shelf cone 04 bisque. Moisten a clean sponge and wipe bisque to remove any dust.
Using the CB-604 Soft Fan Brush, apply 3 coats of SW-166 Norse Blue to the back side of the SW-119 Stoneware Serving Bowl. Make sure not to glaze the bottom of the pie plate and wipe off any glaze that may have gotten on it.
Using the pencil, divide the front of the bowls into quarters, and then into eighths.
Using the CB-604 Soft Fan Brush, apply 2 coats of SW-101 along the pencil lines. Make the lines about the same width as the brush.
Using the CB-604 Fan Brush, apply two coats of SW-166 Norse Blue on the sections in between the lines.
Using the CB-106 Script Liner, apply two coats of SW-506 Bright Blue Gloss on top of the Stoned Denim lines, leaving about ¼ inch on each side of the lines uncovered.
Using the CB-106 Script Liner, apply two coats of SW-153 Indigo Rain on top of the Norse Blue areas, leaving about ¼ inch on each side of the lines uncovered.
Do not stilt or hang over the edge of the kiln shelf.
Begin with properly fired shelf cone 04 bisque. Moisten a clean sponge and wipe bisque to remove any dust.
Using the CB-604 Soft Fan Brush, apply 2 coats of SW-148 Lime Shower to the backside of the SW-101 Pie Plate and the rim on the front. Also apply 2 coats to both the front and the back of the SB-110 Dessert Bowl. Make sure not to glaze the bottom of the pie plate and wipe off any glaze that may have gotten on it.
Using the CB-604 Soft Fan Brush, apply 2 coats of SW-504 Red Gloss over the Lime Shower on both the back of the pie plate and the front and back of the dessert bowl. Set the dessert bowl aside.
Using the CB-604 Soft Fan Brush, apply 2 coats of SW-501 White Gloss to the inside of the bowl and let dry well.
Use the pencil to draw a squiggly line around the upper edge of the inside of the pie plate. Using the carbon paper and a pencil, transfer the pattern of the light bulb 8 times around the inner edge of the pie plate, using the photo as a reference. Make each one face a different direction.
Fill the AC-222 bottle with SW-508 Black Gloss.
Use the applicator bottle with the Black Gloss to draw the squiggly line and to outline the lights and let dry.
Using the CB-106 Script Liner, apply two coats of SW-504 Red Gloss to two of the bulbs, two coats of SW-507 Bright Green Gloss to two bulbs, two coats of SW-510 Blue Gloss to two bulbs, and two coats of SW-506 Bright Blue Gloss to the last two.
Using the CB-106 Script Liner, apply two coats of SW-206 Charcoal onto the screws of the light bulbs.
Place the dessert bowl onto the center of the pie plate and place in kiln. They will fuse together during firing..
Do not stilt or hang over the edge of the kiln shelf.
Begin with properly fired shelf cone 04 bisque. Moisten a clean sponge and wipe bisque to remove any dust.
Using the CB-604 Soft Fan Brush, apply 2 coats of SW-123 to the back side and front rim of the bowl. Do not glaze the bottom or the foot.
Using the CB-604 Soft Fan Brush, apply 2 coats of SW-506 Bright Blue Gloss over the Sapphire.
Using the CB-604 Soft Fan Brush, apply 2 coats of SW-501 White Gloss to the inside of the bowl and let dry well.
Using the carbon paper and a pencil, transfer the pattern onto the platter. You may have to cut the pattern apart to help it fit inside the bowl.
Fill the AC-222 bottles with SW-508 Black Gloss, SW-503 Orange Gloss, SW-502 Yellow Gloss, and SW-510 Blue Gloss, and SW-506 Bright Blue Gloss and attach writer tips.
Use the applicator bottle with the Black Gloss for the letters, the one with the Blue Gloss for the Menorah, the one with the Yellow Gloss for the candles, and the one with the Orange Gloss for the flames. Use Bright Blue Gloss for the stars and to add dots to the menorah. Use Blue Gloss to make dots around the top edge of the inside of the bowl.
Do not stilt or hang over the edge of the kiln shelf.
Outline the entire design using the Black Designer Liner and the metal tip.
Apply 2 coats of Cotton Tail with the Pointed Round to the snow area.
Side load the Pointed Round in The Blues and shade the snow.
Apply 2 coats of Crackerjack Brown with the Pointed Round to the deer.
Apply 2 coats of Tip Taupe with the Pointed Round to the antlers.
Apply 2 coats of Java Bean with the Pointed Round to the hooves.
Apply 2 coats of Ivory Tower to the spots on the deer.
For the lights, apply 2 coats to each bulb with the listed colors: Dandelion, The Blues and Hot tamale.
For the scarf, apply to the larger areas 2 coats of Teal Next Time, and the smaller stripes Dandelion using the mini liner.
For the eye, apply 2 coats of Cotton Tail to the outer eye area, then 2 Coats of The Blues closest to the pupil using the mini liner.
Squeeze out and thin a small amount of Designer Liner Green, and add the pine needles to the branches using the mini liner.
Using the Script Liner and Soft Fan, apply 3 coats od Dark Green Gloss to the rim and back of the plate, excluding the foot area. Stoneware does not get stilted, so no glaze can be on the footed area or it will fuse onto the kiln shelf.
Apply 1 coat of Sand and Sea to the front of the plate using the soft fan.
Apply 1 coat of Speckta-Clear Peppermint over the Sand and Sea using the soft fan.
Place onto a well kiln washed shelf and fire to shelf cone 5/6.
Begin with properly fired cone 04 bisque. Moisten a sponge and wipe bisque to remove any dust.
Place the pattern underneath the tissue paper and trace with the pencil. Place the tissue paper pattern onto the canvas. Trace with the permanent marker.
Squeeze 1 TSP of SC-6 Sunkissed, SC-11 Blue Yonder, SC-26 Green Thumb, SC-41 Brown Cow and SC-75 Orange-A-Peel onto the palette.
Dip the Script Liner in water. Then dip the tip into SC-26 Green Thumb. With the brush horizontal, apply 1 coat to the small pumpkin and the leaves. Add more water or glaze as necessary to achieve a watercolor look.
Repeat Step #4 with SC-41 Brown Cow on the stems.
Repeat Step #4 with SC-75 Orange-A-Peel and SC-6 Sunkissed on the 2 larger pumpkins.
Repeat Step #4 with SC-11 Blue Yonder and SC-6 Sunkissed on the background.
Choose one of the colors for the edge of the canvas. Using the Script Liner with your selected color, apply 2 coats to the edge of the canvas. Allow glaze to dry between coats.
Using SG-401 Black, outline the pattern that you traced. Then doodle a different repeating pattern in each of the sections. If you would like to use other patterns than the ones pictured, Google “Zen Doodles” for ideas.
This is a read and paint project! ‘Grumpy Monkey” by Suzanne Lang and Max Lang (Illustrator)
Begin with properly fired cone 04 bisque. Moisten a sponge and wipe bisque to remove any dust.
Using the Script Liner with SC-16 Cotton Tail, apply 3 coats to the eyes. Allow glaze to dry between coats.
Using the Script Liner with SC-80 Basketball, apply 3 coats to the muzzle and ears. Allow glaze to dry between coats.
Using the Script Liner with SC-34 Down To Earth, apply 3 coats to the nose. Allow glaze to dry between coats.
Using the Script Liner and Soft Fan with SC-48 Camel Back, apply 3 coats to the rest of the monkey. Allow glaze to dry between coats.
Cut the paper towel into 2 or 3” strips. Squeeze 1 TBS of SC-34 Down to Earth onto the palette. Dip the sponge on a stick into the glaze and sponge the palette a few times to get rid of any excess glaze. Then sponge the textured side of the paper towel strip. Place the strip onto the monkey’s body, glazed side down. Remove the strip. Repeat until the entire body has “texture”.
Using the Soft Fan with SC-34 Down to Earth, apply 3 coats to the inside of the monkey. Allow glaze to dry between coats.
Using the Detail Line with SC-15 Tuxedo, outline the details on the monkey. Add a “frown” over its mouth. Then make “angry” eyebrows slanted down in the center.
Dip into NT-CLR Clear Dipping glaze.
Fire to cone 06.
NOTE: For small kids, just have them do 1 coat of all of the glazes. This will be dipped in clear glaze at the end.
This is a read and paint project! ‘How to Catach A Yeti” by Adam Wallace, Andy Elkerton (Illustrator)
(Adult)
Begin with properly fired cone 04 bisque. Moisten a sponge and wipe bisque to remove any dust.
Using the Script Liner with SC-16 Cotton Tail, apply 3 coats to the eyes, horns, teeth and toenails. Allow glaze to dry between coats.
Using the Script Liner with SC-45 My Blue Heaven, apply 1 coat to the irises and 3 coats to the nose. Using the Script Liner and Soft Fan, apply 3 coats to the background and bottom of the mug. Allow glaze to dry between coats.
Using the Script Liner with SC-11 Blue Yonder, apply 3 coats to the face, feet and hands. Allow glaze to dry between coats.
Using the Script Liner with CG-788 Dutch Enamelware, apply 2 coats to the body of the yeti. Allow glaze to dry between coats.
Using the Detail Liner with SC-15 Tuxedo, outline the details on the yeti.
Squeeze around 1 TBS of SC-76 Cara-Bein Blue onto the palette. Dip the sponges in the glaze and stamp the palette a few times to remove any excess glaze. Then stamp the background of the mug. Repeat until you have enough circles.
Using the Soft Fan with SC-11 Blue Yonder, apply 3 coats to the handle and inside of the mug. Allow glaze to dry between coats.
Fire to cone 06.
DIRECTIONS (Kids)
Begin with properly fired cone 04 bisque. Moisten a sponge and wipe bisque to remove any dust.
Using the Soft Fan with FN-001 White, apply 3 coats to the entire mug. Allow glaze to dry between coats.
Using the Script Liner with SC-45 My Blue Heaven, apply 1 coat to the irises and nose.
Using the Script Liner with SC-11 Blue Yonder, apply 1 coat to the face, feet and hands.
Using the Script Liner with CG-788 Dutch Enamelware, apply 1 coat to the body of the yeti.
Squeeze around 1 TBS of SC-45 My Blue Heaven, SC-11 Blue Yonder and SC-76 Cara-Bein Blue onto the palette. Dip the sponges in the glaze and stamp the palette a few times to remove any excess glaze. Then stamp the background of the mug. Repeat until the background and handle are covered in circles.
Using the Soft Fan with SC-11 Blue Yonder, apply 1 coat to the inside of the mug.
Using the Detail Liner with SC-15 Tuxedo, make dots in the eyes and a line for the mouth. Smaller kids will not be able to outline the details, but they can try if desired.
Begin with properly fired cone 04 stoneware bisque. Moisten a clean sponge and wipe the bisque to remove any dust.
Using a fan brush, apply 2 coats of UG-51 to the base of the vessel.
Using a fan brush, apply 3 coats of SW-166 Norse blue to the top and inside of the vessel (you may want to thin some glaze and roll it on the inside if your vessel has a narrow opening).
Use a pencil to draw a few circles randomly around the bottom. These will be the flowers so if you would prefer a pattern go for it.
Mark the center of the circle and use a script liner to brush toward the center. Load your brush with UG-216 Peach and begin making the petals by touching the brush to the outside of the circle, pull down and apply pressure to the brush about ½ way down the petal and then lift again once you reach the center. Repeat this until all of the circles are flowers.
Using a mini liner, apply 1 coat of either UG-90 Green Mist or UG-91 True Teal to create the stem for the leaves. We applied each branch one at a time to help with spacing.
Using a script liner, apply 1 coat of the corresponding Underglaze to create the leaves. Press the brush at the top of the leaf and pull up as you brush down to create the round leaves. For the pointed leaves, begin lightly and press your brush in the middle and lift again. Repeat each brushstroke until your branch is full of leaves.
Using a script liner, apply 1 coat of UG-217 Red Coral to the centers of the flowers and add any embellishments to fill in the design.
Allow to dry and apply 2 coats of SW-001 Stoneware Clear to the bottom section.
Use a damp sponge to wipe away any glaze that may have gotten on the foot.
Fire to cone 5/6. Samples were fired to cone 6.
Form
Wheel thrown vessel using Laguna WC-438 Red B-mix with Grog
Begin with properly fired cone 04 bisque. Moisten a sponge and wipe bisque to remove any dust.
Squeeze around ¼ cup of SC-10 Teal Next Time into the disposable cup and thin with water. Pour into the vase and rotate until the inside is completely covered. Drain the excess and place upside down on paper towels for 1 minute. Turn right side up and wipe any drips with a damp sponge.
Using the Soft Fan with FN-301 Marshmallow White, apply 3 coats to the outside of the vase. Allow glaze to dry between coats.
Squeeze AC-302 Wax Resist onto the palette. Take the handle of a brush and dip the end in the wax. Press the end of the brush onto one of the hobnails. Move the brush in a circular motion to cover the entire hobnail. Repeat until they are all covered in wax.
Using the Detail Liner with wax, make lines connecting the dots.
Using the Script Liner with SC-9 Jaded, SC-10 Teal Next Time and SC-96 Aqu-ward apply 2 coats to each of the diamonds between the hobnails. Allow glaze to dry between coats.
Fire to cone 06.
Planter:
Begin with properly fired cone 04 bisque. Moisten a sponge and wipe bisque to remove any dust.
Using the Soft Fan with FN-304 Black Velvet, apply 3 coats to the outside of the planter. Allow glaze to dry between coats.
Squeeze AC-302 Wax Resist onto the palette. Take the handle of a brush and dip the end in the wax. Press the end of the brush onto one of the hobnails. Move the brush in a circular motion to cover the entire hobnail. Repeat until they are all covered in wax.
Using the Detail Liner with wax, make lines connecting the dots.
Using the Script Liner with SC-9 Jaded, SC-10 Teal Next Time and SC-96 Aqu-ward apply 2 coats to each of the diamonds between the hobnails. Allow glaze to dry between coats.
Using the Soft Fan with SC-96 Aqu-ward, apply 3 coats to the inside of the planter. Allow glaze to dry between coats.
Fire to cone 06.
Form
MB-1556 Textured Bud Vase
MB-1557 Textured Planter
Colors
FN-301 Marshmallow White = 2 oz (vase)
FN-304 Black Velvet = 2 oz (planter)
SC-9 Jaded = 1 oz (both)
SC-10 Teal Next Time = 2 oz (vase), 1 oz (planter)
Begin with properly fired cone 04 bisque. Moisten a sponge and wipe bisque to remove any dust.
Pour around 1/4 cup EL-130 Sea Green glaze into the cup. Thin with water and pour into the vase. Rotate the vase to cover the inside. Place upside down on a few paper towels for 1 minute. Turn the vase over and wipe off any excess glaze with a damp sponge.
Using the Soft Fan with EL-130 Sea Green, apply 2 coats to the outside of the vase. Allow glaze to dry between coats.
Using the Soft Fan with the CG-999 Jazz Notes, apply 2 coats to the upper 2/3 of the vase. Allow glaze to dry between coats.
Begin with properly fired cone 04 bisque. Moisten a sponge and wipe bisque to remove any dust.
Place AC-230 Clay Carbon Paper over the canvas. Place pattern over the paper and trace with a pencil.
Squeeze 1 TSP AC-302 Wax Resist onto the palette. Using the Script liner, apply the wax resist to the trunks of the trees. Cover the entire trunk, do not just outline.
Take the bubble wrap and grab it with one hand so that the sides are up in your hand and the center is below your hand. You should see enough area to make a good stamp (10 or more bubbles). Make sure the textured side is facing outward.
Dip the bubble wrap into the wax and stamp over the trunks of the trees. Repeat until you achieve your desired look.
Using the Detail Liner with wax, make branches going from the trunks to the leaves. Make sure the wax resist is completely dry before continuing.
Using the Soft Fan with CC-102 White, apply 3 coats over the entire canvas. Try to avoid the waxed areas as much as possible. If it starts sticking to the wax, dip the brush in water and go back and forth over the waxed areas to remove the glaze. It is ok to get some glaze over the wax.
Fire to cone 06.
Using the Soft Fan with SS-138 Flat Black, apply 1 coat over the canvas. Wipe off excess with a paper towel.
Cast the mold in usual manner. While the Garden Sphere casting is in the leather hard stage cut out the bats and stars. Allow to dry.
Clean the greenware with a Clean-Up Tool and a Synthetic Sponge. Bisque fire to cone 04.
Begin with properly fired shelf cone 04 bisque. Moisten a clean sponge and wipe bisque to remove any dust.
Center the Garden Pedestal on the banding wheel.
Using a CB-604 #4 Soft Fan, apply several coats of SC-6 Sunkissed to the lower section of the center of the pedestal while spinning the banding wheel. Next apply SC-75 Orange-A-Peel blending into the SC-6 Sunkissed. Followed by SC-16 cotton tail and blending into the SC-75 Orange-A-Peel. Should look like candy corn. Allow to dry.
Using a CB-604 #4 Soft Fan, apply 3 coats of SC-6 Sunkissed to the inside of the Sphere.
Place a small amount of SC-15 Tuxedo onto a foam plate. Sprinkle a pinch of AC-310 Silkscreen Medium on top of the SC-15 Tuxedo. Mix well with a palette knife to the consistency of peanut butter.
Placing various silkscreen images on the center of the pedestal, using your finger tip apply the SC-15 Tuxedo mix to the screen. When done wash the screens. Do Not let color dry in the screens.
Using a CB-604 #4 Soft Fan, apply 2-3 coats of CG-970 Masquerade to the outside of the sphere and to the top and bottom rims of the pedestal. Allow to dry.
Stilt and fire to cone 06.
Optional: You can place colored gift basket wrap inside the sphere.
Cast the mold in usual manner. While in the leather stage, punch 4 holes around the bottom of the stem for the copper wire later. Allow to dry. Clean the greenware with a Clean-Up Tool.
Roll out some Low Fire Whit Clay. Take the Maple Leaf Press Tool and press out 3 or more leaves. Trim with XActo Knife then give a slight bend to the leaf to make it look real. Add a small piece of clay with a hole in it to the back of the leaf to attach later. Clean the leaves with a damp brush. Allow to dry!
Bisque fire the pumpkin and the leaves to cone 04.Moisten a clean sponge and wipe bisque to remove any dust.
Using a Basecoat Brush, basecoat the pumpkin with 1-2 coats of SS-399 Terra Cotta.
Basecoat the stem and the leaves with SS-138 Flat Black. Allow to dry!
Drybrush the pumpkin except the stem with 1-2 coats of SS-210 Orange. Do not was brush. Highlight the upper half of the pumpkin with SS-111 Brightest Yellow.
Apply 1 coat of MM-106 Steel Metallic to the stem and leaves. When dry apply a 2nd coat of MM-106 Steel Metallic to the stem, while this coat is still wet apply MM-305 Rapid Rust to the stem and leaves. You may want to lay the pumpkin on its side so the MM-305 Rapid Rust does not drip onto the pumpkin. Allow to dry!
Shade the deep crevices of the pumpkin with SS-24 Chocolate Fudge. Allow to dry!
Apply 1-2 coats of AC-502 Matte Sealer to the piece.
DO NOT FIRE.
Attach the leaves with the Copper Wire stringing it through the holes in the pumpkin and the back of the leaf. Add some wire curly cues.
Cast the mold in usual manner. While in the leather stage, punch 4 holes around the bottom of the stem for the copper wire later. Allow to dry. Clean the greenware with a Clean-Up Tool.
Roll out some Low Fire Whit Clay. Take the Maple Leaf Press Tool and press out 3 or more leaves. Trim with XActo Knife then give a slight bend to the leaf to make it look real. Add a small piece of clay with a hole in it to the back of the leaf to attach later. Clean the leaves with a damp brush. Allow to dry!
Bisque fire the pumpkin and the leaves to cone 04.
Mix a small amount of SS-138 Flat Black to some SS-130 Medium Gray to create a darker gray color.
Basecoat the pumpkin with 1-2 coats with the dark gray mix. Allow to dry!
Mix a small amount of SS-276 Forest Green to some SS-45 Buttermilk to create a sage color.
Drybrush the pumpkin Stripes in the following order. Drybrush all the stripes with the same color and highlight. Drybrush all the same color on the piece before going to the next color. Green stripe – mix of SS-45 Buttermilk and SS-276 Forest Green, highlight with SS-45 Buttermilk. Yellow stripe – SS-254 Golden Ochre, highlight with SS-45 Buttermilk. Tan stripe – SS-127 Medium Portrait, highlight with SS-45 Buttermilk. Orange stripe – SS-399 Terra Cotta, highlight with SS-45 Buttermilk. Turquoise stripe – SS-317 Turquoise, highlight with SS-45 Buttermilk.
Shade the deep crevices of the pumpkin with the basecoat color. Allow to dry!
Apply 1 coat of MM-106 Steel Metallic to the stem and leaves. When dry apply a 2nd coat of MM-106 Steel Metallic to the stem, while this coat is still wet apply MM-305 Rapid Rust to the stem and leaves. You may want to lay the pumpkin on its side so the MM-305 Rapid Rust does not drip onto the pumpkin. Allow to dry!
Apply 1-2 coats of AC-502 Matte Sealer to the piece.
DO NOT FIRE.
Attach the leaves with the Copper Wire stringing it through the holes in the pumpkin and the back of the leaf. Add some wire curly cues.
Cast the mold in usual manner. While in the leather stage, punch 4 holes around the bottom of the stem for the copper wire later. Allow to dry. Clean the greenware with a Clean-Up Tool.
Roll out some Low Fire Whit Clay. Take the Maple Leaf Press Tool and press out 3 or more leaves. Trim with XActo Knife then give a slight bend to the leaf to make it look real. Add a small piece of clay with a hole in it to the back of the leaf to attach later. Clean the leaves with a damp brush. Allow to dry!
Bisque fire the pumpkin and the leaves to cone 04.
Using a Basecoat Brush, basecoat the whole pumpkin and stem with 1-2 coats of SS-198 Chocolate. Basecoat the leaves with SS-138 Flat Black. Allow to dry!
Using a Drybrush, drybrush the pumpkin with SS-211 Orange Rust then with SS-210 Orange. Highlight with SS-3 Honey Toast.
Drybrush the stem with SS-234 Medium Mocha then highlight with SS-194 Medium Taupe.
Drybrush the nubs with SS-276 Forest Green then with SS-57 Accent Green. Highlight lightly with SS-19 Country Sage then with SS-45 Buttermilk.
Apply 1 coat of MM-106 Steel Metallic to the leaves. When dry apply a 2nd coat of MM-106 Steel Metallic to the leaves, while this coat is still wet apply MM-305 Rapid Rust to the stem and leaves. Allow to dry!
Shade the deep crevices of the pumpkin with SS-198 Chocolate. Allow to dry!
Apply 1-2 coats of AC-502 Matte Sealer to the piece.
DO NOT FIRE.
Attach the leaves with the Copper Wire stringing it through the holes in the pumpkin and the back of the leaf. Add some wire curly cues.
Using the Soft Fan, apply 2 coats of Cotton Tail to the snow area.
Using the Soft Fan, apply 3 coats of Blue Dawn to the sky.
Load your pad of your finger with Cotton Tail, and create snowmen, making the lower ball bigger and then with less pressure, the top ball.
Add arms using the mini liner loaded in Java Bean.
Add noses using the mini liner loaded in Orange a Peel.
For the hats and scarfs, use the mini liner and apply 2 coats of 1 of the listed colors to each snowman: Hot Tamale, Teal Next Time, Green Thumb or Sunkissed.
Side load the Round in The Blues and shade under each snowman.
Using the mini liner, outline and add eyes, mouths and buttons with Tuxedo.
Using the Round and Soft Fan, apply 3 coats of The Blues to the handle and inside of the mug or to the edge of the tile.
Begin with properly fired cone 04 bisque. Moisten a sponge and wipe bisque to remove any dust.
Cut the pattern and AC-230 Clay Carbon Paper so that they are the same size as the plaque. Set aside.
Using the Soft Fan with FN-009 Black, apply 2 coats to the plaque. Allow glaze to dry between coats.
Once the plaque is completely dry, place the clay carbon paper and pattern over the top. Trace the pattern with a pencil. Remove the pattern and clay carbon paper. Trace over the pattern on the plaque with a water based marker so that is it easier to see.
Using the Detail Liner with AC-302 Wax Resist, apply 1 coat over the lines. Fill in any areas that are solid black on the pattern.
Replace the glaze caps with AC-224 Plastic Detailer Caps. For the “tree” or “wreath” pattern, you will be using: SC-16 Cotton Tail, SC-26 Green Thumb, SC-27 Sour Apple, SC-45 My Blue Heaven and SC-74 Hot Tamale. For the “snowman” or “penguin” pattern, you will be using SC-11 Blue Yonder, SC-16 Cotton Tail, SC-45 My Blue Heaven, SC-74 Hot Tamale and SC-75 Orange-A-Peel.
Squeeze around 1/8” of glaze into the corresponding sections on the plaque. If the glaze is too heavy, it will crawl. Refer to the numbers in the “Color” section of the directions and on the pattern for color placement. For the areas that say “mixed”, randomly apply the lighter color to 50% of the area, then apply the darker color and swirl them together with the tip of the cap.
As soon as all sections are filled in, use a hair dryer to force dry the skin of the glaze. Make sure not to put the hair dryer too close while it is wet or it will move the glaze. Dry until you see cracking in the skin.
Fire to cone 06.
Form
BI 1894 – Square Tile Plaque
Colors
FN-009 Black
SC-11 Blue Yonder (1)
SC-16 Cotton Tail (2)
SC-26 Green Thumb (3)
SC-27 Sour Apple (4)
SC-45 My Blue Heaven (5)
SC-74 Hot Tamale (6)
SC-75 Orange-A-Peel (7)*Numbers correspond to the numbers on the patterns.
Remove the seams and clean up the throat of the vase with the Clean-up Tool. Sand any of the remaining imperfections with the Green Grit Cloth. Use a moistened Synthetic Sponge to remove any dust from the ware. Check the inside for any debris.
Using CB-604 Soft Fan apply 3 even and smooth coats of UG-51 China White to the outside of the vase. Let dry.
Using the pencil, mark off a line about 1 ½” from the top edge. Make sure the line is horizontal to the top edge and is even around the neck of the vase.
Apply 3 coats of UG-1 Kings Blue to the marked band at the top of the vase and down into the throat of the vase. Apply the color down into the vase to where the neck narrows. Let dry.
Use a pencil and ruler to draw some vertical lines on the white portion of the vase. The lines are about ¼” apart at the neck of the vase. Keep the lines as vertically straight as possible allowing for the curvature of the vase. Remember that you don’t have to paint in any line, they are there for guidance.
Shake and stir SG-404 Blue. Replace the top and metal tip. Paint in the vertical lines on the vase as evenly spaced as possible.
Fire to Shelf Cone 04.
Thin some S-2101 Crystal Clear Brushing in a plastic cup to a melted ice cream consistency. Pour the thinned glaze into the vase. While working quickly, rotate the vase to coat the inside of the vase. Pour out the excess glaze and invert to dry. Wipe off any glaze from the outside of the vase.
Apply 2-3 coats of S-2101 Crystal Clear Brushing using CB-604 Soft Fan to the outside of the vase.
Pour CD-028 Stack O’ Lantern mold ¼” thick. Refer to casting instructions.
Once it is firm enough to handle, cut out the faces using the X-ACTO knife.
Use the sponge to smooth down the faces and casting lines.
Fire to cone 04.
Use MC-002 12mm Low Track Masking Tape to tape over the faces.
Pour 3oz of FN-044 Yellow-Orange into the disposable cup. Thin with enough water so that it is easily poured. Pour into the bottom of the pumpkins. Rotate until the inside is completely covered in glaze. Shake out the excess and place right-side up on a stack of paper towels. Remove the tape over the faces. Wipe off any excess glaze with a damp sponge.
Using the Soft Fan with SC-97 Cant-elope, apply 1 coat to the outside of the pumpkins.
Working in small sections, use the Soft Fan with SC-97 Cant-elope to apply another coat to the outside of the pumpkins. While that coat is still wet, shade the cervices with SC-75 Orange-A-Peel and the high areas with SC-55 Yella Bout It. Repeat until all pumpkins have a second coat.
Using the Script Liner with SC-7 Leapin’ Lizard, apply 2 coats to the stem. Use a damp sponge to wipe off most of the glaze, leaving it in the crevices.
Using the Script Liner with SC-78 Lime Light, apply 2 coats to the areas of the stem with no glaze. Allow glaze to dry between coats.
Using the Dagger Brush with thinned SC-48 Camel Back, float the glaze in the crevices of the pumpkins and stem.
Begin with properly fired cone 04 bisque. Moisten a sponge and wipe bisque to remove any dust.
Pour around 1oz FN-043 Bright Jade, FN-044 Yellow-Orange and FN-049 Flamingo into the disposable cups. Thin with enough water so that they are easily poured. Pour into the corresponding vases and rotate until the insides are covered in glaze. Place the vases upside down on paper towels for 1 minute. Turn right-side up and remove any excess glaze with a damp sponge.
Using the Soft Fan with FN-043 Bright Jade, FN-044 Yellow-Orange and FN-049 Flamingo, apply 1 coat to the outside of the corresponding planters and vases. Apply 3 coats to the inside of the corresponding planters. Allow glaze to dry between coats.
Using a damp sponge, wipe away most of the glaze on the outside of the planters and vases. There should only be glaze left in the crevices.
Using the Soft Fan with FN-209 Floral Pink, apply 3 coats to the outside of the vase and planter with the hobnail texture. Allow glaze to dry between coats.
Using the Soft Fan with FN-206 Lemon Ice, apply 3 coats to the outside of the vase and planter with the ribbed texture. Allow glaze to dry between coats.
Using the Soft Fan with FN-214 Pastel Jade, apply 3 coats to the outside of the vase and planter with the carved texture. Allow glaze to dry between coats.
Begin with properly fired cone 04 bisque. Moisten a sponge and wipe bisque to remove any dust.
Pour around 2oz of EL-144 Dark Amethyst into the disposable cup. Thin with enough water so that it is easily poured. Pour into the vases and rotate until the insides are covered in glaze. Place the vases upside down on paper towels for 1 minute. Turn right-side up and remove any excess glaze with a damp sponge.
Using the Soft Fan with EL-144 Dark Amethyst, apply 3 coats to the inside of the planters. Allow glaze to dry between coats.
Using the Soft Fan with EL-127 Rose Granite, apply 3 coats to the outside of the vase and planter with the hobnail texture. Allow glaze to dry between coats.
Using the Soft Fan with EL-128 Wheat, apply 3 coats to the outside of the vase and planter with the ribbed texture. Allow glaze to dry between coats.
Using the Soft Fan with EL-131 Turtle Shell, apply 3 coats to the outside of the vase and planter with the carved texture. Allow glaze to dry between coats.
Begin with properly fired cone 04 bisque. Moisten a sponge and wipe bisque to remove any dust.
Using the Soft Fan with SC-16 Cotton Tail, apply 1 coat to the fur on the yeti. Do not proceed until the coat is bone dry.
Squeeze 1 TBS of SC-12 Moody Blue onto the palette. Thin with water.
Using the Soft Fan with thinned SC-12 Moody Blue, gently brush over the yeti’s fur. The glaze should be thin enough to pool in the texture.
Using the Script Liner with SC-11 Blue Yonder, apply 2 coats to the face, hands and feet. Allow glaze to dry between coats. After the 2nd coat is dry, apply a 3rd coat and shade around the edges with SC-76 Cara-Bein Blue.
Using the Script Liner with SC-12 Moody Blue, apply 2 coats to the nose and toenails. Allow glaze to dry between coats.
Using the Detail Liner with SC-45 My Blue Heaven, apply 2 coats to the iris on the eyes. Allow glaze to dry between coats.
Using the Detail Liner with SC-15 Tuxedo, outline the details and make the pupils in the eyes.
Using the Detail Liner with SC-16 Cotton Tail, make dots in the eyes and on the nose.
Dip in NT-CLR Clear Dipping glaze.
Fire to cone 06.
Mug:
Follow directions 1-9 above, only use smaller brushes if needed.
Using the Soft Fan with SC-16 Cotton Tail, apply 2 coats to the inside of the mug and the handle. Apply 1 coat to the background on the outside of the mug.
Take the paper and draw 3-5 stars around 1-1.5” and 5-7 stars 0.5-0.75”. You can trace star-shaped objects or use star paper punches if you want them to be precise. Cut them out.
Take each star, dip it in water and stick it on the background. After they are all on the background, apply 1 thin coat of SC-16 Cotton Tail over each star.
Using the Soft Fan and Script Liner with SC-15 Tuxedo, apply 3 coats to the background of the mug. Allow glaze to dry between coats. Before the last coat is completely dry, remove the stars.
Squeeze 1 TSP SC-16 Cotton Tail onto the palette. Using a brush handle, dip into SC-16 Cotton Tail. Make dots on the background of the mug. Try to concentrate them around the stars.
Cast the mold in usual manner. Allow to dry. Clean the greenware with a Clean-Up Tool. Bisque fire to cone 04.
Begin with properly fired shelf cone 04 bisque. Moisten a clean sponge and wipe bisque to remove any dust.
Using a Basecoat Brush, basecoat the whole pumpkin with 1-2 coats of SS-24 Chocolate Fudge. Allow to dry.
Using a Basecoat Brush, basecoat the whole pumpkin except the stem with 1-2 coats of MM-103 Dark Bronze Metallic. Allow to dry.
Drybrush the pumpkin except the stem with1-2 coats of MM-102 Copper Metallic. Allow to dry.
Apply 1 coat of MM-106 Steel Metallic to the stem. When dry apply a 2nd coat of MM-106 Steel Metallic to the stem, while this coat is still wet apply a coat of MM-305 Rapid Rust to the stem. You may want to lay the pumpkin on its side so the MM-305 Rapid Rust does not drip onto the pumpkin. Allow to dry.
Shade the deep crevices of the pumpkin with the basecoat color. Allow to dry.
Cast the mold in usual manner. Allow to dry. Clean the greenware with a Clean-Up Tool. Bisque fire to cone 04.
Begin with properly fired shelf cone 04 bisque. Moisten a clean sponge and wipe bisque to remove any dust.
Using a Basecoat Brush, basecoat the whole pumpkin with 1-2 coats of SS-24 Chocolate Fudge. Allow to dry.
Using a Basecoat Brush, basecoat the whole pumpkin except the stem with 1 coat of MM-102 Copper Metallic. Allow to dry.
Apply a 2nd coat of MM-103 Copper Metallic to the pumpkin, while the MM-102 Copper Metallic is still wet spritz the Copper Metallic with a heavy coat of MM-202 Green Patina that has a Spritzer Cap on the bottle. Allow to dry!
When the Patina has reached the color you like, apply 1-2 coats of AC-502 Matte Sealer to stop the Patina action. Allow to dry.
Drybrush the lower section of the pumpkin except the stem with1-2 coats of MM-102 Copper Metallic. Allow to dry.
Using a Round brush, apply MM-105 Gold Metallic to all the beads on the pumpkin.
In a small 2oz Cup, mix the following colors, 1/4tsp SS-81 Shimmering Silver and 1/4tsp MM-105 Gold Metallic to create a champagne gold. Highlight the beads with this mix. Allow to dry.
Apply 1 coat of MM-106 Steel Metallic to the stem. When dry apply a 2nd coat of MM-106 Steel Metallic to the stem, while this coat is still wet apply a coat of MM-305 Rapid Rust to the stem. You may want to lay the pumpkin on its side so the MM-305 Rapid Rust does not drip onto the pumpkin. Allow to dry.
Apply 1-2 coats of AC-502 Matte Sealer to the piece.
Begin with properly fired shelf cone 04 bisque. Moisten a clean sponge and wipe bisque to remove any dust.
Pour around 1/4 cup NT-CLR Clear Dipping glaze into the vase. Rotate the vase to cover the inside. Place upside down on a few paper towels for 2 minutes. Turn the vase over and wipe off any excess glaze with a damp sponge.
Using the Soft Fan with CG-962 Blue Azure, apply 2 coats to the outside of the vase. Allow glaze to dry between coats.
Using the Soft Fan with the CG-999 Jazz Notes, apply 2 coats to the upper 2/3 of the vase and the inside of the neck. Allow glaze to dry between coats.
Fire to cone 06.
Begin with properly fired cone 04 bisque. Moisten a sponge and wipe bisque to remove any dust.
On the DSS-0147 Island screen, locate the small pineapple. Draw an outline around it in permanent marker. Cut it out with excess screen around the edges.
Squeeze around 2 TBS of SC-15 onto the palette. Add a pinch of AC-310 Silkscreen Medium. Mix with a palette knife until it becomes the consistency of peanut butter. You may need to add more silkscreen medium or glaze.
Place the pineapple in the center of the plate. While holding the screen firmly in place, take a small amount of premixed silkscreen medium, and gently rub in circles starting in the center and working outward.
Wash the screen and repeat as pictured.
Squeeze 1 TBS of SC-6 Sunkissed, SC-11 Blue Yonder, SC-13 Grapel, SC-27 Sour Apple, SC-73 Candy Apple Red and SC-97 Cant-elope onto the palette. Thin each glaze with water so that they are the consistency of water.
Using the Script Liner with thinned SC-73 Candy Apple Red, apply 1 coat to the left side of the pineapple. Dip the same brush into thinned SC-97 Cant-elope and apply 1 coat next to that coat. Dip the same brush into thinned SC-6 Sunkissed and apply 1 coat next to that coat. Dip the same brush into thinned SC-13 Grapel and apply 1 coat up to the right side of the pineapple. You can brush with water to help blend the colors. Repeat for all pineapples.
Using the Script Liner with thinned SC-11 Blue Yonder, apply 1 coat to the bottom of the leaves. Dip the same brush into thinned SC-27 Sour Apple and apply 1 coat of the middle of the leaves. Dip the same brush into thinned SC-6 Sunkissed and apply 1 coat to the top of the leaves. You can brush with water to help blend the colors. Repeat for all pineapples.
Dip the Script Liner into the thinned SC-73 Candy Apple Red. Tap the center of the brush on your finger to splatter glaze onto the plate. Repeat with thinned SC-97 Cant-elope and SC-6 Sunkissed.
Begin with properly fired shelf cone 04 Stoneware bisque. Moisten a clean sponge and wipe bisque to remove any dust.
Using a fan brush, apply 2 coats of SW-502 Yellow Gloss to the face of the plate.
Allow the glaze to dry and apply your first layer of tape/paper in a vertical striped pattern.
Apply 1 coat of SW-506 Bright Blue Gloss to the face of the plate. Be sure to pay attention to your brushstrokes!
Repeat steps 3 and 4 – 2 more times. Apply the tape/paper overlapping previous pieces and some in new spots, this will create a variety of color saturations amongst the striping.
Remove the tape/paper when the glaze is no longer wet, but before it is completely dry.
Mix together SC-15 Tuxedo and AC-310 Silkscreen Medium using a palette knife. Combine until it is the consistency of peanut butter. Adjust ratios as necessary.
Place the bike from DSS-142 Hipster Silkscreen onto the plate, shiny side down. Use your finger to work the thickened wash through the screen. Remove the screen immediately and rinse or place in water to preserve the screen.
Using a fan brush, apply 3 coats of SW-506 Bright Blue to the back of the plate, avoiding the foot.
Use a sponge to dry foot the piece and allow to dry completely.
Place on a properly kiln washed shelf and fire to cone 06.
Mix desired underglaze (We used Jet Black UG-50) with a small amount of Silkscreen Medium (AC-310) with a pallet knife.
Sprinkle a small amount of silkscreen medium into underglaze at a time, mixing thoroughly with pallet knife until you achieve a “peanut butter” or “toothpaste” constancy.
Lay tissue paper on a dry surface. Choose desired silkscreen and place shiny side down on tissue paper.
Transfer screen by picking up a small amount of mixed underglaze paste on your finger and starting in the center rub underglaze through screen in small circles until screen design is filly covered.
Slowly pull screen away to reveal image.
Repeat to create your own pattern on the tissue paper.
Once dry, option to add color to the designs by adding one coat of an underglaze color into or overtop of the designs.
Let dry and store flat for use.
Traced Pattern
Print out or draw desired pattern or design onto a paper that you can place under the tissue paper.
Lay tissue flat over the design.
Trace design with black underglaze using a brush.
Once dry, option to add color to the designs by adding one coat of an underglaze color into or overtop of the designs.
Let dry and store flat for use.
Feee-Hand
Lay tissue paper down flat on a dry surface.
Paint your own design or pattern onto the tissue with one coat of your desired color(s). Be sure not to apply underglaze thickly as it will crack off piece when fired.
Let dry and store flat for use.
On Clay
Cut desired piece(s) of transfer design with scissors.
It is easier to work with multiple small pieces rather than one large piece, especially when transferring onto a curved surface.
Option to add one coat of underglaze to clay as a background color and let dry before starting transfer.
Place transfer in desired location on wet clay underglaze side down.
Press into place with fingertips gently at first to be sure that design lays flat onto clay.
Carefully smooth transfer down with a rib so that the paper is fully in contact with clay.
If clay is not wet enough to fully saturate the tissue transfer, mist the transfer with some water and continue to press down into clay. Adding too much water can cause transfer to smear, only add small amounts at a time.
Pull tissue back slowly to reveal design. Let dry and bisque piece to Cone 04 or apply clear coat overtop and once-fire.
We suggest applying 2 coats of Crystal Clear Brushing (S- 2101) for low-fire clay bodies or Zinc Free Clear (SW-004) for mid-range clay bodies.
On Bisque
Wipe bisque with a damp sponge to remove dust.
Cut desired piece(s) of transfer design with scissors. It’s easier to work with multiple small pieces rather than one large piece, especially on curved surfaces.
Place transfer in desired location on bisque underglaze side down.
Hold flat and mist with water until tissue is saturated. Only add small amounts at a time. Apply pressure with sponge to transfer image
Continue to add water and apply pressure little by little until transfer is successful.
Pull tissue back slowly to reveal design.
Allow to dry completely and fire to temperature of clay body used (05/06 or 5/6).
We suggest applying 2 coats of Crystal Clear Brushing (S-2101) for low-fire clay bodies or Zinc Free Clear (SW-004) for mid-range clay bodies.
Apply one coat of White Cobblestone (SG-202) inside the black areas revealed by removing the paper leaving a black outline around each shape.
Tint the Cobblestone shapes by applying one coat of Candy Apple Red (SC-73) leaving the black outline around each shape .
Place tile over owl pattern and trace tile size around owl- keeping the owl in the center. If choosing to draw your own pattern, trace size of tile on paper to be sure your owl fits inside.
Cut Clay Carbon Transfer Paper (AC-230) to size and tape to the back of owl pattern so the rough side is exposed.
Be sure to only tape at the edge so the tape does not interfere with the transfer.
Place paper and pattern on top of tile carbon paper side down and tape so it stays in place.
Using a soft graphite pencil, trace lines of pattern applying enough pressure to transfer.
You can check by pulling up one corner of your page that the transfer was successful while keeping other pieces of tape down to avoid needing to re-align.
Remove paper once transfer is complete and set owl pattern aside to be used again.
Trace the design on tile with a pencil so lines are easier to see when glazing.
Graphite will burn out when piece is fired.
With a soft brush, apply one coat of White (FN-001) to the background allowing glaze to come right up to the outline of the owl
Once dry apply Cara-bein Blue (SC-76) and Sunkissed (SC-6) to the background as a watercolor wash, picking up color with a wet brush and blending it into the background.
Apply 2 coats of Cant-elope (SC-97) to the top of the owl’s head (the area between the ears and above the eyes) and let dry.
Cut the top of head area out of your owl pattern and tape edges down to the tile so only the most recently glazed area is exposed.
Using a sponge, apply and even layer of Cara-bein Blue to the Wave Stamp (ST-125)
Apply stamp to the top of the head by firmly pressing the stamp down on the exposed tile.
Pull back stamp to reveal design and remove paper.
Apply one heavy coat of Sassy Orange (CG-753) being sure to mix up the glaze well and apply extra crystals.
Apply 2 coats of Sassy Orange to the wings.
Use back of brush or fingers to knock most crystals off of the wings and add to body with a little more glaze.
If you create a bare spot on a wing just cover up with a little more glaze.
Apply 2 coats of White (FN-001) to eyes and inner ears.
Apply 2 coats of Sunkissed (SC-6) to beak.
Using Cant-elope apply a light wash of orange in the inner ear by picking up a small amount of color with a wet brush.
Apply Cara-bein blue to the center of the eye and outward using the same wash technique.
Outline the design using Black Designer Liner (SG-401).
Squeeze Designer Liner out onto pallet and add a little water pick up with brush to apply to center of the eyes.
Begin with properly fired cone 04 bisque. Moisten a sponge and wipe bisque to remove any dust.
Place the pattern underneath the tissue paper and trace with the pencil. Place the tissue paper pattern onto the plate. Trace with the permanent marker.
Squeeze 1 TSP of SC-1 Pink-A-Boo, SC-11 Blue Yonder and SC-45 My Blue Heaven onto the palette. Thin with water (around 1:1).
Using the Script Liner with thinned SC-11 Blue Yonder, use the brush to make puddles and spread the glaze around the bottom left section of the background. Be sure to dip your brush in water to help spread the glaze like watercolors.
Alternate between thinned SC-1 Pink-A-Boo, SC-11 Blue Yonder and SC-45 My Blue Heaven as you work your way around the background of the plate. It is ok to get a little on the pattern.
Using the Script Liner with SC-45 My Blue Heaven, apply 3 coats to the face and gloves. Allow glaze to dry between coats.
Using the Script Liner with SC-1 Pink-A-Boo, apply 3 coats to the nose and flower petals. Allow glaze to dry between coats.
Using the Script Liner with SC-24 Dandelion, apply 3 coats to the every-other stripe on the hat and the flower centers. Allow glaze to dry between coats.
Using the Script Liner with SC-27 Sour Apple, apply 3 coats to the leaves and beard. Allow glaze to dry between coats.
Using the Script Liner with SC-11 Blue Yonder, apply 3 coats to the remaining stripes on the hat. When glazing the last coat, use SC-45 My Blue Heaven to shade the center of the stripes. Allow glaze to dry between coats.
Using the Detail Liner with SC-15 Tuxedo, quickly outline all of the shapes of the gnome, leaves and flowers. It will look better if you have thick and thin lines that do not go precisely around the shapes.
Begin with properly fired cone 04 bisque. Moisten a sponge and wipe bisque to remove any dust.
Bowl #1
Using the Soft Fan with SC-16 Cotton Tail, apply 2 coats to the outside and bottom of the bowl. Allow glaze to dry between coats.
Using the Soft Fan with SC-15 Tuxedo, apply 2 coats to the inside of the bowl. Allow glaze to dry between coats.
Use the pencil to sketch the design on the outside of the bowl. Start by making a small vertical line at the top of the bowl. Then add circles and more vertical lines. You can do 1, 2 or 3 circles going down from the top line. The design will look the best if it’s not precise.
Using the Script Liner with SC-15 Tuxedo, apply 2 coats to your design. It will look best if your lines are not uniform. Allow glaze to dry between coats.
Dip into NT-CLR Clear Dipping glaze
Fire to cone 06.
Bowl #2
Using the Soft Fan with SC-16 Cotton Tail, apply 2 coats to the entire bowl. Allow glaze to dry between coats.
Use the pencil to sketch 2 horizontal lines at the top of the bowl and 2 at the bottom of the bowl. Between the 2 middle lines, sketch “arrows” going in 1 direction. They do not need to be perfectly spaced.
Using the Script Liner with SC-15 Tuxedo, apply 2 coats to your design. It will look best if your lines are not uniform. Allow glaze to dry between coats.
Dip into NT-CLR Clear Dipping glaze
Fire to cone 06.
Bowl # 3
Using the Soft Fan with SC-16 Cotton Tail, apply 2 coats to the outside and inside of the bowl (not the bottom). Allow glaze to dry between coats.
Cut 6 strips off of the paper. They should be around ¼” wide and long enough to reach from the top to the bottom of the bowl (pressed against the outside). Cut around 6 large triangles (1.5” on all sides) and 10 small triangles (3/4” on all sides).
Take the pencil and mark 6 dots on the rim of the bowl. They should be equally spaced, but do not have to be exact.
One by one, dip the strips of paper in water and press them onto the outside of the bowl (from the dot to the bottom of the bowl). Using the Soft Fan with SC-16 Cotton Tail, apply a thin coat over the paper strips.
One by one, take the large triangles and dip them into the water. Press each of them at the top of the bowl, between 2 lines.
Using the Soft Fan with SC-16 Cotton Tail, apply a thin coat over the paper triangles.
Repeat Step 5 with the smaller triangles, placing them below the larger triangle.
Using the Soft Fan with SC-15 Tuxedo, apply 2 coats over the outside and bottom of the bowl. Allow glaze to dry between coats.
Remove the strips and triangles before the last coat is completely dry.
Begin with properly fired cone 04 bisque. Moisten a sponge and wipe bisque to remove any dust.
You will be using 5 colors: #1 = SC-16 Cotton Tail, #2 = SC-6 Sunkissed, #3 = SC-95 Pinkie Swear, #4 = SC-9 Jaded, #5 = SC-31 The Blues.
Use the pencil to label each branch with the color that will be used. Start at the top row and label, “1, 2, 3” from left to right. Go down to the second row and label “4, 5, 1” right under the first row. Keep working down the tree, going from 1 to 5. Then turn the tree around and repeat. Number the trunk with 4 & 5, alternating.
Using the Script Liner with each of the 5 colors, apply 2 coats to each of the corresponding branches. Allow glaze to dry between coats. Allow the glaze to dry before moving onto the next step.
Using the same brush with SC-16 Cotton Tail, make random, large sized shapes on tree branches. Skip the branches glazed with SC-16 Cotton Tail. Once they are dry, apply a 2nd coat.
Using the same brush with SC-6 Sunkissed, make random, large sized shapes on the tree branches. Skip the branches glazed with SC-6 Sunkissed. You can overlap a few with the shapes from Step #4. Once they are dry, apply a 2nd coat.
Using the same brush with SC-95 Pinkie Swear, make random, medium sized shapes on the tree branches. Skip the branches glazed with SC-95 Pinkie Swear. You can overlap a few with the shapes from Steps #4 & #5. Once they are dry, apply a 2nd coat.Using the same brush with SC-9 Jaded, make random, small sized shapes on the tree branches. Try to overlap them in
areas of overlapping. Skip the branches glazed with SC-9 Jaded. Once they are dry, apply a 2nd coat.
Using the handle of the brush with SC-31 The Blues, make random dots in clusters around areas that have overlapping. On branches glazed with SC-31 The Blues, you can add them over the other shapes.
Begin with properly fired cone 04 stoneware bisque. Moisten a clean sponge and wipe bisque to remove any dust.
If desired, transfer design using AC-230 Clay Carbon Paper. Use a firm hand with a pen (not as soft as a pencil) and keep in mind the paper only transfers on one side!
Apply Designer Liner using the detail tip or brush. Only 1 coat is needed for line work using a brush or detail tip and 2 coats for filling in areas.
Apply 2 coats of SW-004 Zinc Free Clear to the bottle, avoiding the bottom. Zinc Free Clear was chosen here to preserve the pigments in SG-405 Green.Use a damp sponge to wipe away any glaze that may have gotten on the foot.
Cast the mold in usual manner. While the casting is in the leather hard stage cut out the Sections of some of the ornaments and put in the holes for the Pin & Globe lights. Allow to dry. Clean the greenware with a Clean-Up Tool. Bisque fire to cone 04.
Begin with properly fired shelf cone 04 bisque. Moisten a clean sponge and wipe bisque to remove any dust.
Apply 2 coats of S-2101 Crystal Clear Brushing Glaze to the ornament tops and to the centers of the fancy ornaments. Allow to dry! Glaze fire to cone 06.
Apply Liquid Gold to all the Clear Glaze areas. Allow to dry! Fire to cone 018.
Basecoat the striped ornament – Red area with SS-179 Antique Red, white area with SS-130 Medium Grey. Drybrush the red area with SS-176 Christmas Red, highlight with SS-210 Orange. White area with SS-45 Buttermilk then SS-135 White. Line the stripes are SS-288 Bright Green.
Basecoat the blue ornament with SS-335 Rich Blue. Drybrush with SS-29 Dew Drop Blue then SS-317 Turquoise, highlight with SS-135 White.
Basecoat the orange ornament with SS-211 Orange Rust. Drybrush with SS-210 Orange then SS-111 Brightest Yellow, Highlight with SS-45 Buttermilk.
Basecoat the purple / pink Ornament with SS-368 Dusty Violet, stripes with SS-92 Royal Fuchsia. Drybrush with the ornament SS-28 Hushed Violet, highlight with SS-135 White. Drybrush stripes with SS-135 White.
Basecoat the bell with SS-335 Rich Blue, bottom of the bell with SS-179 Antique Red. Drybrush the bell with SS-29 Dew Drop Blue, highlight with SS-135 White. Drybrush the bottom of the bell with SS-176 Christmas Red, highlight with SS-210 Orange
Basecoat the green ornament with SS-288 Bright Green and the top area with SS-179 Antique Red. Drybrush the green area with SS-376 Limeburst, highlight wit a little SS-135 White. Red area with SS-176 Christmas Red, highlight with SS-45 Buttermilk then SS-176 Christmas Red again.
Basecoat the center ornament green area with SS-288 Bright Green, the bottom red area with SS-179 Antique Red and the center white area with SS-130 Medium Grey. Drybrush the green area with SS-376 Limeburst highlight with SS-45 Buttermilk. Red area with SS-176 Christmas Red, highlight with SS-210 Orange. Drybrush the white area with SS-45 Buttermilk then SS-135 White. Basecoat the Area around the center with SS-288 Bright Green then drybrush with SS-377 Limeburst.
Basecoat pine boughs with SS-24 Chocolate Fudge. Drybrush with SS-288 Bright Green then highlight with SS-19 Country Sage.
Basecoat the Holly leaves with SS-57 Accent Green. Drybrush with SS-19 Country Sage then highlight with SS-377 Limeburst a little SS-45 Buttermilk.
Basecoat the holly berries with SS-176 Christmas Red then highlight with S-210 Orange, add a dot of SS-138 Flat Black to the center of the holly berry.
Using a CB-202 #2 detail Liner, apply some AC-523 to the top of the orange ornament and to the top and bottom of the center area of the bell. Allow to dry!
Apply 1-2 coats of AC502 Matte Sealer to the piece.
Glue some Iridescent Glitter to areas of the ornaments.
Glue in Pin & Globe Lights.
DO NOT FIRE!
Optional: Add Red Frit to cut out areas by Masking Tape the underside of the cut outs. Put some F3-151-96-8 Medium Cherry Red Glass Frit into the cut out area then add Dap Rapid Fuse Glue. Let dry! Remove the Masking Tape.
Cast the mold in usual manner. While the casting is in the leather hard stage cut out holes in headlights for the globe lights and for a pinch plug light. Allow to dry. Clean the greenware with a Clean-Up Tool.
Bisque fire to cone 04.
Begin with properly fired shelf cone 04 bisque. Moisten a clean sponge and wipe bisque to remove any dust.
Basecoat the truck with 2 coats of SS-57 Accent Green. Do not paint the windows, bumpers or tires at this time. Allow to dry!
Drybrush 2 coats of SS-276 Forest Green to the truck then with 2 coats of SS-19 Country Sage then with SS-376 Limeburst. Highlight with SS-111 Brightest Yellow and SS45 Buttermilk.
Basecoat the windows with SS-130 Medium Grey. Drybrush the windows with SS-45 Buttermilk then with SS-135 White. Streak in some SS-130 Medium Grey to the windows
Basecoat the tires, bumpers and grill with SS-138 Flat Black. Drybrush the tread on the tires with SS-130 Medium Grey with a little SS-138 Flat Black to create a darker grey.
Drybrush the bumpers with SS-81 Shimmering Silver.
Using a CB-202 #2 Derail Liner, Apply 2 coats of SS-81 to the grill trim, door handles and the hubcaps.
Shade some SS-57 Accent Green in the deep crevices.
Apply 1-2 coats of AC502 Matte Sealer to the piece.
Apply 2 coats of AC-501 Gloss Sealer to the windows, bumpers, grill, hubcaps and door handles. Allow to dry!
Cast the mold in usual manner. Clean the greenware with a Clean-Up Tool. Bisque fire to cone 04.
Begin with properly fired shelf cone 04 bisque. Moisten a clean sponge and wipe bisque to remove any dust.
Using various size drybrush’s, drybrush the pieces as follows.
Basecoat the piece with SS-138 Flat Black 2 coats. Allow to dry!
Drybrush the cart and wheels with SS-237 Dark Brown then with SS-24 Chocolate Fudge Followed by SS-198 Chocolate then SS-234 Medium Mocha.
Drybrush the trim, handles and legs of the cart with SS-194 Medium Taupe the highlight with SS-192 Light Taupe.
Lighten some SS-13 Flat Black with a little SS-192 Light Taupe. Drybrush the center and edges of the wheels with this mix.
Trace on the lettering using Graphite Paper or sketch your own. Using a CB-110 #10/0 Liner, paint the letters with SS-19 Country Sage, highlight the sides with SS-138 Flat
Black.Apply 1-2 coats of AC-502 Matte Sealer to the piece.
Cast the mold in usual manner. While the casting is in the leather hard stage cut out the faces on the pumpkins. Allow to dry. Clean the greenware with a Clean-Up Tool. Bisque fire to cone 04.
Begin with properly fired shelf cone 04 bisque. Moisten a clean sponge and wipe bisque to remove any dust.
Using various size drybrush’s, drybrush the pieces as follows.
Basecoat the outside of the piece with SS-24 Chocolate Fudge 2 coats. Allow to dry!
Basecoat the inside of the piece with SS-111 Brightest Yellow. Allow to dry!
Drybrush the pumpkins with SS-211 Orange Rust then with SS-210 Orange, highlight the tops of the pumpkins with SS-111 Brightest Yellow. Do not wash your brush between the colors, this gives a better blend of the colors.
Drybrush the stems with SS-198 Chocolate then SS-194 Medium Taupe, highlight with SS-45 Buttermilk.
Drybrush the sunflowers with SS-3 Honey Toast then SS-111 Brightest Yellow, Highlight with SS-45 Buttermilk.
Drybrush the flower centers with SS-198 Chocolate then SS-194 Medium Taupe, highlight with SS-45 Buttermilk.
Drybrush the hay with SS-194 Medium Taupe then SS-254 Golden Ochre, highlight with some SS-3 Honey Toast and SS-45 Buttermilk.
Drybrush the leaves with SS-57 Accent Green then SS-19 Country Sage, highlight with SS-111 Brightest Yellow.
Apply 1-2 coats of AC-502 Matte Sealer to the piece.
Begin with properly fired cone 04 bisque. Moisten a sponge and wipe bisque to remove any dust.
Use the pencil to draw lines, dividing the plate into at least 5 sections.
Using the Script Liner or Soft Fan (depends on if your sections are large or small) with SC-1 Pink-A-Boo, SC-9 Jaded, SC-16 Cotton Tail, SC-24 Dandelion and SC-28 Blue Isle, apply 2 coats of glaze to each section. Allow glaze to dry between coats.
Take an item you found and brush it with glaze using the Script Liner or Soft Fan (depending on the size of the item). Gently press it onto a section of your plate and repeat.
Take the raspberry leaves (3 on one stem) and brush them with SC-15 Tuxedo. Press on the blue section of the plate. Repeat.
Take one ground ivy leaf (heart-shaped) and brush with SC-28 Blue Isle. Press along the upper edge of the pink section. Repeat. Take the long grass stem and dip the end into SC-28 Blue Isle. Press onto the pink section to make dots.
Take the long grass stem and dip into SC-15 Tuxedo. Make hash marks in the white section. Repeat.
Using the tip of the dandelion leaf (pointy tip) brush with SC-16 Cotton tail. Press it in the teal section, going around the edge by the yellow section. Repeat. Brush again with SC-24 Dandelion and repeat over the same areas stamped.
Cut the stem of the long grass into smaller sections. Brush with SC-15 Tuxedo and stamp onto the yellow section. Repeat.
Using the Soft Fan with SC-15 Tuxedo, apply 2 coats to the back of the plate. Allow glaze to dry between coats.
Begin with properly fired cone 04 bisque. Moisten a sponge and wipe bisque to remove any dust.
Use the pencil to draw lines, dividing the plate into at least 5 sections.
Using the Script Liner or Soft Fan (depends on if your sections are large or small) with SC-1 Pink-A-Boo, SC-9 Jaded, SC-16 Cotton Tail, SC-24 Dandelion and SC-28 Blue Isle, apply 2 coats of glaze to each section. Allow glaze to dry between coats.
Take an item you found and brush it with glaze using the Script Liner or Soft Fan (depending on the size of the item). Gently press it onto a section of your plate and repeat.
Take the paper towel lay it down over white section (bumpy side down). Trace over the shape and cut it out. Using the Soft Fan with SC-9 Jaded, apply 1 thin coat of glaze to the bumpy side of the paper towel. Press onto the plate and remove.
Take another piece of paper towel and lay it down over the pink drop-shaped section (bumpy side down). Trace over the shape and cut it out. Using the Soft Fan with SC-16 Cotton Tail, apply 1 thin coat of glaze to the bumpy side of the paper towel. Press onto the plate and remove.
Dip the pencil eraser into SC-1 Pink-A-Boo and press onto the small blue oval in the middle of the plate. Repeat.
Dip the rims of various sized caps into SC-28 Blue Isle and press onto the yellow section of the plate. Dip the tip of the pencil in the glaze and press onto the yellow section. Repeat
Dip the bristles of the brush into SC-15 Tuxedo. Press over the pink drop-shaped section.
Dip the tip of the pencil into SC-15 Tuxedo and draw a small hash mark on the inner edge of the white section. Repeat.
Take the paper and cut into thin strips. Brush each strip with SC-15 Tuxedo. Press over the bell-shaped pink section. Repeat.
Take one of the frog’s feet and brush it with SC-15 Tuxedo. Press along the inner edge of the teal section. Repeat.
Using the Soft Fan with SC-15 Tuxedo, apply 2 coats to the back of the plate. Allow glaze to dry between coats.
Begin with properly fired cone 04 bisque. Moisten a sponge and wipe bisque to remove any dust.
Pour around ½ cup of FN-043 Bright Jade into a disposable cup. Thin with water until the glaze is easily poured. Pour into the vase and rotate until the inside is completely covered. Shake upside down to get excess glaze out of the vase. Place upside down on a paper towel to drain. After 1-2 minutes, lift the vase and wipe off any drips with the sponge.
Using the Soft Fan with CG-996 Spring Rain, apply 2 coats of glaze to the upper 2/3 of the vase. Allow glaze to dry between coats.
Using the Soft Fan with CG-962 Blue Azure, apply 2 coats of glaze to the lower 2/3 of the vase.
Begin with properly fired cone 04 bisque. Moisten a sponge and wipe bisque to remove any dust.
Pour around ½ cup of FN-002 Yellow into a disposable cup. Thin with water until the glaze is easily poured. Pour into the vase and rotate until the inside is completely covered. Shake upside down to get excess glaze out of the vase. Place upside down on a paper towel to drain. After 1-2 minutes, lift the vase and wipe off any drips with the sponge.
Using the Soft Fan with CG-963 Lemon Lime, apply 2 coats of glaze to the upper 2/3 of the vase. Allow glaze to dry between coats.
Using the Soft Fan with S-2711 Tahiti Grape, apply 2 coats of glaze to the lower 2/3 of the vase.
Begin with properly fired cone 04 bisque. Moisten a sponge and wipe bisque to remove any dust.
Pour around ½ cup of FN-52 Tangerine into a disposable cup. Thin with water until the glaze is easily poured. Pour into the vase and rotate until the inside is completely covered. Shake upside down to get excess glaze out of the vase. Place upside down on a paper towel to drain. After 1-2 minutes, lift the vase and wipe off any drips with the sponge.
Using the Soft Fan with CG-979 Meadow, apply 2 coats of glaze to the upper 2/3 of the vase. Allow glaze to dry between coats.
Using the Soft Fan with CG-983 Koi Pond, apply 2 coats of glaze to the lower 2/3 of the vase.
Brush the ornaments as shown with the colors listed. Start with the largest area then apply the details last. Also start with the lighter color from the list then shade with the darker color, such as the top ornament with base coated with SS-92 Royal Fuchsia then shaded with SS-176 Christmas Red.
Brush Shimmering Silver to the inverted area of the pink and purplish bulb, then apply color to the detail, leaving the edges in silver. Brush Emperor’s Gold to the indented area of the red bulb before detailing with the pinks.
The purplish bulb is base coated with SS-135 White, for the detail it has a mix of SS-176 Christmas Red and SS-335 Rich Blue, this will give it a bluish-purple shade. Brush to the center detail and on the band and floated around the edges.
Paint ornament caps with SS-81 Shimmering Silver or SS-87 Emperor’s Gold, some of the trim on the ornaments is Shimmering Silver.
Brush the leaves last with SS-57 Accent Green, dry brush with SS-288 Bright Green, highlight with a dry brush of SS-45 Buttermilk in the green brush. Paint the berries with SS-176 Christmas Red.
With a soft brush apply a coat of SS-113 White Iridescent to the bulbs and berries.
On 04 bisque, brush on SS-210 Orange to the pumpkins, shade the shadow and the lines of the pumpkins with SS-211 Orange Rust. Dry Brush the pumpkins with SS-210 Orange add SS-111 Brightest Yellow to the brush for high lights.
Brush the straw with SS-254 Golden Ochre, brush over the straw with a thinned coat of SS-234 Medium Mocha, wipe back with a soft cloth before it dries. Dry brush the straw with SS-254 Golden Ochre and SS-3 Honey Toast.
Paint the sunflowers with SS-111 Brightest Yellow, in the center of the petals, brush a stroke of SS-3 Honey Toast. Brush the centers of the sunflowers and pumpkin stems with SS-24 Chocolate Fudge. Dry Brush the stems and sunflower centers with SS-234 Medium Mocha.
Brush the leaves with SS-276 Forest Green, dry brush with SS-376 Limeburst.
To separate and give the pumpkins depth, float SS-234 Medium Mocha between the pumpkins, use a smaller round to brush a thinned Medium Mocha on the section lines of the pumpkins.
Outline around the petals with the Chocolate Fudge use the detail brush.
Pour CD024+ Garden Cart mold ¼” thick. Refer to casting instructions.
Once it is firm enough to handle, use the sponge to smooth down casting lines.
Fire to cone 04.
Using the Soft Fan with SC-16 Cotton Tail, apply 2 coats to the outside of the cart (not the handles or legs) and 3 coats to the inside of the cart. Allow glaze to dry between coats.
Use the pencil to sketch wood panels in the center on each side of the cart.
For each piece of wood, apply 1 coat of SC-16 Cotton Tail using the Script Liner.
Using the Detail Liner with SC-35 Gray Hare, outline the piece of wood and add random horizontal stripes. Repeat for each piece of wood on the outside of the cart.
Using the Detail Liner with SC-35 Gray Hare, make distinct “knots” and stripes on each piece of wood.
Using the Detail Liner with SC-15 Tuxedo, outline each piece of wood and add nail heads.
Using the Script Liner with SC-73 Candy Apple Red, apply 3 coats to the handles on the cart. Allow glaze to dry between coats.
Using the Script Liner with SC-27 Sour Apple, apply 3 coats to the legs on the bottom of the cart.
Using the Detail Liner with SC-15 Tuxedo, outline the handles and legs. Add dots for nail heads.
Pour CD023 Vintage Ornament Topper mold ¼” thick. Refer to casting instructions.
Once it is firm enough to handle, use the sponge to smooth down casting lines.
Fire to cone 04.
Using the Script Liner and Detail Liner with SC-1 Pink-A-Boo, SC-6 Sunkissed, SC-27 Sour Apple, SC-60 Silver Lining, SC-73 Candy Apple Red and SC-76 Cara-Bein Blue, apply 3 coats to the ornaments as pictured. Glaze the silver sections with SC-60 Silver Lining. Allow glaze to dry between coats.
Using the Script Liner with SC-26 Green Thumb, apply 2 coats to the holly leaves. Allow glaze to dry between coats.
Using the Script Liner with SC-10 Teal Next Time, apply 2 coats to the pine leaves. Allow glaze to dry between coats.
Dip the sponge in water. Squeeze out the excess water and wipe the leaves to remove the glaze on the high areas. This will create an antiqued look, leaving glaze in the details.
Using the Detail Liner with SC-87 Ruby Slippers, apply 2 coats to the berries.
Dip into NT-CLR Clear Dipping.
Fire to cone 06.
Using the Detail Liner with White Gold Overglaze, apply an even, thin coat over the gray areas on the ornaments. Do this in a well-ventilated area.
Fire to cone 018.
Using the Oval Glaze Mop with the Mother of Pear Overglaze, apply a thin coat over the outside of the topper. Apply in small, circular motions for the most color.
On 04 bisque, brush SS-179 Antique Red in all the shadow areas of the truck, brush the remainder of the truck’s body with SS-176 Christmas Red. Dry Brush the body of the truck with Christmas Red, add SS-210 Orange to the brush to dry brush a highlight color over the red. Use the flat shader to float SS-138 Black into the shadow areas.
Brush the windows and the hub caps with SS-45 Buttermilk, dry brush with SS-135 white, Float SS-130 Medium Gray on the window, and hub caps.
Brush SS-81 Shimmering Silver on the bumpers and door handle.
Brush the tires with SS-138 Flat Black.
Brush 2-3 coats of AC-501 Gloss Sealer over the car to gloss, omit the tires.
Pour CD022 Pumpkin/Sunflower Topper mold ¼” thick. Refer to casting instructions.
Once it is firm enough to handle, use the sponge to smooth down casting lines.
Fire to cone 04.
Squeeze around 1 TBS of SG-401 Black onto the palette. Thin slightly with water, so that it is easy to brush. Using the Script Liner, apply to all of the details on the topper. Dip the sponge in water and squeeze out the excess water. Wipe the topper to remove glaze from the high areas, leaving it only in the details.
Using the Script Liner with EL-132 Rust Red, apply 2 coats to the creases on the pumpkins and the stems. Allow glaze to dry between coats. Dip the sponge in water and squeeze out the excess water. Wipe the excess glaze off of the pumpkins, leaving the glaze in the creases.
Using the Script Liner with EL-133 Autumn, apply 2 coats to the pumpkins using vertical strokes.
Using the Detail Liner with EL-128 Wheat, apply 3 coats to the sunflowers. Allow glaze to dry between coats.
Using the Detail Liner with EL-142 Grass, apply 3 coats to the leaves. Allow glaze to dry between coats.
Using the Script Liner with El-148 Wheat, apply 3 coats to the straw at the base of the pumpkins. Use the Soft Fan to apply 3 coats to the bottom and inside of the topper. Allow glaze to dry between coats.
Dip the sponge into EL-132 Rust Red and sponge off the excess onto the palette. Sponge the center of the sunflowers.
Once it is firm enough to handle, use the sponge to smooth down casting lines.
Fire to cone 04.
Use SG-401 Black to make vertical stripes on the center sections of the cart. Outline the details and add nail heads.
Using the Script Liner with EL-131 Turtle Shell, apply 3 coats to the body of the cart (inside and out). Use long and small strokes, going in the direction of the wood. Allow glaze to dry between coats.
Using the Script Liner with EL-119 Burnished Steel, apply 3 coats to the handles, legs and outer section of the wheels. Allow glaze to dry between coats.
Using the Script Liner with EL-146 Rain Cloud, apply 3 coats to the wheels. Allow glaze to dry between coats.
Squeeze around 1 TSP of SG-401 Black on to the palette. Use the Detail Liner to apply 1 coat between the spokes on the wheel.
1. Begin with properly fired shelf cone 04 Bisque. Moisten a clean sponge and wipe bisque to remove any dust.
2. On a plate, tint S-2101 Clear with green food coloring and sprinkle AC-310 Silkscreen Medium into the clear. Use a palette knife to mix, to the consistency of peanut butter. Use the screens from DSS-0152 Day of the Dead, shiny side down, and rub the mix over the screen. This is for color placement only.
3. Use the Script Liner and Liner to apply three coats of SC-74 Hot Tamale to the heart and two coats of SC-97 Cant-elope to the flame. Apply two coats of the colors of your choice to the circular fans. Let dry.
4. Thicken SC-15 Tuxedo as in step two, place the silkscreen design over the painted design and rub the thickened Tuxedo over the screen. Gently clean the screen.
5. Wet a section of cheesecloth and wring out excess water. Lay the cloth flat on a solid surface then use your fingers to widen the spaces and curve the cheesecloth. Use the foam roller to apply SC-15 Tuxedo to the cloth. Place the cheesecloth over the skull and press with a dry sponge to transfer the design to the skull. Remove the cheesecloth, repeat for remaining sections of the skull.
6. Use the Soft Fan to apply two coats of SC-75 Orange-A-Peel to the inside of the skull.
7. Use SG-401 Black to outline the teeth and mouth. Optional: use SG-401 Black Designer Liner to outline the facets.
8. Dip into NT-CLR Clear Dipping Glaze.
9. Fire to cone 05/06.
Form
MB-1515 Faceted Skull Bisque or CD1515 Faceted Skull Mold
Begin with a properly fired shelf cone 04 Bisque. Moisten a clean sponge and wipe bisque to remove dust. Begin with a properly fired shelf cone 04 Bisque. Moisten a clean sponge and wipe bisque to remove dust.
Trace on the pattern with clay carbon paper.
Face and body are shaded using CB-106 Script Liner, use SC-6 Tiger Tail, SC-25 Crackerjack Brown as the base color, apply 2 coats in a blotchy manner, brush SC-2 Melon-Choly over the cheeks and nose. Deepen the shadow areas with SC-14 Java Bean and SC-34 Down To Earth.
Brighten the left side of the nose and face, blotchy SC-75 Orange a Peel onto the body. Highlight the nose and chin with SC-16 Cotton Tail. Use CB-106 Script Liner.
Thin SC-34 Down to Earth, brush with big strokes over the mane. Use the multiple colors of Designer Liner including SG-401 Black to make the lines in the mane, keep them close together.
Outline the parts of the lion with SC-15 Tuxedo, shade around the face and lowers body with Tuxedo.
Brush 1-2 coats of SC-15 Tuxedo on the outer edge framing the flat section of the vase, draw a thick double line of SG-408 Orange on the inner edge of the flat section of the vase, spray with water while the Orange is still wet.
Brush the sides and back with two coats of S-27-25 Safari and two coats of CG-954 Wildfire brushed on with CB-604 Soft Fan.
Brush on two coats of S-2101 Clear Glaze to the flat section of the vase.
Brush the neck of the vase with two coats of SC-15 Tuxedo, use CB-604 Soft Fan.
Load fan brush with SW-154 Shipwreck and as the banding wheel is spinning, apply 2 coats of glaze allowing the coats to dry in between. Keep glaze inside of the rim.
Apply 3 coats of SW-203 Root Beer to the back and rim of the plate. Avoid the foot.
Repeat step 2, but with SW-501 White Gloss.
Use a sponge to clean up any glaze that may have gotten on the foot.
Begin with properly fired cone 04 bisque. Moisten a sponge and wipe bisque to remove any dust.
Using the Soft Fan with FN-304 Black Velvet, apply 4 coats to the front and back of the plate. Allow glaze to dry between coats.
On the DSS-0158 Buggin’ Out screen, locate the bee, snail, dragonfly, ladybug, caterpillar, stinkbug and trees. Draw an outline around them in permanent marker. Cut them out with excess screen around the edges.
Pour around 2 TBS of either S-2101 Crystal Clear Brushing or NT-BR Clear One Brushing onto the palette. Add a few drops of food coloring. Add a pinch of AC-310 Silkscreen Medium. Mix with a palette knife until it becomes the consistency of peanut butter. You may need to add more silkscreen medium or glaze.
Place the screens on the plate one at a time. While holding the screen firmly in place, take a small amount of premixed silkscreen medium, and gently rub in circles starting in the center and working outward.
Using the Script Liner and Detail Liner with SC-6 Sunkissed, SC-13 Grapel, SC-16 Cotton Tail, SC-23 Jack O’Lantern, SC-26 Green Thumb, SC-73 Candy Apple Red, SC-74 Hot Tamale and SC-98 Slime Time, apply 2 coats of glaze to the corresponding screened area. Allow glaze to dry between coats.
Squeeze around 2 TBS of SC-15 onto the palette. Add a pinch of AC-310 Silkscreen Medium. Mix with a palette knife until it becomes the consistency of peanut butter. You may need to add more silkscreen medium or glaze.
Repeat step 5. You will be re-screening the same images in black.
Using SG-403 Red, SG-407 Yellow or SG-408 Orange, go over the legs and antenna on the bugs.
Fire to cone 06.
Form
MB-102 Coupe Dinner Plate
Colors
FN-304 Black Velvet
SC-6 Sunkissed
SC-11 Blue Yonder
SC-13 Grapel
SC-15 Tuxedo
SC-16 Cotton Tail
SC-23 Jack O’Lantern
SC-26 Green Thumb
SC-73 Candy Apple Red
SC-74 Hot Tamale
SC-98 Slime Time
SG-403 Red Designer Liner
SG-407 Yellow Designer Liner
SG-408 Orange Designer Liner
S-2101 Crystal Clear Brushing or NT-BR Clear One Brushing
Create pinch pot by sticking thumb into the middle of the clay ball and pinching while rotating the clay in your hand.
Once your pot is formed in the desired shape smooth out any cracks with your finger and a little water.
Place pot down on the table to create a flat bottom to attach legs.
Roll out two small coils that are twice the thickness of a pencil and similar in length with two flat ends to build on to.
Depending on your desired leg position, the length and thickness of the legs my vary. They must be sturdy enough to support the body if your figure is standing.
Create feet by rolling out small balls of clay and flattening out the connection point with your thumb.
Attach feet to legs by slipping and scoring.
Attach pot (body) to the top of the legs by slipping and scoring. You may need to play around with placement and weight distribution before attaching to be sure your figure will still stand.
Roll out two coils for the arms that are about the thickness of a pencil and similar in length.
Create hands by rolling two small balls of clay to be attached to the end of the arms.
The arms and hands will be smaller than the legs and feet as they are not weight baring.
Attach hands and arms together by slipping and scoring.
Attach arms to the body by slipping and scoring. The angle at which the arm is attached to the body will depend on your desired arm position, be sure to create a flat edge to attach the arm to the body with.
Smooth out any cracks or imperfections with finger and/or sponge.
Allow to dry fully and bisque fire to Cone 04.
Glazing:
Wipe off bisque with a damp sponge to remove any dust.
Decide where you would like to apply color to your doodle and where you would like the black lines to be. You can use a pencil to sketch out your design on the bisque
Squirt out a small amount of each designer liner onto your pallet.
Using a soft bristled round brush apply color to your doodle, by picking up color from your pallet with a wet brush and applying to your piece in the same way that you would apply watercolor.
Once your color is applied add your doodle lines with the black designer liner using the writer tip on the bottle.
Once all details are added allow designer liner to dry completely.
Add 2 coats of Crystal Clear Brushing over the entire piece with a soft fan brush.
Allow to dry completely and glaze fire to Cone 06 using stilts.
Variations and Adaptations
It can help if you make a few practice lines on your pallet or a scrap piece of paper to get used to drawing with the designer liner bottle.
Fold paper vertically and sketch profile of vase form.
Cut out design and unfold.
Roll out a slab about 1/4” thick and compress with rib.
Trace shape of vase onto slab twice and cut out so you have 2 identical pieces.
Cut strips of clay from slab that are about 2 long enough to make the sides and bottom of vase. You can use a string to measure the length if needed.
Place one side of the vase down and slip and score to attach sides and base.
Option to add crumpled paper in the center of vase for support.
Slip and score to attach other side.
Once attached stand up on base and clean up seams.
Allow to dry fully and bisque fire to Cone 04.
Glazing
Wipe off bisque with a damp sponge to remove any dust.
Pour about 1/3 cup of Bright Blue (FN-18) and thin slightly with a splash of water . Ratio about 5 parts glaze to 1 part water.
Mix up thinned glaze and pour into the inside of the vase.
Rock north, south, east and west to coat the whole inside and pour out access.
Touch up missed spots with a brush if necessary
Wipe any drips on the outside of the vase off with a damp sponge.
Using a pencil, draw 2 horizontal lines around the middle of the vase, indicating the blend zone.
Using a soft fan brush Bright Blue (FN-18) apply your first coat of glaze to the top half of the front and back faces of the face, stopping at the mid-point if the blend zone.
Apply one coat of Lavender (FN-12) to the front and back faces of the vase from where the Bright Blue stops to the bottom.
When applying the second and third coats of these glazes, begin to blend them together in the bled zone by brushing one over the other while the glazes are still wet to create an ombré effect.
Apply glaze to the sides of the vase in the same way with Orange (FN-3) on the top and Yellow (FN-2) on the bottom.
Continue the Yellow all the way to the bottom of the vase, covering the foot in glaze.
Once color is dry use stencil and a detail brush to apply spot pattern on vase, using each color’s complement as the spot color on top.
Bright Blue – Orange
Lavender – Yellow
Move the stencil around the vase to create a unique spot pattern, choosing spots of different sizes.
Apply 2 more coats of the colors onto the spots, you may use the stencil again or continue to trace the shape free handed.
Apply 3 coats of Bright Blue to the rim of the vase.
Allow to dry fully and fire to Cone 06 using stilts.
Using a damp sponge dust off the bisque to eliminate dust.
Using the clay carbon paper and the pattern trace the pattern onto the pie plate.Note:Only one side of the Clay Carbon Paper transfers.To test, lay the Clay Carbon Paper on the bisque and with a pencil or pen draw a line.If the line transfers you are good to go, if not, turn the Clay Carbon Paper over and try again. You may also need to cut a dart into the paper so it lays down in the pie plate.
Use the RB-106 #6 Script Liner to apply 4 coats of SW-510 Blue Gloss.Allow the shine to fade before applying the next coat.
Using the same brush apply 4 coats of SW-502 Orange Gloss to the mountain and the foreground under the cactus shrubs.
For the darker areas in the mountain, mix SW-504 Red Gloss and SW-507 Bright Green to create a light brown.
For the dark brown ground, mix SW-504 Red Gloss with SW-509 Dark Green to create a dark brown. Use the Script Liner to apply 4 coats of glaze allowing the coat to fade before applying the next coat of glaze.
The cactus has two sections of green.The dark side or the right of theSaguaro is SW-509Dark Green. Apply 2-3 coats using the Script Liner.
The light sections of the cactus are 2-3 coats of SW-507 Bright Green Gloss.
The cactus flowers are one coat of SW-502 Yellow Gloss with a dab of SW-504 Red Gloss in the center.
Once everything is dry enough to handle.Use the RB-110 10/0 Detail Liner and SW-508 Black Gloss to outline all of the details.
The outside rim of the pie plate has 3 coats of SW-174 Leather or another Stoneware glaze of your choice.
Do not glaze the bottom of the pie plate as it will be dry foot on the kiln shelf.However, you can sign or decorate the bottom with Designer Liner by Mayco as it doesn’t contain frit.
Using the Script Liner with SC-6 Sunkissed, apply 2 coats to the body (large rectangle) and head (square). Allow glaze to dry between coats.
Using the Script Liner with SC-75 Orange-A-Peel, apply 2 coats to the ears and tail (large triangles).
Using the Script Liner with SC-27 Sour Apple, apply 2 coats to the collar (small rectangle).
Using the Script Liner with SC-74 Hot Tamale, apply 2 coats to the legs and nose (small rectangles, small triangle).
Using the Script Liner with SC-11 Blue Yonder, apply 2 coats to the eyes and tag (circles).
Plate Borders Coloring Book
Using the Script Liner with SC-11 Blue Yonder, apply 2 coats of glaze to the rim of the plate. Allow glaze to dry between coats.
Taping (Technique 2)
Cut all of the shapes from the paper.
Arrange shapes onto the plate to make the dog.
Trace each shape with the pencil.
Use MC-002 12mm Low Track Masking Tape to tape off the body (large rectangle) and head (square). Using the Script Liner with SC-6 Sunkissed, apply 2 coats inside the tape. Allow glaze to dry between coats. Remove the tape.
Tape off the ears and tail (large triangles). Using the Script Liner with SC-75 Orange-A-Peel, apply 2 coats inside the tape. Allow glaze to dry between coats. Remove the tape.
Tape off the collar (small rectangle). Using the Script Liner with SC-27 Sour Apple, apply 2 coats inside the tape. Allow glaze to dry between coats. Remove the tape.
Tape off the legs (small rectangles) and nose (small triangle). Using the Script Liner with SC-74 Hot Tamale, apply 2 coats inside the tape. Allow glaze to dry between coats. Remove the tape.
Trace the circles for the eyes and tag. Using the Script Liner with SC-11 Blue Yonder, apply 2 coats to the circles. Allow glaze to dry between coats.
Plate Borders Taping
Place pieces of tape around the edges of the plate.
Using the Script Liner with SC-11 Blue Yonder, apply 2 coats of glaze to the taped-off sections. Allow glaze to dry between coats. Remove the tape before the last coat is completely dry.
Add more pieces of tape and repeat until there is no bisque left on the edge of the plate
Sponging (Technique 3)
Cut around each shape, leaving ½” of paper. (You will only need 1 of each shape) Cut the shape from the paper, leaving the negative.
Squeeze around 1 TBS of each color onto your palette.
Take the sponge and dip it into SC-6 Sunkissed. Place the body (large rectangle) in the center of the plate. Gently sponge. Remove the pattern. Place the head (square) above the right side of the body and gently sponge. Remove the pattern.
Take the sponge and dip it into SC-75 Orange-A-Peel. Place the ear (triangle) on one of the top sides of the head. Gently sponge. Repeat on the other side of the head. Repeat on the back of the body for the tail.
Take the sponge and dip it into SC-27 Sour Apple. Place the collar (small rectangle) between the head and body. Gently sponge. Remove the pattern.
Take the sponge and dip it into SC-74 Hot Tamale. Place the legs (small rectangle) below the body. Gently sponge. Remove the pattern. Repeat for each leg. Place the nose (small triangle) on the head and gently sponge. Remove the patter.
Take the sponge and dip it into SC-11 Blue Yonder. Place the eye (circle) onto the head. Gently sponge. Remove the pattern. Repeat for the other eye and the tag on the body.
Plate Boarders Sponging
Squeeze 1 TSP of SC-11 Blue Yonder onto the palette.
Dip the sponge into SC-11 Blue Yonder and sponge the edge of the plate.
Paper Stamping (Technique 4)
Cut all of the shapes from the paper.
Arrange shapes onto the plate to make the dog.
Trace each shape with the pencil.
Using the Script Liner with SC-6 Sunkissed, apply 1 heavy coat to the body (large rectangle) and head (square). Press paper onto the plate and remove.
Using the Script Liner with SC-75 Orange-A-Peel, apply 1 heavy coat to the ears and tail (large triangles). Press paper onto the plate and remove.
Using the Script Liner with SC-27 Sour Apple, apply 1 heavy coat to the collar (small rectangle). Press paper onto the plate and remove.
Using the Script Liner with SC-74 Hot Tamale, apply 1 heavy coat to the legs and nose (small rectangles, small triangle). Press paper onto the plate and remove.
Using the Script Liner with SC-11 Blue Yonder, apply 1 heavy coat to the eyes and tag (circles). Press paper onto the plate and remove.
Plate Boarders Stamping
Cut a piece of paper around ½” thick and 2” long.
Using the Script Liner with SC-11 Blue Yonder, apply a thick coat to the end half of the paper pattern.
Place the paper pattern perpendicular along the edge of the plate. Press and remove. If the glaze does not reach the edge, you can slide it off towards the edge of the plate. Repeat until you have gone around the entire rim of the plate.
Final
Dip into NT-CLR Clear Dipping glaze
Fire to cone 06.
Form
MB-1115 Casualware Salad Plate
Colors
SC-6 Sunkissed (1oz)
SC-11 Blue Yonder (1oz)
SC-15 Tuxedo (1oz)
SC-27 Sour Apple (1oz)
SC-74 Hot Tamale SC-75 Orange-A-Peel (1oz)
NT-CLR Clear Dipping Glaze (at studio, not in kit)
Use a pencil to draw the shapes for each project on colored construction paper. Refer to each project below:
Once all the construction pieces are cut out, use the scissors to cut out the shapes.
Arrange the shapes onto the plates to make each bug. Using the pencil, trace the shapes. Use the pencil to draw lines for the antenna and legs.
Glue the shapes to a piece of paper. Use the black marker to draw the antennas, eyes, mouth and legs.
Caterpillar Construction
Find 3 sets of circles (1 small, 1 medium, 1 large) or draw your own. Sizes don’t need to be exact.
Small = ½” (a marker cap)
Medium = 1” (salt & pepper shaker cap)
Large = 1 ½” (spice cap)
Trace or draw 2 small circles on the blue paper and white paper.
Trace or draw 1 large circle on the green paper.
Trace or draw 1 medium circle on the orange, yellow, red, blue and green paper.
Butterfly Construction
Find 2 sets of circles (1 small, 1 large) or draw your own. Sizes don’t need to be exact.
Small = ½” (a marker cap)
Medium = 1 ½” (spice cap)
Trace or draw 2 small circles on the red paper and white paper.
Trace or draw 1 medium circle on the orange paper.
Draw an oval on the blue paper. It should be around 4” long.
Draw 2 hearts on the yellow and green paper. They should be around 3” long and 2” wide.
Bee Construction
Find 3 sets of circles (1 small, 1 medium, 1 large) or draw your own. Sizes don’t need to be exact.
Small = ½” (a marker cap)
Medium = 11 ½” (spice cap)
Large = 3” (cup)
Trace or draw 2 small circles on the green and white paper.
Trace 1 medium and 1 large circle on the yellow paper.
Draw 1 triangle on the blue paper. It should be around 1” on each edge.
Draw 2 ovals on the orange and red paper. They should be around 2” long.
Draw 1 rectangle on the black paper. It should be around ½” wide and 9” long. Cut into 3 pieces to make stripes across the large yellow circle.
Caterpillar Glazing
Using the Script Liner with SC-27 Sour Apple, apply 1 coat to the head and last circle on the caterpillar. Do not glaze the eyes.
Using the Script Liner with SC-75 Orange-A-Peel, SC-6 Sunkissed, SC-74 Hot Tamale and SC-11 Blue Yonder, apply 1 coat to the corresponding circles.
Repeat for a total of 3 coats on all circles. Allow glaze to dry between coats.
Using the Detail Liner with SC-15 Tuxedo, make lines for the antenna, legs and mouth. Turn the bush over and dip the end in the glaze. Make 2 dots for the eyes.
Optional: Use the Detail Liner with SC-15 Tuxedo to outline the caterpillar. Or use a plastic fork to add extra details.
Dip into NT-CLR Clear Dipping glaze
Fire to cone 06.
Butterfly Glazing
Using the Script Liner with SC-75 Orange-A-Peel, apply 1 coat to the head of the butterfly. Do not glaze the eyes.
Using the Script Liner with SC-11 Blue Yonder, SC-6 Sunkissed, SC-27 Sour Apple and SC-74 Hot Tamale, apply 1 coat to the corresponding shapes.
Repeat for a total of 3 coats on all shapes. Allow glaze to dry between coats.
Using the Detail Liner with SC-15 Tuxedo, make lines for the antenna, and mouth. Turn the bush over and dip the end in the glaze. Make 2 dots for the eyes.
Optional: Use the Detail Liner with SC-15 Tuxedo to outline the butterfly.
Dip into NT-CLR Clear Dipping glaze
Fire to cone 06.
Bee Glazing
Using the Script Liner with SC-6 Sunkissed, apply 1 coat to the head and yellow stripes on the body of the bee. Do not glaze the eyes.
Using the Script Liner with SC-11 Blue Yonder, SC-27 Sour Apple, SC-75 Orange-A-Peel and SC-74 Hot Tamale, apply 1 coat to the corresponding shapes.
Repeat previous steps for a total of 3 coats. Allow glaze to dry between coats.
Using the Script Liner with SC-15 Tuxedo, apply 2 coats to the stripes. Allow glaze to dry between coats.
Using the Detail Liner with SC-15 Tuxedo, make lines for the antenna, and mouth. Turn the bush over and dip the end in the glaze. Make 2 dots for the eyes.
Optional: Use the Detail Liner with SC-15 Tuxedo to outline the butterfly.
Dip into NT-CLR Clear Dipping glaze
Fire to cone 06.
Form
MB-101 Coupe Salad Plate
Colors
SC-6 Sunkissed (1oz)
SC-11 Blue Yonder (1oz)
SC-15 Tuxedo (1oz)
SC-27 Sour Apple (1oz)
SC-74 Hot Tamale (1oz)
SC-75 Orange-A-Peel (1oz)
NT-CLR Clear Dipping Glaze (at studio, not in kit)
**Amount needed for To-Go Kits are in parentheses
Decorating Accessories
RB-106 #6 Script Liner
RB-110 10/0 Detail Liner
Miscellaneous Accessories
Sponge
Water
Construction paper ½ sheet for each color (red, orange, yellow, green, blue, black and white)
Begin with properly fired cone 04 bisque. Moisten a sponge and wipe bisque to remove any dust.
Mix up the bubble solution. Add 1 TBS of SC-11 Moody Blue, 1 TBS of water and 1 drop of dish liquid into the Dixie cup. Mix with the palette knife. Set aside until Step #5.
Pick either the crab or fish pattern. Cut the pattern out of the paper. Place the pattern on the plate and trace. Then cut the pattern apart on the black lines. Trace each of those sections. This will give you an idea of where to stick the pieces of paper in the following steps.NOTE: For the fish, cut out the entire eye in this step. Don’t worry about the pupils. Don’t cut out the mouths on either pattern.
Using the Soft Fan, apply 1 thick coat of glaze to each piece of paper and press it into position on the plate (glaze side down). When applying 2 colors to 1 piece of paper, randomly brush the first color, then brush the second color to fill in the missing spots. You want the colors to overlap and look random.
Fish Pattern
Using the soft Fan with SC-16 Cotton Tail, apply 1 thick coat to the eyes. Press them onto the plate.
Using the Soft Fan with SC-6 Sunkissed and SC-16 Cotton Tail, apply 1 thick coat to the face, and every other stripe. Press them onto the plate.
Using the Soft Fan with SC-75 Orange-A-Peel and SC-16 Cotton Tail, apply 1 thick coat to the rest of the stripes, fins and tail. Press them onto the plate.
Using the Soft Fan with SC-26 Green Thumb and SC-16 Cotton Tail, apply 1 thick coat to the seaweed. Press them onto the plate.
Crab Pattern
Using the soft Fan with SC-16 Cotton Tail, apply 1 thick coat to the eyes. Press them onto the plate.
Using the Soft Fan with SC-26 Green Thumb and SC-75 Orange-A-Peel, apply 1 thick coat to the body and pincers. Press them onto the plate.
Using the Soft Fan with SC-6 Sunkissed and SC-75 Orange-A-Peel, apply 1 thick coat to the rest of the pieces. Press them onto the plate.
Bubble Technique
Put the straw into the bubble solution. Gently blow until bubbles start coming over the rim of the cup. Scrape across the top of the cup with the palette knife to remove a large clump of bubbles. Lay bubbles onto the plate. Repeat until the plate is covered in bubbles.
After all of the bubbles on the plate have popped, remove the paper pattern. It should be removed before the glaze underneath is completely dry.
Using the Detail Liner with SC-15 Tuxedo, add pupils to the eyes and a smile. If desired, you can outline the fish or crab.
Dip into NT-CLR Clear Dipping glaze
Fire to cone 06
Form
MB-1116 Casualware Dinner Plate
Colors
SC-6 Sunkissed
SC-12 Moody Blue
SC-15 Tuxedo
SC-16 Cotton Tail
SC-26 Green Thumb
SC-75 Orange-A-Peel
NT-CLR Clear Dipping Glaze (at studio, not in kit)
Begin with properly fired shelf cone 04 Stoneware bisque. Moisten a clean sponge and wipe bisque to remove any dust.
Lay the water based marker on the table, press the mug up against the marker and rotate all the way around. This applies a line at the bottom of the mug which is considered the “no paint” line. Do not apply glaze past this point.
Using the soft fan brush apply two coats of SW-156 Galaxy to the outside of the mug. Avoid the handle and the “no paint” line.
Allow the glaze to dry between coats. Dry is considered the shine is off of the glaze.
Using the soft fan brush apply one coat of SW-501 White Gloss to the entire mug. That is over the SW-156 Galaxy, the handle and inside of the Mug. Do not paint past the “no paint” line.
Use the sponge and wipe off any glaze that is below the no paint line or the bottom of the mug.
Dry foot on a properly kiln washed shelf and fire to cone 6.
Form
SB-103 Wavy Mug Stoneware Bisque or CD103+ Wavy Mug Mold
Cast the CD-1252 Skull Mug in the usual manner. Allow to dry!
Clean the greenware.
Using a CB-604 #4 Soft Fan, apply 2 coats of MM-105 Gold Metallic to the outside of the mug on the greenware, do not puddle the color. Allow to dry! (Optional: The mug can be bisque fired to cone o4 then the MM-105 Gold Metallic can be appliers and fired back to cone 04).
Fire to cone 04. Piece will look like it has been burnt when it has been fired..
Using a CB-604 #4 Soft Fan, Apply 3 coats of FN-009 Black to the inside of the mug.
Place some PC-601 Clear Cascade onto a pallet. Using a Sea Wool Sponge, sponge 1 coat to the outside of the mug.
Using a CB-604 #4 Soft Fan, apply 2 coats of S-2101 Crystal Clear to the outside of the mug. Allow to dry!
Begin with properly fired shelf cone 04 bisque. Moisten a clean sponge and wipe bisque to remove any dust.
Using a CB-604 #4 Soft Fan, apply 1 coat of UG-91 True Teal to the Skull Big Mouth. Allow to dry!
Using a damp sponge, wipe back the UG-91 True Teal leaving it in the crevices of the piece. Allow to dry!
Using a CB-604 #4 Soft Fan, apply 3 coats of CC-108 China Sea to the skull. Allow to dry!
Stilt and fire to cone 06.
Classic Crackle glazes need to be stained to enhance the crackle pattern. We use SS-138 Flat Black Softees Acrylic stain slightly thinned with water applied to the piece in sections then wiped back with a damp paper towel.
Begin with properly fired shelf cone 04 bisque. Moisten a clean sponge and wipe bisque to remove any dust.
Place some SG-401 Black Designer Liner onto a foam plate or some form of a pallet.
Using a CB-604 #4 Soft Fan, pick up some water onto the brush and thin the SG-401 Black Designer Liner about the consistency of milk. Apply 1 coat to the outside of the skull mug. Allow to dry!
Using a Damp Sponge, wipe back the SG-401 Black leaving it in the crevices.
Using a CB-604 #4 Soft Fan, apply 2 coats of S-2101 Crystal Clear to the inside of the skull mug only. Allow to dry!
Using a CB-604 #4 Soft Fan, apply 1 coat of CC-107 Green Tea to the outside of the skull mug.. Allow to dry!
Using a CB-604 #4 Soft Fan, apply 2 coats of CC-108 China Sea to the outside of the skull mug. Allow to dry!
Stilt and fire to cone 06.
Classic Crackle glazes need to be stained to enhance the crackle pattern. We use SS-138 Flat Black Softees Acrylic stain slightly thinned with water applied to the piece in sections then wiped back with a damp Paper Towel.
Begin with properly fired shelf cone 04 bisque. Moisten a clean sponge and wipe bisque to remove any dust.
Using a CB-604 #4 Soft Fan, apply 1 coat of UG-210 Forest Green to the outside of the Sugar Skull Box top and bottom.. Allow to dry!
Using a damp sponge, wipe back the UG-210 Forest Green leaving it in the crevices of the piece. Allow to dry!
Using a CB-604 #4 Soft Fan, apply 2 coats of S-2101 Crystal Clear Brushing Glaze. Allow to dry!
Using a CB-604 #4 Soft Fan, apply 3 coats of CC-107 Green Tea to the outside of the Sugar Sull Box. Allow to dry!
Stilt and fire to cone 06.
Classic Crackle glazes need to be stained to enhance the crackle pattern. We use SS-138 Flat Black Softees Acrylic stain slightly thinned with water applied to the piece in sections then wiped back with a damp paper towel.
Begin with properly fired shelf cone 04 bisque. Moisten a clean sponge and wipe bisque to remove any dust.
Basecoat the dog with SS-127 Medium Portrait. Allow to dry!
Using a Pencil, lightly sketch spots on the dog.
Using a RB-118 #8 Round, apply 2 coats of SS-24 Chocolate Fudge to the spots. Allow to dry.
Place the dog on a couple layers of paper towels.
Apply 2 coats of MM-106 Steel Metallic to the spots on the dog. While the second coat is still wet, sprits the MM-106 Steel Metallic with a heavy coat of MM-305 Rapid Rust. Allow to dry.
Drybrush the plain areas of the dog with SS-127 Medium Portrait eliminate the rust rips. Be carful not to get any of this color on the Rust spots.
Drybrush the same areas with SS-45 Buttermilk then highlight with SS-135 White.
Using a pencil, lightly sketch the eyes on the dog.
Using a RB-100 #0 Detail Liner, apply SS-135 White to the whites of the eyes.
Using a RB-100 #0 Detail Liner, apply SS-127 Medium Portrait to the iris of the eyes. Shade around the iris with SS-24 Chocolate Fudge.
Using a RB-100 #0 Detail Liner, apply SS-138 Flat Black to the pupil of the eyes, nose and mouth.
Using a RB-110 #10/0 Liner, outline the eyes with SS-138 Flat Black. Add a highlight of SS-135 White to the eyes. Allow to Dry!
Apply 1-2 coats of AC502 Matte Sealer to the piece.
Appy 2 coats of AC-501 Gloss Sealer to the eyes, nose and mouth of the dog.
DO NOT FIRE!
Form
MB-1516 Faceted Dog Bisque or CD1516+ Faceted Dog Molds
Begin with properly fired shelf cone 04 bisque. Moisten a clean sponge and wipe bisque to remove any dust.
Basecoat the cat with SS-138 Flat Black. Allow to dry!
Apply 2 coats of MM-104 Dark Bronze Metallic to the cat. Allow to dry!
Place the cat on a couple layers of paper towels.
Working from the bottle of metallic color drizzle MM-102 Copper Metallic then some MM-105 Gold Metallic.
Spritz a heavy coating of MM-202 Green Patina to the piece while the MM-102 Copper Metallic and the MM-105 Gold Metallic are still wet.
Drizzle a little more of the MM-102 Copper Metallic and the MM-105 Gold Metallic then spritz again, not as heavy. Allow to dry!
Working from the bottle of metallic color drizzle MM-106 Steel Metallic here and there on the piece. Spritz with MM-305 Rapid Rust on the MM-106 Steel Metallic while it is still wet. Allow to dry!
Apply 1-2 coats of AC502 Matte Sealer to the piece.
DO NOT FIRE
Form
CD1517+ Faceted Cat Mold or MB-1517 Faceted Cat Bisque
Begin with properly fired shelf cone 04 bisque. Moisten a clean sponge and wipe bisque to remove any dust. .
Using a Basecoat Brush, apply 1-2 coats of SS-57 Accent Green to the body of the turtle.
Drybrush the body with heavy coat ofSS-276 Forest then SS-19 Country Sage then lightly with SS-376 Lime Burst followed by some SS-111 Brightest Yellow, Highlight with some SS-135 White in the brush.
Using a Basecoat Brush, apply 1-2 coats of SS-24 Chocolate Fudge to the shell.
Drybrush a heavy coat of SS-198 Chocolate, then SS-234 Medium Mocha then SS-212 Light Umber. Highlight with SS-254 Golden Ochre then some SS-45 Buttermilk in the brush.
Top of Shell (refer to photo) – Apply a coat of MM-102 Copper Metallic coming down form bellow the center into the side feathering it into the other colors.
Apply a coat of MM-106 Steel Metallic to the top center of the shell (refer to photo) feathering into the Copper.
Apply a second coat of the MM102 Copper Metallic and a coat of the MM-106 Steel Metallic. While the metallics are still wet, spritz with MM305 Rapid Rust. You will start getting a Patina and a Rust finish in about 20 – 30 minuets. Allow to dry!
Shade all the deep crevices of the turtle body with SS-57 Accent Green.
Shade the shell with SS-24 Chocolate.
Using a CB-202 #2 Detail and a CB-110 #10/0 Line, apply SS-135 White to the eye area, Apply SS-254 Golden Ochre to the iris, shade with SS-57 Accent Green, Use SS-138 Black for the pupils and outlines. Add a highlight of SS-135 White.
Apply Matte Sealer of choice to each piece. Allow to dry!
Apply 2 coats of AC-501 Gloss Brush on Sealer to the eyes, nose and mouth.
Begin with properly fired shelf cone 04 bisque. Moisten a clean sponge and wipe bisque to remove any dust. .
Using a Basecoat Brush, apply 1-2 coats of SS-237 Dark Brown to the back area of the dog.
Drybrush the back area of the dog with a mix of SS-237 Dark Brown and SS-45 Buttermilk to lighten. Highlight with SS-45 Buttermilk.
Basecoat legs (except the feet, tip of tail, chest and stripe on top of head) head and neck with SS-234 Medium Mocha.
Drybrush with SS-194 Medium Taupe then with SS-212 Light Umber. Highlight with a little SS-45 Buttermilk in the brush.
Basecoat all white areas with SS-127 Medium Portrait.
Drybrush with SS-45 Buttermilk then SS-135 White.
Shade all deep crevices of all brown areas with SS-24 Chocolate Fudge and around the white areas with SS-234 Medium Mocha.
Using a CB-202 #2 Detail brush, apply SS-183 Rich Peach to the nose and mouth.
Using a CB-202 #2 Detail and a CB-110 #10/0 Line, apply SS-135 White to the eye area, Apply SS-19 Country Sage to the iris, shade with SS-57 Accent Green, Use SS-138 Black for the pupils and outlines. Add a highlight of SS135 White.
Apply Matte Sealer of choice to each piece. Allow to dry!
Apply 2 coats of AC-501 Gloss Brush on Sealer to the eyes, nose and mouth.
DO NOT FIRE!
Form
MB-1491 Faceted Fox Bisque or CD1491+ Faceted Fox Mold
Begin with properly fired shelf cone 04 bisque. Moisten a clean sponge and wipe bisque to remove any dust. .
Using a Basecoat Brush, apply 1-2 coats of SS-237 Dark Brown to the back area of the dog.
Drybrush the back area of the dog with a mix of SS-237 Dark Brown and SS-45 Buttermilk to lighten. Highlight with SS-45 Buttermilk.
Basecoat legs (except the feet, tip of tail, chest and stripe on top of head) head and neck with SS-234 Medium Mocha.
Drybrush with SS-194 Medium Taupe then with SS-212 Light Umber. Highlight with a little SS-45 Buttermilk in the brush.
Basecoat all white areas with SS-127 Medium Portrait.
Drybrush with SS-45 Buttermilk then SS-135 White.
Shade all deep crevices of all brown areas with SS-24 Chocolate Fudge and around the white areas with SS-234 Medium Mocha.
Using a CB-202 #2 Detail brush, apply SS-183 Rich Peach to the nose and mouth.
Using a CB-202 #2 Detail and a CB-110 #10/0 Line, apply SS-135 White to the eye area, Apply SS-19 Country Sage to the iris, shade with SS-57 Accent Green, Use SS-138 Black for the pupils and outlines. Add a highlight of SS135 White.
Apply Matte Sealer of choice to each piece. Allow to dry!
Apply 2 coats of AC-501 Gloss Brush on Sealer to the eyes, nose and mouth.
DO NOT FIRE!
Form
MB-1516 Faceted Dog Bisque or CD1516+ Faceted Dog Molds
Wipe down the Stoneware bisque (Cone 04) with a damp sponge to remove any fired dust or debris.
Load the CB-604 Soft Fan brush with SC-33 Fruit of the Vine and apply 2 coats to some of the edges of the leaf brushing the color towards the inside center. Color should be heaviest along the edge trailing out towards the center almost in a dry brush method. You are not trying to completely cover the inner surface of the dish. If there are skips in the color all the better. Only slightly brush the color on the backside of the leaf matching the placement of color on the front. Repeat this same method of color application using SC-73 Candy Apply Red on the other edges of the leaf. The colors can and should overlap some.
Shake and stir EL-207 Gold Mine. Apply two coats to the front of the dish using CB-604 Soft Fan. Apply 1 coat down to about ½” from the foot of the dish. Apply a second coat down to about 1” from the foot of the dish.
Wipe off any glaze from the foot of the dish with a damp sponge. Fire to Shelf Cone 5-6 (Mid-range High Fire.) Do not stilt the piece. Make sure the foot of the dish is completely sitting on the kiln shelf.
Fettle the seams from the ware using a Clean Up Tool. Carve any detail back into the ware. Use the Green Grit Cloth to further sand down the seam lines. Use a moistened Synthetic Sponge to remove any dust from the ware.
Using a Pointed Round brush sized for the area painted, apply 3 coats of the following Fundamental Underglazes;
UG-31 Chocolate to Sven’s pants, Astrid’s shoes and buttons.
UG-32 Cocoa to both gnome’s hands and noses.
UG-82 Tucson Turquoise to Astrid’s dress.
UG-221 Cement to Sven’s beard.
UG-208 Dragon Red to both gnome’s hats.
Place some SG-402 White onto a tile. Dry brush the color over the beard using CB-602 Soft Fan.
Place on a tile a small amount of SW-301 Iron Wash. Use a small section of a moistened Synthetic Sponge to veil on the color along the edges of the hat rim and seam.
Fire to Shelf Cone 04.
On a tile, thin some SW-301 Iron Wash and apply it all over the gnomes using CB-604 Soft Fan. Using a dampened Synthetic Sponge to remove the excess color off the highlights on the gnomes. Rinse the sponge often. The antiquing should be uniform in appearance. The apron area should be the lightest of all. The apron may appear stained after antiquing, but will fire cleaner if the wash is removed well.
Apply 2-3 coats of SW-140 Black Matte to Sven’s shoes using CB-404 Pointed Round.
Apply 3 coats of SW-172 Macadamia to Astrid’s hair using CB-404 Pointed Round.
Apply 3 coats of SW-131 Birch to Sven’s jacket using CB-404 Pointed Round.
Apply 3 coats of SW-02 Matte Clear to the beard and flesh areas on both gnomes using CB-404 Pointed Round.
To make the embroidery on the apron use SG-410 Bright Blue. The procedure is to make laying down “6” and “9” that interlock and then dotted with the color around them to tie the pattern together. Add some dots to the hair ties.
Apply 2 coats of SW-01 Clear to the hats with CB-602 Soft Fan in a dabbing motion. Two coats will produce a matte textured effect. For a complete shine to the hats, apply a third coat.
Apply 3 coats of SW-01 Clear to the remaining areas using a brush sized for the area. These areas on Astrid are her buttons, dress, shoes and hair ties. There is no glaze applied to Sven’s pants.
Wipe off any glaze that may be on the bottom of the shoes. Fire to Shelf Cone 5-6 (Mid-range high fire.) Do not stilt. Make sure they are sitting completely on a shelf.
Fettle the seam lines off the ware using the Clean Up Tool. Sand any imperfections using the Green Grit Cloth. Wipe down the ware to remove any dust. Check the inside for any dust or debris as well.
Transfer the design onto the ware using a Pencil and AC-230 Clay Carbon.
Incise the lines of the design using a Scraffito Tool. Keep the lines even in depth and width when carving the lines. Dust off any clay particles while carving the lines.
Fire to Shelf Cone 04-05.
Use a moistened Synthetic Sponge to wipe down the ware to remove any dust. Check the insides of the container as well.
Using CB-604 Soft Fan to apply 3 coats of FN-08 to the inside of the container bottom and lid. Using CB-404 Pointed Round to apply 3 coats of Brown to the lower sections of the acorns and nob on lid.
Apply 3 coats of EL-142 Rare Earth to the stem and caps of the acorns using CB-404 Pointed Round.
Apply 3 coats of EL-142 Grass to the leaves in a dabbing motion using CB-404 Pointed Round.
On a tile thin SC-51 Poo Bear to non-fat milk consistency. Apply 2 coats to the background of the on the container and lid excluding the nob using CB-604 Soft Fan and CB-106 Script Liner. Let dry.
On a tile thin SC-5 Tiger Tail to non-fat milk consistency. Load the CB-106 Script liner with water and tip brush with color. Shade around the design with the brush about 1 ½” from the design. Shade the lid completely excluding the nob.
On a tile thin SC-25 Crackerjack to a melted ice cream consistency. Further deepen the shading around the design using the CB-106 Script Liner loaded with water and tipped with color. Shade the edge of the lid. Let Dry.
Transfer the lettering onto the ware using AC-230 Clay Carbon and a pencil. Make sure the lettering is perpendicular to the bottom edge of the container. Apply 2 coats of SC-34 Down to Earth using CB-101 Liner to the lettering.
Apply 1-2 coats of SG-703 Autumn Specta-Clear to the background of the design and lid (excluding the nob) using CB-604 Soft Fan and CB-106 Script Liner. Be aware of the specks as you brush on the glaze. Brush out any clumps of specks that accumulate in any given area.
Use the Clean Up Tool to fettle the seam lines from the ware. Further sand the seam lines with the Green Grit Cloth. Use a damp Synthetic Sponge to wipe down the ware to remove any dust.
Using any of the three brushes listed to apply 3 coats of color to the ware sized for the area being covered. Apply the color in smooth coats.
UG-21 Leaf Green to the underskirt and flower stem.
UG-22 Spring Green to the dress.
UG-31 Chocolate to the hair.
UG-57 Spice Brown to the flesh areas.
UG-34 Chestnut. Dot eyes with the handle end of a brush. 1-2 coats only.
UG-203 Squash Yellow to the flower petals
UG-221 Cement to the wings.
UG-216 Peach to the hair tie. Load the brush with water and tip with color to shade the cheeks.
SG-408 Orange. Place some color onto a tile and thin slightly with water. Use CB-604 Soft Fan loaded with water and tip with color to shade the flower petal edges.
SG-402 White. Place some color onto a tile and slightly thin with water. Use CB-604 Soft Fan to dry-brush the wings.
Fire to Shelf Cone 04-05.
Apply 2-3 Coats of FN-23 Cinnamon to the entire angel using CB-604 Soft Fan. Let the color dry some, but not completely bone dry. Use a moistened Synthetic Sponge to wipe off the glaze from the highlights on the angel. Go cross wise against the grain to leave the color in the crevices when possible. Rinse the sponge often. Color should be uniform in look once antiqued. Make sure the face isn’t too dark with glaze. Let dry. Make one final pass over the angle with a clean damp sponge before firing.
Dot the eyes with 1-2 coats of S-2101 Crystal Clear Brushing using the handle end of a brush.
Optional Step for outdoor use. Glaze the inside with 1-2 coats of S-2101 Crystal Clear Brushing to reduce moisture build up in the bisque.
Stilt and Fire to Shelf Cone 05-06.
Optional Step for outdoor use. Apply 1 coat of Thompson’s Water Seal using CB-604 Soft Fan to the entire outside surface. Let dry. Apply a second coat and let dry. Wash brush in warm soapy water.
Place the piece on the Banding Wheel. Fettle the seam lines off the leather-hard wet greenware gazing ball using the Clean Up Tool. Starting at the top of the ware using the Fret Tool, Scalpel or X-acto Knife to cut out the background sections on the piece. Always cut towards solid areas when possible to avoid cutting through a previous or unwanted section. Work you way around and down the ware cutting out all the background sections. Let Dry.
Use the Clean Up Tool to further clean up the cut out portions on the ball. Remove the seam lines from the pedestal. Use the Green Grit Cloth to further sand the seam lines and clean up the cut out sections. Be careful working on the piece as it is very fragile. Moisten a Synthetic Sponge to remove any dust from the ware. Check the inside of the ball for rough edges and smooth them out as well.
Fire to Shelf Cone 04-05.
Shake and stir CG-753 Sassy Orange. Use CB-604 Soft Fan to apply 3 coats of glaze to the inside of the gazing ball being careful to not get any glaze on the exterior portions of the fret work. Use a Clean Up Tool and moistened Spoolie Brush to remove any color from the cut outs. Apply 3 coats to the middle section of the pedestal as well dispersing the crystals evenly. Let Dry.
Using the CB-604 Soft Fan to apply one slightly thinned coat of SC-23 Jack-O-Lantern over the Sassy Orange on the pedestal. Let Dry.
Place and center the pedestal on the Banding Wheel. Using CB-604 Soft Fan loaded with water and side tip the brush into SC-88 TuTu Tango. Starting at the bottom of the middle section, band the color upwards trailing the color to nothing. Repeat this process from the top of the middle section also. Color should be darkest at the bottom and top of the middle section fading out over the Jack-O-Lantern/ Sassy Orange.
Brush 1-2 coats of SC-88 TuTu Tango to the lower inside portions of the ball feathering the color out about half way up.
To the outside and of the ball apply 3 coats of EL-119 Burnished Steel using CB-604 Soft Fan. For the cut-out side edges on the outside use CB-406 Pointed Round. Try not to let the color run inside the ball over the other glazes. Apply 3 coats to the top and bottom sections of the pedestal.
Optional Step for outside use. Brush 2-3 coats of S-2101 Crystal Clear Brushing using CB-604 Soft Fan to the interior of the pedestal for outdoor use. This will aid in keeping the moisture from penetrating the bisque.
Wipe down the bisque with a damp sponge to remove any dust or debris.
Place several pieces of 1” Blue Masking Tape over the cut-out portions on the pumpkin. Secure the edges around the cut-outs well.
In a Plastic Cup mix FN-040 Pumpkin with water to a melted ice cream consistency. Pour the mixture into the pumpkin. While working quickly, rotate the piece to cover the inside with glaze. Pour out excess color to drain. When the color has dried, remove the tape off the cut-out area. Use a damp sponge to remove any glaze that may have seeped out. Let dry.
Apply 3 coats of EL-143 Cactus Flower to the outside of the pumpkin using CB-604 Soft Fan. Apply 3 coats of EL-142 Grass to the stem of the pumpkin using CB-406 Pointed Round.
Place pumpkin on Lazy Susan or Banding Wheel for ease of applying glaze. Apply 1 flowing coat of SG-202 White Cobblestone to the outside of the pumpkin using CB-604 Soft Fan in vertical strokes. After the first coat has dried to a dull finish but still damp, apply the second coat in the same manner. Repeat this for the third coat. Don’t let the piece completely dry before going onto the next step.
On a tile, thin some EL-122 Malachite to a non-fat milk consistency. Dribble the thinned color over the outside of the pumpkin. The glaze should have varying shades of the glaze due to overlapping of the color. Little or no bare cobblestone should be showing when done. Repeat this with some thicker glaze at various places on the pumpkin letting it trail/run down the sides.
Optional Step: If transporting the piece for firing, a coat of AC-302 Wax Resist can be beneficial. This will keep the Cobblestone from flaking off during transport.
Begin with properly fired shelf cone 04 bisque. Moisten a clean sponge and wipe bisque to remove any dust.
Using the CB-604 Soft Fan Brush, apply 3 coats of SW-119 Cinnabar to the back sides and the front of the platter. Do not glaze the bottom or the foot.
Using the carbon paper and a pencil, transfer the pattern onto the platter. Darken the lines with a pencil if necessary.
Prime the CB-110 Mini Liner by dipping it in AC-525 Brush Cleaner and wiping off the excess with a paper towel. Use it to apply one coat of AC-302 Wax Resist to the lines from the pattern and let dry. Clean your brush immediately after use with additional brush cleaner.
Using the CB-106 Script Liner, apply one heavy coat of SW-167 to leaves #1, 7, 9 and 10 according to the pattern. Apply one heavy coat of SW-168 Coral Sands to leaves #4, 5, 6 and 11. Apply one heavy coat of SW-169 Frosted Lemon to leaves #2, 3 and 8.
Using the CB-106 Script Liner, apply two coats of SW-166 Norse Blue to the areas around the leaves, up to but not including the rim.
Do not stilt or hang over the edge of the kiln shelf.
Begin with properly fired shelf cone 04 bisque. Moisten a clean sponge and wipe bisque to remove any dust.
Using the CB-604 Soft Fan Brush, apply 3 coats of SW-140 Black Matte to the back sides and the front rim of the platter. Do not glaze the bottom or the foot.
Using the carbon paper and a pencil, transfer the pattern onto the platter.
Using the SG-401 Black Designer Liner, draw over the lines from the pattern. Color in the pupil of the right eye.
Using the SG-403 Designer Liner Red, draw in the zig zags on the shirt, the squiggles between the black lines in the hair, and color in the x on the left eye.
Using the CB-604 Soft Fan, apply three coats of SW-137 Storm Gray to the areas around the zombie, even over the hair. The Designer Liner lines will show through the glazes once fired. Use a CB-106 Script Liner to get into the tight areas. Apply 2 coats to the right eyelid.
Using the CB-106 Script Liner, apply three coats of SW-148 Lime Shower to the face, neck, arms and legs of the zombie.
Using the CB-106 Script Liner, apply three coats of SW-207 Chambray to the shirt and the iris of the right eye.
Using the script liner, apply 2 coats of SW-001 Stoneware Clear to the eyes and the teeth.
Do not stilt or hang over the edge of the kiln shelf.
Begin with properly fired shelf cone 04 bisque. Moisten a clean sponge and wipe bisque to remove any dust.
Using the CB-604 Soft Fan Brush, apply 2 coats of SW-001 Stoneware Clear to the back sides of the plate. Do not glaze the bottom or the foot.
Using the carbon paper and a pencil, transfer the pattern onto the platter.
Fill the AC-222 bottle with SW-508 Black Gloss and attach writer tip. Use this to draw over the lines that were traced from the pattern.
Using the CB-106 Script Liner, apply two coats of SW-509 Dark Green Gloss to the leaves.
Using the CB-106 Script Liner, apply one coat of SW-507 Bright Green Gloss to the centers of the leaves.
Using the CB-106 Script Liner, apply three coats of SW-163 Soft Red Matte to the blueberries.
Using the CB-106 Script Liner, apply two coats of SW-156 Galaxy to the round parts of the blueberries (not the tails).
Using the CB-604 Soft Fan, apply 2 coats of SW-001 Stoneware clear to the rest of the front of the plate. Use the SB-106 script liner to get into the tight areas.
Do not stilt or hang over the edge of the kiln shelf.
Trace on the pattern with the Clay Carbon Paper onto the plate.
Using the # 4 Round, apply 2 coats of Dandelion to the maple leaves. Side load in Tu Tu Tango and add some random shading to the edges, followed with Basketball.
Using the # 4 Round, apply 2 coats of Lime Light to the birch leaves. Side load in Basketball and add random shading to the edges, followed with Toad-ily Green.
Using the # 4 Round, apply 2 coats of Toad-ily Green to the oak leaves and add random shading with Tuscan Red followed with Basketball.
Outline and detail the leaves and stems with Tuxedo using the #10/0 mini liner.
Using the # 4 Soft fan, apply 2 coats of Wildfire to the rim and back of the plate.
Using the # 4 Soft Fan, apply 2 coats of Dry Champagne to the front area of the plate.
Begin with properly fired shelf cone 04 bisque. Moisten a clean sponge and wipe bisque to remove any dust.
Basecoat the following white areas, chest, muzzle, neck, legs/feet and tip of tail apply 1-2 coats of SS-130 Medium Grey.
Drybrush the white areas with a mix of half and half SS-130 Medium grey and SS-45 Buttermilk. Followed by drybrushing with SS-135 White.
Basecoat the remainder of the cat with a mix half and half of SS-211 Orange Rust and SS-212 Light Umber.
Drybrush the rust area with SS-194 Medium Taupe then SS-192 Light Taupe and highlight with SS-45 Buttermilk.
Drybrush inside the ears with SS-183 Rich Peach, highlight with SS-45 Buttermilk.
Using a bristle brush, add stripes by stippling with SS-212 Light Umber then soften with SS-45 Buttermilk.
Shade all deep crevices and around the withe areas with a mix half and half of SS-212 Light Umber and SS-211 Orange Rust.
Using a CB-202 #2 Detail Liner brush, apply SS-183 Rich Peach to the nose and mouth.
Using a CB-202 #2 Detail Liner and a CB-110 #10/0 Line, apply SS-135 White to the eye area, apply SS-19 Country Sage to the iris and shade with SS-57 Accent Green. Use SS-138 Black for the pupils and outlines. Add a highlight of SS-135 White.
Apply Matte Sealer of choice to the piece. Allow to dry!
Apply 2 coats of AC-501 Gloss Brush on Sealer to the eyes, nose and mouth.
DO NOT FIRE!
Form
CD1517+ Faceted Cat Mold or MB-1517 Faceted Cat Bisque
Cast the CD-1383 Tiki Cup Mold in the usual manner. When the greenware is removed from the mold, cut out some of the shapes to create a votive tea light cup. Allow to dry! Clean the greenware and bisque fire to cone 04.
Begin with properly fired shelf cone 04 bisque. Moisten a clean sponge and wipe bisque to remove any dust.
Using a CB-604 #4 Soft Fan, apply 3 coats of FN-044 Yellow Orange to the inside of each piece. Allow to dry!
Glaze Fire to shelf cone o6.
Using a Basecoat Brush, apply 1 – 2 coats of SS-24 Chocolate Fudge to the outside of each piece. Allow to dry!
Drybrush the cups with SS-234 Medium Mocha then with SS-194 Medium Taupe.
Green areas are drybushed with SS-57 Accent Green, SS-19 Country Sage then SS-376 Lime Burst, highlight with a little SS-135 White.
Orange areas are drybrushed with SS-399 Terra Cotta then, SS-210 Orange, and highlight with SS-111 Brightest Yellow.
Blue areas are drybrushed with SS-335 Rich Blue then SS-29 Dew Drop Blue, highlight with SS-135 White.
Pink areas are drybrushed with SS-92 Royal Fuchsia then SS-32 Razzberri, highlight with a little SS-135 White.
Yellow areas are drybrushed with SS-254 Golden Ochra, then SS-111 Brighest Yellow, highlight with SS-135 White.
Red Areas are drybushed with SS-179 Antique Red then lightly with SS-135 White and then again with SS-179 Antique Red.
Teeth are drybrushed with SS-45 Buttermilk then SS-135 White.
Cast the CD-870 Ice Cream Cone Box Mold in the usual manner. Allow to dry!
Clean the greenware and bisque fire to cone 04.
Begin with properly fired shelf cone 04 bisque. Moisten a clean sponge and wipe bisque to remove any dust.
Using a CB-604 #4 Soft Fan, apply 2 coats of S-2101 Crystal Clear Brushing glaze to the inside of each piece. Allow to dry!
Using a CB-604 #4 Soft Fan, apply 2-3 coats of your choice of one of the Foundations Sheers glazes listed in the Supply List to the Ice Cream Cone. Allow to dry!
Using a CB-604 #4 Soft Fan, apply 2-3 coats of CG-992 Mint Chip to the Ice Cream. Allow to dry!
Stilt and fire to cone 06.
Form
CD870 Ice Cream Cone Box Mold or MB-870 Hand Dipped Ice cream Cone Box Bisque
Begin with properly fired cone 04 bisque. Moisten a sponge and wipe bisque to remove any dust.
Use the Soft Fan to apply two slightly thinned coats of SC-23 Jack O’Lantern to the body of the llama. Apply in big strokes using water on the brush to help spread the glaze.
Remove any Jack O’Lantern that got onto the tail, tips of ears, nose, hooves and eyes.
Use the Script Liner to apply two coats of SC-88 Glo-Worm to the tail and ears. Apply two coats of SC-11 Blue Yonder to the nose and hooves. Let dry.
Use SG-408 Orange Designer Liner to outline the facets. Use the Liner to apply one coat of SC-15 Tuxedo to create a triangle shaped eye.
Dip into NT-CLR Clear Dipping Glaze or use the Soft Fan to apply one coat of NT-BR Clear Brushing Glaze to the entire piece.
Fire to cone 05/06.
Form
MB-1539 Faceted Llama
Colors
SC-11 Blue Yonder
SC-15 Tuxedo
SC-23 Jack O’Lantern
SC-88 Glo-Worm
SG-408 Orange Designer Liner
NT-CLR Clear Dipping or NT-BR Clear Brushing Glaze
Begin with properly fired cone 04 bisque. Moisten a sponge and wipe bisque to remove any dust.
Using the Soft Fan and Script Liner with SC-54 Vanilla Dip, apply 2 coats to the body, door and awnings of the camper. Allow glaze to dry between coats.
Using the pencil, sketch a camo pattern onto the front and back sides of the camper. It should be irregular, rounded shapes that fit into each other like puzzle pieces. You will want to leave a small gap between each shape.
Using the Script Liner with SC-34 Down to Earth, SC-48 Camel Back and SC-92 Cafe Ole, apply 2 coats to each piece in the camo pattern. Use each color randomly.
Using the Script Liner with SC-35 Gray Hare, apply 2 coats to the windows. Allow glaze to dry between coats. Apply another coat and shade with SC-15 Tuxedo.
Using the Script Liner with SC-35 Gray Hare, apply 2 coats to the hubcaps and bumper of the camper. Allow glaze to dry between coats.
Using the Script Liner with SC-15 Tuxedo, apply 2 coats to the tires and underside of the camper. Allow glaze to dry between coasts.
Using the Detail Liner with SC-15 Tuxedo, outline the details on the camper.
Using the Soft Fan, apply 2 coats of S-2101 Clear Brushing Glaze or dip into NT-CLR Clear Dipping Glaze.
Fire to cone 06.
Form
MB-1536 Camper Container
Colors
SC-6 Sunkissed
SC-15 Tuxedo
SC-34 Down To Earth
SC-35 Gray Hare
SC-48 Camel Back
SC-54 Vanilla Dip
SC-92 Cafe Ole
NT-CLR Clear Dipping Glaze or S-2101 Clear Brushing Glaze
1. Begin with properly fired shelf cone 04 Bisque. Moisten a clean sponge and wipe bisque to remove any dust.
2. Roll Glaze the inside of the vase: The ratio is 3 parts glaze to 1 part water. Use FN-009 Black and water, mix and pour inside the vase and roll to coat. Cover the inside of the vase with the mixture. Pour out the excess glaze and leave up side down to drain. If you do not leave up side down the excess glaze could pool at the bottom of the vase and cause crawling.
3. Use the RB-144 #4 Soft Fan Brush to apply one coat of CG-996 Spring Rain over the outside of the vase. Be sure you use plenty of crystals.
4. Prepare your glazes in small cups to get ready to pour: In separate cups, squeeze about 1″ of the following glazes and mix with 1 1/2 caps of water and stir. Use these colors: SC-9 Jaded, SC-29 Blue Grass and SC-75 Orange-A-Peel.
5. Pour SC-15 Tuxedo into the plastic tip bottle and thin with 1 cap of water.
5. This goes quickly, as you want to work while each color is wet. Place the vase on a plate or foil then pour the colors over the piece. Turn the vase slightly to mingle the colors where they meet. Spray with water to get the glaze to move if needed.
6. Squeeze the thinned SC-15 Tuxedo onto the rim and let it drip down the vase. Spray with alcohol when the glaze is wet to aid movement and spreading of the glazes.
1. Begin with properly fired shelf cone 04 Bisque. Moisten a clean sponge and wipe bisque to remove any dust.
2. Roll Glaze the inside of the vase: The ratio is 3 parts glaze to 1 part water. Use FN-009 Black and water, mix and pour inside the vase and roll to coat. Cover the inside of the vase with the mixture. Pour out the excess glaze and leave up side down to drain. If you do not leave up side down the excess glaze could pool at the bottom of the vase and cause crawling.
3. Use the RB-144 #4 Soft Fan Brush to apply one coat of CG-993 Lavender Sprigs over the outside of the vase. Be sure you use plenty of crystals.
4. Prepare your glazes in small cups to get ready to pour: In separate cups, squeeze about 1″ of the following glazes and mix with 1 1/2 caps of water and stir. Use these colors: SC-13 Grapel, SC-33 Fruit of the Vine and SC-52 Toad-ily Green
5. Pour SC-15 Tuxedo into the plastic tip bottle and thin with 1 cap of water.
5. This goes quickly, as you want to work while each color is wet. Place the vase on a plate or foil then pour the colors over the piece. Turn the vase slightly to mingle the colors where they meet. Spray with water to get the glaze to move if needed.
6. Squeeze the thinned SC-15 Tuxedo onto the rim and let it drip down the vase. Spray with alcohol when the glaze is wet to aid movement and spreading of the glazes.
Begin with properly fired cone 04 bisque. Moisten a sponge and wipe bisque to remove any dust.
MB-1503 Saguaro Cactus Vase
Using the Script Liner with SC-1 Pink-A-Boo, apply 3 coats to every-other section on the cactus. Allow glaze to dry between coats.
Using the Script Liner with SC-43 Lettuce Alone, apply 3 coats to the remaining sections. Allow glaze to dry between coats.
Use SG-402 White to make the dots and lines on the cactus.
Dip into NT-CLR Clear Dipping.
Fire to cone 06.
MB-1504 Barrel Cactus Planter
Squeeze 2 TBS of SC-16 Cotton Tail and SC-2 Melon-Choly onto the palette.
Using the Soft Fan with SC-16 Cotton Tail, apply 1 coat to the bottom and halfway up the sides.
Dip the same brush into SC-2 Melon-Choly and gradually blend with the previous coat all the way to the top of the planter.
Repeat steps #2 & #3 for a total of 3 coats.
Using the Soft Fan with SC-9 Jaded, apply 3 coats to the inside of the planter and along the rim.
Use SG-402 White to make the dots.
Dip into NT-CLR Clear Dipping.
Fire to cone 06.
MB-1505 Cactus Dish
Squeeze 2 TBS of SC-2 Melon-Choly and SC-9 Jaded onto the aluminum foil or a paper plate. Spread it out to make a thick layer. Let it dry, then break it into pieces.
Using the Soft Fan with SC-1 Pink-A-Boo, apply 3 coats of glaze to the back of the “arms” of the plate. Allow glaze to dry between coats.
Using the Soft Fan with SC-43 Lettuce Alone, apply 3 coats of glaze to the back of the “body” of the plate. Allow glaze to dry between coats.
Flip the plate over to the front.
Using the Soft Fan with SC-1 Pink-A-Boo, apply 3 coats of glaze to the “arms” of the dish. Allow glaze to dry between coats.
Using the Soft Fan with SC-43 Lettuce Alone, apply 3 coats of glaze to the “body” of the dish. Allow glaze to dry between coats.
While the last coat of glaze is still damp, sprinkle the glaze pieces onto the plate.
Begin with properly fired cone 04 stoneware bisque. Moisten a clean sponge and wipe bisque to remove any dust.
Using a fan brush, apply 2 heavy coats of SW-501 to the center of the piece, avoiding the rim.
If applying a sea creature, cut the plain shape from paper pattern to use as a resist. Place the paper onto your piece. Be sure to work out and wrinkles or air bubbles.
Allow to dry completely before applying bubbles. To apply bubbles, mix 1 parts of Stoneware Gloss glaze to 1 part water and 1 drop of dish soap. Place straw in liquid and blow into the straw to produce bubbles. Scoop the bubbles into the piece and be sure not to apply too many bubbles or they will pop and turn into a puddle. Try and cover the full area with as thin of a layer of bubbles as possible.
Remove the paper resist if you used one and use a script liner to apply 3 coats of Stoneware Gloss glaze to fill it in.
Use a damp sponge to wipe bubbles off of the rim and use a script liner to apply 3 coats of Stoneware Gloss glaze to the rim of the piece.
Using a fan brush, apply 3 coats of Stoneware Gloss glaze to the back of the plate., avoiding the foot.
Once the piece is dry, use AC-230 Clay Carbon Paper to transfer the details of the sea creature into the piece.
Use the AC-222 Medium Writer Tip Kit writer tip kit to outline the sea creature with either SW-501 White Gloss or SW-508 Black Gloss
Use a damp sponge to wipe away any glaze that may have gotten on the foot.
Begin with properly fired cone 04 stoneware bisque. Moisten a sponge and wipe bisque to remove any dust.
Mix together SW-305 Cobalt Wash and AC-310 Silkscreen Medium to make a paste and apply the silkscreen.
Place the silkscreen in the center of the plate, shiny side down, and press the paste through the silkscreen with your finger. Immediately remove the silkscreen and place in water or wash.
Using a script liner brush, apply 1 coat if SW-304 Copper Wash around the rim of the plate.
Using a fan brush, apply 3 coats of SW-201 Turquoise to the entire plate, avoiding the foot.
Use a damp sponge to wipe any glaze that may have gotten on the foot.
Begin with properly fired cone 04 stoneware bisque. Moisten a sponge and wipe bisque to remove any dust.
Mix together SW-301 Iron Wash and AC-310 Silkscreen Medium to make a paste and apply the octopus from the DSS129 Stylized 2 silkscreen.
Place the silkscreen in the center of the plate, shiny side down, and press the paste through the silkscreen with your finger. Immediately remove the silkscreen and place in water or wash.
Using a script liner brush, apply 1 coat of SW-303 Manganese Wash to the rim of the plate.
Using a fan brush, apply 3 coats of SW-204 Amber Topaz to the entire plate, avoiding the foot. Practice caution when applying the first coat as to not smear the Iron Wash.
Begin with properly fired cone 04 stoneware bisque. Moisten a sponge and wipe bisque to remove any dust.
Using a fan brush, apply 2 coats of S-2701 Peacock Eyes around the top ¼ of the piece.
Apply 3 coats of SW-184 Speckled Toad to the rest of the piece; overlapping the Peacock Eyes by about ½”.
Use a damp sponge to wipe away any glaze that may have gotten on the foot.
Fire to cone 5/6. Sample was fired to cone 6.
*This is a project that requires a degree of practical consideration when being used for dinnerware. If you are applying the project to a vessel in which the glaze can pool, the build up of glaze in those areas can potentially craze severely and in that instance would not be ideal for dinnerware use*
Begin with properly fired cone 04 stoneware bisque. Moisten a sponge and wipe bisque to remove any dust.
Place the SL443 Tin Ceiling stencil in the center of the plate.
Pour some SW-302 Rutile Wash onto a palette and dab the sponge into the product. Be sure to dab excess product off of the sponge to ensure a clean transfer.
Secure the stencil with your hand and gently pounce the sponge onto the stencil. You may need to reload you sponge with product. It is okay if your sponging goes over the edge of the stencil.
Once the entire design has been transferred, remove the stencil. Use a different sponge to remove any excess product from around the design. Keep your pouncing sponge dry so you don’t dilute the color!
Once the background is clean, place the stencil back onto the plate aligning the corner of the stencil to the edge of the transferred design and apply glaze through the stencil with a sponge. Repeat for the other 3 edges.
Use a damp sponge to remove excess product from around the design.
Use a script liner to apply 1 coat of SW-302 Rutile Wash around the rim and use a fan brush to apply it to the back of the plate, avoiding the foot.
Use your fan brush to apply 3 coats of SW-137 Storm Gray to the face of the plate. Take note of your brush strokes because the variation in the glaze color is dependent upon application.
For dinnerware, use your fan brush to apply SW-001 Stoneware Clear to the rim and back of the plate.
Use a damp sponge to wipe away any glaze that may have gotten on the foot.
Begin with properly fired cone 04 stoneware bisque. Moisten a sponge and wipe bisque to remove any dust.
Mix together UG-50 Jet Black and AC-310 Silkscreen Medium to make a paste and apply the ship from DSS-100 Nautical silkscreen.
Place the silkscreen in the center of the plate, shiny side down, and press the paste through the silkscreen with your finger. Immediately remove the silkscreen and place in water or wash.
Using a script liner brush, apply 2 coats of SW-303 Manganese Wash to the rim.
Using a fan brush, apply 2 coats of SW-131 Birch in a 1” band over the rim and into the plate.
Apply 1 coats of SC-30 Blue Dawn around the ship.
Using a fan brush, apply 1 coat of SW-001 Stoneware Clear to the entire face of the plate.
Apply 3 coats of SW-131 Birch to the back of the plate, avoiding the foot.
Use a damp sponge to wipe away any glaze that may have gotten on the foot.
Begin with properly fired cone 04 bisque. Moisten a sponge and wipe bisque to remove any dust.
Place AC-230 Clay Carbon Paper over the front of the tray. Trace the pattern using the pencil.
Squeeze SG-407 Yellow onto the palette – around the size of a dime. Using the Script Liner, make brush strokes inside the honeycombs. Apply 1 coat to the bee’s head and stripes.
Squeeze SG-401 Black onto the palette – around the size of a dime. Using the Script Liner, apply 1 coat to the stripes of the bee.
Using SG-401 Black in the detailer bottle, trace over all of the outlines in the pattern. Allow lines to completely dry.
Begin with properly fired cone 04 bisque. Moisten a sponge and wipe bisque to remove any dust.
Using the Soft Fan with FN-41 Medium Blue, apply 3 coats to the front and back of the plate. Allow glaze to dry between coats.
Using the Soft Fan with FN-34 Big Sky Blue, apply 3 coats to the front and back of the bowl. Allow glaze to dry between coats.
Using the Soft Fan with FN-001 White, apply 3 coats to the inside of the tumbler. Allow glaze to dry between coats.
Using the Soft Fan with FN-42 Teal Blue, apply 3 coats to the outside and bottom of the tumbler. Allow glaze to dry between coats.
After the glaze is completely dry, trace the patterns using AC-230 Clay Carbon Paper and the pencil.
Using the Script Liner with SC-93 Honeydew List, apply 3 coats to the large Monstera leaf on the plate and tumbler. Allow glaze to dry between coats.
Using the Script Liner with SC-27 Sour Apple, apply 3 coats to the fern leaves on the bowl and plate. Allow glaze to dry between coats.
Using the Script Liner with SC-96 Aqu-ward, apply 3 coats to the single leaves on the bowl and plate. Allow glaze to dry between coats.
Using the Script Liner with SC-65 Peri-Twinkle, apply 3 coats to the palm leaves on the plate and tumbler. Allow glaze to dry between coats.
Squeeze 1 TBS of SC-16 Cotton Tail onto the palette. Take the end of a brush and dip it into the glaze. Make dots on the plate, bowl and tumbler. Repeat until you have the desired amount of dots.
Begin with properly fired cone 04 bisque. Moisten a sponge and wipe bisque to remove any dust.
Use the pencil to sketch curtains in the windows.
Using the Script Liner with SC-16 Cotton Tail, apply 3 coats to the trim on the campers and the inside of the mug. Allow glaze to dry between coats. Be careful not to get glaze on the trim during the subsequent steps.
Using the Script Liner with SC-37 Ivory Tower, apply 3 coats to the bottom half of the campers. Allow graze to dry between coats.
Using MC-002 12mm Low Track Masking Tape, tape off the bottom and top stripes on the top half of the campers.
Using the Script Liner with SC-24 Dandelion, apply 3 coats to the bottom stripes and the circular window on the dish. Allow glaze to dry between coats.
Using the Script Liner with SC-65 Peri-Twinkle, apply 3 coats to the top stripes and the door on the dish. Allow glaze to dry between coats.
Remove the tape before the glaze is completely dry.
Place the next piece of tape between the two stipes you just glazed. Place 1 more piece over the edge of the SC-24 Dandelion stripe. Using the Script Liner with SC-55 Yella Bout It, apply 3 coats of glaze to the stripes. Allow glaze to dry between coats. Remove the tape.
Place tape on either side of the final stripes. Using the Script Liner with SC-1 Pink-A-Boo, apply 3 coats of glaze to the last stripes, the windows and the hubcaps. Allow glaze to dry between coats. Remove tape.
Using the Script Liner with SC-96 Aqu-ward, apply 3 coats to the tires and curtains. Allow glaze to dry between coats.
Use the pencil to sketch “Happy Camper” at the top of the dish. Sketch a smiley face in the circular window.
Using the Detail Liner with SC-15, outline the details on the campers. Use the Soft Fan to apply 3 coats to the back of the dish and the bottom of the mug. Allow glaze to dry between coats.
Cast the CD020 Sitting Carved Bunny in Low Fire cone 04 slip. Attach the head of the Bunny after removing the greenware from the mold.
Carefully clean the seams from the bunny casting. Cover the bunny with a plastic bag to keep it moist.
Using the CD778 Flowers & Leaves mold. With a piece of moist clay, press the clay into the large rose. Using the fettling knife trim excess clay from the rose. Using a ball of clay, press on to the rose to remove from the mold. Place on a damp paper towel to keep moist. Repeat for the small rose, daisy’s and leaves.
Press out 5 large roses, 2 small roses, 4 daisy’s 11 large leaves and 8 small leaves.
Score and slip attach the large rose and daisy around the neck of the bunny adding leaves in between the flowers. Attach 1 large and 2 small roses to the head with some of the leaves. Clean up any excess slip with a damp brush.Allow to dry.
Using a CB-604 #4 Soft Fan and a CB-220 #2 Detail Liner, apply 3 coats of AS-513 Golden Sand to the body of the bunny. Do not apply to the tail inside the ears, nose. Also do not apply to the bottom of the bunny to prevent the Astro Gem scratching any surface it is placed on.
Using the Script Liner, Apply 3 coats of AS-510 White opal to the tail and inside of the ears. Allow to dry.
Using the Script Liner, shade inside of the ears with UG-215 Blush. Using the Detail Liner, apply 3 coats of UG-215 Blush to the nose.
Using the Script Liner, apply, shade the deep crevices of the bunny, around the flowers, leaves, around the nose on the body side and tail with UG-30 Sand. Allow to dry.
Bisque Fire to one 04.
Using the Script Liner, apply 1 coat of SC-17 Cheeky Pinky. With a damp sponge wipe back leaving the color in the deep crevices. Allow to dry.
Using the Script Liner, apply 1 coat of SC-17 Cheeky Pinky. With a damp sponge wipe back leaving the color in the deep crevices. Allow to dry.
Using the CB-106#6 Script Liner, apply 1 coat of SC-8 Just Froggy to all the leaves. With a damp sponge wipe back the centers of each leaf leaving the color in the veins and outer edges.
Using the Script Liner, apply 3 coats of SC-70 Pink-A-Dot to all the roses.
Using the Script Liner, apply 2 coats of SC-27 Sour Apple to all the leaves.
Using the Script Liner, apply 3 coats of SC-16 Cotton Tail to the daisy petals.
Using the Detail Liner, Apply 3 coats of SC-24 Dandelion to the daisy centers. Shade the daisy centers and in between the petals with SC-27 Sour Apple.
Using the Detail Liner, apply 2 coats of SC-16 Cotton Tail to the eyes. Apply 2 coats of SC-14 Java Bean to the iris of the eye. Apply 2 coats of SC-15 Tuxedo to the pupil of the eye. Using a Liner, brush outline the eyes. Add a dot of SC-16 Cotton tail to the eye for a highlight. Allow to dry.
Using the Script Liner, apply 1 coat of S-2101 Crystal Clear Brushing to all the flowers, leaves eyes and nose. Allow to dry.
Begin with properly fired cone 04 bisque. Moisten a sponge and wipe bisque to remove any dust.
Using a Basecoat Brush, apply 1 good coat of SS-138 Flat Black to the piece. Allow to dry!
Shake and stir MM-102 Copper Metallic, place some on a piece of aluminum foil, apply 1 coat to the Sun Face. Allow to dry!
Apply a second coat of MM-102 Copper Metallic. While still wet, spritz with MM-202 Green Patina. Allow to dry!
Shake and stir MM-106 Steel Metallic, place some on a piece of aluminum foil, apply 1 coat to the Sun Face. Allow to dry!
Apply a second coat of MM-106 Steel Metallic. While still wet, spritz with MM-305 Rapid Rust. It will not hurt t get it on the Copper area. Allow to dry!
In about 20 minutes to an hour you should see come action going on each color.
Using the basecoat brush, drybrush some of the MM-102 Copper Metallic back onto the sun face. This will tone down the patina and will patina from under the copper.
Using the basecoat brush, apply 2 coats of MM-502 Matt Sealer to the piece. This will also spot the patina & rust action. You can opt to not seal and it will continue to patina & rust.
If you would like more copper to the sun face, you can dry bush again with MM-102 Copper Metallic after it has been sealed.
Begin with a properly fired shelf cone 04 Bisque. Moisten a clean sponge and wipe bisque to remove dust.
Use the foam roller to roll a coat of SC-91 Seabreeze over the plate, roll in different directions to the top of the plate, doesn’t need to go to the edge of the plate. The mug is rolled Seabreeze and SC-11 Blue Yonder, roll in a vertical direction.
Use a dry erase marker to scribble across the shiny side of the images used on the plate and mug. Wipe the excess off with a soft cloth. This will make the screens easier to see.
Thicken S-2101 Clear tinted with the food coloring with AC-310 Silkscreen Medium using a palette knife to the consistency of peanut butter. Place the various screen shiny side down on the plate or mug then rub the thickened clear over the screen, this is the pattern for glazing the colors.
With a wet stiff brush remove the Seabreeze glaze from the beard so that it will be white after screening .Brush the hats with SC-73 Candy Apple Red, pants with SC-76 Cara-bein Blue, nose, hands, and mushroom stem with SC-20 Cashew Later, tree branches with SC-14 Java Bean. The larger tree is SC-93 Honeydew List and the shorter one is SC-98 Slime Time. Brush all with 2-3 coats, use RB-110 Liner or RB-106 Script Liner.
Refer to the photo for the colors used on the mug.
When dry, thicken SC-15 Tuxedo follow step 4 in the directions. Lay the screen over the previously screened images, rub the thickened Tuxedo over the screens.
Brush three coats of SC-73 Candy Apple Red on the handle and inside of the mug, use RB-144 Soft Fan.
Brush the plate and the mug with two coats of S-2101 Clear using the fan or dip in a clear glaze.
Begin with properly fired shelf cone 04 bisque. Moisten a clean sponge and wipe bisque to remove any dust.
Brush on two coats of FN-001 White to the hats with RB-122 Soft Fan.
Punch out the various sizes of circles, wet the paper, stick to the glazed hat, press with a paper towel to remove gaps.
Brush the blue hat with 2-3 coats of SC-11 Blue Yonder. Remove the paper dots.
Thin SC-35 Gray Hare, brush over the beard area, wipe back with a damp sponge to leave in the detail of the beard. Use the RB-110 liner to outline some of the hairs of the beard with SC-15 Tuxedo.
Brush the nose with 3 coats of SC-20 Cashew Later, brush and blend SC-89 Cutie Pie Coral on the tip of the nose to redden.
Brush the box shirt with SC-27 Sour Apple, shade SC-26 Green Thumb around the box shirt.
Brush on 2-3 coats of SC-23 Jack O’ Lantern to the hands.\
Punch out various circles with the punches, use the negative space from the punched circles, wet then stick to the shirt and body of the mug, brush two coats of SC-16 Cotton Tail over the circle shapes, remove the paper.
Begin with properly fired cone 04 bisque. Moisten a sponge and wipe bisque to remove any dust.
Squeeze around 1 TBS of SC-73 Candy Apple Red, SC-6 Sunkissed, SC-27 Sour Apple, SC-11 Blue Yonder and SC-85 Orkid onto the palette. Using the Soft Fan with SC-73 Candy Apple Red, apply 1 coat to the head. Using the same brush, apply each of the colors, blending as you work your way to the back of the unicorn. After the glaze is dry, repeat for a 2nd coat.
Using the Soft Fan with SC-15 Tuxedo, apply 1 heavy coat over ¼ of the unicorn. When the glaze starts to lose its shine, take the caps and press up and down into the glaze. They should be pulling the glaze off in circles. If it is not coming off, wait for the glaze to dry a little longer. Use the needle tool to pull up tiny dots of glaze.
Repeat Step #3 until the entire unicorn is complete.
Begin with properly fired cone 04 bisque. Moisten a sponge and wipe bisque to remove any dust.
Tape a straight line 5” from the right side and 4” from the left side. Tape with 1” painters tape on the left side.
Use the Soft Fan to apply 4 coats of FN-301 Marshmallow White to the right side and the back of the tray.
Use the same brush to apply 4 coats of FN-302 Ivory Cream to the left side of the tray. Remove the tape.
Tape over the edge of the Ivory Cream and the Marshmallow White. Apply 4 coats of FN-304 Black Velvet to the remainder of the tray. Remove the tape.
Tape off an approx. width of ½” x 5” long section that crosses over the cream and black matte as shown. Brush the taped of section with three coats of SC-99 Char-ming.
Cut out the shapes to create a pattern. Punch out a 1” circle, a 1 ½” circle shape and a triangle punch. Use the negative space from these punches.
Brush water over the section of the plate and place the paper patterns onto the piece.
Apply three coats of SP-209 Speckled Jaded and SP-288 Speckled Tu Tu Tango, to the circular pattern areas. Apply SC-6 Sunkissed to the paper punched circles and triangles. Apply SC-98 Slime Time to the elongated circle section. Remove the paper patterns after the third coat.
Fire to cone 05/06.
TIP: to make the project faster because of drying time, use cut paper instead of the tape.
Begin with properly fired cone 04 bisque. Moisten a sponge and wipe bisque to remove any dust.
Brush on two coats of FN-001 White to the platter with RB-604 Soft Fan.
When dry, use a dry erase marker to darken the shiny side of the bear from Woodland Animals and the pine trees from Botanical-Trees, wipe off with a soft cloth to see the image.
Thicken SC-15 Tuxedo with AC-310 Silkscreen Medium using a palette knife to the consistency of peanut butter, with the shiny side down screen the bear to the plate in position as shown, use your finger to rub the mixture over the screen. Screen the pine trees around the bear in the same manner. The screening material needs to be a bit thinner to screen the trees.
Thicken SC-99 Charm-ing with a dot of SC-15 Tuxedo to darken with AC-310 Silkscreen medium using a palate knife to the consistency of peanut butter. Use this color to screen the trees on the left side of the platter.
Draw on a simple package with a bow near the bear. Use RB-110 Liner to brush two coats of SC-74 Hot Tamale to the ribbon, outline with SC-15 Tuxedo using CB-110 liner.
Fire to cone 06.
Form
MB-131 Large Oval Platter
Color
FN-001 White
SC-15 Tuxedo
SC-99 Charm-ing
SC-74 Hot Tamal
S-2101 Crystal Clear Brushing or NT-BR Clear One Brushing
Begin with properly fired cone 04 bisque. Moisten a sponge and wipe bisque to remove any dust.
Using the Soft Fan with FN-304 Black Velvet, apply 4 coats to the front and back of the plate. Allow glaze to dry between coats.
On the DSS-0159 Gnomeland screen, locate the two gnomes, mushrooms, trees and flower. Draw an outline around them in permanent marker. Cut them out with excess screen around the edges.
Pour around 2 TBS of either S-2101 Crystal Clear Brushing or NT-BR Clear One Brushing onto the palette. Add a few drops of food coloring. Add a pinch of AC-310 Silkscreen Medium. Mix with a palette knife until it becomes the consistency of peanut butter. You may need to add more silkscreen medium or glaze.
Place the screens on the plate one at a time. While holding the screen firmly in place, take a small amount of premixed silkscreen medium, and gently rub in circles starting in the center and working outward.
Using the Script Liner and Detail Liner with SC-6 Sunkissed, SC-13 Grapel, SC-16 Cotton Tail, SC-23 Jack O’Lantern, SC-26 Green Thumb, SC-73 Candy Apple Red, SC-74 Hot Tamale and SC-98 Slime Time, apply 2 coats of glaze to the corresponding screened area. Allow glaze to dry between coats.
Squeeze around 2 TBS of SC-15 onto the palette. Add a pinch of AC-310 Silkscreen Medium. Mix with a palette knife until it becomes the consistency of peanut butter. You may need to add more silkscreen medium or glaze.
Repeat step 5. You will be rescreening the same images in black.
On the DSS-110 Botanical – Trees screen, locate the grass. Draw an outline around it in permanent marker. Cut it out with excess screen around the edges.
Place the screen on the plate, just under each of your previously screened images. While holding the screen firmly in place, take a small amount of premixed silkscreen medium, and gently rub in circles starting in the center and working outward. Move around until there are 3 sections of grass.
Fire to cone 06.
Form
MB-102 Coupe Dinner Plate
Color
FN-304 Black Velvet
SC-6 Sunkissed
SC-11 Blue Yonder
SC-13 Grapel
SC-15 Tuxedo
SC-16 Cotton Tail
SC-23 Jack O’Lantern
SC-26 Green Thumb
SC-73 Candy Apple Red
SC-74 Hot Tamale
SC-98 Slime Time
S-2101 Crystal Clear Brushing or NT-BR Clear One Brushing
Smack the remaining ¾ of your clay and roll out a slab that is 1/8” thick that measures at least 7”x11”.
Compress slab with credit card or rib.
Cover bottle with one layer of newsprint, flooding along the bottom of the bottle.
Roll slab around wrapped bottle until the bottle sides of the bottle is fully covered by clay.
Cut slab a pencil thickness past the point where the end of the slab meets the clay to allow room for clay to overlap.
Smoosh clay with your fingers pulling clay over the seam until smooth, use credit card or rib to even out clay.
Roll out another 1/8” thick slab and compress.
Trace bottom of the bottle on the slab leaving the same amount of space for overlap.
Cut circle and attach to clay cylinder by pulling and smooshing the clay up the sides of the form.
Smooth out sides of your piece with a credit card or rib by compressing the sides from the bottom up. Be sure to keep the bottle flat on the table when doing this.
Apply stamp mat to outside of the cylinder by wrapping around and gently applying pressure. You can use your credit card or rib again to evenly apply pressure by smoothing over the back of the stamp mat always pulling the rib up towards you from the base.
To create a clean foot, hold the bottle with two hands and rock it forward onto its bottom edge and proceed to roll all the way around the bottom rim.
When ready, remove the bottle by pulling up and twisting. Then pull paper out.
To create roof, cut an angular shape out of the remaining slab (you may need to re- roll if your scraps are not big enough. Option to cut two shapes and pinch together at one side to create a peak roof.
Attach roof to top of cylinder by slipping and scoring at attachment points.
Cut door out with needle tool. Option to leave one side un-cut and fold back to create an open door.
Smooth any cracks or imperfections with fingers and a little bit of water if needed.
Allow to dry fully.
Bisque fire to Cone 04.
Glazing:
Antique textured area of house by covering with one thick coat of the Blueberry Hill (SC-40), allow to dry and wipe away with a damp sponge.
Once dry, glaze 1-2 coats of Brown Cow (SC-41) overtop allowing some of the purple to show underneath.
Antique roof with Moody Blue (SC-12) using the same technique.
Glaze 1-2 coats of Blue Yonder (SC-11) over top of roof once antiqued texture is dry.
If door is open, option to glaze inside with 2-3 coats of Down To Earth (SC-34).
Option to add additional decorative elements and details.
Using the Script Liner with SC-6 Sunkissed, SC-11 Blue Yonder, SC-13 Grapel, SC-26 Green Thumb, SC-74 Hot Tamale and SC-75 Orange-A-Peel, apply 1 coat to the corresponding parts of the face.
Squeeze a small amount of SG-403 Red, SG-407 Yellow and SG-410 Bright Blue onto the palette. Using the Detail Liner, apply random lines and dots to the face.
Using the Soft Fan with SC-15 Tuxedo, apply 2 coats to the edges of the canvas. Allow glaze to dry between coats. Use the Detail Liner to outline the face.
Using the Soft Fan with S-2101 Clear Brushing, apply 2 coats to the front of the canvas. Allow glaze to dry between coats.
Begin with properly fired cone 04 bisque. Moisten a sponge and wipe bisque to remove any dust.
Use the plastic card to apply one coat of SG-501 Sculpting Medium over the top surface of the canvas. Hold the card at a slight angle to apply the Medium and apply so that you leave some texture on the surface.
Cut the card in half lengthwise. Starting in the middle of the canvas, use the small edge of the half card to apply the various colors of the Stroke and Coat in blocks of color. Colors are applied over colors that are next to each other. Generally, only one coat was applied. Apply SC-15 Tuxedo last.
Use an edge of the card to etch lines through overlapping colors to create separate blocks of color.
Use an edge of the plastic card to apply two coats of SC-15 Tuxedo to the sides of the canvas.
Moisten a clean sponge and wipe bisque to remove any dust.
Artist’s Note: There are not three complete layers of any color on this platter. The more unevenly the Stroke & Coat is applied, the more texture you will see in the finished project. You can achieve an interesting finish with Cobblestone if applied to the piece in irregular strokes. If that is not your style, feel free to apply three layers of each glaze. If choosing to paint less than three coats paint in the direction of the shape you are painting.
Sketch the pattern on the plate or trace on using the pattern using the AC-230 Clay Carbon Paper.
Sketch the main cactus and sun. Add vertical lines coming down the cactus as the ribs.
Sketch a horizon line to the right of the cactus.
Using SC-85 Orkid and the #6 Pointed Round (larger) to fill in the background and the back of the platter.
Using the #4 Pointed Round (smaller) fill in the sun and ground with SC-80 Basketball.
Fill in the cactus ribs randomly with SC-43 Lettuce Alone, SC-77 Glow Worm, and SC52 Toadily Green. Alternate between 1-3 coats on the greens to keep things interesting.
Paint the small cacti in the background using each of the greens and the liner brush. Cacti further away should be smaller and darker than the ones in the foreground.
Paint the border with SC-24 Dandelion, carrying over to the outside rim of the platter.
The next step uses S-2726 Cheetah. Open the jar, stir it up well, put the lid back on and shake it up. Now pour some onto a palette so you get the same amount of crystals and glaze in every brush stroke.
Using the larger pointed round brush apply one uneven coat of S-2726 Cheetah over the sun. The more coats you apply the less color of the sun will show through. One good coat is sufficient.
Herb Garden: Open the jar, stir it up well, put the lid back on, and shake it up. Now pour some onto a palette so you get the same amount of crystals and glaze in every brush stroke.
Using the same brush apply one good coat of S-2714 Herb Garden inside some of the ribs on the main cactus.
Using the Detail Liner brush outline the main cactus and some of the ribs with 1-2 coats SG-201 Black Cobblestone. Paint some lines thicker than others for a more drastic Cobblestone effect when the platter is fired.
Use the Detail Liner to outline the background cacti with SG-201 Black Cobblestone. Apply 1-2 coats or a liberal coat.
Paint a thick and uneven border of SG-202 White Cobblestone on top of the SC-24 Dandelion.
On the main cacti, dot on SG-202 White Cobblestone but avoid applying on top of the Jungle Gem Crystal Glaze.
This project will not have a clear glaze, so make sure the bisque is covered with glaze.
Begin with properly fired cone 04 bisque. Moisten a sponge and wipe bisque to remove any dust.
Apply 1 coat of SW-501 White Gloss to the face of the plate, not including the rim.
Pour alternating stripes of SW-501 White Gloss and SW-508 Black Gloss to the face of the plate and pick plate up to swirl. Continue until desired marbling pattern is achieved.
This will need to dry for a while.
Once the glaze is dry, use a palette knife mix some SW-508 with the food coloring and AC-310 Silkscreen Medium.
Apply the Hydrangea Silkscreen to the plate.
Apply 1 coat of SW-501 White Gloss to the inside of the screened area.
Apply 2 coats of SW-507 Bright Green Gloss to the stem and leaves and 2 coats of SW-506 Bright Blue Gloss to the flower. While the second coat of the blue is wet, sponge a bit of SW-505 Purple Gloss onto the flowers.
Allow glaze to dry before lining up and applying the silkscreen again.
Apply 3 coats of SW-508 Black Gloss to the rim and back of the plate.
Use a damp sponge to clean any excess glaze off of the foot of the plate.
Begin with properly fired cone 04 bisque. Moisten a sponge and wipe bisque to remove any dust.
Use the sponge on a stick to apply UG-19 Electra Blue, UG-94 Pansy Purple, and UG-217 Red Coral to the MT-008 Spiral mat. No need to wash in between, it is actually beneficial for blending!
Apply stamp to plate.
Apply design to the plate using 3 coats of UG-94 Pansy Purple. While the last coat is still damp, but not wet, sgraffito the lines into the design.
Apply 3 coats of SW-111 Wrought Iron to the rim and back of the plate, avoiding the foot.
Wipe off any crumbs from the sgraffito and apply 2 coats of SW-001 Stoneware Clear over the center of the plate.
Use a damp sponge to wipe any excess glaze off of the foot.
Begin with properly fired shelf cone 04 Stoneware bisque.Moisten a clean sponge and wipe bisque to remove any dust.
Lay the water based marker on the table, press the mug up against the marker and rotate all the way around. This applies a line at the bottom of the mug which is considered the “no paint” line. Do not apply glaze past this point.
Using the soft fan brush apply two coats of SW-154 Shipwreck to the outside of the mug. Avoid the handle and the “no paint” line.
Allow the glaze to dry between coats. Dry is considered the shine is off of the glaze.
Using the soft fan brush apply two coats of SW-501 White Gloss to the entire mug. That is over the SW-154 Shipwreck, the handle and inside of the Mug.
Using the sponge, remove any glaze from the no paint line or the bottom of the cup.
Moisten a clean sponge and wipe bisque to remove any dust.
Using the Soft Fan brush apply 3 coats of FN-001 White to the front and back of the platter. Allow the shine to fade between coats.
Cut the leaves from the pattern or use AC-230 Clay Carbon Paper to copy the pattern onto the bisque.
For Watercolors Leaves
Squeeze approx. 2 TBS of SC-26 Green Thumb, SC-27 Sour Apple and SC-93 Honeydew List onto the palette.
Thin each color with water to a ratio close to 50:50 / water:glaze.
Dip the Script Liner into SC-93 Honeydew List then dab and puddle in random areas of the leaves.
Using the same brush, repeat the dab and puddle but with SC-27 Sour Apple. Be sure to overlap with some of the previously glazed parts of the leaves.
Using the same brush, repeat with SC-26 Green Thumb. Be sure and overlap with some of the previously glazed parts of the leaves.
Fill the leaves with this technique.
Using the Detail Liner with SC-93 Honeydew List, apply 2 coats to the stems. Allow glaze to dry between coats.
For Ombre Leaves
Squeeze approx. 2 TBS of SC-26 Green Thumb, SC-27 Sour Apple and SC-93 Honeydew List onto the palette.
With a pencil or water-based marker lightly draw two lines creating three sections on the leaf.
Using the Script Liner with SC-93 Honeydew List, apply 1 coat to the outer 1/3 of the first leaf.
Using the same brush with SC-27 Sour Apple, blend with the previous coat and extend down almost to the center of the leaf.
Using the same brush with SC-26 Green Thumb, blend with the previous coat and extend down to the center of the leaf.
Repeat steps 2-4 for the other two leaves. Repeat again for the second coat on all of the leaves.
Using the Detail Liner with SC-93 Honeydew List, apply 2 coats to the stems. Allow glaze to dry between coats.
Crystal Addition
Using the Script Liner with CG-963 Lemon Lime, apply 1 coat to the leaves.
NOTE: If doing ombre with wax technique outlines, put CG-963 Lemon Lime under the glaze. If not, the crystals may come off and stick to other parts of the plate.
Traditional Outlines
Using the Detail Liner with SC-15, outline the leaves and stem.
Wax Outlines
Using the Soft Fan brush with AC-302 Wax Resist, apply 1 thin coat to the front of the platter.
Allow wax to dry.
Use the needle tool (or other sharp tool) to trace around the leaves. You will need to press firmly enough to scrape down to the bisque.
Using the CB-310 Size 10 Flat Shader with SC-15 tuxedo, dab up and down directly over the lines. Try not to get too much excess glaze on the platter.
Use a damp songe or paper towel to wipe away the excess glaze. Do not leave the excess glaze on top of the wax. If glaze is left on the wax, the wax will burn off and leave the glaze where you do not want it during firing.
Look over your outlines to be sure all of the scratched areas have glaze. You may need go over some sections a second time if you didn’t press hard enough.
Begin with properly fired shelf cone 04 bisque. Moisten a clean sponge and wipe bisque to remove any dust.
Use the Soft Fan to apply 1 coat of FN-001 White to the front of the plate.
Unfold the Blue Shop towel, wet and ring out excess water. This keeps the towel from absorbing all of the glaze and helps release the glaze onto the bisque.
Take the caps off of the following glazes and add the AC-224 Plastic Tips to each: SC-16 Cotton Tail, SC-35 Gray Hare and SC-60 Silver Lining. NOTE: The AC-224 Plastic tips fit Mayco’s 2 oz., 8 oz. and pint bottles.
Lay the damp blue shop towel out flat. Squeeze alternating lines of all three colors leaving about 1/4″ between the lines. You can do all of one color at a time or alternate the three.
Using the flexible plastic card, from left to right and horizontally pull the card across the three colors to help blend or create striations. The entire towel does not need to be covered in glaze. The next step will fix bald spots.
Carefully lay the glaze covered towel onto the plate, glaze side down. Use a damp sponge to press the towel onto the bisque. The damp sponge helps the glaze transfer and blend on the bisque.
If there are bald spots on the bisque, pat the paper towel with glaze onto the bisque to fill the spots. Lift off the paper towel.
If there is excess glaze, lightly sponge off excess glaze.
For a guide to flower placement, lightly sketch circles on the plate.
Blow up the balloon to 1/2 the size; it isn’t necessary to fully inflate.
Prepare your glaze palette by pouring a 2″ pool of each color: SC-11 Blue Yonder, SC-45 My Blue Heaven and SC-76 Cara-Bein Blue.
Practice the following steps on a tile first. When comfortable work on the project. Note: the harder you press the larger the flower.
Holding the balloon will both hands, press the balloon straight down into the SC-11 Blue Yonder then again for a double dip of SC-76 Cara-bein Blue
Holding with both hands press the balloon straight down onto the bisque in one of the circles. The glazes will blend together, but you can lightly twist to aid in blending.
Continue creating balloon flowers by alternating between the three blue glaze colors with the balloon.
To deepen a section of the balloon flowers, use the RB-106 Script Liner and SC-12 Moody Blue to press and pull in sections.
Press wispy flowers or shadow of flowers by using left over or thin glaze.
Press the balloon into a thin layer of glaze and press more as the background of flowers
Pour SC-6 Sunkissed on a the palette. Press the tip of the balloon into the Sunkissed then press to the center of the flowers.
Gather 5 Q-Tips into a bunch. Dip the Q-tips into SC-15 Tuxedo and dot in the center of the SC-6 Sunkissed to create dots on the flowers.
Use the RB-110 10/0 Detail Liner to line the stems of the flowers Allow to dry.
Begin with properly fired shelf cone 04 bisque. Moisten a clean sponge and wipe bisque to remove any dust.
Using the Soft Fan, apply 2 coats of thinned SC-45 My Blue Heaven to the wings, tail, feathers and chest.
Add 1 coat SC-16 Cotton Tail over the chest to lighten the color.
Using the Soft Fan, thin SC-11 Blue Yonder and apply 1 coat over the rest of the bird. Be sure to overlap onto the SC-45 My Blue Heaven.
Apply another coat of SC-16 Cotton Tail to the chest area.
While the glaze is wet, press the lace into the wet glaze.
Use the Soft Fan to apply 1 coat of SC-16 Cotton Tail over the lace. This seals the lace into the glaze and prevents the next color from seeping underneath.
Use a paper towel to press down over the area to remove excess glaze and to help the color dry faster.
Using the same brush apply one coat of SC-2 Melon-Choly over the lace. Allow the shine to go away before removing the lace. NOTE: Do not allow to dry completely or the glaze will chip and you will lose the design.
Using the Detail Liner, apply 2 coats of SC-99 Char-ming.
Clean off any glaze from the eyes.
Use the Script Liner or the Detail Liner to apply 2 coats of SC-16 Cotton Tail.
Paint the pupil with the Detail Liner and 2 coats of SC-15 Tuxedo
Shade around the wings, eyes and beak using the Script Liner and SC-76 Cara-Bein Blue. You can add a little water to the brush and blend into the SC-76 Cara-Bein Blue to shade. Cara-Bein Blue is a rich, deep color.
Use the tip of the liner to brush in SC-11 Blue Yonder into the detail on the wings and tail.
Use the Detail Liner to outline the eyes and nose with SC-15 Tuxedo.
Use the Soft Fan to apply 2-3 coats of FN-041 Medium Blue to the inside of the container. Allow to dry.
Begin with properly fired shelf cone 04 bisque. Moisten a clean sponge and wipe bisque to remove any dust.
Using the Soft Fan to apply 1 coat of SC-54 Vanilla Dip to the body of the monkey.
Using the same brush apply 3 coats of SC-54 Vanilla Dip to the muzzle and nose of the monkey.
Cut the jute into 5″ sections and have ready for the next step.
Go back to the body of the monkey and apply a second coat of SC-54 Vanilla Dip.
While the glaze is still wet, press the jute into the wet glaze in a wavy vertical pattern. Let set up for a minute or two.
Use the Soft Fan to apply a coat of SC-54 Vanilla Dip over the jute. This helps seal the jute down to the body of the monkey and prevent the next coat of color from seeping under.
Allow to set up and dry. Dry is considered the shine is off of the glaze. To help the process, press a paper towel down over the jute areas to remove excess glaze.
Still using the Soft Fan, apply 1 coat of SC-86 Old Lace to the chest of the monkey.
Use the Script Liner to apply 2 thin (or thin with water) coats of SC-25 Crackerjack Brown to the rest of the monkey.
Shade around the nose, eyes and muzzle with SC-25 Crackerjack Brown.
Once the shine is off of the glaze remove the jute. NOTE: Do not let completely dry or the glaze will chip and not leave an even mark.
Clean off any glaze on the eyes.
Use the Script Liner or the Detail Liner to apply 2 coats of SC-16 Cotton Tail to the eyes.
Use the Detail Liner tp apply 2 coats of SC-15 Tuxedo to the pupils.
OPTION: Use the Detail Liner to apply SC-15 Tuxedo to outline the tail, inside of the ears, eyes, mouth and muzzle. Some painters may prefer to skip the outline for a softer look.
Use the Soft Fan Brush to apply 3 coats of FN-009 Black to the inside of the container.
Dip into NT-CLR.
Stilt and fire to cone 05/06.
Form
MB-1553 Quirky Monkey
Color
SC-15 Tuxedo
SC-16 Cotton Tail
SC-25 Crackerjack Brown
SC-54 Vanilla Dip
SC-86 Old Lace
FN-009 Black
NT-CLR Clear One Dipping Glaze
Decorating Accessories
RB-106 #6 Script Liner
RB-144 #4 Soft Fan
RB-110 #10/0 Detail Liner
Miscellaneous Accessories
Sponge
Palette
Scissors
Jute cord cut into 5″ sections. (Find at Michaels)
Using the Soft Fan, apply 1 coat of SC-93 Honeydew List to the breast of the frog.
Using the same brush, apply 1 coat of SC-8 Just Froggy to the rest of the frog, omitting the eyes.
Have the jute cut and ready to use.
Using the Soft Fan, apply 1 coat of the same colors onto the frog.
Press the jute into the wet glaze. Create any design or pattern you want with the jute.
Brush a coat of the same color over the jute to seal the fiber onto the bisque. This will keep the next color from seeping under the jute. Allow the color to set.
Use the soft fan brush to apply 2 coats of SC-98 Slime Time over the frog EXCEPT the belly.
Paint the belly with 2 coats of SC-93 Honeydew List. Add in a little SC-8 Just Froggy around the edges to deepen the color.
Allow to dry until the shine leaves the glaze, then remove the jute. NOTE: Do not let the glaze completely dry as it will chip when removing the jute.
Add water to the Script Liner and thin down the SC-36 Irish Luck to add a little shading to the sections of the frog’s body.
Brush a watered down coat of SC-98 Slime Time over the belly to deepen the jute detail.
Remove any glaze from the eyes.
Apply 2 coats of SC-16 Cotton Tail using the Script Liner and the Detail Liner.
Using the Detail Liner paint the pupil with SC-15 Tuxedo.
Using the Soft Fan Brush apply 2-3 good coats of FN-009 Black to the inside of the container. Allow to dry.
Dip into NT-CLR.
Stilt and fire to cone 05/06.
Form
MB-1552 Quirky Frog
Color
SC-8 Just Froggy
SC-15 Tuxedo
SC-16 Cotton Tail
SC-36 Irish Luck
SC-93 Honeydew List
SC-98 Slime Time
FN-009 Black
NT-CLR Clear One Dipping Glaze
Decorating Accessories
RB-106 #6 Script Liner
RB-144 #4 Soft Fan
RB-110 #10/0 Detail Liner
Miscellaneous Accessories
Sponge
Palette
Scissors
Jute cord cut into 5″ sections. (Find at Michaels)
Begin with properly fired shelf cone 04 bisque. Moisten a clean sponge and wipe bisque to remove any dust.Create
a border around the edge of the platter. TIP: Place your pinkie against the edge of the platter and press the pencil approximately 3/8″ from the edge of the platter. Start tracing around the platter by moving your arm but keeping the pencil stationary.
Draw another line that is 1/4″ from the 3/8″ edge.
Either cut out the pattern and trace around or use the AC-230 Clay Carbon paper and to trace the design onto the piece. NOTE: Do not trace the quote or sun rays on yet – the background will be painted first.
Using the Soft Fan brush and the Script Liner, apply 2 coats of SC-86 Old Lace to the background around the sky and mountains.
Using the Script Liner, paint the 1/4″ border line with 2 coats of SC-54 Vanilla Dip. Hold the brush just like you did with the pencil to draw the line. Reload the brush with glaze frequently.
Small Mountain: Use the Script Liner to apply 3 coats of glaze to the various sections of the mountains. Bottom of the small mountain is SC-26 Green Thumb, middle is SC-7 Leapin’ Lizard and the top is SC-16 Cotton Tail.
Sun: Using the Script Liner apply 3 coats of SC-97 Cant-elope to the center of the sun and blend in 3 coats SC-75 Orange-A-Peel around the edges.
Large Mountain: Use the Script Liner to apply 3 coats of glaze to the various sections of the mountains. Bottom of the large mountain is SC-8 Just Froggy, middle is SC-7 Leapin’ Lizard and the top is SC-16 Cotton Tail.
Sky: Using the Script Liner and the Soft Fan brush apply 3 coats of SC-12 Moody Blue to create the sky. OPTIONAL: To get a crisp edge between the sky and mountains, cut a piece of tape and place it on the inside of the traced mountain line. Place the tape edge along the traced line, but on the inside of the line.
Remove the tape before the glaze is dry to avoid chipping.
The hills in front of the mountains are glazed with 3 coats of SC-99 Charm-ing using the Script Liner.
Trace the words on the sky. Use the SG-402 White Designer Liner to write the words. OPTIONAL: Use the Detail Liner to apply 2 coats of the Designer Liner to the words.
Use the SG-408 Orange Designer Liner to create the sun rays.
The remaining border is painted with 3 coats of SC-48 Camel Back applied in the same manner and the inner border. Allow the glaze to dry until the shine is gone before applying the next coat of glaze. This was done last to avoid rubbing off the glaze. Allow to dry.
Begin with properly fired shelf cone 04 bisque. Moisten a clean sponge and wipe bisque to remove any dust.
Using the Soft Fan, painting horizontally, apply 1 generous coat of EL-125 Sahara Sands to the outside of the mug and on the handle. Allow the shine to fade.
Using the same brush, painting horizontally (thin side), apply 1 coat of EL-125 Sahara Sands. Create three rows or bands with space in between them. You are painting around the mug, not up and down.
Paint 1 coat of EL-213 Painted Desert between the bands of EL-125 Sahara Sands overlapping the edges of both colors.
Open the jar of PC-602 White Cascade and stir to mix thoroughly. Using scissors, snip the tip off the plastic Medium Writer Tip. Be sure to remove the black cap and snip the clear plastic tip. NOTE: Do not cut a big opening, just the tip.
Pour the PC-602 White Cascade into the AC-222 Bottle.
Apply two lines of PC-602 White Cascade around the mug. The first row is about 1″ from the top of the mug and the second row is about 1″ from the first row. Stay at least 1.5″ from the bottom of the mug with the PC-602 White Cascade. Cascade is a flux, meaning it helps move the product to blend with the Elements glaze. Allow to dry.
Using the Soft Fan brush, apply 2 more generous coats of EL-125 Sahara Sands and EL-213 Painted Desert to the rows in a circular or horizontal direction. When the glaze breaks during the firing it shows the application.
Using the Detail Liner to apply heavy, random, vertical lines of SC-15 Tuxedo to the outside of the mug. The glaze will melt into the Elements glaze and break up for an interesting effect. Additionally, the black will turn dark brown due to the interaction with the Elements glaze.
Using the same brush to apply 3 coats of EL-213 Painted Desert to the inside of the mug. Paint in a circular manner vs up and down. Elements glazes will move and break leaving a beautiful band of color when painted like this. Allow to dry.
Begin with properly fired shelf cone 04 Bisque. Moisten a clean sponge and wipe bisque to remove any dust.
Trace the pattern onto the piece. Starting with the middle hat, cut it out from the pattern. Cut the band off the hat as well.
Use the negative space for the top part of the hat body. Place this cut out on the pattern and use the sponge on a stick to apply three coats of SC-11 Blue Yonder. Place the positive section of the top part of the hat (not the band) and tap with one coat of SC-11 Blue Yonder and two coats of SC-16 Cotton Tail.
Repeat this process for the hats on the left and right. The left hat is SC-74 Hot Tamale and SC-98 Slime Time. The right hat is SC-98 Slime Time SC-011 Blue Yonder.
Detail the middle hat with two coatsof SC-74 Hot Tamale stripes. Apply triangles of Hot Tamale on the right hat. Apply two coats.
Punch a 1 ¼” circle and use the negative space to tap in a Blue Yonder ball on the right hat.
Decorate the middle hat’s top with loops of SG-403 Red, SG-404 Blue and SG-405 Green. Decorate the last hat with lines of the Designer Liner colors over the Blue Yonder.
Use the Script Liner to apply SC-98 Slime Time to the tassel on the left hat.
Use SG-404 Blue to shade the Blue Yonder in the hats and SG-405 Green to shade the Slime Time in the hats. Outline the hat band of the middle hat with SG-403 Red.
Use the Script Liner to highlight the hats with SC-16 Cotton Tail.
Use the Soft Fan to apply two coats of SG-704 Peppermint to the front of the piece. You can use a Foundations glaze or Speckta-Clear on the back.
Begin with properly fired shelf cone 04 Bisque. Moisten a clean sponge and wipe bisque to remove any dust.
Using the Soft Fan with SC-98 Slime Time, apply three coats to the outside and inside of the hat. Allow glaze to dry between coats.
Using the Soft Fan with SG-704 Peppermint, apply one coat to the outside of the hat.
Cut the eyelash yarn into 4-5” pieces.
Using the Script Liner and Soft Fan with SC-73 Candy Apple Red, apply two coats to the jacket.
While the second coat of Candy Apple Red is still wet, press the eyelash yarn into the glaze with your fingers, a sponge-on-a-stick, or the Soft Fan. Once the glaze is dry to the touch, apply one coat of SC-73 Candy Apple Red over the yarn using the Soft Fan. This will keep the yarn from pulling up.
Using the Soft Fan, apply two coats of SC-87 Ruby Slippers over the jacket. Before the final coat is completely dry, lift the eyelash yarn off the piece.
Using the Script Liner with SC-16 Cotton Tail, apply three coats to the beard.
Squeeze around 1 TBS of SC-15 Tuxedo onto the palette. Thin with water. Using the Soft Fan, float over the beard.
Using the Script Liner with SC-20 Cashew Later, apply three coats to the nose. Highlight with SC-2 Melon-Choly.
Using the Script Liner with SC-98 Slime Time, apply three coats to the gloves.
Using the Soft Fan with SC-73 Candy Apple Red, apply three coats to the inside of the bottom of the jar.
Begin with properly fired shelf cone 04 Bisque. Moisten a clean sponge and wipe bisque to remove any dust.
Trace the pattern onto the piece using AC-230 Clay Carbon Paper.
Use the Script Liner to apply three coats of SC-20 Cashew Later to the face. Add SC-2 Melon-Choly the brush to and apply two coats to the cheeks, nose and mouth. Allow the color to be more pink toward the bottom of the cheeks and nose.
Use the Soft Fan and Script Liner to apply three coats of SC-74 Hot Tamale to the hat area. It is ok if the red goes over the edges where the Snowfall will be applied since Snowfall will cover the glaze.
Use the Script Liner to apply two coats of SC-8 Just Froggy to the leaves.
Thin SC-35 Gray Hare to create a wash. Use the Script Liner to brush swirls of color on the beard, mustache and hat trim. This will give shadow to the Snowfall.
Fill a writer tip bottle with SG-302 Snowfall. Snip the tip to allow the product to flow through easily. Squirt Snowfall onto the piece, following the pattern of swirls on the hat. The swirls on the hat are smaller than the ones on the beard. Squirt into the pattern of the mustache. Use the Script Liner to soften the edges of the Snowfall, always following the lines in the pattern. Note: You can simplify this project by not using the Snowfall.
For the Beard, squirt wide spirals onto the canvas and use your finger to flatten and swirl the spiral in the direction of the pattern.
Carry the pattern from the front of the canvas to the sides.
Use SC-35 Gray Hare around the swirls for depth and to create additional shading in the Snowfall swirls. Use SG-401 Designer Liner with the Liner to accent the lines in the swirls and shape of the mustache.
Use the Script Liner to apply two coats of SC-15 Tuxedo to the eyes. Use the Liner to outline the berries and leaves. Use SC-16 Cotton Tail to highlight the berries, eyes and to outline the cheeks and nose.
Begin with properly fired shelf cone 04 Bisque. Moisten a clean sponge and wipe bisque to remove any dust.
Using the Soft Fan with FN-001 White, apply two coats to the front of the plate. Allow glaze to dry between coats.
Use the Clay Carbon Paper to trace the pattern onto the piece. Go over the wreath pattern with a water-based marker. This will allow you to see the pattern when we apply color onto the piece.
Use the Script Liner to apply one coat of AC-302 Wax Resist to the word “Joy”.
Squeeze 1 TBS of SC-35 Gray Hare, SC-60 Silver Lining and FN-001 White onto the palette. Using the sponge, dip the side into SC-35 Gray Hare and sponge the center of the plate. Then dip into SC-60 Silver Lining and blend with the SC-35 Gray Hare, extending towards the edge of the plate. Then dip into FN-001 White and blend to the edge of the plate.
Using the Detail Liner with SC-48 Camel Back, apply one coat to the branches.
Using the Script Liner with SC-39 Army Surplus, apply one coat to the leaves on the top left and bottom right.
Using the Script Liner with SC-39 Army Surplus and SC-9 Jaded, apply one coat to the leaves on the bottom left and middle right.
Using the Script Liner with SC-9 Jaded, apply one coat to the leaves on the top right.
Using the Script Liner with SC-26 Green Thumb, apply one coat to the leaves on the middle left and the holly.
Using the Script Liner with SC-74 Hot Tamale, apply one coat to the berries.
Dip the Script Liner in FN-001 White and tap the brush handle over another brush handle. This will splatter glaze over the plate.
Using the Soft Fan with FN-001 White, apply three coats to the back of the plate. Alternatively, you can apply two coats of SG-701 Star Dust on the back of the plate.
Begin with properly fired cone 04 bisque. Moisten a sponge and wipe bisque to remove any dust.
Cut out the pattern of the chicken, trace around the pattern on the tile.
Brush the chicken with two coats of SC-6 Sunkissed, wet the area of the chicken, press on the paper pattern, make sure the edges are secure.
Brush the upper ¾ of the tile with 2 coats of SC-91 Seabreeze, and the remainder of the tile with SC-98 Slime Time use RB-144 Soft Fan.
Place the netting fabric over the third coat of Seabreeze and Slime Time while the glaze is still wet. After it has begun to dry, press with a paper towel to remove the excess glaze to speed drying time. Brush over with one coat of SG-202 White Cobblestone, remove the netting when the gloss leaves the glaze.
Cut a toilet paper tube in half lengthwise, then cut it in slats so that a couple of narrow slats will fit in the body of the chicken.
Use a sponge on a stick to apply SC-5 Tiger Tail and SC-97 Cant-elope to the slats use as a stamp to stamp the body and wing of the chicken, will need multiple stamping.
Detail and outline the chicken with SC-15 Tuxedo, brush in the legs with Tuxedo, use RB-110 Liner, use the line to glaze the crown with SC-74 Hot Tamale.
Begin with a properly fired shelf cone 04 Bisque. Moisten a clean sponge and wipe bisque to remove dust.
Brush on one coat of SS-138 Flat Black.
Empty MM-105 Metallic Gold into a jar so that it can be stirred well. Brush on a heavy coat of the Gold to the Llama. Let dry to a tack, brush on a second coat, while the coat is wet, spray on a heavy coating of MM-202 Green Patina. Use MM-600 Spritzer cap on the bottle of Green Patina to spray.
Let dry, may take a few hours to fully develop. I went back and dry brushed more Metallic Gold on the pictured llama as it was too green.
Outline using RB-110 Liner the facets with SS-138 Flat Black, brush on the eye.
Begin with properly fired shelf cone 04 Bisque. Moisten a clean sponge and wipe bisque to remove any dust.
Using a water-based marker laid flat against the table, draw a line around the bottom of the piece. This is the “no paint line.”
Use the Soft Fan to apply two coats of SW-130 Copper Jade on the top 1/3 of the outside of the piece in a curtain pattern. Let dry.
Use the Script Liner to apply vertical lines of SC-32 Bluebeard about ¼” around the middle and bottom of the curtained SW-130 Copper Jade. The lines will extend past the curtain glaze to the bare bisque. Repeat after the first coat dries.
Use the Soft Fan to apply one generous coat of SW-173 Amber Quartz on the outside of the piece except for 1″ from the top. Let dry.
Use the same brush to apply three coats of SW-130 Copper Jade on the inside of the piece. Let dry.
Begin with properly fired shelf cone 04 Bisque. Moisten a clean sponge and wipe bisque to remove any dust.
Roll SC-27 Sour Apple with the 2″ foam roller on the front of the vase, roll in different directions 3-4 times. Or use a sponge and sponge on 3 coats of SC-27 Sour Apple.
Add SC-8 Just Froggy to the roller or sponge (roll off some of the color for a dry roller) roll lightly around the edges of the Sour Apple color for a fade from light in the center to darker on the edges.
Allow to dry.
Place the SL-441 Spots stencil over the green glazes. Lightly roll or sponge SC-16 Cotton Tail over the stencil. Roll or sponge several times to obtain solid coverage. Let dry between some of the coats.
Remove the stencil.
Trace on the deer pattern with AC-230 Clay Carbon Paper.
Brush on three coats of SC-74 Hot Tamale to the deer using the CB-110 Liner, and CB-106 Liner.
Outline the border of the front with SG-403 Red. You can use a sponge to pull around the edge. Or lay a fan brush horizontally to paint a straight line.
Stir the SG-750 Noel crystal glaze, replace the cap and shake. Pour out a dollop of the glaze onto a pallet. This allows an even distribution of crystals and glaze with each brush stroke.
Brush on coat of CG-750 Noel on the sides and back with CB-604 Soft Fan.
When dry, brush with two coats of SC-74 Hot Tamale, over the Noel. Note: CG-750 can be omitted, if desired, then brush on three coats of SC-74 Hot Tamale.
Stilt and fire to cone 06/05.
Form
MB-1391 Med. Flat Bottle of other flat surface form
On 04 bisque, trace on the pattern, use CB-106 Script Liner to brush the leaves with 2-3 coats of SC-27 Sour Apple. Paint slightly past the trace line.
Cut out the paper pattern of the leaves, wet the Sour Apple, place on the paper pattern to mask.
Sponge off excess glaze that may peek from the pattern. Brush on three coats of EL-124 Stormy Blue with the CB-604 Soft Fan.
Remove the paper, outline, and detail with SC-15 Tuxedo, use CB-110 Liner.
Fire to cone 05 to get the silver-blue finish, fire to 06 for a brown finish.
On bisque fired to 04, brush on two coats of FN-001 White using CB-604 Soft Fan.
While the second coat is wet, squirt on SC-26 Green Thumb and SC-29 Blue Grass from AC-220 Detailer Bottles, in a sporadic fashion. Mix colors separately in the detailer bottle, 1” of color, 1/4” of water and 1/2” of isopropyl alcohol. Mix well. Spray with alcohol for an interesting effect.
When dry, cut the cardboard paper tube in small sections to look like fringe. Sponge SC-88 Tu Tu Tango with SC-97 Cant-elope to the fringe. Press to the tile, repeat several times to get a circle of color.
Cut the tube down one side to reduce the circumference and continue to repeat the stamping process to fill in the circle. The circle should look like a fuzzy ball.
Pencil in the eyes, mouth and legs. Scratch out the eye area and brush two coats of FN-001 White. Brush the pupils, mouth line and legs with SC-15 Tuxedo.
Make small tick marks with the tip of the CB-110 Liner with SC-15 Tuxedo throughout the fuzzy ball shape, always radiating from the center to the edges.
Begin with properly fired shelf cone 04 bisque. Moisten a clean sponge and wipe bisque to remove any dust.
Draw a 1/4″ line around the edge of the plate with a pencil or water based marker. An easy way is to hold your little finger against the outside rim, place the pencil and circle the plate.
Using the AC-230 Clay Carbon Paper trace on the pattern. Note: only one side of the Clay Carbon Paper transfers, so test first.
Open and prep the bottle of SG-401. Poke a hole in the tip if the bottle is new – do not cut as the hole will be too big. Tap the tip on the table and start the flow of glaze. This will eliminate air bubbles.
Outline all of the skulls and bones withs the SG-401 Black Designer Liner. The tip makes it easy to do the small areas. Note: Outlines should be a thin application of Designer Liner. If applied like a dimensional glaze it will pop off.
Use the SG-401 Black Designer Liner to fill in the small spaces between the teeth, noses and eyes. Tip: Dot a small amount of Designer Liner on the eye sockets, then use the RB-106 #6 Script Liner to smooth out the glaze.
Depending on the space use either the RB-110 10/0 Detail Liner of the RB-106 #6 Script Liner with SC-15 Tuxedo to fill in the remainder of the white space between the bones and skulls. One good coat is sufficient.
Use the Script Liner to apply 2-3 coats of SC-74 Hot Tamale to the band around the plate. Fully load the script liner, lay it on the plate and pull a long brush stroke. Reload the brush with glaze and continue. The script liner holds a lot of glaze and is meant to lay down a good coat of glaze.
To shade the skulls (refer to picture): Use the Script Liner add water to the brush, dip into the edge of SC-15 Black and swoosh the brush on the palette to water down the black. Lightly lay the brush down on the skull and do one continues pull to shade. It should be a hint of color. If the color is too deep add more water.
Begin with properly fired shelf cone 04 Bisque. Moisten a clean sponge and wipe bisque to remove any dust.
Cut out the flower pattern. Trace around the edges of the pattern, pencil in the center circle, the flower petals and the stem that overlaps the second flower.
Use the RB-106 #6 Script Liner to apply two or three coats of SC-13 Grapel to the petals, mixing in SC-33 Fruit of the Vine to add color variation. Brush past the pencil line at the edge of the petals as it will make it easier to apply the pattern later. Apply two or three coats of SC-33 Fruit of the Vine to the stem. Lighten SC-13 Grapel with SC-16 Cotton Tail and apply in the center of the flowers.
When the flowers are still damp, hold the cut pattern over the painted flowers. Apply a coat of water under the paper, then press the paper onto the tile so it adheres to the glaze. Don’t worry if the glaze is showing past the paper as this will create a more interesting look after firing.
Use the RB-144 #4 Soft Fan to apply two coats of EL-144 Dark Amethyst to the tile, going over the edges of the paper. When applying the glaze, brush different directions to allow the brushstrokes to show.
Remove the paper. • Use the RB-110 #10/0 Liner with SC-15 Tuxedo to outline and add veins to the flower petals. For the flower centers, use the end of a straw the circular shapes.
Use the Script Liner to apply two coats of EL-144 Dark Amethyst over the lower flower. This will make the flower look like a shadow.
Begin with properly fired shelf cone 04 bisque. Moisten a clean sponge and wipe bisque to remove any dust.
Using the Soft Fan with FN-001 White, apply 3 coats to the front and sides of the canvas.
Use the spray bottle and add some SC-74 Hot Tamale and mix in water. You want a very thin glaze, like milk, to spray droplets on the front of the plate. Make sure and clean out the spray bottle immediately after use so it doesn’t clog.
Squeeze around 1 TBS of SC-74 Hot Tamale onto the palette. Thin with water. Using the Script Liner, dab a few large sections on the front of the canvas. Use water to make the sections “spread” to look like blood pooling.
Squeeze around 1 TBS of SC-74 Hot Tamale onto the palette. Use the soft fan brush and apply one good coat to the hand. Press your hand onto the canvas
Using your finger to write “HELP!”. Thin the glaze and let it drip from the bottom of the letters. Holding the canvas at an angle will also help the glaze drip down from the bottom of the lettering.
Dip the Script Liner into the glaze from step 3 and hit the handle of the brush against your finger or another brush to create blood splatters.
Begin with a properly fired shelf cone 04 Bisque. Moisten a clean sponge and wipe bisque to remove dust.
Using the RB-144 Soft Fan brush apply one coat of FN-001 White to the front and sides of the canvas.
Using a sturdy paper towel, dampen and wring out excess water. By wetting the towel it keeps the towel from absorbing all of the glaze.
Lay the towel out flat and in horizontal strips squirt on the following colors: SC-16 Cotton Tail 90% of the towel, SC-60 Silver Lining about 50% and only 5 lines of Gray Hare as it is a dark color.
Fold the paper towel in half vertically, with your hands press the towel to slightly blend the colors, then open the paper towel.
Lay the paper towel down with glaze side up and lay the canvas onto the towel. Lightly press with, your hands, the canvas onto the paper towel to transfer the colors from the towel to the bisque. Wrap the towel around the sides of the canvas.
Remove the paper towel.
To remove the excess glaze you can use a 2″ foam paint roller across the front and wipe off. Or you can use a dry synthetic sponge to blot off the excess glaze and wipe the sponge on another paper towel
Allow to dry.
Center the soldier pattern on the canvas and create the ground about 1″ from the bottom of the canvas. Either use the clay carbon paper and trace the pattern onto the canvas or cut out the pattern and trace around.. If the glaze is too damp the clay carbon paper will not work. Note: test the clay carbon paper to see which side of the paper transfers. Lay the clay carbon paper on the canvas, place the pattern on top of the clay carbon paper and with an ink pen trace the pattern.
Alternative tracing method: If the glaze is dry to the touch, but still a little damp, you can place the pattern on the canvas and trace with a pin (red is nice so you see where you traced) and press firmly. This will make an indentation into the glaze for you to follow.
Use the Script Liner to apply 1-2 coats of SC015 Tuxedo to create the silhouette.
Blow up the balloon.
Squeeze out a puddle of the following colors: SC-73 Candy Apple Red and SC74 Hot Tamale onto a palette.
Press the balloon into the SC-74 Hot Tamale, the dab into the SC-73 Candy Apple Red. Then press onto the canvas. Tip: practice on a tile or paper first. We found holding the balloon with two hands helps steady the balloon and it does not require much pressure to transfer the glaze.
Repeat the process for 3 flowers.
Dot the center of the poppy with SC-15 Tuxedo.
Use the RB-10 10/0 Detail Liner to form the stem of the flower using SC-15 Tuxedo.
Dip in clear glaze or use S-2101 brush on for the front of the canvas.
Stilt and fire to cone 05/06. NOTE: It is important to evenly stilt the Clay Canvas, if not it will warp. Options: A. Do not glaze the back of the canvas and dry foot. B. Use bar stilts and place across each corner. C. Use two large, three prong stilts across the back to provide even support.
Begin with a properly fired shelf cone 04 Bisque. Moisten a clean sponge and wipe bisque to remove dust.
Trace on the pattern.
Punch out 5 round shapes from the circle punch.
Using the RB-106 Script Liner apply 1 coat of SC-24 Dandelion to the plate where the ornament will go. Then paint one coat of SC-24 Dandelion to the paper dot. Press the dot onto the painted spot on the plate. Use a sponge to wipe back any excess glaze that squeezes out.
Place SL-441 Spots Stencil on the plate. Use a sponge on a stick to apply a soft coat of SC-65 Peri-Twinkle to the stencil. It is a light application of glaze for a slight background, not solid coverage. applied to a curved area press on the stencil to flatten then use a press a twist motion with the sponge on a stick. Stay away from the traced tree pattern.
Fill a AC-220 Detailer Bottle with SC-73 Candy Apple Red. Fill in the detail of the tree and the trunk with the bottle of glaze.
Remove the paper circles. Remove paper before the glaze is dry so the edges do not chip.
When the red glaze is dry silkscreen the bell onto the yellow dot. Using a palette knife mix SC-15 Tuxedo with AC-310 Silkscreen Medium to the consistency of peanut butter. Use the small bell ornament from DSS-0133 Merry Christmas. With the shiny side down, rub the thickened Tuxedo over the screen in the space left from the paper circle shapes.
Fill in with SC-73 Candy Apple Red around the ornaments, as the circle shape may have been a tad larger than the silkscreen.
Brush two coats of SC-24 Dandelion over the star. Use the RB-110 Detail Liner to outline the star with SC-15 Tuxedo and add a hook to the ornament so it looks like it is attached to the tree and outline the star.
Optional: Float a shadow under the tree with RB-106 Script Liner use SC-73 Hot Tamale.
Begin with a properly fired shelf cone 04 Bisque. Moisten a clean sponge and wipe bisque to remove dust.
Brush on two coats of FN-001 White to the front of the tray with the RB-144 Soft Fan.
Let dry. Use AC-230 Clay Carbon Paper to trace the pattern pen works best.
Apply one coat of SC-302 Wax Resist to the trees and most of the snow foreground, leaving un-waxed areas for shadow, use RB-110 Liner or RB-106 Script Liner, make sure to clean the brush thoroughly after use.
Use a toothbrush to spatter wax to the sky area.
Use RB-144 Soft Fan to brush with slightly thinned SC-31 The Blues to the lower sections of the sky, brush a coat over the trees to bead up color for the first coat only. Remove some of the beaded colors if too much is applied. Add thinned SC-12 Moody Blue to the brush to finish the upper sky. Let dry completely then apply a second and third coat of the thinned color to avoid a streaky look. Avoid the trees on the second and third coat. The RB-106 Script Liner can be used between the branches.
Brush one coat of thinned SC-12 Moody blue or the SC-31 The Blues to the snow banks, the un-waxed area will tint with this color and create a shadow.
Brush the back with three coats of FN-001 White with RB-144 Soft Fan.
Begin with a properly fired shelf cone 04 Bisque. Moisten a clean sponge and wipe bisque to remove dust.
Using the RB-144 #4 Soft Fan brush apply two coats of FN-001 to the top of the plate.
Cut out the shape of the gnome from the pattern.
Place the pattern on the plate and lightly trace around the shape.
Slide the AC-230 Clay Carbon Paper under the pattern and trace on all the details. Note: Only once side of the Clay Carbon Paper transfers. Test prior to tracing.
The Gnome pattern will act as a masking tool. Use the soft fan brush and rehydrate the Foundations glaze with water and press the pattern in place. Take a damp sponge and press down the pattern. Make sure the edges are sealed tight so the next glaze color does not seep under the pattern. Use a paper towel to press down the pattern and remove excess water.
Brush the plate with three coats of FN-011 Light Blue use the fan brush or three coats of CG-978 Arctic Splash.
Remove the paper Gnome pattern.
Punch out three ½” circle shapes. Place on the hat where the pattern indicates and use water to attach.
Use the RB-106 Script Liner to apply two coats of SC-20 Cashew Later to the skin.
To rosy up the nose and cheeks use SC-2 Melon-Choly. Lightly apply with the CB-106 Script Liner or squeeze a sponge and dap on.
Look at the pattern for locations for SC-73 Candy Apple Red. With the Script Liner apply 2-3 coats of SC-73 Candy Apple Red on the gnomes’ hat, suit, and shoes.
Using the same brush apply 2-3 coats of SC-74 Hot Tamale onto the areas noted on the pattern.
Switch to the RB-110 10/0 Detail Liner Brush. Apply two coats of SC-26 Green Thumb to the mittens.
Still using the Detail Liner Brush stripe the leggings with SC-15 Tuxedo. 1-2 coats is sufficient.
Shade the beard with SC-60 Silver Lining using CB-106 Script Liner.
Remove the paper dots on the hat. Use the Detail Liner to outline the dots on the hat with SC-26 Green Thumb.
The Detail Liner is used to outline everything with SC-15 Tuxedo.
Now we are switching to the Script liner. Brush SC-16 Cotton Tail to highlight lines in the hat, boots, and rim of the hat.
Brush the red areas of the gnome with SG-701 Star Dust one coat.
Use the Soft Fan brush and apply 3 coats of FN-01 White to the back of the plate.
Begin with a properly fired shelf cone 04 Bisque. Moisten a clean sponge and wipe bisque to remove dust.
Using the Soft Fan with FN-006 Blue, apply 3 coats over the tile. Allow glaze to dry between coats.
Place the SL-441 Spots Stencil over the tile.
Squeeze about 1 TBS of SC-15 Tuxedo onto the palette. Dip the sponge on a stick into the glaze and blot off any excess onto the palette. Sponge over the stencil until it is completely covered. Lift the stencil.
Using the scissors, cut the fish from the pattern. Trace the fish onto the tile with the pencil.
Using the X-ACTO knife, scrape away the glaze under the fish’s face.
Using the Detail Liner with AC-302 Wax Resist, trace the body and fins of the fish. Do not trace around the face.
Using the Script Liner with SC-86 Old Lace, apply 2 coats to the face. Shade with SC-2 Melon-Choly. Allow glaze to dry between coats.
Using the Detail Liner with SC-2 Melon-Choly, apply 2 coats to the lips. Allow glaze to dry between coats.
Using the Detail Liner with SC-15 Tuxedo, outline the details of the face and make an eye.
Using the Detail Liner with SC-16 Cotton Tail, make a dot in the center of the eye.
Using the Script Liner with SG-202 White Cobblestone, apply 1 coat to the fins and 2 coats to the body. Apply the second coat after the first coat is no longer shiny.
Using the Script Liner with SC-33 Fruit of the Vine and SC-2 Melon-Choly, apply 1 coat to the fins. This must be done before the cobblestone starts to crack.
Using the Script Liner with SC-33 Fruit of the Vine and SC-85 Orkid, apply 1 coat to the body. This must be done before the cobblestone starts to crack.
Begin with properly fired shelf cone 04 Bisque. Moisten a clean sponge and wipe bisque to remove any dust.
Use the AC-220 Detailer Bottles and fill with the following mixture: 1″ of SC-11 Blue Yonder in one bottle and 1″ of SC-12 Moody Blue in another. Add 1/4″ of water and 1/2″ of rubbing alcohol to each bottle and shake to mix well. Cut a small hole in the tip of the bottle.
Fill the MM-600 Spritzer bottle with rubbing alcohol.
Use the Soft Fan to apply two coats of FN-001 White.
While the second coat of FN-001 White is wet, drop the SC-11 Blue Yonder and SC-12 Moody Blue alcohol mixed glaze in the upper section of the tray. Working while wet helps the glaze spread and move. Spritz the glaze with alcohol using the spritzer bottle while the color is still wet. Let dry.
Prep the Silkscreen: Use a dry erase marker and color the SHINY side of the silkscreen. Wipe off excess color with a paper towel and you can easily see the image in the silkscreen. The stain will last several cleanings. When it fades, repeat the process.
Create Silkscreen Medium: To be able to see the seahorse we will silkscreen with a tinted clear glaze, paint the design, then silkscreen over the painted image with black. Mix S-2101 Clear with food coloring to deepen the color and add AC-310 Silkscreen Medium mixing with palette knife to the consistency of peanut butter.
With the silkscreen shiny side down, position the seahorse screen from DSS-0148 Sea Life 3 XL onto the tray. Rub the thickened clear over the screen pushing the medium through the screen onto the tray. This is only for a pattern for color placement.
Use the Script Liner to apply 2 coats of SC-13 Grapel to the left side of the seahorse and SC-77 Glo-Worm to the right. Overlap and blend the colors where they meet.
Next step on Seahorse: Thicken SC-15 Tuxedo with AC-310 Silkscreen Medium to the consistency of peanut butter. Position the screen over the painted sea horse and rub the thickened Tuxedo over the screen to transfer the black details and outlines onto the tray.
Use the Soft Fan to apply three coats of FN-001 to the back of the tray. Let dry.
Begin with properly fired cone 04 bisque. Moisten a sponge and wipe bisque to remove any dust.
Slightly thin FN-039 Light Gray, pour inside of the pitcher and tumbler. Roll to coat, then pour out the excess and drain.
Use the Soft Fan to apply three coats of FN-001 White to the outside of the pitcher, tumbler and the entire tray.
Use the sponge-on-a-stick to apply SC-35 Gray Hare to the MT-013 Honeycomb Mat or MT-002 Woodgrain Mat for the tray. Press the mat onto the pitcher and the tray to transfer the color. Let dry.
Thicken SC-15 Tuxedo with AC-310 Silkscreen Medium. Mix using a palette knife to create the consistency of peanut butter. Place the silkscreen onto the piece, shiny side down, and rub the thickened Tuxedo over the screen. This creates a pattern. Use the various screens from DSS-0128 Farm and DSS-053 Farmhouse.
Use the Liner and Script Liner to fill in the pattern with one coat of SC-15 Tuxedo.
Apply 2 coats of SW-131 Birch to the outside of the Tumbler. Leave about 1/4″ from the top.
Apply wax resist in design of your choice over the Birch. In the featured photos, on was applied in vertical stripes and the other was applied in a lattice design.
Apply 2 coats of SW-178 Fool’s Gold to the entire Tumbler, avoiding the bottom. If the wax design that you applied is very detailed we would recommend only applying 1 coats where the combo is.
Use a clean sponge to wipe away any glaze that may have gotten on the bottom of the tumbler.
Let dry completely.
Fire to shelf cone 5/6.
Form
SB-128 Tumbler Stoneware Bisque or CD128 Tumbler Mold
Thin SW-176 Sandstone with water to the consistency of heavy cream (about 1 part water/2 parts glaze). Pour the glaze into the vase and roll vase to coat the inside. Pour out excess and place upside down to dry.
Draw three large upside-down teardrop shape on all sides of the vase with a pencil to outline the area SW-176 Sandstone will be applied.
Put SW-405 Light Magma and SW-406 Dark Magma into a slip trailer and squiggle glaze around the three teardrop shapes.
Apply three coats of SW-176 Sandstone to a section of the vase. On the sample vase, it was applied to the neck/top and as three large teardrop shapes around the vase leaving space in between for glaze trailing.
Use a sponge to wipe away any glaze that may have gotten on the bottom of the vase.
Thin about 2 oz of SP-209 Speckled Jaded to the consistency of heavy cream (2/1 glaze/water). Roll the glaze to coat the inside of the vase, pour excess glaze out, and dry upside down.
Apply 2 coats of SP-209 Speckled Jaded to the outside of the vase avoiding 1-2 inches from the top.
Apply 3 coats of SW-405 Light Magma to the top 1/2 of the vase.
Use a clean sponge to wipe away any glaze that may have gotten on the foot of the piece.
Thin about 2 oz of SW-210 Emerald the the consistency of heavy cream (2/1 glaze/water). Roll the glaze to coat the inside of the vase, pour excess glaze out, and dry upside down.
Use a pencil to draw a band about 1/2 way down the vase.
Use a palette knife to mix AC-310 Silkscreen Medium with SW-301 Iron Wash until it is about the consistency of peanut butter.
Align the mask screen with the drawn band and apply the top 1/2 of the screen to the piece above the band. Wash and completely dry the screen to repeat on the other side.
Apply 3 coats of SW-405 Light Magma below the bad, avoid the foot.
Apply 2 coats of SW-210 Emerald above the band. Don’t over brush the glaze one the first coat because the screen will smear if it’s brushed too much. Be aware of your brush strokes and the evenness of application to achieve an even finish.
Apply 1 coat of SW-301 Iron Wash over the Magma.
Use a clean sponge to wipe away any glaze that may have gotten on the foot.
Apply 2 coats of SW-177 Raspberry Mist to the outside of the Tumbler. Leave about 1/4″ from the top.
Apply AC-302 Wax Resist in design of your choice over the Raspberry Mist. In the featured photos, one was applied on a banding wheel and the other was applied in a lattice design.
Apply 2 coats of SW-123 Sapphire to the entire Tumbler, avoiding the bottom. If the wax design that you applied is very detailed we would recommend only applying 1 coats where the combo is.
Use a clean sponge to wipe away any glaze that may have gotten on the bottom of the tumbler.
Begin with properly fired cone 04 bisque. Moisten a sponge and wipe bisque to remove any dust.
Place AC-230 Clay Carbon Paper over the front of the mug. Trace the pattern using the pencil. There is a pattern for “MOM” and “DAD”
Use the pencil to sketch squiggly lines over the entire mug. Make sure you have lines going through your lettering
* NOTE: For Steps 4 & 5, you can also use a different color palette. Just select 3 shades of the same color.
“MOM” pattern: Using the Script Liner with SC-1 Pink-A-Boo, SC-70 Pink-A-Dot and SC-95 Pinkie Swear, apply 2 coats to each section inside the lettering. Make sure not to use the same color for sections that are right next to each other.
“DAD” pattern: Using the Script Liner with SC-11 Blue Yonder, SC-45 My Blue Heaven and SC-76 Cara-Bein Blue, apply 2 coats to each section inside the lettering. Make sure not to use the same color for sections that are right next to each other.
Using the Detail Liner with SC-15 Tuxedo, outline the lettering and the lines.
Begin with properly fired shelf cone 04 bisque. Moisten a clean sponge and wipe bisque to remove any dust.
Pink Angel
Thin some SS-194 Medium Taupe, apply to the face, arms and wings. Wipe back with a damp cloth.
Thin some SS-127 Medium Portrait, apply to the Face & Arms. Drybrush the face & arms with SS-127 Medium Portrait. Mix a bit of SS-176 Christmas Red to some SS-127 Medium Portrait, drybrush the cheeks with this mixture. Deepen a bit more to paint the lips.
Deepen some SS-176 Christmas Red with some SS-198 Chocolate. This will create deep mauve color. Apply a thin wash (with water) to the dress and flower hat. Wipe back for some highlights.
Drybrush the wings and dress collar with SS-135 White. Apply a light wash of the dress color to shade the wings
Drybrush the dress with SS-141 Light Pink. Highlight with some SS-135 added to the brush.
Basecoat the hair with SS-176 Christmas Red mixed with some SS-198 Chocolate and a touch of SS-138 Flat Black to deepen. Drybrush the hair with the mix of SS-176 Christmas Red mixed with some SS-198 Chocolate with some SS-135 White in the brush to lighten.
Shade the deep crevices of the dress and wings with the SS-176 Christmas Red mixed with some SS-198 Chocolate and a touch of SS-138 Flat Black.
Using a CB-110 #10/0 Liner, basecoat the eyes with SS-135 White. The Iris is SS-198 Chocolate and the pupil is SS-138 Flat Black. Outline the eyes and paint the eyebrows with SS-138 Flat Black. Add a highlight to the eyes with SS-135 White.
Apply Sealer of choice to the piece.
Blue Angel
Thin some SS-194 Medium Taupe, apply to the face, arms and wings. Wipe back with a damp cloth.
Thin some SS-127 Medium Portrait, apply to the Face & Arms. Drybrush the face & arms with SS127 Medium Portrait. Mix a bit of SS-176 Christmas Red to some SS-127 Medium Portrait, drybrush the cheeks with this mixture. Deepen a bit more to paint the lips.
Thin some SS-29 Dew Drop Blue, apply to the Dress & hat. Apply a thin wash (with water) to the dress and flower hat. Wipe back for some highlights. Allow to dry.
Apply a thin wash of SS-194 Medium Taupe over the dress and wings.
Drybrush the dress with SS-29 Dew Drop Blue add some SS-135 White for highlights.
Drybrush the wings with SS-194 Medium Taupe and SS-135 White in the brush. Add some SS-29 Dew Drop Blue.
Drybrush the bottom of the drees, collar ad hat top with SS-135 White
Using a CB-110 #10/0 Liner, basecoat the eyes with SS-135 White. The Iris is SS-29 Dew Drop Blue and the pupil is SS-138 Flat Black. Outline the eyes and paint the eyebrows with SS-138 Flat Black. Add a highlight to the eyes with SS-135 White
Apply thinned SS-254 Golden Ochre to the hair.
Thin some SS-234 Medium Mocha, brush over the hair. Drybrush the hair with SS-111 Brightest Yellow with some SS-135 White in the brush.
Apply Sealer of choice to the piece.
Glue the Small Terra Cotta Pot to the Blue Angels hands using 5 Minuet Epoxy. Hot Glue some small filler flowers in the pot. Make a small wreath with some small greenery. Glue to the hands of the Pink Angle.
Load fan brush with SW-131 Birch and as the banding wheel is spinning, apply 2 coats of glaze allowing the coats to dry in between. Keep glaze inside of the rim.
Apply 3 coats of SW-178 Fool’s Gold to the back of the plate. Avoid the foot.
Repeat step 2, but with SW-178 Fool’s Gold and bring it out to the rim.
Use a sponge to clean up any glaze that may have gotten on the foot.
Begin with properly fired shelf cone 04 Bisque. Moisten a clean sponge and wipe bisque to remove any dust.
Use the Soft Fan to apply three coats of FN-001 White to the front of the canvas. Let dry.
Cut out the pattern, then place on the canvas and trace around the edge. Use a foam roller to roll MT-002 Woodgrain Mat with SC-5 Tiger Tail, press the mat to the top of the canvas over the edges of the paper pattern to transfer the design. Hold or adhere paper in place on canvas while stamping to mask zebra area.
Place a piece of AC-230 Clay Carbon Paper under the pattern, trace on the zebra’s stripes and eye, mark the black stripes.
Outline the stripes and eye and the outline of the zebra body with SG-401 Black.
Fill an AC-220 Detailer Bottle with SG-201 Black Cobblestone, fill in the black stripes with the cobblestone.
Use the Liner to apply one coat of SC-15 Tuxedo over the eye area. Apply a second coat of SC-15 Tuxedo over the pupil of the eye, leaving a highlight area in the eye.
For the zebra head with the muzzle, apply Tuxedo over the muzzle. When applying the second coat, leave a section with only one coat for a highlight.
Use the Soft Fan to apply two coats of SC-15 Tuxedo on the edges of the canvas.
Fire to cone 05/06.
Form
MB-1353 8″ x 10″ Clay Canvas or MB-1461 Clay Clipboard
Begin with a properly fired shelf cone 04 Bisque. Moisten a clean sponge and wipe bisque to remove dust. Begin with a properly fired shelf cone 04 Bisque. Moisten a clean sponge and wipe bisque to remove dust.
Trace on the pattern with clay carbon paper.
Face and body are shaded using CB-106 Script Liner with blotchy brush strokes. Basically, you want to the brush strokes to show so the colors somewhat blend but give highs and lows of color, not solid opaque coverage. Start with SC-25 Crackerjack Brown as the base color. Add in SC-5 Tiger Tail apply 2 coats in a blotchy manner. SC-34 Down to Earth is applied towards the edges of the body for depth and shading.
Brush SC-2 Melon-Choly over the cheeks and nose. Deepen the shadow areas with SC-14 Java Bean and SC-34 Down To Earth.
Brighten the left side of the nose and face, blotchy SC-75 Orange-A-Peel onto the body. Highlight the nose and chin with SC-16 Cotton Tail. Use CB-106 Script Liner.
Thin SC-34 Down to Earth and brush with big strokes over the mane area – 1 coat.
Use the multiple colors of Designer Liner including SG-401 Black to make the lines in the mane, keep them close together.
Outline the parts of the lion with SC-15 Tuxedo. Wet the brush and shade around the face and lowers body with Tuxedo.
Brush 1-2 coats of SC-75 Orange-A-Peel on the outer edge of the plate, spray with water while the Orange-A-Peel is still wet.
Begin with a properly fired shelf cone 04 Bisque. Moisten a clean sponge and wipe bisque to remove dust.
Mark 4 of the AC-220 Detailer Bottles from the bottom, 1″, 1 1/4″, and 1 3/4″ lines. Fill with the following colors to the 1″ line, SC-11 Blue Yonder, SC-26 Green Thumb, SC-36 Irish Luck, SC-76 Cara-bein Blue. Add water to the 1 1/4″ line, and rubbing (isotropic) alcohol to the 1 3/4″ line. Stir and mix well. Use a 2 oz size bottle to fill with the alcohol add the MM-600 spritzer cap to the bottle.
Brush on two heavy coats of FN-001 White to the top of the clipboard with the Soft Fan. After the second coat while it’s still really wet, squirt on the alcohol colors, SC-11 Blue Yonder, SC-26 Green Thumb and SC-76 Cara-Bein Blue. Let dry.
Cut out the leaf pattern, trace around the leaf pattern on to the tile. Pencil in the center and veins of the leaf, including the stem.
Use the Liner to apply two coats SC-36 Irish Luck to the stem.
Use RB-110 Liner with AC-302 Wax Resist to outline the veins on the leaf, outline the outside of the leaf with the liner, may want to use a larger brush for a wider band of wax on the outside of the leaf.
Use the alcohol glaze colors, SC-76 Cara-bein Blue near the center sections of the leaf, use SC-26 Green Thumb and SC-36 Irish Luck to fill in the leaf, let the colors mingle with each other where they meet. If the colors cross into the waxed line, use a wet brush to move the color.
Begin with properly fired stoneware bisque. Moisten a clean sponge and wipe bisque to remove any dust.
Using a water-based marker laid flat against the table, draw a line around the bottom of the piece. This is the “no paint line.”
Using a detailer bottle, filled with SC-15 Tuxedo, create two horizontal lines of color about 1″ apart and 1″ from the top of the tumbler. Next, draw vertical lines from the top horizontal line going slightly past the bottom horizontal line. These do not need to be uniform – the messier the better. Allow a little blob of glaze onto the tumbler at the start of each vertical line.
Apply two coats of SW-130 Copper Jade from the top down going directly over the bands of SC-15 Tuxedo. Leave just the tails of the vertical lines exposed. Let dry.
Apply two coats of SW-173 Amber Quartz over the entire piece except for a 1″ band at the top.
While the second coat of SW-173 is still wet drag fingers through the color to create a wave pattern in the wet glaze.
Apply two coats of SW-120 Copper Jade to the inside of the mug in a circular motion with RB-140 #8 Soft Fan.
Fire to cone 6. Do not stilt.
Form
SB-128 Tumbler Stoneware Bisque or CD128 Tumbler Mold
On bisque fired to 04, brush on two coats of FN-001 White using CB-604 Soft Fan. While the second coat is wet, squirt on SC-26 Green Thumb and SC-29 Blue Grass from AC-220 Detailer Bottles, in a sporadic fashion. Mix colors separately in the detailer bottle, 1″ of color, 1/4″ of water and 1/2″ of isopropyl alcohol. Mix well. Spray with alcohol for an interesting effect.
When dry, cut a toilet paper tube at the bottom to look like fringe, to form flower petals. Sponge SC-88 Tu Tu Tango with SC-97 Cant-elope to the fringe, press to the tile, repeat several times.
Sponge SC-97 Cant-elope to the centers. Dot with SC-15 Tuxedo, use the eraser and tip of the pencil to vary the size of the dots.
Use a sponge to apply SC-15 Tuxedo to the ST-367 Leafy Border Stamp only apply to sections of leaves on the stamp. Press to the tile around the flowers.
Use CB-110 Liner to accent the petals of the flowers with SC-15 Tuxedo.
Begin with properly fired stoneware bisque. Moisten a clean sponge and wipe bisque to remove any dust.
Using a water-based marker laid flat against the table, draw a line around the bottom of the piece. This is the “no paint line.”
Apply two liberal coats of SW-166 Norse Blue on the top 2/3 of the outside of the bowl with a fan brush in a wavy line. Holding the bowl upside down to glaze the outside is easiest. Follow the contour of the piece when applying stoneware glaze. NOTE: Do not paint the bottom of the bowl or below the no paint line.
Use the Soft Fan to apply two coats of SW-173 Amber Quartz on the bottom 2/3 of the outside of the bowl. Be sure to overlap the edges of SW-166 Norse Blue and SW-173 Amber Quartz in a slight wave to create a fluid edge.
Apply two liberal coats of SW-173 Amber Quartz on the bottom 2/3 of the inside of the bowl. Create a slight wave to the bottom of your glaze line
Apply two liberal coats of SW-166 Norse Blue on the top 2/3 of the inside of the bowl with the fan brush. Let dry.
Splatter SW-166 Norse Blue over the SW-173 Amber Quartz inside the bowl.
Begin with properly fired shelf cone 04 bisque. Moisten a clean sponge and wipe bisque to remove any dust.
Using a water-based marker laid flat against the table, draw a line around the bottom of the piece. This is the “no paint line.”
Use the Soft Fan to apply one coat of SW-100 Blue Surf on the outside of the piece. Follow the contour of the piece when applying stoneware glaze. NOTE: DO NOT paint the bottom of the bowl or below the no paint line.
Apply one coat of SW-100 Blue Surf on the top 2/3 of the outside of the piece.
Apply one coat of SW-100 Blue Surf on the top 1/3 of the outside of the piece.
Apply two coats of SW-100 Blue Surf to the inside of the piece.
Begin with properly fired shelf cone 04 bisque. Moisten a clean sponge and wipe bisque to remove any dust.
Using a water-based marker laid flat against the table, draw a line around the bottom of the piece. This is the “no paint line.”
Use the Soft Fan to apply two coats of SW-172 Macadamia to the top 1/2 on the outside of the mug. Follow the contour of the piece when applying stoneware glaze.
Apply two coats of SW-174 Leather on the bottom 2/3 on the outside of the mug, overlapping the bottom part of the Macadamia.
Apply one coat of SW-156 Galaxy by plopping the glaze over the bottom half of the SW-172 Macadamia glaze and top half of the SW-174 Leather glaze. Let dry.
Apply two coats of SW-172 Macadamia on the inside of the mug. Let dry.
Begin with properly fired stoneware bisque. Moisten a clean sponge and wipe bisque to remove any dust.
Using a water-based marker laid flat against the table, draw a line around the bottom of the piece. This is the “no paint line.”
Use the Soft Fan to apply one coat of SC-34 Down To Earth on the rimmed edge of the plate.
With a damp sponge to wipe the top layer of SC-34 off the plate while leaving glaze in the ridges.Use the sea
sponge to dab SC-46 Rawhide, SC-86 Old Lace and SC-92 Café Ole randomly around the rim on the back of the plate. NOTE: Do not paint the bottom of the plate or below the no paint line.
Use the sponge-on-a-stick to apply SC-34 Down To Earth to the surface of MT-013 Honeycomb Mat then press mat onto the back rim.
Wipe off any glaze that may have been stamped below the no paint line.
Use the sea sponge to dab SC-46 Rawhide, SC-86 Old Lace and SC-92 Café Ole randomly around the rim on the front of the plate.
Using a palette knife, thicken SG-401 Black Designer Liner with AC-310 Silkscreen Medium to the consistency of peanut butter. With the shiny side down, rub the thickened Designer Liner over the words image from DSS-0153 Farmhouse Silkscreen.
Use the Soft Fan to apply one light coat of SW-002 Matte Stoneware Clear over the entire piece. Let dry.
Begin with properly fired stoneware bisque. Moisten a clean sponge and wipe bisque to remove any dust.
Using a water-based marker laid flat against the table, draw a line around the bottom of the piece. This is the “no paint line.”
Using the Soft Fan, apply two liberal coats of SW-131 Birch on the outside of the bowl. Be sure to fully load the brush. Follow the contour of the piece when applying stoneware glaze. NOTE: DO NOT paint the bottom of the bowl or below the no paint line.
Use the same brush to apply two liberal coats of SW-131 on the inside of the bowl. Fully loaded the brush.
Use either brush to apply SW-130 Copper Jade to strips of paper and press them onto the bowl.
Remove the strips of paper before SW-130 Copper Jade dries.
Using the Liner brush, outline the strips of SW-130 Copper Jade with SC-76 Cara-Bein Blue in a loose manner.
Begin with properly fired shelf cone 04 Bisque. Moisten a clean sponge and wipe bisque to remove any dust.
Snip the tops of the AC-224 Detailer Caps for a larger opening. Mix CG-753 Sassy Orange and CG-756 Firecracker and pour each into one of the two ounce bottles. Fill one bottle with SC-11 Blue Yonder (no need to snip the tip of the applicator).
At the top of the tile, squirt a heavy line of Firecracker, then a heavy line of Sassy Orange, lastly a wide line of SC-11 Blue Yonder. Gently tap the tile on the top edge against a hard surface to move the glaze to fill in the gaps and blend the colors.
Use the Soft Fan to apply two coats of FN-001 White to the remainder of the tile. Pull the SC-11 Blue Yonder into the white at the wet edge of the Blue Yonder.
Fill an AC-220 Detailer Bottle with SG-201 Black Cobblestone. While the FN-001 White glaze is wet, squirt four lines of the Black Cobblestone into the wet glaze. Let dry.
Draw or trace the pattern onto the tile. Use the Script Liner to apply two coats of SC-74 Hot Tamale, CG-753 Sassy Orange and CG-990 Starry Night to the flowers. Apply the crystal glaze heavily.
Use the Script Liner to apply two coats of SG-201 Black Cobblestone to the centers of the flowers. Use the Liner with SC-15 Tuxedo to outline fill in the stems.
Begin with properly fired shelf cone 04 bisque. Moisten a clean sponge and wipe bisque to remove any dust.
Use a Dremel tool to drill 5 holes in the MB-1457 Pinwheel (small).
Use the Soft Fan to apply two liberal coats of EL-103 Sea Spray to the front of both Pinwheels. NOTE: This is a technique based application of EL-103 Sea Spray. CG-985 Monet’s Pond is an Elements-based glaze. So by laying down a coat of Elements, it gives a little more movement.
Using the same brush apply two coats of CG-985 Monet’s Pond to the front and back of the large pinwheel. NOTE: Do not apply glaze where the rod goes on the large pinwheel. The rod adheres better to an unglazed area.
On the large pinwheel plop PC-601 Clear Cascade and PC-602 White Cascade randomly on the front of the large pinwheel.
Large pinwheel: Apply a coat of CG-985 Monet’s Pond over both of the Cascades.
With the soft fan brush randomly plop CG-996 Spring Rain over the front of the pinwheel.
Small Pinwheel: Apply one coat of CG-996 Spring Rain to the front and back of the small pinwheel. It is ok to glaze where the rod area.
Use the Soft Fan Brush and plop PC-601 Clear Cascade and PC-602 White Cascade randomly on the front of the pinwheel.
Apply a second coat of CG-996 Spring Rain over both of the Cascades. By sandwiching the Cascades between the glazes, it enhances movement and helps knock down some of the strong white cascades.
Stack the small pinwheel on the large pinwheel – centered.
Pour 1″ of SC-73 Candy Apple Red, 1/2″ alcohol and 1/4″ of water and mix well. Leave the pinwheel laying flat on the table. Squirt the mixture in a random pattern on the pinwheel. Since there are red crystals in the glaze, this mixture compliments the crystal glaze.
Squirt the SG-201 Black Cobblestone over the pinwheels in a circular and random manner. When the Cobblestone glaze fires it will break up and create an interesting finish.
Begin with properly fired shelf cone 04 bisque. Moisten a clean sponge and wipe bisque to remove any dust.
Use a Dremel Tool, drill 5 holes in the MB-1457 Pinwheel (small).
Using the Soft Fan to apply one liberal coat of PC-601 Clear Cascade over the front of both pinwheels. The PC-601 Clear Cascade helps the next coat of glaze to move and interact.
Using the Soft Fan to apply two coats of CG-756 Firecracker to the front and back of the MB-1458 Super Pinwheel (large). NOTE: Do not glaze the area where the rod goes on the large pinwheel. It attaches better to an unglazed surface.
Using the Soft Fan, apply two coats of SG-753 Sassy Orange to the front and back of the MB-1457 Pinwheel (small). It is ok to cover where the rod goes since the pinwheels will be stacked.
Use the Soft Fan Brush and plop PC-601 Clear Cascade and PC-602 White Cascade randomly on the front of each pinwheel.
Use the Soft Fan to randomly plop CG-753 Sassy Orange over some of the Cascades and on top of the Firecracker on the large pinwheel. Plop CG-756 Firecracker over both of the Cascades and on top of the Sassy Orange on the small pinwheel. By sandwiching the Cascades between the glazes, it enhances movement and helps knock down some of the strong white cascades.
While glaze is drying, pour SG-201 Black Cobblestone into the AC-220 Detail Bottle. Snip the tip for a small opening.
Stack the small pinwheel on top of the large pinwheel (center).
Squirt the SG-201 Black Cobblestone over the pinwheels in a circular and random manner. When the Cobblestone glaze fires it will break up and create an interesting finish.
Clean out the holes on the small pinwheel. Embellishments will be added after fired.
Begin with properly fired shelf cone 04 bisque. Moisten a clean sponge and wipe bisque to remove any dust.
Mug #1 Ridged Mug
Using the BR-144 #4 Soft Fan Brush apply three coats of EL-146 Rain Cloud to the inside and outside rim of the mug in a circular motion (going around the mug, not up and down) The outside band width of glaze is about 1 1/4″ or the width of the Soft Fan brush.
Key: To give the glaze a stoneware look with ridges, load the brush and press on side of the brush apply a heavy coat of glaze. Almost holding the brush sideways to apply heavy on one side and lighter on the other. Using the application apply three heavy coats of EL-144 Dark Amethyst to the outside of the mug. Again applying the glaze in a circular motion. Make sure and overlap the band of EL-146 Rain Cloud so the colors blend seamlessly.
Allow to dry.
Stilt and fire cone 05/06.
Mug #2 Stamped Mug
Using the RB-144 #4 Soft Fan Brush apply three coats of EL-147 Creek Bed in a circular motion to the inside of the mug and the outside rim. For the outside rim apply the glaze the width of the Soft Fan Brush.
Apply the same color to the handle of the mug – three coats.
Outside of the mug: Use the soft fan brush to apply in a circular motion two coats of EL-145 Ginger Root. Make sure to overlap and blend the EL-145 Ginger Root into the EL-147 Creek Bed.
Application of wood grain stamp: If a new stamp clean off to remove the sizing residue. Lay flat on the table to apply color. Pour about the size of a quarter of SG401 Designer Liner Black onto a palette. Blot the sponge-on-a stick into the glaze and then off to the size blot the sponge again to remove excess glaze.
In a light, up and down pouncing motion apply the SG-401 Designer Liner Black to the ST-133 Woodgrain Stamp. Keep the glaze on the high part of the stamp to ensure a clean transferred image.
Press the glazed up stamp onto the mug. Due to the flexibility of the stamp it will wrap around the mug. Press gently, do not stretch or slide and then remove the stamp.
Note: SG-401 Designer Liner is used instead of SC-15 Tuxedo because Designer Liner is pure pigment and will keep its true color. Typically Stroke & Coat™ changes color when used with an Element. In this case SC-15 Tuxedo would become brown.
Allow to dry.
Stilt and fire to cone 05/06
Mug #3 Textile Mug
Using the RB-144 #4 Soft Fan Brush apply in a circular motion three coats of either EL-147 Creek Bed or EL-144 Dark Amethyst inside of the mug and one brush width to the upper rim of the mug.
Using the same brush, apply two coats of El-146 Rain Cloud to the bottom section on the outside of the mug.
Be sure to overlap the top rim color about 1/2″ so the colors blend.
Measure the circumference of the mug with the burlap trim and cut to fit.
Place the burlap into water to wet and wring out the excess water.
While the second coat of glaze is still wet, press the burlap trim around the lower section of the mug.
Using the Soft Fan, apply one coat of EL-146 Rain Cloud over the burlap trim to seal down the trim and prevent the next color from seeping under.
Use a paper towel onto the burlap trim to press into the glaze and to remove excess moisture. Allow the shine to go away before applying the next glaze.
Using the Soft Fan, apply one coat of SG-201 Black Cobblestone over the burlap trim only. The glaze will go through the open spaces to create a design.
Let the glaze set up a bit then remove the burlap. Wash and reuse or toss.
Allow to dry. For best result put in the kiln and let dry. That way the SG-201 Cobblestone is not knocked off.
Begin with properly fired shelf cone 04 bisque. Moisten a clean sponge and wipe bisque to remove any dust.
Use the Soft Fan to apply two coats of FN-001 White to the canvas.
Cut out the flamingo pattern, cutting the wing separately from the body. Punch out the circles from paper.
Holding the paper flamingo body in position on the canvas, brush water under the paper area, then press the paper into the wet glaze. Add the wing next to the body and scatter the paper circles using water to adhere. Gently press the shapes with a paper towel to remove excess water. Note: Keep the negative cut out from the paper.
Pour FN-001 White onto a tile and squirt SC-11 Blue Yonder next to the white. Using the plastic card, pick up both colors at once. Drag the color onto the canvas over the paper to create a watery look. Use the card to pick-up SC-10 Teal Next Time and SC-28 Blue Isle, then loosely apply one coat of these colors to the canvas.
Remove the neck paper piece only. Carefully wet the area surrounding the flamingo and adhere the negative shape of the flamingo onto the canvas. Use the Script Liner to apply one coat of SC-89 Cutie Pie Coral to the neck and body.
Use the wedge-shaped sponge to dab SC-89 Cutie Pie Coral, SC-22 Carrot Top and a little bit of SC-88 Tu Tu Tango onto the neck. Float SC-88 Tu Tu Tango around the edges of the neck to deepen the color.
Remove the paper wing section. Cut out a neck and body section from the second pattern and place over the painted neck and body. Use the Soft Fan and Script Liner to apply one coat of SC-2 Melon-Choly to the wing. Place the Tire Tracks stencil on the wing area and use the foam roller to gently apply SC-89 Cutie Pie Coral. Remove the stencil and the paper pieces from the canvas.
Use the Script Liner to apply two coats of SC-15 Tuxedo to the beak. Place the SL-444 Argyle Stencil over the beak. Gently roll or dab FN-001 White over a small portion of the stencil to create a highlight. (Alternatively, you can highlight the beak by brushing FN-001 White into the wet glaze on the middle section of the beak.) Use the Liner to apply SC-15 Tuxedo to create the eye.
Begin with properly fired shelf cone 04 bisque. Moisten a clean sponge and wipe bisque to remove any dust.
Fill AC-220 Detail Bottles using this formula: 1″ of glaze, 1/4″ of water, 1/2″ Rubbing Alcohol – mix well with brush bristles. You will need a bottle and the formula for each of the following colors: SC-29 Blue Grass, SC-75 Orange-A-Peel and SC-97 Cant-elope.
Fill the NP-302P Squeeze Bottle with Rubbing Alcohol (do not dilute) and top with MM-600 Spritzer Cap.
Mark the toilet paper roll about 1 1/4″ up. Cut strips about 1/4″ wide all the way around the tube. Bend the strips back so the cut pieces lay out flat like a flower.
Using the Soft Fan Brush, apply two coats of FN-001 White to the front of the Coupe Dinner Plate.
While the second coat of glaze is still wet squirt the three glaze colors onto the front of the plate in a random fashion.
Mist the glaze with the rubbing alcohol.
Use the sponge-on-a stick to apply SC-75 Orange-A-Peel and tip with SC-97 Cant-elope to the toilet paper tube flower. Press to the plate, you may need to use your fingers to make sure the tube makes contact with the glaze to the plate. Do this a couple of times until you get a full flower with many different petals. Place two flowers of this color on the front of the plate.
Repeat the process, but this time create one flower with SC-75 Orange-A-Peel tipped with SC-15 Tuxedo.
Using the Script Liner, apply two coats of SC-27 Sour Apple to the centers. Allow to dry.
Use a palette knife to thicken SC-15 Tuxedo with AC-310 Silkscreen Medium to the consistency of peanut butter. Place the animal face (zebra, lion, tiger) only in the center of a flower, shiny side down and screen into the center of the flowers (one face/flower).
Using the sponge-on-a-stick lightly pounce SC-15 Tuxedo on the ST-367 Leafy Border Stamp. The glaze only goes on the high part of the stamp to transfer a clean image. Stamp one leaf at a time around the flowers – don’t ink up the entire stamp strip. OPTIONAL: Brush in stems and stamp the leaves attached to the stem.
Using the Soft Fan brush apply three coats of FN-009 Black to the back of the plate. Allow to dry.
Begin with properly fired shelf cone 04 bisque. Moisten a clean sponge and wipe bisque to remove any dust.
Using the Soft Fan Brush, apply two coats of FN-001 White to the front of the Coupe Dinner Plate. Allow to dry (shine fades) before applying the second layer of glaze.
Mark the toilet paper tube about 1 1/4″ up. Cut strips about 1/4″ wide all the way around the tube. Bend the strips back so the cut pieces lay out flat like a flower.
When decorating the plate, you will work from the center out to the rim.
Use the sponge-on-a-stick and apply SC-6 Sunkissed to the toilet paper roll flower. Stamp create flowers by pressing this down in a circle to the middle of the plate. Re-apply glaze to toilet roll as needed.
Now use the sponge-on-a stick to apply SC-75 Orange-A-Peel and stamp on the outside of the SC-6 Sunkissed flower and overlap the petals so the colors blend into each other.
The next section of flowers will be SC-74 Hot Tamale applied in the same fashion. Continue working your way out to the edge. You can add some SC-75 Orange-A-Peel to the SC-74 Hot Tamale.
The front of the plate will be covered with rows of flowers that blend out to the edge.
Using the end of a brush or pencil use SC-15 Tuxedo to dot the centers of the flower.
Use Detail Liner to randomly outline the flowers to give it form. The outlining is loose and not precise.
Use the Soft Fan brush to apply three coats of FN-001 White to the rim and sides of the plate. Allow to dry.
Begin with properly fired shelf cone 04 bisque. Moisten a clean sponge and wipe bisque to remove any dust.
Using the Soft Fan Brush, apply 2 coats of FN-001 White to the front of the Coupe Dinner Plate. Allow to dry (shine fades) before applying the second layer of glaze.
Cut out the Llama Pattern. It will act as a masking tool.
Using the Soft Fan Brush use water to wet the area where the pattern will be placed. Lay down the pattern and use a damp sponge to seal the paper to the plate.
While the pattern is on the plate, take a pen or the back of your brush and trace the details on the llama pattern. It will leave an indention into the glaze.
Trace the flower pattern to the background.
Paint the center of each of the flowers with two coats of SC-6 Sunkissed, except the Yellow flower which has an SC-75 Orange-A-Peel center.
Using the Script Liner, apply one heavy or two light coats of the following colors for the flower petals: SC-6 Sunkissed, SC-11 Blue Yonder, SC-74 Hot Tamale and SC-75 Orange-A-Peel.
Using the Soft Fan Brush, apply two coats of SC-15 Tuxedo to the front of the plate, painting around the flowers and in between the petals. When painting over the paper, place your brush on the paper and glaze outwards. If you paint up against the paper you run a chance of the glaze seeping under the paper and bleeding.
Put the flower pattern back down and sgraffito around the flower petals and the center of the flowers. The sgraffito does not have to perfectly outline the flowers. Sometimes a little off center is interesting. Remove the pattern and sgraffito the leaves and around the flowers and the centers.
Using the Soft Fan brush apply one coat of SG-701 Speckta-Clear Star Dust over the front of the plate over the black and the flowers.
Remove the paper. Use a pencil to mark the dented areas if needed.
Using the Script Liner, apply two coats of SC-86 Old Lace to the muzzle.
Using the same brush, apply one coat of SC-2 Melon-Choly to the shaded part of the ears. Don’t clean off the SC-86 Old Lace as it helps lighten the SC-2 Melon-Choly.
Sponge SC-2 Melon-Choly to the cheeks or muzzle area. Lightly dab the color.
For the fur: Use the Script Liner and SC-35 Gray Hare around the muzzle and to swipe a coat to the fluffy areas of fur. Lightly blend a little of the SC-35 Gray Hare under the eyelashes.
Use the Detail Liner and SC-11 Blue Yonder to paint the eyes. Use the Detail Liner and SC-15 Tuxedo to paint the eyelashes, nose and mouth. Add a white dot on the eyes and nose as a highlight.
Sgraffito a line at the top of the fluff to give added depth.
Using the Soft Fan Brush apply one coat of S-2101 Brush Clear Glaze over the Llama. This is an insurance coat to make sure you did not sgraffito to the bare bisque.
Using the Soft Fan Brush apply three coats of SC-15 Tuxedo the back of the plate. Allow to dry.
Begin with properly fired shelf cone 04 bisque. Moisten a clean sponge and wipe bisque to remove any dust.
Position the bird screen on a piece of paper, with the shiny side down. Hold the screen on the paper with one hand and rub the thickened Tuxedo over the screen onto the paper using a finger. This will create a template/mask.
Cut out the body of the bird from DSS-0108 Aviary-Small Birds in paper. Trace around the bird on the tile.
Using CB-106 Script Liner, apply two coats of SC-16 Cotton Tail to the bird area.
Brush a coat of water over the cotton Tail, and press on the paper bird, to act as a mask. Blot with a sponge to adhere completely.
Using CB-604 Soft Fan, apply two coats of FN-053 Mint over the tile, but not over the entire bird.
Place SL-431 Bloom on the tile under the bird, and roll with 2″ foam roller with SC-79 It’s Sage. Roll lightly in all directions to avoid glaze seeping under the stencil.
Remove the paper bird.
Place some SC-15 Tuxedo on a palette or tile and sprinkle with AC-310 Silkscreen Medium. Using a palette knife, mix color and medium to the consistency of peanut butter. If the mix is too thin add more AC-310 Silkscreen Medium or if it is too thick add more Stroke & Coat. Too thin of a mixture will bleed under the screen and give you a blurred image. Too thick of a mixture will make it hard for the product to penetrate through the holes in the screen and give blank areas in your screen.
Match up the bird screen from DSS-0108 Aviary-Small Birds to the Cotton Tail, and with the shiny side down, rub the thickened Tuxedo mix over the screen.
Using the music lines from DSS-0124 Music, place shiny side down, and screen.
Begin with properly fired shelf cone 04 bisque. Moisten a clean sponge and wipe bisque to remove any dust.
Fill AC-220 Detail Bottles using the following formula: 1″ of glaze, 1/4″ water, 1/2″ Rubbing Alcohol mix well. Use these colors: SC-12 Moody Blue, SC-26 Green Thumb, SC-29 Blue Grass, SC-97 Cant-elope.
Fill the MM-66 Mister Bottle with Rubbing Alcohol.
Using the Soft Fan apply two coats of FN-001 White to the front of the clipboard. Let the shine fade from the first coat of glaze before applying the second coat.
While the second coat of glaze is still wet, squirt SC-26 Green Thumb, SC-29 Blue Grass and SC-97 Cant-elope in a random fashion across the front of the clipboard. Mist with the MM-66 Mister bottle full of alcohol. You will see the glaze create unique patterns. Let dry.
Cut out the fish pattern.
When the glaze is dry enough, lay the pattern on the clipboard and lightly trace around the pattern with a water-based marker or a pencil. Leave the pattern down for the next step. It will mask off the fish.
Using the sponge-on-a-stick and SC-15 Tuxedo, ink up the ST-126 Dots and Squiggles stamp. Tap the sponge-on-a-stick into the SC-15 Tuxedo glaze then, blot off the excess glaze. Take the sponge-on-a-stick and LIGHTLY pounce it up and down on the stamp so that the glaze transfers to the high part of the design. If the glaze goes into the crevices clean the stamp and start over or you will not get a good design.
Apply the glazed stamp around the fish pattern. It is ok to press over the paper for the illusion the stamp goes behind the fish.
Use the back end of the brush or the tip of the pencil and dot the eye of the fish with SC-15 Tuxedo.
Remove the paper.
Use the Detail Liner and AC-302 Wax Resist and apply one coat around the fish and the tendrils. Wax the eye and dorsal fin outline. Make small dots with the wax on the back end of the fish’s body. IMPORTANT: The only way to remove wax is to burn off in the kiln. Once the wax hits the bisque, it will do its job and mask off the area. If you have an oopsie, make it work as part of the pattern.
To paint the fish body, use the bottles with glaze and squeeze SC-12 Moody Blue and SC-29 Blue Grass fill in the area between the wax lines. The wax dots will resist the glaze.
Apply 1-2 coats of SC-15 Tuxedo to the sides and back of the clipboard. Let dry
Begin with properly fired shelf cone 04 Bisque. Moisten a clean sponge and wipe bisque to remove any dust.
Select which turtle you will glaze and assemble the glazes.
Pour SG-201 Cobblestone Black into a AC-220 Detail Liner Bottle – do not dilute
Pour some SC-97 Cant-elope or SC-29 Blue Grass into a AC-220 Detail Liner Bottle.
Using the 2 oz. plastic cup, pour your Elements glaze into separate cups. Now add 1 tsp of water and mix to thin the Elements glaze. If doing Turtle #1 use EL-142 Grass & El-145 Ginger Root. Turtle #2 El-143 Cactus Flower and EL-145 Ginger Root.
Using the RB-144 #4 Soft Fan Brush apply one liberal coat of either CG-992 Mint Chip or CG-995 Foggy Mist to the shell of the turtle (not the body).
Holding on to the head or legs, pick up a cup of the glaze that has been diluted and pour over the shell, leaving blank areas for the next color.
Pick up the second Element color and pour over the shell in the black areas. Turning and moving the turtle helps blend the glazes. Let the glaze drip over the edge of the shell for coverage.
Use your fingers or a brush to move some of the glaze and insure that the shell is covered.
Once the shell is covered with glaze, take the AC-220 Detail Liner Bottle with SG-201 Cobblestone Black – squirt the Cobblestone glaze into the wet Element glaze.
Same step with the SC-97 Cant-elope or SC-29 Blue Grass. Squirt randomly over the turtle shell.
Let the glaze set up and dry a bit before cleaning up the head and legs.
Use a damp sponge to wipe off any excess glaze from the head and legs.
Use the SG-401 Black Designer Liner to outline the facets on the turtles head and legs. Remember – Designer Liner is meant to be a thin application. If applied like a dimensional glaze it will pop off since it contains no frit.
Allow to dry.
Using the Soft Fan Brush apply two coats of EL-130 Sea Green to the head, legs and underneath the turtle.
Fire to cone 05/06.
Form
MB-1492 Faceted Turtle Bisque or CD1492 Faceted Turtle Mold
Begin with properly fired shelf cone 04 Bisque. Moisten a clean sponge and wipe bisque to remove any dust.
Brush on two coats of FN-001 White to the tile with RB-144 Soft Fan.
When dry, apply SC-35 Gray Hare using a sponge on a stick or a flat sponge, to ST-133 Woodgrain Stamp.
The boards are random widths, pencil straight lines across the tile, tape the edges to make a skinny space between the boards, brush on one coat of SC-15 Tuxedo to fill the space, pull off the tape.
Thicken SC-15 Tuxedo using a palette knife with AC-310 Silkscreen Medium to the consistency of peanut butter. With the shiny side down rub the thickened Tuxedo over the hedgehog screen from DSS-101 Woodland Animals, use the flower spray from DSS-149 Flowers 3XL to screen parts of the flowers around the hedgehog.
Brush one coat of SC-6 Sunkissed to the petals, and SC-75 Orange A Peel to the centers, brush a line of SC-8 Just Froggy on the stems and some leaves.
Brush SC-83 Tip Taupe over the hedgehogs, fur one coat. You may need to sgraffito lines into the fur and add a few SC-15 Tuxedo lines use RB-110 Liner and RB-106 Script Liner.
Begin with properly fired shelf cone 04 Bisque. Moisten a clean sponge and wipe bisque to remove any dust.
Use the Soft Fan to apply 1-2 coats of FN-001 White to the front of the clay clipboard.
Cut out the horse pattern. When the Foundations White is nearly dry, pencil in the horse outline and the areas of bright blue and dark blue.
Use the AC-222 Writer Bottle with the plastic tip only. Nearly fill the bottles one with SC-11 Blue Yonder and the other with SC-12 Moody Blue add a cap of water shake and stir.
Fill AC-220 Detailer Bottles with PC-603 White Cascade and SG-402 White.
Squirt water onto the glazed clipboard. Squirt SC-11 Blue Yonder into the bright blue areas and SC-12 Moody Blue into the dark blue areas. Move the clipboard to mix the colors together; don’t over mix which can cause the colors muddy. Take the plastic card and lay it almost flat to the clipboard; drag the colors together where they meet.
While the glaze is wet, squirt PC-602 White Cascade, onto the wet surface. Drag it into the wet color leaving some lines and dots of color. Squirt SG-402 White in loopy lines. Let dry.
Trace the horse onto the clipboard. Use the Script Liner to apply two coats of SC-15 Tuxedo to the horse.
Cut a toilet paper roll in long cuts, thin the cuts, sponge with SG-402 White, stamp the pattern to the foreground of the tile. Cut long lengths of the roll, sponge with SC-15 Tuxedo, stamp to the tile to make a resemblance of a tree. Cut short sections of the roll to stamp with SC-15 Tuxedo for the horse’s mane.
To separate the horse from the dark background, brush SG-410 Bright Blue at the head and the back and tail. Outline part of the head and ear with SG-402 White. Apply one coat of a clear glaze to the Designer Liner colors.
Begin with properly fired shelf cone 04 Bisque. Moisten a clean sponge and wipe bisque to remove any dust.
Fill three detailer bottles (AC-220) with 1″ of color, 1/4″ of water and 1/2″ of alcohol. Use SC-11 Blue Yonder, SC-30 Blue Dawn and SC-76 Cara-Bein Blue. Snip the top just large enough to make a small opening. Stir and shake well.
Use the Soft Fan to apply two liberal coats of FN-211 Sheer Blue to the top of the whale plate. While the second coat is wet, squeeze on drops of the three colors mixed with alcohol, leaving room for expansion of the glaze. Drop SC-76 Cara-Bein Blue onto the edge of the tray to create a border. Let dry. NOTE: It is important to work while the Foundations glaze is wet.
Use a dry erase marker to color the shiny side of the mermaid and fish silkscreens. Wipe off with a soft rag or paper towel. This will allow you to better see the screen image.
On a palette, tint NT-BR Clear Brushing Glaze with food coloring. Use a palette knife to thicken the glaze with AC-310 Silkscreen Medium to the consistency of peanut butter. Position the silkscreens on the whale plate with the shiny side down. Rub the thickened mix over the DSS-0157 Under the Sea images. This is for placement only.
Remove the dark drops of color from the flesh areas of the mermaid as they may show through the Cashew Later glaze.
Using the Detail Liner or the Script Liner, apply two coats of the following colors to the fish: SC-15 Tuxedo, SC-16 Cotton Tail and SC-75 Orange-A-Peel. Refer to the image for placement.2. Using the Script Liner apply two coats of SC-11 Blue Yonder and SC-13 Grapel to the mermaid tail. Apply one coat of SC-11 Blue Yonder over the entire mermaid tail. Apply one coat of SC-13 Grapel in the center of the tail and the fins, then repeat one more time. This will help blend the colors. You want the edges of the SC-13 Grapel to blend into the SC-11 Blue Yonder.
3. The splash and bubbles are two coats of SC-16 Cotton Tail. You’ll apply 1 coat of SG-701 Speckta-Clear Star Dust over the white after silkscreening the final image.
4. Use a palette knife to thicken SC-15 Tuxedo with AC-310 Silkscreen Medium to the consistency of peanut butter. Line up the mermaid tail silkscreen over the painted image. Hold firmly so the silkscreen does not move or slide and rub the product through the silkscreen. This will give the outline and details to the images.
5. Fish: You can either use the silkscreen with SC-15 Tuxedo for detail or use the Detail Liner to outline and add details.
6. Whale – Use the Detail Liner and apply one coat of SC-15 Tuxedo to the mouth of the whale. For the eye, paint one coat of SC-15 Tuxedo to the center, one coat of SC-16 Cotton Tail around the black pupil and then circle the white with the black. Add a dot of SC-16 Cotton Tail to the top right of the black pupil.
7. Use the Script Liner to apply one coat of SG-701 Speckta-Clear Star Dust over the splash, bubbles and mermaid tail.
7. Use the Soft Fan to apply three coats of FN-041 Medium Blue to the back of the plate.
Begin with properly fired shelf cone 04 Bisque. Moisten a clean sponge and wipe bisque to remove any dust.
Fill three detailer bottles (AC-220) with 1″ of color, 1/4″ of water and 1/2″ of alcohol. Use SC-11 Blue Yonder, SC-30 Blue Dawn and SC-76 Cara-Bein Blue. Snip the top just large enough to make a small opening. Stir and shake well.
Use the Soft Fan to apply two liberal coats of FN-211 Sheer Blue to the top of the whale plate. While the second coat is wet, squeeze on drops of the three colors mixed with alcohol, leaving room for expansion of the glaze. Drop SC-76 Cara-Bein Blue onto the edge of the tray to create a border. Let dry. NOTE: It is important to work while the Foundations glaze is wet.
Use a dry erase marker to color the shiny side of the mermaid and fish silkscreens. Wipe off with a soft rag or paper towel. This will allow you to better see the screen image.
On a palette, tint NT-BR Clear Brushing Glaze with food coloring. Use a palette knife to thicken the glaze with AC-310 Silkscreen Medium to the consistency of peanut butter. Position the silkscreens on the whale plate with the shiny side down. Rub the thickened mix over the DSS-0157 Under the Sea images. This is for placement only.
Remove the dark drops of color from the flesh areas of the mermaid as they may show through the Cashew Later glaze.
Use the Script Liner or Detail Liner to apply two coats of SC-20 Cashew Later to the skin areas of the Mermaid. Apply one good coat of SC-6 Sunkissed to the crown. Apply two coats of SC-22 Carrot Top to the hair and two coats of SC-11 Blue Yonder to the tail and top.
Apply two coats of SC-65 Peri-Twinkle to the dolphin. Add a swipe of SC-16 Cotton Tail on the arched back for a reflection.
Apply two coats SC-97 Cant-elope on the front half of the fish fading into SC-75 Orange-A-Peel for the back half.
The splash and bubbles are two coats of SC-16 Cotton Tail. You’ll apply 1 coat of SG-701 Speckta-Clear Star Dust over the white after silkscreening the final image.
Use a palette knife to thicken SC-15 Tuxedo with AC-310 Silkscreen Medium to the consistency of peanut butter. Line up the Mermaid and dolphin and the fish over the painted image. Hold firmly so the silkscreen does not move or slide and rub the product through the silkscreen. This will give the outline and details to the images.
Whale – Use the Detail Liner and apply one coat of SC-15 Tuxedo to the mouth of the whale. For the eye, paint the center SC-15 Tuxedo, one coat of SC-16 Cotton Tail around the black pupil and then circle the white with the black. Add a dot of SC-16 Cotton Tail to the top right of the black pupil.
Use the Script Liner to apply one coat of SG-701 Speckta-Clear Star Dust over the splash, bubbles and mermaid tail.
Use the Soft Fan to apply three coats of FN-041 Medium Blue to the back of the plate.
Begin with properly fired shelf cone 04 Bisque. Moisten a clean sponge and wipe bisque to remove any dust.
Use the Clay Carbon Paper to trace the pattern onto the piece.
Slightly thin SG-409 Bright Green with water. Use the Script Liner to apply one coat to the leaves (wings). Outline and vein the leaves with SG-405 Green.
Make partial circles of SG-403 Red and SG-408 Orange to resemble flowers for the owl’s chest. Fill in with thinned SG-407 Yellow using a brush.
Brush on a thinned coat of SG-406 Brown mixed with a small amount of SG-407 Yellow and apply with the Liner to the hair, eyelids, ears, feet and beak. Line with SG-406 Brown, and SG-401 Black for the eyelids.
Thin SG-401 Black with water and use the Liner to apply the tree log at the bottom. Create the line detail in the log with SG-406 Brown and SG-401 Black.
Petal detail around the eyes is outlined with SG-408 Orange, filled in with SG-407 Yellow. The pupil is SG-401 Black – leave a space for the highlight. Outline the eyes with SG-401 Black.
The area around the head is dotted with SG-403 Red and SG-411 Purple. While the color is wet, create a fuzzy look by brushing with water. Outline in an uneven line on the inside of the face with SG-401 Black. Dot in rows around the eyes with SG-411 Purple. Use the Script Liner to shade under and the sides of the eyes with the Purple.
Outline with a thin line of SG-401 Black around all the leaves, some of the flowers, the head, beak, ears and feet. Make a heavy line with SG-406 Brown around the edges. While the Brown is wet, wet the Script Liner and pull out the color to create a shade. Shade inside of the face with Brown as shown.
Use SG-401 Black to make circle shapes around the border. Half of the circle is on the top and the other half is on the side of the canvas.
Dip into NT-CLR Clear Dipping Glaze or use the Soft Fan to apply two coats of NT-BR Clear Brushing Glaze.
Fire to cone 05/06.
Form
6″ Tile
Color
SG-401 Black
SG-403 Red
SG-405 Green
SG-406 Brown
SG-407 Yellow
SG-408 Orange
SG-409 Bright Green
SG-411 Purple
NT-CLR Clear Dipping or NT-BR Clear Brushing Glaze
Begin with properly fired shelf cone 04 Bisque. Moisten a clean sponge and wipe bisque to remove any dust.
Brush the tile with two coats of FN-001 White with CB-604 Soft Fan.
To apply color to the MT-012 Ikat Mat use a large sponge-on-a-stick. Press the sponge into the glaze and then dab it off to the side on the palette. You do not want globs of glaze on the sponge. Begin with SC-12 Moody Blue, with a light up and down pouncing motion ink up a section of the mat. Work fast so the colors do not dry. With the same method overlap SC-97 Cant-Elope over the edge of the SC-12 Moody Blue and the next section. Do the same process with SC-24 Dandelion to the center. Then reverse the colors with the sponge to finish the pattern. Press the tile to the mat to transfer the color.
Using the RB-106 #6 Script Liner, apply 2 coats of SC-15 Tuxedo to the cat pattern on the tile. While the glaze is damp, scratch out the fur and facial design from the black glaze with a sgraffito tool. Be careful not to scratch down through the FN-001 White.
Using the RB-144 #4 Soft Fan brush apply 1 coat of S-2101 Clear glaze to the front of the tile.
Begin with properly fired shelf cone 04 Bisque. Moisten a clean sponge and wipe bisque to remove any dust.
Using the Soft Fan, apply two coats of S-77 Glo-Worm to the front of the tile. Let dry.
Using the same brush, wet the surface of the tile with either water or a thin coat of SC-77 Glo-Worm. Place SL-431 Bloom Stencil into the wet surface and press to set into the glaze. Use a paper towel to press down the stencil to make sure glaze does not blend underneath. With a damp sponge, remove some of the glazes from the open sections of the stencil.
Using the Soft Fan, apply two coats of CG-756 Firecracker over the SL-431 Boom Stencil. Allow the shine to go away between coats.
When the gloss leaves the second coat of CG-756 Firecracker, remove the stencil. If some of the petals are lacking crystals apply a few more with the Script Liner.
Using the Script Liner, apply one coat of SC-78 Lime Light on the open areas of the tile to create an edge of Glo-Worm around the flower.
Begin with properly fired shelf cone 04 Bisque. Moisten a clean sponge and wipe bisque to remove any dust.
Cut out the body only of the bird. Place it onto the tile and trace around the outside edge.
Using the CB-604 #4 Soft Fan, apply one heavy coat of FN-001 White to fill in the bird. Glaze just a little past the line so that when the paper is placed over the image it acts as a masking tool and the entire bird is glazed.
Using the same brush and with just water wet the painted area and then press the paper bird on the wet glaze. Use a damp sponge to press down the bird making sure there are no wrinkles or gaps.
Using the CB-604 #4 Soft Fan, apply two heavy coats of FN-001 White into the sky area and swirl in SC-65 Peri-twinkle.
Apply two heavy coats of SC-65 Peri-twinkle to the remainder of the tile. Let dry.
Wet the area where the stencil will be placed with the CB-604 #4 Soft Fan brush and water. Place the Bloom stencil on the left corner of the tile which will overlap the paper bird. Use a paper towel to press down the stencil to prevent bleeding.
Use the sponge-on-a-stick to apply SC-31. Dab the sponge-on-a-stick into the glaze, then blot it off to the side. You don’t want blobs of glaze on the sponge as this is what causes bleeding under the stencil The Blues mixed with SC-65 Peri-twinkle to fade the color. Now apply the color with a light up and down pouncing over the stencil. Don’t try to get solid coverage with one coat, pounce the sponge several times for coverage.
Use a palette knife to thicken SC-15 Tuxedo with AC-310 Silkscreen Medium to the consistency of peanut butter. With the shiny side down, place the DSS-018 Aviary- Small Bird screen on the space created from the paper bird. Rub the mixture over the screen from the center out to push the mixture through the silkscreen pattern. Repeat for the music notes.
Use a fan brush to apply 4-6 coats of SW-180 Desert Dusk. The more coats, the more red that will appear when fired. For dipping, submerge the pieces in SD-180 Desert Dusk for 4-5 seconds. Be sure there are enough crystals on the piece. Allow to dry.
Use a damp sponge to remove glaze from the foot of the piece.
Fire to cone 5/6.
Form
CD-021 Garden Sphere
CD-1495 Garden Pedestal
Mayco Stoneware casting slip
Color
SW-180 Desert Dusk or SD-180 Desert Dusk (dipping)
Use a fan brush to apply 4-6 coats of SW-184 Speckled Toad. The more coats, the more red that will appear when fired. For dipping, submerge the pieces in SD-184 Speckled Toad for 4-5 seconds. Allow to dry.
Use a damp sponge to remove glaze from the foot of the piece.
Fire to cone 5/6.
Form
CD-021 Garden Sphere
CD-1495 Garden Pedestal
Mayco Stoneware casting slip
Color
SW-184 Speckled Toad or SD-184 Speckled Toad (dipping)
Use a fan brush to apply 4-6 coats of SW-183 Oxblood. The more coats, the more red that will appear when fired. For dipping, submerge the pieces in SD-183 Oxblood for 4-5 seconds. Allow to dry.
Use a damp sponge to remove glaze from the foot of the piece.
Begin with properly fired cone 04 stoneware bisque. Moisten a sponge and wipe bisque to remove any dust.
Mix together SW-301 Iron Wash and AC-310 Silkscreen Medium using a palette knife. Combine until it is the consistency of peanut butter. Adjust ratios as necessary.
Apply design of your choice onto the plate with a pencil.
Use SG-401 Black Designer Liner to outline the design.
Apply 3 coats of SW-182 Antique Brass to the entire plate, avoiding the foot.
Use a damp sponge to remove any glaze that may have gotten on the foot.
Fire to shelf cone 5/6 *Sample was fired to cone 6*
*Note this project is not recommended to come into contact with food surfaces – this sample is for display purposes only*
Begin with properly fired cone 04 stoneware bisque. Moisten a sponge and wipe bisque to remove any dust.
Mix together SW-301 Iron Wash and AC-310 Silkscreen Medium using a palette knife. Combine until it is the consistency of peanut butter. Adjust ratios as necessary.
Place the fire breathing dragon from DSS-115 Dragons onto the plate, shiny side down. Use your finger to work the thickened wash through the screen. Remove the screen immediately and rinse or place in water to preserve the screen.
Use the same directions from #3 to screen the flowers from DSS-0149 Flowers XL three times.
Allow to dry, then carefully apply1 coat of SC-89 Cutie Pie Coral.
Apply 1 thin coat of SW-301 Iron Wash to the rim and back of the plate.
Apply 3 coats of SW-124 Matte Maycoshino to the entire plate, avoiding the foot. This glaze is very application dependent, so be sure to apply in a cross hatching patter to promote more consistent variation with the fired results.
Use a damp sponge to remove any glaze that may have gotten on the foot.
Fire to shelf cone 5/6 *Sample was fired to cone 6*
Begin with properly fired cone 04 stoneware bisque. Moisten a sponge and wipe bisque to remove any dust.
Combine 2 parts SW-305 Cobalt Wash to 1 part water. Add 1 drop of dish soap and mix.
Use a straw to blow bubbles into the mixture until they overflow out of the container. Guide overflowing bubbles onto the piece. Be sure not to layer the bubbles too high or they will become a puddle as they pop.
Mix together UG-50 Jet Black and AC-310 Silkscreen Medium using a palette knife. Combine until it is the consistency of peanut butter. Adjust ratios as necessary.
Place the koi fish silkscreen from DSS-0150 Far East onto the place (shiny side down). Use you finger to work the thickened underglaze through the silkscreen. Remove the screen immediately and rinse or place in water to preserve the screen.
Apply 3 coats of SW-111 Wrought Iron the back and rim of the piece.
Apply 2 coats of SW-001 Stoneware Clear to the face of the plate.
Use a damp sponge to remove any glaze that may have gotten on the foot.
Fire to shelf cone 5/6 *Sample was fired to cone 6*
Begin with properly fired cone 04 stoneware bisque. Moisten a sponge and wipe bisque to remove any dust.
Using the AC-222 Medium Writer Tip Kit without the metal tip, apply SW-401 Light Flux in a pattern around the top edge of the piece. We applied 2 rows of “w”s so there is a space to add the Stroke and Coat.
Exchange the cap on your SC for an AC-224 Plastic Detailer Cap and apply SC-9 Jaded as dots inside of the loops made with the Flux.
Allow the glaze to dry.
Apply 3 coats of SW-130 Copper Jade to both the inside and outside of the bowl. Allow the glaze to dry in between coats and avoid glazing the foot.
Use a damp sponge to wipe away any glaze that may have gotten on the foot.
Fire to cone 5/6. *Sample piece was fired to cone 6*
Begin with properly fired cone 04 stoneware bisque. Moisten a sponge and wipe bisque to remove any dust.
Apply 3 coats of SW-181 Night Moth to the piece, allowing the glaze to dry in between coats.
Apply 3 coats of SW-510 Blue Gloss to the rim and back of the piece, avoiding the foot.
Use a damp sponge to wipe away any glaze that may have gotten on the foot.
Apply 2-4 coats of SW-403 White Mudcrack in bands on the piece. The necessary number of coats is dependent upon the thickness of the product. As the glaze dries, it should be cracking, but not curling up and pulling away.
Fire to cone 5/6. *Sample piece was fired to cone 6*
This project is not dinnerware safe due to the Magma glazes. For decorative use only.
Begin with properly fired cone 04 stoneware bisque. Moisten a sponge and wipe bisque to remove any dust
Apply the masking tape in design of choice.
Apply 3 coats of SW-406 Magma to the piece, allowing the glaze to dry in between coats. Keep in mind that heavier the application will result more dimension/texture and lighter application will have less.
Remove the tape.
Apply 1 coat of SW-301 Iron Wash to the front and back of the piece, avoiding the foot.
Use a damp sponge to wipe away any glaze that may have gotten on the foot.
Fire to cone 5/6. *Sample piece was fired to cone 6*
This project is not dinnerware safe due to the Magma glazes. For decorative use only.
Begin with properly fired cone 04 stoneware bisque. Moisten a sponge and wipe bisque to remove any dust.
Use a pencil to mark where you would like the stripes to be.
Fill one writer bottle with SW-405 Light Magma and the other with SW-406 Dark Magma. You will not need the metal tip to apply the glaze; the more glaze the more texture!
Apply alternating stripes of each magma in the area that you marked.
Apply 3 coats of SW-112 Tiger’s Eye to the rest of the piece, avoiding the foot.
Use a damp sponge to wipe away any glaze that may have gotten on the foot.
Fire to cone 5/6. Sample piece was fired to cone 6.
This project is not dinnerware safe due to the Magma glazes. For decorative use only.
Begin with properly fired shelf cone 04 bisque. Moisten a clean sponge and wipe bisque to remove any dust.
In a plastic cup mix well 2 parts UG-52 Silver Grey, 1 part UG-198 Dark Grey and 1 part C-300 Matt Transparent.
Cut out the 5 major flowers from the pattern. Try not to destroy the remaining pattern. Position the main pattern with the cut out areas and lightly draw the outlines for positioning of the flowers. Wet the backs of the flowers with water and place them in their spots according to the pattern creating a stencil. Make sure the edges of the flowers are secure to the bisque.
Using CB-604 Soft Fan loaded with the underglaze mixture to apply 3 coats to the lid of the box. Once the last coat of color has been applied and the glossy sheen is gone, remove the flower cut outs from the pattern using a Clean Up Tool. If the color has dried completely, remoisten the area with water or with another coat of the underglaze mixture. This will prevent chipping of the edges of the stencils in removal process.
Apply 3-4 coats of FN-301 Marshmallow White to the five flowers using CB-404 Pointed Round. Let dry.
Using CB-404 Pointed Round paint in some swatches of color to the five flowers centers using SC-95 Pinky Swear and SC-6 Sunkissed. Colors can overlap but do not completely cover the white matte glaze.
Thin some SC-15 Tuxedo to a watery ink consistency and paint in the flowers detail lines. Keep this color weak and faint as to not overpower the pattern.
Transfer the pattern back onto the ware using AC-230 Clay Carbon and a pencil.
Use CB-202 Detail Liner to apply 3 coats of SC-79 It’s Sage to the areas noted leaves and stems on the pattern. Apply 3 coats of SC-39 Army Surplus darkened with a drop or two of SC-15 Tuxedo and paint in the rose leaves and stems on the buds.
Apply 3 coats of SC-16 Cottontail to the flower buds and some of the smaller flowers in the pattern. Paint in some of the other smaller flowers with SC-1 Pink-A- Boo. Dot in the centers of the white small flowers with SC-1 Pink-A- Boo and the SC-6 Sunkissed to the pink small flowers.
Shake and stir SD-402 White. Paint in the lattice portion of the pattern; flowers and scrolls/leaves. Using CB-110 Liner to apply one coat of S-2101 Crystal Clear Brushing over the Detail Liner flowers, scrolls and leaves. Try not to get the clear glaze on the background areas. Fill in the lattice leaves with 2 coats of Clear Glaze.
Using SD-402 White to paint in the dots in the background of the pattern. Randomly apply the dots to fill in the area trying not to do a poke-a- dot pattern. The dots are meant to add interest and be a part of the design. The key is to be random in their placement.
To the inside of the box and lid apply 3 coats of FN-024 Grey using CB-604 Soft Fan.
To the outside of the box bottom apply 3-4 coats of FN-301 Marshmallow White using CB-604 Soft Fan.
Stilt both the lid and the box and fire to Shelf Cone 05-06.
Begin with properly fired shelf cone 04 bisque. Moisten a clean sponge and wipe bisque to remove any dust. Check the inside for any debris as well.
Apply 3 coats of one of the Foundations (FN-05, FN-11 or FN-13) to the entire box inside and out using CB-604 Soft Fan.
Any soft colored Foundation color can be used. Two other options are FN-012 Orchid or FN-93 Honeydew List for a purple or green shade to the hearts.
Cut out one of the “sayings” with the scissors and center the pattern onto the heart, attaching the pattern using the Blue Masking Tape.
Use AC-230 Clay Carbon and a Pencil to transfer each one of the letters to the lid. Take your time while transferring the lettering to ensure the exact shape of each letter. This will save you time when painting.
On a tile, thin some SC-74 Hot Tamale. Use RB-104 Liner to apply 3 coats of red to each letter. Take your time applying each coat to ensure you stay within the lines of the letter. On the final coat, you can straighten up the edges of the letters.
Stilt and Fire each piece separately to Shelf Cone 05-06.
Begin with properly fired shelf cone 04 Bisque. Moisten a clean sponge and wipe bisque to remove dust.
Thin NT-CLR or S-2101 Clear slightly. Pour inside the vase, turn to coat and pour out to drain.
Use the Soft Fan to apply three coats of FN-001 White to the jar and lid.
Thicken clear glaze with Silkscreen Medium to the consistency of peanut butter. Using the rose from DSS-0149 Flowers 3 XL silkscreen, screen the image onto the jar.
Use the Script Liner to apply 2 coats of SC-73 Candy Apple Red to the rose petals. Let dry.
Mix SC-15 Tuxedo with Silkscreen medium to the consistency of peanut butter. Re-screen the rose image over the painted area, lining up the image as closely as possible to the original screen.
Use the Script Liner to apply SG-963 Lemon Lime over the leaves and stems.
Use the sponge-on-a-stick to gently dab SC-73 Candy Apple Red to the heart stamp. Apply to one hearts at a time instead of the entire stamp. This will allow you to select which image to stamp. Press the heart stamp around the jar, re-applying color as needed to stamp.
Use the heart paper punch to create paper hearts. You will be using the negative. Wet the paper and press randomly around the jar. Press gently with a paper towel to ensure the edges area sealed.
Using the Script Liner, apply two coats of SC-73 Candy Apple Red inside the paper hearts. Brush from the outside inward to keep the color from bleeding under the paper.
Fire to cone 05/06.
Form
MB-125 Ruffle Ware Biscotti Jar
Colors
FN-001 White
SC-15 Tuxedo
SC-73 Candy Apple Red
CG-963 Lemon Lime
NT-CLR Clear Dipping or S-2101 Clear Brushing Glaze
Begin with properly fired shelf cone 04 Bisque. Moisten a clean sponge and wipe bisque to remove dust.
Thicken clear glaze with Silkscreen Medium to the consistency of peanut butter. Using seahorse from DSS-0148 Sea Life 3 XL silkscreen, screen the image onto the box lid. For the first image, screen with the shiny side down. To get a mirror image, screen the next seahorse with the shiny side up.
Use the Script Liner to fill in the screened area with two coats of the following colors. See image for placement. Left seahorse: SC-11 Blue Yonder and SC-27 Sour Apple. Right seahorse: SC-13 Grapel, SC-23 Jack O’Lantern and SC89 Cutie Pie Coral. Let dry.
Mix SC-15 Tuxedo with Silkscreen medium to the consistency of peanut butter. Re-screen the seahorse images over the painted areas, lining up the image as closely as possible to the original screen.
Draw hearts around the seahorses and fill in with two coats of SC-74 Hot Tamale. Use the Liner to loosely outline the hearts with SC-15 Tuxedo.
Use the Soft Fan to apply three coats of SC-74 Hot Tamale.
Use the Soft Fan to apply one coat of S-2101 Clear Brushing Glaze or dip into NT-CLR Clear Dipping Glaze.
Fire to cone 05/06.
Form
MB-1451 Classic Heart Box
Colors
SC-11 Blue Yonder
SC-13 Grapel
SC-15 Tuxedo
SC-23 Jack O’Lantern
SC-27 Sour Apple
SC-74 Hot Tamale
SC-89 Cutie Pie Coral
S-2101 Clear Brushing or NT-CLR Clear Dipping Glaze
Begin with properly fired shelf cone 04 bisque. Moisten a clean sponge and wipe bisque to remove any dust.
Cut out 2 patterns of the heart.
Use the Soft Fan to apply two coats of FN-001 White to the front of the vase.
Brush water over the white glaze, then place one of the paper cut outs on the vase. Gently press with a paper towel to remove excess water and wrinkles and to ensure the edges are sealed.
Using the CB-604 #4 Fan Brush, apply three coats of FN-018 Bright Blue to the inside of the vase and two coats to the outside, brushing over the edges of the paper.
Using the CB-604 #4 Fan Brush, apply one coat of CB-979 Meadow to the outside of the vase. Once the shine is gone, remove the paper.
Use AC-230 Clay Carbon Paper and a pencil to transfer the lines of the heart onto the vase.
Using the CB-106 Script Liner, apply two coats of SC-74 Hot Tamale to the inside of the heart.
Using the CB-106 Script Liner, apply two coats of CG-981 Fruity Freckles to the inside of the heart, over the Hot Tamale.
Fill a AC-219 Designer Bottle with Writer tip with SC-75 Orange-a-Peel. Draw cris crosses in the pointy shapes around the heart.
Fill a AC-219 Designer Bottle with Writer tip with SC-15 Tuxedo. Outline the heart and fill in details according to the photo and pattern.
Wipe off bisque with a damp sponge to remove dust.
Using the CB-604 #4 Fan Brush, apply two coats of FN-001 to the entire piece.
Using the CB-604 #4 Fan Brush, apply one coat of CG-981 Fruity Freckles to the entire piece. Let Dry.
Using a pencil, draw out “I HEART ART” in all caps on the heart using the photo as a reference.
Using the CB-110 10/0 Mini Liner, apply one heavy coat of SC-15 Tuxedo to each letter.
Using the CB-106 Script Liner, randomly paint splotch and drip shapes around the words using SC-27 Sour Apple, SC-74 Hot Tamale, SC-75 Orange A Peel, and SC-74 Cara-Bien Blue. Make three splotches of each color and apply two coats to each one.
1. Begin with properly fired shelf cone 04 bisque. Moisten a clean sponge and wipe bisque to remove any dust.
2. Using the AC-230 Clay Carbon Paper trace on the heart pattern in the center of the lid. Only one side of the AC-230 Clay Carbon Paper transfers the design. So test which side transfers before you spend time tracing. Lay the Clay Carbon Paper on the bisque, place the pattern on top of the Clay Carbon paper and use a pen or pencil to trace the lines. Periodically check to make sure the image transfers.
3. Use the various Designer Liner colors, the order doesn’t matter, create the lines on the lid. To achieve the illusion of a dimensional design with a color of choice, start at the edge of the lid and draw a straight line of color until you reach the design. When you get to the heart design curve the line up to an arch and then when you reach the opposite of the heart design go back to a straight line to the edge of the lid. Repeat until the entire lid is covered with the lines. The heart pattern is the only place the lines will be curved.
4. When the glaze dries or the shine is off of the glaze shade the heart. Using the CB-106 Script Liner, thin SC-12 Moody Blue with water and shade around the heart. The color will be lighter on the outer edge and darker closer to the heart. This will make the heart pop off the design.
5. Using the CB-604 Soft Fan brush apply 3-4 coats of FN-003 Red to the entire heart box bottom and the inside of the lid if you choose
6. Use clear glaze of choice and glaze the lid. If the base is covered with FN-003 you can skip the dip, or clear glaze.
1. Begin with properly fired shelf cone 04 bisque. Moisten a clean sponge and wipe bisque to remove any dust.
2. Use the CB-604 #4 Soft Fan to apply three coats of FN-001 White to the front of the plate.
3. Use the 1/2″ Tape to mark off the border of the inside of the plate.
4. Pencil in the corners of the border and measure to the middle of all the sides., Mark with a pencil line.
5. Thicken SC-74 Hot Tamale with AC-310 Silkscreen Medium using a palette knife, to the consistency of peanut butter.
6. Tape off the section of the border to be screened. Only half of a border side can be screened before the tape will need to be moved. Start in a corner to the middle of a long side, tape off the corner and on the other half of the side, place the small stripe screen at an angle to the corner. Then, with the shiny side up, rub the thickened SC-74 Hot Tamale over the Stripes screen to the middle tape edge.
7. Remove the tape on the center of the middle. Tape the striped side and the next corner. Line up the Stripes screen so that it has opposite angles at the middle of the border. On the next screen, re-tape the corner to the screened side. Match up the stripes at the corner and continue around the border matching up all the stripes at the middle angles and the corners.
8. To make the narrow green border, tape off with 1/2″ tape over the stripes. Place a piece of 1/8″ tape next to the 1/2″ tape on the plate top. Tape another piece of 1/2″ tape next to the 1/8″ tape. Remove the 1/8″ tape. Use the CB-106 #6 Script Liner to apply two coats of SC-36 Irish Luck to the open space. Remove the tape.
9. Thicken SC-15 Tuxedo as in step 5. Use the penguin screen from DSS-0136 Zoo Animals. With the shiny side down, screen so that the bill is in the center of the plate. Clean the screen, then screen the second penguin so that their bills are almost touching. To do this place the shiny side up to reverse the screen.
10. Use the Soft Fan to apply three coats of FN-004 Red to the back of the plate.
1. Begin with properly fired shelf cone 04 bisque. Moisten a clean sponge and wipe bisque to remove any dust.
2. Using CB-604 #4 Soft Fan, apply three coats of FN-043 Bright Jade to the center of the plate. You don’t need to paint the entire plate, just an area large enough for the heart to fit into.
3. Cut a heart shape out of paper, dip in some water, and apply over glaze. Run your finger around the edge of the paper to make sure the edges are sealed to the plate.
4. Moisten a clean sponge and gently wipe away excess glaze from around the paper resist.
5. Using a CB-604 #4 Soft Fan, apply three coats of FN-001 White to the top of the plate.
6. Apply SC-60 Silver Lining to a piece of paper. Tear paper and apply pieces randomly to the plate. If pieces start to dry use a damp sponge to adhere them.
7. Dab the AC-213 Sponge-on-a-Stick into SC-035 Gray Hare, making sure not to overload the applicator. Lay the stamp flat on the table and gently apply the color to the stamp. Turn the stamp over and press onto the desired area. Allow to dry.
8. Using a CB-106 #6 Script Liner, apply three coats of SC-10 Teal Next Time to the chimney.
9. Using a CB-604 #4 Soft Fan, apply three coats of FN-009 Black to the back of the plate.
10. Using a CB-110 #10/0 Mini Liner, apply two coats of FN-009 Black the the border of the front of the plate.
1. Begin with a properly fired shelf cone 04 Bisque. Moisten a clean sponge and wipe bisque to remove dust.
2. Thin FN-048 Bright Pink with water. Pour inside the vase and roll to cover then pour out excess glaze and drain. Use a damp sponge to remove any drips from the outside of the vase.
3. Use the CB-604 Soft Fan to apply two coats of FN-001 White to the outside of the vase.
4. When dry, use AC-230 Clay Carbon Paper to trace a heart pattern onto one side of the vase.
5. Use the CB-106 #6 Script Liner and CB-110 #10/0 to apply two or three coats (depending on how bold you want your color) of the following colors to the segments of the heart: SC-11 Blue Yonder, SC-73 Candy Apple Red, SC-76 Cara-Bein Blue, SC-89 Cutie Pie Coral and SC-95 Pinkie Swear.
6. Punch rows of dots on strips of paper. Wet the white glazed areas with and place the paper strips onto the vase. Use the Script Liner to apply two coats of SC-95 Pinkie Swear to the open dots.
7. Use the Liner with SC-15 Tuxedo to outline the segments inside the heart and outside of the heart. Make squiggle lines inside of the dots.
8. Use the 2″ foam roller to apply SC-15 Tuxedo to the ST-116 Flourish Stamp and press onto the heart.
Begin with properly fired shelf cone 04 bisque. Moisten a clean sponge and wipe bisque to remove any dust.
Apply ½” Masking to the outer edge of the center of the plate.
Using a CB-604 #4 Soft Fan, apply 2 coats of FN-001 White to the center area of the plate. Allow to dry.
Cut out the word love and the heart patterns. With water attach the word love. Blot with a paper towel to absorb any excess water.
Place the hearts to the center of the plate and trace around with a pencil, also trace around the word love.
Using a CB-106 #6 Script Liner, apply 3 coats of SC-74 Hot Tamale to the hearts.
Remove the paper word love.
With a pencil, sketch a 1/8” border to the inside of the word love.
Using a CB-110 #10/0 Liner, apply 2-3 coats of SC-95 Pinkie Swear to the border.
Apply ½” Masking Tape to the edge of the center area
Using a CB-604 #4 Soft Fan, apply 3 coats of SC-1 Pink-A-Boo to the outer edge of the plate. Allow to dry.
With the heart paper punches punch out 4 larger hearts for the corners of the plate and 12 smaller hearts for in between. Apply the negative punch-outs to the edge of the plate with water. Blot with a paper towel to absorb any excess water.
Using a CB-106 #6 Script Liner, apply 3 coats of SC-74 Hot Tamale to the hearts.
Remove the paper cut out hearts.
Using a CB-604 #4 Soft Fan, apply 3 coats of FN-004 Red to the back of the plate. Allow to dry.
Begin with properly fired shelf cone 04 bisque. Moisten a clean sponge and wipe bisque to remove any dust. Check the inside for any debris as well.
Mix FN-036 Grape (approx. 2 oz.) with water to a melted ice cream consistency in a Plastic Cup. Pour the thinned glaze into the vase and while working quickly, rotate the vase to coat the inside of the vase. Pour out excess glaze and invert vase to drain and dry. Use a moistened sponge to remove any drips from the outside of the vase.
Apply 1 even coat of FN-001 White to the one side of the vase using CB-604 Soft Fan. Let dry.
Print 2 copies of the pattern. Cut out the basic pattern shape on one copy of the bunny excluding the grassy areas around the bunny and eggs. Check to see that the pattern fits the side of the vase. Apply one generous, but even coat of FN-001 White to the back side of the cut out pattern with CB-604 Soft Fan. While working quickly as to not let the glaze dry on the paper, apply the pattern to the vase over the dried white glaze to adhere it to the vase. Press and make sure all the edges have securely adhered to the vase. This will be your stencil.
Apply 3 even coats of FN-011 Light Blue over the entire outside of the vase using CB-604 Soft Fan. Do not over apply glaze completely over the papered area. Just make sure that the glaze overlaps onto the paper around all edges of the pattern. After the last coat of glaze has been applied and is still damp, remove the paper stencil before it completely dries. Check to make sure no uneven areas are on the white glaze surface. Finger smooth any uneven white glaze. Check and make sure all of the paper stencils has been removed. Let dry.
Retrace the pattern onto the ware using a pencil and AC-230 Clay Carbon. Include the grass areas.
Using CB-404 Pointed Round loaded with water and tipped with SC-92 Café Ole to shade the edges of the bunny. Pay attention to where the pattern shapes overlap one another. Darken the shading where the shadows of the pattern overlap the Café Ole with SC-41 Brown Cow in the same manner.
The inside of the ears are shaded with SC-1 Pink-A-Boo. Shade the top portions of the bunny’s cheeks also. Apply two coats to saturate the shading.Paint in the nose with 2-3 coats of Pink-A-Boo using CB-404 Pointed Round.
Shade the tummy and tuff of hair on the tummy with SC-35 Gray Hare in the same manner and brush.
Apply 1-2 coats of SC-31 The Blues to the brush handle using CB-404 Pointed Round. Shade the lower half of the handle with SC-29 Blue Grass. The bunny’s eyes are painted with The Blues and shaded lightly with Blue Grass as well. The pupil of the eye is SC-15 Tuxedo. Apply one coat of SC-60 to the brush and shade the lower half with SC-41 Brown Cow. Apply 1-2 coats of SC-51 Poo Bear to the bristles of the brush excluding the “paint” portion on the bristles. Apply thinned SC-73 Candy Apple Red to the “paint” portion on the bristles.
To the left egg, apply SC-51 Poo Bear to the crosshatch portion of the pattern using CB-110 Liner. Use the end of the brush to apply dots with SC-75 Orange-A-Peel between the hatches. The middle egg has SC-11 Blue Yonder painted on the lines using CB-110 Liner and dots of SC-5 Tiger Tail. The right egg has a thin coat of SC-73 Candy Apple Red to the two bands using CB-404 Pointed Round.
Stir and mix each one of the Jungle Gem glazes, CG-966 Tiger Lily, CG-965 Mocha Marble and CG-968 Peppermint Twist. Pour out some of each onto a tile or pallet. Apply 2 coats of each color with crystals to the respected eggs using CB-406 Pointed Round. Do not over apply excess crystals. Monitor the placement of the crystals so they won’t flow down onto the pattern during firing. After the glazes have dried, you can remove some of the crystals as well.
Shade over the eggs edges with a mixture of SC-41 Brown Cow and SC-15 Tuxedo to give contour to the eggs using CB-406 Pointed Round.
Apply one heavy coat of SC-52 Toad-ily Green the grass blades using CB-110 Liner. Shade and darken some of the grass with one coat of SC-39 Army Surplus and SC-36 Irish Luck.
Detail the bunny with SG-406 Brown Designer Liner keeping the line fine and even as you outline. Use the ridge of the blue background glaze to your advantage when applying the Designer Liner. You can add some outline detail to the eggs and grass, but do it sparingly for added reinforcement to the design. Keep any additional lines small and fine in width. Let Dry.
Apply 1 coat of S-2101 Crystal Clear Brushing over the entire outside of the vase excluding the egg areas where the crystal glazes were applied with CB-604 Soft Fan.
Begin with properly fired shelf cone 04 bisque. Moisten a clean sponge and wipe bisque to remove any dust.
Using CB-604 Soft Fan to apply 3-4 smooth and even coats of FN-305 Milk Chocolate to the entire bunnies. Let dry.
Using AC-230 Clay Carbon to transfer the designs to the bunnies. Cut the pattern into sections and cut relief points around the pattern to ease the transfer.
On a tile place about a ½ teaspoon of FN-001 White and mix in some of the Silica Sand to the glaze using the Pallet Knife until the mixture has thickened to about Greek Yogurt consistency. The mixture should be fluid enough to move yet keep its shape when applying to the ware. Using CB-110 Liner to apply the mixture to the daisy petals of the pattern. Do not clean your tile in the sink as the sand may clog your drain.
Repeat Step 4 with the rest of the Foundation colors in the same manner. Apply the FN-005 Pink mixture to the blossom flowers; FN-002 Yellow mixture to all the flower centers; FN-007 Green to some of the leaves and calyxes of the small flower buds; FN-022 Olive to the remaining leaves: FN-222 Indigo to the flower buds.
Use SG-402 White to draw in the scrolls of the pattern. Apply one thin coat of FN-001 White over the drawn in scrolls of Designer Liner using CB-110 Liner.
Begin with properly fired shelf cone 04 bisque. Moisten a clean sponge and wipe bisque to remove any dust.
Using the CB-604 Soft Fan brush, apply 3 coats of FN-48 Bright Pink to entire Jolly Christmas Tree.
Using a pencil, draw bird shapes facing in different directions all over the tree.
Using the CB-106 Script Liner, apply two coats of SC-27 Sour Apple to several of the birds. Repeat with SC-97 Cant-elope and SC-11 Blue Yonder until all of the birds are painted.
Load a section of the BT-910 Synthetic Sponge with SC-3 Wine About It. Sponge on color to the bottom sides of the swirls of the tree using an up and down pouncing motion.
Fill a clean AC-219 Designer Bottle with Writer Tip with SC-15 Tuxedo. Draw around the bird bodies, then add legs, eyes, beaks and patterned wings to each bird. Add a few lines and/or dots to the edges to the swirls of the tree.
Dip the end of the Script Liner handle into a small pool (about the size of a nickel) of SC-16 Cotton Tail. Dab it onto a section of the tree between the birds to make a polka dot. Repeat this until you cover all of the areas between the birds with dots.
Stilt and fire to shelf cone 06
Form
MB-1462 Jolly Christmas Tree Bisque or CD1462 Jolly Christmas Tree Mold
1. Begin with properly fired shelf cone 04 bisque. Moisten a clean sponge and wipe bisque to remove any dust.
2. Use a pencil or low-tack masking tape to mark off the border.
3. Using the AC-230 Clay Carbon Paper, trace on the pattern.
4. Using the Pointed Round, apply one coat of SC-42 Butter Me Up to the blossoms, then one thinned coat of SC-51 Poo Bear to the outside petals.
5. Using the Pointed Round, apply one coat of SC-78 Lime Light to the leaves. Then, apply one coat of SC-52 Toad-ily Green to the edges.
6. Use the Pointed Round to apply two thinned coats of SC-030 Blue Dawn to the water in the birdbath.
7. Use the Pointed Round to apply one thinned coat of SC-35 Gray Hare to the birdbath. Apply a second coat to the rim to deepen the color.
8. Using the Pointed Round, apply one coat of SC-83 Tip Taupe to the birds. Deepen the edges with SC-41 Brown Cow. Apply SC-51 Poo Bear to the chest area and the beaks.
9. Using the Pointed Round, apply one thinned coat of both SC-83 Tip Taupe and SC-52 Toad-ily Green to the ground area.
10. Stipple in darker areas with SC-51 Poo Bear.
11. Using the Pointed Round, apply one very thin coat of SC-30 Blue Dawn to the sky and around the leaves and flowers.
12. Using the Liner with SC-15 Tuxedo, outline the design and add detail.
13. Using the Soft Fan, apply three coats of FN-044 Yellow Orange to the back and border.
14. Using the Soft Fan to apply two coats of S-2101 Crystal Clear Brushing Glaze to the center area. Or dip the plate into NT-CLR Clear Dipping Glaze.
15. Stilt and fire to shelf cone 05/06.
Form
MB-1292 Rectangle Dinnerware
Colors
FN-044 Yellow Orange
SC-15 Tuxedo
SC-30 Blue Dawn
SC-35 Gray Hare
SC-41 Brown Cow
SC-42 Butter Me Up
SC-51 Poo Bear
SC-52 Toad-ily Green
SC-78 Lime Light
SC-83 Tip Taupe
S-2101 Crystal Clear Brushing or NT-CLR Clear Dipping Glaze
1. Begin with properly fired shelf cone 04 Bisque. Moisten a clean sponge and wipe bisque to remove dust.
2. Thin S-2101 Clear Brushing Glaze with water. Pour inside the vase, roll to coat, then pour out the excess and drain.
3. Use the Soft Fan to apply two coats of SC-85 Orkid to the roof and down the sides of the house.
4. Apply an one more coat of SC-85 Orkid to the same areas. While the color is still wet, place row of eyelash yarn into the wet glaze. Brush back over with additional more Orkid to get the hairs of the yarn to adhere to the piece where you want them.
5. After the glaze starts to set, gently press a paper towel over the yarn covered areas to aid in drying the glaze. Once the shine is gone, use the Soft Fan to apply two coats of SC-55 Yella Bout It over the yarn covered areas.
6. When the gloss leaves the glaze, remove the eyelash yarn. Do not let the glaze dry with the yarn in place.
7. Use the Script Liner to apply two coats of SC-85 Orkid over the windows and the doors.
8. Scrape off the excess Orkid, so it stays in the detail lines around the door and window frames, lightly sponge off the remaining Orkid.
9. Use the same brush to apply two coats of SC-55 Yell About It to the windows. Apply three coats of SC-93 Honeydew List to the door.
10. Use the Soft Fan to apply three coats of FN-001 White to the main part of the house.
11. Fire to cone 05/06.
Form
MB-1423 House Vase 10″
Colors
SC-55 Yella Bout It
SC-85 Orkid
SC-93 Honeydew List
FN-001 White
NT-CLR Clear Dipping or S-2101 Clear Brushing Glaze
1. Begin with properly fired shelf cone 04 bisque. Moisten a clean sponge and wipe bisque to remove any dust.
2. Use the CB-604 #4 Soft Fan and CB-106 #6 Script Liner to apply two coats of SC-16 Cotton Tail to the body of the house. Apply three coats of SC-55 Yella Bout It to the roof. Use the Script Liner with SC-97 Cant-elope to apply wide lines of shading onto the roof as shown (one coat).
3. Use the Script Liner to apply two coats of SC-26 Green Thumb to the stem of the roof.
4. Use the same brush to apply two coats of thinned SC-11 Blue Yonder to the door. Apply two coats of SC-73 Candy Apple Red to the door trim and step. Add shading under the roof with SC-25 Crackerjack Brown.
5. Punch out small circles with a paper punch. Use the negative space from the punch to create the dots on the house. Wet the paper, press it onto the house, Gently press onto the bisque with a paper towel to remove excess water and ensure edges are sealed. Use the Script Liner to apply two coats of SC-11 Blue Yonder.
6. Thicken SC-15 Tuxedo with AC-310 Silkscreen Medium and mix using a palette knife to the consistency of peanut butter. Place the shiny side up and rub the thickened Tuxedo over the lady bugs on the roof. Use the CB-110 #10/0 Liner to puddle SC-73 Candy Apple Red around the spots on the back of the lady bug.
Begin with properly fired shelf cone 04 bisque. Moisten a clean sponge and wipe bisque to remove any dust.
Thin all of the colors to a watery consistency and use the Soft Fan to apply the colors. Starting with SC-6 Sunkissed and SC-97 Cant-elope, float color sporadically onto the right side of canvas. Add SC-95 Pinkie Swear, applying some some over the yellows.
Brush thinned SC-11 Blue Yonder over the canvas letting it puddle into the texture of the piece allowing the color to overlap the yellows and pinks.
Brush the thinned SC-12 Moody Blue onto the top and right side edges. Allow some of the bisque to show through the colors.
Thicken SC-15 Tuxedo with AC-310 Silkscreen Medium and mix using a palette knife to the consistency of peanut butter. Use the dandelions from DSS-0116 Stylized and the grasses from DSS-110 Botanical Trees. Place the shiny side up and rub the thickened Tuxedo over the images.
Begin with properly fired shelf cone 04 bisque. Moisten a clean sponge and wipe bisque to remove any dust.
Starting at the top of the tree, apply two coats of a mixture of SC-16 Cotton Tail and SC-1 Pink-A-Boo. Apply two coats of SC-1 Pink-A-Boo to the middle of the tree. Apply two coats of a mixture of SC-1 Pink-A-Boo and SC-89 Cutie Pie Coral to the lower section of the tree. Apply SC-89 Cutie Pie Coral into the swirls at the bottom and arms of the tree, two coats. Us the CB-106 #6 Soft Fan for the large areas and the CB-106 #6 Script Liner for the swirl areas.
Shade a deeper coral by adding SC-81 Cinnamon Stix to Cutie Pie Coral and float this mix of color into and around the swirls using the Script Liner.
Use a sponge to wipe off some of the coral and pink glaze from the top of the swirls. Apply two coats of SC-93 Honeydew List on the swirls, blending the color with SC-89 Cutie Pie Coral, under the arms and the skirt at the bottom. Let dry.
For the butterfly side of the tree, pencil in a grid for a checkerboard pattern. Apply one coat of SC-16 Cotton Tail to every other section of the checkerboard. Shade the Cotton Tail square on left side with one coat of SC-93 Honeydew List.
Use the CB-110 #10/0 Liner to outline the checkerboard pattern with a thinned coat of SC-81 Cinnamon Stix.
Mix AC-310 Silkscreen Medium with SC-15 Tuxedo using a palette knife to the consistency of peanut butter. Rub the thickened mix over the floral screen, from DSS-0138 Floral 2, to the bottom of the tree. Fill in with more flowers from the same screen along the bottom of the tree.
Use the Liner with SC-16 Cotton Tail to add strokes of color into to petals on the flowers. Use SC-97 Cant-elope for the centers.
Screen the butterflies from DSS-0113 Bugs on the tree as shown. Use the Liner to fill in the pattern on the wings with SC-97 Cant-elope and SC-89 Cutie Pie Coral.
Use the paper punch to create dots for the tree. Scatter small dots across the tree by using the negative space from the punch. Wet the paper and press to the tree. Apply one coat of SC-93 Honeydew List and one coat of SC-27 Sour Apple then remove the paper.
Both sides of the tree can be finished with the same or similar design.
Dip into NT-CLR Clear Dipping Glazes or use the Soft Fan to apply one coat of S-2101 Clear Brushing Glaze to the tree.
Stilt and fire to cone 05/06
Alternate decoration of the tree, as shown below:
Follow directions step 1 through 4.
Trace on or sketch on the pattern.
Use CB-106 Script Liner or CB-202 Detail for the flowers and leaves.
For the white flowers, apply stroke of color with SC-16 Cotton Tail to the flower petals. Apply one coat of SC-97 Cant-elope to the centers.
For the blue flowers apply two coats of SC-11 Blue Yonder and one coat of SC-97 Cant-elope to the centers.
For the golden flowers at the top. apply single brushstrokes of SC-97 Cant-elope.
The stems and leaves are two coats of SC-93 Honeydew List and SC-27 Sour Apple The red leaf has SC-81 Cinnamon Six with the Sour Apple.
Use the Liner and thinned SC-73 Candy Apple Red to the stems and leaves.
Use SG-401 Black with the Liner to outline the designs and dots. Thin SG-401 Black with water and add soft stripes on the leaves.
Dip into NT-CLR Clear Dipping Glazes or use the Soft Fan to apply one coat of S-2101 Clear Brushing Glaze.
Stilt and fire to cone 05/06.
Form
MB-1462 Jolly Christmas Tree Bisque or CD1462 Jolly Christmas Tree Mold
Colors
SC-1 Pink A Boo
SC-11 Blue Yonder
SC-15 Tuxedo
SC-16 Cotton Tail
SC-27 Sour Apple
SC-73 Candy Apple Red
SC-81 Cinnamon Stix
SC-89 Cutie Pie Coral
SC-93 Honeydew List
SC-97 Cant-elope
SG-401 Black
NT-CLR Clear Dipping Glaze or S-2101 Clear Brushing Glaze
Damp sponge over ware to remove any dust using the BT-910 Synthetic Sponge.
Using the CB-606 # 6 Soft Fan, apply 2 coats of FN-001 White to the top of the canvas.
Cut out the pattern, wet the glaze, and press the cut out pattern into place, pressing to seal the edges so no color can get under it.
Using the CB-604 # 4 Soft Fan, apply 2 coats of FN-214 Pastel Jade to the front, and remove the paper cut out.
Using the AC-230 Clay Carbon, trace on the pattern.
Apply the 1″ circles to the bunny on the right.
Using the CB-404 # 4 Pointed Round, apply 3 coats of SC-78 Lime Light to the bunny on the left and 3 coats of SC-70 Pink-A-Dot to the bunny on the right, keeping off the tails.
Remove the 1″ circles.
Using a palette knife, mix the AC-310 Silkscreen Medium with SC-15 Tuxedo to a peanut butter consistency.
Holding the silkscreen in place, shiny side down, apply chevron stripes to the bunny on the left with the DSS-0104 Designer Silkscreen Chevron, and to the circles on the bunny on the right, DSS-0103 Flourishes by rubbing the thickened mixture in a circular motion with your finger, pushing the thickened color through the silkscreen. When finished, wash the silkscreens with water.
Using a brush handle or painting them in, add SC-9 Jaded dots to the left bunny, SC-070 Pink-A-Dot dots to the center bunny and SC-78 Lime Light dots to the right bunny.
Using the CB-110# 10/0 Liner loaded in SC-15 Tuxedo, outline and detail the design.
Using the CB-604 # 4 Soft Fan, apply 3 coats of FN-231 Clearly Jade to the edges.
Begin with properly fired shelf cone 04 bisque. Moisten a clean sponge and wipe bisque to remove any dust.
Using a CB-618 #8 Soft Fan, apply 3 coats of FN-011 Light Blue to the duck, avoiding the beak and eyes.
Using a pencil, draw circles of varying sizes randomply about the piece. This will be where the flowers are placed.
Using a CB-106 #6 Script Liner, load the brush with SC-16 Cotton Tail and dip the tip of the brush in SC-13 Grapel. Apply a lot of pressure when you place the brush on the piece and lift as you pull through the brush stroke. Repeat this step until you’ve made it all the way around the circle then us SC-6 Sunkissed as the center of the flower.
Repeat the previous step, but also using SC-11 Blue Yonder and SC-75 Orange-A-Peel until the desired amount of flowers has been achieved.
Using a CB-604 #4 Soft Fan, apply 3 coats of FN-002 Yellow to the beak.
Using a CB-106 #6 Script Liner, apply 2 coats of SC-16 Cotton Tail to the eyes. Add 1 coat of SC-11 Blue yonder for the iris’ and 1 coat of SC-15 Tuxedo for the pupils.
Using a CB-202 #2 Detail Liner apply 3 coats of SC-73 Candy Apple Red to the tongue.
Using a CB-110 #10/0 Liner, apply 1 coat of SC-15 Tuxedo to outline the eyes and beak.
Begin with properly fired shelf cone 04 bisque. Moisten a clean sponge and wipe bisque to remove any dust.
Using a CB-604 #4 Soft Fan, apply 3 coats of FN-011 Light Blue to the inside circle of the lid and 3 coats of FN-020 Medium Green to the outer circle. Also, apply 3 coats of FN-009 Brown to the bottom half of the box.
Using a CB-106 #6 Script liner, dip the brush in some water and without drying it, pull one side of the brush through SC-11 Blue Yonder.Brush around the inner circle of the box with the glaze side of the brush facing outwards. This should create a gradient effect.
Using a CB-110 #10/0 Mini Liner, apply 1 coat of SC-15 Tuxedo to create flowers and apply 1 coat of SC-8 Just Froggy for the stems.
Using a CB-106 #6 Script Liner, apply 1 cpat of SC-74 Hot Tamale and SC-75 Orange-A-Peel to the topes of the flowers.
Using a CB-604 #4 Soft Fan, apply 3 coats of SG-202 White Cobblestone to the outer circle of the lid and the bottom of the box.
When the Cobblestone glaze is dry to the touch, but not yet cracking, apply 1 coat of SC-27 Sour Apple to the cobblestone section on the lid and SC-14 Java Bean to the cobblestone section on the botton half of the box.
Begin with properly fired cone 04 stoneware bisque. Moisten a sponge and wipe bisque to remove any dust.
Apply 2 coats of UG-50 Jet back to the outside, rim, and as an accent inside of the bowl (don’t put too much detail into it as it will be distorted in the firing).
Apply 2 coats of SW-250 White Opal to the inside of the bowl
Apply 2 coats of EL-149 Lavender Flower to the inside of the bowl.
Apply SW-001 Stoneware Clear to the rim and back of the bowl to make it Dinnerware Safe.
Use a damp sponge to wipe away any glaze that may have gotten on the foot.
Fire to cone 5/6. Sample piece was fired to cone 6.
Begin with properly fired shelf cone 04 bisque. Moisten a clean sponge and wipe bisque to remove any dust.
Using the Soft Fan, apply 2 coats of SC-16 Cotton Tail to the top of the mushrooms.
Punch out the two sizes of dots with the paper punches.
Brush the top of the mushrooms with water, in sections where you want white to show through. Place on the paper dots in the wet areas, making sure to press the edges flush to the piece.
Using the Soft Fan brush, apply 3 coats of SC-74 Hot Tamale to the top of each mushroom. Brush around the paper dots, so some of the paper is left exposed, otherwise they can be hard to find later.
Brush the third coat of SC-74 Hot Tamale in sections around the paper. Remove the paper with a pin or a needle tool while the glaze is wet. This will keep the glaze from chipping.
Use the Soft Fan to apply 2-3 coats of SC-86 Old Lace under the tops and stems of the mushrooms.
Use the tip of the Script Liner to apply thinned (with water) SC-14 Java Bean under the mushrooms into the grooves.
Use the Soft Fan to apply 2 coats of S-2101 Clear to the mushrooms or dip in clear glaze.
Begin with properly fired shelf cone 04 bisque. Moisten a clean sponge and wipe bisque to remove any dust.
Using the CB-604 #4 Soft Fan brush, apply 2 smooth coats of Foundation FN-001 White to the top of the plate.
Punch out of paper the desired number of flowers you want using a 2″ paper punch and copier paper.
Wet an area with water, and “glue” down the 2″ paper circle where desired. Continue until you have the desired number of flowers on your plate.
Using the CB-604 #4 Soft Fan brush, apply 2 to 3 coats of Foundation FN-32 Canton Jade to the top of the plate.
On a palette, with a palette knife, mix a small amount of AC-310 Silkscreen Medium into Foundation FN-231 Clearly Jade to the consistency of peanut butter. Screen the entire surface of the plate using the DSS-0103 Flourishes Silkscreen (shiny side down).
Remove the paper circles.
Using the CB-404 #4 Pointed Round brush, apply 2 coats of SC-97 Cant-elope to the orange flowers and 2 coats of SC-89 Cutie Pie Coral to the red flowers.
Side load the Pointed Round brush with SC-81 Cinnamon Stix and add ruffle type of strokes into the SC-89 Cutie Pie Coral flowers.
Side load the Pointed Round brush with SC-88 Tu Tu Tango and add a ruffle type of strokes to the Stroke and Coat SC-97 Cant-elope flowers.
Using the Pointed Round brush, load with SC-7 Leapin Lizard and add leaves where desired.
Reload the Pointed Round brush with SC-7 Leapin Lizard and side load with SC-52 Toad-ilky Green and apply to the leaves, keeping the darker color to the outside edge.
Using the CB-110 #10/0 Mini Liner and SC-36 Irish Luck, outline and add veins to the leaves.
Using the Soft Fan brush, apply 3 coats of Foundation FN-032 Canton Jade to the back and edges.
Begin with properly fired shelf cone 04 bisque tile. Moisten a clean sponge and wipe bisque to remove any dust.
Using scissors, cut out the rabbit from one pattern copy. Place the cut out rabbit pattern on the tile, aligned to the botton of the tile. Trace around the image with a pencil.
Using CB-604 #4 Soft Fan, apply 2 heavy coats of SC-16 Cotton tail to the inside of the pencil line, slightly brushing past the line. Let dry.
Brush SC-16 Cotton Tail painted area with water to adhere the cut out rabbit image to. Place a paper towel over the pattern; gently smooth out the paper on the glaze. Remove paper towel.
Using CB-604 #4 Soft Fan, brush the remainder of the tile with 3 coats of SC-96 Aqu-ward.
Remove the paper pattern. Let dry.
Using a pencil and AC-230 Clay Carbon Paper, transfer the full pattern onto the tile.
Using CB-110 #10/0 Mini Liner, apply 2 coats of Sc-16 Cotton Tail to the petals of the flowers; 2 coats of SC-97 Catn-elope to the centers of the flowers; 2 coats of SC-10 Teal Next Time to the samll leaves; and apply 2 coats of SC-77 Glo Worm mixed with a small amount of SC-10 Teal Next Time for the larger leaves.
Using CB-110 #10/0 Mini Liner, apply SC-10 Teal Next Time to draw in the vines.
Using CB-106 #6 Script Liner, shade the rabbit’s face with 1 coat of SC-46 Rawhide; apply SC-18 Rosey Posey to the nose and inside of the ears.
Using CB-110 #10/0 Mini Liner, detail the rabbit’s features and outline the flowers with SC-15 Tuxedo.
Using SG-409 Bright Green, outline the large leaves and vines. Let dry.
Using CB-604 #4 Soft Fan, apply 1 coat of S-2101 Crystal Clear to the top of the tile.
1. Begin with properly fired cone 04 bisque. Moisten a sponge and wipe bisque to remove any dust.
2. Using the Script Liner with SC-16 Cotton Tail, apply 1 coat to the front of the message plaque.
3. Cut out the 2 rectangles, dip them in water, then place them on the front of the message plaque.
4. Using the Script Liner with SC-45 My Blue Heaven, apply 2 coats to the front of the message plaque. Allow glaze to dry between coats.
5. On the DSS-0142 Hipster screen, locate the record. Draw an outline around it in permanent marker. Cut it out with excess screen around the edges.
6. Squeeze about 2 TBS of SC-15 Tuxedo onto the plate. Add a pinch of AC-310 Silkscreen Medium. Mix with a palette knife until it becomes the consistency of peanut butter. You may need to add more Silkscreen Medium or glaze.
7. Place the record on the front of the message plaque. While holding it firmly in place, take a small amount of premixed Silkscreen Medium, and gently rub in circles starting in the center and working outward. Slowly pull up the screen to avoid smearing. Repeat.
8. Pull up the 2 rectangle patterns before the glaze is completely dry.
9. Place the clay carbon paper over the areas where the rectangles were located. Write desired text on a piece of paper and cut out. Place the “Best Dad” and “On Record” patterns over the clay carbon paper and trace. Use the Detail Liner with SC-15 Tuxedo to trace the lettering.
10. Using the Script Liner with SC-15 Tuxedo, apply 2 coats to the sides and back of the message plaque. Allow glaze to dry between coats.
Using the Soft Fan with SC-70 Pink-A-Dot or SC-6 Sunkissed, apply 3 coats to the inside of the tumbler. Allow glaze to dry between coats.
Using the Soft Fan with SC-1 Pink-A-Boo or SC-55 Yella Bout It, apply one coat to the bottom half of the tumbler. While the glaze is still wet, dip your brush into SC-16 Cotton Tail and blend up to the top of the tumbler. Repeat when dry.
Squeeze about 2 TBS of SC-15 Tuxedo onto the plate. Add a pinch of AC-310 Silkscreen Medium. Mix with a palette knife until it becomes the consistency of peanut butter. You may need to add more Silkscreen Medium or glaze.
On the DSS-0130 Graceful Script screen, locate “Mom”. Draw an outline around it in permanent marker. Cut it out with the excess screen around the edges.
Place “Mom” in the upper-center of the tumbler. While holding it firmly in place, take a small amount of premixed Silkscreen Medium, and gently rub in circles starting in the center and working outward. Slowly pull up the screen to avoid smearing.
Using the Detail Liner with SG-401 Black, draw the stems and branches of the flower(s).
Using the Script Liner with SG-407 Yellow, SG-408 Orange, SG-409 Bright Green, SG-410 Bright Blue or SG-411 Purple, make dots at the tips of the branches.
Fire to cone 06.
Form
MB-1455 Stemless Wine Tumbler
Colors
SC-1 Pink-A-Boo
SC-6 Sunkissed
SC-15 Tuxedo
SC-16 Cotton Tail
SC-55 Yella Bout It
SC-70 Pink-A-Dot
SG-401 Black
SG-407 Yellow
SG-408 Orange
SG-409 Bright Green
SG-410 Bright Blue
SG-411 Purple
NT-CLR Clear Dipping or NT-BR Clear One Brushing Glaze
1. Begin with a properly fired shelf cone 04 Bisque. Moisten a clean sponge and wipe bisque to remove dust.
2. Slightly thin SC-75 Orange-A-Peel and pour to the inside of the trophy. Turn to coat, pour out the excess glaze and drain.
3. Tape a band 3/8″ from the top of the trophy. Use the Soft Fan to apply two coats of SC-9 Jaded. Remove the tape.
4. Tape another band approximately 3/8″ below the first color. Use the Script Liner to apply two coats of SC-13 Grapel in the center fading the color to SC-24 Dandelion. Remove the tape.
5. Use the Soft Fan to apply Sour Apple mixed with the SC-24 Dandelion to the rest of the trophy. Use the Script Liner to apply two coats of SC-27 Sour Apple to the handles. Add SC-26 Green Thumb to scrolls on the handle.
6. Use the Soft Fan and Script Liner to apply two coats of SC-97 Cant-elope and SC-75 Orange A Peel to the base. Add strokes of SC-73 Candy Apple Red. Let dry.
7. Pencil in the words. Use the Script Liner to apply SC-73 Candy Apple Red to the scallop trim at top. Use the Liner to outline the scallops with SC-15 Tuxedo.
8. Use the metal tip to apply SG-402 White to the words World’s Greatest. Paint the pound sign and outline the words with one coat of SC-15 Tuxedo. Use the metal tip to apply SG-403 Red over the number 1.
Begin with properly fired shelf cone 04 Bisque. Moisten a clean sponge and wipe bisque to remove any dust.
Use the Soft Fan to apply three coats of SC-60 Silver Lining to the mug and wrench. Use the same brush to apply three coats of FN-051 Strawberry to the inside of the mug. Let dry.
Use a palette knife to mix SC-15 Tuxedo with AC-310 Silkscreen Medium to the consistency of peanut butter. You will use the pipe screens from DSS-0125 Steampunk to arrange a pattern; be sure to leave space for the words. Hold the screen shiny side down on the mug and rub the thickened Tuxedo over the screen. Gently clean the screen.
Pencil in the words Mr. Fix-it. Use the Script Liner to apply two coats of SC-74 Hot Tamale to the words. Use the Liner with SC-15 Tuxedo to outline the letters.
Thin SC-15 Tuxedo to the consistency of water. Brush over the wrench to antique. Use the same color to go over the spaces on the handle.
1. Begin with properly fired shelf cone 04 Bisque. Moisten a clean sponge and wipe bisque to remove any dust.
2. Use the Soft fan to apply three coats of SC-46 Rawhide to the outside of the mug.
3. Use the Soft Fan to apply three coats of SC-14 Java Bean to the hammer’s handle and SC-35 Gray Hare to the head of the hammer.
4. When Rawhide is dry, use the sponge-on-a-stick to SC-34 Down To Earth onto the ST-133 Wood Grain stamp. Press the stamp onto one section of the mug. Let dry. Place a piece of tape over the edge of the stamped wood grain then continue stamping around the mug, alternate the position of the stamp.
5. Pencil in Nailed It! over the wood grain in bold lettering. Use the Liner with SC-15 Tuxedo to paint over the letters.
Begin with properly fired shelf cone 04 Bisque. Moisten a clean sponge and wipe bisque to remove any dust.
Use the Soft Fan to apply one coat of FN0-001 White to the front of the clipboard.
Pour SC-1 Pink-A-Boo into a small cup and add SC-16 Cotton Tail (about half as much as the Pink-A-Boo) to lighten the color. Add water to thin to the consistency of a light cream. Thinning to much will cause to color to move too much, not enough water will cause the paint to move slowly.
Squirt SC-16 Cotton Tail into the second cup, thin with water as noted in step #3.
Pour the pink mix over the clipboard in uneven bands, fill in between the bands with the thinned Cotton Tail. There should be space in between the bands of color.
Move the clipboard slowly in different directions to marbleize. Stop before it is over mixed. Use your fingers to splatter Cotton Tail into the pink areas, and pink into the Cotton Tail area. Lay flat to dry.
Outline the clip on the board with a pencil, this will help place the flower and the words. Mark where the clip will sit on the board then remove the glaze in this area. This will help the epoxy stick better after firing.
On a plate, mix green food coloring with S-2101 Clear to tint. Sprinkle AC-310 Silkscreen Medium on to the clear and mix with a palette knife to the consistency of peanut butter. Place the hydrangea from DSS-0149 FLowers 3 XL onto the clipboard with the shiny side down. Rub the thickened clear over the screen. This is for color placement only. Gently clean the screen.
Use the Script Liner to apply two coats of SC-77 Glow Worm to the slightly past centers of the flowers.
Fill in the rest of the flower with two coats of SC-17 Cheeky Pinky adding in SC-1 Pink-A-Boo sporadically.
Use the Script Liner to apply two coats of SC-26 Green Thumb to the leaves with the lighter areas being painted with SC-77 Glow Worm. Let dry.
Thicken SC-15 Tuxedo with Silkscreen Medium to the consistency of peanut butter. Place the hydrangea screen directly on top of the previous screen and rub the thickened Tuxedo over the screen.
Pencil on the words Mom’s Notes or whatever you desire. Use the Liner to paint the words with SC-15 Tuxedo. SC-15 Tuxedo can also be used. Alternatively, you may use SG-401 Designer Liner to go over the penciled words.
Tape the area at the where the clip will go then dip the piece into NT-CLR Clear Dipping Glaze. Remove the tape.
Fire to cone 05/06.
After the Clipboard has cooled, use epoxy to glue on the clip following the directions on the package.
Begin with properly fired shelf cone 04 Bisque. Moisten a clean sponge and wipe bisque to remove dust.
Place some FN-006 Blue into a small cup and add a little bit of water to slightly dilute it (about 4 parts glaze to 1 part water). It should be the consistency of coffee cream. Pour this mixture into the tumbler and roll around to coat completely. Drain out the excess glaze until it stops dripping. Wipe off any glaze from the outside using a damp sponge.
Use the colors noted above to stamp the Stick Figure stamp. Use the sponge-on-a-stick to dab color onto one image at a time and randomly apply to the wine tumbler.
Use the word Dad from DSS-0130 Graceful Script with SC-15 Tuxedo. Use the following directions to screen over the Stick Figures on the wine tumbler.
Place some color on a palette or tile and sprinkle with AC-310 Silkscreen Medium. Using a palette knife, mix color and medium to the consistency of thick peanut butter. If the mix is too thin add more AC-310 Silkscreen Medium; if it is too thick add more Stroke & Coat. Too thin of a mixture will bleed under the screen and give you a blurred image. Too thick of a mixture will make it hard for the product to penetrate through the holes in the screen and give blank areas in your screen.
Position the screen shiny side down on the piece. Hold in place, starting from the center out, rub the mixture on the screen with your finger. Lift a corner up to check if you are applying enough color. Remove the screen and wash with water. Do not let the color dry in the screen – this will cause damage to the screen.
Dip into NT-CLR Clear Dipping Glaze or use a Soft Fan to apply two coats of S-2101 Clear Brushing Glaze to the outside of the tumbler.
Fire to cone 05/06.
Form
MB-1455 Stemless Wine Tumbler
Colors
SC-15 Tuxedo
SC-74 Hot Tamale
SC-75 Orange-A-Peel
SC-76 Cara-Bein Blue
SC-97 Cant-elope
FN-006 Blue
NT-CLR Clear Dipping or S-2101 Clear Brushing Glaze
Begin with properly fired shelf cone 04 Bisque. Moisten a clean sponge and wipe bisque to remove dust.
Place some FN-003 Orange into a small cup and add a little bit of water to slightly dilute it (about 4 parts glaze to 1 part water). It should be the consistency of coffee cream. Pour this mixture into the wine tumbler and roll around to completely coat the interior. Drain out the excess glaze until it stops dripping. Wipe off any glaze from the outside using a damp sponge.
Use the colors noted above with the sponge-on-a-stick and Handprints Stamp. Dab color onto one handprint at a time with the color and, stamp to the tumbler in a random pattern.
Use the Script Liner to enhance the color of the print with another coat of the same glaze.
Dip into NT-CLR Clear Dipping Glaze or use the Soft Fan to apply two coats of S-2101 Clear Brushing Glaze to the outside of the tumbler.
Fire to cone 05/06.
Form
MB-1455 Stemless Wine Tumbler
Colors
SC-5 Tuxedo
SC-74 Hot Tamale
SC-75 Orange-A-Peel
SC-76 Cara-Bein Blue
SC-97 Cant-elope
FN-003 Orange
NT-CLR Clear Dipping or S-2101 Clear Brushing Glaze
Begin with properly fired shelf cone 04 bisque. Moisten a clean sponge and wipe bisque to remove any dust.
Using a CB-604 #4 Soft Fan, apply 3 coats of FN-039 Light Gray to the center section of the plate.
Once dry, apply the MMC-001 1/4″ Masking tape to frame the center of the plate. Next, place the tape in evenly spaced stripes across the center of the plate to create the grate of the grill.
Using a sponge, apply 1 layer of SC-15 Tuxedo to the center. On the second layer, incoroprate SC-24 Dandelion and SC-75 Orange-a-Peel randomly and apply SC-15 Tuxedo everywhere else.
Remove the tape and clean up any glaze that got outside of the center area with a clean, damp sponge.
Using a CB-604 #4 Soft Fan, apply 3 coats of FN-004 Red to the outer edge and back of the plate.
Using a CB-106 #6 Script Liner, apply 3 coats of SC-80 Basketball to create the hot dogs.
Using a sponge, apply 2 coats of SC-41 to make the burger. Add 1 coat of SC-34 Down to Earth on top to darken the burger.
Using a CB-110 #10/0 Mini Liner, to applt 1 coat of SC-15 Tuxedo to make the grill marks on the meat.
Using a SG-407 Yellow, write “Dad’s Grillin’ Plate” across the meats on the plate. Repeat with SG-403 Red.
Using a CB-604 #4 Soft Fan, apply 1 coats of S-2101 Crystal Clear Brushing to the top of the plate or dip the entire plate in NT-CLR.
Let dry completely.
Stilt and fire to shelf cone 06/05.
Form
MB-882 Rectangle Tray Mold or CD-882 Rectangle Tray Mold
Colors
FN-004 Red
FN-039 Light Gray
SC-15 Tuxedo
SC-24 Dandelion
SC-34 Down to Earth
SC-41 Brown Cow
SC-75 Orange-a-Peel
SC-80 Basketball
SG-403 Red
SG-407 Yellow
S-2101 Crystal Clear Brushing or NT-CLR Dipping Clear
Using the BT-910 Synthetic Sponge, damp sponge ware to remove any dust.
Using the AC-230 Clay Carbon Paper, trace on the ties as desired.
Using the CB-404 # 4 Pointed Round, apply 3 coats of SC-13 Grapel to one tie, 3 coats of SC-6 Sunkissed to another tie and 3 coats of SC-78 Lime Light to the last tie.
Cut out 3 of the tie shapes, dampen the paper and press over the painted ties to protect them from when we apply the background color.
Using the CB-604 # 4 Soft Fan, apply 3 coats of SC-31 The Blues to the top area of the canvas.
Using the BT-910 Synthetic Sponge, pounce onto the MT-008 Spiral Mat SC-10 Teal Next Time and stamp over the SC-31 The Blues areas.
After stamping the entire top area, remove the paper cutouts.
Cut out the tie as a stencil, separating the top from the bottom areas of the tie.
Holding the stencil in place, stamp the SC-13 Grapel tie with SC-33 Fruit of the Vine and the ST-127 Crackle Stamp.
Holding the stencil in place, stamp the SC-6 Sunkissed tie with SC-75 Orange A Peel and the ST-126 Dots and Squiggles Stamp.
Holding the stencil in place, stamp the SC-78 Lime Light tie with SC-26 Green Thumb and the ST-129 Mini Fern Stamp.
Outline and add lettering using the Cb-110 # 10/0 Liner loaded in SC-15 Tuxedo.
Using the CB-604 # 4 Soft Fan, apply 3 coats of SC-10 Teal Next Time to the edges.
Begin with properly fired shelf cone 04 bisque. Moisten a clean sponge and wipe bisque to remove any dust.
Using a CB-604 #4 Soft Fan, apply 3 coats of FN-044 Yellow-Orange to the outside of the mug.
Once dry, use an AC-213 Sponge on a Stick to apply SC-12 Moody Blue to the ST-127 Crackle. Be sure to dab off excess glaze from the sponge before applying it to the stamp and to have the stamp flat of the table when applying the glaze. Repeat until the entire outside of the mug is covered with the stamped design.
Once dry, use AC-230 Clay Carbon Paper to transfer the design onto the mug.
Using a CB-202 #2 Detail Liner, apply 2 coats of SC-74 Hot Tamale to “World’s Greatest Farter” Outline the word “Farter” with 2 coats of SC-16 Cotton Tail.
Using a CB-110 #10/0 Mini Liner, apply 2 coats of SC-15 Tuxedo to the “x” and the word “Father”
Using a CB-604 #4 Soft Fan, apply 3 coats of SP-212 Speckled Moody Blue to the inside of the mug.
Begin with properly fired shelf cone 04 bisque. Moisten a clean sponge and wipe bisque to remove any dust.
Trace the pattern onto the clipboard using a pencil and AC-230 Clay Carbon Paper
Pencil in dots for the nails 1/2″ apart on the heart and 1/4″ apart for the word DAD.
Use a ruler as a guide to draw straight lines with SG-403 Red inside the heart. Continue applying red lines in random angles until the heart is filled.
Outline the heart using SG-401 Black and to add circles around the dots to mimic nail heads.
Repeat the process used on the heart for the word DAD. Use SG-401 Black inside the word and SG-403 Red as the outline.
Dip into clear glaze or use the CB-604 Soft Fan to apply two coats of S-2101 Clear.
Stilt and fire to cone 05/06.
After the Clipboard has cooled, use epoxy to glue on the clip following the directions on the package.
On 04 Bisque, remove loose dust with a dry brush and make sure the inside is free from dust. For the headlights, drill out the headlight bisque to fit the bulbs with a dremel using bit #562 Tile Cutting Bit.
Slightly thin FN-009 Black and pour inside the truck bed. Turn to coat then drain out the excess glaze.
Use the Pointed Round or Script Liner with SC-35 Gray Hare to create a wide shade around all of the detail of the truck. Let dry. Shade again with a more narrow angle using SC-15 Tuxedo.
Use the Script Liner to apply three coats of SC-60 Silver Lining to the grill and bumper. Let dry. Thin SC-15 Tuxedo to the consistency of water and brush over the grill and bumper to an antique. R back some of the black with the side of the brush to expose the Silver Lining on the high areas of the grill and bumper.
Use the Script Liner to apply SC-15 Tuxedo around the edges of the windows. Add SC-60 Silver Lining to the brush to streak the centers of the windows to make the glass look transparent. Apply two coats. Use the same brush to apply two coats of SC-15 Tuxedo to the tires.
Use the Liner with thinned SC-15 Tuxedo to outline the lines on the truck.
Dip into NT-CLR Clear Dipping Glaze or use the Soft Fan to apply two coats of S-2101 Clear Brushing Glaze to the truck.
Fire to cone 06/05.
Push the headlights through the dremeled holes, hot glue around the opening, push the bulb through the hole to secure. We find it is easier to wrap a piece of stiff wire around the headlight wire. This will allow you to easily direct the bulb through the hole.
Begin with a properly fired shelf cone 04 Bisque. Moisten a clean sponge and wipe bisque to remove dust.
Thin slightly FN-006 Blue with water, pour to the inside, turn to coat, pour out excess glaze, drain. Use a damp sponge to remove the glaze from the top edge and all drips.
Brush on 2-3 coats of FN-001 White to the outside of the pitcher and tumblers with CB-604 Soft Fan.
Measure and 1 1/2″ from the bottom of the tumblers, tape with 1/4″ tape on that line, measure 2 3/4″ from the bottom of the pitcher, tape with 1/2″ tape on the line.
Punch out numerous stars in both sizes, brush water over sections at a time over the White glaze, stick on the paper stars. Make sure to remove gaps from the paper to prevent bleed.
Brush three coats of FN-006 Blue over the star areas, brush to the taped line. Remove the stars and leave the tape.
Tape the remaining areas on the tumblers and the pitcher to create the red stripes. Brush over the open areas with 2-3 coats of SC-74 Hot Tamale, use CB-106 Script Liner. Remove the tape.
Brush with one coat of S-2101 Clear using CB-604 Soft Fan.
Begin with properly fired shelf cone 04 bisque. Moisten a clean sponge and wipe bisque to remove any dust.
Using a CB-604 #4 Soft Fan, apply 2 coats of FN-001 White to the birdhouse.
With ½” masking tape, create stripes on the roof of the birdhouse.
Using a CB-604 #4 Soft Fan, apply 3 coats of SC-74 Hot Tamale to the roof area. Remove the tape before the last coat dries.
On the main body of the bird house, wet the glaze in sections with a little water then place in the paper star (¾” inch), arranging the stars in vertical rows or in a random pattern.
Using a CB-604 #4 Soft Fan, apply 3 coats of SC-12 Moody Blue over the stars.
Begin with properly fired shelf cone 04 Bisque. Moisten a clean Sponge and wipe Bisque to remove any dust.
Using a pencil, sketch your own letter.
Using a CB-106 #6 Script Liner, apply 3 Coats of SC-74 Hot Tamale to the letter. Allow to dry.
Using the ½” masking tape, tape off the center section of the tray.
Using a CB-604 #4 Soft Fan, apply 2-3 Coats of S-2731 Kaboom to the center section of the tray being careful going around the letter. Remove the tape before the last coat dries to avoid chipping.
Using a CB-604 #4 Soft Fan, apply 3 Coats of FN-018 – Bright Blue to the edge and back of the tray.
Using the AC-222 Medium Writer Tip, fill the empty squeeze bottle with SG-202 White Cobblestone. Apply squiggle lines around the edge of the try. Allow to dry.
Stilt and fire to shelf cone 06.
Form
MB-882 Rectangle Tray Mold or CD-882 Rectangle Tray Mold
Colors
FN-018 Bright Blue
SC-74 Hot Tamale
SG-202 White Cobblestone
S-2731 Kaboom
Decorating Accessories
AC-222 – Medium Writer Tip
BT-910 – Synthetic Sponges
CB-106 – #6 Script Liner
CB-604 – #4 Soft Fan
Additional Materials
Pencil
½” masking tape
Low-Fire|Earthenware Bisque|Table Top|Molds|Table Top
Begin with properly fired shelf cone 04 bisque. Moisten a clean sponge and wipe bisque to remove any dust.
Use the Soft Fan to apply two coats of FN-001 White.
Tape off a section for the blue portion of the flag.
Using a palette knife, mix SC-74 Hot Tamale with AC-310 Silkscreen Medium to the consistency of peanut butter. Use the large stripes from DSS-0105 Stripes with the shiny side up (more glaze will pass through the screen with the shiny side up). Position the silkscreen onto the tile and rub the thickened Hot Tamale through the screen with your finger or a rubber squeege. Remove and gently wash the screen.
Remove the tape. Punch out four paper stars. Wet the stars with water then stick to the white glaze. Gently press with a paper towel to remove the excess water and ensure edges are sealed. Use the Soft Fan to apply one or two coats of SC-76 Cara-Bein Blue. Remove the paper stars.
Glaze must be dry for this step. To make the flag worn looking, lightly sand off some of the color without sanding the FN-001 White.
Using a palette knife, thicken SC-15 Tuxedo with AC-310 Silkscreen Medium to the consistency of peanut butter. Place the eagle silkscreen from DSS-0109 Aviary-Large Birds over the red and white stripes with the shiny side down. Rub the thickened Tuxedo over the screen. Remove and gently wash the screen.
Begin with properly fired shelf cone 04 bisque. Moisten a clean sponge and wipe bisque to remove any dust.
From the pattern, cut out enough paper stars to go around the base (right below the rim).
Apply 2 coats of FN-001 White to the top of the hat using a CB-604 #4 Soft Fan.
Right below the rim of the hat, apply the stars to the FN-001 White before it is completely dry. If you find it will not stick dip your brush into water and rewet the white.
Once the FN-001 White is completely dry, apply the MC-002 12mm (1/2″) Low Tack Masking Tape in a vertical stripe pattern to the top portion of the hat. Be sure to create a separation between section using the tape. Refer to the image for reference.
Apply 3 coats of the FN-006 Blue to the lower part of the hat using the CB-604 Soft Fan brush.
Apply 3 coats of FN-004 Red over the striped section using the CB-604 Soft Fan brush.
Once the designed part is almost dry, remove the tape.
Apply 3 coats of FN-004 Red to the rest of the bisque form including the inside of the top hat.
Begin with properly fired shelf cone 04 bisque. Moisten a clean sponge and wipe bisque to remove any dust.
Slightly thin S-2101 Crystal Clear with water (3:1). Pour thinned mixture to the inside, turning to coat interior. Pour out excess to drain, keeping inverted until dry.
Using CB-604 #4 Soft Fan, brush 2 coats of FN-001 White to the outside of the pitcher.
With scissors, cut out the pattern of the eagle.
Wet the paper eagle or the glaze on the pitcher with water. Stick the eagle to the pitcher, pat with a paper towel to remove the excess water, sealing the paper “mask” pattern to the pitcher.
Mark a pencil line about 5″ from the bottom of the pitcher in a few spaces around the shape. Draw a line to connect.
Tape the edge under the line.
Punch out stars for the star area of the flag motif, and the handle.
Wet the paper stars with water then stick to the area above the tape line. Keep in rows to mimic a flag.
Use the 2″ foam roller and roll 2 coats of SC-12 Moody Blue to the star area. Roll in different directions for a worm, rustic look.
Remove the paper stars.
Tape the white stripes with 3/4 inch tape.
Roll over the striped area in the same manner with SC-74 Hot Tamale. 2 coats.
Remove the tape and the paper eagle.
On a palette, with a palette knife, thicken SC-15 Tuxedo with AC-310 Silkscreen Medium to the consistency of peanut butter. Place the eagle screen from DSS-0109 Large Birds in the eagle space on the pitcher. Rub the thickened mixture over the screen, remove and wash gently.
When the blue and red glaze is dry, sand the hard edges with a green scotch pad or something abrasive for a rustic appearance.
Using CB-604 #4 Soft Fan, brush 1 coat of S-2101 Crystal Clear Brushing to the exterior of the pitcher. OR Dip into NT-CLR Clear Dipping Glaze
Fire to cone 05/06.
Form
CD-1403 Oval Pitcher
Colors
FN-001 White
SC-12 Moody Blue
SC-15 Tuxedo
SC-74 Hot Tamale
S-2101 Crystal Clear Brushing or NT-CLR Clear Dipping Glaze
Begin with properly fired shelf cone 04 bisque. Moisten a clean sponge and wipe bisque to remove any dust.
Using a CB-604 #4 Soft Fan, apply 2 coats of FN-001 White to the front of the plate. Allow to dry.
Mark off 1” bands and a 5”X5” Square to create the flag outline.
Apply 1” Masking tape to protect the 5” Square and every other stripe.
Using a CB-604 #4 Soft Fan, apply 2 coats of SG-202 White Cobblestone to the remaining stripes. Apply the 1st coat, and then just as the SG-202 White Cobblestone loses its shine, apply the 2nd coat.
As the second coat of SG-202 White Cobblestone loses its shine, apply 2 coats of SC-75 Hot Tamale to the stripes using a CB-604 #4 Soft Fan.
When the glaze looses its shine, remove all the masking tape.
Punch out the desired amount of stars from standard white copy paper.
Wet the area you wish the star to be in, and press the punched star firmly into place. Repeat till all the stars are down.
Using a CB-604 #4 Soft Fan, apply 2 coats of SG-202 White Cobblestone as in step # 5.
Using aCB-604 #4 Soft Fan, apply 1 coat of SC-76 Cara-bein Blue just as the 2nd coat of SG-202 White Cobblestone starts to dry.
Remove the paper stars before the glaze completely dries.
Using a CB-604 #4 Soft Fan, apply 3 coats of FN-004 Red to the back and edges of the plate.
Begin with properly fired shelf cone 04 bisque. Moisten a clean sponge and wipe bisque to remove any dust.
Using a CB-618 #8 Soft Fan, apply 2 coats of FN-001 White to the top of the salad and charger plates.
Using a star paper punch, cut out about 20-30 stars and place them randomly over the salad and charger plates. Adhere to the plates with either water or a bit of FN-001 White. Be sure to keep track of how many stars go on each plate so you don’t leave any behind!
Fill 2 separate AC-222 Large Writer Tip Bottles about halfway one with SC-74 Hot Tamale and the other with SC-12 Moody Blue.
Beginning with the SC-74 Hot Tamale, drizzle the glaze across the entirety of the plate going straight back and forth. Once the SC-74 Hot Tamale has dried do the same with the SC-12 Moody Blue in the same direction.
Once both glazes are completely dry, thin some SC-12 Moody Blue and apply a light coat over the top of the plate using a CB-604 #4 Soft Fan.
Remove the paper stars before the glaze dries.
Using a CB-618 #8 Soft Fan, apply 3 coats of FN-004 Red to the back of the salad and charger plates.
For the dinner plate, use a CB-618 #8 Soft Fan and apply 3-4 coats of FN-004 Red to the top of the plate and 3 coats of FN-019 Dark Blue to the back of the plate. Allow to dry.
Begin with properly fired shelf cone 04 bisque. Moisten a clean sponge and wipe bisque to remove any dust.
Using a CB-618 #8 Soft Fan, apply 2 coats of FN-001 White to the top of the salad and charger plates.
Section off about 1/3 of both plates and cover that section with paper.
Fill an AC-222 Large Writer Tip bottle with SC-74 Hot Tamale. Drizzle this back and forth in the same direction across both the plates.
Remove the paper and cut out some stars with the paper star punch. Adhere the stars to the blank section using some water or a little bit of FN-001 White. Be sure you know how many stars you apply.
Using a CB-604 #4 Soft Fan, apply 3 coats of FN-019 Dark Blue to that section of both plates.
Remove the stars before the glaze dries.
Using a CB-618 #8 Soft Fan, apply 3 coats of FN-004 Red to the back of the plates.
For the dinner plate, use a CB-618 #8 Soft Fan and apply 3-4 coats of FN-004 Red to the top of the plate and 3 coats of FN-019 Dark Blue to the back of the plate. Allow to dry.
Begin with properly fired shelf cone 04 bisque. Moisten a clean sponge and wipe bisque to remove any dust.
With a pencil and AAC-230 Clay Carbon Paper, trace on the pattern.
Using a CB-106 #6 Script Liner, apply 2 coats of SC-74 Hot Tamale to the red letters, and part of the rocket, stroking in some SC-16 Cotton Tail into the red on the right side of the letters, add a little SC-15 Tuxedo to the Hot Tamale to the left side of the letters to shade.
Using a CB-106 #6 Script Liner, apply SC-76 to the blue letters with SC-31 The Blues to the right side, add a little SC-15 Tuxedo to the Cara-bein Blue on the left side for the last coat. Apply 2 coats. Apply the same for the blue rocket area.
Using a CB-106 #6 Script Liner, apply 1 coat of S-2731 Kaboom to the stars, with crystals, and the centers of all the bursts of fireworks, apply 2 thinned coats of SC-76 Cara-bein Blue to the stars over the S-2731 Kaboom.
Use SG-404 Blue Designer Liner and SG-403 Red Designer Liner to make the red and blue lines from the rocket and stars, and fireworks.
Outline all the letters with SG-401 Black Designer Liner.
Using a CB-604 #4 Soft Fan, apply 2 coats of S-2101 Crystal Clear Brushing to the inside of the platter, brushing around the stars, though its okay to overlap them.
Using a CB-604 #4 Soft Fan, apply 3 coats of FN-004 Red to the back of the platter. Allow to dry.
Begin with properly fired shelf cone 04 bisque. Moisten a clean sponge and wipe bisque to remove any dust.
Place some S-2101 Crystal Clear Brushing into a small cup and add a little bit of water to slightly dilute it (about 3 parts glaze and 1 part water). It should be the consistency of a coffee cream. Pour this into the jar and roll around to completely coat the interior of the jar. Drain out the excess glaze and keep the jar inverted until it has lost its shine. Wipe off any glaze from the outside using a damp sponge. Allow to dry.
Using a pencil section off the top 1/3 of the jar under the ruffle to be painted with crystals.
Using a CB-604 #4 Soft Fan, apply 3 coats of FN-001 White to the bottom section of the jar, the ruffle, and the handle.
Cut 1 ½ in wide pieces of paper that are long enough to cover the bottom section. You will need about 6.
Apply the piece of paper with water so they are equally spaced and straight up and down. Be sure the edges are all down securely.
Using a sponge, apply 3 coats of SC-73 Candy Apple Red between the paper. Also use a CB-106 #6 Script Liner to apply 3 coats to the center section of the ruffle and the top section of the handle.
Using a CB-604 #4 Soft Fan, apply 1 coat with lots of crystals of S-2731 Kaboom to the top ½ of the jar and the lid.
Apply 1 coat of PC-601 Clear Cascade then S-2716 Celestial Blue to the same sections.
1) Begin with properly fired shelf cone 04 bisque. Moisten a clean sponge and wipe bisque to remove any dust.
2) Using the Soft Fan, apply two coats of FN-001 White to the top of the plate.
3) Trace on the pattern using the AC-230 Clay Carbon Paper.
4) Using the Pointed Round apply two coats of SC-78 Lime Light to the hat band.
5) Use the Pointed Round to apply two coats of SC-26 Green Thumb to the hat and the hat band. Then, side load in SC- 36 Irish Luck and shade around all edges.
6) Use the Pointed Round to apply two coats of SC-27 Sour Apple to the shamrock.
7) Using the Pointed Round apply one coat of SC-26 Green Thumb to the inner area on the shamrock.
8) Use the Pointed Round to apply two thinned coats of SC-42 Butter Me Up to the background. Then, apply one thinned coat of SC-24 Dandelion to deepen the color and add shadows.
9) Using the Liner with SC-15 Tuxedo to outline the design and add detail.
10) Use the Soft Fan apply three coats of FN-010 Tree Green the back and edges of the plate.
Begin with properly fired shelf cone 04 bisque. Moisten a clean sponge and wipe bisque to remove any dust.
Using the CB-604 #4 Soft Fan, apply 3 coats of SC-43 Lettuce Alone to the outside areas of the hat.
Using the Soft Fan, apply 3 coats of FN-010 Tree Green to the inside of the hat.
Using the AC-230 Clay Carbon paper, trace the patterns onto the bisque as desired.
Using the CB-404 #4 Pointed Round, block in the shamrocks and the shamrock design with 2 coats of SC-52 Toad-ily Green.
Using the Pointed Round, load in SC-52 Toad-ily Green and tip into SC-26 Green Thumb to add a third coat to the shamrocks. Paint from the outside edge toward the center.
Using the Pointed Round, load in SC-52 Toad-ily Green and side load with SC-26 Green Thumb and shade in the shamrock design where two areas overlap each other to create a shadow.
Using the CB-110 # 10/0 Liner, outline and detail the shamrocks and shamrock design with slightly thinned Designer Liner SG-406 Designer Liner Green. Allow to dry.
Using the Soft Fan, apply 1 coat of S-2101 Crystal Clear Brushing Glaze to the outside areas of the Top Hat.
Begin with a properly fired shelf cone 04 bisque. Moisten a clean sponge and wipe bisque to remove any dust.
Cut out the ear patterns and use a pencil to outline the design onto the bisque.
Using a CB-106 #6 Script Liner, apply 2 coats of SC-20 Cashew Later to the ears; make sure to glaze all the way to or even a bit beyond the pencil line.
Moisten the paper cutouts with clean water, align and apply to the glazed ears to act as a resist.
Repeat the above steps with the buckle cut out; Cutting out of pattern, filling the outline in with SC-42 Butter Me Up and applying the paper as a resist.
Using a CB-604 #4 Soft Fan, apply 3 coats of FN-020 Medium Green to the exterior, rim of the hat. When applying the coats add some FN-007 Green to the brush to add some variation to the hat.
Remove the paper resists.
Using a CB-106 #6 Script Liner, apply 2 coats of SC-15 Tuxedo the create a band around the hat and 2 coats of SC-8 Just Froggy to the clover.
Using a CB-110 #10/0 Mini Liner, apply 1 coat to the outline of the ears, buckle, and clover.
Using a CB-604 #4 Soft Fan, apply 3 coats of FN-044 Yellow-Orange to the inside of the hat.
Begin with properly fired shelf cone 04 bisque. Moisten a clean sponge and wipe bisque to remove any dust.
Using a CB-604 #4 Soft Fan, apply 2 coats of FN-227 Celery to the face of the canvas.
Using a CB-604 #4 Soft Fan, apply 3 coats of FN-010 Tree Green to the edges. Allow to dry.
With a Pencil and AC-230 Clay Carbon transfer the design onto the canvas.
Using a CB-110 #10/0 Mini Liner, apply 3 coats of paint to all of the words. For “Saint Patrick’s Day” use SC-26 Green Thumb; for “Lucky” use SC-36 Irish Luck; for “Shamrock” and the clover use SC-27 Sour Apple; for “March 17” use SC-7 Leapin’ Lizard; for “Wish” use SC-43 Lettuce Alone; and for “Rainbow” use SC-74 Hot Tamale, SC-75 Orange-a-Peel, SC-6 Sunkissed, SC-26 Green Thumb, SC-11 Blue Yonder, SC-76 Cara-bein Blue, and SC-33 Fruit of the Vine.
Begin with properly fired shelf cone 04 bisque. Moisten a clean sponge and wipe bisque to remove any dust.
Pour the background colors on a palette: SC-45 My Blue Heaven and SC-11 Blue Yonder and a smaller amount of SC-9 Jaded onto one plate. Pour SC-6 Sunkissed, SC-24 Dandelion, SC-55 Yell About It and a smaller amount of SC-97 Cant-elope onto another plate.
With the credit card pick up two of the blue colors on the card, then drag the card at a slight angle down the canvas. The colors will blend as you drag. Add another color to the card and repeat to about 2/3 down the canvas at the top and one third towards the bottom (refer to photo). Try to keep SC-45 My Blue Heaven in all the drags with color as the background will get too saturated with color. If needed, SC-16 Cotton Tail can also be added to lighten the color. Finish the sides of the canvas to match the top.
Add SC-24 Dandelion and SC-45 My Blue Heaven to the card to overlap the transition of color to yellow and drag with the card onto the canvas. Repeat with the yellow colors on the card, using less of SC-97 Cant-elope in the drags.
Repeat the background color drags a second time.
When dry, place SL-448 Doily Stencil at the top right on the canvas, use the 2″ foam roller to gently roll on SC-11 Blue Yonder over the stencil. Repeat with the stencil and color at the bottom right, using approximately half the stencil. Repeat the process at the top center and to fill in space at right side of the canvas. Do not clean the roller.
Use AC-230 Clay Carbon Paper to trace the pattern onto the canvas.
Use the CB-106 #6 Script Liner to apply two coats of SC-11 Blue Yonder to the bird’s wing. When dry, use the sponge to apply SC-75 Orange-A-Peel onto a lace doily then use as a stamp on the bird’s wing.
Using the Script Liner, apply SC-55 Yella Bout It to the birds body. Use the same brush to apply SC-6 Sunkissed and SC-24 Dandelion to build up the color. Add SC-16 Cotton Tail around the lower eye to lighten. Float SC-25 Crackerjack Brown onto the lower breast to shadow, float a narrow shade of SC-48 Camel Back to the lower breast.
Use the CB-110 #10/0 Liner to apply SC-11 Blue Yonder, SC-97 Cant-elope with lines of SC-75 Orange-A-Peel to the tail feathers. The bird’s eye is SC-75 Orange-A-Peel, the pupil and outline are SC-15 Tuxedo. The beak is SC-48 Camel Back with some SC-75 Orange-A-Peel.
Use the same brush to apply one coat of SC-75 Orange-A-Peel to outline the head and breast.
Branches are a combination of SC-25 Crackerjack Brown, SC-48 Camel Back and SC-34 Down To Earth. Use SC-34 Down To Earth for the bird’s legs. Use the Liner to apply two coats of each color as noted.
Tape the wing cut out back on the pattern and cut out the body of the bird. Place the pattern back onto the canvas and use the 2″ foam roller to roll SC-25 Crackerjack Brown over the ST-127 Crackle Stamp to the body of the bird.
Cut out the pattern of the bird’s wing and place on the canvas. Place the SL-437 Groovy Stencil over the wing at an angle and use the 2″ Foam Roller to gently roll SC-15 Tuxedo over the stencil to pattern the wing.
Tint S-2101 Clear with food coloring with AC-310 Silkscreen Medium mix using a palette knife to the consistency of peanut butter, screen the leaves in position on the canvas.
Use the Script Liner to apply two coats of SC-11 Blue Yonder to one half of each leaf and two coats of SC-27 Sour Apple to the other half.
Use the Liner to outline the bird and the branches with SC-15 Tuxedo.
Dip into NT-CLR or apply one coat of S-2101 Clear.
Fire to cone 06/05.
Form
MB-1478 12″ x 12″ Clay Canvas
Color
SC-6 Sunkissed
SC-9 Jaded
SC-15 Tuxedo
SC-11 Blue Yonder
SC-24 Dandelion
SC-25 Crackerjack Brown
SC-27 Sour Apple
SC-34 Down To Earth,
SC-45 My Blue Heaven
SC-48 Camel Back
SC-75 Orange-A-Peel
SC-55 Yella Bout It
SC-97 Cant-elope
NT-CLR Clear Dipping Glaze or S-2101 Clear Brushing Glaze
Roll out a slab that is about 1/8” thick and measures at least 13”x4”.
These measurements are for creating a cylinder around a stoneware glaze jar, you can always use a wire or piece of string to measure the circumference of the cylinder that you are using for a mold.
Compress slab with rib.
Cover bottle with one layer of newsprint, flooding along the bottom of the bottle.
Roll slab around wrapped jar until the sides are fully covered by clay.
Cut slab a pencil thickness past the point where the end of the slab meets the clay to allow room for clay to overlap.
Smoosh clay with your fingers pulling clay over the seam until smooth, use credit card or rib to even out clay.
Roll out another 1/8” thick slab and compress.
Trace bottom of the cylinder on the slab leaving the same amount of space for overlap.
Cut circle and attach to clay cylinder by pulling and smooshing the clay up the sides of the form.
Smooth out sides of your piece with a rib by compressing the sides from the bottom up.
Be sure to keep the bottle flat on the table when doing this.
Apply stamp to outside of the cylinder by placing in desired spot(s) around on piece and gently applying pressure.
You can use your rib again to evenly apply pressure by smoothing over the back of the stamp mat always pulling the rib up towards you from the base.
To create a clean foot, hold the jar with two hands and rock it forward onto its bottom edge and proceed to roll all the way around the bottom rim.
When ready, remove the jar by pulling up and twisting, then pull paper out.
Roll coils to attach to strengthen the seams on the inside and smooth out with fingers.
To attach handle cut a strip of clay out of a slab that is about 1” wide.
Smooth edges and pinch to widen the top of the handle to create a wider surface to attach.
Option to slump handle over rolling pin or similar form to help it maintain its shape while waiting to be attached.
Attach top of handle first by slipping and scoring the wide side and attach it about 1” below the rim, holding the end of the handle up towards you.
Curve the rest of the handle down to attach just above the foot of the mug, creating an arch similar to the shape of an ear.
Cut off any access clay and attach by slipping and scoring.
Allow handle to set up a bit.
If you are having a hard time getting it to hold its arch, flip mug over and let the handle hang over the edge to set up.
Smooth out any cracks or imperfections with finger and/or sponge.
Allow to dry fully and bisque fire to Cone 04.
Glazing
From top left: SW-179 Muddy Waters over SW-167 Raspberry Mist; SW-179 Muddy Waters over SW-131 Birch; SW-179 Muddy Waters over SW-165 Lavender Mist; SW-179 Muddy Waters over SW-121 Smoke.
Wipe off bisque with a damp sponge to remove any dust.
Using a soft fan brush, apply 2 coats of combo color option to the inside and outside of the mug, leaving the bottom unglazed.
Be sure that the first coat is fully dry before applying the second coat.
Once glaze is dry apply first coat of Muddy Waters (SW-179) the inside and the top two thirds of the outside of the mug and handle.
This will allow space for the glaze to run without allowing it to run off the bottom of the mug.
Apply your second coat of Muddy Waters to the inside and outside of the mug, stopping about a half inch above where you did on the last coat.
Begin with properly fired cone 04 bisque. Moisten a sponge and wipe bisque to remove any dust.
Using the Soft Fan with FN-001 White, apply 3 coats to the tops of the mushrooms. Allow glaze to dry between coats.
6” Mushroom
Use the pencil to make equally spaced dots around the bottom edge of the mushroom cap. They should be about a finger’s width apart.
Using the Script Liner with SC-12 Moody Blue, dip the brush in the glaze. Set the brush on a dot and quickly make an upward stroke.
Repeat for the rest of the dots.
Repeat Steps #1 &2, making the dots directly above the previously made strokes. There should be a total of 3 rows of strokes.
For the final row, make 5 strokes in a circle at the top of the mushroom cap.
8” Mushroom
Trace the pattern onto a file folder. Use the X-ACTO Knife to cut out the design. Cut a square around the design.
Place the pattern so that the design is 1 finger’s width from the bottom of the mushroom cap. Take the sponge and dip it into the wax.
Sponge excess wax off onto the palette. Sponge over the pattern.
Repeat Step #2 around the mushroom. Place pattern 2 finger’s width’s apart.
Repeat Step #2 above and between each of the designs from Step #3.
Repeat Step #2 below and between each of the designs from Step #3.
Using the Script Liner with wax, make lines connecting the designs to the top and bottom of the mushroom cap.
Squeeze 2 TBS of SC-12 Moody Blue onto the palette. Thin slightly with water. Using the Script Liner, create a puddle coat around the waxed sections. Repeat when dry.
If you want your design to have dots of blue over it (as pictured), do not wipe the glaze off of the wax. If you want your design to be completely white, use a damp sponge to clean the wax.
Using the Soft Fan with CC-102 White, apply 3 even coats to the base of the mushrooms. Allow glaze to dry between coats.
Using the Soft Fan with SC-12 Moody Blue, apply 3 coats to the bottom of the mushroom caps. Allow glaze to dry between coats.
Fire to cone 06.
After the mushrooms have cooled, apply 1 coat of SS-138 to the bases. Wipe off with a damp sponge. You should now be able to see the cracks.
Begin with properly fired cone 04 bisque. Moisten a sponge and wipe bisque to remove any dust.
Using the Soft Fan with SC-16 Cotton Tail, apply 2 coats to the beard. Allow glaze to dry between coats.
Squeeze 1 TSP of SC-35 Gray Hare onto the palette. Thin with water. Use the Soft Fan to float to the glaze over the beard. It should puddle into the lines.
Use the pencil to sketch overalls on the gnome.
Using the Script Liner/Soft Fan with SC-60 Silver Lining, apply 3 coats to the shirt. Allow glaze to dry between coats.
Using the Script Liner with SC-2 Melon-Choly, apply 3 coats to the hands and nose. Allow glaze to dry between coats.
Using the Script Liner with SC-12 Moody Blue, apply 3 coats to the overalls. Allow glaze to dry between coats.
Using the Soft Fan with SC-11 Blue Yonder, apply 3 coats to the outside of the hat. Allow glaze to dry between coats.
Use the Pencil to sketch patches on the hat.
Using the Script Liner with SC-11 Moody Blue, apply 2 coats to the patches. Allow glaze to dry between coats.
Using the Detail Liner with SC-15 Tuxedo, outline the details on the gnome.
Using the Detail Liner with SC-16 Cotton Tail, make stitch lines around the patches and below the straps on the overalls.
Pour CD-002 Woven Lantern mold ¼” thick. Refer to casting instructions.
Once it is firm enough to handle, use the X-ACTO knife to cut out the spaces between the woven lattice.
Use the 1/4” punch to make the 2 holes at the top of the lantern.
Use the sponge to smooth down any casting lines or rough edges.
Fire to cone 04.
Using the Soft Fan with FN-001 White, apply 3 coats to the entire lantern. Allow glaze to dry between coats.
Using the Script Liner with FN-031 Corn Flower Blue, apply 3 coats to the upper bands around the lattice. Apply 3 coats to the upper lip of the lantern. Allow glaze to dry between coats.
Using the Script Liner with S-2701 Peacock Eyes, apply 2 coats to the outside of the lattice.
Using the CB-604 # 4 Soft Fan, apply 2 coats of FN-001 White to the top only.
Cut out the snowman from a sheet of copy paper.
Wet an area, and press down the cut out snowman firmly, making sure all edges are sealed.
Place the snowflake where his hand will be holding it, and apply as if step 3.
Tear thin strips of newspaper, wet them and apply where you want to see trees.
Using the CB-604 # 4 Soft fan, apply 2 coats of FN-231 Clearly Jade to the top. Remove all of the paper as the color starts to dry.
Using a pencil, lightly sketch on the snowman’s details.
Using the CB-110 # 10/0 Liner, apply 1 coat of SC-14 Java Bean to the arms.
Using the CB-110 # 10/0 Liner, apply 1 coat of SC-97 Can’t Elope to the nose.
Using the CB-404 # 4 Round, side load in SC-11 Blue Yonder and shade along the inside area of the body.
Using both the CB-404 # 4 Round and the CB-110 # 10/0 Liner, apply 2 coats of SC-78 Lime Light to the scarf and add detail with SC-74 Hot Tamale.
Using the CB-110 # 10/0 # 1 Liner and the CB-404 # 4 Round apply 2 coats of SC-10 Teal Next Time to the hatband and 2 coats of SC-15 Tuxedo to the hat.
Using the CB-110 # 10/0 Liner, apply 1 heavy coat of SG-302 Snowfall to the top of the hat, and using a brush handle, add dots to the background.
Using the CB-110 # 10/0 Liner, outline and add detail with SC-15 Tuxedo.
Using the CB-604 # 6 Soft fan, apply 2 coats of FN-009 Black to the edges and back.
Begin with properly fired shelf cone 04 bisque. Moisten a clean sponge and wipe bisque to remove any dust.
Using the Script Liner with SC-16 Cotton Tail, apply 3 coats to the upper beak and eye. Allow glaze to dry between coats.
Using the Soft Fan and Script Liner with SC-2 Melon-Choly, apply 2 coats to the flamingo. Allow glaze to dry between coats.
Using the Soft Fan with SC-2 Melon-Choly, apply 1 coat to the flamingo and shade the edges and wing with SC-89 Cutie Pie Coral. Using the Script Liner with SC-16 Cotton Tail, make lines on the wing to look like feathers.
Using the Script Liner with SC-15 Tuxedo, apply 2 coats to the end of the beak. Use the Detail Liner to outline the beak, eye, neck and wing.
Use the pencil to sketch a strand of lights on the flamingo.
Use the Detail Liner with SG-403 Red, SG-405 Green, SG-407 Yellow and SG-409 Bright Green to apply 1 coat to the lights.
Using the Detail Liner with SC-35 Gray Hare, apply 2 coats to the bottom of the light bulbs. Allow glaze to dry between coats.
Use SG-401 Black to outline the lights.
Using the Soft Fan with S-2101 Clear Brushing Glaze, apply 1 coat over the lights or dip into NT-CLR Clear Dipping Glaze.
After the front is dry, turn over and apply 3 coats of SC-2 Melon-Choly to the back of the flamingo. Allow glaze to dry between coats.
Fire to cone 06.
Form
MB-1522 Frieda Flamingo Dish
Colors
SC-2 Melon-Choly
SC-15 Tuxedo
SC-16 Cotton Tail
SC-35 Gray Hare
SC-89 Cutie Pie Coral
SG-401 Black
SG-403 Red
SG-405 Green
SG-407 Yellow
SG-409 Bright Green
NT-CLR Clear Dipping Glaze or S-2101 Clear Brushing Glaze
Decorating Accessories
RB-144 Soft Fan
RB-110 Liner
RB-106 Script Liner
Miscellaneous Accessories
Water
Sponge
Pencil
Low-Fire|Earthenware Bisque|Boxes, Banks & Stuff|Home Décor|Table Top
Begin with properly fired shelf cone 04 bisque. Moisten a clean sponge and wipe bisque to remove any dust.
Brush on one coat of SG-302 Snowfall to the snowman use RB-118 Round, use a sponge on a stick to sponge on a second coat of snowfall to the snowman’s body. Remove the excess Snowfall from the eyes, mouth, nose, hat, buttons and jacket.
Brush the jacket with three coats of CG-978 Arctic Splash, brush the scarf with 3 coats of SC-12 Moody Blue, hatband with two coats of SC-45 My Blue Heaven, brush the hat with two coats of Moody Blue. Use RB-106 Script Liner to heavy shade SC-15 Tuxedo around the edges of the hat so that only some of the Moody Blue shows.
Brush SC-16 Cotton Tail to the mittens and use the tip of the brush handle to dot the scarf with SC-16 Cotton Tail. Brush the eyes with one coat of Cotton Tail, pupil and outline with SC-15 Tuxedo, buttons with Tuxedo. Nose with two coats of SC-75 Orange A Peel.
Shade the creases in the jacket and mittens with thinned Moody Blue.
Fire to cone 05/06.
Glue craft poms as buttons to the piece and beads into the snowman’s hands.
Begin with properly fired shelf cone 04 bisque. Moisten a clean sponge and wipe bisque to remove any dust.
Apply 3 coats of SC-55 Yella Bout it to the body of the Llama.
Apply 3 coats of each SC-45 My Blue Heaven and SC-76 Cara-bein Blue in stripes on the blanket. Apply 1 thin coat of SC-76 Cara-bein Blue on the blanket fringe and cover with 1 coat of SC-45 My Blue Heaven.
Apply 3 coats of SC-6 to the back and 2 coats to the hair and collar/tassles and apply 1 coat of SC-24 Dandelion to shade.
Use SG-402 White Designer Liner to add Fa-la-la-la-la-Lla-ma and details to the blanket.
Use SC-15 Tuxedo, SC-16 Cotton Tail, and SC-76 Cara-bein Blue to make the eyes and outline any details.
Apply 1 coats of S-2101 Crystal Clear Brushing over the blanket.
Let dry completely.
Stilt and fire to shelf cone 06/05.
Form
MB-1523 Rama Llama Dish
Colors
SC-6 Sunkissed
SC-15 Tuxedo
SC-16 Cotton Tail
SC- 24 Dandelion
SC-45 My Blue Heaven
SC-55 Yella Bout it
SC-76 Cara-bein Blue
SG-402 White Designer Liner
S-2101 Crystal Clear Brushing
Decorating Accessories
CB-604 #4 Soft Fan
CB-106 #6 Script Liner
CB-110 #10/0 Mini Liner
Miscellaneous Accessories
Sponge
Water
Low-Fire|Earthenware Bisque|Boxes, Banks & Stuff|Home Décor|Table Top
Begin with properly fired shelf cone 04 Bisque. Moisten a clean sponge and wipe bisque to remove any dust.
For the unicorn planter and mug, slightly thin FN-051 Strawberry, pour inside, turn the pieces to coat, pour out the excess and drain.
For all three unicorn pieces, brush the mane and tail with alternating colors of SC-26 Green Thumb and SC-73 Candy Apple Red. Apply 2-3 Coats with the RB-110 Liner or the CB-106 Script liner.
Shade around the body parts with SC-35 Gray Hare, use RB-106 Script Liner.
For the unicorn planter, use the holly screen from DSS-0162 Holiday Icons.
Place SC-15 Tuxedo on a palette or tile and sprinkle with AC-310 Silkscreen Medium. Using a palette knife mix color and medium to the consistency of thick peanut butter. if the mix is too thin add more AC-310 Silkscreen Medium or if it is too thick add more Stroke & Coat. Too thin of a mixture will bleed under the screen and give you a blurred image. Too thick of a mixture will make it hard for the product to penetrate through the holes in the screen and give blank areas in your screen. Position the screen shiny side down on the piece. Hold in place, starting from the center out, Rub the mixture on the screen with your finger. Lift a corner up to check if you are applying enough color. Remove the screen and wash with water. Do not let the color dry in the screen. this will cause damage to the screen.
Fill in the holly leaves with two coats of SC-26 Green Thumb and the berries with SC-73 Candy Apple Red.
Eyes are SC-30 Blue Dawn, SC-15 Tuxedo, pupil and outline.
Brush the back of the unicorn dish with three coats of FN-051 Strawberry, use RB-144 Soft Fan, brush SG-704 Peppermint over the top of the unicorn dish, Magical is written with SC-15 Tuxedo, use RB-110 Liner, did the mug and unicorn planter in clear, or brush on two coats to the outside of the piece.
Fire to cone 06/05.
Form
MB-1534 Unicorn Container
MB-1521 Unicorn Dish
MB-1524 Unicorn Mug
Colors
SC-15 Tuxedo
SC-26 Green Thumb
SC-30 Blue Dawn
SC-35 Gray Hare
SC-73 Candy Apple Red
FN-51 Strawberry
SG-704 Peppermint
NT-BR Clear Brushing Glaze
Decorating Accessories
RB-144 #4 Soft Fan
RB-110 #10/0 Liner
RB-106 #6 Script Liner
DSS-0162 Holiday Icons
AC-310 Silkscreen Medium
Miscellaneous Accessories
Sponge
Water
Scissors
Low-Fire|Earthenware Bisque|Boxes, Banks & Stuff|Home Décor|Table Top
Begin with properly fired cone 04 bisque. Moisten a sponge and wipe bisque to remove any dust.
Slightly thin FN-051 Strawberry, pour inside the vase and rotate to coat. Pour out and drain excess glaze.
Use the Soft Fan to apply two coats of FN-001 White to the top section of the vase.
Punch out the various sizes of snowflakes. Brush water over the area for the paper snowflake then press the paper onto the wet surface. Gently press with a paper towel to remove excess water and to ensure the edges are sealed. Count the snowflakes so you are sure to remove them all later in the decorating process.
Use the Soft Fan to apply three coats of FN-051 Strawberry to the top section of the vase, going over the snowflakes. Remove the paper snowflakes before the last coat of glaze is completely dry.
Pencil on the nose and beard section on the front side of the vase. Brush the beard area with one coat of SC-16 Cotton Tail. Next, add streaks of SC-16 Cotton Tail with long strokes of color. Add SC-35 Gray Hare to the brush to create light grey streaks into the beard for shadow.
Use the Script Liner to apply two or three coats of SC-20 Cashew Later to the nose. Add brush strokes of SC-2 Melon-Choly to redden the nose.
Shade on both sides of the nose using SC-35 Gray Hare.
Use the Soft Fan and Script Liner to add SC-35 Gray Hare to the remainder of the vase around the beard. Add FN-001 White to the brush sporadically to lighten the Gray Hare so it isn’t all the same color. Apply two coats in a vertical direction.
Use the Liner with SC-15 Tuxedo to outline the nose and mark lines in the beard as shown.
Use the Soft Fan to apply one coat of SG-701 Star Dust to the red area of the vase. Use the same brush to apply NT-BR Clear Brushing Glaze to the remainder of the vase.
Fire to cone 05/06.
Add a white pom pom to the top of the vase for a fun look!
Begin with properly fired cone 04 bisque. Moisten a sponge and wipe bisque to remove any dust.
Using the Soft Fan with FN-001 White, apply 2 coats to the front of the plate. Allow glaze to dry between coats.
Cut out the 1st snowman pattern. Use the sponge to wet the bottom of the pattern and place in the center of the plate. Sponge the edges to make sure they stick down.
Using the Soft Fan with FN-001 White, apply 1 coat to the front of the plate. Go over the sides of the pattern.
Squeeze 1 TBS of SC-11 Blue Yonder and SC-45 My Blue Heaven onto the palette. Dip the sponge in the glaze and sponge over the front of the plate. Repeat until the front is covered. Peel off the pattern before the glaze has completely dried.
Cut out the 2nd snowman pattern. Put back over where the 1st pattern was placed. Take the pencil and trace over the details of the pattern. Press hard enough to make an indent in the glaze.
Using the Script Liner with SC-16 Cotton Tail, apply 1 coat over the head and body. Shade around the edges with SC-60 Silver Lining.
Using the Script Liner with SC-11 Blue Yonder, apply 3 coats to the pompom and rim of the hat. Apply 3 coats to the scarf. Allow glaze to dry between coats.
Using the Script Liner with SC-76 Cara-Bein Blue, apply 3 coats to the top of the hat and the bottom of the scarf. Allow glaze to dry between coats.
Squeeze 1 TBS of SC-2 Melon-Choly onto the palette. Dip the sponge in the glaze and dab below the eyes.
Using the Script Liner with SC-23 Jack O’ Lantern, apply 2 coats to the nose. Allow glaze to dry between coats.
Using the Detail Liner with SC-15 Tuxedo, outline the details on the snowman and make stick arms. Apply 2 coats to the eyes.
Using the Detail Liner with SC-16 Cotton Tail, make 2 dots in each eye.
Using the Soft Fan with SC-11 Blue Yonder, apply 3 coats to the back of the plate. Allow glaze to dry between coats.
Begin with properly fired cone 04 bisque. Moisten a sponge and wipe bisque to remove any dust.
Using the Soft Fan with FN-001 White apply 1 coat to the front of the plate.
Cut out the 1st snowman pattern. Use the sponge to wet the bottom of the pattern and place in the center of the plate. Sponge the edges to make sure they stick down.
Using the Soft Fan with SC-45 My Blue Heaven, apply 2 coats to the front of the plate. Go over the sides of the pattern. Allow glaze to dry between coats.
Squeeze 1 TBS of SC-16 Cotton Tail onto the palette. Dip the sponge on a stick in the glaze and sponge over SL-441 Spots Stencil on front of the plate. Repeat until the front is covered.
Dip the toothbrush into the SC-16 Cotton Tail. Take your thumb and run it along with the bristles so that the glazes splatters onto the front of the plate. Repeat until the desired look is achieved. Remove the pattern before the glaze has completely dried.
Cut out the 2nd snowman pattern. Put back over where the 1st pattern was placed. Take the pencil and trace over the details of the pattern. Press hard enough to make an indent in the glaze.
Using the Script Liner with SC-16 Cotton Tail, apply 1 coat over the head and body. Shade around the edges with SC-60 Silver Lining.
Using the Script Liner with SC-11 Blue Yonder, apply 3 coats to the pompom and rim of the hat. Apply 3 coats to the scarf. Allow glaze to dry between coats.
Using the Script Liner with SC-76 Cara-Bein Blue, apply 2 coats to the top of the hat and the bottom of the scarf. Allow glaze to dry between coats.
Squeeze 1 TBS of SC-2 Melon-Choly onto the palette. Dip the sponge in the glaze and dab below the eyes.
Using the Script Liner with SC-23 Jack O’ Lantern, apply 2 coats to the nose. Allow glaze to dry between coats.
Using the Script Liner with S-2716 Celestial Blue, apply 1 coat over the top of the hat.
Squeeze 1 TBS of SC-76 Cara-Bein Blue onto the palette. Take the ST-103 Retro Star Stamp and place it design-side up. Take the sponge on a stick and gently dab it into the glaze. Sponge the stamp and press over the rim of the hat and the scarf.
Using the Detail Liner with SC-15 Tuxedo, outline the details on the snowman and make stick arms. Apply 2 coats to the eyes.
Using the Detail Liner with SC-16 Cotton Tail, make 2 dots in each eye.
Using the Soft Fan with SC-11 Blue Yonder, apply 3 coats to the back of the plate. Allow glaze to dry between coats.
Begin with a properly fired shelf cone 04 Bisque. Moisten a clean sponge and wipe bisque to remove dust.
With the RB#4 144 Soft Fan brush apply 2-3 Coats of FN-001 White to the plate, let dry. Allow the shine to fade before applying the next layer of glaze.
Hold the SL-445 Kaleidoscope Stencil on the platter. Use a 2” foam roller (found in the paint section of the hardware store) to roll SC-65 Peri-twinkle over the stencil. You will need to bend the stencil for the curved sides and lightly apply glaze. It will be a hint of color to add the design.
Trace on the design using AC-230 Clay Carbon Transfer Paper. Tip: make sure and test the Clay Carbon Transfer Paper to make sure the correct side is down. Only 1 side will transfer the image.
Pears: Use the Script Liner to brush the pears with two coats, of SC-6 Sunkissed, darken the left side with a brushstroke of SC-97 Cant-Elope. Shade the pears with SC-34 Down to Earth on one side.
Leaves: Still using the Script Liner apply two coats of SC-26 Green Thumb to one side of the leaves and SC-36 Irish Luck to the other side of the leaves.
Partridge Body: Brush the body of the bird with two coats of SC-92 Café Ole’ follow the direction of the bird’s body. Further shade the birds’ body with strokes of SC-41 Brown Cow and SC-34 Down To Earth.
Partridge Wing: Brush the wing with SC-86 Old Lace and add a dot of SC-10 Teal Next Time to the Old Lace near the lower section of the wing, and deepen the color slightly for the remainder of the wing with SC-92 Café Ole’. Add SC-89 Cutie Pie Coral in streaks to the lower wing and under the eye
Lighten the area above the eye with SC-86 Old Lace.
The beak is SC-34 Down To Earth.
Dabs strokes of SC-15 Tuxedo with RB-104 #4 Liner at the neck and upper chest and dab SC-10 Teal next Time to the middle chest.
The Eye is SC-41 Brown Cow, outline with SC-15 Tuxedo.
The branches are SC-45 Down To Earth.
Outline everything with accent lines with SC-15 Tuxedo, use RB-110 Liner.
Using the Soft Fan Brush apply three coats of SC-65 Peri-twinkle to the back of the platter.
Begin with a properly fired shelf cone 04 Bisque. Moisten a clean sponge and wipe bisque to remove dust.
Brush 3 coats of FN-001 White to the top of the platter with the fan brush.
Let dry.
Use clay carbon paper to trace on the pattern. Test the paper to see which side transfers, then place the clay carbon paper on the bisque with the pattern over the clay carbon paper. A red ink pen is nice as you can see where you have traced.
Using the RB-106 #6 Script Liner apply 2 coats of SC-92 Cafe Ole to the top of the head, back and under the wing.
While the first coat of glaze is drying paint 1 coat to the pears and leaves. Then go back and do the second coat to the partridge, pears and leaves.
Apply two coats of SC-42 Butter Me Up to the pears.
Apply two coats of SC-27 Sour Apple to the leaves.
Still using the Script Liner, lay down two coats of SC-65 Peri-twinkle to the chest.
The wing alternates with SC-96 Aqu-ward and SC-65 Peri-twinkle using the RB-106 #6 Script Liner to apply color.
The branch is two coats of SC-14 Java Bean using the RB-110 10/0 Detail Liner.
The eye is 1 good coat of SC-92 Cafe Ole with a dot of SC-15 Tuxedo in the center for the pupil.
Still using the Detail Liner, paint the feather coming off the head and the beak. There is a line that connects the eye to the beak, this is also painted with Java Bean.
Outline with SC-15 Tuxedo use RB-110 Liner. Add water to the brush, load with SC-15 Tuxedo and pull out a bit onto the palette to blend the glaze and water into the brush bristles. Thinning the glaze helps it flow smoother and further.
Apply three coats of SC-65 Peri-twinkle to the back of the platter with the RB-144 #4 Soft Fan brush.
Begin with properly fired cone 04 bisque. Moisten a sponge and wipe bisque to remove any dust.
Place the AC-230 Clay Carbon Paper over the front of the plate. Trace the pattern using a pencil.
Using the Script Liner with SC-8 Just Froggy, SC-73 Candy Apple Red, SC-87 Ruby Slippers and SC-98 Slime Time, apply 3 of coats to the corresponding colors on the ornaments. Use SC-98 Slime Time for the ornament with stripes. Allow glaze to dry between coats.
Use MC-001 6mm Low Track Masking Tape to make stripes on the ornament on the right. Using the Script Liner with SC-87 Ruby Slippers, apply 2 coats over the ornament. Allow glaze to dry between coats. Remove the tape.
Use SG-402 White, SG-403 Red, SG-405 Green and SG-409 Bright Green to make the lines and dots on the ornaments.
Using the Script Liner with SC-99 Char-ming, apply 3 coats to the tops of the ornaments. Allow glaze to dry between coats.
Use SG-401 Black to outline the ornaments and make the strings.
Using the Soft Fan with SG-704 Peppermint, apply 2 coats to the front of the plate. Allow glaze to dry between coats.
Using the Soft Fan with SC-87 Ruby Slippers, apply 3 coats to the back of the plate. Allow glaze to dry between coats.
Begin with properly fired shelf cone 04 Bisque. Moisten a clean sponge and wipe bisque to remove any dust.
Use the Soft Fan to apply two coats of FN-001 White to the hat, handle beard and inside the mug. Put a Plastic Detailer Cap on bottles of SC-16 Cotton Tail and SC-98 Slime Time.
Wet a blue paper shop towel and lay flat. Squirt SC-16 Cotton Tail and SC-98 Slime Time in rows on the paper towel and fold in half. Open the towel then press onto the hat and half of the handle. Remove the paper. Pat with a dry sponge to remove the excess color.
Use the sponge to remove any color from the body and nose of the mug.
Use the Script Liner to apply three coats of SC-20 Cashew Later to the nose. Redden the nose with SC-89 Cutie Pie Coral blended into the Cashew Later.
Use the Script Liner to float SC-99 Char-ming around the edges of the beard and into the detail. Use the Liner to outline the hair on the beard.
Use the Script Liner and Fan to apply three coats of SC-73 Candy Apple Red onto the body of the mug.
Use the Liner with SC-15 Tuxedo to outline around the beard and the top of the hat.
Use the Soft Fan to apply one coat of SG-704 Speckta-Clear Peppermint to the entire mug (excluding the nose).
Squeeze about a tablespoon of SC-45 My Blue Heaven onto the plate. Take the ST-103 Retro Star Stamp and place it design-side up. Take the sponge on a stick and gently dab it into the glaze. Blot off any excess onto the bare portion of the plate, then sponge the stamp. Take the stamp and gently press onto the mitten. Repeat until the mitten is covered.
Using the Script Liner with SC-45 My Blue Heaven, Outline the mitten. Apply two coats to the cuff. Allow glaze to dry between coats.
Squeeze about two tablespoons of SC-76 Cara-Bein Blue onto the plate. Take the sponge on a stick and gently dab into the glaze. Sponge onto the inside of the child’s hand. Repeat until it is covered. Press the hand onto the mitten. Slowly lift the hand off to avoid smearing. Allow the handprint to dry completely.
Use the pencil to write the child’s name and date.
Using the Detail Liner with SC-76 Cara-Bein Blue, trace over the lettering.
Using the Soft Fan with SC-45 My Blue Heaven, apply two coats to the back of the mitten. Allow glaze to dry between coats.
Using the Soft Fan, apply two coats of S-2101 Clear Brushing Glaze or dip into NT-CLR Clear Dipping Glaze.
Fire to cone 06.
Form
MB-988 Mitten Dish
Colors
SC-45 My Blue Heaven
SC-76 Cara-Bein Blue
NT-CLR Clear Dipping Glaze or NT-BR Brushing Glaze
Begin with properly fired cone 04 bisque. Moisten a sponge and wipe bisque to remove any dust.
Using the Dremel tool, drill a hole through the top of the truck. Moisten a sponge and wipe bisque to remove any dust.
Using the Script Liner and Detail Liner with SC-74 Hot Tamale, apply two coats to the body of the truck. Allow glaze to dry between coats.
Using the Detail Liner with SC-6 Sunkissed, apply two coats to the lights. Allow glaze to dry between coats.
Using the Detail Liner with SC-60 Silver Lining, apply two coats to the bumpers and hubcaps. Allow glaze to dry between coats.
Using the Script Liner and Detail Liner with SC-15 Tuxedo, apply two coats to the tires. Allow glaze to dry between coats.
Using the Detail Liner with SC-15 Tuxedo, apply accent lines to the truck.
Fire to cone 06.
After the truck is cool, cut a 14″ piece off of the twine. Fold it in half. Take the wire and cut a 5″ piece. Run the wire through the looped end of the twine and fold in half. Take the wire and pull it through the hole in the truck from the bottom up. Pull the twine through until the loop is big enough to hang on a tree. Tie a knot at the hood of the truck. Tie a large knot at the bottom of the truck. Cut off any excess.
Use the hot glue gun to glue presents in the bed of the truck.
Begin with properly fired shelf cone 04 Bisque. Moisten a clean sponge and wipe bisque to remove any dust.
Slightly thin FN-003 Red, pour inside the car, turn to coat and pour out the excess glaze. Wipe off any color from the windshield and the body of the car.
Pencil a line to divide the car. Use a palette knife to mix SC-15 Tuxedo with AC-310 Silkscreen Medium to the consistency of peanut butter. Use the candy cane screen from DSS-0133 Merry Christmas. With the shiny side down, rub the thickened Tuxedo over the screen. Continue using the screen to change angles of the candy cane to covet the top section of the car. The screen can be used multiple times before it needs cleaning.
Use the Soft Fan to apply three coats of SC-36 Irish Luck to the windshield. Use the Liner to apply two coats of SC-74 Hot Tamale to the trim of the windshield.
Use the Soft Fan to apply three thinned coats of SC-27 Sour Apple to the lower section of the car. Use the Script Liner or Liner to apply two or three coats of SC-36 Irish Luck to the trim at the bottom and bumpers.
Use the Script Liner to apply three coats of SC-74 Hot Tamale to the front grill. Apply three coats of Hot Tamale and SC-16 Cotton Tail to the wheels and two coats of SC-15 Tuxedo to the tires.
Apply thin tape on both sides of the pencil line, leaving 1/4″ space. Use the Script Liner to apply two coats of SC-74 Hot Tamale to create the stripe.
Use the Liner to fill in the ribbon on the candy canes, one coat.
Use the Script Liner with thinned SC-35 Gray Hare to add shading to the shadow areas on the top section of the car.
Use the Soft Fan to apply two coats of NT-BR Brushing Glaze to the top section of the car. Apply one coat of SG-701 Star Dust over the Sour Apple on the bottom section of the car.
1. Begin with properly fired shelf cone 04 Bisque. Moisten a clean sponge and wipe bisque to remove any dust.
2. Use the Soft Fan to apply on two thinned coats of SC-86 Old Lace to the llama’s body. Sponge SC-2 Melon-Choly to the cheeks and brush into the ears. Float to shade SC-48 Camel Back in shadows. Thin Camel Back and apply to the hair.
3. Tape off a triangle shape on the tray’s blanket. Use a palette knife to mix SC-74 Hot Tamale with AC-310 Silkscreen Medium to the consistency of peanut butter. Use the stocking screen from DSS-0106 Winter/Holiday. With the shiny side down, rub the thickened Hot Tamale over the screen to fill in the tree using the snowflake and surrounding detail.
4. Use the Script Liner to apply one coat of thinned SC-93 Honeydew List over the remainder of the blank.
5. Use the Script Liner to apply three coats of SC-74 Hot Tamale to the boots. Apply two coats of SG-302 Snowfall to the top of the boots to create a fur trim.
6. Re-tape around the tree edges. Use SG-403 Red to dot the background around the snowflake. This will deepen the color of the Hot Tamale screen and make the snowflake stand out.
7. For the trim stripes on the sides of the blanket: tape to create straight, crisp lines. Dot SG-403 Red for the red stripe, SG-409 Bright Green and SG-410 Bright Blue for the remainder of the stripes.
8. Use the Designer Liner colors to decorate the fringe and the tassels.
9. Use SG-410 Bright Blue with a brush for the eyes. Use SG-401 Black with a brush for the pupils and to outline the eyes.
10. Use the Soft Fan to apply two coats of NT-BR Clear One Brushing Glaze, avoiding the Snowfall.
11. Fire to cone 05/06.
Llama Mug
1. Begin with properly fired shelf cone 04 Bisque. Moisten a clean sponge and wipe bisque to remove any dust.
2. Sightly thin FN-003 Red, pour inside the mug and turn to coat. Pour out the excess glaze and drain. Option: You can use the Soft Fan to apply three coats of the FN-003 Red instead if you prefer.
3. Use the Soft Fan to apply two thinned coats of SC-86 Old Lace to the llama’s body. Sponge SC-2 Melon-Choly to the cheeks and brush into the ears. Float to shade SC-48 Camel Back in shadows. Thin Camel Back and apply to the hair.
4. Use the banner screen from DSS-0156 Llama Drama Screen. Use a palette knife to mix SG-401 Black or SC-15 Tuxedo with AC-310 Silkscreen Medium to the consistency of peanut butter. With the shiny side down, screen the banner in two rows onto the blanket.
5. Dot the edges of the blanket with SG-403 Red, SG-409 Bright Green and SG-410 Bright Blue. Use the Bright Blue to dot into the blanket behind the banners in a loose pattern.
6. Use SG-407 Yellow, SG-408 Orange, SG-409 Bright Green and SG-410 Bright Blue for the tassels and fringe. Thin the various Designer Liner colors and use the Liner to apply one coat onto the banners. Use SG-401 Black for the letters, JOLLY LLAMA. The banner on the back of the blanket is FALALA.
7. Use the Script Liner to apply three coats of Hot Tamale to the legs/feet.
8. Thin SG-410 Bright Blue and apply to the eyes using the Liner. Use SG-401 Black with a brush for the pupils and to outline the eyes.
9. Dip into NT-CLR Clear Dipping Glazes or use the Soft Fan to apply two coats of NT-BR Clear One Brushing Glaze to the outside of the mug.
1. Begin with properly fired shelf cone 04 Bisque. Moisten a clean sponge and wipe bisque to remove any dust.
2. Brush on three thinned coats of SC-20 Cashew Later to the face of the elf, sponge the cheeks with two coats of SC-2 Melon-Choly.
3. Brush the hair with two thinned coats of SC-48 Camel Back, float Camel Back around the face, eyes, and ears for shadow, use CB-106 Script Liner.
4. Brush three coats of SC-73 Candy Apple Red to the hat and suit with CB-604 Soft Fan and CB-106 Script Liner, float SC-81 Cinnamon Stix into the shadow areas of the suit and hat.
5. Brush on two coats of SC-15 Tuxedo to the shoes, use CB-106 Script Liner.
6. Brush on two coats of SG-302 Snowfall to the hat trip, collar, and mittens use CB-406 Round.
7. Clean off the eyes of other glaze colors, brush the white side of the eye with two coats of SC-16 Cotton Tail, the pupil with SC-14 Java Bean, pupil with SC-15 Tuxedo, outline with SC-15 Tuxedo, outline the hair with SC-15 Tuxedo. Brows are Camel Back.
8. Fire to cone 05/06.
9. Outline the mittens with an extra fine black sharpie.
Form
MB-1463 Vintage Elf Bisque or CD1463 Vintage Elf Mold
Begin with properly fired cone 04 bisque. Moisten a sponge and wipe bisque to remove any dust.
On the DSS-0157 Under the Sea screen, locate the starfish. Draw an outline around it in permanent marker. Cut it out with the excess screen around the edges.
Squeeze about two tablespoons of SC-8 Just Froggy onto the plate. Add a pinch of AC-310 Silkscreen Medium. Mix with a palette knife until it becomes the consistency of peanut butter. You may need to add more Silkscreen Medium or glaze.
Place the starfish in the center of the ornament. While holding it firmly in place, take a small amount of premixed Silkscreen Medium, and gently rub in circles starting in the center and working outward. Slowly pull up the screen to avoid smearing. Repeat to the immediate left and right of the center starfish. Work quickly so the screen does not have time to dry.
Using the pencil, draw the bands on the ornament. Refer to image.
Using the Detail Liner with SC-78 Lime Light, apply two coats the starfish. Allow glaze to dry between coats.
Using the Detail Liner with SC-8 Just Froggy, apply two coats to the band behind the starfish. Allow glaze to dry between coats.
Using the Detail Liner with SG-302 Snowfall, apply one coat to the next upper and lower bands. Apply one coat to the band at the top of the ornament.
Using the Scrip Liner with SC-73 Candy Apple Red, apply two coats to the next upper and lower bands. Allow glaze to dry between coats.
Using the Detail Liner with SC-8 Just froggy, make a line between the SG-302 Snowfall and SC-73 Candy Apple Red.
Using the Scrip Liner and Soft Fan, apply two coats to the sides and back of the ornament. Allow glaze to dry between coats.
Using the Script Liner with SG-701 Star Dust, apply one coat to the areas glazed with SC-73 Candy Apple Red.
Using the Soft Fan, apply one coat of S-2101 Clear Brushing Glaze or dip into NT-CLR Clear Dipping Glaze.
Fire to cone 06.
Form
MB-1172 3″ Flat Round Ornament
Colors
SC-8 Just Froggy
SC-73 Candle Apple Red
SG-78 Lime Light
SG-302 Snowfall
SG-701 Star Dust
NT-CLR Clear Dipping Glaze or NT-BR Clear One Brushing Glaze
Begin with properly fired cone 04 bisque. Moisten a sponge and wipe bisque to remove any dust.
On the DSS-0157 Under the Sea screen, locate the fish. Draw an outline around it in permanent marker. Cut it out with the excess screen around the edges.
Squeeze about two tablespoons of SC-15 Tuxedo onto the plate. Add a pinch of AC-310 Silkscreen Medium. Mix with a palette knife until it becomes the consistency of peanut butter. You may need to add more Silkscreen Medium or glaze.
Place the fish in the bottom, left of the ornament. While holding it firmly in place, take a small amount of premixed Silkscreen Medium, and gently rub in circles starting in the center and working outward. Slowly pull up the screen to avoid smearing.
Using the pencil, draw seaweed coming up from the bottom of the ornament. Refer to image.
Using the Detail Liner with SC-73 Candy Apple Red, apply two coats the stripes on the fish. Allow glaze to dry between coats.
Using the Detail Liner with SC-8 Just Froggy, apply two coats to the seaweed. Use the Script Liner and Fan Brush to apply two coats to the sides and bottom of the ornament. Allow glaze to dry between coats.
Using the Script Liner and Detail Liner with SC-45 My Blue Heaven, apply two coats to the background of the ornament. Allow glaze to dry between coats.
Using the Detail Liner with SG-302, apply dots going up from the fish’s mouth.
Use SG-403 to make dots on the seaweed.
Using the Soft Fan, apply one coat of S-2101 Clear Brushing Glaze or dip into NT-CLR Clear Dipping Glaze.
Fire to cone 06.
Form
MB-1172 3″ Flat Round Ornament
Colors
SC-8 Just Froggy
SC-15 Tuxedo
SC-45 My Blue Heaven
SC-73 Candle Apple Red
SG-302 Snowfall
SG-403 Red
NT-CLR Clear Dipping Glaze or NT-BR Clear One Brushing Glaze
Begin with properly fired cone 04 bisque. Moisten a sponge and wipe bisque to remove any dust.
On the DSS-0157 Under the Sea screen, locate the jellyfish. Draw an outline around it in permanent marker. Cut it out with excess screen around the edges.
Squeeze about two tablespoons of SC-15 Tuxedo onto the plate. Add a pinch of AC-310 Silkscreen Medium. Mix with a palette knife until it becomes the consistency of peanut butter. You may need to add more Silkscreen Medium or glaze.
Place the jellyfish in the center of the ornament. While holding it firmly in place, take a small amount of premixed Silkscreen Medium, and gently rub in circles starting in the center and working outward. Slowly pull up the screen to avoid smearing.
Using the Script Liner and Detail Liner with SC-78 Lime Light, apply two coats to the body of the jellyfish.
Using the Script Liner and Detail Liner with SC-45 My Blue Heaven, apply two coats to the background of the ornaments. Allow glaze to dry between coats.
Using the Script Liner and with SC-74 Hot Tamale, apply two coats to the sides and back of the ornament. Allow glaze to dry between coats.
Use SG-401 Black to make the string for the lights.
Use SG-403 Red, SG-404 Blue and SG-407 Yellow to make the lights.
Use the Detail Liner with SG-302 Snowfall to make dots in the background.
Using the Soft Fan, apply one coat of S-2101 Clear Brushing Glaze or dip into NT-CLR Clear Dipping Glaze.
Fire to cone 06.
Form
MB-1172 3″ Flat Round Ornament
Colors
SC-15 Tuxedo
SC-45 My Blue Heaven
SC-74 Hot Tamale
SC-78 Lime Light
SG-302 Snowfall
SG-401 Black
SG-403 Red
SG-404 Blue
SG-407 Yellow
NT-CLR Clear Dipping Glaze or NT-BR Clear One Brushing Glaze
Begin with properly fired cone 04 bisque. Moisten a sponge and wipe bisque to remove any dust.
On the DSS-0156 Llama Drama screen, locate the llama. Draw an outline around it in permanent marker. Cut it out with excess screen around the edges.
Squeeze about two tablespoons of SC-15 Tuxedo onto the plate. Add a pinch of AC-310 Silkscreen Medium. Mix with a palette knife until it becomes the consistency of peanut butter. You may need to add more Silkscreen Medium or glaze.
Place the llama’s head in the bottom, center of the ornament. While holding it firmly in place, take a small amount of premixed Silkscreen Medium, and gently rub in circles starting in the center and working outward. Slowly pull up the screen to avoid smearing.
Using the pencil, draw a candy cane in the Llama’s mouth.
Using the Detail Liner, Script Liner and Fan Brush with SC-8 Just Froggy, apply two coats to the background, sides and back of the ornament. Allow glaze to dry between coats.
Using the Detail Liner with SC-73 Candy Apple Red, apply two coats to every other stripe in the candy cane. Allow glaze to dry between coats.
Using the Detail Liner with SG-302 Snowfall, make a layer of snow falling off of the top of the ornament. Refer to image. Apply one coat to the fur of the llama. Avoid the screened lines.
Using the Detail Liner with SC-15 Tuxedo, outline the candy cane.
Using the Soft Fan, apply one coat of S-2101 Clear Brushing Glaze or dip into NT-CLR Clear Dipping Glaze.
Fire to cone 06.
Form
MB-1172 3” Flat Round Ornament
Colors
SC-8 Just Froggy
SC-15 Tuxedo
SC-73 Candy Apple Red
SG-302 Snowfall
NT-CLR Clear Dipping Glaze or NT-BR Clear One Brushing Glaze
Begin with properly fired cone 04 bisque. Moisten a sponge and wipe bisque to remove any dust.
On the DSS-0157 Under the Sea screen, locate the seahorse. Draw an outline around it in permanent marker. Cut it out with the excess screen around the edges.
Squeeze about two tablespoons of SC-15 Tuxedo onto the plate. Add a pinch of AC-310 Silkscreen Medium. Mix with a palette knife until it becomes the consistency of peanut butter. You may need to add more Silkscreen Medium or glaze.
Place the seahorse towards the right of the ornament. While holding it firmly in place, take a small amount of premixed Silkscreen Medium, and gently rub in circles starting in the center and working outward. Slowly pull up the screen to avoid smearing.
Using the pencil, draw different sized ornaments around the seahorse. Refer to image.
Using the Detail Liner with SC-8 Just Froggy, apply two coats to four of the ornaments and the fins of the seahorse. Allow glaze to dry between coats.
Using the Detail Liner with SC-73 Candy Apple Red, apply two coats to three of the ornaments and the body of the seahorse. Allow glaze to dry between coats.
Using the Detail Liner and Script Liner with SC-45 My Blue Heaven, apply two coats to the background of the ornament. Allow glaze to dry between coats.
Using the Scrip Liner and Fan Brush with SC-78 Lime Light, apply two coats to the sides and back of the ornament. Using the Detail Liner, apply two coats to three of the ornaments. Allow glaze to dry between coats.
Using the Detail Liner and Script Liner with SC-45 My Blue Heaven, apply two coats to the background. Allow glaze to dry between coats.
Using the Scrip Liner with SG-701 Star Dust, apply one coat over the body of the seahorse.
Using the Detail Liner with SC-15 Tuxedo, outline the ornaments.
Use SG-403 Red, SG-402 White and SG-702 Celebration to decorate the ornaments. Refer to the image.
Using the Soft Fan, apply one coat of S-2101 Clear Brushing Glaze or dip into NT-CLR Clear Dipping Glaze.
Fire to cone 06.
Form
MB-1172 3″ Flat Round Ornament
Colors
SC-8 Just Froggy
SC-15 Tuxedo
SC-73 Candle Apple Red
SC-78 Lime Light
SG-402 White
SG-403 Red
SG-701 Star Dust
SG-702 Celebration
NT-CLR Clear Dipping Glaze or NT-BR Clear One Brushing Glaze
Begin with properly fired cone 04 bisque. Moisten a sponge and wipe bisque to remove any dust.
On the DSS-0157 Under the Sea screen, locate the octopus. Draw an outline around it in permanent marker. Cut it out with the excess screen around the edges.
Squeeze about two tablespoons of SC-15 Tuxedo onto the plate. Add a pinch of AC-310 Silkscreen Medium. Mix with a palette knife until it becomes the consistency of peanut butter. You may need to add more Silkscreen Medium or glaze.
Place the octopus in the center of the ornament. While holding it firmly in place, take a small amount of premixed Silkscreen Medium, and gently rub in circles starting in the center and working outward. Slowly pull up the screen to avoid smearing.
Using the pencil, draw Santa hat on the octopus’s head and four ornaments dangling off of its arms. Refer to image.
Using the Detail Liner with SC-8 Just Froggy, apply two coats to two of the ornaments. Allow glaze to dry between coats.
Using the Detail Liner with SC-73 Candy Apple Red, apply two coats to the other two ornaments and the Santa hat. Allow glaze to dry between coats.
Using the Detail Liner, Script Liner and Soft Fan with SC-78 Lime Light, apply two coats to the octopus, sides and back of the ornament. Allow glaze to dry between coats.
Using the Detail Liner and Script Liner with SC-45 My Blue Heaven, apply two coats to the background. Allow glaze to dry between coats.
Using the Detail Liner with SG-302 Snowfall, make fur on the hat.
Using the Detail Liner with SC-15 Tuxedo, outline the hat and hanging ornaments.
Using the Detail Liner with SG-701 Star Dust, apply one coat to the Santa hat.
Using the Soft Fan, apply one coat of S-2101 Clear Brushing Glaze or dip into NT-CLR Clear Dipping Glaze.
Fire to cone 06.
Form
MB-1172 3” Flat Round Ornament
Colors
SC-8 Just Froggy
SC-15 Tuxedo
SC-73 Candle Apple Red
SC-78 LimeLight
SG-302 Snowfall
SG-701 Star Dust
NT-CLR Clear Dipping Glaze or NT-BR Clear One Brushing Glaze
Begin with properly fired cone 04 bisque. Moisten a sponge and wipe bisque to remove any dust.
On the DSS-0157 Under the Sea screen, locate the crab. Draw an outline around it in permanent marker. Cut it out with the excess screen around the edges.
Squeeze about two tablespoons of SC-15 Tuxedo onto the plate. Add a pinch of AC-310 Silkscreen Medium. Mix with a palette knife until it becomes the consistency of peanut butter. You may need to add more Silkscreen Medium or glaze.
Place the crab in the bottom, center of the ornament. While holding it firmly in place, take a small amount of premixed Silkscreen Medium, and gently rub in circles starting in the center and working outward. Slowly pull up the screen to avoid smearing.
Using the pencil, draw two presents resting on top of the crab’s claws. Refer to image.
Using the Detail Liner with SC-73 Candy Apple Red, apply two coats to the crab. Allow glaze to dry between coats.
Using the Detail Liner with SC-8 Just Froggy, apply two coats to the bottom present. Allow glaze to dry between coats.
Using the Detail Liner with SC-78 Lime Light, apply two coats to the top present. Allow glaze to dry between coats.
Using the Script Liner and Detail Liner with SC-45 My Blue Heaven, apply two coats to the background of the ornament. Allow glaze to dry between coats.
Using the Scrip Liner and Fan Brush with SC-74 Hot Tamale, apply two coats to the sides and back of the ornament.
Use SG-403 to make a bow on the presents.
Using the Detail Liner with SC-15 Tuxedo, outline the presents and bow.
Using the Script Liner with SG-401 Star Dust, apply one coat to the crab.
Using the Soft Fan, apply one coat of S-2101 Clear Brushing Glaze or dip into NT-CLR Clear Dipping Glaze.
Fire to cone 06.
Form
MB-1172 3″ Flat Round Ornament
Colors
SC-8 Just Froggy
SC-15 Tuxedo
SC-45 My Blue Heaven
SC-73 Candle Apple Red
SC-74 Hot Tamale
SC-78 Lime Light
SG-403 Red
SG-701 Star Dust
NT-CLR Clear Dipping Glaze or NT-BR Clear One Brushing Glaze
Begin with properly fired cone 04 bisque. Moisten a sponge and wipe bisque to remove any dust.
On the DSS-0156 Llama Drama screen, locate the llama. Draw an outline around it in permanent marker. Cut it out with excess screen around the edges.
Squeeze about two tablespoons of SC-15 Tuxedo onto the plate. Add a pinch of AC-310 Silkscreen Medium. Mix with a palette knife until it becomes the consistency of peanut butter. You may need to add more Silkscreen Medium or glaze.
Place the llama’s head in the center of the ornament. While holding it firmly in place, take a small amount of premixed Silkscreen Medium, and gently rub in circles starting in the center and working outward. Slowly pull up the screen to avoid smearing.
Using the pencil, draw earmuffs on the llama.
Using the Detail Liner with SC-8 Just Froggy, apply two coats to every other ball on the llama. Allow glaze to dry between coats.
Using the Detail Liner with SC-73 Candy Apple Red, apply two coats to every other ball on the llama. Apply two coats to the inner ears. Allow glaze to dry between coats.
Using the Script Liner and Soft Fan with SC-45 My Blue Heaven, apply two coats to the background, sides and back of the ornament. Allow glaze to dry between coats.
Using SG-405 Green apply one coat to the earmuffs.
Using the Detail Liner with SG-302 Snowfall, make dots in the background and fur on the earmuffs.
Using the Detail Liner with SC-15 Tuxedo, outline the earmuffs.
Using the Soft Fan, apply one coat of S-2101 Clear Brushing Glaze or dip into NT-CLR Clear Dipping Glaze.
Fire to cone 06.
Form
MB-1172 3” Flat Round Ornament
Colors
SC-8 Just Froggy
SC-15 Tuxedo
SC-45 My Blue Heaven
SC-73 Candy Apple Red
SG-302 Snowfall
SG-405 Green
NT-CLR Clear Dipping Glaze or NT-BR Clear One Brushing Glaze
Begin with properly fired cone 04 bisque. Moisten a sponge and wipe bisque to remove any dust.
On the DSS-0156 Llama Drama screen, locate the llama. Draw an outline around it in permanent marker. Cut it out with excess screen around the edges.
Squeeze about two tablespoons of SC-15 Tuxedo onto the plate. Add a pinch of AC-310 Silkscreen Medium. Mix with a palette knife until it becomes the consistency of peanut butter. You may need to add more Silkscreen Medium or glaze.
Place the llama’s head in the bottom, center of the ornament. While holding it firmly in place, take a small amount of premixed Silkscreen Medium, and gently rub in circles starting in the center and working outward. Slowly pull up the screen to avoid smearing.
Using the pencil, draw a wreath around the llama’s head and a scarf around it’s neck.
Using the Script Liner and Soft Fan with SC-8 Just Froggy, apply two coats to the wreath. Continue over to the sides and back of the ornament. Allow glaze to dry between coats.
Using the Detail Liner with SC-73 Candy Apple Red, apply two coats to the scarf. Allow glaze to dry between coats.
Using the Script Liner with SC-45 My Blue Heaven, apply two coats between the llama head and wreath. Allow glaze to dry between coats.
Using the Detail Liner with SC-15 Tuxedo, outline wreath and scarf.
Use SG-403 Red to make clusters of three berries in the wreath. Using the Detail Liner with SC-15 Tuxedo, make leaves coming out from the berries.
Use SG-402 White to make stripes in the scarf.
Using the Detail Liner with SC-8 Just Froggy, apply two coats to the rims of the llama’s glasses. Allow glaze to dry between coats.
Using the Soft Fan, apply one coat of S-2101 Clear Brushing Glaze or dip into NT-CLR Clear Dipping Glaze.
Fire to cone 06.
Form
MB-1172 3” Flat Round Ornament
Colors
SC-8 Just Froggy
SC-15 Tuxedo
SC-45 My Blue Heaven
SC-73 Candy Apple Red
SG-402 White
SG-403 Red
NT-CLR Clear Dipping Glaze or NT-BR Clear One Brushing Glaze
Begin with properly fired cone 04 bisque. Moisten a sponge and wipe bisque to remove any dust.
Use the pencil to make two horizontal lines across the ornament. They should be 1/4” from the top and bottom.
Using the Scrip Liner with SC-78 Lime Light, apply two coats to the front, center section of the ornament. Allow glaze to dry between coats.
On the DSS-0156 Llama Drama screen, locate the “NO PROB LLAMA” screen. Draw an outline around it in permanent marker. Cut it out with excess screen around the edges.
Squeeze about two tablespoons of SC-81 Cinnamon Stix onto the plate. Add a pinch of AC-310 Silkscreen Medium. Mix with a palette knife until it becomes the consistency of peanut butter. You may need to add more Silkscreen Medium or glaze.
Place the “NO PROB LLAMA” in the center of the ornament. While holding it firmly in place, take a small amount of premixed Silkscreen Medium, and gently rub in circles starting in the center and working outward. Slowly pull up the screen to avoid smearing.
Using the Script Liner with SG-302 Snowfall, apply one coat to the top and bottom sections of the front of the ornament.
Using the Script Liner with SG-702 Celebration, apply one coat over the SG-302 Snowfall areas.
Use SG-403 Red to make a line between the three sections on the front of the ornament.
Use SG-405 Green to make a horizontal line of dots between the “NO PROB” and “LLAMA”.
Using the Script Liner and Soft Fan with SC-81 Cinnamon Stix, apply two coats to the edge and back of the ornament. Allow glaze to dry between coats.
Using the Soft Fan, apply one coat of S-2101 Clear Brushing Glaze or dip into NT-CLR Clear Dipping Glaze.
Form
MB-1172 3” Flat Round Ornament
Colors
SC-78 Lime Light
SC-81 Cinnamon Stix
SG-302 Snowfall
SG-403 Red
SG-405 Green
SG-702 Celebration
NT-CLR Clear Dipping Glaze or NT-BR Clear One Brushing Glaze
Begin with properly fired cone 04 bisque. Moisten a sponge and wipe bisque to remove any dust.
On the DSS-0156 Llama Drama screen, locate the cactus. Draw an outline around it in permanent marker. Cut it out with excess screen around the edges.
Squeeze about two tablespoons of SC-15 Tuxedo onto the plate. Add a pinch of AC-310 Silkscreen Medium. Mix with a palette knife until it becomes the consistency of peanut butter. You may need to add more Silkscreen Medium or glaze.
Place the cactus in the center of the ornament. While holding it firmly in place, take a small amount of premixed Silkscreen Medium, and gently rub in circles starting in the center and working outward. Slowly pull up the screen to avoid smearing.
Using the pencil, draw a Santa hat on top of the cactus.
Using the Script Liner with SC-8 Just Froggy, apply two coats to the cactus. Allow glaze to dry between coats.
Using the Detail Liner with SC-73 Candy Apple Red, apply two coats to the Santa hat. Allow glaze to dry between coats.
Using the Detail Liner, Script Liner and Soft Fan with SC-45 My Blue Heaven, apply two coats to the background, sides and back of the ornament. Allow glaze to dry between coats.
Using the Detail Liner with SG-302 Snowfall, make dots in the background and fur on the hat.
Using the Detail Liner with SC-15 Tuxedo, outline the Santa hat.
Use SG-401 Black to make lines crossing the body of the cactus. It should look like lights wrapping around the cactus.
Use SG-403 Red, SG-404 Blue and SG-407 Yellow to make lights coming off of the black lines.
Using the Soft Fan, apply one coat of S-2101 Clear Brushing Glaze or dip into NT-CLR Clear Dipping Glaze.
Fire to cone 06.
Form
MB-1172 3” Flat Round Ornament
Colors
SC-8 Just Froggy
SC-15 Tuxedo
SC-45 My Blue Heaven
SC-73 Candy Apple Red
SG-302 Snowfall
SG-401 Black
SG-403 Red
SG-404 Blue
SG-407 Yellow
NT-CLR Clear Dipping Glaze or NT-BR Clear One Brushing Glaze
Begin with properly fired cone 04 bisque. Moisten a sponge and wipe bisque to remove any dust.
On the DSS-0156 Llama Drama screen, locate the leaves. Draw an outline around it in permanent marker. Cut it out with excess screen around the edges.
Squeeze about two tablespoons of SC-15 Tuxedo onto the plate. Add a pinch of AC-310 Silkscreen Medium. Mix with a palette knife until it becomes the consistency of peanut butter. You may need to add more Silkscreen Medium or glaze.
Place the leaves on the left edge of the ornament. While holding it firmly in place, take a small amount of premixed Silkscreen Medium, and gently rub in circles starting in the center and working outward. Slowly pull up the screen to avoid smearing.
Wash the screen with water and make sure it is dry. Flip it over to the other side and re-screen on the right side of the ornament.
Using the pencil, draw an ornament hanging between the two sets of leaves.
Using the Script Liner with SC-8 Just Froggy, apply two coats to the leaves. Allow glaze to dry between coats.
Using the Script Liner with SC-74 Hot Tamale, apply two coats to the berries and the hanging ornament. Allow glaze to dry between coats.
Using the Detail Liner, Script Liner and Soft Fan with SC-78 Lime Light, apply two coats to the background, sides and back of the ornament. Allow glaze to dry between coats.
Using the Detail Liner with SG-302 Snowfall, make accent lines on the hanging ornament.
Using the Detail Liner with SC-15 Tuxedo, outline the hanging ornament and add a string.
Using the Soft Fan, apply one coat of S-2101 Clear Brushing Glaze or dip into NT-CLR Clear Dipping Glaze.
Fire to cone 06.
Form
MB-1172 3” Flat Round Ornament
Colors
SC-8 Just Froggy
SC-15 Tuxedo
SC-74 Hot Tamale
SC-78 Lime Light
SG-302 Snowfall
NT-CLR Clear Dipping Glaze or NT-BR Clear One Brushing Glaze
Begin with properly fired cone 04 bisque. Moisten a sponge and wipe bisque to remove any dust.
Take the MC-002 12mm Low Track Masking Tape and cover the top of the Clipboard, where the clip will be glued.
Squeeze around a tablespoon of SC-35 Gray Hare onto the plate. Take the MT-010 Cable Knit Mat and place it design-side up. Take the sponge on a stick and gently dab it into the glaze. Blot off any excess onto the bare portion of the place, then sponge the mat. Take the mat and gently press onto the Clipboard. Slowly pull the mat off to avoid smearing. Allow glaze to dry completely.
On the DSS-0106 Winter/Holiday screen, locate the snowman. Draw an outline around it in permanent marker. Cut it out with excess screen around the edges.
Squeeze about two tablespoons of SC-15 Tuxedo onto the plate. Add a pinch of AC-310 Silkscreen Medium. Mix with a palette knife until it becomes the consistency of peanut butter. You may need to add more Silkscreen Medium or glaze.
Place the snowman in the lower right corner of the Clipboard. While holding it firmly in place, take a small amount of premixed Silkscreen Medium, and gently rub in circles staring in the center and working outward. Slowly pull up the screen to avoid smearing.
Using the Scrip Liner and SC-16 Cotton Tail, apply two coats to the body of the snowman. Allow glaze to dry between coats.
Using the Detail Liner and SC- 31 The Blues, apply two coats to every other stripe in the scarf. Using the same brush with SC-55 Yella Bout It, apply two coats to the other stripes in the scarf. Allow glaze to dry between coats.
Using the Detail Liner and SC- 75 Orange-A-Peel, apply two coats to the nose of the snowman. Allow glaze to dry between coats.
Using the Detail Liner and SC-26 Green Thumb, apply two coats to the holly on the snowman’s hat. Using the same brush with SC-74 Hot Tamale, apply two coats to the berries in the holly. Allow glaze to dry between coats.
Using the snowflake punch, make three snowflake punches in the paper. You will be using the negatives as stencils. You can discard the actual snowflakes. Cut them apart with the scissors. Use some water to dampen each stencil. Place the snowflakes in the background of the snowman. Press them down and make sure the edges are secure.
Using the Soft Fan and SC-12 Moody Blue, apply one thick coat of glaze over the stencil. Before the glaze dries, remove the stencil.
Using the Script Liner and SG-701 Star Dust, apply one coat to each snowflake.
Using the Soft Fan, apply one coat of S-2101 Clear Brushing Glaze or dip into NT-CLR Clear Dipping Glaze.
Pull off the 12mm tape at the top of the Clipboard.
1. Begin with properly fired cone 04 bisque. Moisten a sponge and wipe bisque to remove any dust.
2. Take the MC-001 6mm Low Track Masking Tape and tape off a line going down the center of each small stripe on the Candy Dish. The line should be around 1/3 of the total width of each stripe.
3. Using the Script Liner and SC-74 Hot Tamale, apply two coats of glaze to each stripe that was previously masked off. Allow glaze to dry between coats. Pull off masking tape before the final coat of glaze is dry.
4. Using the Script and SC-45 My Blue heaven, apply two coats of glaze to the front of the Candy Dish. Using the Soft Fan and SC-45, apply two coats of glaze to the back of the Candy Dish. Allow glaze to dry between coats.
5. Using the Soft Fan and SC-11 Blue Yonder apply one coat of glaze to the handles. Wipe off glaze on the raised surfaces to achieve an antiqued look.
6. Using the Script Liner and SG-702 Celebration, apply one coat of glaze over areas in the front glazed with SC-45 My Blue Heaven.
7. Using the Soft Fan, apply two coats of S-2101 Clear Brushing glaze to the stripes or dip into NT-CLR Clear Dipping Glaze.
Begin with properly fired shelf cone 04 Bisque. Moisten a clean sponge and wipe bisque to remove any dust.
Slightly thin FN-020 Medium Green and pour inside the camper. Turn to fully coat the inside then pour out the excess glaze.
Pencil in a line on the body of the camper to separate the red and white areas. Use the Soft Fan and Script Liner to apply three slightly thinned coats of SC-73 Candy Apple Red to the red areas of the camper. Apply two thinned coats of SC-27 Sour Apple to the green areas.
Use the same brushes to apply three coats of CG-992 Mint Chip to the awning. Press open circle shapes on the awnings with SC-73 Candy Apple Red.
Pencil in the scalloped shades in the windows and the shading detail in the door window. Float SC-30 Blue Dawn on the window sections. Use SC-73 Candy Apple Red to stripe the shades in the front windows and SC-27 Sour Apple and Candy Apple Red for the door window.
Using the negative space from snowflake punches, wet the area for application and press the paper onto the camper. Brush top coat of SC-16 Cotton Tail over the space, remove the paper.
On the white areas of the camper, brush a coat of SC-16 Cotton Tail in the area of the snowflake. Press the paper onto the piece then apply two coats of SC-73 Candy Apple Red over the area. Remove the paper. Check out the size used from the photo.
Use the Liner to outline the sections of the camper, the windows and door frames with SC-15 Tuxedo.
Use the Script Liner to apply two coats of SC-15 Tuxedo on the tires, trailer hitch, and underbody.
Dip into NT-CLR Clear or use the Soft Fan to apply one coat of S201 Clear Brushing Glaze onto the outside of the camper (omit the awning).
Fire to cone 05/06.
Form
MB-1514 Vintage Camper Bisque or CD1514 Vintage Camper Mold
Colors
SC-16 Cotton Tail
SC-15 Tuxedo
SC-27 Sour Apple
SC-30 Blue Dawn
SC-73 Candy Apple Red
FN-020 Medium Green
CG-992 Mint Chip
NT-CLR Clear Dipping or S-2101 Clear Brushing Glaze
Begin with properly fired shelf cone 04 Bisque. Moisten a clean sponge and wipe bisque to remove any dust.
Use the Soft Fan to apply two thinned coats of SC-93 Honeydew List to the scarf and mittens.
Apply one thinned coat of SC-27 Sour Apple over the Honeydew List, letting it puddle in the detail.
Use the Soft Fan to apply three thinned coats of SC-73 Candy Apple Red to the jacket and hatband. When dry, use the Script Liner to float SC-81 Cinnamon Stix into the shadow areas of the jacket.
Use the Script Liner to float SC-30 Blue Dawn around the snowman’s body and facial features.
Use the Liner to add stripes to the scarf with two coats of SC-73 Candy Apple Red. Outline the stripes with SC-15 Tuxedo. Add black dot detail with the tip of the Liner pressed at the tip of the brush. Use the Script Liner to float SC-8 Just Froggy in the creases and edges of the scarf and mittens.
Punch out the snowflake shapes – you’ll use the negative space from the punch. Wet the areas on the jacket for the paper shape and press onto the snowman. Make sure to seal the edges to prevent color seeping. Apply two coats of SC-16 Cotton Tail then remove the paper.
Apply SC-16 Cotton Tail to the areas on the body with the blue snowflakes. Press the paper shapes into the wet glaze, then apply two coats of SC-30 Blue Dawn. Remove the paper.
Sponge the cheeks with SC-2 Melon Choly. Apply two coats of SC-75 Orange A Peel to the nose and two coats of SC-30 Blue Dawn to the eyes. Use the Liner to outline mouth and eyes and around the scarf with SC-15 Tuxedo.
Use the Script Liner to apply two coats of SC-15 Tuxedo to the hat and one coat to the buttons.
Use the Soft Fan to apply one coat of SG-701 Star Dust to the jacket and Hat. Use the same brush to apply S-2101 Clear Brushing Glaze to the remainder of the snowman.
1. Begin with properly fired cone 04 bisque. Moisten a sponge and wipe bisque to remove any dust.
2. Using a pencil, sketch a Santa hat on the top of the flamingo’s head. It will wrap down the neck. Then sketch a Santa coat on the body of the flamingo. The top of the coat will be the line between the neck and the body. The bottom of the coat will be around the middle of the wing.
3. Using the Script Liner and SC-89 Cutie Pie Coral, glaze the parts of the head, neck and body of the flamingo that is not covered by the hat or coat. Apply a total of three coats, allowing the glaze to dry between coats.
4. Using a combination of the Script Liner and Soft Fan with SC-74 Hot Tamale, apply three coats of glaze to the hat and coat. Allow glaze to dry between coats.
5. Using the Script Liner and SC-86 Old Lace, apply three coats of glaze to the beak. Allow glaze to dry between coats.
6. Using SC-15 Tuxedo and the Detail Liner, outline the details on the flamingo. Glaze the tip of the beak. Using the Script Liner, make a belt and buttons on the coat.
7. Take the 1 oz Bottle and add SG-302 Snowfall until it is halfway full. You might need to use the Script Liner to help push the SG-302 Snowfall into the Bottle. Screw on the Detailer Tip and cut off the very top so that there is a small hole. Squeeze out dots of SG-302 at the top and bottom of the hat to look like the fur. Add a line of SG-302 to the top and bottom of the coat to look like fur.
8. After the piece is completely dry, turn over and glaze the bottom with two coats of SC-15 Tuxedo using the Soft Fan.
9. After the bottom is dry, turn over and apply one coat of S-2101 Clear Brushing Glaze to the eye or dip into NT-CLR Clear Dipping Glaze.
10. Fire to cone 06.
Form
MB-1522 Frieda Flamingo Dish
Colors
SC-15 Tuxedo
SC-16 Cotton Tail
SC-74 Hot Tamale
SC-86 Old Lace
SC-89 Cutie Pie Coral
SG-302 Snowfall
NT-CLR Clear Dipping Glaze or S-2101 Clear Brushing Glaze
Decorating Accessories
AC-220 Detailer Tips and 1 oz Bottle
Miscellaneous Accessories
Pencil
Low-Fire|Earthenware Bisque|Boxes, Banks & Stuff|Home Décor|Table Top
Begin with properly fired cone 04 bisque. Moisten a sponge and wipe bisque to remove any dust.
Using a pencil, sketch a Santa hat going from the flamingo’s head to the body of the mug. Then sketch a wreath around the base of the flamingo’s neck. Finally, make horizontal stripes on the flamingo’s legs.
Using the Script Liner and SC-89 Cutie Pie Coral, apply three coats of glaze to the body of the flamingo. Allow glaze to dry between coats. Using the Script Liner and SC-16 Cotton Tail, make highlights at the tips of the wings.
Using the Script Liner and SC-86 Old Lace, apply three coats of glaze to the beak. Allow glaze to dry between coats.
Using the Script Liner and SC-36 Irish Luck, apply three coats of glaze to the wreath. Use the Fan Brush to apply three coats of glaze to the inside of the mug. Allow glaze to dry between coats.
Using the Detail Liner and SC-74 Hot Tamale, apply glaze to the Santa hat. Using the same brush and glaze, apply dots to the wreath. Then make a bow at the bottom of the wreath and stripes on the legs. Apply a total of three coats to all areas, allowing glaze to dry between coats.
Using SC-15 Tuxedo and the Detail Liner, make outlines around the flamingo, wreath and hat. Make an outline of the fur at the top and bottom of the hat.
Take the 1 oz Bottle and add SG-302 Snowfall until it is halfway full. You might need to use the Script Liner to help push the SG-302 Snowfall into the Bottle. Screw on the Detailer Tip and cut off the very top so that there is a small hole. Squeeze out dots of SG-302 Snowfall in the fur outlines at the top and bottom of the hat.
Use the Soft Fan to apply two coats of S-2101 Clear Brushing Glaze to the mug or dip into NT-CLR Clear Dipping Glaze.
Fire to cone 06.
Form
MB-1449 Flamingo Mug
Colors
SC-15 Tuxedo
SC-16 Cotton Tail
SC-36 Irish Luck
SC-74 Hot Tamale
SC-86 Old Lace
SC-89 Cutie Pie Coral
SG-302 Snowfall
NT-CLR Clear Dipping Glaze or S-2101 Clear Brushing Glaze
Begin with properly fired shelf cone 04 Bisque. Moisten a clean sponge and wipe bisque to remove any dust.
Using the RB-144 #4 Soft Fan apply 3 coats of SP-216 Speckled Cotton Tail to the front of the plate only. Allow for the shine to fade before transferring the pattern.
Transfer the pattern onto the plate using the AC-230 Clay Carbon Transfer paper. The greenery is for placement more than exact detail.
On a palette pour the size of a silver dollar of the following colors: SC-08 Just Froggy and SC-27 Sour Apple.
You will now paint the greenery with a fork. Dip the fork into SC-27 Sour Apple. Press and drag the color from inside of the wreath to the outside going all the way around the wreath.
Repeat the process with SC-8 Just Froggy to fill in the branches of the wreath and repeat the process. Overlap the SC-27 Sour Apple, but do not cover entirely.
Sgraffito in lines on the wreath with a bamboo skewer to mimic the needles. Periodically, cross over the lines for visual interest.
Bow: Use the RB-106 #6 Script Liner and apply 2-3 coats of SC-73 Candy Apple Red to the bow. Use SC-74 Hot Tamale to darken the shadow areas on the bow.
Use the RB-110 #10/0 Liner to outline the bow.
Using the eraser end of a pencil, dip the eraser into the following colors and dot the color on the wreath to mimic bulbs. SC-31 The Blues, SC-74 Hot Tamale, SC-97 Cant-elope.
Use RB-144 #4 Soft Fan brush to apply three coats of FN-035 Deep Red on the back and rim of the plate.
1. Begin with properly fired shelf cone 04 Bisque. Moisten a clean sponge and wipe bisque to remove any dust.
2. Using the Soft Fan Brush, apply three coats of FN-001 White to the front of the plate.
3. While the glaze is drying cut out the bulb pattern. You will use the negative space (open hole) from the cutout.
4. Using the Soft Fan, wet the surface of the plate and press down the negative (open hole) of the bulb to the front of the plate. The key is to get the paper down tight so when you add the color it will not seek out. This will give you a crisp outline. Pressing down with a damp sponge also helps.
5. Tear 7 strips of paper approximately 3/4″ to 1″ wide in an uneven fashion.
6. You will start at the top of the bulb and work your way down painting strips of paper and pressing down onto the bulb. You do not want the paper strips to be perfect or match up. Leave gaps between the paper strips.
7. Using the CB-604 #4 Soft Fan Brush paint one heavy coat of SC-73 Candy Apple Red over the strips of paper and blend in one heavy coat of SC-74 Hot Tamale. Paint in a random fashion so some areas are blended and some are just the one color.
8. Lay the paper down and just leave it alone for about a minute. Then press the strip of glazed paper down. Use a damp sponge to help press down and remove all the air bubbles and wrinkles. Move on to the next color.
9. Green stripe – Using the CB-604 #4 Soft Fan Brush apply SC-27 Sour Apple and SC-26 Green Thumb to the strip of paper. Lay it down and leave it for a minute before pressing down with a damp sponge.
10. The third strip is SC-24 Dandelion. Use the same process as directed above.
11. Alternate the next three strips with the same process – red, green and lastly red.
12. Design Options: Use the MT-007 Divots Mat to apply dots to the strips. You can use SC-74 Hot Tamale or SC-26 Green Thumb. Apply prior to removing the bulb pattern paper.
13. Before the paper is removed brush the open spaces between the color strips of paper with one coat of SC-26 Green Thumb or SC-15 Tuxedo using the RB-144 #4 Soft Fan Brush.
14. After all the paper is on the bulb, let it sit so the glaze will soak into the bisque and off the paper for 3 minutes.
15. Test an edge to make sure it is ready to remove by pulling up a corner and checking to see if the glaze transferred. If it did not, take the moistened sponge and press down again over the paper. Remove the paper including the large sheet with the negative pattern.
16. Using the Script Liner, paint the ornament cap with 2-3 coats of SC-24 Dandelion.
17. Using the Soft Fan, apply three coats of SC-73 Candy Apple Red to the back of the plate.
18. Outline the edges and lines in the cap with SG-403 Red.
19. If air bubbles occurred, fill with the appropriate color.
20. Design Options: Write family names on each stripe. Use Mayco’s DSS-107 Season’s Greetings words Seasons Greetings etc on the stripes.
21. Apply a clear glaze of choice.
22. Stilt and fire to cone 05/06.
Form
MB-1116 Casualware Dinner Plate
Colors
FN-001 White
SC-24 Dandelion
SC-26 Green Thumb
SC-27 Sour Apple
SC-73 Candy Apple Red
SC-74 Hot Tamale
SG-403 Red
NT-CLR Clear Dipping or S-2101 Crystal Clear Brushing Glaze
1. Begin with properly fired shelf cone 04 Bisque. Moisten a clean sponge and wipe bisque to remove any dust.
2. Using the RB-144 #4 Soft Fan Brush apply two coats of CG-788 Dutch Enamelware to the top 3 rows of branches and the base of the tree.
3. Brush on to the middle section of the tree (fourth row) and half of the fifth row of branches with CG-718 Blue Caprice three coats. Make sure to overlap half of row three of the branches over the Dutch Enamelware with one coat of the glaze so that it blends the colors.
4. Using the same brush apply three coats of S-2716 Celestial Blue on the bottom branch overlapping the Blue Caprices on the branch above.
5. Brush two coats of SC-11 Blue Yonder over the base with RB-106 #6 Script Liner.
1. Begin with properly fired shelf cone 04 Bisque. Moisten a clean sponge and wipe bisque to remove any dust.
2. Using the RB-144 Soft Fan Brush apply two coats of CG-750 Noel to the entire tree (tall tree). For the smaller tree brush on two coats of CG-963 Lemon Lime to the entire tree.
3. Both trees: Leave the very top section of the branches as is. To create the ombre look you will add and blend colors to sections of the tree. Estimate two rows of branches as a section. When applying the next section of color overlap the previous color for a seamless transition. Using the Soft Fan, apply two coats of SC-93 Honeydew List to the next 2 1/2 rows. Apply two coats of SC-27 Sour Apple to the next 2 1/2 rows and two coats of SC-8 Just Froggy to the last 1 1/2 rows.
4. Base of Tree: Use the Script Liner to apply three coats of SC-74 Hot Tamale.
1. Begin with properly fired shelf cone 04 Bisque. Moisten a clean sponge and wipe bisque to remove any dust.
2. Pencil in a rough sketch of the tree shape to provide a guide for painting or use the pattern to trace.
3. Pour the following colors onto a palette (approx. the size of a lid from the Foundations glaze): SC-26 Green Thumb, SC-27 Sour Apple, SC-77 Glow Worm, SC-11 Blue Yonder, SC-12 Moody Blue and SC-97 Cant-elope.
4. You will create the tree design with torn paper! The pattern lists the colors used in each layer of the tree.
5. Tear a strip of paper about 1/2″ wide and the length of the color listed.
6. Tip: When laying the paper down, do not worry about filling the gap between the layers of paper. In step 15 the blanks will be filled in with glaze.
7. Start at the bottom of the tree and work up your way. Pull the strip of paper through the puddle of SC-26 Green Thumb. You may need to smooth out some of the glazes so the paper is covered. Place it onto the plate, wait a minute then press down to make sure the paper is making contact with the plate. Tip: Take a damp sponge and press down on the paper. If the glaze squirts out, just wipe it back with the sponge. Try to get the air bubbles out of the paper.
8. Repeat step 6 but drag the paper through SC-77 Glow Worm and a little of SC-27 Sour Apple. The first color you put on the paper will be the top color showing on the plate.
9. As you progress you will tear the paper to fit the space
10. Follow the pattern and continue to fill the tree with glazed paper.
11. Top branch is mostly SC-12 Moody Blue with a little SC-11 Blue Yonder. Of course, the color choices are yours to make.
12. Tear a star from paper and drag through SC-6 Sunkissed and SC-97 Cant-elope.
13. The tree trunk is SC-14 Java Bean. Tear a piece of paper, drag through the glaze and apply to the plate.Leave all of the paper on for the next step.
14. With a stiff toothbrush, use the colors used in the tree to spatter the background of the plate. Dip the brush in the glaze then run your thumb across the toothbrush to splatter the glaze.
15. Use the Script Liner and apply two coats of SC-15 Tuxedo between the strips of paper and around the edges.
16. Use the Soft Fan to apply 3 coats of FN-010 Tree Green to the back of the plate.
17. Apply clear glaze of choice.
18. Stilt and fire to cone 05/06.
Form
MB-1293 Rectangle Salad Plate
Colors
SC-6 Sunkissed
SC-11 Blue Yonder
SC-14 Java Bean
SC-15 Tuxedo
SC-26 Green Thumb
SC-27 Sour Apple
SC-77 Glow Worm
SC-97 Cant-elope
FN-010 Tree Green
NT-CLR Clear Dipping or S-2101 Crystal Clear Brushing Glaze
Begin with properly fired shelf cone 04 Bisque. Moisten a clean sponge and wipe bisque to remove any dust.
Use two large sponge-on-a-stick to apply SC-74 Hot Tamale and SC-26 Green Thumb to the MT-008 Spiral Mat.
Apply the glaze in a light up and down pouncing method. This keeps the glaze on the high part of the matte and gives a crisp image when applied.
Load the sponge with 1 color, blot off excess glaze and then lightly pounce in an up and down motion the glaze onto the mat. Apply the two colors in sections. Turn the mat over and lay it down on the bisque and lightly press to the top of the plate. Make sure and press into the corners to avoid blank spots and do not stretch the matte. You can work in sections for a random look when covering the front of the plate.
Once the glaze is dry, lightly pencil in the star and shape of the tree. This will be your template for painting the branches.
Use the RB-106 #6 Script Liner to apply to coats of SC-48 Camel Back to the tree trunk and a third coat to the lower section that is not covered by branches.
On a palette pour SC-27 Sour Apple the size of a silver dollar.
You will now paint the tree branches with a fork. Dip the fork into SC-27 Sour Apple. Press and drag the color from the trunk out in a 45-degree angle, you may need to re-dip to lengthen the branches.
Repeat the process with SC-26 Green Thumb to fill in the tree’s branches.
For contrast use the fork and apply SC-8 Just Froggy in the same direction, plus some branches crossing over each other. This helps fill in the tree but some of the tree’s trunk should be still visible.
Use the CB-106 #6 Script Liner to paint the star with 2-3 coats of SC-24 Dandelion.
When the tree is dry lightly pencil in the garland. Use SG-405 Green to create the garland.
On the garland: use the end of a pencil eraser or a brush handle to dot colors for the bulb ornaments.
Use CB-604 #4 Soft Fan brush to apply three coats of FN-004 Red on the back and rim of the plate.
Dip into NT-CLR Clear Dipping Glaze.
Stilt and fire to cone 05/06.
Form
MB-882 Rectangle Tray Mold or CD-882 Rectangle Tray Mold
1. Begin with properly fired shelf cone 04 Bisque. Moisten a clean sponge and wipe bisque to remove any dust.
2. Cut out the shape of the reindeer and lightly trace around the shape onto the plate with a pencil including the ornaments
3. Using the Soft Fan, three coats of FN-001 White to the reindeer. Paint over the pencil line so it extends past the paper patten when applied.
4. You will work in sections. Use the Soft Fan to apply water to the deer. Place the paper pattern over the moistened area and press down. Press with a paper towel to remove gaps. The paper acts as a masking tool to prevent the next color from seeping onto the deer.
5. Using the Soft Fan, apply three coats of FN-018 Bright Blue to the front of the plate and the back.
6. Create the paste to use with the Designer Silkscreen using SC-12 Moody Blue with the AC-310 Silkscreen Medium. Pour the size of a 1/2 dollar of SC-12 Moody Blue onto the palette. Sprinkle a small amount of AC-310 Silkscreen Medium over the glaze. Use a palette knife to mix the two to the consistency of peanut butter.
9. Use DSS-015 Coloring Page with the shiny side down on the plate. Apply the paste mixture over the DSS-015 Coloring Book screen using a rubber squeegee. Repeat for the other side of the plate. Hold the screen in place and lift a corner to make sure the image has transferred. When finished, soak the screen in water.
10. Remove the paper reindeer pattern.
11. Using the Script Liner, apply three coats of SC-74 Hot Tamale, SC-77 Glow Worm and SC-97 Cant-elope to the ornaments.
11. Use AC-230 Clay Carbon Paper and the deer pattern to trace on the nose, mouth, eyes, and ears.
12. Apply three coats of SC-73 Candy Apple Red to the center of the nose and go around the edges with SC-74 Hot Tamale in an uneven circular shape.
13. Use the Liner to outline the body and antlers with SC-15 Tuxedo. Then, apply fur lines to the head and body of the reindeer.
14. Punch out three paper snowflakes. Wet the negative space then stick the snowflakes to the plate. Use the Script Liner to apply two even coats of SC-16 Cotton Tail to the open space. Remove the paper.
Begin with properly fired shelf cone 04 Bisque. Moisten a clean sponge and wipe bisque to remove dust.
Using Clay Carbon, trace the pattern onto the plate.
Using the masking tape, create a small border around the outer edge.
Using the Pointed Round, apply 2 coats of SC-16 Cotton Tail to the pom-pom and hatband.
Using the Pointed Round, apply 3 coats of SC-74 Hot Tamale to the hat.
Using the Pointed Round, apply 3 coats of SC-46 Rawhide to the face and nose.
Using the Pointed Round, side load in SC-2 Melon-choly and shade the nose.
Using the Pointed Round, apply 3 coats of SC-86 Old Lace to the beard and mustache.
Using the Pointed Round, side load in SC060 Silver Lining and shade the mustache.
Remove the masking tape.
Using the Liner loaded in SC-15 Tuxedo, add the eyes. Add dots to the pom-pom and hatband, outline the design and add small black lines in the border area.
Using the Soft Fan, apply 3 coats of FN-009 Black to the back and the edges.
Using the Soft Fan, apply 2 coats of S-2101 Crystal Crear Brushing to the top of the plate.
Begin with properly fired shelf cone 04 bisque. Moisten a clean sponge and wipe bisque to remove any dust.
Place the pattern on top of the AC-230 Clay Carbon Paper onto the bisque. Trace around the pattern with a pen or pencil.
Place SL-444 Argyle Stencil on the clipboard. Using the Foam roller, gently apply SC-30 Blue Dawn over the stencil. Continue to add on to the rolled stencil to cover the clipboard with the design. Tip: Hold the tip of the roller to apply the color to keep the glaze from bleeding under the stencil.
Use the CB-106 #6 Script Liner to apply 2-3 coats of SC-16 Cotton Tail onto the snow area of the snowman. Use the same brush to apply three coats of SC-74 Hot Tamale to the scarf and hatband. Apply two coats of SC-50 Orange Ya Happy to the nose and three coats of SC-15 Tuxedo to the hat. Apply coat of SC-34 Down to Earth to the arm. Use CB-106 Script Liner or CB-110 Liner to apply color.
Shade the left side of the snow on the snowman with SC-60 Silver Lining, dot the scarf with SC-16 Cotton Tail, by using the end of a brush handle, dot eyes and buttons with the end of the brush handle. Use the CB-110 #10/0 Liner with SC-15 Tuxedo to outline the design.
Use the Script Liner to apply SC-15 to the edges of the clipboard.
Begin with properly fired shelf cone 04 bisque. Moisten a clean sponge and wipe bisque to remove any dust.
Using a CB-604 #4 Soft Fan, apply 3 coats of one of the following colors to each ornament (So, 1 color per ornament and be sure to even glaze the hangers!): SC-42 Butter Me Up, SC-52 Toadily Green, SC-73 Candy Apple Red.
Using a CB-110 #10/0 Mini Liner, apply 2 coats of SC-15 Tuxedo in bands around each ornament (if creating an even band is difficult it may be helpful to lightly sketch the line with a pencil, or possibly make another shape. Just be sure you have a void to fill with the screen designs.
Place SC-15 Tuxedo on a palette or tile and sprinkle with Silkscreen Medium. Using a palette knife mix color and medium to the consistency of thick peanut butter. If the mix is too thin, add more Silkscreen Medium, or if it is too thick add more Stroke & Coat. Too thin of a mixture will bleed under the screen and give you a blurred image. Too thick of a mixture will make it hard for the product to penetrate through the holes in the screen and give blank areas on your screen.
Using various images from the Season’s Greetings Silkscreen, fill between the bands (or inside your shape) with your selected design. Be sure to apply shiny side down and to rub small circles with your finger to push the medium mixture through.
Stilt and fire to shelf cone 06/05.
After the glaze fire is complete, apply the gold lustre to the hangers of each ornament.
Begin with properly fired shelf cone 04 Bisque. Moisten a clean sponge and wipe bisque to remove dust.
With CB-604 Soft Fan, brush on two coats of FN-001 White to the hat and the chest of the penguin.
Punch out the med. snowflakes, wet the spot on the hat for placement, stick on the snowflake, press into the wet glaze, continue to fill in the hat, cut the border from a paper doily, wet the brim set the paper same as the snowflakes. Repeat for the plate using the large snowflake punch.
Brush on SC-74 Hot Tamale to the hats, 3 coats, brush SC-81 Cinnamon Stix in the shadow and creases of the hat with CB-106 Script Liner, two coats.
Remove the paper snowflakes and doily section.
Use SG-403 Red Designer Liner to make lines on the tassels of the hats.
Punch out the large snowflake, use the negative space from the punch. Wet the area of the glaze for the snowflake, press on the cutout shape to the space. Use a sponge on a stick to tap the center of the snowflake with SC-31 The Blues, and the edges tap with SC-76 Cara-bein Blue, 1-2 coats. Remove the paper.
Brush the beak and feet with two thinned coats of SC-5 Tiger Tail, use CB-106 Script Liner.
Brush the black area of the penguin with two coats of SC-15 Tuxedo use CB-604 Soft Fan and CB-106 Script Liner.
Use CB-110 Liner to brush in the eyes with SC-15 Tuxedo.
Begin with properly fired shelf cone 04 Bisque. Moisten a clean sponge and wipe bisque to remove dust.
Use the Soft Fan to apply three coats of SC-91 Seabreeze to the jacket. Apply three coats of SC-74 Hot Tamale to the mittens and hat band.
Use a sponge-on-a-stick to apply SC-31 The Blues to the ST-343 Deco Circles Stamp, the press onto the jacket.
Apply one coat of SC-16 Cotton Tail to the snowman’s body.
To shade, float SC-12 Moody Blue around the jacket, the snowman’s body and scarf.
Punch out medium paper snowflakes – you will be using the negative space of the snowflake. Wet the area of the jacket for the snowflake, press the paper onto the jacket then press with a paper towel to remove gaps. Brush two coats of SC-74 Hot Tamale over the open space of the snowflake, remove the paper.
Repeat the paper masking process to stick the large snowflakes onto the lower part of the snowman’s body. Sponge two coats of SC-91 Seabreeze and SC-31 The Blues on the open snowflake area, going toward the edges. Remove the paper.
Use the Pointed Round to apply two coats of SG-302 Snowfall to the scarf. Scratch detail lines into the Snowfall to reveal the Moody Blue.
Use the Script Liner and Liner to apply two coats of SC-50 Orange Ya Happy to the nose and SC-31 The Blues to the eyes. Use a sponge to apply SC-2 Melon-Choly to the cheeks. Apply two coats of SC-15 Tuxedo to the hat and buttons.
Apply two coats of NTBR Clear Brushing Glaze to the snowman, except for the Snowfall area.
Fire to cone 06.
Brush the scarf with a gloss or matte sealer, sprinkle on glitter.
Begin with properly fired shelf cone 04 Bisque. Moisten a clean sponge and wipe bisque to remove dust.
Brush on two thinned coats of SC-20 Cashew Later to the face with CB-604 Soft Fan. Brush the hair with two coats of SC-42 Butter Me Up. Let dry.
Mix SC-20 Cashew Later with SC-89 Cutie Pie Coral, brush to the cheeks of the elf with CB-106 Script Liner. Float thinned SC-48 Camel Back around the face and hair, in the mouth, ears, and around the eyes, use CB-106 Script Liner.
Brush two coats of SC-26 Green Thumb thinned with CB-604 Soft Fan, let the glaze run off the suit and hat to avoid drips, after the second coat you should not see the bisque. 5. Use SC-36
Irish Luck to shade around all the creases and shadow areas of the hat and elf suit, use CB-106 Script Liner.
Brush the shoes with two-three coats of SC-74 Hot Tamale.
Stamp the hat and suit using ST-103 Retro Star Stamp, with SC-36 Irish Luck, use a sponge on a stick to apply the color to the stamp, press to the hat and suit.
No need to clean glaze off the areas for the Snowfall, as Snowfall will cover. Use CB-604 Pointed Round to apply two coats to all Snowfall areas, collar, mittens, and hat band. Sgafitto a line to separate the mittens.
Scrape off the glaze that is collected in the eyes. Brush two coats of SC-16 Cotton Tail to the whites of the eye, mix SC-76 Cara-Bein Blue with some SC-16 Cotton Tail to lighten, brush to the iris, with SC-15 Tuxedo to the pupil. two coats use CB-110 Liner.
Fire to cone 06.
Form
MB-1463 Vintage Elf Bisque or CD1463 Vintage Elf Mold
Begin with properly fired shelf cone 04 Bisque. Moisten a clean sponge and wipe bisque to remove dust.
Brush on a combination of SC-74 Hot Tamale, and SC-73 Candy Apple Red to the hats, brush the Hot Tamale, in the shadow areas of the hat and next to the hat band, and Candy Apple Red (which is the brighter red) on the highlight areas of the hat, three coats.
Use CB-106 Script Liner to brush SC-81 Cinnamon Stix under the hat band and in the shadow areas, blend into the Hot Tamale to continue with shadow. Use a sponge on a stick to apply SC-81
Cinnamon Stix to ST-129 Mini Fern Stamp, press to the hat.
Float a thin coat of SC-15 Tuxedo under the hat band, and in the creases of the hat, use CB-106 Script Liner.
Punch out four snowflakes, use the negative space from the punch. Wet the area of the hat to place the paper snowflake, press to remove gaps in the paper.
Use CB-406 Pointed round to apply two coats of SG-301 Snowfall over the paper cut out. Remove the paper after the second coat.
Using the pointed round, brush the hat band with 2 coats of SG-301 Snowfall, apply Snowfall to the tassels, with stippling strokes, two coats.
Fire to cone 06.
Form
MB-1348 Stacked Santa Hats Bisque or CD1348 Stacked Santa Hats Mold
Begin with properly fired shelf cone 04 bisque. Moisten a clean sponge and wipe bisque to remove any dust. Check the inside for any debris as well.
In a Plastic Mixing Cup thin some FN-010 Tree Green with water. While working quickly, pour the thinned glaze into the vase. Rotate the vase to completely cover the inside of the vase. Pour off the excess glaze and invert to dry. Wipe off any glaze from the outside edge using a moistened sponge.
Using CB-604 Soft Fan to apply 3-4 coats of FN-051 Strawberry to the outside of the vase. The color should meet the green color inside of the vase.
Stilt and Fire the piece to Shelf Cone 05-06.
Copy the pattern onto the tissue paper with a pencil for transferring. Use the tissue copy of the pattern for transferring the outline of the pattern onto the ware using a Fine Tip Sharpie Marker. Don’t concern yourself with too much detail at this point.
Applying the non-fired snow is not done in a brushing manner for this project excluding the leaves. The brush is loaded FULLY to where it almost is dripping off the bristles. The snow needs to trail off of the brush onto the ware when painting the petals of the flowers. If you over brush or work the surface of the snow you will bring up an unwanted texture or nap to the snow. It can be corrected by applying more snow after the previous coat has dried. The product is viscous and will smooth (round off) itself out as it dries slightly to your advantage. Mix the snow frequently and keep the brush clear during the painting process. You can alter the snow with a touch of water in the brush when trying to manipulate the shape being painted, but don’t rely on the water as you will bring up a texture if care isn’t taken.
Start by laying down a coat to the back petals to the poinsettia using CB-110 Liner or CB-106 Script Liner. Fill in the entire petals that lie beneath the top petals as they will start the building the dimensions to the flower. Workaround the vase completing all of the back petals. Let them dry until firm. Wash your brush well with warm water and AC-525 Brush Cleaner. Once dried, non-fired snow is permanent. Fill in the lower leaves of the pattern in a more traditional brushing application which will give you more of a texture to the leaves. Let dry.
If you need to transfer or redraw in the shape of the next level of petals to the poinsettia do so now, however………..It is easier to mindfully apply the next layer of petals to the poinsettias as before by free-handing the application. Just remember that the next layer of petals are generally shorter than the first allowing the first layer to show through. It can be time-consuming and frustrating to re-apply the pattern and do little for your effort. The next layer of petals does not extend all the way out to the previous petals. Sometimes there may be only two levels of petals to a portion of a flower, sometimes three layers. Remember that the top petals are shorter than the underlying ones. Let dry.
Check over the application of the snow to see if you need more definition or height to some petals for contrast. Re-apply more snow to achieve the desired shape and dimensions to the petals. Let dry.
By now you should be able to see defined shapes to petals hopefully. Once again if you don’t need to sketch in the shapes of the petals all the better. Use Aluminum Foil for your pallet to aid in clean up. Do not dispose of the color down the sink drain. Using CB-404 Pointed Round to fill in the lower leaves with 2 coats of SS-276 Forrest Green. Let dry.
Outline the poinsettia petals with a very fine line of SS-57 Accent Green using CB-110 Liner. Keep the line as fine as possible.
Shading of the poinsettia petals starts with a thin (with water) application of SS-19 Country Sage to the center veins to some of the petals. Accent this vein with a thin (with water) shading of SS-376 Limeburst. Keep these colors light and faint so that just a hint of color exists.
To shade between the poinsettia petals is accomplished with a CB-404 Pointed Round loaded with water and barely tipped with some SS-57 Accent Green. This color is very intense and can easily overpower the shading. Thin applications of the color are used for shading. Its easier to apply multiple layers of thin color than to try and correct too heavy of an application of the green. This is where the Q-Tips may come in handy to remove or blot any excess color application to the shading. Refer to the pattern for the shading and separations to the petals. If necessary, SS-135 White can be used to accent/highlight an edge or cut down a lined area. Try not to rely on using the white as your correcting fluid. Let dry.
Apply 2 coats of SS-87 Emperor’s Gold to the outline and veins in the leaves using CB-110 Liner.
Let dry. No need for a spray sealer coat as the snow is permanent and the shading with meld into the surface of the snow over time. Hand washing is recommended for cleaning the piece.
Using glue or epoxy to affix the 14M Dark Amber Rhinestones to the centers of the flowers.
1. Begin with properly fired shelf cone 04 Bisque. Moisten a clean sponge and wipe bisque to remove dust.
2. Thicken SC-12 Moody Blue on a palette using a palette knife with AC-310 Silkscreen Medium to the consistency of peanut butter. With the shiny side down, use the word Believe from DSS-0130 Graceful Script, rub the mixture over the word in the center of the star dish.
3. Use CB-110 Liner to brush a coat of SC-12 Moody Blue over the word “Believe” to deepen.
4. Brush the back of the plate and the inside sides of the star plate with three coats of PC-601 Clear Cascade, use CB-604 Soft Fan.
5. When dry, brush two coats of FN-216 Sea Glass over the top of the plate, and FN-231 Clearly Jade on the bottom of the plate with CB-604 Soft Fan.
6. Pat PC-602 White cascade, leave space between the pats, on the star bottom and top sides of the star. While wet, pat Sea Glass over and around the pats of White Cascade, brush a coat over the rest of the top with Sea Glass.
7. Repeat with FN-231 Clearly Jade on the back, let Clearly Jade drip over the edge on the front of the star, pat into the wet color on the front.
8. Fire to cone 05/06.
1. Begin with properly fired shelf cone 04 Bisque. Moisten a clean sponge and wipe bisque to remove dust.
2. Green Tree
Outline the facets with SG-405 Green Designer Liner. Use a small ruler on the long lines of the lower branches to keep the lines straight.
Use the sponge-on-a-stick to alternately apply SC-26 Green Thumb and SC-36 Irish Luck onto the ST-127 Mini Fern Stamp. Press the stamp onto the bisque.
Use the Script Liner to apply three coats of SC-36 Irish Luck to the base.
3. Red Tree
Outline the facets with SG-403 Red Designer Liner, using a small ruler to keep the lines straight.
Use the sponge-on-a-stick to alternately apply SC-74 Hot Tamale and SC-87 Ruby Slippers onto the Mini Fern stamp. Press the stamp onto the bisque.
4. Dip the tree into NT-CLR Clear Dipping Glaze or use the Soft Fan to apply two coats of S-2101 Clear Brushing Glaze to the tree.
5. Fire to cone 05/06
Form
MB-1497 Faceted Tree 7″
MB-1498 Faceted Tree 10″
Colors
SC-26 Green Thumb
SC-36 Irish Luck
SC-74 Hot Tamale
SC-87 Ruby Slippers
SG-403 Red Designer Liner
SG-405 Green Designer Liner
NT-CLR Clear Dipping or S-2101 Clear Brushing Glaze
1. Begin with properly fired shelf cone 04 Bisque. Moisten a clean sponge and wipe bisque to remove dust.
2. Use the SL-439 Hex Stencil to stencil the top and sides of the star lid. Use the sponge on a stick to carefully apply SC-12 Moody Blue to the stencil.
3. Use the sponge on a stick to apply SC-12 Moody Blue to ST-127 Crackle Stamp then press onto to bottom of the box.
4. Use the Soft Fan to apply three coats of FN-221 Milk Glass to the lid.
5. Use the Soft Fan to apply three coats of CC-108 China Sea to bottom of the box.
1. Begin with properly fired shelf cone 04 Bisque. Moisten a clean sponge and wipe bisque to remove dust.
2. Thicken SC-12 Moody Blue with AC-310 Silkscreen Medium using a palette knife till it is the consistency of peanut butter. Use the small stripe screen from DSS-0105 Stripes with the shiny side up (more product will go through the screen with the shiny side up). Place the screen at an angle on the widest facet on side of the star. With your finger rub the mixture over the screen. Continue around the star, change directions of the angle on the opposing facet. Gently wash silkscreen.
3. Use a sponge on a stick to apply SC-12 Moody Blue to the ST-113 Circulate Stamp, press the stamp to the front facet of the star.
4. Use the small ruler to outline the facets with SG-404 Blue Designer Liner. This will keep the lines straight.
5. In the center section of the star, use the #2 Soft Fan to apply three coats of PC-601 Clear Cascade, going over the narrow facet shape next to the center with the clear cascade.
6. Use the same brush to apply two coats of FN-214 Pastel Jade to the center section of the star. Pat the area with PC-002 White Cascade. While the White Cascade is still wet, pat the area with FN-214 Pastel Jade.
7. Use the #4 Soft Fan to apply three coats of FN-214 Pastel Jade over the stamped section of the star.
8. Use the #4 Soft Fan to apply three coats of EL-136 Lapis Lagoon over the remainder of the star.
Begin with properly fired shelf cone 04 Bisque. Moisten a clean sponge and wipe bisque to remove dust.
You will screen the cardinal design with clear glaze and food coloring for placement only; the food coloring will burn off during firing.
Place S-2101 Clear, tint with food coloring, on a palette or tile and sprinkle with AC-310 Silkscreen Medium. Using a palette knife mix color and medium to the consistency of thick peanut butter. if the mix is too thin add more AC-310 Silkscreen Medium or if it is too thick add more Stroke & Coat.
Too thin of a mixture will bleed under the screen and give you a blurred image. Too thick of a mixture will make it hard for the product to penetrate through the holes in the screen and give blank areas on your screen.
Position the cardinal design from DSS-0108 Birds shiny side down on the piece and hold in place. Starting from the center and working out, rub the mixture on the screen with your finger. Lift a corner up to check if you are applying enough color. Remove the screen and wash with water. Do not let the color dry in the screen.
Use the Script Liner to apply two coats of SC-97 Cant-elope to the beak. Apply two coats of SC-74 Hot Tamale to body of bird and tail feathers. Mix SC-60 Silver Lining with the SC-74 Hot Tamale for a grayed red color and apply two coats to the wing.
Thin SC-93 Honeydew List with water and use the CB-604 Soft Fan to “float” the color onto the plate. Brush up to the cardinal and around the branch. Apply two thin coats. Let dry.
Use the sponge-on-a-stick to apply SC-39 Army Surplus to the ST-341 Leaves stamp press onto the background of the plate.
Mix SC-15 Tuxedo with AC-310 Silkscreen Medium as in steps 2-3. Place the cardinal screen directly on top of the previously screened image. Rub the mixture over the screen.
Use the Liner to darken the black around the beak and fill in the feet with one coat of SC-15 Tuxedo.
Thicken SC-36 Irish Luck or SG-405 Green with the AC-310 Silkscreen Medium. Screen the pine bough design to the plate in several places.
Use the Soft Fan to apply three coats of FN-004 Red to the back of the plate.
Use the palette knife to apply SG-302 Snowfall to the edges of the plate.
1. Begin with properly fired shelf cone 04 Bisque. Moisten a clean sponge and wipe bisque to remove dust.
2. Cut out pattern and rectangle from the paper.
3. Place pattern onto the clay canvas and trace the outline of the ornament. Holding the pattern in place, draw lines onto the bisque that extend from the horizontal lines on the pattern.
4. Use the Script Liner to apply two coats of SC-16 Cotton Tail to the center section of the ornament, going slightly past the outline.
5. Wet the paper rectangle and place onto the center of the ornament (over the white), extending past the outline. Gently press the paper to ensure edges are sealed.
6. Use the Script Liner and Soft Fan to apply three coats of SC-2 Melon-Choly to the rest of the ornament, going slightly past the outline. Remove the paper rectangle.
7. Wet the paper cut out of the ornament and place onto the painted design. Use a damp sponge to remove glaze that extends beyond the pattern.
8. Use the Soft Fan to apply two coats of SC-45 My Blue Heaven around the ornament. When the second coat is still wet, place the hamper netting on top of the canvas. Press gently to make the netting stick into the glaze.
9. Apply one more coat of SC-45 My Blue Heaven. Allow the color to dry a bit. Gently press the canvas with a paper towel to remove excess glaze.
10. Pour SG-501 Sculpting Medium onto a plate. Pour SC-27 Sour Apple onto a separate plate so it is ready to use.
11. Use a plastic card to apply Sculpting Medium over the netting. Let the product set just a bit. This will keep the color from blending with the medium.
12. Use the Soft Fan to apply SC-27 Sour Apple over the Sculpting Medium.
13. Immediately remove the netting. Waiting too long can cause the medium to chip. The best way to remove the netting is to pull the four corners of the netting up at the same time.
14. Use the plastic card (clean) to scrape excess Sculpting Medium from the sides of the canvas.
15. When the glaze loses its shine, remove the paper. Use the bamboo skewer to lift the edge of the paper.
16. Use a palette knife to mix a bit of AC-310 Silkscreen Medium with SC-29 Blue Grass to the consistency of peanut butter.
17. Screen the small mandala design from DSS-0143 Stylized 3 – Boho silkscreen across the white portion of the ornament. Start in the center then screen the design on each side.
18. Dip the long edge of the plastic card into SC-29 Blue Grass to create the straight lines that create the sections on the ornament. Dip the card into the color then dab onto paper or a paper towel to check the amount of glaze. Press the edge of card onto your ornament. Alternatively, you may use the Liner to paint your lines.
19. Use the Liner to outline the ornament using SC-29 Blue Grass and to create wire extending from the top of the ornament to edge of the canvas.
20. Use the Liner to fill in the design as desired with one coat of the following colors: SC-2 Melon-Choly, SC-24 Dandelion, SC-27 Sour Apple and SC-29 Blue Grass. Create scallops and other designs on the ornament as desired using SC-29 Blue Grass.
21. Use the Soft Fan to apply three coats of SC-29 Blue Grass to the sides of the canvas.
1. Begin with properly fired shelf cone 04 Bisque. Moisten a clean sponge and wipe bisque to remove dust.
2. Cut out the ornament pattern. Place pattern onto the clay canvas and trace the outline of the ornament.
3. Use the Script Liner to apply one coat of FN-001 White Foundations to the ornament, going slightly past the outline.
4. Wet the paper cut out of the ornament and place onto the painted ornament. Gently press the paper to ensure edges are sealed. Use a damp sponge to remove glaze that extends beyond the pattern.
5. Use the Soft Fan to apply three coats of SC-2 Melon-Choly to around the ornament. Let dry.
6. Place the SL-437 Groovy Stencil diagonally on top of the canvas. Use the 2″ foam roller to apply SC-29 Blue Grass to the stencil. Hold the roller handle at the tip, applying gentle pressure to avoid color bleeding underneath the edges of the stencil. Roll in all different directions to get the best coverage.
7. Turn the Groovy Stencil in the opposite diagonal and repeat the rolling process. Tip: You may wish to place a piece of paper over the previously stenciled area to avoid overlap. Remove the paper ornament.
8. Use the Script Liner to apply two coats of SC-45 My Blue Heaven to the upper and lower sections of the ornament. Use the same brush to apply two coats of SC-78 Lime Light to the center and lower bands.
9. Use the foam roller to apply SC-29 Blue Grass to the ST-116 Floral Flourish stamp. Press the stamp onto the center band.
10. Use the tip of the Script Liner to apply dots of SC-29 Blue Grass to the rest of the ornament.
11. Use the Liner with SC-29 Blue Grass to outline the ornament and separate the inside sections. Use the same brush with SC-15 Tuxedo to add detail to the cap and create a wire from the top of the ornament extending to the edge of the canvas.
12. Use the Soft Fan to apply three coats of SC-29 Blue Grass to the sides of the canvas.
1. Begin with properly fired shelf cone 04 Bisque. Moisten a clean sponge and wipe bisque to remove dust.
2. Cut out pattern and keep the negative of the paper.
3. Place pattern onto the clay canvas and trace the outline of the ornament.
4. Use the Script to apply one coat of FN-001 White to the ornament, going slightly past the outline.
5. Wet the paper ornament and place it onto the painted area. Gently press the paper to ensure edges are sealed.
6. Use a plastic card to drag the following colors to the left side of the canvas: SC-2 Melon-Choly, SC-45 My Blue Heaven and SC-78 LimeLight. In the same manner, apply the following colors to the right side of the canvas: SC-2 Melon-Choly, SC-27 Sour Apple, SC-29 Blue Grass and SC-45 My Blue Heaven. Colors should overlap in the center. Tip: Since SC-2 and SC-45 appear on both sides, apply those colors first and allow them to overlap. You will apply two coats of each color.
7. Remove the paper ornament. Use the bamboo skewer if needed to lift the edge.
8. Use the Soft Fan to apply one thin layer of SC-78 Lime Light around the ornament.
9. Place the negative of the paper cutout on the canvas.
10. Bubble SC-89 Cutie Pie Coral and SC- 29 Blue Grass onto the ornament. Bubble Mixture: In a plastic cup combine 2 tablespoons of Stroke & Coat with 1 tablespoon of water and 1 drop of liquid dish soap. Mix the components and blow bubbles with the straw. Allow bubbles to spill out of the cup onto the ornament.
11. Use a palette knife to mix a bit of AC-310 Silkscreen Medium with SC-29 Blue Grass to the consistency of peanut butter. Use the design of your choice from DSS-0103 Flourishes silkscreen onto the ornament.
12. Use the Liner to outline the ornament using SC-29 Blue Grass. Fill in the small band at the bottom of the ornament with the same color. Use SC-15 Tuxedo to add a string and detail to the ornament cap.
13. Use the Script Liner to float SC-29 Blue Grass onto the edges of the canvas.
14. Use the Soft Fan to apply three coats of SC-29 Blue Grass to the sides of the canvas.
Begin with properly fired shelf cone 04 bisque. Moisten a clean sponge and wipe bisque to remove any dust. Check the inside surfaces for debris as well.
Use CB-604 Soft Fan to apply 2 coats of FN-001 White to the shell.
To apply the pattern use the peppermint (pattern) guide as a reference or trace the pattern onto the shell. It is easier to plot out the pattern by hand over tracing it. Just take your time and evenly space the red sections. Notice the red sections have curved edges and are wider at the bottom than at the top of each section. While there won’t be total alignment to the sections, they should be very close when drawing in the pattern.
Using CB-110 Liner or CB-404 Pointed Round to apply 3 coats to the red sections of the pattern on the shell. The smallest sections near the center only 2 coats may be required for color saturation.
Sketch in the stripes between the red sections on the shell with a pencil. The line should be midway between the red sections and mimic the curve between these sections as well. Using SG-405 Green to paint in the lines between the red sections on the shell. Keep the line fine towards the center and growing slightly wider as they progress to the outside edge of the shell as noted in the pattern.
To the bottom body section of the snail apply 2-3 coats of SC-77 Glow Worm to the outside surface using CB-604 Soft Fan. Load the brush with SC-77 Glow Worm and tip one edge (sideload) with SC-52 Toad-ily Green to shade along the upper ruffle and the body and head. The darker tone goes along the edge of the ruffle.
Use CB-110 Liner loaded with thinned SC-53 Toad-ily Green and SC-63 Popeye’s Favorite to shade the creases in the tummy and between the eyes.
Paint in the pupil of the eye and nostrils with SC-15 Tuxedo using CB-110 Liner.
Use a pencil point to dot in the markings along the body ruffle with SC-63 Popeye’s Favorite. Vary the placement and size of the dots to create a more random pattern to the dots.
Apply 2 coats of S-2101 Crystal Clear Brushing to both pieces.
1. Begin with properly fired shelf cone 04 Bisque. Moisten a clean sponge and wipe bisque to remove dust.
2. Cut out pattern and rectangle from the paper.
3. Place pattern onto the clay canvas and trace the outline of the ornament. Holding the pattern in place, draw lines onto the bisque that extend from the horizontal lines on the pattern.
4. Use the Script Liner to apply two coats of SC-55 Yella Bout It to the center section of the ornament, going slightly past the outline.
5. Wet the paper rectangle and place onto the center of the ornament (over the yellow), extending past the outline. Gently press the paper to ensure edges are sealed.
6. Use the Script Liner and Soft Fan to apply three coats of SC-73 Candy Apple Red to the rest of the ornament, going slightly past the outline. Remove the paper rectangle.
7. Wet the paper cut out of the ornament and place onto the painted design. Use a damp sponge to remove glaze that extends beyond the pattern.
8. Use the Soft Fan to apply two coats of SC-45 My Blue Heaven around the ornament. When the second coat is still wet, place the hamper netting on top of the canvas. Press gently to make the netting stick into the glaze.
9. Apply one more coat of SC-45 My Blue Heaven. Allow the color to dry a bit. Gently press the canvas with a paper towel to remove excess glaze.
10. Pour SG-501 Sculpting Medium onto a plate. Pour SC-73 Candy Apple Red onto a separate plate so it is ready to use.
11. Use a plastic card to apply Sculpting Medium over the netting. Let the product set just a bit. This will keep the color from blending with the medium.
12. Use the Soft Fan to apply SC-73 Candy Apple Red over the Sculpting Medium.
13. Immediately remove the netting. Waiting too long can cause the medium to chip. The best way to remove the netting is to pull the four corners of the netting up at the same time.
14. Use the plastic card (clean) to scrape excess Sculpting Medium from the sides of the canvas.
15. When the glaze loses its shine, remove the paper. Use the bamboo skewer to lift the edge of the paper.
16. Use a palette knife to mix a bit of AC-310 Silkscreen Medium with SC-10 Teal Next Time to the consistency of peanut butter.
17. Screen the half-flower design from DSS-0143 Stylized 3 – Boho silkscreen across the yellow portion of the ornament. Start in the center then screen the design on each side.
18. Dip the long edge of the plastic card into SC-10 Teal Next Time to create the straight lines that create the sections on the ornament. Dip the card into the color then dab onto paper or a paper towel to check the amount of glaze. Press the edge of card onto your ornament. Alternatively, you may use the Liner to paint your lines.
19. Use the Liner to outline the ornament using SC-10 Teal Next Time.
20. Use the Liner to fill in the design as desired with one coat of the following colors: SC-10 Teal Next Time, SC-73 Candy Apple Red and SC-89 Cutie Pie Coral.
21. Use the Script Liner to float SC-10 Teal Next Time onto the edges of the canvas.
22. Use the Soft Fan to apply three coats of SC-73 Candy Apple Red to the sides of the canvas.
Begin with properly fired shelf cone 04 Bisque. Moisten a clean sponge and wipe bisque to remove dust.
Use the Script Liner to apply two thinned coats of SC-27 Sour Apple on the border of the plate. Remove excess color on the edge of the plate.
Use the Soft Fan to apply two coats of SC-73 Candy Apple Red to the edge, sides and back of the plate.
Use a palette knife to thicken SC-15 Tuxedo with AC-310 Silkscreen Medium to the consistency of peanut butter. Place the star screen from DSS-0107 Season’s Greetings onto the plate with the shiny side down. Rub the thickened Tuxedo over the screen, remove the screen and gently wash with water.
Use the Liner to apply one coat of SC-24 Dandelion, SC-27 Sour Apple and SC-73 Candy Apple Red to various sections of the screened image.
Begin with a properly fired shelf cone 04 Bisque. Moisten a clean sponge and wipe bisque to remove dust.
Mark off 1 1/4 inches at the brim of the hat, draw a line, tape off the line for the hat band, brush area with 3 coats of SC-74 Hot Tamale, use CB-604 Soft Fan. When dry tape over the edge of the red to mask.
Roughly pencil in the space for the eyelet trim, brush area with two coats of FN-001 White, while the second coat is wet, lay in the eyelet cotton trim, brush back over the trim with more of the white glaze so that it is firmly stuck to the hat with the glaze and the gaps removed from the edges.
Brush SC-074 Hot Tamale with CB-106 Script Liner, over the holes in the eyelet yarn 1-2 coats.
Brush the remainder of the hat with three coats of FN-010 Tree Green, brush just over the edge of the lace.
Remove the lace while the green glaze is still damp. Remove the tape on the red hatband.
1. Begin with properly fired shelf cone 04 Bisque. Moisten a clean sponge and wipe bisque to remove dust.
2. Use the Script Liner to shade under the stem, along the roof line and on top and under the roof with SC-36 Irish Luck. Shade one side of the door with SC-36 Irish Luck.
3. Use the Script Liner to apply two thinned coats of SC-27 Sour Apple to the stem and the door.
4. Use the Soft Fan to apply three coats of SC-74 Hot Tamale to the body of the house.
5.Use the Liner to apply two coats of SC-15 Tuxedo to the trim around the door.
6. Use the Soft Fan to apply two coats of CG-750 Noel to the roof.
7. Thicken SC-15 Tuxedo with AC-310 Silkscreen Medium, using a palette knife, to the consistency of peanut butter. Use the small holly from DSS-0133 Merry Christmas to screen around the door.
8. Use the palette knife to put SG-302 Snowfall into the plastic bottle with the plastic tip. Use the bottle to apply Snowfall to the roof lines.
Begin with properly fired shelf cone 04 Bisque. Moisten a clean sponge and wipe bisque to remove dust.
Use the AC-230 Clay Carbon Paper to trace the pattern onto the tray.
Tape off the yellow rectangle area. Thin SC-5 Tiger Tail. Use the Script Liner to float to the edges of the rectangle. Add two thinned coats of SC-42 Butter Me Up to the center of the rectangle.
Tape to make the red border on the left side of the tray, and add a tape line on the right side. Thin (like water) SC-89 Cutie Pie Coral and use the Soft Fan to apply two coats to the taped area. Use the sponge-on-a-stick to dab SC-81 Cinnamon Stix to the ST-116 Flourish Stamp and press onto the Cutie Pie Coral areas. Remove the tape.
Tape to make the deeper green rectangle at the bottom of the tray. Thin SC-52 Toad-ily Green (like water) and use the Soft Fan to apply two thinned coats to the rectangle area. Use the sponge-on-a-stick to dab SC-39 Army Surplus to the ST-342 Poinsettia Stamp and press onto the Toad-ily Green areas. Remove the tape and let dry.
Use the tape to create the Honeydew List rectangle area. Use the Soft Fan to apply two thinned coats of SC-93 Honeydew List to the remaining areas. Use the sponge-on-a-stick to dab SC-52 Toad-ily Green on the ST-342 Poinsettia Stamp and press onto the Honeydew List area.
Thin SC-39 Army Surplus and SC-52 Toad-ily Green; use the Script Liner to apply two coats to the leaves. Apply the darker green to one side of the leaf and the lighter to the other, adding in SC-42 Butter Me Up to the lighter side.
Use the Script Liner to apply two coats of SC-94 Curry Around to the breast and the eye area. Use the same brush to apply two coats of SC-16 Cotton Tail to the lower part of the body flowing up to meet the Curry Around. Use SC-41 Brown Cow and SC-60 Silver Lining to apply two coats to the remaining sections of the bird.
Thin SG-401 with water. Use the Liner brush with the thinned color to create feather lines.
Use the Liner brush with SG-401 that has not been thinned to create accent lines on the bird and the beak.
Use the Script Liner to float SC-15 Tuxedo on the wings and at the back of their heads. Dot the berries with SC-74 Hot Tamale.
For this step, we used Designer Liner with the CB-110 Liner. Use the Liner and SG-401 Black to outline the birds and detail the leaves. Use SG-401 Black SG-405 Green to stroke in the pine needles. Apply SG-406 Brown to the branches.
Use the Soft Fan to apply three coats of FN-035 Deep Red to the back of the plate.
Use the Soft Fan to apply two coats of S-2101 Clear Brushing Glaze to the top of the plate or dip into NT-CLR Clear Dipping Glaze.
Fire to cone 05/06.
Form
MB-1486 Rustic Tray
Colors
FN-035 Deep Red
SC-5 Tiger Tail
SC-15 Tuxedo
SC-16 Cotton Tail
SC-39 Army Surplus
SC-41 Brown Cow
SC-42 Butter Me Up
SC-52 Toad-ily Green
SC-60 Silver Lining
SC-74 Hot Tamale
SC-81 Cinnamon Stix
SC-89 Cutie Pie Coral
SC-93 Honey Dew List
SC-94 Curry Around
SG-401 Black Designer Liner
SG-405 Green Designer Liner
SG-406 Brown Designer Liner
NT-CLR Clear Dipping or S-2101 Clear Brushing Glaze
Begin with properly fired shelf cone 04 bisque. Moisten a clean sponge and wipe the bisque to remove any dust.
Using the AC-230 Clay Carbon paper to trace the pattern on the plate. Tip: Only one side of the AC-230 Clay Carbon Paper transfers the design. Test the paper on the bisque prior to tracing the entire pattern to avoid saying bad words! Lay the paper onto the plate, rub your pen/pencil over the paper and lift to see if a mark was left. If not, turn the paper over and try again. Write Up on the paper so you don’t have to do this exercise every time. Now lay the AC-230 Clay Carbon paper onto the bisque, place the pattern over the AC-230 Clay Carbon paper and use a pen or pencil to trace the design. Remember to breath!
Using the SG-401 Black Designer Liner to trace the lines from the transferred image. Tip to avoid air bubbles and spurts on the bisque: off to the side turn the point down, tap and squeeze to get the air our of the tip. Keep a sponge close by to periodically wipe the tip. You can even store the Designer Liner point down into the sponge for easy use.
Using a CB-106 #6 Script Liner, thin SC-35 Gray Hare and apply to the shadow under the sleigh and behind the hills. This is a wash or floating of color into the shadows to create depth.
Using the same brush apply 1 thin coat of SC-7 Leapin’ Lizard to the trees.
Using the CB-106 #6 Script Liner, thin SC-11 Blue Yonder and wash or float the color to the horizon.
Using a CB-202 #2 Detail Liner, apply 1 thin coat of SC-74 Hot Tamale to the ribbons, berries, bow and tree leaves.
Designer Liner flows on easy and smooth, so you can either use the CB-110 10/0 brush or the writer tip to outline the tree, grass, flowers, barn, lines in the sled, hilss and details on the rest of the plate.
Using a CB-604 #4 Soft Fan apply 3 coats of FN-018 Bright Blue to the back of the plate. Allow the shine to fade between coats.
Begin with properly fired shelf cone 04 bisque. Moisten a clean sponge and wipe the bisque to remove any dust.
Using a CB-604 #4 Soft Fan, apply 3 coats of FN-023 Cinnamon to the front of the plate.
Once the final coat is dry, use AC-230 Transfer Paper to transfer the pattern onto the plate.
Using a CB-106 #6 Script Liner, apply 2 coats of SC-14 Java Bean to the door.
Apply 3 coats of SC-6 Sunkissed to the windows and door handle.
Using an AC-212 Sponge on a Stick, apply the gumdrops above the door making one of each of the following colors: SC-6 Sunkissed, SC-8 Just Froggy, SC74 Hot Tamale, SC-75 Orange A Peel, SC-76 Cara-bein Blue. Let each coat dry and reapply for 3 coats.
Using both the CB-106 #6 Script Liner and the CB-202 #2 Detail Liner, apply 3 coats of SC-16 Cotton Tail to the white details of the house.
Using a CB-110 #10/0 Mini Liner apply a thinned outline of SC-15 Tuxedo around the door and windows and their details.
Using the back end of a brush, apply the gumdrop colors around the windows. There should be a little bubble of the color left. Be sure to space them out enough so they don’t run together.
Using a CB-604 #4 Soft Fan, apply 3 coats of FN-010 Tree Green to the back of the plate.
Begin with properly fired shelf cone 04 Bisque. Moisten a clean sponge and wipe bisque to remove dust.
Pencil in the design on the ornament.
For JOY brush the letters with 3 coats of SC-60 Silver Lining.
Use the sponge to apply two coats of snowfall on the ornament. You may need to use a brush to dab on around the letters/design.
For the snowman’s face brush the eyes with two coats of SC-16 Cotton Tail, the iris with two coats of SC-11 Blue Yonder, and the pupil and outline with SC-15 Tuxedo, carrot nose with 2-3 coats of SC-23 Jack O’Lantern. Use CB-202 Detail brush.
Use CB-106 Script Liner to apply the SG-302 Snowfall around the painted areas, 2 coats, use the sponge to apply the rest of the Snowfall to the bulb.
Scrape away the Snowfall from the ornament to make the dots for the mouth. Dot or brush in SC-15 Tuxedo with CB-202 Detail.
Begin with properly fired shelf cone 04 Bisque. Moisten a clean sponge and wipe bisque to remove dust.
Cut out the patterns. To cut out the carrots, cut out 3 or 4 at a time, stack the extra paper under the carrot pattern then cut out.
Trace around the patterns on the plate.
Brush the snowman with 2 -3 Coats of SC-16 Cotton Tail, stick arms with 2 coats of SC-41 Brown Cow, brush the carrots with 2 coats of SC-23 Jack O’Lantern, and stems with two coats of SC-27 Sour Apple, shade the left side of the carrot with SC-75 Orange A Peel. Use CB-106 Script Liner.
Wet the painted pieces, while wet, stick on the paper patterns. Cut the stick arms off the snowman then attach to the snowman.
Use a squeegee to apply background color, from a palette, pick up SC-12 Moody Blue, start on the right side of the plate, apply the color to the plate, with back and forth motions, pick up SC-11 Blue Yonder, at the middle of the plate, keep SC-12 Moody Blue on the squeegee with the Blue Yonder, blend the colors into one another. As you get closer to the snowman, use more SC-11 Blue Yonder, and SC-16 Cotton Tail. Apply 2-3 coats in this manner.
Pull off the paper.
Pencil in the detail on the snowman.
Brush two coats of SC-36 Irish Luck to the stripes in the scarf, use CB-202 Detail Liner. Shade the snowman’s body with SC-91 Seabreeze using CB-106 Script Liner.
From a palette, detail the snowman’s body, outline the carrots, and scarf with SG-401 Black use CB-110 Liner.
Write in the words, Has anyone seen my nose? With SG-401 Black using the metal tip.
Brush three coats of SC-12 Moody Blue on the back with CB-604 Soft Fan. Brush one coat of S-2101 Clear to the top.
Begin with properly fired shelf cone 04 Bisque. Moisten a clean sponge and wipe bisque to remove dust.
Use the AC-230 Clay Carbon Paper to trace the pattern onto the tray.
Use the MC-002 Masking Tape and off the yellow rectangle area, place tape on the outside of the traced line.
Use the CB-604 #4 Soft Fan brush to apply two thinned coats of SC-42 Butter Me Up to the rectangle.
Use the CB-106 #6 Script Liner Script Liner and float SC-5 Tiger Tail to the edges of the rectangle.
Remove tape.
Use the tape to make the coral border on the left side of the tray, place the tape on the outside of the traced line. Also, tape off the right red border of the tray, placing the tape on the outside of the traced line.
Thin (like water) SC-89 Cutie Pie Coral and use the CB-604 #4 Soft Fan brush to apply two coats to the taped areas.
Use the sponge-on-a-stick to dab SC-81 Cinnamon Stix to the ST-116 Flourish Stamp and press onto the Cutie Pie Coral areas. Remove the tape.
Now tape off the deeper green rectangle at the bottom of the tray.
Thin SC-52 Toad-ily Green (like water) and use the CB-604 #4 Soft Fan to apply two thinned coats to the rectangle area.
Use the sponge-on-a-stick to dab SC-39 Army Surplus to the ST-342 Poinsettia Stamp and press onto the Toad-ily Green areas.
Remove the tape and let dry.
Use the tape to create the Honeydew List rectangle area.
Use the Soft Fan to apply two thinned coats of SC-93 Honeydew List to the remaining areas.
Use the sponge-on-a-stick to dab SC-52 Toad-ily Green on the ST-342 Poinsettia Stamp and press onto the SC-93 Honeydew List area (light green.)
Remove the tape
Use the SCB-106 #6 Script liner & water to thin SC-39 Army Surplus and SC-52 Toad-ily Green and apply two coats to the leaves. Apply the darker green to one side of the leaf and the lighter to the other, adding in SC-42 Butter Me Up to the lighter side.
Use the Script Liner to apply two coats of thinned SC-74 Hot Tamale to the cardinals head, throat, wings and tail feather.
Use the CB-110 10/0 Liner to dot SC-16 to the eyes. When dry dot SC-15 Tuxedo for the pupil
Use the CB-106 #6 Script Liner to apply one coat of thinned SC-89 Cutie Pie Coral over the chest.
Apply one coat of SC-5 Tiger Tail to the beaks with the CB-110 10/0 Liner brush.
Use the CBC-106 #6 Script Liner to float SC-15 Tuxedo on the wings and at the back of their heads.
Top left square – apply one coat of SC-5 Tiger Tail to the center and outline with thinned SC-74 Hot Tamale. Write a word of choice such as Joy
Bottom right square – Outline with SC-14 Java Bean and with words withe the CB-110 10/0 Liner brush.
Dot the berries with SC-74 Hot Tamale.
Use the CB-110 10/0 Liner and thinned SC-15 Tuxedo Black to outline the birds and detail the leaves.
Use SC-15 Tuxedo and SC-36 Irish Luck to stroke in the pine needles.
Apply SC-14 Java Bean to the branches.
Use the Soft Fan to apply three coats of FN-035 Deep Red to the back of the plate.
Use the Soft Fan to apply two coats of S-2101 Clear Brushing Glaze to the top of the plate or dip into NT-CLR Clear Dipping Glaze.
Fire to cone 05/06.
Form
MB-1486 Rustic Tray
Colors
SC-5 Tiger Tail
SC-14 Java Bean
SC-15 Tuxedo
SC-16 Cotton Tail
SC-36 Irish Luck
SC-39 Army Surplus
SC-41 Brown Cow
SC-42 Butter Me Up
SC-52 Toad-ily Green
SC-74 Hot Tamale
SC-81 Cinnamon Stix
SC-89 Cutie Pie Coral
SC-93 Honey Dew List
SC-94 Curry Around
NT-CLR Clear Dipping or S-2101 Clear Brushing Glaze
Begin with properly fired shelf cone 04 Bisque. Moisten a clean sponge and wipe bisque to remove dust.
Roll Glaze the inside of the Venti Latte Cup: To roll glaze use 2 parts glaze and 1 part water and thoroughly mix. Now pour the glaze into the cup and slowly roll the glaze around the inside to coat the inside. You may have to use a CB-604 #4 Soft Fan Brush to pull the glaze up to the rim. Pour the glaze into a pot and set the mug upside down to drain excess glaze. By inverting, this will help minimize crawling with excess glaze. Note: Just mix enough for your project. After time, the glaze will fall out of suspension due to the excess water.
Use the pattern and AC-230 Clay Carbon paper to trace on your design or freehand the lines. Place the trees approximately 1 to 1 1/4″ apart at different heights.
Draw cone shapes around the lines as a guide for the tree shapes.
Start with the largest tree SG-405 Green, use the ruler to guide the vertical line with SG-405 Green. Hold the ruler and place the tip of the SG-405 against the ruler and pull down for a nice straight center line.
Using SG-405 Green for the main branches and draw lines at different angles.
The tree will be filled in with SG-409 Bright Green branches to add contrast to the darker green. This gives depth and visual interest. You can do it now or draw the base color of the other trees and let this dry a bit then come back with the other color.
Continue around the mug to fill in the rest of the trees. Make sure the trees vary in height to give the impression of depth. The red tree is SG-404 Red as the main branch and filled in with SG-408 Orange.
The Orange tree is SG-408 Orange, filled in with SG-404 Red.
The light green tree is SG-409 Bright Green and fill in branches with SG-405 Green.
The Light Blue tree is SG-409 Bright Blue and filled in with SG-404 Blue.
The handle has a skinny SG-405 Green Tree.
For the stars, squeeze SG-407 Yellow on a palette and using the CCB-110 10/0 Liner brush the star with one coat of the SG-407 Yellow.
Outline with SG-408 Orange and dot around the stars with Yellow.
Dip into NT-CLR or use the Soft Fan to apply two coats of S-2101 Clear Brushing Glaze.
Fire to cone 05/06.
Form
MB122 Venti Latte Cup
Colors
SG-403 Red
SG-404 Blue
SG-405 Green
SG-407 Yellow
SG-408 Orange
SG-409 Bright Green
SG-410 Bright Blue
FN-230 Poppy
NT-CLR Clear Dipping or S-2101 Clear Brushing Glaze
1. Begin with properly fired shelf cone 04 bisque. Moisten a clean sponge and wipe bisque to remove any dust.
2. Transfer the tree pattern to the clay canvases using AC-230 Clay Carbon and a pencil. Note the area of foliage on each tree. Note each of the seasons on the inside back of the canvas in pencil.
3. Each canvas has a season and different stencil used to enhance the background of the skies. The stencils were placed on an angle over the canvas and not all the stencil was printed to the ware. Use the noted Stroke and Coat with a Foam Roller Brush or dry Sponge-on-a-Stick to apply the color over the stencil: Spring is SL-435 Curlicues Stencil with SC-11 Blue Yonder; summer is SL-441 Spots Stencil with SC-45 My Blue Heaven; fall is SL-456 Camo Stencil with SC-83 Tip Taupe; winter is SL-445 Kaleidoscope Stencil with SC-71 Purple-licious.
4. Using CB-404 Pointed Round and CB-220 Detail Liner to paint 2-3 coats of SC-14 Java Bean to the tree trunk and limbs. Detail one side of trunk and lower edges of the branches with SC-34 Dow To Earth using CB-110 Liner. To the trunks below the foliage, areas apply 1-2 Coats of S-2101 Crystal Clear Brushing using CB-220 Detail Liner.
5. Apply 3 coats of the following glazes with CB-604 Soft Fan and CB-404 Pointed Round to the sky portions of each noted canvas excluding the foliage areas except on the winter canvas: Spring is FN-212 Blue Diamond; summer is EL-103 Sea Spray; fall is EL-103 Sea Spray. For winter, stir and shake the jar and apply 2-3 coats of CG-975 Sky Diamonds to the entire sky area up to the tree pattern.
6. For the ground areas on each canvas apply 2-3 coats of the following glazes using CB-604 Soft Fan and CB-404 Pointed Round: Spring is EL-123 Patina; summer is EL-131 Turtle Shell; fall is EL-133 Autumn; winter is SG-302 Snowfall, apply this glaze in one direction for all three coats when possible.
7. For the three trees with foliage, apply the following glazes. Shake and stir each color to fully incorporate the crystals in the glazes. Use CB-604 Soft Fan to apply 2-3 coats of glaze with crystals. Saturate the foliage area with crystals for the best results: Spring is CG-963 Lemon-Lime; summer is S-2714 Herb Garden; fall is CG-966 Tiger Lily.
8. To the spring tree paint in some SP-270 Speckled Pink A Dot to one side mostly in an irregular dappled pattern using CB-404 Pointed Round.
9. To the winter tree apply 1-2 coats of SG-302 Snowfall to the branches where they form a “Y” and would accumulate snow.
10. Stilt and Fire all pieces to Shelf Cone 05-06.
1. Begin with properly fired shelf cone 04 bisque. Moisten a clean sponge and wipe bisque to remove any dust.
2. Using a CB-604 #4 Soft Fan, apply 3 coats of SW-140 Black Matte to the outside of the bowl.
3. Using a CB-604 #4 Soft Fan, apply 2 coats of the Stroke & Coat color to the inside of the bowl. Use a different color for each bowl. Applying the glaze on a banding wheel is helpful because the application of the glaze will be apparent once it is fired.
4. Using the AC-230 Clay Carbon Paper, transfer the design to each bowl.
5. Using a CB-106 #6 Script Liner and a CB-110 #10/0 Mini Liner, squire a bit of SG-402 White out onto a plate and apply 1 coat to the entire design. You may want to consition your brush with water first or mix a few drops in with the product so that it flows better on the piece and to make sure it isn’t applied to heavily.
6. Squirt some of the remaining Designer Liner colors onto a plate. Using a CB-106 #6 Script Liner, double load the brush with both f the greens and apply 1 coat onto the leaves. Next, apply 1 coat of the SG-403 Red to the berries.
7. Using a damp sponge clean to foot of the bowls of any glaze
1. Begin with properly fired shelf cone 04 bisque. Moisten a clean sponge and wipe bisque to remove any dust.
2. Cut out one pattern of the reindeer and trace around the shape on the plate.
3. Using the CB-604 #4 Soft Fan and CB-106 #6 Script Liner, apply two coats of SC-16 Cotton Tail to the reindeer, going outside the pencil lines.
4. Brush water over the glaze on the plate and place the paper cut out over the painted area. Press gently with a towel to remove excess water and remove all wrinkles.
5. Pencil in a snow line. Use the Soft Fan to apply three coats of SC-65 Peri-twinkle above the line to create the sky. Let dry to the touch.
6. Place the SL-441 Spots Stencil over the sky area. Use the 2″ foam roller to gently roll over the stencil with SC-16 Cotton Tail. Roll in various directions for best application. For whiter spots, roll over the stencil several times.
7. Plop SG-302 Snowfall into the foreground and spread with a stiff brush or a rubber squeegee. Scrape it away from the paper reindeer.
8. Remove the paper reindeer.
9. Using the second pattern of the reindeer and AC-230 Clay Carbon Paper, trace the detailed sections of the reindeer on top of the reindeer shape.
10. Use the Script Liner and CB-110 #10/0 Liner to apply three coats of SC-94 Curry Around to the head, tops of the ears and the back legs. Apply three coats of SC-25 Crackerjack Brown to the body and front legs of the reindeer.
11. Use the Liner to apply two coats of SC-74 Hot Tamale to the antlers. Apply 2 coats of SC-15 Tuxedo to the nose.
12. Use the foam roller to apply SC-14 Java Bean over the ST-129 Mini Fern Stamp. Stamp the head and the body of the reindeer.
13. Scrape glaze out from the eyes and apply one coat of SC-16 Cotton Tail and SC-15 Tuxedo for the pupils.
14. Use the Liner and SC-15 Tuxedo to outline the body, eyes and legs. Highlight the nose and antlers with a swipe of SC-16 Cotton Tail.
15. Use the Soft Fan to apply three coats of FN-004 Red to the back of the plate.
1. Begin with properly fired shelf cone 04 bisque. Moisten a clean sponge and wipe bisque to remove any dust.
2. Mix S-2101 Clear with food coloring to deepen the color, add AC-310 Silkscreen Medium use a palette knife to mix to the consistency of peanut butter.
3. Use the animals from DSS-0101 WoodlandANimals, the moose, fox, rabbit and deer head, use the tinted clear to screen onto the plate, place the shiny side down, rub the thickened mix over the screen, gently clean.
4. Brush the dear hean and the moose body with SC-41 Brown Cow, lighten the Moose chest and mussle with SC-54 Vanilla Dip in the same brush. Use CB-106 Script Liner and CB-110 Liner, brush the antlers with SC-54 Vanilla Dip. Two -three coats.
5. Brush the rabbits body with a mix of SC-60 Silver Lining and SC-54 Vanilla Dip, use CB-106 Script Liner, 2-3 coats. Brush the fox’s body with a mix of SC-80 Basketball and SC-75 Orange a Peel, leave the white areas unpainted. 2-3 coats.
6. Screen the bulbs, pine boughs, candy canes,candle scene, from the various silkscreen packs with the tinted clear, brush in the various colors to the spaces, two coats, except for the pine needles, one coat.
7. Thicken SC-15 Tuxedo with AC-310 Silkscreen Medium as in step two.
8. Re-screen all the images with the thickened SC-15 Tuxedo. Line up the screens with the outlines of the tinted clear screen.
9. Mix SC-36 Irish Luck with the thickened SC-15 Tuxedo for a dark green, add more of the AC-310 Silkscreen if necessary, use the pine trees from DSS-0110 Botanical Trees to screen on the fox plate.
10. Brush on two coats of S-2101 Clear to the top of the plates with CB-604 Soft Fan, and brush on three coats of FN-004 Red to backs of two of the plates and three coats of FN-010 Tree Green to others.
11. Fire to cone 05/06.
Form
MB-101 Coupe Salad (4)
Colors
SC-11 Blue Yonder
SC-15 Tuxedo
SC-24 Dandelion
SC-26 Green Thumb
SC-36 Irish Luck
SC-41 Brown Cow
SC-54 Vanilla Dip
SC-55 Yella Bout It
SC-60 Silver Lining
SC-75 Orange A Peel
SC-74 Hot Tamale
SC-80 Basketball
SC-97 Cant-elope
FN-004 Red
FN-010 Tree Green
NT-CLR Clear Dipping Glaze or S-2101 Clear Brushing Glaze
1. Begin with properly fired shelf cone 04 bisque. Moisten a clean sponge and wipe bisque to remove any dust.
2. Using a CB-604 #4 Soft Fan, apply 2 coats of FN-001 White to the front of the plate.
3. Using a CB-106 #6 Script Liner, add a few drops of water to SC-93 Honeydew List to make it more fluid and add a squiggle to the plate. It doesn’t have to be perfect. Repeat this process with SC-27 Sour Apple.
4. Using 3 different AC-213 Sponge-on-a-Sticks, load one sponge at a time with SC-8 Just Froggy, SC-74 Hot Tamale, SC-75 Orange-A-Peel making sure to not overload the applicator. Too much color will result in a blurry image. Tap the color onto the ST-103 Retro Star in an up and down motion, not side to side. Turn the stamp over onto the piece. Repeat until the entire plate is covered.
5. Use the Script Liner to apply 2 coats of SC-14 Java Bean to create the tree trunk.
5. Condition the CB-106 #6 Script Liner with liquid soap then use it to apply a squiggle of wax over the tree design. Clean brush thoroughly to remove wax.
6. Once the wax is dry, apply 3 coats of FN-006 Blue.
7. Using a CB-604 #4 Soft Fan, apply 3 coats of FN-004 Red to the back of the plate.
1. Begin with properly fired shelf cone 04 bisque. Moisten a clean sponge and wipe bisque to remove any dust.
2. Using a sponge, apply 1 coat of SC-16 cottontail to the top of the plate.
3. Once dry, dip the sponge in both SC-16 Cotton Tail and SC-83 Tip Taupe and apply 2 more layers to the plate. Refrain from overworking the glaze so it does not get completely mixed. This will help give the look of a felted texture.
4. Using AC-230 Clay Carbon Paper, transfer one of the images onto the plate.
5. Using a CB-106 #6 Script Liner, use 3 coats of SC-41 Brown Cow, SC-81 Cinnamon Stix, and SC-86 Old Lace to fill in the details.
6. Using a CB-110 #10/0 Mini Liner, add the stitch details using 1 coat of SC-34 Down to Earth.
1. Begin with properly fired shelf cone 04 bisque. Moisten a clean sponge and wipe bisque to remove any dust.
2. Using a CB-604 #4 Soft Fan, apply 3 coats of FN-004 Red to the backs of the plates.
3. Using AC-230 Clay Carbon Paper, transfer the image onto each plate.
5. Using SG-401 Designer Liner, trace over the transfered image.
6. Snowman: Use SC-76- Cara-Bein to add a wash of color around the head using the RB-100 #0 Detail brush. Puddle in SC-75 Orange Ya Happy into the nose. Puddle in SC-15 Tuxedo in for the eyes and mouth.
Santa: Use the CB-106 #6 Script Liner brush to fill in all of the colors. Use three coats of SC-74 Hot Tamale for the hat and shade SC-76 Cara-Bein for the puff ball. You will also shade the rim of the hat with the same color. Apply 3 coats of SC-20 Cashew Later to his face, SC-74 Hot Tamale for the nose, SC-2 Melon- Choly for the cheeks,and SC-16 Cotton Tail for the beard.
Reindeer: Use the CB-106 #6 Script liner brush to apply 3 coats of SC-12 Moody Blue to the antlers and SC-14 Java bean to the top of the head.
Penguin: Apply 3 coats of SC-12 Moody Blue to the body and SC-75 Orange Ya Happy to the nose. Use SC-15 Tuxedo for the eyes by puddling it in with the tip of the brush.
7. Let dry completley.
8. Apply 2 coats of S-2101 Crystal Clear Brushing glaze to the front of the plates using the CB-604 #4 Soft Fan brush. Alternatively, you may dip the entire piece in NT-CLR Clear Dipping Glaze.
9. Stilt and fire to shelf cone 06/05.
Form
MB-101 Coupe Salad Plate
Colors
SC-2 Melon-Choly
SC-12 Moody Blue
SC-14 Java Bean
SC-15 Tuxedo
SC-16 Cotton Tail
SC-20 Cashew Later
SC-74 Hot Tamale
SC-75 Orange Ya Happy
SC-76 Cara-Bein Blue
FN-004 Red
SG-401 Black
NT-CLR Clear Dipping Glaze or S-2101 Crystal Clear Brushing Glaze
1. Begin with a properly fired shelf cone 04 Bisque. Moisten a clean sponge and wipe bisque to remove dust.
2. Use the Santa face pattern provided or make your own by screening the Santa Face screen from DSS-0133 Merry Christmas on paper, then make a copy.
3. Use the CB-604 #4 Soft Fan to apply two coats of FN-001 White to the front of the plate.
4. Cut out the Santa pattern, brush a coat of water to the plate and place the paper Santa face onto the plate. Use a paper towel to remove excess water and smooth out the paper.
5. Cut strips of raffia for rays, so they are larger than space requires. Some need to be split as they may be too wide.
6. Work in sections so the glaze stays wet. Re-apply FN-001 White then place the raffia pieces into the wet glaze in the direction as shown in the photo. Leave spaces between the raffia.
7. Use the Soft Fan to apply two coats of SC-24 Dandelion (near the Santa Face) and SC-97 Cant-elope (around the edges) over the rafia background. Brush over the paper edges.
8. Remove the raffia and paper pattern when the gloss is gone from the second coat.
9. Use a palette knife to mix S-2101 Clear (or FN-001 White) with food coloring and AC-310 Silkscreen Medium to create a tinted clear (or tinted white) to the consistency of peanut butter. Place the Santa Face screen from DSS-0133 Merry Christmas in the space of the pattern. With the shiny side down, rub the tinted clear over the screen for a painting pattern. Remove the screen and gently clean.
10. Use the CB-106 #6 Script Liner to apply two coats of SC-20 Cashew Later to the skin. Apply SC-2 Melon-Choly over the wet Cashew Latere onto the tip of the nose, cheeks, and lip.
11. Apply two coats of SC-74 Hot Tamale to the hat. Let dry.
12. Thicken SC-15 Tuxedo with AC-310 Silkscreen Medium using a palette knife. Place the screen directly over the previously screened image and rub the thickened Tuxedo over the screen. Some touch up may be required. Use the CB-110 #10/0 Liner to fill in any lines or touch up the design.
13. Use the Soft Fan to apply three coats of SC-74 Hot Tamale to the back of the plate.
14. Dip into NT-CLR Clear Dipping Glaze or use the Soft Fan to apply one coat of S-2101 Clear Brushing Glaze to the front of the plate.
15. Fire to cone 05/06.
Form
MB-101 Coupe Salad Plate
Colors
SC-2 Melon-Choly
SC-15 Tuxedo
SC-20 Cashew Later
SC-24 Dandelion
SC-74 Hot Tamale
SC-97 Cant-elope
FN-001 White
NT-CLR Clear Dipping Glaze or S-2101 CLear Brushing Glaze
1. Begin with properly fired shelf cone 04 bisque. Moisten a clean sponge and wipe bisque to remove any dust.
2. Deepen the color of S-2101 Clear with food coloring on a palette, thicken with AC-310 Silkscreen Medium using a palette knife to the consistency of peanut butter. This mixture is used only to make a pattern for the various screens because we are using a clear it will disappear in the firing.
3. Use the Cardinal from DSS-0108 Avairy-Small Birds to screen the Cardinal in place on the largest ornament. Use the thickened Clear with the shiny side down, rub the mix over the screen. Repeat for the skiing snowman, the bulb and the candle screne from DSS-0106 Winter-Holiday, all with the thickened clear glaze.
4. Use the various colors SC-73 Candy Apple Red, for the reds, SC-25 Crackerjack Brown for the skis, ornament is SC-97 Cant-elope and SC-24 Dandelion, etc.2-3 Coats.
5. Pencil in the pointsetta on the large ornament, brush the sky with two thinned coats of SC-30 Blue Dawn, and shade around the petals and leaves with SC-12 Moody Blue. Brush the center petals of the pointsetta with SC-73 Candy Apple Red and the last layer of petals with SC-74 Hot Tamale. Brusht the leaves with SC-8 Just Froggy, highlite the centers with SC-26 Green Thumb.
6. The sky for the skiing snowman is first painted with SC-30 Blue Dawn tow coats, lay on the SL-441 Dots stencil over the sky, roll SC-16 Cotton Tail over the stencil with the foam roller, some clean up may be necessary, use CB-106 Script Liner to brush around the snowballs with SC-30 Blue Dawn.
7. Thicken SC-15 Tuxedo with AC-310 Silkscreen Medium using a palette knife. Place the screens over the painted images, make sure they line up perfectly, rub the thickend Tuxedo over the screen, remove and wash gently. Add a small amount of SC-8 Just Froggy to the thickened Tuxedo, all the Silkscreen Medium if it needs to be thicker, this is for the trees in the background of the Cardinal Ornament. These are from DSS-0110 Trees.
8, Brush three coats of solid color with CB-604 Soft Fan on the backs of the ornaments, FN-004 Red,FN-018 Bright Blue, FN-048 Bright Pink, FN-006 Blue.
9. The evergreen bases, mix SC-8 Just Froggy with SC-15 Tuxedo, thin and brush to the bases, wipe back with a damp sponge, to antique, brush on two coats of SC-8 Just Froggy, leave the shadow areas dark.
10. Apply SG-302 Snowfall to the snow areas of the Cardinal bulb and the skiing snowman, apply with a brush or palette knife, build up the heavier areas for drifts.
11. Outline the pointsetta with SC-15 Tuxedo use CB-110 Liner.
12. Brush on S-2101 Clear to the center sections of the bulb, also the ornament caps and the evergreen branches, avoid brushing over the Snowfall.
13. Fire to cone 05/06.
14. Apply Fired Gold over the ornament caps, the trim around the face of the ornamnets, (may want to tape this area off) outline the pointsetta and leaves with gold. Use Essence to clean the brush.
15. Fire to cone 018.
16. Apply Mother of Pearl with a soft brush to the sold areas of color on the backs of the bulbs, fire to cone 019, clean brush with Luster Essence.
1. Begin with properly fired shelf cone 04 bisque. Moisten a clean sponge and wipe bisque to remove any dust.
2. Using a CB-604 #4 Soft Fan, apply 3 coats of FN-014 Antique White to the top and rim of the plate.
3. Apply 3-4 stripes of tape to the left side of the platter. Squirt some SC-73 Candy Apple Red and SC-42 Butter Me Up onto a plate. Dip sponge into each color separately and be sure to dab the excess off onto a clean paper towel. Layer both colors onto the taped section. Once dry, remove the tape.
4. Using AC-230 Clay Carbon Paper, transfer the image onto the platter.
5. Using a CB-106 #6 Script Liner, apply 2 coats of glaze to the candles. One with SC-11 Blue Yonder , another with SC-78 Limelight, and the third with SC-73 Candy Apple Red.
6.Using a 110 #10/0 Mini Liner, apply 2 coats of SC-73 Candy Apple Red to “Noel”.
7. Using a CB-106 #6 Script Liner, apply 2 coats of SC-42 Butter Me Up to the flames on the candles.
8. Using a CB-110 #10/0 Mini Liner, apply the details to the candles and the stars with 2 coats of glaze. I used SC-15 Tuxedo, SC-16 Cotton Tail, and SC-42 Butter Me Up.
9. Apply masking tape to the inside lip of the rim to create a boarder around the image in the center of the plate. Using a CB-106 #6 Script Liner, apply 2 coats of SC-15 Tuxedo to the boarder you created and thew outside lip of the platter. Remove the tape when dry.
10. Using a CB-604 #4 Soft Fan, apply 3 coats of FN-009 Black to the back of the platter.
Begin with properly fired shelf cone 04 bisque. Moisten a clean sponge and wipe bisque to remove any dust.
Using the CB-604 Soft Fan Brush, apply three coats of SC-77 Glo-worm to the entire tree.
Punch out various sizes of snowflakes. Wet the area of Glo-worm before placing on the paper snowflake, press gently with a paper towel to make the paper stick to the glaze. A light coat of Glo-worm over the paper also helps prevent color bleed. The snowflake is acting as masking, so the edges need to be sealed so the top color does not leak underneath.
Using the CB-604 Soft Fan Brush apply two coats of SC-39 Army Surplus over the snowflake area of the tree, leave the areas under the branches Glo-worm.
Remove the paper snowflakes. Using a needle tool and tweezers is helpful.
Using the CB-106 Script Liner, apply two heavy coats of SG-302 Snowfall on the tips of the branches.
Stilt and fire to shelf cone 06/05.
Form
MB-1462 Jolly Christmas Tree Bisque or CD1462 Jolly Christmas Tree Mold
Colors
SC-39 Army Surplus
SC-77 Glo-Worm
SG-302 Snowfall
Decorating Accessories
CB-106 Script Liner
CB-408 Pointed Round
CB-604 Soft Fan
Miscellaneous Accessories
Various sizes of snowflake punches (found at most craft stores)
Begin with properly fired shelf cone 04 bisque. Moisten a clean sponge and wipe bisque to remove any dust.
Using the CB-604 Soft Fan brush apply three coats of FN-001 White to the front of the tray.
Place the SL-448 Doily Stencil on the tray. Using the foam roller roll over the SL-448 Doily Stencil lightly and in different directions with SC-6 Sunkissed. Randomly place on the tray and fill in with the stencil. It will be a shadow or background design.
Place the SL-450 Lg. Poinsettia stencil in the middle of the tray, with the pencil trace around the outside edge of the last row of petals. Using the CB-106 Script Liner apply two coats of SC-6 Sunkissed to the pattern and it is okay to go outside of the lines for a yellow shadow. Let dry.
The SL-450 Poinsettia Stencil needs to be flat and flush against the tray. So, with the CB-604 Soft Fan Brush wet the SC-6 Sunkissed pointsetta with water or a thin coat of SC-6 Sunkissed. Place the Poinsettia Stencil on the damp surface. Use a paper towel to press the stencil into the glaze and remove excess moisture.
Using the CB-604 Soft Fan Brush apply two coats of CG-756 Firecracker to the stencil, remove the stencil as soon as the glaze sets up enough so the glaze will not move once the stencil is removed.
Pencil in the leaves. Using the CB-106 Script Liner, apply two coats of SC-26 Green Thumb.
Shade the outside of the leaves with SC-36 Irish Luck, use CB-106 Script Liner.
With the CB-110 Liner vein the leaves with SC-15 Tuxedo.
Place the Poinsettia Stencil on the open areas of the tray. With the foam roller, roll over lightly to avoid bleed, with SC-87 Ruby Slippers.
Pencil leaves, two on each flower, brush with one coat of SC-26 Green Thumb. Shade the sides with SC-36 Irish Luck. Vein the leaves with SC-36 Irish Luck use CB-110 Liner.
Use a sponge to apply SC-26 Green Thumb to ST-116 Floral Flourish Stamp. Stamp the design randomly on the tray as an accent.
Dot the center of the Firecracker flower with SC-15 Tuxedo.
Using the CB-106 Soft Fan Brush, apply three coats of FN-015 Brick Red to the back of the tray and edges.
Begin with properly fired shelf cone 04 bisque. Moisten a clean sponge and wipe bisque to remove any dust.
Using the CB-604 Soft Fan Brush add water to SC-48 Camel Back and brush over the face and hair with one coat of glaze. If the glaze is too thick use a wet brush and wipe off the excess and leave heavy in the shadow areas. Basically, we are trying to antique the creases with SC-48 Camel Back.
Using the CB-604 Soft Fan Brush apply three coats of SC-20 Cashew Later over the SC-48 Camel Back on the face. It is ok if the color gets into the eyes, we will paint over later.
Using the CB-106 Script Liner apply a thin coat of SC-2 Melon-Choly to the center of the cheeks, blend into the flesh with the brush. You don’t want a big dot so it looks like a clown.
To decorate the suit and hat: Use the DSS-0113 Flourish. For the Girl Elf, use the SC-81 Cinnamon Stix and for the Boy Elf, use the SC-39 Army Surplus.
Place the color on a palette or tile and sprinkle a pinch of AC-310 Silkscreen medium over the glaze. Using a palette knife, mix color and medium together to the consistency of peanut butter. Too thin of product it will bleed and give a blurred image. Too thick of mixture may not penetrate the screen and give a clean image. Position the screen shiny side down on the piece. Hold in place with non-dominate hand and apply the product from the center out on the screen. You may use your finger, a squeegee or sponge to apply. Rub the mixture over the entire image – out to the drawn line. (See package on how to prep a Designer Silkscreen). Holding the silkscreen in place, lift up a corner to view the image. If it printed fully, remove, if areas have skipped set down and apply more product.
The screen can be used several times before cleaning, they can also be flipped over for the mirror image.
Shading Hat & Suit: Use the CB-106 Script Liner — Girl Elf: Mix SC-81 Cinnamon Stix mixed with a touch of SC-15 tuxedo to darken blend into the folds Boy Elf: Mic SC-39 Army Surplus mixed with a touch of SC-15 Tuxedo
Using the CB- 604 Soft Fan Brush apply three coats of FN-209 Floral Pink over the hat and suit of the girl, and three coats of FN-227 Celery for the boy elf.
Use the CB-106 Script Liner to apply three coats of SC-81 Cinnamon Stix on the mittens. Use the CB-106 Script Liner to apply two coats of SC-15 Tuxedo on the shoes.
Brush the hatband and the collar with two heavy coats of SG-302 Snowfall, brush then pat on for texture.
Use the CB-202 Detail Liner for the eyes: Apply two coats of SC-16 Cotton Tail for the white area. Mix SC-76 Cara- bein Blue with Cotton Tail to lighten the blue. Brush the iris with two coats, darken the outer edge with a stroke of SC-76 Cara-Bein Blue. Brush the pupil with SC-15 Tuxedo, two coats, dot the highlight in the eye with SC-16 Cotton Tail.
Using the CB-110 Detail Liner to outline the eye, iris and the smile with SC-15 Tuxedo.
Use the CB-202 Detail Liner and apply two coats of SC-48 Camel Back to the eyebrows.
Using the CB-202 Detail Liner apply one coat of SC-22 Carrot Top to the Lips, outline smile with SC-15 Tuxedo.
Stilt and fire to shelf cone 06/05.
Form
MB-1463 Vintage Elf Bisque or CD1463 Vintage Elf Mold
Begin with properly fired shelf cone 04 bisque. Moisten a clean sponge and wipe bisque to remove any dust.
Use the CB-106 #6 Script Liner to apply three coats of SC-73 Candy Apple Red to the jacket. Use the same brush to apply one coat of SC-81 Cinnamon Stix to the jacket and allow the color to fade into Candy Apple Red.
Use the Script Liner to apply three coats of SC-45 My Blue Heaven to the scarf. Use the same brush to add shading on the edges with SC-29 Blue Grass.
Use the Script Liner to apply the following: two coats of SC-45 My Blue Heaven to the buttons; three coats of SC-29 Blue Grass to the mittens; two coats of SC-73 Candy Apple Red to the hat band; two coats of SC-15 Tuxedo to the hat and two coats of SC-22 Carrot Top to the nose.
Use the sponge to lightly apply one coat of SC-2 Melon-Choly to the cheeks.
Use the CB-110 #10/0 Liner with SC-16 Cotton Tail to highlight the hat. Use the same brush to apply two thinned coats of SC-76 Cara-Bein to the eyes; apply one coat of SC-15 Tuxedo to the pupils and to outline the eyes and mouth and fill in the eyebrows.
Use the star paper punch to punch out shapes. You will be using the negative part of the punch. Wet each piece of paper and gently press onto the scarf and jacket. Gently press the shapes down with a paper towel to remove excess water and ensure the edges are sealed. Use the CB-604 #4 Soft Fan to apply two coats of SC-16 Cotton Tail over the star shapes. Remove the paper.
Use a brush or cotton swab with water to remove any color that may have gotten on to the body of the snowman.
Use the Soft Fan to apply two or three coats of CC-101 Transparent Crackle over the head and body of the snowman. Heavier application gives larger cracks; thinner application gives smaller cracks.
Fire to cone 05/06.
Thin a dark acrylic paint and use the Soft Fan to brush over the head and body of the snowman (antiquing). Use a soft cloth or towel to wipe color off of the piece. Color will remain in the cracks. Note: You may antique the snowman right after firing or wait a day to allow more cracks to appear.
Begin with properly fired shelf cone 04 bisque. Moisten a clean sponge and wipe bisque to remove any dust.
Thin FN-010 Tree Green with water (3:1 glaze to water ratio) and pour inside MB-1405 Can-It Quart to coat interior. Pour out excess glaze and wipe away any drips with BT-910 Synthetic Sponge.
Using a palette knife, mix SC-74 Hot Tamale with AC-310 Silkscreen Medium to the consistency of peanut butter.
Tip: Familiarize yourself with Mayco’s Silkscreen Instructions for further information and how to properly clean your screen.
Using DSS-0105 Patterns – Stripes, align the screen to be diagonal stripes on the can.
With your finger, use the thickened SC-74 Hot Tamale to screen the stripes onto MB-1405 Can-It Quart.
Tip: For more bold SC-74 Hot Tamale stripes, apply a double screen, aligning with the previously screened stripes. Allow glaze to dry completely between screenings. It will also be helpful to clean your screen in water and allow to dry between screenings.
Using CB-604 #4 Soft Fan, brush S-2101 Crystal Clear Brushing over the entire surface of MB-1405 Can-It Quart. Allow glaze to dry between coats. Apply 2 coats.
Fire to cone 05/06.
Review this video to create the handle from a wire hanger.
To properly fired glazed piece, use CB-604 #4 Soft Fan and apply SS-81 Shimmering Silver to the top and bottom rims of MB-1405 Can-It Quart. Also apply SS-81 Shimmering Silver to the wire hanger and handle connectors on the side of the can.
Tip: If too much SS-81 Shimmering Silver is applied, simply brush away areas with water.
Tape off a triangle shape on the bisque with the 1/2 inch tape.
Brush three coats of SC-16 Cotton Tail to this taped section. When dry, brush a thin coat of water over the Cotton Tail, place the SL-433 Crooked Lines Stencil on the surface, brush over the stencil with one coat of SC-16 Cotton Tail to seal the edges, this will prevent leaking.
Brush alternating stripes with SC-74 Hot Tamale, and SC-27 Sour Apple, two coats with CB-106 Script Liner. Remove the stencil.
Punch out a paper star, trace the shape to the top of the tree. Brush the star with 2-3 coats of SC-97 Cant-elope. Stick the paper star to the painted star, with water or glaze.
Let the tree dry, tape over the edges of the tree.
Brush SC-16 Cotton Tail on plastic wrap, let it dry, crunch up, when the last coat of the FN-018 Bright BLue is still wet, sprinkle on the blue so it looks like snowflakes, to get it to stick to the tree, if the glaze is dry, brush with water, then sprinkle.
Brush the background with 3-4 coats of FN-018 Bright Blue using CB-604 Soft Fan. After the third coat remove the tape.
Begin with properly fired shelf cone 04 bisque. Moisten a clean sponge and wipe bisque to remove any dust.
Using CB-618 Soft Fan to apply 2 thin coats of FN-01 White to the entire penguins. Let dry.
Use a pencil to draw in the shapes of the side face markings and [white] tummy areas of the penguins. Mark in an area where the ribbons/scarf will be placed. The ribbon/scarf pattern does not need to be exact at this time.
On a tile place SC-2 Melon-Choly, SC-7 Leapin’ Lizard, SC-16 Cotton Tail, SC-23 Jack-O- Lantern, SC-28 Blue Isle, SC-55 Yella Bout It, SC-88 Tu Tu Tango for painting. Load AB-708 Round with some SC-16 Cottontail and tip the edge with SC- 55 Yella Bout It. Start pouncing the brush from the top edge of the tummy area with the yellow towards the middle of the tummy. As you pounce the color on, slowly move the brush lower blending the color from dark to light. The color will always be more concentrated next to the line/edge slowly fading out toward the center of the tummy area. The yellow will only be in the upper half of the tummy area. All of these colors are applied in the same manner. When reloading the brush it may be necessary to load the brush with the white color only every other time or two. Moving to the next color SC-2 Melon Choly, apply the color not completely over all of the yellow areas. The Melon-Choly color can be brought down as far as the lower wing area. You can shade around the areas of the ribbons with some of the colors as well. Pick up some SC-23 Jack-O- Lantern and repeat this process. You can concentrate some of the color is specific places now to create shading and nuances’ in the colors. Pick up some SC-88 Tu Tu Tango to brighten up the top edge of the tummy areas.
Finishing out the tummy areas are done with SC-7 Leapin’ Lizard from the bottom of the tummy areas up toward the middle section of the tummy. Strengthen the green color now with SC-28 Blue Isle concentrating the color above the feet and under the wings.
The side face areas are completed in the same manner as the tummy areas of the penguins with all of the same colors. Keep the warmer colors towards the areas nearest the eyes and the cooler colors near the bottom of the heart shaped area.
Using a pencil and AC-230 Clay Carbon to transfer the bow/ holly near the top of the tummy areas of the penguins. Complete the ribbon around the neck to fill in the pattern with the pencil.
The holly is filled in with 1-2 coats of SC-7 Leapin’ Lizard using CB-220 Detail Liner. Shade and detail the holly with SC-8 Just Froggy, SC-39 Army Surplus using CB-110 Liner.
Apply 3 coats of SC-4 Salsa to the ribbon/scarf sections using CB-406 Pointed Round. Let dry.
Load CB-406 Pointed Round with water and tip the point with SC-81 Cinnamon Stix to “wet shade” the edges of the ribbons/scarf. All edges are shaded with the dark color next to the outside edge of the ribbon.
Using CB-406 Pointed Round apply one coat of SC-88 Tu Tu Tango in metered sections of the ribbon/scarf. The width of the line should be about ¼ inch. In the center of the line, paint in a smaller line of SC-24 Dandelion. Thin some SC-34 Down To Earth and paint in a fine line over the yellow line.
Dot in some berries around the holly with SC-74 Hot Tamale highlighted with a dot of SC-73 Candy Apple Red and SC-88 Tu Tu Tango. Other berries are SC-13 Grapel highlighted with a dot of SC-75 Orange-A- Peel.
Fill in the black areas (excluding the beaks) of the penguins by applying 3 coats of SC-15 Tuxedo with the brush appropriate for the area being covered. For the smaller areas use a liner and the broader areas use a Soft Fan. Using AB-708 Round to stipple a jagged edge around the tummy and face markings.
Mark a line under the top portion of the beak for the “markings” on both beaks. To the beak of the large penguin apply 1 good coat of SC-23 Jack-O- Lantern using CB- 406 Pointed Round. The smaller penguin’s beak is filled in with a thin coat SC-24 Dandelion. Shading on the beaks is completed with a thin watery coat of SC-34 Down To Earth over the first color. You should be able to see the underlying color showing through the brown color on both. Wet shade all the edges on the top/bottom areas of the beak with SC-15 Tuxedo. The markings under the larger penguin’s beak are filled in with SC-88 Tu Tu Tango highlighted with a top line of SC-75 Orange-A- Peel. For the smaller penguin use SC-23 Jack-O- Lantern highlighted with a top line of SC-24 Dandelion.
On the smaller penguin stipple on SC-60 Silver Lining and then SC-16 Cottontail to the wings and top of the head. This color should go from black to gray to white toward the center of the shading. This is completed as in Step 4-5.
Paint in the eye with SC-23 Jack-O- Lantern using CB-220 Detail Liner. Shade the iris with some thinned SC-75 Orange-A- Peel and SC-34 Down To Earth. Paint in a round pupil in the center of the iris of the eye. Highlight with a dot of SC-16 Cottontail.
Apply 1-2 coats of SC-24 Dandelion to the feet. Wet shade the sections and top edge near the body with SC-23 Jack-O- Lantern. Reinforce the shading with SC-88 Tu Tu Tango.
Use 1” Blue Masking Tape to block out portions of the SL-438 Snowflakes stencil that you don’t want to print. Position the stencil onto the ware and hold firmly. Using a dry 1” Sponge on a Stick loaded with SC-11 Blue Yonder, pounce/stipple 1 coat of color, then lift the stencil off the ware. The three smallest snowflakes are repeated over the penguins sparingly. The snowflakes are done with SC-16 Cottontail over the black areas of the penguins.
Squeeze out some SG-402 White onto a tile and thin slightly with water. Using a Spatter Brush or Old Tooth Brush, spatter the white over the both pieces. Reload the brush and spatter SC-31 The Blues over the pieces. Let dry.
Apply 1 thin coat of S-2101 Crystal Clear Brushing entirely over both pieces. Let dry.
Begin with properly fired shelf cone 04 bisque. Moisten a clean sponge and wipe bisque to remove any dust.
Using a CB-604 #4 Soft Fan, apply 3 coats of FN-011 Light Blue to the face of the bottlecap.
Once dry, place some SC-31 The Blues on a palette or tile and sprinkle with AC-310 Silkscreen Medium. Using a palette knife mix color and medium to the consistency of thick peanut butter. if the mix is too thin add more AC-310 Silkscreen Medium or if it is too thick add more Stroke & Coat. Too thin of a mixture will bleed under the screen and give you a blurred image. Too thick of a mixture will make it hard for the product to penetrate through the holes in the screen and give blank areas in your screen.
Position the DSS-0107 Seasons Greetings bulb screen shiny side down on the piece. Hold in place, starting from the center out, rub the mixture on the screen with your finger. Lift a corner up to check if you are applying enough color. Remove the screen and wash with water. Do not let the color dry in the screen. this will cause damage to the screen.
Using AC-213 Sponge on a Stick, apply some SC-8 Just Froggy to the child’s hand. Gently place the hand on the edge of the piece. Repeat this process around the entire outer edge leaving some spaces. Repeat this process with SC-26 Green Thumb to fill in the spaces.
Using your own or the child’s fingers, make berries around the wreath.
Using a CB-604 #4 Soft Fan, apply 2 coats of SP-212 Speckled Moody Blue around the rim. To get a scalloped finish, load the brush starting about 1/2″ above a scallop on the rim and brush straight down. Repeat this process with each scallop around the rim.
Using AC-230 Carbon Paper, transfer the bow onto the piece. Use a CB-106 #6 Script Liner to apply 3 coats of SC-74 Hot Tamale.
Using a CB-110 #10/0 Mini Liner, apply 1 coat of SC-15 Tuxedo and outline the bow.
1. Begin with properly fired shelf cone 04 bisque. Moisten a clean sponge and wipe bisque to remove any dust.
2. Use AC-230 Clay Carbon Paper and a pencil or pencil to trace the pattern onto the penguin.
3. For the red flower load the CB-106 #6 Script Liner with SC-63 Candy Apple Red, and tip the brush with SC-97 Cant-elope. Press the tip next to the center and pull the brush to the end of the petal – lifting the brush near the end. Each petal requires two of these strokes. Apply SC-27 Sour Apple to the center of the flower.
4. Blue flower – repeat as in step 3, but use SC-33 Fruit of the Vine and SC-11 Blue Yonder.
5. Yellow flower – repeat as in previous steps, but use SC-24 Dandelion and SC-97 Cant-elope.
6. Purple flower – repeat as in prevous steps, but use SC-97 Cant-elope and SC-33 Fruit of the Vine.
7. Thin SC-11 Blue Yonder and SC-24 Dandelion to a wash consistency. Apply to the background of the shirt.
8. The leaves are SC-27 Sour Apple with the brush tipped with SC-26 Green Thumb. Use the CB-110 #10/0 Liner to outline each of the flowers and centers with SC-15 Tuxedo.
9. Apply two coats of SC-15 Tuedo to show the outline of the penguin’s coat. Apply two coats of SC-97 Cant-elope under the beak.
10. Dip into NT-CLR Clear Dipping Glaze or use the CB-604 #4 Soft Fan to apply two coats of S-2101 Clear to the penguin.
11. Fire to cone 05/06.
Form
MB-1426 Large Penguin
Colors
SC-11 Blue Yonder
SC-15 Tuxedo
SC-24 Dandelion
SC-26 Green Thumb
SC-27 Sour Apple
SC-33 Fruit Of the Vine
SC-63 Candy Apple Red
SC-97 Cant-elope
NT-CLR Clear Dipping Glaze of S-2101 Clear Brushing Glaze
Starting at the top of the tree, brush with SC-93 Honeydew List, about half way add SC-27 Sour Apple to the brush to tint the Honeydew List, add more SC-27 Sour Apple for the bottom of the tree, (always keep Honeydew List in the brush) use CB-604 Soft Fan. Brush on two coats.
At the top of the tree, use the 1/4″ punch paper dots, wet the space for the paper dots, then stick on the paper, continue this process for all the dots. Use the 3/4″ dots for the middle of the tree, and the 1″ dots for the bottom section.
Starting at the top of the tree brush with SC-27 Sour Apple with some SC-93 Honeydew List to lighten, in the middle of the tree just use SC-27 Sour Apple, add SC-52 Toadily Green to the brush to deepen the Sour Apple. Just two coats, water should be added to the brush to brush on smooth coats, use CB-604 Soft Fan.
Let dry, before taking off the paper dots, stamp with the ST-129 Mini Fern. At the top and middle of the tree, stamp with SC-26 Green Thumb, towards the bottom stamp with SC-8 Just Froggy. Use a sponge on a stick or a 2″ foam roller to apply the color to the stamp. Remove the paper dots.
Brush SC-8 Just Froggy under the the top and middle branches, fading the color to SC-16 Cotton Tail when the branches start to curl. Two coats, use CB-106 Script Liner.
The lower skirt of the tree, brush with SC-52 Toadily Green, darken to SC-8 Just Froggy, fade to SC-16 Cotton Tail on the tips and edges of the curls. Two coats.
Shade around all the curls with SC-34 Down to Earth mixed with SC-52 Toadily Green, shade further with SC-8 Just Froggy mixed with a little SC-15 Tuxedo to deepen the shading in the tight section of the curls, and under the arms. Use CB-106 Script Liner.
Trace or draw on the pointsetta pattern. Use CB-106 Script Liner to stoke the petals with SC-74 Hot Tamale, add SC-97 Cante-lope to the brush for the middle of the petal, and Hot Tamale to the end. Two coats, CB-106 Script Liner. Centers are a mix of SC-34 Down To Earth and SC-97 Cante-lope. Outline with SC-15 Tuxedo use CB-110 Liner.
Lay SL-436 Curlicues Stencil on the flipped up skirt of the tree, use the foam roller to roll on SC-8 Just Froggy over the stencil.
Brush on one coat of S-2101 Clear with CB-604 Soft Fan.
Stilt and fire to cone 05/06.
Form
MB-1462 Jolly Christmas Tree Bisque or CD1462 Jolly Christmas Tree Mold
1. Begin with properly fired cone 04 bisque. Moisten a sponge and wipe bisque to remove any dust.
2. Apply two coats of SC-86 Old Lace to the flipped up curly area of the tree under the branches. Apply a third coat in sections at the bottom area only. Wet the crocheted doily and squeeze out water. Place the doily into the wet glaze and brush over the doily with Old Lace. When it starts to dry, pat with a paper towel to remove excess glaze.3. When the SC-86 Old Lace is dry to the touch, brush or sponge on 2 coats of SC-16 Cotton Tail over the underside of the tree (over the doily) then remove the doily.
4. Apply two coats of SC-16 Cotton Tail wherever you want your white dots to appear. Punch out small dots – approximately 1/4″ in diameter. Brush over the Cotton Tail with water and place the paper dots onto the piece.
5. Apply 1 coat of SC-16 Cotton Tail under the top branch and second layer, leaving the shadow area the Old Lace.
6. Apply two coats of SC-74 Hot Tamale at the top of the tree, second layer of branch and at the bottom. Use the CB-110 Script Liner to get into the tight curls and the CB-106 Script Liner to get a tight edge of color at the wave. To transition the color from Red to Green, add SC-93 Honeydew List to the Hot Tamale brush. Brush back and forth to blur the line between the colors. Use the AB-834 Base Coat brush, as it is a stiffer brush.
7. Remove the paper dots, immediately after the second coat of Hot Tamale.
8. Once the color is blended, continue to brush the Honeydew List up to just under the top branch. Repeat steps 6 and 7 twice.
9. On the reindeer side, SC-52 Toadily Green was added to the Honeydew List as it was brushed on to get a deeper green.
10. When dry, hold the SL-438 Snowflakes Stencil over the tree and use the 2″ foam roller to roll on SC-52 Toadily Green over the stencil. Only one at a time, because the tree is rounded. so only use the large patterns from the stencil.
11. Use the AC-230 Clay Carbon Paper to trace the poinsettia pattern onto the tree. Start at the outer tip of the petal with SC-74 Hot Tamale and add SC-97 Cant-elope to the brush for the middle. Add SC-34 Down to Earth to darken the Hot Tamale near the center. Use CB-106 Script Liner to apply two coats. Outline with SG-401 Black using CB-110 Liner.
12. The dots in the center are a mix of SC-97 Cant-elope and SC-34 Down To Earth.
13. Use the Clay Carbon Paper to trace the JOY pattern onto the piece. Use the Liner with SG-401 Black or SC-15 Tuxedo to paint over the word.
14. Use the reindeer screen from DSS-0107 Season’s Greeting., Thicken SC-15 Tuxedo with AC-310 Silkscreen Medium to the consistency of peanut butter, rub the thickened mixture over the screen. Clean the screen.
15. Mix SC-52 Toadily Green with a small amount of SC-15 Tuxedo and use to shade under the branches at the top and middle sections. Thin SC-52 Toadily Green and brush over the detail of the doily. Darken Hot Tamale with Tuxedo and apply as a wash over parts of the doily – use a very thin application so it puddles in the detail only.
16. Darken SC-74 Hot Tamale with a small amount of SC-15 Tuxedo and float at the edges of the Hot Tamale areas at the curls. This helps also to shadow the white dots.
17. Stamp the tree sporadically with ST-129 Mini Fern Stamp using SC-97 Cant-elope. Darken Cant-elope with SC-34 Down To earth and stamp the Mini Fern stamp in some areas. Stamp the doily area also.
18. Dip into NT-CLR Clear Dipping Glaze or apply one coat of S-2101 Clear with the CB-604 Soft Fan to the entire tree.
19. Fire to cone 05/06.
Form
MB-1462 Jolly Christmas Tree Bisque or CD1462 Jolly Christmas Tree Mold
Colors
SC-16 Cotton Tail
SC-34 Down To Earth
SC-52 Toadily Green
SC-74 Hot Tamale
SC-86 Old Lace
SC-93 Honeydew List
SC-97 Cant-elope
SG-401 Black
NT-CLR Clear Dipping Glaze or S-2101 Clear Brushing Glaze
Roll SC-27 Sour Apple with the 2″ foam roller on the front of the vase, roll in different directions 3-4 times. Add SC-8 Just Froggy to the roller, (roll off some of the color for a dry roller) roll lightly around the edges of the Sour Apple color for a fade. Sour Apple is in the center.
When dry, place the SL-441 Spots stencil over the green glazes, roll gently SC-16 Cotton Tail in different directions with the foam roller. Roll several times, let dry between some of the coats.
Remove the stencil.
Trace on the deer pattern with AC-230 Clay Carbon Paper.
Brush on three coats of SC-74 Hot Tamale to the deer use, CB-110 Liner, and CB-106 Liner.
Outline the border of the front with SG-403 Red.
Brush on coat of CG-750 Noel on the sides and back with CB-604 Soft Fan, make sure to stir for an even coat of crystals.
When dry, brush with two coats of SC-74 Hot Tamale, over the Noel. Note: CG-750 can be omitted, if desired, then brush on three coats of SC-74 Hot Tamale.
Thin slightly S-2101 Clear, roll the inside with the clear, drain excess. Brush the front panel with two coats of S-2101 Clear use CB-604 Soft Fan.
Moisten a clean BT-910 Synthetic Sponge and wipe bisque to remove any dust.
Using the MC-002 6mm(1/4″) Low Tack Maskingtape, apply to the outer edge to create a protected border.
Using the CB-604 # 4 Soft Fan, apply 3 coats of FN-022 Tan to the top of the plate.
Using the CB-604 # 4 Soft Fanb, apply 3 coats of FN-008 Brown to the back and edges.
Remove the Masking tape while the glaze is still damp to help stop chipping.
Using the AC-230 Clay Carbon Paper and a pencil, trace on the pattern.
Using the CB-106 # 6 Script Liner, apply 3 coats of SC-80 Basketball to the body, tail and upper face area on the fox.
Using the CB-106 # 6 Script Liner, apply 3 coats of SC-16 Cotton Tail to the tip of the tail, inside of the ears, lower section on the face, chest and the feet of the fox.
Using the CB-106 # 6 Script Lineer, apply 3 coats of SC-94 Curry Around to the hat.
Using the CB-106 # 6 Script Liner, apply 3 coats of SC-52 Toad-ily Green to the hat trim and the scarf.
Outline and detail the fox using the CB-110 # 10/0 Liner loaded in SC-15 Tuxedo.
Add dots to the fox geet using a brush handle loaded in SC-80 Basketball.
Place SC-15 Tuxedo onto a palette or tile and sprinkle a pinch of AC-310 Silkscreen Medium over the glaze. Using a palette knife, mix color and medium together to the constincy of peanut butter. If the product is too thinit will bleed and give a blurred image. If to thick, it may not penetrate the screen and give a clean image.
Position the pine branch from DSS-0106 Winter/Holiday shiney side down onto the piece. Hold in place wiht your non-dominate hand and apply the product from the center out on the screen. You may use your finger, a squeegee or sponge to apply. Rub the mixture over the intire image-out of the drawn line. (see package on how to prep a Designer Silkscreen). Holding the silkscreen in place lift up a corner to view the image. If good remove, if areas have been skipped set down and apply more product.
Repeat step 15 but this time using the lettering and bow from DSS-0133 Merry Christmas.
Using the Cb-106 # 6 Script Liner, apply 3 coats of S-2708 Oriental Caramal to the border.
Lay the SL-438 Snowflakes Stencil on the tray, roll over with SC-65 Peri-twinkle. To prevent bleed, roll off some of the color on the roller, roll lightly and in different directions.
Trace the pattern with AC-230 Clay Carbon Paper and a pencil.
Brush on 2-3 cts of SC-16 Cotton Tail to the faces of the snowballs. Brush three coats of SC-74 Hot Tamale to the hats, and 2-3 cts of SC-75 Orange A peel to the carrot noses. Use CB-110 Liner and CB-106 Script Liner.
Plop a heavy coat of SG-302 Snowfall to the hat tassels and trim.
Outline everything with SG-401 Black using the tip or can be used with a CB-110 Liner. SC-15 Tuxedo can be subsituted.
Brush on two coats of S-2101 Clear to everything on the top of the tray except for the Snowfall areas, use CB-604 Soft Fan. Snowfall can be dipped in clear, though the finish will be shiny.
Glaze the sides and back with 4 coats of FN-213 Saffire Blue with CB-604 Soft Fan, Color can be subsituted for FN-041 Meduim Blue, or SC-76 Cara-bein Blue.
On 04 bisque, brush on three coats of FN-009 Black with the fan brush.
Let dry, trace on the pattern, pencil in the design to see it better.
Use CB-110 Liner to outline the pattern with AC-302 Wax Resist.
Brush two coats of SG-202 White Cobblestone to the flower sections, leaves and stem. Apply the second coat after the first coat has lost its shine. Brush on even coats.
Brush one coat of color to the flower, center with SC-6 Sunkissed, shade SC-75 Orange A Peel around the yellow brushing SC-74 to the remainder of the flower, leaves and stem one coat of SC-52 Toad-ily Green. Use CB-106 Script Liner to apply, cobblestone needs to lose its shine before apply color.
Brush two coats of SC-91 Seabreeze to the background use CB-106 Script Liner to apply color.
Begin with properly fired shelf cone 04 bisque MB-1508 Vintage Truck. Moisten a clean sponge and wipe bisque to remove any dust.
Apply one coat of AC-302 Wax Resist top the tire and door handles
Apply three coat of RK-104 Red to the body of the truck.
Apply three coats of RK-105 Copper Penny to the bumper, wheels, and windows.
Apply three coats of RK-107 Oil Slick to the truck bed and the bottom of the truck.
Apply RK-107 Oil Slick to the top of the truck, the hood, fenders, and other places you would like to accumulate with rust. With this step, gradually decrease the area covered with glaze to mimic a fading effect – thicker in the middle and thinner on the edges.
Fire your piece in a raku kiln that is outside to about 1890 degrees F or until the glazes are all shiny.
Use a metal can with a lid that a little larger than your piece line it with newspaper.
Use raku tongs and protective raku clothing. Pull your piece out of the kiln and place it gentle in the can with the newspaper, allow the paper to catch on fire and cover with the lid. (Do not take the lid off the can until your piece has cooled completely).
When your piece has cooled clean your piece as it comes out of the can with a stiff brush or green kitchen scrubby to lean off the carbon.
1. Thin slightly SC-91 Seabreeze with water and brush one coat to the background with CB-604 Soft Fan.
2. Use the various Designer Liner colors to make the coral reef as pictured.
3. Fill in the rings of color with one coat of the various Stroke and Coat colors. Brush one coat of SC-34 Down to Earth around the coral shapes with CB-106 Script Liner.
4. Squeeze about 2 TBS of SC-15 Tuxedo onto a palette. Add a pinch of AC-310 Silkscreen Medium. Mix with a palette knife until it becomes the consistency of peanut butter. You may need to add more silkscreen medium or glaze.
5. Place the seahorse silkscreen from DSS-0102 Sea Life on the tile. While holding the screen firmly in place, take a small amount of premixed silkscreen medium, and gently rub in circles starting in the center and working outward. Slowly pull up the screen to avoid smearing. To silkscreen the seahorse facing the opposite direction, clean the silkscreen and repeat the same steps on the opposite side.
6. Brush on one coat of the Stroke & Coat colors with CB-106 Script Liner or CB-110 Liner over the sea life silkscreen to give it color.
7. Brush on 1-2 coats of S-2101 Clear with CB-604 Soft Fan.
Begin with properly fired shelf cone 04 Bisque. Moisten a clean sponge and wipe bisque to remove dust.
Apply 3 coats of SC-97 Cant-elope to the top of the canvas with CB-604 Soft Fan.
Let dry, apply the pattern using AC-230 Clay carbon paper.
Wax the outline of the pattern using CB-110 Liner.
When dry, apply a slightly thinned coat of SC-15 Tuxedo, and three coats to the sides with CB-604 Soft Fan. Add water to a brush to apply over waxed lines that won’t resist.
Let the glaze sit to a damp dry, sgraffito lines for fur, and stars, words, use the clean-up tool or a bamboo skewer.
Begin with a properly fired shelf cone 04 Bisque (CD-003 Geometric Planter or MB-1124 Travel Tumbler). Moisten a clean sponge and wipe bisque to remove dust.
Brush the ornament box with two coats of SC-15 Cotton Tail inside and out with CB-604 Soft Fan.
Use Sponge to apply SC-77 Glo-worm, SC-11 Blue Yonder, SC-13 Tuxedo to desired coverage.
1. Brush on one coat of FN-001 White to the tile, let dry.
2. Use a palette knife to mix AC-310 Silkscreen Medium with SC-15 Tuxedo to the consistency of peanut butter.
3. With the shiny side down, place the seahorse screen from DSS-148 Sea Life 3 XL, start in the center of the screen holding it firmly with your fingers, rub the thickened SC-15 Tuxedo mix over the screen, remove and gently wash screen for future use.
4. Use CB-106 Script Liner, apply a heavy coat of FN-001 White to the background, work in sections so the glaze remains wet for the next step.
5. In a detailer bottle, fill half with SC-12 Moody Blue and another with SC-11 Blue Yonder, add about 1/2 tsp water then fill the bottle just to where the bottle starts to curve with rubbing alcohol. About 1:1 glaze and rubbing alcohol. Shake well.
6. Use the detailer bottles to drop color into the wet FN-001 White, leave space as the drops will expand. Continue around the seahorse with FN-001 White and drops of color till you are satisfied with the results.
7. Apply one coat of SC-13 Grapel to the left side of the seahorse using CB-106 Script Liner, fill in the rest with one coat of SC-77 Glo-Worm, more than one coat will cover the screen.
Begin with properly fired shelf cone 04 bisque. Moisten a clean sponge and wipe bisque to remove any dust.
Use a Banding wheel and draw 3 different size circles on your plate. With the middle section a little larger than the rest.
Hold the SL 441 Spot Stencil in place and using the AC-213 Sponge on a Stick load the sponge with RK-106 Peacock Matte. Sponge the colors in the middle section of the plate. Move and clean stencil as needed. Do not apply to much of the paint to the sponge or it will seep under the stencil.
Use the writer bottles filled with SC- 11 Blue Yonder, SC-27 Sour Apple, and SC- Hot Tamale and add some details around the dots.
Use a CB-604 #4 Fan Brush and apply 2 coats of RK-101 Copper Metallic to the back of the plate and to the other two bands. Do not apply to the foot of the plate.
Fire your piece in a raku kiln that is outside to about 1800 or until the glazes are all shiny.
Use a metal can with a lid that a little larger than your piece line it with newspaper.
Use raku tongs and protective raku clothing. Pull your piece out of the kiln and place it gentle in the can with the newspaper, allow the paper to catch on fire and cover with the lid. (Do not take the lid off the can until your piece has cooled completely).
When your piece has cooled clean your piece as it comes out of the can with a stiff brush or green kitchen scrubby to lean off the carbon.
Have fun and use caution when you Raku.
Form
SB-105 Rimmed Dinner Plate or create your own out of your favorite Raku clay
Begin with properly fired shelf cone 04 bisque. Moisten a clean sponge and wipe bisque to remove any dust.
Draw a 3” circle in the middle of your plate.
Hold the SL 436 Fern Leaf Stencil in place and using the AC-213 Sponge on a Stick load the sponge with, SC- 8 Just Froggy, SC-26 Green Thumb, SC-27 Sour Apple. Sponge these three random colors on the outer rim of the plate. Move and clean stencil as needed. Do not apply to much of the paint to the sponge or it will seep under the stencil.
Fill 3 writer bottles with these colors SC-55 Yella Bout It, SC- 2 Melon Choly, RK-101 Copper Metallic.
Use the writer bottle with RK-101 Copper Metallic draws some 5 petals flower to the center of the plate and a few around the fern to fill in any gaps and apply some veins on your fern leaves. Fill the center with RK-101 Copper Metallic. Use the writer bottles filled with SC- 2 Melon Choly, SC-55 Yella Bout It and fill in the flower petals.
Use the writer bottle with RK-101 Copper Metallic and draw a boarder of circle around the center circle.
Use a604 #4 Fan Brush and apply 2 coats of RK-101 Copper Metallic to the back of the plate. Do not apply to the foot of the plate.
Fire your piece in a raku kiln that is outside to about 1800 or until the glazes are all shiny.
Use a metal can with a lid that a little larger than your piece line it with newspaper.
Use raku tongs and protective raku clothing. Pull your piece out of the kiln and place it gentle in the can with the newspaper, allow the paper to catch on fire and cover with the lid. (Do not take the lid off the can until your piece has cooled completely).
Form
SB-105 Rimmed Dinner Plate or create your own out of your favorite Raku clay
Begin with properly fired shelf cone 04 bisque. Moisten a clean sponge and wipe bisque to remove any dust.
Place some RK-101 Copper Metallic, RK-106 Peacock Matte on a palette or tile and sprinkle with AC-310 Silkscreen Medium. Using a palette knife mix color and medium to the consistency of thick peanut butter. If the mix is to thin add more AC-310 Silkscreen Medium or if too thick add more Raku Glaze. Too thin of a mixture will bleed under the screen and give you a blurred image. Too thick a mixture will make it hard for the product to penetrate through the holes in the screen and give you blank areas in your screen.
On this project place the shiny side up for more of the raku glaze to go through the screen. Position the screen on the piece. Hold in place, starting from the center out, rub the mixture on the screen with your finger. Lift a corner up to check if you are applying enough color. Remove the screen and wash with water. Do not let the color dry in the screen. This will cause damage to the screen
Fire your piece in a raku kiln that is outside to about 1800 or until the glazes are all shiny.
Use a metal can with a lid that a little larger than your piece line it with newspaper.
Use raku tongs and protective raku clothing. Pull your piece out of the kiln and place it gentle in the can with the newspaper, allow the paper to catch on fire and cover with the lid. (Do not take the lid off the can until your piece has cooled completely).
When your piece has cooled clean your piece as it comes out of the can with a stiff brush or green kitchen scrubby to lean off the carbon.
Begin with properly fired shelf cone 04 bisque. Moisten a clean sponge and wipe bisque to remove any dust.
Using CB-604 #4 Soft Fan, brush 2-3 coats of SC-34 Down To Earth to the plate. This color must be dry before proceeding.
Pencil in 2 circles for the flowers and smaller circles for the centers. Also pencil in the stem and leaves.
Using CB-106 #6 Script Liner, brush the outer circle shape for the petals with 1 coat of SC-16 Cotton Tail, this will help the SC-6 Sunkissed color show up. Brush over the Cotton Tail with 2 coats of SC-6 Sunkissed, use in a “press and lift” motion for the petals.
Using CB-106 #6 Script Liner, brush 2 coats of SC-75 Orange A Peel to the center of the flowers.
Using CB-106 #6 Script Liner, brush the stem and leaf with 1 coat of SC-27 Sour Apple and 1 coat of SC-26 Green Thumb.
While these colors are damp, use the sgraffito tool to outline the petals, and to make circles in the orange centers, also small lines at the base of the petals.
Using CB-604 #4 Soft Fan you work on the top half of the plate for the blue back ground. Starting at the middle of the plate you will work toward the top of the plate by applying 1 coat of SC-31 The Blues, but stop about 1 1/2 inches from the rim. Then in the middle of the SC-31 use the CB-604 #4 Soft Fan brush and apply 1 coat of SC-76 Cara-Bein blue over the SC-31 The Blues all the way to the edge of the plate. Repeat with one more coat. This gives you subtle variation of blue
While the blue is still damp sgraffito the circles into the glaze to reveal the brown. Take care not to scratch all the way to the bisque.
On the lower half of the plate use the CB-604 #4 Soft Fan Brush and work your way down by apply 1 coat SC- 6 Sunkissed , but stop about 1 inch from the rim of the plate. Now apply 1 coat of and SC-27 Sour Apple to the lower half, starting in the middle of the SC-6 Sunkissed and go all the way to the rim of the plate. Repeat 1 more time.
While the color is damp use the sgraffito tool to draw in circles in different sizes, touching each other.
While the color is damp use the sgraffito tool to draw in circles in different sizes, touching each other.
With the opposite end of the brush, dot the centers of the flowers with SC-34 Down to Earth and SC-6 Sunkissed around the edges.
Using CB-110 #10/0 Mini Liner, brush SC-34 Down to Earth around the petals, for more definition.
Using CB-604 #4 Soft Fan, brush 3 coats of SC-76 Cara bein Blue to the back of the plate.
Once plate is fully dry, using CB-604 #4 Soft Fan, brush the top of the plate with 1 coat of S-2101 Crystal Clear Brushing or dip in clear.
Begin with properly fired shelf cone 04 bisque. Moisten a clean sponge and wipe bisque to remove any dust.
Cut out the pattern. Trace around the pattern onto the tile.
Use the Script Liner to apply two coats of SC-26 Green Thumb to the leaves. Add SC-6 Sunkissed to highlight.
Use the Script Liner to apply two coats of SC-6 Sunkissed to the petals. Add SC-97 Cant-elope to the brush to darken some of the petals. Shade the petals near the center with SC-81 Cinnamon Stix.
Use the Script Liner to dab the center of the flower with two coats of SC-26 Green Thumb, SC-81 Cinnamon Stix and SC-34 Down to Earth.
Use the Soft Fan to brush water over the painted sunflower. Place the paper pattern onto the tile and press to adhere to the tile. Gently press with a paper towel to remove excess water and ensure the edges are sealed.
Use the Soft Fan to apply two coats of EL-118 Blue Grotto to the background of the tile. When dry, apply two coats of SC-97 Cant-elope around the flower head. Apply two coats of SC-42 Butter Me Up to the remainder of the tile, blending the colors together.
Begin with properly fired shelf cone 04 bisque. Moisten a clean sponge and wipe bisque to remove any dust.
Use the Soft Fan to apply two coats of SC-73 Candy Apple Red to the tile.
Cut out the pattern of the pear with leaf and stem. Trace around the pattern on the tile.
Apply another coat of SC-73 Candy Apple Red. While the glaze is wet place the eyelash yarn into the glaze. Allow some of the yarn to extend over the edges of the leaf and around the pear.
Apply SC-73 Candy Apple Red over the eyelash yarn so it sticks to the tile. When it begins to dry, pat with a paper towel to remove glaze, this will speed up drying.
Wet the area of the pear and leaf on the tile. Place the paper pattern onto the tile and press to adhere to the tile. Gently press with a paper towel to remove excess water and ensure the edges are sealed.
Use the Soft Fan to apply one coat of EL-130 Sea Green to the tile.
Remove the paper. Apply two coats of SC-27 Sour Apple to the pear area, leaving a red border around the pear. Apply two coats of SC-26 Green Thumb to the leaf and two coats of SC-14 Java Bean to the stem.
Remove the eyelash yarn when the gloss leaves the glaze.
1. Begin with properly fired shelf cone 04 bisque. Moisten a clean sponge and wipe bisque to remove any dust.
2. Use the Soft Fan to apply three coats of SC-76 Cara-Bein Blue to the back of the plate.
3. Use the Soft Fan to apply three coats of FN-001 White to the front of the plate.
4. Combine two teaspoons of SC-28 Blue Isle with two teaspoons of water and add a drop of dish soap. Mix well.
5. Using the straw, blow into the mixture until it starts to bubble over the cup. Let the bubbles fall onto the front of the plate.
6. Repeat steps 4-5 with SC-10 Teal Next Time
7. Using a pencil and the clay carbon paper, transfer the pattern onto the front of the plate.
8. Using the CB-106 Script Liner, apply 2 coats of SC-97 Cant-Elope to every other fish. Apply 2 coats of SC-74 Orange-A-Peel to the remaining fish.
9. Using the CB-106 Script Liner, apply 2 coats of SC-13 Grapel to the octopus. Wet blend SC-33 Fruit of the Vine into the Grapel near the edges of the octopus.
10. Dip the eraser of a pencil into SC-16 Cotton Tail a dab onto the fish for eyes.
Begin with a properly fired shelf cone 04 bisque. Moisten a clean sponge and wipe bisque to remove dust.
Trace on the pattern of leaf and veins, outline with SG-401 Black, while the black is wet, use CB-106 Script Liner, wet, to drag the black from the veins and edges of leaf to shade.
Use SG-401 Black to shade heavily on the background around the leaf and the edges of the tile.
Use a sponge on a stick to pat ST-110 Paint Splatter Stamp with SG-401 Black, press to the leaf design. This will give the leaf an aged look.
Brush two coats of EL-133 Autumn to the leaf and a couple of inches past, brush EL-132 Rust into the Autumn for the remainder of the tile. Two coats, use CB-604 Soft Fan.
Begin with properly fired shelf cone 04 Bisque. Moisten a clean sponge and wipe bisque to remove any dust making sure not to over saturate the bisque.
Use SL-433 Crooked Lines Stencil to trace the fence and post onto the tile for placement.
Place SC-15 Tuxedo on a palette or tile and sprinkle with AC-310 Silkscreen Medium. Using a palette knife mix color and medium to the consistency of thick peanut butter. If the mix is too thin add more AC-310 Silkscreen Medium or if it is too thick add more Stroke & Coat. Too thin of a mixture will bleed under the screen and give you a blurred image. Too thick of a mixture will make it hard for the product to penetrate through the holes in the screen and result in blank areas on your screen.
Position the Rooster screen from DSS-128 The Farm, shiny side down on the top of the fence and hold in place. Starting from the center out, rub the mixture on the screen with your finger. Lift a corner up to check if enough color is going through. Remove the screen and wash with water. Do not let the color dry in the screen. This will cause damage to the screen.
Use the group of daisies from DSS-0138 Floral 2, screen, as above, to the background of the tile.
Use the Script Liner to apply two thinned coats of SC-27 Sour Apple to the foreground of the tile. Dab with thinned SC-26 Green Thumb.
Thin SC-11 Blue Yonder like water. Use the Script Liner to spread the color around the flowers and rooster in the sky area.
Apply a coat of SC-24 Dandelion tipped with SC-97 Cant-elope to the daisies. Apply SC-75 Orange A Peel to the centers.
Use the Liner to apply one coat of SC-74 Hot Tamale to the cone and waddle. Apply one coat of SC-97 Cant-elope to the beak and legs.
Place SL-433 Crooked Lines stencil onto the tile to create the fence. The fence should be just under the rooster’s feet; leave space for the rail. Pick up SG-501 Sculpting Medium with a squeegee or card, scrape against the stencil, lift off. Repeat for the rail.
Use the Liner to outline the fence with SC-15 Tuxedo. Screen daisies with SC-15 Tuxedo between the rail in some of the spaces.
Use the Script Liner to apply one coat of S-2101 Clear to the tile, avoiding the fence. This will allow the fence to remain matte.
1. Begin with properly fired shelf cone 04 bisque. Moisten a clean sponge and wipe bisque to remove any dust.
2. For the body of the hedgehog, brush two blended coats of SC-86 Old Lace with SC-83 Tip Taupe, brush mostly with the Old Lace, brushing in Tip Taupe for more interest.
3. Cut a toilet paper roll in half lengthwise then make cuts in the short side to look like fringe about two inches long, cut widths vary between 3/8 and 1/2 inch. Trim the widths so that there is a small space between them when they lay flat.
4. Start stamping at the back, sponge the toilet paper roll with SC-34 Down To Earth, tip the fringe with SC-15 Tuxedo, press to the back, you will need to repeat the stamp till the glaze builds on the cardboard roll, overlap the stamping, add in SC-14 Java bean to some of the stamps for more interest.
5. Brush the head with two coats fo SC-86 Old Lace blending with SC-60 Silver Lining, use the fan brush. Stamp with SC-35 Gray Hare.
6. Paint the nose with SC-15 Tuxedo, eyes are first glazed with SC-16 Cotton Tail, SC-14 Java Bean for the eye, SC-15 Tuxedo outline, eyelashes, and pupil, use RB-110 Liner. Stoke in a line for the mouth and dots for freckles use Tuxedo. Shade with SC-15 Tuxedo around the nose, under the eye and around the head, use SC-15 Tuxedo with RB-106 Script Liner.
7. Dip into NT-CLR Clear Dipping or use the Soft Fan to apply one coat of or NT-BR Clear Brushing Glaze.
8. Fire to cone 05/06.
Form
MB-1452 Hedgehog Bank
Colors
SC-14 Java Bean
C-15 Tuxedo
SC-16 Cotton Tail
SC-34 Down To Earth
SC-35 Gray Hare
SC-60 Silver Lining
SC-86 Old Lace
SC-83 Tip Taupe
NT-CLR Clear Dipping or NT-BR Clear Brushing Glaze
Begin with a properly fired shelf cone 04 Bisque. Moisten a clean sponge and wipe bisque to remove dust.
Cut out the pattern, position on the tile, trace loosely around the designs.
Brush the crow with two coats of SC-15 Tuxedo, the beak with 2 coats of SC-5 Tiger Tail. Leaves and stem with 2-3 Coats of SC-73 Candy Apple Red, and SC-75 Orange-a-Peel, blend one color into the other. Use CB-106 Script Liner. Brush slightly past the pencil line.
Place the crow first, brush water over the crow, lay on the paper crow to the painted one, press with a paper towel, remove gaps.
Repeat for the leaves and stem.
Remove excess glaze from outside of the paper, scrape excess, then gently sponge off the remaining glaze.
Brush the tile, with two coats of EL-118 Blue Grotto, use CB-604 Soft Fan. Let dry.
Brush the tile with one coat of SC-11 Blue Yonder, over the entire tile, with CB-604 Soft Fan, brush on a second coat of SC-11 Blue Yonder, add SC-16 Cotton Tail to the edges of the tile, this will lighten the blue.
Pull off the paper.
If white bisque shows, repair with glaze.
Dot the eye with SC-16 Cotton Tail with the end of a small brush. Dot the center of the white with SC-15 Tuxedo.
1. Begin with properly fired shelf cone 04 bisque. Moisten a clean sponge and wipe bisque to remove any dust.
2. Dremel a hole just above the hands, and below the hands for the flower.
3. Brush two coats of SC-1 Pink A Boo to the inside of the ears and the cheeks.
4. Brush the remainder of the mouse with two coats of SC-60 Silver Lining with RB-144 Soft Fan.
5. Cut a toilet paper roll in half lengthwise, then make cuts in the short side to look like fringe about 2 inches long., cut sizes vary between 3/8 inch and 1/2 inch. Trim the thickness between cuts so that there is a small space between them when they lay flat.
6. Start at the top of the head, sponge the toilet roll fringe with SC-35 Gray Hare, press to the mouse, for the first couple of stamps, you will need to repeat till glaze builds up on the toilet roll. Stamp in rows, overlapping stamps. Use SC-32 Bluebeard to apply to the toilet roll with the sponge so that all the stamped design is not the same color.
7. Stamp into the ears over the pink glaze at the edges, same for the cheeks, stamp the entire mouse.
8. Brush the nose with SC-15 Tuxedo, outline the mouth, hands, whiskers, and inside of the ears. Float SC-15 Tuxedo inside the ears, around the arms and feet for shadow. Eyes are SC-16 Cotton Tail, pupils and eyelashes with SC-15 Tuxedo use RB-110 Liner.
9. Fire to cone 05/06.
Form
MB-1453 Roly Poly Mouse Bank
Colors
SC-1 Pink-A-Boo
SC- 15 Tuxedo
SC-32 Bluebeard
SC-35 Gray Hare
SC-60 Silver Lining
NT-CLR Clear Dipping or NT-BR Clear Brushing Glaze
1. Begin with a properly fired shelf cone 04 Bisque. Moisten a clean sponge and wipe bisque to remove dust.
2. Use CB-604 Soft Fan to brush 1-2 coats of SC-15 Tuxedo to the tile.
3. Use an old credit card or key card, to apply SC-74 Hot Tamale, and SC-97 Cant-elope over the Black glaze. Pick up the color from a palette, with both colors on the card, drag the card at a slight angle to the tile. The glaze will blend as you apply. Two coats.
4.Let dry.
5. Brush one heavy coat of SC-27 Sour Apple to the SL-432 Stonework Stencil. Press to the painted tile while the Sour Apple is wet.
6. Press around the stencil with your fingers to secure the stencil to the tile.
7. Put SG-501 Sculpting Medium into AC-223 Large Writer Tip bottle with the plastic applicator. Squeeze lines of the Sculpting Medium over the stencil in rows. Different thickness is desirable. Before it is dry, use the card to flatten the lines of Sculpting Medium.
8. Once the gloss leaves the Sculpting Medium, roll SC-15 Tuxedo over the stencil, darkening the Sculpture Medium.
Begin with a properly fired shelf cone 04 Bisque. Moisten a clean sponge and wipe bisque to remove dust.
Brush 2-3 Coats of EL-141 Aged Bronze to the tile with CB-604 Soft Fan.
When dry, brush the tile with water, place the SL-452 Victorian Stencil over the wet surface, press with a paper towel to remove gaps. With a damp sponge, sponge away the glaze that is inside of the stencil.
Plop 1-2 coats of CG-795 Yardro Print (with crystals) into the flower area, and CG-716 Pagoda Green into the leaf areas of the stencil. Use CB-106 Script Liner.
When the gloss leaves the glaze, pull off the stencil.
Apply three coats of S-2101 Crystal Clear to inside of pot allowing to dry between coats.
Using the glaze atomizer, spray from the bottom of pot upwards with SC-76 Cara-Bein Blue. Application of glaze should gradually fade to no glaze at all.
Fire pot in Raku kiln to 1850 degrees Farenheight.
Pull pot from the kiln while hot.
Carefully drape horsehair on pot.
As the hair burns away, it leaves squiggly lines where it touched the pot.
Begin with properly fired shelf cone 04 bisque. Moisten a clean sponge and wipe bisque to remove any dust.
Using a CB-604 #4 Soft Fan brush on 2 coats of FN-009 Black on the tile.
Cut out the paper ants.
Dampen the area for the ant placement. Place the paper ants on the tile and wet the paper with a brush of water. Press down paper with paper towels. This will press the paper into the glaze and avoid any leaking of glaze. Make sure you remember you ant placement.
Brush on 2 coats of SC-27 Sour Apple over the tile and the paper ants.
Pencil on a center stem and direction of the leaf veins.
Brush back over the area with SC-27 Sour Apple under where the raffia will be placed. Place the raffia at angles (to mimic veining of a leaf) into the wet glaze then press with your fingers to get it to stick.
Brush a coat of SC-36 Irish luck over the tile. Mix SC-27 Sour Apple with SC-36 Irish Luck to get variations of color.
When the glaze begins to dry, remove the raffia and the paper ants.
With CB-110 #10/0 Liner, stroke in a center vein with SC-34 Down To Earth.
Begin with properly fired shelf cone 04 Bisque. Moisten a clean sponge and wipe bisque to remove any dust.
Slightly thin FN-024 Gray with water, pour inside of the car and turn to coat. Pour out the excess glaze and drain. Use the Soft Fan to apply two or three to the inside of the windshield.
Pencil in the line to divide the pink from the white area of the car. Use the Soft Fan to apply three coats of SC-1 Pink-A-Boo to the pink area. Use the Script Liner to shade the shadow areas of the pink parts of the car with SC-17 Cheeky Pinky.
Use the Soft Fan to apply three coats of SC-91 Seabreeze to the windshield. Use the Script Liner to apply three coats of SC-60 Silver Lining to the bumpers, grill, hub cabs and window trim.
Use the Script Liner to float SC-35 Gray Hare around the pink section of the car where it meets the white.
Thin SC-15 Tuxedo to a water-like consistency. Use the Script Liner to apply the color over the hubcaps and the front grill to antique. When dry, scrub back with a wet flat brush to remove some of the Tuxedo from the high areas to further enhance the detail.
Use the Script Liner to apply three coats of SC-74 Hot Tamale to the tail lights. Apply two coats of SC-15 Tuxedo to the tires.
Use the Script Liner to shade the windshield and bumpers with the thinned SC-15 Tuxedo. Use the Liner to outline the windshield, car doors and around the bumpers with the thinned Tuxedo.
Dip into NT-CLR Clear Dipping Glaze or use the Soft Fan to apply two coats of Nt-BR Clear One Brushing Glaze.
Fire to cone 05/06.
Form
MB-1528 Vintage Convertible
Colors
SC-1 Pink-A-Boo
SC-15 Tuxedo
SC-17 Cheeky Pinky
SC-35 Gray Hare
SC-60 Silver Lining
SC-74 Hot Tamale
SC-91 Seabreeze
FN-024 Gray
NT-CLR Clear Dipping or NT-BR Clear One Brushing Glaze
1. Begin with properly fired cone 04 bisque. Moisten a sponge and wipe bisque to remove any dust.
2. Using a combination of the Soft Fan, Script Liner and Detail Liner, apply one coat of SC-97 Cant-elope to the corresponding sections of the bus.
3. Using a combination of the Soft Fan, Script Liner and Detail Liner, apply one coat of SC-52 Toad-ily Green to the corresponding sections of the bus.
4. Using a combination of the Soft Fan, Script Liner and Detail Liner, apply one coat of SC-55 Yella Bout It to the corresponding sections of the bus.
5. Using a combination of the Soft Fan, Script Liner and Detail Liner, apply one coat of SC-48 Camel Back to the corresponding sections of the bus.
6. Repeat steps 2-5 for the second coat of glaze. Allow second coat to dry completely.
7. Squeeze around a Tablespoon of SC-75 Orange-A-Peel onto the plate. Take the ST-128 Zebra Stamp and place it design-side up. Take the Sponge on a Stick and gently dab the bottom of the sponge into the glaze. Blot off any excess onto the bare portion of the plate, then sponge onto the stamp. Take the stamp and gently press onto the top of the bus. Repeat until the top is covered.
8. Squeeze around a Tablespoon of SC-39 Army Surplus onto the plate. Take the ST-127 Crackle Stamp and place it design-side up. Take the Sponge on a Stick and gently dab the bottom of the sponge into the glaze. Blot off any excess onto the bare portion of the plate, then sponge onto the stamp. Take the stamp and gently press onto the areas of the bus glazed with SC-52 Toad-ily Green.
9. Squeeze around a Tablespoon of SC-34 Down to Earth onto the plate. Take the MT-007 Divots Mat and place it design-side up. Take the Sponge on a Stick and gently dab the bottom of the sponge into the glaze. Blot off any excess onto the bare portion of the plate, then sponge onto the mat. Take the mat and gently press onto the areas of the bus glazed with SC-48 Camel Back.
10. Using SC-6 Sunkissed and the Detail Liner, apply two coats of glaze to the headlights. Allow glaze to dry between coats.
11. Using SC-74 Hot Tamale and the Detail Liner, apply two coats of glaze to the taillights. Allow glaze to dry between coats.
12. Using SC-35 Gray Hare and the Script Liner, apply two coats of glaze to the tires, grille and bumper. Allow glaze to dry between coats.
13. Mix SC-15 Tuxedo with water and apply to windows using a dagger brush. Use water to blend.
14. Using SC-15 Tuxedo and the Detail Liner, outline the sections of the bus. Using the Script liner, glaze around the bottom of the bus. Using a Fan Brush, glaze the bottom of the bus.
15. Using the Soft Fan, apply two coats of S-2101 Clear Brushing Glaze to the bus or dip into NT-CLR Clear Dipping Glaze.
16. Fire to cone 06.
Form
MB-1483 Double Decker Bus Bank
Colors
SC-6 Sunkissed
SC-15 Tuxedo
SC-34 Down To Earth
SC-35 Gray Hare
SC-39 Army Surplus
SC-48 Camel Back
SC-52 Toad-ily Green
SC-55 Yella Bout It
SC-74 Hot Tamale
SC-75 Orange-A-Peel
SC-97 Cant-elope
NT-CLR Clear Dipping or S-2101 Crystal Clear Brushing Glaze
Begin with properly fired cone 04 bisque. Moisten a sponge and wipe bisque to remove any dust.
2. Using a CB-604 #4 Soft Fan, apply two coats of FN-001 White to the front of both the pinwheels.
For the Patriotic pinwheel:
3. Use the paper punch to cut some stars out of paper (if you don’t have one available you can cut them out with scissors). Wet the stars and place them on the pinwheel. Gently press on the stars to remove air bubbles and ensure edges are sealed. Once they are cut adhere them to the top folds of the pinwheel (the more raised part). I applied about 4 stars in each section. Sometimes it helps to snap a photo so you don’t forget where you put the paper!
4. Once the stars are secure, use the Soft Fan to apply two coats of FN-041 Medium blue to cover that section.
5. Once the glaze has lost it shine, but before it is bone dry, remove the paper stars.
6. Using a CB-106 #6 Script Liner, apply three coats of FN-004 REd to create stripes in the lower fold of the pinwheel. You may want to sketch this out with a pencil first to make sure they are even. I contoured the stripes to the shape of the form so there is some variation in the size.
7. Using a CB-604 #4 Soft Fan, apply three coats of FN-041 Medium blue to the back of the pinwheel.
For the peppermint pinwheel:
8. Using a CB-106 #6 Script Liner, apply three coats of FN-004 Red to create the stripes on both levels of the pinwheel. Similar to the first one it may be easier to sketch them out first with pencil and contouring the stripes to the shape of the form will help.
9. Using a CB-110 #10/0 Mini Liner, apply two coats of SC-8 Just froggy creating two thinner srtipes in between some of the red ones.
10. Using a CB-604 #4 Soft Fan, apply three coats of FN-004 Red to the back of the pinwheel.
1. Begin with properly fired shelf cone 04 Bisque. Moisten a clean sponge and wipe bisque to remove any dust.
2. Use the Soft Fan to apply one coat of FN-001 White onto the tile.
3. Using a palette knife, thicken SC-15 Tuxedo with AC-310 Silkscreen Medium to the consistency of peanut butter. The glaze should be almost dry before applying the screen. Hold the screen shiny side down on the tile, rub the thickened SC-15 Tuxedo over the screen with your finger, remove the screen, wash gently.
4. Cut the tips of the detailer bottles so that a small hole appears. Fill half of one bottle with SC-73 Candy Apple Red and the rest of the bottle with rubbing alcohol, stir and shake to mix. Fill the second bottle with SC-97 Cant-elope and repeat the process. Make a third Detailer bottle with SC-26 Green Thumb mixed with alcohol.
5. Use the Soft Fan to apply one heavy coat of CG-963 Lemon-Lime around the rabbit screen. Drop small droplets of the alcohol mix of SC-73 Candy Apple Red and SC-97 Cant-elope into the wet glaze, leaving room for it to expand. Double or triple drop color for a deeper color as it begins to dry. Drop 2-3 dots of SC-26 Green Thumb next to the colorful dots for leaves.
1. Begin with properly fired shelf cone 04 Bisque. Moisten a clean sponge and wipe bisque to remove any dust.
2. Refer to the picture for color placement. Use the narrow tape to section off the rectangles of color on the roof of the bus. Use the various brushes to apply three coats of the Foundations (FN) colors listed above.
3. Use the Pointed Round to apply one coat of SC-15 Tuxedo into the windows and tires.
4. Use the Script Liner and one coat of SC-15 Tuxedo to outline the windows and to separate the colors.
1. Begin with properly fired shelf cone 04 Bisque. Moisten a clean sponge and wipe bisque to remove dust.
2. Use the Soft Fan to apply two thinned coats of SC-86 Old Lace to the area under the mouth.
3. Use the Soft Fan to apply two thinned coats of SC-94 Curry Around to the body, tail and legs.
4. Use the Soft Fan to apply two thinned coats of SC-75 Orange-A-Peel to the feet, lower legs and mouth area, brushing over the Curry Around.
5. Use the same brush to apply one thinned coat of SC-97 Cant-elope over the back of the gecko.
6. When dry, use a sponge on a stick to pat SC-15 Tuxedo over ST-346 Animal Print Stamp. Press the stamp onto the body, legs, and tail of the gecko.
7. Use the Script Liner to shade between the legs and the body with SC-15 Tuxedo.
8.Use the Liner to apply two coats of SC-25 Crackerjack Brown to the eyes and two coats of SC-15 Tuxedo to the pupil. Outline the eyes with SC-15 Tuxedo.
9. Dip into NT-CLR Clear or use the Soft Fan to apply one coat of S-2101 Clear Brushing Glaze.
10. Fire to cone 05/06.
Form
CD715 Medium Gecko Mold or MB-714 Medium Gecko Bisque
Colors
SC-15 Tuxedo
SC-25 Crackerjack Brown
SC-75 Orange-A-Peel
SC-86 Old Lace
SC-94 Curry Around
SC-97 Cant-elope
NT-CLR Clear Dipping or S-2101 Clear Brushing Glaze
Begin with properly fired shelf cone 04 bisque. Moisten a clean sponge and wipe bisque to remove any dust.
Using a Palette Knife, stir the SG-501 Sculpting Medium thoroughly. Apply a thick coat onto the pinwheel and as it sets up pull the pallet knife through it to create ridges.
Using a CB-604 #4 Soft Fan, apply 3 coats of SC-27 Sour Apple to the inside fold of the pinwheel and SC-97 Cant-Elope to the back, sides, and center pin.
Using a CB-604 #4 Soft Fan, apply 1 thinned coat of SG-411 Purple Designer Liner on top of the Sculpting Medium.
Begin with properly fired shelf cone 04 bisque. Moisten a clean sponge and wipe bisque to remove any dust.
Using a CB-604 #4 Soft Fan, apply a thinned coat of SC-34 Down to Earth to the shell. be sure to apply it going with the direction o the swirl.
Also, apply a thinned coat of SC-29 Bluegrass to the body of the snail and use a sponge to antique it.
Using a CB-604 #4 Soft Fan, apply 2 coats of SC-25 Crackerjack Brown to the shell.
Using a CB-106 #6 Script Liner, apply 2 coats of SC-11 Blue yonder to the body of the snail and 2 coats of SC97 Cant-Elope to the belly.
Using a CB-110 #10/0 Mini Liner, apply 1 coat of SC-16 Cotton Tail to the eyes. Apply 1 coat of SC-52 Toad-ily green to the iris, and 1 coat of SC-15 Tuxedo to the pupils and outline of the eyes and mouth.
Using a CB-106 #6 Script Liner apply 2 coats of SG-302 Snowfall on top of the shell. Apply a thinned coat of SC-34 Down to Earth and SC-52 Toad-ily green to make it look like moss.
Begin with properly fired shelf cone 04 bisque. Moisten a clean sponge and wipe bisque to remove any dust.
Using a CB-604 #4 Soft Fan, apply 3 coats of SC-25 Crackerjack Brown to the shell and 3 coats of SC-51 Poo Bear to the belly and back of the turtle.
Using a CB-106 #6 Script Liner, apply 1 thinned coat of SC-34 Down to Earth to the rest of the turtles body. Use a sponge to antique the details.
Using a CB-106 #6 Script Liner, apply 1 coat of SC-52 Toad-ily Green to the turtle, apply 1 coat of SC-27 Sour Apple to the high points to add variation, and fill in the rest with another coat of SC-52 Toad-ily Green.
Using a CB-110 #10/0 Mini Liner, apply 1 coat of SC-16 Cotton Tail to the eyes and toenails. Apply 1 coat of SC-11 Blue Yonder as the iris, and 1 coat of SC-15 Tuxedo as the pupil and the outline. Also, outline the mouth and nose.
Using a CB-604 #4 Soft Fan, apply 3 coats of SG-202 White Cobblestone to the top of the shell. Once the Cobblestone is dry enough to touch, but before it begins cracking, apply 1 coat of SC-34 Down to Earth on top.
Using a CB-106 #6 Script Liner, apply 2 coats of SG-302 Snowfall randomly around the edge of the shell.
Once dry, apply a thinned coat of SC-34 Down to Earth and SC-52 Toad-ily Green so the snowfall resembles moss.
Begin with properly fired shelf cone 04 bisque. Moisten a clean sponge and wipe bisque to remove any dust.
Using the Soft Fan, apply 3 coats of SC-77 Glo Worm to the inside folds of the pinwheel and 3 coats of SC-29 Bluegrass to the outside folds and the back.
Using the same brush, apply 3 coats of SG-202 White Cobblestone on top of the Bluegrass.
Once the Cobblestone is dry to the touch, but not cracking yet, use the Soft Fan or Script Liner to apply 1 thinned coat of SC-97 Cant-elope.
1. Begin with properly fired shelf cone 04 bisque. Moisten a clean sponge and wipe bisque to remove any dust.
2. Thicken SC-15 Tuxedo with AC-310 Silkscreen Medium using a palette knife to the consistency of peanut butter. Make a pattern of the whale by screening the whale image from DSS-0131 Sea Life 2 onto copy paper. Place the silkscreen shiny side down and rub the thickened tuxedo over the whale. Make a photocopy of the pattern, then cut out the shape.
3. Place the whale cutout onto the clipboard and trace around the outside. Use the Soft Fan to apply two coats of SC-16 Cotton Tail to the inside of the whale area. Let the glaze dry a bit, then we the glaze with stick on the paper whale pattern onto the painted area. Press down firmly with a paper towel to remove excess water and ensure the edges are sealed.
4. Use an old credit card to spread on two coats of SC-11 Blue Yonder onto the clipboard.
5. Cut lengths of raffia. Spread them flat, but slightly curved pattern, into the wet SC-11 Blue Yonder. Work in sections so the glaze is wet when the raffia is applied.
6. Use the credit card to spread two coats of SC-76 Cara-Bein Blue to the top of the clipboard, scraping against the raffia.
7. Remove the raffia.
8. Thicken SC-15 Tuxedo with AC-310 Silkscreen Medium using a palette knife, to the consistency of peanut butter. With the shiny side down, place the whale from DSS-0131 Sea Life 2 in the space on the plate from the paper template. Rub the mixture over the screen with your fingers. Gently clean the screen.
9. Dip into NT-CLR Clear Dipping Glaze or use the Soft Fan to apply one coat of S-2101 Clear Brushing Glaze.
7. Fire to cone 05/06.
Form
MB-1461 Clay Clipboard
Colors
SC-11 Blue Yonder
SC-15 Tuxedo
SC-16 Cotton Tai
SC-76 Cara-Bein Blue
NT-CLR Clear Dipping or S-2101 Clear Brushing Glaze
1. Begin with properly fired cone 04 bisque. Moisten a sponge and wipe bisque to remove any dust.
2. Using a CB-604 Soft Fan, apply 2 coats of FN-040 Pumpkin to the outside and head of the cat and 2 coats of FN-032 Canton Jade to the outside and head of the dog.
3. Using the 1/2″ circle paper punch, cut some circles out of paper.
4. Wet circles with water and adhere them randomly to the outside of both bowls. Press gently on the paper to remove air bubbles and ensure the edges are sealed.
5. Once the paper is secure, use a CB-604 #4 Soft Fan to apply two coats of SC-88 Tu Tu Tango to the entire cat bowl and two coats of SC-9 Jaded to the entire dog bowl.
6. While the glaze is still moist apply a swirl of eyelash yarn into the center of the bowl. You may need to use your fan brush to apply a bit more of the base and spread out the “eyelashes” on the yarn.
7. Once the glaze securing the yarn is mostly dry, apply one coat of SC-16 Cotton Tail to the inside of the bowl.
8. Using a CB-106 #6 Script Liner, apply one coat of SC-16 Cotton Tail to the pads of the feet and the eyes of both bowls.
9, Using a CB-110 #10/0 Mini Liner, apply one coat of SC-15 Tuxedo to outline the details of the bowls. Apply one coat of SC-25 Crackerjack Brown to the irises of the dog and one coat of SC-11 Blue Yonder to the irises of the cat.
Tape off the top section of box bottom (about 1” from the top – this is where red paint will be). Smoothing edges to keep paint from going under tape edge.
Sponge paint 1 good coat on the bottom of the box using SC45 My Blue Heaven all the way to the taped off area.
Wet fish cutouts in light blue paint/water and apply to the painted area in a wave pattern (have one fish going up, next going down, etc.). Be sure to smooth out wrinkles to prevent paint from going underneath fish cutouts.
Sponge paint 12 good coats of SC75 Carabein blue. Paint just slightly above the fish cutouts, following the wave of the fish cutouts, leaving some of the SC45 My Blue Heaven paint to show.
Remove fish cutouts. Paint in the area, alternating between SC6 Sunkissed and SC24 Dandelion fish. Paint in fish details (fins) with opposite color…ex. SCSunkissed fish, SC 24 Dandelion details. Using SC15 Tuxedo paint, dot eye using the end of paintbrush or toothpick.
Remove tape and paint area taped 3 coats of SC74 Hot Tamale. Paint the box top red – 3 coats. Paint the “handle” on box top the SCS75 Carabein Blue used on the bottom.
Paint the fish addon combination of yellows.
Dip into NT-CLR clear glaze and fire to cone 06.
Assembly
Fold the Twisteez wire in half.
Loop the wire through the box top handle and run the other 2 ends through the small hole in fish addon tail extending the end about 1” through the hole.
Using a small paintbrush end, wrap the ends of the wire around the end to make curlicue in the wire.
Bend the middle of the wire to make the fish appear to be floating off the bobber!
Form
MB-865 Ornament Box
ADD-313 Fish Add-On (Chesapeake Ceramics – drill small hole in tail)
Begin with properly fired shelf cone 04 bisque. Moisten a clean sponge and wipe bisque to remove any dust.
Using a CB-604 #4 Soft Fan, apply 2 coats of FN-001 White to the outside of the bisque piece.
Once dry, coat a CB-110 #10/0 in AC-525 Brush Cleaner then apply 1 coat of AC-302 Wax resist to create scallops all around the paint can. (if you’re not confident in your spacing abilities try to lightly draw scallops around the piece in pencil first.)
In a small dish, combine 2 parts glaze to 1 part water and add 1 drop of dish soap. Mix together and use a straw to blow into the mixture which will create bubbles. Dip the piece into the bubble moud you’ve created. Repeat this step until the entire surface has been covered in bubbles.
Do the same step, using SC-10 Teal ext time and again with SC-33 Fruit of the vine. Be sure the layers dry in betweeen.
Using a CB-604 #4 Soft Fan, apply 1 coat of FN-216 Seaq Glass to the entire outside of the piece. Be sure to wipe up and glaze that may be pooled on the resist.
Using a CB-604 #4 Soft Fan, apply 3 coats of FN-028 Wisteria Purple to the inside of the piece.
Lay the SL-440 Twirls Stencil over the body of the Hedgehog, use the foam roller with SC-8 Just Froggy to gently roll on the color. Roll in different directions, very gently to avoid bleeding.
Use the foam roller to roll SC-15 Tuxedo to the ST-129 Mini Fern Stamp, stamp to the body in a sporatic fashion, (don’t cover the entire surface).
Brush the head with three coats of SC-96 Aqu-ward with CB-604 Soft Fan.
Brush the body of the hedgehog with two coats of S-2714 Herb Garden with CB-604 Soft Fan.
Brush one coat of Herb Garden to the face, staying away from the eyes.
Brush the nose with one coat of SG-401 Black, leave it without glaze for a matt finish.
Outline the eye and stroke in the eyelashes with CB-110 Liner, using SG-401 Black.
Brush the body of the hedgehog with 3-4 coats of FN-047 LIght Pink with CB-604 Soft Fan.
When dry, lay the SL-431 Bloom stencil over sections of the hedgehog, use the 2″ foam roller to gently roll over the stencil with SC-1 Pink A Boo.
Punch out circle shapes from the various punches, use the negative space from the circle punch. Carefully wet the area to attach the paper template.
Lighten SC-83 Tip Taupe with SC-16 Cotton Tail, brush this mix over the circle shapes created with the paper template, and the head section of the hedgehog, three coats. Remove the paper.
When dry, use a sponge with SC-17 Cheeky Pinky to sponge color to the cheeks.
Use the 2″ foam roller to roll SC-17 Cheeky Pinky over the ST-129 Mini Fern Stamp, stamp to the head section.
Brush the nose with one coat of SG-401 Black, outline around the head and eyelids, stoke in the eyelashes with SG-401 Black using CB-110 Liner.
Leave the nose unglazed for a matt finish. Apply one coat of clear to the remainder of the hedgehog.
Stilt and fire to cone 05/06.
Form
MB-1452 Hedgehog Bank
Colors
FN-047 Light Pink
SC-1 Pink-A-Boo
SC-16 Cotton Tail
SC-17 Cheeky Pinky
SC-83 Tip Taupe
SG-401 Black
NT-CLR Clear Dipping or S-2101 Clear Brushing Glaze
Begin with properly fired shelf cone 04 bisque. Moisten a clean sponge and wipe bisque to remove any dust.
Use the CB-604 Soft Fan to apply three coats of SP-001 Speckeled Pink A Boo to the entire mouse.
Scrape off all glaze from the eyes. Let dry.
Place the SC-15 Tuxedo on a palette and sprinkle a pinch of AC-310 Silkscreen medium over the glaze. Using a palette knife, mix color and medium together to the consistency of peanut butter. With the shiny side down, hold the lady bug screen from DSS-0113 Bugs on the mouse and rub the thicked mix over the screen. Continue to reuse the screen for the random placement of the lady bugs. Wash the screen when your screened images start to get lighter.
Use CB-110 Liner to puddle one coat of SC-74 Hot Tamale on the lady bug’s body. If you go over the center line, Use the CB-110 with SC-15 Tuxedo to create an outline.
Use a sponge to dab on two coats of SC-17 Cheeky Pinky to the cheeks and inside the ears.
Use the CB-106 Script Liner to float SC-3 Wine About It inside the ears, around the arms and feet, under the smile for a shade.
Use a 2″ foam roller to apply SC-3 Wine About It to the ST-129 Mini Fern Stamp then stamp the inside of the ears.
Use the CB-110 Liner to apply the following colors: SC-16 Cotton Tail on the eyes, two coats of SC-11 Blue Yonder on iris and one coat of SC-15 Tuxedo for the pupil. Use SC-15 Tuxedo to paint the nose, outline the mouth and outline around the arms and feet.
Begin with properly fired shelf cone 04 bisque. Moisten a clean sponge and wipe bisque to remove any dust.
Using the CB-604 Soft Fan apply 3-4 coats of FN-002 Yellow onto the ducks body, avoiding the eyes.
Use the same brush to apply three coats of FN-052 Tangerine to the duck’s bill.
With a pencil, lighty draw a neck tie shape onto the duck. Use the CB-106 Script Liner to apply 2 coats of SC-15 Tuxedo, brushing in the direction of the tie sections. Leave a small space between the knot and the bow.
Shade around the wings and the curl on the duck’s head. To do this, load the CB-106 Script Liner with FN-002 Yellow then tip the brush in FN-052 Tangerine. Hold the brush flat against the shape of the wing and pull the color to outline the wing for a soft shade.
Remove excess glaze from the eyes, then use the CB-202 Detail to apply 2 coats of SC-16 Cotton Tail to the eyes. Lighten SC-76 Cara-bein blue with SC-16 Cotton Tail and apply two coats to the iris. Use the CB-110 Liner to apply SC-15 Tuxedo to the pupil and create outlines.
Begin with properly fired shelf cone 04 bisque. Moisten a clean sponge and wipe bisque to remove any dust.
Place the SL-439 Hexagons Stencil even with the edges of the clipboard. Use the 2″ foam roller to apply SC-31 The Blues over the stencil. Hold the roller handle at the tip and apply very gentle pressure. Too much pressure can result in color bleeding under the stencil. Move your roller in different directions to allow for even application. You may wish to practice on paper first. Move the stencil and repeat the rolling process to fill in the clipboard. Tip: Do not load foam roller with a lot of glaze. Take your time and the color will gradually fill the spaces.
Tape off the bottom 1 1/2″of the clipboard. Sprinkle a pinch of AC-310 Silkscreen Medium over SC-15 Tuxedo. Using a palette knife, mix color and medium together to the consistency of peanut butter. Place the Eiffel Tower silkscreen from DSS-0117 Vintage-Retro onto the clipboard, shiny side down. Rub the thickened Tuxedo over the screen. Remove the screen and clean.
Use the CB-604 Soft Fan to apply two coats of SC-91 Seabreeze onto the clipboard, extending over the edge of the taped area. Let dry.
Using AC-230 Clay Carbon paper, trace the shoe pattern onto the clipboard.
Use the CB-106 Script Liner and the CB-110 Liner to apply two coats of SC-11 Blue Yonder to the Bike’s frame, two pf SC-97 Cant-elope to the seat and basket, two coats of SC-35 Gray Hare to the handle bars, chain and brake line.
Use the CB-110 #10 Liner to apply one coat of Tuxedo to the tires.
Fill in flowers with SC-89 Cutie Pie Coral, SC-2 Melon-choly, SC-97 Cant-elope and SC-11 Blue Yonder. The leaves and vines are SC-26 Green Thumb.
Use SG-401 Black to outline the bicycle, basket and flowers and to write the words “Bike Love” (or whatever words you like).
Remove tape from the bottom of the clipboard.
Place an AC-224 Plastic Detailer Caps onto a bottle of SC-15 Tuxedo, SC-31 The Blues, SC-97 Cant-elope and SC-89 Cutie Pie Coral. Squirt lines of color in this order: SC-15 Tuxedo, SC-31 The Blues, SC-89 Cutie Pie Coral, then SC-15 Tuxedo, SC-97 Cant-elope, SC-31 The Blues, SC-15 Tuxedo.
Pull the color down to the bottom, without scraping the tile, with Xiem 10238 Deco Rib.
Dip into clear glaze or apply one coat of brush on one coat of S-2101 Clear with CB-604 Soft Fan.
Begin with properly fired shelf cone 04 bisque. Moisten a clean sponge andf wipe bisque to remove any dust.
Use the 1/2 inch tape to tape sections of the lage pinwheel, leave approximately 1/2 inch between tape. Brush the exposed sections of the pinwheel with SC-11 Blue Yonder, two coats, using the CB-106 Script Liner. Remove the tape, brush a thin line of SC-23 Jack 0’Lantern next to the Blue Yonder stripe with CB-110 Liner, two coats.
Brush the outer sections of the pinwheel with one coat of CG-788 Dutch Enamelware, make sure to brush on plenty of crystals.
Brush a light coat, thinned with water, of the SG-788 Dutch Enamelware over the striped section of the pinwheel. (Use just a small amount of crystals, spread evenly)
Brush over the Dutch Enamelware with two coats of SC-23 Jack O’Lantern with CB-604 Soft Fan. (not on the striped area)
Outline the edges of the pinweels with SG-404 Blue.
Using CB-604 Soft Fan, clear glaze the secions of the pinwheel with the stripes, make sure to brush over the SG-404 Blue, two coats.
Small pinwheel is the same as the larger one, only use the negative area of the punches circles, instead of the tape for the stripes. To get the paper templates to stick to the bisque, apply one coat of S-2101 Clear to the pinwheel, stick the paper to the wet glaze, smooth out the edges, to avoid leaking.
Stilt and fire to cone 05/06.
Form
MB-1457 Pinwheel
MB-1458 Super Pinwheel
Colors
SC-11 Blue Yonder
SC-23 Jack O’Lantern
CG-788 Dutch Enamelware
SG-404 Blue
NT-CLR Clear Dipping or S-2101 Clear Brushing Glaze
Begin with the leatherhard thrown vessel and make sure it’s been trimmed already if it’s getting trimmed (we used our brown studio clay).
Cut circles out of vessel where you want the texture windows to be.
Roll a slab out about ½” thick. Measure the size of the cutout window (if intact you can just trace the cutout piece!) and press texture mat into the slab using a roller.
Cut a piece out about ¼”-1/2” larger than the window. Slip and score the edges of both connecting pieces, align them, and press together firmly.
Smooth the edges together for a more secure connection and to smooth the interior of the vessel.
Repeat until you’ve filled all of the windows and add any additional embellishments to your liking.
Place under loose plastic and allow to slow dry completely before bisque firing.
Once it is completely dry, bisque fire to cone 04.
Glazing by vessel:
MT004 Swirls, SW-128 Cordovan, SW-204 Amber Topaz, SW-301 Iron Wash
1. Begin with a properly fired shelf cone 04 Bisque. Drill in holes for the pipe cleaners in the center section of the pinwheel, four holes. Moisten a clean sponge and wipe bisque to remove dust.
2. Apply 3 coats of SC-16 Cotton Tail or FN-001 White to both pinwheels as a base.
3. Use the paper punch to cut out some stars out of paper (if you don’t have one available you can cut them out with scissors). Wet the stars and place them on the pinwheel. Gently press on the stars to remove air bubbles and ensure edges are sealed. Once they are cut adhere them to the top of the small pinwheel. Sometimes it helps to snap a photo so you don’t forget where you put the paper!
4. Once the stars are secure, use the Soft Fan to apply two coats of SC-12 Moody Blue to cover that pinwheel. Once the glaze has lost its shine, but before it is bone dry, remove the paper stars.
5. Use MC-001 6mm Low Tack Masking Tape to section out the stripes on the larger pinwheel. You may want to sketch this out with a pencil first to make sure they are even.
6. Use the Soft Fan to apply two coats of SC-73 Candle Apple Red over the exposed areas.
7. Allow to dry and place the small pinwheel on top of the large pinwheel in the kiln. The two pieces will fuse together during the firing process.
8. Fire to cone 05/06.
9. Use epoxy to glue in the wire to the holes in the center, use epoxy to glue on the beads. Use construction adhesive to secure the copper 1/2″ tube to the back, cut the 3/4″ tube around 9″ long this tube should be put into the ground for the installation of the pinwheel.
1. Begin with properly fired cone 04 bisque. Moisten a sponge and wipe bisque to remove any dust.
Tree Stump Fairy House:
a. Using the Soft Fan with SC-1 Pink-A-Boo, apply 2 coats to the roof of the house. Allow glaze to dry between coats.
b. Using the Script Liner with SC-89 Cutie Pie Coral, apply 2 coats to the bottom side of the roof and the top of the stairs. Allow glaze to dry between coats. Using the Detail Liner, outline the veins on the roof.
c. Using the Script Liner with SC-53 Purple Haze, apply 1 coat to the bark on the house.
d. Using the Script Liner with SC-85 Orkid, apply 2 coats to the door. Allow glaze to dry between coats.
e. Using the Detail Liner with SC-33 Fruit of the Vine, apply 2 coats to the doorknob and bottom side of the stairs.
f. Using the Detail Liner with SC-15 Tuxedo, outline the details of the house.
g. Using the Soft Fan with SG-701 Star Dust, apply 1 coat to the roof.
h. Using the Soft Fan with NT-BR Clear One Brushing Glaze, apply 1 coat to the rest of the house or dip into NT-CLR Clear Dipping Glaze.
Fairy Door
a. Using the Script Liner with SC-89 Cutie Pie Coral, apply 2 coats to the door. Allow glaze to dry between coats.
b. Using the Script Liner with SC-33 Fruit of the Vine, apply 1 coat to the log doorframe. Use a damp sponge to antique.
c. Using the Detail Liner with SC-13 Grapel, apply 1 coat to the doorknob, peephole and nail heads.
d. Using the Script Liner with SC-1 Pink-A-Boo, apply 2 coats to the base of the door. Allow glaze to dry between coats.
e. Using the Detail Liner with SC-15 Tuxedo, outline the details on the door.
f. Using the Script Liner with SG-701 Star Dust, apply 1 coat over the door.
g. Using the Soft Fan with NT-BR Clear One Brushing Glaze, apply 1 coat to the rest of the door or dip into NT-CLR Clear Dipping Glaze.
Fairy Window W/ Awning
a. Using the Soft Fan with SC-53 Purple Haze, apply 2 coats to the top of the awning. Allow glaze to dry between coats.
b. Using the Script Liner with SC-33 Fruit of the Vine, apply 2 coats to the bottom of the awning. Allow glaze to dry between coats.
c. Using the Script Liner with SC-2 Melon-Choly, apply 1 coat to the branches and flower box. Use a damp sponge to antique.
d. Using the Detail Liner with SC-1 Pink-A-Boo, SC-89 Cutie Pie Coral, SC-13 Grapel, SC-53 Purple Haze and SC-33 Fruit of the Vine, apply 1 coat to the flowers and leaves. Use a damp sponge to antique.
e. Using the Script Liner with SC-89 Cutie Pie Coral, apply 2 coats to the windows. Allow glaze to dry between coats.
f. Using the Detail Liner with SC-15 Tuxedo, outline the details.
g. Using the Soft Fan with SG-701 Star Dust, apply 1 coat over the top of the awning.
h. Using the Soft Fan with NT-BR Clear One Brushing Glaze, apply 1 coat to the rest of the window or dip into NT-CLR Clear Dipping Glaze.
Fairy Window W/ Shutters
a. Using the Script Liner with SC-85 Orkid, apply 2 coats to the windows. Allow glaze to dry between coats.
b. Using the Script Liner with SC-89 Cutie Pie Coral, apply 1 coat to the stones around the window. Use a damp sponge to antique. Apply one coat to the nail heads on the door.
c. Using the Script Liner with SC-33 Fruit of the Vine, apply 1 coat to the door. Use a damp sponge to antique.
d. Using the Script Liner with SG-701 Star Dust, apply 1 coat to the windows.
e. Using the Soft Fan with NT-BR Clear One Brushing Glaze, apply 1 coat to the rest of the window or dip into NT-CLR Clear Dipping Glaze
6. Fire to cone 06.
Form
MB-1484 Tree Stump Fairy House
MB-1488 Fairy Door
MB-1500 Fairy Window w/ Awning
MB-1501 Fairy Window w/ Shutters
Colors
SC-1 Pink-A-Boo
SC-2 Melon-Choly
SC-15 Tuxedo
SC-33 Fruit of the Vine
SC-53 Purple Haze
SC-85 Orkid
SC-89 Cutie Pie Coral
SG-701 Speckta-Clear Star Dust
NT-CLR Clear Dipping Glaze or NT-BR Clear One Brushing Glaze
1. Begin with properly fired cone 04 bisque. Moisten a sponge and wipe bisque to remove any dust.
2. Using the Soft Fan with FN-001 White, apply 3 coats to the underside of the mushroom heads. Allow glaze to dry between coats.
3. Using the Soft Fan with CC-102 White, apply 3 coats to the stem of the mushrooms. Allow glaze to dry between coats.
4. Using the Soft Fan with FN-004 Red, apply 3 coats to the top of the mushroom heads. Allow glaze to dry between coats.
5. Use the circle punches to make patterns with the paper. You will need to cut the negatives from the paper using the scissors. Dip each pattern in water and stick to the top of the mushroom head.
6. Use the Script Liner with SG-302 Snowfall and apply 1 thick coat to each circle. Remove the pattern before the glaze dries.
7. Fire to cone 06.
8. Apply SS-138 Flat Black to the stem of the mushrooms. Wipe off with a paper towel.
1. Pour CD1489 Hedgehog Planter mold 1/4″ thick. Refer to casting instructions.
2. Once it is firm enough to handle, use the sponge to smooth down any casting lines in the greenware.
3. Fire to cone 04.
4. Using the Soft Fan with EL-125 Sahara Sands, apply 3 coats to the inside of the hedgehog. Allow glaze to dry between coats.
5. Using SG-401 Black, outline the spines on the hedgehog.
6. Using the Script Liner and Soft Fan with EL-125 Sahara Sands, apply 3 coats to the face and underside of the hedgehog. Avoid the eyes. Allow glaze to dry between coats.
7. Using the Soft Fan with EL-110 Mudslide, apply 2 coats over spines on the body. Using the Script Liner, apply 2 coats to the inside of the ears. Allow glaze to dry between coats.
8. Using SG-401 Black, outline the eyes, ears and mouth.
9. Using the Detail Liner with SC-15 Tuxedo, apply 2 coats to the nose. Allow glaze to dry between coats.
10. Using the Detail Liner with SC-16 Cotton Tail, apply 2 coats to the eyes. Allow glaze to dry between coats.
11. Using the Detail Liner with SC-31 The Blues, apply a dot to the eye to make the iris. Repeat with SC-15 Tuxedo to make the pupil. Repeat with SC-16 Cotton Tail, to make a highlight in the pupil.
12. Fire to cone 06.
Form
MB-1489 Hedgehog Planter Bisque or CD1489 Hedgehog Planter Mold
1. Begin with a properly fired shelf cone 04 Bisque. Drill in holes for the wire in the center section of the pinwheel, four holes. Moisten a clean sponge and wipe bisque to remove dust.
2. Use the Soft Fan to brush on one heavy coat of PC-601 Clear Cascade to the entire pinwheel.
3. Use the same brush to apply two liberal coats of SC-11 Blue Yonder to the flat section of the pinwheel and two heavy coats of CG-718 Blue Caprice to the remaining sections.
4. Fill AC-220 Detailer bottles one with SG-201 Black Cobblestone and the other with SC-75 Orange-A-Peel. While the glaze is wet, squirt the colors in the bottles around the pinwheel.
5. Fire to cone 05/06.
6. Use epoxy to glue in the wire to the holes in the center, use epoxy to glue on the beads. Use construction adhesive to secure the copper 1/2″ tube to the back, cut the 3/4″ tube around 9″ long this tube should be put into the ground for installation of the pinwheel.
Small Pinwheel
1. Begin with a properly fired shelf cone 04 Bisque. Drill in holes for the wire in the center section of the pinwheel, four holes. Moisten a clean sponge and wipe bisque to remove dust.
2. Use the Soft Fan to apply a liberal coat of PC-601 Clear Cascade to the entire pinwheel.
3. Use the same brush to apply two liberal coats of CG-718 Blue Caprice to the flat section of the pinwheel. Apply two heavy coats of CG-753 Sassy Orange to the remaining sections.
4. Fill AC-220 Detailer Bottles with SG-201 Black Cobblestone, and SC-75 Orange-A-Peel.
5. While the crystal glazes are wet, pat with PC-602 White Cascade, pat over the white cascade with the opposing crystal glaze, leave some of the white cascade showing.
6. Squirt in a circular direction with the Black Cobblestone and SC-75 Orange-a-Peel from the detailer bottles.
7. Fire cone 05/06.
8. Use epoxy to glue in the wire to the center holes, glue on the beads. Use the construction adhesive to secure the 3/8″ copper tubing. Cut the 1/2″ copper about 7″ to insert into the ground. The pinwheel will fit into this tube.
1. Begin with properly fired shelf cone 04 Bisque. Moisten a clean sponge and wipe bisque to remove dust.
2. Use the Soft Fan to apply three coats of EL-136 Lapis Lagoon to the flower part of the roof. Use the Script Liner to apply EL-123 Patina to the stem section of the roof.
3. Using the Soft Fan, apply three coats of EL-207 Gold Mine to the body of the house. Apply three coats of EL-139 Nectar to the door.
4. After the Lapis Lagoon is dry, apply one coat of EL-134 Mirror Blue to the roof. While the glaze is wet, use the Soft Fan to brush over the Mirror Blue with water. This will help the glaze puddle in the detail.
1. Begin with properly fired shelf cone 04 bisque. Moisten a clean sponge and wipe bisque to remove any dust.
2. Use the Dremel and carbide bit to drill a small hole into the center of the small pinwheel. Drill a hole in each of the four sections.
3. Use the Soft Fan to apply one heavy coat of PC-601 Clear Cascade on both pinwheels.
4. Mix SC-26 Green Thumb with alcohol in the detailer bottle. The formula is 1″ of glaze, 1/4″ of water and 1/ 2″ of alcohol. Mix well. Fill detailer bottles with the following colors using the same formula: SC-75 Orange A Peel and SG-201 Black Cobblestone. Have these ready before the next step.
5. On the small pinwheel: Use the Soft Fan to apply two coats of SC-6 Sunkissed to the inside of the sections and SC-24 Dandelion to the outside of the sections. On the large pinwheel: use the Soft Fan to apply two coats of SC-24 Dandelion to the inside of the sections and SC-97 Cant-elope to the outside of the sections.
6. While the colors are wet, squirt in a spiral direction the colors that you mixed in step 6. Let dry then place the pieces together to fuse in the firing.
7. Fire to cone 05/06.
8. Use epoxy to glue in the wire. Let it set, then use epoxy to glue on the beads.
9. Use construction adhesive to attach the 1/2″ copper tube to the back of the pinwheel. We had a 15″ tube and cut a piece of 3/4″ between 7-8″ long. The 3/4″ copper tube gets hammered into the ground. The pinwheel with the 1/2″ inch tube fits nicely into the wider copper tube.
Use a water-moistened Synthetic Sponge to wipe down the bisque to remove any dust and debris from the ware.
Place out your colors onto a tile for painting. SC-6, SC-24 and SC-97 for bird one; SC-23, SC-75 and SC-88 for bird two.
Apply three coats of SC-6 Sunkissed to the crown of the head, down behind the eye continuing down the breast and below the wing area of the bird using CB-602 Soft Fan.
Refer to photo. Try to avoid the eye if possible. Wet blend from the bottom of the breast upward with SC-24 Dandelion about halfway up on the breast. Wet blend SC-97 Cant-elope from the bottom upward over the Dandelion about one quarter to the breast. The breast should appear darkest at the bottom of the breast fading upwards to the Sunkissed neck area. Wet blend lightly SC-97 Cant-elope around the beak.
Apply three coats of SC-23 Jack-O-Lantern to the same areas on the second bird using the same brush. Wet blend as before over the breast with SC-75 Orange Ya Happy about half way from the bottom of the breast. Darken the breast area from the bottom with SC-88 Tutu Tango about a quarter of the way over the breast. Color should appear darkest at the bottom of the breast fading upwards to the neck on the Jack-O-Lantern area. Wet blend lightly SC-88 TuTu Tango around the beak.
Shade the tufted breast feathers with SC-55 Yella Bout It using CB-404 Pointed Round. Highlight eh tips of the feathers with SC-16 Cotton Tail using CB-110 Liner.
Paint the beaks with a wash of SC-14 Java Bean using CB-404 Pointed Round. Shade the beak next to head with SC-34 Down To Earth and SC-15 Tuxedo. Paint in a fine line of SC-15 Tuxedo with CB-110 Liner to separate the upper and lower beak.
Paint in the eyes with SC-14 Java Bean using CB-220 Detail Liner. Shade the eye with thinned SC-34 Down To Earth. Place a highlight in the iris with SC-88 TuTu Tango using CB-110 Liner. Paint in the pupil with SC-15 Tuxedo with CB-110 Liner and add a high light with SC-16 Cotton Tail. Let dry.
Apply 1 coat of S-2101 Crystal Clear Brushing over the painted areas of the head, beak, breast, eyes and under the wing on what was painted with Stroke and Coat. The clear glaze can overlap past these areas slightly to lighten/ shade the crystal glaze.
Shake and stir well CG-988 Fireflies. Apply 1 coat of color over the yellow areas overlapping slightly and to the back, wings and tail (all areas not painted) using CB-604 Soft Fan. Try not to get a lot of crystals onto the yellow areas. Apply 2 more coats of glaze with crystals over the back, wings and tail.
Shake and Stir CG-986 Smoke and Fire. To the Orange bird, apply CG-986 Smoke and Fire as before on the yellow bird.
Apply one coat of the Jungle Gems Crystal glaze over the Stroke and Coat colors on the breast of the bird.
Begin with properly fired shelf cone 04 bisque. Moisten a clean sponge and wipe bisque to remove any dust.
Using the palette knife, apply SC-76 Cara-Bein Blue in a streaky manner onto random areas of the brick around the window. Repeat with SC-97 Cant-elope, SC-11 Blue Yonder, SC-27 Sour Apple, and SC-73 Candy Apple Red until all the bricks are streaked with color.
Using the CB-106 #6 Script Liner, apply 3 coats of SC-73 Candy Apple Red to the shutters.
Using the CB-106 #6 Script Liner, apply 3 coats of SC-15 Tuxedo to the hinges of the shutters and the frame around the window.
Mix SC-15 Tuxedo with Silkscreen medium to the consistency of peanut butter. Screen the DSS-0144 Background Script onto the window panes. You may have to cut down the silkscreen to a size that is easier to work with.
Using the synthetic sponge, sponge SC-16 Cotton Tail to the wood on the shutters.
Using the CB-104 Fan Brush, apply two coats of S-2101 Crystal Clear Brushing glaze to the entire piece.
Begin with properly fired shelf cone 04 bisque. Moisten a clean sponge and wipe bisque to remove any dust.
Using the palette knife, apply SC-76 Cara-Bein Blue in a streaky manner onto random areas of the top of the awning. Repeat with SC-97 Cant-elope, SC-11 Blue Yonder, SC-27 Sour Apple, and SC-73 Candy Apple Red until the whole awning is streaked with color.
Using the CB-106 #6 Script Liner, apply 3 coats of SC-73 Candy Apple Red to the bottom of the awning.
Using the CB-106 #6 Script Liner, apply 3 coats of SC-15 Tuxedo to the frame around the window.
Using the CB-106 #6 Script Liner, apply 3 coats of SC-76 Cara-Bein Blue to the window box under the flowers.
Using the CB-106 #6 Script Liner, apply 3 coats of SC-27 Sour Apple to the tree trunks.
Using the CB-106 #6 Script Liner, apply 2 coats of SC-27 Sour Apple to the leaves of the flowers.
Using the CB-106 #6 Script Liner, apply 2 coats of SC-97 Cant-elope, SC-11 Blue Yonder, and SC-73 Candy Apple Red to the flowers.
Mix SC-15 Tuxedo with Silkscreen medium to the consistency of peanut butter. Screen the DSS-0144 Background Script onto the window panes. You may have to cut down the silkscreen to a size that is easier to work with. Also, silkscreen the small ladybug from DSS-0113 Bugs three times to the top of the awning
Using the synthetic sponge, sponge SC-16 Cotton Tail to the bottom of the awning and to the window box.
Using the synthetic sponge, sponge SC-52 Toadily Green over the flowers, leaves and tree trunks
Using the CB-104 Fan Brush, apply two coats of S-2101 Crystal Clear Brushing glaze to the entire piece.
Begin with properly fired shelf cone 04 bisque. Moisten a clean sponge and wipe bisque to remove any dust.
Using the palette knife, apply SC-76 Cara-Bein Blue in a streaky manner onto random areas of the body of the teapot house. Repeat with SC-97 Cant-elope, SC-11 Blue Yonder, SC-27 Sour Apple, and SC-73 Candy Apple Red until the entire body of the teapot is streaked with color.
Using the CB-106 #6 Script Liner, apply 3 coats of SC-73 Candy Apple Red to the roof of the teapot, the brick around the base of the teapot, and the top of the spout.
Using the CB-106 #6 Script Liner, apply 3 coats of SC-97 Cant-elope to the door of the teapot.
Using the CB-106 #6 Script Liner, apply 3 coats of SC-27 Sour Apple to the steps underneath the door and the brick underneath the window in the back of the teapot.
Using the CB-106 #6 Script Liner, apply 3 coats of SC-15 Tuxedo to the top knob.
Using the CB-110 Mini Liner, apply 3 coats of SC-15 Tuxedo to the frame of the door, the frame around the back window, and the windows on the door and roof.
Mix SC-15 Tuxedo with Silkscreen medium to the consistency of peanut butter. Screen the DSS-0144 Background Script onto the spout and handle of the teapot and the top of the window on the roof. You may have to cut down the silkscreen to a size that is easier to work with.
Screen the small ladybug from DSS-0133 onto the body of the teapot.
Using the synthetic sponge, sponge SC-15 Tuxedo to the swirls of the handle, sponge SC-27 Sour Apple to the window frame in the front window, and sponge SC-16 Cotton Tail to the wood on the door, steps, and brick around the bottom of the teapot.
Dip the back of a paintbrush into SC-16 Cotton Tail and make dots on the roof.
Using the CB-104 Fan Brush, apply two coats of S-2101 Crystal Clear Brushing glaze to the entire teapot.
Measure out and wedge about 1.5 lbs of white stoneware clay.
Throw a narrow dome and close it.
Use a rib to flatten the sides to create the wrapper.
Apply slip to the top while the wheel is spinning to create a swirl texture.
Use a wire to cut off the wheel and when it’s leather hard use a serrated rib to add texture to the wrapper.
Roll a ball, slip and score to add a cherry on top.
Let dry completely.
Fire to shelf cone 05/04
To hand-build instead of throw replace steps 2 and 3. Connect a long, narrow slab (the wrapper) to another slab that has been formed in a bowl (cupcake top).
Glazing the cupcakes
Apple 2 coats of SW-501 to the top of the cupcake.
On top of that swirl 1-2 coats of any combination of colors from our stoneware gloss line (SW-501 through SW-508).
Apply 3 coats of SW-178 Fool’s Gold to the wrapper.
Apply 3 coats of SW-504 Red Gloss to the cherry.
Wipe the bottom of the piece to make sure it is free of glaze.
Let dry completely.
Fire to shelf cone 5/6.
Creating the doughnuts
Measure out and wedge about 1lb of white stoneware clay.
Throw a closed tube on the wheel.
Use a wire tool to cut the tube off of the wheel and apply slip to create the icing on the top of the doughnut.
Roll out a tiny coil and cut into ½” pieces to create sprinkles and attach them into the slip icing.
Let dry completely.
Fire to shelf cone 05/04
To hand-build instead of throw replace step 2, extrude a tube and attach the top to bottom to create a closed tube.
Glazing the doughnuts
Apply 3 coats of SW-178 Fool’s Gold to the base of the doughnuts.
Apply 2-3 coats of any combination of colors from our stoneware gloss line (SW-501 through SW-508)
Wipe the bottom of the piece to make sure it is free of glaze.
1 .Begin with properly fired shelf cone 04 Bisque. Moisten a clean sponge and wipe bisque to remove dust.
2. Slightly thin UG-50 Jet Black with water. Use the Soft Fan to apply to the entire piece. Use a damp sponge to wipe off the excess Jet Black, allowing the detail to show.
3. Use the Script Liner to apply one coat of UG-50 Jet Black to the iron work on the door. Apply two coats of SC-74 Hot Tamale to the heart shape on the door.
4. Use the Soft Fan and Script Liner (depending on the size of the area) to apply two coats of EL-101 Oyster Shell to the stones. Apply three coats of EL-127 Rose Granite to the door (brush over the iron detail and the heart). Apply three coats EL-135 Rare Earth to the vines.
1. Begin with properly fired shelf cone 04 Bisque. Moisten a clean sponge and wipe bisque to remove dust.
2. Use the Soft Fan to apply two coats of EL-134 Mirror Blue to the door of the house.
3. Use the Soft Fan to apply three coats of EL-123 Patina to the leaf roof. Apply three coats of EL-121 Copper Adventurine to the stump sections of the house and one coat of EL-121 Copper Adventurine over the Patina Roof.
1. Begin with properly fired shelf cone 04 Bisque. Moisten a clean sponge and wipe bisque to remove dust.
2. Apply SG-401 Black to the window frames of the house.
3. Use the Soft Fan to apply two coats of EL-125 Sahara Sands to the base of the jar. Brush over the windows with one coat of Sahara Sands. Apply two coats of Sahara Sands to the inside of the jar.
4. Use the Soft Fan to apply three coats of EL-118 Blue Grotto to each roof.
5. Use the Script Liner to apply two coats of EL-134 Mirror Blue to the shutters and doors.
6. Use the Script Liner to apply two or three coats of EL-135 Rare Earth to the chimney, base and branches around the doors.
7. Fire to cone 06.
Form
MB-1390 Fairytale Jar – Acorn Cottage Bisque or CD1390 Fairytale Jar – Acorn Cottage Mold
1. Begin with properly fired cone 04 bisque. Moisten a sponge and wipe bisque to remove any dust.
2. Using the Soft fan and SC-74 Hot Tamale, apply one coat of glaze to the top of the awning. While the glaze is still wet, take the Script Liner with SC-81 Cinnamon Stix and apply a coat of glaze to the recessed areas on the awning. Make sure to blend. Then apply one coat to the bottom of the awning. Repeat when dry.
3. Using the Scrip Liner with SC-6 Sunkissed, apply one coat to the flower box and tree supports. Using the same brush with SC-97 Cant-elope, shade the trees. Repeat when dry.
4. Using the Detail Liner with SC-53 Purple Haze, apply one coat to the outer portion of the flower petals. Using the same brush with SC-33 Fruit of the Vine, apply one coat to the inner portion of the flower petals. Be sure to blend. Repeat when dry.
5. Using the Detail Liner with SC-97 Cant-elope, apply a drop to the center of each flower.
6. Using the Detail Liner with SC-26 Green Thumb, apply one coat to the leaves. Using the same brush with SC-36 Irish Luck, apply one coat to the inner portion of each leaf. Be sure to blend. Repeat when dry.
7. Using the Dagger brush with SC-35 Gray Hare, shade the windows.
8. Using the Detail Liner with SC-15 Tuxedo, outline the window and make accents.
9. Using the Soft Fan with SG-702 Celebration, apply two coats to the windows.
1. Begin with properly fired shelf cone 04 Bisque. Moisten a clean sponge and wipe bisque to remove any dust.
2. Use the Soft Fan to apply one heavy coat of CG-996 Rain to the gecko, omitting the area under the mouth line.
3. Pour approximately 1 oz of EL-130 Sea Green and 1 oz of EL-142 Grass into small containers. Thin each slightly with water. Fill a detailer bottle with SC-29 Blue Grass and one with SG-201 Black Cobblestone.
4. Pour the EL-130 Sea Green over the gecko leaving space to fill in with poured EL-142 Grass. Squirt with SC-29 Blue Grass and with SG-201 Black Cobblestone.
5. When it is dry enough to handle, sponge off the excess glaze on the area under the mouth. Brush under the mouth and the bottom with two or three coats of EL-145 Ginger Root.
6. Scrape off the glaze from the eyes. Use the Liner to apply two 2 coats of SC-26 Green Thumb to the eye. Apply one coat of SC-15 Tuxedo to the pupil and outline the eye with Tuxedo.
7. Fire to cone 05/06.
Form
CD715 Medium Gecko Mold or MB-714 Medium Gecko Bisque
Begin with properly fired cone 04 bisque. Moisten a sponge and wipe bisque to remove any dust.
Squeeze around ¼ cup of SC-14 Java Bean into the cup. Add around 1 TBS of water and mix. It should be thin enough to be easily poured from the cup. Pour into the planter and rotate to cover the inside. Turn upside down to drain the excess glaze. Flip upright and use a damp sponge to remove any glaze drips on the outside of the planter.
Using the Soft Fan with SC-37 Ivory Tower, apply 2 coats to the outside of the planter. Allow glaze to dry between coats.
Using the Soft Fan with FN-044 Yellow Orange, apply 1 coat to spines on the hedgehog.
Squeeze around 1 TSP of SC-6 Sunkissed, SC-23 Jack O’ Lantern, SC-24 Dandelion and SC-78 Lime Light onto the palette. Using the Pointed Round, dip it into 1 of the colors. Place the tip of the brush at the end of one of the spines, then press the brush down and drag it across the bottom edge of the spine. This will add color to the bottom of each spine. Repeat with each of the colors until you have glazed every spine.
Using the Script Line with SC-70 Pink-A-Dot, apply 1 coat to the inside of the ears.
Squeeze around 1 TSP of SC-25 Crackerjack Brown, SC-14 Java Bean and SC-37 Ivory Tower onto the palette.
Dip the sponge into SC-25 Crackerjack Brown and sponge from the nose to a little past the eyes. Dip the same sponge into SC-37 Ivory Tower and sponge over the edge of where you stopped sponging. This will make sure there isn’t an abrupt line
Dip the sponge into SC-14 Java Bean and sponge around the tip of the nose.
Using the Detail Liner with SC-14 Java Bean, outline half of the spines and add lines going down the centers. Repeat with SC-25 Crackerjack Brown with the other half of the spines. Outline the ears.
Using the Detail Liner with SC-15 Tuxedo, apply 2 coats to the eyes and nose. Outline the mouth.
Using the Soft Fan with NT-BR Clear One Brushing, apply 1 coat to the outside of the planter. Or dip into NT-CLR Clear One Dipping.
Fire to cone 06.
Form
MB-1489 Hedgehog Planter Bisque or CD1489 Hedgehog Planter Mold
Colors
SC-6 Sunkissed
SC-14 Java Bean
SC-15 Tuxedo
SC-23 Jack O’ Lantern
SC-24 Dandelion
SC-25 Crackerjack
SC-37 Ivory Tower
SC-70 Pink-A-Dot
SC-78 Lime Light
FN-044 Yellow Orange
NT-CLR Clear One Dipping or NT-BR Clear One Brushing
1. Begin with properly fired shelf cone 04 Bisque. Moisten a clean sponge and wipe bisque to remove any dust.
2. Use the Soft Fan to apply one heavy coat of CG-993 Lavender Sprigs to the top of the mushroom cap.
3. Pour approximately 1 oz of EL-128 Wheat EL-145 and Ginger Root into small containers. Thin each slightly with water. Fill a detailer bottle with SC-75 Orange-A-Peel and one with SG-201 Black Cobblestone.
4. Pour the thinned EL-128 Wheat over the mushroom cap in a spiral pattern. Fill in the empty space by pouring on EL-145 Ginger Root. Be sure all the space is covered with Elements glaze. Mist with water if necessary to move the color.
5. While the color is wet, squirt on SC-75 Orange-A-Peel and SG-201 Black Cobblestone. Let dry.
6. Sponge off some of the color that dripped under the cap and on the stem. It is not necessary to remove all of the glaze.
7. Use the Soft Fan to apply two coats of EL-145 Ginger Root under the cap and three heavy coats on the stem (brush in a circular direction). Push the side of the brush into the wet glaze to get a ridge of glaze as this will make an interesting pattern during the firing.
1.Begin with properly fired shelf cone 04 Bisque. Moisten a clean sponge and wipe bisque to remove dust.
2. Thin slightly S-2101 Clear. Pour inside the jar, roll to coat, then pour out the excess glaze and drain.
3. Use the Soft Fan to apply one coat of UG-50 Jet Black (thinned slightly with water) to the entire outside of the house.Use a damp sponge to wipe off the excess Jet Black to allow the detail of the house to show.
4. Use the Script Liner to apply one coat of UG-50 Jet Black to the shutters and frames around the doors and windows.
5. Use the Soft Fan to apply three coats of EL-139 Nectar to the thatched roofs. Apply three coats of EL-103 Sea Spray to the body of the house, including the doors and windows. Apply two coats of EL-101 Oystrer Shell to the stone chimneys.
Begin with properly fired shelf cone 04 Bisque. Moisten a clean sponge and wipe bisque to remove dust.
Use the Soft Fan and Script Liner to apply one coat of SC-16 Cotton Tail to the entire fairy house.
Use the paper punch to create paper hearts. Wet each heart and press randomly around the teapot. Press gently with a paper towel to ensure the edges area sealed.
Use the Soft Fan and Script Liner to apply three coats of SC-74 Hot Tamale to the teapot and door. Do not apply to the door frame, steps or base of the teapot. Remove the hearts. Using a straight pin is helpful in lifting the paper.
Use SG-402 White Designer Liner to create a woodgrain design on the door.
Use the Liner to apply one coat of SC-15 Tuxedo to the door, window and knob. Use the same brush to outline the inside and outside of the door frame.
Use SG-403 Red Designer Liner to create bricks on the base of the teapot and to separate the steps.
Dip into NT-CLR Clear Dipping Glaze or use the Soft Fan to apply one coat of S-2101 Clear Brushing Glaze to the door, steps and base of the teapot. The goal is to ensure the Designer Liner areas have clear glazes over them.
Fire to cone 05/06.
Form
MB-1502 Teapot Fairy House
Colors
SC-15 Tuxedo
SC-16 Cotton Tail
SC-74 Hot Tamale
SG-402 White Designer Liner
SG-403 Red Designer Liner
NT-CLR Clear Dipping or S-2101 Clear Brushing Glaze
Begin with properly fired shelf cone 04 Bisque. Moisten a clean sponge and wipe bisque to remove dust.
Use the Soft Fan to apply two coats of SC-16 Cotton Tail to the awning. Punch out paper heart shapes so you can use the negative space from the punch. Wet the Cotton Tail with a coat of water, place on the paper, press firmly with a paper towel and ensure all edges are sealed.
Use the Script Liner to apply two coats of SC-74 Hot Tamale to the open heart shape. Remove the paper.
Use the Script Liner or Liner to apply three coats of SC-74 Hot Tamale to the window trim. Apply an outline in a heart shape around the flowers. Use the Script Liner to apply two thinned coats of SC-26 Green Thumb to the leaves.
Pencil in window shades in the windows. Use the Liner or Script Liner to apply two thinned coats of SC-89 Cutie Pie Coral to the window shaes. Use the Liner to outline the shades with SC-15 Tuxedo. Create small heart pulls from each shade and outline.
Pencil in flowers under the awning. Use the Liner to apply two strokes of SC-74 to the petals, SC-89 Cutie Pie Coral to the centers and SC-26 Green Thumb to the leaves. Outline with SC-15 Tuxedo.
Use SG-403 Red to outline the woodgrain on the planter box and the tree stumps that are holding up the awning.
Use the Soft Fan to apply two coats S-2101 Clear Brushing Glaze to the entire piece or dip into NT-CLR Clear Dipping Glaze.
Fire to cone 05/06.
Form
MB-1500 Fairy Window w/Awning
Colors
SC-15 Tuxedo
SC-16 Cotton Tail
SC-26 Green Thumb
SC-74 Hot Tamale
SC-89 Cutie Pie Coral
SG-403 Red Designer Liner
S-2101 Clear Brushing or NT-CLR Clear Dipping Glaze
Begin with a properly fired shelf cone 04 Bisque. Moisten a clean sponge and wipe bisque to remove dust.
Brush the body of the teapot with three thinned coats of SC-73 Candy Apple Red, brush SC-74 Hot Tamale one coat onto the large sections of the teapot, leaving the edges the Candy Apple red.
Brush the door and knob on the lid of the teapot, with two thinned coats of SC-27 Sour Apple, the steps, and bricks with two coats of SC-36 Irish Luck.
Shade around the edges of the door with thinned SC-36 Irish Luck, use CB-106 Script Liner. Outline the wood planks of the door with Irish Luck, use CB-110 Liner.
Thin SC-24 Dandelion brush over the windows.
Outline the bricks with SG-402 White.
Punch out snowflakes, use the negative space. Wet the red glaze on the teapot in the space for the snowflake press on the paper, press again with a paper towel to remove the water and gaps. Brush two coats of SC-16 Cotton Tail over the snowflake, remove the paper. Repeat for all the snowflakes.
Use CB-110 Liner to brush SC-15 Tuxedo over the door and window trim, one coat.
Brush on two coats of NTBR Clear One Brushing over the entire teapot with CB-604 Soft Fan.
Fire to cone 05/06.
Form
MB-1502 Teapot Fairy House
Colors
SC-15 Tuxedo
SC-16 Cotton Tail
SC-24 Dandelion
SC-27 Sour Apple
SC-36 Irish Luck
SC-73 Candy Apple Red
SC-74 Hot Tamale
SG-402 White Designer Liner or NT-CLR Clear Dipping Glaze
Brush one coat of SS-127 Medium Portrait to the face with AB-838 Base Coat Brush. When dry, float thinned SS-212 Light Umber around all the detail of the face and around the outline of the face.
When dry, dry brush with SS-127 Medium Portrait to even out the flesh, add a very small about of SS-176 Christmas Red and SS-211 orange Rust to the brush, use to blush the cheeks. Use a thinned mix of the Red and Orange Rust to brush the lips, use CB-202 Detail Liner.
Brush the hair with one coat of SS-211 Orange Rust, brush a thinned coat of SS-237 Dark Brown over the hair , dry brush back over with the Orange Rust, adding SS-210 Orange to the brush.Use AB-708 Round.
Brush one coat of SS-3 Honey Toast to the neck trim and hat trim, use CB-310 FLat Shader to brush SS-45 Buttermilk with SS-3 Honey Toast in the brush in a patchy fashion over the Honey Toast, leave the edges only Honey Toast.
Lightly pencil in the checkered pattern on the hat trim, use the shader to brush in SS-111 Brightest yellow into a checkerboard pattern.
Outline the checkered pattern with SS-237 Darkest Brown and SS-210 Orange.
To make the nesk trim look like fringe, paint in lines with SS-210 Orange, SS-111 Brightest Yellow, SS-237 Darkest Brown, and SS-35 White, dot with the brush at the begininng and end of the lines, use CB-110 Liner.
Brush the remainder of the hat with SS-19 Country Sage, and the shirt and pants, brush with the same brush in a patchy fasion SS-376 Limeburst over the Country Sage, always keeping some of the Country Sage in the brush, darken all the crevices with SS-57 Accent Green, use CB-310 Flat Shader.Blend where the colors meet.
Brush the gloves with SS-237 Darkest Brown, wet brush over with SS-234 Medium Mocha, highlite with SS-211 Orange Rust.
Shoes are SS-138 Black and highlited with SS-237 Darkest Brown, wet brush.
Eyes are painted SS-35 White, Iris is SS-331 Medium Blue, pupil and outline is SS-138 Black. Freckles are SS-272 light Umber, thinned, brows are thinned SS-237 Darkest Brown.
Thicken SS-138 Black with AC-310 Silkscreen Medium using a palette knife to the consistency of peanut butter, hold the ladybug and the small butterfly (on hat) with the shiny side down, rub gently the thickened Black over the screen. Wash screens in warm water immediately after use.
When the screen is dry, use CB-110 Liner to brush in SS-176 Christmas red on the lady bug’s back be careful to go around the dots. Decorate the butterfly with SS-111 Brightest Yellow and SS-210 Orange.
Use AC-501 Gloss Sealer to brush to the eyes, ladybug and butterfly.
Form
MB-1463 Vintage Elf Bisque or CD1463 Vintage Elf Mold
Begin with properly fired shelf cone 04 Bisque. Moisten a clean sponge and wipe bisque to remove dust.
Slightly thin FN-020 Medium Green with water. Pour inside the planter, roll to coat, pour out excess and drain.
Use the Soft Fan to apply three coats of SC-37 Ivory Tower to the breast of the frog.
Use the Script Liner to apply SC-36 Irish Luck into the detail lines of the frog – around the legs and under the eyes.
Use the Soft Fan to apply three coats of CG-717 Pistachio to the body of the frog, thinning with water to brush over the edges of the breast.
Use a damp sponge to remove the crystal glaze from the eyes.
Use the Liner to apply two coats of SC-37 Ivory Tower to the eyes and two coats of SC-26 Green Thumb to the irises. Apply SC-15 Tuxedo to the pupil. Outline the eyes with SC-15 Tuxedo.
Use the Liner to float SC-36 Irish Luck under the mouth line. Outline the mouth with SC-15 Tuxedo.
1. Begin with properly fired shelf cone 04 bisque. Moisten a clean sponge and wipe bisque to remove any dust.
2. Using CB-110 Liner to apply lines of thinned SC-34 Down to Earth to the (gills) lines under the mushroom tops.
3. Trace the windows to the mushrooms using AC-230 Clay Carbon and a pencil.
4. Apply 1 thinned coat of SC-54 Vanilla Dip over the gills under the mushroom tops with CB-604 Soft Fan and CB-406 Pointed Round. To the stems excluding the windows apply 3 coats of SC-54 Vanilla Dip. With each coat, pick up some SC-92 Café Ole on the corner of the brush and wet blend the darker color next to the mushroom gills and base of the mushroom. This color should fade out down and over the gills, darken in the crevice of the stem/gills and fading down about 1” toward the base of the stem. The darker color should fade upward from the bottom of the stem up about 1” as well. With each coat of Vanilla Dip, wet blend some of the Café Ole to the same areas to insure the color is blended well.
5. Retrace the doors, awning and windows back onto the ware with the Clay Carbon and pencil.
6. Starting with SC-5 Tiger Tail to paint in a wash of color around the window trims, the awning and to the doors using CB-406 Pointed Round or CB-220 Detail Liner. Paint in the grain detail to the doors and window trim with SC-25 Crackerjack Brown. Detail the wood with SC-14 Java Bean using CB-110 Liner. Accent the Java Bean with SC-34 Down to Earth around the door and window trim. Paint in the window muttons with SC-14 Java Bean and outlined with SC-34 Down to Earth using CB-110 Liner. Tip CB-406 Pointed Round with SC-24 Dandelion to shade the window panes next to the trim and muttons. Accent the Dandelion with SC-88 TuTu Tango ever so lightly to give a warm glow to the lighting.
7. Using a lightly dampened Silk Decorating Sponge to stipple some SC-7 Leaping Lizard to the shrubbery and vines next to the doors and windows. Accent the green with SC-39 Army Surplus.
8. To paint in the flowers on the larger mushroom use SG-408 Orange to dot in clusters of dots to make the flowers. For the smaller mushroom’s vine, use dots of SC-13 Grapel and SG-410 Bright Blue for the flowers. Detail the vine stems with thinned SC-14 Java Bean and SC-25 Crackerjack Brown.
9. Mark off the top of the mushroom with a pencil. Apply 3 coats of FN-225 Watermelon to the tops of the mushrooms using CB-604 Soft Fan. Apply 2 coats of S-2101 Crystal Clear Brushing to the gills and stems of the mushrooms using CB-604 Soft Fan. Apply one thinned coat of S-2101 Crystal Clear Brushing to the top of the mushroom over the Watermelon glaze.
10. If need be, redraw with a pencil where the top of the mushroom painted in red ends and where the gills begin. Using CB-604 Soft Fan to apply 3 coats of SG-202 White Cobblestone to the tops of the mushrooms over the watermelon glaze area. The larger mushroom has 4 coats of Cobblestone to produce a larger breakup of the product. After the first coat of Cobblestone has lost its sheen and turned matte, you can apply the next coat. Do not let the cobblestone glaze completely dry before applying the next coat. Once the 3-4 coats of Cobblestone glaze has lost its sheen and turn matte, apply 1 coat of SC-16 Cottontail over the cobblestone glaze. Condition the CB-604 Soft Fan with AC-525 Brush Cleaner prior to apply the wax resist. When the Cottontail has dried somewhat and lost its sheen, apply 1 coat of AC-302 Wax Resist over the cobblestone glazed areas. The application of the wax aids in the transportation of the piece prior to firing.
11. Stilt and Fire both pieces to Shelf Cone 05-06. Due to the application of the Wax Resist there will be a smoking burn off of the product. Allow extra venting time during the firing process until there is no sign of smoke fumes.
1. Begin with properly fired shelf cone 04 bisque. Moisten a clean sponge and wipe bisque to remove any dust
2. Transferring the pattern will take a bit of effort due to the shape of the ware. Place the pattern onto the ware, the pattern is centered on the mushroom top and to where it doesn’t fall below the edge of the mushroom cap. Trace the pattern using AC-230 Clay Carbon and a pencil while securing the pattern with Blue Masking Tape. Move the pattern around the mushroom top to complete the overall pattern. Some adjustments may be needed to make the pattern fit by adjusting the distance between the spacing of the pattern. On the large mushroom there should be 10 circles to the pattern around the flower-like center. On the small mushroom there should be 9 circles connecting around the center lattice area. The circles on both tops will touch one another around the center.
Large Mushroom
3. The center of the flower on top of mushroom is 3 coats of SC-33 Fruit on the Vine using Sponge-on-a-Stick, The petals of the flower are left blank but outlined with SG-410 Bright Blue. Fill in the area between the petals and to the border are 2-3 coats SC-53 Purple Haze using CB-220 Detail Liner. Detail around this section with SG-404 Blue.
4. The next set of 10 circles that continuously touch are filled in with 3 coats of SC-53 Purple Haze shaded with some SC-33 Fruit of the Vine using Sponge-on-a-Stick. There are dots on top of the larger circles using the end of a brush to apply SC-33 Fruit of the Vine. The circles outlines and loops around this area are detailed with SG-404 Blue.
5. The sweeping areas originating from the above circles down to the larger circles are two different colors and patterns. Each alternating section is shaded with either SC-77 Glo-Worm or SC-11 Blue Yonder using CB-406 Pointed Round loaded with water and tipped with the color. Over the areas shaded with Blue Yonder, it is stamped with ST-125 Wave loaded with some thinned SG-404 Blue applied with a dry Sponge-on-a-Stick. Print the wave pattern only to the blue section. For the Glo-Worm sections detail and outline the area with lines using CB-110 Liner loaded with SC-39 Army Surplus. The blue areas are detailed with SG-404 Blue.
6. The largest circles below are shaded back and forth in 3 alternating coats with SC-13 Grapel and SC-53 Purple Haze using CB-406 Pointed Round. The medium circle inside the large circle is 3 coats of SC-52 Toad-ily Green shaded with SC-39 Army Surplus using Sponge-on-a-Stick.Outline this circle with SC-39 Army Surplus using CB-110 Liner. Using the end of a larger brush, apply a dot of SC-33 Fruit of the Vine to the center top green circle. The outside edge and the radiating lines in the larger section are done with SG-404 Blue. The teardrop loops and dots between the large circles are done with SG-404 Blue. The triangular shapes below and between the large circles are shaded with SC-28 Blue Isle using CB-406 Pointed Round. Detail the lower jagged line with SG-404 Blue. The field of dots below the jagged line are completed with SG-410 Bright Blue. The final border edge on the mushroom cap is SG-404 Blue.
Small Mushroom
7. Starting with the lattice section on top of the mushroom, it is completed with SG-410 Bright Blue. Make fine dots with a pencil point using SC-33 Fruit of the Vine between each section of the lattice.
8. The area below the lattice section is filled in with 3 coats of SC-31 The Blues using CB-406 Pointed Round. Apply evenly spaced dots of SG-402 White to this section.
9. The nine circles around the lattice are 3 coats of SC-77 Glo-Worm shaded with SC-39 Army Surplus using Sponge-on-a-Stick. These circles are outlined with SG-404 Blue. There are dots that trail around the top portion of the circle that are done with SC-33 Fruit of the Vine using the end of a brush. There are dots between and just below the larger green circles completed with 3 coats of SC-33 Fruit of the Vine applied with Sponge-on-a-Stick. Detail around these circles with SG-404 Blue as well. Apply a dot of SC-11 Blue Yonder to the centers of the purple circles.
10. The oval lined shapes are shaded with SC-11 Blue Yonder using CB-406 Pointed Round loaded with water and tipped with color to complete the shading. The center dots are 3 coats of SC-13 Grapel applied with Sponge-on-a-Stick. Detail all of the oval shape with SG-404 Blue. There are 5 teardrop brushstrokes of SC-31 The Blues applied with CB-110 Liner in a stroke. Apply small dots of SC-11 Blue Yonder at the end of each teardrop. The dots between the oval shapes are SC-11 Blue Yonder applied with a large handle of a brush. The three trailing dots are done in SC-76 Cara-bein Blue using a handle of a smaller brush. Complete the bottom edge line with SC-404 Blue.
11. To both mushrooms apply 3-4 coats of EL-124 Stormy Blue to the stems starting from the SG-404 Blue line while covering the entire stem using CB-604 Soft Fan and CB-406 Pointed Round.
12. Apply 2-3 coats of S2101 Crystal Clear Brushing to the mushroom caps over the design using CB-604 Soft Fan and CB-406 Pointed Round up to the blue line delineating the two sections.
13. Stilt and Fire to Shelf Cone 05. The higher temperature will make the EL-124 Stormy Blue take on a silver tone to the glaze.
Begin with properly fired cone 04 bisque. Moisten a sponge and wipe bisque to remove any dust.
2. Sightly thin FN-016 Harvest Orange with water. Pour inside the planter, roll to coat, pour out excess and drain.
3. Use the Script Liner to apply one coat of SC-26 Green Thumb to the body of the turtle. Use a damp sponge to wipe away some of the glaze, leaving the color in the detail to antique.
4. Use the Script Liner to float more SC-26 Green Thumb under the eyes and mouth and into the crevices of the toes.
5. Use the Soft Fan to apply two coats of SC-37 Ivory Tower to the breast and the belly. Use the same brush to apply three coats of FN-227 Celery to the rest of the body.
5. Use the Soft Fan to apply three coats of S-2714 Herb Garden to the shell.
6. Use the Script Liner to apply two 2 coats of SC-26 Green Thumb to the eyes and SC-15 Tuxedo to the pupils. Outline the mouth with Tuxedo.
Begin with properly fired shelf cone 04 Bisque. Moisten a clean sponge and wipe bisque to remove dust.
Thin SC-97 Cant-elope, float to the sides of the windows, float a small line of SC-15 Tuxedo to the left sides of the window.
Pencil in candles in the lower window, use SG-402 White for the wax, and one coat of SC-97 Cant-elope for the flame, outline with SC-15 Tuxedo, use CB-110 Liner. Float SC-36 Irish Luck around the edges, CB-106 Script Liner.
Brush on two thinned coats of SC-27 Sour Apple to the shutters, use CB-604 Soft Fan.
Brush on 2-3 Coats of SC-74 Hot Tamale to the brick and one coat of SC-15 Tuxedo to the window trim and gate trim on shutters. Use CB-110 Liner
Outline the bricks with SG-402 White, plop SG-302 Snowfall on the tops of the bricks and shutters with CB-404 Pointed Round.
Apply two coats of NTBR Clear One Brushing to everything except for the Snowfall.
Begin with a properly fired shelf cone 04 Bisque. Moisten a clean sponge and wipe bisque to remove dust.
Trace on the candy cane shapes on the top.
On a palette, thicken SC-74 Hot Tamale with AC-310 Silkscreen Medium using a palette knife. Thicken to the consistency of peanut butter.
Place the shiny side of DSS-0105 Stripes, using the small size, on an angle over the candy canes, rub the thickened Hot Tamale over the screen.
Sponge off excess stripes from around the canes, brush on one coat of Hot Tamale over the red stripes to deepen the color.
Wash a thin coat of SC-97 Cant-elope around the candy canes, leave spaces for thinned SC-31 The Blues, repeat under the roof area.
Thin SC-97 Cant-elope to brush over the windows, remove from the centers of the top windows, with a damp sponge.
Thicken SG-405 Green as above in step 4. Screen the pine needles with the shiny side down, rub the thickened SG-405 Green over the pine needle to fill in around the candy canes, and under the roof.
Screen the small bulb in the windows, from DSS-0133 Merry Christmas with thickened SC-15 Tuxedo.
Brush two thinned coats of SC-27 Sour Apple to the planter box with CB-604 Soft Fan.
Brush the flowers with 2 coats of SC-74 Hot Tamale with CB-106 Script Liner dot the centers with SG-407 Yellow, outline centers with SC-15 Tuxedo. Sgaffito the petals with the clean-up tool while the petals are still wet.
Brush the leaves with two coats of SG-405 Green when the last coat is damp, use a clean-up tool to score a line in the center of the leaves.
Float SG-405 Green around the petals and leaves on the planter box with CB-106 Script Liner.
Tree trunks are SC-48 Camel Back, streak with SC-90 Elephant Ears, two coats, use CB-106 Script Liner.
Float SC-15 Tuxedo around the tree trunks, left side of the windows, with CB-109 Script Liner.
Use CB-110 Liner to brush SC-15 Tuxedo to the window frames.
Brush one coat of SC-74 Hot Tamale on the ornaments.
Outline the candy canes with SC-15 Tuxedo, use CB-110 Liner.
Brush two coats of NTBR Clear One Brushing with CB-604 Soft Fan over the entire piece.
1. Begin with properly fired shelf cone 04 Bisque. Moisten a clean sponge and wipe bisque to remove dust.
2. Slightly thin FN-037 Chartreuse with water. Pour inside the planter, turn to coat, pour out excess and drain.
3. Use the Soft Fan to apply three coats of SC-37 Ivory Tower to the face, ears, belly and legs of the Hedgehog. Blend SC-17 Cheeky Pinky into the Ivory Tower for the cheeks and ears on the last coat of Ivory Tower.
4. Use the Soft Fan to apply three coats of CG-958 Lagoon Blue to the body of the hedgehog.
5. Thin Lagoon Blue to brush over the edges of Ivory Tower to transition the color.
6. Use the Liner with SC-15 Tuxedo to outline the mouth and brush in the eyes. Thin Tuxedo to brush on the nose.
7. Fire to cone 06.
Form
MB-1489 Hedgehog Planter Bisque or CD1489 Hedgehog Planter Mold
Begin with properly fired shelf cone 04 Bisque. Moisten a clean sponge and wipe bisque to remove dust.
Slightly thin FN-041 Medium Blue with water. Pour inside the planter, roll to coat, pour out excess glaze and drain.
Use the Soft Fan to apply three coats of CG-718 Blue Caprice to the largest section of the shell. Blend CG-722 Seawind with the Blue Caprice at the beginning of the spiral of the shell. As you apply Seawind, blend into CG-963 Lemon Lime to the and the end of the spiral. Apply three coats.
Use the Soft Fan to apply 2-3 coats of CG-963 Lemon Lime to the ruffled section of the shell.
Use the Script Liner and Soft Fan to apply three coats of SC-77 Glo-worm to the snail’s body.
Use the Liner to apply two coats of SC-11 Blue Yonder, to the snail’s eyes and shade with SC-12 Moody Blue. Shade the snail’s body with thinned Moody Blue. Thin SC-15 Tuxedo with water and apply onto and inside the mouth.
Use the Script Liner to apply one coat of SC-77 Glo Worm over the Seawind section of the shell. Use the Script Liner to outline the shell’s spirals with SC-12 Moody Blue, then with thin lines of SC-15 Tuxedo.
Detail the mouth and edge of ruffle with SC-15 Tuxedo.
Fire to cone 06.
Form
MB-1329 Snail Planter Bisque or CD1329 Snail Planter Mold
Begin with properly fired shelf cone 04 bisque. Moisten a clean sponge and wipe bisque to remove any dust.
Using CB-604 #4 Soft Fan Brush, paint 3 coats of SP-274 Speckled Hot Tamale to the top of the mushroom, including underneath the rim.
Pour out some SC-16 Cotton Tail onto a palette and load the AC-213 Sponge on a Stick 1 ¼ Inch round with the glaze. Gently press the sponge onto the top of the mushroom and make a polka dot. Repeat to make more dots in a random fashion. Go over each dot one more time to ensure full coverage.
Sponge underneath the rim of the top of the mushroom with the AC-213 Sponge on a Stick 1 ¼ Inch round loaded with SC-16 Cotton Tail and dab repeatedly to bring out the texture.
Take the Rabbit silkscreen from the DSS-0101 Woodland Animal and place it on top of a piece of paper. Using your finger or a squeegee and gentle pressure, push some glaze (color isn’t important in this step as long as it’s not Cotton Tail) through the silkscreen onto the paper. This step is just to get the shape of the rabbit onto the paper so you can cut him out. You don’t have to get a perfect design, and therefore we aren’t using silkscreen medium.
Cut out the screened rabbit shape from the paper.
Place the paper on the front of the mushroom (the flattest spot is best) and trace around it with a pencil.
Using the CB-408 Size 8 Round brush, paint 2 coats of SC-35 Gray Hare into the area you traced, making sure to paint over the lines slightly. Let Dry.
Using CB-604 #4 Soft Fan Brush, brush some water over the painted area and adhere the paper rabbit to it, ensuring there are no air bubbles and the edges are sealed completely (to act as a mask).
Use a damp BT-910 Synthetic Sponge to sponge away any glaze that is outside of the paper. Be careful not to rip the paper.
Using CB-604 #4 Soft Fan Brush, paint 3 coats of SP-227 Speckled Sour Apple onto the stem and bottom of the mushroom. Make sure to paint the edges of the paper but not the whole thing.
Remove the paper rabbit.
On a palette, with a palette knife, mix SC-15 Tuxedo with AC-310 Silkscreen Medium to thicken to the consistency of peanut butter.
Using the rabbit silkscreen grain side up, center the screen in the area on the mushroom painted gray. Using your finger or a squeegee, rub the thickened SC-15 Tuxedo over the screen. Remove screen, rinse and lay flat to dry.
Outline the polka dots on the top of the mushroom with SA-002 Black.
Stilt and fire to shelf cone 06.
Instructions for 6-inch Mushroom:
Exactly the same, except use SP-206 Speckled Sunkissed for mushroom top, SC-11 Blue Yonder for polka dots, SC-51 Poo Bear for underneath silkscreen, SP-226 Speckled Green Thumb for stem of mushroom, AC-212 Sponge on a Stick ¾ “ round to make polka dots, and the hedgehog silkscreen from the Woodland Animal Designer Silkscreen.
Begin with properly fired shelf cone 04 bisque. Moisten a clean sponge and wipe bisque to remove any dust.
Using a CB-604 #4 Soft Fan, apply 3 coats of FN-301 Marshmallow to the outside of the birdhouse.
Using a CB-202 #2 Detail Liner and the CB-106 #6 Script Liner, apply 1 coat of any of the Stroke and Coats to apply the flowers. I made a random assortment using brushstrokes and did it all the way around the mug. See pattern for some inspiration for shapes.
Using a CB-110 #10/0 Mini Liner, apply 1 coat of SC-34 Down to Earth to outline the flowers.
Using a CB-604 #4 Soft Fan, apply 3 coats of FN-029 Rich Chocolate to the top and base of the birdhouse. Also, get the pearch and around the opening.
Begin with properly fired shelf cone 04 Bisque. Moisten a clean sponge and wipe bisque to remove dust.
Place FN-20 Pumpkin Foundation into a small cup and add a little bit of water to slightly dilute it (about 3 parts glaze to 1 part water). It should be the consistency of coffee cream. Pour this mixture into the planter, roll around to completely coat the interior. Drain out the excess glaze, keep the planter inverted until it has lost its shine. Wipe off any glaze from the outside using a damp sponge. Allow to dry.
Use the Soft Fan to apply CG-981 Fruity Freckles on the body of the owl, omit the breast and wings, 2 coats, use CB-106 Script Liner in tight spaces..
Use the Soft Fan and Script Liner to apply two or three coats of SC-24 Dandelion to the breast. Add SC-16 Cotton Tail to the brush to lighten in the center area of the breast, darken the edges around the breast with SC-97 Cantelope.
Use the same brushes to apply three coats of SC-23 Jack O’Lantern to the wings. Apply two or three coats of SC-9 Jaded to the large circles around the eyes. Add shading with two coats of SC-12 Moody Blue near the eyes for depth.
Use the Detail brush to apply two coats of SC-24 Dandelion to the eye ball and SC-15 Tuxedo to the pupil. Float SC-97 Cant-elope around the eyes.
Use the Script Liner to apply three coats of SC-12 Moody Blue to the beak and feet.
Use a sponge-on-a-stick to tap SC-12 Moody Blue to the ST-129 Mini Fern Stamp, then press to the wings.
Fire to cone 06.
Form
CD1331 Owl Planter Mold or MB-1331 Owl Planter Bisque
Begin with properly fired shelf cone 04 bisque. Moisten a clean sponge and wipe bisque to remove any dust.
Apply dots of UG-22 Spring Green using the handle end of a brush. The dots are applied to the cheeks, head, throat/neck and knees. Keep the placement of the dots in a random but tight area to create a texture for the Element Glaze to “ break” over. Allow to dry.
Place some EL-125 Sahara Sand into a small cup and add a little bit of water to slightly dilute it (about 3 parts glaze and 1 part water). It should be the consistency of a coffee cream. Pour this into the planter and roll around to completely coat the interior of the planter. Drain out the excess glaze and keep planter inverted until it has lost its shine. Wipe off any glaze from the outside using a damp sponge. Allow to dry
Shake and stir AS-513 Golden Sand, using a CB-604 Soft Fan, apply 3 coats to the shell portion of the piece. Watch the disbursement of the crystals while applying each coat. Brush out any clusters of crystals with the brush to achieve a uniform texture.
Use a dry AC-213 Sponge on a stick to apply SC-34 Down to Earth to ST-366 Fruit Blossom Stamp. While working quickly, apply the stamp onto the turtle shell portion of the piece, press firmly to make sure contact of the stamp to the ware due to the curvature and texture. Lift off the stamp and repeat this step until completion of the overall pattern onto the shell.
If there are any missing or skipped areas to the pattern on the shell use a CB-110 #10/0 Liner and apply 1 coat of SC-34 Down to Earth completing the design.
Using a CB-404 #4 Pointed Round, apply 1 heavy coat of SC-79 It’s Sage to the leaves in a “Pressure Point” stroke.
Using a CB-404 #4 Pointed Round, apply 2 coats of SC-53 Purple Haze to the petals of the flowers in a “Print” stroke.
Using a CB-404 #4 Pointed Round, apply 1 coat of SC-24 Dandelion to the centers of the flowers in a “Print” stroke.
Using a CB-220 #2 Detail Liner, paint in the iris of the eye with SC-28 Blue Isle. Paint in the pupil with SC-15 Tuxedo. Allow to dry. Apply 1-2 coats of S-2101 Crystal Clear Brushing over the eye (pupil, iris and white of eye.) Keep the glaze slightly away from the edge of the eye.
Using a CB-604 #4 Soft Fan, apply 2-3 coats of EL-131 Turtle Shell over the body (head, legs and tummy of the turtle excluding the eyes. Do not apply the glaze to the shell.
Begin with properly fired shelf cone 04 bisque. Moisten a clean sponge and wipe bisque to remove any dust.
Print two copies of the pattern and cut out both of them. Set one aside for now.
Center one of the patterns on the pot and sketch a line around the pattern about ¼” beyond the pattern.
Using a CB-406 #6 Pointed Round, apply 2 coats of SC-86 Old Lace to owl area. Allow to dry.
Position the pattern onto the SC-86 Old Lace area. With a Fan Brush, apply water under the pattern then press into place. Blot with a paper towel to remove any excess water and any bubbles. With a damp sponge, clean up around the edges of the pattern, be careful not to wet the pattern too much so it does not rip.
Position the pot on a banding wheel and center it.
Using a CB-604 #4 Soft Fan, starting at the bottom of the pot, band with SC-31 The Blues, the middle with SC-76 Cara-bein Blue and then the top and the inside rim with SC-32 Bluebeard. Blend each color into the next.
Remove the pattern after all the banding of the background is done. Allow to dry.
With a pencil and AC-230 Clay Carbon Paper, use the other cut out pattern and trace on all the details of the owls.
Using a CB-404 #4 Pointed Round, load the brush with water, tap off excess on a paper towel and side load in SC-14 Java Bean then pressure stroke in each of the owl feathers. Float some SC-14 Java Bean on the chest around the wings, feet and around the eyes.
Float SC-15 Tuxedo on the tree branch and leaf.
Using a CB-404 #4 Pointed Round, apply 2 coats of SC-24 Dandelion to the iris of the eyes and SC-15 Tuxedo to the pupils. Add a highlight with SC-86 Old Lace.
Using a CB-110 #10/0 Liner, detail the design with SC-15 Tuxedo. Allow to dry.
Using a CB-604 #4 Soft Fan, apply 1 coat of S-2101 Crystal Clear to the outside of the pot and 2 coats to the inside or apply the clear glaze of our choice. Allow to dry.
Begin with properly fired shelf cone 04 bisque. Moisten a clean sponge and wipe bisque to remove any dust.
Using a CB-604 #4 Soft Fan, apply 2 coats of SC-86 Old Lace to the belly of the owl.
Using a CB-106 #6 Script Liner, apply 1 coat of SC-54 to the edges of the belly fading it into the middle.
Using a CB-106 #6 Script Liner, apply 1 coat of SC-16 Cotton Tail to the eyes.
Using a combination of a CB-604 #4 Soft Fan and a CB-106 #6 Script Liner, apply 3 coats of SC-5 Tiger Tail to the wings, the inside, and to the outsides of the eyes. This will also be part of the iris, but you will only need 2 coats for that.
Using a CB-110 #10/0 Liner, apply 1 coat of SC-14 Java bean around the edge of the iris and let it fade to the middle.
Using a CB-106 #6 Script Liner, apply 2 coats of SC-42 Butter Me Up to the beak and feet.
Using a CB-106 #6 Script Liner, apply 1 coat of SC-15 Tuxedo to the pupils.
Using a CB-604 #4 Soft Fan, apply 3 coats of CG-798 Black Iris to the rest of the body.
Using a CB-604 #4 Soft Fan, apply 3 coats of SC-5 Tiger Tail to the inside of the planter.
Using a CB-110 #10/0 Liner outline the eyes and toes with SC-15 Tuxedo. Allow to dry.
Stilt and fire to shelf cone 06/05.
Form
CD1331 Owl Planter Mold or MB-1331 Owl Planter Bisque
Begin with properly fired shelf cone 04 bisque. Moisten a clean sponge and wipe bisque to remove any dust.
Thin SC-15 Tuxedo, Using a CB-604 #4 Soft Fan, apply over the entire house, wipe back with a damp sponge to antique.
Using a CB-604 #4 Soft Fan and a CB-106 #6 Script Liner, apply 2 coats of SC-86 Old Lace to the body of the house. Highlight with SC-16 Cotton Tail, and shade with SC-46 Rawhide in some of the areas to vary the color.
Using a CB-106 #6 Script Liner, apply 1 coat of SC-76 to the door and shutters, apply 2 coats of SC-11 Blue Yonder, highlight with SC-16 Cotton tail.
Using a CB-604 #4 Soft Fan, apply 2 coats of SC-50 Orange Ya Happy, SC-75 Orange-A-Peel, and SC-25 Crackerjack to the acorn roof and the two small roofs, in patches overlapping the colors.
Using a CB-106 #6 Script Liner, apply 2 coats of SC-60 Silver Lining Brush to the tree stumps and the chimney. Brush the various oranges on the bricks.
The base is floated around the edges with SC-39 Army Surplus, then brush with SC-26 Green Thumb.
Use SG-407 Yellow Designer Liner to outline the window frame.
Dip in Clear Glaze of choice. Or.
Place some S-21001 Crystal Clear Brushing into a small cup and add a little bit of water to slightly dilute it (about 3 parts glaze and 1 part water). It should be the consistency of a coffee cream. Pour this into the jar and roll around to completely coat the interior of the jar. Drain out the excess glaze and keep the jar inverted until it has lost its shine. Wipe off any glaze from the outside using a damp sponge. Allow to dry.
Using a CB-604 #4 Soft Fan, apply 1 coat of S-2101 Crystal Clear Brushing to the outside of the jar. Allow to dry.
Stilt and fire to shelf cone 06/05.
Form
MB-1390 Fairytale Jar – Acorn Cottage Bisque or CD1390 Fairytale Jar – Acorn Cottage Mold
Colors
SC-11 Blue Yonder
SC-15 Tuxedo
SC-16 Cotton Tail
SC-25 Crackerjack Brown
SC-26 Green Thumb
SC-39 Army Surplus
SC-46 Rawhide
SC-50 Orange Ya Happy
SC-60 Silver Lining
SC-75 Orange-A-Peel
SC-76 Cara-Bein Blue
SC-86 Old Lace
S-2101 Crystal Clear Brushing or Clear Glaze of Choice
Begin with properly fired shelf cone 04 bisque. Moisten a clean sponge and wipe bisque to remove any dust.
Tape around the rims of the flowerpots leaving about ½ -1 inch at the top.
Using a CB-604 #4 Soft Fan, apply 3 coats to the inside and upper rim of the pots. Pot #1 use FN-044 Yellow Orange, Pot #2 use FN-043 Teal Blue, and Pot #3 SC-52 Toad-ily Green. Remove the Masking Tape before the last coat of glaze dries to avoid chipping.
In a small cup, mix 2 parts FN-304 Black Velvet and 1 part UG-50 Jet Black to create the chalkboard glaze.
Lightly sketch a rectangle on the front of each pot. Apply Masking Tape around the rectangle.
Using a CB-106 #6 Script Liner, fill the rectangle in the 3 – 4 coats of the mixed chalkboard glaze. Remove the Masking Tape before the last coat of glaze dries to avoid chipping.
Using a CB-604 #4 Soft Fan, apply 3 coats of glaze to the rest of the pot. Pot #1 us FN-028 Wisteria Purple, Pot #2 use SC-52 Toad-ily Green, and Pot #3 use SC-88 Tu Tu Tango.
For the tray: Begin with a CB-604 #4 Soft Fan, apply 3 coats of FN-001 White to the top and 3 coats of FN-028 Wisteria Purple to the bottom. Allow to dry.
Using a CB-106 #6 Script Liner, apply 1 coat in random brushstrokes all over the top of the tray. Use SC-52 Toad-ily Green, SC-88 Tu Tu Tango, FN-028 Wisteria Purple, FN-042 Teal Blue, and FN-044 Yellow Orange. Allow to dry.
Begin with properly fired shelf cone 04 bisque. Moisten a clean sponge and wipe bisque to remove any dust.
If using Dipping Clear Glaze skip this step. Place some S-2101 Crystal Clear Brushing into a small cup and add a little bit of water to slightly dilute it (about 3 parts glaze and 1 part water). It should be the consistency of a coffee cream. Pour this into the cottage and roll around to completely coat the interior of the cottage. Drain out the excess glaze and keep the cottage inverted until it has lost its shine. Wipe off any glaze from the outside using a damp sponge. Allow to dry.
Using a CB-604 #4 Soft Fan and a CB-406 #6 Pointed Round, apply 1 coat of SC-25 Crackerjack Brown to the roof, chimney, grass area, shutters, under mushroom roof tops and tree trunk columns.
With a damp sponge wipe back leaving the color in the crevices. Be careful not to get onto other areas.
Using a CB-404 #4 Pointed Round, apply 1 coat of SC-3 Wine About It to the door, wipe back leaving the color in the crevices.
Using a CB-404 #4 Pointed Round, apply 1 coat of SC-35 Gray Hare to the windows, wipe back with a AB-705 #5 Round Brush leaving a highlight in the windows.
Using a CB-408 #8 Pointed Round, apply 3 coats of SP-245 Speckled My Blue Heaven to the main body of the house.
Using a CB-404 #4 Pointed Round, apply 3 coats of SP-206 Speckled Sunkissed to the left part of the house.
Using a CB-404 #4 Pointed Round, apply 2 coats of SC-78 Lime Light to every other row, the top part of the roof and the shutters. Apply 2 coats of SC-24 Dandelion to the remaining rows on the roof and under mushroom roofs.
Using a CB-404 #4 Pointed Round, apply 2 coats of SC-95 Pinkie Swear to the door. Apply 2 coats of SC-35 Gray Hare to the chimney and the tree trunk columns.
Using a CB-408 #8 Pointed Round, apply 2 coats of SC-23 Jack O’ Lantern to the mushroom rooftops.
Using a CB-404 #4 Pointed Round, apply 2 coats of the various colors to the bricks on the chimney.
Using a CB-408 #8 Pointed Round, apply 2 coats of SC-27 Sour Apple to the grass areas and the bottom of the cottage.
Using a CB-110 #10/0 Liner, apply 1 coat of SG-402 White Designer Liner to all the window trim.
Using the end of a brush handle add dots of SC-24 Dandelion to the mushroom roofs. Add dot flowers under the front windows first with SG-402 White Designer Liner to help block out the speckled background with SC-6 Sunkissed and SC-23 Jack O’Lantern. Ally to dry.
Using a CB-604 #4 Soft Fan, apply 1 coat of S-2101 Crystal Clear Brushing to the outside of the piece. Or Dip in Clear Glaze of choice.
Stilt and fire to shelf cone 06/05.
Form
MB-1390 Fairytale Jar – Acorn Cottage Bisque or CD1390 Fairytale Jar – Acorn Cottage Mold
Colors
SC-3 Wine About It
SC-6 Sunkissed
SC-23 Jack O’Lantern
SC-24 Dandelion
SC-25 Crackerjack Brown
SC-27 Sour Apple
SC-35 Gray Hare
SC-78 Lime Light
SC-95 Pinkie Swear
SP-206 Speckled Sunkissed
SP-245 Speckled My Blue Heaven
SG-402 White Designer Liner
S-2101 Crystal Clear Brushing or Clear Glaze of Choice
Begin with properly fired shelf cone 04 bisque. Moisten a clean sponge and wipe bisque to remove any dust.
Thin some SC-34 Down To Earth about half water and half color. Using a CB-604 #4 Soft Fan, apply over the house except the roof and chimneys. With a damp sponge wipe back to remove excess color so it is left in the detail areas of the house. Leave the windows dark with the SC-34 Down to earth.
Thin some SC-15 Tuxedo about half water and half color. Using a CB-604 #4 Soft Fan, apply to the roofs, and chimneys. With a damp sponge wipe back to remove excess color so it is left in the detail areas
Using a CB-106 #6 Script Liner, apply 2 coats of SC-86 Old Lace on the stucco section of the house.
Thin SC-35 Grey Hare and brush over sections of the chimney, add in some thinned SC-14 Java Bean to some sections of the bricks.
Using a CB-106 #6 Script Liner, apply 2 coats of SC-74 Hot Tamale to the doors.
Using a CB-106 #6 Script Liner, apply 2 coats of SC-27 Sour Apple to all the trim and shutters.
Using a CB-604 #4 Soft Fan, apply 2 coats of SC-30 Blue Dawn to the thatched roofs.
Apply 1 coat of SC-15 Tuxedo around the windowsills.
Use SG-402 White Designer Liner to paint on the windowpanes.
Float SC-15 Tuxedo around all the large sections of the roof and house parts for shadow.
Light above the front door is SC-15 Tuxedo with SC-6 Sunkissed for the bulb area.
Dip n Clear Glaze of Choice or Apply 2 coats of S-2101 Crystal Clear Brushing to the entire house in and out. Allow to dry.
Stilt and fire to shelf cone 06/05.
Form
MB-1389 Fairytale Jar- English Cottage
Colors
SC-6 Sunkissed
SC-14 Java Bean
SC-15 Tuxedo
SC-27 Sour Apple
SC-31 The Blues
SC34 Down to Earth
SC-35 Gray Hare
SC-74 Hot Tamale
SC-86 Old Lace
SG-402 White Designer Liner
S-2101 Crystal Clear Brushing or Dipping Clear Glaze of Choice
Begin with properly fired shelf cone 04 bisque. Moisten a clean sponge and wipe bisque to remove any dust.
Place some S-2101 Crystal Clear Brushing into a small cup and add a little bit of water to slightly dilute it (about 3 parts glaze and 1 part water). It should be the consistency of a coffee cream. Pour this into the jar and roll around to completely coat the interior of the jar. Drain out the excess glaze and keep the jar inverted until it has lost its shine. Wipe off any glaze from the outside using a damp sponge. Allow to dry.
Using a combo of a CB-604 #4 Soft Fan and a CB-106 #6 Script Liner, apply 3 coats of EL-125 Sahara Sands to the stucco area of the house,
Thin SC-15 Tuxedo, using a CB-106 #6 Script Liner, apply over the window panes, then remove excess with a damp sponge to antique.
Using a CB-604 #4 Soft Fan, apply 2 coats of EL-116 Blue Grotto to the roof.
Using a CB-604 #4 Soft Fan, apply 1 coat of PC-602 White Cascade to the roof, stay away from the valley’s in the roof (where the dormer roofs connect with the main roof) and then 1 coat of EL-113 Spanish Moss. Allow to dry.
Using a CB-106 #6 Script Liner, apply a line of SC-15 Tuxedo in the valley’s of the roof.
Using a CB-604 #4 Soft Fan, apply 2-3 coats of EL-201 River Bottom to the chimney.
Using a CB-110 #10/0 Liner, outline the stones with SC-15 Tuxedo.
Using a CB-106 #6 Script Liner, apply 2 heavy coats of EL-135 Rare Earth to the wood trim. Doors and shutters with 2 coats of EL-134 Mirror Blue. Apply over the SG-401 Black designer liner.
Use SG-404 Blue Designer Liner to detail the windowpanes, and SG-401 Black Designer Liner to detail the window frames.
Using a CB-106 #6 Script Liner, apply 1 coat of SC-6 Sunkissed to the lantern , SC-15 Tuxedo to the top of the lantern
Using a CB-604 #4 Soft Fan, apply 2 coats of S-2101 Crystal Clear to the windowpanes, and frames. Allow to dry.
Begin with properly fired shelf cone 04 bisque. Moisten a clean sponge and wipe bisque to remove any dust.
Using the CB-604 #4 Soft Fan, apply 2 coats of FN-001 White to the entire piece.
Place some SC-32 Bluebeard on a palette or tile sprinkle with AC-310 Silkscreen Medium. Using a palette knife mix to the consistency of thick peanut butter. If the mix is to thin add more AC-310 Silkscreen Medium or if to thick add more SC-32 Bluebeard to thin.
Repeat Step #3 this time using SC-14 Java Bean.
Hold the Silkscreen in place, and apply the thickened SC-32 Bluebeard to the bird’s body, and the thickened SC-14 Java Bean to the beak and feet.
Using a CB-106 #6 Script Liner and a CB-110 #10/0 Liner, apply 2 coats of SC-15 Tuxedo to the ribs on the roof, around the opening, the perch and the base. Create the birdcage “bars” and scroll work keeping them in line with the roof ribs.
Using a CB-106 #6 Script Liner, add leaves to the roof area with 2 coats of SC-27 Sour Apple.
Using a CB-106 #6 Script Liner, side load and shade the leaves with SC-26 Green Thumb.
Using aCB-110 # 10/0Liner, outline and vein the leaves with SC-15 Tuxedo. Allow to dry.
Begin with properly fired shelf cone 04 bisque. Moisten a clean sponge and wipe bisque to remove any dust.
Remove the stopper. Optional: Place masking tape over the hole in the front and top of the birdhouse.
Place some FN-008 Brown into a small cup and add a little bit of water to slightly dilute it. It should be the consistency of a coffee cream. Pour this into the birdhouse and roll around to completely coat the interior of the birdhouse. Remove the tape from the top of the birdhouse and let the excess Glaze drain from the inside. Drain out the excess Glaze and keep birdhouse inverted until it has lost its shine. Remove the masking tape. Wipe off any Glaze from the outside using a damp Sponge. Allow to dry.
Using the Soft Fan, apply 2-3 Coats of FN-008 Brown to the entire outside of the birdhouse.
Using a Silk Decorating Sponge loaded with SC-16 Cotton Tail, sponge on 2 Coats of color to the birdhouse excluding the roof. Do apply the color to the top ball finial portion on the roof though.
Allow drying time between the Coats of SC-16 Cotton Tail. Keep the color back from the edges about ¼” where the roof and body of the birdhouse meet. This should be slightly uneven. Leave a space between the bottom rim and around the side hole and footrest as well.
Using the Pointed Round, apply 1 thin coat of PC-601 Clear Cascade to the sections on the roof excluding the raised beaded rim between the sections on the roof.
Using the Pointed Round, apply 2 Coats of CG-716 Pagoda Green to the sections of the roof painted with PC-601 Clear Cascade. The crystals should be evenly dispersed yet somewhat heavy on each section. Keep the crystals off of the ridges in the roof. Do not paint the top finial on the roof. Allow to dry.
Using the Soft Fan, apply 1 coat of S-2709 Cappuccino Mint over the entire outside of the birdhouse. This includes the roof, body, and bottom of the birdhouse. There will be a few crystals that will be deposited on the outside of the birdhouse, which is what you are looking for. Try not to apply a lot of crystals over the entire piece. The scattered random placement is what you are trying to achieve here. Allow to dry.
Make sure the stopper is not in the piece before firing.
Begin with properly fired shelf cone 04 bisque. Moisten a clean sponge and wipe bisque to remove any dust.
Place some S-2101 Crystal Clear Brushing into a small cup and add a little bit of water to slightly dilute it (about 3 parts glaze and 1 part water). It should be the consistency of a coffee cream. Pour this into the jar and roll around to completely coat the interior of the jar. Drain out the excess glaze and keep the jar inverted until it has lost its shine. Wipe off any glaze from the outside using a damp sponge. Allow to dry.
Using a CB-602 #2 Soft Fan, apply 2 coats of CG-963 Lemon Lime to the body of the house and the chimney.
Using a CB-604 #4 Soft Fan, apply 1 coat of CG-722 Sand Petal to the roofs, make sure to evenly place crystals.
Using a CB-106 #6 Script Liner, apply 2 even coats of SC-75 Orange-A-Peel to the front door, shutters, and small mushroom stem.
Using a CB-106 #6 Script Liner, apply 1 coat of SC-6 Sunkissed over the windowpanes.
Using a CB-106 #6 Script Liner, apply 1 coat of SC-90 Elephant Ears to the chimney.
Using a CB-106 #6 Script Liner, apply 2 even coats of SC-26 Green Thumb to the grass base then float the edges with SC-36 Irish Luck.
Using a CB-106 #6 Script Liner, apply 1 coat of SC-90 Elephant Ears to the tree branches near the front door then 1 thinned coat of SC-15 Tuxedo.
Apply under the small roofs SC-6 Sunkissed, adding in some SC-75 Orange-A-Peel.
Apply 1 coat of SC-52 Toad-ily Green to the roofs then 1 coat of SC-10 Teal Next Time to the roofs.
Using a CB-110 #10/0 Liner, apply 1 coat of SG-405 Green Designer Liner to the window panes.
Using a CB-110 #10/0 Liner, outline the shutters, front door and lines under the small roof with SC-15 Tuxedo.
Using a CB-110 #10/0 Liner, outline the detail in the front door with SG-407 Yellow Designer Liner, and circles and dots on the shutters with yellow.
Use SG-405 Green Designer Liner to make a vine of leaves and stems on the branches at the front door, and stems and leaves on the flowers on the small mushroom.
Use SG-402 White Designer Liner to makes petals on the small mushroom and flowers in the grass and on the vine. Dot centers with SG-407 Yellow Designer Liner, and some SG-408 Orange Designer Liner dots in the grass.
Using a CB-106 #6 Script Liner, apply 2 coats of S-2101 Crystal Clear Brushing to the windows, shutters, front door, small mushroom stem and grass. Allow to dry.
Stilt and fire to shelf cone 06/05.
Form
MB-1390 Fairytale Jar – Acorn Cottage Bisque or CD1390 Fairytale Jar – Acorn Cottage Mold
Begin with properly fired shelf cone 04 bisque. Moisten a clean sponge and wipe bisque to remove any dust.
Place some FN-029 Rich Chocolate into a small cup and add a little bit of water to slightly dilute it (about 3 parts glaze and 1 part water). It should be the consistency of a coffee cream. Pour this into the vase and roll around to completely coat the interior of the vase. Drain out the excess glaze and keep vase inverted until it has lost its shine. Wipe off any glaze from the outside using a damp sponge. Allow to dry.
Using a CB-604 #4 Soft Fan, apply 3 thinned coats of SC-54 Vanilla Dip to the beast of the owl.
Lighten SC-84 Dee John slightly with SC-54 Vanilla Dip.
Using a CB-604 #4 Soft Fan, apply 3 thinned coats of the mix on the head area of the owl, blending with more SC-54 Vanilla Dip where the color meets the breast.
Using a CB-602 #2 Soft Fan apply, 3 coats of SC-41 Brown Cow to the wings.
Using a CB-106 #6 Script Liner, apply 3 coats of SC-16 Cotton Tail to the white part of the eyes.
Cut out a circle approx the same diameter of the large eyes. Place over the eye as a splatter guard. Using an old tooth brush, spatter the eyes with thinned SC-29 Blue Grass and SC-34 Down to Earth. Remove the spatters from the iris.
Using a CB-106 #6 Script Liner, apply 2 thinned coats of SC-51 Poo Bear to the iris of the eyes.
When the glaze has dried to the touch, stamp the body area with ST-343 Deco Circles Stamp using SC-34 Down To Earth, stamp the breast with ST-340 Flower Branch Stamp, and the wing with ST-339 Star Swirls Stamp. Use the AC-213 Sponge on a Stick to apply the color.
Using a CB-110 #10/0 Liner, thin slightly SC-29 Blue Grass to stroke in the petals of the flowers on the breast, stroke in the leaves with SC-39 Army Surplus.
Using a CB-106 #6 Script Liner, apply 2 coats of SC-15 tuxedo to the beak and feet, pupil
Using a CB-110 #10/0 Liner, out line the eye sections with SC-15 Tuxedo. Allow to dry.
Stilt and fire to shelf cone 05/06.
Form
CD1331 Owl Planter Mold or MB-1331 Owl Planter Bisque
Begin with properly fired shelf cone 04 bisque. Moisten a clean sponge and wipe bisque to remove dust.
Rolls glaze the inside of the cat/dog. To roll: Add a small amount of water to FN-026 Salmon Mousse. A rule of thumb is 3 parts glaze to one part water.
Pour the glaze into the cat/dog and roll around to cover the inside. The glaze should be creamy and thick enough that the bisque does not show through once rolled.
Pour out any extra glaze and leave the vessel up side down so extra glaze does not pool into the bottom of the ware. If glaze pools it may cause crawling.
Using the CB-604 #4 Soft Fan, apply two coats of FN-001 White to the outside of the cat/dog. Allow to dry.
The next step is to apply AC-302 Wax Resist over the FN-001 White. Using the ST-345 Large Deco Circle Stamp and a dry sponge-on-a-stick, lightly pounce AC-310 Wax Resist on the stamp. Use a light up and down pouncing motion to keep the Wax Resit on the high part of the design.
Press the Large Deco Circle Stamp to the middle of the body and one in the middle of the forehead.
Apply wax to the ST-113 Circulate Stamp and press to the lower legs, tail and lower belly. Do not stamp all over the container as you will use another stamp after applying color the first time.
Put the stamps in water as soon as you’re finished to help clean them.
Using the Soft Fan, add water to thin the following colors to the consistency of colored water: SC-11 Blue Yonder, SC-27 Sour Apple, SC-75 Orange-A-Peel and SC-97 Cant-elope.
The thinned colors are applied to the entire bisque in a random fashion and overlapping fashion. Let the first coat dry and apply the color in the same pattern a second time. You will see the color bead up and roll off the waxed area. Let dry.
Apply AC-302 Wax Resist to the ST-113 Circulate Stamp. Stamp all areas that are not stamped. Do not stamp the face. Let dry.
To provide contrast and add a second layer of stamped color you will apply two, thinned down coats of the following colors. Blend into the previous color. Tip: The deeper colors add depth and contrast.
Apply:
2 coats of thinned SC-29 Blue Grass over SC-11 Blue Yonder areas
2 coats of thinned SC-Green Thumb over the SC-27 Sour Apple areas
3 coats of thinned SC-73 Candy Apple Red to the SC-75 Orange-A-Peel areas
Thin down and float the following colors around the mouth. Use a combination of SC-97 Cant-elope, SC-75 Orange-A-Peel and SC-73 Candy Apple Red.
Dog: Use the CB-106 #6 Script Liner to float in SC-29 Blue Grass into the crease of the ears.
Dog: Paint the eyes SC-11 Blue Yonder. The pupil is SC-15 Tuxedo.
Cat: The eyes are SC-27 Sour Apple with SC-26 Green Thumb floated around the edge
Use the CB-110 10/0 Liner to outline the eyes, create whiskers and paint the nose with SC-15 Tuxedo.
Begin with properly fired shelf cone 04 bisque. Moisten a clean sponge and wipe bisque to remove any dust.
Apply 3 coats of SC-78 Limelight to the body of the Llama.
Apply 3 coats of SC-26 Green Thumb to the inside of the planter and the inner square of the blanket, leaving about 1/2″ around it. Also apply 2 coats of SC-26 Green Thumb to the hair, blanket fringe, and collar/tassles.
Apply 3 coats of SC-74 Hot Tamale to the outer square on the blanket.
Use SG-402 White Designer Liner to make the snowflake on the blanket.
Use SC-15 Tuxedo, SC-16 Cotton Tail, and SC-26 Green Thumb to glaze the eyes and outline the face details.
Apply 1 coat of S-2101 Crystal Clear Brushing over the blanket design.
1. Begin with properly fired cone 04 bisque. Moisten a sponge and wipe bisque to remove any dust.
2. Using the Script Liner with SC-41 Brown Cow, apply 2 coats to the body of the mermaid. Allow glaze to dry between coats.
3. Squeeze around 1 TBS of SC-87 Ruby Slippers onto the palette. Lightly dip the sponge into the glaze and blot off the excess onto the palette. Sponge on her cheeks.
4. Using the Detail Liner with SC-16 Cotton Tail, apply 1 coat to her eyes and teeth.
5. Using the Detail Liner with SC-48 Camel Back, apply 1 coat to the pupils of her eyes.
6. Using the Script Liner with SC-89 Cutie Pie Coral, apply 2 coats to the strap and center of her bra. Allow glaze to dry between coats.
7. Using the Script Liner with SC-89 Cutie Pie Coral, apply 2 coats to the top and sides of the tail and shade the inside with SC-2 Melon-Choly. Allow glaze to dry between coats.
8. Using the Script Liner with SC-53 Purple Haze and SC-33 Fruit of the Vine, apply 2 coats to the tail. Allow glaze to dry between coats.
9. Using the Script Liner with SC-15 Tuxedo, apply 2 coats to her hair.
10. Using the Script Liner with SG-701 Star Dust, apply 1 coat to her hair.
11. Using the Detail Liner with SC-15 Tuxedo, outline her details.
12. Fire to cone 06.
MUG
For the mermaid, follow steps 1-9.
14. Squeeze 2 TBS of SC-11 Blue Yonder onto the Palette. Thin with water. Use the Script Liner in circular motions to cover the background of the mug.
15. Using the Script Liner with SP-254 Speckled Vanilla Dip, apply 2 coats to the sand. Allow glaze to dry between coats.
16. Using the Script Liner with SC-33 Fruit of the Vine, SC-89 Cutie Pie Coral and SC-76 Cara-Bein Blue apply 2 coats to the shells. Allow glaze to dry between coats.
17. Use the Detail Liner with SC-15 Tuxedo to outline the details.
18. Using the Soft Fan with SC-11 Blue Yonder, apply 3 coats to the inside of the mug. Allow glaze to dry between coats.
19. Using the Script Liner with SC-15 Tuxedo, apply 2 coats to the bottom of the mug. Allow glaze to dry between coats.
20. Using the Soft Fan, apply 2 coats of S-2101 Clear Brushing Glaze to the background of the mug or dip into NT-CLR Clear Dipping Glaze.
21. Fire to cone 06.
Form
MB-1518 Mermaid Dish
MB-1482 Mermaid Mug
Colors
SC-2 Melon-Choly
SC-11 Blue Yonder
SC-15 Tuxedo
SC-33 Fruit of the Vine
SC-41 Brown Cow
SC-48 Camel Back
SC-53 Purple Haze
SC-76 Cara-Bein Blue
SC-87 Ruby Slippers
SC-89 Cutie Pie Coral
SG-701 Speckta-Clear Star Dust
SP-254 Speckled Vanilla Dip
NT-CLR Clear Dipping or NT-BR Clear One Brushing Glaze
Trace around assorted coins to create different size lady bugs.
Using the CB-404 # 4 Pointed Round, apply 3 coats to each lady bug using any of the following colors: SC-24 Dandelion, SC-74 Hot Tamale, SC-88 Tu Tu Tango or SC-95 Pinky Swear.
Using the CB-110 # 10/0 Mini Line loaded in SC-15 Tuxedo create the V pattern on the backs.
Using a brush handle loaded in SC-15 Tuxedo, add a head to each lady bug and add spots to the body’s.
Using the CB-404 # 4 Pointed Round, apply 1 coat of CG-788 Dutch Enamelware to the background.
Using the CB-404 # 4 Pointed Round, ally 1 coat of SC-77 Glo Worm to the background.
Using the CB-604 # 4 Soft Fan, apply 2 to 3 coats of FN-009 Black to the back and edges.
Using the CB-604 # 4 Soft Fan, apply 1 coat of S-2101 Clear over the entire top.
Stilt and fire to shelf cone 05/06.
Form
MB-882 Rectangle Tray Mold or CD-882 Rectangle Tray Mold
Colors
S-2101 Clear Brushing
FN-009 Black
CG-788 Dutch Enamelware
SC-15 Tuxedo
SC-24 Dandelion
SC-74 Hot Tamale
SC-88 Tu Tu Tango
SC-95 Pinky Swear
SC-77 Glo Worm
Decorating Accessories
CB-110 # 10/0 Mini Liner
CB-404 # 4 Pointed Round
CB-604 # 4 Soft Fan
Miscellaneous Accessories
Assorted Coins
Pen
Low-Fire|Earthenware Bisque|Table Top|Molds|Table Top
Begin with a properly fired shelf cone 04 Bisque. Moisten a clean sponge and wipe bisque to remove dust.
Brush the top of the plate with one coat of FN-001 White use RB-144 Soft Fan.
Arrange the screens from DSS-0158 Buggin’ Out on the plate, wet the glaze around the screen, press into the glaze the punched clouds. Press with a paper towel so they stick. There are 8 clouds on the plate.
Squeeze out SC-11 Blue Yonder, SC-16 Cotton Tail on a plate, use the foam roller to pick up the color then roll over 2/3rds of the plate, roll in different directions so the colors will mix without totally mixing together, roll 2-3 coats. Roll on SC-98 Slime Time to the remainder of the plate, overlap onto the blue.
Remove the paper clouds.
Roll SC-98 Slime Time onto the mug in a vertical direction, overlap the rolls for interest and to deepen the color.
Thicken SC-15 Tuxedo with AC-310 Silkscreen Medium using a palette knife to the consistency of peanut butter. Hold the screen with the shiny side down onto the plate or mug, rub the thickened Tuxedo over the screen with your finger. Remove and gently wash the screen to re-use.
Brush two coats of color as listed in materials, use RB-110 Liner or RB-106 Script Liner stay inside of the lines avoiding the screened lines. Darken the stamens and the body of the butterfly, spots and body of the ladybug with SC-15 Tuxedo.
Brush the inside and handle of the mug with three coats of SP-275 Speckled Orange A Peel, use RB-144 Soft Fan, and RB-106 Script Liner.
Refer to the picture for color placement.
Brush one coat of NTBR Clear over the top and body of the mug, two coats of clear to the back of the plate.
Begin with properly fired cone 04 bisque. Moisten a sponge and wipe bisque to remove any dust.
Locate the trees and “Merry Christmas” on DSS-0160 Vintage Holiday screen. Draw an outline around them in permanent marker. Cut them out with excess screen around the edges.
Squeeze 1 TBS of SC-15 Tuxedo onto the palette. Add a pinch of AC-310 Silkscreen Medium. Mix with a palette knife until it becomes the consistency of peanut butter. You may need to add more silkscreen medium or glaze.
Place the “Merry Christmas” on the plate, shiny side down. While holding it firmly in place, take a small amount of premixed silkscreen medium and gently rub in circles staring in the center and working outward. Next, place the large tree in the center of the plate and repeat. Finally, use the small tree to fill in the rest of the space.
Using the Script Liner with SC-26 Green Thumb, SC-73 Candy Apple Red, SC-74 Hot Tamale and SC-98 Slime Time, apply 2 coats to the lettering. Allow glaze to dry between coats.
Use SG-402 White, SG-403 Red and SG-405 Green to decorate the lettering with lines and dots.
Using SG-98 Slime Time or SG-26 Green Thumb apply 2 coats to the trees. Allow glaze to dry between coats.
Using the Detail Liner with SC-6 Sunkissed, apply 2 coats to the stars. Allow glaze to dry between coats.
Using the Detail Liner with SC-74 Hot Tamale, apply 2 coats to the ornaments. Allow glaze to dry between coats.
Using the Script Liner with SG-704 Peppermint, apply 1 coat over the trees.
Using the Soft Fan with S-2101 Clear Brushing Glaze, apply 2 coats to the front and back of the plate. Or dip into NT-CLR Clear Dipping Glaze.
Begin with properly fired cone 04 bisque. Moisten a sponge and wipe bisque to remove any dust.
Locate the Santa and holly on DSS-0162 Holiday Icons screen. Draw an outline around them in permanent marker. Cut them out with excess screen around the edges.
Squeeze 1 TBS of SC-15 Tuxedo onto the palette. Add a pinch of AC-310 Silkscreen Medium. Mix with a palette knife until it becomes the consistency of peanut butter. You may need to add more silkscreen medium or glaze.
Place the Santa in the center of the plate, shiny side down. While holding it firmly in place, take a small amount of premixed silkscreen medium and gently rub in circles staring in the center and working outward. Next, place the holly on the plate and repeat.
Squeeze 1 TBS of SC-11 Blue Yonder and SC-45 My Blue Heaven onto the palette. Take the sponge and dip it into the glaze. Sponge the background, alternating between the 2 colors.
Using the Script Liner with SC-26 Green Thumb and SC-98 Slime Time, apply 2 coats to the holly leaves, Santa pants and gloves. Allow glaze to dry between coats.
Using the Script Liner with SC-74 Hot Tamale, apply 2 coats to the berries, Santa hat and coat. Allow glaze to dry between coats.
Using the Detail Liner with SC-6 Sunkissed, apply 2 coats to belt. Allow glaze to dry between coats.
Using the Detail Liner with SC-20 Cashew Later, apply 2 coats to Santa’s face. Allow glaze to dry between coats.
Using the Script Liner and Soft Fan with SG-704 Peppermint, apply 1 coat over the background.
Using the Script Liner with S-2101 Clear Brushing Glaze, apply 1 coat over the screened images. Use the Soft Fan to apply 2 coats to the back. Or dip into NT-CLR Clear Dipping Glaze.
Begin with properly fired cone 04 bisque. Moisten a sponge and wipe bisque to remove any dust.
Use the Soft Fan to apply three coats of FN-032 Canton Jade onto the front of the platter. Let dry.
Use the sponge-on-a-stick to apply SC-28 Blue Isle to the MT-013 Honeycomb Mat then press to the inside of the platter. Tip: It is not necessary to get the entire press. Allowing the stamped image to have uneven edges or open spaces will add a rustic look to the design.
Squeeze about 2 TBS of SC-15 Tuxedo onto a palette. Add a pinch of AC-310 Silkscreen Medium. Mix with a palette knife to create the consistency of peanut butter.
Place the crab silkscreen (shiny side down) from DSS-0148 Sea Life 3 XLon the platter. While holding the screen firmly in place, take a small amount of premixed silkscreen medium and gently rub in circles starting in the center and working outward. Slowly pull up the screen to avoid smearing.
Use the Script Liner to fill in the crab silkscreen with one coat of SC-15 Tuxedo.
Use the Soft Fan to apply two coats of FN-009 Black to the back of the platter.
Use the Clay Carbon Paper to trace the words “Walk This Way” onto the piece. Use the Liner to apply one coat of SC-15 Tuxedo to fill in the words.
Fire to cone 05/06
Goat Platter
Follow the directions above using FN-053 Mint for the top of the background color on the front of the platter.
Use a mix of SC-27 Sour Apple and SC-52 Toad-ily Green for the mat stamping.
Begin with properly fired shelf cone 04 Bisque. Moisten a clean sponge and wipe bisque to remove any dust.
Slightly thin EL-144 Dark Amethyst. Pour inside the pitcher, turn to coat, pour out the excess glaze and drain.
Cut out the flower pattern. Trace around the edges of the pattern, pencil in the center circle, the flower petals and the stem that overlaps the second flower.
Use the Script Liner to apply two or three coats of SC-13 Grapel to the petals, mixing in SC-33 Fruit of the Vine to add color variation. Brush past the pencil line at the edge of the petals as it will make it easier to apply the pattern later. Apply two or three coats of SC-33 Fruit of the Vine to the stem. Lighten SC-13 Grapel with SC-16 Cotton Tail and apply in the center of the flowers.
When the flowers are still damp, hold the cut pattern over the painted flowers. Apply a coat of water under the paper, then press the paper onto the pitcher so it adheres to the glaze. Don’t worry if the glaze is showing past the paper as this will create a more interesting look after firing.
Use the Soft Fan to apply two coats of EL-144 Dark Amethyst to outside of the pitcher, going over the edges of the paper. When applying the glaze, brush different directions to allow the brushstrokes to show.
Remove the paper.
Use the Liner with SC-15 Tuxedo to outline and add veins to the flower petals. For the flower centers, use the end of a straw the circular shapes, or, use the Designer Liner to create circles.
Use the Script Liner to apply two coats of EL-144 Dark Amethyst over the lower flower. This will make the flower look like a shadow.
1. Begin with properly fired shelf cone 04 Bisque. Moisten a clean sponge and wipe bisque to remove any dust.
2. Use the Soft Fan to apply two coats of SC-88 Tu Tu Tango in the center section of the tray. Leave a little over 1″ unglazed.
3. Use the same brush to apply two coats of EL-144 Dark Amethyst to the remainder of the tray. Brush into the Tu Tu Tango where the colors meet. While the second layer of glaze is still wet, place the lace over both the Tu Tu Tango and the Dark Amethyst. Apply another coat of glaze over the lace. As it begins to dry, place a paper towel over to remove some of the excess glaze. Let dry to the touch.
3. Use the same brush to apply one coat of EL-144 Dark Amethyst over the top of the tray. Apply two coats of Dark Amethyst to the back of the tray. Remove the lace before it dries.
1. Begin with properly fired cone 04 bisque. Moisten a sponge and wipe bisque to remove any dust.
2. Use the Soft Fan to apply three coats of FN-003 Yellow onto the salad plate. Apply three coats of FN-052 Tangerine to the dinner plate and and three coats of FN-001 White to the charger. Let dry.
2. Using a palette knife, thicken NT-BR Clear with Silkscreen Medium to the consistency of peanut butter. Mix in a few drops of gel food coloring to tint the mixture. With the shiny side down, rub the mixture over the small daisy from DSS-0112 on the salad plate. Screen the larger daisy from DSS-0149 on the dinner plate. Screen just the flower head from DSS-0149 in a cluster on the charger plate. This is only to create a pattern.
3. On the salad and dinner plates, use the Script Liner to apply strokes of SC-16 Cotton Tail to the petals. Apply two or three coats, following the outline from the silkscreen. Pat SC-75 Orange-A-Peel on the centers.
4. Continuing on the salad and dinner plates, use the Script Liner to apply SC-27 Sour Apple to the leaves and stem. Deepen the color by adding SC-26 Green Thumb. Float SC-6 Sunkissed around the center of the flower on the dinner plate. Use the Liner with SC-34 Down to Earth to outline the flower.
5. For the charger plate, load the Script Liner with SC-6 Sunkissed and tip the brush with SC-97 Cant-elope. Apply as a brushstroke to the petals into the flower pattern, two coats. Pat the centers with SC-75 Orange-A-Peel then dot with SC-34 Down to Earth. Apply SC-27 Sour Apple and SC-26 Green Thumb to the leaves and outline with SC-34 Down To Earth.
Begin with properly fired cone 04 bisque. Moisten a sponge and wipe bisque to remove any dust.
Thin slightly EL-146 Rain Cloud, pour inside vase, turn to coat, then pour out the excess color. Drain.
Cut out the pattern and loosely trace the shape onto the pitcher.
Use the Script Liner to apply two coats of EL-146 Rain Cloud over the penciled shape. Let it dry to the touch. Use the Soft Fan to brush water onto the section with water to adhere the paper pattern to the piece. Gently press the edges of the paper down to ensure they are sealed. Use a damp sponge to wipe back some of the Rain Cloud that is not under the paper. It is not necessary to remove all of it.
Use the Soft Fan to apply two coats of EL-144 Dark Amethyst to the remainder of the pitcher. Apply the glaze in different directions for more interest. Remove the paper before the last coat dries.
Use the Liner to outline the petals with SG-401 Black.
Use the sponge-on-a-stick (or flat sponge) to apply SG-401 Black to the ST-100 Game Board Stamp and press onto the piece.
Fire to cone 06.
Form
MB-1472 Rustic Ware Pitcher
MB-1474 Rustic Ware Tumbler
1. Begin with properly fired cone 04 bisque. Moisten a sponge and wipe bisque to remove any dust.
2. Squeeze around a half cup of SC-87 Ruby Slippers into a disposable cup. Add water until it is easily poured. Pour into the teapot until all interior surfaces are covered. Pour out of Spout. Wipe off any excess.
3. Using a pencil, make a checkered pattern at the bottom of the teapot. Make sure there is an even number of squares going around the teapot. They are not supposed to look perfect. Make the same pattern on the top of the lid. Made four lines going vertically down the spout of the teapot. Try to space them out equally.
4. Squeeze around three tablespoons of SC-86 Old Lace onto the plate. Add some water to turn it into a wash. Using the Soft Fan, apply one coat to the entire exterior of the teapot and lid.
5. Using the Flat Shader with SC-15 Tuxedo, apply one coat of glaze to every other square in the checkered pattern. Apply one coat of glaze to the front and back portions of the spout.
6. Using the Flat Shader with SC-35 Gray Hare, apply highlights to the squares not previously glazed with SC-15 Tuxedo. In addition to the SC-35 Gray Hare, use SC-42 Butter Me Up to add random highlights.
7. Using the Script Liner with SC-87 Ruby Slippers, apply two coats of glaze to the handle of the lid, handle accent of the teapot, rim of the teapot, rim of the spout and inside of the lid. Allow glaze to dry between coats.
8. Using the Detail Liner with SC-15 Tuxedo, make an accent line around the base of the spout and on the handle of the teapot.
9. On the DSS-0138 Flowers 2 screen, locate the rose. Draw an outline around it in permanent marker. Cut it out with excess screen around the edges.
10. Squeeze about two tablespoons of SC-15 Tuxedo onto the plate. Add a pinch of AC-310 Silkscreen Medium. Mix with a palette knife until it becomes the consistency of peanut butter. You may need to add more Silkscreen Medium or glaze.
11. Position the rose in the center of the teapot. While holding it firmly in place, take a small amount of premixed Silkscreen Medium, and gently rub in circles starting in the center and working outward. Slowly pull up the screen to avoid smearing.
12. Using the Detail Liner and SC-73 Candy Apple Red, apply two coats of glaze to the rose. Allow glaze to dry between coats.
13. Using the Detail Liner and SC-26 Green Thumb, apply two coats of glaze to the leaves and stem. Allow glaze to dry between coats.
14. Using the Soft Fan, apply one coat of S-2101 Clear Brushing Glaze or dip into NT-CLR Clear Dipping Glaze.
15. Fire to cone 06.
TEACUP
1. Begin with properly fired cone 04 bisque. Moisten a sponge and wipe bisque to remove any dust.
2. Using a pencil, make a checkered pattern on the exterior of the cup. Make sure there is an even number of squares going around. They are not supposed to look perfect.
3. Squeeze around two tablespoons of SC-86 Old Lace onto the plate. Add some water to turn it into a wash. Using the Soft Fan, apply one coat to the entire exterior of the cup.
4. Using the Flat Shader with SC-15 Tuxedo, apply one coat of glaze to every other square in the checkered pattern.
5. Using the Flat Shader with SC-35 Gray Hare, apply highlights to the squares not previously glazed with SC-15 Tuxedo. In addition to the SC-35 Gray Hare, use SC-42 Butter Me Up to add random highlights.
6. Using the Script Liner with SC-87 Ruby Slippers, apply two coats of glaze to the rim of the cup and handle accent. Allow glaze to dry between coats.
7. Using the Detail Liner with SC-15 Tuxedo, make an accent line on the handle of the cup.
8. Using the Soft Fan, apply one coat of S-2101 Clear Brushing Glaze or dip into NT-CLR Clear Dipping Glaze.
9. Fire to cone 06.
SUGAR JAR
1. Begin with properly fired cone 04 bisque. Moisten a sponge and wipe bisque to remove any dust.
2. Using the Soft Fan with SC-87 Ruby Slippers, apply two coats to the interior of the jar and lid. Allow glaze to dry between coats.
3. Using a pencil, make a checkered pattern on the exterior of the jar and lid. Make sure there is an even number of squares going around. They are not supposed to look perfect.
4. Squeeze around three tablespoons of SC-86 Old Lace onto the plate. Add some water to turn it into a wash. Using the Soft Fan, apply one coat to the entire exterior of the jar and lid.
5. Using the Flat Shader with SC-15 Tuxedo, apply one coat of glaze to every other square in the checkered pattern.
6. Using the Flat Shader with SC-35 Gray Hare, apply highlights to the squares not previously glazed with SC-15 Tuxedo. In addition to the SC-35 Gray Hare, use SC-42 Butter Me Up to add random highlights.
7. Using the Script Liner with SC-87 Ruby Slippers, apply two coats of glaze to the handle of the lid, handle accents of the jar and rim of the jar. Allow glaze to dry between coats.
8. Using the Detail Liner with SC-15 Tuxedo, make an accent line on the handles of the teapot.
9. Using the Soft Fan, apply one coat of S-2101 Clear Brushing Glaze or dip into NT-CLR Clear Dipping Glaze.
10. Fire to cone 06.
Form
MB-1371 Dancing Teapot Bisque or CD1371 Dancing Teapot Mold
MB-1386 Dancing Teacup Bisque or CD1386 Dancing Tea Cup Mold
MB-1373 Dancing Sugar Jar Bisque
Colors
SC-15 Tuxedo
SC-26 Green Thumb
SC-35 Gray Hare
SC-42 Butter Me up
SC-73 Candy Apple Red
SC-86 Old Lace
SC-87 Ruby Slippers
NT-CLR Clear Dipping Glaze or S-2101 Clear Brushing Glaze
Use a damp BC-901 Sponge to wipe down the piece. Check the insides of the pieces and remove any debris using a damp sponge as well.
Use the pencil to draw a line around the pitcher approximately two inches from the top. Use the blue masking tape to tape off the bottom portion of the pitcher and handle. Use several short pieces of tape to complete the straight line around the piece due to the curvature of the pitcher. Repeat this taping procedure on the tumbler about 1″ from the top edge. Make sure the top edge of the tape firmly adheres to the ware.
In a plastic mixing cup thin about 2 oz. of FN-005 Pink with water to a melted ice cream consistency for rolling the glaze to the inside of the pitcher. Pour the thinned FN-005 Pink inside the pitcher. While working quickly, rotate the color to completely cover the inside. Pour out the excess color and invert to drain. Use a damp sponge to remove any color from the outside of the pitcher.
Using CB-604 Soft Fan and CB-406 Pointed Round to apply 3 coats of FN-005 Pink to the top marked off portions of the pitcher. After the third coat of color has lost its sheen and started to dry, remove the tape from the ware. If the glaze is allowed to completely dry, chipping of the color can occur.
Shake and stir CG-977 Ink Spots. To the unpainted bottom portions of the pitcher apply 2-3 coats of CG-977 Ink Spots to the ware using CB-604 Soft Fan and CB-604 Pointed Round. Make sure the two glazes meet along the pink glaze edge. Evenly disperse the crystal in the glaze as you apply it to the ware. You are striving for an uniform placement of the crystals. Use the brushes to push and place the crystals while the glaze is wet.
Trace or freehand the word “Fresh” in the center middle of the pink trim on the pitcher. Use SC-15 Tuxedo to paint in the lettering with CB-220 Detail Liner.
1. Begin with properly fired shelf cone 04 Bisque. Moisten a clean sponge and wipe bisque to remove dust.
2. Using the Script Liner, outline half of the dish with SC-60 Silver Lining. Fill in the outlined area using the Soft Fan. Repeat for a total of 3 coats.
3. Using the Script Liner, outline the other half of the dish with SC-74 Hot Tamale. Fill in the outlined area using the Soft Fan. Repeat for a total of 3 coats.
4. Allow glaze to dry completely.
5. Trace on the pattern with clay carbon paper.
6. Using SG-401 Black, trace over pattern and fill in. Trace around laces and the center line of the dish.
7. Apply 2 coats of S-2101 Crystal Clear Brushing.
1. Begin with properly fired shelf cone 04 Bisque. Moisten a clean sponge and wipe bisque to remove dust.
2. Use the Soft Fan to apply three coats of FN-001 White to the ice cream section of the cookie jar. Note that there is a section of ice cream on the base of the jar. When the third coat of White is wet, center the lid on a banding wheel. Slightly thin SC-97 Cant-elope and pour into a Writer Bottle. Squeeze slightly thinned color onto the wet glaze in a spiral. Practice first to make sure the Cant-elope is thin enough to break up on the wet glaze. You can also have a mix of thinned White glaze in a squeeze bottle to squeeze over the Cant-elope in case it is too heavy.
3. Repeat for the section of ice cream on the base of the jar. Clean off any glaze that drips on the cone.
4. Use the Soft Fan to apply three coats of FN-014 Antique White to the cone portion of the jar. Note: The next step requires the third coat of color to be wet.
5. Cut a section of cheesecloth to fit around the bottom of the cone, wet with water, open it up and place it into the third coat of FN-014 Antique White. Apply a thin coat of Antique White over the cheesecloth.
6. After the glaze loses its shine, use the Soft Fan to apply two thinned coats of SC-25 Crackerjack Brown over the cheesecloth. Remove the cheesecloth after the last coat loses its gloss.
7. Use the Script Liner to shade the sections of the bottom of the cone with SC-48 Camel Back to give it depth.
8. Use the Script Liner to shade into the swirls of the lid with SC-97 Cant-elope.
9. Clear Glaze Option 1: Dip into NT-CLR Clear Dipping Glaze. Option 2: Use the Soft Fan to apply one coat of S-2101 Clear to the outside of the base. Thin the Clear to pour to the inside of the base.
10. Fire to cone 06.
Form
MB-1318 Ice Cream Cone Cookie Jar
Colors
FN-001 White
FN-014 Antique White
SC-25 Crackerjack Brown
SC-48 Camel Back
NT-CLR Clear Dipping or S-2101 Clear Brushing Glaze
1. Begin with properly fired shelf cone 04 Bisque. Moisten a clean sponge and wipe bisque to remove dust.
2. Shark: Use SC-15 Tuxedo to darken SC-35 Gray Hare to a deep charcoal. Use the Script Liner and Soft Fan to apply three coats to the dark area of the shark’s body.
3. Use the Soft Fan to apply two coats of thinned SC-89 Cutie Pie Coral to the inside of the mouth. Use the Liner to add in the gum line around the teeth.
4. Use the Script Liner with the mixed Charcoal color to shade around the edges of the dark part of the shark’s head and around the gum line.
5. Wipe glaze off the eyes. Use the Liner to apply SC-15 Tuxedo to the pupil and create an outline with SC-15 Tuxedo. Outline the teeth also.
6. Plate: Place the shark on the charger and trace around the bottom of the shark with a pencil.
7. Place SC-31 The Blues, and SC-16 Cotton Tail on a tile. Load the Soft Fan with SC-31 The Blues, tip the brush into SC-16 Cotton Tail and apply onto the plate. Always brush towards the penciled line to make the shark appear to be coming out of the water. Load the brush with more Cotton Tail then the Blues. Brush closer to the penciled line then flip the brush back to create a “wave” repeat the stroke around the penciled lines to create a look of motion. Apply two-three coats.
8. Use the Soft Fan to apply two-three coats of SC-31 The Blues nto the bcak of the plate.
9. Dip both pieces into NT-CLR Clear Dipping Glaze or use the Soft Fan to apply two coats of S-2101 Clear Brushing Glaze.
10. Fire to cone 06. Can be fused together in the firing or kept separate.
Form
MB-1367 Shark Bite Bisque or CD1367+ Shark Dish Mold
MB-1117 Casualware Charger Plate
Colors
SC-15 Tuxedo
SC-15 Tuxedo
SC-31 The Blues
SC-35 Gray Hare
SC-89 Cutie Pie Coral
NT-CLR Clear Dipping or S-2101 Clear Brushing Glaze
Decorating Accessories
CB-604 #4 Soft Fan
CB-106 #6 Script Liner
CB-110 #10/0 Liner
Low-Fire|Earthenware Bisque|Table Top|Molds|Table Top
1. Begin with properly fired shelf cone 04 Bisque. Moisten a clean sponge and wipe bisque to remove dust.
2. Use the Clay Carbon Paper to trace the pattern onto the plate. Go over the traced lines with a red felt pen to see the detail after it is glazed.
3. Follow the notes on the pattern for color placement. Use the Script Liner to apply two coats of each color to the flower petals; apply in the direction of the petal and do the same for the leaves.
4. Use the end of a brush to created the dotted flowers with SC-23 Jack O’ Lantern, SC-89 Cutie Pie Coral, SC-75 Orange-A-Peel and SC-74 Hot Tamale. Use different sized dots. Let dry.
5. Use SG-401 Black Designer Liner to outline and detail the flowers, leaves and stems. Use SG-404 Blue for the group of leaves at the bottom.
6. Use the Soft Fan to apply three coats of FN-041 Medium Blue to the back of the plate.
7. Dip into NT-CLR or use the soft fan to apply two coats of S-2101 Clear to the front of the plate.
7. Fire to cone 05/06.
Form
MB-1117 Casualware Charger Plate
Colors
SC-9 Jaded
SC-23 Jack O’ Lantern
SC-24 Dandelion
SC-33 Fruit of the Vine
SC-74 Hot Tamale
SC-75 Orange-A-Peel
SC-89 Cutie Pie Coral
SG-401 Black Designer Liner
SG-404 Blue Designer Liner
FN-041 Medium Blue
NT-CLR Clear Dipping or S-2101 Clear Brushing Glaze
Using the AC-230 Clay Carbon Paper, trace on the patterns.
Using the CB-604 # 4 Soft Fan, apply 1 coat of SW-304 Copper Wash to the rims, allowing it not to be even.
Outline the designs with SG-401 Designer Liner Black. If desired, add scrolls to fill in the background.
Using the CB-404 # 4 Pointed Round, apply 1 coat of SC-26 Sour Apple followed with 1 coat of SC-26 Green Thumb to the leaves, stems and outside of the pea pod.
Using the CB-404 # 4 Pointed Round, apply 2 coats of SC-78 Lime Light to the peas, and 2 coats of SC-27 Sour Apple to the space around the peas.
Using the CB-404 # 4 Pointed Round, apply 2 coats of SC-71 Purple-licious to the eggplant and then sideload and shade the edges with SC-33 Fruit of the Vine.
Using the CB-404 # 4 Pointed Round, apply 2 coats of SC-74 Hot Tamale to the radish, and shade the edges with SC-4 Salsa.
Using the CB-404 # 4 Pointed Round, apply 2 coats of SC-75 Orange-a-Peel to the carrot and then sideload with SC088 Tu Tu Tango and SC097 Can’t Elope and shade the edges.
Using the CB-604 # 34 Soft Fan, apply 2 coats of SW-168 Coral Sands to the eggplant plate, staying off the painted design areas and excluding the foot and bottom of the plate.
Using the CB-604 # 34 Soft Fan, apply 2 coats of SW-169 Frosted Lemon to the radish plate, staying off the painted design areas and excluding the foot and bottom of the plate.
Using the CB-604 # 34 Soft Fan, apply 2 coats of SW-167 Sand and Sea to the pea plate, staying off the painted design areas and excluding the foot and bottom of the plate.
Using the CB-604 # 34 Soft Fan, apply 2 coats of SW-166 Norse Blue to the carrot plate, staying off the painted design areas and excluding the foot and bottom of the plate.
Using a damp sponge, remove any color from the foot and bottom of the plates.
Place onto a well kiln washed self and fire to shelf cone 5-6.
1. Begin with properly fired shelf cone 04 Bisque. Moisten a clean sponge and wipe bisque to remove any dust.
2. Slightly thin FN-013 Light Yellow and pour inside the pitcher. Roll to coat, pour out the excess glaze and drain.
3. Use the Soft Fan to apply three coats of FN-002 Yellow to the outside of the pitcher. Let dry.
4. Dampen the glaze with water on one of the flat sides. Place the SL-439 Hexagon Stencil onto the piece at an angle and press into the wet glaze so it will ahdere to the pitcher. Use the foam roller to gently apply SC-73 Candy Apple Red over the stencil. Apply light pressure and hold hte roller at the tip of the handle to keep the color from bleeding under the stencil. Roll in different directions to fill the stencil area. Remove the stencil. Add to the design by moving the stencil around the same side of the pitcher. Overlap the stencil areas to keep the design in proper alignment.
5. Use the Soft Fan to shade around the edges of the pitcher, neck and handle with two coats of SC-97 Cant-elope.
1. Begin with properly fired shelf cone 04 Bisque. Moisten a clean sponge and wipe bisque to remove any dust.
2. Use the Soft Fan to apply three coats of SC-55 Yella Bout It to the inside and three coats of SC-6 Sunkissed to the outside of the piece. Let dry.
3. Thicken S-2101 Clear with AC-310 Silkscreen Medium and use a palette knife mix to the consistency of peanut butter. Add a few drops of food coloring to tint the mixture. Place the large or small pineapple screen from DSS-0147 Island (shiny side down) and rub the thickened clear over the screen inside the piece. This is for color placement only.
4. Use the Script Liner to apply two coats of SC-26 Green Thumb to the crown of the pineapple and two coats of SC-24 Dandelion to the fruit. Shade the left side of hte fruit with two coats of SC-97 Cant-elope. Let dry.
5. Thicken SC-15 Tuxedo as in step three. Place the pineapple screen directly on top of the previously screened image and rub the thickened Tuxedo over the screen.
Begin with properly fired shelf cone 04 bisque. Moisten a clean sponge and wipe bisque to remove any dust.
With a pencil and AC-230 Clay Carbon Paper, trace on the fish design.
Outline one fish in the SG-405 Green Designer Liner and one in SG-403 Red Designer Liner, the v detail in the scales is SG-401 Black Designer Liner.
Place some SG-405 Green Designer Liner on a palette. Thin the SG-405 Green Designer Liner and using a CB-106 #6 Script Liner to shade around the head and scales of the fish, use SC-24 Dandelion in the same way to color some fins and scales.
Using a CB-604 #4 Soft Fan and a CB-106 #6 Script Liner, apply 2 thinned coats of SC-11 Blue Yonder to the background of the tray.
With the 1” and ¾” Round Paper Punches, punch out about 15 of each size from plain paper. Wet the paper punches and scatter them around the tray. Press with paper towel so they stick.
Using a CB-604 #4 Soft Fan and a CB-106 #6 Script Liner, apply 2 coats of SC-12 Moody Blue to the background, taking care to brush around the paper dots in a circular stroke, as brush strokes will show.
Remove the paper dots before the color dries.
Using a CB-604 #4 Soft Fan, apply 3 coats of SC-11 Moody Blue to the back of the tray. Allow to dry.
Using a CB-604 #4 Soft Fan, apply 2 coats of S-2101 Crystal Clear Brushing glaze to the top of the plate. Allow to dry.
Stilt and fire to shelf cone 06/05.
Form
MB-882 Rectangle Tray Mold or CD-882 Rectangle Tray Mold
1.Begin with properly fired shelf cone 04 Bisque. Moisten a clean sponge and wipe bisque to remove any dust.
2. Sprinkle AC-310 Silkscreen Medium onto SC-12 Moody Blue and mix with a palette knife to the consistency of peanut butter. To achieve a darker blue, flip the screen so the shiny side is up, then rub the mix over the screen.
3. Use the large crab from DSS-0148 Sea Life-XL and the coral from DSS-0102 Sea Life. On the salad plate we used the seahorse from the Sea Life XL. After screening the first seahorse, gently clean the screen then flip to screen the second so the seahorses are facing each other.
4. Use the Soft Fan to apply three coats of FN-006 Blue to the back of the plates.
Begin with properly fired shelf cone 04 Bisque. Moisten a clean sponge and wipe bisque to remove dust.
Thicken clear glaze with Silkscreen Medium to the consistency of peanut butter. Using the large pineapple and hibiscus from DSS-0147 Island silkscreen, screen the image onto the plate.
Use the Script Liner and Soft Fan to apply two coats of SC-24 Dandelion to the pineapple, adding SC-85 Tiger Taill to some areas of the pineapple.
Use Script Liner to apply two coats of SC-89 Cutie Pie Coral to the hibiscus flowers.
Use the Script Liner to apply two coats of SC-43 Lettuce Alone and SC-52 Toad-ily Green to the crown of the pineapple. Apply two coats of SC-43 Lettuce Alone to the hibiscus leaves. Let dry.
Mix SC-15 Tuxedo with Silkscreen medium to the consistency of peanut butter. Re-screen the pineapple image over the painted area, lining up the image as closely as possible to the original screen.
NOTE: If you don’t want to try to line up the screen after painting the design, you can omit step 2 and screen the image in Tuxedo. If you go this route, apply one thin coat of the colors noted above on the screened pineapple, crown, hibiscus and leaves so you don’t cover up the screened lines.
Use a pencil to sketch leaves and stems that extend from the pineapple.
Use the Script Liner to apply SC-26 Green Thumb, SC-43 Lettuce Alone and SC-52 Toad-ily Green to the leaves and stems.
Use the Liner to add veins to the leaves and outline the leaves and stems.
Use the Soft Fan to apply three coats of SC-26 Green Thumb to the back of the plate.
Begin with properly fired shelf cone 04 Bisque. Moisten a clean sponge and wipe bisque to remove dust.
Thicken clear glaze with Silkscreen Medium to the consistency of peanut butter. Using the large pineapple from DSS-0147 Island silkscreen, screen the image onto the plate.
Use the Script Liner and Soft Fan to apply two coats of SC-24 Dandelion to the pineapple, adding SC-5 Tiger Tail to some areas of the pineapple.
Use the Script Liner to apply two coats of SC-43 Lettuce Alone and SC-52 Toad-ily Green to the crown of the pineapple. Let dry.
Mix SC-15 Tuxedo with Silkscreen medium to the consistency of peanut butter. Re-screen the pineapple image over the painted area, lining up the image as closely as possible to the original screen.
NOTE: If you don’t want to try to line up the screen after painting the design, you can omit step 2 and screen the image in Tuxedo. If you go this route, apply one thin coat of the colors noted above on the screened pineapple and crown so you don’t cover up the screened lines.
Use a pencil to sketch leaves and stems that extend from the pineapple.
Use the Script Liner to apply SC-26 Green Thumb, SC-43 Lettuce Alone and SC-52 Toad-ily Green to the leaves and stems.
Use the Liner to add veins to the leaves and outline the leaves and stems.
Use the Soft Fan to apply three coats of SC-26 Green Thumb to the back of the plate.
1. Begin with properly fired shelf cone 04 bisque. Moisten a clean sponge and wipe bisque to remove any dust.
2. Place the tissue paper on top of the pattern and trace with the pencil.
3. Place the tissue paper pattern onto the canvas and trace over the design with the water-based marker. This will allow the pattern to transfer to the canvas.
4. Use SG-407 Designer Liner Yellow to create dots in the lemon sections in the center and the peel.
5. Use SG-409 Designer Liner Bright Green to outline and vein the leaves.
6. Dot SG-401 Designer Liner Black around all the detail as shown.
7. Use ¾” or 1” tape to tape off stripes on the canvas. NOTE: You may prefer to fill in the stripes without using tape.
8. Using the Shader, apply one coat of SG-401 Designer Liner Black, going in one direction. Use smaller brushes to apply the color around the design areas. Remove the tape.
9. Use the Soft Fan to apply one coat of SG-401 Designer Liner Black to the sides of the canvas.
10. Dip into NT-CLR Clear One Dipping glaze or use the Soft Fan or apply two coats of NT-BR Clear One Brushing glaze.
11. Fire to cone 05/06.
Form
MB-1352 6” x 6” Square Clay Canvas
Colors
SG-401 Designer Liner Black
SG-407 Designer Liner Yellow
SG-409 Designer Liner Bright Green
NT-CLR Clear One Dipping or NT-BR Clear One Brushing
1. Begin with properly fired shelf cone 04 bisque. Moisten a clean sponge and wipe bisque to remove any dust.
2. Trace the pattern onto the piece using Clay Carbon Paper.
3. Use the Script Liner to apply two coats SG-407 Designer Liner Yellow to the Lemons. Add SG-402 Designer Liner White to highlight the lemons in the center.
4. Use the same brush to apply two coats of SG-409 Designer Liner Bright Green to the leaves. Shade the edges of the leaves with SG-405 Designer Liner Green. Note: Leave some of the Bright Green in the brush to help lighten the color.
5. Mix SG-402 Designer Liner White with a bit of SG-401 Designer Liner Black to create grey color. Use the Shader to create streaks in the background with CB-310 #10 Flat Shader.
7. Use the Soft Fan brush to apply two coats of SC-15 Tuxedo to the sides of the canvas.
8. Dip the canvas into NT-CLR or use the Soft Fan to apply two coats of NT-BR to the top of the canvas.
9. Fire to cone 05/06.
Bisque
MB-1352 6” x 6” Square Clay Canvas
Color
SC-15 Tuxedo
SG-401 Designer Liner Black
SG-402 Designer Liner White
SG-405 Designer Liner Green
SG-406 Designer Liner Brown
SG-407 Designer Liner Yellow
SG-409 Designer Liner Bright Green
NT-CLR Clear One Dipping or NT-BR Clear One Brushing
Begin with a properly fired shelf cone 04 bisque. Moisten a clean sponge and wipe bisque to remove dust.
Cut out the screens from DSS-0157 Under The Sea needed for the project. Use a dry erase marker to scribble on the shiny side of the screen, wipe off with a paper towel. This will show the screen detail and will be easier to use.
Tint S-2101 Crystal Clear Brushing with food coloring to enhance the color. Thicken with AC-310 Silkscreen Medium using a palette knife to the consistency of peanut butter, with the shiny side down, rub the thickened mix over the mermaid and fish screens. This is for the pattern only.
Brush two coats of the Stroke & Coat® colors over the various sections of the screen, use SC-41 Cashew Later for the black mermaids’ flesh tone.
Thicken SC-15 Tuxedo with AC-310 Silkscreen Medium to the consistency of peanut butter.
Line up the various screens used so they fit perfectly over the painted images, rub the thickened Tuxedo over the screens.
Thin SC-11 Blue Yonder to the consistency of water and use RB-144 #4 Soft Fan to brush the thinned Blue Yonder on the background of the clipboard.
Trace or write on the words You are Mermazing in the right corner of the tile with SG-401 Designer Liner Black.
Brush one coat of SG-701 Speckta-Clear Star Dust over the tile, omit the skin of the mermaids, use RB-144 #4 Soft Fan.
Brush the edge with a dark blue or teal color, two coats.
Begin with properly fired shelf cone 04 bisque. Moisten a clean sponge and wipe bisque to remove any dust.
First, you need to decide what direction you want the design to go in. You could do a swirl that goes off the bisque similar to the pictured pieces; or even a swirl that doesn’t get cut off; or a kind of flower design. Really, the possibilities are endless, but you’ll want to begin with drawing what direction the brushstrokes will be going in.
Place some FN-009 Black into a small cup and add a little bit of water to slightly dilute it (about 3 parts glaze and 1 part water). It should be the consistency of a coffee cream. Pour this into the piece and roll around to completely coat the interior of the piece. Drain out the excess glaze and keep piece inverted until it has lost its shine. Wipe off any glaze from the outside using a damp sponge. Allow to dry.
Using a CB-106 #6 Script Liner, apply 1 coat of FN-009 Black to the “arms” of the containers. Once this is dry use a damp sponge to antique them so there is still black left in the swirls.
Using a CB-604 #4 Soft Fan, apply 4 coats of SC-95 Pinkie Swear to the lid and with a CB-106 #6 Script Liner apply 4 coats to the arms.
Using a CB-104 #4 Soft Fan, apply 3 coats of FN-009 Black to the bottom of the pieces as well as the top knob.
Now, you will want to begin your brushstrokes. Begin by double loading your brush with SC-1 Pink-A-Boo and SC-95 Pinkie Swear. When applying the glaze to the bisque you’ll want to put the most pressure when you begin your brushstroke then slowly lift to get it to taper. Continue this until sufficient pink strokes are applied and then switch to the teal strokes which include SC-9 Jaded and SC-10 Teal Next Time
Once you have all the brushstrokes on it will still not quite look right until you add the black.
Using a CB-110 #10/0 Liner to apply SG-401 Black Designer Liner with a brush. Outline all of your brushstrokes; you can add any extra flares or designs that you would like so that the spacing and everything is coherent.
Next, apply some dots using SG-402 White Designer Liner in the applicator bottle that it comes in. Allow to dry
Using a CB-604 #4 Soft Fan, apply 1 coat of S-2101 Crystal Clear Brushing or Clear glaze of your choice. Allow to dry.
Stilt and fire to shelf cone 06/05.
Form
MB-1371 Dancing Teapot Bisque or CD1371 Dancing Teapot Mold
MB-1372 Dancing Container Bisque or CD1372 Dancing Container Mold
MB-1373 Dancing Sugar Jar Bisque or CD1373 Dancing Sugar Jar Mold
Colors
SC-1 Pink-A-Boo
SC-9 Jaded
SC-10 Teal Next Time
SC-95 Pinkie Swear
FN-009 Black
SG-401 Black Designer Liner
SG-402 White Designer Liner
S-2101 Crystal Clear Brushing or Clear Glaze of Choice
Decorating Accessories
CB-106 #6 Script Liner
CB-110 #10/0 Liner
CB-604 #4 Soft Fan
BT-910 Synthetic Sponge
Miscellaneous Accessories
Pencil
Small Cup
Low-Fire|Earthenware Bisque|Table Top|Molds|Table Top
Begin with properly fired shelf cone 04 bisque.Moisten a clean sponge and wipe bisque to remove any dust.
Using the Soft Fan Brush, apply two coats of FN-001 White to the front of the rectangle tray.
Cut out the pattern
Place pattern on the bisque and trace the shape.Leave the pattern on the bisque.The pattern will act as a masking tool so you can stamp the background and not get the color on the design.
On a palette, squeeze out a quarter-sized amount of the following colors:SC-75 Orange-A-Peel, SC-76 Cara-Bein Blue, SC-97 Cant-elope.
Using the 1 1/2” sponge-on-a-stick apply the color to the MT-012E Ikat Mat. Use a light up and down pouncing motion to keep the glaze on the raised part of the mat.
Tip:All of the colors will overlap on the edges. It will look like one continuous pattern with no gaps in color.
Work quickly so the glaze doesn’t dry. The mat has 3 sections that look likes eyes – start with these sections.Start with SC-97 Cant-elope. Do not clean the sponge. Pick up SC-75 Orange-A-Peeland sponge on the sides of the SC-97 Cant-elope. With a different sponge-on-a-stick pick up SC-76 Cara-Bein Blue and overlap over the SC-75 Orange-A-Peel.Repeat until the entire mat is covered with glaze.
Tip:The mat is not as long as the bisque, so lay it down horizontally or left to right. It will take two applications to cover the tray.Lay the glazed mat on the bisque and over the paper pattern.Make sure and press the mat into the corners so the design is complete.
Tip:Hold the mat in place but lift up the edges to make sure contact was made and the glaze was transferred.
Re-apply the glaze in the same pattern.Line up the pattern, there may be some overlap, but with this pattern it looks good.Lay down the mat, press and remove.
Remove the paper pattern.
Cat:Use the negative space from the cut out to paint the moon.Using the sponge-on-a-stick apply 2 coats of SC-6 Sunkissed to the moon.Don’t clean the sponge then pick up SC-75 Orange-A-Peel and apply to the outer portion of the moon.
Using the Script Liner, apply 1 heavy coat of SC-15 Tuxedo to the pattern area.The entire design should be black. This process is fairly quick as you want to work while the SC-15 Tuxedo is still damp.If the glaze dries apply more SC-15 Tuxedo to rehydrate. Or, instead of painting the entire animal black work in sections so the glaze doesn’t dry.
The next step will use the sgraffito technique.Sgraffito is the process of scratching off color to reveal the base color.
Use the bamboo skewer to scratch or scrape off the white lines shown in the pattern. Do not scratch down to the bisque, just enough to reveal the white base coat. Tip: Wipe off the skewer often to remove the glaze from the point.
Note:If there are glaze burrs, let it dry and gently wipe them off when dry.
Using the CB-604 #4 Soft Fan Brush apply 3 coats of SP-277 Specked Glo Worm on the back of the tray.
Let dry then apply clear glazem- either NT-CLR or NTBR brush on glaze.
Stilt and fire to shelf cone 06/05.
Form
MB-882 Rectangle Tray Mold or CD-882 Rectangle Tray Mold
Use a moistened synthetic sponge to wipe down the bisque ware to remove any dust.
Print two copies of the pattern. Place the one pattern onto the ware. Using a pencil and AC-230 Clay Carbon to transfer only the flower portion of the design at this time. Using scissors to carefully cut out the flower in the other pattern copy.
Apply 3 coats of UG-46 Bright Yellow to the flower portion of the pattern. Apply the color out over the edges about ¼” past the outline of the flower edges. Apply the color as even as possible using CB-406 #6 Pointed Round.
Paint the back of the cut-out flower pattern with water and secure it to the yellow painted area. Make sure that the pattern covers only the yellow areas painted and all edges are tightly affixed to the ware.
On a tile or palette place some of UG-91 True Teal, UG-94 Pansy Purple, UG-210 Forest Green and UG-219 Marine Blue. Start up on the right corner of the tile and apply some UG-94 Pansy Purple using CB-604 #4 Soft Fan working down the side of the tile and towards the middle. Without washing the brush, pick up some UG-219 Marine Blue and brush over the wet edge of the purple area working downward and towards (diagonally) the left side of the tile. Work the brush back and forth where the two colors overlap creating a blending of color. There should be no harsh edge, but a gradual transition from one color to the next. The tile should be about two-thirds of being covered. Load the unwashed brush and apply some UG-91 True Teal to the remaining portion of the tile, wet blending the edge of the UG-219 Marine Blue into the UG-91 True Teal area. Pick up some UG-210 Forest Green and wet blend the left corner of the tile. This color should be darkest at the left corner portion of the tile.
Repeat this step until 3 coats of each color has been applied. As you look at the tile you should see a subtle blending of colors diagonally from the purple on the right upper corner of the tile transitioning into the blue-greens to the darkest green at the left bottom corner. Before the color has completely dried, remove the paper pattern from the flower. Check to make sure no yellow color was lifted as you removed the paper. If any color was removed, re-apply the yellow to the flower.
Transfer or freehand the leaves onto the pattern. Apply two coats of UG-220 Sage using CB-110 Liner to the leaves excluding the one on the far left. Apply some thinned UG-1 Kings Blue to this portion. Shade the Sage portion of the leaves with some UG-91 True Teal using CB-404 Pointed Round.
Starting with the top left petal, apply 1 coat of UG-206 Fire Engine Red using CB-106 #6 Script Liner. Use some water to lighten the color towards the flower center. The petal to the right of the first petal is a wash of UG-206 Fire Engine Red. You should be able to see some yellow coming through the red. To the petal below the first painted petal, apply 1 coat of UG-217 Red Coral to the petal and fading the color towards the center. Paint in washes of Red Coral on the remaining petals overlapping slightly where the red coral meets on the second petal.
Slightly thin some UG-50 Jet Black. Load CB-106 #6 Script Liner with water and tip it in the thinned black. Shade the throat of the flower to where the darkest coloring is in the center of the flower. This shading should be subtle and not dominant on the flower. Paint in the stamens with thinned UG-50 Jet Black using CB-110 #10/0 Mini Liner. Do not make them appear too dark, they should be rather faint in appearance.
Apply 2 coats of S-2101 Crystal Clear Brushing to the flower and leaves on the pattern. To the sides of the tile apply 3 coats of FN-009 Black using CB-406 #6 Pointed Round. Try to not get any glaze on the background areas of the tile.
Stilt and fire the piece to shelf cone 05-06.
Bisque
MB-1397 Message Plaque (clip isn’t necessary for the final piece)
Begin with properly fired shelf cone 04 bisque. Moisten a clean sponge and wipe bisque to remove any dust.
Using the CB-604 #4 Soft Fan brush apply one coat of FN-01 White to the front of the plate. If doing the Purple combination base coat with FN-006 Blue.
Using the small cup mix the colors. The formula is 2 tablespoons glaze to 1/2 cap of water and stir to mix. (We used a Stroke & Coat bottle cap to measure the water.)
Spray the plate with a little water. This helps the glaze slide and move over the plate for better mixing of colors.
Tip:Work light to dark when pouring the colors.
Start with SC-16 Cotton Tail and pour it into 2 sections of the bisque.
Pour the second color over the edges of the SC-16 Cotton Tail and tilt to get the colors moving.
Periodically mist the ware to assist in the movement.
Tip: When tilting be careful not to muddy the colors, but to blend and create striations.
Pour the third color over the edges of the other two colors and a little in the center.Tilt the plate and periodically mist with water or rubbing alcohol to enhance the movement of the glazes.
Goal:Cover the entire front of the plate with the glazes.
Add the fourth color to the front of the plate.Add a little at a time to prevent mudding the colors.
Finishing step: Squirt a line of SC-15 Tuxedo across the plate – not a lot. This is to add visual interest. Additionally, flick or splatter darker colors to the front of the plate.
Optional step: Spritz the plate with rubbing alcohol. This merges some of the colors and creates little circles in the glaze.
Using the Soft Fan Brush apply three coats of a color of your choice to the back of the plate.
Allow to dry. The surface will be nice and smooth.
Artist choice:Add a Designer Silkscreen, stamp or design on the surface.
1.Begin with properly fired shelf cone 04 Bisque. Moisten a clean sponge and wipe bisque to remove dust.
2. Cut out the cactus shapes. Place shapes on the tray and trace around the cacti.
3. Use the Script Liner to apply three coats of SC-27 Sour Apple to the cactus, shading with SC-52 Toad-ily Green.
4. Wet the paper cactus shapes and place them onto the painted cacti. Gently press to ensure the edges are sealed.
5. Use the Soft Fan to apply two coats of FN-003 Orange. While the last coat is still wet, place the lace onto the tray. Apply one more coat of FN-003 Orange to help secure the lace. Let glaze dry a bit. Gently press with a paper towel to remove excess glaze and aid in drying.
6. Use the Soft Fan to apply two coats of SC-16 Cotton Tail over the lace. Remove the lace when the second coat has lost its gloss. Remove the paper cacti.
7. Use the Soft Fan to apply three coats of FN-020 Medium Green to the back of the tray.
8. Use CB-110 Liner to add small lines on the cactus with S-36 Irish Luck.
Begin with properly fired shelf cone 04 bisque. Moisten a clean sponge and wipe bisque to remove any dust. Check the inside surface for any debris as well.
In a Plastic Mixing Cup mix FN-023 Cinnamon with some water to a melted ice cream consistency. While working quickly, pour the thinned glaze to the inside of the pitcher, rotating the glaze to cover the entire inner surface. Pour out the excess glaze and invert the piece to drain and dry. Use a moistened sponge to wipe off any glaze from the outside of the piece.
In a Plastic Mixing cup mix 1 oz. of SP-216 Speckled Cottontail and 1 oz. of SP-254 Speckled Vanilla Dip. Mix well. Using CB-604 Soft Fan to apply 3 coats of the mixture to the outside of the pitcher including the handle.
Use CB-604 Soft Fan loaded with the mixture and tip (side load) the brush with SC-92 Café Ole’. Shade the top and bottom edges of the pitcher. Shade around where the handle attaches to the ware. More than one coat may be necessary for proper color concentration. Apply one thinned coat of SC-92 to the handle using the Soft Fan brush. Let dry.
Transfer the pattern using AC-230 Clay Carbon. The pattern can be cut out and attached with the Blue Masking Tape for transferring. Repeat the pattern on both sides of the pitcher.
On a tile place SC-14 Java Bean, SC-23 Jack-O-Lantern, SC-25 Crackerjack, SC-34 Down To Earth, SC-52 Toad-ily Green, SC-79 It’s Sage and SC-97 Cant-elope. Thin the colors with water to a skim milk consistency. Using CB-406 Pointed Round to fill in the acorns with SC-14 Java Bean. The acorn caps are SC-34 Down To Earth. Colors should be almost solid coverage.
To the leaves in the pattern, randomly apply the remaining colors to the leaves in a dabbing motion with CB-406 Pointed Round. Wet blending and overlapping the colors as you paint the leaves. The colors should be mottled and blended as they move through the leaves.
Detail the acorn caps with SG-401 Black. To the acorn bottoms and leaves detail them with SG-406 Brown as shown in the pattern.
On a tile mix some SC-31 The Blues with water to a skim milk consistency. Using the 1” Sponge-on-a-Stick to apply one coat to the ST-127 Crackle stamp. While working quickly, apply the stamp in a diagonal across the piece, pressing firmly onto the ware. Lift the stamp from the piece. By applying the stamp on a diagonal you lessen the chance of the pattern becoming to repetitive and obvious to the eye. Repeat this process all over the ware to complete the overall crackle pattern. Let dry.
Using CB-604 Soft Fan to apply one coat of S-2101 Crystal Clear Brushing over the entire outside surface.
1.Begin with properly fired shelf cone 04 Bisque. Moisten a clean sponge and wipe bisque to remove any dust.
2. For the background, tape off 1 1/2″ from the right side and 2 inches from the bottom. Tape an angle to the corner where the tape meets.
3. Use the Soft Fan to apply three thinned coats of SC-11 Blue Yonder to the right side. Let dry. Use the Soft Fan to shade the taped edge with one thinned coat of SC-32 Bluebeard. Let dry.
4. Remove the tape on the right side, then tape over the Blue Yonder edge. Use the Soft Fan to apply two thinned coats of SC-45 My Blue Heaven to the background, adding SC-11 Blue Yonder to the brush to create a shadow on the taped edge. Remove the bottom tape line, but not the side. Let dry.
4. On a palette, tint S-2101 Crystal Clear Brushing with food coloring then add AC-310 Silkscreen Medium to thicken. Use a palette knife to mix to the consistency of peanut butter. With the shiny side down, place the large pineapple from DSS-0147 Island onto the canvas and rub the thickened clear over the screen. Repeat the process for the flowers in the background from DSS-0149 Flowers 3 XL. This is for color placement only. Gently clean and dry the screens.
5. Use the Script Liner to apply two coats of SC-26 Green Thumb to the crown of the pineapple and two coats of SC-97 Cant-elope to the body of the fruit. Use the same brush to apply two coats of SC-97 Cant-elope and SC-75 Orange-A Peel to the flowers. Apply two coats of SC-73 Candy Apple Red to the centers. Let dry.
6. Thicken SC-15 Tuxedo with AC-310 Silkscreen Medium as noted in step 4. Place the clean screens, shiny side down, over the painted pineapple and flowers then rub the mixture over the images.
7. Remove the tape on the blue side. Tape the 2 inch section at the bottom and the angle at the corner.
8. To make a checkerboard, use the 1/2″ tape to tape horizontal rows (4)then remove every other piece of tape. Tape 16 vertical rows of tape over the horizontal rows, then remove every other piece of tape. Use the Script Liner to apply two coats of SC-15 Tuxedo over the open squares.
9. To complete the checkerboard, tape horizontal and vertical tape lines over the painted squares. Use the Script Liner to apply two coats of SC-15 Tuxedo over the open squares. Remove the tape and you have your perfect checkerboard. Remove all tape from the canvas.
10. For the sides of the canvas, glaze to match the color from the top of the canvas so the design will carry over to each respective side.
11. Use the Liner to paint the word Sweet at the top.
Begin with properly fired shelf cone 04 Bisque. Moisten a clean sponge and wipe bisque to remove dust.
Slightly thin FN-037 Chartuese with water. Pour inside the pitcher and the tumblers, turn to coat, pour out the excess, drain. Sponge off drips on the outside of the pieces.
Pitcher and Tumblers:
Pencil a line 1 1/2″ from the bottom of the pitcher and 3/4″ from the bottom of the tumblers. Adhere tape above the line. Use the Soft Fan to apply three coats of SC-89 Cutie Pie Coral under the tape line. Remove the tape.
Use a palette knife to mix SC-29 Blue Grass with AC-310 Silkscreen Medium on a palette to the consistency of peanut butter.
Using the triangle design motif from DSS-0140 Southwest Designs, rub the thickened SC-29 Blue Grass over the screen with the shiny side up. Place the design at the rim of the tumblers and pitcher. Repeat the design to fill in space around the rim.
Use the Liner to apply one coat of SC-75 Orange-A-Peel to the center triangle in the design. Apply SC-77 Glow Worm into the fourth triangle in the design.
Add a drop of food coloring to S-2101 Clear of FN-001 White, then mix with AC-310 Silkscreen Medium as in step 4. Use to screen the tall cactus (DSS-040 Southwest) to the pitcher and the small cactus to the tumblers. Screen should be used with the shiny side down. This is for color placement only.
Use the Script Liner to apply two coats of SC-27 Sour Apple to the cacti. Let dry.
Thicken SC-15 Tuxedo as in step 4, re-screen the cactus images over the painted cacti with the thickened Tuxedo.
Dip into NT-CLR Clear Dipping Glaze or use the Soft Fan to apply two coats of S-2101 Clear Brushing Glaze.
Dinner Plate:
Use the Soft Fan to apply three coats of FN-001 White to the top of the plate. Re-wet the glaze with water or watered down White Foundations glaze. Place the SL-454 Southwest Stencil in the center of the plate, press the stencil into the glaze to remove gaps between the stencil and plate.
Use the Script Liner to apply two coats of each of the following colors: SC-89 Cutie Pie Coral into the largest design section, SC-77 Glow Worm into the next size, and SC-29 Blue Grass into the smallest section. Remove the stencil.
Use the triangle screens around the edge, as in steps 5 and 6.
Use the Soft Fan to apply three coats of FN-037 Charteuse to the back and edges of the plate.
Fire to cone 05/06.
Form
MB-1116 Casualware Dinner Plate
MB-1472 Rustic Ware Pitcher
MB-1474 Rustic Ware Tumblers
Colors
SC-15 Tuxedo
SC-27 Sour Apple
29 Blue Grass
SC-75 Orange-A-Peel
SC-77 Glo-Worm
SC-89 Cutie Pie Coral
FN-001 White
FN-037 Chartreuse
NT-CLR Clear Brushing or S-2101 Clear Dipping Glaze
Begin with properly fired shelf cone 04 bisque.Moisten a clean sponge and wipe bisque to remove any dust.
Using the CB-604 #4 Soft Fan brush apply two coats of FN-001 Whiteto the front and sides of the MB-1352 6×6 Square Clay Canvas. Allow to dry.
While the glaze is drying mix SC-15 Tuxedo with AC-310 Silkscreen Medium to create a paste for the DSS-146 Princess & Unicorn silkscreen. Refer to the Mayco Channel on YouTube for directions.
Position the Unicorn and Rainbow on the Clay Canvas and apply the mixture to screen the image.
Put the silkscreen in water to soak and clean.
Use the palette knife to stir the CG-963 Kaleidoscope glaze. Mix it up, shake it up and pour out a dollop onto a palette.
Using the CB-106 #6 Script Liner apply one good coat of CG-964 Kaleidoscope to the Unicorn body and legs.Make sure and stay between the lines from the silkscreen and not cover the eye and mouth lines.
Apply a wash of SC-11 Blue Yonder over the crystals on the unicorn.This just helps separate the unicorn from the background a little more since Kaleidoscope has a white background.
Using the Liner paint one coat on the mane and tail of the unicorn – alternating the following colors:SC-6 Sunkissed, SC-11 Blue Yonder and SC-75 Orange-A-Peel.
Paint the horn SC-6 Sunkissed.
Paint the hearts SC-74 Hot Tamale.
Using the Script Liner apply two coats of the following colors to the rainbow: SC-6 Sunkissed, SC-27 Sour Apple and SC-75 Orange-A-Peel.
Mix up the glaze and water to blow bubbles.The formula is 1 tablespoon of SC-31 The Blues, 2 tablespoons of water and two drops of liquid dish soap.Mix well.
Using a straw blow into the mixture creating bubbles.Let the bubbles build up over the top of the cup then take the straw and push onto the canvas.Apply the bubbles horizontally across the unicorn.
Use the Soft Fan to apply one coat of CG-964 Kaleidoscope to the sides of the canvas.
Begin with a properly fired shelf cone 04 Bisque. Moisten a clean sponge and wipe bisque to remove dust.
Thicken SC-29 Blue Grass with AC-310 Silkscreen Medium with a palette knife to the consistency of peanut butter.
Find the center of the tray, pencil a line in the length and width of the tray. Where the two lines cross is where to begin the design. Use the design as shown on the tray from DSS-0140 Southwest Designs. Place the shiny side down, rub the thickened SC-29 Blue Grass over the design with your finger. Repeat to fill in the tray, overlap the end line of the design to begin the next screen.
Once the tray is filled with the design, it creates an open space, in this space brush with two coats of SC-89 Cutie Pie Coral. When dry, screen in the center of this area with another design from DSS-0140 Southwest Designs, as shown. Use the thickened Blue Grass.
Brush two coats of SC-75 Orange A Peel in the orange squares, and SC-77 Glo-Worm in the triangles and squares.
Brush the back and edge with three coats of FN-037 Chartreuse, use CB-604 Soft Fan.
Dip into NT-CLR Clear Dipping Glaze or use the Soft Fan to apply two coats of S-2101 Clear Brushing Glaze.
Fire to 05/06.
Form
MB-1486 Rustic Tray
Colors
SC-29 Blue Grass
SC-75 Orange-A-Peel
SC-77 Glo-Worm
SC-89 Cutie Pie Coral
FN-037 Chartreuse
NT-CLR Clear Brushing or S-2101 Clear Dipping Glaze
Begin with properly fired shelf cone 04 bisque. Moisten a clean sponge and wipe bisque to remove any dust.
Apply 2 coats of FN-001 White to entire piece using CB-604 Soft Fan. Let dry.
Transfer the pattern to the ware using a pencil and AC-230 Clay Carbon. Use Blue Masking tape to mask off inside edge of the pattern and bird where it extends below the edge of the plate.
On a tile, place SC-13 Grapel, SC-23 Jack O’Lantern and SC-89 Cutie Pie Coral. Using CB-604 Soft Fan to apply SC-23 to the top portion of the plate extending the color to the corners. Without washing the brush, pick up some SC-89 and apply the coral color over the previous orange color at the corner edges and extending the color toward the lower corners of the plate. Pick up some SC-13 and a blend the color along the lower edges of the plate excluding the bird area. When blending these colors, work the brush in an “X” or crisscross strokes to blend the colors together while they are wet. Repeat these colors in the same manner to the back of the plate in the same order. This application and blending of the wet color is repeated three times for solid coverage. The colors should appear to blend from one color to the next without a harsh delineation of the colors. When all three coats have been sequentially applied and the color has lost the sheen from the last coat, remove the masking tape from the plate.
Apply 2 coats of SC-27 Sour Apple to the bird body tapering the color off above the upper eye towards the beak with CB-406 Pointed Round. Apply 2 coats of SC-24 Dandelion from the on the upper portion of the head above the eye blending the color over the green. Also shade the back edge of the head and the wing portion of the body with one coat of SC-24. When applying the third coat of SC-27 on the bird, wet blend SC-7 Leapin’ Lizard to the body under the eye, down the neck and along the lower edge of the plate on the wing. Apply SC-97 Cant-elope to the upper portion of the head from the beak backward s along the top of the head fading the color out over the yellow.
Apply 3 coats of SC-53 Purple Haze to the lower and upper eyelids using CB-406 Pointed Round. Shade with SC-71 Purple-licious at each ends of the eyelids using CB-110 Liner.
Apply 2 coats of SC-24 Dandelion to the three feathers below the eye using CB-406 Pointed Round. Shade the left side of each feather with SC-97 Cant-elope.
Apply 3 coats of SC-11 Blue Yonder to the beak and iris of the eye using CB-220 Detail Liner. Shade the iris of the eye with SC-28 Blue Isle using CB-220 Detail Liner. Paint in some fine lines radiating out from the pupil with SC-28 using CB-110 Liner. Paint in the pupil of the eye with SC-15 Tuxedo using CB-220 Detail Liner. Paint in highlights in the pupil with SC-16 Cotton Tail with the same brush. The white of the eye is 2 coats of SC-16 Cotton Tail. Shade the edges of the white of the eye with some very thin (almost like dirty water) SC-15 Tuxedo.
To outline the bird, start with some thinned SC-15 Tuxedo using CB-110 Liner. The lines don’t have to be very fine in width. This will act as some shading of the pattern. Use SC-15 to re-outline the pattern but keeping the line finer and smaller in width than the previous outlining. This will reinforce the detail in the pattern and intensify the black lines.
Outline the border in the pattern with SC-15 Tuxedo using CB-110 Liner. Fill in the triangles and diamond shapes with one coat of SC-16 Cotton Tail using CB-220 Detail Liner.
Shake and stir CG-968 Peppermint Twist and apply 2 coats of the glaze with crystals to the background areas in the pattern using CB-406 Pointed Round. Manipulate the crystals as you are painting to evenly disperse them. Keep the larger crystals slightly away from the edges in the pattern and trim. When dry apply 1 coat of SC-15 Tuxedo to the topknot feathers in the pattern on the bird using CB-110 Liner.
Begin with properly cleaned greenware prepared by using the Clean Up Tool and Green Grit Pad to remove the seams and imperfections to the ware. Use a damp BT-910 Sponge to remove any excess clay dust from the ware.
Using CB-618 Soft Fan to apply 3 good even coats of UG-32 Cocoa to the entire front of the piece. Let dry.
Using the Blue Masking Tape to secure the pattern to the ware. Use a pencil and AC-320 Clay Carbon to transfer the pattern. Do not transfer any of the fine feather detail to the bird at this time. Only transfer the major sections of the bird, you should have 6 areas noted: Upper back down above the wing, breast down to legs and rear, pointed oval shape below the wing area, two areas to the wing and a section behind the lower wing feathers.
On a tile, place small amounts of all of the following colors. When blocking in the following colors, use the brush to your advantage but applying the color in the direction of the section being painted. Using CB-404 and CB-406 Pointed Rounds to apply 2-3 coats of color washes (color thinned with some water) to the pheasant as follows:
UG-210 Forrest Green to the Head excluding the eye marking.
UG-206 Fire Engine Red to the eye marking around the eye.
*UG-213 Cinnamon and UG-57 Spice Brown mixed (1:1) to paint in the back section and breast section down to the rear of the body.
UG-58 Harvest Gold to the section below the wing along the breast and to the beak.
UG-53 Silver Grey to the upper wing section above the gold section.
UG-31 Chocolate to the lower wing section.
UG-73 Wedgewood Blue to the upper section behind the lower wing area.
UG-57 Spice Brown to the bottom portion behind the lower wing. Blend this color up over the Wedgewood Blue slightly.
UG-58 Harvest Gold to the tail feathers.
UG-30 Sand to the feet and legs.
Shading of the above areas are done with the following colors over them as noted using CB-406 Pointed Round loaded with water and tipped with color using the brush on its side. The shading should add dimension to the shape and contour of the pheasant: UG-91 True Teal to the upper edge on the head down the back side and just under the
beak.
UG-50 Jet Black to shade the back of neck over green and teal. Just under the beak for shadow and just below the eye over the red. Keep this color light.
UG-31 Chocolate to the upper edge along the back, down the front of the breast to the rear, under the gold section below the wing, to the feet and legs, on the upper gold section next to the wing.
UG-34 Chestnut Brown to the lower section of the wing section.
UG-57 Spice Brown to the separation of the tail feathers and along the bottom edge of the tail feather.
To the leaves of the bush apply some shading with thinned SC-85 Orange Sorbet and UG-21Leaf Green using CB-406 Pointed Round loaded with water and tipped with the color. Use the brush on its side to do the shading. Use some UG-21 Leaf Green to add some subtle shading of the grass areas near and around the feet, to the grasses behind the pheasant’s tail and along the bottom edge of the pattern near the rim and keeping the brush strokes going with the flow of the grass. Use UG-30 Sand to shade in amongst the leaves and grass areas around the pheasant. Darken these areas especially below the pheasant and below the individual leaves with UG-31 Chocolate.
Retrace the detail to the feather or sketch them in with a pencil. It is best to have some idea of the direction and location of the separations of the individual feathers and their markings prior to detailing the pattern. Keep the feathers in an alternating pattern and placement like scales on a fish.
There are some markings on the upper back feathers that are done with a wet brush tipped ever so with thinned UG-50 Jet Black. These markings are done with the tip of the brush to form a light “V” shaped print.
To the berries on the bush plant, use thinned UG-85 Orange Sorbet with thinned UG-206 Fire Engine Red using CB-220 Detail Liner. Keep these colors light especially the red. Just a hint of color is needed.
Shade along each individual lower wing feather with thinned UG-34 Chestnut Brown. Accentuate the shading along the lower feathers behind the wing as well.
Detailing of the pattern is done with SG-406 Brown to note each feather keeping the lines as fine as possible. The feathers behind the wing are detailed by quickly outlining them in a free form “scratchy” style. The leaves and stems on the bush plant and to the grasses behind and around the bush plant are detailed as well. Draw in some detail lines to the grasses and background areas below the pheasant. Detail the legs and feet.
The markings on the breast feathers, wings and tail are done with SG-401 Black. Add some fine detail to the head over the green and red areas. This can be done with fine dots of color as well as a fine broken line of black. To darken and reinforce some of the detail to the lower wing and feathers behind them by adding some lines back over the previous detailed brown lines. Darken one side of the branches with some black dots and broken lines to give the branches dimension. Squeeze out some color on a tile and paint in the eye with CB-100 Liner.
Use SG-402 White to paint in the ring feathers on the neck and add the highlight to the eye.
Fire to Shelf Cone 04-05.
Apply 3 coats of FN-023 Cinnamon to the back of the platter using CB-604 or CB-618 Soft Fan. Try to keep this edge even along the rim of the platter.
Apply 2-3 coats of S-2101 Crystal Clear Brush to the front of the platter using CB-604 or CB-618 Soft Fan. The clear glaze can overlap the color on the back slightly. Let dry.
1. Begin with properly fired shelf cone 04 Bisque. Moisten a clean sponge and wipe bisque to remove dust.2. Use the Clay Carbon Paper to trace the pattern onto the plate. Cut out the pattern of the Koala and the tree branch. Save the negative of the pattern for Step 9.
3. Use the Script Liner to apply two or three coats (depending on the depth of color you want) of SC-54 Vanilla Dip to the Koala. Add in SC-83 Tip Taupe to your brush for a variance in fur color.
4. Use the same brush to apply two coats of SC-17 Cheeky Pinky to the inside of the ears.
5. Apply color to the branch by subtly striping with SC-54 Vanilla Dip, SC-83 Tip Taupe and SC-14 Java Bean. Use the Script Liner to apply two or three coats (depending on the depth of color you want). Use the same brush to apply SC-26 Green Thumb to the leaves, brushing past the pencil line.
6. Use the Soft Fan to brush a coat of water over the koala. Place the paper pattern into the koala area. Gently press with a paper towel to remove excess water and ensure the edges are sealed.
7. Use the Soft Fan to apply three coats of SC-12 Moody Blue to the background. Apply SC-13 Grapel over the Moody Blue on the right side of the plate and near the Koala’s belly.
8. Remove the paper.
9. Place the negative cut out of the Koala onto the plate. Mix SC-83 lip Taupe and SC-14 Java Bean on a palette. Use the sponge-on-a-stick to dab the color onto the Mini Fern Stamp. Repeat the stamp all over the koala to create fur.
10. Use the Script Liner to shade around the body with SC-14 Java Bean. Use the Liner to apply two coats of SC-15 Tuxedo to the nose, hands, feet and eyes. Use the Liner to create the mouth line and outline the koala with a thin line of SC-15 Tuxedo.
11. Use the Soft Fan to apply three coats of SC-26 Green Thumb to the back and the rim of the plate.
Begin with properly fired shelf cone 04 bisque. Moisten a clean sponge and wipe bisque to remove any dust.
Place some FN-009 Black into a small cup and add a little bit of water to slightly dilute it (about 3 parts glaze and 1 part water). It should be the consistency of a coffee cream. Pour the contents of the cup into the piece and evenly coat the inside of each of the following pieces: Dancing Container, Dancing Creamer, Whimsical Clock, Dancing Teapot, Dancing Tea Cup, including lids. Pour the extra glaze back into the cup. This step is not necessary for the clock. Use a damp sponge to remove any product that may have dripped.
Using the Soft Fan, apply 3 coats of FN-009 Black to the bottoms, bottom and top rims, handles of the Dancing Teapot and Dancing Container, and roof of the Whimsical Clock.
Using the Soft Fan, apply two coats of FN-001 White to the remaining unpainted areas of the pieces.
Cut out two of each eye you would like to use from the pattern.
Dip each cut out paper eyes into clean water and adhere them onto the piece where you would like to place them. Make sure the edges are smoothed down so glaze can’t get under the paper.
Pour out the following colors on a foam plate and use a rubber squeegee or a flexible credit card to apply them in up and down strokes, creating a streaky look. Apply one color and let dry. Layer the second color on top of the first. Try not to cover the entire pieces of paper which will make it easier when it’s time to remove it. For the body of MB1490 – Whimsical Clock (not the clock face or center of face) use SC-73 Candy Apple Red and SC-18 Rosey Posey.. For the MB-1371 Dancing Teapot use SC-7 Leapin’ Lizard and SC-52 Toad-ily Green. For the MB1386 – Dancing Tea Cup, the MB-1388 Dancing Creamer and the center of the clock face on the MB1490 – Whimsical Clock (leave the area with the numbers white) use SC-24 Dandelion and SC-97 Cantelope. For the MB-1372 Dancing Container use SC-31 The Blues and SC-76 Cara-Bein Blue.
Using the BT-910 SyntheticSponge, load a section of the sponge with SC-15 Tuxedo. Tap the SC-15 Tuxedo onto the appropriate stamp or mat as listed below. Only load small sections of the stamps instead of using the entire thing. Lay the stamp across teapot and lightly press down with your fingers. For the Whimsical Clock, Dancing Tea Cup and Dancing Creamer use the MT-009 Scallops Mat. For the Dancing Container use the ST-127 Crackle Stamps. For the Dancing Teapot use the MT-004 Swirls Mat.
Using the Foam roller, gently apply the following colors over the stencil (see below for color/stencil/bisque combinations). Just use small sections of the stencil instead of the entire thing. Tip: Hold the tip of the roller to apply the color to keep the glaze from bleeding under the stencil. For the Dancing Teapot, use SC-18 Rosey Posey with the SL-440 Swirls Stencil. For the Dancing Container, use SC-97 Cant-elope with the SL-456 Camo Stencil. For the Whimsical Clock body and the middle of the face, use SC-31 The Blues with the SL-448 Doily Stencil. For the Dancing Tea Cup and the Dancing Creamer, use SC-52 Toad-ily Green and SL-435 Curlicues Stencil.
When the color is no longer shiny, take a cleaning or pin tool to lift up the edge of the paper and lift off. Repeat for each feature.
Using the second copy of your pattern and a sheet of AC-230 Clay Carbon paper, trace the details of each of the features onto your pieces.
Using the colors of your choice and the Script Liner, apply two coats of Stoke and Coats to your features.
Fill a AC-219 Designer Bottle with Writer Tip with SC-15 Tuxedo. When your piece is completely dry (no longer damp or cool to the touch), outline your features and draw in the details. Make dots on the Teapot spout and handles of each piece. Draw in the numbers and details of the clock face.
Pour out a small puddle of SC-16 Cotton Tail. Dip the eraser of the pencil into the paint and dab it on the roof of the Whimsical Clock to make dots. Use the end of a paintbrush dipped in SC-16 Cotton Tail to make dots on the handle of the Dancing Teapot and Dancing Container, or use the AC-219 Designer Bottle with Writer Tip.
Using the Script Liner, apply 2 coats of SC-73 Candy Apple Red to the handle of the Whimsical Clock.
Using a section of the synthetic sponge, dab it into SC -15 Tuxedo and gently sponge around the rims of all the pieces and up the side edges of the clock.
Stilt and fire to Cone 06
Form
MB-1372 Dancing Container Bisque or CD1372 Dancing Container Mold
MB-1388 Dancing Creamer Bisque or CD1388 Dancing Creamer Mold
MB1490 Whimsical Clock Bisque or CD1490 Whimsical Clock Mold
MB-1371 Dancing Teapot Bisque or CD1371 Dancing Teapot Mold
MB1386 Dancing Tea Cup Bisque or CD1386 Dancing Tea Cup Mold
Begin with properly fired shelf cone 04 bisque. Moisten a clean sponge and wipe bisque to remove any dust.
Tear around outline of apple/lime paper stencil.
Using the Texture and Mask technique and a CB-618 #8 Soft Fan, apply 1 heavy coat of SC-77 Glo-Worm, SC-27 Sour Apple, SC-26 Green Thumb, and SC-36 Irish Luck in columns on the back of the ripped apple/lime. With painted side down, press paper against plate in desired location.
Rip second sheet of paper into small pieces. Using a CB-618 #8 Soft Fan, apply 1 heavy coat of SC-27 Sour Apple, SC-26 Green Thumb, SC-36 Irish Luck, SC-11 Blue Yonder, and/or SC-29 Blue Grass to paper pieces, and press against plate covering remaining areas. Once surface is entirely covered, remove small pieces leaving apple/lime mask.
Using the Bubbles technique, apply SC-12 Moody Blue around the rim.
Remove apple/lime paper stencil.
Using the Etch technique to create a loose outline around the apple. Etch any additional accent lines as desired.
Using a dry CB-310 #10 Flat Shader, feather 2 -3 thin coats of SC-15 Tuxedo around the rim of the bisque piece.
Using the Silkscreen technique and SC-15 Tuxedo, transfer the apple/lime silkscreens where desired. Repeat in desired locations.
Using the Flecks technique, apply SC-15 Tuxedo where desired.
Begin with properly fired shelf cone 04 bisque. Moisten a clean sponge and wipe bisque to remove any dust.
Apply 2-3 even coats of FN-001 White to the entire piece using CB-604 Soft Fan. Let dry.
Trace the pattern onto the ware using AC-230 Clay Carbon and a pencil. Do not trace the hip section or front paws.
Apply 3 coats of SC-80 Basketball to the fox excluding the eyes, eye markings above the eye, facial muzzle, nose, ears and white portion of the tail using CB-406 Pointed Round and CB-604 Soft Fan. Apply 3 coats to the back of the plate as well.
Using CB-406 Pointed Round tipped in SC-80 Basketball, shade the upper edge of the white markings over the eye and along the top edge of the facial muzzle.
Paint in the iris of the eye with SC-14 Java Bean. Highlight the iris with a bit of SC-75 Orange-A-Peel and shade the outside edge with SC-34 Down to Earth using CB-202 Liner. Paint in the pupil and the top eye lash with SC-15 Tuxedo. Shade the eyebrows with SC-14 Java Bean and detail with SC-34 Down to Earth. Notice that there are slivers of white around the eye. If they have been painted over and no highlight in the pupil is visible, use some SG-402 White to accomplish this.
Retrace of freehand in the hip and front paws on the pattern.
Shading of the fox is done with CB-406 Pointed Round tipped in SC-14 Java Bean along the edges behind the ears and all around the head, both sides of the tail excluding the white portions on the inner edge, both sides of the hip, along the lower edge areas around the front feet.
Use some SC-34 Down to Earth to strengthen the shading between the hip and tail. Shade the front portion of the paws and darken with some SC-15 Tuxedo. Detail the pattern with SC-34 Down to Earth using CB-110 Liner. Thin some SC-15 to a dirty water consistency and paint in some shadow hair lines in the white portion of the tail using CB-110 Liner.
Shade the inner portion of the ears with thinned SC-15 Tuxedo using CB-406 Pointed Round tipped with color. Detail the ears with SC-15 Tuxedo full strength using CB-110 Liner.
Using CB-406 Pointed Round tipped in thinned SC-15 Tuxedo too shade the nose bridge and along the edges of the nose. Detail the nose with SC-15 Tuxedo full strength.
Thin some S-2101 Crystal Clear Brushing and apply one thin coat over the entire plate using CB-604 Soft Fan.
1. Begin with properly fired shelf cone 04 bisque. Moisten a clean sponge and wipe bisque to remove dust.
2. Using the Clay Carbon Paper, trace the pattern onto the bisque.
3.Use SG-401 Designer Liner Black to outline the vase and table. The lines should be a little thicker than normal. While the SG-401 Designer Liner Black is wet, spray with water to get the color to move. Hold the canvas vertically or to the side to get the color move in that direction. This gives a shadow effect.
4. Using the SG-401 Designer Liner Black, outline the flowers and stems again with thicker lines. Tip: Work in sections so the glaze stays wet. Now spray the section with the water bottle to get the fuming or shading effect onto the canvas.
5.Flowers:All of the flowers will use three colors: SG-403 Designer Liner Red, SG-407 Designer Liner Yellow and SG-408 Designer Liner Orange.To fill in the flowers you will use both the bottle tip and the Script Liner.
6.Squeeze in the color, scribbling back and forth. Make sure and overlap the colors so the colors blend seamlessly versus hard stops. Use the Script Liner to blend edges. The flowers will have a textured and rough look, that’s what you want.
7.Highlight the flower with SG-402 Designer Liner White over the color.
8.Use SG-401 Designer Liner Black to add the center to the flowers.
9.Continue to spray with water as you work the canvas while the color is wet. The spraying tints the background from the color of the flower.
5. Scribble and brush in the leaves with SG-405 Designer Liner Green and SG-409 Designer Liner Green then streak with SG-403 Designer Liner Red.
6.Scribble and brush out SG-410 Designer Liner Bright Blue in the background on the left side of the canvas. Refer to the picture.
7.Use a plastic card to scrape on SG-401 Designer Liner Black onto the sides of the canvas. Fill in the open spots with a coat of SG-410 Designer Liner Bright Blue.
8. Clear glaze with either NT-CLR Clear One Dipping or brush two coats of NT-BR Clear One Brushing to the canvas with the Soft Fan.
9.Fire to cone 05/06.
Stroke & Coat Option:
This same project may be done with Stroke & Coat®.Designer Liner moves and shades a little easier and only requires one coat due to the heavy pigmentation.Stroke & Coat will fire smother but still has a pleasing effect.
Designer Liner
Stroke & Coat®
SG-401 Black
SC-15 Tuxedo
SG-402 White
SC-16 Cotton Tail
SG-403 Red
SC-74 Hot Tamale
SG-405 Green
SC-26 Green Thumb
SG-407 Yellow
SC-6 Sunkissed
SG-408 Orange
SC-75 Orange-A-Peel
SG-409 Bright Green
SC-27 Sour Apple
SG-410 Bright Blue
SC-11 Blue Yonder
Form
MB-1353 8″ x 10″ Clay Canvas
Colors
SG-401 Designer Liner Black
SG-402 Designer Liner White
SG-403 Designer Liner Red
SG-405 Designer Liner Green
SG-407 Designer Liner Yellow
SG-408 Designer Liner Orange
SG-409 Designer Liner Bright Green
SG-410 Designer Liner Bright Blue
NT-CLR Clear One Dipping or NT-BR Clear One Brushing
1. Begin with properly fired shelf cone 04 Bisque. Moisten a clean sponge and wipe bisque to remove dust.
2. Slightly thin FN-001 White and pour to the inside of the pitcher. Turn to coat then pour out the excess and drain.
3. Punch out the desired amount of 1 1/2″ circles. Trace around the shape with a pencil onto the pitcher, the edge of the plate and the tumblers.
4. Use the Script Liner to apply two heavy coats of SC-75 Orange-A-Peel to the circle areas. Let dry.
5. Dip each paper dot into water and adhere to the pieces. Gently press with a paper towel to remove excess water and to ensure edges are sealed.
6. Use the Soft Fan to apply two coats of FN-001 White to the outside of each piece. Working on one piece at a time, apply a third coat. Before this coat dries, place the lace onto the piece. You will have to cut slits in some sections of the lace on the pitcher to get it too lay flat.
7. Apply one coat of FN-001 White over the lace.
8. To help the drying process and to make sure the lace is flat, press with a paper towel after the glaze sets up a bit.
9. Apply two coats of FN-020 Medium Green over the lace.
10. Remove the lace and paper dots when the gloss leaves the Medium Green.
11. Use the Soft Fan to apply three FN-003 Orange to the back of the plate.
12. Dip into NT-CLR Clear Dipping Glaze or apply one coat of S-2101 Clear Brushing Glaze. Clear glaze will flatten the texture of the lace.
13. Fire to cone 05/06.
Form
MB-1472 Rustic Ware Pitcher
MB-1474 Rustic Ware Tumbler
MB-101 Coupe Salad
Colors
FN-001 White
FN-020 Medium Green
SC-75 Orange A Peel
NT-CLR Clear Dipping or S-2101 Clear Brushing Glaze
Begin with properly fired shelf cone 04 bisque. Moisten a clean sponge and wipe bisque to remove any dust.
Rip one piece of paper into a large semi-circle for lime shape.
Using the Paper Texture technique and a CB-618 #8 Soft Fan, apply 1 heavy coat of SC-77 Glo-Worm and SC-27 Sour Apple together on back of ripped piece of paper. With painted side down, press paper against plate in desired location. Remove paper.
Rip second sheet of paper into small pieces. Using a CB-618 #8 Soft Fan, apply 1 heavy coat of SC-11 Blue Yonder, SC-29 Blue Grass, SC-12 Moody Blue, and/or SC-15 Tuxedo to paper pieces, and press against plate in remaining areas. Once remaining areas are covered, remove paper pieces.
Using the Bubbles technique, apply SC-26 Green Thumb over lime.
Rip remaining paper into narrow strips. Using a CB-618 #8 Soft Fan, apply 1 heavy coat of SC 26-Green Thumb and SC-36 Irish Luck to narrow strips. Press strips against edge of lime.
Using the Etching technique and back end of a CB-618 #8 Soft Fan, etch a center point into lime and etch triangles out from that center point. Etch any additional accent lines as desired.
Using a dry CB-310 Size 10 Flat Shader, feather 2-3 thin coats of SC-15 Tuxedo against edge of bisque.
Using the Screen Printing technique and SC-15 Tuxedo, transfer lime silkscreen where desired. May repeat 2-3 times.
Using the Fleckle technique, apply 1 layer of SC-15 Tuxedo. 11. Let dry completely.
1. Begin with properly fired shelf cone 04 Bisque. Moisten a clean sponge and wipe bisque to remove dust.
2. Using the CB-604 #4 Soft Fan, apply 1 coat of FN-001 White to the top of the plate and let dry.
3. Cut out the sock patterns. Wet the paper socks and stick it to the plate.Use a damp sponge to press the paper pattern onto the plate.This acts as a mask to prevent glaze from getting onto the socks. Make sure the edges are sealed down to prevent glaze from seeping under.
4.Punch out ten stars for the front of the plate.On a palette, pour a quarter-sized amount of SC-6 Sunkissed and SC-16 Cotton Tail. Drag the star though both colors to cover the entire paper star. Lay the painted star on the plate around the socks, color side down.This can be messy! If the glaze squeezes out wipe it back with a damp sponge. It doesn’t have to be perfectly clean. Continue with all ten stars. Take a picture so you will know where the stars are located so it will be easier to remove later.
5.Painting the background of the plate will be painted like a spackling process. Use the plastic card and pick up two colors at the same time from your palette. Lay the card down on the paper sock and pull it out onto the bisque.Don’t swipe into the edge of the paper as it may lift the edge and it bleeds under the paper.
6.Pick up two more colors of glaze and lay it down overlapping the first application and pull it out onto the bisque. When selecting colors, try to pick up secondary and tertiary colors. For example SP-288 Speckled Tu Tu Tango and SP-277 Speckled Glo Worm.
7.Where the two colors overlap, an additional color is created. Continue picking up colors and laying down a coat of glaze onto the bisque. Periodically wipe off the card as you apply colors to the plate. Tip: Wipe back the middle of the paper star so you can find it easier when it is time to remove.
8.When the glaze is dry, lightly sketch out a section where the words will be placed.This is to ensure the area is kept clean and not compete with the next step of stamping the background.
9.Using the sponge-on-a-stick, apply SC-15 Tuxedo to the ST-126 Dots & Squiggles Stamp.For a good random and scrapbook effect, use sections of the stamp at a time versus inking up one long strip.Press down sections to the left side and between the socks. Re-ink the stamp after each time stamping. Try to avoid the area where the wording will be.
10.Using a sponge-on-a-stick and SC-29 Blue Grass, apply the glaze to the ST-132 Diamond Plate Stamp and apply randomly on the plate. Again try to avoid the area where the words will be written.
11.Remove the paper stars and the paper socks.
12.Refer to the pattern for color placement.Use the CB-106 #6 Script Liner and apply two-three good coats of the following colors to the socks:
SC-6 Sunkissed
SC-45 My Blue Heaven
SP-209 Speckled Jaded
SP-277 Speckled Glo Worm
SP-288 Speckled Tu Tu Tango
13. Use the MC-002 1/2″ Low Tack Masking Tape to mask off the outside space for the DSS-104 Chevron Silkscreen.
14.Thicken SC-10 Teal Next Time with AC-310 Silkscreen Medium, using a palette knife, to the consistency of peanut butter. Using the shiny side up (more color will go through the screen to give it a solid coating), use your finger to rub the mixture over the small chevron silkscreen on both socks. Gently clean the screen.
15. Use SC-10 Teal Next Time to apply to the different sections of the ST-100 Game Board Stamp with a sponge on a stick. Tape off the area to be stamped, press to the different colors.
16.Using the 102 R190 1/2″ Royal Dagger Brush float one thinned coat of SC-15 Tuxedo around the socks. This provides a shadow and adds depth to the project. The socks will really pop now.
Tip – How to Float:Wet the brush with water then pick up some color on the tip of the brush, then wipe the brush back and forth across a palette.This blends the color into the brush but keeps it thinned.Now put the brush onto the plate with the tip against the sock and brush on one thin coat.Since the dagger brush is slanted or chiseled the color will be stronger at the tip and lighter further out.
17.Pencil the words or phrase of choice onto the plate or quote of choice.
18. Use SG-401 Designer Liner Black to outline the socks and to create the words I’M KIND OF A BIG DEAL. Use SG-403 Designer Liner Red for the word Big.
19.Using the Soft Fan, apply three coats of the Speckled Stroke & Coat® of your choice to the back of the plate.
20.Clear glaze with NT-CLR Clear One Dipping or NT-BR Clear One Brushing.
18.Fire to cone 05/06.
Bisque
MB-1353 8″ x 10″ Clay Canvas
Color
FN-001 White
SC-6 Sunkissed
SC-10 Teal Next Time
SC-15 Tuxedo
SC-16 Cotton Tail
SC-29 Blue Grass
SC-45 My Blue Heaven
SP-209 Speckled Jaded
SP-277 Speckled Glo Worm
SP-288 Speckled Tu Tu Tango
SG-401 Designer Liner Black
SG-403 Designer Liner Red
NT-CLR Clear One Dipping or NT-BR Clear One Brushing
Begin with a properly fired shelf cone 04 Bisque. Moisten a clean sponge and wipe bisque to remove dust.
Use the Clay Carbon Paper to trace the pattern onto the plate.
Load the CB-106 Liner with SC-33 Fruit of the Vine. Press, pull and lift the brush to stoke in the petals of the lilacs. Use the Script Liner to apply two coats of SC-24 Dandelion on the yellow flowers. Use Liner to stroke in lines from the center to the end of the petals with SC-97 Cant-elope.
Use the Script Liner to apply two coats of SC-27 Sour Apple to the leaves and stem.
We used all brush strokes to create the fur on the sloth. Use the Script Liner with SC-14 Java Bean and SC-34 Down to Earth to create the fur. Use the Liner to add brushstroke lines of SC-15 Tuxedo around the eyes. Use stokes of SC-35 Gray Hare and SC-14 Java Bean, thinned, for the gray area of his face. Use SC-35 Gray Hare for the top of his head and SC-14 Java Bean without water for the darker fur.
To create the body fur, use the Script Liner to apply strokes of SC-14 Java Bean, SC-34 Down to Earth and SC-35 Gray Hare (one coat).
Punch out small circles, saving the negative of the punched paper. Brush one coat of SC-16 Cotton Tail on the plate to the areas that will be under the dots. Press the paper dots into the wet Cotton Tail. Do this one at a time to ensure the glaze is wet. Scatter the dots on the background of the plate. Apply two coats of SC-15 Tuxedo over the open dot of the paper, then remove the paper.
Apply one coat of SC-34 Down To Earth to the eyes. Use SC-15 for the pupils and outline the eyes. Apply one coat of SC-14 Java Bean to the nose. Outline the flowers, mouth line and nose with SC-15 Tuxedo. Use CB-110 Liner for outlining.
Use the Soft Fan to apply three coats of SC-97 Cant-elope to the back of the plate. Dip into Clear Glaze.
Begin with properly fired shelf cone 04 bisque. Moisten a clean sponge and wipe bisque to remove any dust.
Trace on the pattern onto the plate using the Clay Carbon Paper.
Use the #6 Script Liner to apply two coats of SC-20 Cashew Later to the mermaid’s skin. Add SC-2 Melon-Choly to the cheek.
Apply two coats of SC-42 Butter Me Up to the hair. Add streaks of color with lines of SC-5 Tiger Tail.
Apply two coats of SC-45 My Blue Heaven to the body and bikini top. Shade the body with SC-28 Blue Isle and the tail with SC-9 Jaded.
When dry, stamp the top of the body with SC-28 Blue Isle using ST-113 Circulate Stamp, then darken the stamp towards the tail by stamping with SC-29 Blue Grass.
Thicken SC-29 Blue Grass with AC-310 Silkscreen Medium using a palette knife to the consistency of peanut butter. Use the shell screen from DSS-0131 Sealife 2 and place the shiny side down. Rub the thickened mix over the screen. Screen the shells to the background of the plate.
Apply three coats of SC-11 Blue Yonder to the back of the plate.
Outline with a thin SC-15 Tuxedo line using CB-110 Liner around the mermaid and to stoke in the brow and eyelash.
1. Begin with properly fired shelf cone 04 bisque. Moisten a clean sponge and wipe bisque to remove any dust.
2. Cut out the pattern of the frog and the tree branch.
3. Use the soft Fan to apply one coat of FN-001 White to the top of the plate.
4. Brush water over the white glaze to then place the paper cut out on the plate. Gently press with a paper towel to remove excess water and wrinkles and to ensure the edges are sealed.
5. Use the Soft Fan to apply three coats of FN-034 Big Sky Blue over the top of the plate, brushing over the edges of the paper. Remove the paper after the last coat loses its gloss. Allow to dry.
6. Trace the pattern of the frog and branch onto the plate.
7. Use the Script Liner to apply the following colors: two coats of SC-37 Ivory Tower to the chest; two coats of SC-77 Glo Worm to the edges of the chest, upper mouth and inner legs; two coats of SC-27 Sour Apple to the remainder of the frog’s body.
8. Use the Liner to apply two coats of SC-75 Orange-A-Peel to the feet and hands. Apply two coats of SC-73 Candy Apple Red over the Orange A Peel to the tips.
9. Brush the eyes with SC-73 Candy Apple Red, 2 coats, pupil with SC-15 Tuxedo.
10.Use the Script Liner to apply two coats of SC-14 Java Bean to the tree branch, adding strokes of SC-26 Green Thumb and a small amount of SC-75 Orange-A-Peel.
11. Use the Liner to outline the frog with SC-15 Tuxedo.
12. Thicken SC-15 Tuxedo with AC-310 Silkscreen Medium using a palette knife to the consistency of peanut butter. With the shiny side down, screen the large leaves from DSS-0111 Botanical-Leaves as shown. Use the screen shiny side up to screen the small leaf with the branch.
13. Use the Script Liner to apply three coats of SC-26 Green Thumb over the leaves. Allow to dry then re-screen with the leaf screens using the thickened SC-15 Tuxedo.
14. Use the foam roller or a flat sponge to apply SC-15 Tuxedo over the ST-127 Crackle Stamp, the stamp the branch.
15. Use the soft fan to apply three coats of FN-037 Chartreuse to the back of the plate.
Begin with properly fired shelf cone 04 bisque. Moisten a clean sponge and wipe bisque to remove dust.
Trace the pattern onto the bisque.
Outline heavily with SG-401 Designer Liner Black, outline about three petals, then spray water with the spray bottle over the wet Designer Liner Black, this will soften the black and run the color. Outline all the petals and leaves.
From a palette, brush the centers with SG-406 Designer Liner Brown, use CB-106 #6 Script Liner, two coats.
Dot around the centers with SG-401 Designer Liner Black, add a few dots inside of the centers, spray with water. From a palette, pat SG-405 Designer Liner Green with the tip of CB-106 #6 Script Liner, to the centers, pat SG-408 Designer Liner Orange only less than the Green to the centers.
Apply SG-407 Designer Liner Yellow to the petals with the tip, in a scribble fashion, before it dries, use CB-106 #6 Script Liner to flatten and spread the color, outline inside of the black line with SG-408 Designer Liner Orange, spray after a few petals with water. Highlight some of the petals with a brush stroke of SG-402 Designer Liner White for a highlight.
From a palette, brush on both SG-405 Designer Liner Green and SG-409 Designer Liner Bright Green to the leaves, use the dark and bright green to shade the leaves, 1-2 coats.
Refer to the photo for the background colors, use SG-410 Designer Liner Bright Blue and SG-411 Designer Liner Purple to color the background using both CB-106 #6 Script Liner and AB-834 Base Coat Brush to stroke in the colors, one coat, use sparingly SG-405 Designer Liner Green in the foreground.
Brush SG-401 Designer Liner Black to the sides with AB-834 Base Coat brush.
Brush with two coats of NT-BR Clear One Brushing with CB-604 #4 Soft Fan.
2 Cut out the pattern of the skull and place on the center of the plate, then trace around with a pencil.
3. Use the Soft Fan to apply two coats of SC-16 Cotton Tail to the traced skull area, go slightly past the pencil lines. Let dry a bit then brush the area with water and place the paper skull pattern onto the painted area. Press down firmly with a paper towel to remove excess water and ensure the edges are sealed.
4. Use the Soft Fan to apply two coats of SC-24 Dandelion around the edges of the plate. Add SC-88 Tu Tu Tango one side of the brush and apply two coats around the plate. These colors should extend into the plate about 1 3/4 inches from the rim.
5. Break the spine of the chicken feathers in several places so they will curve. Wet your fingers then shape one side of the feather so they separate nicely.
6. Placethe shaped feather into the wet glaze on the rim,. Use only half of the feather, leaving the other half hanging over the edge of the plate. Continue around the plate, brush over the feather with the glaze that is beneath it so it stays in place.
7. When the glaze is dry to the touch, use the Soft Fan to apply three coats of FN-034 Big Blue Sky over the top of the plate.
8. When the glaze loses its gloss remove the feathers and the paper skull.
9. Thicken SC-15 Tuxedo with AC-310 Silkscreen Medium using a palette knife, to the consistency of peanut butter. With the shiny side down, place the large skull screen from DSS-0140 Southwestern in the space on the plate from the paper template. Rub the mixture over the screen with your fingers. Gently clean the screen.
10. Use the Soft Fan to apply three coats of SC-97 Cant-elope onto the back of the plate.
1. Begin with properly fired shelf cone 04 bisque. Moisten a clean sponge and wipe bisque to remove any dust.
2. Download the skull pattern and cut out the shape of the skull and horns.
Tip: We created our pattern by using a palette knife to mix Silkscreen Medium with SC-15 Tuxedo to the consistency of peanut butter. With Screen the Large Skull image from DSS-040 Southwestern Silkscreen, shiny side down, onto a piece of paper. Make a photocopy of the pattern to use for the project.
3. Use double stick tape to tape the skull pattern in place on the plate, trace around it with a pencil.
4. Position the SL-450 Poinsetta Stencil on the plate and hold it in place with one hand. Use the foam roller to apply SC-97 Cant-elope over the stencil, several times in different directions. Repeat for each image on the plate.
5. Add SC-73 Candy Apple Red to the same roller. Re-position the stencil over the previously stenciled poinsettias and apply color to the center sections of the stencil. Repeat for each image on the plate.
6. Remove the paper, thicken SC-15 Tuxedo with AC-310 Silkscreen Medium as in step 2. Place the Large Skull silkscreen shiny side down onto the penciled area on the plate. Rub the thickened Tuxedo over the skull screen. Remove the screen and clean with water.
8. Use the Soft Fan to apply three coats of SC-73 Candy Apple Red onto the back of the plate. Dip into NT-CLR Clear Dipping Glaze or apply two coats of S-2101 Clear Brushing glaze to the front of the plate.
9. Fire to cone 05.06.
Form
MB-101 Coupe Salad Plate
Colors
SC-15 Tuxedo
SC-97 Cant-elope
SC-73 Candy Apple Red
NT-CLR Clear Dipping or S-2101 Clear Brushing Glaze
Begin with a properly fired shelf cone 04 bisque. Moisten a clean sponge and wipe bisque to remove dust.
Using the CB-604 #4 Soft Fan Brush to apply three coats of FN-001 White to the front and sides of the canvas.
When the shine is off the glaze, stamp the ST-127 Crackle Stamp randomly across the canvas.
Pencil in your design.
Pour SG-202 White Cobblestone into the bottle from AC-223 Large Writer Tip, use the plastic and metal tip.
Brush two coats of SG-202 White Cobblestone to the center area of the feather with CB-106 #6 Script Liner. Use the Writer Tip Bottle to do the stem and feathers, apply slowly so the feathers and stems are thick.
When the cobblestone loses its shine, brush one coat of color over the stem and feathers, SC-10 Teal Next Time, or SC-33 Fruit of the Vine, use CB-110 #10/0 Mini Liner to apply. The center area is SC-33 Fruit of the Vine, outline with SC-11 Blue Yonder, then SC-97 Cant-elope.
Brush two coats of SC-11 Blue Yonder to the sides of the canvas with CB-604 #4 Soft Fan.
Begin with a properly fired shelf cone 04 Bisque. Moisten a clean sponge and wipe bisque to remove dust.
Using the CB-604 #4 Soft Fan Brush, apply three coats of FN-008 Brown to the canvas, front and sides.
Using the AC-230 Clay Carbon Paper trace on the pattern. Clay carbon paper will not transfer if the glaze is wet or damp.
Use the CB-110 #10/0 Mini Liner just the AC-302 Wax Resist to outline the cactus and the lines in the body of the cactus. Basically, any line drawn from the pattern is outlined with the Wax Resist.
Using the CB-106 #6 Script Liner apply 2 1/2 coats of EL-130 Sea Green to the cactus. The 1/2 coat is one coat down the center of the cactus.
Using the CB-106 #6 Script Liner apply two coats of EL-131 Turtle Shell to the small pieces of the cactus.
When the shine is off the glaze, use the same brush and apply 1-2 coats of SC-27 Sour Apple over the EL-131 Turtle Shell. Just on the small sections of the cactus.
Using the CB-106 #6 Script Liner apply 2 coats of EL-128 Wheat to the background and sides of the canvas.
Begin with properly fired shelf cone 04 bisque. Moisten a clean sponge and wipe bisque to remove dust.
Using the CB-604 #4 Soft Fan Brush, apply 3 coats of FN-024 Gray to the front of the MB-1352 6″ x 6″ Square Clay Canvas with CB-604 Soft Fan.
Let the Foundations glaze dry, re-wet the glaze, lay the stencil over damp glaze, and brush another coat of FN-024 Gray over the stencil to fill in gaps to prevent leakage. Use a sponge or paper towel to press the stencil down and remove excess glaze.
Grab the Sculpting Medium bottle and mix or shake. Pour some onto a palette. Using the card, scoop up the Sculpting Medium and pull across the stencil to fill in the stencil design and level the glaze. While the stencil is still on the canvas, brush or use the card to apply one coat of SG-407 Designer Liner Yellow. Pull off the stencil when the shine leaves the glaze. Do not let the glaze completely dry or it will chip when removing the stencil. This step should be done quickly as the Sculpture Medium will chip at the edges.
Use the card to apply Sculpture Medium at the edges of the canvas for visual interest.
Roll SG-401 Designer Liner Black over the Medium with the 2″ foam roller.
Begin with a properly fired shelf cone 04 bisque. Moisten with a clean sponge and wipe bisque to remove dust.
Brush on three coats of FN-304 Black Velvet with CB-604 #4 Soft Fan in one direction.
When dry, trace or sketch on the pattern, brush one coat of SC-16 Cotton Tail to the pattern, to block the black glaze.
Brush on two coats of SC-74 Hot Tamale to the outside petals, SC-75 Orange-A-Peel to the next layer of petals, and SC-97 Cant-elope to the center, overlap the colors. Use CB-106 #6 Script Liner.
Brush the leaf with two coats of SC-27 Sour Apple.
Outline and detail with SC-15 Tuxedo use CB-110 #10/0 Mini Liner.
Begin with properly fired shelf cone 04 bisque. Moisten a clean sponge and wipe bisque to remove dust.
Cut out the pattern of the truck. Trace the pattern on the canvas.
Squirt SC-74 Hot Tamale, SC-60 Silver Lining, SC-75 Orange-A-Peel and SC-81 Cinnamon Stix on a palette, leave space between the colors.
Pick up the Hot Tamale and Cinnamon Stix on the card, hold nearly flat to the truck, transfer the glaze from the card to the truck. The colors will blend as it is scraped on. Make sure the wheels are glazed with the red glazes. Two coats, repeat for the grill with SC-60 Silver Lining and the pumpkins.
Brush water over the truck, stick on the paper truck, to mask.
Remove the excess glaze that is not covered with the paper.
Using the CB-604 #4 Soft Fan Brush apply three coats of AS-512 Black Diamond over the rest of the canvas.
When the Black Diamond is nearly dry, ponce bubble wrap into S-2101 Crystal Clear Brushing, pat to the Black Diamond, for random areas of clear glaze.
Remove the paper truck.
Remove the glaze from the window. Detail the truck with SC-15 Tuxedo, use CB-110 #10/0 Mini Liner. Brush SC-16 Green Thumb over the stems of the pumpkins.
Stilt and fire to cone 06.
Brush on one coat of Mother of Pearl luster with a clean brush, clean the brush with Essence.
Begin with properly fired cone 04 bisque. Moisten a sponge and wipe bisque to remove any dust.
Using the Script Liner with SC-55 Yella Bout It, apply 2 coats to the dragon’s belly and the inside of the wings. Allow glaze to dry.
Using the Script Liner with SC-55 Yella Bout It, apply 1 coat to the dragon’s belly and inside the wings in small sections. Use the Script Liner with SC-24 Dandelion to shade around the edges while the glaze is still wet.
Using the Script Liner with SC-24 Dandelion, apply 3 coats to the spines on the back. Allow glaze to dry between coats.
Using the Script Liner with SC-16 Cotton Tail, apply 2 coats to the eyes and teeth.
Using the Script Liner with SC-11 Blue Yonder, apply 2 coats to the webbing on the wings and the irises of the eyes. Allow glaze to dry between coats.
Plaque:
Using the Script Liner and Soft Fan with CG-979 Meadow, apply 3 coats to the body of the dragon. Allow glaze to dry between coats.Using the Script Liner with CG-753 Sassy Orange, apply 1 coat to the upper edge of the belly and the inner section of the wings.
Mug:
Using the Script Liner and Detail Liner with SC-98 Slime Time, apply 3 coasts to the dragon’s body. Allow glaze to dry between coats.
Use the pencil to sketch flames on the background of the mug.
Using the Script Liner with SC-45 My Blue Heaven, apply 3 coats to the background of the mug. Allow glaze to dry between coats.
Using the Script Liner with CG-756 Firecracker, apply 1 coat to the upper portion of the flames. Using the same brush with CG-753 Sassy Orange, shade down to the bottom of the flames while the glaze is still wet. Repeat for a total of 3 coats.
Using the Soft Fan with SC-11 Blue Yonder, apply 3 coats to the inside of the mug. Allow glaze to dry between coats.
Using Detail Liner with SC-15 Tuxedo, outline the details on both dragons. Apply 2 coats to the pupils of the eyes.
Fire to cone 06.
Form
MB-1549 Dragon Plaque
MB-1550 Dragon Mug
Colors
CG-753 Sassy Orange
CG-756 Firecracker
CG-979 Meadow
SC-11 Blue Yonder
SC-15 Tuxedo
SC-16 Cotton Tail
SC-24 Dandelion
SC-45 My Blue Heaven
SC-55 Yella Bout It
SC-97 Cant-elope
SC-98 Slime Time
Decorating Accessories
RB-144 #4 Soft Fan
RB-106 #6 Script Liner
RB-110 10/0 Detail Liner
Miscellaneous Accessories
Sponge
Water
Pencil
Low-Fire|Earthenware Bisque|Boxes, Banks & Stuff|Home Décor|Table Top
Begin with properly fired shelf cone 04 bisque. Moisten a clean sponge and wipe bisque to remove dust.
Squirt the color from the color box onto a palette, leave space between the colors. Use a hair dryer to remove some of the water from the color or let it sit for a period of time.
Cut out and trace around the pattern of the pear and leaf.
Pick up a couple of the yellows on the credit card, hold the card at a slight angle to the canvas, apply the color to the pear, add SC-2 Melon-choly to the SC-42 Butter Me Up and apply to the lower section of the pear.
Apply two coats of color using the card to blend and apply, the leaf is SC-26 Green Thumb and SC-27 Sour Apple, apply with the card. The stem is SC-34 Down to Earth.Brush the pear and leaf with water and stick on the paper cut out.
Remove the excess glaze around the pear with the card.
Use the thickened glaze to apply SC-73 Candy Apple Red and SC-75 Orange-A-Peel and SC-97 Cant-elope with SC-11 Blue Yonder and SC-76 Cara-bein Blue on the top right side. Use oranges, red and yellow to the right side of the pear. apply two coats in the same general area with the card.
To the left side of the pear, use the yellows and greens.
Remove the paper, outline with SC-15 Tuxedo, use CB-110 #10/0 Mini Liner. Roll the MT-007 Divots Mat with SC-15 Tuxedo using the 2″ foam roller.
Place a layer of bubble wrap on a table, then the divot mat, press the canvas to the mat.
Brush one coat of S-2101 Crystal Clear Brushing with CB-604 #4 Soft Fan.
Fire to cone 06.
Form
MB-1352 6″ x 6″ Square Clay Canvas
Colors
SC-2 Melon-choly
SC-11 Blue Yonder
SC-15 Tuxedo
SC-24 Dandelion
SC-26 Green Thumb
SC-34 Down To Earth
SC-42 Butter Me Up
SC-73 Candy Apple Red
SC-75 Orange-A-Peel
SC-76 Cara-bein Blue
SC-97 Cant-elope
S-2101 Crystal Clear Brushing or NT-CLR Clear One Dipping
Begin with properly fired cone 04 bisque. Moisten a sponge and wipe bisque to remove any dust.
Using the Script Liner with SC-16 Cotton Tail, apply 2 coats to the eyes. Allow glaze to dry between coats.
Using the Soft Fan with SC-98 Slime Time, apply 3 coats to the body and bottom. Allow glaze to dry between coats. Make sure glaze is bone dry before moving onto the next step.
Squeeze around 1 TBS of SC-26 Green Thumb onto the palette. Thin with water. Using the Soft Fan, brush over the body of the frog. The glaze should pool into the crevices. You can dip the Soft Fan in water to remove any excess glaze.
Squeeze around 1 TSP of SC-2 Melon-Choly onto the palette. Dip the sponge in the glaze and sponge the cheeks of the frog.
Using the Detail Liner with SC-15 Tuxedo, outline the details on the frog.
Using the Soft Fan with SC-26 Green Thumb, apply 3 coats to the inside of the frog.
Wipe down the ware with a moistened Synthetic Sponge to remove any dust.
Apply 3 coats of SC-98 Slime Time to ware excluding the eyes using CB-604 Soft Fan.
Load CB-406 Pointed Round with water and tip with SC-39 Army Surplus to shade the sections of the seahorse. Keep the color to stronger along two edges of each of the sections. Shade the detail around the eyes and mouth and along the back dorsal fin.
Using CB-220 Detail Liner to paint in the eyes with SC-5 Tiger Tail shaded with SC-25 Cracker Jack Brown. Paint in the pupil with SC-15 Tuxedo. Let Dry.
Paint in the water section between the tail with thinned SC-28 Blue Isle using CB-404 Pointed Round.
Using CB-604 Soft Fan to apply 2 coats of SG-703 Spectra-Clear Autumn to the entire ware.
Stilt and Fire to Shelf Cone 05-06.
Form
MB-1381 Seahorse Dish Bisque or CD1381 Sea Horse Dish Mold
Begin with properly fired shelf cone 04 Bisque. Moisten a clean sponge and wipe bisque to remove dust.
Sketch or trace on the design.
Use the various Designer Liner colors to draw in the petals. Red, Orange, Yellow, or Purple, and outline with SG-501 Black. Fill in white spaces with one coat of SG-407 Yellow.
Dot the center with all the colors in the petals, plus SG-406 Brown, fill in the white areas using a CB-106 #6 Script Liner. Dot the edges and some in the center with SG-401 Designer Liner Black.
Outline the detail of the leaves with a thick line of SG-405 Designer Liner Green, use a wet dagger or round brush to pull the wet Designer Liner Green into the body of the leaf. Outline the center section of the leaf with Designer Liner Bright Green, pull wet color to the center. Use Designer Liner Yellow in the center and as a circle outline in the body of the leaf.
Shade around the leaves with Designer Liner Green and Designer Liner Purple, use the dagger brush. Outline the leaves and stem with Designer Liner Black.
Detail the frame of the canvas with loops of Designer Liner Black.
When dry, clear glaze two coats with CB-604 #4 Soft Fan.
Fire to cone 06.
Bisque
MB-1352 6 x 6 Square Clay Canvas
Color
SG-401 Designer Liner Black
SG-403 Designer Liner Red
SG-405 Designer Liner Green
SG-406 Designer Liner Brown
SG-408 Designer Liner Orange
SG-409 Designer Liner Bright Green
SG-411 Designer Liner Purple
S-2101 Crystal Clear Brushing or NT-CLR Clear One Dipping
Begin with properly fired cone 04 bisque. Moisten a sponge and wipe bisque to remove any dust.
Using the Script Liner with SC-16 Cotton Tail, apply 2 coats to the eyes. Allow glaze to dry between coats.
Using the Soft Fan with SC-23 Jack O’Lantern, apply 3 coats to the body and bottom. Allow glaze to dry between coats. Make sure glaze is bone dry before moving onto the next step.
Squeeze around 1 TBS of SC-75 Orange-A-Peel onto the palette. Thin with water. Using the Soft Fan, brush over the body of the monkey. The glaze should pool into the crevices. You can dip the Soft Fan in water to remove any excess glaze.
Using the Soft Fan with SC-55 Yella Bout It, apply 2 coats to the muzzle of the monkey. Apply 1 more coat and shade the edges with SC-24 Dandelion. Allow glaze to dry between coats.
Using the Script Liner with SC-88 Tu Tu Tango, apply 3 coats to the nose. Allow glaze to dry between coats.
Squeeze around 1 TSP of SC-2 Melon-Choly onto the palette. Dip the sponge in the glaze and sponge the cheeks of the monkey.
Using the Detail Liner with SC-15 Tuxedo, outline the details on the monkey.
Using the Soft Fan with SC-75 Orange-A-Peel, apply 3 coats to the inside of the monkey.
Begin with properly fired cone 04 bisque. Moisten a sponge and wipe bisque to remove any dust.
Using the Script Liner with SC-16 Cotton Tail, apply 2 coats to the eyes. Allow glaze to dry between coats.
Using the Soft Fan with SC-11 Blue Yonder, apply 3 coats to the body and bottom. Allow glaze to dry between coats. Make sure glaze is bone dry before moving onto the next step.
Squeeze around 1 TBS of SC-76 Cara-Bein Blue onto the palette. Thin with water. Using the Soft Fan, brush over the body of the bird. The glaze should pool into the crevices. You can dip the Soft Fan in water to remove any excess glaze.
Squeeze around 1 TSP of SC-2 Melon-Choly onto the palette. Dip the sponge in the glaze and sponge the cheeks of the bird.
Using the Script Liner with SC-23 Jack O’Lantern, apply 2 coats to the beak.
Using the Detail Liner with SC-15 Tuxedo, outline the details on the bird.
Using the Soft Fan with SC-76 Cara-Bein Blue, apply 3 coats to the inside of the bird.
Begin with properly fired cone 04 bisque. Moisten a sponge and wipe bisque to remove any dust.
Using the Script Liner with SC-97 Cant-elope, apply 1 coat to the dragon’s body. Allow glaze to dry.
Using the Script Liner with SC-97 Cant-elope, apply 1 coat to the dragon’s body in small sections. Use the Script Liner with SC-75 Orange-A-Peel to shade around the edges while the glaze is still wet.
Using the Script Liner with SC-55 Yella Bout It, apply 1 coat to the dragon’s belly and the inside of the wings. Allow glaze to dry.
Using the Script Liner with SC-55 Yella Bout It, apply 1 coat to the dragon’s belly and inside the wings in small sections. Use the Script Liner with SC-24 Dandelion to shade around the edges while the glaze is still wet.
Using the Script Liner with SC-75 Orange-A-Peel, apply 2 coats to the webbing on the wings and the spines on the back. Allow glaze to dry between coats.
Using the Detail Liner with SC-27 Sour Apple, apply 2 coats to the irises of the eyes. Allow glaze to dry between coats.
Using the Soft Fan and Script Liner with SC-27 Sour Apple, apply 3 coats to the background and bottom of the mug. Allow glaze to dry between coats.
Using the Soft Fan with SC-97 Cant-elope, apply 3 coats to the inside of the mug. Allow glaze to dry between coats.
Using the circle punches, punch 10-15 holes in the paper. Cut around the holes with the scissors to make a negative pattern. Dip each circle pattern in water and place on the back of the dragon plaque. Using the Script Liner with SC-75 Orange-A-Peel, apply 2 coats to each circle. Before the last coat is dry, remove the circle patterns.
Using the circle punches, punch 8-15 several holes in the paper. Cut around the holes with the scissors to make a negative pattern. Dip each circle pattern in water and place on the background of the dragon mug. Using the Script Liner with SC-26 Green Thumb, apply 2 coats to each circle. Before the last coat is dry, remove the circle patterns.
Using the Detail Liner with SC-15 Tuxedo, outline the details on the dragon mug and plaque.
Using the Script Liner with S-2101 Clear Brushing, apply 2 coats to the eyes and teeth of the dragons or dip into NT-CLR Clear Dipping.
Begin with a properly fired shelf cone 04 Bisque. Moisten a clean sponge and wipe bisque to remove dust.
Create a one-inch border all the way around the canvas. Use the ruler to pencil the width of the ruler on the border.
Tape off the first color, stamp using ST-116 Floral Flourish Stamp, tapped with SC-81 Cinnamon Stix, press to the taped off area.
Continue around the border, stamp using the ST-113 Circulate Stamp tapped with SC-29 Blue Grass. Next, tape and stamp with SC-5 Tiger Tail using the ST-129 Mini Fern Stamp. Lastly, tape and stamp with SC-39 Army Surplus, using ST-131 Postage Stamp. Use a sponge on a stick to apply the glaze to the stamps.
Use the ruler as a guide, to outline the center square, with SG-411 Purple.
Use the C-604 Soft Fan Brush to apply three coats of the following colors over the stamped sections. FN-209 Floral Pink over the Cinnamon Stix, FN-214 Pastel Jade over SC-29 Blue Grass, FN-206 Lemon Ice over SC-5 Tiger Tail, FN-227 Celery over SC-39 Army Surplus, use CB-604 Soft Fan.
Brush the center square with three coats of FN-201 Golden Clear.
When the shine is off the glaze, begin prepping the Silkscreen Medium. Thicken SC-15 Tuxedo with AC-310 Silkscreen Medium and mix together using a palette knife. Work the glaze into the consistency of peanut butter. With the bird screen shiny side down, rub the mix over the screen, remove, wash gently.
Thin SC-80 Basketball slightly to brush to the breast, thinner near the wing, SC-14 Java Bean to the branch. Use CB-106 #6 Script Liner and CB-110 #10/0 Mini Liner.
Begin with properly fired shelf cone 04 bisque. Moisten a clean sponge and wipe bisque to remove any dust.
Brush on three coats of SC-45 My Blue Heaven to the body of the star, leaving the inner star unglazed. Tape off the border surrounding the inner star on both sides with the ¼” tape. Brush with two coats of SC-31 The Blues, use RB-106 Script Liner. Use RB-110 Liner to stoke in a line of The Blues in the creases of the inner star.
Clear glaze and fire to cone 05/06.
Repeat the process for the Aqu-ward, pastel green star, and the pink star with Pink A Boo and SC-70 Pink A Dot.
After firing decorate with the self-adhesive rhinestones, also the self adhesive crafting tapes is fun to use on ¼” border that surrounds the inner star.
Begin with properly fired shelf cone 04 bisque. Moisten a clean sponge and wipe bisque to remove any dust.
Tape off the narrow border around the inner star, tape of the second star, and the middle section. An X-ACTO blade works well to get clean edges.
Brush SC-11 Blue Yonder to the inner star, leave an unglazed line between the sections of the star shape, brush one side of the facet with two coats and the other side of the facet with three coats to give it a shaded look.
Brush the second star shape with 2-3 coats of SC-98 Slime Time, and the last taped off area with three coats of SC-7 Leapin’Lizard. Use RB-144 Soft Fan.
When dry, thicken SC-15 Tuxedo with AC-310 Silkscreen Medium using a palette knife to the consistency of peanut butter. Tape of the facet around the tree screen.
Hold the shiny side down with the top of the tree pointing towards the center of the star, rub the thickened Tuxedo over the screen. I recommend testing the Tuxedo with the screen to make sure you have the desired consistency, I generally use a thinner consistency to get a dark screen.
Brush on two coats of S-2101 Clear or dip in a clear glaze.
Clean the greenware vase using the Clean-up Tool to remove the seams. Use the Green Grit Cloth to sand any imperfections from the ware, then use a moistened BT-910 Sponge to remove any dust from the ware. Check the inside of the vase for any debris.
In a 4 oz. Plastic jar mix 4 Tablespoons of UG-58 Harvest Gold with 4 Tablespoons of C-300 Matte Transparent. 50;50 ratio. Do not use more than 50 percent Matte Glaze in the formula. Stir and then shake the color well to make sure the colors are blended well.
Apply 1 even smooth coat of the mixture to the entire outside of the vase using CB-604 Soft Fan. Lightly moisten BT-910 Sponge with water and squeeze out any excess water from the sponge in a paper towel. Pour out some of the mixture onto a tile. Dip the sponge into the color and pounce on 3 even coats to the entire outside of the vase allowing drying time between coats. Keep the color even and producing a fine pebble texture to the surface of the ware when applying the color with the sponge. Let Dry.
Transfer the basic outline of the pattern to the ware. No fine detail is needed at this time.
Place some of all the colors out onto a Tile or Pallet noting the color numbers. Using the pattern as your guide, apply 3 even coats of the noted Foundation Underglazes to the appropriate areas using CB-404 Pointed Round.
Apply 2 coats of UG-220 Sage to the stalk and stems of the bamboo using CB-404 Pointed Round and CB-110 Liner. To each half of the leaves of the bamboo, apply 1 heavy coat of UG-218 Pear Green using CB-110 Liner in a “pressure point” stroke. The color should shade itself as you apply the color by forming a ridge of color along the edge of the leaf while forming the center vein of the leaf. To the leaves in shadow apply UG-220 Sage in the same manner. Moisten CB-404 Pointed Round with water and tip the brush in UG-219 Marine Blue and shade the base of each leaf with color. Color should be darkest next to the stem and fade out down the leaves. Shade the lower half portion of the stalk with UG-219 Marine Blue as well.
Detail the stalk of bamboo with UG-57 Spice Brown along the bottom edge and joints of the stalk to darken using CB-110 Liner. Continue to detail the fine lines in the bamboo with UG-22 Spring Green.
Paint in the iris of the eye with UG-31 Chocolate using CB-220 Detail Liner. Place some SG-408 Orange onto the tile and shade the iris. Paint in the pupil with UG-50 Jet Black. Highlight the pupil with a dot of SG-402 White.
Shade the beak with thinned UG-213 Cinnamon using CB-220 Detail Liner. Darken and shade the beak edges with UG-50 Jet Black. Paint in the separation of the beak with Jet Black.
Starting with the head area by shading with UG-50 Jet Black from the beak and tapering off as you go back towards the neck area using CB-404 Pointed Round. The black is heaviest towards the front of the head and fading out towards the neck. Shade along the lower edge of the head (crown) with black over the eye and white marking in the neck.
Shade around the eye with UG-50 Jet Black over the Cinnamon areas to blend the color change.
Shade the White area on the neck with some thinned UG-72 Wedgewood Blue and thinned (dirty water thin) UG-50 Jet Black.
The throat area (UG-72 section) of blue is shaded with some thinned UG-1 Kings Blue.
The wing area (“A” section) and Kings Blue area below the white neck and eye section up to the beak is shaded with UG-50 Jet Black. The black color is darkest around the upper edges and towards the bottom of this section. Streak in some thinned black striations to give the appearance of feathers keeping the contour of the wing
The front upper part of the wing (“B” section) is shaded along the top edge down the front part of the wing and down along the bottom edge of the wing. The upper ridge area of the wing is detailed with fine lines streaked in with SG-410 Bright Blue for a highlight. Refer to the detail portion of the pattern on the wing.
The lower wing section below the “A and B” is shaded with UG-50 Jet Black as well. Shade the individual feathers in the lower wing. Detail the separations in the feathers with thinned Jet Black using CB-110 Liner.
The breast and lower abdomen area of the bird (UG-213) shaded with UG-31 Chocolate and then darkened with UG-50 Jet black. Keep the color darkest along the front edge of the breast. Shade the different areas in the abdomen creating separate areas. Add some thinned SG-408 Orange to the area up around the neck and lower abdomen for highlights.
Shade the back (UG-19) area with UG-97 Bright Blue along the back edge and around the tail feathers. Darken the shading with UG-1 Kings Blue and some thinned UG-50 Jet Black. Paint in the detail on the tail feathers with thinned UG-50 Jet Black using CB-110 Liner.
The detail in the back (UG-19 section) is done with SG-402 White. Keep the lines as fine as possible using the pattern as a guide as to how the detailing is done. Shade over these feather shapes with some thinned UG-97 Bright Blue to give depth to the feather sections.
The spot details in the head, throat and wing are done in the same manner. Use SG-410 Bright blue to create the irregular shaped spots that trail to finer and finer spots. Highlight each of the spots with a fine dot of SG-402 White.
The foot is detailed with thinned UG-50 Jet Black using CB-110 Liner. Highlight the tops of the sections in the foot with some thinned SG-408 Orange.
Stilt and fire the piece to Shelf Cone 04.
Check for any debris in the vase and remove. Tape off around the neck and lip area on the yellow part of the vase with Blue Masking Tape. This is done to avoid staining the underglaze areas when pouring the glaze to the interior of the vase. In a Plastic Cup mix some water into FN-08 Blue to thin to a melted ice cream consistency. Pour the thinned glaze into the vase. While working quickly, rotate the vase to cover the inside of the vase. Pour out the excess glaze and invert to drain and dry. When the glaze has dried some, remove the tape and wipe off any excess glaze off the yellow background areas. The blue glaze can stain the yellow background easily.
Apply 1 coat of S-2101 Crystal Clear Brushing to the entire eye only using CB-220 Detail Liner. Do not over paint onto the bird feathers.
Begin with a properly fired shelf cone 04 Bisque. Moisten a clean sponge and wipe bisque to remove dust.
Brush on two coats of FN-008 Brown with CB-604 #4 Soft Fan.
Let dry, trace on the pattern.
Outline all the detail with AC-302 Wax Resist use CB-110 #10/0 Mini Liner.
Use the CB-106 #6 Script Liner, or CB-604 #4 Soft Fan for larger areas. Brush on 2 1/2 coats of EL-128 Wheat to the petals. EL-130 Sea Green to the stem and leaves. EL-127 Rose Granite to the center of the flower. EL-125 Sahara Sands to the background. Note: the half coat refers to brushing in the center of the space rather than to the edges, this will give it more of a shaded look.
Brush 1-2 coats of SC-75 Orange-A-Peel to the center over the Rose Granite.
1. Begin with properly fired shelf cone 04 Bisque. Moisten a clean sponge and wipe bisque to remove dust.
2. Cut out the shape of the truck, minus the fruit. Cut out the wheels separately.
3. Trace the outline of the truck and wheels onto the canvas. Apply one coat of UG-51 China White to the penciled area. Re-wet the China White by brushing with water, then place the paper cut outs onto the wet surface. Use a paper towel to remove excess water, smooth out any wrinkles and ensure the edges are sealed.
4. Pour UG-46 Bright Yellow, UG-203 Squash Yellow and UG-58 Harvest Gold onto a tile. Use the plastic card to pick up UG-203 Squash Yellow with UG-46 Bright Yellow, keeping the Bright Yellow to the center section of the canvas. Hold the card almost flat against the canvas, drag on the color. It will blend as it is dragged. Use UG-58 Harvest Gold to the area under the truck. Apply two coats, you should not see the bisque through the Underglaze.
5. Hold the SL-456 Camo Stencil down on the canvas, using the foam roller to apply UG-19 Electra Blue over the stencil, going different directions for best application. Fill in the background as shown with the pattern. Leave the space from the middle of the truck to the end of the canvas plain.
6. Remove the paper truck and wheels.
7. Use CB-106 #6 Script Liner, or CB-408 #8 Pointed Round to apply three coats of UG-207 Flame Red to the body of the truck and three coats of UG-53 Silver Grey to the grill.
8. Use the Script Liner to apply two coats of UG-51 China White to the center of the wheels and two coats of UG-50 Jet Black to the tires and fenders.
9. Use SL-455 Tire Track Stencil to make the pattern under the truck. Use the foam roller to apply UG-50 Jet Black over the stencil, rolling in different directions.
10. Place some UG-50 Jet Black on a palette or tile and sprinkle with AC-310 Silkscreen Medium. Using a palette knife, mix color and medium to the consistency of thick peanut butter. If the mix is too thin add more AC-310 Silkscreen Medium or if it is too thick add more Stroke & Coat®. Too thin of a mixture will bleed under the screen and give you a blurred image. Too thick of a mixture will make it hard for the product to penetrate through the holes in the screen and give blank areas in your screen.
11. Use the small fruit from DSS-0121 Fruit, position the screen shiny side down on the piece. Hold in place, starting from the center out. Rub the mixture on the screen with your finger. Lift a corner up to check if you are applying enough color. Remove the screen and wash with water. Do not let the color dry in the screen as this can damage the screen.
12. Use the Liner and Script Liner to apply three coats of the following colors: UG-53 Wild Violet to the grapes, UG-203 Squash Yellow and UG-21 Leaf Green to the pineapple, UG-216 Peach to the watermelon and UG-207 Flame Red to the cherries.
13. Line the same fruit screens over the painted images. Re-screen the thickened UG-50 Jet Black over the painted fruit.
14. Detail the truck with UG-50 Jet Black using the Liner.
15. Wet the Script Liner and use the float UG-50 Jet Black in the window, behind the truck, behind the rear wheel and under the front panel to create a shadow.
16. Use the Round brush to apply two coats of UG-50 Jet Black to the sides of the canvas.
17. Use the Script Liner to apply two coats of S-2101 Clear Brushing glaze to the truck, wheels and fruit.
Begin with properly fired shelf cone 04 bisque. Moisten a clean sponge and wipe bisque to remove any dust.
Using the CB-604 # 4 Soft fan, apply 2 flowering coats of EL-125 Sahara Sands to the entire piece.
Using the CB-604 # 4 Soft fan, apply 2 coats of SG-202 White Cobblestone to the entire piece.
Note: To apply cobblestone, apply 1 flowing coat, just as it looses it wet look apply the 2nd coat. If it is allowed to dry in between, you may not get the cobblestone to break up.
Begin with properly fired cone 04 bisque. Moisten a sponge and wipe bisque to remove any dust.
Using the Soft Fan with FN-001 White, apply 2 coats to the body of the truck. Allow glaze to dry between coats.
Using the Soft Fan with FN-001 White, apply 1 coat to a small section of the truck. Using the Script Liner with SC-35 Gray Hare, shade the recessed areas. Repeat until all areas of the truck have been shaded.
Using the Script Liner with SC-35 Gray Hare, apply 2 coats to the windows. Allow glaze to dry between coats.
Using the Script Liner with SC-35 Gray Hare, apply 1 coat to one of the windows. Using the Script Liner with SC-15 Tuxedo, shade the window. Repeat for all windows.
Using the Script Liner with SC-6 Sunkissed, apply 2 coats to the headlights. Allow glaze to dry between coats.
Using the Script Liner with SC-74 Hot Tamale, apply 2 coats to the taillights. Allow glaze to dry between coats.
Using the Script Liner with SC-35 Gray Hare, apply 3 coats to the hubcaps, bumpers and grille. Allow glaze to dry between coats.
Using the Detail Liner with SC-15 Tuxedo, outline the details on the truck.
Using the Script Liner with SC-15 Tuxedo, apply 2 coats to the tires, grille details and bottom of the truck. Allow glaze to dry between coats.
Fire to cone 06.
Decorate with small Christmas trees, wreaths, presents, ornaments or greenery.
Begin with properly fired shelf cone 04 bisque. Moisten a clean sponge and wipe bisque to remove any dust.
Using a Basecoat Brush, apply 1 coat of SS-192 Light Taupe to the body of the tree. Allow to dry.
Using a BT-910 Synthetic Sponge, sponge 2 coats of SS-192 Light Taupe to the body of the tree to create some texture.
Using a Basecoat Brush, apply 1 – 2 coats of SS-234 Medium Mocha to the bottom portion of the tree (refer to photo).
Using a Basecoat Brush, apply 1 – 2 coats of SS-198 Chocolate to the top of the tree/hat as a base coat.
Transfer the pattern onto the piece using White Graphite Paper.
Using a CB-202 #2 Detail brush, apply SS-135 White to the eye. Apply SS-194 Medium Taupe to the iris of the eye and SS-138 Black to the pupil of the eye. Add highlights with SS-135 White.
Using a CB110 #10/0 Liner, outline and paint the eyelashes with SS-138 Black.
Using a CB-202 #2 Detail brush, apply SS-399 Terra Cotta to the nose.
Drybrush a highlight to the nose with a mix of SS-399 Terra Cotta and SS-135 White, also drybrush the cheeks with the same color mix.
Using a CB-408 #8 Pointed Round, float SS-234 Medium Mocha around the edge/ curly cues of the bottom of the tree. Also float around the eyes, nose and bottom of the mouth.
Using a CB110 #10/0 Liner, outline the nose and mouth plus add stiches with SS-138 Black.
Drybrush the top of the tree (hat) with SS-194 Medium Taupe. Highlight the curly cues on the bottom of the tree with SS-194 Medium Taupe.
Drybrush highlights of SS-1392 Light Taupe to the top (hat) of the tree.
Apply Matte Sealer to the piece.
Hot Glue the raffia to the piece. Feed a pipe cleaner through the burlap to create the ruffle of the hat. Hot glue the burlap covering the Raffia. Add the Flower and leaf.
Form
MB-1462 Jolly Christmas Tree Bisque or CD1462 Jolly Christmas Tree Mold
Begin with properly fired cone 04 bisque. Moisten a sponge and wipe bisque to remove any dust.
Using the Soft Fan with SP-209 Speckled Jaded, apply 3 coats to the body of the llama. Allow glaze to dry between coats.
Using the Script Liner with SC-77 Glo-Worm, apply 3 coats to the feet on the llama.
Using the Script Liner with SC-88 Tu Tu Tango, apply 3 coats to the ears, tail, and nose of the llama.
Use SG-401 Black to make dots along the facet lines on the body (glazed with Speckled Stroke & Coats). Make lines along the facets on the feet, ears, nose and tail. (glazed with Stroke & Coats).
Begin with properly fired cone 04 bisque. Moisten a sponge and wipe bisque to remove any dust.
Using the Soft Fan with SP-288 Speckled Tu Tu Tango, apply 3 coats to the body of the bear. Allow glaze to dry between coats.
Using the Script Liner with SC-9 Jaded, apply 3 coats the feet on the bear. Allow glaze to dry between coats.
Using the Script Liner with SC-77 Glo-Worm, apply 3 coats to the nose of the bear.
Use SG-401 Black to make dots along the facet lines on the body (glazed with Speckled Stroke & Coats). Make lines along the facets on the feet, ears, nose and tail (glazed with Stroke & Coats).
Begin with a properly fired shelf cone 04 Bisque. Moisten a clean sponge and wipe bisque to remove dust.
Brush on two coats of FN-001 White with RB-144 Soft Fan to the front of the plate.
Trace on the pattern of the gnome, mushroom and clouds to the plate use Clay Carbon Paper. Cut out the shape of the gnome, mushrooms and clouds. Place the cut out patterns onto the traced outline, pull back the paper to brush water under the pattern so that the paper will stick to the glaze.
Brush two coats of SC-91 Seabreeze around the gnome brush over the paper edges, add SC-11 Blue Yonder to brush onto the remainder of the plate, stopping just past the grass edges. Use the RB-144 Soft Fan to apply the two coats, remove the paper.
Brush two coats of SC-20 Cashew Later to the nose and face, add SC-2 Melon-Choly to redden the nose and cheeks, use RB-106 Script Liner.
Brush the boots and patches in the hat with 2-3 coats of SC-6 Sunkissed, shade with SC-97 Cant-elope.
Hat brush 2-3 coats of SP-275 Speckled Orange A Peel with RB-106 Script Liner jacket is SC-92 Cafe’ Ole’, pants are SC-34 Down to Earth, gloves are SC-98 Slime-Time. 2-3 coats.
Punch out small dots for the mushroom tops, wet the glaze then stick on the paper dots, brush SC-74 Hot Tamale over the mushrooms tops 3 coats. Remove the paper. Brush 3 coats of SC-81 Cinnamon Stix to the underside of the mushroom caps.
Brush the grass with SC-26 Green Thumb and SC-8 Just Froggy in the direction of the grass shapes 2 coats. Let dry.
Thicken SC-15 Tuxedo with AC-310 Silkscreen Medium using a palette knife to the consistency of peanut butter, hold the grass screen shiny side down on the green grass area, I only used sections of the grass screen, no need to clean between screening if you continue to repeat the screen immediately, rub your finger with the thickened Tuxedo over the screen and repeat in a couple of rows to fill in the grass. Screen a few ladybugs over the grass with the image from DSS-0113 Bugs. Paint the backs with two coats of SC-74 Hot Tamale around the spots.
Use RB-110 Liner to outline the gnome, detail the mustache and beard, the mushrooms and blades of grass as shown, use SC-15 Tuxedo.
Dip in clear or brush two coats of clear to the back and one coat to the front use S-2101 Clear with the RB-144 Soft Fan.
Begin with properly fired shelf cone 04 bisque. Moisten a clean sponge and wipe bisque to remove any dust.
Using a Basecoat Brush, apply 2 coats of SS-276 Forest Green & SS-335 Rich Blue 1 : 1 to the truck (except the windows, head & tail lights). Allow to dry.
Drybrush the truck with a mix of 1 part SS-276 Forest Green, 1 part SS-335 Rich Blue and 2 parts SS-317 Turquoise.
Add a small amount of SS-135 White to the above mix then highlight the truck with this mix.
Basecoat the windows, tire whitewalls and headlight with 2 coats of SS-45-Buttermilk. Allow to dry.
Antique the windows and tire whitewalls with a thin wash of SS-234 Medium Mocha.
Drybrush the windows, tire whitewalls and headlight with SS-45 buttermilk then 2 coats of SS-135 White.
Basecoat the tires, bumpers and grill with SS-138 Flat Black. Allow to dry.
Drybrush the bumpers and the grill with SS-81 Shimmering Silver.
Apply 2 coats of SS-176 Christmas Red to the tail light. Drybrush with SS-210 Orange.
Trim hubcaps, doorknob, head light, tail light and windows with SS-81 Shimmering Silver.
Drybrush the tires with SS-130 Medium Gray. Allow to dry.
Apply Matte Sealer to the piece.
Drill holes in the back of the truck, attach to grapevine wreath with floral wire.
Glue Mini Pumpkins and Scarecrow in the back of the truck.
Begin with properly fired cone 04 bisque. Moisten a sponge and wipe bisque to remove any dust.
Condition the fan brush by dipping in water and then removing excess gently with a dry paper towel. Apply three coats of FN-009 Black Foundations to the entire mug, allowing it to dry between coats.
Between applying the coats of FN-009 Black Foundations and while the glaze is drying, cut out the 3 leaves from the paper patterns.
Because the SG-202 White Cobblestone is not a smooth surface, you want to avoid placing it in areas that come in contact with food or liquid and avoid areas where it would come into contact with the lips on the rim of the mug. The largest leaf is to be positioned on the outside of the mug opposite the handle. This way it can be close to the rim where it is unusual for anyone to drink from that side of the mug.
Once the 3 coats of FN-009 Black are dry, position the largest leaf on the outside of the mug opposite the handle and trace around the pattern with a pencil. Do not score/scratch the glaze by applying too much pressure to the pencil.
Trace the other two smaller leaves on either side of the large leaf, keeping them well away from the rim of the mug and varying the direction of the stems.
To avoid bubbles in the AC-302 Wax Resist, do not shake immediately before using. Pour about the size of a nickel of the AC-302 Wax Resist on the 6″ round plate.
Use a separate brush for applying AC-302 Wax Resist and wash immediately to remove the wax and prevent the wax from drying in the bristles. Note: The only way to remove wax from a project is to fire in the kiln. If you drip it on your ware it will do its job and repel glaze even if you wipe it off. Use care not to drip or drop your brush on the mug.
Using the CB-202 #2 Detail Liner apply one coat of AC-302 Wax Resist to the outline of the leaves. Make a fairly bold line as the outline.
After all of the leaves are outlined, apply wax resist to the handle of the mug where it attaches to the mug. go about 1/2″ up the handle of the mug.
Clean the wax resist brush well. Allow the wax resist to dry.
The next steps, applying and coloring the Cobblestone glaze are completed rather quickly. The color needs to be applied as soon as the SG-202 White Cobblestone has lost its gloss, but before it is completely dry and begins to crack too much.
Pour out about a quarter size of the Stroke & Coat colors for the leaves onto your palette: SC-6 Sunkissed, SC-27 Sour Apple, SC-74 Hot Tamale, SC-75 Orange-A-Peel.
Using a #4 or #6 brush as appropriate, apply the first coat of SG-202 White Cobblestone to all of the leaves. Brush on a good coat – the application should be somewhat opaque. Do not overwork the glaze, just lay down a good coat. IF the coats are too thin, the Cobblestone will not break up. The heavier the coat of Cobblestone, the deeper the texture and larger the break up. Since you are working on a curved surface, be careful not to apply so much that it drips over the wax resist outline.
When the first coat of SG-202 White Cobblestone has lost its shine, apply a second coat in the same manner.
When the second coat of Cobblestone has lost its shine and before it begins to crack, apply one coat of Stroke & Coat over the SG-202 White Cobblestone. Use the #4 or #6 Round to apply one coat of leaf colors starting at the edges and feathering toward the center as shown in the photo. Apply the center color last and feather outward overlapping the outer colors. Be careful not to muddy the colors too much. Unblended blocks of color will not really be that distinguishable when the Cobblestone creates its cracked texture. Each leaf in nature is different, so be creative!
Once the leaves are complete and dry, apply two coats of either SC-3 Wine About It or SC-29 Blue Grass around the leaves on the outside of the mug – exclude the handle, the bottom, and the rim. The wax resist will help keep the lines distinct. follow the contour of the leaves and handle. This is not meant to be 100% coverage but to have a mottled, rich look.
Tip: If you have too much color on top of the wax resist, use a damp sponge or a damp stiff brush to remove the excess.
Begin with properly fired cone 04 bisque. Moisten a sponge and wipe bisque to remove any dust.
Using the Soft Fan with FN-301 Marshmallow White, apply 4 coats to the front and back of the platter. Allow glaze to dry between coats. The final coat must be completely dry before moving onto the next step.
Place the AC-230 Clay Carbon Paper onto the platter. Position the pattern in the center of the platter and trace it with a pencil.
Using the Script Liner with SC-97 Cant-elope, apply 3 coats to the small pumpkin on the left. Allow glaze to dry between coats.
Using the Script Liner with SC-50 Orange Ya Happy, apply 3 coats to the large pumpkin in the center. Allow glaze to dry between coats.
Using the Script Liner with SC-51 Poo Bear, apply 3 coats to the medium pumpkin on the right. Allow glazes to dry between coats.
Using the Script Liner with SC-52 Toad-ily Green, apply 3 coats to the gourd. Allow glaze to dry between coats.
Using the Script Liner with SC-8 Just Froggy, apply 3 coats to the leaves and stem of the small pumpkin on the left. Allow glaze to dry between coats.
Using the Script Liner with SC-48 Camel Back, apply 3 coats to the remaining stems. Allow glaze to dry between coats.
Using the Detail Liner with SC-15 Tuxedo, outline everything and add accent lines.
Wipe down the bisque with a moistened BT-910 Synthetic Sponge to remove any dust and debris from the ware.
Using CB-604 Soft Fan to apply 3 coats of SC-16 Cotton Tail to the blanket on the Llama.
Apply 3 coats of SC-54 Vanilla Dip to the remaining portions of the Llama using CB-604 Soft Fan.
Place some SC-92 Café Ole’ onto the Pallet/Tile. Using CB-604 Soft fan loaded with water, tip one side of the brush with color and wet shade around the blanket, between the legs, around the tassel neck decoration, tail, around the eyes and top mane hair as well as the contours of the hair.
Use a pencil to sketch on the diamond pattern onto the blanket. Space the diamond pattern to where there are three half diamonds along the bottom edge of the blanket that are evenly spaced. Work from the bottom edge upwards to complete the diamonds in the pattern. Sketch in a line on the inner portion of the diamonds. Then sketch in a smaller diamond in the center of each diamond.
Apply 2 coats of SC-88 TuTu Tango to the inner line on the diamonds using CB-202 Detail Liner.
Apply 2-3 coats of SC-76 Cara-bein Blue to the inner diamonds using the same CB-202 Detail Liner.
Using a BT-910 Synthetic Sponge to apply some thinned SC-14 Java Bean to the muzzle/ nose area on the Llama. Trail the color slightly down the neck from the nose area. Darken the nose area with some thinned SC-34 Down To Earth. Keep this color very light on the nose area.
Paint in the iris of the eye with SC-14 Java Bean using CB-220 Detail Liner. Apply a line of SC-88 TuTu Tango to shade the iris of the eye. Paint in the pupil of the eye with SC-15 Tuxedo using CB-110 Liner. Apply a highlight of SC-16 Cotton Tail to the pupils. Apply a fine line along the bottom edge of the eye and a slightly heavier line to the eyelid with a couple of fine lashes. Apply lines to the nostrils and mouth area using SC-15 Tuxedo.
Apply one coat of SC-2 Melon-Choly to the inner ear using CB-404 Pointe Round. Use a sponge to apply color to the cheeks of the Llama. The color should be strongest along the cheek ridge and fade out to nothing.
Apply thinned SC-8 Just Froggy to the rope tie around the neck using CB-404 Pointed Round. Apply thinned SC-9 Jaded, SC-11 Blue Yonder, SC-88 TuTu Tango and SC-97 Cant-elope to the tassels in an alternating pattern. Darken the lines in the rope and tassels with the appropriate colors using CB-110 Liner.
To the fringe along the blanket edge, apply thinned SC-88 TuTu Tango using CB-404 Pointed Round. Color should be darker in the separations in the fringe.
Apply thinned SC-34 Down to Earth to the hooves on the Llama using CB-404 Pointed Round. Shade the crease and upper edge of the hoof with SC-15 Tuxedo.
Shake and Stir CG-981 Fruity Freckles. Place some color onto a tile with the crystals well mixed into the color. Add some AC-310 Silk Screen Medium to thicken the color. A few pinches is all that is needed to make it thick enough to hold its shape when applied. Load the color into AC-220 Detailer bottle with plastic tip and using Scissors to cut the tip to about 1/8” opening. The hole should be large enough for the color with crystals to flow out of the bottle when applying the color. Apply the thickened crystal glaze color to the diamond pattern. Watch how the color trails out of the bottle to ensure that there are enough crystals being applied. The color should stand about 1/8” to 1/4” in height. Let dry. If there are any areas in the line of crystal glaze that doesn’t have some crystal in it, apply some from the bottle with a brush. Let dry.
Condition a CB-404 Pointed Round with some liquid detergent. Apply 1 good coat of AC-302 Wax Resist to the tassels, hoofs and blanket edge where it meets the Llama. Wash the brush immediately after with warm water and liquid detergent.
Apply 2-3 coats of SG-202 White cobblestone to the to the Llama excluding the face area using CB-604 Soft Fan and CB-404 Pointed Round. When one coat of glaze has dried to a dull look, apply the next coat of glaze. Do not let the glaze to completely dry between application. Trail the glaze thinner up the neck and do not apply any on the face area. The heavier the application of the Cobblestone will create larger break up pattern to the glaze. Too thin of the glaze will not show up as a breaking up in the glaze surface for contrast over the Vanilla Dip.
Begin with a properly fired shelf cone 04 Bisque. Moisten a clean sponge and wipe bisque to remove dust.
Use RB-144 Soft Fan to brush on two coats of SC-16 Cotton Tail to the top of the plate.
Punch out the small butterflies from copy paper, wet the sky area of the plate, stick on the paper butterflies.
Use the foam roller to roll SC-11 Blue Yonder with SC-16 Cotton Tail on the roller to the sky area of the plate, roll SC-98 Slime Time to the grass area. Roll in different directions and overlap the green and blue glaze where they meet. Take off the paper butterflies.
Scribble a dry erase marker on the shiny side of the screens used on the plate, wipe off the excess with a soft cloth. This will show up the image on the screen.
Thicken S-2101 Clear tinted with food coloring with AC-310 Silkscreen Medium using a palette knife to the consistency of peanut butter, place the screens on the plate, rub the thickened clear over the screens for a pattern.
Brush in two coats of the various colors as shown.
Thicken SC-15 Tuxedo as in step 6. Place the screens over the previous screened images, rub over with the thickened Tuxedo.
Stamp the tree stump with ST-133 Wood Grain using SC-14 Java Bean. Use a sponge on a stick to apply color to the stamp.
Begin with a properly fired shelf cone 04 Bisque. Moisten a clean sponge and wipe bisque to remove dust.
Use the foam roller to roll a coat of SC-91 Seabreeze over the plate, roll in different directions to the top of the plate, doesn’t need to go to the edge of the plate. The mug is rolled Seabreeze and SC-11 Blue Yonder, roll in a vertical direction.
Use a dry erase marker to scribble across the shiny side of the images used on the plate and mug. Wipe the excess off with a soft cloth. This will make the screens easier to see.
Thicken S-2101 Clear tinted with the food coloring with AC-310 Silkscreen Medium using a palette knife to the consistency of peanut butter. Place the various screen shiny side down on the plate or mug then rub the thickened clear over the screen, this is the pattern for glazing the colors.
With a wet stiff brush remove the Seabreeze glaze from the beard so that it will be white after screening .Brush the hats with SC-73 Candy Apple Red, pants with SC-76 Cara-bein Blue, nose, hands, and mushroom stem with SC-20 Cashew Later, tree branches with SC-14 Java Bean. The larger tree is SC-93 Honeydew List and the shorter one is SC-98 Slime Time. Brush all with 2-3 coats, use RB-110 Liner or RB-106 Script Liner.
Refer to the photo for the colors used on the mug.
When dry, thicken SC-15 Tuxedo follow step 4 in the directions. Lay the screen over the previously screened images, rub the thickened Tuxedo over the screens.
Brush three coats of SC-73 Candy Apple Red on the handle and inside of the mug, use RB-144 Soft Fan.
Brush the plate and the mug with two coats of S-2101 Clear using the fan or dip in a clear glaze.
Begin with properly fired shelf cone 04 bisque. Moisten a clean sponge and wipe bisque to remove any dust.
In a small cup or foam plate, mix 2 parts SS-127 Medium Portrait with 2 parts of SS- 376 Limeburst.
Using a basecoat brush, apply the color mix to the flesh area, going beyond the area of the face. Allow to dry!
Trace on the face pattern using White Transfer Paper.
Using a Script Liner, Shade (float) SS-19 Country Sage to the face.
Using a Liner, outline the face pattern with SS-138 Flat Black.
Mix 2 part SS-179 Antique Red with 1 part SS-24 Chocolate Fudge, apply to the tongue of the witch. Add a little more SS-24 Chocolate Fudge to the mix to darken and apply to the inside mouth area.
Using a Drybrush, apply SC-183 Rich Peach mixed with some SS-135 White to the cheeks.
Using a Script Liner, add highlights of SS-135 White to the cheeks and nose and chin.
Using a Detail Brush, apply SS-145 to the teeth.
Using a Detail Brush, apply SS-135 White to the eyes. Apply SS-138 Flat Black to the eyes. Highlight with SS-19 Country Sage and SS-135 White.
Using a Liner, apply SS-138 Flat Black to the Eye lashes, eye brows and outline the teeth.
Using a Basecoat Brush, apply SS-368 Dusty Violet to the under part of the bottom and top limbs of the tree.
Drybrush the curls of the tree with SS-28 Hushed Violet. Highlight with some SS-135 White in the same brush.
Apply SS-138 Flat Black to the remaining area of the tree area.
Optional: Apply SS-138 Flat Black to the remaining areas of the tree including the limbs. Drybrush with SS-368 Dusty Violet and Highlight with SS-28 Hushed Violet then with some SS-135 White.
Apply Matte Sealer to the piece.
Using Hot Glue, apply the Spanish Moss to create hair for the witch.
Optional: Trim with some Purple and or Orange Glitter using AC-502 Matte Sealer to apply the glitter.
Form
MB-1462 Jolly Christmas Tree Bisque or CD1462 Jolly Christmas Tree Mold
Begin with properly fired cone 04 bisque. Moisten a sponge and wipe bisque to remove any dust.
Apply MC-002 12mm Low Track Masking Tape over the holes in the branches of the cactus. Leave the large center hole open.
Pour around ½ cup of FN-003 Orange into the disposable cup. Thin with water until it is easily poured. Pour into the top of the cactus and rotate until the inside is covered. Pour out the excess. Remove the tape.
Using the Soft Fan with CG-987 Tree Frog, apply 3 coats to the outside of the cactus.
Begin with properly fired cone 04 bisque. Moisten a sponge and wipe bisque to remove any dust.
Using the Soft Fan with FN-001 White, apply 3 coats to the front and sides of the canvas. Allow glaze to dry between coats.
Squeeze 1 TBS of SC-97 Cant-elope, SC-23 Jack O’ Lantern, and SC-6 Sunkissed onto the palette. Take the ST-103 Retro Star Stamp and place it design-side up. Take the sponge on a stick and gently dab it into the glazes. Use the 3 colors to cover the stamp. Gently press the stamp onto the front of the canvas. Repeat until the front is covered.
Place the AC-230 Clay Carbon Paper over the front of the canvas. Print or freehand a fun pattern. Place the pattern over the paper and trace with the pencil.
Using the Script Liner with CG-756 Firecracker, apply 1 puddle coat to the body of the bird and the center of the lower-left flower.
Using the Script Liner with CG-753 Sassy Orange, apply 1 puddle coat to the wing of the bird and the center of the upper right flower.
Using the Script Liner with CG-968 Peppermint Twist, apply 1 puddle coat to the 3 small circle flowers.
Using the Script liner with CG-954 Wildfire, apply 1 puddle coat to the remaining upper flower.
Using the Script Liner with S-2723 Grape Divine, apply 1 puddle coat to the remaining lower flower.
Using the Script Liner with SC-26 Green Thumb, apply 1 coat to the stems and leaves.
Using the Script Liner with SC-6 Sunkissed and SC-74 Hot Tamale, apply 2 coats to the outer parts of the corresponding flowers.
Using the Detail Liner with SC-23 Jack O’ Lantern, apply 2 coats to the beak. Allow glaze to dry between coats.
Using SG-401 Black, SG-405 Green, SG-407 Yellow, SG-408 Orange and SG-411 Purple, outline the corresponding parts of the flowers, leaves and bird.
Begin with a properly fired shelf cone 04 Bisque. Moisten a clean sponge and wipe bisque to remove dust.
Slightly thin FN-009 Black, pour to the inside, turn to coat, pour out the excess glaze, drain.
Brush on two coats of FN-009 Black with RB-122 Soft Fan to the outside of the cactus, brush on a third coat, while the glaze is wet place pieces of skinny jute in the creases between the sections of cactus. Brush over the jute to cover with glaze. After it begins to dry, press areas of jute to remove the excess glaze and to promote drying.
Brush the outside of the cactus with two coats of SG-202 White Cobblestone.
Thin sc-8 Just Froggy and SC-98 Slime Time in separate containers, 1 TBS glaze to 1 ½ caps of water, fill the medium writer tip bottles with the colors, snip the plastic tip to make the opening larger. Squirt the colors over the cactus, let them run together where they meet. Not necessary to cover all the white cobblestone.
Remove the jute when the gloss leaves the color.
Use RB-110 Liner to brush in the space left from the jute one coat of SG-202 White Cobblestone, brush over the white with one coat of SC-73 Candy Apple Red.
Begin with properly fired shelf cone 04 Bisque. Moisten a clean sponge and wipe bisque to remove any dust.
Using the Soft Fan with CG-997 Sea Foam, apply 3 coats to the top of the hat. Allow glaze to dry between coats.
Using the Script Liner and Soft Fan with SC-10 Teal Next Time, apply 3 coats to the rim of the hat and inside the hat. Allow glaze to dry between coats.
Using the Script Liner with SC-16 Cotton Tail, apply 3 coats to the beard. Allow glaze to dry between coats.
Squeeze about 1 TBS of SC-99 Char-ming onto the palette. Thin with water. Use the Dagger Brush to float the thinned glaze over the beard.
Using the Script Liner with SC-20 Cashew Later, apply 3 coats to the nose and hands. Allow the glaze to dry between coats. Highlight with SC-2 Melon-Choly.
Using the Script Liner and Soft Fan with SC-23 Jack O’ Lantern, apply 3 coats to jacket and inside of the container. Shade with SC-88 Tu Tu Tango.
Use the circle punches to punch 10-20 circles in the paper. Cut them out with scissors to make a negative pattern. Dip each pattern in water and stick to the jacket. Using the Script Liner with SC-23 Jack O’ Lantern, apply 1 coat over each circle to make sure it sticks.
Using the Script Liner with SC-9 Jaded, apply 2 coats over each circle. Allow glaze to dry between coats. Remove the patterns before the glaze is completely dry.
Using the Detail Liner with SC-15 Tuxedo, outline the details on the container.
Begin with properly fired cone 04 bisque. Moisten a sponge and wipe bisque to remove any dust.
Pour in separate dixie cups, EL-149 Lavender Flower, and EL-128 Wheat, thin with water, depending on how thick the glaze is from the jar will dictate how much water to use. We used less water with the Lavender Flower because the glaze was thinner. Ultimately you want the glaze thin enough so that it will move but not too thin as it will weaken the color and move too much.
Brush on one heavy coat of CG-993 Lavender Sprigs to the llama, while it is still wet or if not, spray with water, this will help the glaze move.
Pour in a sporadic pattern EL-149 Lavender Flower, fill in with EL-128 Wheat, leave space between colors.
Move the llama in different directions to mingle the glaze make sure the llama is covered. Try not to over mingle the glaze as it will muddy the colors.
Begin with properly fired shelf cone 04 bisque. Moisten a clean sponge and wipe bisque to remove any dust.
Holding the Kaleidoscope Stencil on the top of the canvas, use a plastic card or squeegee to drag SG-501 Sculpting Medium over the stencil . Remove the stencil and let dry.
Use the Soft Fan to apply three coats of EL-149 Lavender Flowers over the entire piece.
Begin with properly fired shelf cone 04 Bisque. Moisten a clean sponge and wipe bisque to remove any dust.
In three separate paper cups, pour SC-98 Slime Time, SC-29 Blue Grass and FN-001 White. Thin each with one cap of water to create the consistency of heavy cream. Pour some rubboing alcohol into an empty 2 oz bottle and top with a Spritzer Cap.
Use the Soft Fan to apply one coat of FN-001 White to the canvas. Once dry, apply a second coat.
While the glaze is still wet, pour SC-98 Slime Time and SC-29 Blue Grass in uneven lines onto the canvas. Fill in with FN-001 White then move the canvas so the glaze mingles together. You may need to tap the canvas or pour more color onto it to fill all the space.
Pour some SC-88 Tu Tu Tango into a Detailer bottle then squirt onto the canvas in a random fashion. Slightly thin SC-15 Tuxedo in a detailer bottle and squirt onto the canvas.
While all the colors are still wet, spray with alcohol.
Use a toothbrush with the thinned SC-15 Tuxedo to spatter onto the canvas.
Begin with properly fired cone 04 bisque. Moisten a sponge and wipe bisque to remove any dust.
Slightly thin NT-BR Clear with water and pour inside the vase. Turn to coat and pour out the excess glaze. Use a damp sponge to remove the clear glaze from inside the neck of the vase.
While this dries, pour some SC-15 Tuxedo into AC-220 Detailer Bottle and thin slightly with water.
Use the RB-144 Soft Fan to apply two coats of PC-601 Clear Cascade onto the first row of facets and halfway up the neck of the vase. This will help the glaze flow.
Use the Soft Fan to apply two coats of EL-149 Lavender Flower to the vase and inside the neck.
Stir S-2709 Plum Jelly, then pour into the AC-222 Medium Writer Bottle, snip the tip to enlarge the opening so the crystals will flow through to hole.
Squirt S-2709 Plum Jelly on the row of facets on the hip section of the vase.
Use the Soft Fan to apply the third coat of EL-149 Lavender Flower.
Use the detailer bottle with thinned SC-15 Tuxedo to add dots around the top of the vase and at the top of the first row of facets. Spray with rubbing alcohol.
Begin with properly fired cone 04 bisque. Moisten a sponge and wipe bisque to remove any dust.
Pour around 1/3 cup of FN-207 Orange Slice into the disposable cup. Thin with water. Pour into the Vintage Camper. Rotate until the inside is completely covered with glaze. Drain the excess.
Pour around 1/4 cup of SC-50 Orange Ya Happy into the other disposable cup. Thin with water. Pour into the Camper Container. Rotate until the inside is completely covered with glaze. Drain the excess.
Using the Script Liner with SC-86 Old Lace, apply 3 coats to the trim around the windows and doors of both campers. Allow glaze to dry between coats.
Squeeze 1 TBS of SC-45 My Blue Heaven onto the palette. Thin with water. Apply a wash to the windows of both campers.
Using the Script Liner with SC-86 Old lace, apply 1 coat to the curtains of both campers. Apply another coat and shade with SC-92 Café Ole. Use the Detail Liner with SC-10 Teal Next Time to make ties on the curtains.
Using the Script Liner with CG-981 Fruity Freckles, apply 1 coat to the 2 sides of the Vintage Camper. Apply 1 coat to the door and awnings on the Camper Container.
Using Script Liner with SC-42 Butter Me Up, apply 3 coats to the 2 sides of the Vintage Camper. Using the Script Liner with FN-207 Orange Slice, apply 3 coats to the door on the Camper Container. Using the Script Liner with FN-214 Pastel Jade, apply 3 coats to the awnings on the Camper Container. Be careful not to knock off any of the crystals. Allow glaze to dry between coats.
Using the Script Liner with SC-10 Teal Next Time, apply 3 coats to the bumpers, border and underside of the awnings of the Vintage Camper. Using the Soft Fan, apply 3 coats to the top, front and back of the Camper Container. Using the Script Liner with SC-9 Jaded, apply 3 coats to the bumpers and underside of the awnings of the Camper Container. Apply 3 coats to all of the hubcaps of both campers. Allow glaze to dry between coats.
Squeeze 1 TBS of SC-10 Teal Next Time onto the palette. Take the ST-343 Deco Circles Stamp and place it design-side up. Take the Sponge on a stick and gently dab it into the glaze. Blot off any excess onto the pare portion of the palette, then sponge the stamp. Take the stamp and gently press onto the top, front and back of the Vintage Camper. Repeat until covered.
Using the Soft Fan with FN-214 Pastel Jade, apply 3 coats to the top, front and back of the Vintage Camper. Allow glaze to dry between coats.
Using the Script Liner with SC-15 Tuxedo, apply 2 coats to the tires and hitch pins. Allow glaze to dry between coats. Use the Detail Liner to outline all of the details on both campers.
Using the Soft Fan with SC-9 Jaded, apply 3 coats to the bottom of the Camper Container. Using the Soft Fan with SC-10 Teal Next Time, apply 3 coats to the bottom of the Vintage Camper. Allow glaze to dry between coats.
Fire to cone 06.
Form
MB-1514 Vintage Camper Bisque or CD1514 Vintage Camper Mold
Begin with properly fired cone 04 bisque. Moisten a sponge and wipe bisque to remove any dust.
Using the Soft Fan with SP-277 Speckled Glo-Worm, apply 3 coats to the body of the unicorn. Allow glaze to dry between coats.
Using the Script Liner with SC-9 Jaded, apply 3 coats to the ears, horn, and tail on the unicorn. Allow glaze to dry between coats.
Using the Script Liner with SC-88 Tu Tu Tango, apply 3 coats to the mane of the unicorn.
Use SG-401 Black to make dots along the facet lines on the body (glazed with Speckled Stroke & Coats). Make lines along the facets on the feet, ears, nose, tail, mane, and horn (glazed with Stroke & Coats).
Begin with properly fired shelf cone 04 Bisque. Moisten a clean sponge and wipe bisque to remove any dust.
Brush on with RB-122 Soft Fan two coats of FN-001 White to the area of the white dots and the breast of the dinosaur.
Wet the area glaze white, punch out the various sizes of dots from copy paper, place on the wet glaze, press with a paper towel to remove gaps. Count the dots, so you can remember to remove them later.
Brush on three slightly thinned coats of SC-98 Slime Time over the body of the dinosaur, legs and arms, use the fan and the Script Liner.
Remove the dots of paper.
Sponge a couple of coats of SC-2 Melon-Choly to the cheek, fade the edges by adding Slime Time to the sponge. Brush two thinned coats of SC-73 Candy Apple Led to the inside of the mouth.
Punch out circles for the breast, use the negative space of the circle, wet then press to the breast, brush the circle shape with two coats of SC-11 Blue Yonder. Remove the paper.
Eyes are SC-8 Just Froggy, pupils and outlines with SC-15 Tuxedo, outline the teeth and lines on the body first with a wider line of SC-26 Green Thumb, then a narrow line of SC-15 Tuxedo. Use RB-220 Liner.
Use RB-106 Script Liner to float SC-26 Green Thumb around all the body parts.
Begin with properly fired shelf cone 04 Bisque. Moisten a clean sponge and wipe bisque to remove any dust.
With the fan, brush on 2 coats of FN-001 White to the body of the llama, when dry, re-wet with water, stick on the various punches of dots to the white glaze. Press with a paper towel to set the paper dots.
Use the fan to brush on 2-03 thinned coats of SC-86 Old lace over the body of the llama, remove the dots after the last coat.
Brush the blanket with 2-3 coats of thinned SC-17 Cheeky Pinky with the fan brush.
Sponge off the excess Cheeky Pinky from the fringe to antique. Clean off the old lace glaze from the tassel fringe around the neck, brush over with SC-17 Cheeky Pinky one coat.
Brush inside the ears with two coats of SC-2 Melon-Choly, sponge on the cheeks.
Float SC-48 Camel Back around the body to separate the legs and tail, around the face and tip the hair to create dimension using the Script Liner brush. Float heavier around the hooves.
Thicken SC-15 Tuxedo with AC-310 Silkscreen Medium using a palette knife to the consistency of peanut butter.
Use the screens from DSS-0140 Southwestern to create the pattern on the blanket, hold the shiny side down, with your finger, rub the thickened Tuxedo over the screen. Use the cactus from DSS-0156 Drama Llama in the center of the blanket, thicken tinted with food coloring S-2101 Clear with AC-310 Silkscreen Medium, screen the cactus screen with this mix for a pattern.
Brush two coats of SC-43 Lettuce Alone over the cactus, when dry, screen over the thickened Tuxedo. Brush into the blanket design with SC-11 Blue Yonder and some SC-43 Lettuce Alone, use the Detail Liner brush.
Brush strokes of SC-43 Lettuce Alone, and SC-11 Blue Yonder into the fringe and tassels, when dry brush over with very thin SC-81 Cinnamon Stix to antique.
Eyes are SC-48 Camel Back, pupil and outlines are SC-15 Tuxedo. Lightly outline with Tuxedo, around the fringe, tassels, blanket, mouth, legs, and hooves with the detail liner brush
Begin with properly fired shelf cone 04 bisque. Moisten a clean sponge and wipe bisque to remove any dust.
Using the CB-604 Soft Fan Brush, apply 3 coats of SW-104 Black Walnut to the back sides and the front rim of the platter. Do not glaze the bottom or the foot.
Using the carbon paper and a pencil, transfer the pattern onto the platter.
Using the SG-401 Black Designer Liner, draw over the lines of the pattern. Color in the pupil of the eyes.
Using the script liner and/or the fan brush, apply three coats of each stoneware glaze into the various areas of the turkey and the background according to the pattern.
Using the script liner, apply 3 coats of SC-74 Hot Tamale to the turkey’s comb.
Using the script liner, apply 2 coats of SW-001 Stoneware Clear to the eyes.
Do not stilt or hang over the edge of the kiln shelf.
Begin with properly fired cone 04 bisque. Moisten a sponge and wipe bisque to remove any dust.
Using the Soft Fan with EL-213 Painted Desert, apply 2 coats to the body of the pumpkin. Allow glaze to dry between coats.
Using the Soft Fan with EL- 212 Spotted Walnut, apply 2 coats to the body of the pumpkin. Start the second coat around 2 inches from the bottom of the pumpkin.
Using the Soft Fan with SC-15 Tuxedo, apply 3 coats to the stem. Allow glaze to dry between coats.
Begin with properly fired shelf cone 04 bisque. Moisten a clean sponge and wipe bisque to remove any dust.
Slightly thin NT-CLR Clear Glaze Clear, pour inside the vase and turn to coat. Pour out the excess glaze and drain.
Use the sponge-on-a-stick to apply SC-34 Down to Earth the Leafy Border Stamp. Press to the milk can so that it continues around the bottom.
Use the Script Liner to apply two coats SC-52 Toadily Green and SC-97 Cant-elope to the leaves. Alternate the colors to variegate the color of the leaves.
Use the Liner with SC-15 Tuxedo to outline and add veins to the leaves.
Brush one coat of SC-97 Cant-elope to the band on the milk can using RB-106 Script Liner. Brush 2 coats of SC-15 Tuxedo to the top and bottom edge, and inside of the neck of the milk can.
Use the Soft Fan to apply two coats of SG-703 Speckta-Clear Autumn to the outside of the milk can.
Begin with properly fired shelf cone 04 bisque. Moisten a clean sponge and wipe bisque to remove any dust.
Using a CB-604 #4 Soft Fan, apply 3 coats of FN-014 French Antique to the top side of the plate. Allow to dry
Transfer the pattern onto the piece using AC-230 Clay Carbon Paper.
Using a CB-604 #4 Soft Fan, apply a wash of SC-31 The Blues to the sky area, brushing out from behind the scarecrow.
Using a CB-604 #4 Soft Fan, apply a wash of SC-78 Lime Light to the grass area. Allow to dry.
Using a CB-106 #6 Script Liner, apply 1 coat of SC-46 Rawhide to the Scarecrow face. Shade with SC-99 Char-ming.
Using a CB-106 #6 Script Liner, apply 1 coat of SC-99 Charm-ing to the hat and the crow.
Using a CB-110 #10/0 Liner, outline the hat, detail the crow add eyes with SC-15 Tuxedo.
Using aCB-106 #6 Script Liner, apply 2 coats of SC-46 Rawhide to all the straw.
Using a CB-110 #10/0 Liner, shade and outline the straw with SC-14 Java Bean.
Using a CB-110 #10/0 Liner, apply 2-3 coats of SC-23 Jack O’Lantern to the nose. Add cheeks and mouth stiches. Shade the nose with SC-80 Basketball.
Using a CB-110 #10/0 Liner, apply 2-3 coats of SC-80 Basketball to the gloves and patch on shirt. Outline and detail with SC-14 Java Bean.
Using a CB-106#6 Script Liner, apply 2 coats of SC-14 Java Bean to the shirt and 1 coat to the post. Detail the post with SC-34 Down to Earth.
Using a CB-110 #10/0 Liner, stripe the shirt with 1 coat of SC-74 Hot Tamale.
Using a CB-106#6 Script Liner, apply 2 coats of SC-55 Yella Bout It to the Sunflower petals. Stroke in 1 coat of SC-24 Dandelion over the SC-55 Yella Bout It.
Using a CB-106#6 Script Liner, stipple SC-14 Java Bean to the sunflower centers then stipple SC-34 Down To Earth to the outer part and very center.
Using a CB-106#6 Script Liner, apply 2 coats of SC-26 Green Thumb to the leaves. Streak I coat for the grass.
Using a CB-110 #10/0 Liner, outline and detail the sunflowers and outline the leaves with SC-14 Java Bean.
Using a CB-604 #4 Soft Fan, apply 3 coats of FN-008 Brown to the back of the plate. Allow to dry.
Using a CB-604 #4 Soft Fan, apply 1 coat of S-2101 Crystal Clear Brushing to the top of the plate. Allow to dry.
Begin with properly fired shelf cone 04 bisque. Moisten a clean sponge and wipe bisque to remove any dust.
Brush on two coats of FN-001 White to the handle of the mug with RB-122 Soft Fan.
Punch out the various sizes of circles, wet the paper, stick to the glazed hat, press with a paper towel to remove gaps.
Brush the orange hat with SC-23 Jack O’Lantern, handle with SC-27 Sour Apple. Remove the paper dots.
Thin SC-35 Gray Hare, brush over the beard area, wipe back with a damp sponge to leave in the detail of the beard. Use the RB-110 liner to outline some of the hairs of the beard with SC-15 Tuxedo.
Brush the nose with 3 coats of SC-20 Cashew Later, brush and blend SC-89 Cutie Pie Coral on the tip of the nose to redden.
Brush the mug body with two thinned coats of SC-11 Blue Yonder.
Punch out various circles with the punches, use the negative space from the punched circles, wet then stick to the shirt and body of the mug, brush two coats of SC-16 Cotton Tail over the circle shapes, remove the paper.
Brush a couple of coats of SC-27 Sour Apple into the mug with the fan, thin the glaze.
Begin with properly fired cone 04 bisque. Moisten a sponge and wipe bisque to remove any dust.
Freehand the design or using the AC-230 Clay Carbon Paper and the pattern, trace the eye, mouth and rib areas.
Squeeze about 2 TBS of SC-98 Slime Time onto the palette and thin with water. Using the Soft Fan, apply 3 coats to the body, legs, and ears of the unicorn. Allow glaze to dry between coats.
Using the Script Liner with SC-74 Hot Tamale, apply 3 coats to the area under the eye, in the mouth, and between the ribs. Allow glaze to dry between coats.
Using the Detail Liner with SC-16 Cotton Tail, apply 3 coats to the ribs and teeth. Allow glaze to dry between coats. Shade with SC-60 Silver Lining.
Using the Script Liner with SC-6 Sunkissed, apply 3 coats to the hooves, horn, and eye. Allow glaze to dry between coats.
Squeeze about 2 TBS of SC-13 Grapel onto the palette and thin with water. Using the Script Liner, apply 3 coats to the mane and tail. Allow glaze to dry between coats.
Using the Detail Liner with SC-15 Tuxedo, apply 2 coats to the eye. Allow glaze to dry between coats. Use the Detail Liner to outline the details and add the stitches.
Using the Detail Liner with SC-16 Cotton Tail, apply 2 dots to the eye.
Being with properly fired shelf cone 04 bisque. Moisten a clean sponge and wipe bisque to remove any dust.
Use the Soft Fan to apply two coats of FN-009 Black. Lay the jute into the wet glaze and press gently. Apply another coat of FN-009 Black.
Use the Script Liner to apply two coats of SG-202 White to the tile, following the direction of the jute.
Use the Script Liner to apply one coat of SC-98 Slime Time adding in SC-11 Blue Yonder to some areas.
Pull the jute off the piece.
Use the Soft Fan to apply one coat of SG-202 White Cobblestone over the black area formed by the jute. Use the Liner to apply one coat of SC-73 Candy Apple Red over the White Cobblestone line. Be sure to leave a black edge on both sides of the jute line.
Begin with properly fired cone 04 bisque. Moisten a sponge and wipe bisque to remove any dust.
Apply the MC-002 12mm Low Track Masking Tape down the center of the plates. Apply 9 strips of MC-001 6mm Low Track Masking Tape going down the center line. It should look like the laces of a football.
Using the Soft Fan with SC-5 Tiger Tail, SC- 41 Brown Cow or SC-14 Java Bean, apply 3 coats to each of the plates. Allow glaze to dry between coats.
Squeeze around 1 tbs of SC-41 Brown Cow, SC-14 Java Bean and SC-34 Down to Earth onto the palette.
Using the sponge on a stick, dab it into SC-41 Brown Cow. Blot off excess glaze onto the palette. Sponge the MT-007 Divots Mat until the dots are covered with glaze. Press the mat onto the plate glazed with SC-5 Tiger Tail. Remove the mat and peel off the tape before the glaze is completely dry. • Repeat step #5 with SC-14 Java Bean over the plate glazed with SC-41 Brown Cow.
Repeat step #5 with SC-34 Down to Earth over the plate glazed with SC-14 Java Bean.
Using the Detail Liner with SC-15 Tuxedo, outline the laces. Use the Soft Fan to apply 3 coats to the back of the plates. Allow glaze to dry between coats.
Using the Script Liner with S-2101 Clear Brushing Glaze, apply 2 coats over the laces. Or dip into NT-CLR Clear Dipping Glaze.
Fire to cone 06.
Form
MB-1115 Casualware Salad Plate
Colors
SC-5 Tiger Tail
SC-14 Java Bean
SC-15 Tuxedo
SC-34 Down To Earth
SC-41 Brown Cow
NT-CLR Clear Dipping Glaze or S-2101 Clear Brushing Glaze
Using the Script Liner and SC-97 Cant-elope, brush small half-circles around the eye sockets. They should be touching so the entire eye socket is covered. Then brush a four-pedal flower on both sides of the skull (near the temples). Using the Detail Liner and SC-6 Sunkissed, make a dot in the center of both flowers.
Using the Script Liner and SC-13 Grapel, brush half-circles over each tooth. They should be touching so the entire gum line is covered. Using the Detail Liner, brush an upside-down teardrop between the eyes. Then brush small five-petal flowers around the sides and top of the skull to fill up space (6-10). Using the Detail Liner and SC-97 Cant-elope, make dots in the center of the flowers.
Using a Detail Liner and SC-76 Cara-Bein Blue, Brush one scroll design on each cheek bone. Then make three dots towards the outer side of each eye. Brush one five-petal flower on the upper side of the jaw on each side. Brush one small five-petal flower in the center of the bottom jaw. Using a Detail Liner and SC-97 Cant-elope, make one dot in the center of each flower.
Using a Detail Liner and SC-74 Hot Tamale, brush a heart above the teardrop. Brush two decorative splashes to each side of the heart. Brush a small heart below the nose.
Using a Detail Liner and SC-74 Hot Tamale and SC-13 Grapel, brush a three-petal design at the upper, outer corner of each eye. The outer petals are SC-13 Grapel and the inner petal is SC-74 Hot Tamale.
Using a Detail Liner and SC-15 Tuxedo, brush stems between the flowers on the sides and top of the skull. Brush a stem to either side of the small flower in the center of the bottom jaw.
Using SC-8 Just Froggy, add leaves to all of the stems. The leaves on the upper part of the skull can be random. The leaves on the bottom jaw should be across from each other, pointing outward. Outline the nose cavity.
Using a Script Liner and SC-6 Sunkissed, brush a cross above the heart on the upper part of the skull. Make three dots above each eye. Make one dot on either side of the heart below the nose.
Repeat steps 2-9 for a total of two coats of glaze.
Using a Detail Liner and SC-15 Tuxedo, outline all of the designs. Outline the teeth.
Apply one coat of SG-702 Celebration to entire skull using the Soft Fan. Evenly distribute the specks.
Fire to cone 06.
Form
MB-1515 Faceted Skull Bisque or CD1515 Faceted Skull Mold
Begin with properly fired shelf cone 04 Bisque. Moisten a clean sponge and wipe bisque to remove any dust.
Use the Soft Fan to apply three coats of FN-302 Ivory Cream to the front of the tray. Allow to dry.
Lightly trace the pattern onto the tray.
Use the Dagger Brush (or Script Liner) to float SC-25 Crackerjack Brown around the edges on the front of the tray.
Using the Script Liner, apply two coats of SC-75 Orange-A-Peel in the direction of the pumpkin shape.
Using the Script Liner shade the outside of the pumpkin and the sections with one coat of SC-81 Cinnamon Stix. Add lines of Cinnamon Stix to create the shape of the pumpkin.
Leaves: Using the Script Liner, apply two coats of SC-26 Green Thumb. Load the brush, lay it down, press and pull toward the stems. Release pressure as you get to the stem.
Paint the stems with two coats of SC-14 Java Bean.
The star is painted with two coats of SC-24 Dandelion – go around the moon. Apply two coats of SC-16 Cotton Tail to the moon.
Use the Liner to paint the eye of the crow with SC-16 Cotton Tail. Either drop and fill in space or apply two coats.
Use the Script Liner to paint the wing of the crow with 2 coats of SC-12 Moody Blue. Fill in the wing and the crows body with two coats of SC-15 Tuxedo, making sure to leave some of the SC-12 Moody Blue showing.
Use the Liner to add a black dot to the crow’s eye and a white accent above the eye with SC-16 Cotton Tail.
Outline the moon, star and accent lines with SC-15 Tuxedo.
Use the Soft Fan to apply three coats of FN-022 Tan to the back of the tray.
Begin with properly fired cone 04 bisque. Moisten a sponge and wipe bisque to remove any dust.
Using the Script Liner with SP-274 Speckled Hot Tamale, apply 3 coats to the top half of the camper. Allow glaze to dry between coats.
Using the Script Liner with SP-260 Speckled Silver Lining, apply 3 coats to the lower half of the camper. Allow glaze to dry between coats.
Using MC-001 6mm Low Track Masking Tape, apply to the door to look like laces on a football.
Using the Script Liner with SC-48 Camel Back, apply 3 coats to the door. Allow glaze to dry between coats. Remove the tape before the last coat has dried.
Using the Script Liner with SC-60 Silver Lining apply 1 coat to the windows. After the first coat is dry, apply another coat and shade with SC-35 Gray Hare.
Using the Script Liner with SC-35 Gray Hair, apply 3 coats to the fenders and hubcaps. Allow glaze to dry between coats.
Using the Script Liner with SP-215 Speckled Tuxedo, apply 2 coats to the tires. Allow glaze to dry between coats.
Squeeze around 2 tbs of SC-15 Tuxedo onto the palette. Add a pinch of AC-310 Silkscreen Medium and mix with a palette knife until it becomes the consistency of peanut butter. You might need to add more silkscreen medium or glaze.
Locate the banner on the DSS-0156 Llama Drama screen. Use a permanent marker to make an outline around the banner. Use the scissors to cut it out. Make sure to leave extra screen around the edges.
Take the banner and place it over the window. Hold it in place while you take a small amount of premixed silkscreen medium and gently rub in circles over the screen. Carefully lift the screen to avoid smearing.
Using the Detail Liner with SC-26 Green Thumb, apple 2 coats to the banner. Allow glaze to dry between coats.
Using the Detail Liner with SC-15 Tuxedo, outline the details on the camper. Write “TEAM!” on the banner and “#1” in the window.
For the mug, apply 3 coats of SC-74 Hot Tamale to the inside using the Soft Fan. Allow glaze to dry between coats.
Using the Soft Fan with SC-15 Tuxedo, apply 2 coats to the back of the dish and the bottom of the mug. Allow glaze to dry between coats.
Using the Script Liner with S-2101 Clear Brushing Glaze, apply 2 coats over the laces. Allow glaze to dry between coats. Or dip into NT-CLR Clear Dipping Glaze.
Fire to cone 06.
Form
MB-1531 Camper Mug
MB-1542 Camper Dish
Colors
SC-15 Tuxedo
SC-26 Green Thumb
SC-35 Gray Hare
SC-48 Camel Back
SC-60 Silver Lining
SC-74 Hot Tamale (mug only)
SP-215 Speckled Tuxedo
SP-260 Speckled Silver Lining
SP-274 Speckled Hot Tamale
NT-CLR Clear Dipping Glaze or S-2101 Clear Brushing Glaze
Begin with properly fired shelf cone 04 Bisque. Moisten a clean sponge and wipe bisque to remove any dust.
Using the Soft Fan, apply three coats of FN-009 Black to the front and back of the plate. Allow the shine to go away before applying the next coat of glaze.
While the glaze is drying cut out a circle with a circumference of 8 inches; you will need both the positive and negative space of the circle shape.
Place the positive circle shape (solid) in the center of the plate. This acts as a masking tool to prevent glaze from being applied to this area.
Use a sponge to apply 2-3 coats of SC-76 Cara-bein Blue in random directions on the exposed section of the plate. When the shine is off the SC-76 Cara-bein Blue tap two coats of SC-31 The Blues near the edge of the paper and fade with more of the SC-76 Cara-bein Blue. Tip: Don’t clean the sponge between the colors to help with blending. Remove the paper.
Place the negative paper (open hole) circle over the sponged area of the plate.
Use a sponge to sponge to apply and blend SC-74 Hot Tamale, SC-75 Orange-A-Peel and SC-97 Cant-elope. Begin with SC-74 Hot Tamale at the top of the plate. Apply in an uneven line. Overlap/blend SC-75 Orange-A-Peel over the lower part of the SC-74 Hot Tamale so it changes color slowly. The last color is SC-97 Cant-elope, sponge from the outside edge into the pate overlapping Orange-A-Peel. Sponge 2-3 coats of each color.
Sgraffito the Image: Sgraffito is a form of decoration made by scratching through the surface to reveal a lower layer of a contrasting color. The sgraffito work must be done while the glaze is damp. One way is to cut out the pattern and lightly trace around the outside edge. The other way is to lay the pattern on the damp glaze and with a pen trace around it will dent the glaze and sometimes remove the top layer, which is what we will do anyway.
Sgraffito/scratch out most of the sponged on the color of the witch and the broomstick. Mayco recommends Xiem tools. The curved end of a cleaning tool works well also or a bamboo skewer is another choice. Scratch out the color in the direction of the shape, leave enough of the color to give it shape. Take care not to scratch down the to the bisque. You want to scratch off the surface color to reveal the black glaze.
Begin with properly fired shelf cone 04 Bisque. Moisten a clean sponge and wipe bisque to remove dust.
Place SC-15 Tuxedo on a palette or tile, sprinkle with AC-310 Silkscreen Medium. Using a palette knife mix color and medium to the consistency of thick peanut butter. if the mix is too thin add more AC-310 Silkscreen Medium or if it is too thick add more Stroke & Coat. Too thin of a mixture will bleed under the screen and give you a blurred image. Too thick of a mixture will make it hard for the product to penetrate through the holes in the screen and give blank areas in your screen.
Position the screen shiny side down on the piece. Hold in place, starting from the center out, Rub the mixture on the screen with your finger. Lift a corner up to check if you are applying enough color. Remove the screen and wash water. Dry flat.
Use the three sizes of skulls from the Day of the dead silkscreen, position the center of the plates and mug, rub the thickened SC-15 Tuxedo over the screen. Screen the circle designs around the skull on the salad plate, screen the guitar on the mug between the skulls with tuxedo.
Thicken SC-74 Hot Tamale follow directions in stem 2 and 3, screen the circle designs around the skulls and guitar and inside of the mug.
Fill in the design on the skulls with the following colors, SC-11 Blue Yonder, SC-27 Sour Apple, SC-97 Cant-elope, SC-74 Hot Tamale, darken the eye and nose sockets with SC-15 Tuxedo, use CB-110 Liner, and CB-106 Script Liner. The guitar is thinned SC-25 Crackerjack Brown.
For the flower design around the skull on the dinner plate, thicken NTBR Clear One Brushing with AC-310 Silkscreen Medium as in step 2 &3. Screen the floral design around the skull, apply 2-3 coats of SC-97 Cant-elope to the center flower and SC-24 Dandelion to the remaining flowers. When dry, re-position the screen on top of the painted flowers and screen with thickened SC-15 Tuxedo.
Shade SC-15 Tuxedo around the shapes and on the edges of the plate and mug, use CB-106 Script Liner
Brush 2-3 coats of FN-009 Black to the back of the plates, brush two coats of NTBR Clear One Brushing to the tops and mug. Use CB-604 Soft Fan. Alternatively, you may dip the pieces into NT-CLR Clear Dipping Glaze instead of using brush on glaze.
Fire to cone 05/06.
Form
MB-101 Coupe Salad Plate
MB-102 Coupe Dinner Plate
MB-113 12 oz Mug
Colors
SC-11 Blue Yonder
SC-15 Tuxedo
SC-24 Dandelion
SC-25 Crackerjack Brown
SC-74 Hot Tamale
SC-27 Sour Apple
SC-75 Orange A Peel
SC-97 Cant-elope
FN-009 Black
NT-CLR Clear Dipping or NTBR Clear One Brushing Glaze
Begin with properly fired shelf cone 04 Bisque. Moisten a clean sponge and wipe bisque to remove dust.
Thin SC-97 Cant-elope like water. Use the Script Liner to apply one coat to the glass area on both windows. Remove the color from the centers of the windows with a stiff brush. Let dry.
Thin SC-15 Tuxedo then use the Script Liner to shade the left side of the window.
Awning Window: Use the Script Liner to apply two coats of SC-16 Cotton Tail to the top. Wet the 1/2″ and 1″ circles and place them on the Cotton Tail. Press with a paper towel to remove excess water and ensure edges are sealed.
Use the Soft Fan to apply three coats of SC-73 Candy Apple Red over the top of the roof. Remove the paper circles.Apply three coats of the following colors with the Liner and Script Liner:
Use the Liner to apply one coat of SC-15 Tuxedo to the trim, outline the flowers and leaves and shade under the leaves.
Flowers: two coats of SC-73 Candy Apple Red and SC-97 Cant-elope
Leaves: two coats of SC-26 Green Thumb
Planter box: three coats of SC-13 Grapel, thinned
Branches: two coats of SC-27 Sour Apple
Shutter Window: Use the Liner and Script Liner to apply the following colors:
Use the Liner with SC-15 Tuxedo to outline between the slats of wood. Apply SC-15 Tuxedo to the door and window trim.
Bricks: three coats of SC-77 Glo-Worm; brush over with very thin SC-26 Green Thumb to antique
Shutters: three coats of SC-13 Grapel
Apply S-2101 Clear Brushing Glaze the windows only.
Begin with properly fired shelf cone 04 Bisque. Moisten a clean sponge and wipe bisque to remove dust.
Use the Soft Fan to apply three thinned coats of SC-27 Sour Apple to the door, adding SC-77 Glo-worm to the center. Apply 3 coats of SC-27 Sour Apple to the bricks.
Use the Script Liner to apply three coats of SC-75 Orange-A-Peel to the center section of the body of the teapot. Add SC-73 Candy Apple red to the brush to fade to red at the top, bottom and handle. Do the same for the spout.
Use the Soft Fan to apply three coats of SC-73 Candy Apple Red to the lid, fading into SC-97 Cant-elope on the edges.
Thin SC-97 Cant-elope and apply one coat to the windows on the lid. Use the Liner to apply one coat of SC-15 Tuxedo to the door trim and window. Thin SC-15 Tuxedo to float color around the edges of the door and to brush over the bricks. The color should be thin enough to flow into the detail to darken.
Use the sponge-on-a-stick to apply SC-81 Cinnamon Stix to the ST-127 Crackle Stamp, then press randomly on the teapot.
Begin with properly fired shelf cone 04 bisque. Moisten a clean sponge and wipe bisque to remove any dust.
Using the Soft Fan, apply 1 coat of FN-002 Yellow. While that coat is still wet, apply some FN-003 Orange to the edge and blend in towards the center. Repeat this once the first coat has dried to have a total of 2 coats.
Let the base dry completely, then use the Clay Carbon Paper to transfer the image onto the plate.
Place SC-15 Tuxedo on a palette or tile and sprinkle with Silkscreen Medium. Using a palette knife mix color and medium to the consistency of thick peanut butter. If the mix is too thin, add more Silkscreen Medium, or if it is too thick add more Stroke & Coat. Too thin of a mixture will bleed under the screen and give you a blurred image. Too thick of a mixture will make it hard for the product to penetrate through the holes in the screen and give blank areas on your screen.
Using DSS-0118 Halloween, apply the Pumpkin and Tree screen to the plate.
Using the Script Liner, apply 1 coat of AC-302 Wax Resist to the filled in the area of the pattern and let dry.
To add stars to the plate, use the Detail Liner and paint a simple 5 point star onto the plate with the wax resist.
Using the Soft Fan, apply 3 coats of FN-009 Black to the entire plate.
Cast the mold with SLS-01 Stoneware White Casting Slip to your desired thickness.
Remove from the mold when leather hard. When dry, clean and fire to shelf cone 04 bisque.
Using the CB-604 # 4 Soft Fan, apply 1 coat of SW-129 Creamsicle to the body of the pumpkin, excluding the part that will sit on the kiln shelf.
Using the CB-406 # 6 Pointed Round, apply 2 coats of SW-104 Black Walnut to the stem.
Using the CB-406 # 6 Pointed Round, side load in the SW-104 Black Walnut and shade the ridges on the pumpkin.
Using the CB-604 # 4 Soft Fan, apply 1 coat of SW-118 Sea Salt over the painted areas, again keeping any floor from the very bottom or it will fuse to the kiln shelf.
Place on a well kiln washed shelf and fire to shelf cone 6.
Moisten a clean sponge and wipe bisque to remove any dust.
Using a CB-604 #4 Soft Fan, apply 1 coat of SC-35 Gray Hare to the top if the plate. When applying the 2nd coat of SC-35 Gray Hare, load 1/2 the brush with SC-29 Bluegrass and apply in a cross hatch pattern. Repeat the previous step, but use SC-27 Sour Apple and SC-60 Silver Lining for a grand total of 3 coats.
Using a CB-106 #6 Script Liner, apply 3 coats of SC-77 Glo-Worm to the windows and door and SC-13 Grapel to the chimney.
Using the same brush, apply 2 coats of SC-29 Bluegrass to the roof and SC-36 Irish Luck to the grass. Using a CB-202 #2 Detail Liner, apply 3 coats of SC-13 Grapel to the trim around the windows and door.
Using AC-230 Clay Carbon Paper, transfer the design onto the plate.
Place SC-15 Tuxedo on a palette or tile and sprinkle with AC-310 Silkscreen Medium.
Using a palette knife mix color and medium to the consistency of thick peanut butter. If the mix is too thin, add more AC-310 Silkscreen Medium, or if it is too thick add more Stroke & Coat. Too thin of a mixture will bleed under the screen and give you a blurred image. Too thick of a mixture will make it hard for the product to penetrate through the holes in the screen and give blank areas in your screen.
Use the spider web screen from DSS-118 Halloween and apply the screen in the circle windows.
Using a CB-110 #10/0 Mini Liner, outline the details with 1 coat of SC-15 Tuxedo and fill in the monster and fence.
Using a CB-106 #6 Script Liner, apply 2 coats of SC-29 Bluegrass to the monster’s shadow.
Using a CB-604 #4 Soft Fan, apply 3 coats of FN-009 Black to the back of the plate.
Moisten a clean sponge and wipe bisque to remove any dust.
Using a CB-604 #4 Soft Fan, apply 3 coats of FN-003 Orange to the face of the dish.
Using a CB-106 #6 Script Liner, apply 3 coats of SC-8 Just Froggy to the stem and 2 coats of SC-15 Tuxedo to the details of the face.
Using a CB-110 #10/0 Mini Liner, apply 3 coats of SC-6 Sunkissed around parts of the face details to create a 3D effect.
Using a CB-110 #10/0 Mini Liner, apply 1 coat of SC-15 Tuxedo to the lines on the pumpkin. Condition your brush with water and pull over the lines to soften them.
Using a CB-604 #4 Soft Fan, apply 3 coats of FN-009 Black to the back of the dish.
Begin with properly fired shelf cone 04 bisque. Moisten a clean sponge and wipe bisque to remove any dust.
Using a CB-604 #4 soft Fan, apply 3 coats of FN-007 Green to the top of the dish.
Using a CB-604 #4 Soft Fan, condition the brush with water, tapping off the excess, and load 1/2 of the brush with SC-8 Just Froggy. Run the brush around the edge of the plate with the SC-8 Just Froggy towards the outside. This should create a gradient around the edge of the dish. Using a CB-106 #6 Script Liner, apply 3 coats of SC-6 Sunkissed to the eyes, SC-16 Cotton Tail to the teeth, SC-81 Cinnamon Stix to the tongue, SC-8 Just Froggy to the nose, SC-35 Gray Hare to the bolts, and 2 coats of SC-15 Tuxedo to the mouth, pupils, eyebrows, and stem.
Using a CB-110 #10/0 Mini Liner, apply 1 coat of SC-15 Tuxedo to outline all of the details.
Moisten a clean sponge and wipe bisque to remove any dust.
Using a CB-604 #4 Soft Fan, apply 2 coats of FN-001 White to the top of the dish. Thin some SC-33 Fruit of the Vine, and using a CB-604 #4 Soft Fan, apply 1 coat around the edges of the dish and blend into the center.
If you end up with too much of the SC-33, apply some FN-001 White to the center and blend out towards the edge to brighten it up. Using a CB-110 #10/0 Mini Liner to fill in the eyes and mouth, and add the dimples to the smile.
Using a CB-106 #6 Script Liner, blend in a coat of SC-11 Blue Yonder in a few places around the edge. Using a CB-604 #4 Soft Fan, apply 3 coats of SC-33 Fruit of the Vine to the back of the dish.
Begin with properly fired shelf cone 04 bisque. Moisten a clean sponge and wipe bisque to remove any dust.
Using a CB-604 #4 Soft Fan, apply 2 coats of FN-001 White to the top of the dish.
Once dry, use the AC-230 Clay Carbon Paper to transfer the lumberjack costume to the dish.
Using a CB-106 #6 Script Liner, apply 3 coats of the following: SC-81 Cinnamon Stix to the shirt, SC-25 Crackerjack Brown to the beard, and SC-34 Down to Earth to the hat. Using a CB-202 #2 Detail Liner, apply 1 coat of SC-34 Down to Earth to the shirt to create the plaid design, 1 coat of SC-11 Blue Yonder to the iris’, and apply 2 coats of SC-Tuxedo to the pupils and the mouth on the ghost. Using a CB-110 #10/0 Mini Liner, apply 1 coat of SC-15 Tuxedo to outline the details.
Using a CB-604 #4 Soft Fan, apply 3 coats of SC-8 Just Froggy to the back of the plate.
Begin with properly fired shelf cone 04 bisque. Moisten a clean sponge and wipe bisque to remove any dust.
Using the CB-104 Fan Brush, apply 3 coats of FN-009 Black to the sides of the clay canvas.
Using the CB-104 Fan Brush, apply 3 coats of FN-001 White to the front of the clay canvas.
Lay the SL-456 Camo Stencil over the front of the canvas.
Squeeze about two tablespoons of SC-15 Tuxedo onto a palette. Pinch a section of a dry synthetic sponge and gently dab it into the glaze. Blot off any excess onto the bare portion of the plate, then gently sponge over the stencil. Repeat until the design is complete. Slowly lift the stencil to avoid smearing. Allow it to dry completely.
Use the plastic spoon to scoop out some FN-004 Red and drizzle on several small puddles of glaze. Using the drinking straw, blow into the glaze so that it spreads in different directions.
Repeat step 6 with both the FN-003 Orange and FN-044 Orange Yellow while the Red is still wet. The colors will mix together slightly creating a marbled effect. Let dry.
Using the CB-106 #6 Script Liner, apply two coats of SC-16 Cotton Tail to form the eyes.
Using the CB-106 #6 Script Liner, apply one generous coat of SC-15 Tuxedo to form the pupils.
Stilt and fire to cone 06.
Blue and Green Monster
Begin with properly fired shelf cone 04 bisque. Moisten a clean sponge and wipe bisque to remove any dust.
Using the CB-104 Fan Brush, apply 3 coats of FN-009 Black to the sides of the clay canvas.
Using the CB-104 Fan Brush, apply 3 coats of FN-001 White to the front of the clay canvas.
Lay the SL-441 Spots Stencil over the front of the canvas.
Squeeze about two tablespoons of SC-15 Tuxedo onto a palette. Pinch a section of a dry synthetic sponge and gently dab it into the glaze. Blot off any excess onto the bare portion of the plate, then gently sponge over the stencil. Repeat until the design is complete. Slowly lift the stencil to avoid smearing. Allow it to dry completely.
Use the plastic spoon to scoop out some FN-007 Green and drizzle on several small puddles of glaze. Using the drinking straw, blow into the glaze so that it spreads in different directions.
Repeat step 6 with both the FN-041 Medium Blue and FN-.034 Big Sky Blue while the Green is still wet. The colors will mix together slightly creating a marbled effect. Let dry.
Using the CB-106 #6 Script Liner, apply two coats of SC-16 Cotton Tail to form the eyes.
Using the CB-106 #6 Script Liner, apply one generous coat of SC-15 Tuxedo to form the pupils.
Begin with properly fired shelf cone 04 bisque. Moisten a clean sponge and wipe bisque to remove any dust.
Using the CB-104 Fan Brush, apply 3 coats of FN-009 Black to the sides of the clay canvas.
Using the CB-104 Fan Brush, apply 3 coats of FN-001 White to the front of the clay canvas.
Lay the SL-456 Camo Stencil over the front of the canvas.
Squeeze about two tablespoons of SC-15 Tuxedo onto a palette. Pinch a section of a dry synthetic sponge and gently dab it into the glaze. Blot off any excess onto the bare portion of the plate, then gently sponge over the stencil. Repeat until the design is complete. Slowly lift the stencil to avoid smearing. Allow it to dry completely.
Use the plastic spoon to scoop out some FN-004 Red and drizzle on several small puddles of glaze. Using the drinking straw, blow into the glaze so that it spreads in different directions.
Repeat step 6 with both the FN-003 Orange and FN-044 Orange Yellow while the Red is still wet. The colors will mix together slightly creating a marbled effect. Let dry.
Using the CB-106 #6 Script Liner, apply two coats of SC-16 Cotton Tail to form the eyes.
Using the CB-106 #6 Script Liner, apply one generous coat of SC-15 Tuxedo to form the pupils.
Stilt and fire to cone 06.
Blue and Green Monster
Begin with properly fired shelf cone 04 bisque. Moisten a clean sponge and wipe bisque to remove any dust.
Using the CB-104 Fan Brush, apply 3 coats of FN-009 Black to the sides of the clay canvas.
Using the CB-104 Fan Brush, apply 3 coats of FN-001 White to the front of the clay canvas.
Lay the SL-441 Spots Stencil over the front of the canvas.
Squeeze about two tablespoons of SC-15 Tuxedo onto a palette. Pinch a section of a dry synthetic sponge and gently dab it into the glaze. Blot off any excess onto the bare portion of the plate, then gently sponge over the stencil. Repeat until the design is complete. Slowly lift the stencil to avoid smearing. Allow it to dry completely.
Use the plastic spoon to scoop out some FN-007 Green and drizzle on several small puddles of glaze. Using the drinking straw, blow into the glaze so that it spreads in different directions.
Repeat step 6 with both the FN-041 Medium Blue and FN-.034 Big Sky Blue while the Green is still wet. The colors will mix together slightly creating a marbled effect. Let dry.
Using the CB-106 #6 Script Liner, apply two coats of SC-16 Cotton Tail to form the eyes.
Using the CB-106 #6 Script Liner, apply one generous coat of SC-15 Tuxedo to form the pupils.
Begin with properly fired cone 04 bisque. Moisten a sponge and wipe bisque to remove any dust.
Pour around 1/4 cup of SC-86 Old Lace into the disposable cup. Thin with water. Pour into the camper mug and rotate until the inside is completely covered. Place mug upside down until all of the excess glaze has drained. Wipe the rim with a damp sponge.
Using the Script Liner with SC-86 Old Lace, apply 3 coats to the trim around the windows and doors. Allow glaze to dry between coats.
Using the Script Liner with SC-9 Jaded, apply 3 coats to the bumpers and top halves of the campers. Allow glaze to dry between coats.
Squeeze 1 TBS of SC-10 Teal Next Time onto the palette. Take ST-343 Deco Circles Stamp and place it design-side up. Take the sponge on a stick and gently dab it into the glaze. Blot off any excess onto the bare portion of the plate, then sponge the stamp. Take the stamp and gently press onto the top half of the camper dish. Avoid the window.
Using MC-001 6mm Low Track Masking Tape, make vertical lines on the bottom half of the camper mug.
Using the Script Liner with SC-50 Orange Ya Happy, apply 3 coats to the bottom half of the campers. Allow glaze to dry between coats. Remove the tape on the mug before the glaze is completely dry.
Using the Script Liner with SC-50 Orange Ya Happy, apply a drop of glaze to the door knobs.
Use the pencil to draw the curtain in the windows.
Squeeze 1 TBS of SC-45 My Blue Heaven onto the palette. Thin with water. Apply a wash to the windows.
Using the Script Liner with SC-86 Old lace, apply 1 coat to the curtains. Apply another coat and shade with SC-92 Café Ole. Use the Detail Liner with SC-10 Teal Next Time to make ties on the curtains.
Using the Script Liner with SC-10 Teal Next Time, apply 3 coats to the doors and the handle on the mug. Allow glaze to dry between coats.
1. Begin with properly fired shelf cone 04 Bisque. Moisten a clean sponge and wipe bisque to remove any dust.
2. Use the #8 Soft Fan to apply two coats of FN-001 White to the llama.
2. Wet a blue shop paper towel, wring out the excess water and squirt sections of the paper with SC-16 Cotton Tail, SC-86 Old Lace and SC-45 My Blue Heaven. Fold the towel in half then press to spread the colors. Open the towel and drape over the body of the llama. Press to transfer the glaze from the paper to the llama. Remove the paper towel. With a dry sponge roller or a sponge on a stick, roll to remove the excess color. The pattern will reveal the pattern of color.
3. To wrap the legs and the head and neck cut small strips from the towel and proceed as above. Let dry.
4. Outline the facets with SG-401 Black. Use the Liner to paint the triangle eye with SG-401 Black.
5. Use the #4 Fan to apply one coat of SG-702 Celebration over the entire llama.
1. Begin with properly fired cone 04 bisque. Moisten a sponge and wipe bisque to remove any dust.
2. Using the Soft Fan with FN-211 Sheer Blue, apply 1 coat to the body of the sea horse. Allow to dry completely.
3. Prepare the AC-220 Detailer Tips and 1oz bottles. Take the 4 bottles and add 3/4 inch of glaze to each bottle. Do one for each of the following colors: SC-11 Blue Yonder, SC-30 Blue Dawn, SC-76 Cara-Bein Blue and SC-89 Cutie Pie Coral. Add 1/4 inch of water to each bottle and shake with your thumb covering the hole. Add 1 inch of rubbing alcohol. Screw the caps on and shake vigorously. Cut the top of the tip with scissors. Test to make sure drops come out of the tip.
4. Using the Soft Fan with FN-211 Sheer Blue, apply a heavy coat to the body of the sea horse. Do not let dry.
5. Using the detailer bottles, drop the glaze mixtures onto the sea horse’s body. Use the colors as desired.
6. Using the Script Liner with SC-31 The Blues, apply 2 coats to the face, inner fin, spines and back of the sea horse. Allow glaze to dry between coats.
7. Using the Script Liner with SC-2 Melon-Choly, apply 2 coats to the nose and outer fin. Blend with SC-31 The Blues. Allow glaze to dry between coats.
8. Using the Detail Liner with SC-45 My Blue Heaven, apply 2 coats to the inner eye. Using the same brush with SC-31 The Blues, apply 2 coats to the outer eye. Allow glaze to dry between coats.
9. Using the Detail Liner with SC-15 Tuxedo, apply 2 coats to the pupil of the eye. Outline the eye.
10. Use SG-402 White to make a dot on the pupil.
11. Using the Soft Fan, apply 2 coats of S-2101 Clear Brushing Glaze to the eye or dip into NT-CLR Clear Dipping Glaze.
12. Fire to cone 06.
Form
MB-1381 Seahorse Dish Bisque or CD1381 Sea Horse Dish Mold
Colors
FN-211 Sheer Blue
SC-2 Melon-Choly
SC-11 Blue Yonder
SC-15 Tuxedo
SC-30 Blue Dawn
SC-31 The Blues
SC-45 My Blue Heaven
SC-76 Cara-Bein Blue
SC-89 Cutie Pie Coral
SG-402 White
NT-CLR Clear Dipping or NT-BR Clear Brushing Glaze
Begin with properly fired cone 04 bisque. Moisten a sponge and wipe bisque to remove any dust.
Brush on two coats of SC-88 Glo-worm using RB-122 Soft Fan, add water to your brush to apply the glaze in flowing coats, avoiding drips in the glaze.
Remove the glaze from the ears, eyes, and feet with a sponge. Brush the ears with SC-11 Blue Yonder. Brush inside of the ears and feet with two coats of SC-23 Jack O’Lantern using RB-106 Script Liner.
Brush eyes with SC-15 Tuxedo with RB-110 Detailer Liner
When dry, outline the facets with SG-409 Bright Green. Brush entire piece with one coat of S-2101 Clear.
Begin with properly fired cone 04 bisque. Moisten a sponge and wipe bisque to remove any dust.
Use the Soft Fan to apply two slightly thinned coats of SC-11 Blue Yonder to the body of the unicorn. Apply in big strokes, using water on the brush to help spread the glaze.
Remove any Blue Yonder that got onto the mane, tail, nose, hooves, and horn
Use the Script Liner to apply two coats of SC-88 Glo-Worm to the mane and tip of the tail. Apply two coats of SC-23 Jack O’Lantern to the horn, hooves and the remainder of the tail. Let dry.
Use SG-404 Blue Designer Liner to outline the facets.
Use the Liner to apply one coat of SC-15 Tuxedo to create a triangle shaped eye.
Dip into NT-CLR Clear Dipping Glaze or use the Soft Fan to apply one coat of NT-BR Clear Brushing Glaze to the entire piece.
Fire to cone 05/06.
Form
MB-1538 Faceted Unicorn
Colors
SC-11 Blue Yonder
SC-15 Tuxedo
SC-23 Jack O’Lantern
SC-88 Glo-Worm
SG-404 Blue Designer Liner
NT-CLR Clear Dipping or NT-BR Clear Brushing Glaze
1. Begin with properly fired shelf cone 04 bisque. Moisten a clean sponge and wipe bisque to remove any dust.
2. Print and cut 2 copies of the pattern on the outer edge of pattern. With a pencil, trace the outer edge of the pattern to the piece.
3. Using a CB-604 #4 Soft Fan apply 2 coats of FN-001 White to the inside of the pattern going over the edge about ¼”. Allow to dry.
4. Using a CB-604 #4 Soft fan, wet the glaze area and apply the pattern to the wet glaze. Secure the edges of the pattern with a damp sponge.
5. Using a CB-604 #4 Soft Fan, apply 3 coats of SP-245 Speckled My Blue Heaven to the background of the plate.
6. Using an old toothbrush spatter the top of the plate with SC-16 Cotton Tail and SC-25 Crackerjack Brown.
7. When done remove the pattern before the glaze dries. Allow to dry.
8. With a pencil and AC-230 Clay Carbon Paper, line up the 2nd cut out pattern and trace the pattern.
9. Punch out paper triangles, wet attach to where the purple triangles on the egg are, press with a sponge.
10. Using a CB-106 #6 Script Liner, apply 3 coats of SP-237 Speckled Ivory Tower to the egg. Remove the paper triangles before the color dries.
11. Punch out paper triangles, wet attach to the opposite sides of the other triangles, press with a damp sponge. This will create the area for the glaze in the triangles.
12. Using a CB-106 #6 Script Liner, apply 3 coats of SP-213 Speckled Graple to the triangle areas. Remove the surrounding paper.
13. Using a CB-106 #6 Script Liner, apply 3 coats of SC-2 Melon-Choly to the inside of the bunny ears and nose.
14. Using a CB-106 #6 Script Liner, apply 3 coats of SC1 Pink-A-Boo to the dogwood flowers.
15. Using a CB-106 #6 Script Liner and a CB-110 #10/0 Liner, apply 3 coats of SC-27 Sour Apple to the leaves and stems.
16. Using a CB-202 #2 Detail, apply 2 coats of SC-41 Brown Cow to the centers of the flowers.
17. Using a CB-106 #6 Script Liner, shade the outside edge of the bunny ears with SC-16 Cotton Tail.
18. Using a CB-106 #6 Script Liner, shade the bunny and the egg with SC-25 Crackerjack Brown.
19. Using a CB-106 #6 Script Liner, Shade the flowers with SC-17 Cheeky Pinky and SC-41 Brown Cow to the center edge of each petal. Using a CB-110 Liner, detail the flower petal veins with SC-17 Cheeky Pinky
20. Using a CB-106 #6 Script Liner, shade the leaves and stems with SC-39 Army Surplus. Detail using a CB-110 Liner with SC-39 Army Surplus.
21. Add dots to the flower centers with SC-42 Butter Me Up. Add dots to the egg with SC-97 Cant-elope.
22. Using a CB-110 #10/0 Liner, Apply SC-15 Tuxedo to the bunny eyes, whiskers and mouth.
23. Using a CB-604 #4 Soft Fan, apply 3 coats of FN-.42 Teal Blue to the back of the plate.
24. Using a CB-604 #4 Soft Fan, apply 1 coat of S-2101 Crystal Clear Bushing to the top of the plate. Allow to dry!
1. Moisten a clean sponge and wipe bisque to remove any dust.
2. Using the AC-230 Clay Carbon Paper, trace on the pattern.
3. Using the SG-401 Black Designer Liner, apply to all the traced lines. Allow to dry.
4. Using the CB-404 # 4 Pointed Round, apply 1 coat of FN-213 Sapphire Blue to the petals of the hydrangea, then apply a 2nd coat at random and add some FN-223 Amethyst to deepen the petals. Apply 2 coats of FN-218 Sapphire to the leaves and stem.
5. Using the CB-404 # 4 Pointed Round, apply 2 coats of FN-206 Lemon Ice to the daisy center, then shade with FN-207 Orange Slice. Apply 1 coat of FN-202 Yadro to the petals, then add to the tips FN-206 Lemon Yellow. Apply 2 coats of FN-224 Key Lime to the leaves and stem.
6. Using the CB0404 # 4 Pointed Round, apply 1 coat of FN-208 Crystal Coral to the rose petals. Deepen the petals at random with a 2nd coat of FN-208 Coral and FN-207 Orange Slice. Apply 2 coat of FN-216 Sea Glass to the leaves and stem.
7. Using the CB-404 # 4 Pointed Round, apply 1 coat of FN-211 Sheer Blue to the water area in the jars, then shade with FN-213 Sapphire Blue.
8. Using the CB-404 # 4 Pointed Round, apply 1 to 2 coats of FN-229 Iced Mocha to the ground area.
9. Using the CB-604 # 4 Soft Fan, apply 2 coats of FN-201 Golden Clear to the entire piece, being careful not to cause the Black Designer Liner to streak.
1. Begin with properly fired shelf cone 04 Bisque. Moisten a clean sponge and wipe bisque to remove any dust.
2. Slightly thin FN-009 Black, pour inside of the vase and roll to coat the inside. Pour out the excess glaze and drain.
3. Fill the AC-220 Detailer Bottles with a mixture of glaze, water, and alcohol. Put each of the following colors in separate bottles: SC-29 Blue Grass, SC-75 Orange-A-Peel and SC-97 Cant-elope. To each color add approximately 1″ of glaze, 1/4″ of water and 1/2″ of alcohol. Mix with a stiff brush and shake well.
4. Use the Soft Fan to apply two coats of FN-001 White to the outside of the vase. While the second coat is wet, squirt on the three alcohol mixed colors in squiggle lines. The glaze will spread so leave room for that and leave a lot of white glaze showing. Let dry.
5. Use the 1/4″ tape to mask off every other faceted shape.
6. Cut a toilet paper cardboard tube in half. Cut the long end with snips approximately 1 1/2″ long so it looks like fringe. Bend the cut edge to create a right angle. Sponge SC-15 Tuxedo onto the cardboard, press to the open spaces on the faceted vase. Press the cut strips with your fingers to ensure you get good contact. Always press the cut tube in the same direction on every other faceted shape. Remove the tape.
7. Apply the 1/8″ tape down and across the faceted shapes. This is to keep the edges between the shapes as the background color and will define the shapes.
8. Repeat the sponge and press process in the opposite direction from the previous stamp on the unstamped faceted shapes. Remove the tape.
9. Use the Soft Fan to apply two coats of FN-001 White or SC-15 Tuxedo.
1. Begin with properly fired cone 04 bisque. Moisten a sponge and wipe bisque to remove any dust.
2. Using the Soft Fan with SC-16 Cotton Tail, apply one coat to the body of the truck.
3. Punch the paper using the star and circle punches. You will be using a combination of both the positive and negative shapes. For the negative shapes, use the scissors to cut them from the paper.
4. Layout where you want the positive shapes. Dip them in water and stick them to the truck. Using the Script Liner with SC-16 Cotton Tail, apply 1 coat over the shapes.
5. Using the Script Liner with SC-45 My Blue Heaven, apply 1 coat to the body of the truck. While applying, use SC-11 Blue Yonder to shade. Allow glaze to dry. Repeat for a second coat. Remove all paper shapes before the glaze dries.
6. Layout where you want the negative shapes. Dip them in water and stick them to the truck. Using the Script Liner with SC-11 Blue Yonder, apply 2 coats to the shapes. Allow glaze to dry between coats. Remove all paper shapes before the glaze dries.
7. Using the Script Liner with SC-60 Silver Lining, apply 2 coats to the windows, grille and bumpers. Allow glaze to dry between coats.
8. Using the Script Liner with SC-35 Gray Hare, shade the windows. Apply 2 coats around the taillight and headlights.
9. Using the Detail Liner with SC-6 Sunkissed, apply 2 coats to the headlight. Allow glaze to dry between coats.
10. Using the Detail Liner with SC-74 Hot Tamale, apply 2 coats to the taillight. Allow glaze to dry between coats.
11. Using the Detail Liner with SC-76 Cara-Bein Blue, apply 2 coats around the windows. Allow glaze to dry between coats. Use the Script Liner to apply 1 coat to the hubcaps. Antique them with a damp sponge.
12. Using the Detail Liner with SC-15 Tuxedo, outline the details on the truck. Use the Script Liner to apply 2 coats to the tires and underside of the truck. Allow glaze to dry between coats. Antique the tires with a damp sponge.
13. Using the Soft Fan, apply 2 coats of S-2101 Clear Brushing Glaze or dip into NT-CLR Clear Dipping Glaze.
Begin with properly fired cone 04 bisque. Moisten a sponge and wipe bisque to remove any dust
Free-hand a smile and eyes on a piece of paper
Place the Clay Carbon Paper over the door and windows of the truck. Position the pattern over the paper and trace with the pencil.
Using the Script Liner with SC-79 It’s Sage, apply one coat to the body of the truck. While applying, use SC-39 Army Surplus to shade. Do not glaze inside the mouth. Allow glaze to dry. Repeat for a second coat.
Squeeze around 1 TBS of SC-39 Army Surplus onto the palette. Take the ST-127 Crackle Stamp and place it design-side up. Take the sponge on a stick and gently dab it into the glaze. Blot off any excess onto the bare portion of the palette, then sponge the stamp. Take the stamp and gently press onto the body of the truck. Repeat until covered.
Using the Script Liner with SC-39 Army Surplus, apply 2 coats to the front and back bumpers of the truck. Allow glaze to dry between coats.
Using the Detail Liner with SC-74 Hot Tamale, apply 2 coats to the taillight. Allow glaze to dry between coats.
Using the Detail Liner with SC-6 Sunkissed, apply 2 coats to the headlight. Allow glaze to dry between coats.
Using the Detail Liner and Script Liner with SC-60 Silver Lining, apply 2 coats to the windows and hubcaps. Do not glaze inside the eyes. Allow glaze to dry between coats.
Using the Detail Liner and Script Liner with SC-2 Melon-Choly, apply 2 coats inside the mouth. Do not glaze the teeth. Allow glaze to dry between coats.
Using the Detail Liner with SC-15 Tuxedo, outline the details on the truck. Use the Script Liner to apply 2 coats to the tires and underside of the truck. Allow glaze to dry between coats.
Using the Detail Liner with SC-16 Cotton Tail, apply 2 dots to the pupil of each eye.
Using the Soft Fan, apply 2 coats of S-2101 Clear Brushing Glaze or dip into NT-CLR Clear Dipping Glaze.
Fire to cone 06.
Hot Glue fake birds onto the head/top of the truck for extra fun!
Form
MB-1529 Vintage Truck Plaque
Colors
NT-CLR Clear Dipping Glaze or S-2101 Clear Brushing Glaze
1. Begin with a properly fired shelf cone 04 Bisque. Moisten a clean sponge and wipe bisque to remove dust.
2. Brush SC-2 Melon-Choly to the flamingo body and neck in the middle sections and SC-89 Cutie Pie Coral into the shadow sections, 2-3 coats, add SC-16 to brush in strokes on the neck and cheeks as a further highlight.
3. Float SC-88 Tu Tu Tango into the neck crevice and at the head near the bill and under the eyes over the cheeks.
4. Brush SC-2 Melon-Choly and Cutie Pie Coral into the wings, follow the direction of the feathers, 2 coats, of SC-16 Cottontail on some of the feathers, and shade some with SC-88 Tu Tu Tango.
5. Brush the tip of the bill with SC-15 Tuxedo, outline with SC-15 Tuxedo, eye and outline is Tuxedo use RB-110 Liner.
Begin with properly fired cone 04 bisque. Moisten a sponge and wipe bisque to remove any dust.
Using the Soft Fan with FN-001 White, apply 1 coat to the clipboard. Allow glaze to dry.
Cut out the donuts from the pattern. Dip them in water and place them on the clipboard.
Using the Soft Fan with FN-001 White, apply 1 coat over the donuts. Allow glaze to dry.
Using the Soft Fan with FN-001 White and FN-011 Light Blue, drop glaze randomly onto the canvas. Take the Soft Fan and blend the colors together using long up down strokes. Before the glaze is dry, remove the donut pattern.
Using the Script Liner with SC-46 Rawhide, apply 2 coats to each donut. Allow glaze to dry between coats.
Use the pencil to draw the “icing” on each donut.
Using the Script Liner with SG-202 White Cobblestone, apply 1 coat to the icing on each donut. As soon as it is dry, apply another coat. Do not let it dry enough to crack.
Apply 1 coat of SC-2 Melon-Choly, SC-11 Blue Yonder, SC-13 Grapel, SC-76 Cara-Bein Blue, SC-85 Orkid or SC-89 Cutie Pie Coral to each corresponding donut. Make sure the SG-202 White Cobblestone is dry, but not yet cracking.
Using the Detail Liner with SC-15 Tuxedo, make accent lines around the donuts.
Begin with properly fired shelf cone 04 Bisque. Moisten a clean sponge and wipe bisque to remove any dust.
Sponge a coat of SC-2 Melon-Choly under the eyes for the cheeks and muzzle and inside the ears.
Use the Script Liner to float SC-35 Gray Hare to create a shadow in the body creases around the tail and mane, under the eyes and horn.
Refer to the photo for color placement. For the rainbow hair and tail, apply two coats of SC-11 Blue Yonder. Thin the color slightly so it moves into the detail. Use the side of a wet brush to brush against the detail to remove color to give it a highlight. Use all of the colors in the same manner: SC-6 Sunkissed, SC-27 Sour Apple, SC-75 Orange-A-Peel, SC-73 Candy Apple Red and SC-33 Fruit of the Vine.
Dip in clear glaze or use the Soft Fan to apply two coats of NT-BR Clear.
Use the Liner to apply two coats of SC-15 Tuxedo on the hooves. Use the same brush to outline around the hair and tail, mouth, eyes, ears with SC-15 Tuxedo. Apply one coat of SC-33 Fruit of the Vine on the horn, the wipe off the excess to antique.
Fire to cone 05/06.
Form
MB-1534 Unicorn Container
Colors
MB-2 Melon-Choly
SC-6 Sunkissed
SC-11 Blue Yonder
SC-15 Tuxedo
SC-27 Sour Apple
SC-33 Fruit of the Vine
SC-35 Gray Hare
SC-73 Candy Apple Red
SC-75 Orange-A-Peel
NT-CLR Clear Dipping or NT-BR Clear Brushing Glaze
1. Begin with properly fired shelf cone 04 Bisque. Moisten a clean sponge and wipe bisque to remove any dust.
2. Thin NT-BR Clear, pour inside the piece, rotate to coat then pour out the excess. Allow to drain.
3. Use the Soft Fan to apply Brush two thinned coats of SC-86 Old Lace to the llama’s body. Pat the cheeks with SC-2 Melon-Choly. Tthin SC-35 Gray Hare and apply over the hair, then wipe back the excess to antique.
4. Shade around the blanket, neck, feet and tail with SC-5 Tiger Tail.
5. Tape off the various sections of the blanket, use the following colors in the sections of the blanket, SC-17 Cheeky Pinky, SC-6 Sunkissed, SC-11 Blue Yonder, SC-7 3 Candy Apple Red and SC-15 Tuxedo. Stamp the Sunkissed stripe with ST-352 Jambalaya Stamp — use the sponge-on-a-stick to apply SC-15 Tuxedo to the stamp. Dot the Cheeky Pinky blanket section with SC-73 Candy Apple Red.
6. Use the various colors from the blanket for the fringe and the tassel neck trim.
7. Use the Liner to apply the facial features and to outline the trim, tassels, and blanket. Applyl two coats of SC-15 Tuxedo to the feet.
8. Use the Soft Fan to apply one coat of NT-BR Clear to the outside of the llama or dip the piece in NT-CLR Clear Dipping Glaze.
9. Fire to cone 05/06.
Form
MB-1537 Llama Container
Colors
SC-5 Tiger Tail
SC-6 Sunkissed
SC-11 Blue Yonder
SC-15 Tuxedo
SC-17 Cheeky Pinky
SC-35 Gray Hare
SC-73 Candy Apple Red
NT-CLR Clear Dipping of NT-BR Clear Brushing Glaze
1. Begin with properly fired shelf cone 04 Bisque. Moisten a clean sponge and wipe bisque to remove any dust.
2. Use the Soft Fan to apply three coats of SC-11 Blue Yonder inside the container. Or, slightly thin the color and pour inside, roll to coat, pour out excess and drain.
2. Brush on three thinned coats of SC-20 Cashew Later to the flesh. Use a sponge to sponge the cheeks with SC-2 Melon-Choly.
3. Use the Script Liner to float or shade around the edges of the flesh areas with SC-48 Camel Back.
4. Use the Liner to apply 2-3 coats of SC-45 My Blue Heaven to the bikini top.
5. Use the Sofrt Fan to apply three coats of SC-45 My Blue Heaven to the top of the fishtail and into the middle. Add SC-11 Blue Yonder to the brush to darken the sides and middle (around and into the My Blue Heaven area) to fade the colors. Add SC-29 Blue Grass to the Blue Yonder brush for the remainder of the tail. Remove the glaze in the tail detail with a toothpick so the detail shows.
5. Use the Liner to apply one coat of SC-29 Blue Grass to the shell in the mermaid’s hair. Wipe off so the glaze stays in the detail.
6. Use the Script Liner to apply 2-3 coats of SC-80 Basketball and SC-22 Carrot Top to the mermaid’s hair. Apply in the direction of the hair hair, alternating the color and overlapping. Use SC-89 Ruby Slippers to brush into the shadow areas of the hair.
7. Use the Liner toi dot the beads with SC-16 Cotton Tail. Scrape out the glaze from the eyes, then apply two coats of SC-16 Cotton Tail. Apply two thinned coats of SC-76 Cara-Bein Blue to the iris. Apply SC-15 Tuxedo to the pupil and eyelashes.
8. Use the Soft Fan to apply one coat of SG-701 Star Dust to the mermaid’s tail. Apply one coat of NT-BR Clear to the remainder of the mermaid.
Use a water-moistened Synthetic Sponge to wipe down the bisque for any dust and debris. Check the inside cavity as well for any debris.
In a Plastic Cup mix FN-08 Brown with some water to a melted ice cream consistency. Pour the thinned glaze into the ware. While working quickly, rotate the piece to get full coverage with the glaze. Pour out excess glaze and invert to dry. Wipe off any spills from the outside of the ware with a moistened Synthetic Sponge.
Using CB-604 Soft Fan to apply 3 coats of FN-013 Soft Yellow to the entire outside of the ware.
Load the fan brush with glaze and tip one corner with SC-93 Tip Taupe. Wet blend and shade around the neck, feet, and ears.
Cut out the paisley pattern for ease of placement around the ware. Using a pencil and AC-230 Clay Carbon to transfer the pattern in a repeating placement around the middle portion of the cat. The filler flowers and leaves can be placed to fill in the pattern. The leaves portion can be shortened or lengthened to fill in any given areas needed.
The daisy flowers in the paisley are painted in with SG-411 Purple. Keep the lines as fine as possible for a delicate look. Centers of the daisy flower are a dot of SC-24 Dandelion done with the brush handle To the outer area of the paisley and larger floating flowers apply 2-3 coats of SC-53 Purple Haze using CB-404 Pointed Round.
Use CB-110 Liner to apply 1 coat of SC-91 Sea Breeze to the scallops around the paisley.
The inner area around the paisley teardrop is 1 coat of SC-28 Blue Isle applied using CB-404 Pointed Round.
All leaves in the pattern are 1 coat of SC-96 Aqu-ward applied with CB-110 Liner. The five petals “dot” flowers are SC-30 Blue Dawn applied with the handle of a small brush. Centers are a dot of SC-24 Dandelion.
Outline all of the lines of the pattern with SG-406 Brown. Keep the lines as fine as possible.
Place a dot of SC-13 Grapel between each of the scallops on the outer edge of the paisley.
Paint in the iris of the eye with SC-13 Grapel and SC-53 Purple Haze using CB-404 Pointed Round.
The pupil and eyelash line is SC-15 Tuxedo using CB-110 Liner. Scratch out a highlight in the pupil with a Clean-up Tool.
Thin some SC-14 Java Bean and paint in the nose with CB-404 Pointed Round. Shade the edges with SC-15 Tuxedo. Outline and paint in the nose and mouth with SC-15 Tuxedo using CB-110 Liner.
The whiskers are SC-83 Tip Taupe painted with CB-110 Liner.
In a cup thin some S-2101 Crystal Clear Brushing to a melted Ice cream consistency and apply 1 coat over the outside of the cat.
1. Begin with properly fired shelf cone 04 Bisque. Moisten a clean sponge and wipe bisque to remove any dust.
2. Lay the groovy stencil over the top of the box, use a 2″ foam roller with SC-9 Jaded to roll over the stencil, a sponge on a stick can also be used, though, to prevent bleed tap off glaze to apply thinly.
3. Brush the bottom with two coats of FN-001 White while the second coat is wet, squirt on SC-26 Green Thumb and SC-29 Blue Grass from an AC-220 Detailer Bottle, mix and stir the colors mixed with isopropyl alcohol. The formula is 1″ of color, 1/4″ water and 1/2″ of isopropyl alcohol. Pat with a dry sponge as the drying is underway.
4. Thicken SC-15 Tuxedo with AC-310 Silkscreen Medium to the consistency of peanut butter using a palette knife. Use the bugs and large butterfly from DSS-0113 Bug, with the shiny side down, rub the thickened mix over the screen, using your finger.
5. Use CB-110 Liner to fill in the lady bug’s body with 2 coats of SC-74 Hot Tamale.
6. Brush the knob with three coats of CC-102 White Crackle use the CB-604 Soft Fan, brush the edges with two coats of SC-15 Tuxedo, use CB-106 Script Liner.
7. Brush the inside and the lid with two coats of S-2101 Clear.
8. Fire to cone 05/06.
9. Thin slightly black acrylic, brush over the knob, wipe off to reveal the crackle pattern.
1. Begin with properly fired cone 04 bisque. Moisten a sponge and wipe bisque to remove any dust.
2. Mix SC-9 Jaded with water to thin. Using the Script Liner, apply one coat to the body of the camper. Apply thicker to the recessed areas for shading.
3. Use the flower and circle stamps to stamp the paper. Cut a circle around the negatives. These will be used as stencils.
4. Start with one side of the camper. Arrange the flower and circle stencils where you want them. Dip them in water and stick them to the camper. Using the Script Liner with SC-16 Cotton Tail, apply 1 coat over the stencils. Repeat for all sides of the camper.
6. Using the Script Liner with SC-6 Sunkissed, SC-31 The Blues, SC-88 Tu Tu Tango and SC-97 Cant-elope, apply 2 coats to the flowers and circles on the camper. Allow glaze to dry between coats. Before the last coat is dry, remove the stencils.
7. Using the Script Liner with SC-60 Silver Lining, apply 2 coats to the windows. Allow glaze to dry between coats. Apply a third coats and shade with SC-15 Tuxedo.
8. Using the Script Liner with SC-60 Silver Lining, apply 2 coats to the bumper and hubcaps. Allow glaze to dry between coats.
9. Using the Script Liner with SC-9 Jaded, apply 2 coats to the door and awnings. Allow glaze to dry between coats.
10. Using the Script Liner with SC-15 Tuxedo, apply 2 coats to the tires and underside of the camper. Allow glaze to dry between coats.
11. Using the Detail Liner with SC-15 Tuxedo, outline the details on the camper.
12. Using the Soft Fan, apply 2 coats of S-2101 Clear Brushing Glaze or dip into NT-CLR Clear Dipping Glaze.
13. Fire to cone 06.
Form
MB-1536 Camper Container
Colors
NT-CLR Clear Dipping Glaze or S-2101 Clear Brushing Glaze
1. Begin with properly fired cone 04 bisque. Moisten a sponge and wipe bisque to remove any dust.
2. Using the Soft Fan and Script Liner, apply one coat of SC-16 Cotton Tail to the body of the truck.
3. Use the flower and circle stamps to stamp the paper.
4. Start with one side of the truck. Arrange the flower and circle cutouts where you want them. Dip them in water and stick them to the truck. Using the Script Liner with SC-9 Jaded, apply 1 coat over the cutouts. Extend beyond each cutout. This will keep them in place. Repeat for all sides of the truck.
5. Using the Soft Fan and Script Liner with SC-9 Jaded, apply 2 coats over the body of the truck. Allow glaze to dry between coats. Before the last coat dries, remove the cutouts.
6. Using the Script Liner and Detail Liner with SC-6 Sunkissed, SC-31 The Blues, SC-88 Tu Tu Tango and SC-97 Cant-elope, apply 2 coats to the flowers and circles on the truck. Allow glaze to dry between coats.
7. Using the Script Liner with SC-60 Silver Lining, apply 2 coats to the windows. Allow glaze to dry between coats. Apply a third coats and shade with SC-15 Tuxedo.
8. Using the Script Liner with SC-60 Silver Lining, apply 2 coats to the bumpers, grille and hubcaps. Allow glaze to dry between coats.
9. Using the Script Liner with SC-6 Sunkissed, apply 2 coats to the headlights. Allow glaze to dry between coats.
10. Using the Script Liner with SC-15 Tuxedo, apply 2 coats to the tires and underside of the truck. Allow glaze to dry between coats.
11. Using the Detail Liner with SC-15 Tuxedo, outline the details on the truck.
12. Using the Soft Fan, apply 2 coats of S-2101 Clear Brushing Glaze or dip into NT-CLR Clear Dipping Glaze.
13. Fire to cone 06.
Form
MB-1535 Truck Container
Colors
NT-CLR Clear Dipping Glaze or S-2101 Clear Brushing Glaze
1. Begin with properly fired cone 04 bisque. Moisten a sponge and wipe bisque to remove any dust.
2. Using the Soft Fan and Script Liner with SC-54 Vanilla Dip, apply 2 coats to the body of the truck. Allow glaze to dry between coats.
3. Using the pencil, sketch a camo pattern onto the body of the truck. It should be irregular, rounded shapes that fit into each other like puzzle pieces. You will want to leave a small gap between each shape.
4. Using the Script Liner with SC-34 Down to Earth, SC-48 Camel Back and SC-92 Cafe Ole, apply 2 coats to each piece in the camo pattern. Use each color randomly.
5. Using the Script Liner with SC-35 Gray Hare, apply 2 coats to the windows. Allow glaze to dry between coats. Apply another coat and shade with SC-15 Tuxedo.
6. Using the Script Liner with SC-35 Gray Hare, apply 2 coats to the hubcaps, grille and bumpers of the truck. Allow glaze to dry between coats.
7. Using the Script Liner with SC-6 Sunkissed, apply 2 coats to the headlights. Allow glaze to dry between coats.
8. Using the Script Liner with SC-15 Tuxedo, apply 2 coats to the tires and underside of the truck. Allow glaze to dry between coasts.
9. Using the Detail Liner with SC-15 Tuxedo, outline the details on the truck.
10. Using the Soft Fan, apply 2 coats of S-2101 Clear Brushing Glaze or dip into NT-CLR Clear Dipping Glaze.
11. Fire to cone 06.
Form
MB-1535 Truck Container
Colors
SC-6 Sunkissed
SC-15 Tuxedo
SC-34 Down To Earth
SC-35 Gray Hare
SC-48 Camel Back
SC-54 Vanilla Dip
SC-92 Cafe Ole
NT-CLR Clear Dipping Glaze or S-2101 Clear Brushing Glaze
1. Begin with properly fired cone 04 bisque. Moisten a sponge and wipe bisque to remove any dust.
2. Take the MC-002 12mm Low Track Masking Tape and wrap around the center of the camper. You might need to tear it while going around the corners. Repeat in the center of the section above the tape.
3. Take the MC-001 6mm Low Track Masking Tape and wrap around the upper portion of the camper.
4. Press the tape to make sure it is secure.
6. Using the Soft Fan with SC-6 Sunkissed, apply 3 coats to the upper half of the camper. Allow glaze to dry between coats. Before the last coat is dry, peel off the tape.
7. Using the Script Liner with SC-26 Green Thumb, apply 2 coats to the bottom half of the camper. Allow glaze to dry between coats.
8. Using the Script Liner with SC-26 Green Thumb, apply another coat to the bottom half of the camper. While the glaze is still dry, use the Script Liner with SC-27 Sour Apple and SC-36 Irish Luck to shade.
9. Using the Script Liner with SC-27 Sour Apple, apply 3 coats to the door and awnings. Allow glaze to dry between coats.
10. Squeeze around 1 TBS of SC-36 Irish luck onto the plate. Take the MT-007 Divots Mat and place it design-side up. Take the sponge on a stick and gently dab it into the glaze. Blot off any excess onto the bare portion of the plate, then sponge the mat. Take the mat and gently press onto the door and awnings of the camper.
11. Using the Script Liner with SC-35 Gray Hare, apply 2 coats to the windows. Allow glaze to dry between coats. Apply another coat, one window at a time. While the glaze is still wet, use the Script Liner with SC-15 Tuxedo to shade the windows.
12. Using the Script Liner with SC-35 Gray Hare, apply 3 coats to the bumper and tires. Allow glaze to dry between coats.
13. Using the Script Liner with SC-6 Sunkissed, apply 2 coats to the hubcaps. Allow glaze to dry between coats.
14. Using the Script Liner with SC-15 Tuxedo, apply 2 coats to the tires and underside of the camper. Allow glaze to dry between coats.
15. Using the Detail Liner with SC-15 Tuxedo, outline the details on the camper.
16. Using the Soft Fan, apply 2 coats of S-2101 Clear Brushing Glaze to the piece or dip into NT-CLR Clear Dipping Glaze.
1. Begin with properly fired cone 04 bisque. Moisten a sponge and wipe bisque to remove any dust.
2.. Use the Soft Fan to apply two coats of FN-054 Pistachio to the top area of the gator. Use the same brush to apply two coats of FN-014 Antique White to the underside of the gator.
3. Cut the toilet paper tube in half, then cut in half again. Cut slits into the tube about 1 1/2″ long and 1/2″ wide. Trim each cut a tiny amount so there is a gap between them. Use a sponge-on-a-stick to apply SC-39 Army Surplus to the cut sections of the tube.
4. Tip the tube slices with SC-48 Camel Back. Beginning at the mouth, press the tips to the top of the alligator’s body, overlapping the stamps. Add in SC-15 Tuxedo to tip some of the stampings. Stamp the legs in the same manner. NOTE: Use two tube cuttings, as one will get too wet with the glaze.
5. Use the same tube cuttings to apply color to the underside of the gator. Use the sponge-on-a-stick to apply SC-46 Rawhide to the tube and tip with SC-83 Tip Taupe. Tip the cardboard with SC-48 Camel Back for some of the stamps. Scrape the glaze off of the teeth and the eyes.
6. Use the Liner to apply two coats of SC-16 Cotton Tail to the eyes and teeth. Use the same brush to apply SC-39 Army Surplus to the iris of the eye and apply SC-15 Tuxedo to the pupils and outlines.
7. Float a shadow of SC-15 Tuxedo around the legs.
1. Begin with properly fired cone 04 bisque. Moisten a sponge and wipe bisque to remove any dust.
2. Using the Soft Fan and Script Liner with SC-26 Green Thumb, apply two coats over the entire body of the truck. Allow glaze to dry between coats.
3. Using the Soft Fan and Script Liner with SC-26 Green Thumb, apply one coat over one side of the truck. While the glaze is still wet, use the Script Liner with SC-27 Sour Apple and SC-36 Irish Luck to shade. Repeat for remaining sides of the truck.
4. Using the Script Liner with SC-35 Gray Hare, apply two coats to the windows. Allow glaze to dry between coats. Apply a third coat, one window at a time. Before the glaze dries, use the Script Liner with SC-15 Tuxedo to shade each window.
5. Using the Detail Liner with SC-35 Gray Hare, apply three coats to the bumpers, grille and tires. Allow glaze to dry between coats.
6. Using the Detail Liner with SC-6 Sunkissed, apply two coats to the lights and hubcaps. Allow glaze to dry between coats.
7. Using the Scrip Liner with SC-15 Tuxedo, apply two coats to the tires and underside of the truck. Using the Detail Liner, outline the details on the truck.
8. Using the Soft Fan, apply 2 coats of S-2101 Clear Brushing Glaze to the piece or dip into NT-CLR Clear Dipping Glaze.
9. Fire to cone 06.
Form
MB-1535 Truck Container
Colors
SC-6 Sunkissed
SC-15 Tuxedo
SC-26 Green Thumb
SC-27 Sour Apple
SC-35 Gray Hare
SC-36 Irish Luck
NT-CLR Clear Dipping Glaze or S-2101 Clear Brushing Glaze
1. Begin with properly fired cone 04 bisque. Moisten a sponge and wipe bisque to remove any dust.
2. Mix the bubble solution. Add 1 TBS water, 1 TBS of SC-3 Wine About It and 2 drops of liquid dish soap to the disposable cup. Mix with the straw. Use the straw to blow bubbles in the cup. As the bubbles extend out of the cup, scrape them off the with the palette knife and place them on the body of the unicorn. Do this until the body is covered in bubbles. Avoid the face.
3. Using the Script Liner with SC-73 Candy Apple Red, SC-97 Cant-elope, SC-6 Sunkissed, SC-27 Sour Apple, SC-11 Blue Yonder and SC-13 Grapel, apply three coats to the mane and tail of the unicorn. Allow glaze to dry between coats.
4. Using the Script Liner with SC-70 Pink-A-Dot to shade the face and ear.5. Using the Script Liner with SC-13 Grapel, apply three coats to the feet. Allow glaze to dry between coats.6. Using the Detail Liner with SC-15 Tuxedo, outline the horn, ear, eye, nose, mouth and feet.
7. Using the Soft Fan, apply 2 coats of NT-BR Clear Brushing Glaze or dip into NT-CLR Clear Dipping Glaze.
8. Fire to cone 06.
Form
MB-1530 Unicorn Plaque
Colors
SC-3 Wine About It
SC-6 Sunkissed
SC-11 Blue Yonder
SC-13 Grapel
SC-15 Tuxedo
SC-27 Sour Apple
SC-70 Pink-A-Dot
SC-73 Candy Apple Red
SC-85 Orkid
SC-97 Cant-elope
NT-CLR Clear Dipping Glaze or NT-BR Clear Brushing Glaze
1. Begin with properly fired cone 04 bisque. Moisten a sponge and wipe bisque to remove any dust.
2. Using the Script Liner and Soft Fan with SC-26 Green Thumb, apply one coat to the body of the truck.
3. Using the Script Liner and Soft Fran with SC-26 Green Thumb, apply another coat to the body of the truck in sections. Before the glaze is dry, use the Script Liner with SC-27 Sour Apple and SC-36 Irish Luck to shade the truck. Move to the next section and repeat until the second coat is complete.
4. Using the Script Liner with SC-35 Gray Hare, apply two coats to the windows, hub caps, bumpers and door handle on the truck. Allow glaze to dry between coats.
5. Using the Script Liner with SC-15 Tuxedo, shade the windows.
6. Using the Detail Liner with SC-6 Sunkissed, apply two coats to the headlight. Allow glaze to dry between coats.
7. Using the Detail Liner with SC-74 Hot Tamale, apply two coats to the taillight. Allow glaze to dry between coats.
8. Using the Script Liner with SC-15 Tuxedo, apply two coats to the tires and under-side of the truck.
9. Take your custom screen and draw an outline around the logo in permanent marker. Cut it out with excess screen around the edges.
10. Squeeze about two tablespoons of SC-15 Tuxedo onto the plate. Add a pinch of AC-310 Silkscreen Medium. Mix with a palette knife until it becomes the consistency of peanut butter. You may need to add more silkscreen medium or glaze.
11. Place the logo on the door. While holding it firmly in place, take a small amount of premixed silkscreen medium, and gently rub in circles staring in the center and working outward. Slowly pull up the screen to avoid smearing.
1. Begin with properly fired cone 04 bisque. Moisten a sponge and wipe bisque to remove any dust.
2. Using the Soft Fan with FN-208 Crystal Coral, apply one coat to the inside of the dish. Allow to dry completely.
3. Prepare the AC-220 Detailer Tips and 1oz bottles. Take six bottles and add 3/4 inch of glaze to each bottle. Do one for each of the following colors: SC-2 Melon-Choly, SC-11 Blue Yonder, SC-22 Carrot Top, SC-30 Blue Dawn, SC-73 Candy Apple Red and SC-76 Cara-Bein Blue. Add 1/4 inch of water to each bottle and shake with your thumb covering the hole. Add 1 inch of rubbing alcohol. Screw the caps on and shake vigorously. Cut the top of the tip with scissors. Test to make sure drops come out of the tip.
4. The inside of the starfish is divided into 5 sections. Do one section at a time and wait for it to dry before moving to the next section. Using the Soft Fan with FN-208 Crystal Coral, apply a thick coat to one of the sections. Use the dropper bottles with glaze to make dots. The dots should go from blues in the center of the starfish to reds towards the edge of the starfish. Complete all sections.
5. Using the Soft Fan with FN-049 Flamingo, apply two coats to the back of the plate. Allow glaze to dry between coats.
6. Using the Script Liner with FN-212 Blue Diamond, apply two coats to the rim of the plate. Allow glaze to dry between coats.
7. Fire to cone 06.
Form
MB-1379 Starfish Dish Bisque or CD1379 Starfish Dish Mold
1. Begin with properly fired cone 04 bisque. Moisten a sponge and wipe bisque to remove any dust.
2. Using the Soft Fan with EL-145 Ginger Root, apply one coat to the bottom of the vase.
3. Using the Soft Fan with EL-147 Creek Bed, apply one coat to the top of the vase. Slightly overlap the bottom layer.
4. Repeat steps 2 and 3. Allow glaze to dry completely.
5. Place the pattern in the center of the bottom portion of the vase. Outline with the pencil.
6. Squeeze a small amount of SG-402 White, SG-403 Red, SG-404 Blue and SG-407 Yellow onto the plate. Using the Detail Liner, apply one coat of each color to their corresponding sections of the rooster.
Begin with properly fired shelf cone 04 Bisque. Moisten a clean sponge and wipe bisque to remove any dust.
For the rainbow hair and tail: Apply two coats of SC-11 Blue Yonder. Thin the color slightly so that it moves into the details (refer to the picture for color placement). Use all the colors in the same manner: SC-6 Sunkissed, SC-97 Cant-elope, SC-75 Orange-A-Peel, SC-73 Candy Apple Red and SC-36 Fruit of the Vine. Use the side of a wet brush to brush against the detail to remove color to give it a highlight.
Use the Script Liner to apply two coats of your desired color to the feet.
Lightly sponge SC-2 Melon-Choly to the muzzle and under the eyes. Use the Script Liner to apply two coats of SC-2 Melon-Choly into the ears.
Use the Script Liner to apply one coat of SC-33 Fruit of the Vine to the horn. Use the sponge to wipe off color to antique. Use the same brush to float SC-35 Gray Hare into the shadow areas. Use the Liner with SC-15 Tuxedo to outline the mouth, feet, around the hair and inside the ears and eye and lashes.
Use a palette knife to thicken SC-15 Tuxedo with AC-310 Silkscreen Medium to the thickness of peanut butter. Use the heart screen from DSS-0146 Princess and Unicorns and rub the thickened mix over the hearts on the unicorn’s body. Use the Liner to apply the colors used in the hair inside the hearts.
Dip into NT-CLR Clear Dipping Glaze or use the Soft Fan to apply two coats of NT-BR Clear Brushing Glaze to the unicorn.
Fire to cone 05/06.
Form
MB-1530 Unicorn Plaque
Colors
SC-2 Melon-Choly
SC-6 Sunkissed
SC-11 Blue Yonder
SC-15 Tuxedo
SC-27 Sour Apple
SC-33 Fruit of the Vine
SC-35 Gray Hare
SC-73 Candy Apple Red
SC-75 Orange-A-Peel
NT-CLR Clear Dipping or NT-BR Clear Brushing Glaze
1. Begin with properly fired cone 04 bisque. Moisten a sponge and wipe bisque to remove any dust.
2. Using the Script Liner with SC-74 Hot Tamale, outline the body of the truck. Use the Soft Fan to fill in the body of the truck. Apply a total of three coats. Allow glaze to dry between coats.
3. Using the Detail Liner with SC-35 Gray Hare, outline the gray details on the truck. Fill them in using the Script Liner. Apply a total of three coats. Allow glaze to dry between coats.
4. Using the Detail Liner with SC-15 Tuxedo, outline the tires and windows. Fill them in using the Script Liner. Apply a total of three coats. Allow glaze to dry between coats.
5. Using the Detail Liner with SC-15 Tuxedo, make accents lines on the truck.
1. Begin with properly fired cone 04 bisque. Moisten a sponge and wipe bisque to remove any dust.
2. Using the Soft Fan with EL-146 Rain Cloud, apply two coats to the bottom half of the vase. Allow glaze to dry between coats.
3. Using the Soft Fan with EL-144 Dark Amethyst, apply two coats to the top half of the vase. Overlap around an inch with the bottom coats. Allow glaze to dry between coats.
4. Using the scissors, cut the barn out from the pattern. Trace the outline of the barn using the pencil. It should be positioned near the center of the lower half of the vase.
5. Using the pencil, sketch in the details on the barn. Add a fence below the barn.
6. Using the Detail Liner with SG-402 White, apply one coat to the siding on the barn.
7. Using the Detail Liner with SG-403 Red, apply one coat to the roof of the barn.
8. Using the Detail liner with SG-401 Black, outline the barn and add accent lines.
9. Use SG-401 to trace over the fence.
10. On the DSS-0110 Botanical – Trees screen, locate the tree. Draw an outline around it in permanent marker. Cut it out with excess screen around the edges.
11. Squeeze about two tablespoons of SC-15 Tuxedo onto the plate. Add a pinch of AC-310 Silkscreen Medium. Mix with a palette knife until it becomes the consistency of peanut butter. You may need to add more silkscreen medium or glaze.
12. Place the tree to the left of the barn. While holding it firmly in place, take a small amount of premixed silkscreen medium, and gently rub in circles starting in the center and working outward. Slowly pull up the screen to avoid smearing.
1. Begin with properly fired shelf cone 04 Bisque. Moisten a clean sponge and wipe bisque to remove any dust.
2. Outline the detail in the truck’s body with SG-401 Black.
3. Use the Soft Fan and Script Liner to apply three coats of EL-143 Cactus Flower to the trucks’ body.
4. Use a silk sponge to apply one coat of EL-133 Autumn over the Cactus Flower.
5. Use the Script Liner to apply three coats of SC-35 Gray Hare to the hubcaps and bumpers.
6. Use the Script Liner to apply SC-15 Tuxedo to the tires, underbody and truck bed with two coats of SC-15 Tuxedo. To create a flat finish instead, use the Script Liner to apply one coat of SG-401 Black over the Tuxedo.
7. Use the Script Liner to float SC-15 Tuxedo in the windows. Use the Liner to outline the windows with Tuxedo.
8. Use the Script Liner to apply one coat of NT-BR Clear One Brushing Glaze to the window area.
Begin with properly fired shelf cone 04 Bisque. Moisten a clean sponge and wipe bisque to remove any dust.
Brush on two coats of FN-001 White to the top of the bottle cap with RB-144 Soft Fan.
Cut out the paper pattern of the llama, brush water to the glazed surface over the space for the llama, place on the paper, press with a paper towel to remove excess water and gaps from the side of the paper.
Punch out the paper flowers, draw circles around the paper on the bottle cap, brush two coats of the following colors over the circled areas, SC-11 Blue Yonder, SC-70 Pink-A-Dot, SC-13 Grapel, SC-27 Sour Apple, and SC-74 Hot Tamale. Re-wet the colors, then stick the paper flowers and dots to the wet surface, press with a paper towel.
Brush two coats of FN-009 Black over the bottle cap, brush one coat of SG-701 Star Dust using RB-144 Soft Fan, remove the paper llama, flowers and dots before the Star Dust coat dries.
Brush the inside of the ears with two coats of SC-2 Melon-Choly and sponge the cheek with Melon-Choly.
Detail the face with SC-15 Tuxedo using RB-110 Liner.
Use SC-90 Elephant Ears to shade tufts of fur on the body, outline the shade with Elephant Ears, mixed with a touch of SC-15 Tuxedo.
Use the small sponge on a stick to dot the centers of the flowers with a contrasting S&C color.
SG-402 White was used for the white lined flowers. Apply a clear glaze over the Designer Liner White.
Fire to cone 05/06.
Hot glue four pom-poms across the neck of the llama. Hot glue pom-poms and the red cording around the outer edge of the bottle cap.
1. Begin with properly fired cone 04 bisque. Moisten a sponge and wipe bisque to remove any dust.
2. Use the Script Liner to apply three thinned coats of SC-20 Cashew Later to the flesh areas. Use a sponge to sponge the cheeks with SC-2 Melon-Choly.
3. Use the Script Liner to float or shade around the edges of the flesh areas with SC-48 Camel Back.
4. Use the Liner to apply two coats of SC-2 Melon-Choly to the star. When dry, then apply a thinned coat of SC-22 Carrot Top.
5. Use the Script Liner to apply two or three coats of SC-45 My Blue Heaven to the bikini top. Use the Soft Fan to My Blue Heaven to the top of the fishtail and into the middle. Add SC-11 Blue Yonder to the brush to darken the sides and middle (around and into the My Blue Heaven area) to fade the colors. Add SC-29 Blue Grass to the Blue Yonder brush for the remainder of the tail. Apply three coats with this process. Remove the glaze in the fine detail with a toothpick so the detail shows.
6. Use the Script Liner to apply one coat of SC-29 Blue Grass to the shell in the mermaid’s hair. Wipe off so the glaze stays in the detail
7. Use the Script Liner to apply two or three coats of SC-80 Basketball and SC-22 Carrot Top to the mermaid’s hair. Apply in the direction of the hair, alternating the color and overlapping. Use SC-89 Ruby Slippers to brush into the shadow areas of the hair.
8. Dot the beads with SC-16 Cotton Tail. Scrape out the glaze from the eyes and use the Liner to apply two coats of SC-16 Cotton Tail. The iris is two thinned coats of SC-76 Cara-Bein Blue; the pupil and eyelashes are SC-15 Tuxedo.
9. Use the Soft Fan to apply one coat of SG-701 Star Dust to the mermaid’s tail and one coat of NT-BR Clear Brushing Glaze to the remainder of the mermaid.
Squeeze around a 1/4 cup of SC-73 Candy Apple Red into the disposable cup. Add water and mix until it is thin enough to pour. Pour into the ornament vase and rotate until all interior surfaces are covered. Pour out any excess.
Using the Soft Fan with SC-73 Candy Apple Red, apply two coats to the upper ornament. Allow glaze to dry between coats.
Using the Soft Fan with SC-27 Sour Apple, apply two coats to the lower ornament. Allow glaze to dry between coats.
Use the pencil to write a name on each ornament.
Using the Detail Liner with SC-15 Tuxedo, trace the names.
Using the Script Liner with SC-60 Silver Lining, apply two coats to the ornament caps. Allow glaze to dry between coats.
Using the Detail Liner with SC-15 Tuxedo, outline the ornament caps.
Using the Soft Fan with SG-701 Star Dust, apply one coat to the upper ornament.
Using the Soft Fan with SG-702 Celebration, apply two coats to the middle ornament. Allow glaze to dry between coats.
1. Begin with properly fired cone 04 bisque. Moisten a sponge and wipe bisque to remove any dust.
2. Place the ST-105 Dancing Heart Stamp on the long edge of a piece of paper and trace the width of the stamp down the entire length of the paper. Use the scissors to cut down the line. Wet the paper and stick it to the center of the bottom portion of the milk can. Wrap around the milk can.
3. Using the Soft Fan with SC-54 Vanilla Dip, apply two coats to the bottom section of the milk can.
4. Wet the cheesecloth and drape over the glazed section to look like burlap.
5. Using the Soft Fan with SC-54 Vanilla Dip, apply one coat over the cheesecloth. Allow glaze to dry.
6. Using the Soft Fan with SC-92 Cafe Ole, apply two coats over the cheesecloth. Allow glaze to dry between coats. Pull off the cheesecloth before the final coat is dry. Pull off paper.
7. Squeeze around a tablespoon of SC-74 Hot Tamale onto the plate. Take the ST-105 Dancing Heart Stamp and place it design-side up. Take the sponge on a stick and gently dab it into the glaze. Blot off any excess onto the bare portion of the plate, then sponge the stamp. Take the stamp and gently press on the center of the lower section. Repeat for the other side of the milk can.
8. Using the Script Liner and Detail Liner with SC-74 Hot Tamale, apply two coats of glaze to the hearts. Allow glaze to dry between coats.
9. Using the Scrip Liner with SC-74 Hot Tamale, apply two coats to the middle section of the milk can. Allow glaze to dry between coats.
10. Using the Soft Fan with SP-274 Speckled Hot Tamale, apply two coats to the upper section of the milk can. Allow glaze to dry between coats.
11. Using the Soft Fan, apply one coat of S-2101 Clear Brushing Glaze or dip into NT-CLR Clear Dipping Glaze.
12. Fire to cone 06.
Bud Vase Instructions
1. Begin with properly fired cone 04 bisque. Moisten a sponge and wipe bisque to remove any dust.
2. Take the paper and pencil and draw a heart. Cut the heart out with scissors. Wet the heart and place it in the center of the bottom section of the milk can.
3. Using the Soft Fan with SC-54 Vanilla Dip, apply two coats to the bottom section of the milk can.
4. Wet the cheesecloth and drape over the glazed section to look like burlap.
5. Using the Soft Fan with SC-54 Vanilla Dip, apply one coat over the cheesecloth. Allow glaze to dry.
6. Using the Soft Fan with SC-92 Cafe Ole, apply two coats over the cheesecloth. Allow glaze to dry between coats. Pull off the cheesecloth before the final coat is dry. Pull off paper.
7. Using the Script Liner with SC-74 Hot Tamale, apply two coats of glaze to the heart. Allow glaze to dry between coats.
8. Using the Scrip Liner with SC-74 Hot Tamale, apply two coats to the middle section of the milk can. Allow glaze to dry between coats.
9. Using the Soft Fan with SP-274 Speckled Hot Tamale, apply two coats to the upper section of the milk can. Allow glaze to dry between coats.
10. Using the Soft Fan, apply one coat of S-2101 Clear Brushing Glaze or dip into NT-CLR Clear Dipping Glaze.
11. Fire to cone 06.
Form
MB-1527 Milk Can Vase
MB-1526 Milk Can Bud Vase
Colors
SC-74 Hot Tamale
SC-54 Vanilla Dip
SC-92 Cafe Ole
SP-274 Speckled Hot Tamale
NT-CLR Clear Dipping Glaze or NT-BR Clear One Brushing Glaze
1. Begin with properly fired shelf cone 04 Bisque. Moisten a clean sponge and wipe bisque to remove any dust.
2. Use the Soft Fan to apply one coat of clear in the area where the flowers and leaves are at the bottom of the clock. Cut out the pattern for the flowers and leaves, wet the area then press the paper patterns onto this area. Gently press to ensure the edges are sealed.
3. Use the Soft Fan to apply three coats of SC-11 Blue Yonder to the clock, going over the paper pattern. Remove the paper after the third coat loses the gloss.
4. Pencil in the flower and leaves detail. Use the Script Liner to apply two coats of SC-74 Hot Tamale to the flowers. For the third coat, load the Script Liner with the SC-74 Hot Tamale and tip the brush with SC-81 Cinnamon Stix. Apply to the petals, holding the darker red to the edges of the flower.
5. Use the Script Liner to apply two coats of SC-43 Lettuce Alone to the leaves, darkening the edges and stem with SC-8 Just Froggy. Use the Liner with SC-15 Tuxedo to outline the designs.
6. For the center face of the clock, pencil straight lines from the center to the middle of the number. Then, another pencil line to split that distance in half. Use a compass or a circle grid to add two lines decreasing the circumference. Use the Script Liner to apply two coats of SC-15 Tuxedo to every other section on the face. Outline so the edges connect.
7. Us the Script Liner to apply two coats of SC-74 Hot Tamale to the numbers and dots. Shade the unglazed section of the face with thinned SC-81 Cinnamon Stix.
8. Use the Soft Fan to apply three coats of SC-55 Yell About It to the top of the clock. Let dry.
9. Use a sponge-on-a-stick or 2″ foam roller to apply SC-12 Moody Blue to the MT-008 Spiral Mat then press to the top of the clock.
10. Use the Script Liner to apply three coats of SC-12 Moody Blue to the trim edge of the top and handle. Let dry.
11. Use SG-407 Yellow to outline the curl in the handle.
12. Dip into NT-CLR Clear Brushing Glaze or use the Soft Fan to apply two coats of S-2101 Clear to the center of the clock.
13. Fire to cone 05/06.
Form
MB-1490 Whimsical Clock
Colors
SC-8 Just Froggy
SC-11 Blue Yonder
SC-12 Moody Blue
SC-15 Tuxedo
SC-43 Lettuce Alone
SC-55 Yella Bout It
SC-74 Hot Tamale
SC-81 Cinnamon Stix
SG-407 Yellow
NT-CLR Clear Dipping or S-2101 Clear Brushing Glaze
1. Begin with properly fired shelf cone 04 Bisque. Moisten a clean sponge and wipe bisque to remove any dust.
2. Slightly thin SC-15 Tuxedo, brush to the chest area, wipe back with a damp sponge to antique.
3. Use a circle template to pencil in eyes on the faceted shape.
4. Brush the nose, top facet on the head, shoulders, hips, knees and back with two coats of SC-12 Moody Blue. This will give the black glaze a highlight.
5. Brush two coats of SC-15 Tuxedo on the remaining areas of the dog.
6. Brush the eyes with two coats of SC-14 Java Bean with Tuxedo pupils.
7. Brush one coat of CG-701 Star Dust using CB-604 Soft Fan to the body of the dog.
Begin with properly fired cone 04 bisque. Moisten a sponge and wipe bisque to remove any dust.
Using the Soft Fan with SC-16 Cotton Tail, apply 1 coat to the clipboard. Allow glaze to dry.
Cut out the donuts from the pattern. Dip them in water and place them on the clipboard.
Using the Soft Fan with SC-16 Cotton Tail, apply 1 coat over the donuts. Allow glaze to dry.
Using the Soft Fan with SC-1 Pink-A-Boo, apply 2 coats over the clipboard. Allow glaze to dry between coats. Before the last coat is dry, remove the donut pattern.
Squeeze about 2 TBS of SC-16 Cotton Tail onto the palette. Take the MT-008 Spiral Mat and place it design-side up. Take the sponge on a stick and gently dab it into the glaze. Blot off excess onto the bare portion of the palette, then sponge mat. Take the mat and gently press it onto the clipboard. Slowly pull the mat off to avoid smearing.
Use the pencil to sketch the icing on the donuts.
Using the Script Liner with SC-46 Rawhide, apply 2 coats to the “cake” portion of each donut. For the donut without icing, use SC-5 Tiger Tail to shade. Allow glaze to dry between coats.
Using the Script Liner with SC-16 Cotton Tail, SC-45 My Blue Heaven and SC-70 Pink-A-Dot, apply 2 coats to the icing on the corresponding donuts. Allow glaze to dry between coats.
Using the Script Liner with SG-702 Celebration, apply 1 coat over the icing on each corresponding donut.
After the glaze is completely dry, place AC-230 Clay Carbon Paper over the center of the clipboard. Place the “word” portion of the pattern in the center of the clipboard. Trace with the pencil.
Using the Detail Liner with SC-15 Tuxedo, trace over the patter. Make accent lines around the donuts.
1. Begin with properly fired shelf cone 04 Bisque. Moisten a clean sponge and wipe bisque to remove any dust.
2. Brush on two coats of CG-977 Ink Spots to the cat. Remove crystals from the nose and muzzle area. Scrape the glaze from the eyes. Use a circle template to trace on the eyes.
3. Use the Pointed Round or a sponge to apply one coat of SC-2 Melon-Choly to the inside of the ears, nose and muzzle.
4. Use the Pointed Round to apply two coats of SC-16 Cotton Tail to the eyes, two thinned coats of SC-27 Sour Apple to the iris and one coat of SC-15 Tuxedo to the pupil. Outline the eyes with Tuxedo.
5. Use the Liner to outline the nose and muzzle with SC-15 Tuxedo.
6. Use the Soft Fan to apply one coat of SG-702 Celebration to the cat, avoiding the eyes, and muzzle.
7. Fire to cone 05/06.
Form
CD1517+ Faceted Cat Mold or MB-1517 Faceted Cat Bisque
1. Begin with properly fired shelf cone 04 Bisque. Moisten a clean sponge and wipe bisque to remove any dust.
2. Use a pencil to sketch spots on the cow. Trace around the spots with SG-401 Black Designer Liner. Use the Liner to apply one coat of SC-15 Tuxedo inside the ears and nose and on the mouth.
3. Use the Script Liner to apply EL-125 Sahara Sands around the eyes and spots. Use the Soft Fan to apply two coats of Sahara Sands to the remainder of the cow. Sponge on two coats of SC-16 Cotton Tail over the Sahara Sands; this will lighten and give the Elements a mottled look.
4. Use the Liner to apply SC-15 Tuxedo to the eyes. Use the Script Liner to apply three coats of EL-144 Dark Amethyst to the spots of the cow.
Begin with properly fired cone 04 bisque. Moisten a sponge and wipe bisque to remove any dust.
Take the MC-002 12mm Low Track Masking Tape and cover the top of the Clipboard, where the clip will be glued.
On the DSS-0157 Under the Sea screen, locate the mermaid, octopus and tree fish. Draw an outline around them in permanent marker. Cut them out with excess screen around the edges.
Squeeze about two tablespoons of SC-15 Tuxedo onto the plate. Add a pinch of AC-310 Silkscreen Medium. Mix with a palette knife until it becomes the consistency of peanut butter. You may need to add more Silkscreen Medium or glaze.
Place the screens in their corresponding locations on the Clipboard. Refer to image. Screen one at a time. While holding it firmly in place, take a small amount of premixed Silkscreen Medium, and gently rub in circles starting in the center and working outward. Slowly pull up the screen to avoid smearing.
Mix the bubble solution. Add 1 TBS water, 1 TBS SC-12 Moody Blue and 2 drops of liquid dish soap to the disposable cup. Mix with the staw. Use the straw to blow bubbles in the cup. As the bubbles extend out of the cup, scrape them off with the palette knife and place them on the background of the Clipboard. Do this until the background is covered in bubbles. Avoid the screened areas.
Using the Script Liner and Detail Liner with SC-24 Dandelion, apply two coats of glaze to upper portion of the mermaid’s hair. Use the same brushes with SC-22 Carrot Top, to apply two coats of glaze to the lower portion of the mermaid’s hair. Make sure to blend the two colors in the center to achieve an ombre look.
Using the Detail Liner and SC-20 Cashew Later, apply two coats to the upper body of the mermaid. Allow glaze to dry between coats.
Using the Detail Liner and SC-11 Blue Yonder, apply two coats to the mermaid’s tail and top. Allow glaze to dry between coats.
Using the Detail Liner and SC-89 Cutie Pie Coral, apply two coats to the octopus. Allow glaze to dry between coats.
Using the Detail Liner and SC-27 Sour Apple, apply two coats to fish on the left. Allow glaze to dry between coats.
Using the Detail Liner and SC-26 Green Thumb, apply two coats to the back half of the middle fish. Using the same brush with SC-27 Sour Apple, apply two coats to the front half of the middle fish. Allow glaze to dry between coats.
Using the Detail Liner and SC-36 Irish Luck, apply two coats to the stripes on the fish on the right. Using the same brush with SC-22 Carrot Top, apply two coats to the body of the fish on the right.
Using the Soft Fan, apply one coat of S-2101 Clear Brushing Glaze or dip into NT-CLR Clear Dipping Glaze.
Pull off the 12mm tape at the top of the Clipboard.
Fire to cone 06.
After the Clipboard has cooled, use epoxy to glue on the clip, if desired.
Form
MB-1461 Clay Clipboard
Colors
SC-11 Blue Yonder
SC-12 Moody Blue
SC-15 Tuxedo
SC-20 Cashew Later
SC-22 Carrot Top
SC-24 Dandelion
SC-26 Green Thumb
SC-27 Sour Apple
SC-36 Irish Luck
SC-89 Cutie Pie Coral
NT-CLR Clear Dipping Glaze or S-2101 Clear Brushing Glaze
1. Begin with a properly fired shelf cone 04 Bisque. Moisten a clean sponge and wipe bisque to remove dust.
2. Use a pencil to sketch spots on the inside and outside of the pig. Trace around the spots with SG-401 Black Designer Liner
3. Use the Script Liner to fill in the spots with two coats of SC-15 Tuxedo.
4. Use the Soft Fan to apply three heavy coats of EL-145 Ginger Root onto the piece, following the shapes of the spots with the brush. This glaze will show the direction of brushstrokes. Apply less glaze around the spots so it will not flow over the Tuxedo.
5. Use the Script Liner to apply two coats of EL-143 Cactus FLower to the snout and inside the ears.
6. Use the Liner to apply one coat of SC-15 Tuxedo to the eyes.
Begin with properly fired cone 04 bisque. Moisten a sponge and wipe bisque to remove any dust.
Take the MC-002 12mm Low Track Masking Tape and cover the top of the Clipboard, where the clip will be glued.
On the DSS-0157 Under the Sea screen, locate the mermaid with dolphin, crab, starfish and two fish. Draw an outline around them in permanent marker. Cut them out with excess screen around the edges.
Squeeze about two tablespoons of SC-15 Tuxedo onto the plate. Add a pinch of AC-310 Silkscreen Medium. Mix with a palette knife until it becomes the consistency of peanut butter. You may need to add more Silkscreen Medium or glaze.
Place the screens in their corresponding locations on the Clipboard. Refer to image. Screen one at a time. While holding it firmly in place, take a small amount of premixed Silkscreen Medium, and gently rub in circles starting in the center and working outward. Slowly pull up the screen to avoid smearing.
Using the Scrip Liner and Soft Fan with SC-45 My Blue Heaven, apply two coats to sea portion of the background. Using the same brushes with SP-254 Speckled Vanilla Dip, apply two coats to the sand portion of the background. Allow glaze to dry between coats.
Mix the bubble solution. Add 1 TBS water, 1 TBS SC-76 Cara-Bein Blue and 2 drops of liquid dish soap to the disposable cup. Mix with the staw. Use the straw to blow bubbles in the cup. As the bubbles extend out of the cup, scrape them off with the palette knife and place them on the background of the Clipboard. Do this until the sea portion of the background is covered in bubbles. Avoid the screened areas.
Using the Script Liner and Detail Liner with SC-23 Jack O’Lantern, apply two coats of glaze to the mermaid’s hair.
Using the Detail Liner and SC-46 Rawhide, apply two coats to the upper body of the mermaid. Allow glaze to dry between coats.
Using the Detail Liner and SC-26 Green Thumb, apply two coats to the mermaid’s tail. Allow glaze to dry between coats.
Using the Detail Liner and SC-89 Cutie Pie Coral, apply two coats to mermaid’s top. Allow glaze to dry between coats.
Using the Detail Liner and SC-6 Sunkissed, apply two coats to the mermaid’s crown. Allow glaze to dry between coats.
Using the Scrip Liner and SC-60 Silver Lining, apply two coats to the dolphin. Allow glaze to dry between coats.
Using the Detail Liner and SC-85 Orkid, apply two coats to the head of the upper fish. Using the same brush, apply two coats of SC-13 Grapel to the tail of the fish. Allow glaze to dry between coats.
Using the Detail Liner and SC-23 Jack O’Lantern, apply two coats to the lower fish. Allow glaze to dry between coats.
Using the Detail Liner and SC-73 Candle Apple Red, apply two coats to the crab. Allow glaze to dry between coats.
Using the Detail Liner and SC-76 Cara-Bein Blue, apply two coats to the starfish. Allow glaze to dry between coats.
Using the Detail Liner and SC-25 Crackerjack Brown, apply two coats in the shape of rocks in the sand. Allow glaze to dry between coats.
Using the Detail Liner and SC-89 Cutie Pie Coral, glaze coral coming up from one of the rocks. Apply a total of two coats and allow glaze to dry between coats.
Using the Detail Liner and SC-27 Sour Apple, glaze seaweed coming up from the sand. Using the same brush with SC-26 Green Thumb, make another seaweed. Apply a total of two coats and allow glaze to dry between coats.
Using the Detail Liner and SC-15 Tuxedo, make accents in the sand.
Using the Soft Fan, apply one coat of S-2101 Clear Brushing Glaze or dip into NT-CLR Clear Dipping Glaze.
Pull off the 12mm tape at the top of the Clipboard.
Fire to cone 06.
After the Clipboard has cooled, use epoxy to glue on the clip, if desired.
Form
MB-1461 Clay Clipboard
Colors
SC-6 Sunkissed
SC-13 Grapel
SC-15 Tuxedo
SC-23 Jack O’Lantern
SC-25 Crackerjack Brown
SC-26 Green Thumb
SC-27 Sour Apple
SC-36 Irish Luck
SC-45 My Blue Heaven
SC-46 Rawhide
SC-60 Silver Lining
SC-73 Candy Apple Red
SC-76 Cara-Bein Blue
SC-85 Orkid
SC-89 Cutie Pie Coral
SP-254 Speckled Vanilla Dip
NT-CLR Clear Dipping Glaze or S-2101 Clear Brushing Glaze
1. Begin with properly fired shelf cone 04 Bisque. Moisten a clean sponge and wipe bisque to remove any dust.
2. Roll Glaze the inside of the vase: The ratio is 3 parts glaze to 1 part water. Use FN-009 Black and water, mix and pour inside the vase and roll to coat. Cover the inside of the vase with the mixture. Pour out the excess glaze and leave up side down to drain. If you do not leave up side down the excess glaze could pool at the bottom of the vase and cause crawling.
3. Use the RB-144 #4 Soft Fan Brush to apply one coat of CG-995 Foggy Mist over the outside of the vase. Be sure you use plenty of crystals.
4. Prepare your glazes in small cups to get ready to pour: In separate cups, squeeze about 1″ of the following glazes and mix with 1 1/2 caps of water and stir. Use these colors: SC-11 Blue Yonder, SC-52 Toadily Green and SC-97 Cant-elope.
5. Pour SC-15 Tuxedo into the plastic tip bottle and thin with 1 cap of water.
5. This goes quickly, as you want to work while each color is wet. Place the vase on a plate or foil then pour the colors over the piece. Turn the vase slightly to mingle the colors where they meet. Spray with water to get the glaze to move if needed.
6. Squeeze the thinned SC-15 Tuxedo onto the rim and let it drip down the vase. Spray with alcohol when the glaze is wet to aid movement and spreading of the glazes.
1. Begin with a properly fired shelf cone 04 bisque. Moisten a clean sponge and wipe bisque to remove dust.
2. Put the Faceted Star flat on the table, so that the small inner star is facing up.
3. Using MC-001 6mm Low Track Masking Tape, tape off the inner star. Use an X-ACTO knife to trim off any excess. You don’t want any tape on the inner star.
4. Using the Soft Fan and SC-87 Ruby Slippers, apply three coats to the inner star. Allow glaze to dry between coats. Before the last coat of glaze is completely dry, carefully remove the tape.
5. Leave the adjacent star facet as bisque.
6. Using MC-001 6mm Low Track Masking Tape, tape off the next star facet. Use an X-ACTO knife to trim off any excess tape.
7. Using the Soft Fan and SC-87 Ruby Slippers, apply three coats to the star. Allow glaze to dry between coats. Before the last coat of glaze is completely dry, carefully remove the tape.
8. Repeat steps 5-7 until the entire star is complete.
9. Make sure star is completely dry.
10. Using the Soft Fan and SG-701 Star Dust, apply two coats to the entire star.
1. Begin with properly fired shelf cone 04 bisque. Moisten a clean sponge and wipe bisque to remove any dust.
2. Use the Soft Fan to apply two coats of FN-001 White.
3. Cut out the mushroom pattern. Brush water onto the space where you want the mushroom design. Place the paper pattern onto the piece, then use a paper towel to remove excess water, smooth out any wrinkles and ensure the edges are sealed.
4. Apply another coat of FN-001 White. While the glaze is wet, place the eyelash yarn around the mushrooms shape and press into the glaze. Apply another coat of the white glaze over the yarn. After it dries and the yarn has adhered to the canvas, press with a paper towel to remove excess glaze.
5. When the gloss leaves the glaze, use the Soft Fan to apply one coat of EL-128 Wheat.
6. When the gloss leaves the glaze, remove the yarn and the paper.
7. Pencil in the lines of the mushrooms from the pattern.
8. Use the Script Liner to apply two coats of SC-73 Candy Apple Red to the mushroom caps. When dry, use the Liner or Script Liner to apply two coats of SC-16 Cotton Tail to the spots.
9. Use the Liner to add shading under the caps with SC-5 Tiger Tail. Use tiny dots of Tiger Tail to enhance the shadow areas.
10. Use the Liner to outline the design with SC-15 Tuxedo.
Begin with properly fired cone 04 bisque. Moisten a sponge and wipe bisque to remove any dust.
Take the MC-002 12mm Low Track Masking Tape and cover the top of the Clipboard, where the clip will be glued.
Place the stamp horizontally on the top of the Clipboard. Use a pencil to draw a line across the bottom of the stamp. Repeat at the bottom of the Clipboard, making the line across the top of the stamp.
Using the Soft Fan and SC-60 Silver Lining, apply two coats of glaze to the top and bottom sections of the Clipboard. Allow glaze to dry between coats.
Squeeze around a tablespoon of SC-15 Tuxedo onto the plate. Take the ST-132 Diamond Plate Stamp and place it design-side up. Take the sponge on a stick and gently dab it into the glaze. Blot off any excess onto the bare portion of the plate, then sponge the stamp. Take the stamp and gently press onto the top section of the Clipboard. Slowly pull the stamp off to avoid smearing. Repeat on the bottom section of the Clipboard.
Trace the pattern in the center of the Clipboard.
Using a combination of the Script Liner and Detail Liner with SC-74 Hot Tamale apply two coats to the body and tires of the truck. Allow glaze to dry between coats.
Using the Detail Liner and SC-35 Gray Hare, apply two coats to the dark gray accents on the truck. Allow glaze to dry between coats.
Using the Detail Liner and SC-60 Silver Lining, apply two coats to the light gray accents on the truck. Allow glaze to dry between coats.
Using the Detail Liner and SC-6 Sunkissed, apply two coats of glaze to the lights on the truck. Allow glaze to dry between coats.
Using the Detail Liner and SC-15 Tuxedo, apply two coats of glaze to the windows and tires. Allow glaze to dry between coats. Using the same brush, outline the truck.
Using the Soft Fan, apply one coat of S-2101 Clear Brushing glaze or dip into NT-CLR Clear Dipping Glaze.
Pull off the 12mm tape at the top of the Clipboard.
Fire to cone 06.
After the Clipboard has cooled, use epoxy to glue on the clip, if desired.
Form
MB-1461 Clay Clipboard
Colors
SC-6 Sunkissed
SC-15 Tuxedo
SC-35 Gray Hare
SC-60 Silver Lining
SC-74 Hot Tamale
SG-402 White Designer Liner
NT-CLR Clear Dipping Glaze or S-2101 Clear Brushing Glaze
1. Begin with properly fired shelf cone 04 Bisque. Moisten a clean sponge and wipe bisque to remove any dust.
2. Slightly thin FN-009 Black. Pour inside the vase, turn to coat, pour out the excess and drain.
3. Use the Soft Fan to apply three coats of EL-145 Ginger Root to the top section of the milk can. Apply in a circular direction. Brush in thick coats to form a ridge of glaze with your brush. Don’t flatten the ridges; they will add interest to the glaze.
4. In the middle band, use the Soft Fan to apply two coats of EL-146 Rain Cloud and one coat of EL-144 Dark Amethyst.
5. For the remainder of the milk can, apply three coats of EL-144 Dark Amethyst in a circular direction leaving ridges in the glaze.
6. Use the pattern to trace the rectangle shape onto the can. Scratch off most of the glaze in the rectangular area. Leave some of the Elements glaze as it will give it an antique look.
7. Use the Script Liner to apply 2-3 coats of SC-86 Old Lace to the rectangular space.
8. Use a palette knife to thicken SC-15 Tuxedo with AC-310 Silkscreen Medium to the consistency of peanut butter. Place the silkscreen (shiny side down) onto the rectangular area and rub the thickened mixture over the screen.
9. Use the Liner to repaint the lines on the edges of the screen if necessary.
1. Begin with properly fired shelf cone 04 bisque. Moisten a clean sponge and wipe bisque to remove any dust.
2. Using the CB-604 #4 Soft Fan apply two coats of FN-001 White to the center of the canvas – approximately 3 1/2″ square.
3. Cut out the square pattern provided. Place it on the canvas and trace around the shape. After tracing the pattern, use the Soft Fan brush and wet the glaze with water. Place the pattern into the damp glaze and press down with a paper towel. The paper towel helps seal the paper down and removes excess moisture.
4. Using the Soft Fan, apply two coats of FN-009 Black to the canvas, including the sides.
5. Apply a third coat of FN-009 Black.Place the lace into the wet glaze then brush another coat of FN-009 Black over the lace. Make a fold with the lace at the corners so it will lay down flat. By applying the coat of glaze over the lace it seals down the lace and keeps the next layer of color from seeping under the lace. This will give you a crisp lace image. As the Black begins to dry, press on a paper towel to absorb excess glaze, this will help speed the drying time.
5. After about 5 minutes, remove excess glaze with paper towel.
6. When the shine is gone from the FN-009 Black, use the Soft Fan to apply two coats of FN-001 White. Always wait until the shine is off the glaze before applying a second coat.
7. When the gloss leaves the second coat of FN-001 White remove the lace and the paper. This process can be done with any color combination you like (not just black and white).
8. Place the rose pattern onto the square area. Trace the outside edges of the rose, stem and leaves to the center of the square.
7. Use the CB-106 #6 Script Liner to apply two coats of SC-24 Dandelion to the rose. Apply a few strokes here and there with SC-97 Cant-elope, this will give the rose added dimension.
8. Use the same brush to apply two coats of SC-26 Green Thumb to the leaves and stem.
9. Place SC-15 Tuxedo on a palette or tile and sprinkle with AC-310 Silkscreen Medium. Using a palette knife mix color and medium to the consistency of thick peanut butter. if the mix is too thin add more AC-310 Silkscreen Medium or if it is too thick add more Stroke & Coat®. Too thin of a mixture will bleed under the screen and give you a blurred image. Too thick of a mixture will make it hard for the product to penetrate through the holes in the screen and give blank areas in your screen. For tips on creating the mixture watch the Silkscreening video on the Mayco YouTube channel.
10. Line up the Large Rose silkscreen with the rose you just painted. Place it shiny side down, hold in place and then apply the thickened Stroke & Coat. Once screened, remove the silkscreen and place it in water to soak for easier cleaning.
13. Dry foot or evenly stilt and fire to cone 05/06.
Begin with properly fired cone 04 bisque. Moisten a sponge and wipe bisque to remove any dust.
Take the MC-002 12mm Low Track Masking Tape and cover the top of the Clipboard, where the clip will be glued.
Using the Soft Fan and SC-55 Yella Bout It, apply two coats of the glaze to the front of the clipboard. Allow glaze to dry between coats.
Squeeze around a tablespoon of SC-97 Cant-elope onto the plate. Take the MT-013 Honeycomb Mat and place it design-side up. Take the sponge on a stick and gently dab it into the glaze. Blot off any excess onto the bare portion of the plate, then sponge the mat. Take the mat and gently press onto the Clipboard. Slowly pull the mat off to avoid smearing.
On the DSS-0101 Woodland Animals screen, locate the bear. Draw an outline around it in permanent marker. Cut it out with excess screen around the edges.
Squeeze about two tablespoons of SC-15 Tuxedo onto the plate. Add a pinch of AC-310 Silkscreen Medium. Mix with a palette knife until it becomes the consistence of peanut butter. You may need to add more Silkscreen Medium or glaze.
Place the bear in the lower right corner of the Clipboard. While holding it firmly in place, take a small amount of premixed Silkscreen Medium, and gently rub in circles starting in the center and working outward. Slowly pull up the screen to avoid smearing.
Using the carbon paper and pattern, trace the bees above the bear.
Using the Detail Liner and SC-6 Sunkissed, apply two coats of glaze to the bodies of the bees. Allow glaze to dry between coats.
Using the Detail Liner and SC-15 Tuxedo, apply one coat of glaze to the stripes in the bees. Next, outline the bees.
Using the Soft Fan, apply one coat of S-2101 Clear Brushing Glaze or dip into NT-CLR Clear Dipping Glaze.
Pull off the 12mm tape at the top of the Clipboard.
Fire to cone 06.
After the Clipboard has cooled, use epoxy to glue on the clip, if desired.
Form
MB-1461 Clay Clipboard
Colors
SC-6 Sunkissed
SC-15 Tuxedo
SC-55 Yella Bout It
SC-97 Cant-elope
NT-CLR Clear Dipping Glaze or S-2101 Clear Brushing Glaze
2) Using the CB-604 #4 Soft Fan, apply 3 coats of FN-010 Tree Green to the front and edges of the canvas.
3) Using AC-230 Clay Carbon, trace on the pattern.
4)Using the CB-110 #10/0 Mini Liner, apply AC-230 Wax resist around the design, and add the veins to the leaves.
5)Using the CB-110 #10/0 Mini Liner or CB-404 #4 Pointed Round, apply 2 coats of SG-202 White Cobblestone to the pattern areas. Apply 1 coat, as it loses its shine apply the 2nd coat.
6) Just as the Cobblestone starts to lose its shine, apply any of the listed Stroke and Coat colors at random, 1 time only.
Begin with properly fired cone 04 bisque. Moisten a clean sponge and wipe bisque to remove any dust.
Take MC-002 12mm Low Track Masking Tape and cover the top of the Clipboard, where the clip will be glued.
Cut a circle out of paper with a 4″ diameter. Trace with the pencil in the center of the Clipboard.
Using the Soft Fan and SC-60 Silver Lining, apply two coats of glaze around the circle.
Squeeze around a tablespoon of SC-35 Gray Hare on the plate. Take the sponge on a stick and gently dab the bottom of the sponge into the glaze. Blot off any excess onto the bare portion of the plate. Sponge over the area glazed with SC-60 Silver Lining.
Tape the paper circle over the circle that was previously traced.
Take the MT-011 Diamond Plate Mat and lightly sand it with fine sand paper. This will create enough texture to prevent beading-up of the glaze. Rinse with water and dry.
Remove the circle from the center of the Clipboard. Take the carbon paper and trace the monster pattern in the center of the circle.
Using the Detail Liner and Script Liner with SC-76 Cara-Bein Blue, apply two coats to the body.
Using the Detail Liner and SC-15 Tuxedo, apply two coats to the mouth and pupils of the eyes.
Using SC-45 My Blue Heaven, squeeze around 2 tablespoons on the plate. Take the sponge on a stick and gently dab the bottom of the sponge into the glaze. Blot off any excess onto the bare portion of the plate. Take the sponge and lightly dab around the inside edge of the circle.
Using the Script Liner and SG-701 Star Dust, apply one coat to the areas of the background that were glazed with SC-15 Tuxedo.
Using the Script Liner and SC-702 Celebration, apply one coat to the body of the monster.
Using the Detail Liner and SC-15 Tuxedo, outline the circle.
Using SG-402 White Designer Liner, make one dot in the pupil of each eye.
Using the Soft Fan, apply two coats of S-2101 Clear Brushing Glaze or dip into NT-CLR Clear Dipping Glaze.
Pull off the 12mm tape at the top of the Clipboard.
Fire to cone 06.
After the Clipboard has cooled, use epoxy to glue on the clip, if desired.
1. Begin with properly fired shelf cone 04 bisque. Moisten a clean sponge and wipe bisque to remove any dust.
2. Using the CB-604 #4 Soft Fan brush apply two coats of FN-001 White to the top and sides of the canvas.
3. Cut out the pattern provided. Place it on the canvas and trace the lines of the image. After tracing the pattern, use the soft fan brush and wet the glaze with water. Now place the pattern into the damp glaze and press down with a paper towel. The paper towel helps seal the paper down and removes excess moisture.
4. Using the Soft Fan, apply another coat of FN-001 White. It is okay to get glaze on the edges of the paper, but do not paint over the entire owl image. Place the lace into the wet glaze then brush another coat of White over the lace. Make a fold with the lace at the corners so it will lay flat. By applying the coat of glaze over the lace it seals down the lace and keeps the next layer of color from seeping underneath. This will give you a crisp lace image.
5. After about 5 minutes, remove excess glaze with a paper towel.
6. When the shine is gone from the FN-001 White, use the Soft Fan to apply two coats of SC-15 Tuxedo over the lace. Always wait until the shine is off the glaze before applying a second coat.
7. When the gloss leaves the second coat of SC-15 Tuxedo remove the lace and the paper. This process can be done with any color combination you like (not just black and white).
8. Using the CB-106 #6 Script Liner apply two coats of SC-24 Dandelion around the eyes and nose.
9. Apply SC-23 Jack O’Lantern to the rest of the owl’s feathers.
10. Paint the beak with two coats of SC-14 Java Bean.
11. Apply two coats of SC-74 Hot Tamale to the tie.
12. Place SC-15 Tuxedo on a palette or tile and sprinkle with AC-310 Silkscreen Medium. Using a palette knife mix color and medium to the consistency of thick peanut butter. If the mix is too thin add more AC-310 Silkscreen Medium or if it is too thick add more Stroke & Coat®. Too thin of a mixture will bleed under the screen and give you a blurred image. Too thick of a mixture will make it hard for the product to penetrate through the holes in the screen and give blank areas in your screen. For tips on creating the mixture watch the Silkscreening video on the Mayco YouTube channel.
13. Line up the Owl silkscreen with the owl you just painted. Place it shiny side down, hold in place and then apply the thickened Stroke & Coat. Once screened, remove the silkscreen and place it in water to soak for easier cleaning.
14. Use the CB-110 #10/0 Mini Liner to apply a coat of SC-15 Tuxedo over the eye glasses.
13. Dry foot or evenly stilt and fire to cone 05/06.
Begin with properly fired shelf cone 04 bisque. Moisten a clean sponge and wipe bisque to remove any dust.
Take the MC-002 12mm Low Track Masking Tape and cover where the clip will be glued.
Take the MC-001 6mm Low Track Masking Tape and place to make boxes on the Clipboard. Refer to the image of the Dragon Clipboard.
Take the DSS-0155 Comic Expressions screen and locate “POW”, “SLAT”, “OMG”, “Yoink” and the bomb. Draw an outline around them in permanent marker. Cut them out with the excess screen around the edges.
Squeeze about two tablespoons of SC-15 Tuxedo onto the plate. Add a pinch of AC-310 Silkscreen Medium. Mix with the palette knife until it becomes the consistency of peanut butter. You may need to add more Silkscreen Medium or glaze.
Place the screens in their corresponding locations. Refer to the image of the Dragon Clipboard. Screen one at a time. While holding it firmly in place, take a small amount of the premixed silkscreen medium, and gently rub in circles starting in the center and working outward. Gently pull the screen off to avoid smearing.
Using the Script Liner and Fan Brush, apply two coats of glaze to the squares that were not screened. Refer to the image of the Dragon Clipboard. Use SC-6 Sunkissed, SC-11 Blue Yonder, and SC-27 Sour Apple.
For the square with “POW”, use the Script Liner and SC-13 Grapel to apply one coat on the background. Use the Detail Liner with SC-11 Blue Yonder for the lettering. Use the same brush with SC-6 Sunkissed for the inner burst and SC-74 Hot Tamale for the outer burst.
For the square with “SPLAT”, use the Script Liner and SC-11 Blue Yonder to apply one coat to the background. Use the Detail Liner with SC-6 Sunkissed to fill in the lettering. Use the same brush with SC-27 Sour Apple for the dripping goo.
For the square with “OMG”, use the Script Liner and SC-6 Sunkissed to apply one coat to the background. Use the Detail Liner with SC-74 Hot Tamale to fill in the lettering.
For the square with the bomb, use the script Liner and SC-74 Hot Tamale to apply one coat to the background. Use the Detail Liner with SC-6 Sunkissed for the flame.
For the square with “YOINK”, use the script Liner and SC-75 Orange-A-Peel to apply one coat to the background. Use the Detail Liner with SC-27 Sour Apple for the lettering.
Using SG-401 Black, make decorative dots in the upper green and lower yellow squares.
Using SG-402 White, make decorative lines in the upper orange and lower blue squares.
Repeat steps 8-12. Each square should have a total of two coats of glaze. Before the glaze is completely dry, remove the 6mm tape.
Using the Soft Fan, apply one coat of S-2101 Clear Brushing Glaze or dip into NT-CLR Clear Dipping Glaze.
Pull off the 12mm tape at the top of the Clipboard.
Fire to cone 06.
After the Clipboard has cooled, use epoxy to glue on the clip, if desired.
Form
MB-1461 Clay Clipboard
Colors
SC-6 Sunkissed
SC-11 Blue Yonder
SC-13 Grapel
SC-27 Sour Apple
SC-74 Hot Tamale
SG-401 Black
SG-402 White
NT-CLR Clear Dipping or S-2101 Crystal Clear Brushing
1. Begin with properly fired shelf cone 04 bisque. Moisten a clean sponge and wipe bisque to remove any dust.
2. Starting 2.5″ up from the bottom of the canvas, place the pattern on top of the AC-230 Clay Carbon Paper and place both sheets on the bisque. Only one side of the AC-230 Clay Carbon Paper transfers so test before tracing the entire design. Use a pen or pencil to trace the pattern.
3. All of the color on this project is applied with a plastic card hotel room key, loyalty card or plastic card; a squeegee will also work. You will apply all the colors once then go back a second time for two coats. Use the picture and pattern for a visual reference and for color placement.
4. With the card, pick up SC-75 Orange-A-Peel and SC-73 Candy Apple Red about 50/50 on the end of the card. Glazing left to right and starting with the first house, drag the card horizontally to the end of the first house on the left side. Repeat to cover the house.
5. The second house: Again left to right, pick up SC-91 Seabreeze with a small amount of SC-11 Blue Yonder on the card or squeegee and drag across to the third house.
6. The third house: Repeat the process with SC-29 Blue Grass and SC-27 Sour Apple. Picking up color on the plastic card or squeegee and dragging left to right across the house.
7. The fourth house: SC-16 Cotton Tail and SC-77 Glo-Worm.
8. The fifth house: SC-26 Green Thumb and SC-27 Sour Apple.
9. The last house: SC-73 Candy Apple Red and SC-75 Orange-A-Peel.
10. Repeat the colors again but add in a small amount of SC-15 Tuxedo to shade the second, third and last house.
11. The roofs are treated the same, refer to photo for color placement.
12. For the background and sky, use the card to apply one coat of SC-73 Candy Apple Red near the roof lines. Use the credit card like a palette knife to fill the space.
13. For the foreground or area underneath the houses: apply the color with the card in a vertical direction. Pick up the color in the same manner as before.
14. House one: Use SC-75 Orange-A-Peel and SC-73 Candy Apple Red from the bottom of the house to the bottom of the canvas.
15. House two: Pick up SC-16 Cotton Tail with a small amount of SC-27 Sour Apple.
16, House three: Pick up SC-16 Cotton Tail with a small amount SC-26 Green Thumb.
16. Last three houses: Pick up a small amount of SC-75 Orange-A-Peel, SC-73 Candy Apple Red and SC-97 Cant-elope. Use the credit card like a palette knife to fill the space. This is a blending so it doesn’t have to be perfect or precise.
17. In the sky area: pick up SG-501 Sculpting Medium and, in a knock down fashion, drag one coat of the Sculpting Medium across the sky area of the canvas. When the shine is off the glaze apply SC-11 Blue Yonder and touches of SC-97 Cant-elope for the sky.
18. Thicken SC-15 Tuxedo with AC-310 Silkscreen Medium using a palette knife. See the directions on the Designer Silkscreen, or watch the video on Mayco’s YouTube channel, for proper consistency.
19. Using the DSS-0103 Flourishes, with the shiny side up, screen the section of flourish onto a couple of houses as shown.
20. When dry outline all the houses with SG-401 Designer Liner Black or use the CB-110 #10/0 Mini Liner with thinned SC-15 Tuxedo. Without clear glaze Designer Liner will be matte and have texture; clear glaze will provide gloss.
21. Use the card to apply two coats of SC-29 Blue Grass to the sides of the canvas.
22. Fire to cone 06.
Form
MB-1478 12″ x 12″ Square Clay Canvas
Colors
SC-11 Blue Yonder
SC-15 Tuxedo
SC-16 Cotton Tail
SC-26 Green Thumb
SC-27 Sour Apple
SC-29 Blue Grass
SC-73 Candy Apple Red
SC-75 Orange-A-Peel
SC-77 Glo-Worm
SC-91 Seabreeze
SC-97 Cant-elope
SG-401 Designer Liner Black
SG-501 Sculpting Medium
Decorating Accessories
AC-230 Clay Carbon Paper
AC-310 Silkscreen Medium
DSS-103 Flourishes
Miscellaneous Accessories
Palette knife
Plastic card (old loyalty card or hotel room key) or squeegee
1. Begin with properly fired shelf cone 04 bisque. Moisten a clean sponge and wipe bisque to remove any dust.
2. Using the CB-604 #4 Soft Fan brush apply three coats of FN-008 Brown to the top only of the canvas. If you plan to use the Magic Metallics on the side do not use the Foundations glaze. (Magic Metallics are applied after the glaze firing) If you will not be using the Magic Metallics, base coat the sides with the FN-008 Brown.
3. Each canvas will have a different stenciled background. Select a stencil and lay it over the dry Brown glaze. There are two options for applying the glaze over the stencil.
Option 1 – Use a 2″ Foam Roller (available at home improvement stores) and lightly roll the SC-15 Tuxedo over the stencil. Roll lightly in different directions for a crisp edge.
Option 2 – Use a dense sponge or ball up the BT-910 Synthetic sponge and gently tap over the stencil to apply the SC-15 Tuxedo. The key is not to apply too much glaze at one time and to take your time.
4. Choose one of the bird patterns. Cut out the outline of the bird then use a pencil to trace the outside of the shape onto the canvas.
5. Pencil in the lines that separate the colors on the bird. As an option, you can cut the pattern in pieces and use a pencil to trace the outlines from the cut.
6. Follow the pattern for color placement on the beaks, eyes, feet, branches or logs. Apply two coats of Stroke & Coat® color.
7. Using the CB-110 #10/0 Mini Liner and SC-15 Tuxedo outline the beaks, eyes, feet, branches or logs.
Note: For the Toucan and Flamingos outline with SG-408 Designer Liner Orange.
8. Using the CB-110 #10/0 Mini Liner apply one coat of AC-302 Wax Resist to outline all of the lines traced on from the pattern and over the SC-15 Tuxedo. Also, apply one coat of the AC-302 wax over the painted eyes, beak, branches, feet or logs – this will keep Cobblestone off of the design.
9. When the wax is dry apply two coats of SG-202 White Cobblestone to the bird’s body. The wax resist will repel the SG-202 White Cobblestone so brush up to the Wax Resist. If you get too much glaze on the Wax Resist take a Q-Tip or a clean brush and remove the glaze.
Tip: Glide the SG-202 White Cobblestone over the bird body. Load your brush (CB-106 #6 Script Liner) full of glaze. The script liner has long hairs that are meant to hold a lot of glaze. This will allow you to glide the glaze onto the piece vs. lots of brushstrokes.
Tip: When the shine is off the glaze it is time to apply the second coat of SG-202 White Cobblestone glaze. With Cobblestone glaze it is important to apply the next coat of glaze before the Cobblestone dries or cracks.
10. After the shine has left the second coat of Cobblestone glaze, use the CB-106 #6 Script Liner to apply one coat of the Stroke & Coat® color indicated on the pattern for the appropriate bird. One moderate coat of Stroke & Coat® is all you want so that the Stoke & Coat® does not weigh down the Cobblestone Glaze and prevent it from breaking up.
11. No clear glaze is needed. The Foundations and Stroke & Coat glazes will fire to a glossy finish.
12. Either dry foot or stilt evenly and fire to cone 05/06.
Form
MB-1352 6″x6″ Square Clay Canvas
Colors
SC-2 Melon-choly
SC-5 Tiger Tail
SC-9 Jaded
SC-11 Blue Yonder
SC-12 Moody Blue
SC-13 Grapel
SC-15 Tuxedo
SC-16 Cotton Tail
SC-25 Crackerjack Brown
SC-27 Sour Apple
SC-73 Candy Apple Red
SC-75 Orange-A-Peel
SC-97 Cant-elope
FN-008 Brown
SG-202 White Cobblestone
SG-408 Designer Liner Orange
Optional: MM-105 Gold Metallic
MM-106 Steel Metallic
MM-202 Green Patina
AC-302 Wax Resist (dedicated brush)
Decorating Accessories
SL-442 Stars Stencil (discontinued)
SL-436 Fern Leaf Stencil
SL-447 Fence Stencil
SL-448 Doily Stencil
SL-455 Tire Tracks Stencil
CB-110 #10/0 Mini Liner
CB-604 #4 Soft Fan
CB-106 #6 Script Liner
Miscellaneous Accessories
Palette knife
Plastic card (hotel or old charge card) or squeegee
Begin with properly fired shelf cone 04 bisque. Moisten a clean sponge and wipe bisque to remove any dust.
Take the MC-002 12mm Low Track Masking Tape and cover where the clip will be glued.
Take the Pencil and draw a horizontal line down the middle of the Clipboard.
To make the fire on the top half, you will need bottles of SC-74 Hot Tamale, SC-75 Orange-A-Peel and SC-6 Sunkissed. Take the bottle of SC-74 Hot Tamale and squeeze out a generous amount over the top third. Repeat with SC-75 Orange-A-Peel over the middle third. Repeat with SC-6 Sunkissed over the bottom third. The top half of the Clipboard should now be almost covered in glaze. Take the Needle Tool and run it through the glaze from the middle of the Clipboard to the top. It should start to look like flames. Take the Clipboard and gently tap the top on a surface so that the glaze starts to run off. Do this until all the glaze has run together and looks like flames. Wipe off any excess.
Take the DSS-0153 Cute Dragon screen and locate the castle, dragon with fire and hatching dragon. Draw an outline around them in permanent marker. Cut them out with the excess screen around the edges.
Squeeze about two tablespoons of SC-15 Tuxedo onto the plate. Add a pinch of AC-310 Silkscreen Medium. Mix with a palette knife until it becomes the consistency of peanut butter. You may need to add more Silkscreen Medium or glaze.
Place the screens in their corresponding locations. Screen one at a time. While holding it firmly in place, take a small amount of the premixed silkscreen medium, and gently rub in circles starting in the center and working outward. Gently pull the screen off to avoid smearing.
Using the Detail Liner and SC-52 Toad-ily Green, apply two coats to the body and inner ears of both dragons. Use the same brush with SC-55 Yella Bout It to apply two coats to the belly and outer ears of both dragons.
Using the Detail Liner and SC-6 Sunkissed, apply two coats to the spines on both dragons. Using the Script Liner, apply two coats to the middle flame coming out of the large dragon’s mouth.
Using the Script Liner and SC-1 Pink-A-Boo, apply two coats to the mouth of the large dragon.
Using the Scrip Liner and SC-74 Hot Tamale, apply two coats to the tongue of the large dragon and the small flames coming out of it’s mouth.
Using the Scrip Liner and SC-75 Orange-A-Peel, apply two coats to the outer two flames coming out of the large dragon’s mouth.
Using a combination of the Soft Fan, Script Liner and Detail Liner, apply two coats of glaze to the background on the bottom half of the Clipboard. Apply two coats to the castle, leaving the windows to show the flames. Make some small treed next to the castle.
Using the Soft Fan, apply one coat of SG-701 Star Dust over the black background.
Using the Soft Fan, apply one coat of S-2101 Clear Brushing Glaze to the teeth of the dragons and the egg or dip into NT-CLR Clear Dipping Glaze.
Pull off the tape at the top of the Clipboard.
Fire to cone 06.
After the Clipboard has cooled, use epoxy to glue on the clip, if desired.
Form
MB-1461 Clay Clipboard
Colors
SC-1 Pink-A-Boo
SC-6 Sunkissed
SC-15 Tuxedo
SC-52 Toad-ily Green
SC-55 Yella Bout It
SC-74 Hot Tamale
SC-75 Orange-A-Peel
SG-701 Speckta-Clear Star Dust
NT-CLR Clear Dipping or S-2101 Crystal Clear Brushing
Begin with properly fired shelf cone 04 bisque. Moisten a clean sponge and wipe bisque to remove dust.
Using the Soft Fan, apply one coat of SC-54 Vanilla Dip to the front of the Clipboard. Allow it to dry.
Using the Soft Fan, apply another coat of SC-54 Vanilla Dip to the front of the Clipboard. Before it is dry, use the Script Liner to apply SC-41 Brown cow and SC-86 Old Lace in random vertical strokes. Use the Soft Fan to blend the colors before they dry.
Squeeze around a Tablespoon of SC-48 Camel Back onto the plate. Take MT-002 Wood Grain Mat and place it design-side up. Take the Sponge on a Stick and gently dab the bottom of the sponge into the glaze. Blot off any excess onto the bare portion of the plate, then sponge onto the stamp. Take the stamp and gently press onto the Clipboard.
Take DSS-0153 Farmhouse silkscreen and locate the cow, weather vane and “Farm to Table” images. Draw an outline around them in permanent marker. Cut them out with the excess screen around the edges.
Use a pencil to make a square on the clipboard where the images will be screened (“Farm to Table” is top left, weather vane is top right, and cow is at the bottom). Make sure the square is big enough for the entire image. Use an X-ACTO Knife to scrape away most of the glaze from the box. Using the Script Liner and SC-86 Old Lace apply two coats of glaze to each of the three boxes. Allow glaze to dry completely.
Squeeze about two Tablespoons of SC-15 Tuxedo onto the plate. Add a pinch of AC-310 Silkscreen Medium. Mix with a palette knife until it becomes the consistency of peanut butter. You may need to add more Silkscreen Medium or glaze.
Place the screens over their corresponding squares. Screen one at a time. While holding it firmly in place, take a small amount of the premixed silkscreen medium, and gently rub in circles starting in the center and working outward.
Use the X-ACTO Knife to remove the glaze at the top of the clipboard, where the clip will sit.
Using the Soft Fan and SC-15 Tuxedo, apply one coat to the edges of the Clipboard.
Using the Soft Fan, apply two coats of S-2101 Clear Brushing Glaze or dip into NT-CLR Clear Dipping Glaze. Do glaze portion where the clip will be placed.
Fire to Cone 06.
After the Clipboard has cooled, use epoxy to glue on the clip
Form
MB-1461 Clay Clipboard
Colors
SC-15 Tuxedo
SC-41 Brown Cow
SC-48 Camel Back
SC-54 Vanilla Dip
NT-CLR Clear Dipping or S-2101 Crystal Clear Brushing
Begin with properly fired shelf cone 04 bisque. Moisten a clean sponge and wipe bisque to remove any dust.
Using a CB-604 #4 Soft Fan, plop on each of the Jungle Gem glazes randomly. Allow to overlap some, but you’re generally trying to cover most of the surface area with glaze here.
Fill in any holes between crystal plops with PC-601 Clear Cascades, allowing some overlap as well.
Repeat the previous 2 steps to add a second layer. You don’t need to be precise or overlap the second layer either.
The more crystal glazes in an area, the more movement that will create, so be aware of how many crystals are gathered around the bottom fins of the fish to prevent any accidents.
Apply 1-2 coats of CG-977 Ink Spots to the belly.
Using a CB-106 #6 Soft Fan, apply some streaks of SC-15 Tuxedo randomly over the fish.
Begin with properly fired shelf cone 04 Bisque. Moisten a clean sponge and wipe bisque to remove any dust.
Optional: Dremel out holes in the headlights for the bulbs, if desired. Tape over the holes when glazing the inside of the truck.
Slightly thin FN-009 Black (3 parts glaze to 1 part water) and pour inside of the truck and roll to coat all surface areas. Pour out the excess glaze and leave upside down to drain the excess glaze. Sponge off any black glaze that leaks onto the truck body.
Using either the Daggar brush or CB-604 #4 Soft Fan the Brush apply 3 coats of SC-22 Carrot Top to the body.
Shading: Use the Dagger brush and load the length of the brush with SC-80 Basketball. Lay the tip against the wheel well, running board and fender and apply one coat.
Shading: In the same areas apply one coat of SC-81 Cinnamon Stix. This time only load 1/2 of the brush bristles with SC-81 Cinnamon Stix so it is a narrower application of color.
Tip: if the colors are too stark or look like specific lines you can apply a coat of SC-22 Carrot Top over the shading to knock down.
For the yellow-orange sections of the truck – the fender, running board and wheel wells. Apply two coats of SC-97 Cant-elope. Two coats of SC-97 Cant-elope is sufficient as it is a strong color. This area is smaller so the CB-106 #6 Script Liner may work best.
Shading or highlights: Use the Dagger brush to apply SC-42 Butter Me Up to the high points of the areas. Think of where the sun would hit the fenders.
Shading or highlights: Using the Daggar brush with the point of the brush next to the body of the truck apply 1 coat of SC-5 Tiger Tail over the SC-42 Butter Me Up.
Next: slightly SC-15 Tuxedo and 1/2 load the chiseled bristles to apply 1 coat ver the SC-5 Tiger Tail. i
Using the CB-106 #6 Script Liner apply two coats of SC-60 Silver Lining to the grill and hub cabs (cabs can be either SC-97 Cant-elope or SC-60 Silver Lining). Let dry before adding next color/steip.
When the SC-60 is dry brush a very thin coat of SC-15 Tuxedo over the grill and bumper to shade or antique. With the side of a wet brush rub over the grill to bring back the gray color.
Brush two coats of SC-97 Cant-elope or two coats of SC-60 Silver Lining to the hubcaps. Using the Dagger Brush shade around the edges with SC-15 Tuxedo,
Use the CB-106 Script Liner to apply brush two coats of SC-15 Tuxedo to the tires.
Windows: You want the finish to look streaky as if light is hitting the glass. Two options: 1. Using the CB-106 Script Liner apply one full coat the the glass. Then add a second coat here and there for depth. 2. Paint the glass solid and while the second coat is still wet, lightly brush in SC-16 Cotton Tail here and there.
Apply clear glaze of choice.
Stilt and fire to cone 05/06.
Pull the headlights through the holes, put a bead of hot glue around the opening, push the headlight into place.
Begin with properly fired cone 04 bisque. Moisten a sponge and wipe bisque to remove any dust.
Take the MC-002 12mm Low Track Masking Tape and cover the top of the Clipboard, where the clip will be glued.
Take the DSS-1056 Llama Drama screen and find the llama and cactus. Draw an outline around them in permanent marker. Cut them out with excess screen around the edges.
Squeeze about two tablespoons of SC-15 Tuxedo onto the plate. Add a pinch of AC-310 Silkscreen Medium. Mix with a palette knife until it becomes the consistency of peanut butter. You may need to add more Silkscreen Medium or Glaze.
Place the llama in the lower right corner of the Clipboard. While holding it firmly in place, take a small amount of premixed Silkscreen Medium, and gently rub in circles starting in the center and working outward. Slowly pull up the screen to avoid smearing. Repeat for the cactus in the lower left portion of the Clipboard.
Using the Soft Fan and Script Liner (to outline screens) with SC-2 Melon-Choly, apply one coat of glaze to the bottom half of the Clipboard. Using the Soft Fan with SC-16 Cotton Tail, blend with the SC-2 Melon-Choly in the center of the Clipboard and continue to the top of the Clipboard. After dry, repeat for a second coat.
Using the AC-220 Detailer Tips and 1 oz Bottle, squeeze SC-24 Dandelion into the bottle until it is 1/4 full. Add 1/4 water and shake. Fill the remaining 1/2 with rubbing alcohol. Put the cap on and cut the tip with scissors. Shake vigorously. Make sure the glaze at top of the Clipboard is still wet. If not, add more glaze. Drop 5-10 drops in the upper left corner of the Clipboard to make the sun.
Using the Detail Liner and SC-27 Sour Apple, apply two coats to the cactus. Allow glaze to dry between coats.
Using the Detail Liner and SC-13 Grapel, SC-6 Sunkissed, SC-27 Sour Apple and SC-11 Blue Yonder apply two coats to the corresponding sections of the llama’s saddle blanket. Refer to picture. Allow glaze to dry between coats.
Take the needle tool and make lines coming out from the sun.
Using the Soft Fan, apply one coat of S-2101 Clear Brushing Glaze or dip into NT-CLR Clear Dipping Glaze.
Pull off the 12mm tape at the top of the Clipboard.
Fire to cone 06.
After the Clipboard has cooled, use epoxy to glue on the clip, if desired.
Form
MB-1461 Clay Clipboard
Colors
SC-2 Melon-Choly
SC-6 Sunkissed
SC-11 Blue Yonder
SC-13 Grapel
SC-15 Tuxedo
SC-16 Cotton Tail
SC-24 Dandelion
SC-27 Sour Apple
NT-CLR Clear Dipping Glaze or NT-BR Clear Brushing Glaze
1. Begin with properly fired shelf cone 04 Bisque. Moisten a clean sponge and wipe bisque to remove dust.
2. Thin SC-12 Moody Blue on a plate, then use a stiff toothbrush to spatter the splash bowl with the thinned color. Spatter heavily on the splash tips and the outside of the bowl.
3. Using a palette knife, mix SC-15 Tuxedo with AC-310 Silkscreen Medium to the consistency of peanut butter. Use the clownfish from DSS-0102 Sea Life with the shiny side down. Rub the thickened Tuxedo over the fish screen. Repeat two more times in a circular direction inside of the bowl. Gently clean the screen.
4. On the orange areas of the fish, use the Script Liner and Liner to apply two coats of SC-75 Orange-A-Peel. Apply one coat of SC-15 Tuxedo to the black fins adn outline the fish and sections of the fish.
5. Dip into NT-CLR or use the Soft Fan to apply two coats of S-2101 Clear.
6. Fire to cone 06.
Form
MB-1368 Splash Bowl
Colors
SC-12 Moody Blue
SC-15 Tuxedo
SC-75 Orange-A-Peel
NT-CLR Clear Dipping or S-2101 Clear Brushing Glaze
Use the Soft Fan to brush three coats of CG-965 Mocha Marble to the breast. Apply three coats of SC-65 Peri-Twinkle to the remainder of the pot.Let dry.
Use the foam roller to apply SC-12 Moody blue to MT-008 Spiral Mat. Press to the Peri-twinkle section of the owl pot.
For the eyes, use the Script Liner to apply two coats of SC-16 Cotton Tail to the outside edge as shown. Use the Soft Fan to apply three coats of SC-11 Blue Yonder to the bottom of the tray. Let dry.
Use a circle template to outline the pupils to bottom of the trays, over the Blue Yonder. Use the Script Liner to apply two coats of SC-15 Tuxedo to the pupils. Outline the edge in Tuxedo. Use SC-16 Cotton Tail to create dots in the eyes for the highlight.
Use the Soft Fan to apply two coats of S-2101 Clear to the tray eyes.
Temporarily fix the eyes to the rim of the pot. Use a small piece of clay to shape a beak to fit between the eyes. Let dry. Brush the top of the nose with three coats of SC-6 Sunkissed.
Fire to cone 06 all pieces separately.
After firing, epoxy the eyes and nose to the rim of the clay pot.
1. Begin with properly fired shelf cone 04 Bisque. Moisten a clean sponge and wipe bisque to remove any dust.
2. Use the Soft Fan to apply two thinned coats of SC-27 Sour Apple to the front of the tray and three coats (not thinned) to the back of the tray.
3. Use the foam roller to apply SC-8 Just Froggy to MT-002 Wood Grain Mat, then press the mat onto the tray. Let dry. Place tape over the edge of the first stamped design to avoid a double image when stamping again.
4. Thicken S-2101 Clear with AC-310 Silkscreen Medium and use a palette knife mix to the consistency of peanut butter. Add a few drops of food coloring to tint the mixture. Starting at the center of the tray, place the tiki mask from DSS-0147 Island (shiny side down) onto the center of the tray. Rub mixture over the screen. This is for color placement only. Repeat on each side of this image for the other masks.
5. Start on the left side of the tray and use the Script Liner to apply two coats of the following colors: SC-77 Glow Worm, SC-11 Blue Yonder, SC-75 Orange-A-Peel. Avoid the eyes and the mouth.
6. Use the Liner to apply one coat of SC-16 Cotton Tail to the whites of the eyes and the teeth.
7. Thicken SC-15 Tuxedo as in step 4 and place the tiki mask screen (shiny side down) over the previously screened image. Check to ensure the alignment is correct then rub the thickened Tuxedo over the screen. Repeat for each mask.
8. Dip into NT-CLR Clear Dipping Glaze or use the Soft Fan to apply two coats of S-2101 Clear to the top of the tray.
Use the Soft Fan to apply three coats of CG-989 Fruit Punch onto the 6 1/2″ drip tray, three coats of CG-954 Wildfire on the 4 1/2″ drip tray and three coats of CG-753 on the 3″ drip tray.
Use the Soft Fan to apply three coats of SC-54 onto the outside and bottom of the clay pot.
Place all of the pieces together to fuse in the kiln.
1. Begin with properly fired shelf cone 04 bisque. Moisten a clean sponge and wipe bisque to remove any dust.
2. Use the Clay Carbon Paper to transfer the pattern onto the bisque. Then, cut the anchor out of the pattern and save to use as a mask.
3. Use the CB-106 #6 Script Liner to apply one coat of SC-16 Cotton Tail to the anchor design on the canvas. Place the anchor cut out onto the wet glaze and gently press to adhere to bisque.
4. Dampen the blue shop towel and squeeze out excess water. Squirt SC-54 Vanilla Dip onto the towel then squirt smaller patches of SC-2 Melon-choly and SC-25 Crackerjack Brown around the towel. Fold the towel in half. Unfold the towel and fold in half the other way. Unfold the towel and fill in any areas missing color with a dab of the glazes being used.
5. Place the towel onto the canvas. Use a dry foam roller to roll over the paper towel to transfer the glaze onto the piece.
6. Holding two sides of the towel, lift it straight up from the piece. Roll the dry foam roller over the wet glaze to remove any excess. Wipe the excess glaze off of the roller after each pass of the roller. Remove the paper anchor.
7. Use the CB-106 #6 Script Liner and CB-110 #10/0 Mini Liner to apply two coats of SC-16 Cotton Tail to the rope.
8. Use the Script Liner and Mini Liner to apply two coats of SC-60 Silver Lining to the anchor. Add a bit of SC-15 Tuxedo to some of the SC-60 Silver Lining to add shading.
9. Using the same brushes, apply one coat of SC-32 Bluebeard to the cross bar on the anchor. Add a bit of SC-15 Tuxedo to some of the SC-32 Bluebeard to create shading. Paint the ring, tips of the anchor and edges of the canvas with SC-15 Tuxedo.
10. Use the foam roller or a sponge dotter to apply SC-25 Crackerjack Brown to portion of the ST-127 Crackle Stamp. Press the stamp randomly around the canvas, reapplying glaze as needed. Applying glaze to portions of the stamp allows for a less uniform look.
11. Let dry completely.
12. Use the Clay Carbon Paper (or tissue paper and a permanent marker) to retrace the pattern onto the piece.
13. Outline the design and go over the letters with the Mini Liner and SC-15 Tuxedo or SG-401 Designer Liner Black.
1. Begin with a properly fired shelf cone 04 Bisque. Moisten a clean sponge and wipe bisque to remove dust.2. Find the center of the can, mark with a pencil.
3. Pour 2 tablespoons of S-2101 Clear onto a palette and tint with food coloring. Sprinkle with AC-310 Silkscreen Medium and blend with a palette knife to the consistency of peanut butter. Position the guitar screen from DSS-0152 Day of the Dead in the center of the can (shiny side down), rub the thickened clear over the screen, repeat for the marigolds on the side of the guitar.
4. Brush one coat of FN-041 Medium Blue to the body of the guitar and two coats of SC-73 Candy Apple Red to the neck. Brush three coats of SC-75 Orange-A-Peel to the marigolds and one coat of SC-73 Candy Apple Red to the center. Use CB-106 Script Liner and CB-110 Liner.
5. Thicken SC-15 Tuxedo as in the above directions, position the screen over the painted screens, check to make sure they are in perfect position. Rub the thickened Tuxedo over the painted screens.
6. Thin slightly FN-041 Medium Blue, pour to the inside, roll to coat, our out the excess glaze, drain.
7. Tape on the top and bottom edges, brush three coats of FN-041 Medium Blue, remove the tape.
8. Brush the middle section with two coats of S-2101 Clear, use CB-604 Soft Fan, or dip in a Clear Glaze.
8. Fire to cone 05/06.
Form
MB-1405 Can It- Quart Can
Colors
SC-15 Tuxedo
SC-31 The Blues
SC-73 Candy Apple Red
SC-75 Orange-A-Peel
FN-041 Medium Blue
S-2101 Clear Brushing Glaze OR NT-CLR Clear Dipping Glaze
Begin with properly fired shelf cone 04 Bisque. Moisten a clean sponge and wipe bisque to remove any dust.
Brush on two coats of FN-001 White to the tile with Soft Fan brush.
When dry, screen the crab from DSS-0148 Sea Life 3XL using SC-15 Tuxedo thickened with Silkscreen Medium. For further instruction see package directions.
Mix 1:1 rubbing alcohol and SC-12 Moody Blue in a Detailer Bottle, mix the same with SC-11 Blue Yonder in a second bottle. Work in sections apply a heavy coat of FN-001 White, squeeze drops of the mix of SC-12 Moody Blue, leave space for expansion. Apply drops of the alcohol mix of SC-11 Blue Yonder around the Moody Blue drops. Dot again with color to deepen.
Brush one coat of SC-31 The Blues to the crab and one coat of SC-74 Hot Tamale to the claws.
1. Begin with properly fired shelf cone 04 Bisque. Moisten a clean sponge and wipe bisque to remove any dust.
2. Slightly thin FN-041 Medium Blue with water. Pour inside the can, roll to coat, pour out the excess and drain.
3. Draw a pencil line down the center of the can.
4. Pour two tablespoons of S-2101 Clear onto a palette and tint with food coloring. Sprinkle with AC-310 Silkscreen Medium and blend well with a palette knife to the consistency of peanut butter. Use the various screens from DSS-0152 Day of the Dead. Position the heart screen in the center of the can (shiny side down) and rub the mixture over the screen. Next, screen the medallions in various sizes around the heart. This screening is for color placement only.
5. Use the Script Liner to apply two coats of various colors to the medallions. Apply three coats of SC-74 Hot Tamale to the heart and three coats of SC-97 Cant-elope to the flame. Apply one thin coat of SC-31 The Blues to the wings.
6. Thicken SC-15 Tuxedo with AC-310 Silkscreen Medium as step 3. Place the screen directly onto the previously screened image (shiny side down). Check all sides to ensure it is in proper alignment. Rub the thickened Tuxedo over the screen.
7. Tape the edge at the top and bottom of the can. Use the Soft Fan to apply three coats of FN-041 Medium Blue at the top and bottom. Remove the tape.
8. Dip into NT-CLR Clear Dipping Glaze or use the Soft Fan to apply two coats of S-2101 Clear to the center section of the can.
9. Fire to cone 05/06.
Form
MB-1405 Can It – Quart
Colors
SC-11 Blue Yonder
SC-15 Tuxedo
SC-27 Sour Apple
SC-31 The Blues
SC-74 Hot Tamale
SC-97 Cant-elope
FN-041 Medium Blue
S-2101 Clear Brushing Glaze OR NT-CLR Clear Dipping Glaze
Begin with properly fired shelf cone 04 bisque tile. Moisten a clean sponge and wipe bisque to remove dust.
Use the Soft Fan to apply two coats of FN-001 White to the front and sides of the canvas. Let dry, then trace the pattern onto the canvas.
Use the Script Liner to fill the frog’s body with two thick coats of CG-987 Tree Frog. Use the same brush to apply two 2 coats of SC-75 Orange-A-Peel to the tips of the feet.
Use the Liner with SC-15 Tuxedo to outline the frog.
Mix 1 TBS of SC-12 Moody Blue, 1 TBS of water, and 2 drops of liquid soap. Double the recipe if the bubbles won’t easily reach the top of the container. Bubbles can be collected with a spoon and dropped on a tile.
With a straw, blow into the mixture, let the bubbles flow over the top and drop onto the tile around the frog. Or you can blow the bubbles till they start to spill over the top of the cup. Press the canvas to the bubbles allowing the bubbles to burst on their own. This will create an assortment of bubble textures.
Scrape the crystals away from an oval area to create the eyes. Fill in with two coats of SC-16 Cotton Tail. Add one coat of SC-15 Tuxedo for the pupil.
Clear glaze background using CB-604 Soft Fan, 2 coats with S2101 Crystal Clear Brushing. Fire to cone 06/05.
Form
6″ tile
Colors
CG-987 Tree Frog
FN-001 White
SC-75 Orange-A-Peel
SC-15 Tuxedo
SC-12 Moody Blue
NT-CLR Clear Dipping or S-2101 Clear Brushing Glaze
1. Begin with properly fired shelf cone 04 bisque. Moisten a clean sponge and wipe bisque to remove any dust.
2. Using the AC-230 Clay Carbon Paper trace on the pattern. Only one side of the AC-230 Clay Carbon Paper transfers so test before tracing the entire design. Lay the pattern on top of the AC-230 Clay Carbon Paper and place both sheets on the bisque. Use a pen or pencil to trace the pattern. Pen presses a little firmer.
3. Using the MC-002 1/2″ Low Tack Masking Tape, tape the inside of the vase at the edge and the bottom
4. Place the SL-456 Camo Stencil over the canvas. Lightly dab SC-11 Blue Yonder over the stencil (heavy application will bleed) going around the vase and flowers.
5. Remove the tape.
6. Place a piece of the 1/2″ Masking Tape to the outside edges and bottom of the vase. Be sure the entire vase area is exposed.
7. Use the CB-106 Script Liner pat color onto the vase in thirds. The goal is to graduate the color from left to right and darker to lighter on the vase. Begin with SC-12 Moody Blue on the left third of the vase and with a few pats past center. Pat SC-11 Blue Yonder to the next third and SC-45 My Blue Heaven over the right edge of the SC-11 Blue Yonder extending to the right side of the vase. Overlap colors randomly to keep the gradation between colors soft.
8. Remove the tape.
9. Use the Script Liner to apply two coats of the following colors in a random manner where the pattern places the flowers. Try to separate the color and not overlap. Pat on two coats of: SC-06 Sunkissed, SC-97 Cant-elope, SC-11 Blue Yonder, SC-13 Grapel, SC-75 Orange-A-Peel, SC-73 Candy Apple Red.
10. Use the sponge-on-a-stick to pat SC-15 Tuxedo onto sections of the ST-345 Deco Circles stamp. Use a light up and down pouncing motion so the glaze stays on the high part of the stamp design.
11. Press the stamp onto the painted flower area in a random pattern. Repeat to fill in the floral area with stamped centers.
1. Begin with properly fired shelf cone 04 Bisque. Moisten a clean sponge and wipe bisque to remove any dust.
2. Use the Soft Fan to apply three coats of FN-002 Yellow to the back of the tray and three coats of FN-013 Light Yellow to the front of the tray. Let dry.
3. Use the foam roller to apply SC-34 Down to Earth onto MT-013 Honeycomb Mat then press the mat onto the tray as shown.
4. Thicken S-2101 Clear with AC-310 Silkscreen Medium and use a palette knife mix to the consistency of peanut butter. Add a few drops of food coloring to tint the mixture. Using the butterflies from DSS-0113 Bugs (shiny side down), rub the thickened Clear over the screen. You can immediately re-use the screen without cleaning between prints in this application.
5. For the large butterflies, use the Script Liner to apply two coats of SC-23 Jack O’Lantern onto the wings near the body. Blend in SC-75 Orange-A-Peel to finish the wings.
6. Use the Liner and Script Liner to apply two coats of SC-13 Grapel onto the small butterflies. Let dry.
7. Thicken SC-15 Tuxedo as in step four. Place the butterfly screen over the previously screened image ensuring the design is in alignment. Rub the thickened Tuxedo over the screen. Wash between uses.
Begin with properly fired shelf cone 04 Bisque. Moisten a clean sponge and wipe bisque to remove any dust making sure not to over saturate the bisque.
Use the Soft Fan to apply one coat of SC-16 Cotton Tail to the tile.
Pour SC-16 Cotton Tail into a small cup and add water to thin; do the same with SC-76 Cara-Bein Blue. Pour the thinned Cotton Tail over the center of the tile and move the tile so the glaze moves.Pour on less of the thinned Cara-Bein Blue into the Cottontail. Move the tile to blend the glazes and marble. Let dry.
On a palette, sprinkle AC-310 Silkscreen Medium onto SC-15 Tuxedo. Mix with the palette knife to the consistency of peanut butter. Using the birdcage screen from DSS-0141 Birdcage, place the screen shiny side down on the tile and rub the thickened mix over the screen. Remove the screen gently clean with water.
Hold the SL-431 Bloom Stencil on the side of the tile. Use the plastic card or squeegee to drag SG-501 Sculpting Medium over the stencil. (Use only 3-4 layers on the petals). Before removing the stencil, use the card to drag or SG-403 Red and SG-408 Orange onto the tile (or apply with a brush). Remove the stencil immediately.
Pencil in a vine of leaves and apply one coat of SC-27 Sour Apple and SC-26 Green Thumb. Pat SG-408 Orange onto the leaves.
Outline the leaves and flower petals with SC-15 Tuxedo. Use SG-403 Red to make spirals over the leaves and flower petals.
Dip into NT-CLR or apply one coat of S-2101 Clear to the tile.
Fire to cone 06.
Form
6″ tile
Colors
SC-15 Tuxedo
SC-16 Cotton Tail
SC-26 Green Thumb
SC-27 Sour Apple
SC-76 Cara-Bein Blue
SG-403 Red Designer Liner
SG-408 Orange Designer Liner
NT-CLR Clear Dipping or S-2101 Clear Brushing Glaze
1. Begin with properly fired cone 04 bisque. Moisten a sponge and wipe bisque to remove any dust.
2. Slightly thin FN-035 Deep Red. Pour inside the can, turn to coat, pour out the excess glaze and drain.
3. Pour two tablespoons of S-2101 Clear onto a plate and add a few drops of food coloring to enhance the color. Sprinkle AC-310 Silkscreen Medium onto the glaze and blend with a palette knife to get a consistency of peanut butter.
4. Use the large skull from DSS-052 Day of the Dead and the rose from DSS-0138 Flowers 2. With the shiny side down, use the mixture to screen the skull image onto the center of the can. This is for color placement only. Use the rose screen from DSS-038 Flowers 2, screen next to the center of the skull. Use only use part of the screen as shown.
5. Use the Script Liner and Liner to apply two coats of the following colors into the sections of the skull: SC-73 Candy Apple Red and SC-97 Cant-Elope. Apply one coat of SC-31 The Blues. Do not paint the eyes and nose yet.
6. Use the same brushes to apply two coats of SC-73 Candy Apple Red on the bright sections of the rose and SC-74 Hot Tamale on the darker red sections of the rose petals. Apply two coats of SC-27 Sour Apple to the leaves. Apply only one thinned coat on the leaf that is turned. Let dry.
7. Thicken SC-15 Tuxedo as in step three (no food coloring) and line up the screens (shiny side down) over the previously screened images. Check all sides to ensure your image is lined up. Rub the thickened Tuxedo over the screens.
9. Use the Liner to apply one coat of SC-15 Tuxedo into the eye and nose cavity. Screening may not fill in this area completely.
10. Use the Script Liner to apply three coats of SC-76 Cara-Bein Blue around the skull and roses. Use the Liner to puddle one coat of SC-76 Cara-bein Blue in the small areas around the leaves and roses. Use the Soft Fan to blend Cara-Bein Blue into SC-12 Moody Blue for the remainder of the can.
11. Tape off the can’s bottom and top edges. Use the Soft Fan to apply three coats of FN-035 Deep Red to the edges and the bottom of the can. Remove the tape.
12. Dip into NT-CLR Clear Dipping Glaze or use the soft fan to apply two coats of S-2101 Clear Brushing Glaze area around the skull and roses.
13. Fire to cone 05/06.
Form
MB-1409 Can It – One Gallon
Colors
SC-12 Tuxedo
SC-27 Sour Apple
SC-31 The Blues
SC-73 Candy Apple Red
SC-74 Hot Tamale
SC-76 Cara-Bein Blue
SC-97 Cant-Elope
FN-035 Deep Red
S-2101 Clear Brushing Glaze OR NT-CLR Clear Dipping Glaze
Begin with properly fired shelf cone 04 bisque. Moisten a clean sponge and wipe bisque to remove any dust.
Cut out the pattern for the zebra. Trace around the pattern onto the tile.
Apply two coats SC-16 Cotton Tail over the Zebra area.
Wet the area of the zebra on the tile. Place the paper pattern onto the tile and press to adhere to the tile. Gently press with a paper towel to remove excess water and ensure the edges are sealed.
Brush the tile going over the edges of the paper with two coats of CG-968 Peppermint Twist.
Remove the paper after the gloss leaves the glaze. Let dry.
Pencil in the zebra stripes.
Use the Liner to apply two coats of SC-15 Tuxedo to the stripes. Create an eye and outline the zebra with Tuxedo.
1. Begin with properly fired shelf cone 04 bisque. Moisten a clean sponge and wipe bisque to remove any dust.
2. Using the AC-230 Clay Carbon paper trace the pattern onto the bisque. Place the pattern on top of the Clay Carbon Paper. Only one side of the Clay Carbon paper transfers, so test before tracing the entire design,
3. Pour a quarter sized amount of all of the glazes onto a palette. Using the CB-106 #6 Script Liner add water to each color trying to create the same consistency.
4. Using the Script Liner, apply two thinned coats of the watercolor glaze to the color on the giraffe. The application is more of a puddling or floating rather than a brush stroke.
5. Using the CB-110 #10/0 Mini Liner, outline the giraffe with a thinned SC-15 Tuxedo and dab SC-15 Tuxedo to the eyes.
6. Use the Script Liner to float SC-33 Fruit of The Vine to the left side of the giraffe to create shading and SC-29 Blue Grass to the right side of the giraffe to create shading.
7. Using the Script Liner drip the thinned color from the head and stripes so it goes to the bottom of the canvas. If the drips are too thick use the CB-308 #8 Flat Shader and water to thin the stripes. Brushing with just water will remove the excess glaze and create straight lines.
8. Decorating the sides is artist choice. Paint a solid color with the Stroke & Coat listed above, stamp or use CG-964 Kaleidoscope for a pop of color.
9. Dip into NT-CLR Clear One Dipping. Do not apply clear glaze over a crystal glaze as it will change the color. If crystal glazes are used, apply a brush on clear glaze to non-crystal glaze areas.
Begin with properly fired shelf cone 04 Bisque. Moisten a clean sponge and wipe bisque to remove dust.
Using theCB-604 #4 Soft Fan Brush apply 2 coats of FN-01 White to the front of the plate only.
Cut out the male and female skeleton to use as paper masking. Wet the paper skeletons and stick onto the plate.
Squeeze SC-55 Yella bout it, SC-11 Blue Yonder, SC-27 Sour Apple, SC-97 Cant-elope, SC-74 Hot Tamale, onto a tile. Use the flexible card to pick up SC-55 Yella Bout It with SC-11 Blue Yonder, scrape the color onto the blank areas of the plate, staying away from the silkscreen. Vary the color for the background by adding SC-97 Cant-elope to the Yella Bout It, or add SC-27 Sour Apple.
Continue to add color to the background, with the card, add SC-74 Hot Tamale to the card with SC-97 Cant-elope for the rusty red color, add SC-26 Green Thumb with SC-27 Sour Apple, the application with the card will blend the colors together, fill in with CB-106 Script Liner color that is close to the the silkscreen.
Remove the paper.
To silkscreen: place SC-15 Tuxedo on a palette or tile and sprinkle with AC-310 Silkscreen Medium. Using a palette knife mix color and medium to the consistency of thick peanut butter. If the mix is too thin add more AC-310 Silkscreen Medium or if it is too thick add more Stroke & Coat. Too thin of a mixture will bleed under the screen and give you a blurred image. Too thick of a mixture will make it hard for the product to penetrate through the holes in the screen and give blank areas in your screen.
Position the screen shiny side down on the piece. Hold in place, starting from the center out, Rub the mixture on the screen with your finger. Lift a corner up to check if you are applying enough color. Remove the screen and wash with water.
Use sthe CB-106 #6 Script Liner to paint the heart with SC-74 Hot Tamale.
Stamp over with ST-106 Summer Days Stamp with SC-15 Tuxedo, apply with a flat sponge to the stamp. Stamp the sun and the moon only from the stamp above the heads of the couple, remove the paper flowers.
Stamp ST-353 Jumbo Swirl Blocks in the foreground.
Use the CB-106 #6 Script Liner to paint the flowers with FN-01 White or SC-16 Cotton Tail
Use CB-110 Liner to brush SC-15 Tuxedo to the man’s outfit and hat, SC-25 Crackerjack to the guitar, use the various background colors in the bouquet and lady’s hat.
Use the CB-604 Soft Fan to apply three coats of FN-23 Medium Green to the back of the plate.
Apply clear glaze of choise
Stilt and fire to cone 05/06.
Form
MB-1435 House Plate
Colors
SC-11 Blue Yonder
SC-15 Tuxedo
SC-25 Crackerjack Brown
SC-26 Green Thumb
SC-27 Sour Apple
SC-55 Yella Bout It
SC-74 Hot Tamale
SC-97 Cant-elope
FN-020 Medium
NT-CLR Clear Dipping or NTBR Clear One Brushing Glaze
1. Begin with properly fired cone 04 bisque. Moisten a sponge and wipe bisque to remove any dust.
2. Prep the bottles of Designer Liner. Shake all of the bottles to mix up the product. To open the bottles: Take the plastic cap off and run a toothpick from the inside out to open the tip. Take the metal nip, press and twist onto the plastic tip. Leave the pin in the little bag and poke it through to make the bag a flag. When not using the Designer Liner, put the pin in the tip to prevent clogging. If you do not plan to use the glaze for a while take off the metal tip, clean and store in the plastic bag and put the white cap back on the bottle.
3. Use the AS-230 Clay Carbon Paper to transfer the image. Place the AC-230 Clay carbon paper on the bisque, use a pen and test to see if you have the side that transfers on the bisque. Make a mark on the paper, if it leaves a mark on the bisque that is the correct side. If not turn it over and test again. Once you have the correct side down, place the pattern on top of the AC-230 Clay Carbon Paper and begin tracing the pattern.
4. Tip: Use a red or colored pen to trace. This will help you determine where you have already traced.
5. Remove the pattern and paper when completely traced. Now you get to the fun part!
6. Tip: Always tap the bottle with the tip down and start the glaze moving on a paper or towel before the bisque. This will prevent air bubbles from spurting the glaze where you don’t want it to land. Also, periodically wipe the tip as you go.
7. Designer Liner is meant for fine lines, outlining and details. So practice how hard to squeeze each color before laying on the bisque. Mayco welcomes you to choose your colors! Only go over the pattern once.
9. Using the CB-604 #4 Soft Fan Brush apply three coats of FN-051 Strawberry to the back of the plate. Allow the shine to fade then apply the next coat.
10. Apply glaze of choice to the entire piece.
11. Stilt and fire to cone 05/06
Form
MB-1292 Rectangular Dinnerware – Dinner Plate
Colors
SG-401 Black
SG-403 Red
SG-405 Green
SG-407 Yellow
SG-408 Orange
SG-409 Bright Green
SG-410 Bright Blue
SG-411 Purple
FN-051 Strawberry
NT-CLR Clear One or NT-BR Clear One Brushing Glaze
1. Begin with properly fired shelf cone 04 bisque. Moisten a clean sponge and wipe bisque to remove any dust.
2. Starting 2.5″ up from the bottom of the canvas, place the pattern on top of the AC-230 Clay Carbon Paper and place both sheets on the bisque. Only one side of the AC-230 Clay Carbon Paper transfers so test before tracing the entire design. Use a pen or pencil to trace the pattern.
3. All of the color on this project is applied with a plastic card hotel room key, loyalty card or plastic card; a squeegee will also work. You will apply all the colors once then go back a second time for two coats. Use the picture and pattern for a visual reference and for color placement.
4. With the card, pick up SC-81 Cinnamon Stix and SC-87 Ruby Slippers about 50/50 on the end of the card. Glazing left to right and starting with the first house, drag the card horizontally to the end of the first house on the left side. Repeat to cover the house.
5. The second house: Again left to right, pick up SC-60 Silver Lining with a small amount of SC-15 Tuxedo on the card or squeegee and drag across to the third house.
6. The third house: repeat the process with SC-29 Blue Grass and SC-28 Blue Isle. Picking up color on the plastic card or squeegee and dragging left to right across the house.
7. The fourth house: SC-28 Blue Isle and SC-91 Seabreeze.
8. The fifth house: SC-11 Blue Yonder.
9. The last house: SC-81 Cinnamon Stix.
10. Repeat the colors again but add in a small amount of SC-15 Tuxedo to shade the second, third and last house.
11. The roofs are treated the same, refer to photo for color placement.
12. For the background and sky, use the card to one coat of each color near the roof lines: SC-81 Cinnamon Stick, and SC-29 Blue Grass, blend the rest of the sky with SC-28 Blue Grass and SC-11 Blue Yonder. Use the credit card like a palette knife to fill the space.
13. For the foreground or area underneath the houses: Apply the color with the card in a vertical direction. Pick up the color in the same manner as before.
14. House one: Use SC-81 Cinnamon Stix with SC-15 Tuxedo from the bottom of the house to the bottom of the canvas.
15. Houses two & three: Pick up SC-91 Seabreeze with a small amount of SC-15 Tuxedo and SC-81 Cinnamon Stix.
16. Last three houses: pick up a small amount of SC-75 Orange-A-Peel and SC-81 Cinnamon Stix, add in SC-11 Blue Yonder at the middle space. This is a blending so it doesn’t have to be perfect or precise.
17. In the sky area: Pick up SG-501 Sculpting Medium and, in a knock down fashion, drag one coat of the Sculpting Medium across the sky area of the canvas.
18. Thicken SC-15 Tuxedo with AC-310 Silkscreen Medium using a palette knife. See the directions on the Designer Silkscreen, or watch the video on Mayco’s YouTube channel, for proper consistency.
19. Using the DSS-0103 Flourishes, with the shiny side up, screen the section of flourish onto a couple of houses as shown.
20. When dry outline all the houses with SG-401 Designer Liner Black or use the CB-110 #10/0 Mini Liner with thinned SC-15 Tuxedo. Without clear glaze Designer Liner will be matte and have texture; clear glaze will provide gloss.
21. Use the card to apply two coats of SC-29 Blue Grass to the sides of the canvas.
22. Fire to cone 06.
Form
MB-1478 12″ x 12″ Square Clay Canvas
Colors
SC-11 Blue Yonder
SC-15 Tuxedo
SC-28 Blue Isle
SC-29 Blue Grass
SC-60 Silver Lining,
SC-75 Orange-A-Peel
SC-87 Ruby Slippers
SC-91 Seabreeze
SG-401 Designer Liner Black
SG-501 Sculpting Medium
Decorating Accessories
AC-230 Clay Carbon Paper
AC-310 Silkscreen Medium
DSS-0103 Flourishes
Miscellaneous Accessories
Palette knife
Plastic card (old loyalty card or hotel room key) or squeegee
1. Begin with properly fired shelf cone 04 Bisque. Moisten a clean sponge and wipe bisque to remove any dust.
2. Slightly thin FN-036 Grape, pour inside the mug, turn to coat, pour out the excess glaze and drain.
3. Use the Script Liner to apply three coats of SC-73 Candy Apple Red to the tips of the claws. Apply three coats of SC-74 Hot Tamale to the remainder of the claws, overlapping the colors. Apply three coats of SC-74 Hot Tamale to the bottom of the crab’s shell.
4. Apply three coats of SC-13 Grapel to the crab’s legs, arms and the middle section of the crab’s body. Apply SC-33 Fruit of the Vine to the sides of the crab’s body, overlapping two of the coats over the Grapel. This will allow the center of the body to be a brighter purple and the sides a deeper purple.
5. Outline the detail on the crab’s body with SC-15 Tuxedo. Tuxedo is brushed between the spaces in the claws, eyes are Tuxedo, use CB-110 Liner.
6. Use the Soft Fan to apply three coats of FN-036 Grape to the back of the crab dish.
8. Use the Soft Fan to apply two coats of NTBR Clear One Brushing Glaze to the outside of the mug.
1. Begin with a properly fired shelf cone 04 Bisque. Moisten a clean sponge and wipe bisque to remove dust.
2. Squirt SG-404 Blue onto a palette. Use the end of a brush handle to dot the Blue on the larger dot shapes in the starfish dish. Use the bottle tip for the small dots.
3. Use the Soft Fan to apply three coats of FN-041 Medium Blue to the back of the dish.
4. Use the Soft Fan to apply two coats of S-2703 Berryberry Pie to the inside of the dish. Apply one coat over the Medium Blue on the underside.
5. Fire to cone 06.
Form
MB-1379 Starfish Dish Bisque or CD1379 Starfish Dish Mold
Begin with properly fired shelf cone 04 Bisque. Moisten a clean sponge and wipe bisque to remove dust.
Apply three coats of SC-2 Melon-Choly to entire plaque using the Soft Fan. Allow to dry between coats. Make sure plaque is completely dry.
Pour about two tablespoons of S-2101 Crystal Clear Brushing onto the plate. Add a pinch of AC-310 Silkscreen Medium. Mix with a palette knife until it becomes of the consistency of peanut butter. You may need to add more Silkscreen Medium or glaze. Add a few drops of blue food coloring.
On the DSS-0156 Llama Drama screen, locate the llama on the left side of the screen, the cactus in the lower left corner and the saying “NO PROB LLAMA”. Draw an outline around them in permanent marker. Cut them out with the excess screen around the edges.
Place the llama’s head on the left side of the plaque. While holding it firmly in place, take a small amount of the premixed silkscreen medium, and gently rub in circles starting in the center and working outward. Place the cactus on the right side of the plaque and repeat process.
Using the Detail Liner and SC-87 Ruby Slippers, fill in the ears on the llama and the flower on the cactus. Do another coat after the first coat is dry.
Using the Detail Liner and SC-26 Green Thumb, fill in the cactus. Do another coat after the first coat is dry.
Using the Detail Liner and SC-6 Sunkissed and SC-11 Blue Yonder, fill in the pompoms around the llama’s neck. Do another coat after the first coat is dry.
Squeeze about two tablespoons of SC-15 Tuxedo onto the plate. Add a pinch of AC-310 Silkscreen Medium. Mix with a palette knife until it becomes of the consistency of peanut butter. You may need to add more Silkscreen Medium or glaze.
Place the llama screen back to it’s previous position. It must be perfectly lined up. While holding it firmly in place, take a small amount of the premixed silkscreen medium, and gently rub in circles starting in the center and working outward. Place the cactus screen back and repeat the process. Place the “NO PROB LLAMA” screen in the center of the plaque and repeat.
1. Begin with properly fired cone 04 bisque. Moisten a sponge and wipe bisque to remove any dust.
2. Slightly thin FN-026 Salmon Mousse, pour inside of the mug, turn to coat, pour out the excess glaze and drain.
3. Use the Script Liner to apply three coats of SC-22 Carrot Top to the head of the octopus. Add SC-87 Ruby Slippers to the brush where the tentacles begin. Add SC-3 Wine About It to the brush as you get near the end of the tentacle.
4. Shade around the head of the octopus dish with two coats of SC-97 Ruby Slippers. Apply SC-75 Orange A Peel to the center section of the head to brighten. Add shading with SC-75 Orange-A-Peel around the octopus tentacles on the mug with. Let dry.
5. Use SG-407 Yellow Designer Liner to outline the circle designs on the dish. Dot the head and around the tentacles on the dish with the yellow. Fill in the spaces between the tentacles on the dish with SC-12 Moody Blue by plopping on one heavy coat. Use the Liner and Script Liner.
6. Use the Liner to outline the eyes and fill in the pupils with one coat of SC-15 Tuxedo.
7. Use the Soft Fan to apply three coats of FN-035 Deep Red on the back of the Octopus Dish.
8. Outline the loops on the tentacles (on the mug) with SG-408 Orange. Use the Liner with SC-15 Tuxedo to outline the mouth and in the spirals at the end of the tentacles.
9. Use the Soft Fan to apply two coats of S-2101 Clear on the mug and one coat of Clear on the top of the dish.
Begin with properly fired shelf cone 04 Bisque. Moisten a clean sponge and wipe bisque to remove dust.
Use a sponge-on-a-stick to gently dab SC-34 Down to Earth onto the ST-126 Dots & Squiggles Stamp. Stamp to the shell of the turtle, changing directions on each section of the shell.
Outline all the faceted edges of the turtle with SG-406 Brown.
Use the Soft Fan to apply three coats of FN-227 Celery to the shell. Apply FN-203 Dry Champagne to the section under the shell and FN-229 Iced Mocha to the head, legs and tail of the turtle.
Fire to cone 05/06.
Form
MB-1492 Faceted Turtle Bisque or CD1492 Faceted Turtle Mold
Begin with a properly fired shelf cone 04 Bisque. Moisten a clean sponge and wipe bisque to remove dust.
Cut out the shape of the pear cactus and pot. Trace the outline onto the tile with pencil.
Use the Script Liner to apply one coat of UG-51 China White to the cactus and pot, going slightly past the pencil lines.
Re-wet the China White by brushing with water, then place the paper cut out onto the penciled area. Use a paper towel to remove excess water, smooth our any wrinkles and ensure the edges are sealed.
Pour some UG-203 Squash Yellow, UG-51 China White, and UG-207 Flame Red onto a tile.
Use the card to pick up China White and Squash Yellow. Holding the card almost flat against the tile, drag the color onto the piece. Repeat once. On the second coat, pick up the Squash Yellow and China White, then dot the color with UG-207 Flame Red. Repeat once.
Remove the paper.
Use the Script Liner to apply three coats of UG-218 Pear Green to the cactus. Apply three coats of UG-219 Marine Blue to the pot and shade with UG-97 Bright Blue.
Outline and detail the cactus and the pot with UG-50 Jet Black with the Liner.
Use the Script Liner to apply two coats of S-2101 Clear Brushing Glaze to the pot and cactus.
1. Begin with properly fired shelf cone 04 bisque. Moisten a clean sponge and wipe bisque to remove any dust.
2. Using the AC-230 Clay Carbon paper, place the pattern on top of the Clay Carbon paper and trace on the pattern. Only one side of the Clay Carbon paper transfers so test that the correct side is down.
3. Pour a quarter sized amount of all of the glazes onto a palette. Using the CB-106 #6 Script Liner add water to each color. You will have small pools of thinned glaze. Try to get the same consistency of watered glaze color.
4. Use the Script Liner to apply two coats of color to the various stripes in the Zebra. Pool SC-29 Blue Grass on the muzzle of the Zebra, adding in a bit of thinned SC-8 Just Froggy.
5. Using the CB-110 #10/0 Mini Liner, outline the head, ears and hair with SC-12 Moody Blue. Use SC-15 Tuxedo to accent the lines around the head and ears.
6. Using the Script Liner, float SC-13 Grapel to shade the bottom of the head and near the mane. See pattern or picture.
7. Using the Script Liner, drip the thinned color from the head and stripes so it goes to the bottom of the canvas. If the drips are too thick, use the CB-308 #8 Flat Shader and water to thin the stripes. Brushing with just water will remove the excess glaze and create straight lines.
8. Spatter with the various colors used in the canvas with a toothbrush or the Script Liner, by tapping the handle against the sides of the canvas.
9. Decorating the sides is artist choice. Paint a solid color with one of the project colors, stamp or use CG-964 Kaleidoscope for a pop of color.
10. Dip into NT-CLR Clear One Dipping. Do not apply clear glaze over a crystal glaze as it will change the color. If crystal glazes are used, apply a brush on clear glaze to non-crystal glaze areas.
Begin with properly fired shelf cone 04 bisque. Moisten a clean sponge and wipe bisque to remove any dust.
Cut out the cactus pattern and trace the outline with pencil onto the tile.
Use the Script Liner to apply one coat of UG-51 China White to the cactus, going just beyond the pencil lines.
Re-wet the China White by brushing with water, then place the paper cut out onto the wet surface. Use a paper towel to remove excess water, smooth our any wrinkles and ensure the edges are sealed.
Pour some UG-216 Peach, UG-51 China White and UG-218 Pear onto a tile. Pick up these colors with the card. Holding the almost flat against the bisque, drag the colors onto the tile. The colors will blend as it is applied. Apply two coats to achieve the desired color.
Remove the paper cactus.
Use the Script Liner to apply two coats of UG-2118 Pear to the cactus, shading with UG-22 Spring Green.
Use the Liner to apply two coats of UG-216 Peach to the flowers.
To apply the pattern on the background, sponge UG-204 Orange onto hamper netting and press onto the tile. Keep the netting off of the cactus.
Outline and detail the cactus with UG-50 Jet Black and the CB-110 Liner.
Use the Script Liner to apply two coats of S-2101 Clear Brushing Glaze to the cactus.
1. Begin with properly fired shelf cone 04 bisque. Moisten a clean sponge and wipe bisque to remove any dust.
2. Place the pattern on top of the AC-230 Clay Carbon Paper and trace the design onto the bisque.
3. Using the CB-106 #6 Script Liner apply two coats of SC-16 Cotton Tail to the entire mushroom.
4. With the pencil lightly sketch the mushroom design onto the piece.
5. Using the Script Liner, apply three coats of SC-73 Candy Apple Red to the mushroom caps.
6. Using the same brush, apply two coats of SC-16 Cotton Tail on the spots of the mushroom caps.
7. When dry, outline the mushrooms with SC-15 Tuxedo.
8. Use a stylus or the end of a paintbrush to dot the shadow areas with SC-5 Tiger Tail.
8. Using the CB-604 #4 Fan Brush and the Script Liner, for smaller areas, apply two coats of S-2715 Spotted Kiwi to the background.
9. While the S-2715 Spotted Kiwi is still wet, dab or plop on CG-753 Sassy Orange over the S-2715 Spotted Kiwi. This is a random application, but do leave a little bit of the S-2715 Spotted Kiwi showing.
Begin with a properly fired shelf cone 04 Bisque. Moisten a clean sponge and wipe bisque to remove dust.
Cut out the pattern of the snake. Trace around the snake onto a tile.
Apply one coat of UG-51 China White over the snake pattern, going past the edges.
Wet the snake area with water, then place the paper snake on the wet surface. Press down gently with a paper towel to remove excess water and to ensure the edges are sealed.
With the plastic card pick up UG-51 China White then add some UG-46 Bright Yellow and UG-219 Marine Blue. Drag the color down the tile and over the paper snake, holding the card almost flat to apply the color.. Repeat for a second application.
Remove the paper snake.
Use the Script Liner to apply two coats of UG-51 Bright Blue over the snake. Use the Liner to apply UG-204 Orange for the stripes.
Use the Soft Fan to apply two coats of S-2101 Clear Brushing Glaze.
Begin with properly fired shelf cone 04 bisque. Moisten a clean sponge and wipe bisque to remove any dust.
Cut out the pattern of the pineapple. Use the Soft Fan to apply one coat of UG-51 China White to the space where you want the pineapple. Re-wet the China White by brushing with water, then place the paper cut out onto the wet surface. Use a paper towel to remove excess water, smooth our any wrinkles and ensure the edges are sealed.
Pour some of UG-97 Bright Blue, UG-218 Pear Green and UG-51 China White onto a palette.
Using the plastic card, pick up two of the colors on the tile. Holding the card almost flat against the bisque, drag the colors onto the tile. Continue with all of the colors, placing the Pear Green to one side of the tile. This will take a couple of passes with the color to get the desired background.
Sponge UG-50 Jet Black to the hamper netting, then stamp to one side of the pineapple.
Remove the paper pineapple.
Use the Script Liner to apply two coats of UG-203 Squash Yellow to the pineapple. Shade with UG-58 Harvest Gold.
Use both greens, UG-22 Spring Green and UG-210 Forest Green for the leaves.
Place the SL-455 Tire Tracks Stencil over the body of the pineapple and sponge lightly with UG-31 Chocolate.
Use the Liner to outline the pineapple and leaves with UG-50 Jet Black.
Apply two coats of S-2101 Clear to the pineapple and leaves only.
1. Begin with properly fired shelf cone 04 Bisque. Moisten a clean sponge and wipe bisque to remove any dust.
2. Use the Script Liner to apply two coats of the following colors to the turtle’s shell: SC-13 Grapel, SC-22 Carrot Top, SC-26 Green Thumb, SC-27 Sour Apple and SC-97 Cant-elope. Use at least two colors on each section. Refer to photo for placement.
3. Outline the body with SG-405 Green using the bottle with the metal tip. Use the Liner to apply the SG-405 Green between the sections of the shell. Shade with the SG-405 Green by thinning and brushing over the texture detail. Deepen the green on the fins where they connect to the shell.
4. Use the Script Liner to apply one coat of SC-27 Sour Apple over the fins and head. Apply two coats of SC-22 Carrot Top on the beak.
5. Use the Liner to outline the eye and beak with SC-15 Tuxedo.
6. Use the Soft Fan to apply three coats of FN-010 Tree Green to the back of the turtle.
7. Use the Soft Fan to apply two coats of NTBR Clear One Brushing to the top.
1. Begin with properly fired cone 04 bisque. Moisten a sponge and wipe bisque to remove any dust.
2. Place a dime size of SG-410 Bright Blue on a palette. Use the Script Liner to brush into the recesses of the shell and the design on the back. Using the bottle with the metal tip, outline between the shell sections on the back.
3. Use the Soft Fan to apply three coats of S-2702 Northern Lights onto the piece.
4. Fire to cone 06.
Note: Sometimes this color can be finicky and fire with tiny bubbles, not to worry, just re-fire and they disappear.
Form
MB-1380 Shell Dish Bisque or CD1380 Shell Dish Mold
1. Begin with properly fired cone 04 bisque. Moisten a sponge and wipe bisque to remove any dust.
2. Use SG-404 Blue Designer Liner to outline the spines on the seahorse body.
3. Use the Soft Fan to apply three coats of CG-980 Coral Puff to the body, evenly distributing the large crystals.
4. Use the Liner to apply two coats of SC-15 Tuxedo to the pupil.
5. Seahorse Mug: follow the above directions for the handle.
6. Slightly thin FN-043 Bright Jade, pour inside the cup, roll to coat, pour out the excess and drain. Alternatively, you may apply three coats of FN-043 Bright Jade using the Soft Fan.
7. Using a palette knife, thicken SC-29 Blue Grass with AC-310 Silkscreen Medium with to the consistency of peanut butter. With the shiny side down, use your finger to rub the thickened Blue Grass over the coral image from DSS-0102 Sea Life. Remove and gently clean.
8. Use the Soft Fan to apply two coats of S-2101 Clear over the body of the mug.
1. Begin with properly fired shelf cone 04 Bisque. Moisten a clean sponge and wipe bisque to remove any dust.
2. Pour some EL-120 Black Ice into a plastic cup and thin slightly with water. Holding the skull upside down, pour the glaze inside and roll to coat. Pour out the excess. Use the #4 Soft Fan to touch up any areas that did not get glazed.
3. Use the #6 Soft Fan to apply three coats of EL-120 Black Ice to the entire skull. NOTE: Since this is a moving glaze, recede third coat up 1/3 from the bottom of the bisque.
4. Fire to cone 05/06.
Form
MB-1515 Faceted Skull Bisque or CD1515 Faceted Skull Mold
1. Begin with properly fired shelf cone 04 Bisque. Moisten a clean sponge and wipe bisque to remove any dust.
2. Thin slightly FN-001 White pour too the inside, turn to coat, pour out the excess, drain.
3. Tape a line three inches from the bottom of the vase.
4. With CB-604 Soft Fan, brush on three coats of FN-040 Pumpkin to the shorter bottle and three coats of FN-026 Salmon Mousse to the tall bottle, remove the tape.
5. When dry, tape of the bottom of both of the colors on the bottles.
6. Pour FN-001 White on a plate along with FN-026 Salmon Mousse, load the fan with more of the White glaze and Salmon Mousse to tint the color, brush around the bottle in a circular direction, three coats, add more of the Salmon Mousse to the brush still keeping the White glaze in the brush to continue the gradation to the bottom of the bottle. Remove the tape.
7. Repeat step 6 with the FN-040 Pumpkin for the shorter bottle.
8. Clean off the top edge of the bottles glaze with FN-001 White for a crisp white edge.
Begin with properly fired shelf cone 04 bisque. Moisten a clean sponge and wipe bisque to remove any dust. Check the inside for any debris as well.
In a plastic cup mix S-2101 Crystal Clear Brushing with some water to a melted ice cream consistency. Place some Blue Masking Tape over the two holes in the arms of the cactus vase. While working quickly, pour the thinned glaze into the vase. Rotate the vase to ensure all the insides of the vase are covered. Pour out excess glaze and invert to dry. Remove the tape from the holes to allow glaze to drain also. Using a damp sponge to wipe off any excess glaze from the outside of the vase.
Shake and stir CG-953 Sassy Orange and CG-956 Firecracker. Using CB-604 Soft Fan apply 1 coat of CG-953 Sassy Orange to the top half of the vase feathering out the glaze towards the bottom. Apply 1 coat of CG-956 Firecracker to the bottom third of the vase feathering the color up over Sassy Orange to at least half of the vase. The two colors should start from red at the bottom portion of the vase up to about halfway blending/fading into the lighter color. Repeat this step alternating the Sassy Orange and Firecracker for two more coats.
Apply two coats of SC-33 Fruit of the Vine using CB-604 Soft Fan to the bottom portion of the vase feathering the color up over the Firecracker about a fourth of the way up. Color should solid and fade up over the Firecracker about 1 ½ inches.
To the top of the vase apply some SC-77 Lime Light feathering out the color down from the tops of the vase and arms about 1 ½ inches using CB-604 Soft Fan. Apply some thinned SC-52 Toad-ily Green to the creases in the cactus to darken the green along the top downward about 1 inch.
Stilt and Fire the piece to Shelf Cone 05-06.
Dish
Begin with properly fired shelf cone 04 bisque. Moisten a clean sponge and wipe bisque to remove any dust. Check the inside for any debris as well.
In a plastic cup mix S-2101 Crystal Clear Brushing with some water to a melted ice cream consistency. While working quickly, pour the thinned glaze into the vase. Using a damp sponge to wipe off any excess glaze from the outside of the dish.
Shake and stir CG-953 Sassy Orange and CG-956 Firecracker. Using CB-604 Soft Fan apply 1 coat of CG-953 Sassy Orange to the top half of the dish feathering out the glaze towards the bottom. Apply 1 coat of CG-956 Firecracker to the bottom third of the dish feathering the color up over Sassy Orange to at least half of the dish. The two colors should start from red at the bottom portion of the dish up to about halfway blending/fading into the lighter color. Repeat this step alternating the Sassy Orange and Firecracker for two more coats.
Apply two coats of SC-33 Fruit of the Vine using CB-604 Soft Fan to the bottom portion of the dish feathering the color up over the Firecracker about a fourth of the way up. Color should solid and fade up over the Firecracker about 1 ½ inches.
To the top of the dish apply some SC-77 Lime Light feathering out the color down from the tops of the dish about 1 ½ inches using CB-604 Soft Fan. Apply some thinned SC-52 Toad-ily Green to the creases in the cactus to darken the green along the top downward about 1 inch.
Stilt and Fire the piece to Shelf Cone 05-06.
Planter
Begin with properly fired shelf cone 04 bisque. Moisten a clean sponge and wipe bisque to remove any dust. Check the inside for any debris as well.
Apply 3 coats of FN-51 Strawberry to the inside of the planter using CB-604 Soft Fan.
Shake and stir CG-953 Sassy Orange. Apply 2-3 Coats of glaze to the outside of the planter.
Apply 2 coats of SC-52 Toad-ily Green using CB-604 Soft Fan to the bottom of the planter feathering the color out up from the bottom to about 1 1/2 inches.
Use a slightly dampened sponge to apply 1-2 coats of SC-97 Cant-elope to the crest of the ridges around the top feathering out the color about 2 inches downward.
Using the dampened sponge again to apply some SC-50 Orange Ya Happy to the top portions of the crests to reinforce the previous shading feathering out the color over the lighter one.
Begin with a properly fired shelf cone 04 Bisque. Moisten a clean sponge and wipe bisque to remove dust.
Brush the top of the plate with one coat of FN-001 White use RB-144 Soft Fan.
Arrange the screens from DSS-0158 Buggin’ Out on the plate, wet the glaze around the screen, press into the glaze the punched clouds. Press with a paper towel so they stick. There are 8 clouds on the plate.
Squeeze out SC-11 Blue Yonder, SC-16 Cotton Tail on a plate, use the foam roller to pick up the color then roll over 2/3rds of the plate, roll in different directions so the colors will mix without totally mixing together, roll 2-3 coats. Roll on SC-98 Slime Time to the remainder of the plate, overlap onto the blue.
Remove the paper clouds.
Roll SC-98 Slime Time onto the mug in a vertical direction, overlap the rolls for interest and to deepen the color.
Thicken SC-15 Tuxedo with AC-310 Silkscreen Medium using a palette knife to the consistency of peanut butter. Hold the screen with the shiny side down onto the plate or mug, rub the thickened Tuxedo over the screen with your finger. Remove and gently wash the screen to re-use.
Brush two coats of color as listed in materials, use RB-110 Liner or RB-106 Script Liner stay inside of the lines avoiding the screened lines. Darken the stamens and the body of the butterfly, spots and body of the ladybug with SC-15 Tuxedo.
Brush the inside and handle of the mug with three coats of SP-275 Speckled Orange A Peel, use RB-144 Soft Fan, and RB-106 Script Liner.
Refer to the picture for color placement.
Brush one coat of NTBR Clear over the top and body of the mug, two coats of clear to the back of the plate. or Dip in NT-CLR Clear Dipping Glaze.
Begin with properly fired cone 04 bisque. Moisten a sponge and wipe bisque to remove any dust.
Locate the penguin on DSS-0162 Holiday Icons screen. Draw an outline around it in permanent marker. Cut it out with excess screen around the edges.
Squeeze 1 TBS of SC-15 Tuxedo onto the palette. Add a pinch of AC-310 Silkscreen Medium. Mix with a palette knife until it becomes the consistency of peanut butter. You may need to add more silkscreen medium or glaze.
Place the penguin on the mug, shiny side down. While holding it firmly in place, take a small amount of premixed silkscreen medium and gently rub in circles staring in the center and working outward.
Squeeze 1 TBS of SC-45 My Blue Heaven and SC-11 Blue Yonder onto the palette. Dip the sponge in the glazes and sponge the background. Alternate between colors to blend.
Using the Detail Liner with SC-98 Slime Time, apply 2 coats to the ball and rim of the hat. Allow glaze to dry between coats.
Using the Script Liner with SC-26 Green Thumb, apply 2 coats to the rest of the hat. Allow glaze to dry between coats.
Using the Script Liner with SC-74 Hot Tamale, apply 2 coat to the horizontal portion of the scarf. Allow glaze to dry between coats.
Using the Script Liner with SC-73 Candy Apple Red, apply 2 coats to the vertical portion of the scarf. Allow glaze to dry between coats.
Using the Script Liner and Detail Liner with SC-15 Tuxedo, apply 2 coats to the body of the penguin. Allow glaze to dry between coats.
Using the Detail Liner with SC-23 Jack O’ Lantern, apply 2 coats to the beak. Allow glaze to dry between coats.
Using SG-403 Red, make vertical lines on the rim of the hat.
Locate the snowflakes on DSS-0162 Holiday Icons screen. Draw an outline around them in permanent marker. Cut them out with excess screen around the edges.
Squeeze 1 TBS of SC-12 Moody Blue onto the palette. Add a pinch of AC-310 Silkscreen Medium. Mix with a palette knife until it becomes the consistency of peanut butter. You may need to add more silkscreen medium or glaze.
Place the snowflake on the mug, shiny side down. While holding it firmly in place, take a small amount of premixed silkscreen medium and gently rub in circles staring in the center and working outward. Repeat for the desired amount.
Using the Soft Fan with SC-11 Blue Yonder, apply 3 coats to the handle, inside and bottom of the mug. Allow glaze to dry between coats.
Using the Soft Fan with S-2101 Clear Brushing Glaze, apply 2 coats to the outside of the mug. Or dip into NT-CLR Clear Dipping Glaze.
Begin with properly fired cone 04 bisque. Moisten a sponge and wipe bisque to remove any dust
Using the Script Liner with SC-16 Cotton Tail, apply 3 coats to the beard. Allow glaze to dry between coats
Squeeze around 1 TBS of SC-10 Teal Next Time onto the palette. Thin with water. Use the Dagger Brush to float the glaze over the beard.
Using the Soft Fan and Script Liner with SC-6 Sunkissed, apply 3 coats to the upper part of the hat and the inside of the mug. Allow glaze to dry between coats.
Using the Soft Fan and Script Liner with SC-99 Char-ming, apply 3 coats to the body of the mug. Allow glaze to dry between coats.
Using the Script Liner with SC-20 Cashew Later, apply 3 coats to the nose. Allow glaze to dry between coats. Shade with SC-2 Melon-Choly.
Using the Script Liner with SC-23 Jack O’ Lantern apply 3 coats to the rim of the hat and the handle. Allow glaze to dry between coats.
Use the ½” circle punch to punch around 10 circles in the paper. Cut around each circle with the scissors to create a negative pattern. Dip each pattern into the water and stick onto the hat.
Using the Script Liner with SC-9 Jaded, apply 3 coats over each circle. Allow glaze to dry between coats.
Using the Detail Liner with SC-15 Tuxedo, outline the details on the mug.
Brush or dip into clear glaze with NT-CLR Clear Dipping Glaze.
Begin with properly fired cone 04 bisque. Moisten a sponge and wipe bisque to remove any dust.
Squeeze around 1 TBS of SC-14 Java Bean on to the palette. Thin with water. Apply 1 coat to the inside of the mouths and the recessed area of the face. Use a damp sponge to antique.
Using the Soft Fan with SC-6 Sunkissed, apply 3 coat to the inside of the cups. Allow glaze to dry between coats.
Using the Script Liner with SC-6 Sunkissed, SC-11 Blue Yonder, SC-27 Sour Apple and SC-73 Candy Apple Red apply 3 coats to the corresponding parts on the faces. Allow glaze to dry between coats.
Using the Script Liner with SC-23 Jack O’ Lantern, apply 3 coats to the top and bottom rims of the cups. Allow glaze to dry between coats.
Using the Script Liner with SC-14 Java Bean, apply 3 coats to the rest of the cups. Allow glaze to dry between coats.
Using the Soft Fan, apply 1 coat of S-2101 Clear Brushing Glaze to the faces or dip into NT-CLR Clear Dipping Glaze.
Fire to cone 06
Form
MB-1383 Tiki Cups Bisque or CD1383 Tiki Cups Mold
Colors
SC-6 Sunkissed
SC-11 Blue Yonder
SC-14 Java Bean
SC-23 Jack O’ Lantern
SC-27 Sour Apple
SC-73 Candy Apple Red
NT-CLR Clear Dipping Glaze or S-2101 Clear Brushing Glaze
Decorating Accessories
CB-604 #4 Soft Fan
CB-106 #6 Script Liner
Miscellaneous Accessories
Water
Sponge
Palette
Low-Fire|Earthenware Bisque|Table Top|Molds|Table Top
Begin with properly fired cone 04 bisque. Moisten a sponge and wipe bisque to remove any dust.
Using the Soft Fan with SC-74 Hot Tamale, apply 3 coats to the inside of the mug. Allow glaze to dry between coats.
Using the Soft Fan with SC-6 Sunkissed, apply 3 coats to the outside of the mug. Allow glaze to dry between coats.
On the DSS-0155 Comic Expressions screen, locate the two empty quote bubbles, bomb and “OMG”. Draw an outline around them in permanent marker. Cut them out with excess screen around the edges.
Squeeze about 2 TBS of SC-15 Tuxedo onto the palette. Add a pinch of AC-310 Silkscreen Medium. Mix with a palette knife until it becomes the consistency of peanut butter. You may need to add more silkscreen medium or glaze.
Place the screens on the mug one at a time. While holding the screen firmly in place, take a small amount of premixed silkscreen medium, and gently rub in circles starting in the center and working outward. Slowly pull up the screen to avoid smearing.
Place the AC-230 Clay Carbon Paper over the quote bubbles. Place the pattern over the carbon paper and trace with the pencil.
Use SG-403 Red to fill in “Super”. Use the Detail Liner with SC-15 Tuxedo to outline the lettering. Use SG-402 White to make lines behind the lettering.
Use SG-410 to fill in “Dad”. Use the Detail Liner with SC-15 Tuxedo to outline the lettering. Use SG-408 Orange to go around the inside of the quote bubble.
Use SG-408 Orange to fill in the flames on the bombs.
Using the Detail Liner with SC-74 Hot Tamale, apply 1 coat to the “OMG”.
Use SG-409 Bright Green to make dots on the outside of the cup. They should be staggered and larger towards the top.
Using the Script Liner with SC-11 Blue Yonder, apply 3 coats to the wrench. Allow glaze to dry between coats.
Use SG-408 Orange and SG-410 Bright Blue on the wrench adjuster. Make dots going up the wrench using SG-409 Bright Green.
Use the Detail Liner with SC-15 Tuxedo, to outline the details on the wrench.
Using the Soft Fan, apply 1 coat of S-2101 Clear Brushing Glaze or dip into NT-BR Clear Dipping Glaze.
Fire to cone 06.
Form
MB-1513 Handyman Mug – Wrench
Colors
SC-6 Sunkissed
SC-11 Blue Yonder
SC-15 Tuxedo
SC-74 Hot Tamale
SG-402 White Designer Liner
SG-403 Red Designer Liner
SG-408 Orange Designer Liner
SG-409 Bright Green Designer Liner
SG-410 Bright Blue Designer Liner
NT-CLR Clear Dipping Glaze or NT-BR Clear Brushing Glaze
Begin with properly fired cone 04 bisque. Moisten a sponge and wipe bisque to remove any dust.
Using the Soft Fan with SC-6 Sunkissed, apply 3 coats to the inside of the mug. Allow glaze to dry between coats.
Using the Soft Fan with SC-11 Blue Yonder, apply 3 coats to the outside of the mug. Allow glaze to dry between coats.
On the DSS-0155 Comic Expressions screen, locate the “Pow” and two quote bubble screens. Draw an outline around them in permanent marker. Cut them out with excess screen around the edges.
Squeeze about 2 TBS of SC-15 Tuxedo onto the palette. Add a pinch of AC-310 Silkscreen Medium. Mix with a palette knife until it becomes the consistency of peanut butter. You may need to add more silkscreen medium or glaze.
Place the screens on the mug one at a time. While holding the screen firmly in place, take a small amount of premixed silkscreen medium, and gently rub in circles starting in the center and working outward. Slowly pull up the screen to avoid smearing.
Using the Detail Liner with SC-74 Hot Tamale and SC-6 Sunkissed, apply 2 coats to the “Pow” screen. Allow glaze to dry between coats.
Using the Script Liner with SC-6 Sunkissed, apply 3 coats to the handle of the hammer. Allow glaze to dry between coats.
Using the Script Liner with SC-74 Hot Tamale, apply 3 coats to the head of the hammer. Allow glaze to dry between coats.
Using the Script Liner with SC-15 Tuxedo, apply 2 coats to the head, claw and bottom attachment of the hammer. Make a dot on the top of the head.
Squeeze around 1 TBS of SC-15 Tuxedo onto the palette. Take ST-133 Wood Grain Stamp and place it design-side up. Take the sponge on a stick and gently dab it into the glaze. Blot away any excess onto the bare portion of the palette and sponge the stamp. Take the stamp and gently press onto the handle of the hammer. Repeat around the handle.
Using the Detail Liner with SC-74 Hot Tamale, apply 1 coat to the “OMG”.
Use SG-402 White to make dots on the outside of the cup. They should be staggered and larger towards the bottom.
Using the Soft Fan, apply 1 coat of NT-BR Clear Brushing Glaze or dip into NT-CLR Clear Dipping Glaze.
Fire to cone 06.
Form
MB-1512 Handyman Mug – Hammer
Colors
SC-6 Sunkissed
SC-11 Blue Yonder
SC-15 Tuxedo
SC-74 Hot Tamale
SG-402 White Designer Liner
NR-CLR Clear Dipping or S-2101 Crystal Clear Brushing Glaze
Begin with properly fired shelf cone 04 Bisque. Remove the plastic lid. Moisten a clean sponge and wipe bisque to remove dust.
Using the 1/2″ masking tape, make 5 evenly spaced lines going vertically down the tumbler. Firmly press the tape.
Using the 1/4″ masking tape, make 4 evenly spaced lines between each of the 1/2″ lines at the top of the tumbler. These lines should be no longer than 1″. Make 3 evenly spaced lines between each of the 1/2″ lines a the bottom of the tumbler. These lines should be no longer than 1″. Firmly press the tape.
Apply 3 coats of SC-26 Green Thumb using the Soft Fan.
Before the last coat is completely dry, remove all of the tape.
After the glaze is dry, trace on the pattern with clay carbon paper. Place “10”, “20”, “30”, “40” and “50” chronologically around each of the five 1/2″ lines. Place them towards the center of the tumbler.
Using SG-402 White, outline and fill in the numbers.
Dip into NT-CLR or apply 2 coats of S-2101 Crystal Clear Brushing Glaze.
Fire to cone 06.
Insert the lid when cool.
Form
MB-1124 Travel Tumbler
Colors
SC-26 Green Thumb
SG-402 White Designer Liner
NR-CLR Clear Dipping or S-2101 Crystal Clear Brushing Glaze
1. Begin with properly fired shelf cone 04 Bisque. Moisten a clean sponge and wipe bisque to remove any dust.
2. Use a Dremel to drill holes to fit the 10mm lights for the headlights.
3. Slightly thin FN-009 Black. Pour pour inside the bed of the truck, roll to coat, pour out the excess glaze and drain.
4. Use the Soft Fan and Script Liner to apply three coats of FN-007 Green to the green areas of the truck. Use FN-020 Green to add the shadow areas, blending into the FN-007 Green. Highlight the FN-007 Green with FN-037 Chartreuse.
5. Use the same brushes to apply three coats of FN-003 Orange to the orange areas.
6. Use the Script Liner to float a thin coat of SC-15 Tuxedo around the sections of the truck for additional shading.
7. Use the Script Liner to apply three coats of FN-039 Glaze to the grill and bumper. Let dry, then apply a thin coat of SC-15 Tuxedo over these areas to antique. The Tuxedo should be as thin as water.
8. Use the Square Shader to apply one thinned coat of SC-15 Tuxedo to the windows. Apply in the direction of the window.
9. Use the Liner to outline the sectional lines with SC-15 Tuxedo.
10. Use the Script Liner to apply FN-007 to the hubcaps. Apply a wash of thinned SC-15 Tuxedo over the green. Apply two coats of FN-009 Black to the tires.
11. Remove glaze from headlight openings.
12. Fire to cone 05/06.
13. Use epoxy or E-6000 to secure the headlights into place.
Begin with properly fired shelf cone 04 Bisque. Moisten a clean sponge and wipe bisque to remove dust.
For the mug that is primarily SC-97 Cant-elope, use the Soft Fan to apply two coats of SC-16 Cotton Tail on the outside of the mug.
Apply another coat of Cotton Tail. While the glaze is wet, place the doily on the mug and apply one more coat of Cotton Tail so that any gaps between the doily and the mug are gone. You can find cotton doilies at antique shops. Try those that are made of cotton and have open spaces.
Press a paper towel over the doily to absorb excess glaze and to speed up the drying.
When the glaze has lost it’s gloss, use the Soft Fan to apply two coats of SC-97 Cant-elope over the outside of the mug.
Remove the doily after the glaze has started to dry to avoid chipping.
Sponge off excess glaze from the rim and inside of the mug.
Dip into NT-CLR or use the Soft Fan to apply one coat of S-2101 Clear on the outside of the mug and two coats on the inside of the mug.
For the primarily white mug, reverse the colors on the outside of the mug and apply three coats of SC-97 Cant-elope to the inside of the mug with CB-604 Soft Fan.
1. Begin with properly fired shelf cone 04 Bisque. Moisten a clean sponge and wipe bisque to remove any dust.2. Slightly thin FN-003 Orange, pour inside the camper and roll to coat. Pour out the excess glaze and drain.3. Pencil a line for the lower section of the camper for color separation, then apply tape to the line.
4. Use the Soft Fan to apply three coats of FN-007 Green to the lower section. Use the Script Liner to highlight with two coats of FN-037 Chartreuse. To deepen the color for the shadow, use FN-020 Medium Green. Blend the colors into the FN-007 Green.
4. For a clean look, tape around the spaces where FN-003 Orange will be applied (see picture). Use the Script Liner to apply two coats of the FN-003 Orange.
5. Use the Script Liner to apply stripes of SC-15 Tuxedo with a narrow line of FN-003 Orange (Liner). Use the Liner to apply one coat of FN-007 Green to the window curtains. Apply two coats of FN-002 Yellow to the flowers with FN-003 Orange dotted into the centers. Use the Liner to outline all designs with SC-15 Tuxedo.
6. Use the Script Liner to apply two coats of SC-15 Tuxedo to the trailer hitch and tires.
7. Fire to cone 05/06.
Form
MB-1514 Vintage Camper Bisque or CD1514 Vintage Camper Mold
Begin with properly fired shelf cone 04 Bisque. Moisten a clean sponge and wipe bisque to remove any dust.
Use the Soft Fan to apply three coats of the following colors to each of the Tiki Mugs: SC-6 Sunkissed, SC-11 Blue Yonder, SC-75 Orange-A-Peel, SC-77 Glo-Worm.
Alternatively you may use Foundations Glazes: FN-002 Yellow, FN-018 Bright Blue, FN-003 Orange, FN-037 Chartreuse.
1. Begin with properly fired shelf cone 04 Bisque. Moisten a clean sponge and wipe bisque to remove dust.2. Use the Soft Fan to apply two coats of FN-044 Yellow Orange to the inside, including the eye sockets, and mouth.3. Use the following colors with SC-16 Cotton Tail to lighten them: SC-97 Cant-elope, SC-75 Orange-A-Peel, SC-11 Blue Yonder and SC-27 Sour Apple. Use the plastic card to pick up SC-97 Cant-elope along with SC-16 Cotton Tail and a small amount of SC-75 Orange-A-Peel. Spread the color onto the faceted sections of the skull. Pick up SC-11 Blue Yonder and SC-27 Sour Apple with SC-16 Cotton Tail and spread onto the skull. Work your way around the skull changing colors on the card as you go. Use the card to spread SC-16 Cotton Tail or SC-55 Yella Bout It on top of the colors if they are too intense. We used a plastic card to apply the color, but a brush works if you prefer to use that application technique.
4. Thicken S-2101 Clear (tinted with a drop of food coloring) with AC-310 Silkscreen Medium to thicken. Use the heart from DSS-152 Day of the Dead to screen with the clear glaze mixture. Use your finger to rub the mixture over the screen with the shiny side down. Screen the marigolds in a semi-circle around the heart.
5. Use the Script Liner to apply two coats of SC-Candy Apple Red to the heart, two coats of SC-16 Cotton Tail to the wings and two coats of SC-97 Cant-elope to the marigolds.
7. Use SC-15 Tuxedo thickened with AC-310 Silkscreen Medium to screen the medallions on both sides of the skull. Screen the small skull on the back. See step 4.
8. Use SG-401 Black to outline the facets.
9. Dip into NT-CLR Clear Dipping Glaze or use the Soft Fan to apply one coat of S-2101 Clear Brushing Glaze.
10. Fire to cone 05/06.
Form
MB-1515 Faceted Skull Bisque or CD1515 Faceted Skull Mold
Begin with properly fired shelf cone 04 Bisque. Moisten a clean sponge and wipe bisque to remove any dust.
Use the Soft Fan and Script Liner to apply three coats of SC-6 Sunkissed to the butterfly handle and wing. Apply three coats of Sunkissed inside the mug.
Use a sponge-on-a-stick to apply SC-97 Cant-elope to a section of ST-100 Game Board Stamp then press onto the wings.
Use the Script Liner to shade around the wings and inside of the handle with SC-97 Cant-elope.
Thicken SC-15 Tuxedo with AC-310 Silkscreen Medium and mix with a palette knife to the consistency of peanut butter. Place the ladybug from DSS-0113 Bugs (shiny side down) onto the mug. Rub the thickened Tuxedo over the screen. Repeat for as many ladybugs as you wish. Use the Liner to fill in around the black spots with one thick coat of SC-73 Candy Apple Red.
Use the Liner to apply SC-15 Tuxedo to the body and antennae outline the butterfly wings.
1.Begin with properly fired shelf cone 04 Bisque. Moisten a clean sponge and wipe bisque to remove dust.
2. Use the Soft Fan and Script Liner to apply three coats of SC-2 Melon-Choly to the octopus.
3. Use the Script Liner to float SC-89 Cutie Pie Coral onto the tentacles to create shading. Let dry.
4. Use SG-402 White to outline the suckers.
5. Use a palette knife and AC-310 Silkscreen Medium to thicken SC-73 Candy Apple Red to the consistency of peanut butter. Screen the hydrangea flower from DSS-149 Flowers 3-XL, shiny side down, onto the body of the octopus. Rub the mixture over the screen with your finger, gently run water over the screen to clean.
6. Scrape excess color from the eyes. Use the Lier to apply two coats of SC-76 Cara-bein Blue to the iris and one coat of SC-15 Tuxedo to the pupil.
7. Puddle two coats of SC-32 Bluebeard into the spaces between the tentacles. with SC-32 Bluebeard.
1. Begin with properly fired shelf cone 04 Bisque. Moisten a clean sponge and wipe bisque to remove dust.
2. Use the Soft Fant to apply three coats of FN-037 Chartreuse to the inside of the skull, eye sockets, and mouth.
3. Outline the faceted shapes with SG-401 Black. Let dry.
4. Use the Soft Fan to apply three coats of CC-101 Clear Crackle to the outside of the skull.
6. Fire to cone 06.
7. Wait a day or so for the cracks to develop after firing. Slightly thin a black acrylic stain, brush onto the skull, then wipe clean to reveal the crackle finish.
Form
MB-1515 Faceted Skull Bisque or CD1515 Faceted Skull Mold
Begin with properly fired shelf cone 04 Bisque. Moisten a clean sponge and wipe bisque to remove any dust.
Slightly thin FN-036 Grape, pour inside the mug, turn to coat, pour out the excess glaze and drain.
Use the Script Liner to apply three coats of SC-73 Candy Apple Red to the tips of the claws. Apply three coats of SC-74 Hot Tamale to the remainder of the claws, overlapping the colors. Apply three coats of SC-74 Hot Tamale to the bottom of the crab’s shell.
Apply three coats of SC-13 Grapel to the crab’s legs, arms and the middle section of the crab’s body. Apply SC-33 Fruit of the Vine to the sides of the crab’s body, overlapping two of the coats over the Grapel. This will allow the center of the body to be a brighter purple and the sides a deeper purple.
Outline the detail on the crab’s body with SC-15 Tuxedo. Tuxedo is brushed between the spaces in the claws, eyes are Tuxedo, use CB-110 Liner.
Use the Soft Fan to apply two coats of NTCLR Clear One Dipping Glaze to the outside of the mug.
Fire to cone 06.
Form
MB-1447 Crab Mug
Colors
FN-036 Grape
SC-13 Grapel
SC-15 Tuxedo
SC-33 Fruit of the Vine
SC-73 Candy Apple Red
SC-74 Hot Tamale
S-2101 Clear Brushing Glaze or NT-BR Clear Dipping
1.Begin with properly fired shelf cone 04 bisque. Moisten a clean sponge and wipe bisque to remove dust.
2. Use a dry sponge, dab two coats of SC-65 Peri-twinkle onto the blue sections of the crab. Use the sponge to dab SC-30 Blue Dawn to the edges of the crab’s body to darken.
3. Use the Script Liner to apply two coats of SC-88 Tu Tu Tango to the claws, Wipe off some of the color to lighten and show the bumps on the claws.
4. Use the Liner and Script Liner to outline the sections of the crab with SG-404 Blue. Fill in the sections between the legs with a puddle coat of SC-12 Moody Blue.
5. Use the Script Liner to float SC-12 Moody Blue around the crab’s body and legs to create separation.
6. Use a 2″ foam roller to apply SC-12 Moody Blue to the Honeycomb Mat, then press onto the crab’s body.
7. Use the Liner to dot SC-15 Tuxedo to the eyes.
8. Use the Soft Fan to apply three coats of SC-30 Blue Dawn to the back of the dish.
9. Dip into NT-CLR or use the Soft Fan to apply one coat of S-2101 Clear to the crab.
9. Fire to cone 05/06.
Form
MB-1511 Crab Dish
Colors
SC-12 Moody Blue
SC-15 Tuxedo
SC-30 Blue Dawn
SC-88 Tu Tu Tango
SG-404 Blue
NT-CLR Clear Dipping or S-2101 Clear Brushing Glaze
1. Begin with properly fired shelf cone 04 Bisque. Moisten a clean sponge and wipe bisque to remove dust.
2. Thin slightly FN-009 Black. Pour to the inside of the bed o the truck, roll, pour out the excess glaze and drain.
3. Use the Soft Fan to apply two coats of SC-45 My Blue Heaven to the body of the truck.
4. Use the Script Liner to shade a wide stroke of SC-11 Blue Yonder around all the parts of the truck. Apply SC-16 Cotton Tail on the highlight areas of the truck.
5. Use the Script Liner with SC-12 Moody Blue to shade over the Blue Yonder shading; however, apply this color in a narrow area. Clean the color off the windows.
6. Use the Script Liner to shade the sides of the window with SC-15 Tuxedo, mixed with SC-16 Cotton Tail to create a charcoal color.
7. Use the Script Liner to apply three coats of SC-11 Blue Yonder to the hub caps and two coats of SC-15 Tuxedo to the tires. Use the same brush to apply two coats of SC-60 Silver Lining to the bumper and grill. Let dry.
8. Thin SC-15 Tuxedo to the consistency of water. Use the Soft Fan to brush quickly over the grill and bumper so the color will puddle in the detailed areas. If it is too dark, brush over the color with water.
9. Mix SC-15 Tuxedo with AC-310 Silkscreen Medium to the consistency of peanut butter. Screen the flamingo heads in the windows and the palm tree on the door, screens from DSS-0147 Island.
10. Use the Script Liner to apply one coat of each color as noted: SC-2 Melon-choly to the flamingo’s body, SC-7 Leapin’ Lizard to the palm leaves and SC-41 Brown Cow to the tree trunk.
11. Use ther Liner to outline the door and window with SC-15 Tuxedo.
12. Dip into NT-CLR or use the Soft Fan to apply one coat of S-2101 Clear to the truck.
Begin with properly fired shelf cone 04 Bisque. Moisten a clean sponge and wipe bisque to remove any dust.
Slightly thin FN-026 Salmon Mousse, pour inside of the mug, turn to coat, pour out the excess glaze and drain.
Use the Script Liner to apply three coats of SC-22 Carrot Top to the head of the octopus. Add SC-87 Ruby Slippers to the brush where the tentacles begin. Add SC-3 Wine About It to the brush as you get near the end of the tentacle.
Shade around the head of the octopus dish with two coats of SC-97 Ruby Slippers. Apply SC-75 Orange-A-Peel to the center section of the head to brighten. Add shading with SC-75 Orange-A-Peel around the octopus tentacles. Let dry.
Outline the loops on the tentacles with SG-408 Orange. Use the Liner with SC-15 Tuxedo to outline the mouth, eye and in the spirals at the end of the tentacles.
Use the Soft Fan to apply two coats of S-2101 Clear on the mug.
Fire to cone 05/06.
Form
MB-1408 Octopus Mug
Colors
FN-026 Salmon Mousse
SC-3 Wine About It
SC-15 Tuxedo
SC-22 Carrot Top
SC-75 Orange-A-Peel
SC-87 Ruby Slippers
SG-408 Orange Designer Liner
S-2101 Clear Brushing Glaze or NT-BR Clear Dipping
1. Begin with properly fired shelf cone 04 Bisque. Moisten a clean sponge and wipe bisque to remove dust.
2. Outline all the lines in the turtle with SG-401 Black.
3. Use the Script Liner to apply three coats of FN-224 Key Lime to the center section of the shapes in the turtle’s shell.
4. Apply three coats of the remaining area of the Turtle’s shell with FN-227 Celery, overlapping onto the Key Lime.
5. Use the Soft Fan to apply three coats of FN-204 Mudpuddle Brown to the head and flippers.
6. Use the Liner with SG-401 Black to outline and brush in the pupil. These areas will need a clear glaze.
7. Use the Script Liner to apply one coat of NTBR Clear One Brushing Glaze to the eye area. Alternatively, you may use SC-15 Tuxedo and no clear glaze will be required.
Begin with properly fired shelf cone 04 Bisque. Moisten a clean sponge and wipe bisque to remove any dust.
Slightly thin FN-041 Medium Blue, pour inside the mug, turn to coat, pour out the excess glaze and drain.
Deepen the color of S-2101 Clear with food coloring on a palette, sprinkle AC-310 Silkscreen Medium into the clear and mix with a palette knife to the consistency of peanut butter. Use the dolphin screens from DSS-0131 Sea Life 2 with the shiny side down. Rub the thickened Clear over the screen on the mug. This is for color placement only.
Use the Script Liner to apply two coats of SC-60 Silver Lining to the dolphin body on the screened images and three coats on the handle.
Pencil in a water line. Use the Script Liner to apply three coats of SC-65 Peri-Twinkle to the water area. Shade the water line with SC-31 The Blues.
When the dolphins are dry, thicken SC-15 Tuxedo, as in step 3 (no clear glaze or food coloring). Place the dolphin screens over the previously screened images and rub the thickened SC-15 Tuxedo over the designs.
Use the Liner and SC-15 Tuxedo to outline the dolphin handle to separate the white belly from the gray.
Use the Soft Fan to apply two coats of S-2101 Clear Brushing Glaze to the outside of the mug and handle.
Fire to cone 06.
Form
MB-1448 Dolphin Mug
Colors
FN-041 Medium Blue
SC-15 Tuxedo
SC-31 The Blues
SC-60 Silver Lining
SC-65 Peri-Twinkle
S-2101 Clear Brushing Glaze or NT-BR Clear Dipping
1. Begin with properly fired shelf cone 04 Bisque. Moisten a clean sponge and wipe bisque to remove dust.
2. Use SG-401 to outline all the lines of the crab to separate the body, legs, and claws and to fill in the spaces between the legs.
3. Use the Soft Fan to apply three coats of FN-212 Blue Diamond to the legs, body, and back of the crab dish. Use the Script Liner to apply two coats of FN-230 Poppy to the claws.
4. Use a stiffer brush to scrub back the Poppy color where it meets the Blue Diamond to lighten the color. To shade the body of the crab, use the Soft Fan to apply one coat of FN-213 Saffire Blue in the shadow area of the body to darken the blue. Disperse the color with a coat of water at the edges of the Blue Saffire to blend. When doing this, only load half of the brush with color.
5. Clean off color from the eyes and use the end of a large brush to dot the eyes with SC-15 Tuxedo for a round circle.
6. Use Soft Fan to apply NTBR Clear One Brushing to the eyes and over the thinned Poppy color area. Alternatively, you may dip the piece into NT-CLR Clear Dipping Glaze.
1. Begin with properly fired shelf cone 04 Bisque. Moisten a clean sponge and wipe bisque to remove any dust.2. With a dry sponge, apply one coat of SC-25 Crackerjack Brown on various areas of the cat. Leave some areas open for black and white (no color). Sponge one coat of SC-23 Jack-O-Lantern onto the cat, allowing some areas of Crackerjack Brown to show.3. Sponge one coat of SC-15 Tuxedo onto various areas of the cat. Overlap over the Crackerjack areas where they meet. 4. Outline the faceted lines with SG-401 Black. You may wish to use a ruler to keep the long lines straight.
5. Use the circle template to pencil in the eyes. Use the Liner to apply two coats of SC-52 Toad-ily Green to the iris. Apply two coats of SC-15 Tuxedo to the pupil and nose.
6. Dip into NT-CLR Clear Dipping Glaze.
7. Fire to cone 05/06.
Form
CD1517+ Faceted Cat Mold or MB-1517 Faceted Cat Bisque
Begin with properly fired shelf cone 04 Bisque. Moisten a clean sponge and wipe bisque to remove any dust.
Use SG-404 Blue Designer Liner to outline the spines on the seahorse body.
Use the Soft Fan to apply three coats of CG-980 Coral Puff to the body, evenly distributing the large crystals.
Use the Liner to apply two coats of SC-15 Tuxedo to the pupil.
Slightly thin FN-043 Bright Jade, pour inside the cup, roll to coat, pour out the excess and drain. Alternatively, you may apply three coats of FN-043 Bright Jade using the Soft Fan.
Using a palette knife, thicken SC-29 Blue Grass with AC-310 Silkscreen Medium with to the consistency of peanut butter. With the shiny side down, use your finger to rub the thickened Blue Grass over the coral image from DSS-0102 Sea Life. Remove and gently clean.
Use the Soft Fan to apply two coats of S-2101 Clear over the body of the mug.
1. Begin with properly fired shelf cone 04 Bisque. Moisten a clean sponge and wipe bisque to remove dust.
2. Use a dry sponge to apply one coat of SC-65 Peri-twinkle to various areas of the dog. Follow up with a sponged coat of SC-30 Blue Dawn over the Per-twinkle. Sponge Blue Dawn more sparingly, so you can still see Peri-twinkle.
3. Sponge one coat of SC-41 Brown Cow onto the dog, overlapping the blue. Be sure to leave bisque showing on parts of the dog so it will fire white.
4. Outline the facets of the dog with SG-401 Black. You may wish to use a ruler to keep the lines straight.
5. Use a circle template to pencil in the dog’s eyes. Use the Liner to apply two coats of SC-41 Brown Cow to the iris. Apply two coats of SC-15 Tuxedo to the nose and pupil.
6. Dip into NT-CLR Clear Dipping Glaze.
7. Fire to cone 05/06.
Form
MB-1516 Faceted Dog Bisque or CD1516+ Faceted Dog Molds
1. Begin with properly fired shelf cone 04 bisque. Moisten a clean sponge and wipe bisque to remove dust.
2. Thin FN-034 Big Sky Blue, pour to the inside, turn to coat, pour out the excess.
3. Tape a line under the window trim all around the camper. Use the Script Liner and Soft Fan to apply three coats of SC-37 Ivory Tower above the tape. As you go, add SC-55 Yella Bout It to shade the edges of the camper. On the third coat deepen the yellow around the edges with one coat of SC-51 Poo Bear, use the same brush so the colors blend. Remove the tape.
4. Use the Script Liner and Soft Fan to apply SC-45 My BLue Heaven on the door and the lower section of the camper. Use SC-11 Blue Yonder to shade around all the edges of the blue in a wide area. Let dry. Shade in a small edge with SC-31 The Blues.
5. Use the Script Liner to apply two coats of SC-31 The Blues to the trim around the windows and door.
6. Use the Script Liner to apply two coats of SC-7 Leapin’ Lizard to create stripes on the awning.
7. Mix S-2101 Clear with food coloring. Add in AC-310 Silkscreen Medium and mix with a palette knife to the consistency of peanut butter. If the mix is too thin add more AC-310 Silkscreen Medium or if it is too thick add more S-2101 Clear.
8. Position the screen shiny side down on the piece. Holding in place – start in the center go out – rub the mixture on the screen with your finger. Lift a corner up to check if you are applying enough color. Screen on the palm trees, flowers and flamingo head from DSS-0147 Island. Screening in the clear with food coloring is for color placement. Remove the screen and wash with water. Do not let the color dry in the screen.
9. Use the Liner and Script Liner to apply two coats of SC-7 Leapin’ Lizard to the palm leaves. Apply two coats of SC-2 Melon-Choly to the flowers and flamingo head. Apply one coat of SC-41 Brown Cow to the palm tree trunks.
10. Thicken SC-15 Tuxedo with AC-310 Silkscreen Medium. Follow application process from step 8. Line up the screen directly over the previously screened image.
11.Use the Script Liner to apply 3 coats of SC-60 Silver Lining to the trailer hitch. When dry, apply a thinned coat of SC-15 Tuxedo over the hitch. The Tuxedo should have a water-like consistency.
12. Apply two coats of SC-15 Tuxedo to the tires and two coats of SC-31 The Blues to the hubcaps. Thin SC-45 My Blue Heaven to create the curtain in the window. The dots were created with SC-2 Melon-Choly.
13. Float SC-15 Tuxedo into the windows.
14. Use the Soft Fan to apply two coats of NTBR Clear One Brushing or dip into NT-CLR Clear Dipping Glaze.
15. Fire to cone 05/06.
Form
MB-1514 Vintage Camper Bisque or CD1514 Vintage Camper Mold
Colors
SC-2 Melon Choly
SC-7 Leapin’ Lizard
SC-15 Tuxedo
SC-16 Cotton Tail
SC-31 The Blues
SC-37 Ivory Tower
SC-41 Brown Cow
SC-45 My Blue Heaven
SC-51 Poo Bear
SC-55 Yella Bout It
SC-60 Silver Lining
SC-89 Cutie Pie Coral
FN-034 Big Sky Blue
NTBR Clear One Brushing or NT-CLR Clear Dipping Glaze
Begin with properly fired shelf cone 04 Bisque. Moisten a clean sponge and wipe bisque to remove any dust.
Slightly thin FN-049 Flamingo. Pour inside the mug, roll to coat, pour out the excess glaze and drain.
Outline the flamingo, feathers, legs, and head with SG-401 Black. Use the Script Liner to apply three coats of SC-70 Pink-A-Dot to the legs and three coats of CG-968 Peppermint Twist to the body.
Use the Liner to apply one coat of SC-15 Tuxedo to the tip of the beak, outline the eye and fill in the pupil.
Use a palette knife to thicken S-2101 Clear with AC-310 Silkscreen Medium to the consistency of peanut butter. Add a drop of food coloring to tint the glaze. Use the palm trees and hibiscus from DSS-0147 Island, with the shiny side down, rub the tinted and thickened clear over the screens, continue around the mug. This is for color placement only.
Use the Script Liner to apply two coats of SC-26 Green Thumb to the palm trees and SC-48 Camel Back to the trunks. Shade the hibiscus with SC-70 Pink-A-Dot.
Thicken SC-15 Tuxedo as in step 4 (without clear glaze and food coloring). Place the palm screens over the painted screens on the mug, checking to see the screens line up with the painted images. Rub the thickened Tuxedo over the screens.
Use the Soft Fan to apply two coats of S-2101 Clear over the outside of the mug, except for the Peppermint Twist crystal glaze.
*Begin with properly fired shelf cone 04 Bisque. Moisten a clean sponge and wipe bisque to remove dust.
Vase
Thin S-2101 Clear and pour inside the vase. Turn the vase to coat the inside and pour out the excess glaze. Drain.
Use the Soft Fan to apply two coats of EL-123 Patina.
Use the same brush to plop PC-602 White Cascade over the vase, leaving spaces between plops. Start 3 1/2″ up from the bottom of the vase and go out only 1″ from the top of the arms. Since the vase is a vertical shape the glaze will flow downward.
Stir CG-987 Tree Frog. Use the Soft Fan to plop heavily on the vase starting 2 1/2″ from the bottom of the vase. Overlap but do not completely cover the White Cascade.
Use the Soft Fan to plop PC-601 Clear Cascade 2 1/2″ up from the bottom of the vase.
Use the Soft Fan to pat EL-134 Mirror Blue starting at the top of the vase and arms. Take the color just 1″ down from the top of the vase and arms.
Dish
Use the Soft Fan to apply two coats of EL-123 Patina.
Use the same brush to plop PC-602 White Cascade over the vase, leaving spaces between plops. The dish is fired flat so you don’t have worry about movement during firing.
Stir CG-987 Tree Frog. Use the Soft Fan to plop heavily on the dish. Overlap but do not completely cover the White Cascade.
Use the Soft Fan to pat EL-134 Mirror Blue onto the edges of the tray.
Use the Soft Fan to apply three coats of EL-113 Spanish Moss on the bottom of the dish.
Planter
Use the Soft Fan to apply three coats of EL-106 Tidal Pool to the inside of the planter.
Use the Soft Fan to apply two coats of EL-106 Tidal Pool to the outside of the container.
Use the same brush to plop PC-602 White Cascade 1 1/2″ up from the bottom of the cactus, leaving space so the Tidal Pool shows.
Randomly plop EL-132 Rust Red on the outside of the container.
Use the same brush to plop EL-134 Mirror Blue to the top edge of the planter.
NOTE: If you wish to use the same color scheme as the vase and dish, we suggest using three coats of EL-118 Blue Grotto inside the piece.
2. Use the Liner to line the deep ridges with SC-15 Tuxedo on all the pieces.Use the Liner to line the deep ridges with SC-15 Tuxedo on all the pieces.
Begin with properly fired shelf cone 04 Bisque. Moisten a clean sponge and wipe bisque to remove any dust.
Bubbled Mug:
Slightly thin FN-006 Blue, pour inside the mug, turn to coat, pour out the excess glaze and drain.
Pencil in a larger eye on the whale.
Use the Soft Fan to apply three coats of SC-31 The Blues to the whale.
Use the Soft Fan and Script Liner to apply two coats of S-2718 Cosmic Black. Do not glaze the eye or the underbelly.
Outline the eye and underbelly with SC-15 Tuxedo and fill in the pupil wiht the Liner.
Into a cup, add 1 Tbs of SC-12 Moody Blue and 2 Tbs of water, two drops of liquid soap. This recipe may be doubled if the cup is a bit larger. Blow bubbles with the straw into the mixture. When the bubbles exceed the top of the cup, press the mug to the bubbles covering the background of the mug. It is ok if the bubbles get on the whale.
Apply two coats of S-2101 Clear to the background, whale’s eye and belly.
Whale with Netting:
Follow steps 2 and 3 in the directions above.
Use the Soft Fan to apply three coats of SC-76 Cara-Bein Blue to the whale’s body
Use the Liner with SC-15 Tuxedo to outline eye and fill in the pupil.
Apply two coats of S-2718 Cosmic Black over the SC-76 Cara-Bein Blue.
Cut a section of cheesecloth to fit the mug. Wet the cheesecloth and place it on a flat surface. Alter the pattern of the cheesecloth to open the fibers with your fingers. Dip the cloth into SC-12 Moody Blue, squeeze out the excess glaze, open the cheesecloth and lay across the mug. Press with a paper towel to transfer the pattern to the mug.
Apply two coats of S-2101 Clear to the background of the mug, whale’s eye and belly.
1. Begin with properly fired shelf cone 04 Bisque. Moisten a clean sponge and wipe bisque to remove dust.
Sketch out three uneven sections on the platter.
Using the Soft Fan, apply two coats to the center section of the plate with PC-602 Clear Cascade.
Using the Soft Fan, apply three coats of FN-214 Pastel Jade over the PC-602 Clear Cascade.
Using the Soft Fan, apply two coats ofEL-110 Mudslide to one section of the plate making sure to overlap onto the Pastel Jade.
Using the Soft Fan, apply two coats of EL-118 Blue Grotto to the remaining side.
Where the colors meet, plop one generous coat of PC-601 White Cascade over the edges of the EL-110 Mudslide and EL-119 Blue Grotto, and FN-214 Pastel Jade with the Soft Fan brush.
Using the Script Liner splatter PC-601 White Cascade over the plate.
Work while the glaze is wet. Plop both Blue Grotto over the Blue Grotto side, plop Mudslide over the Mudslide side, plop over the White Cascade on both sides. Use the same brush without washing between colors. Some color from the brush will show up on the other side of the plate.The key is to have some white showing but not big blobs, that is why more color is added over the Cascade.
Use the 10/0 Liner to apply veins of SC-15 Tuxedo.
Use the Script Liner to splatter the plate with PC-602 Clear Cascade.
Use the Soft Fan brush to apply three coats of EL-110 Mudslide to the back of the plate.
Begin with properly fired shelf cone 04 bisque. Moisten a clean sponge and wipe bisque to remove any dust.
Trace or draw the pattern.
Slightly thin FN-003 Orange and pour inside, roll to coat, then pour out the excess.
Remove glaze that drips to the outside of the cat with a damp sponge.
Use the Script Liner to apply three coats of SC-75 Orange-A-Peel to the banners and inside the ears.
Use the Liner to apply two coats of SC-97 Cant-elope to the banner string wrapping it around the tail. Brush the remainder of the cat with two coats of SC-15 Tuxedo, careful around the eyes, leave unglazed.
Use the Liner to outline the banner from the string, to fill in the letters BOO and dot the banner with SC-15 Tuxedo. Use the Script Liner to shade the inside of the ears with SC-15 Tuxedo.
When the Tuxedo is dry, use SG-408 Orange to draw in the whiskers and SG-403 Red to outline the mouth and nose. Use the Liner to apply two coats of SC-27 Sour Apple to the eyes. Fill in the pupil and outline the eyes with SC-15 Tuxedo.
Dip into NT-CLR Clear Dipping Glaze or use the Soft Fan to apply one coat of S-2101 Clear Brusing Glaze.
Fire to cone 06.
Form
MB-1406 Stretch Cat Container
Colors
FN-003 Orange
C-75 Orange-A-Peel
SC-15 Tuxedo
SC-97 Cant-elope
SG-408 Orange
SG-403 Red
SC-27 Sour Apple
NT-CLR Clear Dipping or S-2101 Clear Brushing Glaze
Moisten a clean sponge and wipe bisque to remove dust. Slightly thin FN-009 Black.
Pour into the container, roll to coat then pour out the excess glaze. Use a sponge to wipe away drips on the outside of the dog. Download the pattern. Pencil a section of the dog’s body for the cape. Trace the bat pattern onto the middle of the cape using Clay Carbon paper and a pencil. Pencil in the mask on the dog’s face.
Use the Soft Fan to apply three coats of slightly thinned SC-5 Tiger Tail over the remainder of the body. Add SC-24 Dandelion to the brush to highlight.
Paint over the edges of the penciled lines – Tuxedo will cover the glaze. Use the Script Liner with SC-34 Down to Earth to shade around the ears and cape.
Use the Script Liner to apply two coats of SC-24 Dandelion onto the yellow area of the bat pattern.
Use the Script Liner to apply two coats of SC-15 Tuxedo over the black areas, mask, bat, cape and dog’s nose.
Use the Liner to apply two coats of SC-5 Tiger Tail to the irises of the eyes and SC-15 Tuxedo to the pupils. Outline the eye areas with SC-15 Tuxedo.
Use the Soft Fan to apply one coat of S-2101 Clear or dip into NT-CLR Clear Dipping Glaze.
Fire to cone 05/06
Form
MB-1507 Stretch Dog Container
Colors
SC-5 Tiger Tail
SC-15 Tuxedo
SC-24 Dandelion
SC-34 Down To Earth
SC-54 Vanilla Dip
FN-009 Black
S-2101 Clear Dipping or NT-CLR Clear Brushing Glaze
Begin with a properly fired shelf cone 04 Bisque. Moisten a clean sponge and wipe bisque to remove dust.
Use CB-604 Soft Fan to apply three coats of SC-75 Orange-A-Peel to the inside of the mug and SC-65 Peri-twinkle to the outside of the mug.
Apply three coats of SC-60 Silver Lining to the wrench. Let dry, thin SC-15 Tuxedo like water, brush quickly over the wrench so it puddles in the detail.
Use a sponge on a stick to apply SC-31 The Blues to ST-132 Diamond Plate Stamp, press to the mug.
Begin with properly fired shelf cone 04 bisque. Moisten a clean sponge and wipe bisque to remove dust.
Using Sponge on a Stick load the sponge with SC-15 Tuxedo, making sure to tap off excess glaze. Too much color will result in a blurred, messy image. Apply the color to the ST-111 Four Flowers Stamp, while it is laying flat on the table. Turn the stamp over onto the desired area and press down; make sure not to rub back and forth or this will cause a double image. Repeat until the center section of the stein is covered in the stamp.
Using a CB-106 #6 Script Liner, apply 1 coat of the various Stroke & Coat colors to fill in the details of the stamp.
Using a CB-604 #4 Soft Fan, apply 3 coats of FN-052 Tangerine to the outside of the mug, avoiding the stamping.
Apply 3 coats of FN-028 Wisteria to the inside.
Using a CB-106 #6 Script Liner, apply 2 coats of S-2101 over the stamped area.
Let Dry Completely
Stilt and fire to shelf cone 06/05.
Form
MB-145 Loop Handled Mug
Colors
FN-028 Wisteria Purple
FN-052 Tangerine
SC-6 Sunkissed
SC-11 Blue Yonder
SC-15 Tuxedo
SC-24 Dandelion
SC-27 Sour Apple
SC-74 Hot Tamale
SC-89 Cutie Pie Coral
S-2101 Crystal Clear Brushing or NT-CLR One Dipping Glaze
Begin with properly fired shelf cone 04 bisque. Moisten a clean sponge and wipe bisque to remove any dust.
Using a CB-604 #4 Soft Fan, apply 2 coats of FN-001 White to the top 2/3 of all 3 wine tumblers.
Apply 3 coats of glaze to the inside of the tumbler and anywhere from 1/3-3/4 of the way up using the following colors: SC-2 Melon-Choly, SC-3 Wine About It and SC-55 Yella Bout It.
Using AC-230 Clay Carbon Paper, transfer the lettering onto each glass coordinating the wine colors with the phrase.
Using SG-401 Black Designer Liner, write your favorite wine sayings.
Once the Designer Liner is completely dry, dip the tumblers into NT-CLR Clear Dipping Glaze. Alternatively, you may use a Soft Fan to apply 1 coat of S-2101 Crystal Clear Brushing over the lettering.
Begin with properly fired shelf cone 04 Bisque. Moisten a clean sponge and wipe bisque to remove dust.
Thin slightly FN-009 Black pour to the inside, roll to coat, pour out the excess, drain.
Brush on two coats of SC-37 Ivory Tower, brush on in sections, SC-37 Ivory Tower, while wet, place the eyelash yarn into the wet glaze, to cover the dog’s body. Brush over with the Ivory Tower to make sure it sticks.
After the glaze begins to dry, press with a paper towel to remove excess glaze.
Don’t let the Ivory Tower dry completely as the hairs from the eyelash yarn will break off when you remove it.
After the Ivory Tower has lost its gloss, brush on two thinned coats of SC-5 Tiger Tail, remove the eyelash yarn.
Thin SC-48 Camel Back like water, brush to sections of the dog’s body to create variation in color, deepen some of the areas with very thin SC-15 Tuxedo, use CB-106 Script Liner.
Sponge some of the colors off of the muzzle to it is the Ivory Tower color, outline the mouth with SG-401 Black. Dot the muzzle with the Black, shade thinned SG-401 Black around the ears and nose, and part of the eyes.
Iris is two coats of SC-48 Camel Back, outline with SG-401 Black use CB-110 Liner.
Brush one coat of NTBR Clear One Brushing with CB-604 Soft Fan over the dog’s body.
Fire to cone 05/06.
Form
MB-1507 Stretch Dog Container
Colors
FN-009 Black
SC-5 Tiger Tail
SC-37 Ivory Tower
SC-48 Camel Back
SC-15 Tuxedo
NT-CLR Clear Dipping or NTBR Clear One Brushing Glaze
Begin with properly fired shelf cone 04 Bisque. Moisten a clean sponge and wipe bisque to remove dust.
Use the Soft Fan to apply three coats of SC-15 Tuxedo to the inside of the cup.
Thicken clear glaze with Silkscreen Medium to the consistency of peanut butter. Using the hula girl from DSS-0147 Island silkscreen, screen the image onto the plate.
Use the Script Liner apply two coats of SC-20 Cashew Later to the girl’s body. Apply two coats of SC-85 Tiger Tail to the grass skirt.
Use the Liner to apply two coats of the following colors to the flowers on the, headpiece, lei and grass skirt: SC11 Blue Yonder, SC-24 Dandelion and SC-89 Cutie Pie Coral. Let dry.
Mix SC-15 Tuxedo with Silkscreen medium to the consistency of peanut butter. Re-screen the hula girl over the painted area, lining up the image as closely as possible to the original screen.
NOTE: If you don’t want to try to line up the screen after painting the design, you can omit step 3 and screen the image in Tuxedo. If you go this route, apply one thin coat of the colors noted above on the girl, skirt and flowers so you don’t cover up the screened lines.
Use the Script Liner to apply three coats of SP-209 Speckled Jaded to the handle and bottom of the cup.
Begin with properly fired shelf cone 04 Bisque. Moisten a clean sponge and wipe bisque to remove dust.
Use a circle template to draw circles scattered around the dog as shown. Pencil in petals and leaves to the centers.
From a palette, stroke in SG-407 Yellow, with streaks of SG-408 Orange two coats. Brush SG-406 Brown to the centers, use a dry sponge to sponge SG-405 Green to one side of the centers.
Dot SG-408 Orange sporadically to the centers. With the tip on the SG-405 Green, draw the outline of the leaves and stem, fill in the leaves with two strokes of SG-409 Bright Green, use CB-106 Script Liner.
On a palette, thin slightly SG-411 Purple and SG-406 Brown, use CB-106 to brush around the flowers and leaves with on coat of the Purple and use the Brown to brush over the Purple in the shadow areas such as around the flowers on the face, and from the middle of the belly to under the belly. Sponge off some of the color from the muzzle to lighten.
Outline the flower petals and leaves, dot the centers with SG-401 Black.
Stamp in different directions with ST-126 Dots and Squiggles using SG-401 Black to the stamp. Use a sponge on a stick to apply the Black to the stamp. Stamp the background and the centers of the sunflowers.
For the eyes, brush the eyes with 1-2 coats of SG-402 White, iris is SG-406 Brown, the pupil is black and outline.
Nose and outline of mouth are SG-401 Black, use CB-110 Liner.
Thin FN-003 Yellow slightly, pour to the inside, roll to coat, drain out the excess.
With CB-604 Soft Fan brush on two coats of NTBR Clear Brushing One to the outside of the dog.
Fire to cone 05/06.
Form
MB-1507 Stretch Dog Container
Colors
SG-401 Black Designer Liner
SC-402 White Designer Liner
SG-405 Green Designer Liner
SG-406 Brown Designer Liner
SG-407 Yellow Designer Liner
SG-408 Orange Designer Liner
SG-409 Bright Green Designer Liner
SG-411 Purple Designer Liner
FN-002 Yellow
NT-CLR Clear Dipping Glaze or NTBR Clear Brushing Glaze
Begin with properly fired shelf cone 04 bisque. Moisten a clean sponge and wipe bisque to remove any dust.
Using a CB-604 #4 Soft Fan, apply 2 coats of FN-001 White to the top 2/3 of all 3 wine tumblers.
Apply 3 coats of glaze to the inside of the tumbler and anywhere from 1/3-3/4 of the way up using the following colors: SC-2 Melon-Choly, SC-3 Wine About It and SC-55 Yella Bout It.
Using AC-230 Clay Carbon Paper, transfer the lettering onto each glass coordinating the wine colors with the phrase.
Using SG-401 Black Designer Liner, write your favorite wine sayings.
Once the Designer Liner is completely dry, dip the tumblers into NT-CLR Clear Dipping Glaze. Alternatively, you may use a Soft Fan to apply 1 coat of S-2101 Crystal Clear Brushing over the lettering.
Let dry completely.
Stilt and fire to shelf cone 06/05.
Form
MB-1455 Stemless Wine Tumbler (3 tumblers)
Colors
FN-001 White
SC-2 Melon-Choly
SC-3 Wine About It
SC-55 Yella Bout It
SG-401 BlackDesigner Liner
NT-CLR Clear Dipping or S-2101 Crystal Clear Brushing Glaze
Begin with properly fired shelf cone 04 Bisque. Moisten a clean sponge and wipe bisque to remove dust.
Pencil lines to create the different areas for color on the cat’s body.
Brush three coats of SC-45 My Blue Heaven to the light blue areas, SC-75 Orange-A-Peel to the orange, and SC-27 Sour Apple to the bright green area. Use CB-106 Script Liner and CB-604 Soft Fan to apply.
Tape the various sections to avoid over stamping. Stamp ST-126 Dots and Squiggles to the orange stripe with SC-15 Tuxedo, apply with a sponge on a stick to the stamp.
Use a pattern from ST-100 Game Board to stamp SC-26 Green Thumb to the Sour Apple area. Stamp SC-12 Moody Blue using ST-133 Wood Grain Stamp to the My Blue Heaven color next to the tail.
Pencil a checkerboard pattern on the bisque section of the sweater, use CB-308 Square Shader to apply two even coats of SC-29 Blue Grass to every other square. Stamp over the blue squares with ST-129 Mini Fern using SC-12 Moody Blue.
Thicken SC-29 Blue Grass with AC-310 Silkscreen Medium using a palette knife, with the shiny side up, screen the chevron pattern over the My Blue Heaven area of the sweater.
Use SG-404 Blue to shade the cats face, ears, legs, and tail with CB-106 Script Liner, thin SG-404 Blue. Outline the sweater and the checkerboard with SG-404 Blue.
Use SG-403 Red for the cat’s mouth, SG-4-1 Black for the whiskers and nose, eyes are SG-410 Bright Blue, outlines with SG-401 Black, including eyelashes, use CB-110 Liner.
Brush on two coats of NTBR Clear One Brushing with CB-604 Soft Fan to the outside of the cat and FN-034 Big Sky Blue to the inside of the cat. Alternatively, you may dip into NT-CLR Clear Dipping Glaze.
Fire to cone 05/06.
Form
MB-1506 Stretch Cat Container
Colors
SC-12 Moody Blue
SC-15 Tuxedo
SC-26 Green Thumb
SC-27 Sour Apple
SC-29 Blue Grass
SC-45 My Blue Heaven
SC-75 Orange-A-Peel
SG-401 Black Designer Liner
SG-404 Blue Designer Liner
SG-403 Red Designer Liner
FN-034 Big Sky Blue
NTBR Clear One Brushing or NT-CLR Clear Dipping Glaze
Begin with properly fired shelf cone 04 Bisque. Moisten a clean sponge and wipe bisque to remove dust.
Draw a large flower with pedals
Use SG-403 Red to outline the flower petals, outline inside of the red lines with SG-408 Orange, SG-410 Bright Blue, use CB-106 Script Liner to brush on one stroke of SG-407 Yellow over the open area of the petals.
Outline and create new petals with SG-401 Black, dot the Black heavily in the center along with SG-408 Orange.
Outline the leaves with SG-405 Green, fill in with brush strokes of SG-409 Bright Green, detail the leaves with SG-405 Green, SG-408 Orange, SG-407 Yellow, outline again with SG-401 Black.
Use the same Designer Liner colors in lines inside of the ears, dot SG-410 Bright Blue in the eyebrow space, SG-403 Red for the mouth. Use SG-401 Black to brush in the nose, outline the whiskers. Use CB-110 Liner to brush in SG-409 Bright Green for the eyes, outline with CB-110 Liner using SG-401 Black.
Shade the cat, around the leaves, face, eyes, ears, feet with SG-410 Bright Blue, use CB-106 Script Liner.
Two medium-size flowers are on the back of the cat along with two leaves.
Thin FN-018 slightly, pour to the inside, turn to coat, carefully pour out the excess. Drain
Brush on two coats of NTBR Clear One Brushing with CB-604 Soft Fan.
Fire to cone 05/06.
Form
MB-1506 Stretch Cat Container
Colors
FN-018 Bright Blue
SG-403 Red Designer Liner
SG-402 Black Designer Liner
SG-405 Green Designer Liner
SG-407 Yellow Designer Liner
SG-408 Orange Designer Liner
SG-409 Bright Green Designer Liner
SG-410 Bright Blue Designer Liner
NTBR Clear One Brushing or NT-CLR Clear Dipping Glaze
Begin with properly fired shelf cone 04 bisque. Moisten a clean sponge and wipe bisque to remove any dust.
Mix 2 parts of FN-009 Black with 1 part water to make a mixture to pour into the bed of the truck. Roll around until it is thoroughly coated and pour out the excess.
Using a pencil, sketch the flames onto the truck behind the wheels.
Using a CB-106 #6 Script Liner and a CB-110 #10/0 Mini Liner, apply 2 coats of each SG-403 Red, SG-407 Yellow, SG-408 Orange Designer Liner colors to the flames.
Outline the flames with the writer bottle of SG-401 Black. Once that dries apply 2 coats of S-2101 Crystal Clear Brushing.
Apply AC-302 Wax resist over the flames.
Using a CB-106 #6 Script Liner, apply 3 coats of SC-45 My Blue Heaven to the windows. Once that is dry, apply a wash of FN-009 Black around the edges for shading.
Using a CB-604 #4 Soft Fan, apply 3 coats of FN-041 Medium Blue to the body of the truck. Be sure to wipe away droplets of glaze off the wax-resisted areas.
Using a CB-106 #6 Script Liner, apply 3 coats of SC-60 Silver Lining to the wheels and bumpers Also, apply 2 coats of SC-6 Sunkissed to the headlights.
Apply 2 coats of FN-009 Black to the tires.
Using a CB-106 #6 Script Liner, apply a wash of FN-019 Dark Blue to shade the truck.
Using a CB-110 #10/0 Mini Liner, apply an outline to the details of the truck.
Using a CB-106 #6 Script Liner, apply 2 coats of SC-16 Cotton Tail to the license plate and add the plate digits with a CB-110 #10/0 Mini Liner in FN-041 Medium Blue.
Begin with properly fired shelf cone 04 Bisque. Moisten a clean sponge and wipe bisque to remove dust.
Slightly thin FN-044 Yellow-Orange. Pour into the container, roll to coat, then pour out the excess. Use a sponge to wipe off drips to the outside of the cat.
Use the Script Liner to apply three coats of FN-044 Yellow Orange to the inside of the ears.
Use the Soft Fan and Script Liner to apply three coats of CG-989 Fruit Punch to the body of the cat, avoiding the eyes and the nose. Use the end of a brush or sgraffito tool to remove the crystal glaze from the whiskers and mouth lines.
Use the Liner to apply two thinned coats of SC-26 Green Thumb to the pupil. Fill in the pupil with SC-15 Tuxedo. Outline the eyes, iris and ears with SC-15 Tuxedo.
Use SG-407 Yellow to outline the whiskers. Use the Script Liner to apply one coat of S-2101 Clear over the whiskers for a glossy and brighter finish.
Begin with properly fired shelf cone 04 Bisque. Moisten a clean sponge and wipe bisque to remove any dust.
Thin slightly FN-50 Coral pour to the inside of the barrel cactus and the tall cactus, turn to coat, pour out excess, drain.
For the tall cactus, set it up so the color can drain off. Brush on 2-3 coats of SC-43 Lettuce Alone thinned with water. Thin enough so when applied with CB-604 Soft Fan, it runs off the cactus.
Next color is SC-9 Jaded, applied the same as in step 3, apply two coats.
Next color is SC-8 Just Froggy, thinned applied just in the v sections of the cactus use a dagger brush or the CB-106 Script LIner.
Thin SC-15 Tuxedo, shade the crease in the sections of the cactus.
Barrel cactus is painted in the same manner as the tall cactus, the first color used is SC-93 Honeydew List, the second color is SC-9 Jaded and the last color is SC-43 Lettuce Alone.
Cactus Tray, starts with SC-78 Limelight, the second color is SC-7 Leapin’ Lizard, floated with SC-8 Just Froggy in the creases. Brush three coats of FN-20 Medium Green on the back.
Begin with properly fired shelf cone 04 bisque. Moisten a clean sponge and wipe bisque to remove any dust.
Using a CB-604 #4 Soft Fan, apply 3 coats of FN-034 Big Sky Blue to the outside of the mug, avoiding the handle.
Take the strand of yarn and dip it entirely in some SC-41 Brown Cow and press onto the outside of the mug. Repeat about 7 times in one direction (no need for them to be perfectly straight). Then, repeat in the other direction so the lines are relatively perpendicular to one another to create the look of netting.
Place SC-8 Just Froggy on a palette or tile and sprinkle with AC-310 Silkscreen Medium. Using a palette knife, mix color and medium to the consistency of thick peanut butter. if the mix is too thin add more AC-310 Silkscreen Medium or if it is too thick add more Stroke & Coat. Too thin of a mixture will bleed under the screen and give you a blurred image. Too thick of a mixture will make it hard for the product to penetrate through the holes in the screen and give blank areas in your screen.
Position the seaweed screen shiny side down on the piece. Hold in place, starting from the center out, Rub the mixture on the screen with your finger. Lift a corner up to check if you are applying enough color. Remove the screen and wash with water. Do not let the color dry in the screen. this will cause damage to the screen.
Using a CB-110 #10/0 Mini Liner, apply 1 coat of SC-34 Down to Earth to loosely outline the netting. Use quick and light brushstrokes. It does not have to be perfect!
Using a CB-106 #6 Script Liner, apply 3 coats of SC-74 Hot Tamale to the lobster handle.
Using a CB-110 #10/0 Mini Liner, apply 1 coat of SC-15 Tuxedo to outline the lobster and add his eyes.
Using a CB-604 #4 Soft Fan, apply 3 coats of FN-006 Blue to the inside of the mug.
Begin with properly fired shelf cone 04 bisque. Moisten a clean sponge and wipe bisque to remove any dust.
Using a CB-604 #4 Soft Fan, apply 3 coats of FN-007 Green to the ouside of the mug, avoiding the handle.
Place some SC-32 Bluebeard on a palette or tile and sprinkle with AC-310 Silkscreen Medium. Using a palette knife mix color and medium to the consistency of thick peanut butter. If the mix is too thin add more AC-310 Silkscreen Medium of if too thick add more Stroke & Coat. Too thin of a mixture will bleed under the screen and give you a blurred image. Too thick a mixture will make it hard for the product to penetrate through the holes in the screen and give you blank areas in your screen.
Using the lotus from DSS-0138 Flowers 2, place the screan shiny side down lining up with the bottom of the mug, take some of the thicken Bluebeard mixture and rub onto the screen. Remove the screen and repeat all around the bottom (after a few screenings you may want to rinse and dry the screen to avoid buildup which will affect the integrity of the screened image).
Repeat this process around the top of the mug only usuing the top section of the screen.
Use a sponge to wipe off any glaze you may have gotten on the flamingo.
Using a CB-106 #6 Script Liner, apply 3 coats of SC-89 Cutie Pie Coral to the flamingo’s body. apply 2 coats of SC-16 COtton Tail to the eye, beak, and legs.
Using a CB-110 #10/0 Mini Liner, apply 1 coat of SC-15 Tuxedo to the lines, pupil, and beak on the flamingo.
Using a CB-604 #4 Soft Fan, apply 3 coats of SC-88 Tu Tu Tango to the inside of the mug.
Begin with a properly fired shelf cone 04 Bisque. Moisten a clean sponge and wipe bisque to remove dust.
Thin slightly, FN-009 Black, pour to the inside, pour out the excess color, drain.
Brush on SC-73 Candy Apple Red to the high areas of the truck, or where the sun would hit it, fill in the shadow areas with SC-74 Hot Tamale, while the glaze is wet to blend. Use a combination of brushes, CB-602 soft fan, and CB-106 Script Liner, 2-3 coats. Brush with CB-106 Script Liner SC-81 Cinnamon Stix to the reds in all the shadow areas to create a deeper shadow. one coat.
Brush the hubcaps, bumpers, grill, and windows with two thinned coats of SC-60 Silver Lining. Let dry.
Thin SC-15 Tuxedo (like water), brush over the grill, bumpers, and hubcaps so it antiques and remains in the detail.
Brush two coats of SC-15 Tuxedo on the tires. Brush one coat in the recess area of the grill, use CB-110 Liner.
Float SC-15 Tuxedo to shade the windows, use CB-106 Script Liner.
Use CB-110 Liner to outline all the lines in the truck with thinned SC-15 Tuxedo.
Begin with properly fired shelf cone 04 bisque. Moisten a clean sponge and wipe bisque to remove any dust.
Using a CB-604 #4 Soft Fan apply three coats of FN-039 Light Gray to the outside of the mug including the crab.
Once dry, combine approximately 1 oz of SC-32 Bluebeard, 1 drop of dish soap, and 4 oz water into a cup and stir. Insert the straw and begin blowing into the straw to make bubbles.
Once the bubbles begin to overflow from the cup, take the mug and press it into the bubbles. This will leave a mark from them as they pop. Repeat until the entire outside of the mug is covered.
Using a CB-202 #2 Detail Liner apply two coats of the following colors to the crab: SC-11 Blue Yonder, SC-32 Bluebeard, SC-42 Butter Me Up and SC-74 Hot Tamale. Carmen applied the Hot Tamale around the edges and blended into the other colors as she went inward.
Using a CB-604 #4 Soft Fan, apply three coats of FN-004 Red to the inside of the mug.
Cut slab into a 5” x 7” rectangle and compress both sides with rib.
Sketch out shape that script will go inside and cut stencil out of cardboard.
Sketch script to go inside the shape on paper and set aside.
Place cardboard stencil on slab and place texture mat overtop.
Firmly press texture mat into clay being careful not to move it.
Pull mat away slowly revealing texture and remove stencil.
Using a straw, punch a hole for the tile to hang from.
Thin a small amount of black underglaze with water to create a wash. Paint wash onto textured surface.
Using a dry sponge remove glaze access glaze from the relief leaving glaze only in the indentations.
Cut paper with your script sketch to fit inside logo area.
Place on clay, trace script with pencil and peel away revealing indentation.
Using detail liner brush and white underglaze, trace outline of design.
Using detail liner brush and red underglaze, fill in script lettering. Apply a second coat once the first is fully dry.
Using detail liner brush and blue underglaze, fill in logo shape around the words leaving some room around the edges. Apply a second coat once the first is fully dry.
While the blue underglaze is still wet, apply yellow underglaze to the edges of your logo, allowing the colors to blend. Apply a second coat to just the edges once first coat is completely dry.
Using detail liner brush, apply a second coat of white underglaze to the outline.
Apply black underglaze wash around the outside of logo to create depth.
Using a sgraffito tool once black wash dry, scrape away access wash to create highlights on the textured surface.
Allow to dry completely.
Bisque fire to Cone 04.
Option to glaze with clear coat and glaze fire to Cone 06.
Use the Soft Fan to apply a liberal coat of PC-601 Clear Cascade to the top sections of both pinwheels.
Brush over the Cascade with two liberal coats of CG-753 Sassy Orange for the small pinwheel and CG-756 Firecracker for the large pinwheel. Be sure to apply plenty of crystals.
Use the Soft Fan to apply two coats of EL-128 Wheat to the lower section of the small pinwheel. Apply one liberal coat of Wheat over the Sassy Orange.
Use the same brush to apply two liberal coats of EL-143 Cactus Flower to the lower section of the large pinwheel. Apply one liberal coat of Cactus Flower over CG-756 Firecracker.
While the glazes are wet, fill an AC-220 Detailer Bottle with SG-301 Black Cobblestone, then squirt lines of Cobblestone on top of the pinwheel. Use SC-75 Orange-A-Peel and SG-401 Designer Liner Black in the same manner.
Fuse together in the firing at cone 06.
Use epoxy to glue the wire and beads to the center holes. Cut the 1/2″ copper tube approx. 15″ long, use construction adhesive to adhere to the back. Cut the 3/4″ tube about 8-9″ ling, this is staked in the ground so that the pinwheel will fit nicely inside of the larger tube.
Begin with properly fired cone 04 bisque. Moisten a sponge and wipe bisque to remove any dust.
Squeeze about two tablespoons of SC-11 Blue Yonder onto the plate. Take the sponge on a stick and gently dab into the glaze. Sponge onto the inside of the child’s hand. Repeat until it is covered. Press the hand onto the canvas. Slowly lift the hand off to avoid smearing. Allow the handprint to dry completely.
Using a pencil, sketch the lettering (child’s name and the date).
Using the Detail Liner with SC-15 Tuxedo, trace the lettering.
Using the Soft Fan, apply two coats of SG-702 Celebration.
Begin with properly fired shelf cone 04 bisque. Moisten a clean sponge and wipe bisque to remove any dust.
In the plastic bottle of the AC-222 Medium Writer Tip, put SC-12 Moody Blue 2 parts and 1 part water mix well. Put the plastic applicator tip on the bottle. You do not need the metal tip.
Using a CB-604 #4 Soft Fan, apply 2 heavy coats of FN-001 White to the tile, one after another.
Place the tile on the floor (over some newspaper) then drip the thinned SC-12 Moody Blue onto the tile, the drops of glaze should spatter.
Allow to dry.
Cut out the fish from the pattern, we will be using the negative of the fish.
Slightly wet the tile, without over brushing you don’t want to disturb the spatter. Then place the paper on the tile, press with a paper towel.
Remove any real dark blue spatter from the fish shape with a damp sponge, as it will show.
Using a CB-604 #4 Soft Fan, apply 2 coats of SC-88 Tu Tu Tango to the fish, fading into SC-24 Dandelion on the edges of the fish and fins.
Using a CB-106 #4 Script Liner, apply 2 coats of SC-12 Moody Blue to the eye. Using a CB-110 #10/0 Mini Liner, apply SG-401 Black Designer Liner to the pupil.
When dry, outline and detail the fish with SG-401 Designer Liner Black. Allow to dry.
Using a CB-604 #4 Soft Fan, apply 1 coat of S-2101 Crystal Clear Brushing to the top of the tile. Allow to dry.
Begin with properly fired cone 04 bisque. Moisten a sponge and wipe bisque to remove any dust.
Using the Soft Fan with SC-8 Just Froggy or SC-74 Hot Tamale, apply two coats to the front and sides of the canvas. Allow glaze to dry between coats.
Squeeze about two tablespoons of SC-15 Tuxedo onto the plate. Take the sponge on a stick and gently dab into the glaze. Sponge onto the inside of the child’s hand. Repeat until it is covered. Press the hand onto the canvas. Slowly lift the hand off to avoid smearing. Allow the handprint to dry completely.
Using a pencil, sketch the lettering (child’s name and the date).
Using the Detail Liner with SC-15 Tuxedo, trace the lettering.
Using the Soft Fan, apply one coat of SG-701 Star Dust.
Begin with properly fired cone 04 bisque. Moisten a sponge and wipe bisque to remove any dust.
Using the Soft Fan with FN-001 White, apply two coats to the front and sides of the canvas. Allow glaze to dry between coats.
Place the SL-438 Snowflakes Stencil on the canvas.
Squeeze about two tablespoons of SC-45 My Blue Heaven onto the plate. Take the sponge on a stick and gently dab it into the glaze. Blot off any excess onto the bare portion of the plate, then sponge over the stencil. Repeat until the design is complete. Slowly lift the stencil to avoid smearing. Allow it to dry completely.
Squeeze about two tablespoons of SC-87 Ruby Slippers onto the plate. Take the sponge on a stick and gently dab into the glaze. Sponge onto the inside of the child’s hand. Repeat until it is covered. Press the hand onto the canvas. Slowly lift the hand off to avoid smearing. Allow the handprint to dry completely.
Using a pencil, sketch the face, tree branch and lettering (child’s name and the date).
Using the X-ACTO knife, scratch off the portion of the handprint that will be beneath the eyes, beak and feet. This will prevent the red from showing through.
Using the Detail Liner with SC-16 Cotton Tail, apply two coats to the eyes. Allow glaze to dry between coats.
Using the Detail Liner with SC-75 Orange-A-Peel, apply two coats to the beak and feet. Allow glaze to dry between coats.
Using the Detail Liner with SC-48 Camel Back, apply one thick coat to the branch.
Using the Detail Liner with SC-36 Irish Luck, make the needles coming off of the branches. Start with the brush at the branch and use short, quick movements to make the needles pointy.
Using the Detail Liner with SC-15 Tuxedo, detail the eyes, beak and feet.
Using the Detail Liner with SC-36 Irish Luck, apply one coat to the lettering.
Begin with properly fired shelf cone 04 bisque. Moisten a clean sponge and wipe bisque to remove any dust.
Trace or sketch on a dragon pattern.
With SA-002 Black Accent, outline with the pattern. The pupil of the eye is also the SA-002 Black Accent. Allow to dry.
Using a CB-106 #6 Script Liner, apply SC-74 Hot Tamale to the spikes on the dragon’s back and hair, the tips with SC-88 Tu Tu Tango, blend the colors where they meet applying 2-3 coats.
Using a CB-110 #10/0 Mini Liner, apply 2 coats of SC-26 Green Thumb to the iris of the eye.
Apply SC-16 Cotton Tail to the teeth and the whites’ of the eyes.
Using a combination of a CB-106 #6 Script Liner and a CB-110 #10/0 Mini Liner to apply the glaze. Plop heavily, CG- 973 Alligator into the body of the dragon, make sure to use the crystals from the bottom of the jar. If bisque is showing as it dries add more glaze. Brush on two coats of CG-722 Seawind to the background of the tile. Use the fan brush and smaller brushes where needed. Allow to dry.
Begin with properly fired cone 04 bisque. Moisten a sponge and wipe bisque to remove any dust.
Using the Soft Fan with FN-001 White, apply two coats to the front and sides of the canvas. Allow glaze to dry between coats.
Squeeze about two tablespoons of SC-78 Lime Light or SC-60 Silver Lining onto the plate. Take the MT-010 Cable Knit Mat and place it design-side up. Take the sponge on a stick and gently dab it into the glaze. Blot off any excess onto the bare portion of the plate, then sponge the mat. Take the mat and gently press onto the canvas. Slowly pull the mat off to avoid smearing. Repeat the pattern for the portion of the canvas that was missed by the first mat. Allow glaze to dry completely.
Squeeze about two tablespoons of SC-14 Java Bean or SC-35 Gray Hare onto the plate. Take the sponge on a stick and gently dab into the glaze. Sponge onto the inside of the child’s hand. Repeat until it is covered. Press the hand onto the center of the canvas. Slowly lift the hand off to avoid smearing. Repeat to make a handprint to the left and right of the first handprint. Allow the handprints to dry completely.
Using a pencil, draw a face on each of the reindeer. Write the child’s name above and the date below.
Using the X-ACTO knife, remove the portion of the handprint that will be beneath the eyes and nose. This will prevent the darker glaze from showing through.
Using the Detail Liner with SC-16 Cotton Tail, apply two coats to the eyes. Allow glaze to dry between coats.
Using the Detail Liner with SC-87 Ruby Slippers, apply two coats to the noses. Allow glaze to dry between coats.
Using the Detail Liner with SC-15 Tuxedo, detail the faces.
Using the Script Liner with SC-16 Cotton tail, add a highlight to the noses.
Using the Detail Liner with SC-81 Cinnamon Stix, trace the lettering.
Moisten a clean sponge and wipe your bisque to remove any dust or dirt.Create a beginner’s Gray Scale worksheet with a five-value scale. To do this, create five boxes that are adjacent to each other on one line. Label the boxes, left to right, 5, 4, 3, 2,1 with Five being the darkest color and one being the lightest. Using a pencil, shade in each square leaving the lightest completely white and gradually getting darker as they move to the black square.
Once you’ve completed the gray scale worksheet, look at the dolphin image. Have the children value the image (i.e. What colors in the image are a 5? Which color is a 4?, etc.) To do this, squint and look at the image. The dark and light colors will stand out more than the middle values. The color does not have to be gray to assign a value to it. The value will be assigned according to how light or dark it is.
Next, select colors based on the values assigned. In our sample the following colors were assigned as follows (5 being the darkest value)5: SC-15 Tuxedo (5); SC-8 Just Froggy (4), SC-33 Fruit of the Vine (4), SC-40 Blueberry Hill (4); SC-18 Rosey Rosey (3), SC-39 Army Surplus (3), SC-51 Poo Bear (3), SC-52 Toadily Green (3); SC-7 Leapin’ Lizard (2), SC-23 Jack O-Lantern (2), SC-52 Toad-ily Green (2), SC-53 Purple Haze (2), SC-70 Pink-A-Dot (2); SC-16 Cotton Tail (1).
Using tracing paper, trace the image onto the plate or platter of your choosing.
Using your original image as a guide along with the scale values you assigned each color, begin applying the background color to your piece. Keep in mind that you may want to make a wash to further lighten a color and decrease its value.
Once you have finished applying solid backgrounds, you will begin working in a pointillist style of painting meaning you will paint with dots. While the dots are not necessarily connected, your eye will automatically group the colors and like-values together.
Using the tip of a round brush, begin applying dots to your piece. The colors you assigned a dark value to will be applied to the areas that are dark values in the original image. Likewise, the colors you assigned light values to will be applied to the areas of light value in the original image. You will notice that dark values tend to recede while light values press towards you.
Fire to cone 06.
Form
MB-890 Asian Flair 11″ Square Plate (discontinued)
1.Begin with properly fired shelf cone 04 Bisque. Moisten a clean sponge and wipe bisque to remove dust.
2. Trace pattern using Clay Carbon Paper. Use the three brushes to apply three coats of CC-108 China Sea to the sky area. Use the largest brush possible for the area you are painting.
3. Use the sponge-on-a-stick to apply SC-76 Cara-Bein Blue to the ST-113 Circulate Stamp. Press onto the sky area.
4. Use the Script Liner to apply two coats of the following colors:
SC-37 Ivory Tower to the llama’s body
SC-91 Seabreeze to the blanket
SC-5 Tiger Tail to the basket
SC-94 Curry Around to the peaches
Create dots with SC-75 Orange A Peel.
5. Use SG-401 Black Designer Liner cut outline the mountains, llama, and details on the blanket and basket. Dot the circle shapes on the blanket with SC-75 Orange A Peel.
6. Plop and spread two heavy coats of CG-991 Mountain Moss to the mountain range.
7. Use the Script Liner to apply one coat of S-2101 Clear Brushing Glaze to the Llama and basket.
Begin with properly fired cone 04 bisque. Moisten a sponge and wipe bisque to remove any dust.
Using the Soft Fan with FN-001 White, apply two coats to the front and sides of the canvas. Allow glaze to dry between coats.
Place the SL-438 Snowflakes Stencil on the canvas.
Squeeze about two tablespoons of SC-11 Blue Yonder onto the plate. Take the sponge on a stick and gently dab it into the glaze. Blot off any excess onto the bare portion of the plate, then sponge over the stencil. Repeat until the design is complete. Slowly lift the stencil to avoid smearing. Allow it to dry completely.
Squeeze about two tablespoons of SC-15 Tuxedo onto the plate. Take the sponge on a stick and gently dab into the glaze. Sponge onto the bottom of the child’s foot. Repeat until it is covered. Press the foot onto the canvas. Slowly lift the foot off to avoid smearing. Allow the footprint to dry completely.
Using a pencil, sketch where the white of the belly will be located. Sketch on a hat and/or scarf. Using the X-ACTO knife, scrape off the portions of the footprint that will be beneath the belly and the hat and/or scarf. This will prevent black from showing through.
Using the Script Liner with SC-16 Cotton Tail, apply two coats to the belly of the penguin. Allow glaze to dry between coats.
Using the Script Liner with SC-16 Cotton Tail and SC-1 Pink-A-Boo, or SC-45 My Blue Heaven and SC-76 Cara-Bein Blue apply two coats to the hat and/or scarf. You can also use other color variations.
Using a pencil, draw the face of the penguin. Write the child’s name and the date.
Using the Detail Liner with SC-75 Orange-A-Peel, apply two coats to the beak. Allow glaze to dry between coats.
Using the Detail Line with SC-15 Tuxedo, outline the hat and/or scarf, face and the lettering.
Begin with properly fired cone 04 bisque. Moisten a sponge and wipe bisque to remove any dust.
Using the Soft Fan with FN-301 Marshmallow White, apply 4 coats to the front and back of the tray. Allow glaze to dry between coats.
Squeeze around 2 TBS of SC-24 Dandelion onto the palette. Dip the sponge on a stick into the glaze and sponge the baby’s bottom. Take the tray and press the center against the baby’s bottom. Allow glaze to dry completely.
Place the AC-230 Clay Carbon Paper onto the tray. Position the pattern so that the stem and leaves are above the print. Trace the pattern using the pencil.
Using the Script Liner with SC-48 Camel Back, apply 1 coat to the stem.
Using the Detail Liner with SC-34 Down to Earth, make accent lines on the edges of the stem.
Using the Script Liner with SC-26 Green Thumb, apply 1 coat to the leaves.
Using the Detail Liner with SC-36 Irish Luck, make accent lines on the leaves.
Use the pencil to sketch the lettering. Using the Detail Liner with SC-34 Down to Earth, apply 1 coat to the lettering.
Squeeze 1 TBS of SC-24 Dandelion onto the palette. Thin with water. Use the dagger brush to go around the edges of the platter.
Begin with properly fired shelf cone 04 bisque. Moisten a clean sponge and wipe the bisque to remove any dust. Check the inside for any debris as well.
Use some Blue Masking Tape to cover the holes in the side of the pail where the handles are attached.
In a Plastic Mixing Cup mix some water into FN-009 Black to a melted ice cream consistency for rolling the inside of the container. While working quickly, pour the glaze on the inside of the container and rotate the ware for even coverage.
Pour out the excess glaze and invert to dry. Remove tape and wipe off any excess glaze from the outside of the ware.
Apply 3 coats of FN-009 Black to the bottom and top including the beaded trim on the piece using CB-604 Soft Fan or CB-406 Pointed Round.
Use a pencil and AC-230 Clay Carbon to transfer the pattern to the ware. Do not transfer any of the detail in the raccoon or acorns. Use the scissors to cut the pattern if necessary. The Blue Masking Tape can be used to affix the pattern to the ware during the transferring. Note that all the colors used in painting the piece need to be thinned slightly to allow the color to flow easily out of the brush and for blending.
Starting with the pumpkin top, load CB-406 Pointed Round with SC-97 Can’t Elope to paint in the tops of the pumpkin’s individual top sections with two coats of color. While the color is still wet, wet blend the rest of the top sections with SC-50 Orange Ya Happy down to the top of the raccoon. The lighter shade will be the tops of the rigid sections of the pumpkin blending down to the orange color. Use the brush loaded with color by following the individual shapes of the pumpkin sections. The two colors are wet blended to give a shaded effect.
For the pumpkin bottom, start by painting in 2 coats to the “cut” sections of the pattern with SC-97 Can’t Elope using CB-406 Pointed Round.
The sections of the pumpkin are painted with 2 coats of SC-50 Orange Ya Happy starting from the top of the cuts marks about two-thirds of the way down each section.
Alternate the coats with SC-22 Carrot Top by starting at the bottom of the pumpkin sections, wet blending the color over the Orange Ya Happy about two-thirds of the way up each section.
Apply 1 coat of the Carrot Top over each line of the pumpkin sections to darken slightly. Use CB-406 Pointed Round to apply 2 floating coats of SC-92 Café Ole to the raccoon excluding the “white” portions and “mask” areas of the face and eyes. Note the color placement on the pattern. Apply one thin coat of color to the nose. To the “white” sections around the mask and eye portions of the face apply a dirty watery mix of SC-92 Café Ole. Keep this color very light and thin. To the dark sections of the “mask” around the eyes, apply two thin coats of thinned SC-34 Down To Earth using CB-406 Pointed Round. This color should be dark and yet still be able to see through it slightly.
Apply one thinned coat of Down To Earth to the markings in the tail.
Shade the inner ear with some thinned Down To Earth.
To the nose apply some thinned SC-15 Tuxedo using CB-210 Detail Liner to shade and give it contour. Do not paint in the nostrils; just allow the underlying color to peek through as the highlight.
Paint in the eyes with SC-15 Tuxedo omitting the highlight in the eye.
Apply 2 coats of SC-4 Salsa to the apple using CB-406 Pointed Round keeping the brush fully loaded and following the contour of the apple shape. Shade the lower one-third portion of the apple with SC-82 Tuscan Red from the bottom up by wet blending the color. Load the CB-604 Pointed Round with water and dip the brush in SC-39 Army Surplus to shade the leaves along the center vein and base of the leaves where they tuck in behind the pattern. Use the same method of shading to complete the rest of leaves with SC-25 Crackerjack Brown and SC-50 Orange Ya Happy. Shade the top one-half of the acorns with SC-25 Crackerjack Brown in the same manner as step 10. Shade the bottom half of the acorns with SC-14 Java Bean. To the acorn tops apply a thin coat of SC-34 Down To Earth. Use a moistened brush to wipe a highlight in the center of the tops. To the pumpkin stem, apply a dirty water coat of SC-39 Army Surplus and shade with thinned SC-25 Crackerjack Brown using CB-406 Pointed Round. To the branch apply one thinned coat of SC-14 Java Bean. Dot in the berries using the end of a brush with varying sizes of color using SC-22, SC-4 and SC-97. Detailing of the pattern is done with SG-401 Black Designer Liner. Keep the detailing as even as possible when painting in the lines. When painting in the “hair” detail of the pattern, keep the individual hairs short and contour them around the body. Refer to the pattern while painting the hair detail. Note the hairs in the “mask” will overlap onto the white sections slightly.
Using SG-402 White Designer Liner to apply the “hair” lines on the white sections of the face mask. These hairlines will overlap onto the brown color of the body as well. Cut out the shape of the raccoon from the pattern and use a small piece of the Blue Masking Tape to adhere it over the painted section of the raccoon.
Using a Spatter Brush or stiff Toothbrush loaded with slightly thinned SC-14 Java Bean and SC-34 Down To Earth to apply a light speckle over the piece. Keep the speckles light and evenly dispersed over the pattern. Try not to over apply speckles in one area over another.
Apply 2- 3 coats of SC-15 Tuxedo to the handle fittings on the side of the ware using CB-406 Pointed Round.
Apply 3 coats of S-2101 Crystal Clear Brushing over the outside portion of the piece over the pattern and background. Do not over brush the first coat of clear glaze. The clear glaze can overlap the black glaze on the edge of the can to ensure complete coverage.
Stilt and Fire the piece to Shelf Cone 05-06.
Use a piece of heavy gauge wire to form the handle of the container.
Begin with properly fired cone 04 bisque. Moisten a sponge and wipe bisque to remove any dust.
Squeeze around 2 TBS of SC-23 Jack O’Lantern onto the palette. Dip the sponge on a stick into the glaze and sponge the baby’s bottom. Take the plate and press the center against the baby’s bottom. Allow glaze to dry completely.
Take the MC-002 12mm Low Tack Masking Tape and make 2 perpendicular lines going across the entire plate. Then take the tape and place 3 pieces in each of the 4 sections on the rim of the plate. Try to space them equally.
Using the Script Liner with SC-24 Dandelion, apply 3 coats to every other section on the rim. Allow glaze to dry between coats.
Using the Script Liner with SC-23 Jack O’Lantern, apply 3 coats to the remaining sections on the rim. Try to space them equally.
Remove the tape before the glaze has completely dried.
Place the AC-230 Clay Carbon Paper onto the plate. Position the pattern so that the stem and leaves are above the print and the lettering is below. Trace the pattern using the pencil.
Using the Script Liner with SC-48 Camel Back, apply 1 coat to the stem.
Using the Script Liner with SC-26 Green Thumb, apply 1 coat to the leaves.
Using the Detail Liner with SC-15 Tuxedo, make accent lines and dots on the rim. Make accent lines around the leaves, stem and bottom. Apply 1 coat over the lettering.
Using the Soft Fan with SG-703 Autumn, apply 2 coats over the rim of the plate. Allow glaze to dry between coats.
Using the Soft Fan with NT-BR Clear One Brushing, apply 2 coats to the center of the plate and the back. Allow glaze to dry between coats.
Using the SG-401 Designer Liner Black, apply an outline to all the faceted edges, and allow the color to dry.
Using the CB-106 # 6 Script Liner, apply 3 coats of EL-121 Copper Adventurine to alternating openings on the shell. Using the CB-106 # 6 Script Line, apply 3 coats of EL-128 Wheat to the remaining openings on the shell. Using the CB-106 # 6 Script Liner and CB-604 Soft Fan, apply 3 coats of FN-218 Green Sapphire to the body of the turtle.
Stilt and fire to shelf cone 05/06.
Using the Heavy Duty White Craft Glue, apply it to the Copper Adventurine openings and apply the polished pebbles or polished glass beads.
Continue until all the alternating openings are covered, and allow to dry
Form
MB-1492 Faceted Turtle Bisque or CD1492 Faceted Turtle Mold
With a rolling pin on canvas, roll out a piece of moist clay ¼” thick between wooden slats.
Smooth out the grain from the canvas with a straight edge.
Lay the smooth side of the clay over the CD911 African Mask (Oval) slump mold clay should extend to the edges of the mold. Use a sandbag to hump the clay into the form of the mold.
Take a damp sponge to further the slumping process to make sure the clay fills all the detail of the mold. Trim around the outside edge of the mold shape with a knife or fettling tool.
Let the clay sit in the mold for 20 min. (approx). Release the clay from around the edges of the trimming. Place a board over the mold, flip the mold over and it should release easily, if it does not, wait longer.
Once the mask is out of the mold, pencil in triangles on the flange surrounding the mask, when you are satisfied with the design, cut out using the X-ACTO knife.
Cut out the eyes and the mouth. Drill small holes in the triangles below the chin (for later decoration with studs). Drill small holes to fit a wire for earrings.
Open the nose on the sides, make bones to fit into the nose opening. If desired, cut small pieces of high fire wire, poke the pieces in a row in the middle of the forehead, for decoration.
Use Xiem tool ARD02 to roll design in a zigzag under the eyes, and on the triangles around the mask.
Press clay into the shield from CD1260 Masks & Shield African Theme Sprig Mold, trim the excess from around the shape. Make a ball of clay, stick it to the back of the shield to release it from the mold. Put a small hole at the top, for a wire. Press the sun shape from the press to CD1072 into a thin piece of clay, cut around it, score the section on the forehead, add water to the score, place on the sun shape.
Clean edges of the mask with a damp sponge, let dry.
Fire to cone 04.
Glazing:
Brush slightly thinned SC-15 Tuxedo over the mask, wipe off excess with a damp sponge to antique.
Using sponge-on-a-stick, pounce SC-15 Tuxedo onto the ST-124 Maze Stamp. Press stamp to the triangle shape under the mouth. Remove stamp marks from other areas with a sponge.
Using CB-106 #6 Script Liner, brush 2-3 coats of SC-97 Cant-elope to the triangles around the face, inside edge of the eyes, and rays of the sun; coloring the center with SC-75 Orange-A-Peel.
Using CB-106 #6 Script Liner, brush the mouth with 2-3 coats of SC-74 Hot Tamale. Brush the triangles at the chin with 2-3 coats of SC-26 Green Thumb and SC-75 Orange-A-Peel.
Using CB-106 #6 Script Liner, brush 2 coats to the bones with SC-16 Cotton Tail. Brush the triangles at the eyes and bands on the forehead with 2 coats of SC-15 Tuxedo.
Antique the shield earrings with SC-15 Tuxedo. Brush 2 coats of Hot Tamale in the center section. Let dry completely.
Using CB-604 #4 Soft Fan, brush the entire mask with 3 coats of EL-136 Lapis Lagoon. After each coat, brush water over the Stroke and Coat colors to remove some of the Lapis Lagoon.
Fire to cone 06.
Use epoxy to glue on the various studs. Wire the earrings to the hole at the eyes.
Begin with a properly fired shelf cone 04 Bisque. Moisten a clean sponge and wipe bisque to remove dust.
Trace on the pattern.
Load CB-106 Script Liner with SC-73 Candy Apple Red, tip the brush into SC-75 Orange-A-Peel brush to the flower petal. Continue to brush the petals, using SC-97 Cant-elope with the SC-75 Orange-A-Peel in the center section of the flower, two coats.
Large Leaves: Using the CB-106 Script Liner apply two coats SC-29 Blue Grass to one side of the leaf and SC-36 Irish Luck to the other side. Add SC-97 Cant-elope to the brush for the center of the large leaves. Use the CB-1110 Liner for smaller areas.
Brush the small leaves with two coats of SC-29 Blue Grass. Use CB-106 Script Liner and CB-110 Liner.
When the shine is off the glaze, outline and detail the flowers and leaves with SG-401 Black using either the metal tip or the CB-110 Liner. When the shine is off the glaze, outline and detail the flowers and leaves with SG-401 Black using either the metal tip or the CB-110 Liner.
Using the CB-106 Script Liner, plop two coats of CG-979 Meadow around the flowers and large leaves on the lid. Use the CB-110 Liner for the smaller areas. Using the CG-979 Meadow, apply two coats to the inside and out of the box bottom.
Brush one coat of S-2101 Clear to the flowers and leaves. If no clear glaze is used, the SG-401 Black will be matte and textured.
Begin with properly fired cone 04 bisque. Moisten a sponge and wipe bisque to remove any dust.
Squeeze around 2 TBS of SC-36 Irish Luck onto the palette. Dip the sponge on a stick into the glaze and sponge one of the baby’s foot. Take the plate and press against the baby’s foot. Repeat with the other foot. Allow glaze to dry completely.
On the DSS-0162 Holiday Icons screen, locate the holly with 2 leaves. Draw an outline around it in permanent marker. Cut it out with excess screen around the edges.
Squeeze about 2 TBS of SC-15 Tuxedo onto the palette. Add a pinch of AC-310 Silkscreen Medium. Mix with a palette knife until it becomes the consistency of peanut butter. You may need to add more silkscreen medium or glaze.
Place the holly above the footprints. While holding it firmly in place, take a small amount of premixed silkscreen medium and gently rub in circles starting in the center and working outward.
Place the AC-230 Clay Carbon Paper onto the plate. Position the pattern so that the ribbons are next to the feet. Trace with a pencil. Position the pattern so that the lettering is below the footprints. Trace with a pencil.
Using the Script Liner and Detail Liner with SG-403 Red, apply 1 coat to the berries, ribbons, and writing.
Using the Script Liner with SG-405 Green, apply 1 coat to the leaves.
Using the pencil, sketch the name below “Mistletoes” and the year next to the prints.
Using the Detail Liner with SC-15 Tuxedo, make accent lines. Apply 1 coat over the name and year.
Using the Soft Fan with SG-704 Peppermint, apply 2 coats over the front and back of the plate.
1. Begin with properly fired shelf cone 04 Bisque. Moisten a clean sponge and wipe bisque to remove dust.
2. Use the Soft Fan to apply two coats of SC-52 Toad-ily Green to the shell.
3. Appy a third coat then place the cotton doily into the wet glaze. Brush back over with more glaze to seal the edges.
4. When the gloss leaves the glaze, use the Soft Fan to apply two coats of SC-14 Java Bean to the shell. Remove the doily with the gloss leaves the color.
5. Use the Soft Fan to apply two coats of SC-37 Ivory Tower to the body of the turtle. Let dry. Thin SC-52 Toad-ily Green with water and use the Stiff Fan or other stuff brush to apply color over the Ivory Tower. Brush off some of the Toad-ily Green to create an antiqued look.
6. When dry, outline the body of the turtle with SG-408 Brown. Outline the shell with SG-401 Black. The outlining on the shell can be done after firing, and a clear applied at that time, then re-fire.
7. Dip into NT-CLR Clear Dipping Glaze or use the Soft Fan to apply one coat of S-2101 Clear Brushing Glaze.
8. Fire to cone 05/06.
Form
MB-1492 Faceted Turtle Bisque or CD1492 Faceted Turtle Mold
Colors
SC-14 Java Bean
37 Ivory Tower
SC-52 Toad-ily Green
SG-401 Black Designer Liner
SG-408 Brown Designer Liner
NT-CLR Clear Dipping or S-2101 Clear Brushing Glaze
With a rolling pin on canvas, roll out a piece of moist clay ¼” thick between wooden slats.
Form over the hump side of CD-1076 Oval Tray using a sandbag. Trim off excess clay.
Draw on placement of facial features.
Add clay to form the nose, eyelids and mouth.
Use a straight edge to trace on headband design. Sgraffito in headband and the zigzag design.
Press in triangle shape using press tool from CD-1075 Small Design Press Tools all around the headband, the head, and the forehead details.
Press in the circle shape from the press mold for the circle detail on cheeks and chin and around eyelids and nose.
Allow to dry completely.
Bisque fire to shelf cone 04.
Glazing:
Using a CB-604 #4 Soft Fan, apply 3 coats of SC-31 The Blues to the blue sections of the face. While still wet, use a CB-106 #6 Script Liner to apply SC-65 Peri-Twinkle to the highlighted areas to lighten.
Brush in SC-32 Bluebeard to the shadow areas of the facial features to give depth.
Apply 2-3 coats of SC-27 Sour Apple to the cheeks and the chin. Brush on strokes over and under the eyes.
Apply 2-3 Coats of SC-74 Hot Tamale to the lips. Thin SC-32 Bluebeard to wash over the lips to dull the red.
Apply color to the triangles using an AC-223 Large Writer Tip with SC-74 Hot Tamale and SC-75 Orange-A-Peel.
Dot the circles with SC-15 Tuxedo
Use the sponge-on-a-stick to pat the ST-379 Totem Blanket stamp with SC-15 Tuxedo. Press the totem design on the large areas of the blue color. Allow to dry.
1. Begin with a properly fired shelf cone 04 Bisque. Moisten a clean sponge and wipe bisque to remove dust.
2. Wet a blue shop towel, squeeze out the excess water and lay flat on a surface. Squeeze SC-16 Cotton Tail in wavy lines on the paper; fill in with a few SC-75 Orange-A-Peel. Fold the paper towel in half then unfold. Take another damp shop towel and place it over the glaze from the first towel to pick up the paint.
3. Lay the towel with the glaze over the body of the fox, roll over the top of the paper towel with a foam roller or pat with a dry sponge to transfer the color to the bisque.
4. Remove the paper towel and use a dry foam roller to roll over the color to remove the top layer of color.
5. Repeat to finish the rest of the fox. Let dry.
6. Outline the facets with SG-401 Black Designer Liner. Use the Script Liner to apply two coats of SC-15 Tuxedo to the legs and nose.
7. Use the Liner with Tuxedo to outline the eye and paint the pupil.
8. Dip into NT-CLR or use the Soft Fan to apply two coats of S-2101 Clear.
9. Fire to cone 05/06.
Form
MB-1491 Faceted Fox Bisque or CD1491+ Faceted Fox Mold
Colors
SC-15 Tuxedo
SC-16 Cotton Tail
SC-75 Orange-A-Peel
SG-401 Black Designer Liner
NT-CLR Clear Dipping or S-2101 Clear Brushing Glaze
Begin with properly fired shelf cone 04 Bisque. Moisten a clean sponge and wipe bisque to remove any dust.
Slightly thin FN-009 Black, pour inside each vase and turn to coat. Pour out the excess glaze and drain.
Use the Soft Fan to apply three coats of CC-102 White Crackle in an uneven line on the vases as shown.
Fire to cone 06.
Use SS-138 Flat Black slightly thinned to brush over the crackle glaze. Wipe off to leave the black in the cracks of the glaze. Brush the remainder of the vase with a solid coat of the black acrylic.
Pour MM-106 Steel Metallic in another container and stir thoroughly. Use an old soft brush to apply a heavy coat of the color onto the vase. While it is wet, screw on an MM-600 Spritzer cap to the Rapid Rust bottle and spray MM-305 Rapid Rust liberally over the Steel Metallic. Repeat the process of applying the Steel and Rapid Rust spray. To fully develop the rust may take overnight.
Begin with properly fired shelf cone 04 bisque. Moisten a clean sponge and wipe bisque to remove any dust.
Using the CB-604 Soft Fan Brush, apply one coat of SS-317 Turquoise to the front and sides of the canvas.
While still wet, use the Fan Brush to blend in random areas of SS-288 Bright Green. Let dry
Using the Clay Carbon Paper and a pencil, transfer the pattern onto the front of the canvas.
Using the CB-110 Mini Liner, apply one coat of SS-179 Antique Red to the word ‘shine’.
Using the Mini Liner, outline the word shine with SS-138 Flat Black.
Using the Mini Liner, apply one coat of SS-111 Brightest Yellow to the sun.
Using the Mini Liner, apply one coat of SS-135 White to the words ‘make your life’, outline the sun, and add highlights to the word ‘shine’.
Using the CB-604 Soft Fan Brush, apply two coats of MM-102 around the edges of the words and to the sides of the canvas.
Using a toothbrush, splatter MM-202 Green Patina randomly over the Copper Metallic while it’s still wet. Apply some larger drips to a few areas. The oxidation reaction should begin several minutes after applying the patina.
Once you are satisfied with the oxidation process, apply one or two coats of AC-502 Matte Sealer to the front of the canvas to stop the reaction.
1. Begin with properly fired shelf cone 04 bisque. Moisten a clean sponge and wipe bisque to remove dust.
2. Use the Soft Fan to apply one coat of SC-51 Poo Bear to the head and the body, excluding the mane.
3. Apply a second coat of Poo Bear in sections. While wet, place pieces of raffia into the glaze in a stripe pattern on the body and the face. Be sure that the edges of the raffia are pushed into the glaze. The raffia usually needs to be split to fit the scale of the lion.
4. Use the Soft Fan to apply two coats of SC-97 to the lion’s body. After the second coat, remove the raffia.
5. Use the Script Liner and the Soft Fan to apply three coats of SC-97 Cant-elope to the lion’s mane. Let dry completely.
6. Outline all the facets with SG-401 Black Designer Liner. Use the Liner to apply one coat of SC-15 Tuxedo to the nose and eyes.
7. Dip into NT-CLR or use the Soft Fan to apply one coat of S-2101 Clear.
8. Fire to cone 05/06.
Form
MB-1476 Faceted Lion Bisque or CD1476+ Faceted Lion Mold
Colors
SC-15 Tuxedo
SC-51 Poo Bear
SC-97 Cant-elope
SG-401 Black Designer Liner
NT-CLR Clear Dipping or S-2101 Clear Brushing Glaze
Begin with properly fired shelf cone 04 bisque. Moisten a clean sponge and wipe bisque to remove any dust.
Brush on SS-179 Antique Red to the body of the truck.
Brush on a mix of SS-135 White and a drop of SS-138 Flat Black to the chrome sections of the truck. Brush SS-138 Flat Black to the windows and tires. Thin SS-138 Flat Black with water, brush over the grills to shadow.
Brush the inside of the bed of the truck with SS-138 Flat Black.
Pour MM-106 Steel Metallic into a wide mouth jar and mix it thoroughly. Use an old brush as it cannot be used for glazing after using it with the metallics.
Brush a thick coat of the Steel Metallic on the body of the truck allowing some of the red stain show.
Spray heavily with MM-305 Rapid Rust. This must be sprayed while the Steel is wet. Alternatively, you can brush it on.
If desired, re-apply rust and Patina for a more rusty finish.
Dry brush more of the Antique Red and SS-211 Orange Rust over the Antique Red if you want more of the red to show.
Dry Brush one coat of SS-81 Shimmering Silver over the chrome areas.
Brush on a coat of MM-502 Gloss Sealer over the red spots on the car, it will make it look more realistic and stop the Steel Metallic from rusting further on these areas.
1. Begin with properly fired shelf cone 04 Bisque. Moisten a clean sponge and wipe bisque to remove dust.
2. Use the Soft Fan to apply two coats of SC-91 Honeydew List to the shell.
3. Apply a third coat of Honeydew List. While wet, place a piece of lace onto the shell and press into the wet glaze. Brush over the lace with another coat of Honeydew List. When it dries enough so the lace is stable, press a paper towel to the shell to remove the excess glaze.
4. After the shine leaves the glaze, use the Soft Fan to apply two coats of SC-88 Tu Tu Tango. Remove the lace after the shine leaves the glaze.
5. Use the Soft Fan to apply two coats of SC-37 Ivory Tower to the turtle’s body.
6. Thin SC-52 Toad-ily Green slightly with water, brush over the Ivory Tower, brushing off some of the glaze to mottle the Toad-ily Green. Let dry completely.
7. Outline with SG-406 Brown Designer Liner.
8. Dip into NT-CLR or use the Soft Fan to apply one coat of S-2101 Clear.
9. Fire to cone 05/06.
Form
MB-1492 Faceted Turtle Bisque or CD1492 Faceted Turtle Mold
Colors
SC-37 Ivory Tower
SC-52 Toad-ily Green
SC-88 Tu Tu Tango
SC-91 Honeydew List
SG-406 Brown Designer Liner
NT-CLR Clear Dipping or S-2101 Clear Brushing Glaze
Begin with properly fired shelf cone 04 bisque. Moisten a clean sponge and wipe bisque to remove any dust.
Using CB-604 Soft Fan, apply 1 coat of EL-123 Patina to the bottom 2/3 of the vase. Apply another coat half-way over the bottom 2/3 of the vase, and apply the last coat to the top 1/3 of the bottom 2/3 of the vase.
Using CB-604 Soft Fan, apply 3 coats of EL-135 Rare Earth to the to 2/3 of the vase.
Begin with properly fired shelf cone 04 bisque. Moisten a clean sponge and wipe bisque to remove any dust.
In a plastic cup, pour 2 oz. of FN-009 Black and thin with a bit of water to a melted ice cream consistency. While working quickly, pour the thinned black glaze into the vase, rotating the piece until all inside surfaces are covered. Pour out excess glaze and drain upside down until the glaze has dried. Use a brush to touch up the inside of the throat of the vase with glaze. Wipe off any excess glaze from the outside surface with a damp sponge.
Using CB-604 Soft Fan to apply 2 smooth coats of FN-001 White to the outside surface. Let dry.
Transfer the placement of the flower circles and butterflies to the vase using a pencil and AC-230 Clay Carbon. A simple circle denoting the size and placement of the flower shape and rough outline of the butterflies is all that is necessary.
The stamping of the flowers is completed easier if the individual shapes are cut from the stamp mat. More caution is involved when stamping as well as the cumbersomeness of using the mats if the shapes are not cut from the mat. Depends if you want to destroy the mat for this project.
On a tile place some of each color SG-403 Red, SG-408 Orange and some SC-407 Yellow with a drop or two of SG-408 mixed into this yellow color. The lower and the upper smallest flowers are done in Red. Use a dry Sponge-on-a-stick to apply the color to the stamps. You can use a piece of masking tape formed into a loop to create a handle for maneuvering and printing the stamp shape. Place the stamp on the area marked for the flower. Press firmly and then lift the stamp straight up so the print isn’t smeared. Repeat this process with the Yellow mixture for the two yellow flowers and for the one orange flower with the appropriate sized stamp and color. Let dry.
To the two red flowers; detail the outer circles of each flower with thinned SC-23 Jack-O-Lantern. To the orange flower; detail the outer circle with thinned SC-24 Dandelion. The yellow flowers; detail the outer edges with thinned SC-42 Butter Me Up. Use the Detail Liners to detail the centers of each flower with a contrasting color. Yellow for the red flowers, Red for the orange flower and Orange for the yellow flowers. Let Dry.
Cut some Blue Masking Tape to the cover the flower circles. They don’t have to be exact but yet need to cover the portions where the silkscreens will go behind the flowers.
On a tile mix some AC-310 Silk Screen into SC-15 Tuxedo to create a paste the consistency of peanut butter. Mix this color well using the Pallet Knife. Place the Butterfly silkscreen from DSS-0113 Bugs onto the pattern (shinny side down). Two different yet similar butterflies were used from this selection of bugs. The smaller one is used towards the top portion of the pattern and larger one down towards the lower portion in the pattern. Secure the silkscreen (shinny side down) flat against the ware with a piece of Blue Masking Tape. While holding down the silkscreen with the fingers of one hand, then scoop up some of the thickened black mixture with the finger of the other hand and work the mixture over the image. Once the image has been screened, lift the silkscreen off the ware. Let dry. Repeat this process for each butterfly silkscreen. Wash the screen in water after use.
Use some thinned SC-23 Jack-O-Lantern and SC-24 Dandelion to fill in the colored portions of the butterflies using CB-110 Liner.
Use the two scrolls from DSS-0103 Flourishes to print the “leaf and stem” portions of the pattern. Separately mix up some SC-11 Blue Yonder and SC-27 Sour Apple with AC-310 Silkscreen Media to peanut butter consistency using the Pallet Knife. Mix well. Tape down the first scroll (shinny side down against the ware) for the lower part of the pattern. You will use both colors when printing this image. The blue color is towards the base of the scroll and the green color for the remaining portions. This will create a two tone print. While holding down the screen with your fingers from one hand, then scoop up some color with the finger from the other hand and work it over the image. When both colors have been completed, lift the screen from the ware. Repeat this step for the other top portion of the pattern in the same manner. Let dry. Remove the Masking Tape from the flowers.
Trace the added details of the pattern using AC-230 Clay Carbon and a pencil. Using CB-110 Liner loaded with SC-11 Blue Yonder to paint in the long trailing scroll portions at the ends of the flowers. Use the same brush loaded with SC-28 Blue Isle to paint in the “paisley” filler portions of the pattern next to the scrolls.
Use CB-110 Liner loaded with SC-28 Blue Isle to add some accent embellishments to the silkscreened “leaf and stems” of the pattern. Paint in some dots using the end of a brush handle to the ends of the trialing scroll portions of the pattern and at the ends of the “paisley” parts of the pattern. Let dry.
Apply one coat of S-2101 Crystal Clear Brushing to the outside of the vase using CB-604 Soft Fan.
Begin with properly fired shelf cone 04 bisque. Moisten a clean sponge and wipe bisque to remove any dust. Check the inside of the jars and lid for any debris as well.
Thin some S-2101 Crystal Clear Brushing with water to a melted ice cream consistency in a plastic cup. Pour the thinned glaze into the inside of the jar, while working quickly to rotate the jar to completely coat the inside with glaze. Pour out excess glaze and invert to dry. Wipe off any excess color with a moistened sponge.
In a Plastic Cup mix some FN-001 White with water to a milk consistency. Use CB-604 Soft Fan to apply 2 coats of the thinned color to the middle sections on both jars.
Lay down the piece of ½” Foam and place the smooth side up on the bubble wrap over the foam piece.
In the plastic cups separately mix some of the following colors with water to melted ice cream consistency; SC-52 Toad-ily Green, SC-53 Purple Haze, FN-001 White, FN-212 Blue Diamond, FN-225 Celery. All of the colors need to be about the same viscosity. Onto the plastic covered foam place 5-6 dollops ( approximately half dollar size) of FN-001 White with the plastic spoon. For the smaller green vase place, 6 smaller dollops (quarter sized) of FN-227 Celery in and over the white dollops and then add yet large dots (small fingernail sized) of SC-52 Toad-ily Green.Use the end of a brush handle to drag through the colors creating small swirls. Place your hand under the foam and while holding the small jar, lift the foam up from underneath to the center portion of the jar. Use your hand to cup the foam around the shape of the jar’s middle. Remove the jar from the foam. The colors should resemble marbled colors. Repeat this process around the jar’s center portion. Reapply the glaze to the plastic covering if and when the colors are depleted or overly blended. The colors may overlap on the jar slightly to create a uniform marbling appearance. Check for small gaps in the color. Reapply the colors to the missing sections either by using the foam/plastic technique or for very small areas with a brush.
For the larger jar use the following colors in the same process: FN-001 White, FN-212 Blue Diamond, and SC-53 Purple Haze.
Use a damp sponge to remove any glaze where it overlaps onto the stems of the jar.
Using CB-110 Liner to apply some diagonal irregular lines/veins to the marbled sections of the jars using either SC-53 Purple Haze for the larger jar and SC-39 Army Surplus. These lines should vary in width and length and should be mottled in look. These winding veins should add accents of darker color to the marbled colors already applied and follow the cues in the marbled color.
To the smaller jar lid (exclude bead on final) and base (exclude the three beads in the stem) apply 3 coats of SC-52 Toad-ily Green with CB-604 Soft Fan. While the color is still wet, tip one corner of the brush with SC-39 and shade the bottom edge of the lid and base. Also, shade the bottom edge of the final next to the middle bead.
To the larger jar lid (exclude bead on final) and base (exclude the three beads in the stem) apply 3 coats of SC-53 Purple Haze with CB-604 Soft Fan. While the color is still wet, tip one corner of the brush with SC-72 Purple Jelly and shade the bottom edge of the lid and base. Also, shade the bottom edge of the final next to the middle bead.
To the top and bottom beads on both stems apply 2-3 coats of SC-16 Cottontail using CB-404 Pointed Round.
To the middle bead on the smaller jar apply 3 coats of FN-227 Celery with CB-404 Pointed Round. To the middle bead on the larger jar apply 3 coats of FN-212 Blue Diamond with CB-404 Pointed Round.
Use CB-110 Liner to apply a thin line of color, separating the beaded sections on the lids and stems with SC-79 Purple Jelly on the larger jar to accentuate the delineations on the stem. A line of SC-39 Army Surplus is used on the smaller jar to accentuate the beaded sections.
In a Plastic Cup mix some S-2101 Crystal Clear Brushing with water to a skim milk consistency. Apply 1 coat to the entire outside surfaces of both pieces using CB-406 Soft Fan.
Stilt and Fire the pieces to Shelf Cone 05-06
Note: Any color variation can be made by using any light color in place of the FN-001 White. The second color should be a Foundations Sheer glaze that compliments or contrasts with the third Stroke and Coat color. There should be a light, medium and dark hue in the combination.
Begin with properly cleaned Greenware by using a Clean Up Tool and Green Grit Pad. Moisten a clean sponge and wipe Greenware to remove any dust. Check the inside for any debris as well.
Using CB-618 Soft Fan to apply 3 coats of UG-51 China White to the entire outside surface. Let Dry.
Transfer the pattern to the ware using a Pencil and AC-230 Clay Carbon. Use Blue Masking Tape to secure the pattern while transferring.
Paint in 3 coats of UG-216 Blush to the scallops in the flowers and to the line details on the other flowers using CB-110 Liner. The line detail in the one set of flowers are a “pressure point” stroke. The line detail should be fatter towards the outer edge tapering to a point towards the flower center.
Paint in 3 coats of UG-82 Tucson Turquoise to the negative spaces in the scallop flowers and to the markings in the peacock eye shapes using CB-110 Liner and CB-404 Pointed Round.
Using SG-411 Purple to paint in the purple details of the pattern. More than one coat might be needed to alleviate any color variations. These markings should be solid coverage.
Fill AC-219 Designer Bottle with Writer Tip with some UG-218 Pear Green and draw in the vertical line detail in the four leaves as noted in the pattern.
Double check the pattern to make sure all necessary shapes and areas (steps 3,4 and 5) noted above are painted before moving onto the next step.
Condition CB-110 Liner and CB-404 Pointed Round with AC-525 Brush Cleaner. Carefully paint 1 good coat over the pattern with AC-302 Wax Resist using a brush sized for the area being painted. Paint around the outside edge of the pattern about ½” from the line over the background. Be careful not to get any drops of wax on the background areas where the green will be applied. The Wax Resist will facilitate the ease and speed of painting the background areas. Wash the brushes immediately after with warm water and AC-525 Brush Cleaner.
Using CB-110 Liner and CB-404 Pointed Round to apply 4 coats of UG-218 Pear Green to the negative areas of the pattern. If any color gets up onto the waxed areas, use a moistened brush with water to remove any unwanted beads of color.
Fire the vase to Shelf Cone 04-05.
Check the pattern for any loose spots of green color before glazing. Small dots of color may have been overlooked and fired onto the ware. Usually, a light wiping of a dampened sponge will remove any of these dots of errant color.
Thin some FN-037 Chartreuse to melted ice cream consistency in a Plastic Cup. While working quickly, pour the color into the vase, rotating the piece to completely cover the inside of the vase. Pour out the excess glaze and invert to dry. Wipe off any drips to the outside with a moistened sponge.
Apply 3 coats of S-2101 Crystal Clear Brushing to the entire outside of the vase excluding any of the Pear Green background areas using a brush sized for the area being painted. Wipe off any unwanted glaze to the green background areas with a moistened brush.
Begin with properly fired shelf cone 04 Bisque. Moisten a clean sponge and wipe bisque to remove dust.
Mix SG-401 with a bit of Silkscreen Medium to the consistency of peanut butter. Screen the large bouquet from the Flowers 2 screen and the ladybugs from the Bugs screen onto the center of the plate.
Use the sponge-on-a-stick to apply SG-401 Black Designer Liner tp the Divots Mat. Stamp the mat onto the rim.
Use the Soft Fan to apply three coats of EL-101 Oyster Shell to the inside of the plate.
Use the Soft Fan to Apply three coats of EL-103 Sea Spray to the rim of the plate.
Use the Soft Fan to apply three coats of EL-103 Sea Spray to the back of the plate.
Begin with properly fired shelf cone 04 Bisque. Moisten a clean sponge and wipe bisque to remove dust.
Use the Soft Fan to apply two coats of FN-39 Light Gray to the front of the plate.
Use a pen or pencil and the Clay Carbon Paper to trace the light bulb design onto the plate.
Starting on the outside, working your way toward the light bulb, use the sponge to apply two layers of SC-35 Gray Hare onto the plate. The color should fade as you get closer to the bulb
Use the Liner and Script Liner to apply SC-97 Cant-elope to the filament, SC-16 to create the shine of the bulb and SC-15 Tuxedo to the hardware of the bulb. Once dry, condition a brush and apply a coat of AC-302 Wax Resist over these details.
Slightly thin SC-15 Tuxedo with water and use the Liner to outline the bulb and various parts of the filament.
Starting in the center of the bulb sponge three coats of EL-125 Sahara Sands making sure each coat recedes with each layer from the edge to create a gradient “glow”. Don’t take this all the way to the edge, but rather fade it into the SC-35 Gray Hare that you applied previously.
Use the sponge to apply one or two coats of SC-15 Tuxedo to the edge of the plate to create a gradient.
Use the Soft Fan to apply three coats of FN-009 Black to the back of the plate.
Begin with properly cleaned Greenware Vase using a Clean Up Tool and Green Grit Pad to remove the seams and imperfections to the surface. Moisten a clean sponge and wipe greenware to remove any dust. Check the inside for any debris as well.
Apply 3 coats of UG221 Cement to the entire outside surface using CB-604 Soft Fan.
In a Plastic cup pour about 1 ½ ounces of Glycerin. Place the ware in the center of a Banding Wheel with a paper towel underneath the ware.
Squeeze out about a quarter ounce of SG409 Bright Green, SG410 Bright Blue and SG411Purple into separate Plastic cups. Add some water to each color mixing them to about the consistency of light cream. Color should be fluid.
Starting at the top of the vase apply a coat of the Glycerin to the entire vase. Work the glycerin from the top and working around the vase in a downward progression to the bottom.
The glycerin will allow the color mixtures of Designer Liners to flow downward when applied. Load the CB106 Script Liner with the SG410 Bright Blue. Start at the top and while turning the Banding Wheel, apply a line of color around the vase. Almost immediately you will notice the color “weeping” downward forming “legs” or rivulets of color. Depending on how thick you apply the color and how wet the glycerin is will determine the overall movement of the color. Move down the vase about two inches and repeat the banding of color. Move down the vase in about two inch intervals with other lines of color. Allow the glycerin and color to dry which may take several minutes.
Repeat this process with the other two colors separately allowing a drying time between the color applications. You can repeat this process with the same colors if you aren’t happy with the effect of the glycerin/color application after it has dried. Let Dry. Do not apply the glycerin over color that isn’t dry as it will smear.
Clean up the bottom of the vase with a moistened sponge.
Fire to Shelf Cone 04-05.
In a Plastic Cup mix some FN028 Wisteria Purple to a melted ice cream consistency. While working quickly, pour the thinned glaze into the vase, rotate the piece to completely cover the inside surface. Pour out excess glaze and invert to dry. Wipe off any drips from the outside surface with a moistened sponge.
Apply 3 coats of S2101 Crystal Clear Brushing to the entire outside surface.
Stilt and Fire the piece to Shelf Cone 05-06.
Note. Any shade of underlying Fundamental colors can be applied and any of the Designer Liners can be used for this “Weeping Watermarked” technique. Lighter colors work best for the background coloring.
Begin with properly fired shelf cone 04 bisque. Moisten a clean sponge and wipe bisque to remove any dust.
With a pencil and AC-230 Clay Carbon Paper trace on the design or sketch on your own.
For the placement of the primary colors: Using a CB-106 #6 Script Liner, apply 3 coats of SC-6 Sunkissed, on the far left tail feather on the bird skip one tail feather, apply 3 coats of SC-74 Hot Tamale on the center of the birds tail feather. Skip one tail feather to the right of the SC-74 Hot Tamale tail feather and apply 3 coats of SC-12 Moody Blue. So now every other tail feather should have a primary color on them.
For the feather between the primary colors, the colors will be mixed to create these colors. Orange – mix SC-74 Hot Tamale with some SC-6 Sunkissed. Purple – mix SC-74 Hot Tamale and SC-12 Moody Blue. Green – mix SC-6 Sunkissed and SC-12 Moody Blue. Visually the wet glaze will mimic the fired color, so mix according.
For the foreground, stipple the blue side with SC-12 Moody Blue and SC-6 Sunkissed, and the red side with SC-74 Hot Tamale, and SC-6 Sunkissed.
The body of the peacock is the mix of SC-74 Hot Tamale, SC-12 Moody Blue and SC-16 Cotton Tail.
Using a CB-604 #4 Soft Fan, apply 1 coat of CG-788 Dutch Enamelware to the sky area of the tile.
Using a CB-110 #10/0 Mini Liner, outline with SC-15 Tuxedo. Eyes are SC-16 Cotton Tail with a dot of SC-15 Tuxedo for a pupil.
Using a CB-604 #4 Soft Fan, apply 2 coats of S-2101 Crystal Clear Brushing. Allow to dry.
Begin with properly fired shelf cone 04 Bisque. Moisten a clean sponge and wipe bisque to remove dust.
Use the Soft Fan to apply two coats of EL-128 Wheat on the front of the plate.
Use the Soft Fan to Apply two coats of EL-129 over Wheat. Randomly apply the color, allowing brushstrokes to show.
Wet and place each octagon cut out onto center of plate. Leave space in between shapes. Wet and place each octagon cut out onto center of plate. Leave space in between shapes. Pattern is attached if you do not have an octagon paper punch.
Squeeze Designer Liner onto a palette. Use the Script Liner to apply the color over the negative spaces.
Remove paper.
Use the Soft Fan to apply two coats of Slate to the back of the plate.
Begin with properly fired shelf cone 04 Bisque. Moisten a clean sponge and wipe bisque to remove dust.
Use the Soft Fan to apply two coats of FN-051 to the front of the plate.
Cut out, then trace around the pattern.
Use the Soft Fan to apply one coat of FN-051 Strawberry around the pattern. Place eyelash yarn all over the plate, allowing it to extend over the edge of the pattern pencil lines to get a rough edge on the pears and leaves.
Use the Soft Fan to apply FN-051 Strawberry as needed to hold the yarn in place.
Wet the paper pears and leaves and press into the outlined area.
Use the Soft Fan to apply one coat of EL-128 Wheat over the plate. Remove the paper.
Use the Script Liner to apply two coats of the following colors:
Pears: SC-27 Sour Apple
Stems: SC-14 Java Bean
Leaves: SC-26 Green Thumb
Remove the yarn.
Use the sponge-on-a-stick to apply SC-14 Java Bean to the Crackle Stamp. Press the design onto each pear.
Use the Soft Fan to apply three coats of FN-051 Strawberry to the back of the plate.
Begin with properly cleaned greenware by using the Clean Up Tool and Green Grit Pad. Moisten a clean sponge and wipe surface to remove any dust. Check the inside of the vase for any debris as well.
In a 4 oz. Jar using a 1 Tbsp. measurement, mix 3 parts (6 Tbsp.) of UG-92 Lilac with 2 parts (4 Tbsp.)UG72 Wedgewood Blue and 1 part (2 Tbsp.) UG-211 Cement – Use a 3:2:1 ratio. It is best to mix more than you think you will need in case of corrections or mishaps. Mix well by stirring and shaking the color mixture.
Sketch in a rough placement of the daisy pattern with a pencil. This doesn’t need to be detailed nor exact. You will be covering over this, but you need a sense of where to place the colors for the background. Notice where the stems trail off as this will be the end of a “V” section of black color.
Starting with UG-51 Jet Black by applying 3 coats using CB-604 Soft Fan from the lip of the vase down about 3 inches around the vase feathering out the bottom edge. Extend the black color down forming an elongated “V” section where the pattern will be painted to about 2 ½” inches from the bottom of the vase. The width of the elongated “V” section should be about 3” tapering down to a point about 5” long.
To the right of the pattern area and starting about 1 ½” from the rim, apply 2 coats of UG-94 Purple Pansy using CB-408 Pointed Round pulling the color downward over the black. Keep a hard irregular top edge to the purple area and feathering it downwardly out after about 2 inches. Let the color dry between applications. Starting about ¾” below the top edge of the just applied purple color, apply 2 coats of UG-10 Crimson over the Purple Pansy keeping an irregular edge and feathering it out in a downward direction approximately two more inches. While the crimson color is still wet, apply some random downward streaks of UG-215 Blush by wet blending the two colors. You should see crimson with blended streaks of pink bursting out in the crimson color.
To the left of the pattern area ( black “V” section) starting about 1” from the bottom edge, apply 3 coats UG-91 True Teal using CB-604 Soft Fan streaking the color upward from the bottom and feathering the color upwardly over the black “V” area to almost where the flower shapes begin. Continue to apply the teal color around the vase to feather blend the color upward over the lower edge of the crimson and pink area. Just to the right of the lower black “V” area, vertically streak in some UG-22 Spring Green over the teal, purple, crimson and pink. Keep this green color weak.
To the bottom of the vase and streaking upward, apply 4 coats of the Underglaze mixture (UG-92, UG-72 and UG-211) using CB-604 Soft Fan feathering out the edge of the color over the previously painted colors. The bottom portion of the vase and all around the vase will be the purple mixture feathering out the edge upward over the prior colors. By feathering and wet blending the trailing edge upwards, it will ensure a subtle blending of the purple over the other colors. Let the each coat dry before applying the next coat. You can wet blend the colors over one another with the aid of a moistened brush and water. Keep the excess color mixture in reserve.
Trace the pattern onto some thin tissue paper with a pencil. Place the pattern onto the ware securing it with some Blue Masking Tape. Use a Red Fine Tip Marker (water based) to retrace the pattern to the ware. The thinness of the tissue will allow the pen color to go through the tissue transferring the pattern.
Using CB-220 Detail Liner apply 2 coats of UG-67 Ivory to the “white” lower petals of the flowers as noted on the pattern. To the (shadow) top petals apply 3 coats of the Underglaze mixture. Paint in 3 coats to the buds, stems and leaves using CB-110 Liner loaded with the Underglaze mixture. Keep the stems as fine of a line as possible trailing the bottom point out to nothing.
Use SG-402 White Designer Liner to paint in the highlights only to the white petals only in the daisy pattern as noted. Note that the white highlights do not completely cover the “white” petals. Some of the ivory color should still be seen peeking out from behind the highlights.
Apply some thinned (dirty water) UG-22 Spring Green and UG-91 True Teal over the leaves and stems for shading using CB-404 Pointed Round. If the color is too thin, reapply another coat to deepen the shading.
Paint in the flower center with 2 coats of UG-58 Harvest Gold using CB-220 Detail Liner. Use CB-220 Detail Liner loaded with thinned UG-31 Chocolate to shade the flower center.
Fire to Shelf Cone 04-05.
Thin with water some FN-28 Wisteria Purple to a melted ice cream consistency in a plastic cup. While working quickly, pour the thinned glaze into the vase, rotating the vase for complete coverage. Pour out excess glaze and invert to dry. Wipe off any drips of glaze from the outside using a moistened sponge.
Apply 3 coats of S-2101 Crystal Clear Brushing to the outside of the vase using CB-604 Soft Fan.
Begin with properly fired shelf cone 04 bisque. Moisten a clean sponge and wipe bisque to remove any dust.
Thin some EL-141 Aged Bronze with water (3 parts glaze, 1 part water) in a small cup until it is the consistency of heavy cream. Pour the contents into the vase and roll it to coat the entire inside. Stand vase upside down to drain.
Use the CB-604 #4 Soft fan to apply three coats of EL-141 aged bronze to the top, sides and bottom of the vase, including spout.
Using a pencil, draw 8 equal blocks on the front of the vase, 4 on top and 4 on the bottom.
Using the CB-604 #4 Soft Fan brush three coats of the following colors to the sections, apply EL-140 Toasted Almond to two blocks, EL-136 Lapis Lagoon to two blocks, EL-121 Copper Adventurine to two blocks, and EL-123 to two blocks.
Using the CB-110 #10 10/0 Liner apply 2 coats of SC-15 Tuxedo in between each of the blocks where your pencil lines were.
Begin with properly fired shelf cone 04 bisque. Moisten a clean sponge and wipe bisque to remove any dust.
Using a CB-604 #4 Soft Fan, apply 1 coat of FN-001 White to the front of the tile.
Cut out the negative space from the fish pattern taking out the fish and leaving the surrounding areas.
Re-wet the tile with glaze or water, and place the paper stencil into the wet surface, use a paper towel to flatten the paper and remove excess water.
Using a CB-604 #4 Soft Fan, apply 2 coats of SC-88 TuTu Tango over the fish area. Allow to become semi-dry: when the glaze loses its shine.
Pour some SG-501 Sculpting Medium into the plastic bottle with the metal tip. Practice making loopy lines on paper first, then start the line off the fish on the paper, quickly making loopy lines over the fish.
Remove the paper.
Using a CB-604 #4 Soft Fan, apply 1 coat of SC-77 Glo-Worm to the background, work in sections, brushing another coat of SC-77 Glo-Worm and place the eyelash yarn into the wet glaze, brush more SC-77 Glo-Worm over the yarn to get it imbedded into the glaze.
Wait until the shine leaves the SC-77 Glo-Worm then apply 2 coats of SC-12 Moody Blue.
Apply 1 thin coat of CG-722 Seawind with crystals over the SC-12 Moody Blue.
Pull off the yarn when the shine leaves the glaze.
Paint an eye in with SC-16 Cotton Tail, with a SC-15 Tuxedo pupil, outline with SC-15 Tuxedo.
Begin with properly fired shelf cone 04 bisque. Moisten a clean sponge and wipe bisque to remove any dust.
Thin some FN-001 with water in a small cup until it is the consistency of heavy cream. Pour the contents into the vase and roll it to coat the entire inside. Stand vase upside down to drain.
Use the Soft Fan to apply two coats of FN-001 White to the top, sides and bottom of the vase, including spout. Let dry.
Using the masking tape, tape off the raised edge of the front and back of the vase so you are left with just the flat front surface to work on.
Using the CB-604 Soft Fan Brush, apply one coat of SC-11 Blue Yonder to the top third of the front of the vase. While still wet, apply SC-24 Dandelion to the middle third of the front of the vase and wet blend into the Blue Yonder. Apply SC-18 Rosey Posey to the bottom third of the front of the vase and wet blend into the Dandelion. Repeat two more times so that you have a total of 3 coats.
>Apply strips of masking tape horizontally to the edges of the vase approximately ¼ inch apart. Make sure the tape is pressed securely down so none of the edges are sticking up or wrinkled.
Using the Soft Fan Brush, apply two coats of SC-15 Tuxedo to the outside edge of the vase over the tape strips. Also, apply two coats of to the spout.
When the shine goes away, remove the strips of tape.
Using the AC-230 Clay Carbon Paper, transfer the pattern to the front of the vase.
Using the Script Liner, apply two coats of SC-23 Jack O’Lantern to the sun.
Fill the AC-219 Designer Bottle with Writer Tip with SC-15 Tuxedo. Fill in the letters and outline the sun. Draw random rows of scallops around the edges of the front of the vase.
Clean the writer bottle and fill it with SC-16 Cotton Tail. Fill in the middles of the letters and the scallops around the edges of the front.
1. Begin with properly fired shelf cone 04 bisque. Moisten a clean sponge and wipe bisque to remove any dust
2. Transfer the pattern to the piece using a pencil and AC-230 Clay Carbon.
3. Starting with the purple horse, apply 3 coats of SC-13 Grapel with CB-406 Pointed Round or CB-106 Script Liner to the horse and mane excluding the eyes.
4. Wet blend SC-33 Fruit of the Vine and SC-32 Bluebeard to the shading in the horse body and mane using CB-406 Pointed Round. SC-32 is used to reinforce and darken the SC-33 shading. To the highlights in the face, wet blend SC-11 Blue Yonder.
5. Apply 3 coats of SC-87 Ruby Slippers to the red horse using CB-406 Pointed Round or CB-106 Script Liner. Wet blend SC-34 Down to Earth to the shading below the jaw bone in the neck, behind the ears, above and below the eye, below the nostrils above the mouth, where the mane and neck meet and along the lower jaw using CB-604 Pointed Round. Shading on the side of the face for the highlights are done with SC-88 TuTu Tango around the muscles using CB-406 Pointed Round. The flat portion of the face (nose) is done with SC-94 Curry Around.
6. Use SG-402 White to detail the front of the eye of the red horse. Detailing of the eyelash and socket are done in SG-403 Red. The iris of the eye is SG-410 Bright Blue and shaded with SG-403 Red. The iris on the purple horse is SG-408 Orange shaded with SG-403 Red. The highlight is SG-407 Yellow.
7. The leading highlight along the nose and mouth on the purple horse is SG-407 Yellow. The highlights along the front edge of the ears and mane are SG-407 Yellow as well as all top portions in the mane. The shadow detail in the main is done with SG-403 Red. SG-410 Bright Blue is used to detail the rest of the mane’s hair and back edge of the ears.
8. The marking on the face front (nose) in the red horse is done in SG-407 Yellow in a sketchy method and not solid. The mouth is highlighted with SG-408 Orange and towards the back of the mouth with SG-403 Red. SG-403 Red is used to highlight the lower jaw line down the neck. Add some highlights next to the red lined portion of the neck with SG-408 Orange. The edge of the ears is detailed with SG-408 Orange. Add some detail to the shadows of the ears with SG-410 Bright Blue. The highlights in the mane are done with SG-407 Yellow. For the shadows in the mane, they are completed with SG-403 Red and SG-410 Bright Blue. The rest of the mane’s detail is completed with SG-408 Orange. Let Dry.
9. Apply a thin coat of S-2101 Crystal Clear Brushing to the horses using CB-406 Pointed Round making sure to include all Detail Liner portions in the pattern. Apply 3 coats of FN-009 Black to the edges and back of the tray using CB-604 Soft Fan.
10. Apply 3 coats of CG-416 Pagoda Green to the background areas around the horses using CB-110 Liner, CB-406 Pointed Round or CB-604 Soft Fan. Be careful in the placement of the crystals. An even distribution of the crystals will give you a better overall look to the finished piece. Watch the placement of the crystal next to the horses so they don’t run up over the horses in firing.
Begin with properly fired shelf cone 04 Bisque. Moisten a clean sponge and wipe bisque to remove dust.
Thin NT-CLR or S-2101 Clear slightly. Pour inside the vase, turn to coat and pour out to drain.
Use the Soft Fan to apply three coats of SC-71 Purple-licious to the front panel of the vase. Let dry.
Mark the center of the front panel of the vase. Use the Soft Fan to apply a coat of water to the surface the place the Doily Stencil in the middle of the panel. Press into the glaze then burnish the openings of the stencil with your finger to prevent glazes that will be applied on top of the stencil from bleeding through. Use a damp sponge to remove glaze from the stencil design.
Use the Script Liner to apply one coat of SC-16 Cotton Tail. This coat will hide glaze left in the stencil design.
Use the Script Liner to apply one coat of SC-75 Orange A Peel to the smallest design in the center.
Using the same brush, apply one coat of CG-963 Lemon Lime (with crystals) to the next group of designs.
Using the same brush, apply one or two coats of 1-2 coats of CG-756 Firecracker to the next group of designs.
Using the same brush, apply one or two coats of CG-753 Sassy Orange to the last design group.
Remove the stencil when the Crystal glazes begin to dry.
Use the Soft Fan to apply two or three coats of CG-753 Firecracker to the sides and back of the vase.
Use the Script Liner to apply three coats of SC-71 Purple-licious inside the neck.
Use the Script Liner to apply two coats of SC-15 Tuxedo on the on the front edge of the front panel.
Fire to cone 06.
Form
MB-1391 Medium Flat Bottle
Colors
SC-15 Tuxedo
SC-16 Cotton Tail
SC-71 Purple-licious
CG-756 Firecracker
CG-963 Lemon-Lime
CG-753 Sassy Orange
NT-CLR Clear Dipping or S-2101 Clear Brushing Glaze
1. Begin with properly fired shelf cone 04 Bisque. Moisten a clean sponge and wipe bisque to remove dust.
2. Use the Soft Fan to apply three coats of SC-86 Old Lace to the tray. When dry, use the Soft Fan to float the edges with thinned SC-25 Crackerjack Brown.
3. When dry, silkscreen the DSS-0144 Background Script to the tray. Position the screen shiny side down on the piece. Hold in place, starting from the center out, Rub the mixture on the screen with your finger. Lift a corner up to check if you are applying enough color. Gently clean the screen with water.
Silkscreening: Place SC-15 Tuxedo on a palette or tile and sprinkle with AC-310 Silkscreen Medium. Using a palette knife mix color and medium to the consistency of thick peanut butter. if the mix is too thin add more AC-310 Silkscreen Medium or if it is too thick add more Stroke & Coat. Too thin of a mixture will bleed under the screen and give you a blurred image. Too thick of a mixture will make it hard for the product to penetrate through the holes in the screen and give blank areas in your screen.
4. Trace the pattern onto the piece.
5. Brush one coat of SC-16 Cotton Tail to all the flowers and leaves. This will help block the color on the tray.
8. Use the Script Liner to apply two coats of SC-7 Leapin’ Lizard to the leaves, SC-55 Yella Bout It to the light yellow flowers, SC-23 Jack O’Lantern to the orange flowers, SC-24 Dandelion to the medium yellow flowers and SC-85 Orkid to the purple flowers.
9. Brush the vase with three coats of SC-16 Cotton Tail, screen the DSS-103 Flourish screens onto the vase.
Begin with a properly fired shelf cone 04 Bisque. Moisten a clean sponge and wipe bisque to remove dust.
Trace on the pattern, brush two heavy coats of CG-985 Monet’s Pond to the middle section of the fish, make sure to stir to get an even distribution of crystals.
Brush the fins and the head with SC-27 Sour Apple, while the color is wet, drag in Monet’s Pond into the wet glaze in brush strokes.
Outline and detail the fins with SC-15 Tuxedo, use CB-110 #10/0 Mini Liner.
In the small dixie cup, mix 1 tbs of SC-12 Moody Blue, 2 tbs of water and 2 drops of liquid soap. Depending on the size of the container, the recipe should be doubled if the bubbles aren’t reaching over the edge of the container.
With a straw, blow into the mix, bubbles should form and bubble over the edge of the container. Press the tile to the bubbles, let them break on their own. Or let the bubble drop onto the tile, let them break on their own.
Brush the background of the tile with two coats of S-2101 Crystal Clear Brushing.
Begin with properly fired shelf cone 04 Bisque. Moisten a clean sponge and wipe bisque to remove dust.
Tape off 3″ from the bottom of the clock, 4″ from the bottom of the teapot, and 2″ from the bottom of the other pieces.
Use the Soft Fan to apply three coats of FN-001 White to the white areas shown on each piece.
Punch 1″ circles from paper for the clock and triangles for the teapot. We will use the negative space for these shapes.
Brush water over the space for the paper then press the paper into the wet glaze. Press gently with a paper towel to remove excess water and ensure the edges are sealed. The triangles should be placed tip to tip. You may need to trim the paper to ensure the best fit.
Use the Soft Fan to apply two coats of SC-15 Tuxedo over the open spaces of the paper punches. Remove the paper before the SC-15 Tuxedo dries.
Remove the tape then re-tape over the glazed edge
Use the Soft Fan to apply four coats of FN-003 Orange to the bottom section of the clock. Apply FN-018 Bright Blue over the top section and handle of the teapot.
Use the Script Liner to apply three coats of SC-75 Orange-A-Peel to the numbers and dots on the face of the clock.After firing, you may wish to use an extra-fine black permanent marker to outline the numbers and the rings around the face of the clock.
For the cup: Apply the 1/8″ tape to create the pattern at the top of the cup. Us the Soft Fan to apply four coats of FN-044 Yellow-Orange tot the bottom. Apply the 1/2″ tape to the creamer to create the pattern and applied four coats of FN- 043 Bright Jade to the bottom.
For the Dancing Container: Pencil the harlequin pattern over the White Foundations. Use the Script Liner to apply two coats of SC-15 Tuxedo to the pattern. Use the Soft Fan to apply four coats of FN-007 Green to the bottom of the container.
Thin NT-CLR Clear Dipping or S-2101 Clear Brushing Glaze and pour the insides of the containers. Roll to coat then pour out the excess and drain. Alternatively, the pieces can be be dipped into NT-CLR Clear.
Fire to cone 05/06.
Form
MB1371 Dancing Teapot
MB1372 Dancing Container
MB1373 Dancing Sugar
MB1386 Dancing Tea Cup
MB1388 Dancing Creamer
MB1490 Clay Clock
Colors
FN001 White
FN002 Yellow
FN003 Orange
FN007 Green
FN018 Bright Blue
FN043 Bright Jade
FN044 Yellow Orange
SC15 Tuxedo
SC75 Orange-A-Peel
NT-CLR Clear Dipping or S-2101 Clear Brushing Glaze
Begin with properly fired shelf cone 04 bisque. Moisten a clean sponge and wipe bisque to remove any dust.
Using a CB-604 #4 Soft Fan, apply on 2-3 coats of FN-001 White to the top of the plate. Allow to dry.
Cut out the shape of the fish from the pattern. Apply some water to the glaze area of the fish, this will help the pattern to stick to the glaze. Lay a paper towel over the pattern press/pat to remove any excess water.
Stamp the plate with the MT-002 Wood Grain Mat using SC-31 The Blues. Apply SC-31 The Blues to the mat with a mini foam roller. Make sure to clean the mat if it is new.
Remove the paper fish pattern.
Cut out the fins and the eye and place them on the fish using water to get them to stay.
Using a CB-604 #4 Soft Fan, apply 1 coat of SC-89 Cutie Pie Coral to the fish then 1 coat of SC-2 Melon-choly.
While the SC-2 Melon-choly coat is wet lay in some eyelash yarn into the wet glaze, wind it around the fish then to the center. Apply another coat of the SC-2 Melon-choly over the yarn.
After it starts to dry, pat with a paper towel to remove excess glaze.
When the glaze is dry to the touch or the gloss leaves, brush on 1-2 coats of S-74 Hot Tamale.
Remove the yarn and the paper fins and eye after the gloss leaves the glaze.
Using a CB-106 #6 Script Liner, apply on SC-75 Orange-A-Peel streaked with SC-24 Dandelion to the fins, eye is Orange-A-Peel with the SC-24 Dandelion, with the SG-401 Designer Liner for the pupil.
Pencil in the water or trace with AC-230 Clay Carbon Paper.
Use the SG-401 Designer Liner to line the waves, use A CB-110 #10/0 Liner with the SG-401 Designer Liner to line the fins and the eyes.
Using a CB-604 #4 Soft Fan, apply 1 coat of SC-31 The Blues to the waves and a thinned coat of SC-76 Cara-bein Blue for the area under the top wave.
Using a CB-604 #4 Soft Fan, apply 3 coats of FN-031 Cornflower Blue to the back of the plate. Allow to dry.
1. Begin with properly fired shelf cone 04 Bisque. Moisten a clean sponge and wipe bisque to remove dust.
2. Directions for the teapot: Place a tape line one inch from the skirt of the teapot. Pencil in the design as shown on the skirt, lid, spout and handle. Tape can be used for the lid and spout; pencil in a line for the design.
3. Use the Script Liner to apply SC-74 Hot Tamale to the sides of the larger design and fill in with two coats of SC-73 Candy Apple Red.
4. Use the same brush to apply two coats of SC-27 Sour Apple to the green areas of the design.
5. Thin SC-24 Dandelion with water and apply to the yellow areas of the teapot.
6. With the Liner, use a press and lift stroke to apply SC-76 Cara-Bein Blue between the red and green pattern.
7. Use the Liner to outline the pattern with one coat of SC-15 Tuxedo.
8. Place some S-2101 Clear on a palette or tile. Darken the clear with food coloring and sprinkle with AC-310 Silkscreen Medium. Using a palette knife mix color and medium to the consistency of thick peanut butter. If the mix is too thin add more AC-310 Silkscreen Medium or if it is too thick add more Stroke & Coat. Too thin of a mixture will bleed under the screen and give you a blurred image. Too thick of a mixture will make it hard for the product to penetrate through the holes in the screen and give blank areas in your screen.
9. Position the screen shiny side down on the piece and hold in place. Starting from the center and moving outward, rub the mixture on the screen with your finger. Lift a corner up to check to see if you are applying enough color. Remove the screen and wash with water. Do not let the color dry in the screen – doing so will cause damage to the screen.
10. We used the rose screens from DSS-0138 Flowers 2 and DSS-0112 Flowers. Using the mixture of the clear, food coloring and Silkscreen Medium, screen the rose images to the tea set. This step is for color placement only.
11. Apply both reds, SC-73 Candy Apple Red and Hot Tamale, to the rose to achieve depth. Apply two coats using the Sript Liner. Apply two coats of SC-26 Green Thumb to the leaves.
12. When dry, follow the directions in step 8, but use SC-15 Tuxedo instead of the S-2101 Clear.
13. Line up the screens previously used on the roses, rub the thickened Tuxedo over the screens.
14. Use the end of a brush handle to dot SC-76 Cara-Bein Blue around the rose.
15. Dip into NT-CLR or use the Soft Fan to apply two coats of S-2101 Clear to the outside then thin with water and roll the inside of each piece.
16. Use the Soft Fan to apply three coats of SC-74 Hot Tamale to the lids.
17. Fire to cone 05/06.
Form
MB-1371 Dancing Teapot Bisque or CD1371 Dancing Teapot Mold
MB-1372 Dancing Container Bisque or CD1372 Dancing Container Mold
MB-1373 Dancing Sugar Jar Bisque or CD1373 Dancing Sugar Jar Mold
MB-1386 Dancing Tea Cup Bisque or CD1386 Dancing Tea Cup Mold
MB-1388 Dancing Creamer Bisque or CD1388 Dancing Creamer Mold
Colors
SC-15 Tuxedo
SC-24 Dandelion
SC-26 Green Thumb
SC-27 Sour Apple
SC-73 Candy Apple Red
SC-74 Hot Tamale
SC-76 Cara-Bein Blue
NT-CLR Clear Dipping or S-2101 Clear Brushing Glaze
Begin with properly fired shelf cone 04 Bisque. Moisten a clean sponge and wipe bisque to remove dust.
Use the Soft Fan to apply two coats of EL-128 Wheat to the front of the plate.
Trace pattern onto the plate using Clay Carbon and a pencil.
Use the Soft Fan to apply two coats of the following colors to the fish:
Body: SC-74 Hot Tamale
Fins, Inner Eye Circle and Mouth: SC-16 Cotton Tail
Use SG-401 Black Designer Liner with the Script Liner to fill in the eye. Apply Designer Liner from the bottle or with the Liner to outline and add details to the fish.
Use the Soft Fan to apply two coats of EL-129 Slate over the background (Wheat).
Use the Soft Fan to apply two coats of EL-131 Turtle Shell to the back of the plate.
1. Using the scissors, make cuts on one end of the toilet paper tube. They should be around 1/4 inch thick and 1 1/4 inches long. When making the last cut, continue to the end of the toilet paper tube. Push the roll flat and fold up all of the pieces that were cut. Pull off two pieces from the center.
2. Squeeze about a tablespoon of SC-6 Sunkissed and SC-75 Orange-A-Peel on to the plate. Take the sponge on a stick and gently dab both glazes. Sponge onto the stamp until it is completely covered in glaze. Stamp down the center of the plate to look like butterfly wings. Repeat for the other side of the butterfly.
3. Use the pencil to draw the body of the butterfly.
4. Using the Detail Liner with SC-15 Tuxedo, apply two coats to the body of the butterfly. Allow glaze to dry between coats.
5. On the DSS-0113 Bugs screen, locate the butterflies. Draw an outline around them in permanent marker. Cut it out with the excess screen around the edges.
6. Squeeze about two tablespoons of SC-15 Tuxedo onto the plate. Add a pinch of AC-310 Silkscreen Medium. Mix with a palette knife until it becomes the consistency of peanut butter. You may need to add more silkscreen medium or glaze.
7. Place the butterfly on the plate. While holding it firmly in place, take a small amount of premixed silkscreen medium, and gently rub in circles starting in the center and working outward. Slowly pull up the screen to avoid smearing. Repeat while the screen is still wet for additional butterflies.
8. Using the Detail Liner with SC-6 Sunkissed and SC-75 Orange-A-Peel, apply one coat to the butterflies that were screened.
9. Using the Detail Liner with SC-15 Tuxedo, make decorative swirls coming from some of the butterflies to make it look like they are moving.
10. Using the Soft Fan with SC-75 Orange-A-Peel, apply two coats to the back of the plate. Allow glaze to dry between coats.
11. Using the Soft Fan with S-2101 Crystal Clear Brushing, apply two coats to the plate. Allow glaze to dry between coats. Or dip with NT-CLR Clear One Dipping.
12. Fire to cone 06.
Bisque
MB-101 Coupe Salad Plate
Color
SC-6 Sunkissed
SC-15 Tuxedo
SC-75 Orange-A-Peel
NT-CLR Clear One Dipping or S-2101 Crystal Clear Brushing
1.Begin with properly fired shelf cone 04 Bisque. Moisten a clean sponge and wipe bisque to remove dust.
2. Pour SC-16 Cotton Tail, SC-5 Tiger Tail and SC-76 Cara-Bbein Blue onto a tile. Pick up SC-16 Cotton Tail with the rubber squeegee, then dot the Cotton Tail with SC-5 Tiger Tail and SC-76 Cara-Bein Blue. Starting on the front of the clock at the top, hold the squeegee against the bisque and drag down until the glaze on the squeegee is gone. Repeat until the clock is covered with the subtle drag lines of the Tiger Tail and Cara-Bein Blue.
3. Cut out the pattern of the butterfly and place in the center of the lower part of the clock body. Use the number six as a centering point. Brush water under the paper with and place the paper butterfly onto the piece. Gently press with a paper towel to remove excess water and ensure the edges are sealed.
4. When dry, apply the 1″ tape in horizontal rows across the body of the clock. Start at the bottom and go up. Place three rows of tape, then remove the middle piece and place it beside the third piece. Repeat all the way up. Watch our video Tips for Even Rows to see how this works. For the vertical stripes, start in the middle of the clock and move outward on each side. Use the Soft Fan to apply two coats of SC-15 Tuxedo over the exposed squares. Remove the tape and let the color dry.
5. To make the final squares of the checker board, tape over the rows that have the Tuxedo square, both vertically and horizontally. Apply two coats of SC-15 Tuxedo over the exposed squares. Remove the tape and the paper butterfly.
6. Use the 1/2″ tape to create 1/2″ stripes on the top of the clock. Apply two coats of SC-74 Hot Tamale to the stripe areas. Remove the tape, then re-tape over the red stripes and every half inch in the opposite direction. Apply two coats of SC-97 Cant-elope on the exposed squares.
7. To make the black squares, tape over the parallel lines of Cant-elope in the opposite direction over a Hot Tamale square. This will expose the Hot Tamale squares. Apply two coats of SC-15 Tuxedo over these squares. This will produce checks with three colors, and squares with no color.
8. Use the Script Liner to apply one coat of SC-5 Tiger Tail and one coat of SC-97 Cant-elope to the outer ring around the face of the clock. Apply three coats of SC-74 Hot Tamale to the inner circle of the clock and the top handle.
9. Use the Liner to apply two coats of SC-15 Tuxedo to the numbers.
10. To Silkscreen – Place SC-15 Tuxedo on a palette or tile and sprinkle with AC-310 Silkscreen Medium. Using a palette knife mix color and medium to the consistency of thick peanut butter. if the mix is too thin add more AC-310 Silkscreen Medium or if it is too thick add more Stroke & Coat. Too thin of a mixture will bleed under the screen and give you a blurred image. Too thick of a mixture will make it hard for the product to penetrate through the holes in the screen and give blank areas in your screen.
11. Position the screen shiny side down on the piece. Hold in place, starting from the center out, Rub the mixture on the screen with your finger. Lift a corner up to check if you are applying enough color. Remove the screen and wash with water. Do not let the color dry in the screen. this will cause damage to the screen.
12. Screen the large. butterfly into the space on the front of the clock.
10. Use the Liner with SC-74 Hot Tamale and SC-97 Cant-elope to fill in some of the markings on the butterfly.
NT-CLR Clear One Dipping or NT-BR Clear One Brushing
Decorating Accessories
AC-310 Silkscreen Medium
DSS-0113 Bugs
RB-144 #4 Soft Fan
RB-106 #6 Script Liner
RB-110 10/0 Detail Liner
Miscellaneous Accessories
Palette
Sponge-on-a-stick
X-ACTO knife
Pencil
Palette knife
Scissors
Permanent marker
Toilet Paper or cardboard tube
1. Begin with properly fired cone 04 bisque. Moisten a sponge and wipe bisque to remove any dust.
2. Using the scissors, make cuts on one end of the paper towel roll. They should be around 1/4 inch thick and 1 1/4 inches long. Fold each piece away from the center of the roll to make the stamp.
3. Squeeze around a tablespoon of SC-15 Tuxedo onto the plate. Take the sponge-on-a-stick and gently dab into the glaze. Sponge onto the stamp until it is completely covered in glaze. Press stamp onto the plate. Press down all sections and remove.
4. Use the pencil to draw the spider’s face and web. Using the Script Liner with SC-15 Tuxedo, apply two coats of glaze to the spider’s body. Using the Detail Liner, outline the eyes, tongue and web.
5. Using the Detail Liner with SC-2 Melon-choly, apply two coats to the tongue. Allow glaze to dry between coats.
6. On the DSS-0113 Bugs silkscreen, locate the fly. Draw an outline around it in permanent marker. Cut it out with excess screen around the edges.
7. Squeeze about two tablespoons of SC-15 Tuxedo onto the plate. Add a pinch of AC-310 Silkscreen Medium. Mix with a palette knife until it becomes the consistency of peanut butter. You may need to add more silkscreen medium or glaze.
8. Place the fly on the plate. While holding it firmly in place, take a small amount of premixed silkscreen medium, and gently rub in circles starting in the center and working outward. Slowly pull up screen to avoid smearing. Repeat while the screen is still wet for additional flies.
9. Using the Soft Fan with SC-74 Hot Tamale, apply two coats to the back of the plate. Allow glaze to dry between coats.
10. Using the Soft Fan, apply two coats of NT-BR Clear One Brushing or dip into NT-CLR Clear One Dipping.
Begin with properly fired cone 04 bisque. Moisten a sponge and wipe bisque to remove any dust.
Using the Soft Fan with FN-008 Brown, apply 2 coats to the front and back of the plate. Allow glaze to dry between coats.
Before the glaze is bone dry, use the pencil to trace over the apple pattern in the center of the plate. You should be able to see a slight indent in the glaze.
Using the Detail Liner with AC-302 Wax Resist, outline the lines of the pattern. Then make a circle going around the inner and outer rims of the plate. Make lines connecting in the inner and outer rims, going around the plate. Try to space them out evenly.
Using the Script Liner with EL-125 Sahara Sands, apply 2 coats to the area behind the apple. Allow glaze to dry between coats. Apply a third coat, but only in the center of the section. This will make the glaze more variegated.
Cut the apple out of the pattern and wet it with a damp sponge. Place over the apple on the plate.
Squeeze around 1 TBS SG-401 Black Designer Liner onto the palette. Dip the sponge on a stick into the Designer Liner and sponge the textured side of the stamp. Press the stamp down around the apple. Repeat until you have enough leaves. Remove the paper pattern.
Using the Script Liner with EL-130 Sea Green, apply 2 coats to the leaves and border of the plate. Allow glaze to dry between coats. Apply a third coat, but only in the center of each section.
Using the Script Liner with SC-74 Hot Tamale, apply 2 coats to the apple. Try to make them uneven coats, so the apple will not be solid red.
1. Begin with properly fired cone 04 bisque. Moisten a sponge and wipe bisque to remove any dust.
2. Using the scissors, make cuts on one end of the paper toilet paper roll. They should be around 1/4 inch thick and 1 1/4 inches long. When making the last cut, continue to the end of the toilet paper roll. Push the roll flat and fold up all of the pieces that were cut.
3. Squeeze about a tablespoon of SC-15 Tuxedo onto the plate. Take the sponge-on-a-stick and gently dab into the glaze. Sponge onto the stamp until it is lightly covered in glaze. Let the stamp dry completely.
4. Squeeze about a tablespoon of SC-74 Hot Tamale onto the plate. Take the sponge on a stick and gently dab into the glaze. Sponge onto the stamp until it is completely covered in glaze. Stamp down the center of the plate to look like centipede legs. Reapply glaze as needed.
5. Using the Script Liner with SC-81 Cinnamon Stix, apply large dots of glaze going down the center of the centipede. This will be the body.
6. Using the Detail Liner with SC-15 Tuxedo, make two lines coming from the back and front of the centipede.
7. On the DSS-0113 Bugs Silkscreen, locate the ants. Draw an outline around them in permanent marker. Cut them out with excess screen around the edges.
8. Squeeze about two tablespoons of SC-15 Tuxedo onto the plate. Add a pinch of AC-310 Silkscreen Medium. Mix with a palette knife until it becomes the consistency of peanut butter. You may need to add more silkscreen medium or glaze.
9. Place the ants on the plate. While holding them firmly in place, take a small amount of premixed silkscreen medium, and gently rub in circles starting in the center and working outward. Slowly pull up the screen to avoid smearing. Repeat while the screen is still wet for additional ants.
10. Using the Detail Liner with SC-15 Tuxedo, make dotted lines in front and behind the ants.
11. Using the Soft Fan with SC-6 Sunkissed, apply two coats to the back of the plate. Allow glaze to dry between coats.
12. Using the Soft Fan with S-2101 Clear Brushing Glaze or dip into NT-CLR Clear Dipping Glaze.
13. Fire to cone 06.
Form
MB-101 Coupe Salad Plate
Colors
SC-6 Sunkissed
SC-15 Tuxedo
SC-74 Hot Tamale
SC-81 Cinnamon Stix
NT-CLR Clear One Dipping or NT-BR Clear One Brushing
1. Begin with properly fired shelf cone 04 Bisque. Moisten a clean sponge and wipe bisque to remove dust
2. Wet a blue shop towel, squeeze out the excess water and lay flat on a surface. Squeeze loops of SC-16 Cotton Tail onto the paper towel. Fill in with SC-25 Crackerjack Brown using 1/4 as much as the Cotton Tail.
3. Fold the towel in half press together, then open, if some of the surface has missing color, fill in with more SC-16 Cotton Tail. Press the paper towel to the owl. Roll over with a foam roller to transfer the color to the bisque.
4. Remove the paper towel, roll over the color with a clean, dry foam roller to reveal the color beneath the top layer.
5. Repeat to finish the owl.
6. For the log base, add more of the SC-25 Crackerjack Brown to the paper towel to darken the area. Let dry.
7. Use the Detail Brush to outline the facets with SG-408 Brown.
8. Use the Liner to paint the eyes with SC-15 Tuxedo. Lighten the Tuxedo with water to create gray for the iris.
9. Dip into NT-CLR or use the Soft Fan to apply two coats of S-2101 Clear.
10. Fire to cone 05/06.
Form
MB-1477 Faceted Owl Bisque or CD1477 Faceted Owl Mold
Colors
SC-15 Tuxedo
SC-16 Cotton Tail
SC-25 Crackerjack Brown
SG-408 Brown Designer Liner
NT-CLR Clear Dipping or S-2101 Clear Brushing Glaze
Clean the seams of the ware using a Clean Up Tool. Sand any other imperfections using the Green Grit Cloth. Wipe down the piece using a moistened Synthetic Sponge to remove any dust from the ware. Check the inside for any debris as well.
Use either CB-406 Pointed Round or CB-604 Soft Fan to apply 3 smooth and even coats of the following Fundamental Under Glazes to the noted areas.
UG-93 Wild Violet to Top portion of finial, middle section of the vase.
UG-82 Tucson Turquoise to the bead trim on middle of lid and two smaller bead trim on pedestal.
UG-94 Pansy Purple to the lower portion of lid, large bead trim on pedestal and lower section of the base.
On a tile covered with aluminum foil, pour out some AC-302 Wax Resist. Dip the flat surface of a Sea Wool sponge into the wax. You may want to make a practice print to get the feel of veiling the wax onto paper first to avoid a mishap when working on the ware. “Print” one coat of the wax resist onto the bowl of the jar. Keep the pattern even and lacey. Rotate the sponge when printing to avoid a repeated pattern. Wash sponge with cool water and liquid detergent immediately after use. Let Dry.
Apply 2 coats of NT-BR Clear One Brushing using CB-604 Soft Fan over the wax resist areas on the vase, pedestal base and lower lid portion. Do not paint the foot of the base and lid. The piece cannot be stilted during firing.
Fire to Shelf Cone 04. Do not stilt the pieces and make sure no glaze is on the feet of the ware before firing.
Thin some FN-36 Grape in a plastic cup. Pour the thinned glaze into the lid and jar. Working quickly, rotate the piece to cover the inside. Pour out excess glaze and invert to dry. Wipe off any excess glaze from the lip and top.
Apply 2 coats of NT-BR Clear One Brushing to the finial and bead trims on the lid and jar. Glaze the underside of base/foot.
Stilt and Fire to Shelf Cone 05-06.
Optional Step. Apply one thin coat of Mother of Pearl to the High-Low areas of the jar lid, bowl and base using a brush reserved for the Luster. Clean brush in Luster Essence. Stilt and Fire to Shelf Cone 020.
Small Jar
Clean the seams of the ware using a Clean Up Tool. Sand any other imperfections using the Green Grit Cloth. Wipe down the piece using a moistened Synthetic Sponge to remove any dust from the ware. Check the inside for any debris as well.
Use either CB-404 Pointed Round or CB-604 Soft Fan to apply 3 smooth and even coats of the following Fundemental Underglazes to the noted areas.
UG-93 Wild Violet to middle bead trim on lid and two smaller bead trims on pedestal.
UG-82 Tucson Turquoise to the bowl of jar.
UG-94 Pansy Purple to the finial on lid and large bead trim on pedestal.
UG-219 Marine Blue to lower portion of lid and lower portion on pedestal base.
On a tile covered with aluminum foil, pour out some AC-302 Wax Resist. Dip the flat surface of a Sea Wool sponge into the wax. You may want to make a practice print to get the feel of veiling the wax onto paper first to avoid a mishap when working on the ware. “Print” one coat of the wax resist onto the bowl of the jar. Keep the pattern even and lacey. Rotate the sponge when printing to avoid a repeated pattern. Wash sponge with cool water and liquid detergent immediately after use. Let Dry.
Using the CB-404 Pointed Round loaded with Wax Resist paint on one coat in horizontal intermittent striation lines on the lower lid and lower base of the jar base. Wash brush immediately after use with warm water and liquid detergent. Let Dry.
Apply 2 coats of NT-BR Clear One Brushing using CB-604 Soft Fan over the wax resist areas on the vase, pedestal base and lower lid portion. Do not paint the foot of the base and lid. These pieces cannot be stilted during firing.
Fire to Shelf Cone 04. Do not stilt the pieces and make sure no glaze is on the feet of the ware before firing. Vent the kiln well during the early part of the firing as the wax will produce some smoking during the burning off of the wax.
Thin some FN-42 True Teal in a plastic cup. Pour the thinned glaze into the lid and jar. Working quickly, rotate the piece to cover the inside. Pour out excess glaze and invert to dry. Wipe off any excess glaze from the lip and top.
Apply 2 coats of NT-BR Clear One Brushing to the finial and bead trims on the lid and jar. Glaze the underside of base/foot.
Stilt and Fire to Shelf Cone 05-06.
Optional Step. Apply one thin coat of Mother of Pearl to the High-Low areas of the jar lid, bowl and base using a brush reserved for the Luster. Wash brush in Luster essence. Stilt and Fire to Shelf Cone 020.
Use the Clay Carbon Paper to trace the pattern onto a 04 fired bisque tile.
Use the CB-106 #6 Script Liner to brush two heavy coats of CG-989 Fruit Punch to the largest section of the pinwheel and two heavy coats of SC-73 Candy Apple Red to the smaller section of the pinwheel.
Apply two heavy coats of SC-97 Cant-elope to the background. Apply a third coat to the open spaces of the background. Tip the CB-106 #6 Script Liner into SC-73 Candy Apple Red and swirl the colors to the background.
Use the CB-110 #10/0 Mini Liner to outline the pinwheel sections and paint the stick with SC-15 Tuxedo.
Pour SG-201 Black Cobblestone into an AC-220 Detailer Bottle. Snip the tip to create a small hole then lightly squeeze in a circular direction for a swirly pattern over the tile.
Order the greenware wet. When the greenware has set up enough to stand on its own you may start the cutting out process. Start at the top of the bowl on the jar. Use a Fret Tool or Scalpel to cut triangular shapes about ¾ “ in length and about ¼” between the cut outs, working around the bowl and then downwards as you cut out the ware. Always cut towards solid areas when possible. When the bowl is completely cut out, let the ware dry.
Clean up the seam lines and the cut-out triangles using the Clean up Tool. Be careful as you clean the inner portions of the triangles. Use Green Grit Cloth to further clean up the ware. Use a moistened Synthetic Sponge to wipe down the ware and remove any dust and debris.
Fire to Shelf Cone 04.
Using CB-604 Soft Fan to apply 3 coats of SC-98 Slime Time or SC-11 Blue Yonder, the inner surfaces of the lid and jar. Apply 3 coats to the bead trim on lid and large bead trim on pedestal.
Using CB1-106 Script Liner to apply 3 coats of SC-15 Tuxedo to the outside of the bowl. Use CB-604 Soft Fan to apply color to the lower lid section and base of pedestal. The finial and smaller bead trim on the pedestal can be painted if no Gold luster is being applied later. Do not paint these sections if you are going to apply the Fired Gold Luster later.
Apply 1-2 coats of S-2101 Crystal Clear Brushing to the entire ware.
Stilt and Fire to Shelf Cone 05-06.
Optional Step. Apply 1 medium coat of Fired Gold Luster to finial and smaller bead trim on pedestal using a brush reserved for the Gold Luster. Clean brush in Luster Essence. Stilt and Fire to Shelf Cone 018-020.
Roll out slab 1/4 inch thick, press slab into CD850 Large Hosta Leaf, make sure to press hard enough to transfer the detail, remove from the mold, slump into CD879 Mask Slump Mold. Use a sandbag to slump and a damp sponge to press the clay into the eyes, nose and mouth area. Bend the edges of the leaf, support with a paper towel till it is firm enough to stay on its own.
Let it firm up in the mold, flip it over to remove, use a wood stick to detail the missing lines in the leaf. Let it sit till it is still damp but not able to lose its form.
Press clay into the frog, turtle, and dragonfly in CD916 Project Press Mold, scrape off the excess clay, remove the form from the mold by pressing a small ball of clay over the form and pull up. Make 4 frogs and two turtles, one dragonfly.
Score the clay with the needle tool in the spot for attachment, brush with water to make a slurry, press the clay frogs etc to the face.
Roll a small ball of clay, press over the star form from CD1078 Press Tools 3, this will make the small red flowers. Score, wet and attach to the hosta lady in three groups as pictured.
Make the skinny leaf from press mold CD778 Flowers & Leaves Press Mold. Press the end of the leaf to the hosta face, then lift the rest of the leaf to stick it straight up, around the flowers. Score, wet and attach.
Let dry, fire to cone 04.
Glazing:
Brush the hosta leaf with two thinned coats of SC-78 Lime Light with CB-604 #4 Soft Fan. When dry, thin SC-26 Green Thumb and brush over the Hosta Leaf using CB-604 #4 Soft Fan, this will flow into the detail.
Remove excess glaze from the frogs, turtles, and dragonfly with a wet brush or sponge. Brush the leaves with 2-3 coats of SC-36 Irish Luck, brush the flowers with three coats of CG-984 Ladybug, two coats of CG-963 Lemon Lime to the frogs.
Brush a coat of SC-26 Green Thumb over the turtle, and the dragonfly, wipe back to antique, brush the body of the dragonfly with SC-15 Tuxedo, and The turtle shell with one coat of SC-81 Cinnamon Stix.
Shade around everything on the hosta leaf and around the face with SC-36 Irish Luck, use CB-106 #6 Script Liner, further shade deeper shadow areas, with SC-37 Army Surplus and SC-15 Tuxedo.
Brush a very thin coat of SC-26 Green Thumb over the eyes. Brush the iris with SC-26 Green Thumb 2 coats, brush the pupil with two coats of SC-15 Tuxedo, use CB-110 #10/0 Mini Liner. Remove some of the Green Thumb around the pupil, brush SC-77 Glo-Worm into the iris. Outline the iris and the eyes with SC-15 Tuxedo, use CB-110 #10/0 Mini Liner, shade SC-15 Tuxedo around the top of the eyes.
Brush a coat of S-2101 Crystal Clear Brushing over the hosta mask, omit the crystal glazes.
Fire to cone 05/06.
Variations and Adaptations
If the mask mold is not available, a plastic mask from any craft store will also work to form the clay on top of. Remember to remove the clay before it starts to dry too much to avoid cracking.
Use a moistened Synthetic Sponge to wipe downs the piece to remove any dust.
Using CB-604 Soft Fan to apply 2 coats of FN-01 White to the entire surface. Let dry.
Use a pencil to transfer the design using AC-230 Clay Carbon.
Load CB-406 Pointed Round with water and tip with S-212 Blue Diamond and shade the petals as shown in the pattern.
Shade the inside of the flower center (circular portion) with SC-98 Slime Time in the same manner.
Using CB-220 Detail Liner to paint in the stamen of the flower with SC-24 Dandelion. Shade one side of the stamen with SC-5 Tiger Tail. High light other side of stamen with SG-407 Yellow and add a few dots of SG-409 Bright Green. Use SG-411 Purple to fill in the portion of the stamen that is shown in solid black on the pattern.
Outline the flower petals with SG-404 Blue. Keep this line as fine as possible.
The frilly portion of the inner flower is SG-410 Bright Blue. These lines extend out about half way from the center of the flower. There are shorter lines that extend over the previous lines about 1/3 of the length which are SG-411 Purple. Note the slight direction to the lines in the pattern as you paint. Keep these lines as fine as possible as well.
Use SG-401 Black to dot in the ring that runs around the center stamen. Use SG-411 Purple to paint in the fine lines around the stamen noting their curvature.
Apply 2 coats of S-216 Sea Glass to the leaf. Thin some SG-405 Green with water to shade the sections of the leaf. Apply more green towards the base of the leaf next to the flower.
Use SG-409 Bright Green and SG-405 Green to draw in the tendrils of the flowers.
Apply 3 coats of SC-33 Fruit of the Vine to fill in the trim around the plate using CB-106 Script Liner. Apply 3 coats to the ball feet as well.
Apply 1 coat of NT-BR Clear One Brushing over entire piece.
Begin with properly fired shelf cone 04 Bisque. Moisten a clean sponge and wipe bisque to remove dust.
Trace pattern onto the plate using Clay Carbon and a pencil.
Apply SG-401 Black Designer Liner over the pattern lines.
Using the Soft Fan with random brush strokes, apply two coats of EL-128 Wheat to the front of the plate, changing to EL-130 Sea Green when you reach the rim. Allow the colors to overlap.
Apply two coats of EL-130 Sea Green to the back of the plate.
Begin with properly fired shelf cone 04 Bisque. Moisten a clean sponge and wipe bisque to remove dust.
Trace pattern onto the plate using Clay Carbon and a pencil. Cut out the pattern.
Use the Script Liner to apply two coats of the following colors to the fish:
Body: SC-74 Hot Tamale
Fins, Inner Eye Circle, Mouth: SC-16 Cotton Tail
Wet the paper fish and press into the traced area.
Use the Soft Fan to apply two coats of EL-118 Blue Grotto to the background and rim. Add two coats of SC-11 Blue Yonder to the rim. Allow brush strokes to show and fade the color. Remove paper.
Use SG-401 Black Designer Liner with the Script Liner to fill in the eye. Use the bottle or Liner brush to outline and add details to the fish.
Use the Soft Fan and Script Liner to apply one coat of EL-135 Rare Earth the the fish.
Use the Soft Fan to apply two coats of EL-118 Blue Grotto to the back of the plate.
Begin with properly fired shelf cone 04 Bisque. Moisten a clean sponge and wipe bisque to remove dust.
Trace pattern onto the plate using Clay Carbon and a pencil. Cut out the pattern.
Use the plastic card to apply two coats of the following colors to the cactus (color will go beyond the pencil lines): SC-7 Leapin’ Lizard, SC-43 Lettuce Alone and SC-93 Honeydew List.
Wet the paper cactus and press into the traced area.
Use the end of a brush or sgraffito tool to scrape excess green from outside the pencil lines. Scrape to the bare bisque and allow some color to remain. Follow the shape of the cactus when scraping.
Use the Soft Fan to apply three coats of EL-132 Rust Red to the front of the plate. Remove paper.
Add detail to the cactus with the following colors: SG-401 Black Designer Liner, SG-407 Yellow Designer Liner and SG-408 Orange Designer Liner.
Use the Soft Fan to apply three coats of EL-132 Rust Red to the back of the plate.
Begin with properly fired shelf cone 04 Bisque. Moisten a clean sponge and wipe bisque to remove dust.
Use SG-401 Black Designer to apply lines and dots to the rim of the plate. Alternate between short and long lines.
Use the Soft Fan to apply two coats of EL-101 Oyster Wheat to the front of the plate.
Use the Soft Fan to Apply two coats of EL-129 Slate to the plate. Tip: Follow the shape of the plate when applying the glazes to get a swirled look. You may wish to use a decorating wheel so you may easily turn the plate as you apply the color.
Use the Soft Fan to apply two coats of EL-129 Slate to the back of the plate.
Begin with properly fired shelf cone 04 Bisque. Moisten a clean sponge and wipe bisque to remove dust.
Use SG-401 Black Designer to apply lines and dots to the rim of the plate. Alternate between short and long lines.
Use the Soft Fan to apply two coats of EL-101 Oyster Wheat to the front of the plate.
Use the Soft Fan to Apply two coats of EL-132 Rust Red to the plate. Tip: Follow the shape of the plate when applying the glazes to get a swirled look. You may wish to use a decorating wheel so you may easily turn the plate as you apply the color.
Use the Soft Fan to apply two coats of EL-132 Rust Red to the back of the plate.
Thin Slightly FN-009 Black, pour to the inside, turn to coat, pour out the excess glaze.
From a palette, brush on thinned SG-406 Brown with CB-604 Soft Fan to the body of the llama.
Use a slightly damp sponge to remove some of the color to give it a rustic look. Brush strokes from application should not show, and most of the llama should be an off white color, deeper brown in all the detail and shadow areas.
From a palette, use SG-401 Black to float a shadow color around the detail of the llama. Brush thinned Black on the fringe and tassels, remove the excess with a damp sponge or stiff brush.
Trace on the cactus pattern to the blanket.
Brush the cactus with 2-3 coats of SC-8 Just Froggy with CB-106 Script Liner.
Thin SG-404 Blue like water, brush stroke the background of the blanket in a brush stoke fashion, stoke in thinned SG-401 Black very thin to shadow the blanket background.
Use SG-401 Black from the bottle with the tip, to pattern the cactus and the blanket with black short lines. Outline the cactus, use SG-401 Black using the CB-110 Liner.
Brush the feet with 2 coats of FN-009 Black use CB-604 Soft Fan.
Eyes, are with SG-406 Brown, and SG-401 Black use CB-110 Liner.
Brush on two coats of S-2101 Clear with CB-604 Soft Fan.
From a palette, use a fan brush to apply thinned SG-404 Blue and SG-407 Bright Blue to sections of the globe, overlapping and mingle the colors so it isn’t blotchy.
Use a damp sponge to remove some of the color to show up the flower design. Pat the globe to remove the color so it keeps most of the background color and lights the flower pattern.
Use a banding wheel to apply three coats of SC-30 Blue Dawn to the insets of the base of the pedestal.
Brush on two coats of S-2101 Clear to the pedestal and the globe, use CB-604 Soft Fan.
Fire to cone 05/06.
Use the banding wheel applying with CB-425 Glaze brush or any soft wide brushmother of pearl in a banded fashionon the pedestal.
Brush on one coat of Mother of Pearl to the globe, in a swirling brushstroke.
Clean the brush in Essence, mark the brush as mother of pearl so as not to contaminate.
Fire to cone 020 or 021, if you kiln fires on the hot side. Firing temp is important.
If using the pedestal and globe in a yard, we recommend it me staked with a rod so the wind or squirrels won’t knock it down. Another way is to fill the base with sand and seal it with melted wax.
In wet greenware, leave the ball in the lower section of the mold. Use and Exacto knife to cut on a flower section to form a scallop shape. When dry enough to remove from the mold tap the bottom to create a flat bottom so that it will sit without rolling. Scrape to further fatten.
Fire to cone 04.
Thin FN-009 Black slightly, pour to the inside, roll to coat, pour out the excess glaze. Drain.
Brush on one heavy coat of CG-995 Spring Rain with CB-604 Soft Fan, brush on 1 heavy coat of CG-722 Sea Wind, using lots of crystals, brush on two coats of CG-962 Blue Azure with the fan.
Fill an AC-220 Detailer bottle with SC-15 Tuxedo, snip the top for a small hole, squirt the planter with lines of Tuxedo. These lines will spread and break up in firing.
Pour CD-1119 Hareball Bunny Baby mold ¼” thick. Refer to casting instructions. Repeat for 3.
Once they are firm enough to handle, use the sponge to smooth down any casting lines.
Fire to cone 04.
Moisten a sponge and wipe bisque to remove any dust.
Using the Soft Fan with SC-6 Sunkissed, apply 3 coats a bunny. Repeat with SC-11 Blue Yonder and SC-89 Cutie Pie Coral with the other 2 bunnies. Allow glaze to dry between coats. Fire to cone 06.
In wet greenware, attach the arms in any position that you wish as they are posable. Fire to 04.
Thin SC-48 Camel Back, brush on the entire angel, wipe back with a damp sponge to antique.
Brush on two coats of SC-20 Cashew Later with CB-106 Script liner to the face and arms, brush the cheeks with SC-89 Cutie Pie Coral, blend the edges with Cashew Later.
Brush the hair with two coats of SC-42 Butter Me Up.
Pencil in the flower pattern, largest flower has a 2 ¼” center, medium flower is 1 ¾” center and smallest is 1 ¼” diameter. Draw on the scallops.
Brush the dress with two thinned coats of SC-11 Blue Yonder, centers of flowers with SC-16 Cotton Tail, and scallops with SC-89 Cutie Pie Coral. Draw in the flower pattern, SC-42 Butter Me Up petals, with SC-29 Blue Grass centers.
Brush the lowers section of the skirt with SC-29 Blue Grass thinned, brush over with one coat of SC-27 Sour Apple.
Brush SC-16 Cotton Tail onto the wings and dress neck trim two coats, brush parts of the wings with SC-27 Sour Apple. Flower hat is SC-11 Bluer Yonder and stem with Sour Apple and Blue Grass.
Float deep crevices around the body such as around the face and wings with SC-34 Down to Earth.
Eyes are first painted with SC-16 Cotton Tail, iris with SC-11 Blue Yonder, pupil with SC-15 Tuxedo, outline with Tuxedo, use CB-110 Liner. Outline the flower patterns on her dress with SC-15 Tuxedo.
Brush on 1-2 coats of S-2101 Clear with CB-106 Soft Fan.
Brush the skin areas with two slightly thinned coats of SC-20 Cashew Later, by thinning the coats it will avoid brush strokes for an even finish. Brush the cheeks with 1-2 coats of SC-2 Melon-Choly, blend the edges with SC-20 Cashew Later. When dry, float SC-48 Camel Back to the shadow areas of the face, hands and ears.
Brush the hair and beard with thinned SC-60 Silver Lining, use a stiff brush on the side to remove the excess glaze so it shows in the detail of the hair.
Brush two coats of SC-22 Carrot Top to the jacket, brush one coat of SC-75 Orange A Peel to the center sections of the jacket, Carrot Top will show lighter around the edges.
Brush the hat with 2-3 coats of SC-32 Bluebeard in a circular direction. Brush the pants with three coats of SC-25 Crackerjack Brown, use CB-106 Script Liner.
Brush the belt and shoes with SC-15 Tuxedo, remove the tuxedo from the buckle and brush with 2 coats of SC-24 Dandelion.
Eyes are SC-32 Bluebeard, lighten with SC-16 Cotton Tail.
Brush on 1-2 coats of S-2101 Clear with CB-604 Soft Fan.
Fire to cone 05/06.
Form
CD-1121+ Gnome Elwood Mold or MB-1121 Gnome Elmwood Bisque
Brush the skin areas with two slightly thinned coats of SC-20 Cashew Later, by thinning the coats it will avoid brush strokes for an even finish. Brush the cheeks with 1-2 coats of SC-2 Melon-Choly, blend the edges with SC-20 Cashew Later. When dry, float SC-48 Camel Back to the shadow areas of the face, hands and ears.
Brush the hair and beard with thinned SC-60 Silver Lining, use a stiff brush on the side to remove the excess glaze so it shows in the detail of the hair.
Brush the jacket with two thinned coats of SC-98 Slime Time, float SC-8 Just Froggy into the shadow and detail areas of the jacket. Use CB-106 Script Liner.
Brush the hat with two coats of SC-22 Carrot Top, brush in a circular direction, brush one coat of SC-75 Orange a Peel over the center section of the hat in a circular direction.
Brush the pants with three coats of SC-32 Bluebeard use CB-106 Script Liner. Brush the knapsack with 3 coats of SC-25 Crackerjack Brown, use CB-106 Script Liner.
Belt and shoes with 2 coats of SC-15 Tuxedo, remove the Tuxedo from the belt buckle and brush with 2-3 coats of SC-24 Dandelion.
Eyes are painted one coat of SC-16 Cotton Tail, one coat of SC-32 Bluebeard, slightly lighten the Bluebeard with Cotton Tail.
Brush with two coats of S-2101 Clear use the fan brush.
Fire to cone 05/06.
Form
CD-1120 Gnome Jake Mold or MB-1120 Gnome Jake Bisque
Brush the skin areas with two slightly thinned coats of SC-20 Cashew Later, by thinning the coats it will avoid brush strokes for an even finish. Brush the cheeks with 1-2 coats of SC-2 Melon-Choly, blend the edges with SC-20 Cashew Later.
Brush the hair with thinned SC-60 Silver Lining, use a stiff brush on the side to remove the excess glaze so it shows in the detail of the hair.
Brush one coat of SC-25 Crackerjack to the basket, use a stiff wet brush on the side to remove excess gaze to show the detail in the basket.
Pencil in the apron on the skirt.
Brush the hat with two coats of SC-98 Slime Time brush in the circular direction of the hat, Brush the gnome’s dress with one coat of SC-98 Slime Time use a damp sponge to remove the excess glaze so it shows Slime Time in the detail and folds of the dress. Further float around the shadow areas of the dress and the bottom of the hat with SC-8 Just Froggy.
Brush the apron with 3 coats of SC-22 Carrot Top, outline and detail the edges with SG-404 Blue.
Clear glaze two coats with CB-604 Soft Fan.
Fire to cone 05/06
Form
CD1212 Gnome Hilda Mold or MB-1212 Gnome Hilda Bisque
In wet greenware, cut out the back of the duck, use the cut out piece of clay to slip attach to the inside of the duck to cover up the cast hole. Fire to cone 04.
Thin slightly FN-009 Black, pour to the inside, turn to coat, drain excess glaze.
Brush on three coats of FN-001 White to the outside of the duck planter with CB-604 Soft Fan.
For the background, use a combination of a paper doily or scrapbook die cut paper, I used a floral pattern, sponge sections of the paper with Stroke and Coat colors such as, SC-1 Pink A Boo, SC-24 Dandelion, SC-65 Peri-Twinkle, and SC-93 Honeydew List, sponge in separate sections, then press to the duck. Makes an interesting background.
Trace or draw on the simple flowers scattered around the duck’s body. Puddle coat with CB-106 Script Liner CG-989 Fruit Punch to the red flowers, CG-753 Sassy Orange to the yellow flowers, and CG-722 Seawind to the speckled blue flowers. Leave spaces for the centers or dot details for Stroke and Coat colors. A puddle coat is a heavy dropped coat of glaze and crystals from the bottom of the jar. If coats are applied thin, 2 coats are needed.
Thicken SC-15 Tuxedo with AC-310 Silkscreen Medium using a palette knife to the consistency of peanut butter, use the leaves shown from DSS-0111 Botanical-leaves with the shiny side down, rub the thickened Tuxedo with your finger over the screen to make the image, place as shown.
Use CB-110 Liner to outline and detail the centers of the flowers.
Brush the lock of hair with one coat of SC-24 Dandelion, and the tongue with SC-1 Pink A Boo. Eyes are SC-31 The Blues, pupil and outlines with SC-15 Tuxedo.
Thin SC-15 Tuxedo to faintly outline the wings and duck’s bill.
Brush one coat of EL-146 Rain loud to the cat, avoid the eyes and nose, with CB-604 Soft Fan.
Use CB-604 Soft Fan to stripe in a horizontal line EL-146 Rain Cloud, next stripe is EL-129 Slate, keep separate brushes, second color is brushed into the color applied first. My cat has four stripes of the Rain Cloud and four of the Slate.
Pour PC-602 White Cascade into AC-222 Bottle, use the plastic tip only to apply an uneven thick line of the cascade over the Rain Cloud stripe. I like to leave the White Cascade thicken up so it will apply thick and stay put. Let dry enough so that it will not mingle with the colors in the next step.
Apply two more heavy coats of the Rain Cloud and the Slate in the striped fashion as in step 3 apply over the White Cascade.
Remove glaze from the nose and the eyes, brush two coats of SC-16 Cotton Tail over the eyes with SC-15 Tuxedo for the pupil and the nose.
With a clean-up tool, remove the glaze from the mouth line and the line under the nose, brush the lines with Tuxedo.
Use CB-110 Liner to brush in whiskers, and hair lines all over the body. These lines will break up to give an interesting look.
Brush the inside with 2-3 coats of EL-129 Slate with the CB-604 Soft Fan.
Fire to 06. Firing to a hotter temp will affect the finished results.
From a palette, thin SC-60 Silver Lining and SC-35 Gray Hare to the consistency of milk, use both colors to brush over the entire rabbit, use Gray Hare in the shadow areas and Silver Lining in the highlight areas, don’t clean your brush between colors, use CB-604 Soft Fan.
Use the side of a wet soft fan to remove the greys from the top of the carved detail. A sponge can also be used, but take care not to wipe off too much of the grey.
Add a drop of SC-15 Tuxedo to the Gray Hare to darken, float to shade into the deep detail lines of the body parts.
Brush a thinned coat of SC-89 Cutie Pie Coral into the ears.
Remove the grey from the eyes, with a wet brush, apply the iris with CB-110 Liner, 2 cts, pupil with SC-15 Tuxedo and outline. Outline the mouth and under the nose with SC-15 Tuxedo.
Brush three coats of FN-221 Milk Glass White to the entire rabbit with CB-604 Soft Fan.
On 04 bisque, wipe dust or remove dust or debris from the inside.
Thin FN-009 Black slightly, pour to the inside, turn to coat, pour out the excess glaze.
Mix EL-133 Autumn and EL-132 Rust Red 1:1 in a separate container, brush on three coats to the frog’s body with the fan brush.
Brush on one coat of SC-8 Just Froggy with a fan brush, avoid the deep crevices of frog detail, brush on the second coat of SC-52 Toadily Green, receding from the Just Froggy color.
Brush the eyes with two coats of SC-16 Cotton Tail, pupil with SC-15 Tuxedo, outline with SC-15 Tuxedo. Remove the glaze from the mouth line, then apply Tuxedo to the smile. Shows up better this way.
The angel’s arms attach and are posable, so I recommend if you want her to hold the pot, purchase it first to you can get a good fit. Fire the greenware to 04.
Thin slightly SC-48 Camel Back brush on the entire angle, wipe back with a damp sponge to antique.
Brush two coats of SC-20 Cashew Later with CB-106 Script liner to the face and arms, brush SC-22 Carrot top to the cheeks, subdue the Carrot Top by brushing another coat of Cashew Later over the Carrot Top.
Brush the hair with two coats of SC-22 Carrot Top, use the liner brush.
Brush the top layer of the dress with two coats of SC-86 Old Lace, avoid deep crevices in the gown.
Brush the lower skirt and the flower hat with 2 coats of SC-11 Blue Yonder, the stem with SC-27 Sour Apple, the neck trim with 2 coats of SC-42 Butter Me Up.
Brush the wings with Old Lace, brush in a little SC-27 Sour Apple, and lightened Blue Yonder. (Lighten with old lace).
Use SC-14 Java Bean to float color into the shadow areas to deepen the shadow.
Thicken SC-15 Tuxedo with AC-310 Silkscreen Medium using a palette knife to the consistency of peanut butter. Use the lady bug screen with the shiny side down, on the flower hat, rub the thickened screening material over the screen. Brush two coats of SC-73 Candy Apple Red into the body of the lady bug with CB-110 Liner.
Screen the lower section of the dress with the various flower screens and lady bug screens, fill in with the various colors as shown.
Clear glaze if desired, I think it gives the piece a better finish.
In wet greenware, cut out the back for a planter, take the clay cut out from the back, and slip attach to the inside of the rabbit to cover the cast hole. Place a drain hole for drainage in the bottom. Fire to cone 04.
Brush on one heavy coat of CG-993 Lavender Sprigs with CB-604 Soft Fan.
In separate cups, pour EL-146 Rain Cloud, and EL-144 Dark Amethyst, add water so that it is the consistency of cream. Make sure to make enough thinned glaze.
Pour the glaze over the rabbit, turn the rabbit so they will mingle, cover the entire rabbit.
Pour SC-15 Tuxedo and SC-29 Blue Grass into the AC-220 Detailer Bottle, snip the tip just enough to see a hole. Squirt these colors over the wet glaze of the rabbit.
When dry, remove the glaze from the eyes, use a clean- up tool to remove from the mouth line and the line around the nose.
Brush the eyes with one coat of SC-16 Cotton Tail, iris is two coats of SC-60 Silver Lining, pupil is SC-15 Tuxedo, and outline. Outline mouth with SC-15 Tuxedo.
Pour the inside with thinned EL-144 Dark Amethyst.
Brush on one heavy coat of PC-601 Clear Cascade to the entire ball.
Brush on one coat of CG-2716 Celestial Blue to the ball with the fan brush.
Brush on two coats of CG-974 Bloomin’ Blue but on the second coat pat with PC-602 White Cascade and the Bloomin’ Blue, only small amounts of the White Cascade should be showing. Use the fan brush.
Fill an AC-220 Detailer Bottle with SC-12 Moody Blue, snip the top so a small hole shows, squirt the ball with the Moody blue in random lines.
Clean the greenware with a Clean Up Tool. Sand any imperfections with the Green Grit Cloth. Remove any dust and debris with a moistened Synthetic Sponge.
It is best to draw some of the feathers in using a pencil to get the direction, size and layering of the feathers before starting the carving. Using a Scraffito Tool to incise the center vein on each feather. Then incise the outer edge of the feathers. Use a old pen to scratch in the detail lines in the feathers starting from the center vein to the outer edge of each feather. Repeat these steps over the entire ware. Wipe the piece down with a dry sponge to remove any carvings debris.
Fire to Shelf Cone 04.
Using CB-404 Pointed Round to apply 3 coats of SC-41 Butter Me Up to the beak, feet and iris of the eye. Paint in the pupil with SC-15 Tuxedo using CB-220 Detail Liner.
Use a corner of the synthetic Sponge tipped with SC-5 Tiger Tail and sponge around the outer edges of the eye markings. Color should be strongest along the edge and fading inwards to the eye.
Using CB-604 Soft Fan loaded with water, tip one edge of the brush with SC-34 Down to Earth and shade the edges of the head, around the eyes and beak, along the top of the wings, crevices of the wing separations and above the feet. Use water to fade/thin out the color over the detail of the ware.
Apply 2 coats of SG-703 Spectra-clear Autumn over the eye markings using CB-404 Pointed Round. Keep the specks off the iris and pupil of the eyes. Concentrate the specks along the outer edge of the eye markings.
Apply 3 coats of S-203 Mud Puddle Brown to the remaining portions of the ware using CB-604 Soft Fan.
Make a hole in the bottom if intended use if a planter for drainage. Fire greenware to cone 04.
Thin slightly FN-009 Black, pour to the inside, turn to coat, pour out the excess glaze, drain.
Brush on one coat of CG-995 Foggy Mist with CB-604 Soft Fan to the dog, avoid the eyes.
Use CB-602 Soft Fan or CB-604 Soft Fan (using the side of this brush as it is too wide) brush on EL-125 Sahara Sands heavily in a horizontal stripe, about an inch wide, next stripe is EL-213 Painted Desert, overlap the first stripe, continue on the head to the feet with the striping.
Pour PC-602 White Cascade into a AC-222 Bottle, use the plastic tip only to apply an uneven thick line of the cascade over the Sahara Sands stripe. I like to let the White Cascade thicken up so it will apply thick and stay put. Let dry so that it will not mingle the colors in the next step.
Apply two more heavy coats of the Sahara Sands and Painted Desert as in step 4. Apply over the White Cascade.
Remove the glaze from the nose, eyes, and the mouth line (with a clean-up tool).
Use a sponge on a stick to apply SC-15 Tuxedo to the ST-133 Woodgrain Stamp, press to the body and head of the dog. These lines will break up and look liked fur.
Brush the eyes with 2 coats of SC-16 Cotton Tail, iris with 2 coats of SC-14 Java Bean, pupil, nose and outline eyes and mouth with SC-15 Tuxedo.
Begin with properly fired cone 04 bisque. Moisten a sponge and wipe bisque to remove any dust.
Put the AC-230 Clay Carbon Paper over the tray. Trace the pattern with the pencil.
Using the Detail Liner with SG-401 Black, SG-403 Red and SG-405 Green, apply 1 coat over the lettering as shown.
Using the Script Liner with SG-406 Brown, apply 1 coat the inner edge of the cookies. Dip the brush in water and pull the color to the center of the cookies. This will create a watercolor look.
Using the Script Liner with SG-408 Orange, apply 1 coat to the carrot. Using the Detail Liner with SG-405 Green apply 1 coat to the top of the carrot.
Using the Detail Liner with SG-401 Black, outline the cookies and carrot. Add chocolate chips to the cookies.
Using SG-403 Red and SG-405 Green, make a line of dots going around the border of the tray.
Using the Soft Fan with SC-74 Hot Tamale, apply 3 coats to the back of the tray.
Using the Soft Fan with S-2101 Clear Brushing Glaze, apply 2 coats to the front of the tray. Or dip into NT-CLR Clear Dipping Glaze.
Fire to cone 06
Form
MB-882 Rectangle Tray Mold or CD-882 Rectangle Tray Mold
Colors
SC-74 Hot Tamale
SG-401 Black
SG-403 Red
SG-405 Green
SG-406 Brown
SG-408 Orange
S-2101 Clear Brushing or NT-CLR Clear Dipping Glaze
Cast and poke holes in the tree for the lights, hole in the base for cord, and light socket, (used a large socket with a tube bulb, hole size is approx… ¼ inch for the threaded rod.
Clean and fire to cone 04.
Brush the over the detail in the base with one coat of slightly thinned SC-89 Cutie Pie Coral, wipe back with a damp sponge so the color stays in the detail/
Brush on three coats of FN-209 Floral Pink over the tree and entire base.
Snip the top of AC-222 Plastic bottle to make the opening larger, fill with SG-302 Snowfall, squirt the on the edges of all the branches, squirt on the hills on the base, and roof tops, use a brush to drag the edges of the snowfall over sections of the roof top and the hills Use a small brush to apply to the trees on the base.
Make sure the holes are clean or will still fit the flame bulbs before firing.
Fire to cone 05/06.
Use a flexible tape, to tape off the trim edge of the tree, brush the trim with one coat of fired Gold Luster, and make sure to use a new brush, clean the brush in Essence. Mark the brush for gold only so not to contaminate with other lusters.
Fire to cone 018.
Brush on one coat of Luster or Mother of Pearl, over all the tree including the snowfall and the base fire to cone 020. Use a soft full brush for this, mark it for Luster, clean in essence that is only for this product so not to contaminate the brush and product.
Lime Green Tree
Cast and poke holes in the tree for the lights, hole in the base for the cord, and light socket, (used a large socket with a tube bulb, hole size is approx… ¼ inch for the threaded rod.
Clean and fire to cone 04.
Brush over the detail in the base with one coat of FN-231 Clearly Jade, wipe back with a damp sponge so the color stays in the detail.
Brush on three coats of FN-224 Key Lime over the tree and entire base.
Snip the top of AC-222 Plastic bottle to make the opening larger, fill with SG-302 Snowfall, squirt the on the edges of all the branches, squirt on the hills on the base, and rooftops, use a brush to drag the edges of the snowfall over sections of the rooftop and the hills. Use a small brush to apply to the trees on the base.
Make sure the holes will still fit the flame bulbs before firing.
Fire to cone 05/06.
Use a flexible tape, to tape off the trim edge of the tree, brush the trim with one coat of fired Gold Luster, and make sure to use a new brush, clean the brush in Essence. Mark the brush for gold only so as not to contaminate with other lusters.
Fire to cone 018
Brush on one coat of Luster or Mother of Pearl, overall the tree including the snowfall and the base fire to cone 020. Use a soft full brush for this, mark it for Luster, clean in essence that is only for this product so as not to contaminate the brush and product.
Seafoam Tree
Cast and poke holes in the tree for the lights, hole in the base for the cord, and light socket, (used a large socket with a tube bulb, hole size is approx… ¼ inch for the threaded rod.
Clean and fire to cone 04.
Brush over the detail in the base with one coat of slightly thinned SC-29 Blue Grass, wipe back with a damp sponge so the color stays in the detail.
Brush on three coats of CG-997 Seafoam over the tree and entire base.
Snip the top of AC-222 Plastic bottle to make the opening larger, fill with SG-302 Snowfall, squirt the on the edges of all the branches, squirt on the hills on the base, and rooftops, use a brush to drag the edges of the snowfall over sections of the rooftop and the hills. Use a small brush to apply to the trees on the base.
Make sure the holes will still fit the flame bulbs before firing.
Fire to cone 05/06.
Use a flexible tape, to tape off the trim edge of the tree, brush the trim with one coat of fired Gold Luster, and make sure to use a new brush, clean the brush in Essence. Mark the brush for gold only so as not to contaminate with other lusters.
Fire to cone 018. Brush on one coat of Luster or Mother of Pearl, overall the tree including the snowfall and the base fire to cone 020. Use a soft full brush for this, mark it for Luster, clean in essence that is only for this product as not to contaminate the brush and product.
Orange Tree
Cast and poke holes in the tree for the lights, hole in the base for the cord, and light socket, (used a large socket with a tube bulb, hole size is approx… ¼ inch for the threaded rod.
Clean and fire to cone 04.
Brush the over the detail in the base with one coat of slightly thinned SC-50 Orange ya Happy, wipe back with a damp sponge so the color stays in the detail.
Brush on three coats of FN-207 Orange Slice over the tree and entire base.
Snip the top of AC-222 Plastic bottle to make the opening larger, fill with SG-302 Snowfall, squirt the on the edges of all the branches, squirt on the hills on the base, and roof tops, use a brush to drag the edges of the snowfall over sections of the roof top and the hills. Use a small brush to apply to the trees on the base.
Make sure the holes will still fit the flame bulbs before firing.
Fire to cone 05/06.
Use a flexible tape, to tape off the trim edge of the tree, brush the trim with one coat of fired Gold Luster, and make sure to use a new brush, clean the brush in Essence. Mark the brush for gold only so as not to contaminate with other lusters.
Fire to cone 018.
Brush on one coat of Luster or Mother of Pearl, overall the tree including the snowfall and the base fire to cone 020. Use a soft full brush for this, mark it for Luster, clean in essence that is only for this product so as not to contaminate the brush and product.
Begin with properly fired cone 04 bisque. Moisten a sponge and wipe bisque to remove any dust.
On a palette, thin slightly SG-401 Black Designer Liner brush with the fan over the claws and stump, shade around the eyes, nose, head, and wings where they attach to the body. Wipe back the excess with a damp sponge to give it shadow.
Use the tip on the SG-401 Black Designer Liner to outline the facets around the eyes, nose, and forehead.
Use the SG-401 Black Designer Liner with the sponge on a stick to stamp with the ST-133 Wood Grain Stamp on the log.
Brush three coats of EL-135 Rare Earth on the log base use the fan brush.
Brush the claws with 2 coats of SC-41 Brown Cow, shade again with SC-15 Tuxedo, do darken and avoid using a clear glaze to gloss the SG-401 Black Designer Liner.
Brush the forehead and the large section around the eyes of the owl with 2 coats of EL-122 Spotted Walnut, avoid using many crystals as it will run. Brush the body of the owl with two coats of the bottom sections, brush the third coat two inches from the bottom as the color will move. Avoid using too many crystals near the bottom third of the owl.
Brush the eye with two coats of SC-97 Cant-elope, and the pupil with SC-15 Tuxedo.
Fire to cone 06.
Form
MB-1477 Faceted Owl Bisque or CD1477 Faceted Owl Mold
Cut the bottom of the slab straight across so your plaque can stand or be hung.
Draw a bonsai tree on paper (no larger than 7 inches in any direction).
Cut out the tree using x-acto knife or scissors (be sure to keep the negative of the cutout).
Place the positive cutout on the slab where you want your tree and then place the negative cutout on the clay and smooth it with a dry sponge so there are no bumps.
Remove the positive cut out.
Using X-10081 tools, carve out where the trunk and limbs will be.
Using a ballpoint pen, lightly tap to make indentations on the tree top.
Remove the paper and clean up edges.
Dry and bisque fire to cone 04.
Glazing:
Mask off the tree, roots, and leaves with masking tape, using an x-acto knife to make the edges crisp.
Paint 3 coats of a sunset in an Ombre style with the Stroke & Coat® colors.
Remove tape and paint 3 coats using EL-142 Grass on the leaves using a round brush and stippling technique to push the glaze into the small indentations of the leaves.
Paint 3 coats with EL-145 Ginger Root on the branches, trunk, and roots of the tree.
Begin with properly fired shelf cone 04 Bisque. Moisten a clean Sponge and wipe Bisque to remove any dust.
With a pencil and AC-230 Clay Carbon Paper trace the frog pattern onto the canvas.
With a Bright Colored Fine Point Water Based Marker, re-trace the pattern. This will aid in seeing the pattern after it is stamped
Using a DRY sponge-on-a-stick load the sponge with SC-15 Tuxedo. Tap the SC-15 Tuxedo onto the ST-367 Leafy Border Stamp then press the stamp gently onto the canvas over the pattern. Continue stamping around the piece. Allow to dry.
To create a dimensional outline of the pattern, prepare SA-002 Black then outline the pattern with the Sa-002 Black.
To prepare the Crystal glaze start by shaking the jar and stirring the crystals from the bottom of the jar then place on the lid and shake the jar again.
Pour some of the glaze onto a palette, using a CB-106 #6 Script Liner, apply a puddled coat of CG-795 Yadro Print to the tree trunk.
Using a CB-106 #6 Script Liner, apply a puddled coat of CG-982 Mixed Melon or CG-9893 Koi Pond to the frog body except the eyes and mouth area.
Using a CB-106 #6 Script Liner, drop and fill a coat of SC-74 Hot Tamale to the eyes.
Using a CB-106 #6 Script Liner, apply 2 Coats of FN-203 Dry Champagne to the background of the canvas. Apply up to the SA-002 Black, but not over the frog or tree branch. Allow to dry.
Pour CD-1366 Bottle Cap mold ¼” thick. Refer to casting instructions.
Once it is firm enough to handle, use the sponge to smooth down any casting lines.
Fire to cone 04.
Using the Soft Fan with SC-37 Ivory Tower, apply 2 coats to the front and sides of the bottle cap. Allow glaze to dry between coats.
Free-hand or print letters and saying in font of choice. Use the scissors to cut out the lettering, tiki cups and outline of the drink from the pattern. Dip them in water and stick them to the front of the bottle cap. Place as pictured.
Using the Soft Fan with SC-37 Ivory Tower, apply 1 coat to the front and sides of the bottle cap. If the patterns are coming up, rewet them with a damp sponge.
After the glaze is completely dry, use MC-001 6mm Low Track Masking Tape to make 4 vertical lines going down the front of the bottle cap. Try to space them evenly. Now make a horizontal line through each of the 5 vertical sections. Make them staggered.
Squeeze a small amount of SC-10 Teal Next Time onto the palette. Thin with water. Using the Soft Fan, apply a very light coat over the front of the bottle cap.
Squeeze 1 TBS of SC-10 Teal Next Time onto the palette. Take the ST-133 Wood Grain Stamp and place it design-side up. Take the sponge on a stick and dab it into the glaze. Blot off any excess onto the bare portion of the palette, then sponge the stamp. Take the stamp and press it onto one of the sections created by the tape. Repeat until all sections have been stamped.
Use the X-ACTO knife to peel up all of the paper patterns. Do this before the glaze has completely dried.
Using the Script Liner with SC-97 Cant-elope, SC-88 Tu Tu Tango and SC-6 Sunkissed, apply 3 coats to the lettering as shown. Allow glaze to dry between coats.
Using the Script Liner with SC-6 Sunkissed, SC-75 Orange-A-Peel and SC-13 Grapel, apply 3 coats to the tiki heads as shown. Allow glaze to dry between coats.
Use the drink pattern with the AC-230 Clay Carbon Paper to trace the details of the drink. Using the Detail Liner with SC-88 Tu Tu Tango, SC-6 Sunkissed, SC-26 Green Thumb and SC-37 Ivory Tower, apply 3 coats to the details of the drink as pictured. Using the Script Liner with SC-48 Camel Back, apply 3 coats to the cup. Allow glaze to dry between coats.
On the DSS-0147 Island Screen, locate the tiki head. Draw an outline around it in permanent marker. Cut it out with excess screen around the edges.
Squeeze about 2 TBS of SC-15 Tuxedo onto the palette. Add a pinch of AC-310 Silkscreen Medium. Mix with a palette knife until it becomes the consistency of peanut butter. You may need to add more silkscreen medium or glaze.
Place the tiki head over each of the 3 previously glazed locations. While holding it firmly in place, take a small amount of premixed silkscreen medium and gently rub in circles starting in the center and working outward. Repeat for the 2 other tiki heads.
Using the Detail Liner with SC-15 Tuxedo, outline the lettering and drink.
Using the Script Liner with SC-6 Sunkissed, SC-75 Orange-A-Peel and SC-13 Grapel, apply 3 coats to the indents in the side of the bottle cap. Use the Detail Liner with SC-15 Tuxedo to outline the indents.
Pour the skinny gourd mold 1/4′ thick, cut out the bird hole and the perch hole.
The gourd needs to be leather hard to sgraffito.
Cut out the shape of the snake and largest cactus from the pattern.
Place the pattern on the gourd to trace the design. Start with the sun around the bird hole. Using a pint lid, trace around the hole for the sun. Lay the cut-out snake around the sun and largest cactus then trace around the snake. Trace or pencil in the shapes to fill in space on the gourd.
Artist choice on the colors used on the designs. Using the CB-106 Script Liner apply three coats of underglaze color to all the shapes. Detail the snakes with dots or stripes with one coat of contrasting color. Use the curved side of the cleanup tool to remove color from the cactus for the spikes.
Using the CB-106 Script Liner fill in the remaining spaces of the gourd with one heavy coat of color.
Use one of the mini ribbon tools from Xiem 10291 Mini Ribbon Sculpting Tools. One of the tools may be too large for this application.
Leave a line of the Kings Blue around the shapes, follow the direction of the shape with the tool, to carve away lines in the greenware.
Let dry, fire to cone 04.
Apply two coats of S-2101 Clear using CB-604 Soft Fan.
Cast in a low fire body clay, while wet cut out slices of the tree as shown in the picture. Make a grove in the base to allow the cord to fit so the tree will stand flat. Clean with a wet brush to smooth the cutouts, remove the seamline while wet.
Fire to 04.
Thin SC-98 Slime Time with water so it is a pouring consistency, pour to the inside of the tree, make sure all the surface is covered, brush out the drips on the outside of the tree.
Brush three coats of SC-98 Slime Time to the outside of the tree including the base with the fan brush
Stir and shake SG-704 Peppermint well, brush one coat to the outside of the tree using the fan brush.
Fire to 05/06.
Bulbs were purchased at Hobby Lobby, wire to the tree on the back so they don’t fall to the bottom. Pier One sells clear bubble lights that would also look great in the tree
Place clay in between the dowels and roll the clay to ¼” slab. The slab should be wide and long enough to extend slightly beyond the width and length of CD777 Oval Slump & Hump Mold – the slump portion.
Drape the slab over the mold and lightly pounce a sandbag on the slab until it takes the shape of the mold. Trim away the excess clay using the needle tool.
Let the form rest for about an hour until it can be handled without losing its shape.
Create a second slab for the mane. Texture the clay with various stamps and mats listed in Decorating Accessories.
Use the needle tool to cut various sizes of circles from this textured slab. You can use paper templates made using a paper punch or things like bottle caps, jar lids, shot glasses, etc.
Remove the oval shape from the mold, add clay to build a nose, muzzle, ears and mouth. Roll two balls the same size, press flat, score and wet area to fix eyes in place.
Score clay on the flange around the head, wet, press in the textured circles, layering sizes to keep the look random.
Use the needle tool to poke holes in the muzzle for copper wire whiskers.
When dry, fire to cone 04.
Glazing:
Lion’s face is done with a series of washes. Thin slightly SC-42 Butter Me Up brush two coats to the face with CB-604 #4Soft Fan.
Use CB-106 #6 Script Liner to shade SC-5 Tiger Tail around the shadow areas, sides of the nose, muzzle, under eyes, and in the ears, do additional shading with SC-25 Crackerjack Brown. Brush parts of the face with SC-24 Dandelion to brighten.
Tip of nose is two coats of SC-15 Tuxedo, float Tuxedo around the top of the eyes and around the head. Use CB-110 #10/0 Mini Liner to outline the mouth and muzzle.
Use the various colors in the product box to brush two thinned coats of color over the textured circle shapes. Brush various circle shapes with S-2726 Cheetah use CB-106 #6 Script Liner, two coats.
Shade SC-15 Tuxedo under the circle shapes for depth.
Brush on one coat of S-2101 Crystal Clear Brushing with CB-604 #4 Soft Fan, make sure to clean out the glaze from the holes in the muzzle.
Fire to cone 06/05.
Cut lengths of copper wire glue in the holes of the muzzle.
When leather hard, remove the piece from the mold, Gently clean edges with a sponge, and when bone dry, bisque fire to shelf cone 04.
Pour CD-1404 Gallon Paint Can and CD-1405 Quart Paint Can molds ¼” thick. Refer to casting instructions.
Once it is firm enough to handle, use the sponge to smooth down any casting lines.
Place the patterns on the cans and trace with the pencil.
Use the X-ACTO knife to cut out the faces. Smooth with a damp sponge.
Use the needle tool to a poke hole where the handles attach.
Rip the cotton fabric into thin strips. Around ½”-1” wide and 12” long. They do not need to be exact.
Dip each strip into the slip and press onto the paint cans. Smooth them down with your fingers. Crisscross them to look like they are wrapping around the cans.
Fire to cone 04.
Use MC-002 12mm Low Track Masking Tape to tape over the eyes, mouth and handle holes.
Pour about 1 cup of FN-009 Black into the disposable cup. Thin with water. Pour into the paint cans and rotate to completely cover the inside. Drain the excess glaze.
Remove the tape.
Pour a small amount of FN-009 Black onto the palette. Thin with water. Using the Soft Fan, apply a thin coat to the faces. Use a damp sponge to antique.
Using the Script Liner with SC-86 Old Lace, apply 1 thick coat over the strips of fabric. Use the Script Liner with SC-92 Café Ole to shade the recessed areas around the strips.
Using the Script Liner with FN-009 Black, apply 3 coats to the knobs where the handles insert and to the upper rims. Use the Soft Fan to apply 3 coats to the bottoms. Allow glaze to dry between coats.
Using the Soft Fan with S-2101 Clear Brushing Glaze apply 2 coats over the outside of the paint cans. Or dip into NT-CLR Clear Dipping Glaze.
Fire to cone 06.
Straighten out the metal coat hanger. Bend into the shape of a handle. Cut off excess with the wire cutters. Insert into the holes.
Form
CD-1404 Gallon Paint Can
CD-1405 Quart Paint Can
Colors
FN-009 Black
NT-CLR Clear Dipping Glaze or S-2101 Clear Brushing Glaze
In wet greenware, use the circle template to hold against the back of the frog, use a X-ACTO Knife to cut out the holes.
Clean and fire to cone 04 bisque.
Tape over the holes, thin slightly FN-004 Red pour to the inside of the frog, move around to coat, pour out the excess glaze. Use a damp sponge to clean up excess glaze on the outside of the frog.
Pencil flowers on the elbows, knees, nose, and petals on the toes, pencil a line on the brows over the eyes.
Use the various Designer Liner colors to make dot patterns, start around the cut out circles on the back, dot SG-408 Orange around the outside edges, SG-410 Bright Blue on the inside circles, small SG-401 Black dots around each of the circles.
SG-404 Blue Dots on the body of the frog, add in SG-410 Bright Blue dots, going to SG-409 Bright Green dots on the feet.
Outline all the flower’s petals with small SG-401 Black dots. Refer to photo for colors.
Eyes are a cluster of SG-409 Bright Green and SG-405 Green dots, with dots of SG-401 Black. Outline the eyes with SG-401 Black use CB-110 Liner.
Brush on two coats of S-2101 Clear with CB-604 Soft Fan.
Roll out clay 1/2″ thick, lay clay over the CD879 Mask Slump Mold, use a sandbag to pounce over the clay to fill the mold, use a damp sponge to further mold the features of the mask. Use a needle tool to cut the excess clay from the mold.
Leave the clay in the mold till it is dry enough to hold its shape.
Roll out clay approx 1/4″ thick, use a rolling pin to texture the clay with the various texture tools listed in Decorating Accessories.
Cut various circle shapes out of the clay with the circle cutters.
Remove the mask from the mold, enhance the nose with clay to your liking.
Attach the various circle shapes to the forehead area of the mask, score with the needle tool, wet with water, press clay to scored area.
Let dry, fire to cone 04.
Glazing:
Brush the various colors from the colors listed in Colors to the circle shapes, thin color, and brush on two coats. Lightly remove some of the color from the shapes with a damp sponge.
Use CB-106 #6 Script liner to shade SC-15 Tuxedo around the eyes, nose, mouth, and forehead. Use SG-401 Designer Liner Black to outline all the round shapes on the head. While SG-401 Designer Liner Black is wet pull the color into the shape and around the edges with CB-310 #10 Flat Shader.
Thin SC-74 Hot Tamale, use CB-106 #6 Script Liner to brush in the lips. Eyes are two coats of SC-11 Blue Yonder, SC-15 Tuxedo pupil and outline.
Thicken SC-15 Tuxedo with AC-310 Silkscreen Medium using a palette knife to the consistency of peanut butter. Use the various screens from DSS-0143 Stylized 3- Boho, with the shiny side down, rub the thickened mixture over the screen. Gently clean with water.
When dry, brush with two coats of S-2101 Crystal Clear Brushing use CB-604 #4 Soft Fan.
1. Begin with properly fired cone 04 bisque. Moisten a sponge and wipe bisque to remove any dust.
2. Thin slightly FN-037 Chartreuse, pour to the inside, move to cover pour out the excess glaze. Wipe off the drips from the outside of the house.
3. Brush the roof with 2-3 Coats of SC-26 Green Thumb using CB-604 Soft Fan, keep the brush strokes in one direction, use water with your brush to spread the glaze evenly. Brush the body of the house with 2-3 coats of SC-55 Yell About It, and the door with SC-27 Sour Apple. Outline the door and roof line with SC-15 Tuxedo.
4. Let the roof color dry before this step. Punch out the rectangle shapes from card stock. Cut a border around the negative space of the rectangle. Dip in water, place to the roof, press in place. Use a plastic card to fill the space with SG-501 Sculpture Medium, scrape across the open rectangle to flat brick shape, pull off the paper. Repeat on all sides of the roof.
Begin with properly fired shelf cone 04 bisque. Moisten a clean sponge and wipe bisque to remove any dust.
Apply three coats of FN-004 Red to the back of the plate using the CB-604 #4 Soft Fan brush.
Using the AC-230 Clay Carbon Paper and a pencil trace the pattern onto the face of the plate.
Use the SG-401 Designer Liner Black to go over the traced lines.
Use the CB-110 #10/0 Mini Liner to fill in the blocks of SC-15 Tuxedo on the portrait.
Use the same brush and glaze watered down to create the gray hues of the face. Use the image for reference.
Use SC-43 Lettuce Alone and SC-78 Lime Light to puddle in the glaze using the CB-110 #10/0 Mini Liner to the leaves.
Use SC-6 Sunkissed, SC-43 Lettuce Alone, SC-74 Hot Tamale, and SC-78 Lime Light and the CB-110 #10/0 Mini Liner to glaze the butterflies. Outline the wings with one color then when the glaze is still damp add another to blend the colors as you go.
Once the glazes are completely dry apply two coats of S-2101 Crystal Clear Brushing Glaze to the front of the plate using the CB-604 #4 Soft Fan brush.
1. In wet greenware, cut out the windows, and make a mouse hole in the back for the tea light insertion. Clean and fire to cone 04.
2. Thin slightly FN-037 Chartreuse, pour to the inside move to cover, pour out the excess glaze, wipe off the glaze that drips to the outside of the house.
3. Brush the roof of the house with 2-3 coats of SC-11 Blue Yonder with the CB-604 Soft Fan, keep the brush strokes in one direction, use water to spread the glaze evenly. Brush in the same manner SC-23 Jack O’ Lantern to the body of the house and SC-27 Sour Apple to the door.
4. Wait till the glaze on the roof is dry before this step. Punch out the hex shapes from thin card stock. Cut a border around the open hex shape about 1/2 inch.
5. Wet the shape, press to the roof of the house in a pattern or just randomly. Fill the open hex with SG-501 Sculpture Medium, apply with a card so you can scrape across the cut shape, pull off the hex shape,
6. Outline the door and the roof line with SC-32 Bluebeard.
1. In wet greenware, cut out the pumpkin faces, clean and fire to cone 04.
2. Tape over the cut-outs on the cans, thin slightly FN-037 Chartreuse, pour to the inside, turn to coat, pour out the excess glaze. Drain, remove the tape, clean off excess glaze from the front of the can.
3 Fire to cone 05/06.
4. Use a flat soft brush to brush on SS-210 Orange, streaking in SS-247 Bright Yellow, occasionally, will need two coats. Let dry.
5. Thicken SS-138 Black with AC-310 Silkscreen Medium using a palette knife, sprinkle in the Medium a little at a time, then mix. Should be a thick paste. Test before using on the can. Use the small crow from DSS-0114 Creepy with the shiny side down, rub the thickened black over the crow screen, remove and gently wash in warm water.
6. Brush on SS-81 Shimmering Silver to the cans rims and bottom edge to make it look like metal.
7. Brush on the gloss sealer or spray with a gloss sealer.
8. Handles are made from hangers, use a wire cutter to cut the straight side of the hanger, bend it around something circular, use pliers to bend the edges to fit into the cans side holes. Brush the handles with the SS-138 Black and gloss seal.
1. Pour CD-002 Woven Lantern, CD-1362 Garden Bird (Looking Right) and CD-1363 Harden Bird (Looking Left) molds 1/4″ thick. Refer to casting instructions.
2. Once they are firm enough to handle, use the sponge and water to smooth down any casting lines in the greenware. Cut the holes out of the lantern using the X-ACTO knife. Smooth down the edges with the sponge.
3. Fire to cone 04.
4. Squeeze around 1 TBS of SG-401 Black onto the palette. Thin with water. Use the soft fan to brush over the details on each piece. Wet the sponge and wipe over each piece to remove the excess.
5. Using the Detail Liner with SG-401 Black, outline the eyes on the birds.
6. Using the Soft Fan with CC-101 Transparent, apply 1 coat to each bird and over the center section of the lantern. Allow glaze to dry.
7. Using the Soft Fan with CC-102 White, apply 2 coats to each bird and over the center section of the lantern. Allow glaze to dry between coats.
8. Using the Soft Fan with EL-119 Burnished Steel, apply 3 coats to the top and bottom sections of the lantern. Allow glaze to dry between coats.
9. Fire to cone 06.
10. The day after firing, wash the crackle portion of each piece with SS-138 Black and wipe off with a paper towel.
For the right depth of clay, lay out canvas fabric on table and place 1/4″ slats on the left and right side of the canvas fabric. Place a piece of moist clay about 4 lbs. in size in the middle of the fabric. Using a rolling pin, roll out the clay to the size desired. The slats are used as a guide to keep your clay level and at the same thickness. Make sure the edges of the rolling pin hit the 1/4″ slats.
Using a fettling knife, cut out a 17″ x 10″ rectangle. With the rest of the slab, trace the pattern provided for the row boat the the lighthouse and cut them out.
For the lighthouse cut outs, take the MT-007 Divots Mat and apply texture to all of the pieces using the rolling pin. Be sure not to push too hard causing the mat to move when the clay gets compressed.
Wrap the large textured slab around the cone form; slip and score the seam. You may want to wrap the form in newspaper or apply cornstarch so it will release easier. Once attached, lightly trace 2 lines in a spiral up the lighthouse to distinguish the different areas.
Using the XST 03 stylus tool, fill in the spaces between the dots on one of the swirls.
Attach the top and details via slipping and scoring.
Let the clay set up until the clay can support itself, then remove the supporting form.
Align the 2 outside pieces of the boat and attach by slipping a scoring to a coil down the center on the outside. Blend the inside so it is smooth.
For the texture on the outside of the boat, take a flat ended carving tool and carve out texture.
Attach the 2 parts of the paddle by slipping and scoring.
Let all of the pieces dry slowly. Once they are completely dry fire them to bisque.
Glazing:
Using AC-230 Clay Carbon Paper, transfer the pattern to the slab.
You will need to dedicate an AC-219 Designer Bottle w/ Writer Tip to each of the following colors: SC-2 Melon-choly, SC-5 Tiger Tail, SC-16 Cotton Tail, SC-22 Carrot Top, SC-24 Dandelion, SC-33 Fruit of the Vine.
Begin with the lightest parts of the water using the SC-16 Cotton Tail bottle. Then, add some SC-76 Cara-bein Blue to the bottle to make a light blue. Add the dots to the water for that. Continue this process 3 or 4 times, until you have a very close match to the Cara-bein Blue.
Repeat this process with the beach area, but begin with the SC-5 Tiger Tail bottle and add SC-16 Cotton Tail to the bottle to make it lighter.
For the sky, begin around the edge with SC-33 Fruit of the Vine and work your way towards the middle; integrating the colors into SC-22 Carrot Top, SC-2 Melon-choly, SC-75 Orange-A-Peel, then SC-24 Dandelion. It doesn’t need to be perfect row of blended colors. You may need to spread some colors out more the make the transitions smoother.
Add some of the sky colors to the reflection on the water.
Let the dots dry completely then add 2 coats of S-2101 Crystal Clear Brushing.
Apply 1 coat of SC-74 Hot Tamale to one of the swirls on the lighthouse and SC-60 Silver Lining to the other.
Carefully antique each color individually using a sponge.
Apply 1 coat of SC-15 Tuxedo to the roof and details of the lighthouse and antique those as well.
Let dry and apply 2 coats of S-2101 Crystal Clear Brushing.
Apply 1 coat of SC-34 Down to Earth to the outside of the boat and antique it once it’s dry.
Add a thinned coat of SC-14 Java Bean, let dry, then add 1 coat of S-2101 Crystal Clear Brushing.
Using the back end of a brush, apply dots of SC-14 Java Bean, SC-25 Crackerjack Brown, SC-34 Down to Earth, and SC-41 Brown Cow to the inside of the boat.
With CB-310 Shader brush on slightly thinned SS-135 White to the apron, nose with SS-127 Medium Portrait, brush SS-331 Medium Blue to the dress, brush the hair with slightly thinned SS-3 Honey Toast, hat with SS-210 Orange.
Thin SS-331 Blue like water, use CB-406 Pointed Round to brush into the folds of the apron and shade the sides of the apron. Dry brush the dress with SS-331 Medium Blue with SS-135 White in the brush. Shade with SS-335 Rich Blue in the creases and shadow areas, such as where the sleeve meets the apron and hair, under the apron, under the nose, etc. buttons are SS-210 Orange.
Dry brush the hat with SS-210 Orange with SS-135 White in your brush to lighten and highlight, shade with SS-92 Royal Fuchsia, in the creases, seam and under the hat. Brush the gloves with Royal Fuchsia, dry brush with White in the Fuchsia brush.
Dry brush the hair with SS-3 Honey Toast with SS-111 Bright Yellow in the brush, add White to the brush to highlight. Hair ties are Royal Fuchsia.
Brush a coat of SS-57 Accent Green to the shoes, dry brush with SS-19 Country Sage.
Thicken SS-138 Black with AC-310 Silkscreen Medium using a palette knife to the consistency of a thick paste. With the shiny side down, rub the thick Black over the ladybug screen from DSS-0113 Bugs to the hat. Brush in SS-176 Christmas Red around the black spots on the ladybug.
Outline with CB-110 Liner and SS-138 Black around the hair, the hat, and the dress. Brush a coat of AC-501 Gloss Sealer over the ladybug and the shoes.
Sven Gnome
Brush the beard with thinned SS-135 White, nose with SS-127 Medium Portrait, hat with SS-331 Medium Blue, jacket with SS-376 Limeburst, pants with SS-212 Light Umber, gloves with SS-210 Orange, use a soft brush to apply.
Thin SS-331 Medium Blue like water with the CB-406 Pointed Round brush into the deep creases of the beard, further shade the beard with thinned SS-130 Medium Gray, and SS-138 Black, dry brush with SS-135 White.
Dry brush the jacket with SS-376 Limeburst with SS-111 Brightest Yellow in the brush, add White to further highlight.
Dry brush the hat with SS-331 Medium Blue with white in the brush, highlight with more white in the brush on the edges of the hat. Shade with SS-335 Rich Blue in the crease and hat seam with the round brush or flat shader.
Shade the gloves and nose with SS-212 Light Umber, shade the pants with SS-138 Black, use the flat or pointed round brush.
Dry brush the shoes with SS-335 Rich Blue. Follow the directions in step 7 above for the ladybug.
Use CB-110 Liner to outline around the nose, gloves, beard, and hat with SS-135 Black.
For the right depth of clay, lay out canvas fabric on table and place ¼ inch slats on the left and right side of the canvas fabric. Place a piece of moist clay about 2 lbs. in size, in the middle of the fabric. Using a rolling pin, roll out the clay to the size desired. The slats are used as a guide to keep your clay level and at the same evenness. Make sure the edges of the rolling pin hit the ¼ inch slats.
Take a marble size piece of clay and place it in the individual portion cup and add about 3 tablespoon of water. Mix this up with your fingers to make a slurry. This will be the “glue” to attach all the pieces together.
Using a sandbag press the clay into the slump mold making sure the clay fits snugly. Trim around edges to mold. Remove clay from mold when firm enough to hold its shape. Make two of these. This base will be used for the Sherlock Holmes hat and the beanie hat.
For the Sherlock Holmes hat, use the remainder of the slabs to cut out four half moon shapes and attach to the form using the clay slurry and scoring technique. Two will be used for the front and back bill. The other two will be attached to the sides of the hat. Cut a thin strip of clay to create two loops on the top for the ribbon. Apply with slurry.
For the Beanie hat flip the base over and create a coil and add two petal shapes to the top to create the spinner.
For the Princess and Wizard hats, create a cone shape out of clay and slip and score the fold together. Allow to dry standing upright to keep the cone shape.
For the Jester hat, cut out a slab long enough to create a half of a cylinder with a top. While that is stiffing up create four small cones out of clay. These will be attached using the slip and score method using the clay slurry. Make sure there is a hole from the cylinder to the cones for air release. Once you attach the cones bend them down to create different levels of the hat. Use the end of the fettling knife on the inside of the top circle to bend the top of the hat down. Attach a small clay ball where you pushed down using the slurry. You may choose to add clay balls to the ends of the cones or add found materials to the ends. Cut out small triangles from a slab and slip and score them to the bottom of the cylinder. Use a pencil to draw on detail lines.
Allow to completely dry and bisque fire them to cone 04.
Glazing:
Begin with properly fired shelf cone 04 bisque. Moisten a clean sponge and wipe bisque to remove any dust.
Princess Hat: Apply three coats of CG-964 Kaleidoscope to the whole piece using a CB-604 #4 Soft fan brush.
Wizard Hat: Apply three coats of CG-785 Floral Fantasy to the whole piece using a CB-604 #4 Soft fan brush.
Beanie Hat: Section off the hat into four sections using the CB-110 #10/0 Mini Liner and FN-009 Black. For each section, you will use one of the following glazes, CG-718 Blue Caprice, CG-753 Sassy Orange, CG-756 Firecracker, or CG-970 Masquerade. You will apply the three coats of glaze using the CB-604 #4 Soft Fan brush. For the top of the beanie you will apply three coats of FN-009 Black to the rod, one of each FN-031 Corn Flower Blue and FN-004 Red to the petal shapes, and FN-002 Yellow to the ball on top using the CB-404 Pointed Round.
Jester Hat: You will apply three coats of CG-753 Sassy Orange, CG-756 Firecracker, or CG-970 Masquerade to each section using the CB-604 #4 Soft Fan Brush. The triangles on the bottom are three coats of CG-753 Sassy Orange applied with the CB-404 #4 Pointed Round brush. For the ball on the top of the hat apply three coats of FN-020 Medium Green.
Sherlock Holmes: Apply three coats of FN-016 Harvest Orange to the top of the hat using the CB-604 #4 Soft fan brush. Apply three coats of FN-023 Cinnamon to the ribbon and the front and back bill using the CB-404 #4 Pointed Round brush. Apply three coats of CG-965 Mocha Marble using the CB-604 Soft Fan brush to the bills and the inside of the hat.
Stilt and fire to shelf cone 06/05.
Variations and Adaptations
If you don’t have a slump mold, a kitchen bowl will work. Be sure to line with paper or plastic wrap before forming the clay with it.
If you don’t have a sandbag for pressing the clay into the mold, your fingers will work just fine.
All of these hats can also be created using the coil hand building method
After firing, you may choose to create a glitter star for the wizards hat or attaching ribbon to the princess hat
Form
Low-fire white clay body
Colors
FN-002 Yellow
FN-004 Red
FN-009 Black
FN-016 Harvest Orange
FN-20 Medium Green
FN-023 Cinnamon
FN-031 Corn Flower Blue
CG-KIT2 Jungle Gems™ Assortment Kit (CG-964 Kaleidoscope, CG-965 Mocha Marble, CG-753 Sassy Orange, CG-756 Firecracker Red, CG-717 Pistachio, CG-780 Mystic Jade, CG-962 Blue Azure, CG-718 Blue Caprice, CG974 Bloomin’ Blue, CG-785 Royal Fantasy, CG-970 Masquerade, CG-798 Black Iris)
1. Begin with properly fired cone 04 bisque. Moisten a sponge and wipe bisque to remove any dust.
2. For the Cobblestone Bird: Using the Script Liner with SC-6 Sunkissed, apply 2 coats to the body of the bird. Using the Detail Liner with SC-23 Jack O’Lantern, apply 2 coats to the beak. Using the Script Liner with SC-16 Cotton Tail, apply 2 coat to the wings and tail. Allow glaze to dry between all coats. Using the Detail Liner with SG-401 Black, outline the eyes, beak, and wings. Using the Script Liner with SG-201 Black Cobblestone, apply 2 coats to the wings. Do not let the glaze dry completely between coats. Just allow shine to go away. Using the Script Liner, apply 2 coats of S-2101 Clear Brushing Glaze over the eyes and beak, or dip head into NT-CLR Clear Dipping Glaze.
3. For the Crackle Birds: Squeeze SG-401 Black onto the palette. Thin with water. Use the Script Liner to brush onto the birds. Dip the sponge in water and wipe it over the bird, leaving some SG-401 Black in the details. Squeeze some more SG-401 Black onto the palette. Use the Detail Liner to outline the eyes and beak. Using the Soft Fan with CC-108 China Sea or CC-102 White, apply 3 coats to the birds. Allow glaze to dry between coats.
4. Fire to cone 06.
5. For the Crackle birds, wash with SS-138 Black and wipe off with a paper towel. This should be done the day after firing to maximize the number of cracks.
1. Fire greenware to 04 bisque, remove dust with a damp sponge.
2. With CB-106 Script Liner brush two coats of SC-20 Cashew Later to the nose.
3. Brush the hat with two thinned coats of SC-11 Blue Yonder using the fan make sure not to leave drips or streaks, when dry shade with SC-32 Bluebeard to the seam, creases, and edge of the hat.
4. With CB-106 Script Liner, brush thinned SC-11 Blue Yonder into the beards, detail, deepen some of the beard with SC-32 Bluebeard and SC-35 Gray Hare, shade around the edges of the beard with Gray Hare.
5. Brush the jacket with two coats of SC-23 Jack O’Lantern, slightly thinned, with the fan brush, when dry shade with SC-88 Tu Tu Tango.
6. Brush the pants with 2-3 coats of SC-32 Bluebeard, shade with SC-15 Tuxedo.
7. Brush the shoes with SC-15 Tuxedo, add SC-16 Cotton Tail to Tuxedo to make a highlight on the tops of the shoes.
8. Apply one coat of S-2101 Clear to the gnome, use CB-604 Soft Fan.
1. In wet greenware, use a circle template to cut out the circle patterns with a Xacto knife. Fire to 04.
2. Thin SC-97 Cant-elope with water pour to the inside to cover.
3. Brush on a slightly thinned coat of SC-97 Cant-elope, with back with a damp sponge to antique.
4. Brush sections of the fish with SC-6 Sunkissed, 2 coats and some with SC-75 Orange A Peel for a mottled look.
5. Use CB-106 Script Liner to detail the larger lines in the fins with SC-75 Orange a Peel, shade at the tops of the fins with SC-81 Cinnamon Stix.
6. Darken inside edge of the circle cutouts by brush SC-81 Cinnamon Stix to the lower section of the circle and SC-75 Orange A Peel to the upper section, use CB-106 Script Liner.
7. Brush the eye with one coat of SC-97 Cant-elope, use the circle template to pencil in the round pupil, brush with SC-15 Tuxedo, outline the eye with Tuxedo, use CB-110 Liner.
8. Brush on one coat of S-2101 Clear with CB-604 Soft Fan.
2. Thin slightly FN-037 Chartreuse, pour to the inside, turn to coat, pour out the excess glaze, drain.
3. Brush the roof with three coats of SC-97 Cant-elope, use CB-604 Soft Fan. Brush the body of the house with 3 coats of SC-45 My Blue Heaven and the door with SC-23 Jack O’ Lantern.
4. Remove excess glaze from the windows, outline the windows and door with SG-410 Bright Blue.
5. When the color on the roof is dry, punch out strips of square shapes with the paper punch, use card stock so it will be thicker.
6. Wet the strips of square shapes, place in rows on the roof, press in place to remove gaps in the paper. Use a rubber squeegee or plastic card to drag SG-501 Sculpture Medium over the open square shapes. Remove the paper almost immediately to prevent chipping.
7. Brush on one coat of S-2101 Clear over the SG-410 Bright Blue areas.
Order the greenware wet. When the greenware has set up enough to stand on its own you may start the cutting out process. You can mark out the cut-out pattern or free hand it. Cut out the sections on the breast and wings. Cut out circles in the eyes. When the pattern is completely cut out, let the ware dry.
Clean up the seam lines and the cut-out sections using the Clean up Tool. Be careful as you clean the inner portions of the cut outs. Use Green Grit Cloth to further clean up the ware. Use a moistened Synthetic Sponge to wipe down the ware and remove any dust and debris.
Fire to Shelf Cone 04.
To the eye markings, dot in trailing dots from the outside edge inwards using the end of a brush tipped with SC-34 Down to Earth.
Paint 2 coats of SC-97 Cant-elope to the beak and feet using CB-404 Pointed Round.
Apply 3 coats of SC-50 Orange Ya Happy to the inside of the ware using CB-604 Soft Fan.
Apply 2-3 coats of EL-125 Sahara Sands to the outside of the lid and bottom.
Using a Tuffy Chore Girl Sponge to stipple SC-88 Tu Tu Tango and SC-34 to the ears and face on the owl. Keep these colors light while framing the face and ears.
Shake and Stir S-2725 Safari. Apply 1 coat of S-2725 Safari using CB-604 Soft Fan to the lower portion of the owl. Apply more crystals to the top of the wings and breast.
Begin with properly fired cone 04 bisque. Moisten a sponge and wipe bisque to remove any dust.
Cut out the flower, lemon and leaf shapes from the pattern. The shapes should be the whole shape of the flower, lemon, and leaves.
Trace the pattern onto the platter with Clay Carbon paper.
Use the Script Liner to apply two coats of FN-001 White to the flower shapes, going past the pencil lines of the pattern. There are 12 flowers — this is important to know for later. It is also beneficial to photograph the plate as you move through the decorating process.
Wet the paper flowers and adhere them in place over the glazed surface. Gently press with a paper towel to remove excess water and ensure edges are sealed.
Use the Script Liner to apply three coats of FN-054 Pistachio to the leaves. Wet the paper leaves adhere into place on the platter.
Use the same brush to apply three coats of FN-002 Yellow to the lemons. We the paper lemons and adhere into place. Gently press with a paper towel to remove excess water and ensure edges are sealed.
Use the Soft Fan to apply three coats of FN-041 Medium Blue over the exposed areas of the platter, going over the paper pieces. Before the third coat of glaze is dry, remove the paper lemons, leaves and flowers. It is important to remove all the paper. Count the flowers and the leaves, it’s hard to miss the lemons as they are sizable. If you should leave on a paper piece, during the firing the paper will burn away but the glaze on top of the paper will end up on the tray.
Add veins to the leaves using the Liner and SC-36 Irish Luck. Use the tip of a brush handle and SC-12 Moody Blue to add dots to the centers of the flowers and the sides of the lemons.
Use the Soft Fan to apply three coats of FN-001 White.
In wet greenware, hold the circle template against the back of the frog, use the Exacto Knife to cut out the circle shapes.
Clean and fire to cone 04.
Tape over the holes on the back of the frog, thin slightly FN-003 Orange, pour to the inside move the frog to coat with glaze, pour out the excess glaze. With a damp sponge remove the excess glaze from the body of the frog.
Use a pencil to draw a leaf shape around both of the eyes, fill in the head area with large leaves as shown.
Use the circle template to pencil in ¾ “ circle shapes on the arms and legs, one-inch circle shapes on the back. Pencil in a circle on the legs, extending a line to the toes with more circles.
From a palette, brush on two coats of SG-407 Yellow with CB-106 Script Liner to all the circle shapes, go slightly past the pencil line.
Punch out the paper circles, wet the paper then stick it on the yellow circles to mask the color
Brush the leaves with SG-409 Bright Green, shade with SG-405 Green use CB-106 Script Liner, two coats.
Brush two coats of SG-408 Orange to the circle shapes on the legs and fingers.
Brush the remainder of the body with two coat of SG-411 Purple, brush strokes of SG-404 Blue over the larger sections of the purple areas. Use CB-106 Script Liner and CB-110 Liner for the smaller areas.
Remove the paper circles, use SG-401 Black to dot around the yellow circles, leaves, and veins of the leaves.
Brush iris of eyes with SG-11 Purple, shade with SG-404 Blue, the pupil is SG-401 Black. Outline the orange dots and circles on the frog’s feet with SG-407 Yellow use the writer tip to outline.
Brush on two coats of NTBR Clear using CB-604 Soft Fan.
2. Brush the nose with two coats of SC-20 Cashew Later. Brush the hair with a coat of SC-97 Cant-elope, wipe back the Cant-elope, brush over the hair with one coat of SC-24 Dandelion.
3. Brush the hat with two slightly thinned coats of SC-27 Sour Apple use the CB-604 Soft Fan, make sure not to leave drips or streaks. When dry shade the edges, creases, and seam with SC-26 Green Thumb, use CB-106 Script Liner.
4. Brush the dress with two slightly thinned coats of SC-11 Blue Yonder, shade the shadow areas, creases, and bottom with SC-32 Bluebeard.
5. Brush two coats of SC-23 Jack O’ Lantern to the gloves, shade with SC-88 Tu Tu Tango.
6. Float SC-27 Sour Apple into the folds of the apron, use CB-106 Script Liner.
7. Brush 2-3 Coats of SC-32 Bluebeard to the shoes, highlight by adding SC-16 Cotton Tail to the brush on the tops of the shoes. Buttons brush 2 coats of SC-16 Cotton Tail with CB-110 Liner.
8. Outline with SC-15 Tuxedo using CB-110 Liner, around the hair, the bodice and arms.
9. Brush two coats of S-2101 Clear with the CB-604 Soft Fan.
1. Fire greenware to 04 bisque, use a damp sponge to remove dust.
2. Brush the body of the dragon with one coat of SC-97 Cant-elope, while the color is wet remove color from the scales by rubbing your thumb against the color. You can also remove it with a damp sponge, although it can remove more than desired with a sponge.
3. Shade the feet, legs, and around the head with SC-75 Orange A Peel, and shade around the back, tail, and breast, nose with SC-73 Candy Apple Red. Thin Candy Apple Red and brush over the tail area.
4. Brush two coats of SC-73 Candy Apple Red over the breast, remove some from the lower center breast area, brush over with Cant-elope.
5. Brush the dragon’s spines at the head area with SC-73 Candy Apple Red, and wipe back to highlight the tops of the spines.
6. Brush the inside of the mouth and tongue with SC-74 Hot Tamale, 2-3 coats. Brush the nose with SC-74 Hot Tamale, shade around the nose and snout with SC-74 Hot Tamale, and use CB-106 Script Liner.
7. Brush two coats of slightly thinned SC-11 Blue Yonder to the back spines and wings, and wipe back some with your finger to highlight. When dry, shade or float SC-12 Moody Blue at the base of the spines.
8. Remove the color from the brows, wiskers, and edge around the mouth, brush with two coats of SC-16 Cotton Tail.
9. The eye is SC-25 Crackerjack Brown, the pupil is SC-15 Tuxedo, the outline is SC-15 Tuxedo. Use CB-110 Liner to outline the whiskers, mouth teeth, and wings.
10. Brush on one coat of S-2101 Clear with CB-604 #4 Soft Fan.
11. Fire to cone 05/06.
Form
CD1359 Asian Dragon Mold or MB-1359 Asian Dragon Bisque
Pour CD-1334 Tall Pitcher Vase a bit heavier than normal with Mayco Stoneware Slip. Let dry.
Use a Clean Up Tool to fettle the seam lines from the piece. Use the Green Grit Cloth to sand the seam lines further and to dress down the throat of the pitcher. Use a moistened Sea Wool Sponge to wipe down the ware to remove any dust. Check the inside of the pitcher for any debris.
On a piece of Aluminum Foil pour out some AC-302 Wax Resist. Remember to handle the ware carefully as it is greenware. Use the CB-604 Soft Fan to apply 1 coat of Wax to the bottom of the pitcher and slightly up the side walls of the pitcher about ¼” to form a line. Do not paint the handle with any wax. Load the flat surface of the sponge with wax. Make a test of the pattern on a piece of paper to see how the pattern of the sponge transfers the wax. Reload the sponge with wax. Use the Sea Wool Sponge to print/vail the pitcher surface. Repeat this until the outer surface of the pitcher is printed/vailed with wax. Notice the placement of the sponge as you apply the wax. It may be necessary to rotate the sponge to accomplish an even pattern of waxed areas to the unwaxed ones. You don’t want a contrived pattern to the waxed areas. The surface should be about covered with about half waxed areas and half unwaxed areas. Let the wax dry.
Remember that the piece is greenware. You will be adding water to the ware and is more fragile due to the added moisture. Use the Sea Wool sponge fairly saturated with water to slowly scrub the unwaxed areas away.
Use the sponge in a rotating scrubbing motion. Not much pressure is needed to erode the background area. Rinse the sponge often to remove excess clay from the sponge and ware. Continue the etching of the surface until the surface has been eroded about 1/8” in depth. Larger areas will naturally be deeper than smaller ones. Let the piece dry.
In a Plastic Cup thin some SW-130 Copper Jade to a melted ice cream consistency. Remember that the ware is fragile. Pour the glaze into the greenware pitcher. Being careful and working quickly, rotate the ware to fully cover the inside surface with glaze. Pour out the excess glaze and invert the ware to drain and dry.
Using CB-604 Soft Fan to apply 3 coats of SW-130 Copper Jade to the outer surface and handle. Let the glaze bead up on the wax and leave the small beads of glaze. If the glaze doesn’t seem to want to bead up on the wax, use a moistened sponge in a pouncing motion to break the tension in the glaze surface and to remove any excess glaze on the waxed areas. You want some beads of glaze to remain on the waxed areas. Let Dry.
Wipe off any glaze from the bottom of the ware before firing. Place the pitcher fully on a shelf in the kiln. Fire the ware to Shelf Cone 5-6 mid-range high fire.
Note: Another glaze that can be used in place of SW-130 Copper Jade is SW-101 Stoned Denim.
Form
CD-1334 Tall Pitcher Vase cast in SLS01 Stoneware Slip. Cast a bit heavier than normal.
Use a moistened Synthetic Sponge to wipe down the bisque ware to remove any dust. Check the inside for any debris as well.
In a Plastic Cup thin FN-043 Bright Jade with some water to a melted ice cream consistency. Pour the thinned glaze into the vase. While working quickly, rotate the vase to coat the inside of the vase with glaze. Pour out the excess glaze and invert to drain and dry. Wipe off any drips from the outside with a moistened sponge.
Apply 3 even coats of FN-01 White to the entire outside surface using CB-604 Soft Fan or CB-608 Soft Fan. Let dry.
Transfer the patterns of diamond shapes using a pencil and AC-230 Clay Carbon. Note the layers in each diamond.
Starting with the largest diamond, place the colors listed in the pattern onto a tile and thin with some water to a milk consistency. SC-5, SC-7, SC-9, SC-24, SC-28, SC-75, SC-80, SC-88.
The painting of the diamond starts in the center. The colors are painted in a water color wash effect for the most part in vertical short strokes.The color(s) can overlap and have multiple layers to each section. Blending of the colors while they are wet will create shades and nuances to each section. Thinning of the colors at times can create lighter shades and hues. Try to keep the color applied in a vertical axis to the ware.
Apply some SC-9 Jaded to the center using CB-406 Pointed Round. The center is the darkest and fades out with the next two colors. As the color moves outward pick up some SC-28 Blue Isle. The next section is SC-7 Leapin’ Lizard. The next sections is SC-80 Basketball primarily with some hints of SC-75 Orange-A-Peel and SC-88 TuTu Tango.The next section is SC-24 Dandelion with thinned SC-5 Tiger Tail. The last section is some SC-75 Orange-A-Peel and mostly SC-88 Tutu Tango blending and muddled together.The outer edge is SC-15 Tuxedo painted with CB-110 Liner keeping the strokes uneven and vertically aligned as in the pattern. Since the black color has been thinned, more than one coat of color to this area may be necessary to achieve color saturation.
Moving to the second largest diamond place out SC-5, SC-10, SC-13, SC-15, SC-28, SC-80, SC-88 on a Tile and thin with water to a milk consistency. The clover section of the inner diamond is SC-5 shaded with SC-88 towards the outer edges. The center is SC-80. The outer edges of the clover leaves are SC-13. The next section is thinned SC-10 painted in multiple layers. The outer edges are SC-15 Tuxedo painted in multiple layers with vertical strokes using CB-110 Liner.
For the smallest diamond place some SC-2, SC-5, SC-14, SC-15, SC-88 and thin with water to a milk consistency.The center starts with SC-5 and some SC-42 with a darker center of SC-14. The next section is SC-2 and with some SC-88 towards the corners of the diamond area.The outside edge is SC-15 Tuxedo painted in multiple layers with vertical strokes using CB-110 Liner.
Place some EL-122 Malachite onto a tile and thin with some water to a milk consistency. Using CB-106 Script Liner loaded with water and tipped with the thinned EL-122 Malachite. Place the brush tip next to the black outlines and trail the color out vertically around the pattern. Multiple coats with create light and dark shades. The color should trail off to points as if the color is running/bleeding.
In a Plastic Cup thin FN-043 Bright Jade with some water to a melted ice cream consistency. Pour the thinned glaze into the vase. While working quickly, rotate the vase to coat the inside of the vase with glaze. Pour out the excess glaze and invert to drain and dry. Wipe off any drips from the outside with a moistened sponge.
Apply 3 even coats of FN-01 White to the entire outside surface using CB-604 Soft Fan or CB-608 Soft Fan. Let dry.
Transfer the patterns of diamond shapes using a pencil and AC-230 Clay Carbon. Note the layers in each diamond.
On a tile place the colors out and thin with water to a milk consistency SC-2, SC-3 SC-7, SC-10, SC-14, SC-15, SC-28, SC-88. Painting of the diamond shape starts with the center inside of the clover leaves using CB-406 Pointed Round. The painting is done in watercolor washes in a vertical stroke for the most part. Hues and shades of colors are in the application of multiple layers of thinned color(s) and blending of wet color in the pattern on the ware. The center between the 4 clover leaves is painted in with SC-7 and darkened with SC-14.The leaves of the clover are SC-2 with shading of SC-88 to the outer edges. The areas around the leaves are SC-10. The next area is SC-2 shaded with hints of SC-7 and SC-14. The corners of the diamond are SC-3 shaded with SC-13. The outer edge and center of the diamond is done with SC-15 Tuxedo using CB-110 Liner in short vertical stroke keeping the axis of the strokes vertical to the ware. Multiple layers of black are used to create light and dark areas to the areas.
Thin some EL-122 Malachite on a Tile with water to a milk consistency.Load CB-106 Script Liner with water and tip with the thinned glaze.Shading the background is completed by placing the tip of the brush next to the black trim trailing the color out in vertical strokes.The color can have multiple thin coats to create layers of shading. Trail the color out to points when painting these areas.
Wipe down the bisque with a moistened Synthetic Sponge to remove any dust. Check inside for any debris as well.
Apply 3 coats of UG53 to the roof panels and the lower portion of the birdhouse using CB-406 Pointed Round.
Using the foam roller to apply (ink) UG-57 Spice Brown to ST-133 Wood Grain Stamp. Apply the stamp in a vertical application to the birdhouse. Repeat this process until the entire birdhouse base is completed. Vary the positioning of the stamp to where the pattern isn’t obvious in its repetition.
Apply 1 good coat to the trim on the birdhouse front around the opening using UG-57 Spice Brown with CB-406 Pointed Round.
For the panels on the roof you will need the Cardboard Tissue Tube. With the Scissors, cut it lengthwise to open it up, unroll to flatten. Cut slats in the one end about 1” in length tapering them slightly at the bottom edge.
Use the Synthetic sponge to apply some UG-10 Crimson and then some UG-207 Flame Red to the slats on the cardboard. Press the color side down on the cardboard towards the bottom edge on the roof panel. Repeat the application of color and print the shingle pattern up to the roof apex. It should look like staggered shingles of a roof when finished. Use the pointed blade of the Clean Up Tool to scratch (Scraffito) in highlights around the individual shingles. Remove any color debris.
The trim on the roof and eave is UG-221 Cement applied in 3 coats using CB-106 Script Liner.
Apply 3 coats of UG-10 Crimson to the ball and lower base trim of the birdhouse using CB-106 Script Liner.
The flowers around the birdhouse opening are dots of UG-207 Flame Red using a large brush handle. Let dry. The centers of the flowers are dotted in with UG-204 Orange using a smaller brush handle.The leaves are completed with the curved end of the Clean Up Tool. Dip the curved blade into UG-220 Sage. Roll (rock) the blade where you want the leaf. It’s best to start with the tip and rock the blade back forming the base of the leaf. A larger leave can be completed by double printing the leaf with the blade.The stems of the flowers are painted in with 1 coat of UG-31 Chocolate using CB-110 Liner.
Fire the piece to Shelf Cone 03-04.
Use the Blue Masking Tape to cover over the birdhouse opening on the side of the piece. Thin some S-2101 Crystal Clear Brushing in a Plastic Cup to a melted ice cream consistency. Pour the thinned glaze to the inside, while working quickly, rotate the piece to cover the inside surface. Pour out any excess glaze and let dry. Remove the Blue Masking Tape from the ware. Apply 2-3 coats of S-2101 Crystal Clear Brushing to the outside of the ware.
1. Pour CD 1360 Peacock mold 1/4″ thick. Refer to casting instructions.
2. Once it is firm enough to handle, use the sponge to smooth down any casting lines in the greenware.
3. Fire to cone 04.
4. Using the Detail Liner with SC-15 Tuxedo, apply 1 coat around the eye areas of the peacock. While it is still wet, use the Script Liner with SC-76 Cara-Bein Blue and SC-13 Moody Blue to shade the head, neck and front. Repeat when dry.
5. Using the Script Liner with SC-76 Cara-Bein Blue, apply 2 coats to the upper wings. Allow glaze to dry between coats.
6. Using the Script Liner with SC-60 Silver Lining, apply 2 coats to the beak, legs and head feathers. Allow glaze to dry between coats.
7. Using the Script Liner with SC-76 Cara-Bein Blue, apply 2 coats to the top of the head feathers. Allow glaze to dry between coats.
8. Squeeze some SG-404 onto the plate. Thin slightly with water. Use the dagger brush to shade around the tail feathers.
9. Using the Detail Liner with SC-51 Poo Bear, apply 2 coats to the eyes of the feathers.
10. Using SG-404 Blue, apply 1 coat to the center of the eye of each feather. Use SG-401 Black to make a dot in each eye.
11. Using SG-404 Blue, trace over the lines on the inner parts of the feathers and the upper part of the wings.
12. Using SG-410 Bright Blue, trace over the lines on the outer parts of the feathers and the lower part of the wings.
13. Using SG-409 Bright Green, trace around the eye of the feathers.
14. Using SG-405 Green, trace around the eye of the feather again and extend down the stalk of the feathers.
15. Using SG-410 Bright Blue, make dots around the top of the eye in each feather. Use SG-411 Purple to make a dot above the top of those dots.
16. Using SG-411 Purple, trace the feathers on the back of the peacock. Make dots going towards the neck.
17. Using SG-402 White, trace the feathers on the upper wings. Add dots to the body and head feathers.
18. Using SG-410 Bright Blue, add dots to the body.
19. Using SG-405 Green and SG-409 Bright Green, apply dots to shade the base.
20. Using the Detail Liner with SC-15 Tuxedo, outline the beak, eyes, head feathers and legs.
21. Using the Soft Fan, apply 2 coats of NT-BR Clear One Brushing Glaze or dip into NT-CLR Clear Dipping Glaze.
22. Fire to cone 06.
Form
CD-1360 Peacock
Colors
NT-CLR Clear Dipping Glaze or NT-BR Clear One Brushing Glaze
1. Pour CD1363 Garden Bird (Looking Left) and/or CD1362 Garden Bird (Looking Right) mold 1/4″ thick. Refer to casting instructions.
2. Once it is firm enough to handle, use the sponge to smooth down any casting lines in the greenware.
3. Use the X-ACTO knife to carve out a hold in the top of the body of the bird. Smooth the edges with a sponge.
4. Fire to cone 04.
5. Using the Soft Fan, apply 3 coats of EL-136 Lapis Lagoon. Allow glaze to dry between coats.
6. Using the Soft Fan, quickly apply 1 coat of EL-134 Mirror Blue. Before it is dry, dip the Soft Fan in water and float over the glaze. This will remove some glaze from the high areas and deposit it into the details of the bird.
1. In wet greenware, use a circle template, hold on the cap while tracing around with an Exacto knife to cut out circles in various sizes on the mushroom caps, clean and fire to cone 04.
2. Thin slightly EL-125 Sahara Sands pour to the inside of the mushroom turn to coat so the inside is covered with glaze. Pour over a bowl to catch the glaze drips.
3. Brush the outside of the mushroom with three coats of EL-125 Sahara Sands use CB-106 Soft Fan.
1. Begin with properly fired cone 04 bisque. Moisten a sponge and wipe bisque to remove any dust.
2. Slightly thin EL-144 Dark Amethyst, pour to the inside, to coat, pour out the excess. Clean glaze from the outside of the bisque with a damp sponge.
3. Brush the roof with two coats of EL-144 Dark Amethyst, do not glaze the window panes or trim around the windows. Brush the lower section of the house with two coats of EL-143 Cactus Flower, avoid the window panes, use CB-604 Soft Fan.
4. Brush SC-15 Tuxedo to the window panes, two coats. Brush two coats of SC-11 Blue Yonder to the door, shade with SC-32 Bluebeard.
5. When the Cactus Flower is dry, pencil on flowers and leaves at the bottom. Use SG-405 Green with CB-106 Script Liner to brush in wispy strokes around the penciled flowers at the base of the house. This will provide background.
6. Outline the leaves and flowers with SG-405 Green, fill in the flower petals with two coats of SG-402 White, centers with SG-407 Yellow, and fill in the leaves with SG-409 Bright Green, use CB-110 Liner, one coat.
7. Outline around the door frame and the roof line with SG-401 Black.
When leather hard, trim and carefully remove from the mold.
Using a cutout knife, cut heart shapes to the wings and the center of the eyes. Allow to dry.
Clean the ware, and bisque fire to shelf cone 04.
Using the Pointed Round, apply 3 coats of SC-24 Dandelion to the outside area of the eyes and feet.
Using the Pointed Round, apply 3 coats of SC-51 Poo Bear to the beak.
Using the Pointed Round, side load in SC-51 Poo Bear and shade around the eyes and feet.
Using the Soft Fan, apply 2 coats of FN-004 Red to the chest and 3 coats to the inside and remaining body, excluding the wings.
Using the Soft Fan, apply 1 thinned coat of FN-004 Red to the chest, and while still wet, press the lace into the wet color and press firmly with a paper towel.
When the chest area loses its wet look, apply 1 coat of SC-15 Tuxedo over the lace using the Soft Fan.
Just as the color starts to lose its wet look, remove the lace.
Using the Pointed Round, apply 2 coats of SC-15 Tuxedo to the center portion of the eyes.
Wipe down the bisque with a moistened Synthetic Sponge to remove any dust from the ware.
Use CB-604 Soft Fan to apply 1-2 coats of SS-138 Flat Black to the entire piece.
Pattern can be transferred but can be time consuming when using the White Chaco paper. Use a White Chalk pencil to sketch the basic areas on the Lizard for guidance. Both will wipe off afterwards easily after painting using a damp paper towel if necessary
The “dots” are made with the ends of brush handles, stylus or pencil points. One trick is that when you load (dip) the handle into color and then do one print it gives a specific sized dot.If you keep printing with the handle without reloading and continue to do prints, the size of the dot will naturally decrease in size. This will be helpful when doing trailing or gradations of dots, like on the toes. The stylus probably with give you the smallest dot. A toothpick will also give you about the same look. The brushes listed may not give you the size dot desired, so a trial printing of different brush handles may be necessary. When filling in an area with dots, it is a random placement generally.Keep in mind how and where you are placing dots for the optimum look you are trying to achieve. Be careful when painting your dots as they will stay wet a bit longer than one might think.Cover your Tile or Pallet with Aluminum Foil for ease of clean up after painting.
Start with the collar of trailing dots along the neck. Center dots are SS-335 Rich Blue starting at the end and trail the descending dots towards the front of the head about 1” . Flank those dots with trailing dots of SS-317 Turquoise. The toes are trailing dots of Rich Blue flanked with dots of SS-376 Limeburst. Toenails are SS-87 Emperors Gold painted with CB-220 Detail Liner.
Paint in the white dots that delineate the different sections of the lizard with SS-135 White. Refer to the picture and pattern diagram for placement. There are two rows of dots between the painted collar and the head. Down the entire spine of the lizard, around the ankles, along the back in a wavy line that extends from the head to just past the back legs. There is the double row along the belly side and then a single row between those peaks in the pattern. To the tail, the diamond outlines are done in the smallest of dots.
Fill in the sides of the belly with dots of SS-210 Orange. There is a line of orange dots along the wavy line bordering the spine along with a row of SS-28 Hushed Violet and SS-87 Emperor’s Gold. The smaller sections above the orange belly area are SS-176 Christmas Red.
The markings inside the squares along the sides of the tail are SS-111 Brightest Yellow.
Paint in the iris of the eye with SS-224 Golden Ochre using CB-220 Detail Liner. Shade the iris with SS-210 Orange.yle=”margin: 0px;”> Paint in the vertical pupil with SS-138 Flat Black using CB-110 Liner. The highlight is with SS-135 White. The top and bottom eyelash are painted in with SS-376 Limeburst using CB-110 Liner. Refer to the eye detail on the lizard diagram. The dots above the eye are SS-87 Emperor’s Gold.
The head is dotted in with three colors of green starting with SS-276 Forest Green towards the back of the head near the neck. As you dot in color moving forward, you change to SS-19 Country Sage and then finally with SS-376 Limeburst. Do not make the mistake of abruptly changing from one color to the another. Make the dots irregular in size and placement to where they blend gradually from one color to the next. The throat is primarily Limeburst, but with some Country Sage towards the back of the throat near the base of the lizard. Do not dot in any area directly along the mouth area. The tail is all dots of SS-376 Limeburst. Once the color has dried, go back and add some smaller dots over the green areas to create a shimmering effect.
The scrolls on the legs are fine dots of SS-335 Rich Blue using a fine point stylus. Let dry.
Shake AC-512 True Gloss Spray well. In an area well ventilated, apply two to three light coats of True Gloss Spray approximately 8” to 10” from the piece allowing drying time between coats.Several light coats are better than one heavy coat.
2. Using a palette knife, thicken SC-15 Tuxedo with AC-310 Silkscreen Medium to the consistency of peanut butter. Pencil in a line to find the middle of the platter. With the shiny side down, rub the mixture over the cow screen from DSS-0153 Farmhouse in the center of the platter at the bottom. Be sure to leave space to stack the next screens the pig and the chicken from the same Farmhouse set.
3. Use SL-441 Spots Stencil to outline with a pencil the placement of the dotted spots on the rim of the platter.
4. Use SG-401 Black to dot on the outline of the spots and into the center.
5. Use the Soft Fan to apply two coats of S-2101 Clear to the top of the platter and two coats of FN-009 Black to the back of the platter.
For the right depth of clay, lay out canvas fabric on table and place 1/4″ slats on the left and right side of the canvas fabric. Place a piece of moist clay about 2 lbs. in size in the middle of the fabric. Using a rolling pin, roll out the clay to the size desired. The slats are used as a guide to keep your clay level and at the same evenness. Make sure the edges of the rolling pin hit the 1/4″ slats.
Using a needle tool cut the shapes as they are on the pattern.
Wrap the two larger pieces of clay around a cylinder. Be sure to wrap paper around the cylinder to avoid having the clay stick to the form. Slip and score the slabs to attach on the back seam of the boot. Let set to firm a bit.
Drape the front section of the boot over a smaller cylinder; slip and score the toe so it is closed.
Take the pieces intended for the bottom of the sole, set them on some canvas, and step on them. Be careful not to step too hard, but just enough to put the texture from the bottom of our shoe onto the piece!
Construct the heel of the boot and attach it to the sole. Then attach this to the front section of the boot.
Once the top section is firm enough to support itself attach it to the rest of the boot.
Next, fit the tongue inside the boot and attach by slipping and scoring at the base and sides. Smooth the front seam with your finger or sponge. Be sure to leave about ¼” of the side pieces in front of the tongue so you can cut out the holes for the laces.
Using a hole cutter cut out the holes for the shoe laces.
Use various sculpting tools to create any small details or texture that you would like the shoe to have.
Let piece slow-dry and once it is in it’s greenware state fire to shelf cone 04.
Glazing:
Begin with properly fired cone 04 bisque. Moisten a clean sponge and wipe bisque to remove any dust.
Place some FN-008 Brown into a small cup and add a little bit of water to slightly dilute it (about 3 parts glaze and 1 part water). It should be the consistency of coffee cream. Pour this into the shoe and roll around to completely coat the interior of the shoe. Drain out the excess glaze and keep the piece inverted until it has lost its shine. Wipe off any glaze from the outside using a damp sponge. Allow to dry.
Using a CB-604 #4 Soft Fan, apply 2 coats of FN-008 Brown to the entire outside of the boot.
Once dry, use an AB-834 ¾” Base Coat to dry brush SC-16 Cotton Tail onto the outside of the boot.
Using a CB-604 #4 Soft Fan, apply random brushstrokes of the following Foundation glazes: FN-002 Yellow, FN-003 Orange, FN-004 Red, FN-007 Green, FN-017 Purple, and FN-018 Bright Blue. For the lighter colors you may want to apply to coats to each stroke. Keep in mind the way the light may hit the boot; keeping the deeper colors around areas where there would be shading and the lighter colors around areas that would have highlights.
1. In wet greenware, cut out the window panes with an X-ACTO knife, cut out a mouse hole in the back for a tea light candle.
2. Clean and fire to cone 04.
3. Thin slightly EL-144 Dark Amethyst pour to the inside to cover, clean off glaze that leaked through the window panes.
4. Brush the roof with two coats of EL-144 Dark Amethyst and the lower section of the house with two coats of EL-128 Wheat, use CB-106 Soft Fan.
5. Brush the trim and the window panes with two coats of SC-15 Tuxedo, brush the door with two coats of SC-11 Blue Yonder, shade with SC-32 Bluebeard. Use CB-106 Script Liner and CB-110 Liner.
6. Outline the roof line and the door with SG-401 Black.
1. In wet greenware, use an X-ACTO knife to cut out the window panes, and a one-inch hole in the back for a pinch light. Instead of using an electric bulb a battery operated votive will also work.
2. Clean and fire to cone 04.
3. Brush two coats of CG-986 Smoke & Fire to the chimneys, clean up excess crystals from the roof and body of the house.
4. Brush on 2-3 thinned coats of SC-11 Blue Yonder to the body of the house, use CB-604 Soft Fan, brush Thinned SC-27 Sour Apple to the door, 2-3 coats.
5. Brush the thatched roof with 2 thinned coats of SC-97 Cant-elope with the fan, sponge off some of the color, brush over with SC-6 Sunkissed for a highlight.
6. Brush the trim and shutters with SC-75 Orange A Peel use CB-106 Script Liner two coats. Brush the window panes with SC-15 Tuxedo, one coat.
7. Brush one coat of Smoke & Fire over the window panes.
8. Float SC-12 Moody Blue in the shadow areas of the house use a dagger brush or CB-310 Flat Shader.
9. Shade the roof with SC-75 Orange A Peel, and SC-15 Tuxedo in a narrower shade on the roof.
10. Shade sections of the body of the house, door, and shutters with SC-15 Tuxedo.
11. Brush one coat of S-2101 Clear over everything except for the chimneys, use CB-604 Soft Fan.
. In wet greenware cut out the windows with an Exacto knife, clean and fire to cone 04.
2. Thin slightly SC-15 Tuxedo brush over the chimneys with CB-604 Soft Fan, sponge off the excess leaving the glaze in the detail.
3. Brush the roofs with SC-36 Irish Luck, leave it heavy in the detail and around the edges, wipe back to show the detail in the thatch.
4. Brush the doors with 2-3 coats of SC-74 Hot Tamale, brush SC-73 Candy Apple Red into the door for a highlight.
5. Brush the trim and shutters of the house with 2 coats of SC-74 Hot Tamale, use CB-106 Script Liner. Brush one coat of SC-15 Tuxedo over the frames around the windows with CB-106 Script Liner.
6. Float SC-15 Tuxedo in the shadow areas of the house use a dagger or CB-310 Flat Shader.
7. Brush one coat of CG-750 Noel over the body of the house, keep the crystals to a minimum then brush over with one coat of S-2101 Clear to everything but the roof with CB-604 Soft Fan.
8. Use CB-110 Liner with SC-15 Tuxedo to outline the planks of wood in the doors and shutters, and around the wood trim.
8. Use a stiff brush or a palette knife to apply SG-302 Snowfall to the roofs, apply so that it looks like it is melting so some of the roofs are visible.
9. Fire to cone 06.
10. Select lace trim that is heavy and has open areas for the light to show threw. I purchased from JoAnn Fabrics. Use mod podge to stiffen the lace, dut to fit the windows, hot glue in place. Use battery operated tea lights to light up.
1. In wet greenware, cut out the 3 poinsettia flowers, the flower at the bottom ruffle, cut the petals, then lift to make them dimensional, roll pieces of clay from the cutout flowers into balls for the center of the flower. Score the clay, wet with water then attach the balls near the ruffle. Cut a one-inch hole in the back for the pinch socket.
2. Clean and fire to cone 04.
3. Place tape over the cut-out forms, thin FN-003 Red slightly, pour to the inside of the tree, roll to coat, pour out the excess glaze. Wipe off glaze that may drip to the front of the tree.
4. Place a quarter size of SG-405 Green on a palette, use CB-106 Script Liner or a Dagger Brush to float wide lines around the wavy branches as shown in the photo. Brush a thinner line of SC-15 Tuxedo using CB-106 Script Liner into the curl of the branch ending in a thin line at the end of the swirl.
5. Brush the inside of the cut-out poinsettias and an edge on the outside of the cut out with two heavy coats of SC-74 Hot Tamale, brush the center dots with SC-6 Sunkissed 2 coats, outline the centers with SC-15 Tuxedo.
6. Use the two-inch foam roller to roll MT-007 Divots Mat with SC-74 Hot Tamale, press to the tree in sections.
Using a ¼” dowel rods, roll out a slab with a rolling pin using a low fire clay body.
Cut out three 4” x 14” rectangles to wrap around a squatty pint jar.
Once the jars are wrapped with clay slabs, remove the jars from the middle and clean up and seam lines.
Using a needle tool, mark off 4 even points on the rim of cylinder.
Cut out 4 triangles of equal size to create the darts in the teapot and sugar jar. Note: The larger the triangles are, the more dramatic the dart in the cylinder will be.
Score and slip the negative space where the triangles were removed, and pinch the cylinder into a square.
Cut out a circle from the rolled out slab and attach to the bottom of the teapot/sugar jar.
Using a toilet paper roll, wrap a slab around it to create the neck of the teapot and score and slip the neck to the body.
Cut out a lid to place on top of the teapot and form a knob from a ball of clay.
Create a handle from either pulling clay or using a slab, and attach to the side of the teapot.
To create the spout, cut out a large triangle and wrap the edges around to create a cone. Shape the spout to the desired form and attach to the body of teapot.
Allow for teapot or sugar jar to completely dry and bisque fire to cone 04.
Glazing:
Begin with properly fired shelf cone 04 bisque. Moisten a clean sponge and wipe bisque to remove any dust.
Using FN-KIT3 Foundations Kit 3, select various colors and, with CB-604 Soft Fan, glaze the different sections of the teapots/sugar jar. Note: Make sure at least 3 coats of Foundations are applied to achieve desired color.
For the tallest teapot: FN-002 Yellow was used for the spout, handle and knob, FN-003 Orange for the trim and lid, FN-004 Red for the body, and FN-018 Bight Blue for the feet and neck.
For the other teapot: FN-002 Yellow was used for the neck, FN-007 Green for the body, FN-018 Bright Blue for the trim, FN-004 Red for the lid, and FN-003 Orange for the spout, handle and knob.
For the sugar jar: FN-002 Yellow was used for the trim, FN-018 Bright Blue for the body, FN-007 Green for the lid, and FN-004 Red for the knob.
Once glazed, stilt and fire to cone 06.
Form
Low-fire clay
Colors
FN-KIT3:
Fn-001 White
FN-002 Yellow
FN-003 Orange
FN-004 Red
FN-005 Pink
FN-017 Purple
FN-018 Bright Blue
FN-019 Dark Blue
FN-007 Green
FN-020 Medium Green
FN-008 Brown
FN-009 Black
1. Pour CD1489 Hedgehog Planter mold 1/4″ thick. Refer to casting instructions.
2. Once it is firm enough to handle, use the sponge to smooth down any casting lines in the greenware.
3. Fire to cone 04.
4. Using the Soft Fan with EL-125 Sahara Sands, apply 3 coats to the inside of the hedgehog. Allow glaze to dry between coats.
5. Using SG-401 Black, outline the spines on the hedgehog.
6. Using the Script Liner and Soft Fan with EL-125 Sahara Sands, apply 3 coats to the face and underside of the hedgehog. Avoid the eyes. Allow glaze to dry between coats.
7. Using the Soft Fan with EL-110 Mudslide, apply 2 coats over spines on the body. Using the Script Liner, apply 2 coats to the inside of the ears. Allow glaze to dry between coats.
8. Using SG-401 Black, outline the eyes, ears and mouth.
9. Using the Detail Liner with SC-15 Tuxedo, apply 2 coats to the nose. Allow glaze to dry between coats.
10. Using the Detail Liner with SC-16 Cotton Tail, apply 2 coats to the eyes. Allow glaze to dry between coats.
11. Using the Detail Liner with SC-31 The Blues, apply a dot to the eye to make the iris. Repeat with SC-15 Tuxedo to make the pupil. Repeat with SC-16 Cotton Tail, to make a highlight in the pupil.
12. Fire to cone 06.
Form
MB-1489 Hedgehog Planter Bisque or CD1489 Hedgehog Planter Mold
1. In wet greenware, punch out stars with a star punch, cut a one-inch hole in the back of the tree for the clip in light fixture. Clean and fire when dry to cone 04.
2. Thin slightly FN-002 Yellow, pour to the inside, turn to coat, drain excess, wipe off the glaze that will leak to the front, but put tape over the one-inch hole to make it easier. An alternate way is to leave it bisque on the inside.
3. Brush three coats of FN-218 Green Sapphire to the tree as shown, use a combination of CB-604 Soft Fan and CB-106 Script Liner. Sponge off the color where the snow will be applied.
4. Brush on two heavy coats of SG-302 Snowfall to the underside of the branches with CB-106 Script Liner and CB-604 Soft Fan, Use CB-110 Liner to get into the little curls in the tips of the branches.
5. Fire to cone 05/06.
6. If by chance, your edge between the snowfall and the Green Sapphire is uneven or a bluish color, and it is undesirable use a brush on white-out to fix.
1. Begin with properly fired cone 04 bisque. Moisten a sponge and wipe bisque to remove any dust.2. Thin SG-401 Black on a palette. Use the Soft Fan to apply the color onto the leaf. Sponge off the excess to antique, leaving the glazes heavier on the edges.
3. Use the Soft Fan to apply two coats of EL-143 Cactus Flower in random directions.
4. Sponge SC-81 Cinnamon Stix in a lacy manner to the inside of the leaf dish, applying more heavily on the inside sides.
5. When dry, use the tip with SG-401 Black to outline the veins in the leaf as the Cactus Flower will cover them somewhat. Lightly sponge the SG-401 at the edges also.
1. Begin with properly fired cone 04 bisque. Moisten a sponge and wipe bisque to remove any dust.
2. Thin SG-401 Black Designer Liner on a palette. Use the Soft Fan to apply the color onto the leaf. Sponge off the excess to antique, leaving the glazes heavier on the edges.
3. Us the same brush to apply two coats of EL-128 Wheat with random brushstrokes.
4. Sponge SC-97 Cant-elope in a lacy manner to the inside sides of the leaf dish.
5. Sponge one coat of EL-133 Autumn in the same manner over the entire inside of the leaf dish. Try using an old sponge with lots of holes.
6. Re-vein the veins of the leaf with the Liner or by using the metal tip with SG-401 Black Designer Liner. Lightly re-sponge the edges of the leaf with SG-401 Black Designer Liner.
Begin with properly fired shelf cone 04 bisque. Moisten a clean sponge and wipe bisque to remove any dust.
Use the Soft Fan to apply two coats of EL-142 Grass. Use random brushstrokes to avoid directional strokes. Let dry.
Pencil in design.
Use the Script Liner to apply one coat of SG-402 White to the petals of the white flowers and SG-407 Yellow to the yellow flowers. Use the Liner for the smaller flowers. Mix SG-405 Green with the yellow for a lighter green and apply one coat to the leaves.
Use the metal tip with SG-401 Black to outline and line the stems.
1. In wet greenware, cut out the windows, use the cutout clay from the front, side and back windows, to make shutters. Stamp the clay with ST-133 Woodgrain Stamp, cut to fit, slip attach to the sides of the windows Cut a one-inch hole in the bottom for the light pinch in light socket. Clean and fire to cone 04 Bisque. Moisten a clean sponge and wipe bisque to remove dust.
2. Pencil in a line to separate the red from the white on the camper. Brush three coats of SC-74 Hot Tamale to the red areas. Brush the shutters with two thinned coats of SC-27 Sour Apple, when dry thin like water, SC-26 Green Thumb, brush over shutters so it pools in the woodgrain. Brush the inside of the window cutouts with Green Thumb.
3. Brush the tires and the trailer hitch with SC-15 Tuxedo, 2 coats, float SC-15 Tuxedo around the edge of the hubcaps.
4. Thicken SC-36 Irish Luck with AC-310 Silkscreen Medium to the consistency of peanut butter use a palette knife. Repeat for SC-34 Down To Earth. Use the pine cone screen from DSS-0111 Botanical-Leaves, with the shiny side down, rub the thickened Irish Luck over the pine needles and the thickened SC-34 Down to Earth over the pine cone. Gently wash with water.
5. Outline the stripes and the red on the body of the camper with CB-110 Liner.
6. Dip in a clear glaze or brush on two coats of S-2101 Clear to the camper with CB-604 Soft Fan.
7. Fire to cone 05/06.
Form
CD-1514 Vintage Camper
Colors
SC-15 Tuxedo
SC-26 Green Thumb
SC-27 Sour Apple
SC-36 Irish Luck
SC-34 Down To Earth
SC-74 Hot Tamale
NT-CLR Clear Dipping or S-2101 Clear Brushing Glaze
1. Begin with properly fired cone 04 bisque. Moisten a sponge and wipe bisque to remove any dust.
2. Thin SG-401 Black Designer Liner with water and use the Soft Fan to apply onto the leaf. Wipe off excess to “antique”, then sponge SG-401 Black Designer Liner to the rim of the leaf.
3. Use the Soft Fan to apply one coat of CG-993 Lavender Sprigs.
4. Use the same brush to apply three coats of EL-147 Creek Bed over the Lavender Sprigs.
5. Use the Liner to re-vein the leaf veins with SG-401 Black Designer Liner. Use the sponge to lightly dab the color to the edges of the leaf.
Begin with properly fired shelf cone 04 bisque. Moisten a clean sponge and wipe bisque to remove any dust.
Apply 1 coat of SC-8 Just Froggy to the top of the dish. Let dry and using a damp sponge wipe away, leaving glaze in the details/shadows.
Apply 2 coats of SC-27 Sour Apple to the top of the dish.
Apply 2 coats of SC-8 Just Froggy, SC-11 Blue Yonder, and SC-74 Hot Tamale to different ornaments and apply 2 coats of SC-6 Sunkissed to the tops of them.
Apply 3 coats of SC-14 Java Bean to the trunk.
Apply 2 coats of SC-16 Cotton Tail to the eyes and 1 coat of SC-11 Blue Yonder.
Apply 2 coats of SC-6 Sunkissed to the star.
Apply 3 coats of SC-8 Just Froggy to the back of the dish.
Apply 2 coats of SC-15 Tuxedo to the pupils and 1 coat to outline the details.
Let dry completely.
Stilt and fire to shelf cone 06/05.
Form
MB-793 Merry Christmas Tree Dish or CD-793 Tree Dish Mold
In wet greenware use a tube tool to drill in the holes in the branches, clean seam and fire to 04.
Brush 3 coats of SC-74 Hot Tamale to the base and the edges of the facets as shown, brush larger spaces on the larger branches, use CB-106 Script Liner.
Brush three coats of CG-994 Field and Flowers to the remainder of the tree brush up to or overlap slightly onto the Hot Tamale.
1. Pour CD-1095 Funky Tree mold 1/4″ thick. Refer to casting instructions.
2. Once it is firm enough to handle, use a sponge to smooth down any casting lines in the greenware.
3. Use the tube tool to punch holes at the bottom of each section of the tree. This will be where the lights will be located. Use the X-ACTO knife to cut a hole in the back big enough for the clip-in light.
4. Fire to cone 04.
5. Using the Soft Fan and SC-74 Hot Tamale, glaze every other section of the tree, starting with the top and ending with the trunk. Apply a total of three coats to each section. Allow the glaze to dry between coats.
6. Using the Soft Fan and CG-994 Field and Flowers, glaze the remaining sections of the tree. Apply a total of two coats to each section. Allow the glaze to dry between coats and make sure the crystals are evenly distributed.
7. Fire to cone 06.
10. When completely cooled, add the tree lights and clip-in light on the back.
1. Begin with properly fired shelf cone 04 bisque. Moisten a clean sponge and wipe bisque to remove any dust.
2. Cut out the pattern of the flowers, keep the negative and positive of the cutout.
3. Use the Soft Fan to apply one coat of FN-001 White to the front of the vase. In the flower pattern area, wet the paper cutout of the flowers and press it onto the vase. At the neck and shoulder of the vases apply one coat of CG-981 Fruity Freckles, keeping the crystal load to a minimum.
4. Use the Soft Fan to apply two coats of the following colors to the background. Keep the brush wet when applying the color.
Thinned SC-70 Pink a Dot to the top left
SC-55 Yella Bout It to the right side, brushing in SC-93 Honey Dew List to the right side towards the bottom
5. When dry, hold the SL-435 Culicues Stencil over the top sides of the vases. Use the foam roller to apply SC-26 Green Thumb over the stencil on the tall vase and SC-8 Just Froggy on the short vase. On the right side of the short vase, roll SC-81 Cinnamon Stix over the Curlicues Stencil.
6. Using a palette knife, thicken SC-81 Cinnamon Stix with AC-310 Silkscreen Medium to the consistency of peanut butter. Rub the thickened mix over the various silkscreen images (shiny side down) to use as a muted background.
7. Use the foam roller to apply SC-26 Green Tumb over MT-013 Honeycomb Mat then press to the lower section of the tall vase. Use the same roller to apply SC-8 Just Froggy over the same mat and press to the shorter vase. No need to clean between colors.
8. Remove the paper flowers. Let dry.
9. Trace flower petals onto the vase, then cut out the centers. Hold the flower with the cutout center on the vase, then use a squeegee or a card to drag SG-501 Sculpting Medium into the open space to give the flower dimension. Remove the paper.
9. Use the Script Liner to apply two coats of SC-6 Sunkissed, SC-5 Tiger Tail and SC-75 Orange-A-Peel to the petals. Use the same brush to apply SC-26 Green Thumb and SC-8 Just Froggy to the stem and leaves. Use the sponge-on-a-stick to dab SC=8 Just Froggy onto the ST-100 Game Board Stamp then press onto the leaves.
10. Use the Script Liner to apply one coat of SG-403 Red, SG-404 Blue, and SG-411 Purple to the Sculpting Medium in the center of the large flower. Use the Liner to outline the flowers with SG-401 Black Designer Liner.
11. Use the Script Liner to apply one coat of CG-981 Fruity Freckles on the leaves and stem on the short vase. Apply two two coats of SC-26 Green Thumb and shade the lower section with SC-8 Just Froggy.
12. Use the Script Liner to apply one coat of SG-407 Yellow Designer Liner and SG-408 Orange Designer Liner to the center of the flower on the short vase. Let dry. Use the sponge-on-a-stick to apply SG-405 Green Designer Liner to the ST-127 Crackle Stamp and apply as shown.
13. Use all of the Designer Liner colors to make lines coming from the center of the flower. Some should be longer and some cross over the other lines for interest. Outline with SG-401 Black Designer Liner.
14. Use the Soft Fan to apply two coats of S-2101 Clear Brushing Glaze, avoiding the centers and the crystal leaves on the short vase.
1. Begin with properly fired shelf cone 04 Bisque. Moisten a clean sponge and wipe bisque to remove any dust.
2. Using a pencil, draw a line to separate the water from the sky.
3. Using the Soft Fan, apply two coats of SC-45 My Blue Heaven to the water and two coats of SC-91 Seabreeze to the sky.
4. Cut a toilet paper tube in half, then cut the length in halves., Cut the end of the lengths into 1/4″ inch sections and trim small slices of each section so when flattened it will have spaces between the cuts.
4. You will be using the cut tube as a stamp. Use the sponge-on-a-stick to apply SC-11 Blue Yonder to the section of the cut tube and add SC-12 Moody Blue to the tips. Press to the water section starting at the right side of the water. Overlap each stamp changing direction of the stamp to mimic a rocky sea. Alter the color on the tube for more interest; use more of the Moody Blue or add SC-30 Blue Dawn. Fill the water area with this stamping technique.
5. Repeat the process for the sky using SC-45 My Blue Heaven and SC-30 Blue Dawn, adding SC-16 Cotton Tail to the stamp. Use the same cut tube from the water; This will allow the color left on the tube to transfer to the sky.
6. Use a palette knife to mix SC-15 Tuxedo with AC-310 Silkscreen Medium to the consistency of peanut butter. Use the ship screen from DSS-0100 Nautical, shiny side down, and rub the thickened Tuxedo over the screen.
7. Use the Script Liner to apply three coats of SC-16 Cotton Tail to the sails. Use the Liner with SC-15 Tuxedo to re-line the detail back into the sails.
8. Use the Soft Fan to apply three coats of FN-041 Medium Blue to the back of the platter. Dip into NT-CLR Clear Dipping Glaze or use the Soft Fan to apply one coat of NT-BR Clear Brushing Glaze to the front.
9. Fire to cone 05/06.
Form
MB-957 Large Oval Platter
Colors
SC-11 Blue Yonder
SC-12 Moody Blue
SC-15 Tuxedo
SC-16 Cotton Tai
SC-30 Blue Dawn
SC-45 My Blue Heaven
SC-91 Seabreeze
FN-041 Medium Blue
NT-CLR Clear Dipping or NT-BR Clear Brushing Glaze
1. Begin with properly fired shelf cone 04 Bisque. Moisten a clean sponge and wipe bisque to remove any dust.
2. Shade in the deep crevices of the legs, and mouth and around the eyes with SC-15 Tuxedo. Sponge the excess color into the body of the toad. Shade in the eye around the edges, wipe off the excess color. Brush two coats of SC-8 Just Froggy to the iris, two coats of SC-15 Tuxedo to the pupil, outline with Tuxedo, use CB-106 Script Liner, and CB-110 Liner.
3. Brush CG-987 Tree Frog to the Toads’ body three coats, brush only two coats around the eyes, use CB-106 Script Liner around the eyes, and CB-604 Soft Fan for the rest of the Toad.
4. Brush two coats of S-2709 Cappuccino Mint to the breast overlap onto the crystal Tree Frog. Brush two coats of FN-037 Chartreuse over the Cappuccino Mint use CB-604 Soft Fan.
1. Begin with properly fired shelf cone 04 Bisque. Moisten a clean sponge and wipe bisque to remove any dust.
2. Use the Soft Fan Brush to apply one coat of UG-50 Jet Black inside the neck of the vase.
3. Use a circle template to enlarge the area around the eye with a pencil. Use the Liner to apply two coats of SC-16 Cotton Tail to the whites of the eye. Apply two coats of SC-65 Per-twinkle to the iris. Fill in the pupil and outline the eye with SC-15 Tuxedo.
4. Use the Soft Fan to apply two heavy coats of EL-103 Sea Spray to the fish. Brush over the eye area with one of the coats, but not as heavily.
5. Use the Soft Fan to apply one coat of S-2714 Herb Garden to the fish, avoiding the eyes.
6. Use the same brush to apply one more coat of EL-103 Sea Spray to the fish.
7. Use the Soft Fan to apply a heavy coat of PC-601 Clear Cascade to the top third of the fish. Make sure the glaze drips down the fish. Let dry.
8. Wet a section of cheesecloth then alter the pattern by pressing the fabric into a grid pattern. Squirt SC-15 Tuxedo onto a plate and dip the cheesecloth into the Tuxedo to saturate, then open the material. If necessary, remove some of the Tuxedo with your fingers. Lay the cheesecloth onto the fish in a horizontal position. Press with a paper towel to transfer the pattern. Turn the fish over to continue the process.10. Thin EL-103 Sea Spray slightly, pour to the inside of the fish, turn to coat, pour out the excess and drain.
1. Begin with properly fired cone 04 bisque. Moisten a sponge and wipe bisque to remove any dust.
2. Thin slightly FN-037 Chartreuse pour to the inside, turn to coat, pour out excess glaze, drain.
3. Brush Chartreuse on the edges of the pockets, three coats, and SC-6 Sunkissed on the trim edge of the large opening, three coats. Use CB-106 Script Liner or CB-604 Soft Fan.
1) Strap your mold, and pour with low fire casting slip.
2) When leather hard, remove from the mold.
3) With a cutting tool, open the windows as desired.
4) Allow to dry, then clean and fire to shelf cone 04 bisque.
5) Using the CB-604 # 4 Soft Fan and the CB-106 # 6 Script Liner, apply 2 coats of EL-143 Cactus Flower to the roof and doors.
5) Mix AC-310 Silkscreen Medium with SC-15 Tuxedo to a peanut butter constancy.
6) Hold one of the leaves from the DS-0111 Botanical Leaves Designer Silkscreen shiny side down, and apply the thickened Tuxedo mixture to the design. Repeat at random with this and a few other leaves.
7) Using the CB-106 # 6 Script Liner, apply 2 coats of EL-142 Grass to the shutters.
8) Using the CB-604 # 4 Soft Fan and the CB-106 # 6 Script Liner, apply 2 to 3 coats of CG-995 Foggy Mist to the lower portion of the house and the chimney.
1. Begin with properly fired shelf cone 04 Bisque. Moisten a clean sponge and wipe bisque to remove any dust.
2. Thin SW-174 Leather to a coffee cream consistency, pour to the inside, turn to coat, pour out the excess.
3. Large Vase: Brush on two heavy coats of SW-172 Macadamia to the outside of the vase, apply two heavy coats of SW-173 Amber Quartz over the Macadamia. Recede two inches from the bottom on the last coat.
4. Medium Vase: Brush on three heavy coats of SW-174 Leather, brush on a fourth coat of Leather at the top three inches of the vase. The heavier application will bring out the blue hues.
1) Strap and cast the mold with low fire casting slip.
2) When leather hard, remove from the mold and cut out a hole in the back for a light kit and small holes around the jacket for tree lights.
3) Allow to dry. Then clean and fire to shelf cone 04 bisque.
4) Using the CB-604 # 4 Soft Fan, apply 1 slightly thinned coat of EL-137 Black Adventurine to the entire piece.
5) Using a dampened sponge, wipe back the color, leaving it just in the recessed areas.
6) Using the CB-604 # 4 Soft Fan and the CB-106 # 6 Script Liner, apply 1 coat of SC-16 Cotton Tail to the snow areas.
7) using the CB-106 Soft Fan and the CB-106 # 6 Script Liner, apply 2 coats of EL-143 Cactus Blossom to the jacket.
8) Using the CB-106 # 6 Script Liner, apply 2 coats of EL-146 Rain Cloud to the gloves and buttons.
9) Using the CB-106 # 6 Script Liner, apply 2 coats of EL-142 Grass to the scarf.
10) Using the CB-106 # 6 Script Liner, apply 2 coats of EL-144 Dark Amethyst to the hat band.
11) Using the CB-106 # 6 Script Liner, apply 2 coats of EL-147 Creek Bed to the hat.
12) Using the CB-404 # 4 Pointed Round, apply 1 heavy coats of SG-302 Snowfall to the Cotton Tail areas.
13) Using the CB-110 # 10/0 Mini Liner, apply 2 coats of SC-97 Can’t Elope to the nose.
14) Using the CB-110 # 10/0 Mini Liner, apply 1 coat of SC-16 Cotton Tail to the eye, then SC-31 The Blues for the iris and SC-15 Tuxedo for the pupal.
15) Sketch on holly leaves to the jacket.
16) Using the CB-404 # 4 Pointed Round, apply 1 coat of SC-26 Green Thumb, and using the brush handle, SC-74 Hot Tamale for the berries.
17) Stilt and fire to shelf cone 05/06.
18) Add the lighting kit and glue in the Christmas light bulbs.
1.Begin with properly fired shelf cone 04 Bisque. Moisten a clean sponge and wipe bisque to remove any dust.
2. Thin slightly FN-006 Medium Blue, pour to the inside, roll to coat, pour out the excess glaze, drain.
3. Trace on the pattern using clay carbon paper.
4. Brushstroke in the lighter pink flowers with SC-2 Melon-Choly, using CB-106 Script Liner, add SC-89 Cutie Pie Coral to the tip of the brush to deepen the color tones, two coats. The small flowers and some centers are SC-88 Tu Tu Tango, 2-3 coats. The largest flower is the outline of the flower that will be silk screened brush SC-89 Cutie Pie Coral, with shades of SC-88 Tu Tu Tango. Center of the flower is one coat of SC-12 Moody Bl
5. Blue centers use SC-12 Moody Blue, two coats, leaves, and stems are SC-12 Moody Blue, two coats.
6. Outline flowers with CB-110 Liner using SC-12 Moody Blue.
7. Thicken SC-15 Tuxedo with AC-310 Silkscreen Medium using a palette knife to the consistency of peanut butter. place the screen over the painted dry flower, shiny side down, rub the thickened Tuxedo over the screen with your finger. Gently wash the screen.
8. Outline all the flowers with SC-12 Moody Blue using CB-110 Liner. Thinly outline all the flowers and the large petals of the silkscreened flower with SG-401 Blue.
9. Brush on two coats of S-2101 Clear to the outside of the vase with CB-604 Soft Fan.
1. Begin with properly fired shelf cone 04 Bisque. Moisten a clean sponge and wipe bisque to remove any dust.
2. Copy two patterns, cut out the shapes.
3. Trace around the owl pattern on the vase, brush the area past the pencil lines with two coats of FN-001 White.
4. When dry, re-wet the area with brushed on water, place the paper pattern over the white glaze. press a paper towel over the paper to remove gaps.
5. With CB-604 Soft Fan brush on one coat of SC-43 Lettuce Alone brush over the edges of the paper. For the second coat brush SC-93 Honeydew List over the area around the owl’s head and top wings, brush the remainder of the vase with Lettuce Alone, third coat repeats the second coat, blending the Honeydew List with Lettuce Alone.
6. Let dry, apply SC-7 Leapin’ Lizard to the MT-012 Ikat mat, press to the vase, front and back. Use the two-inch foam roller to apply color to the mat.
7. Remove the paper.
8. Refer to the picture for color placement, feathers are SC-16 Cotton Tail, SC-60 Silver Lining, SC-35 Gray Hare, and SC-83 Tip Taupe. Apply with CB-106 Script Liner, in a press, pull and lift stroke for the individual feathers.
9. Owl’s body is a little darker, using mostly SC-60 Silver Lining and SC-35 Gray Hare, in a blocky stroke, mixed in with SC-16 Cotton Tail and soft Tuxedo lines.
10. Eyes are SC-79 Cant-elope, the beak is SC-83 Tip Taupe, dots of SC-75 Orange A Peel and Cant-elope are in the wings next to the body.
11. Use a stiff toothbrush to spatter the wings with SC-35 Gray Hare, and SC-83 Tip Taupe. Outline with SC-15 Tuxedo using CB-110 Liner around the outside edges and a lighter outline on the body near the wings. Shade SC-15 Tuxedo on the left side of the body next to the wings with CB-106 Script Liner.
12. Brush FN-001 White into the neck and top edge of the vase, if desired clear glaze the inside for use with flowers.
Small Finial Jar: Brush on two coats of SC-75 Orange A Peel to the lid, body of jar and base, exclude the nob, and middle rings at the base. Brush on a third coat of SC-75 Orange A Peel in sections, so the glaze will remain wet as the shredded paper is applied, press in the paper in rows, leaving small spaces between the paper, press down any gaps in the paper.
Brush on two coats of SC-12 Moody Blue over the SC-75 Orange A Peel, remove the paper after the second coat loses its gloss. Brush the middle rings and nob with three coats of SC-12 Moody Blue, use CB-106 Script Liner. Let dry.
Use SG-408 Orange to outline the rings and nob over the Moody Blue.
Use S-2101 Clear Glaze inside, thinned and poured, and one coat brushed on the outside.
Large Finial Jar: Brush on two coats of SC-75 Orange A Peel with CB-604 Soft Fan, brush on a third coat in sections so it remains wet as the jute is applied, apply the jute in spiral lines, the spacing in your preference. Apply another coat of SC-75 Orange A Peel around the jute to seal the edges.
Brush on two coat of SC-12 Moody Blue over the jute areas, and three coats on the top nob. Pull off the jute as the last coat loses its gloss.
Use the Clean-up Tool to remove the seams from the greenware. Sand the seams and dress down the bottleneck with the Green Grit Cloth. Use a damp sponge to remove any dust from the ware. Check the inside of the bottle for any debris as well.
Trace the pattern onto the tissue paper with a pencil. Place the pattern onto the ware and transfer the butterfly portion of the pattern only at this time using the Red Sharpie marker. The red marker with penetrate the tissue paper and leave the outline of the butterfly.
Use CB-106 Script Liner, CB-404 Pointed Round and CB-602 Soft Fan to apply 2-3 even coats of UG-51 Jet Black to the background on the flat recessed areas.
Transfer the leaves of the pattern using the tissue paper and Red Sharpie Marker to the black underglaze areas.
Scraffito the lines of the leaves in the pattern using the Sgraffito Tool. If the lines are too light, retrace over them with the Sharpie Marker. It is best to gradually carve through the black color in several passes over the line. Carving through in one pass over the line can cause chipping of the color. If the color has become too dry, lightly mist the area with the spray bottle filled with water. If the color has dried too long of a time between the sgraffito, chipping can occur also. If chipping of the color does happen, reapply the black color and re-carve the line.
Dust off any color and clay debris from the ware using the Dusting Brush. If you had to use the spray bottle to mist the color, be sure all the fine dust and color has been removed from the carved lines. The moistened color has a tendency to adhere to the carve lines more easily.
In a 4 oz. Jar, mix 4 tablespoons of UG-46 Bright Yellow with 1 tablespoon of UG-203 Squash Yellow, a 4: 1 ratio. Mix and shake the contents of the jar. Using CB-106 Script Liner, CB-404 Pointed Round, CB-602 Soft Fan or CB-604 Soft Fan to apply 3-4 even coats of the yellow mixture to the butterfly and bottle trim. Use the brushes sized for the area being painted to your advantage.
Fire to Shelf Cone 03-04.
In a plastic cup, mix FN-009 Black with some water to a melted ice cream consistency. Check the inside of the bottle for any debris and remove. Pour the thinned color into the bottle. While working quickly, rotate the bottle to evenly coat the inside of the bottle. Pour out the excess color and invert to drain and dry. Use a moistened sponge to remove any glaze from the outside of the ware.
Use a damp sponge to wipe down the piece before glazing. Make sure there is no fire dust or debris in the carved lines. Apply 2-3 coats of S-2101 Crystal Clear Brushing to the outside of the bottle.
Begin with properly fired shelf cone 04 bisque. Moisten a clean sponge and wipe bisque to remove any dust.
Trace on the pattern.
Outline and add all the detail with SG-401 Designer Liner Black.
Using the CB-404 # 4 Pointed Round, apply 1 very thin coat of SW-304 Copper Wash to the design areas.To deepen select areas, apply a 2nd or 3rd thinned coat. If not thinned, the Copper Wash will fire to an almost black color.
Using both the CB-106 # 6 Script Liner and the CB-604 # 4 Soft Fan, apply 2 coats of SW-120 Northern Woods to the rim and back wall area, excluding the foot or recessed area.
Using the CB-604 # 4 Soft fan, apply 2 coats of SW-001 Clear to the front, excluding the rim.
Place on a well kiln washed shelf and fire to shelf cone 5/6.
1.Begin with properly fired shelf cone 04 Bisque. Moisten a clean sponge and wipe bisque to remove any dust.
2. Thin slightly FN-013 Light Yellow pour to the inside, roll to coat, pour out the excess, drain.
3. Use CB-604 Soft Fan to apply three coats of FN-013 to the outside of the vase.
4. Use a 1 1/2″ wide craft brush such as a “chip brush” to brush on wide strokes of SC-12 Moody Blue, lift up the brush at the end of the stroke so to see the separation of the bristles. Continue to fill in the vase in different directions of strokes, leave some of the Light Yellow base coat showing. Apply a second coat just on the fat area of the stoke leaving the ends showing the separation of the strokes.
5. Mark a 1/4″ line at the top of the vase brush on 2-3 coats of SC-75 Orange A Peel.
Begin with properly fired shelf cone 04 bisque. Moisten a clean sponge and wipe bisque to remove any dust.
Using the pattern and clay carbon paper, trace the pattern onto the center of the plate using a pencil.
Using the CB-604 Soft Fan Brush, apply three coats of SW-152 Blue Splatterware onto the back of the plate, making sure not to glaze the foot or the bottom. When dry, flip plate over and apply three coats to the front rim of the plate.
Using the SG-404 Designer Liner Blue, outline all of the letters and the stars.
Fill the PAS1OZ Xiem Applicator Bottle Red with SW-501 White Gloss and attach the thickest tip (white). Use it to fill in the stars, OY and WORLD. Rinse the bottle and tip.
Fill the PAS1OZ Xiem Applicator Bottle Red with SW159 Blue Matte and use it to fill in TO and THE. Rinse out the applicator bottle and tip.
Using the CB-106, apply three coats of SW-123 Sapphire to the rest of the center of the plate around the letters. Use a smaller brush to get into tight spaces if needed.
Wipe off any excess glaze from the foot of the bowl with a damp sponge.
Do not stilt or hang over the edge of the kiln shelf.
Fire to cone 5/6.
Form
SB-130 Modern Salad Plate
Colors
SW-123 Sapphire
SW-152 Blue Splatterware
SW-159 Blue Matte
SW-501 White Gloss
SG-404 Designer Liner Blue
Decorating Accessories
CB-604 #4 Soft Fan
CB-106 Script Liner
PAS1OZ Xiem 2oz Applicator Red
Use the Clean-up Tool to fettle the seam lines from the ware. Further sand down the seam lines with the Green Grit Cloth. Wipe down the ware to remove excess dust using a moistened sponge.
Use CB-220 Detail Liner or CB-404 Pointed Round to apply 1 coat of AC-302 Wax Resist to the eyes, toenails and backspin fin and bottoms of the feet. Wash brush immediately after use with warm water and liquid soap. Let dry.
Place the iguana on a used towel. In a plastic cup mix 3 teaspoons of Baking Soda with water to create a watery slurry. Using CB-604 Soft Fan to apply a coat of the Baking Soda mixture to the body of the Iguana excluding the backspin, eyes, and toenails. Let dry until the baking soda turns white.
Fill a spray bottle with the White Vinegar. Spray lightly the Iguana with vinegar.
A chemical reaction will happen to make the clay surface bubble and boil creating a texture.
If after the initial spraying you want more of a texture or craters, you may apply either more Baking Soda mixture and or more vinegar. Applying the vinegar with a brush can create a pattern of the brush stroke but is an option if there is no spray bottle for use.
Sometimes it may need only another misting of vinegar for the process to continue. If too much Baking Soda is applied it can create hard spots on the fired bisque surface.
When you are satisfied with the texture of the lizard, allow it to dry. Be careful when handling the dried iguana as the texture can be damaged and if still moist, the greenware is more susceptible to breakage.
Before Firing, dust any excess Baking Soda patches that may be left after the texturizing process.
Fire the piece to Shelf Cone 03-04.
Glazing
On a tile mix SC-27 Sour Apple to a wash consistency with water, (about 1:1 ratio).
Apply to the textured surface of the lizard using CB-604 Soft Fan. The color will flow into the recesses of the texture and stay lighter along the top surface. Darken the creases and around the toes, legs, neck, around the eyes, and along the spine with thinned SC-39 Army Surplus using the same brush.
Fill in the eyes with SC-97 Cant-elope with CB-220 Detail Liner and shade the edges of the eye with thinned SC-88 Tu Tu Tango. Detail the pupil and toenails with SC-15 Tuxedo using CB-110 Liner. Paint in the eyelid with SC-39 Army Surplus. Place some dots below the eye using SG-410 Bright Blue.
Use CB-604 Soft Fan to apply 1 coat of S-2101 Crystal Clear Brushing to the body of the lizard excluding the spine area
Apply an extra coat to the eyes.
Using CB-604 Soft Fan apply a 1-2 coat of FN-220 Sooty Grey to over the body of the iguana excluding the eyes.
Apply 2 coats of EL-134 Mirror Blue to the spine of the iguana using CB-404 Pointed Round.
To the unshaken or stirred jars of S-2701 Peacock Eyes, S-2702 Northern Lights and S-2703 Berryberry Pie, use a spoon to reach down and gather a scoop of the crystals from each and place them onto a tile. Note the numbers of each for later use.
Apply one coat of the crystals from S-2703 Berryberry Pie to the spine of the iguana and slightly onto the body using CB-604 Soft Fan.
Place some of the crystals on the forehead and feet as well. Starting just below the previously applied crystals, apply 1 coat of the crystal from S-2102 Peacock
Eyes about ½ to ¾ an inch. You can apply a wider area towards the middle of the belly.
Place some of these crystals on the forehead and feet as well.
Next apply below and overlapping slightly the previously applied crystals with S-2702 Northern Lights about ½ to ¾ inches and slightly wider along the middle of the belly. Also, apply a few crystals on the forehead and feet.
Order the piece to be kept wet from the caster. Place the piece in a plastic bag until ready to work on. Ideally, it would be best to work on the piece about 1-2 hours after being removed from the mold.
Using the sharp pencil or Stylist to trace the various sizes of circles on the fish body allowing about a ¼” spacing between circles. Place the larger circles towards the top and reducing the size and number of large circles towards the tail. Some of the circles may be only portions depending on where they are located next to the head, fin or tail. Try not to place the same sized circle next to one another for a better design. The smallest circle (3/8”) is a good filler for the spacing of other circles.
Use the Clean-up Tool to lightly remove the seams from the ware. You don’t need to completely clean the seams at this time. Place the piece on a banding wheel or Lazy Susan for the cutout work.
Using a Scalpel or Fret Tool to cut through the ware along the incised circles. It is best to start from the top and work your way down the body of the ware when cutting out the circles.
When all of the circles have been cut out, drape the plastic bag over the ware to slow the drying process.
After a day or two, completely remove the bag off the ware to finish drying.
Use the Clean-up Tool to remove any sharp edges from the cutouts on the fish. Be careful as to how you clean and carve your circles. Continue to dress down seams and cutouts on the ware with Green Grit cloth. Lightly sponge off the piece to remove any dust on the ware.
Fire to Shelf Cone 03-04. Use a damp sponge to wipe down the piece before glazing.
Apply 2 coats of FN-001 to the entire ware inside and out using CB-602 Soft Fan and CB-604 Soft Fan. Make sure all of the cutout areas have glaze on them.
It may be beneficial to add a drop or two of food coloring to the glaze before applying the second coat to ensure that all areas have been covered.
Place Blue Masking Tape on the inside of the mouth area to where it sticks up above the mouth lips creating a “dam” to keep the color from flowing back inside of the fish.
In three plastic cups mix SC-16 Cotton Tail, SC-12 Moody Blue and SC-32 Bluebeard separately with water in equal parts. You will need about 4 oz. of the white mixture and about 2 oz. of each of the blue colors. During this step, you will need to have all your colors mixed and ready for use. The process will go quickly. Start at the top of the fish and pour the SC-16 Cottontail mixture over the outside and around the mouth.
Once the color has been applied around the fish’s mouth, pour some SC-12 Moody Blue mixture over the wet color. When that has been done, then apply a smaller amount of SC-32 Bluebeard mixture over the Moody Blue areas.
As the color is “weeping” down the ware, spritz with the alcohol. Spritzing with the alcohol will make the color halo or break up slightly as it dries.
As long as the underlying white color is wet you can apply more of the blue colors to further enhance or add color to what has been achieved.
Repeat this process on the fin and lower tail section at the bottom of the piece.
Let dry.
Apply 1 coat of S-2101 Crystal Clear Brushing over the entire piece using CB-604 Soft Fan.
Stilt and Fire the piece to Shelf Cone 05-06.
Form
CD-1425 Fish Vase (Wet Greenware cast at least ¼” thick— Place wet greenware in a plastic bag until doing cut out work.)
Colors
FN-001 White
SC-16 Cottontail
SC-32 Bluebeard
S-2101 Crystal Clear Brushing
Decorating Accessories
CB-604 Soft Fan
CB-602 Soft Fan
Miscellaneous Accessories
Scalpel for Fret Tool
Plastic (Dry Cleaning) Bag (large enough to cover piece)
Clean-up tool
Green Grit Cloth
Sponge
Cardboard circle shapes in various sizes: 3/8”, ½”, 5/8”, 7/8”, 1- 1/8”.
Begin with properly fired shelf cone 04 bisque. Moisten a clean sponge and wipe bisque to remove any dust.
Using the CB-604 Soft Fan Brush, apply 3 coats of SW-501 White Gloss to the back rim and the entire front of the plate, making sure not to glaze the foot or the bottom of the plate.
Using the pattern and clay carbon paper, trace over the white lines of the pattern onto the center of the plate using a pencil.
Attach the AC-224 Plastic Detailer Cap to the 2oz bottle of AC-302 Wax Resist. Apply wax over the traced lines of the pattern. Let dry.
Using the CB-106, apply three coats of each glaze into the sections of the gnome, sky and mushrooms according to the pattern. If you get any glaze on the wax and it beads up, wipe it off with a damp sponge.
Fill the AC-222 Medium Writer Tip Kit with SW-508 Black Gloss. Draw in the zig zags on the shirt and hat and the birds in the sky.
Dip the eraser of the pencil into SW-504 Red Gloss and make polka dots on the rim of the plate.
Wipe off any excess glaze from the foot of the bowl with a damp sponge.
Do not stilt or hang over the edge of the kiln shelf.
Begin with properly fired shelf cone 04 bisque. Moisten a clean sponge and wipe bisque to remove any dust.
Find the center of the plate and mark it with a pencil (using a banding wheel helps).
Mix together UG-50 Jet Black and AC-310 Silkscreen Medium to make a paste and apply the ornaments from the DSS-0160 Vintage Holiday silkscreen (save any extra paste because we will screen these images again).
Apply the first ornament by touching the tip to the center mark. Repeat directly across (with the tip touching the center again) and then again perpendicular to the first 2. This should leave you with 4 ornaments evenly spaced around the center. You may want to wash and dry your screen between uses, but keep in mind that this will not be your final lines, so an imperfect transfer is acceptable.
Fill in between the first style ornaments with the second style ornament and repeat, totaling 4 of each ornament.
Apply 3 coats of underglaze to the details of the ornaments and in the background. Once complete add dots of UG-51 China White to the background.
Gather your extra silkscreen paste and line up your silkscreen with the image on the plate. Screen the images again to freshen up the lines.
Apply 2 coats of UG-50 Jet Black to the rim and back of the plate.
Use a damp sponge to wipe off any excess glaze from the foot of the plate.
Allow to dry completely.
Fire to shelf cone 5/6.
*If you want this plate to be functional, we would recommend applying clear glaze before firing.
1. Begin with properly fired shelf cone 04 Bisque. Moisten a clean sponge and wipe bisque to remove any dust.
2. Use the Soft Fan to apply two heavy coats of EL-101 Oyster Shell to the entire piece.
3. Use the Soft Fan to apply one coat of CG-986 Smoke and Fire and CG-988 Fireflies in a sporadic fashion. Fill in all spaces with one or the other crystal color.
4. Use the same brush to apply one more coat of EL-101 Oyster Shell over the crystal glazes.
5. Use the same brush to apply one heavy coat of PC-601 Clear Cascade over the edge of the bowl’s rim so it has heavy drips to the center of the bowl. Brush heavily on the underside of the rim so it drips
6. Fill A detail bottle with SC-15 Tuxedo. Randomly sqiggle lines inside of the bowl and long lines on the pedestal; lines to not need to be straignt. The combination of glazes will move the Tuxedo and add interest.
Begin with properly fired shelf cone 04 bisque. Moisten a clean sponge and wipe bisque to remove any dust.
Apply 1 heavy coat of SW-501 White gloss to the face of the plate.
Pour SW-501 White Gloss, SW-504 Red Gloss, and SW-507 Bright Green Gloss in alternating stripes on the face of the plate. The more stripes the finer the marbling will be.
Rotate the plate in your hands allowing the glaze to move and swirl into itself. Continue until desired marbling is reached (be careful not to marble too much as the colors will get muddy).
Set aside to dry.
Mix together UG-50 Jet Black and AC-310 Silkscreen Medium to make a paste and apply the Santa and Holly leaves from the DSS–0162 Holiday Icons silkscreen (save any extra paste because we will screen these images again). Be sure to wash the screens out afterwards so they can dry.
Apply 3 coats of SW-501 White Gloss, SW-504 Red Gloss, and SW-507 Bright Green Gloss to fill in the details of the screens. Use UG-30 Sand on Santa’s face (you will want to stay in the lines, but don’t need to fuss about being super precise as we will screen again to get crisp lines).
Gather your extra silkscreen paste and line up your silkscreen with the image on the plate. Screen the images again to freshen up the lines.
Apply 3 coats of SW-111 Wrought Iron on the back and rim of the plate.
Use a damp sponge to wipe off any excess glaze from the foot of the plate.
Begin with properly fired shelf cone 04 bisque. Moisten a clean sponge and wipe bisque to remove any dust.
Apply 1 heavy coat of SW-501 White gloss to the face of the plate.
Pour SW-501 White Gloss, and SW-506 Bright Blue Gloss in alternating stripes on the face of the plate. The more stripes the finer the marbling will be.
Rotate the plate in your hands allowing the glaze to move and swirl into itself. Continue until desired marbling is reached (be careful not to marble too much as the colors will get muddy).
Set aside to dry.
Mix together UG-50 Jet Black and AC-310 Silkscreen Medium to make a paste and apply the Polar Bear and Snowflakes from the DSS-0162 Holiday Icons silkscreen (save any extra paste because we will screen these images again). Be sure to wash the screens out afterwards so they can dry.
Apply 3 coats of SW-501 White Gloss and SW-504 Red Gloss to fill in the details of the screens (you will want to stay in the lines, but don’t need to fuss about being super precise as we will screen again to get crisp lines).
Gather your extra silkscreen paste and line up your silkscreen with the image on the plate. Screen the images again to freshen up the lines.
Apply 3 coats of SW-111 Wrought Iron on the back and rim of the plate.
Use a damp sponge to wipe off any excess glaze from the foot of the plate.
1. Begin with a properly fired shelf cone 04 Bisque. Moisten a clean sponge and wipe bisque to remove dust.
2. Thin slightly FN-001 White, pour to the insides of the vase, roll to coat, pour out the excess and drain.
3. Brush on 2-3 coats of FN-001 White to the outside of the vases with CB-604 Soft Fan.
4. Wet a section of cheesecloth that will fit around the vase loosley. 5. Open it up and take your fingers to drag the fibers into clumps or grids.
6. Squirt SC-75 Orange A Peel onto a plate, soak the cheesecloth into the glaze, open it up, you may need to remove some of the colors to get back to your grid pattern. Lay the vase horizontally, place the cheesecloth over the vase, press over the cheesecloth with a paper towel to transfer the pattern. Workaround the vase. It may bunch up at the end but that also looks interesting. Remove the cheesecloth. For the neck of the vase, saturate the cheesecloth again, bunch it together place it around the neck to transfer the color, repeat again for more color.
7. The smaller vase is done the same as step 6 only use SC-88 Tu Tu Tango.
1. Begin with properly fired shelf cone 04 Bisque. Moisten a clean sponge and wipe bisque to remove any dust.
2. Thin S-2101 Clear Brushing, pour to the inside, turn to coat, pour out excess.
3. Brush on two coats of FN-001 White with CB-604 Soft Fan to the vase.
4. Fill the detailer bottles, AC-220 with half of SC-12 Moody Blue, and another bottle with half of SC-11 Blue Yonder, add a 1/2 tsp of water, fill the remainder of the bottle with rubbing alcohol. Shake well.
5. Brush on another coat of FN-001 White work in sections as the glaze needs to be wet, place the vase in a horizontal position, drop onto the wet glaze small drops of the Blue Yonder and Moody Blue mixture, give space for the color to expand. Fill in to your desired look.
6. When dry, thicken SC-15 Tuxedo with AC-310 Silkscreen Medium using a palette knife to the consistency of peanut butter, use the seahorse from DSS-148 with the shiny side down and up to get them to face one another, rub the thickened Tuxedo over the screen. The small seahorse from DSS-102 Sea Life also works well.
7. Brush on one coat of SC-78 Lime Light and SC-23 Jack O’Lantern to sections of the seahorse with CB-106 Script Liner.
8. Brush the inside neck of the vase with SC-12 Moody Blue three coats with CB-604 Soft Fan.
9. Fire to cone 05/06.
Form
CD-1144 Home Decor Vase or MB-1144 Home Decor Vase (bisque)
Moisten a BT-910 Sponge and wipe down the piece to remove any dust and debris from the ware. Check the inside as well.
Apply 3 coats of SW-134 Eggplant to the inside of the cup using CB-604 Soft Fan. Apply 3 coats to the handle using CB-406 Pointed Round.
Cut the pattern to fit onto the ware using the scissors. Attach the pattern onto the ware with Blue Masking Tape and then transfer the pattern onto the ware using AC-230 Clay Carbon and a pencil.
To the hat (cone and brim) apply 2 coats of UG-198 Dark Gray using CB-406 Pointed Round in a dabbing (patting) motion. The color is applied unevenly and not brushed on as normally applications.
Apply 3 even coats of UG-218 Pear Green to the face excluding the mouth using CB-406 Pointed Round.
Apply 3 coats of UG-58 Harvest Gold to the hair and stars using CB-406 Pointed Round and CB-110 Liner. Detail the hair with stripes of UG-31 Chocolate using CB-110 Liner. Thin some SG-408 Orange on a tile and shade the hair with some stripes using CB-110 Liner. Use the thinned (dirty water) UG-87 Regal Purple to fill in the mouth and to shade the cheeks.
Apply 2 coats of UG-87 Regal Purple to the coat and hat band in an uneven dabbing motion using CB-406 Pointed Round. Dab the coat and one side of the hat band with 1 uneven coat of UG-93 Wild Violet using the same brush. Thin some SG-408 Orange on a tile and then dab some areas with the thinned color in an uneven manner as before. Shade under the top portion of the coat and front seam with some UG-1 Kings Blue using CB-406 Pointed Round.
For the lettering and detailing of the pattern use SG-401 Black. Sketch or trace the face detail if needed. Keep the detail in the face as fine as possible. The shading on the hat is done with the Black Designer Liner. Let Dry.
Apply 2-3 coats of SW-001 Clear to the cup using CB-604 Soft Fan and CB-406 Pointed Round excluding the handle and interior. Do not paint the bottom of the cup.
Make sure there is no glaze on the bottom of the piece. Use a moistened sponge to remove any glaze from the bottom of the ware before firing.
Fire the piece to Shelf Cone 6.
Form
SB-120 Latte Cup Stoneware Bisque or CD130 Latte Mug Mold
1. Begin with properly fired shelf cone 04 Bisque. Moisten a clean sponge and wipe bisque to remove any dust.
2. Use CB-604 Soft Fan to brush on two coats of FN-001 White to the outside of the vase front and neck of the vase.
3. If the vase is to be used for flowers, thin S-2101 Clear, pour to the inside, turn to coat, pour out the excess.
4. Cut out the pattern, hold the pattern to the vase, carefully lift up the trees and branches, brush water under the paper, press with a paper towel to get the paper to stick.
5. Brush on two coats of SC-65 Peri-Twinkle to the vase front and three coats to the back with CB-604 Soft Fan.
6. Let the Peri-Twinkle dry to the touch, roll SC-31 The Blues with the foam roller, onto the MT-012 Ikat Mat, press the mat to the front of the vase. Remove the paper.
7. Shade the right side of the trees with SC-35 Gray Hare and in some places SC-83 Tip Taupe, shade the left side lighter with SC-60 Silver Lining, use CB-106 Script Liner, the dark branches are first painted with SC-83 Tip Taupe, then streaked with SC-34 Down To Earth, outlined with SC-15 Tuxedo.
8. Lightly outline the trees with SC-35 Gray Hare and SC-15 Tuxedo. Mute the horizontal lines in the branches of the tree.
9. Fire to cone 05/06.
Form
CD-815 Short Envelope Vase or MB-1303 Envelope Vase (bisque)
1. Pour CD-522 Large Slim Pumpkin mold 1/4″ thick. Refer to casting instructions.
2. Once it is firm enough to handle, use the sponge to smooth down any casting lines in the greenware.
3. Trace the pattern on the front of the pumpkin.
4. Cut the pattern out using an X-ACTO knife. Use a sponge to smooth the edges.
5. Use the Xiem tools to carve the leaves and stems.
6. Use the X-ACTO knife to carve a hole in the back of the pumpkin, towards the bottom. It should be big enough to fit the light.
7. Fire to cone 04.
8. Pour around a cup of FN-301 Marshmallow white into a bowl. Add enough water until it is easily poured. While rotating the pumpkin, pour the glaze into the bottom, making sure it evenly coats the inside. Use a Soft Fan to spread any glaze that has dripped out from the holes.
9. Using the Soft Fan, apply four even coats of FN-301 Marshmallow white to the exterior of the pumpkin.
Begin with SC-9 Jaded and mix with water (about a 1 to 2 water to glaze ratio). Pour the mixture into the vase and roll to coat the entire inside. Pour out the excess mixture and let dry upside down to avoid pooling. All of the vases have this glaze on the inside.
Apply 3 coats of the underglaze to the bottom 2/3 of the vase.
Apply 2 coats of the crystal glaze (or 1 coat or each glaze if doing a combination) to the top 1/3 of the piece.
Wipe the bottom of the vase to be sure it is free of excess glaze.
1.Begin with a properly fired shelf cone 04 Bisque. Moisten a clean sponge and wipe bisque to remove dust.
2. Thin slightly FN-044 Yellow Orange, pour to the inside, roll to coat, pour and drain out the excess glaze.
3. Thin with water in the CB-604 Soft Fan SC-80 Basketball, brush in a circular direction on the pot, avoiding the flames, two coats, brush in slightly thinned SC-81 Cinnamon Stix brush into the shadow areas around the flames and under the neck, use CB-106 Script Liner, use the line to brush in Cinnamon Stix to various rings in the pot to vary the color.
4. Brush the top ring at the neck opening with three solid coats of SC-80 Basketball.
5. Shade around the flames with SC-14 Java Bean, use CB-106 Script Liner.
6. Use a damp sponge to remove glaze from the flames.
7. Brush SC-6 Sunkissed at the tips of the flames, blend into SC-97 Cant-elope, brush SC-75 Orange A Peel into the center of the flames, two coats, use CB-106 Script Liner.
8. Brush the ring around the opening with 3 coats of SC-88 TuTu Tango.
9. Brush with one coat of S-2101 Clear.
10. Outline the flames with SC-15 Tuxedo use CB-110 Liner.
1. Pour CD-523 Medium Slim Pumpkin mold 1/4″ thick. Refer to casting instructions.
2. Once it is firm enough to handle, use the sponge to smooth down any casting lines in the greenware.
3. Trace the pattern on the front of the pumpkin.
4. Cut the pattern out using an X-ACTO knife. Use a sponge to smooth the edges.
5. Use the Xiem tools to carve the leaves and stems.
6. Use the X-ACTO knife to carve a hole in the back of the pumpkin, towards the bottom. It should be big enough to fit the light.
7. Fire to cone 04.
8. Pour around a cup of FN-301 Marshmallow white into a bowl. Add enough water until it is easily poured. While rotating the pumpkin, pour the glaze into the bottom, making sure it evenly coats the inside. Use a Soft Fan to spread any glaze that has dripped out from the holes.
9. Using the Soft Fan, apply four even coats of FN-301 Marshmallow white to the exterior of the pumpkin.
1.Begin with a properly fired shelf cone 04 Bisque. Moisten a clean sponge and wipe bisque to remove dust.
2. Thin the glazes on a palette for this blending and shading project. Brush SC-97 Cant-elope to the highlight areas of the squirrel’s body, such as the cheeks, top of head and ears, elbow, knee, and middle of back, also streak the color into the tail.
3. Brush SC-75 Orange A Peel next to the Cant-elope color, overlap the Cant-elope. Streak into the tail.
4. Brush SC-80 Basketball in a wide float in all the shadow areas, streak into the tail, overlap the other colors in the tail.
5. Float SC-81 Cinnamon Stix in over the SC-80 Basketball in the shadow area, inside of the ears, around the arms and legs, under the chin, eyes, and mouth, between the tail and the body, streak into the tail.
6. Repeat these colors for another thin coat of color.
7. Float SC-14 Java Bean in a smaller float in all of the deep shadow areas.
8. Use a sponge or a brush to scrub back color from the breast and muzzle, to antique.
9. Brush the nose with SC-15 Tuxedo, outline the mouth and dot the muzzle.
10. Eyes are SC-14 Java Bean.
11. Apply one coat of S-2101 Clear with CB-604 Soft Fan. 12. Fire to cone 06/05.
1. Begin with properly fired cone 04 bisque. Moisten a sponge and wipe bisque to remove any dust.
2. Once it is firm enough to handle, use the sponge to smooth down any casting lines in the greenware.
3. Trace the pattern on the front of the pumpkin.
4. Cut the pattern out using an X-ACTO knife. Use a sponge to smooth the edges.
5. Use the Xiem tools to carve the leaves and stems.
6. Use the X-ACTO knife to carve a hole in the back of the pumpkin, towards the bottom. It should be big enough to fit the light.
7. Fire to cone 04.
8. Pour around a cup of FN-301 Marshmallow White into a bowl. Add enough water until it is easily poured. While rotating the pumpkin, pour the glaze into the bottom, making sure it evenly coats the inside. Use the Soft Fan to spread any glaze that has dripped out from the holes.
9. Using the Soft Fan, apply four even coats of FN-301 Marshmallow White to the exterior of the pumpkin.
Begin by applying 2 coats of SW-501 White Gloss to the entire bowl except the bottom.
Once the base layers have dried, use a banding wheel to draw spacing lines about 1/2″-1″ apart depending on the size of your bowl. It helps to start in the center and work your way out and if you’re working on the outside, start on the top and work your way down.
Divide bands into 8-12 even sections and draw various shapes into the sections having them meet at the edge. We used triangles and half circles for most of the sections and applied 3-5 rows of shapes.
Use a CB-106 #6 Script Liner or CB-110 #10/0 Mini Liner to fill in the shapes with various brushstrokes. Apply 1 coat to show the texture of the brushstroke and 2-3 for opaque coverage.
Use a CB-604 #4 Soft Fan to apply 1-2 coats of glaze to add colored bands around the details.
Use a CB-110 #10/0 Mini Liner to apply 1 coat of SW-508 Black Gloss to outline the details.
Allow to dry completely and use a sponge to wipe any excess glaze that may have gotten on the bottom.
Begin with properly fired shelf cone 04 bisque. Moisten a clean sponge and wipe bisque to remove any dust.
Using the CB-604 Soft Fan Brush, apply 2 generous coats of SW-154 Shipwreck to the inside and outside of the bowl, leaving the bottom and foot unglazed.
Using the CB-604 Soft Fan Brush, apply 2 coats of the following glazes in a spiral direction according to the pattern. You can leave some uncovered Shipwreck in between sections if you’d like. The order of the colors in the spiral is not important. Make sure you don’t use Dark Flux too close to the bottom of the outside of the bowl or else it may run off the bowl: SW-402 Dark Flux, SW-155 Winter Wood, SW-169 Frosted Lemon, SW-163 Soft Red Matte
Wipe off any excess glaze from the foot of the bowl with a damp sponge.
Do not stilt or hang over the edge of the kiln shelf.
Begin with a properly fired shelf cone 04 Bisque. Moisten a clean sponge and wipe bisque to remove dust.
2. Mix AC-310 Silkscreen medium with S-2101 Clear, add food coloring to enhance the color, use a palette knife to mix to a consistency of peanut butter.
3. Use the Tiki Mask screen from DSS-147 Island, screen the mask on four sides of the pot, with the shiny side down rub the mixture over the screen, continue with the same screen for all four masks.
4. Brush the entire mask with two coats of SC-55 Yella bout It, shade inside the edges with SC-25 Crackerjack Broun, use CB-106 Script Liner.
5. Brush the remainder of the pot with two coats of SC-97 Cant-elope use CB-604 Soft Fan.
6. Work in sections to apply the raffia the glaze must be wet to apply. Brush in sections, SC-97 Cant-elope to the pot, lay in the strands of raffia, press so they lay flat, continue to fill in the cantelope areas.
7. Brush over the Cant-elope with one coat of SC-75 Orange a Peel, pull off the raffia.
8. Re-screen using the tinted clear over the spaces glazed with SC-55 Yella bout It, brush the nose, brows and eyes with two coats of SC-11 Blue Yonder, mouth with SC-73 Candy Apple Red, use SC-73 Candy Apple Red and SC-97 Cant-elope in the design work on the mask.
9. Thicken SC-15 Tuxedo with AC-310 Silkscreen Medium using a palette knife till it is as thick as peanut butter. Lay the mask screen over the painted image, match up all the design work, rub the thickened Tuxedo over the screen. Repeat for all four of the masks.
10. Thin FN-018 Bright Blue slightly, pour to the inside of the pot, roll to coat, pour out the excess, drain.
11. Brush one coat of clear over the outside of the pot with CB-604 Soft Fan.
1. Begin with a properly fired shelf cone 04 Bisque. Moisten a clean sponge and wipe bisque to remove dust.
2. Brush on two coats of FN-001 White to the inside of the bird feeder and the base, with CB-604 Soft Fan.
3. Punch out a number of 1 Inch circles, wet the paper, stick to the inside and base of the feeder as shown.
4. With the fan brush over the bowl and base of the feeder with three coats of SC-65 Peri-twinkle use CB-604 Soft Fan. Remove the paper circles.
5. When dry, thicken S-2101 Clear with AC-310 Silkscreen Medium, using a palette knife to the consistency of peanut butter. Deepen the color by adding food coloring.
6. Use the palms and the flamingo from DSS-147 Island, rub the thickened mixture over the screens with the shiny side down. This screening is for color placement only.
7. Brush one coat of SC-16 Cotton Tail over the flamingos to block out the blue glaze, then brush with two coats of SC-2 Melon-choly, use CB-106 Script Liner. Brush SC-16 Cotton Tail on the section of the beak before the black end.
8. Brush two coats of SC-48 Camel Back to the palm trunks, the palm leaves use three colors of green, SC-77 Glo-worm, SC-27 Sour Apple, and SC-10 Teal Next Time, two coats.
9. Let dry, thicken SC-15 Tuxedo with AC-310 Silkscreen Medium to the consistency of peanut butter using a palette knife. Lay the screen over the painted images, line them up so they fit exactly, rub the thickened Tuxedo over the screen. Screen all the palms and the two flamingos in this manner.
10. Let dry, apply one coat of S-2101 Clear using CB-604 Soft Fan over the top and bottom, fuse together during the firing.
Begin with properly fired cone 4 bisque. Moisten a sponge and wipe bisque to remove any dust.
Apply 2 coats of SW-178 Fool’s Gold to the entire pitcher.
Apply 2 coats of SW-156 Galaxy to the outside of the pitcher. Avoid a heavy concentration of crystals around the bottom to prevent too much movement.. You may also recede the coats instead.
Using a clean sponge, wipe off any glaze that may have gotten on the foot.
Begin with properly fired cone 4 bisque. Moisten a sponge and wipe bisque to remove any dust.
Apply as desired the MC-002 12mm Masking Tape to create a pattern.
Using the CB-604 # 4 Soft Fan, apply 3 coats of SW-501 Gloss Whit to the main areas on the plate and mug, staying off the bands and very bottom of the pieces.
Remove the masking tape.
Using the CB-106 # 6 Script Liner, apply 3 coats of SW-503 Bright Orange to the stripes on the plate and 3 coats of SW-502 Bright Yellow to the stripes on the mug.
Using both the CB-106 # 6 Script Liner or the CB-604 # 4 Soft Fan, apply 3 coats of SW-507 Bright Green Gloss to the rim and back of the plate, and 3 coats of SW-503 Orange Gloss to the inside and rim of the mug.
Wipe off any color from the bottoms of the pieces with a damp sponge.
Place on a well kiln washed shelf and fire to a shelf cone 5/6.
Begin with properly fired cone 4 bisque. Moisten a sponge and wipe bisque to remove any dust.
Place the piece on a banding wheel and while it is spinning apply 2 coats of SW-165 Lavender Mist. Leave a build-up of glaze in a swirl so that will show in the firing.
Apply 3 coats of SW-176 Sandstone to the entire piece, avoiding the foot.
Use a sponge to clean up any glaze that may have gotten on the foot.
Begin with properly fired cone 4 bisque. Moisten a sponge and wipe bisque to remove any dust.
Using the Soft Fan with SW-507 Bright Green Gloss, apply 4 coats to the Rimmed Dinner Plate. Do not glaze the bottom. Allow glaze to dry between coats.
Using the Soft Fan with SW-506 Bright Blue Gloss, apply 4 coats to the Rimmed Salad Plate. Do not glaze the bottom. Allow glaze to dry between coats.
Using the Soft Fan with SW-502 Yellow Gloss, apply 4 coats to the Rimmed Bowl. Do not glaze the bottom. Allow glaze to dry between coats.
Using the Soft Fan with SW-503 Orange Gloss, apply 4 coats to the 16 oz Mug. Do not glaze the bottom. Allow glaze to dry between coats.
Fire to cone 6.
Form
SB-100 16 oz Mug Stoneware Bisque or CD100+ Pottery Mug Mold
Begin with properly fired shelf cone 04 bisque. Moisten a clean sponge and wipe bisque to remove any dust.
Pour out puddles about the size of quarters of SW-118 Sea Salt, SC-73 Candy Apple Red, SC-88 Tu Tu Tango, and SC-40 Blueberry Hill and let dry out completely. Once dry, break them up into small chunks.
Using the CB-604 Soft Fan Brush, apply 3 coats of SW-131 Birch to the front and back of the bowl, leaving the bottom and foot unglazed.
Using the CB-604 Soft Fan Brush, apply 2 coats of SW-402 Dark Flux to the inside the bowl. While the second coat is still wet, sprinkle the dried chunks of the other glazes to the top two inches of the inside of the bowl, near the rim.
Wipe off any excess glaze from the foot of the bowl with a damp sponge.
Do not stilt or hang over the edge of the kiln shelf.
1. Begin with a properly fired shelf cone 04 Bisque. Moisten a clean sponge and wipe bisque to remove dust.
2. Slightly thin FN-224 Key Lime, pour to the inside, roll to coat, pour out the excess glaze, drain.
3. Cut off the tips of the AC-220 Detail bottles, fill 1/4 full of the following colors, SC-11 Blue Yonder, SC-2 Melon-Choly, SC-27 Sour Apple, SC-97 Cant-elope, SC-75 Orange A Peel. Add a cap or two of water, shake to mix. Test on a white glaze, wet tile to check the drip, looking for the drip to spread.
4. Apply two heavy coats of FN-001 White to the shell of the snail, work on one side at a time, as the glaze needs to be wet. Place and prop the snail on the floor, so it is level. Use the Detail bottles to drip on color on the shell, while in a standing position, drop all of the colors in the bottles, spray with water to disperse color if desired.
5. Let dry, before doing the back of the snail shell, repeat the same in #4.
6. Sponge off the drips on the other sections of the snail.
7. Brush two slightly thinned coats of SC-11 Blue Yonder to the section of the body under the shell, when dry, shade around the area with SC-12 Moody Blue, use CB-106 Script Liner to apply two coats of SC-16 Cotton Tail to the edge of the body.
8. For the green area of the snail, brush SC-27 Sour Apple, in all of the shadow areas of the body, brushing SC-77 Glo-worm to the highlite areas of the body, repeat, 2-3 times, keeping water in our brush. Let dry, shade around the eyes, and under the chin and around the edges of the body. Re-shade with SC-36 Irish Luck, in the same areas, and in the mouth.
9. Use SC-11 Blue Yonder for the eyes, SC-15 Tuxedo, to outline the mouth and eyes.
10. Brush on one coat of S-2101 Clear to the outside of the snail.
11. Fire to cone 05/06.
Form
CD-1329 Snail Planter Bisque or CD1329 Snail Planter Mold
1.Begin with a properly fired shelf cone 04 Bisque. Moisten a clean sponge and wipe bisque to remove dust.
2. Slightly thin FN-049 Flamingo, pour to the inside, roll to coat, pour out the excess, drain.
3. Brush two thinned coats of SC-55 Yella bout it to the breast of the frog, use CB-604 Soft Fan.
4. Brush two thinned coat of SC-27 Sour Apple to the body of the frog, brush SC-77 Glo-worm to the highlight areas at the same time. Brush out drips from the thinned color.
5. Shade SC-26 Green Thumb into all the shadow areas in a wide float. Shade again with SC-36 Irish Luck in a narrow float, use CB-106 Script Liner.
6. Trace on the flower patterns, scattered around the frog, brush one coat of SC-16 Cotton Tail to block out the green, then two coats of SC-2 Melon-choly, SC-6 Sunkissed to the stamen.
7. Use CB-110 liner to outline and vein the flowers with S-15 Tuxedo.
8. Use CB-110 Liner to brush two coats of SC-26 Green Thumb to the eyes with Tuxedo Pupils and outline.
9. Brush on one coat of S-2101 Clear with CB-604 Soft Fan. 10. Fire to cone 05/06.
1. Begin with a properly fired shelf cone 04 Bisque. Moisten a clean sponge and wipe bisque to remove dust.
2. Thin slightly FN-018 Bright Blue, pour to the inside, roll to coat, pour out the excess, drain.
3. Brush the light area of the eyes and the belly with two coats of SC-55 Yell about It, use CB-604 Soft Fan and CB-106 Script Liner.
4. Brush three coats of SC-75 Orange A Peel to the top and back section of the owl, use CB-106 Script Liner, and CB-604 Soft Fan.
5. When dry, use a sponge on a stick to apply SC-88 Tu Tu Tango to the ST-113 Circulate stamp, stamp over the Orange A Peel, it has a muted look, if you want it to show more, stamp with SC-73 Candy Apple Red.
6. Brush three coats of SC-11 Blue Yonder to the wings and the beak.
7. Thicken S-2101 Clear with AC-310 Silkscreen Medium using a palette knife, add food coloring to deepen the color, screen the flowers in the shape of a lei on the chest of the owl. Flowers are from DSS-147 Island. To screen, place the shiny side down, rub with your finger the thickened clear, this is for color placement.
8. Brush two coats of color to the various flowers in the lei, use SC-2 Melon-choly, SC-75 Orange A Peel, and SC-6 Sunkissed, the leaves are SC-26 Green Thumb.
9. When dry, thicken SC-15 Tuxedo as in step 7, reposition the flower screen over the painted flower, rub over with the thickened Tuxedo. 10. Apply 2 coats of SC-11 Blue Yonder to the eyes, it is helpful to pencil in the pupil using a circle template. Pupil is two coats of SC-15 Tuxedo, lightly float thinned Tuxedo around the eyes. Outline the eyes and wings, and around the scalloped front with CB-110 Liner.
11. Apply one coat of S-2101 Clear using CB-604 Soft Fan.
12. Fire to cone 05/06
Form
CD1331 Owl Planter Mold or MB-1331 Owl Planter Bisque
Begin with a properly fired shelf cone 04 Bisque. Moisten a clean sponge and wipe bisque to remove dust. Find the center, make a hole to fit the clock stem.
Use SG-401 Black to outline around the edge of the flat middle section, and to separate the spout and lid and base from the teapot. Apply a heavy line then brush out the excess on the shadow area of the handle.
From a palette, use the key card to pick up SC-16 Cotton Tail and SC-55 Yella bout it, start in the center section of the teapot, apply the color with the card, moving toward the edges, add SC-65 Peri-twinkle to the card with SC-16 Cotton Tail apply to the top and sides of the center. Add SC-29 Blue Grass to the card with SC-65 Peri-twinkle to shade at the top and side edges. Apply twice.
Brush three coats of SC-50 Orange ya Happy on the lid and base of the teapot, brush up to the black line, re-apply the black if it covers from the Orange glaze.
Apply the large flower silkscreen to the center section from DSS-149 Flowers, use SC-15 Tuxedo.
Use CB-110 Liner to apply a heavy stroke of SC-75 Orange-A-Peel to the flower petals, SC-26 Green Thumb to the stems, and SC-29 Blue Grass to the centers.
Apply three coats of CG-987 Tree Frog to the remaining section of the teapot, 2-3 coats, use CB-106 Script Liner, apply S-2101 Clear to the SG-401 Black areas, and the center section.
1. Begin with a properly fired shelf cone 04 Bisque. Moisten a clean sponge and wipe bisque to remove dust.
2. Thin slightly FN-40 Pumpkin, pour to the inside, roll to coat, pour out the excess, may need a brush to get at some of the spots.
3. Use CB-604 Soft Fan, brush thinned SC-11 Blue Yonder over the body of the fish one coat, shade each scale, around the eyes and fins with SC-12 Moody Blue, brush one coat of SC-13 Grapel into the middles of the scales and fins.
4. Brush the scallop trim around the scales with 2 coats of SC-16 Cotton Tail, use CB-106 Script Liner.
5. Brush the mouth and the top of the tail with three coats of SC-88 TuTu Tango. Brush the eyeball with two coats of SC-23 Jack O’Lantern, small ring around pupil with SC-88 TuTu Tango, sc-15 Tuxedo pupil.
6. Outline the fins, scallops, and eyes with SC-15 Tuxedo, use CB-110 Liner.
7. Use ST-113 Circulate Stamp with SC-12 Moody Blue to stamp the back of the tail. Use a sponge on a stick to apply the Moody Blue to the stamp.
8. Brush with two coats of NTBR Clear One Brushing use CB-604 Soft Fan.
1.Begin with a properly fired shelf cone 04 Bisque. Moisten a clean sponge and wipe bisque to remove dust.
2. Thin slightly FN-43 Bright Jade, pour to the inside, turn to coat, pour out the excess glaze, drain.
3. Brush on 3 coats of SC-50 Orange ya Happy to the shell with CB-604 Soft Fan.
4. Brush the turtle’s body with thinned SC-7 Leapin’ Lizard, leave the breast unpainted, brush thinned SC-77 Glo-worm on the highlights of the body, thinned and very thin on highlights of the chest.
5. Float widely around the body with SC-26 Green Thumb, use CB-604 Soft Fan, float SC-8 Just Froggy in a narrow float with CB-106 Script Liner.
6. Thicken S-15 Tuxedo with AC-310 Silkscreen Medium using a palette knife, to the consistency of peanut butter, use the large pineapple screen from DSS-147 Island. Use sections of the screen on the shell of the turtle, with the shiny side down, rub the thickened Tuxedo over the screen, gently wash, re-use to go around the shell.
7. Use CB-110 Liner to brush in SC-27 Sour Apple to the eyes, with SC-15 Tuxedo for the pupils and the outline, outline the mouth with Tuxedo.
8. Apply one coat of S-2101 Clear to the outside of the turtle with CB-604 Soft Fan.
Begin with properly fired shelf cone 04 Bisque. Moisten a clean sponge and wipe bisque to remove dust.
Brush the ornament box with two coats of FN-001 White inside and out with the Soft Fan.
Brush a third coat of FN-001 White, while the glaze is wet lay in the eyelash yarn, brush the yarn flat to the ornament with another coat of FN-001 White. Let dry to a damp state. Press paper towel to speed the process of drying.
Brush two thinned coats of SC-73 Candy Apple Red to the lid of the box with the Soft Fan.
Brush the bottom of the box with two thinned coats of SC-77 Glo Worm at the top, change the color to SC-26 Green Thumb. Leave Glo- Worm in the brush to lighten the color.
Remove the eyelash yarn when the gloss leaves the glaze.
Brush the ornament top with two coats of SC-60 Silver Lining with the Script Liner.
When leather hard, remove from the mold and allow to dry.
When dry, clean and fire to shelf cone 04 bisque.
Mask off the teeth and recessed area using the MC-001 12mm Masking Tape.
Using the CB-604 #4 Soft Fan, apply 3 coats of SC-77 Glo-worm to the body of the alligator, keeping color off the eye and the indented chalkboard area.
Mix 1 part of SC-26 Green Thumb to 2 parts water and a few drops of liquid soap detergent, and mix.
Blowing thru the straw, create bubbles and press the piece into the bubbles.
Remove the masking tape.
Wipe any color off the eye and chalkboard areas with a damp sponge.
Using the CB-404 # 4 Pointed Round, apply 2 coats of SC-16 Cotton Tail to the teeth and the eye-opening.
Using the CB-404 # 4 Pointed Round, add the iris to the eye using 2 coats of SC-26 Green Thumb.
Using the CB-110 # 10/0 Mini Liner, outline the eye and apply 2 coats of Tuxedo to the pupil.
Stilt and fire to shelf cone 05/06.
If using the aerosol chalkboard paint, mask off the depressed area with MC-002 12mm Masking Tape, then spray 2 to 3 light coats. Remove the tape.
If using a brush-on chalkboard paint, follow the label directions and apply using the AB-834 ¾” Base Coat brush.
Allow to cure for 24 hours before using.
Form
CD-902 Chalkboard Gator
Colors
SC-015 Tuxedo
SC-16 Cotton Tail
SC-26 Green Thumb
SC-77 Glo-worm
Decorating Accessories
CB-110 # 10/0 Mini Liner
CB-404 # 4 Pointed Round
CB-604 # 4 Soft Fan
AB-834 ¾” Base Coat (if using a brush-on chalkboard paint)
Cast the CD-002 Lantern Mold with SLS-001 Stoneware White Casting Slip to your desired thickness.
When leather hard, remove from the mold and cut out the openings with a craft knife.
When dry, clean and bisque fire to shelf cone 04.
Using the CB-604 # 4 Soft Fan, apply 2 coats of SW-104 Black Walnut to the bottom side wall, the top side wall and the inside collar area, keeping any color off the very bottom of the piece.
Using the CB-604 # 4 Soft Fan, apply 1 coat of SW-118 Sea Salt to the center area and to the inside, except for the upper top area that has already been painted.
Using the CB-604 # 4 Soft Fan, apply to the top 1/3 area of the Sea Salt 1 coat of SC-78 Lime Light, followed by 1 coat of SC-27 Sour Apple to the center area and 1 coat of SC-52 Toad-ily Green to the bottom 1/3.
Place on a well kiln washed shelf and fire to shelf cone 6.
Begin with a properly fired shelf cone 04 Bisque. Moisten a clean sponge and wipe bisque to remove dust.
Tape off the chalkboard area, brush with three coats of FN-001 White.
From DSS-0121 Fruit, screen the apple, bananas, and the LG. pineapple on paper to make a pattern. Cut out the shapes, just the lower section of the pineapple, trace the outline of the shapes at the bottom of the chalkboard.
Place SG-401 Black on a palette or tile and sprinkle with AC-310 Silkscreen Medium. Using a palette knife mix color and medium to the consistency of thick peanut butter. if the mix is too thin add more AC-310 Silkscreen Medium or if it is too thick add more Stroke & Coat. Too thin of a mixture will bleed under the screen and give you a blurred image. Too thick of a mixture will make it hard for the product to penetrate through the holes in the screen and give blank areas on your screen.
Position the screen shiny side down on the piece. Hold in place, starting from the center out, Rub the mixture on the screen with your finger. Lift a corner up to check if you are applying enough color. Remove the screen and wash with water. Do not let the color dry in the screen. this will cause damage to the screen.
Brush two coats of SG-407 Yellow to the bananas, mix SG-406 Brown with SG-407 Yellow to get a pineapple color, brush this color to the pineapple, two coats, brush two coats of SG-403 Red to the apple, use CB-106 Script Liner.
Tape paper over the chalkboard area to protect it from the next steps.
Use SG-401 Black to draw a thick line at all the edges of the chalkboard, do in sections as the Designer Liner color must be wet. While the color is wet spray with water to disperse the black, hold the chalkboard in different directions to get the black to move in that direction. 7. Pull off the paper, let the colors dry.
Use the fruit screens again, only this time screen over the painted fruit at the bottom of the chalkboard.
Brush the sides of the chalkboard with two coats of SG-401 Black.
Brush on two coats of NTBR Clear One Brushing with CB-604 Soft Fan to the chalkboard, omitting the middle glazed section.
Begin with properly fired shelf cone 04 Bisque. Moisten a clean sponge and wipe bisque to remove dust.
Draw or trace the pattern.
Outline the large flowers with SG-403 Red, while the Red is wet, squirt with water from a spray bottle to blur the color. Fill in the petals with a couple of lines of SG-408 Orange, spray with water while color is wet.
Outline the leaves with a thick line of SG-405 Green, spray while wet, fill in the leaves with SG-409 Bright Green, use CB-106 Script Liner to apply.
Outline the purple and yellow flowers with SG-411 Purple, spray while wet to blur, fill in with brush strokes of SG-407 Yellow.
Fill in some areas of the background with SG-410 Bright Blue. Brushstroke SG-407 Yellow into the orange and red flowers.
When dry, outline all the flowers, and leaves with SG-401 Black.
For the body of the teapot, make a thick line of SG-401 Black in the edge around the inset, work in sections to keep the Black wet, spray the Black outline with water while holding the teapot so the drips run away from the floral design. Continue around the center, the spout, the handle and the lid.
When dry, brush on two coats of NYBR Clear One Brushing with CB-604 Soft Fan.
Begin with properly fired shelf cone 04 Bisque. Moisten a clean sponge and wipe bisque to remove dust.
Squirt a thick line about 1/2″ long of SG-407 Yellow, SG-408 Orange on the shoulder of the vase, while wet spray with water to make it run and spread down the vase. Check out the photo for color placement, continue with SG-403Red, SG-409 Bright Green, and SG-410 Bright Blue. Notice some of the color is used less.
Trace on the pattern.
From a palette, brush on two coats of SG-406 Brown with CB-106 Script Liner to the wings and head.
Use the metal tip to fill in the colorful feathers on the owl’s chest. Use CB-110 Liner to outline the feathers with SG-406 Brown.
Brush the branch with two coats of SG-406 Brown, leaves with SG-405 Green, and berries with SG-403 Red.
Outline owl and draw on feathers on the wings with SG-401 Black. Outline the leaves and branch, pupils in the eyes.
Make a thick line of SG-403 Black on the neck and shoulder of the vase in sections, while wet spray with water, let the drips run down the vase, avoid letting to many drips run through the owl.
When dry, apply two coats of NTBR Clear Ove Brushing.
Begin with a properly fired shelf cone 04 Bisque. Moisten a clean sponge and wipe bisque to remove dust.
Brush on two coats of SG-405 Green to the chalkboard area, when the last coat is damp just as the shine leaves the color, use a soft cloth to polish the SG-405 Green. This will seal the green and darken the color.
Outline shape of the gator with a thick line of SG-405 Green, while the color is wet, spray with water to drip the color and distort the line. Do in sections so the paint remains wet.
Use SG-403 Red on the edges of the teeth and spray with water.
Let dry, screen the various bugs from DSS-0113 Bugs around the gator with thickened SG-401 Black. Silkscreen
Place some SG-401 Black on a palette or tile and sprinkle with AC-310 Silkscreen Medium. Using a palette knife mix color and medium to the consistency of thick peanut butter. if the mix is too thin add more AC-310 Silkscreen Medium or if it is too thick add more Stroke & Coat. Too thin of a mixture will bleed under the screen and give you a blurred image. Too thick of a mixture will make it hard for the product to penetrate through the holes in the screen and give blank areas on your screen.
Position the screen shiny side down on the piece. Hold in place, starting from the center out, Rub the mixture on the screen with your finger. Lift a corner up to check if you are applying enough color. Remove the screen and wash with water. Do not let the color dry in the screen. this will cause damage to the screen.
Use a circle template to pencil in a circle for the eye. Brush two coats of SG-409 Bright Green to the iris, and SG-401 Black to the pupil use CB-110 Liner. Shade the eye with +SG-405 Green. Outline with the Black.
Brush on two coats of NTBR Clear One Brushing on the gator, not the chalkboard.
Fire to 04.
Apply a stone or grout sealer to the green chalkboard to protect.
Begin with a properly fired shelf cone 04 Bisque. Moisten a clean sponge and wipe bisque to remove dust.
Brush 2-3 Coats of UG-50 Jet Black to the chalkboard area with CB-604 Soft Fan, when the last coat loses its gloss and is still damp, use a soft cloth to buff the underglaze, it should darken the color, this is called polishing underglaze.
Pencil in the lines for color, apply two coats to all the colors in the color blocks. The gray color is a mix of SG-401 Black and SG-402 White.
After the colors are dry, use SG-401 Black to heavily outline each block, work in sections so while the Designer Liner is wet, spray with water to blur the line.
Brush the handle the bottom and the inside with two coats of SG-401 Black.
Apply two coats of NTBR Clear One Brushing to the cup, omit the chalkboard area, use CB-604 Soft Fan.
Fire to 04.
To protect the chalkboard area, apply one coat of a stone or grout sealer.
When leather hard, remove from the mold and add holes for lights if desired.
When dry, clean and fire to shelf cone 04 bisque.
Using the CB-106 # 6 Script Line. Apply 3 coats of SP-227 Speckled Sour Apple to the underside of the branches.
Using the CB-106 # 6 Script Line, apply 3 coats of SP-275 Speckled Orange A Peel to the flat areas on the tree and alternating spaces on the base.
Using both the Cb-106 # 6 Script Liner and the CB-604 # 4 Soft Fan, apply 3 coats of SP-206 Speckled Sunkissed to the flat areas on the tree and the alternating spaces on the base.
Using the SG-401 Black Designer Liner, outline the segments on the tree and base.
Using the CB-604 # 4 Soft Fan, apply 1 coat of S-2101 Crystal Clear Brushing to the tree and base.
Clean out any color that may be in the openings prior to firing.
Stilt and fire to shelf cone 05/06.
Glue in the light and wire the base for a lighted tree
Fire bisque to shelf cone 04, and wipe bisque with a damp sponge before starting to paint.
Start by using SG-401 Black Designer Liner to draw in the details of the eyes, nostrils, mouth, and fingernails.
Using SW- 253 Green Opal paint two coats over the eyeballs. Next Using SC-16 Cotton Tail paint 2 coats over the teeth. Next to mask off those areas carefully paint AC-302 Wax Resist over the eyeballs and teeth.
Paint 2 coats of SW-120 Northern Woods over the entire piece.
Once the SW-120 Northern Woods is completely dry, paint two coats of SW-155 Winter Wood over the entire piece.
Make sure the bottom of the piece is completely cleaned and free of any glaze.
Begin by casting CD-4139 and CD-4140 using SLS-01 – Stoneware White Casting Clip (download Casting Instructions for reference)
Soft Bisque fire to shelf cone 04.
Antique the toad’s mouth area by applying one coat of UG-50 Jet Black with a #6 Script Liner CB106 brush. Using a wet sponge, wipe away the black underglaze so only the recessed areas remain black.
Using the #8 Soft Fan CB-618 brush glaze the entire toad with SW122 Maycoshino (minus the eyes and bottom of the piece). Three coats should be applied, allowing to dry between coats. The glaze application should be tapered, one coat all the way to the bottom, two coats two finger width from the bottom, and the third coat, three finger widths from the bottom.
Using the #8 Soft Fan CB-618 brush, glaze the entire toad minus the stomach area with SW-154 Satin Patina. 5. Using the #6 Script Liner CB-106 brush, paint the eyes with UG50 Jet Black, UG-51 China White, UG-46 Bright Yellow, UG-210 Forest Green 6. Allow underglaze to dry before applying 2 coats of SW-001 Stoneware Clear to the eyes.
Fire bisque to shelf cone 04, and wipe bisque wit a damp sponge before starting to paint.
Using SG-409 Bright Green Designer Liner, draw in the middle line of the leaf.
Using SW-161 Yellow Matte paint in the middle wave design with three coats of glaze. Next outline the wave design with SG-405 Green Designer Liner.
Using SW- 160 Chartreuse Matte loosely mirror the middle design in the next level of color. Next outline the wave design with SG-405 Green Designer Liner.
Using SW-164 Satin Patina paint three coats of the final wave pattern to the rim.
Paint on a coat of SW-148 Lime Shower over the entire piece.
Begin by casting CD-859 using SLS-01 – Stoneware White Casting Slip (download Casting Instructions for reference).
Soft Bisque fire to shelf cone 04.
Thin slightly SW-140 Black Matte, pour to the inside of the boots, turn to coat, pour out the excess, drain.
Use a circle punch to create various sizes of circles on the boots, including the top trim and the soles.
Use the CB-106 Script Liner to brush two healthy coats of SW-140 Black Matte to the circles.
When dry, brush on three heavy coats of SW-163 Red Matte to the body of the boots, SW-161 Yellow Matte to the top trim and SW-159 Blue Matte to the soles, three heavy coats.
Brush on two coats of SW-118 Sea Salt to the outside of the boots, recede second coat two inches.
Clean off the glaze from the bottom of the boots, fire to cone 6. Do Not Stilt.
Begin by casting CD-760 using SLS-01 – Stoneware White Casting Slip (download Casting Instructions for reference).
Soft Bisque fire to shelf cone 04.
Using a CB-604 Soft Fan brush, start by painting the entire body of the dragonfly, excluding the eyes, with SW-154 Shipwreck.
Next, using SG-401 black designer liner outline all the all the detail on the wings and around the eyes.
Using a CB-604 Soft Fan brush, paint 1 coat of SW-104 Black Walnut on the entire underside of the wings, and using a CB106 Script Liner brush paint 1 coat of SW-104 Black Walnut on the bottom edge of the top of the wings.
Once the SW-104 Black Walnut has completely dried, using a CB-604 #4 Soft Fan brush, Paint 2-3 coats of SW-253 Green Opal over the entirety of the wings.
Finally, using a CB-106 Script Liner paint the dots in the eyes with UG-50 Jet Black. When UG-50 Jet Black is completely dry, using a CB-106 Script Liner brush, paint 1-2 coats of SW-252 Blue Opal over the eyes.
2. Smack the remaining ¾ of your clay into a sphere.
3. Push thumb into center of ball and start pinching, rotating your piece slightly each time you pinch to form walls all the way around.
4. Continue rotating and pitching until the walls are slightly thicker than a pencil and your piece is twice the size of the original ball.
5. Mold pot to sit open side down.
6. Smooth out any cracks with your fingers, adding a small amount of water if needed.
7. Create ridges of the cactus by pressing the side of your pencil firmly into your pot and rocking up and down until an impression is made.
8. Draw out flower pattern on a piece of paper and cut out to use as a stencil.
9. Flatten the remaining ¼ of your clay with your hand to be slightly thinner than your pencil, smooth out any cracks if needed.
10. Trace flower onto clay with pencil tip and cut out with knife. Set scraps aside.
11. Roll a small ball out of your scrap clay for flower center.
12. Score on back and center of flower by making small hatch marks with pencil tip.
13. Add a small amount of water to scored area with your finger and attach pieces by pressing down firmly.
14. Mold flower petals with your hands.
15. Attach the bottom of your flower to the top of your cactus with the same slip and scoring technique.
16. Add texture to the center of your flower and around your cactus by making small holes with the tip of your pencil.
17. Clean up your ridges and any imperfections by smoothing the clay with your finger or pencil eraser.
Glazing
1. Antique cactus body with SC-8 Just Froggy by painting one heavy coat and letting it set, then wipe away with a dry sponge.
2. Antique center of flower using SC-6 Sunkissed with the same technique.
3. Using SC-89 Cutie Pie Coral and SC-2 Melon-choly paint the flower pedals, using the two colors to extenuate the highlights and shadows on the pedals.
4. Use SC-98 Slime Time to paint in the highlights on the cactus body, applying one thick coat of glaze.
1. Dust out mask slump mold to be sure it is clean to make your mask.
TIP: If your mold is wet apply a light dusting of cornstarch to the inside of the mold to keep your clay from sticking to the wet plaster.
2. Roll out a slab about 1/4” thick.
3. Compress slab on either side with rib.
4. Slump your clay into the mold, starting in the center place the clay down into the mold so the entire face is covered with clay.
5. Cut away extra clay around the outside of your mask, leaving a small border if you wish.
6. Compress and smooth the inside of your mask and let it sit in the mold until clay is dry enough to hold the shape.
7. Pull clay out of the mold and clean up with a sponge.
8. Use press molds (CD-1151, CD-1152) to add decoration to the mask by creating impressions on small pieces of clay and attaching them to the mask by slipping and scoring.
9. Use a ribbon tool to carve in decorative lines and add texture.
10. Option to create holes in border of mask by punching holes with the end of a straw.
11. Let dry completely and bisque piece to Cone 04 if not adding stroke & coat.
Stroke & Coat® on wet clay (left in photo):
1. Once sculpture is complete add color to the piece by brushing on Stroke & Coat® colors with a soft bristled brush.
2. Option to create a wash to cover sections of the mask by adding 1 part water to 2 parts glaze and brushing on the color.
3. Wipe semi dried glaze away with a damp sponge to create an antiqued look.
4. Using a loop or ribbon tool carve back into the mask revealing the bare clay underneath.
5. Once dried fully fire to Cone 06.
Softees Acrylic on Bisque (right in photo):
1. With a variety of acrylic brushes, add color to designs of your mask.
2. Create wash with your base color(s) of the face by adding water to acrylic until it is a watercolor constancy.
3. Apply wash(s) to base face area with a soft bristle acrylic brush.
4. Before completely dry wipe away with a wet sponge to achieve an antiqued look.
5. Finish mask with Emperor’s Gold accents and outline designs in Flat Black.
Assemble:
1. After all the firing stages, add optional beads and wire to the outside of the mask by threading through holes made in the hand building stage.
Variations and Adaptations
If you don’t have access to the mask molds, plain plastic masks are usually available at most craft stores. Instead of draping the clay inside of the mask mold, the clay will be draped over the top of the plastic mask and removed before drying out to avoid cracking from shrinkage.
Form
Low-fire white clay (EM 100)
Colors
SC-6 Sunkissed
SC-26 Green Thumb
SC-74 Hot Tamale
SS-179 Antique Red
SS-57 Accent Green
SS-111 Brightest Yellow
SS-87 Emperor’s Gold
SS-138 Flat Black
Accessories
CD879 Mask Slump Mold
CD1152 Native American Continuous Design Press Tool
Begin by casting CD714 or CD715 using SLS01 – Stoneware White Casting Slip.
Soft Bisque fire to shelf cone 04.
Using a #8 Soft Fan Brush CB618, paint the entire Gecko (minus the eyes and bottom of the piece) with three coats of SW253 Green Opal.
Using a #8 Soft Fan Brush CB618, paint the top one-third of the Gecko with SW-146. Make sure to stir the jar of glaze in order to get crystals from the bottom. Apply two coats, making sure crystal chunks are not too low on the piece. They will run.
Draw an eye with the Orange Designer Liner SG408.
Draw a pupil with the Black Designer Liner SG401
Draw the outer edges of the eye with the White Designer Liner SG402
Outline the eye with the Black Designer Liner SG401
Using the #6 Script Liner Brush CB106, cover the entire eye with two coats of SW001 Stoneware Clear.
Make sure the bottom of the Gecko has no glaze on it before firing to Cone 5/6.
Form
CD714 Small Gecko
CD715 Medium Gecko Mold or MB-714 Medium Gecko Bisque
3. Using stencil or circle cutters, trace 3 body of snowman that is 3 circles high and cut out shape.
4. Option to cut additional smaller circles and add texture to them by creating impressions with Spirals stamp mat.
5. Create facial features by rolling small balls of clay for eyes and mouth and a small cone for the nose.
6. Attach decorative circles and features by slipping and scoring pieces to your snowman slab.
7. Create holes to hang your snowman from by using the back of your needle tool or pencil to create the making for the hole and cut out with needle tool.
8. Smooth corners and edges with a sponge.
9. Lightly cover with plastic to dry slowly.
10. Once dried fully bisque fire to Cone 04.
Glazing:
1. Apply one thick layer of SG-302 Snowfall with a soft bristled brush to areas of snowman where you would like the snow texture. You can apply snowfall with a stencil to create additional decorative elements.
2. Allow the Snowfall to dry.
3. Create your watercolor palette by squirting out small amounts of designer liner.
4. Once snowfall is dry, begin to add color to your snowman by picking up small amounts of color with a wet brush, the more water you use the more translucent your colors will be.
5. Use less water when painting fine details such as the facial features.
6. Once dried fully fire to Cone 06.
Assemble:
1. Attach Twine, wire or ribbon to the hanging holes to allow your snowman plaque to hang on the wall.
Begin by casting CD-1493 using SLS-01 – Stoneware White Casting Slip.
Soft Bisque fire to shelf cone 04.
Brush on three coats of SW-140 Black Matte to the inside of the planter with CB-604 Soft Fan.
Brush three coats of SW-155 Winterwood (crystal glaze, stir in the crystals) to the outside, recede last coat 2 inches from the bottom, use CB-604 #4 Soft Fan.
Remove glaze from the bottom, fire to cone 6. (do not stilt)
Fire bisque to shelf cone 04, and wipe bisque with a damp sponge before starting to paint.
Start by using SG-401 Black Designer Liner to fill in the veins of the leaf. Nex, with a wet brush, pull some of the SG-401 Black Designer Liner into the other details on the surface of the leaf.
Paint one coat of SW-210 Emerald over the leaf.
Paint one coat of SW-148 Lime shower on top of SW-210 Emerald.
1. Roll out coil ¼” thick (about the thickness on a pencil).
2. Starting in the center of the mold, create a circle that is about a 1 ½ “ in diameter (for the opening in the top).
3. Continue to build outward using coils until you reach the bottom edge, smoothing the inside of the lantern as you go. Create decorative openings by applying coils in a wavy pattern. Add texture by rolling coil on stamp pad before applying.
4. Let dry in slump mold until leather hard.
5. Turn mold over and carefully remove.
Optional Plate:
1. Roll out a slab about ¼” thick.
2. Compress slab on either side with rib.
3. Add texture to slab by laying texture pad over slab and applying pressure with a rolling pin.
4. Place GR form wide side down and cut slab around the circle.
5. Place the bottom side of the GR form down on the slab and center it in the circle.
6. Flip clay and GR form over, keeping the slab centered on the form.
7. Mold sides down the GR form.
8. Use rolling pin to apply pressure to the bottom, flattening out the bottom of the dish.
9. Let sit until leather hard, then flip and gently remove.
Glazing:
1. Glaze the inside of the lantern with 3 coats of SC-55 Yella Bout It.
2. Pre- rip pieces of copy paper in varying sizes
3. Using EL-144 Dark Amethyst, EL-145 Ginger Root and EL-143 Cactus Flower, glaze outside of lantern (and front and back of optional plate) with “Paper painting” technique:
a. Using a brush, apply a generous amount of glaze to a ripped piece of paper.
b. Place glazed side down on bisque and allow to soak in.
c. Continue to glaze and apply papers until desired area is covered.
d. Peel back paper to reveal glazed surface.
i. You can use a needle tool to pick up hard to pull corners.
4. Allow to dry fully, fire to Cone 06 using stilts.
Begin by casting CD-620 and CD-645 using SLS-01 – Stoneware White Casting Slip.
Soft Bisque fire to shelf cone 04.
Using a circle template, lightly pencil in a variety of circles on the surface of the frogs.
Using a CB-106 Script-Liner fill in all the circles with 2-3 coats of SW-140 Matte Black.
Once the SW-140 Matte Black is completely dry, using a CB-604 Soft Fan, brush on 2-3 coats of SW-163 Soft Red Matte of the top half of the frog (except the eyes) and SW-159 Blue Matte over the bottom half of the frog, and blending the two colors in the middle.
Once all of the glazes have completely dried, then paint 1-2 coats of SW-118 Sea Salt over the entire surface with exception to the eyes.
On the eyes use black designer liner to outline the eyes and create the pupil, and then paint 1-2 coats of SW-161 Yellow matte over the rest of the eye.
Fire to cone 6.
Form
CD620 Frog-Large Wall Climber
CD645 Frog Medium Wall Climber Mold or MB-645 Frog Medium Wall Climber Bisque
Fire bisque to shelf cone 04, and wipe bisque with damp sponge before starting to paint.
Start using SG-401 Designer Liner to draw in the details of the face.
Using SW-211 Glacier Blue paint in the color of the eye. Next using SC-16 Cotton Tail to paint the whites of the eyes.
Using SC-73 Candy Apple Red Paint the lips.
Using AC-302 Wax Resist carefully mask off the lips eyes and eyebrows.
Using SW-305 Cobalt Wash, paint the background of the sun, and then with a damp sponge wipe it away leaving the wash only it the low areas of the detail. Next paint two coats of SW- Glacier Blue over the SW-305 Cobalt Wash on the background of the sun. Once the SW-211 Glacier Blue is dry mask off the background of the sun by painting a coat of AC-302 Wax Resist over it.
Next Using SC-6 Sunkissed, SC-23 Jack O’Lantern, and SC-73 Candy Apple Red, paint and blend a gradient of the three colors on the sun. You will need two coats of each color.
Once dry, paint a final coat of SW-118 Sea Salt over the piece. Wipe away most of the SW-118 Sea Salt from the waxed Background of the sun, but allow a few beads to remain.
3. Lay down texture pads side by side onto slab and apply pressure to create texture.
4. Cut circles with a cookie cutter.
5. Roll cardstock into a cone and tape edge to create armature. Cut bottom so the cone sits flat on the table.
6. Start assembling tree by slipping and scoring textured circles together so they slightly overlap and make a ring around the base of the cone.
7. Continue to slip and score circles together as you build up to the top of the cone in a spiral pattern. Leave bottom circles slightly detached so they can stick out to look like branches.
8. Cone final circle at the top to create a point.
9. Let dry completely, fire to Cone 04. You can leave paper cone inside and allow to burn out.
Glazing:
1. Using a soft bristled brush, apply 3 coats of glaze to each petal, alternating between the 5 colors.
2. Once the outside is fully dry paint the inside with 3 coats of FN-231 Clearly Jade.
3. Let dry completely, fire to Cone 06 using stilts.
Form
Low-fire white clay (EM 100)
Color
UG-97 Bright Blue
UG-206 Fire Engine Red
UG-50 Jet Black
UG-46 Bright Yellow
UG-51 China White
FN-231 Clearly Jade
Accessories
Variety of Mats (MT-003 Brick Mat, MT-012 Ikat Mat, etc.)
1. Begin with properly fired shelf cone 04 Bisque. Moisten a clean sponge and wipe bisque to remove any dust.
2. With CB-604 Soft Fan, brush on 2-3 coats of FN-014 Antique White to the body of the gourd.
3. Trace on the pattern with the glaze is dry.
4. Brush two coats of SC-23 Jack O’Lantern in the direction of the pumpkin shape with CB-106 Script Liner. Outline the sections of the pumpkins with SC-14 Java Bean, use CB-110 Liner, brush over the outlines with SC-75 Orange A Peel using CB-106 Script Liner.
5. Brush the leaves with two brushstrokes of SC-8 Just Froggy, stems with SC-14 Java Bean. Stars are two coats of SC-24 Dandelion, the moon is two coats of SC-16 Cotton Tail.
6. Outline the wing of the crow with SC-12 Moody Blue, 2 coats, fill in the wing and the crows body with SC-15 Tuxedo, leave a white space for the eye.
7. Cut a piece of cheesecloth that will fit around the gourd, wet them with your fingers alter the shape by pulling the threads together. Dip into SC-12 Moody Blue, spread out the cheesecloth, drape it over the gourd. Press with a paper towel to transfer the pattern, avoid the pumpkins.
Lay down texture pads side by side onto slab and apply pressure to create texture. We used a combination of MT-004 Swirls Mat, MT-005 Retro Squares Mat, MT-007 Divots Mat, MT-008 Spiral Mat, MT-013 Honeycomb Mat.
Cut circles with a cookie cutter.
Roll cardstock into a cone and tape edge to create armature.
Cut bottom so the cone sits flat on the table.
Start assembling tree by slipping and scoring textured circles together so they slightly overlap and make a ring around the base of the cone.
Continue to slip and score circles together as you build up to the top of the cone in a spiral pattern.
Leave bottom circles slightly detached so they can stick out to look like branches.
Cone final circle at the top to create a point.
Once the tree has been built and is set up to be leather hard, use a pencil or small hole cutter to cut out light holes.
Let dry completely, fire to Cone 04. You can leave paper cone inside and allow to burn out.
Glazing
Using a soft fan brush, apply 3 coats of SW-173 Amber Quartz, SW- 210 Emerald, SW-150 Celadon Bloom, SW-204 Amber Topaz, SW-252 Blue Opal, SW-177 Raspberry Mist, or SW-132 Mirror Black to each petal.
Begin by casting CD-001 using SLS-01 – Stoneware White Casting Slip (download Casting Instructions for reference).
Soft Bisque fire to shelf cone 04.
Using a CB-604 #4 Soft Fan brush, paint 1 coat of SW-140 Black Matte over the spine. Next with a damp sponge, wipe the SW-140 Black Matte away leaving it just in the cracks and texture of the spine.
Next, using the CB-604 Soft Fan brush, Paint a one coat stripe of the SW-301 Iron Wash on both sides just below the spine.
Using a CB-106 Script Liner brush, paint 1-2 coats stripe of SW-140 Black Matte down the length of the tail and on the finger nails.
Using SG-401 Black Designer Liner outline the mouth, nostrils, eyes, and draw solid black circles on the jaw. Also draw the pupil using SG-401 Black Designer Liner.
Next, using a CB-604 Soft Fan brush, paint 2-3 coats of SW-164 Satin Patina over the entire lizard, excluding the eyes.
Finally, using SG-409 Bright Green Designer Liner draw an outline around the pupils, and once dry paint 1-2 coats of SW-163 Soft Red Matte over the eyes. Using a CB-106 Script Liner, paint 1-2 coats of SW-253 Green Opal over the eye lids.
Roll out a slab that is about ¼”-1/2” thick and apply MT-007 Divots Mat.
Cut out 2 circles and slump over a bowl so that the texture is on the outside of the domes.
Once they have set up for about 20 min and a bit more stable. Take each half of the dome and press together. We wanted a more oblong/oval shape for the body. So, in order for the piece to fit together this way, the edges needed to be trimmed accordingly.
Once both pieces can be aligned, slip and score the edges to attach.
Cut a larger hole out of the top for plants to come out of and a small hole directly beneath for hanging (the rope will come up out of the plant hole to hang).
Attach fins, tail, mouth, and eyes and add texture and details as you please.
Let dry completely and bisque fire.
Glazing
Apply 3 coats of EL-136 Lapis Lagoon to the entire piece.
Apply 1 thinned coat of EL-134 Mirror Blue.
Apply 2 coats of EL-121 Copper Adventurine to the fins. Wipe away any base glaze if you want to see the brown otherwise, it will just be green (we left a strip at the top of each fin).
Wipe glaze off of the eyes and apply 1 coat of SC-16 Cotton Tail.
Apply 2 coats of SC-77 Glo Worm and 1 coat of SC-26 Green Thumb to the rim of the iris.
Apply 2 coats of SC-15 Tuxedo to the pupil and add some dots of SC-16 Cotton Tail as a highlight.
Use a pipe cleaner to clean any glaze out of the hole for hanging.
Pour SW-506 Bright Blue Gloss and SW-507 Bright Green Gloss into the bowl in a striped pattern. Swirl around in the bowl and pour out the excess. Be sure not to mix too much or the colors will blend and not look marbled.
Apply 3 coats of SW-505 Purple Gloss to the outside of the bowl, avoiding the bottom.
Once the inside of the bowl is completely dry, transfer the cat pattern into the center using AC-230 Clay Carbon Paper.
Apply 3 coats of SW-503 Orange Gloss to the Cat body and SW-502 Yellow Gloss to the lines.
Use a sponge to wipe away any excess glaze that may have gotten on the bottom.
Thin SW-176 Sandstone with water to the consistency of heavy cream (about 1 part water/2 parts glaze). Pour the glaze into the vase and roll vase to coat the inside. Pour out excess and place upside down to dry.
Apply 3 coats of SW-176 Sandstone to a section of the vase. On the sample vase, it was applied to the neck/top and as 3 large teardrop shapes around the vase leaving space in between for glaze trailing.
Put SW-405 Light Magma and SW-406 Dark Magma into a slip trailer. and squiggle glaze around the shapes.
Use a sponge to wipe away any glaze that may have gotten on the bottom of the vase.
Begin with about a 1 lb. ball of clay and pinch out into a pinch pot. Keep it tall and narrow for the squid’s body with a cone at the top (top of the squid’s head, but the bottom of the pinch pot).
Roll out a slab about ¼” thick and apply MT-004 Swirls.
Cut out fins from the textured slab and attach to the pinch pot by slipping and scoring.
Cut a hole out of the top for hanging.
Let dry completely and bisque fire.
Glazing
Apply 1 coat of EL-207 Gold Mine.
Apply 2 coats of EL-118 Blue Grotto to the inside and outside.
Use a CB-604 #4 Soft fan to plop PC-601 Clear Cascade, PC-602 White Cascade, and EL-118 Blue Grotto. Let dry and repeat.
Apply squiggles of SC-15 Tuxedo randomly.
Use a pipe cleaner to clean any glaze out of the hole in the top.
Apply 3 coats of SW-203 Root Beer to the Rim of the piece, Apply 2 coats to the back, avoiding the foot. If applying to the handle of the mug recede to coats! Mug handles are like slip and slides for glazes.
Place the piece on a banding wheel and while it is spinning apply 2 coats of SW-167 Sand and Sea. We left a build-up of glaze in a swirl so that will show in the firing.
Repeat the previous step, but with SW-176 Sandstone instead.
Use a sponge to clean up any glaze that may have gotten on the foot.
Moisten a Sponge and wipe down the piece to remove any dust and debris from the ware.
Using a palette knife, mix some AC-310 Silkscreen Medium with some UG-50 Jet Black until it is thick (about the consistency of peanut butter).
Select the citrus screen from the DSS-121 Fruits Silkscreen and apply repeatedly to the wares. I applied it randomly onto the cups and I drew a band with a pencil to fit them in on the pitcher. Wash and thoroughly dry about ever 2 screenings.
Using a CB-110 #10/0 Mini Liner, apply 2 coats of SW-508 Black Gloss to the bands on the pitcher.
Using a CB-618 #8 Soft Fan, Apply 3 coats of SW-501 White Gloss to the inside of the pieces.
Use a sponge to clean off the feet of the cups and pitcher.
In wet greenware, cut out the bird hole and the perch hole.
When dry, fire to cone 04.
In an uneven line, brush one two coats of EL-204 Glowing Embers to the top section of the gourd with CB-604 Soft Fan, make sure to use the crystals from the bottom of the jar. 3-4 inches from the stem.
Brush the remainder of the gourd with two coats of either same as step 3. Overlap EL-209 Night Sky or EL-211 Volcanic Glow onto the EL-Glowing Embers about 1/2 inch.
While the glaze is still wet, use the CB-604 #4 Soft Fan to plop PC-601 Clear Cascade over the Element colors, in a random pattern, leave space between the plops, stop two inches from the bottom of the gourd, as this will cause the glazes to move.
While the glazes are wet, plop PC-602 White Cascade in the same manner as the Clear Cascade in step 5, overlapping sometimes on the Clear Cascade, and leaving spaces between.
Still while all the glazes are wet, brush on heavy vein lines with SC-15 Tuxedo using CB-110 Liner. The lines will move during the firing and cause interesting effects.
Brush the stem with 2-3 coats of EL-111 Ruby Creek.
Apply 1 coat of SW-405 Light Magma around the rim of the plate. Spin the plate on a banding wheel and work the coat toward the center, but not going all of the way.2. Apply 1 coat of SW-406 Dark Magma beginning in the center and working outward while the plate is spinning on a banding wheel.3. Repeat steps 1 and 2 until there are 3 coats of both glazes.4. Apply 3 coats of SW-508 Gloss Black to the back of the plate and wrap around the edge a bit. Be sure to leave the foot unglazed.
5. Use a sponge to tough up any glaze that may have gotten on the foot.
6. Fire to shelf cone 6.
*Although this project is done on a dinner plate we do not recommend this to be used as anything but decorative
Gourd comes with the marking for a bird hole, cut out if desired otherwise, sponge in off in the greenware.
Fire to 04.
Brush on two coats of EL-204 Glowing Embers with CB-604 #4 Soft Fan.
Plop PC-601 Clear Cascade, and PC-602 White Cascade over the Glowing Embers, leaving spaces between plops, overlap the Cascades. Omit the Cascades two inches from the bottom of the gourd, as the colors will move during the firing.
Vein heavily with SC-15 Tuxedo use CB-110.
Brush the stem with 2-3 coats of EL-111 Ruby Creek.
Begin with a properly fired shelf cone 04 Bisque. Moisten a clean sponge and wipe bisque to remove dust.
Brush on three coats of CG-972 Alligator to the body of the alligator, leave the underbelly unpainted.
Brush the underbelly with 2-3 coats of SC-37 Ivory Tower, pull in the Alligator color while the two colors are wet, where they meet. This will give it a pale green appearance.
Brush the teeth with two coats of SC-16 Cotton Tail, toe nails with SC-15 Tuxedo, outline teeth and mouth with SC-15 Tuxedo, use CB-110 Liner.
Scrape off glaze from the eyes, pupil is SC-26 Green Thumb, two coats, with a slit pupil in SC-15 Tuxedo, outline.
Begin with a properly fired shelf cone 04 Bisque. Moisten a clean sponge and wipe bisque to remove dust.
Use a rubber squeegee to pick up a couple of the yellows, SC-6 Sunkissed, and SC-97 Cant-elope, or SC-6 and SC-24 Dandelion, scrape the color over the sun plaque, covering twice with color, use CB-106 Script Liner to fill in the areas where the squeegee doesn’t fill.
With a clean-up tool, remove the glaze from the detail of the rays, scrape off glaze from the eyes.
Use SG-410 Bright Blue to line the grooves of the rays, use SG-404 Blue with CB-106 Script Liner to shade between the rays.
Use SC-81 Cinnamon Stix to shade the sun face and large rays, use CB-106 Script Liner, shade around the eyes, mouth, lips, brows, and face.
Brush the eyes with 1-2 coats of SC-37 Ivory Tower, iris is SC-76 Cara-bein Blue, lighten slightly with SC-16 Cotton Tail, the pupil is SC-15 Tuxedo, outline with CB-110 Liner.
Tap ST-114 Stary Swirls Stamp with SC-75 Orange A Peel, press to the rays and sun face.
Brush with 1-2 coats of S-2101 Clear, use CB-604 #4 Soft Fan.
Begin with properly fired shelf cone 04 bisque. Moisten a clean sponge and wipe bisque to remove any dust.
Lay MT-012 Ikat flat on the table and use a sponge on a stick to apply UG-91 True Teal to the plate. The width of the mat should just fit the inside of the salad plate, so line it up and carefully press down to apply.
Let dry completely
Carefully apply 2 coats of SG-701 Stardust. Be sure not to over brush as it will smear the design.
Apply 3 coats of SW-164 Satin Patina to the back and rim of the plate. Avoid glazing the foot and bottom of the plate.
Use a clean sponge to wipe the bottom clean any glaze that may have gotten out of place.
Let dry completely and fire in oxidation to cone 6.
Begin with properly fired shelf cone 04 bisque. Moisten a clean sponge and wipe bisque to remove any dust.
Apply 2 coats of any combination of the Stroke and Coat glazes. I applied 2 glazes, blending in the middle. Be sure to leave ¼” from the bottom and do not glaze the very bottom.
Add 2 coats of SW-401 Light Flux to the top ½”-1” of the tumbler.
Use a clean sponge to wipe the bottom clean any glaze that may have gotten out of place.
Let dry completely and fire in oxidation to cone 6.
Form
SB-128 Tumbler Stoneware Bisque or CD128 Tumbler Mold
Begin with properly fired shelf cone 04 bisque. Moisten a clean sponge and wipe bisque to remove any dust.
Apply 2 coats of SW-117 Honeycomb to the outside of the tumbler. Leave about ½” from the top lip and ¼” from the bottom.
Apply 3 coats if SW-172 Macadamia to the inside of the tumbler and 2 coats to the outside. Leave about ¼” from the bottom and do not glaze the very bottom. If you’re feeling experimental, feel free to reverse the order of application for a similar, but different look!
Use a clean sponge to wipe the bottom clean any glaze that may have gotten out of place.
Let dry completely and fire in oxidation to cone 6.
Form
SB-128 Tumbler Stoneware Bisque or CD128 Tumbler Mold
Begin with a properly fired shelf cone 04 Bisque. Moisten a clean sponge and wipe bisque to remove dust.
Cut out the patterns, trace around the pattern on the leaf plate.
Brush two coats of SC-15 Tuxedo to the crow, SC-14 Java Bean to the branch, SC-5 Tiger Tail to the beak, use CB-106 Script Liner.
Brush the corn with SC-42 Butter Me Up, add highlight of SC-97 Cant-elope, the green area with SC-26 Green Thumb, highlight areas with SC-27 Sour Apple, 2 coats.
Stamp the Sour Apple with ST-100 Game Board Stamp with SC-26 Green Thumb use a section of the Game Board Stamp. Use a sponge on a stick to apply the color to the stamp, press to the areas on the plate. Stamp the corn in the same manner with SC-14 Java Bean.
Brush water over the corn, place the paper cut out over the corn, press with a paper towel to remove gaps in the paper. Repeat for the crow.
Scrape away excess glaze around the paper.
Brush two coats of EL-118 Blue Grotto over the top of the tray, and three coats on the back with CB-106 Soft Fan.
Brush two coats of SC-97 Cant-elope and SC-75 Orange a Peel in a sporadic pattern of color on top of the tray, going over the paper edges. Use CB-604 Soft Fan, brush on even coats.
Remove the paper, outline the leaves in the corn, dot the crows’ eye with SC-16 Cotton Tail, dot smaller with SC-15 Tuxedo over the Cotton Tail.
Using about ½ lb of clay, create a baseball-sized pinch pot. Smooth out any cracks that form and place open side down to create the body.
Roll out 8 coils of varying lengths about ¾” thick tapering at the end.
Flatten the thicker end of the coil to attach to the body.
Press backside of the coil into stamp pad to create “suction cup” texture.
Attach flattened end to octopus body by slipping and scoring.
Repeat steps 3-5 to attach all the coils. Gently weave the coils around each other while attaching being careful not to break any off.
Using thumbs, push into the body to create indentations for the eyes above where tentacles are attached.
Roll two small balls for the eyes and attach by slipping and scoring.
Using the eraser side of a pencil, dip pencil in water and press into center of eye to create the pupil.
Let dry completely
Bisque fire to Cone 04
Glaze
Inlay Char-ming into texture on tentacles by painting one thick layer of the glaze onto the textured surface, wait for the glaze to dry and wipe away with damp sponge.
Using Green Thumb, paint one layer of glaze around the outer edge of the textured areas.
Paint 2 coats of Slime Time all over the entire octopus avoiding the eyes.
Add an extra 3rd coat of Slime Time to any area that does not have another glaze underneath.
Using a small detail liner brush, paint Blue Grass into the pupils of the eyes.
Paint 2 coats of Ivory Tower onto the whites of the eyeballs.
Cut a circle large enough to cover eyes and part of the head.
When the glaze is dry, wet paper circle with a sponge and place it over eyes and part of the head as a masking tool.
Using a toothbrush, splatter Blue Grass on uncovered parts of octopus.
Remove paper before the glaze is completely dry.
Let dry completely
Fire stilted piece to Cone 06
Variations/Adaptations
Instead of using a stamp pad to create the sucker texture, the eraser side of a pencil will also work.
Use balled up newspaper or other items to help hold the arms in place as you build. Remember to remove before the piece starts to dry out too much.
Begin with properly fired shelf cone 04 bisque. Moisten a clean sponge and wipe bisque to remove any dust.
Lay MT-013 Honeycomb Mat on the table and use a sponge on a stick to apply SW-301 Iron Wash to the Mat. I just applied to a section in the middle to avoid and stark straight lines on the tumbler. Repeat and add sections around tumbler. Feel free to leave blank spaces and even overlap the design in some sections. (Layering the stamping and bee silkscreen will enhance the movement of the screen design, so if you want more clear screened imaged, we recommend leaving blank areas to screen the bees.
Sprinkle AC-310 Silkscreen Medium onto some UG-50 Jet Black and use a palette knife to mix until the mixture has just lost a smidge of shine (it should not be matte!)/to the consistency of peanut butter
Apply the bee screen to the bisque smooth/shiny side down. Use your finger to rub some of the thickened underglaze through the screen. Repeat as desired around the vase. You may need to rinse and dry the screen every 2-3 transfers.
Let dry completely.
Apply 2 coats of SW-204 Amber Topaz to the outside of the tumbler. Leave about 1/2” from the top lip and ¼” from the bottom and leave the very bottom unglazed. Be cautious when applying the fires coat as to not smear your design. We recommend working quickly and not over brushing.
Apply 3 coats of SW-130 Copper Jade to the inside and outside 1/2” lip/
Use a clean sponge to wipe the bottom clean any glaze that may have gotten out of place.
Let dry completely and fire in oxidation to cone 6.
Form
SB-128 Tumbler Stoneware Bisque or CD128 Tumbler Mold
Begin with about 3# of wedged clay and rolling out a slab about ¼” thick.
Either pull the handles or roll coils for the handles and shape on the table to set up a bit.
Make the base of the mug by cutting out a circle from the slab for a flat bottom or pinching a small bowl to make a lifted bottom (if you have access to wheels this is also an option to make the lifted bottom, but be sure to account for drying time if using this method).
Place a mat of your choice onto the slab and gently press down with your hand from the center outward. Once the mat is secure, use a rolling pin to fully and evenly press it into the slab. Gently remove the mat.
Use a straight edge to cut about a 4” tall band. Depending on the size of your base it will need to be about 6”-10” long. We would recommend leaving it kind of long and precisely measuring it in the next step.
Place your slab vertically on top of your base and wrap it around so it is forming the top of the mug. Cut off any excess length from the slab, but be sure to leave about ¼”-1/2” overlap for slipping and scoring.
Lay the slab back on the table and score the inside of one edge and the outside of the other, as well as the bottom edge of the slab. Set slab up vertically and attach both ends with water or slip. Be sure to pinch firmly with your finger.
Score the top edge of your base, add water and align the top cylinder, firmly pressing down to ensure a strong connection.
Attach handle to the mug by slipping and scoring both the attachment points of the handle and where they attach to the piece. Firmly press the handle into the piece; you may need to provide support from the inside to avoid any warping.
Clean up your seams and edges.
Loosely cover with plastic and allow to dry slowly before bisque firing.
Fire to cone 04.
Using the Soft Fan, apply 3 coats of FN-002 Yellow, FN-207 Orange Slice, or FN-216 Sea Glass to the corresponding mug. Allow glaze to dry between coats.
Begin with properly fired shelf cone 04 bisque. Moisten a clean sponge and wipe bisque to remove any dust
Use water (1:2 water to glaze ratio)to thin SW-166 Norse Blue to the consistency of heavy cream and roll to coat the inside of the vase.
Use a pencil to mark a band around the shoulder of the vase that is about 1”-2” wide.
Apply 3 coats of UG-82 Tuscan Turquoise.
Let dry completely.
Use SG-402 White Designer Liner to apply design work into the band. It helps to use a pencil to divide the band into even segments and design a small segment and repeat. See the attached design.
Apply 3 coats of SW-166 Norse Blue to the rest of the vase, Leave about ¼’bare from the bottom and do not glaze the very bottom.
Use a clean sponge to wipe the bottom clean any glaze that may have gotten out of place.
Let dry completely and fire in oxidation to cone 6.
Begin with properly fired shelf cone 04 bisque. Moisten a clean sponge and wipe bisque to remove any dust.
Fill the writer bottle with SW-135 Wintergreen and apply in loops around the top of the bowl. Use a pencil to mark a band around the top, covered the line with glaze from the writer bottle, and then apply loops like small “w”s. Apply 3 full rows and on the fourth row, add only a single loop every other opening. Apply 2 coats.
Dot SC-93 in all of the openings of the loops. Apply heavily, you may want to add 3-4 coats.
Let dry completely.
Apply 3 coats of SW-129 Copper Float to the inside and outside of the bowl, avoiding the foot and very bottom.
Use a clean sponge to wipe the bottom clean any glaze that may have gotten out of place.
Let dry completely and fire in oxidation to cone 6.
1. Select one of the listed mats. Lay the mat on top of a 8″ x 10″ slab of clay and press into the clay using either a pony roller or your hand.
2. Peel the mat off of the clay by pulling up both sides simultaneously instead of one side at a time. This process will ensure full detail and keep the mat impression flawless.
3. Using the needle tool trace around the tree template and then cut the tree out of the 8″ x 10″ slab of clay.
4. Use the pony roller to thin out the edges of the clay creating a beveled edge. Use the damp sponge to smooth out the clay.
5. Turn the cut out tree over with the front side facing down. Place the 1/2″ dowel rod in the middle lower section of the tree.
6. Center the “pocket” on the back of the tree and mark where it will be attached. Cut the pocket to size if needed.
7. Score the edges of the pocket and the tree where it will attach. Add a small amount of water to the score marks, creating a slip which acts like a glue. Attach the pocket and compress and smooth seam lines with a sponge.
8. Add a small slab circle of clay to the top of the pocket to cap it off. Compress and seal.
9. Cover with plastic and allow to dry slowly, otherwise the slabs with warp as they dry.
10. Fire to 04.
Glazing:
1. The MT-008 Spiral Mat tree and the MT-007 Divots Mat tree are glazed with three coats of FN-219 Luster Green applied with CB-604 #4 Soft Fan.
2. The MT-012 Ikat Mat tree starting at the top of brush SC-93 Honeydew List with CB-604 #4 Soft Fan. All colors will be overlapped to seamlessly blend the next section. Now add SC-78 Lime Light into the next section followed by SC-26 Green Thumb. The darkest area at the bottom is glazed with with SC-8 Just Froggy. Using the same brush apply two thinned coats to give it a transparent look.
3. Brush with one coat of S-2101 Crystal Clear Brushing or dip in NT-CLR Clear One Dipping.
4. Stilt and fire to cone 06.
Form
Earthenware clay
Colors
FN-219 Lustre Green
SC-8 Just Froggy
SC-26 Green Thumb
SC-78 Lime Light
SC-93 Honeydew List
S-2101 Crystal Clear Brushing (or NT-CLR Clear One Dipping)
Begin with properly fired shelf cone 04 bisque. Moisten a clean sponge and wipe bisque to remove any dust.
Roll the inside of the vase with SW-001 Stoneware Clear. We recommend using the dipping version of this glaze (SD-001) or measure out some SW-001 Brushing Clear Glaze and add some water (about 1 part water to 2 parts glaze) until it is the consistency of heavy cream.
Use a banding wheel and a pencil to mark bands around the top of the vase and use SG-402 White Designer Liner to add details.
Apply 3 coats of SW-166 Norse Blue to the top and bottom sections of the vase.
Be sure to wipe the bottom of the piece so the foot is dry.
Let dry completely.
Fire to shelf cone 6.
Form
LWC 436 Red B-mix clay
Colors
SW-166 Nore Blue
SG-402 White Designer Liner
SW-001 Stoneware Clear or SD-001 Stoneware Clear Dry
Begin with a properly fired shelf cone 04 Bisque. Moisten a clean sponge and wipe bisque to remove dust.
Cut out the patterns, including the center of the sunflower. Trace around the patterns on the leaf.
Use CB-106 Script Liner, load the brush with SC-97 Cant-elope, tip with SC-81 Cinnamon Stix, stroke in a petal. Re-load, for another petal, reverse the loading of color for darker petals, two coats.
Brush SC-42 Butter Me Up to the center, swirl in SC-52 Toad-ily Green and SC-97 Cant-elope to the center, two coats.
Brush two coats of SC-52 Toad-ily Green to the stem and leaves.
Brush the crow with two coats of SC-15 Tuxedo, and the beak with SC-97 Cant-elope, two coats.
Brush water over the flower and the crow, stick on the paper while wet, press with paper towel to remove gaps.
Use a sponge on a stick to tap the middle section of the ST-100 Game Board Stamp with SC-15 Tuxedo, press to the center while the paper is still on.
Brush two coats of EL-118 Blue Grotto to the top of the plate, brushing over the paper edges, with CB-604 Soft Fan, three coats to the back.
When dry, brush two coats of SC-26 Green Thumb, and SC-27 Sour Apple on the lower section of the plate, and SC-97 Cant-elope around the flower changing to SC-75 Orange-A-Peel to the rest of the leaf plate. Use CB-604 Soft Fan, brush evenly.
Remove the paper.
Outline the petals, around the center of the flower with SC-15 Tuxedo, use CB-110 Liner.
Dot the crows’ eye with SC-16 Cotton Tail, dot again smaller with SC-15 Tuxedo.
Begin with properly fired shelf cone 04 bisque. Moisten a clean sponge and wipe bisque to remove any dust.
Roll the inside of the vase with SW-001 Stoneware Clear. We recommend using the dipping version of this glaze (SD-001) or measure out some SW-001 Brushing Clear Glaze and add some water (about 1 part water to 2 parts glaze) until it is the consistency of heavy cream.
Use a banding wheel and a pencil to mark bands around the top of the vase and use SG-402 White Designer Liner to add details.
Apply 3 coats of SW-167 Sand & Sea to the top and bottom sections of the vase.
Be sure to wipe the bottom of the piece so the foot is dry.
Let dry completely.
Fire to shelf cone 6.
Form
LWC 436 Red B-mix clay
Colors
SW-167 Sand & Sea
SG-402 White Designer Liner
SW-001 Stoneware Clear or SD-001 Stoneware Clear Dry
Begin with a properly fired shelf cone 04 Bisque. Moisten a clean sponge and wipe bisque to remove dust.
Brush two coats of EL-204 Glowing Embers unevenly to the top three inches of the gourd with CB-604 Soft Fan, overlap EL-211 Volcanic Glow onto the Glowing Embers 1/2 inch, brush the remainder of the gourd. Make sure to mix the glaze to use plenty of crystals.
Plop PC601 Clear Cascade with CB-604 #4 Soft Fan to the gourd, leaving space between plops. Stop two inches from the bottom as the color will move.
Plop PC-602 White Cascade, overlapping onto the Clear Cascade, leave spaces between the plops, stop three inches from the bottom. These colors can be applied while the previous glazes are wet.
Use CB-110 Liner to heavily vein SC-15 Tuxedo to the gourds.
Roll clay flat into a slab that is 3/8 of an inch thick.
Choose an oval size for the body of the snail. Make 2 paper stencils of the oval you chose.
Place the stencils on the slab and cut both ovals with a needle tool.
Add texture by rolling XAR09 Xiem NamiWaves Art Roller over both ovals.
Take a CD777 Oval Slump & Hump mold and slump one of your textured ovals into the mold. Make sure the texture is facing down into the mold. Let this sit for 15-30 mins and then repeat with other oval.
Roll another slab and cut 3 long strips out of the slab that are 2-3 inches wide and long enough to go all the way around your slumped ovals.
Attach one of the strips to one of the ovals and then attached the remanding oval to the other end of the strip. This will be the snails shell. Make sure you cut a small hole into the underside of the shell to keep it from blowing up in the kiln.
With the other 2 long slabs, create the snail’s body. Attach the 1 slab to the underside of the snail. Leave a few inches in the back for the tail and the rest is for the head of the snail. Make sure you don’t close up the air vent that you created on the snail’s shell.
Cut the end of the snail’s tail to a point.
Take the other end of the slab and attach it to the shell to keep the head of the snail up.
You have one half of the head of the snail done, but you need to use the 3rd for the other half of the head. You are creating a tube by attaching one part of the slab to the other.
Close up the top of the tube and this will be the top of the snail’s head.
Roll small coils and attach to the top of the head for the eyes.
Let snail get to bone dry and fire to cone 04 to bisque.
Glazing:
Begin with properly fired shelf cone 04 bisque. Moisten a clean sponge and wipe bisque to remove any dust.
Using CB-604 #4 Soft Fan brush apply 1 heavy coat of SC-97 Cant-elope to the textured part of the shell.
Once that is dry take a damp BT-910 Synthetic Sponge and wipe away the SC-97 Cant-elope, leaving glaze in the texture part of the shell.
When that is all dry apply 3 coats of CG-966 Tiger Lily to the shell of the snail. CG-966 Tiger Lily is a translucent crystal glaze so the Cant-elope will show through the Tiger Lily.
The body of the snail gets 3 coats of SC-88 Tu Tu Tango with a soft fan brush.
While the third coat of SC-88 Tu Tu Tango is drying, float a coat of SC-97 Cant-elope around the shell. Blend the 2 colors together.
Pour the CD-605 Garden Ornament a little on the heavy side.
After removing the ornament from the mold and still damp, score the clay with the needle tool where the lace will be set. An easy way to get a straight line is to set the ornament in a jar as straight as possible. Then center the jar on a banding wheel and score the line.
Measure a length of cotton lace loosely around the score line. Then dip the cotton lace in the same slip used to pour the ornament and completely saturate. Let it set a minute or two to absorb the slip into the cotton.
Use a needle tool to guide and ruffle the lace around the ornament, use the tool to press the lace into the ornament. The jute is used in the same way. Decorate with the lace in rows, varying the width of the lace. Set it aside until leather hard.
Brush with three coats of various colors of Fundamentals Underglaze. Brush the background first with UG-46 Bright Yellow, use CB-106 Script Liner or CB-604 Soft Fan.
Brush the lace with the various colors. Brush UG-85 Orange Sorbet then sporadically float UG-206 Fire Engine Red over the UG-85 Orange Sorbet. Float UG-85 Orange Sorbet onto the UG-46 Bright Yellow body. Continue with the other colors, UG-206 Fire Engine Red, UG-209 Jade, and UG-210 Forest Green for the smaller lace and jute. Float the lace color onto the Bright Yellow for all the lace.
Let Dry, and fire to Cone 04.
Use CB-604 Soft Fan to brush two coats of S-2101 Clear over the ornament and lace.
Fire to 04.
Brush one coat of Mother of Pearl Luster over the entire ornament and lace, with a clean or new brush. Clean the brush with Essence.
Brush SC-11 Blue Yonder and SC-28 Blue Isle, add SC-27 Sour Apple, on the back, from the nose to approx. middle of the back with CB-604 #4 Soft Fan, brush the yellows, SC-6 Sunkissed, SC-97 Cant-elope, and SC-75 Orange A Peel the remaining area of the back to almost the end of the tail, 2-3 coats.
Punch out the triangle and the hexagon shapes, dip the paper in water, or brush water over the dry glaze, place the paper in a row from the nose to the tail.
Brush the toes with 2-3 coats of SC-75 Orange a Peel, brush the chest with 2 coats of SC-27 Sour Apple, use CB-106 Script Liner, and CB-604 #4 Soft Fan.
Brush three coats of SC-12 Moody Blue over the remainder of the gecko, brush over the paper shapes.
Remove the paper after the last coat of Moody Blue.
Brush the eyes with two coats of SC-97 Cant-elope with CB-110 Liner, pupil, and outline with SC-15 Tuxedo.
Use CB106 Script Liner to brush SG409 Bright Green into the areas of the gecko to separate the legs and tail from the body, brush two coats.
Brush one coat of S-2101 Clear to the gecko use CB-604 Soft Fan.
Fire cone 05/06.
Form
CD-714 Small Gecko
CD715 Medium Gecko Mold or MB-714 Medium Gecko Bisque
Begin with a properly fired shelf cone 04 Bisque. Moisten a clean sponge and wipe bisque to remove dust.
Thin FN-009 Black with water 4-1, pour to the inside, roll to coat, pour out the excess, drain.
Use a stiff toothbrush to spatter UG-50 Jet Black to the top of the planter.
Brush three coats of EL-140 Toasted Almond to the outside of the planter, stagger the last coat, 2 inches from the bottom. Brush a fourth coat just at the top, before it starts to curve.
Spatter the UG-50 Jet Black, again over the glaze.
Begin with properly cleaned Greenware using a Clean Up Tool and Green Grit Pad to remove the seam lines and any imperfections. Moisten a clean sponge and wipe greenware to remove any dust.
Using the Pointed Round or Liner to apply 3 coats of UG-218 Pear Green to the frogs excluding the eyes
Apply 3 coats of UG-58 Harvest Gold to eyes with the Liner. Detail pupils with SG-401 Black.
Detail the sides of the stomach areas with dots and small circles using SG-411 Purple with dots of SG-408 Orange in the center of the purple circles.
Fire to Shelf Cone 04-05.
In a plastic cup, mix some UG-91 True Teal and UG-34 Chestnut Brown in separate cups with 1 part color to 1 part water (1:1 ratio) to create a “Wash”. Using the Pointed Round and the Soft Fan to apply the wash to the wood area of the piece. Let dry for a few minutes. Use a moistened Sponge to wipe off the excess color for an Antiquing effect. Use the sponge to wipe across the crevices and not with the crevice to leave the color in the recesses of the detail. Rinse the sponge as often as needed in clean water. Color should be even and not overly heavy in one area and not the other. The highlights of the detail should be clean and crisp in appearance. Repeat the same process with the Teal color over the Frogs. Allow the color to dry before glazing.
Apply 3 coats of S-2101 Crystal Clear Brushing over the frogs using the PointedRound, Liner or Soft Fan. Do not over brush the first coat of color.
Apply 3 coats of FN-229 Iced Mocha to the wood areas of the piece using a brush sized for the area being painted. Do not over brush the first coat of color.
Measure out and wedge about 1.5 lbs of white earthenware clay.
Throw a narrow dome and close it.
Use a rib to flatten the sides to create the wrapper.
Apply slip to the top while the wheel is spinning to create a swirl texture.
Use a wire to cut off the wheel and when it’s leather hard use a serrated rib to add texture to the wrapper.
Roll a ball, slip and score to add a cherry on top.
Let dry completely.
Fire to shelf cone 04
To handbuild instead of throw replace steps 2 and 3. Connect a long, narrow slab (the wrapper) to another slab that has been formed in a bowl (cupcake top).
Glazing the cupcakes
Using Stroke and Coat colors, apply 3 coats of glaze to the icing, the wrapper, and the cherry. (SC-1 Pink-a-Boo, SC-5 Tiger Tail, SC-11 Blue Yonder, SC-16 Cotton Tail, SC-34 Down to Earth, SC-45 My Blue Heaven, and SC-74 Hot Tamale were used on the pictured cupcakes)
Apply 1-2 Coats of either Speckta-Clear glaze SG-701 Stardust or SG-702 Celebration glazes over the Stroke and Coats to add extra pizzazz!
Fire to shelf cone 05/06.
Creating the doughnuts
Measure out and wedge about 1 lb of white earthenware clay.
Throw a closed tube on the wheel.
Use a wire tool to cut the tube off of the wheel and apply slip to create the icing on the top of the doughnut.
Roll out a tiny coil and cut into ½” pieces to create sprinkles and attach them into the slip icing.
Let dry completely.
Fire to shelf cone 04
To hand-build instead of throw replace step 2, extrude a tube and attach the top to bottom to create a closed tube.
Glazing the doughnuts
Using Stroke and Coat colors, apply 3 coats of glaze to the icing and the doughnut. (SC-1 Pink-a-Boo, SC-5 Tiger Tail, SC-14 Java Bean, SC-16 Cotton Tail, and SC-74 Hot Tamale were used on the pictured doughnuts)
Apply 1-2 Coats of either Speckta-Clear glaze SG-701 Stardust or SG-702 Celebration glazes over the Stroke and Coats to add extra pizzazz!
With CB-604 Soft Fan, brush SC-93 Honeydew List from the tail to under the belly up to the mouth. Add in the brush, SC-27 Sour Apple, brush to the top of the head to the back add in SC-9 Jaded to the back, then SC-27 Sour Apple to the tail blending to the Honeydew List. The legs and feet, begin with SC83 Honeydew List blended with SC-27 Sour Apple. Apply three coats.
Use CB106 Script Liner to brush the tops of the toes and around the mouth with SC-97 Cant-elope, 1-2 coats.
Shade in all the crevices with SC-36 Irish Luck and SC-10 Teal Next Time, use CB-106 Script Liner, esp. around the eyes.
Mix and thin SC-36 Irish Luck with SC-15 Tuxedo paint to the toenails and outline the back ridges.
Eye is SC-97 Cant-elope with SC-15 pupil and outline. CB-110 Liner.
Use a sponge on a stick to tap ST-113 Circulate stamp with SC-10 Teal Next Time, press to the back, top of head and beginning of the tail.
Cut all the shapes from the patterns, cut three fish patterns, two butterflies.
Start with the large leaf section lay the cut out on the pedestal for the position, trace a loose oval shape around the leaf section.
Use the rubber squeegee to pick up a couple of the greens, SC-27 Sour Apple and SC-26 Green Thumb, swipe onto the penciled oval section on the pedestal, in random directions, don’t worry about staying inside of the oval. Apply color two times.
After the gloss leaves the color, wet with water using CB-604 Soft Fan, place on the paper leaf section.
Leave about 3.5 inches to the right,(for the bird pattern) draw an oval around the statue of liberty, use the squeegee to pick up SC-9 Jaded and SC-11 Blue Yonder, in random strokes apply the color to the space. Apply twice, adding in a small amount of SC-97 Cant-elope, and SC-27 Sour Apple. Apply the paper.
The bird with the branch is next, repeat directions from step three. The bird is between the leaves and the statue of liberty, so part of the tail will overlap the statue of liberty and the beak will overlap the leaves, which will be painted after the paper is removed.
Use the squeegee to pick up SC-97 Cant-elope and SC-75 Orange A Peel, apply the same as in step 6 then apply the paper.
The remainder of the pedestal base uses the large round flower and the large flower with stem.
Continue as in the previous steps, using SC-73 Candy Apple red for the flower with the stem and SC-26 Green Thumb for the stem. the large flower without the stem uses SC-75 Orange A Peel and SC-97 Cant-elope.
All the paper pieces should now be on the pedestal, use the squeegee to apply the background colors, mainly, SC-36 Irish Luck near the base, SC-12 Moody Blue beginning where the Irish Luck leaves off, let some of the background colors show through, two coats, add in SC-13 Grapel near the top of the leaves and SC-73 Candy Apple Red at the top of the statue of Liberty’s head.
The bowl is done in the same manner with the three fish inside of the bowl, the butterflies, dog, cat, leaves, small flower with stem under the bowl. Finish as above using the colors listed. Detail using CB-110 Liner the bird’s branch and beak, dogs, eyes and spots, fish eyes.
Use a banding wheel to apply SC-76 Cara-bein Blue to the centers of the rings, 3 coats, and SC-15 Tuxedo to apply to the trim of the rings, use CB-106 Script Liner and CB-106 Soft Fan.
Can be fuzed together in firing, or epoxy glued afterward.
Press a texture of your choosing into the clay. When using Mayco’s mats gently press down in the middle and work your way outward. Once the mat is secure, go over with a rolling pin to be sure the design is applied evenly. Begin rolling lightly in the center and increase pressure slowly until the mat is pressed down all the way. Remove the mat. Depending on how you want to make your monster you may want to leave some of the slabs without texture.
Cut a circle or oval out of the slab and use a Slump & Hump mold to shape it. Let it set up for about 15 minutes before handling. Repeat this step so you have 2 parts to create a shell. I squeezed some of the finished forms to create more of an oblong shape and I cut off excess to make smaller monsters.
Slip and score edges of the forms to attach to make a closed form, or I offset a pair to create a big mouth on one!
Once you have created the form you are free to create little details to add on. I rolled up slabs to make tubes for legs, attached stamped slabs to layer textures, pinched out a big tail, and hand-rolled eyeballs. All to be slipped and scored as attachments.
Once all of the details have been created and attached, cover loosely with a bag so they can dry slow, to help reduce any cracking that could occur.
Once completely dry (after 1-2 weeks) fire to shelf cone 6.
Using a CB-604 #4 Soft Fan or a CB-106 #6 Script Liner, apply 2-3 coats of color to the desired area. Let dry to the touch in between coats.
Form
White stoneware clay – LWC 401 B-mix
Colors
SC-11 Blue Yonder
SC-13 Grapel
SC-15 Tuxedo
SC-16 Cotton Tail
SC-24 Dandelion
SC-27 Sour Apple
SC-73 Candy Apple Red
SC-75 Orange A Peel
SC-76 Cara-bein Blue
SC-26 Green Thumb
Decorating Accessories
CD775 Triangle Slump & Hump Mold
CD777 Oval Slump & Hump Mold
CD776 Circle Slump & Hump Mold
CD1072 Spiral Press Tools
CD1223 Celtic and Leaves Continuous Design Press Tools
Use ST-367 Leafy Border Stamp to create texture on the top of the compressed slab. This will be the top of the house.
Cut excess clay around the outside edge of the mold.
Roll out another slab approximately ¼ inch thick 11” long and 7” tall, compress and set aside.
Wrap paper around the tin can.
Cut the bottom edge of the slab to be flat.
Wrap slab around paper and can with the flat side on the bottom.
Slightly overlap the slab and cut any extra clay off.
Smooth the overlapped clay into the rest of the slab to create a tube around the can. This is base of the house.
Cut around the top edge of the can to create a flat top to attach the roof.
Texture the slab on the can with ST-113 Circulate Stamp.
Cut a hole for the door (be sure to only cut 2 sides of the door so it will stay connected.
Remove slab from can.
Score and slip the top of the house and the bottom side of the soon to be roof created earlier.
Place roof slab on the house.
Create an organic wave with roof edge and add ST-353 stamp for extra texture.
Add welcome sign and any other additions.
Let dry completely.
Bisque fire to cone 04.
Paint 3 coats of EL-146 Rain Cloud on the outside wall of the house. We will leave the bottom and the inside unglazed to let moisture release from the house.
Paint 3 coats of EL- 145 Ginger Root on the door except for the handle and hinges.
Paint 3 coats of EL-144 Dark Amethyst on the handle and hinges of the door.
Paint 2 coats of EL-143 Cactus Flower on Welcome sign.
Wipe welcome sign with a damp sponge until you can read the words.
Paint 3 coats of EL-144 Dark Amethyst on the screws on the welcome sign.
Paint 3 coats of EL-142 Grass to the roof. Let dry.
Rub the roof and walls with your hand so that some of the glaze is removed from the high points of the roof. This will promote the color changes in the glaze.
Begin with properly fired shelf cone 04 bisque. Moisten a clean sponge and wipe bisque to remove any dust.
Using a palette knife mix AC-310 Silkscreen Medium with UG-50 Jet Black to the consistency of peanut butter.
With the shiny side down place the screen from DSS-156 Llama Drama onto the piece. Beginning in the center of the screen and holding it down firmly with your fingers, rub the thickened underglaze mix over the screen making sure to cover the entire image, remove and gently wash screen for future use
Apply 3 coats of SW-141 White Matte to the outside of the mug.
For the inside and handle, apply 2 coats of SW-106 Alabaster and 2 coats of a Stroke and Coat color of your choice. I used SC-27 Sour Apple and SC-89 Cutie Pie Coral.
Be sure to wipe any excess glaze off the bottom so the foot is dry.
In leather-hard greenware, pencil in the design cuts, use an X-ACTO knife to cut the design, clean the edges with a stiff wet brush. When dry, fire to cone 04.
For CD-607 and CD-605 thin slightly FN-002 Yellow, pour to the inside, turn to coat, pour out the excess, wipe off excess glaze from the outside with a damp sponge. Thin FN-050 Coral, pour to the inside of CD-607, same as above.
Brush CG-979 Meadow 2-3 coats with CB-604 Soft Fan to the body of CD-606 Garden Ornament, brush the rings with CG-718 Blue Caprice two coats, use CB-106 Script Liner.
Brush the body of CD-605 with two coats of CG-966 Tiger Lily, and one coat of CG-756 Firecracker, patting it on leaving some of the Tiger Lily showing. Brush the rings with CG-717 Pistachio.
Brush three coats of S-2724 Lotus Blossom to the body of CD-607 Garden Ornament, brush the rings and ball top with 2 coats of SC-42 Butter Me Up, float SC-89 Cutie Pie Coral around the rings, with CB-106 Script Liner.
Begin with properly fired shelf cone 04 bisque. Moisten a clean sponge and wipe bisque to remove any dust.
Using a palette knife, mix AC-310 Silkscreen Medium with UG-1 Kings Blue until it is the consistency of peanut butter.
With the shiny side down place the screen from DSS-155 Comic Expressions onto the piece. Beginning in the center of the screen and holding it down firmly with your fingers, rub the thickened underglaze mix over the screen making sure to cover the entire image, remove and gently wash screen for future use.
Apply 2 coats of SW-170 Blue Hydrangea to the entire piece and for the third coat only apply it to the outside so be sure the screen is visible through the glaze.
Be sure to wipe the bottom of the piece so the foot is dry.
Press a textured mat into the clay. When using Mayco’s mats gently press down in the middle and work your way outward. Once the mat is secure, go over with a rolling pin to be sure the design is applied evenly. Begin rolling lightly in the center and increase pressure slowly until the mat is pressed down all the way. Remove the mat. Depending on how you want to make your monster you may want to leave some of the slabs without texture!
Cut a circle or oval out of the slab and use a Slump & Hump mold to shape it. Let it set up for about 15 minutes before handling. Repeat this step so you have 2 parts to create a shell. Squeezed some of the finished forms to create more of an oblong shape and cut off excess to make smaller monsters.
Slip and score edges of the forms to attach to make a closed form, or offset a pair to create a big mouth on one!
Once you have created the form you are free to create little details to add on. Possible additions; rolled up slabs to make tubes for legs, attached stamped slabs to layer textures, pinched out a big tail, or hand-rolled eyeballs. All to be slipped and scored as attachments.
Once all of the details have been created and attached, cover loosely with a bag so they can dry slow, to help reduce any cracking that could occur.
Once completely dry fire to shelf cone 05/04.
Using a CB-604 #4 Soft Fan or a CB-106 #6 Script Liner, apply 2-3 coats of color to the desired area. Let dry to the touch in between coats.
Once completely dry fire to shelf cone 06/05.
Add wire, pipe cleaners, and beads and antenna for embellishments.
Form
Low-fire white earthenware clay
Colors
SC-11 Blue Yonder
SC-13 Grapel
SC-15 Tuxedo
SC-16 Cotton Tail
SC-24 Dandelion
SC-27 Sour Apple
SC-73 Candy Apple Red
SC-75 Orange-A-Peel
SC-76 Cara-Bein Blue
Decorating Accessories
MT-004 Swirls Mat
MT-005 Retro Squares Mat
CD-776 Circle Slump & Hump Mold
CD777 Oval Slump & Hump Mold
Miscellaneous Accessories
Rolling pin
Optional embellishments (wire, pipe cleaners, and beads and antenna)
Brush the body of the toad with two coats of EL130 Sea Green, overlap onto the chest, brush the chest with two coats, of EL125 Sahara Sands, with CB604 Soft Fan.
Brush the body of the frog with one coat of CG717 Pistachio, heavy with crystals, skip over the detail, one coat of CG795 Yadro Print to the chest, arrange crystals, so they are evenly spread. Use CB604 Soft Fan.
Brush the eyes with two coats of SC55 Yell about it, Iris is two coats of SC-8 Just Froggy, pupil and outline is SC15 Tuxedo. Use CB110 Liner.
Begin with a properly fired shelf cone 04 Bisque. Moisten a clean sponge and wipe bisque to remove dust.
Pencil in lines for the mountain range at the bottom of the gourd, pencil lines for the river (China Sea) on the gourd.
Brush the mountain range with three coats of EL-110 Mudslide, the river with 4 coats of CC-108 China Sea, and the remainder of the gourd with three coats of EL-209 Night Sky. Overlap Night Sky two coats onto the China Sea, and about 1/2 inch over the Mudslide.
Plop PC-601 Clear Cascade over the Night Sky and top 2″ of Mudslide, leave spaces between the plops. Plop White Cascade over the Night Sky, leave spaces, and just the top section of the Mudslide. These colors will cause the colors to move, so staggered coats are important.
Vein with SC-15 Tuxedo, using CB-110 Liner, on the Night Sky and Mudslide areas. Brush the stem with three coats of FN-304 Black Velvet.
Fire to cone 06.
Give the gourd a day at least to let the cracks develop in the China Sea area, thin slightly a Black Acrylic brush over the crackle, wipe off excess.
Begin with properly fired shelf cone 04 bisque. Moisten a clean sponge and wipe bisque to remove any dust.
Using a palette knife, mix AC-310 Silkscreen Medium with UG-50 Jet Black to the consistency of peanut butter.
With the shiny side down place the screen from DSS-157 Under the Sea onto the piece. Beginning in the center of the screen and holding it down firmly with your fingers, rub the thickened underglaze mix over the screen making sure to cover the entire image, remove and gently wash screen for future use.
Repeat with various screens to make a pattern.
Apply 3 coats of SW-211 Glacier Blue to the body, SW-253 Green Opal to the foot and lid, and SW-168 Coral Sands to the spout and handle.
Be sure to wipe any excess glaze off the bottom so the foot is dry.
Cut out the wet greenware in your desired design. Eyes, nose and mouth design is etched in the mold, to remove and cut your own design, sponge off the lines. Cut a hole in the back for a cord hole to light up.
Let Dry and fire to cone 04.
Thin slightly FN-044 Yellow-Orange, pour to the inside of the pumpkin, roll to coat, wipe off the excess glaze that will run onto the front of the pumpkin. Brush the Yellow-Orange inside edges of the cut out features.
Brush on three coats of FN-003 Orange using CB-604 Soft Fan to the outside of the pumpkin, brush the stem with FN-020 Medium Green, three coats. Thin slightly SC-14 Java Bean, brush a line to the detail of the pumpkins, fade at the edges.
Let dry.
Mix on a palette, SC-15 Tuxedo with AC-310 Silkscreen Medium with a palette knife to the consistency of peanut butter. Use the Halloween screens spider, bat, tree, spider web from DSS-0118 Halloween Screens and the crow from DSS-0114 Creepy. Hold the shiny side down, on the surface of the pumpkins, rub the thickened SC-15 Tuxedo over the screens, remove gently wash, lay flat to dry.
Outline the outside edges of the eyes and mouth with SG-401 Black use CB-110 Liner to apply, while the Black is wet pull the black with a wet brush to create bleed lines under the eyes, mouth and nose. Pull the paint with a stiffer brush such as a square shader.
Brush the letters in the mouth opening with two coats of SC-15 Tuxedo, use CB-106 Script Liner.
Tear the outside edge of the slab so it has a ridged look.
Compress both sides of the clay with a rib tool.
Place paint brushes or pens under the slab where you would like foreground trees.
Smooth clay around the pens with a damp sponge.
Cut 2 holes for the rope.
Let dry.
Bisque fire to cone 04.
With the Designer Liner Bright Blue*, create a horizontal line across the piece, without going over the raised trees, as these are in the foreground. *Shake the bottle before using.
While the Designer Liner is still wet, use a finger wipe down and blur the line.
Use Designer Liner Black to create the trees.
Mix Designer Liner Black and Silkscreen Medium to the consistency of peanut butter. Silkscreen the plants on the bottom section of the piece.
Place found leaves onto the slab and gently press down with your hand. Once they are secure, roll your rolling pin across them to get an even texture transfer.
Remove the found leaves and cut the leaf shapes out of the clay slab using a toothpick. You should have about 6 leaves.
Lay into a slump mold or shallow bowl to form. I put 2 in at a time, overlapping the bottoms and slipping and scoring to attach them. Shift each pair of leaves as you build up the bow and attach to those under it.
Let set up briefly until it can hold form on its own
Attach a coil for the foot.
Loosely cover with plastic and allow to slow dry.
Once completely dry, fire to shelf cone 04.
Glazing
Begin with properly fired shelf cone 04 bisque, moisten a clean sponge and wipe bisque to remove any dust.
Apply 1 coat of UG-50 Jet Black to the entire piece and let dry. Use a moist sponge to wipe away the glaze, leaving some behind in the textures.
Apply 2-3 coats of EL-133 Autumn to the entire piece.
Let dry completely.
Stilt and fire to shelf cone 06/05.
Variations/Adaptations
If it’s not the right season for leaves, artificial leaves my be used. Be sure to put the textured side down on the clay
If teaching for a class, pre-slab the clay beforehand and cover until needed.
Begin with properly fired shelf cone 04 bisque. Moisten a clean sponge and wipe bisque to remove any dust.
Using the Soft Fan Brush, apply 3 coats of SW-166 Norse Blue in a spiral pattern starting inside the bowl and continuing down the outside of the bowl, leaving the bottom and foot unglazed.
Using the Soft Fan Brush, apply 3 coats of SW-147 Moonscape into the remaining areas between the Norse Blue.
Using the Soft Fan Brush, apply 3 coats of SW-151 Olive Float over the Norse Blue.
Wipe off any excess glaze from the foot of the teapot with a damp sponge.
Do not stilt or hang over the edge of the kiln shelf.
Begin by rolling out a slab that is about ¼” thick. The size of the slab will depend on what size you want your vessels to be.
Place the MT-002 Wood Grain Mat onto the slab and gently press down working your way across the mat. Be sure to press down and not drag your hand across the mat causing the mat to shift. Using your rolling pin to slowly work across the mat works well also.
Cut out the appropriately sized rectangle to form your cylinder. Be sure to leave some extra slab to make the bottom!
Stand the slab up vertically and connect the ends to create a cylinder and attach the connecting edges.
Place on extra slab space for the bottom and trace around the bottom of your cylinder. Cut it out, then slip and score to attach to the walls of the cylinder.
Using your hand or a sponge, push out slightly from the inside to misform the cylinder a bit so that it is more organic.
Tear the top edge of clay off.
To make the moss, push some clay through a screen or strainer and let the pieces dry or force them dry. It shouldn’t take too long. Score and slip the area that you want the moss to be and sprinkle the dried pieces of clay onto it. You may need to gently press down to secure.
Pinch out some small domed disks to form the mushrooms. Cut them about in half and slip and score to attach to the form.
To put an owl in the tree, cut a small hole into your cylinder depending on the size you would like the owl to be. Smooth the cut edges with your fingers, I pulled out a bit here to define the edge more.
Slip and score to attach a thin slab inside of the hole.
Form a small owl to fit in the hole. I created mine by flattening small disks and cutting and reforming them. Make sure the bottom of your own resembles the shape it will fit in and be sure not to make it too thick so it’s sticking out too much. Once your owl is formed, slip and score to attach.
Loosely lay plastic over forms and allow to dry slowly.
Once completely dry, fire to shelf cone 04.
Glazing
Begin with properly fired shelf cone 04 bisque. Moisten a clean sponge and wipe bisque to remove any dust.
Apply 3 coats of FN-023 Cinnamon to the inside of the vessels. Allow drying between coats.
Apply 3 coats of EL-145 Ginger root to the wood grain texture.
Apply 2 coats of FN-142 Grass to the moss.
Antique both the mushrooms and the owl with UG-50 Jet Black. To antique, apply 1 coat and allow to dry. Use a moist sponge to wipe glaze away, leaving some behind to emphasize texture.
Apply 2-3 coats of EL-143 Cactus Flower to the mushrooms.
Apply 2 coats of the following colors to the owl: SC-9 Jaded, SC-10 Teal Next Time, SC-42 Butter Me Up, SC-94 Curry Around* (discontinued).
Apply 2 coats of EL-144 Dark Amethyst if there’s bisque open behind the owl.
Roll a wide coil with a small piece of clay to use as a branch.
Roll coil around MT-002 so that the wood grain follows the coil.
Set branch aside to dry.
Using a ballpoint pen draw a straight line down the middle of the feather.
Draw thin lines towards the bottom of the feather at a 45-degree angle.
Repeat on the back side of the feather.
Using a skewer make a small hole about ½ inch from the top.
Dry and bisque fire to cone 04.
Paint one coat of SC-34 on the branch and then wipe lightly with a damp sponge leaving some color in the crevasse.
Paint one coat of SC-5 on the branch and then wipe lightly with a damp sponge leaving some color.
With a fan brush lightly paint one coat of SC-46 on the branch in patches that have no color.
Paint 3 coats each feather with a variety of the following combos: a.)CG-993 on the top half of feather and SC-33 on the bottom half. b.) CG-995 on the top half of feather and SC-97 on the bottom half. c.) CG-996 on the top half of feather and SC-28 on the bottom half. d.)CG-992 on the top half of feather and SC-27 on the bottom half.
With a damp sponge wipe the bottom of the feather so texture shows through the glaze.
Create 2 pinch pots, one slightly taller and thinner than the other. These should be slightly thicker than a normal pinch pot, about ¾ in. thick.
The shorter, wider pinch pot will be your base. Sit the taller, thinner pinch pot on top so that the open sections make one sphere.
Connect the 2 pinch pots by pulling clay from the bottom pinch pot up and over the connection point and up the side to make a smooth transition.
Now that air is trapped inside the sphere, roll the top and bottoms into an egg shape. Be sure to create a flat spot so it won’t roll away.
Next, texturize the dragon egg to your liking.
To create scales, it is easiest to sit the egg on the bigger side and use a pallet knife press 3 indentations into to the top section of the clay in 3 sections.
Continue pushing the pallet knife into the space between the 2 previous knife pushes to create a scale pattern.
Once scales are completed, hollow out a space for the dragon eye to peak out.
Use a toothpick to carve in cracks around the space for the eye.
Cut a hole in the bottom of the egg so that air can be released.
Dry and bisque fire to cone 04.
Glazing
Paint 1 messy coat of SC-15 Tuxedo over the entire piece.
With a damp sponge gently wipe off the surface so the black stays in all the crevices. (Technique: antiquing)
Paint 3 coats of CG-992 Mint Chip over the egg except for the eyeball and cracks.
Wipe off any CG-992 that may have gotten on the eye of the dragon.
Paint the eye from the inside out using a liner brush paint 3 coats of SC-15 for pupil, then SC-6 blended into SC-75 into SC-74 working out for a marbleized effect.
Remove any glaze in the cracks near the eye with a tooth pick and then paint 3 coats of SC-15 with a liner brush.
Roll out a 12” diameter slab approximately ¼” thick.
Using the pottery wheel, throw a flat disc of clay onto a batt.
Moisten the bottom of Mayco’s Hump Mold CD-776 and center it on the clay covered batt.
Drape the 10” diameter over the CD-776 Hump Mold. Gently press the clay onto the mold, conforming it to the hump.
Spin the wheel and firmly compress the slab onto the mold with a wet Xiem Pro-Sponge X-10185.
Make a final compression and remove any excess slurry using a Xiem Soft Silicone Clay Rib X-10193.
Holding the Xiem Foot Shaper X-10351, spin the wheel and cut away any excess clay from the bottom of the hump mold, creating an even/level bowl.
Throw a foot on the bottom of the bowl.
Spin the wheel slowly, and with firm pressure, add the texture and design to the outside of the bowl with the Xiem Art Roller Detailing Tool X-10380.
Allow the clay to slowly dry on the CD-852 Hump Mold. Make sure the edge of clay or rim of the bowl is loose and can move as the clay dries.
Once the bowl is leather hard, the bowl can be removed from the hump mold. Soften the inner edge of the bowl with the Xiem Pro-Sponge X-10185.
Bisque fire bowl to cone 04.
Thoroughly mix SD-168 Coral Sands. Dip the entire bowl into the bucket of SD-168 Coral Sands for one second. Remove and shake any excess glaze off.
Thoroughly mix SD-169 Frosted Lemon. Grasp the foot of the bowl and dip the rim into the bucket of SD-165 Lavender Mist. Shake excess glaze off. Pour a small amount of SD-169 Frosted Lemon from the center of the bowl outwards to the edge of the bowl. Rotate the bowl three times to pour.
Apply 2 coats of SW-304 Cooper Wash to the rim of the bowl.
Roll out a 12” diameter slab approximately ¼” thick.
Using the pottery wheel, throw a flat disc of clay onto a batt.
Moisten the bottom of Mayco’s Hump Mold CD-852 and center it on the clay covered batt.
Drape the 10” diameter over the CD-852 Hump Mold. Gently press the clay onto the mold, conforming it to the hump.
Spin the wheel and firmly compress the slab onto the mold with a wet Xiem Pro-Sponge X-10185.
Make a final compression and remove any excess slurry using a Xiem Soft Silicone Clay Rib X-10193.
Holding the Xiem Foot Shaper X-10351, spin the wheel and cut away any excess clay from the bottom of the hump mold, creating an even/level bowl.
Throw a foot on the bottom of the bowl.
Spin the wheel slowly, and with firm pressure, add the texture and design to the outside of the bowl with the Xiem Art Roller Detailing Tool X-10380.
Allow the clay to slowly dry on the CD-852 Hump Mold. Make sure the edge of clay or rim of the bowl is loose and can move as the clay dries.
Once the bowl is leather hard, the bowl can be removed from the hump mold. Soften the inner edge of the bowl with the Xiem Pro-Sponge X-10185.
Bisque fire bowl to cone 04.
Thoroughly mix SD-166 Norse Blue. Dip the entire bowl into the bucket of SD-116 Norse Blue for one second. Remove and shake any excess glaze off.
Thoroughly mix SD-165 Lavender Mist. Grasp the foot of the bowl and dip the rim into the bucket of SD-165 Lavender Mist. Shake excess glaze off. Pour a small amount of SD-165 from the center of the bowl outwards to the edge of the bowl. Rotate the bowl three times to pour, creating six triangular sections.
Apply 2 to 3 coats of SW-402 Dark Flux to the rim of the bowl.
Begin with properly fired shelf cone 04 bisque. Moisten a clean sponge and wipe bisque to remove any dust.
Using the CB-604 Soft Fan Brush, apply 3 coats of SW-111 Wrought Iron to the inside of the bowl.
Using the Clay Carbon Paper and a pencil, transfer the bee pattern onto the outside of the bowl.
Pour out some SG-407 Designer Liner Yellow onto a palette. Using the synthetic sponge, load the MT-013 Honeycomb texture mat with the yellow Designer Liner. Randomly stamp areas of the outside of the bowl, making sure not to stamp on top of the bee.
Repeat step 4 with SG-401 Designer Liner Black.
Using the SG-401 Designer Liner Black, draw over the lines of the pattern, fill in alternating lines on his body, his pupils and his mouth.
Using the CB-106 #6 Script Liner, apply 3 coats of SW-161 Yellow Matte to the bee’s head and alternating stripes on his body.
Using the CB-106 Script Liner, apply 2 coats of SW-001 Stoneware Clear to the bee’s wings..
Using the CB-106 Script Liner, apply 1 coat of SW-001 Stoneware Clear to the bee’s mouth and the black stripes on his body.
Using the Soft Fan brush, apply 3 coats of SW-211 Glacier Blue to the rest of the outside of the bowl. Do not glaze the bottom or foot of the bowl. You can paint over his antennae and feet.
Using the CB-604 Script Liner, apply one coat of SC-89 Cutie Pie Coral to the bee’s cheeks.
Wipe off any excess glaze from the foot of the bowl with a damp sponge.
Do not stilt or hang over the edge of the kiln shelf.
In wet greenware, cut the top of the pig-out and plug the cast holes with the clay for the salsa bowl. For the yard ornament do not cut out the bank plug set the copper pipe into a plop of silicone inside the pig. For the planter cut out a section at the top of the pig, plug the cast hole with the excess clay, drill small holes for drainage.
Begin with properly fired shelf cone 04 bisque. Moisten a clean sponge and wipe bisque to remove any dust.
Using the CB-604 Soft Fan Brush, apply 3 coats of SW-140 Black Matte to the back sides and the front rim of the platter. Do not glaze the bottom or the foot.
Using the carbon paper and a pencil, transfer the pattern onto the platter.
Using the SG-401 Black Designer Liner, draw over the lines that were transferred from the pattern.
Using the CB-106 Script Liner, apply 2 heavy coats of the following glazes as follows:
Background – SW-170 Blue Hydrangea
Top of the vase – SW-173 Amber Quartz
Scallops on the vase – SW-212 Peacock
Stems of flowers – SW-253 Green Opal
Left flower – Center of flower SW-212 Peacock, petal centers – SC-74 Hot Tamale, petal middles – SW-140 Black Matte, outer petals – SW 134 Eggplant
Center flower – alternate SW-140 Black Matte and SW 141 White Matte, top scallops SC-74 Hot Tamale
Right flower – Center of flower SC-74 Hot Tamale on petals, SW-134 Eggplant around petals. Middle of flower SW-212 Peacock. Outer scallops SP-288 Speckled Tu Tu Tango
Apply dots around the rim by dipping the back end of a paintbrush into SW-141 White Matte and touching it to the plate.
Apply dots to the center of the left flower and the middle of the right flower (on top of the Peacock) by dipping the back end of a paintbrush into SP-288 Speckled Tu Tu Tango and touching it to the plate.
Wipe off any excess glaze on bottom or foot of the plate
Do not stilt or hang over the edge of the kiln shelf.
Begin with properly fired shelf cone 04 bisque. Moisten a clean sponge and wipe bisque to remove any dust.
Using the CB-604 Soft Fan Brush, apply 3 coats of SW140- Black Matte to the back side of the plate, leaving the bottom and foot unglazed.
Using the CB-604 Soft Fan Brush, apply three coats of SW-140 Black Matte in 3 thick, irregular stripes, spaced out as shown in the photo. Add thin stripes in between the thick stripes so you have alternating thick and thin stripes.
Using the Fan Brush, apply three coats of SW-115 Midnight Rain beginning at each thin stripe and moving to the right until you have covered about 1/3 of the next thick stripe. You will be overlapping the Black Matte with the Midnight Rain.
Using the Fan Brush, apply three coats of SW-170 Blue Hydrangea beginning at each thin stripe and moving to the left until you have covered about 1/3 of the next thick stripe. You will be overlapping the Black Matte with the Blue Hydrangea. The center 1/3 of the thick stripes should just be the Black Matte without anything overlapping it.
Wipe off any excess glaze from the foot of the plate with a damp sponge.Do
not stilt or hang over the edge of the kiln shelf.
Begin with properly fired shelf cone 04 Bisque. Moisten a clean sponge and wipe bisque to remove any dust.
Thin slightly SW-001 Stoneware Clear, pour to the inside, roll to coat, pour out the spout, drain.
Brush on 3-4 coats of SW-141 White Matte to the spout, handle, knob, top, and bottom rings with CB-604 Soft Fan. It’s okay to be a little messy as the next color will cover.
Brush three coats of SW-170 Blue Hydrangea on the lid and body of the teapot, with CB-604 Soft Fan, use CB-106 Script Liner to get into tight spots.
Remove the glaze from the bottoms and fire to cone 6.
Form
SB-127 Stoneware Teapot Bisque or CD127+ Teapot Mold
Order the Banana Leaf greenware WET, keep in a plastic bag until the modeling is completed.
Refer to the frog diagram for approximate size of the frog parts.
Start with the frog body.
The diagram shows the top and side views of the body to be sculpted.
The nose of the frog is slightly pointed with a triangular forehead. Make the contours of the spine as shown.
Form two holes for the eye sockets about the size of a pencil eraser.
Roll two balls of clay about the size of a pea.
Use slip to attach the eyes into the sockets.
Use some clay to form a brow/eyelid over each eye.
Give the body a slight twist or bend to it for better movement to the sculpture.
Form the four legs about the size of the diagram. The thighs of the legs are kind of triangular in shape. The feet are formed separately. Use a modeling tool to form the muscles in the legs and calves. Set aside to firm up. The front legs are small tapered logs.
To assemble the frog
Start with the body placed on your leaf. Use a small ball of clay to support the placement of the frog.
For the back legs; Make a small triangle flat shape for the foot pad. Use the legs to see how far to place the footpad before attaching.
Attach it with some slip to the Banana Leaf. Take the long back leg and attach it to the body of the frog and then to the foot pad. Use slip to attach each piece to one another after scoring the ware (scratches to each side is attached.)
Make four small teardrop shapes for the toes (raised portions) on the foot.
Model the teardrops onto the foot and web clay around the ankle and hip area.
Place the other hind leg on the other side and repeat the process for attachment and making of the foot.
Attach the front legs to the body with slip and web the clay into the body. Make the feet pads as before with the teardrops (toes) on the foot pads.
Attach them with slip and web them onto the leaf.
Check the frog before letting it dry to make sure all attachments are done well and no excess clay remains.
Once the form is attached to the banana leaf and it can support itself, remove the clay support from under the frog.
Keep the ware in a plastic bag to slow down the drying process.
It may be necessary to mist the piece with water to keep the piece drying slowly.
Don’t rush the drying process because of the two different moisture contents to the piece.
If there are cracks that develop during the drying process, use some slip and modeling clay to repair the cracks. Let the piece completely dry before firing. I would suggest about a week before firing.
Remove the seam from the piece and clean up the frog using a clean-up tool.
Use green grit cloth to sand the seams and frog. Be careful not to damage the frog.
Sponge lightly with a moistened sponge to remove any dust from the ware.
Fire to Shelf Cone 03-04.
Glazing
Apply 3 coats of SC-27 Sour Apple to the frog excluding the eyes and feet pads using CB-404 #4 Pointed Round. One coat of Sour Apple can be applied to the foot pads about halfway to the toes.
Shade the muscles and crevices with SC-52 Toad-ily Green.
Paint a line along the mouth with SC-52 Toad-ily Green using CB-110 #10/0 Mini Liner.
Apply 3 coats of SC-23 Jack-O-Lantern to the foot pads blending the color over the Sour Apple color up onto the ankle of the leg using CB-404 Pointed Round.
Shade the toes of the feet with SC-88 Tu Tu Tango using CB-404 #4 Pointed Round.
Apply 2 coats of SC-88 Tu Tu Tango to the eyes using CB-220 #2/0 Detail Liner.
Shade the eyes with thinned SC-73 Candy Apple Red around the edge of the eye.
Paint in the pupil shape (vertical slit) with SC-15 Tuxedo using CB-110 #10/0 Mini Liner.
Paint in some SC-11 Blue Yonder to the area between the front and back legs along the side of the frog using CB-220 #2/0 Detail Liner.
Apply 1 coat of S-2101 Crystal Clear Brushing to the frog only using CB-404 #4 Pointed Round.
Apply 3 coats of FN-217 Evergreen Fir to the Banana Leaf using CB-404 #4 Pointed Round and CB-604 #4 Soft Fan.
Stilt and Fire the ware to Shelf Cone 05-06.
Form
CD1167 Banana Leaf, WET Greenware stored in plastic bag until use.
Begin with properly fired shelf cone 04 bisque. Moisten a clean sponge and wipe bisque to remove any dust.
Using a CB-604 #4 Soft Fan, apply 3 coats of any of the above glazes (excluding SW-402 Dark Flux) to the entire mug (not the very bottom). Let coats dry in between and be sure brush is fully loaded. These glazes have minimal movement and perform well with a generous application.
Apply 2 coats of SW-402 Dark Flux to the inside rim of the mug. This will keep the movement to the inside of the piece to avoid and kiln shelf mishaps!
Wipe the bottom of the piece to make sure it is free from any glaze.
Let dry completely.
Stilt and fire to shelf cone 6
*NOTE: The SW-402 Dark Flux may be added to the outside of the piece also, but be sure to account for the movement in the glaze that will be caused by this. Usually, for every addition of a coat of flux to a piece, I will recede my base coat a bit and keep the flux to the top 1/2-1/3 of a piece. The form and base glaze have as much to do with how much movement will occur as the amount of flux you are applying. If you’re not sure, we would recommend firing on a kiln brick!
Fire bisque to shelf cone 04, and wipe bisque with a damp sponge before starting to paint.
Start by using SG-401 Black Designer Liner to draw lines in the creases. Using a wet brush, pull out some of the SG-401 Black Designer Liner lines to create a shadow effect.
Paint one coat of SW-139 Creamsicle over the body of the pumpkin.
Using SW-164 Satin Patina, paint 2 coats on the stem of the pumpkin
Begin with properly fired shelf cone 04 bisque. Moisten a clean sponge and wipe bisque to remove any dust.
Using a CB-604 #4 Soft Fan, apply 2 coats of S-2714 Herb Garden to the lid and top 1/2 of the vessel.
Apply 3 coats of SW-110 Oyster to the inside of the jar and 2 coats to the bottom 1/2 of the jar and the handle.
Clean bottom of the piece and the lip of the lid with a sponge for firing.
Let dry completely.
Stilt and fire to shelf cone 5/6.
*NOTE: The S-2714 Herb Garden is a cone 06 glaze and has a lot of movement. Please account for this when glazing, with some forms you may need recede coats. Having a heavy crystal application will also result in greater movement. *
Begin with properly fired shelf cone 04 bisque. Moisten a clean sponge and wipe the bisque to remove any dust.
Using Sponge on a Stick load the sponge with UG-31 Chocolate making sure to tap off excess glaze. Too much color will result in a blurred, messy image. Apply the color to the ST-133 Woodgrain, while it is laying flat on the table. Turn the stamp over onto the desired area and press down; make sure not to rub back and forth or this will cause a double image. Repeat until the center section of the stein is covered in the stamp.
Once the stamping has been completed, put some SG-401 Black Designer Liner out on a plate. Sprinkle some AC-310 Silkscreen Medium onto the glaze and mix with a palette knife until the mixture is about the consistency of peanut butter.
Take the “Dad” screen from the DSS-130 Graceful Script set. Lay the screen flat onto the stein and rub the screening mixture through the screen. Remove the screen and wash immediately.
Using a Soft Fan, apply 3 coats of SW-144 Lava Rock to the inside, handle, and rims of the stein.
Apply 2 coats of SW-001 Stoneware Clear to the center section of the stein.
Wipe any excess glaze off the bottom of the piece.
Let dry completely.
Fire to shelf cone 5/6.
Form
SB-133 Stein Stoneware Bisque or CD133 24. oz Stein Mold
Begin by throwing the bottom section of the mugs. I threw sever small shallow bowls and trimmed a foot onto them once they had set up.
Next, roll out a 1/4″ slab of a stoneware clay of your choice with a rolling pin or slab roller.
Place the matte of your choice onto the slab and press into the slab evenly. Do not drag your hand across the matte; apply even pressure straight down, or use a rolling pin to carefully press the matte into the slab.
Measure the circumference of the bottom portion of the cup and cut a rectangle that will be long enough to attach to the top.
Slip and score the vertical edge of the slab to create a circle and then slip and score the bottom piece and the bottom edge of the slab and attach. there is no need to blend any of the edges, just be sure to score and slip very well and apply firmly.
Pull a handle and attach to the mug.
Cover and let dry slowly
Once dry, fire to shelf cone 05/04.
Begin with properly fired shelf cone 04 bisque. Moisten a clean sponge and wipe bisque to remove any dust.
Using a CB-604 #4 Soft Fan, apply 3 coats of your desired Ice glaze color to the textured part of the mug.
With the same brush, apply 3 coats of SW-111 Wrought Iron to the bottom, inside, and handle of the mug.
Let dry completely.
Stilt and fire to shelf con 5/6.
Repeat as desired with any of the Matte or Classic Stoneware glazes.
Begin with a properly fired shelf cone 04 Bisque. Moisten a clean sponge and wipe bisque to remove dust.
In wet greenware, cut out the Happy Holiday words, pattern from the internet.
Fire to cone 04.
Tape over the words on the outside of the hat with painters tape, thin slightly FN-004 Red, pour to the inside of the hat, turn to coat, pour out the excess color, drain.
Remove the tape, check the lettering, add more of the FN-004 Red to the letters if needed, wipe off excess color.
Brush on 4 coats of FN-304 Black Velvet to the entire hat (take care not to get the glaze into the lettering.) Use CB-604 Soft Fan and CB-106 Script Liner.
When dry, tape off one inch at the brim of the hat for the hat band. Brush with one coat of SC-16 Cotton Tail and 3 Coats of FN-004 Red. Wrap a two or three-inch candle with paper, set it on the top middle of the hat.
Use a palette knife to apply SG-302 Snowfall around the candle covering the top of the hat, place SG-302 Snowfall into the plastic bottle (use a palette knife) cut the plastic tip to enlarge, squeeze Snowfall to drip onto the sides of the hat, to mimic snow or melting wax from the candle.
Remove the paper wrapped candle when the glaze is nearly dry.
Fire bisque to shelf cone 04 and wipe bisque with a damp sponge before starting to paint.
Using AC-230 Clay Carbon paper, draw and transfer the outline of the rose onto the bisque.
Using SG-403 Red Designer Liner, trace the transferred outline of the rose.
Using SG-404 Blue Designer Liner and SG-410 Bright Blue Designer Liner, remove the designer tip and use CB-106 Scrip Liner brush and CB-110 Liner brush to paint the inside of the rose petals.
Next, using SG-405 Green Designer Liner and SG-Bright Green Designer Liner and using the brushes mentioned in step 4, paint the leaves and eucalyptus.
Lastly, paint 1-2 coats of SW-001 Stoneware Clear over the entire piece
Fire to cone 6.
Form
SB-128 Tumbler Stoneware Bisque or CD128 Tumbler Mold
Begin with properly fired shelf cone 04 bisque. Moisten a clean sponge and wipe bisque to remove any dust. Check the inside for any debris as well.
Cut out the parts of the pattern. They are labeled right and left and keep separate. Transfer the parts of the pattern using a pencil and AC-230 Clay Carbon with the aid of the Blue Masking Tape. Space the parts of the pattern to where they are pleasing and do not have any major voids between the shapes. Note on the pattern that the handle and spout are noted for your placement of the design.
Condition CB-110 Liner with AC-525 Brush Cleaner. Place some AC-302 Wax Resist on the foil. Use CB-110 Liner loaded with Wax to outline the design. Be careful not to overpaint the pattern or drop any errant wax onto the background areas of the pattern. A drop of a color of food coloring mixed into the wax may aid in seeing where you have painted the wax. Load the brush fully with the wax while painting, since only one coat of wax is necessary for coverage and it is futile to apply more than one coat once the first application of wax has been made. Check to make sure all lines touch another line. There should be no skips in the waxed line. Wash the brush immediately after use with warm water and Brush Cleaner. Dispose of the wax in the trash.
Starting with the big flowers in the pattern by loading CB-404 Pointed Round with water and tip the end of the brush with UG-72 Wedgewood Blue to shade the “scallop” petals on both flowers. Reload the brush in the same manner with UG-97 Bright Blue to darken the petals towards the center of each petal. Repeat the darkening of the shading in the same manner now with UG-1 Kings Blue. Keep the Kings Blue to a minimum but strongest near the calyx of the flower. To the lid apply the three blues in the same manner over the design. The Wedgewood Blue is applied first over the scallop filigree, then darkened with the Bright Blue. The bottom edge and top knob portions of the lid are done in Kings Blue.
Using SG-402 White Designer Liner to add dots of white to the base of the petals.
Apply the following Fundamental Underglazes to the noted areas of the pattern. Use a brush sized for the areas being painted at any given time with 3 coats of color. Use the wax to your advantage when painting the colors in. Try not to over paint any lined area when possible. UG-68 Apple Green to the leaves and stems excluding the inner portion of the leaf. UG-204 Orange to bottom and top beaded trim and to the handle. UG-217 Red Coral to the “bell” shaped flowers. UG-218 Pear Green to the calyx on the large flowers. UG-219 Marine Blue to the background around all of the flowers, leaves, and stems. UG-220 Sage to the inner portion of each leaf.
Fire the piece to Shelf Cone 04-05 to set the colors and burn off the wax from the design. Note that the kiln needs extra venting in the early stages of the firing to vent off the burning wax fumes.
Thin some SW-001 Stoneware Clear with water in a Plastic Mixing Cup to a flowing consistency. While working quickly, pour the thinned stoneware clear glaze into the teapot. Rotate the glaze to cover the inside of the teapot.
Pour out excess glaze through the spout for adequate coverage and invert to dry.
Glaze the outside of the teapot with 2-3 coats of SW-001 Stoneware Clear using CB-604 Soft Fan. Do not apply glaze to the foot of the teapot.
Use a moistened sponge to check and remove any glaze on the bottom foot of the teapot prior to firing.
Place the teapot and lid separately onto a kiln shelf. Do not stilt. Do not have it overhanging any shelf edge. Fire to Shelf Cone 5-6
Form
SB-127 Stoneware Teapot Bisque or CD127+ Teapot Mold
Pour mold, drill holes for lights while leather hard, clean and fire to cone 04.
Use an X-ACTO knife to drill a hole for the nipple in the base.
Outline the facets of the tree with SG-405 Green, let dry, brush on 2- 3 coats of CG-750 Noel, clean out the glaze from the holes. Use CB-604 Soft Fan.
Using the fan brush, brush on three coats of FN-004 Red to the base, let dry.
Outline with SG-409 Bright Green.
Brush the base with one coat of S-2101 Clear with the fan brush.
Fire to cone 06. Glue in the bulbs, wire the base.
Form
CD-004 14″ Faceted Tree and Base
Colors
CG-750 Noel
FN-004 Red
SG-405 Green
SG-409 Bright Green
S-2101
Decorating Accessories
CB-604 #4 Soft Fan
Miscellaneous Accessories
Light Socket
Cord
X-ACTO Knife
Nipple (Small Threaded Rod)
LED 40-Watt Tube Bulb
Plastic Bulbs
Low-Fire|Molds|Home Décor|Holiday
406|408|446|445
1685
Elements and Cascade Vases with Honeycomb Mat – Clay and Glaze
1. Begin with about 3 lbs of wedged white earthenware clay. Roll to about 1/4″ thickness with slab roller or rolling pin.
2. Place MT-013 Honeycomb Mat over the slab and press straight down gently with your hand to secure into place. Do not rub hand across stamp as it could cause the mat to move and distort the image. Gently roll over the mat to press into the clay.
3. Use the rim of your bowl or about a 5″ circle template and cut out 2 circles from the textured clay.
4. Slump both circles over a bowl or plaster hump mold with the texture facing up to shape clay. Let set up until soft leather hard.
5. In the meantime prepare the other pieces to the vase. Cut out a 1″ wide strip of clay, roll some coils, and cut out a 3″ wide strip of clay to form the foot.
6. Shape the wider slab into a cone and slip and score to attach.
7. Once the forms have set up, slip and score the edges of both circles and the 1″ strip. Attach together securely.
8. Find the center of the form on both the top and bottom. Attach coils around the top circle and the cone to the bottom by slipping and scoring.
9. Cut out the top circle so the form is open.
10. Let dry completely and fire to shelf cone 04.
Glazing
11. Begin with properly fired shelf cone 04 bisque. Moisten a clean sponge and wipe bisque to remove any dust.
12. Thin some FN-009 Black with a 3 to 1 ratio glaze to water. It should be the consistency of creamer. Roll glaze on the inside of the vase and pour out excess.
13. Using a CB-604 #4 Soft Fan, apply 2 coats of EL-101 Oyster Shell for the pink vase and EL-103 Sea Spray for the green vase.
14. Next, apply 2 coats of EL-127 Rose Granite for the pink vase and EL-106 Tidal Pool for the green vase.
15. Using a CB-106 #4 Soft Fan, plop PC-601 Clear Cascade to the top of the vase. For the second coat, plop all 3 colors.
Begin with properly fired shelf cone 04 bisque. Moisten a clean sponge and wipe bisque to remove any dust.
Begin with properly fired shelf cone 04 bisque. Moisten a clean sponge and wipe bisque to remove any dust.
Using the CB-604 Soft Fan Brush, apply 3 coats of SW104- Black Walnut to the back side of the platter and the front rim, leaving the bottom and foot unglazed.
Using the CB-604 Soft Fan Brush, apply 1 coat of FN-001 White to the top of the plate, inside the rim
Dip your snowflake in water and adhere it to the center of the front of the platter by pressing down with a damp sponge. Make sure all the edges are stuck to the plate. Add more water with a brush if you need to.
Using the Soft Fan brush, apply 3 coats of SW119 Cinnabar to the front of the platter, inside the rim. After your third coat, remove the paper.
Using the SG-401 Black designer liner, doodle inside the snowflake area using the photo as a reference. Let dry.
Using the CB106 Script Liner, apply 3 coats of SW137 Storm Gray to the snowflake.
Apply random dots of SW137 Storm Gray over the Cinnabar by dipping the back end of a paintbrush into the Storm Gray and touching it to the platter.
Wipe off any excess glaze from the foot of the teapot with a damp sponge.
Do not stilt or hang over the edge of the kiln shelf.
Begin with properly fired shelf cone 04 bisque. Moisten a clean sponge and wipe bisque to remove any dust.
Using the CB-604 Soft Fan Brush, apply 3 coats of SW141 White Matte to the outside of the bowl
Using the CB-604 Soft Fan Brush, apply 3 coats of SW-123 Sapphire to the inside of the bowl
Combine 2 teaspoons of SG-401 with 2 teaspoons of water and a drop of dish soap in the plastic cup. Mix well.
Blow into the mixture using the straw until bubbles start to form and spill out of the cup. Let the bubbles fall onto the outside of the bowl. Repeat until the entire bowl is covered.
Using the CB-604 Soft Fan Brush, apply 2 coats of SW-132 Mirror Black in two triangular shapes starting from the top outside rim and tapering down.
Using the CB-604 Soft Fan Brush, apply 2 coats of SW-118 Sea Salt over the Mirror Black.
Using the CB-604 Soft Fan Brush apply 1 heavy coat of SW-401 Mayco Flux to the inside of the bowl, starting about 1.5 inches below the rim.
Wipe off any excess glaze from the foot of the teapot with a damp sponge.
Do not stilt or hang over the edge of the kiln shelf.
Roll out clay on a canvas surface, 1/4 to 3/8″ thick, with a rolling pin.
Find a circle shape or use a string to cut out a circular shape.
Let the clay firm up but still able to manipulate. Drape the circle shape over the edge of a table, turn up some of the edges so it is misshapen. Let dry.
Clean and fire to 04.
Glazing
Pencil a line around the outer edge, approximately 3/4″. Use CB-604 #4 Soft Fan to brush 2-3 coats of SC-97 Cant-elope.
On a palette, thin SC-11 Blue Yonder, so it will apply smoothly, apply 2-3 coats to the remainder of the clock. Let dry.
Pencil in the letters and the hands of the clock. Brush the letter with SG-401 Designer Liner Black and one coat or SC-15 Tuxedo, use CB-110 #10/0 Mini Liner.
Use a ruler to get the hands on straight, if desired use SG-401 Designer Liner Black.
Apply 2 coats of S-2101 Crystal Clear Brushing with CB-604 #4 Soft Fan.
Wrap a piece of copy paper around a soda can. Roll the can on the diagonal until the paper is used up, then secure with a small piece of tape.
Roll out clay ¼” thick. Cut a rectangle 9″ x 5″. With a pony roller, thin the clay at one of the short sides. Score the top side of the thinned edge.
Lay the can on the clay on the thicker side. Roll the clay onto the can. Score the remaining side using slip (mix of clay you are using and water in a sour cream consistency) on the scored surface. Press the pieces together.
Take excess clay and roll out ¼” slab for the bottom of the piece. Score the clay on the bottom portion of your cylinder adding slip in preparation to be placed on the slab. Place the cylinder shape with the can still inside on top of the slab. Cut around the cylinder leaving about a 1/8 inch extra clay. Push up the extra clay on to the sides of the cylinder sealing the bottom layer to the side walls of your tube.
Leave the soda can in the clay till the walls of your vessel are stiff enough to stand on their own. If you put a little hole in the bottom it will release easier, as it can form a vacuum. When removing the can the paper should stay behind. You can remove the paper at any time. Remember to fill in the little hole of this vessel if you wish it to hold liquids.
Follow the directions from 1-5, to make the cactus, tape two cans together to build the height of the structure, then proceed. The clay will need to be cut larger to accommodate.
To close off the top, after the cans are removed, slump a small piece of clay over a round shape such as a tennis ball, let it set so it keeps its form, then score and slip attach to the top of the cylinder shape.
To make the arms, squeeze a fat coil, then poke a dowel rod into the coil, roll on a flat surface this will keep the arms hollow. Remove the dowel rod. Pinch the ends to close, widen the base by pinching the clay, shape to make the arms shape, score the ends, slip attach.
Let it rest so it can be finished. After the clay is firm, cut a hole for the opening of the birdhouse.
Let dry. Fire to cone 04.
Thin some FN-009 Black to the consistency of creamer to use as a rolling glaze (about 1 part water, 2 parts glaze). Pour into the cactus and roll to coat the inside. Pour out excess and let dry.
Using a CB-604 #4 Soft Fan, apply SC-7 Leapin’ Lizard toward the bottom, SC-43 Lettuce Alone in the middle, and SC-93 Honeydew List on the top. Blend the colors into one another and repeat 2-3 times.
Using a sponge-on-a-stick, apply glaze to ST-133 Wood Grain Stamp. Be sure to tap off excess glaze and keep the stamp flat on the table when applying the glaze. The stamping will cover the entire surface of the cactus so, this will need to be repeated several times. Keep in mind to have SC-36 Irish Luck on the bottom half and SC-26 Green Thumb on the top half. It works best to have the transition be on the stamp itself. So, divide the stamp and blend so the transition is smooth.
Apply 3 coats of SC-89 Cutie Pie Coral to the hanger.
Begin with a properly fired shelf cone 04 Bisque. Moisten a clean sponge and wipe bisque to remove any.
Using a pencil, trace the design with clay carbon on to the tumbler.
Outline the entire design with SG-401 Black.
On the orange tumbler, fill in the petals with SG-408 Orange, using the tip to make scribble stokes inside the petals.
Fill in the stem with SG-405 Green, shade the leaves with SG-405 Green and SG-409 Green with the scribble strokes.
Pour some SW-206 Melon into a small cup and add a little bit of water to slightly dilute it (about 3 parts glaze to 1 part water). It should be th consistency of a coffee cream. Pour this into the piece and roll around to completely coat the interior of the piece. Drain out the excess glaze and keep inverted until it has lost its shine. Wipe off any glaze from the outside using a damp sponge. Allow to dry. (An alternative to pouring glaze to the inside, is brushing on the SW-206 Melon, three coats, in a circular direction to the inside.)
Using CB-604 Soft Fan, appy 3 HEAVY coats of SW-139 Creamsicle to the outside of the tumbler.
The blue tumbler is finished the same way as the orange tumber, but uses SW-252 Blue Opal on the inside, outlined in SG-401 Black, SG-410 Bright Blue for the flower petals, SG-405 Green for the leaves and stem, SG-407 Yellow for the flower centers.
Using CB-604 Soft Fan, apply 3 HEAVY coats of SW-136 Weathered Blue to the outside of the blue tumbler.
For the yellow tumbler, inside is SW-254 Yellow Opal, outline design in SG-401 Black, scribble petals with SG-407 Yellow, center is SG-408 Orange, and leaves are SG-409 Bright Green.
Using CB-604 Soft Fan, apply 3 HEAVY coats of SW-138 Lemon Meringue to the outside of the yellow tumbler.
With a damp sponge, clean off any glaze on the bottom of the tumblers, and fire to cone 6.
Begin with properly fired shelf cone 04 bisque. Moisten a clean sponge and wipe bisque to remove any dust.
Using the CB-604 Soft Fan Brush, apply 3 coats of SW-140 Matte Black to the back side of the bowl, leaving the bottom and foot unglazed.
Using the CB-604 Soft Fan Brush, apply 3 coats of SW-146 Aurora Green to the inside of the bowl. Make sure you have plenty of crystals in your coats. Let dry.
Using the Soft Fan brush, apply 2 heavy coats of SW-210 Emerald to the upper rim of the inside of the bowl about 2 inches wide.
Using the Soft Fan brush, apply 2 heavy coats of SW-250 White Opal right below the band of Emerald, about 2 inches wide.
Using the Soft Fan Brush, apply 2 heavy coats of SW-123 Sapphire to the rest of the inside of the bowl.Wipe off any excess glaze from the foot of the teapot
with a damp sponge.
Do not stilt or hang over the edge of the kiln shelf.
Begin with properly fired shelf cone 04 bisque. Moisten a clean sponge and wipe bisque to remove any dust.
Thin some SW-141 White Matte with water in a small cup until it is the consistency of heavy cream. Pour the contents into the teapot and roll it to coat the entire inside. Stand teapot upside down to drain.
Using the CB-604 Soft Fan Brush, apply 3 coats of SW-141 White Matte to the outside of the teapot except for the spout, handle, lid knob and bottom of teapot. Also leave the bottom 1/8” of the lid’s foot unglazed.
Thin a small amount of SG-404 Designer Liner Blue with some water until it is the consistency of milk. Using the CB-604 Soft Fan, apply to a small area (no larger than 2” diameter in any direction).
Dip the CB-106 Script Liner into isopropyl alcohol and dab onto the wet Designer Liner. This will make feathery spots.
Repeat steps 4 and 5 with the remaining colors of Designer Liner.
Using the CB-604 Soft Fan, apply 3 coats of SW-152 Blue Spatterware to the lid knob, spout and handle of the teapot.
Wipe off any excess glaze from the foot of the teapot with a damp sponge.
Do not stilt or hang over the edge of the kiln shelf.
Fire to cone 5/6.
Form
SB-127 Stoneware Teapot Bisque or CD127+ Teapot Mold
Begin by throwing the bottom section of the mugs. I threw sever small shallow bowls and trimmed a foot onto them once they had set up.
Next, roll out a 1/4″ slab of a stoneware clay of your choice with a rolling pin or slab roller.
Place the matte of your choice onto the slab and press into the slab evenly. Do not drag your hand across the matte; apply even pressure straight down, or use a rolling pin to carefully press the matte into the slab.
Measure the circumference of the bottom portion of the cup and cut a rectangle that will be long enough to attach to the top.
Slip and score the vertical edge of the slab to create a circle and then slip and score the bottom piece and the bottom edge of the slab and attach. there is no need to blend any of the edges, just be sure to score and slip very well and apply firmly.
Pull a handle and attach to the mug.
Cover and let dry slowly
Once dry, fire to shelf cone 05/04.
GLAZING
Begin with properly fired shelf cone 04 bisque. Moisten a clean sponge and wipe bisque to remove any dust.
Using a CB-604 #4 Soft Fan, apply 3 coats of your desired Classic glaze color to the textured part of the mug.
With the same brush, apply 3 coats of SW-111 Wrought Iron to the bottom, inside, and handle of the mug.
Let dry completely.
Stilt and fire to shelf con 5/6.
Repeat as desired with any of the Matte or Classic glazes
Wrap a piece of copy paper around a soda can. Roll the can on the diagonal until the paper is used up, then secure with a small piece of tape.
Roll out clay ¼” thick. Cut a rectangle 9″ x 5″. With a pony roller, thin the clay at one of the short sides. Score the top side of the thinned edge.
Lay the can on the clay on the thicker side. Roll the clay onto the can. Score the remaining side using slip (mix of clay you are using and water in a sour cream consistency) on the scored surface. Press the pieces together.
Take excess clay and roll out ¼” slab for the bottom of the piece. Score the clay on the bottom portion of your cylinder adding slip in preparation to be placed on the slab. Place the cylinder shape with the can still inside on top of the slab. Cut around the cylinder leaving about an 1/8 inch extra clay. Push up the extra clay on to the sides of the cylinder sealing the bottom layer to the side walls of your tube.
Leave the soda can in the clay till the walls of your vessel are stiff enough to stand on their own. If you put a little hole in the bottom it will release easier, as it can form a vacuum. When removing the can the paper should stay behind. You can remove the paper at any time. Remember to fill in the little hole of this vessel if you wish it to hold liquids.
Follow the directions from 1-5, to make the cactus, tape two cans together to build the height of the structure, then proceed. the clay will need to be cut larger to accommodate.
To close off the top, after the cans are removed, slump a small piece of clay over a round shape such as a tennis ball, let it set so it keeps its form, then score and slip attach to the top of the cylinder shape.
To make the arms, squeeze a fat coil, then poke a dowel rod into the coil, roll on a flat surface this will keep the arms hollow. Remove the dowel rod. Pinch the ends to close, widen the base by pinching the clay, shape to make the arms shape, score the ends, slip attach.
Let it rest so it can be finished. After the clay is firm, cut a hole for the opening of the bird house, poke small holes for the cactus wires, roll a coil for the hanger and the perch. Score and slip attach the perch and coil.
Let dry. Fire to cone 04.
Glazing
Use the Soft Fan to apply three coats of EL-118 Blue Grotto to the hanger, perch and where the arms meet the body of the cactus.
Use the Soft Fan to apply three coats of EL-130 Sea Green to the remainder of the cactus, brushing over the edges of the Blue Grotto.
Apply three coats of EL-118 Blue Grotto to the inside – as far as you can see through the bird house hole.
Fire to 06. Glue in copper wire or other material to the small holes in the cactus.
Begin with properly fired shelf cone 04 bisque. Moisten a clean sponge and wipe bisque to remove any dust.
Transfer pattern onto the platter using Clay Carbon Paper and a pencil Using SG-401 Designer Liner Black, draw over the lines of the design on the plate.
Using the other colors of Designer Liner, fill in the small shapes in the design according to the photo.
Using the CB-604 Soft Fan, apply 3 coats of SW-132 Mirror Black to the back of the platter, making sure to leave the very bottom and the foot of the plate unglazed.
Using the CB-604 Soft Fan, apply 3 coats of SW-132 Mirror Black to the outer rim of the front of the platter.
Using the CB-106 Script Liner, apply 3 coats of SW-124 Matte Maycoshino over the entire sun design.
Using the SB-604 Soft Fan, apply 3 coats of SW-212 Peacock to the rest of the front of the plate. Use the CB-106 Script Liner to get into the tight areas.
Wipe off any excess glaze from the foot of the plate with a damp sponge. Do not stilt or hang over the edge of the kiln shelf.
1. Form two clay slabs approximately. 8″ x 14″ and 5″ x 5″ with a rolling pin or slab roller. Compress and smooth both sides of the clay slabs with a rib.
2. Dust top of the license plate with talc. Shake excess off.
3. Center larger clay slab on top of the license plate, compress clay slab onto the license plate using a rolling pin or moist sponge.
4. Bevel the long ends of the clay slab with opposite 45 degree angle cuts. Slip and score along the beveled edges and along the bottom of the back side.
5. Cut a circle with an approximately 3.5″ diameter out of the smaller slab.
6. Slip and score along the outside edges of the circle.
7. Wrap the larger slab around the smaller circular slab. Using the edges of your fingers, “zip” up the beveled edges until the seam is sealed.
8. Turn the mug over and compress and seal the bottom edge. Return the mug right-side up and make sure opening to mug is in the round.
9. Pull or roll out a handle. Slip and score to attach.
10. Let dry then fire to cone 04.
11. Wet the blue shop towel, squeeze out the excess water. Pour a small amount of FN-001 White to the towel, leaving spaces for FN-018 Bright Blue. Drizzle in the Bright Blue into the open space on the towel.
12. Fold the towel in half, open, then press to the license plate area of the mug. Use a dry sponge to pat the back of the towel. Remove the paper towel, pat again with the dry sponge to remove excess glaze.
13. Use the Script Liner to apply three coats of FN-006 Blue to the numbers and the word Ohio, etc. with three coats of FN-004 Red.
14. Apply two coats of FN-020 Medium Green for the grass at the bottom, and FN052 Tangerine for the sun and the rays.
15. Brush the inside, handle and top and bottom trim with three coats of FN-004 Red, use CB-604 Soft Fan, and CB-106 Script Liner.
Next using Mayco designer mats roll and press into the clay in any variety and pattern you wish. In this example, MT-009 Scallops Mat, MT-008 Spiral Mat, MT-001 Flower Branch, and MT-004 were used.
Next using Mayco “Slump and Hump” 13 inch platter mold CD-914, drape the slab into the platter mold, lightly pounce a sand bag onto the slab to compress it into the shape of the platter in the mold, and then cut the excess slab away by running your cutting tool along the outside of the mold.
When leather hard, remove the piece from the mold, Gently clean edges with a sponge, and when bone dry, bisque fire to shelf cone 04.
Next using any combination of Mayo’s Stoneware Glazes to apply 2-3 coats of each. Glaze each impressed design with a separate color. In this example, SW-201 Turquoise, SW-205 Coral, SW-2017 Chambray, SW-209 Charcoal, and SW-211 Glacier Blue were used.
Finish by firing the piece to cone 6 on medium speed.
Begin with properly fired shelf cone 04 Stoneware bisque. Moisten a clean sponge and wipe bisque to remove any dust.
Apply 3 even coats of UG-51 China White to the front of each plate using CB-604 Soft Fan.
Trace on the pattern using AC-230 Clay Carbon and a pencil. Note the flowers and leaves that are a dotted line. These are the “shadow” flowers and leaves.
Apply 2-3 coats of each of the following Underglazes as noted using CB-404 Pointed Round: Sm. Red Flower and petals to lg. Red Flower; UG-206 Fire Engine Red, Orange Flower; UG-57 Harvest Gold, Yellow Flower; UG-46 Bright Yellow, Blue Flower; UG -72 Wedgewood Blue. To the center of the large red flower is done with a ring of Wedgewood Blue, then Harvest Gold and inner center is Apple Green.
Shade the flowers as follows with 1-2 coats using the same brush: Red Flower; no shading to petals or sm. Red Flower. Blue Flower; Apple Green, Orange Flowers; Fire Engine Red, Yellow Flower; Harvest Gold.
Paint in the leaves with 3 coats of UG-68 Apple Green using CB-404 Pointed Round. Detail the leaves with SG-407 Yellow and SG-409 Bright Green and UG-210 Forest Green.
Detailing the center of the large red flower is done with the Designer Liner colors and UG-210 Forest Green. Inner most center is detailed with Black and UG-210 Forest green, Gold center ring is detailed with SG-401, SG-403, SG-407, SG-408 and SG-409.. The outermost center ring is detailed with SG-401 and UG-210. The smaller flowers on both plates are primarily done with only SG-401. The sm. blue and yellow flowers have a bit of SG-408 added to some as accents as well.
The fern stems are SG-409 Bright Green. Leaves are UG-68 Apple Green applied with CB-220 Detail Liner and detailed with SG-407 and SG409.
Fill the AC-220 Writer Bottle with some UG-30 Sand. Attach the Medium metal writer tip and detail the shadow flowers, leaves and stems that are noted as a dotted line on the patterns.
Using CB-604 Soft Fan to apply 3 coats of SW-001 Clear to the centers of the plates. To the rim and back of the plates excluding the “foot and inner foot section” apply 3-4 coats of SW-108 Green Tea with CB-604 Soft Fan.
Using CB-604 Soft Fan loaded with water, tip one edge with SW-304 Copper Wash to the outside edge of the plate. Color should be medium in concentration at the edge fading to nothing inward.
Use a damp sponge to completely remove any glaze on the foot and inner bottom footed section of the plate. No glaze can be there on the “foot” as the piece is not stilted in firing. Any glaze on the “foot” will cause the piece to stick to the shelf in firing.
Place the plates separately on a shelf for firing. Do not allow any part of the plate to hang over the edge of the shelf during firing.
Fire to Shelf Cone 6.


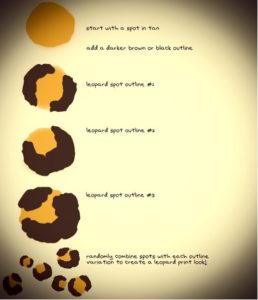
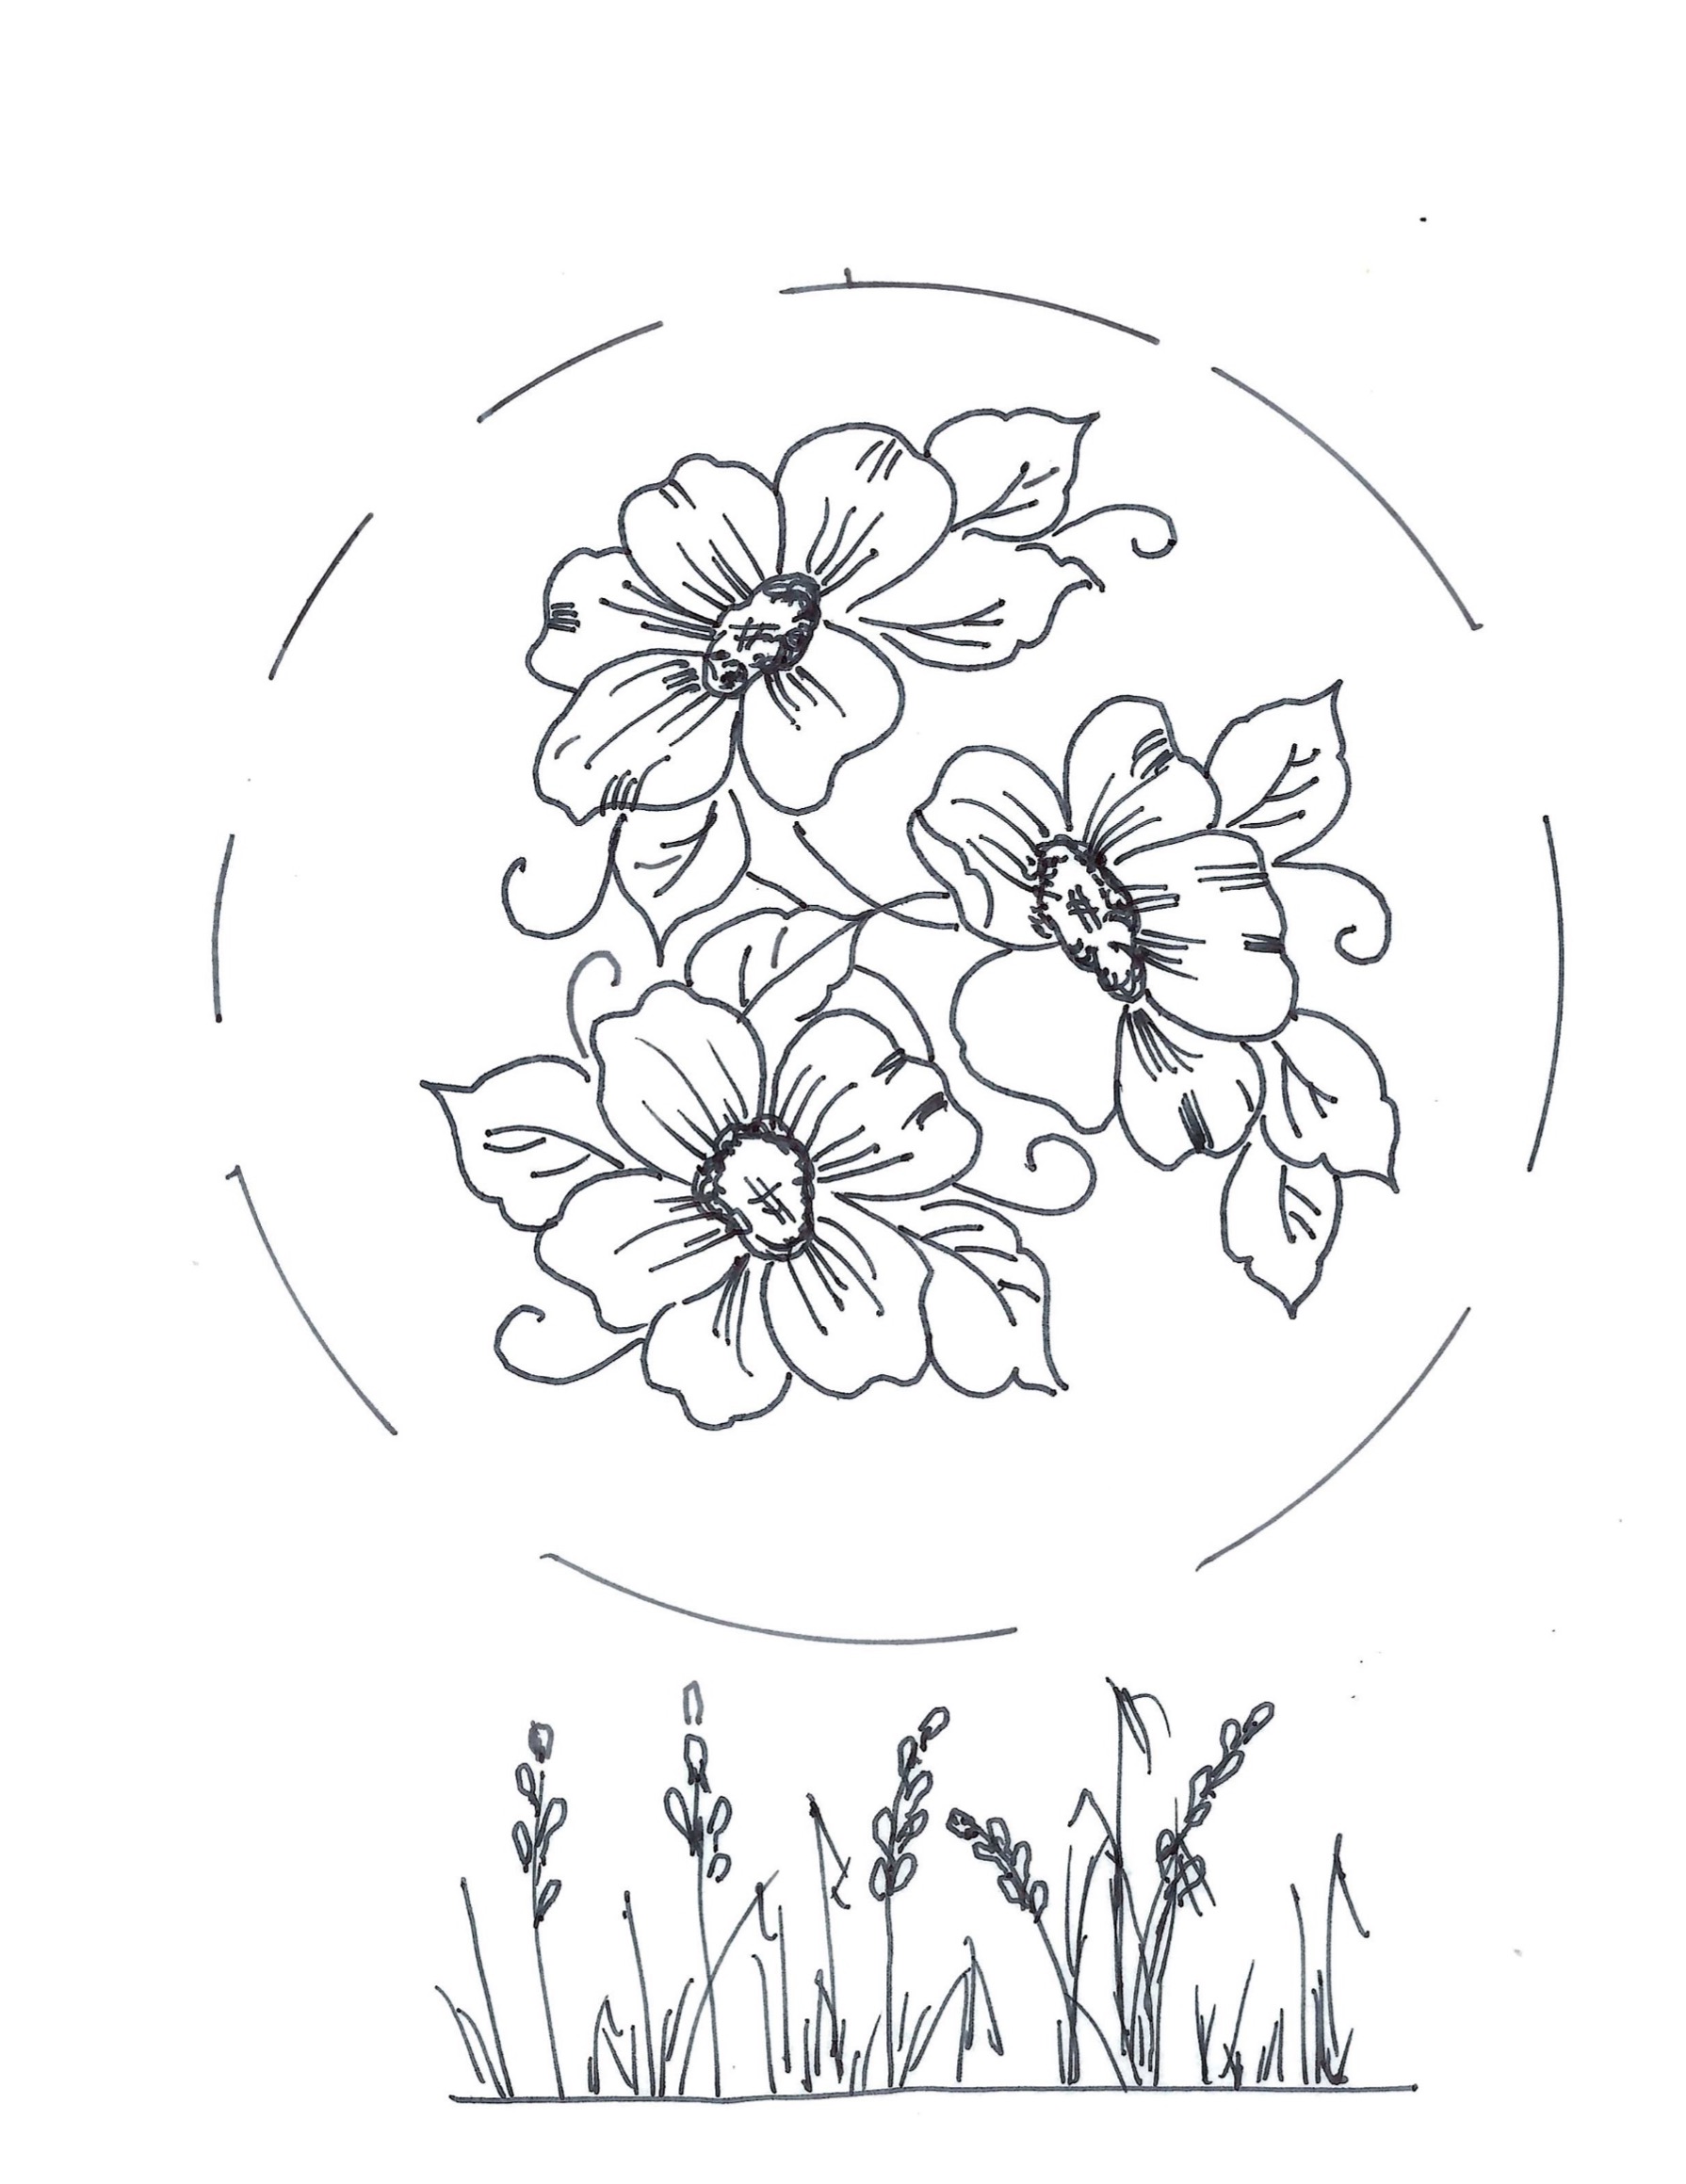
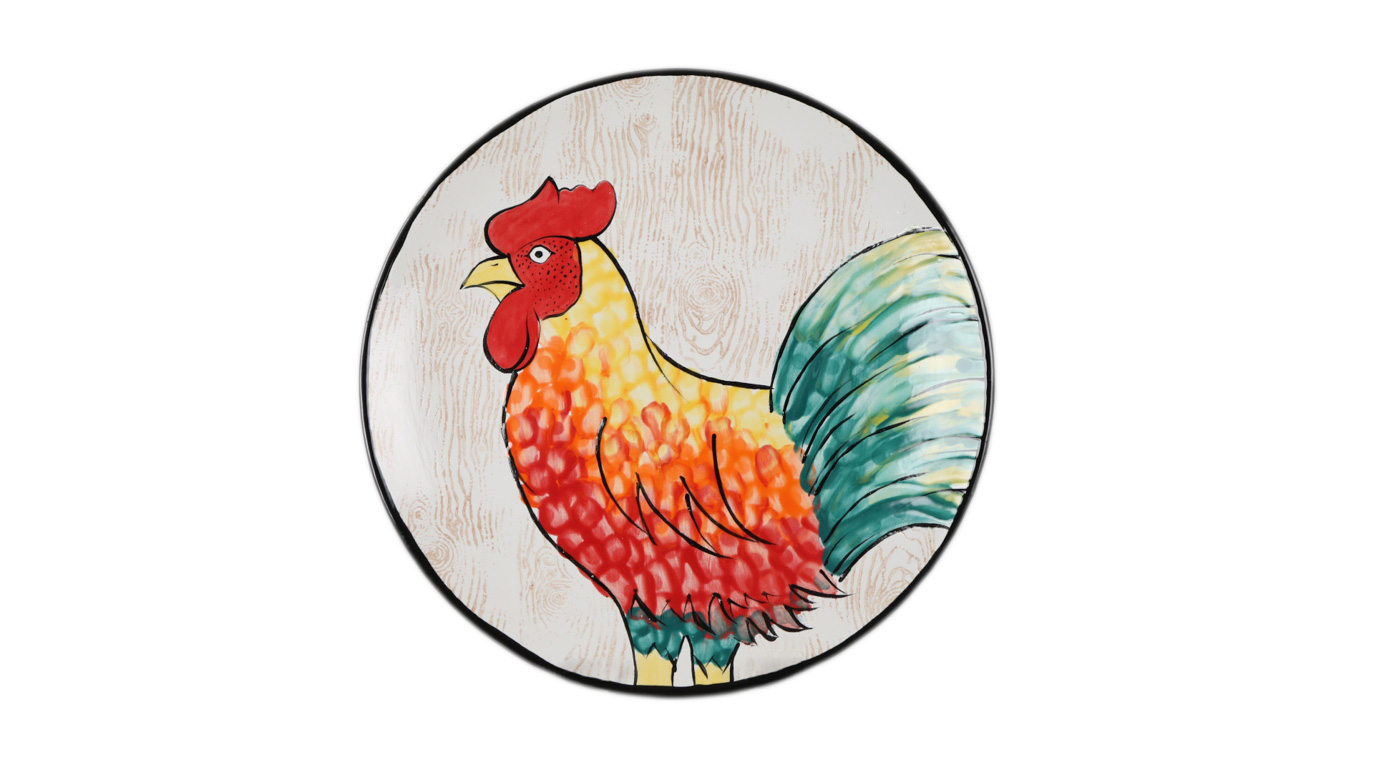
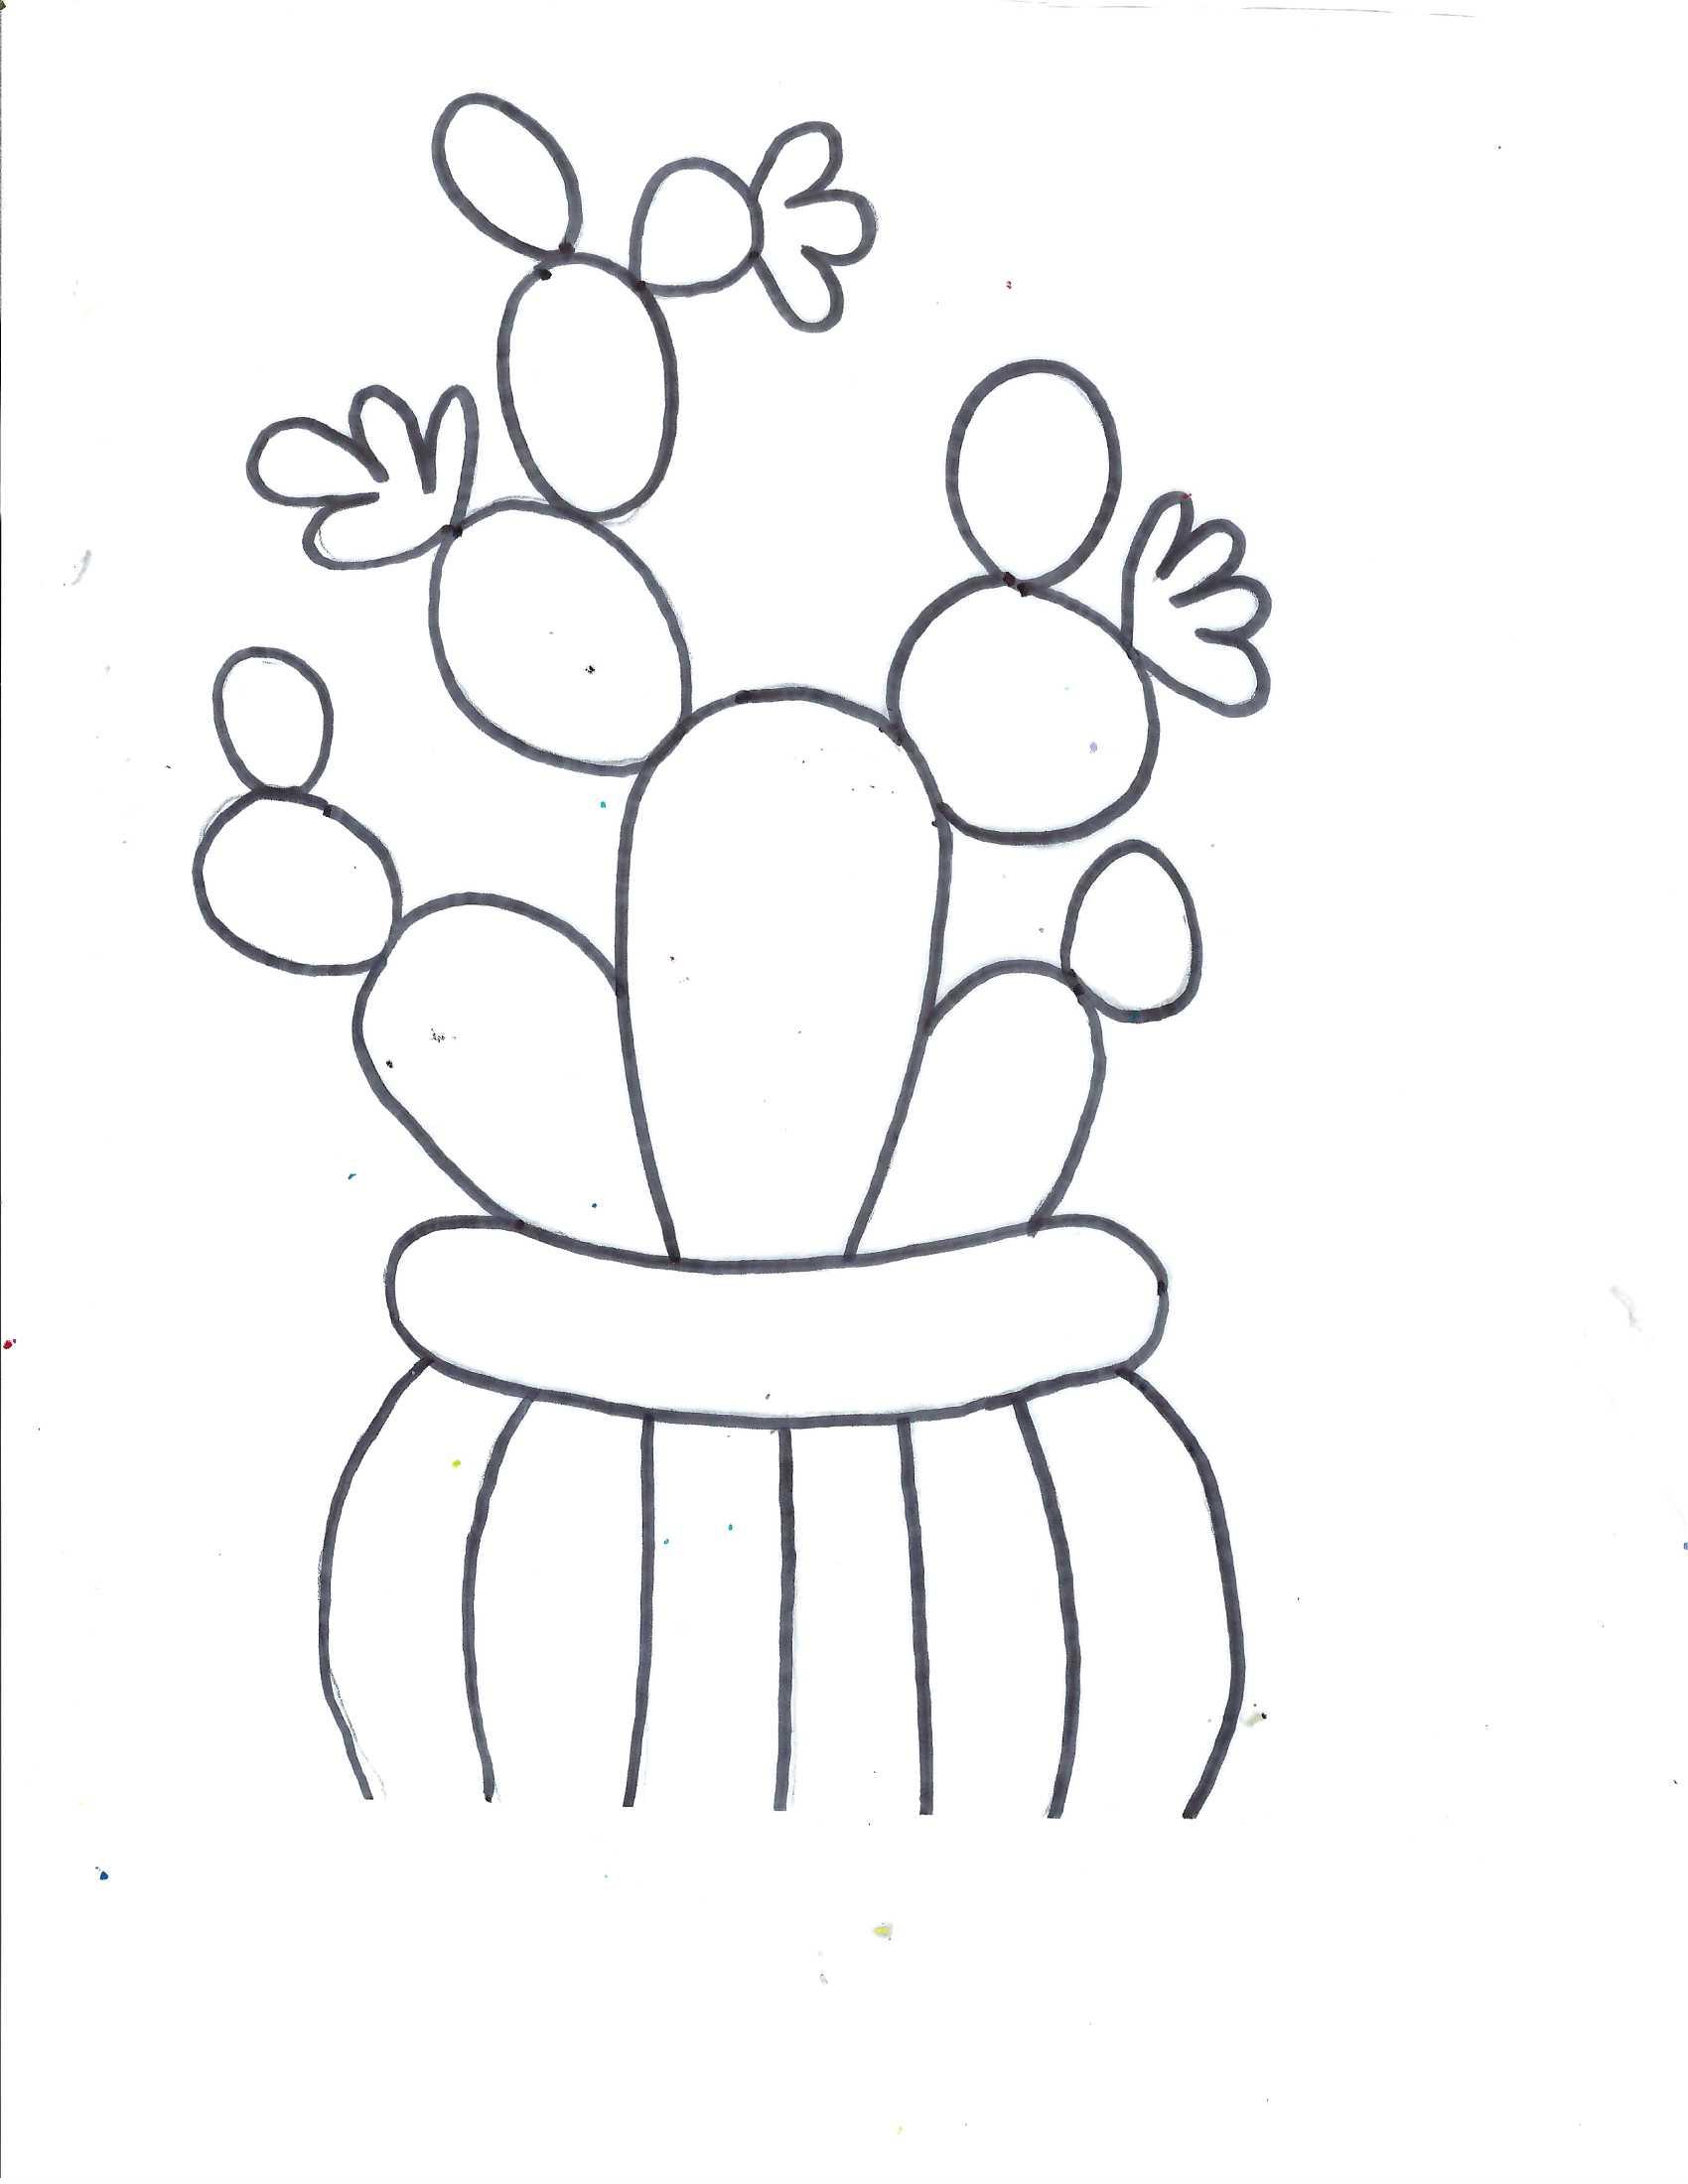