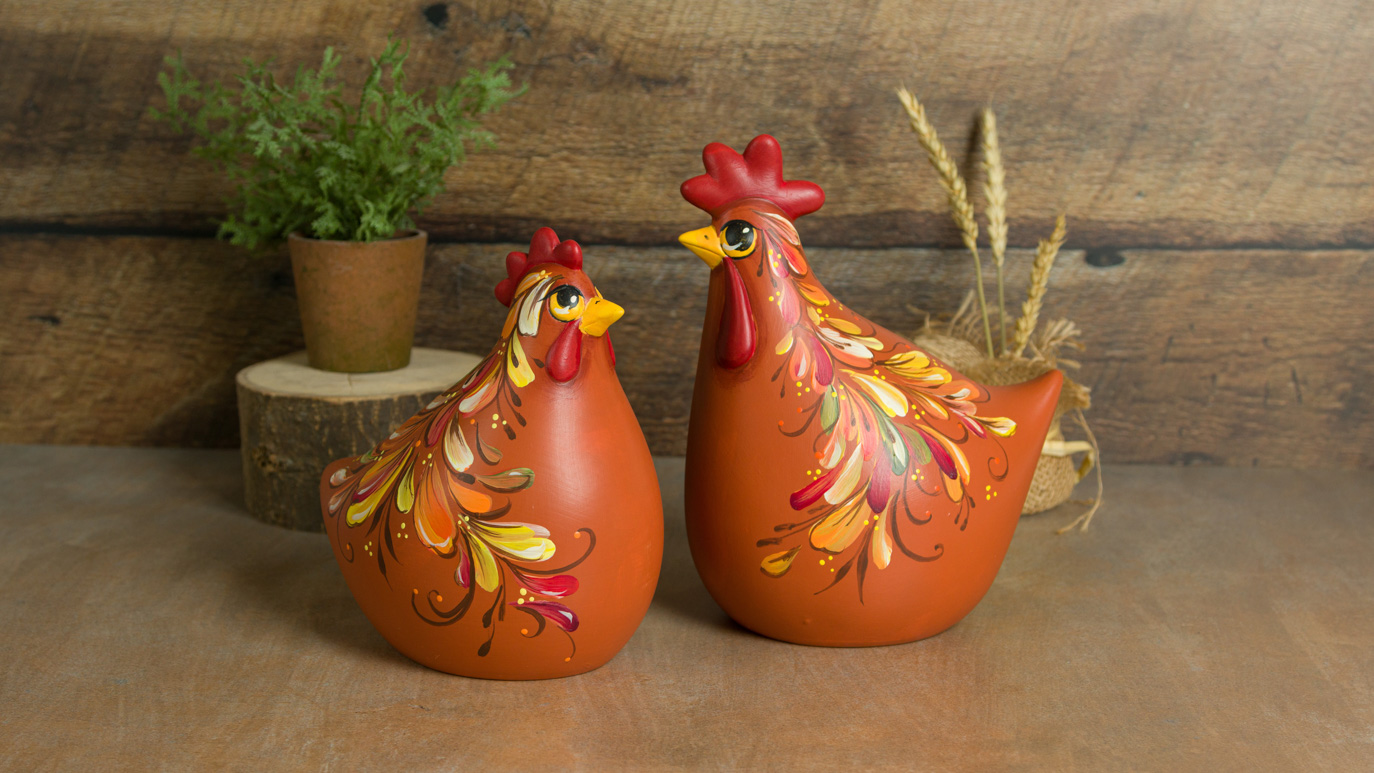
Autumn Feather Chickens

Designer: David Hoff

Share

Instructions

  1. Check the pieces over for any blemishes and if present remove them by sanding with 100-grit sand paper. 
  2. Damp sponge to condition the piece for decorating and to remove any dust from the ware’s surface. 
  3. Place the Acrylic colors as needed on the Aluminum Foil or Page Protector Palette. 
  4. Precede to basecoat rooster and hen with a very smooth coat of Burnt Orange, using the ¾” Flat Shader.  Do not cover the eyes, comb, waddle or beak with the Burnt Orange.  Use the #8 Pointed Round to cut color in around the unpainted areas.  If color appears streaked or sparse, when dry apply another coat of the Burnt Orange. 
  5. Using the Pointed Round of choice apply the following colors to the following areas: 
    1. Comb and Waddle – Fire Thorn 
    2. Eyes – Lemon Peel 
    3. Beak – Gold
      *If colors appear streaked, a second coat will be needed.*
  6. Place Cinnamon on the palette and add a few drops of Water or Thin ‘n Shade, mix with palette knife. 
  7. Water dampen the #6 Flat Shader and corner load with thinned Cinnamon. Proceed to float in shading under the comb, around the beak, around the waddle and around the eyes.  Keep the Cinnamon side of the brush next to the area to be shaded and the rest of brush held flat against the body and head of the rooster or hen. 
  8. Using the float method again, corner load the #6 Flat Shader with Gold and float in shading to the upper half of the eye. 
  9. Float a hint of Burnt Orange to the beak where it joins the head. 
  10. Proceed to dry brush Bright Red using the #5 Round Dry Brush.  Several passes over the Fire Thorn will be needed.  Try to achieve a somewhat brighter and highlighted look. 
  11. With a piece of white chalk, sketch in the flowing lines somewhat copying the provided pattern.  The chalked lines start at the top of the head between the comb and eye ball. 
  12. To the palette, add the following colors and if needed add more of the previously used colors: Ivory, Pale Yellow, Dark Yellow, Orange Peel, Avocado, Walnut, Garnet Red, Persimmon, Olive Moss.  These colors along with the others on the palette will be used for the comma strokes and detailing. 
  13. Instructions for completing the design work: 
    1. Use all sizes of the Pointed Rounds.  The bigger the brush number the larger the brush thus the larger the stroke. 
    2. Dampen the brush before starting and pinch out all excess water. 
    3. Fully load the brush with your color choice (normally a lighter tone) then proceed to side load with a different color or two and tip with another color. 
    4. In most cases the brush does not need to be washed out between strokes and color combinations.  Wash when the brush becomes over loaded with color. 
    5. The decorating stroke is known as a comma stroke.  To complete the stroke: 
      1. Load the brush. 
      2. Hold the brush straight up. 
      3. Press the brush against the ware thus forming the wider, rounded start to the stroke. 
      4. Pull the brush and slowly lift off the ware forming a distinct tail.  The total motion is Press, Pull and Lift. 
      5. As the strokes are pulled in, they curve slightly to the left or right forming a soft comma like design. 
      6. Strokes can over-lap one another. 
      7. Change the loading, side-loading and tipping colors often and wash the brushes only when they become too full of color. 
      8. Please note, work one side of the Rooster or Hen then allow drying before doing the other side of pieces. 
    6. Here are some examples of loading, side loading and tipping. 
      1. Load in Ivory, side load in Persimmon and Dark Yellow and tip in Bright Red. 
      2. Load in Pale Yellow, side load in Dark Yellow, tip in both Avocado and a hint of Olive Moss. 
      3. Load in Gold, side load in Orange Peel and Garnet Red and tip in Ivory. 
      4. Load in Bright Red, side load in Fire Thorn, tip in Pale Yellow and Ivory. 
      5. Other combinations work well. 
  14. Remember: Allow one side of the ware to dry thoroughly before adding strokes to the other side of the ware. 
  15. Soft smaller Ivory comma strokes can be added to some of the deeper tones and larger comma strokes.  By doing this, highlights will be created. 
  16. Thin down the Walnut slightly with a few drops of water or Thin ‘n Shade.  Mix with palette knife. 
  17. Fully load the #2 Detail Liner with the thinned Walnut.  Working from the fine tip of the comma strokes outward, add fine lines to some of the dried comma strokes, accent outline a few of the comma strokes.  Pull out some simple scroll-work throughout the design. 
  18. There are a few small hat pin style strokes painted over some of the comma strokes and in the background.  To complete these, fully load the liner with the thinned Walnut, pull in a fine line, then press the brush against the ware and lift off; thus creating the stroke.  
  19. A variation of this stroke would be to pull out a fine line, press brush against the ware, lift slightly and pull out forming a tail at the end of the stroke.  Add nostrils and mouth line. 
  20. With the #4 Pointed Round loaded in Black, paint in the large pupils to the eyes. 
  21. With #2 Detail Liner, pull in a fine upper lid line and a lower lid line. Using Black. 
  22. When dry, add highlights to the eyes with Ivory. 
  23. With handle of a brush, add tiny dots of Pale Yellow in groups of three throughout the design. 
  24. At the ends of the pulled in scroll-work add a dot of Hot Orange. 
  25. Sign the pieces. 
  26. With the softer ¾” Flat Shader, apply two smooth coats of Brush on Matte Sealer over the entire hen and rooster.  Be sure to apply as smooth as possible and allow some drying time between coats. 

Supplies

Form

  • MB 1596 Rudy Rooster 
  • MB 1597 Holly Hen 

Colors

  • OS432 Ivory 
  • OS433 Pale Yellow 
  • OS434 Lemon Peel 
  • OS435 Dark Yellow 
  • OS436 Gold 
  • OS438 Orange Peel 
  • OS439 Hot Orange 
  • OS440 Burnt Orange 
  • OS449 Bright Red 
  • OS466 Avocado 
  • OS472 Walnut 
  • OS476 Black 
  • OS480 Garnet Red 
  • OS481 Cinnamon  
  • OS484 Persimmon 
  • OS487 Olive Moss 
  • OS568 Fire Thorn 
  • AC-502 Matte Sealer

Decorating Accessories

  • AB-710 3/4” Flat Shader 
  • CB-404 #4 Pointed Round  
  • CB-406 #6 Pointed Round 
  • CB-408 #8 Pointed Round 
  • CB-306 #6 Flat Shader 
  • CB-202 #2 Detail Liner 
  • DB-802 #5 Round Dry Brush 

Miscellaneous Accessories

  • Sponge
  • Palette knife
  • Aluminum Foil for palette or Heavy-Duty Plastic Page Protector 
  • Water Bowl 
  • Paper Towels 
  • White Chalk 
  • 100 grit sand paper 
  • Pattern
Top