Mystical Modern Pumpkin Casserole Dish

Designer: David Hoff

Share

Instructions

  1. Check the ware over for any blemishes, if present sand with 100-grit sandpaper. 
  2. Damp sponge ware to condition for glazing and to remove any fired dust or dirt on the ware’s surface. 
  3. Using the #8 Soft Fan, apply three flowing even coats of White Matte to the inner surface of the casserole dish.  Bring the color up the inside edges and slightly just over the inner rim. 
  4. Allow the applied glaze time to dry. 
  5. Using provided pattern, clay carbon and a red pen, trace the pattern onto the ware. 
  6. As needed place the Stroke ‘n Coat on the palette. Condition with palette knife and thin only if color is extremely thick. 
  7. For the upper pumpkin use the following Stroke ‘n Coats:  Cotton Tail, Silver Lining and Gray Hare.  Use the #8 or #6 Pointed Round.  Note: All detailing is completed when all the pumpkins are painted in. 
    1. Load the Round with Cottom Tail, side load with Silver Lining, and blend the two colors on the palette.  Following the contour of each of the side segments, blend in one coat with the darker (Silver Lining) to the inner edge of each segment.  Note: segments on the left of pumpkin are shaded on the right side of each segment.  Segments on the right side are shaded to the left side.  The middle segment is light in the center and shaded to the left and right of the middle. 
    2. With #6 Pointed Round fully loaded in Silver Lining and tipped in Gray Hare pull in two coats of color to the small segments behind the unpainted stem.  Two coats are needed. 
    3. Reload the Round with Cotton Tail, side load with Silver Lining and Gray Hare on the same side of the Round.  Blend on clean area of palette.  Following the instruction in step 7a, add additional shading to each segment to the pumpkin.  Work out all ridges of color. 
  8. The second pumpkin is the darkest in tone.  Use the following Stroke ‘n Coats:  Jaded and Blue Jade.   
    1. Fully load the Round with Jaded, side load with Blue Jade, and blend on clean area of palette.  Following the same approach as in step 7a, apply the two colors to each of the segments with darker color to the inner edge of the segment. 
    2. The middle segment is completed with the same two colors, however this time the darker color is to the outer edge of the segment.  A few blended streaks of Cotton Tail can be added to this middle section. 
    3. Load the #6 Round with Jaded, tip with Blue Jade and pull in the four smaller segments to the left and right of the unpainted stem. 
    4. Again, loading in the same manner, apply a second coat of the two colors to each segment. 
    5. When dry, if more intensity of color is desired, deepen the shading to the segments with a float of Blue Jade to the inner edge of the segments. 
  9. The bottom pumpkin is a combination of colors.  Colors used are Cotton Tail, Silver Lining, Jaded and Blue Jade. 
    1. Fully load the Round with Cotton Tail, heavily side load with Silver Lining and Jaded on the same side of Round. As before (step 7a), apply color to each segment and keep the deeper Jaded tone to the inner edge of the segments and to the outer edge of the middle segment. 
    2. Fully load the #6 Pointed Round with Silver Lining, tipped in both Jaded and Blue Jade, pull the small segments to the left and right of the unpainted stem. 
    3. Repeat step 9a, for a second coat of color.  Allow to dry. 
    4. Side load a water loaded Pointed Round with Blue Jade and float in shading to the inner edges of each of the side segments and to the outer edge of the middle segment. 
  10. Fully load the #6 Pointed Round with Camel Back and carefully apply two coats to the three stems. 
  11. Place Cobalt Jet Black EZ-Stroke on the palette and thin with a few drops of water or Thin ‘n Shade. 
  12. Fully load the #2 Detail Liner with the thinned Cobalt Jet Black, with very fine lines, detail the pumpkins, also, add a few accent marks here and there on the segments and clearly define the stems.  Be sure to deepen the shading closest to the base of the Camel Back stems. 
  13. The filler leaves throughout the background of the design are completed with #8 Round fully loaded in Lettuce Alone and tipped in Jaded.  Press, pull and lift these leaves in place. 
  14. Thinned Gray Hare is fully loaded onto #2 Detail Liner and fine accent stems are added amongst the background leaves and a fine middle vein is pulled in to the background leaves. 
  15. Sign the piece with thinned Cobalt Jet Black and the #2 Detail Liner. 
  16. Stir and shake the Winter Wood glaze thoroughly. There are small crystals in this glaze. 
  17. Pour about 1 and ½ ounces of glaze into a paper cup.  Add a few drops of water if glaze is too thick.  Mix with palette knife. 
  18. Using #8 Soft Fan, apply two to three coats of glaze to the side of the casserole and the top rim.  Carefully butt the Winter Wood next to the White Matte.  When glazing the sides of the casserole leave a ¼” unglazed area at the bottom edge of the ware.  Also, make sure that the bottom of the ware is free of any glaze or Stroke ‘n Coat. 
  19. Place ware on a thoroughly kiln washed kiln shelf. 
  20. Fire to shelf cone 6. 

Supplies

Form

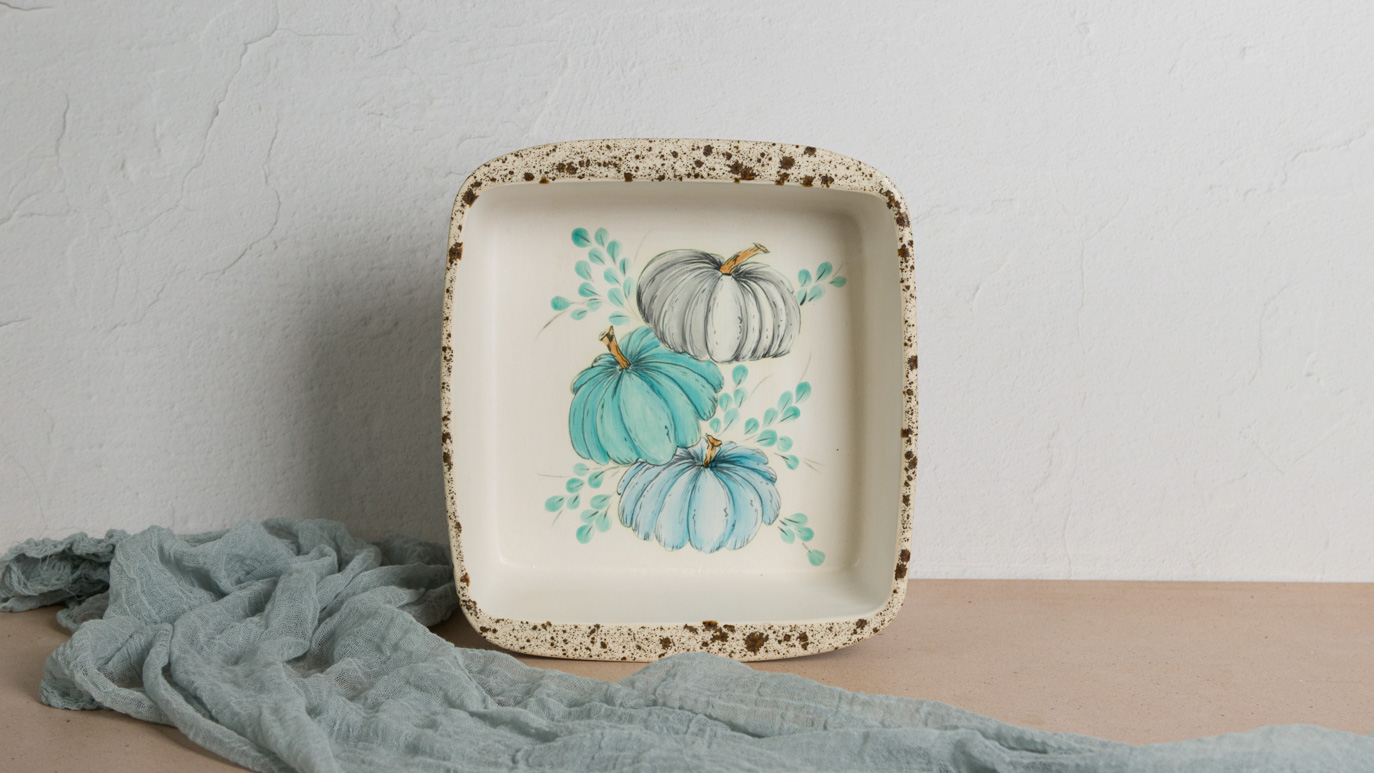
  • SB-102 9” x 9” Casserole Dish 

Colors

  • EZ012 Cobalt Jet Black 
  • SC-9 Jaded 
  • SC-16 Cotton Tail 
  • SC-28 Blue Jade 
  • SC-35 Gray Hare 
  • SC-43 Lettuce Alone 
  • SC-48 Camel Back 
  • SC-60 Silver Lining 
  • SW-101 Matte White 
  • SW-155 Winter Wood 

Decorating Accessories

  • CB – 406 #6 Pointed Round 
  • CB – 408 #8 Pointed Round  
  • CB – 202 #2 Detail Liner 
  • RB – 140 #8 Soft Fan 

Miscellaneous Accessories

  • Sponge
  • Water
  • Palette knife
  • 100 grit sandpaper  
  • 3 oz Plastic or Paper Cup (2) for Glaze 
  • AC-230 Clay Carbon  one sheet 
  • Heavy Duty Plastic Page Protector for palette or glazed tile 
  • Paper Towels 
  • Red Pencil or Pen prefer Red Pen 
  • Pattern
Top