Color
Fired
Glaze Combinations
Atmospheric Firing Samples
Classic Crackles©
Cobblestone
Designer Liner
Elements™ & Elements™ Chunkies
E-Z Stroke® Translucent Underglazes
Flux
Foundations®
French Dimensions™
Fundamentals® Underglazes
Jungle Gems™
Low Fire Clear-Brushing
Low Fire Clear-Dipping
Pottery Cascade™
Product Kits
Raku
Rapid Roll
Ritual Glaze by Mayco
Snow Gems
Snowfall
Stoneware
Stoneware Clear
Stoneware Engobes
Stoneware Specialty
Stroke & Coat
Speckled Stroke & Coat
Washes
Fired Accessories
Clay Mender
Kiln Wash
Silkscreen Medium
Thin ‘N Shade
Wax Resist
Non-Fired
Bisq-Stain®
Magic Metallics™
Matte and Gloss Sealers
Non-Fired Snow
Pearls
Sparklers™ Brush-On Glitter
Thin ‘N Shade
Ultra Metallics™
Forms
New Forms
Earthenware Bisque
Stoneware Bisque
Tools
Accessories
Brushes
Silkscreens
Communities
Creative Studios
Potters & Hobbyists
Art Educators
Traditional Artists
Artist Features
Inspiration
Glaze Combinations
Glazing Techniques
Projects
Lesson Plans
Resources
Dinnerware & Food Safety
Consumer Product Information Sheet
Literature and Price Lists
Mayco Product Updates
Ceramic Education
Product Conversions
Product Warranty & Freeze Policies
Safety Data Sheets (SDS)
Store
Cart
Color
Fired
Glaze Combinations
Atmospheric Firing Samples
Classic Crackles©
Cobblestone
Designer Liner
Elements™ & Elements™ Chunkies
E-Z Stroke® Translucent Underglazes
Flux
Foundations®
French Dimensions™
Fundamentals® Underglazes
Jungle Gems™
Low Fire Clear-Brushing
Low Fire Clear-Dipping
Pottery Cascade™
Product Kits
Raku
Rapid Roll
Ritual Glaze by Mayco
Snow Gems
Snowfall
Stoneware
Stoneware Clear
Stoneware Engobes
Stoneware Specialty
Stroke & Coat®
Speckled Stroke & Coat®
Washes
Fired Accessories
Clay Mender
Kiln Wash
Silkscreen Medium
Thin ‘N Shade
Wax Resist
Non-Fired
Bisq-Stain®
Magic Metallics™
Matte and Gloss Sealers
Non-Fired Snow
Sparklers™ Brush-On Glitter
Pearls
Thin ‘N Shade
Ultra Metallics™
New Colors
Tidal Wave
New Colors
Mood Ring
New Colors
Red Melt Gloop
New Colors
Speckled Old Lace
New Colors
Pink Speck
View All New Colors
Forms
New Forms
Earthenware Bisque
Stoneware Bisque
Tools
Accessories
Brushes
Silkscreens
Communities
Creative Studios
Potters & Hobbyists
Art Educators
Traditional Artists
Artist Features
Inspiration
Glaze Combinations
Glazing Techniques
Projects
Lesson Plans
Resources
Dinnerware & Food Safety
Consumer Product Information Sheet
Literature and Price Lists
Product Updates
Ceramic Education
Product Conversions
Discontinued Color
Product Warranty & Freeze Policies
Safety Data Sheets (SDS)
Store
Cart
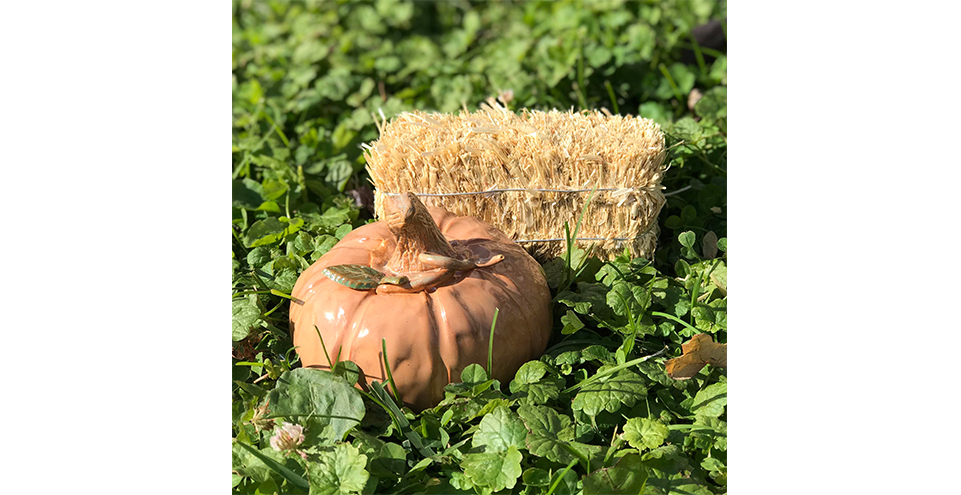
Pinch Pot Pumpkins
Designer:
Bre Kathman
Share
Instructions
Create a pinch pot with about 1 lb of clay.
Leave the top rim about half an inch thick.
Flip over and gather the top of the pot so it looks round when sat down.
Draw 8 lines from the top of the pumpkin to the base with the back part of a paintbrush.
Using 2 fingers on the inside of the pumpkin push the space between the lines out so there is a visual bulge.
Rub the edges of lines drawn to soften and blend into pumpkin shape.
Create stem by rolling out a small piece of clay in a cone.
Make a thin flat disc of clay slightly bigger than the stem base.
Attach stem to flat base by score and slip method.
Add flat base to the top of the pumpkin by score and slip method.
Texture the stem with a skewer stick.
Roll out a thin coil for the vine to attach to base of stem with score and slip method.
Press clay in to leaf press mold of CD778 Flowers & Leaves and attach with score and slip method.
Dry and bisque fire to cone 04.
Paint 3 coats of EL-143 Cactus Flower on the body of the pumpkin with a soft fan brush.
Paint 2 coats of EL-145 Ginger Root on the stem and vine.
Paint thin ribbons of EL-142 Grass directly on top of the stem and vine to add highlights of green.
Paint 3 coats of EL-142 Grass on the leaves. Let dry.
Gently rub the highlights on the body of the pumpkin with a paper towel to create a color variation on the finished piece.
Stilt and fire to Cone 05/06.
Supplies
Clay
Low-fire white clay
Color
EL-145 Ginger Root
EL-143 Cactus Flower
EL-142 Grass
Decorating Accessories
BT-910 Synthetic Sponge
CB-110 #10/0 Mini Liner
CB-404 #4 Pointed Round
CB-604 #4 Soft Fan
CD778 Flowers & Leaves Press Mold
Miscellaneous Accessories
Skewer stick
Similar Projects
Back to Lesson Plan Projects
Top