Pink Floral Vase

Designer: William Pulse

Share

Instructions

  1. Use a moistened Synthetic Sponge to wipe down the piece. Check the inside of the bisque vase for any loose debris as well.  Do not use your Silk Decorating Sponge for this step.
  2. Apply the Blue Masking Tape around the outer lip of the vase. Use the tape to cover a portion of the neck area as well.
  3. In a Plastic Cup mix FN-304 Black Velvet with water to a melted ice cream consistency. Pour the thinned glaze into the vase. While working quickly, rotate the vase to cover the inside of the vase. Pour out any excess glaze trying not to get any color onto the outer portion of the vase.
  4. Invert the vase to drain and dry. Immediately wipe off any drips of glaze from the taped area and vase with a damp Synthetic Sponge. This step may need to be repeated for adequate coverage. When dry, remove the tape from the vase. Check to make sure no black glaze remains on the outside of the vase.
  5. Apply 3-4 even and smooth coats of FN-301 Marshmallow White Matte to the outside of the vase using CB-604 Soft Fan. Let dry.
  6. Transfer the basic design onto the vase using AC-230 Clay Carbon and a pencil. Cut out the individual flower patterns creating stencils.
  7. On a tile place the EZ-Strokes and thin slightly with water.
  8. Load the edge/tips of a slightly damp Silk Decorating Sponge with Some EZ-018 Chartreuse. While holding the full flower stencil onto the ware of the pattern, sponge/pounce around the stencil edge placing the color slightly over onto the stencil. The color should be the most concentrated around the edge of the stencil then fading out to nothing onto the background.  This should extend only about ½”-1” around the pattern. Where the top flower shadows the lower flower, keep the color light and not extended as far.
  9. Without rinsing the sponge, tip it next into the EZ-028 Leaf Green and repeat this process.
  10. Pick up some of the EZ-011 Sienna Brown and EZ-032 Peacock Green and add some variation to the background edges. These colors should blend yet remain as individual colors extending in an uneven manner.
  11. Remove the full flower stencil. Place the second lower flower stencil and repeat this shading with the Silk Decorating Sponge. Lightly apply some of the colors along the stem of the hanging leaves for shadow.
  12. The leaves are done by pouncing in one coat of EZ-018 Chartreuse. Without rinsing the sponge, shade them with EZ-028 Leaf Green and then with EZ-033 Ivy Green. Keep the darker colors to the top portion of the leaves as well as the base of the leaves next to the flowers.
  13. Use a clean Silk Decorating Sponge tipped with EZ-002 Cinderella Pink used to shade the flower petals. The color is darkest next to the flower center. To add further depth and shading, tip the sponge with EZ-030 Rose and darken the shading next to the flower center. The color should be darkest next to the center and fading out to nothing onto the petals. The petals are not fully covered with color.
  14. Use the Silk Decorating Sponge loaded with EZ-026 Yellow Orange to pounce in the flower centers. Keep the shape of the centers a flattened oval shape. Tip the sponge in EZ-018 Chartreuse to shade the right upper portion of the center. Then shade the lower left portion of the center with EZ-011 Sienna Brown.
  15. Load CB-106 Script Liner and CB-110 Liner loaded with EZ-012 Cobalt Black to detail the pattern. Follow the pattern on how to shape the lines on the pattern. Notice that the detail lines for the most part start out at a point, widen as they shape the leaf and then come to a fine point at the tip of the leaves. You want a bold and spontaneous look to the detail lines.
  16. Condition the CB-106 Script Liner with Liquid Detergent. Do not rinse brush. Place a small amount of AC-302 Wax Resist in a Plastic Cup. Apply 1 coat of the wax over the leaves along the top of the flowers where the banded line will run. Wash brush immediately after use with warm water and Liquid Detergent. Let wax dry.
  17. Center the vase onto the Banding Wheel. Use CB-106 Script Liner loaded with slightly thinned EZ-012 Cobalt Black. Brace your arm against something to aid in your stability while painting the banded line. Paint in a ½” band along the hip of the vase where it will intersect the leaves. Let dry. Use a moistened brush to remove any beads of color on the waxed area.
  18. Stilt and Fire the vase to Self Cone 05-06.

Supplies

Form

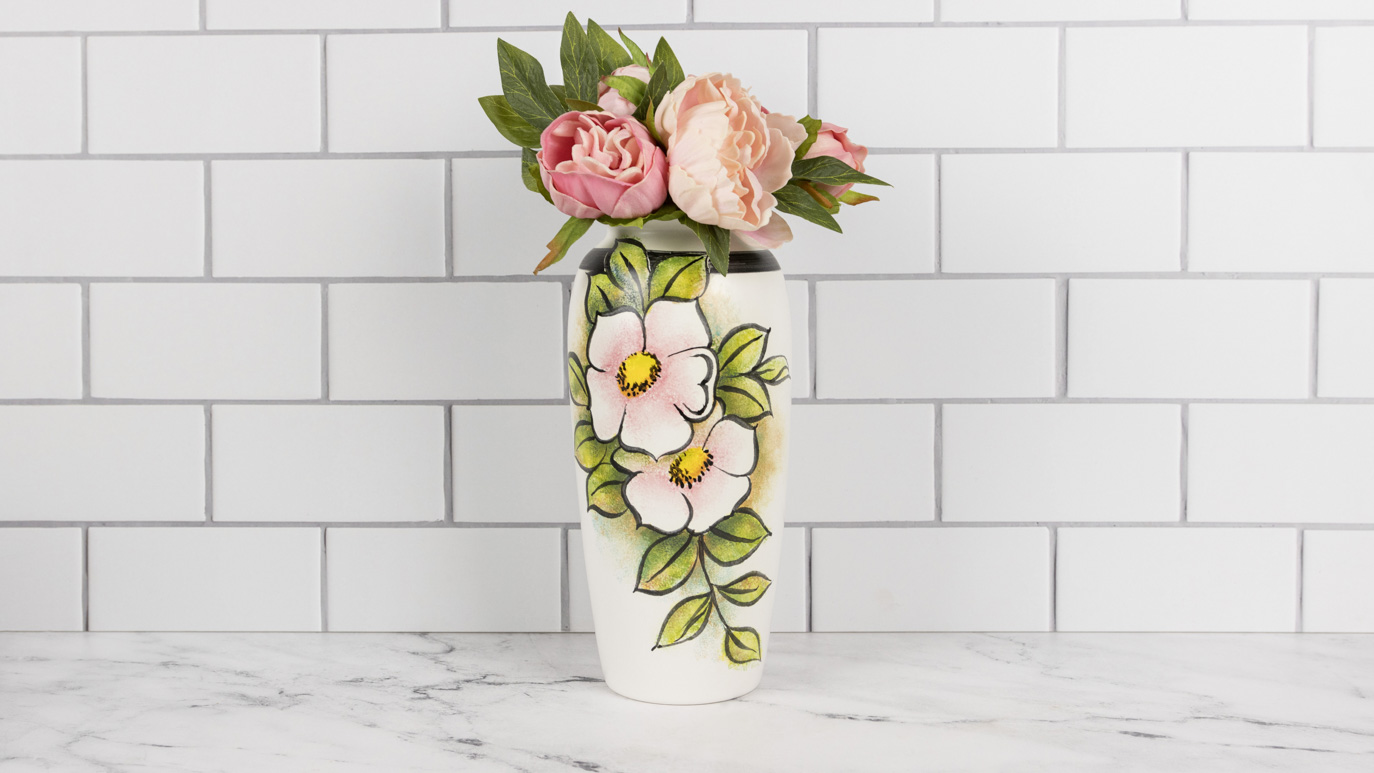
  • CD-1128  Medium Vase, Bisque

Colors

  • EZ-02 Cinderella Pink
  • EZ-011 Sienna Brown
  • EZ-012 Cobalt Black
  • EZ-018 Chartreuse
  • EZ-026 Yellow Orange
  • EZ-028 Leaf Green
  • EZ-032 Peacock Green
  • EZ-030 Rose
  • EZ-033 Ivy Green
  • FN-301 Marshmallow White (Matte)
  • FN-304 Black Velvet (Matte).

Decorating Accessories

  • CB-110 Liner
  • CB-106 Script Liner
  • CB-604 Soft Fan.
  • AC-230 Clay Carbon
  • AC-302 Wax Resist

Miscellaneous Accessories

  • Water
  • Silk Decorating Sponge (There is a difference in the usage of a Silk Decorating Sponge over other types, for that reason, the Silk Decorating Sponge should be used for this decorating process. A Synthetic Sponge does not produce the same effect as a Silk Decorating Sponge and will alter the overall look of the piece.)
  • Synthetic Sponge
  • Pencil
  • Scissors
  • Blue Masking Tape
  • Small Plastic Cup
  • Liquid Detergent
  • Banding Wheel
  • Stencil
  • Pattern


Top