Handbuilding:
- For the right depth of clay, lay out canvas fabric on table and place ¼ inch slats on the left and right side of the canvas fabric. Place a piece of moist clay about 2 lbs. in size, in the middle of the fabric. Using a rolling pin, roll out the clay to the size desired. The slats are used as a guide to keep your clay level and at the same evenness. Make sure the edges of the rolling pin hit the ¼ inch slats.
- Take a marble size piece of clay and place it in the individual portion cup and add about 3 tablespoon of water. Mix this up with your fingers to make a slurry. This will be the “glue” to attach all the pieces together.
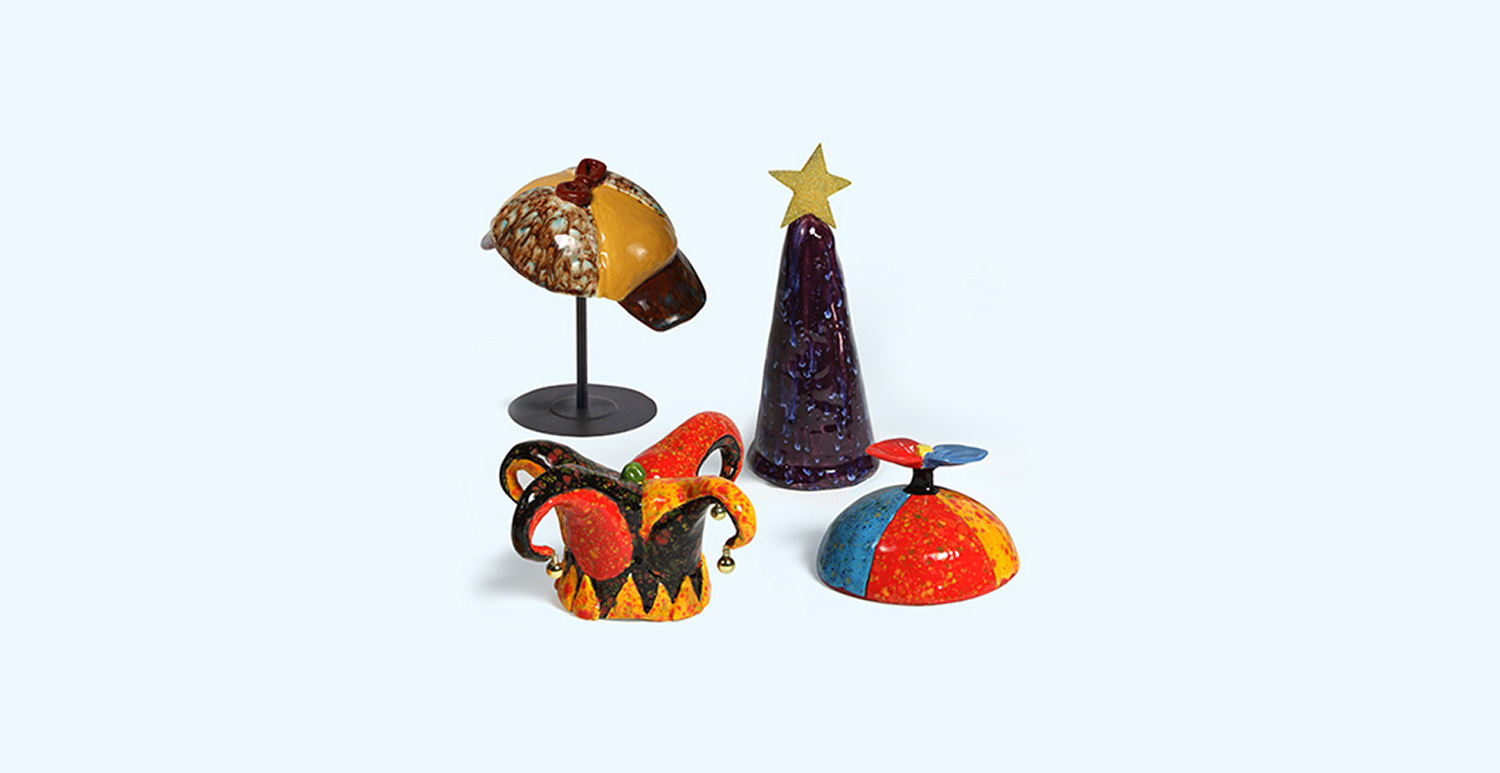
- Using a sandbag press the clay into the slump mold making sure the clay fits snugly. Trim around edges to mold. Remove clay from mold when firm enough to hold its shape. Make two of these. This base will be used for the Sherlock Holmes hat and the beanie hat.
- For the Sherlock Holmes hat, use the remainder of the slabs to cut out four half moon shapes and attach to the form using the clay slurry and scoring technique. Two will be used for the front and back bill. The other two will be attached to the sides of the hat. Cut a thin strip of clay to create two loops on the top for the ribbon. Apply with slurry.
- For the Beanie hat flip the base over and create a coil and add two petal shapes to the top to create the spinner.
- For the Princess and Wizard hats, create a cone shape out of clay and slip and score the fold together. Allow to dry standing upright to keep the cone shape.
- For the Jester hat, cut out a slab long enough to create a half of a cylinder with a top. While that is stiffing up create four small cones out of clay. These will be attached using the slip and score method using the clay slurry. Make sure there is a hole from the cylinder to the cones for air release. Once you attach the cones bend them down to create different levels of the hat. Use the end of the fettling knife on the inside of the top circle to bend the top of the hat down. Attach a small clay ball where you pushed down using the slurry. You may choose to add clay balls to the ends of the cones or add found materials to the ends. Cut out small triangles from a slab and slip and score them to the bottom of the cylinder. Use a pencil to draw on detail lines.
- Allow to completely dry and bisque fire them to cone 04.
Glazing:
- Begin with properly fired shelf cone 04 bisque. Moisten a clean sponge and wipe bisque to remove any dust.
- Princess Hat: Apply three coats of CG-964 Kaleidoscope to the whole piece using a CB-604 #4 Soft fan brush.
- Wizard Hat: Apply three coats of CG-785 Floral Fantasy to the whole piece using a CB-604 #4 Soft fan brush.
- Beanie Hat: Section off the hat into four sections using the CB-110 #10/0 Mini Liner and FN-009 Black. For each section, you will use one of the following glazes, CG-718 Blue Caprice, CG-753 Sassy Orange, CG-756 Firecracker, or CG-970 Masquerade. You will apply the three coats of glaze using the CB-604 #4 Soft Fan brush. For the top of the beanie you will apply three coats of FN-009 Black to the rod, one of each FN-031 Corn Flower Blue and FN-004 Red to the petal shapes, and FN-002 Yellow to the ball on top using the CB-404 Pointed Round.
- Jester Hat: You will apply three coats of CG-753 Sassy Orange, CG-756 Firecracker, or CG-970 Masquerade to each section using the CB-604 #4 Soft Fan Brush. The triangles on the bottom are three coats of CG-753 Sassy Orange applied with the CB-404 #4 Pointed Round brush. For the ball on the top of the hat apply three coats of FN-020 Medium Green.
- Sherlock Holmes: Apply three coats of FN-016 Harvest Orange to the top of the hat using the CB-604 #4 Soft fan brush. Apply three coats of FN-023 Cinnamon to the ribbon and the front and back bill using the CB-404 #4 Pointed Round brush. Apply three coats of CG-965 Mocha Marble using the CB-604 Soft Fan brush to the bills and the inside of the hat.
- Stilt and fire to shelf cone 06/05.
Variations and Adaptations
- If you don’t have a slump mold, a kitchen bowl will work. Be sure to line with paper or plastic wrap before forming the clay with it.
- If you don’t have a sandbag for pressing the clay into the mold, your fingers will work just fine.
- All of these hats can also be created using the coil hand building method
- After firing, you may choose to create a glitter star for the wizards hat or attaching ribbon to the princess hat